

Page 1
INSTRUCTIONS AND OWNER’S MANUAL
MAXXBENCH
ASSEMBLY
INSTRUCTIONS
MAINTANENCE
WARRANTY
SAFETY
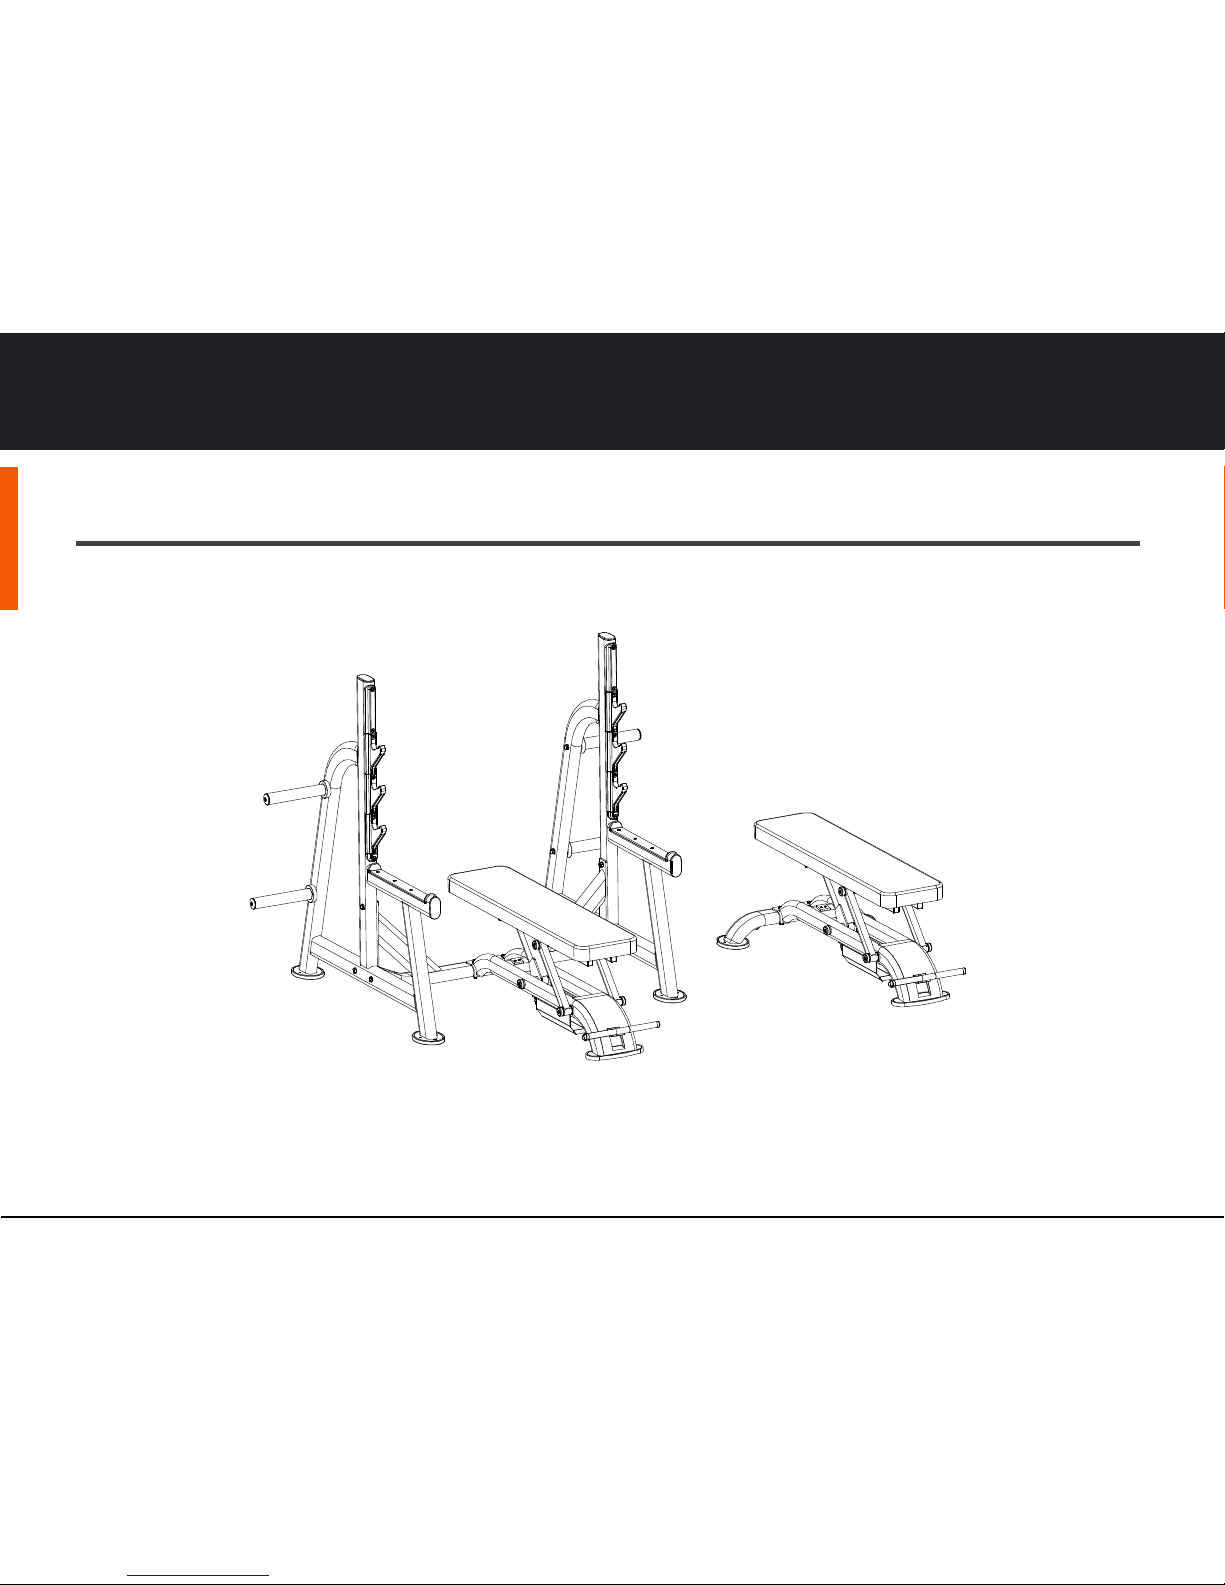
MAXX OLYMPIC FLAT BENCH · MAXX FLAT BENCH
MAXX BENCH | WILKES-BARRE PA | WWW.MAXXBENCH.COM
MAXX OLYMPIC FLAT BENCH
MAXX FLAT BENCH
page 1
Page 2

1.1 IMPORTANT SAFETY INSTRUCTIONS
MAXXBENCH
ASSEMBLY
INSTRUCTIONS
MAINTANENCE
WARRANTY
SAFETY
MAXX BENCH | WILKES-BARRE PA | WWW.MAXXBENCH.COM
Before beginning any fitness program, consult
your physician and receive a thorough physical
examination.
•
When using exercise equipment, basic precautions should
always be taken, including the following:
•
Read all instructions before using the equipment. These
instructions are written to ensure your safety and to protect
the unit.
•
Do not allow children or those unfamiliar with its operation on
or near the equipment. Do not leave children unsupervised
•
Use the equipment only for its intended purpose as described
in this guide. Do not use accessory attachments that are not
recommended by the manufacturer, as such attachments may
cause injuries.
•
Wear proper exercise clothing and shoes for your workout
and avoid loose clothing. Tie long hair back.
•
Use care when getting on or off the unit.
•
Do not overexert yourself or work to exhaustion.
•
If you feel any pain or abnormal symptoms, stop your
workout immediately and consult your physician.
•
Never operate the unit when it has been dropped or
damaged. Return the equipment to a service center for
examination and repair.
•
Never drop or insert objects into any opening. Keep hands
away from moving parts.
•
Always check the unit before each use. Make sure that all
fasteners are secure and in good working condition.
•
Do not use outdoors.
page 2
Page 3

MAXXBENCH
ASSEMBLY
INSTRUCTIONS
MAINTANENCE
WARRANTY
SAFETY
MAXX BENCH | WILKES-BARRE PA | WWW.MAXXBENCH.COM
OBTAINING SERVICE
•
Do not attempt to service the Maxx Bench yourself. This unit
does not contain any user-serviceable parts
•
For information about product operation or service, refer to
the Maxx Bench web site at www.MaxxBench.com. Should
you need more information regarding customer support
numbers or a list of Maxx Bench authorized service centers,
visit the Maxx Bench website at www.MaxxBench.com/
contact.
•
If you call or e-mail Customer Service, have the serial number
and part numbers available.
•
You can find the serial number printed on a label affixed to the
frame, underneath the seat pad, on the Maxx Bench. For
future reference, write the serial number in the space
provided below.
Serial number: _______________________
PERSONAL SAFETY DURING ASSEMBLY
•
It is strongly recommended that a qualified dealer assemble
the equipment.
•
Read each step in the assembly instructions and follow the
steps in sequence. Do not skip ahead. If you skip ahead, you
may learn later that you have to disassemble components
and that you may have damaged the equipment.
•
Assemble and operate the Maxx Bench on a solid, level
surface.
1.2 SERVICE AND SAFETY DURING ASSEMBLY
page 3
Page 4

MAXXBENCH
ASSEMBLY
INSTRUCTIONS
MAINTANENCE
WARRANTY
SAFETY
MAXX BENCH | WILKES-BARRE PA | WWW.MAXXBENCH.COM
1.1 Important Safety Instructions…………………………………………………………………………..…
1.2 Service and Personal Safety During Assembly……………………………………….…………….…
2.1 Table of Contents…………………………………………………………………………………….…….…
3.1 Before You Begin……………………………………………………………………………….……..……
3.2 Unpacking the equipment……………………………………………………………………..…….……
3.3 Preparations…………………………………………………………………………….……………………
3.4 Required Tools………………………………………………………………………………………………
3.5 Installation Requirements…………………………………………………………………………………
4.1 Assembly Instructions………………………………..…………………………………………….….…
4.2 Assembly Instructions: Olympic Rack…………………………………………………………….…..…
4.3 Attach Bench to Rack………………………………………………………………………………………
4.4 Attach Bench to Wheelset…………………………………………………………………………………
5.1 Parts Lists and Exploded Drawings: Maxx Olympic Bench ……………………………………..…
5.2 Parts Lists and Exploded Drawings: Maxx Olympic Rack ………………………………………..…
5.3 Parts Lists and Exploded Drawings: Maxx Wheel Set……………………………………………..…
6.1 Operating Instructions…………………………………………………………………………………..…
6.2 Maintenance………….…………..………………………………………………………………………..…
7.1 Limited Warranty……………………………………………………………………………………………
7.2 Warranty Registration………………………………………………………………………………….…..
8.1 Specifications…………………………………………………………………………………..……………
2.1 TABLE OF CONTENTS
page 4
2
3
4
5
5
6
6
6
7
8-10
11
12
13
14
15
16
17-23
24
25
26
Page 5
3.1 before you begin
MAXXBENCH
ASSEMBLY
INSTRUCTIONS
MAINTANENCE
WARRANTY
SAFETY
MAXX BENCH | WILKES-BARRE PA | WWW.MAXXBENCH.COM
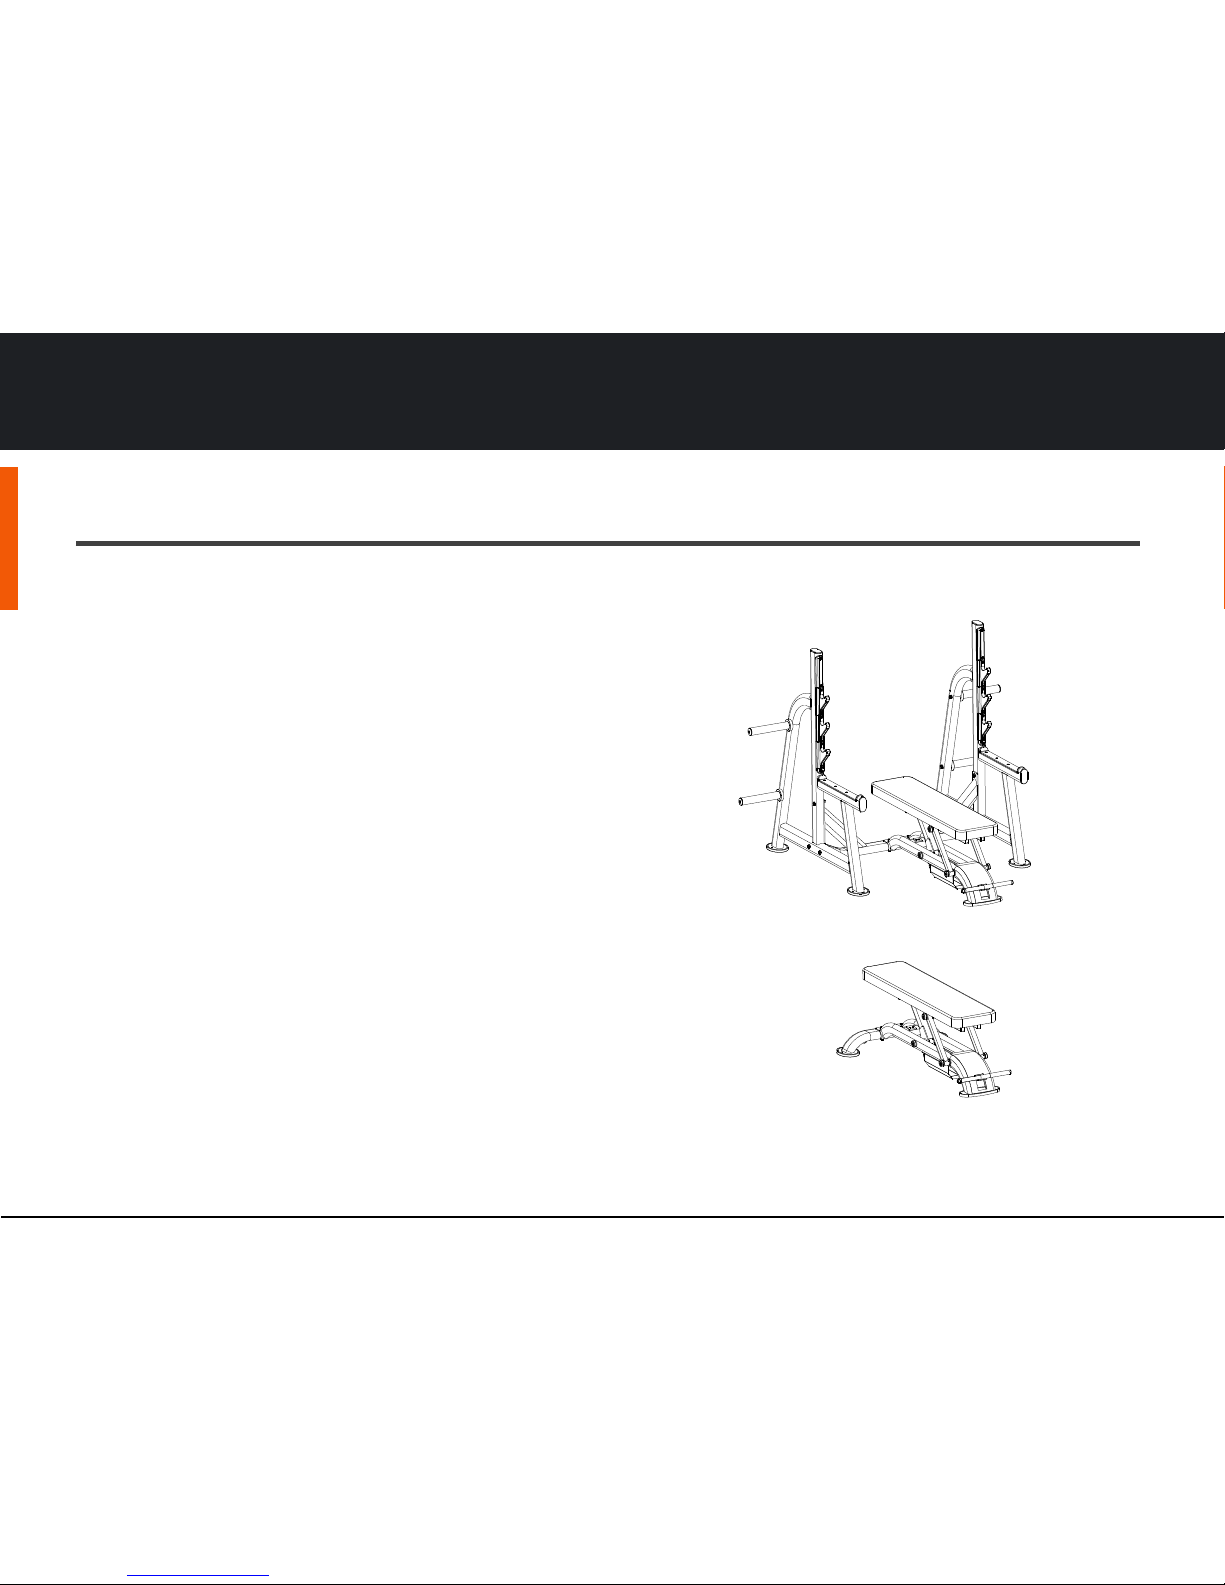
Thank you for purchasing the Maxx Bench. This unit is part of
the Maxx Bench strength line. To maximize your use of the
equipment, please study this guide thoroughly.
3.2 Unpacking the Equipment
•
The Maxx Bench is carefully tested and inspected before
shipment. Maxx Bench ships the unit in several pieces that
require assembly. Ask for assistance during the assembly
process.
•
Review the Installation Requirements found on the next page.
•
Carefully unpack the pieces and lay them on the floor near the
location where you plan to use the equipment.
•
If any items are missing, contact the dealer from whom you
purchased the unit. For more information, refer to Obtaining
Service.
MAXX OLYMPIC FLAT BENCH
MAXX FLAT BENCH
page 5
Page 6

3.3 PREPARATIONS and installation requirements
MAXXBENCH
INSTRUCTIONS
MAINTANENCE
WARRANTY
MAXX BENCH | WILKES-BARRE PA | WWW.MAXXBENCH.COM
You must review and follow the instructions in this guide. If
you do not assemble and use the Maxx Bench according to
the following guidelines, you could void the Maxx Bench
Limited Warranty.
3.4 Required Tools
Tools that you need to obtain before assembling the unit
include:
❏ Two 19-mm wrenches
❏ Two 8-mm hex keys
❏ Wire tie cutter (cuts plastic tie wraps)
Note: Use box-end, open-end or standard crescent
wrenches.
3.5 Installation Requirements
Follow these installation requirements when assembling the unit:
•
Fill out and submit the warranty registration card online.
•
Provide ample space around the machine. Open space
around the machine allows easier access.
•
Set up the Maxx Bench on a solid, flat surface. A smooth, flat
surface under the unit helps keep it level.
•
Insert all fasteners in the same direction. For aesthetic
purposes, insert all the fasteners in the same direction unless
specified (in text or illustrations) to do otherwise.
•
Leave room for adjustments. Tighten fasteners (such as
screws, nuts, and bolts), so the unit is stable, but leaves room
for adjustments. Do not fully tighten fasteners until instructed
(in the steps) to do so.
page 6
ASSEMBLYSAFETY
Page 7
4.1 ASSEMBLY INSTRUCTIONS
MAXXBENCH
INSTRUCTIONS
MAINTANENCE
WARRANTY
MAXX BENCH | WILKES-BARRE PA | WWW.MAXXBENCH.COM
Assembly of the Maxx Bench takes professional installers
about 1⁄2 hour to complete. If this is the first time you have
assembled this type of equipment, plan on significantly more
time.
Professional installers are highly recommended!
However, if you acquire the appropriate tools, obtain
assistance, and follow the assembly steps sequentially, the
process will take time, but is fairly easy.
Note: As with any assembled part, proper alignment and
adjustment is critical. While tightening the fasteners, be sure
to leave room for adjustments. Do not fully tighten fasteners
until instructed to do so.
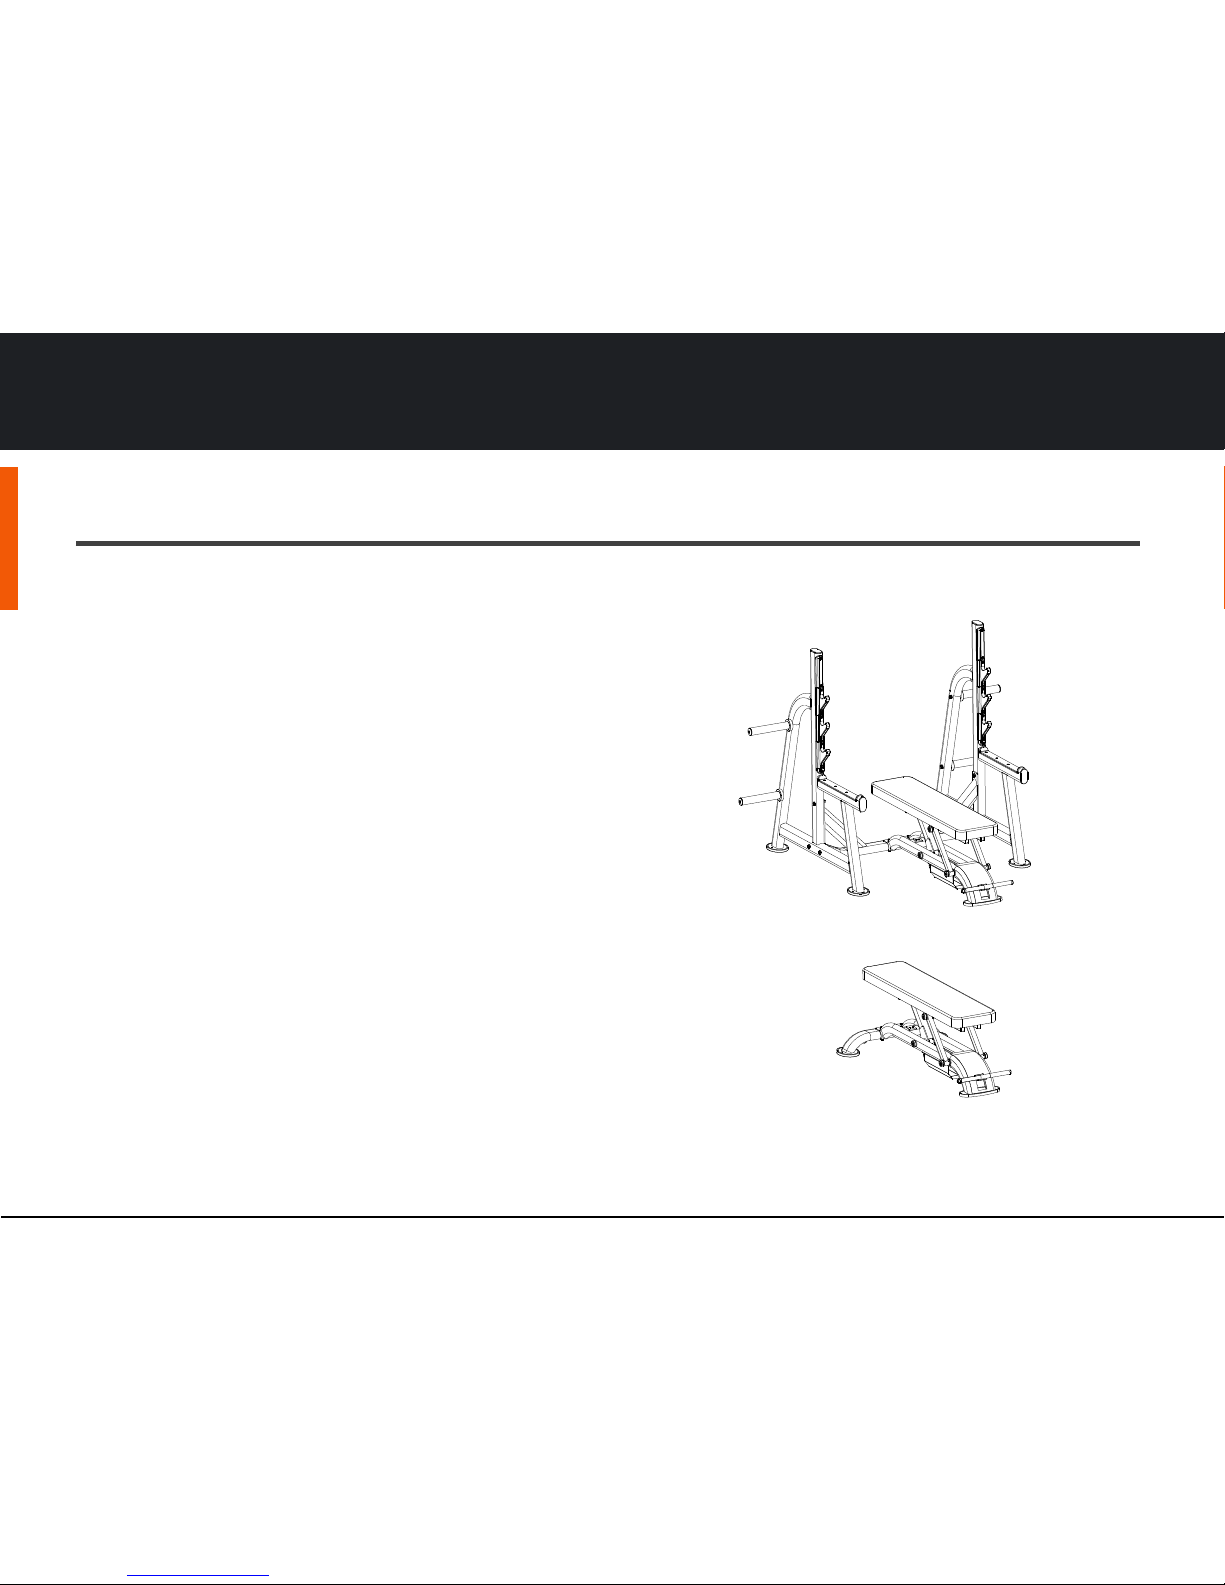
MAXX OLYMPIC FLAT BENCH · MAXX FLAT BENCH
MAXX OLYMPIC FLAT BENCH
MAXX FLAT BENCH
page 7
ASSEMBLYSAFETY
Page 8
4.2 ASSEMBLY INSTRUCTIONS
MAXXBENCH
INSTRUCTIONS
MAINTANENCE
WARRANTY
MAXX BENCH | WILKES-BARRE PA | WWW.MAXXBENCH.COM
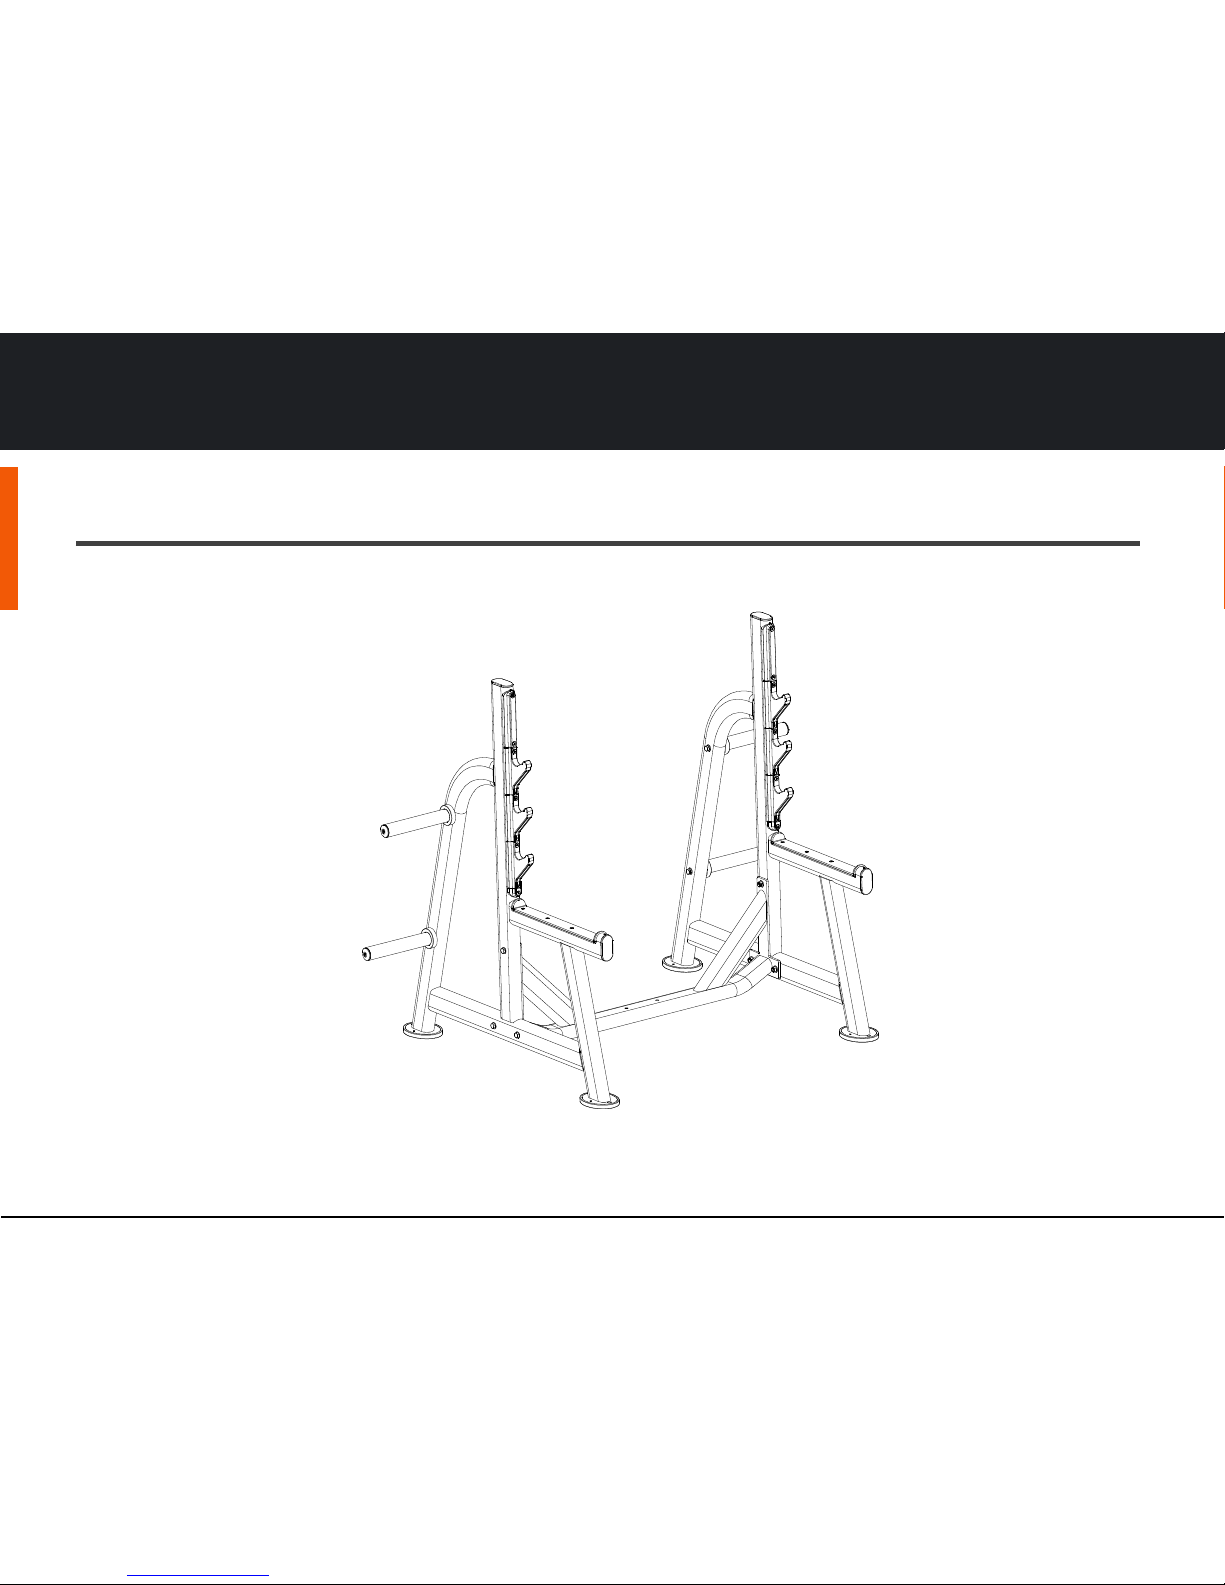
MAXX OLYMPIC RACK
page 8
ASSEMBLYSAFETY
Page 9
4.2 ASSEMBLY INSTRUCTIONS
MAXXBENCH
INSTRUCTIONS
MAINTANENCE
WARRANTY
MAXX BENCH | WILKES-BARRE PA | WWW.MAXXBENCH.COM
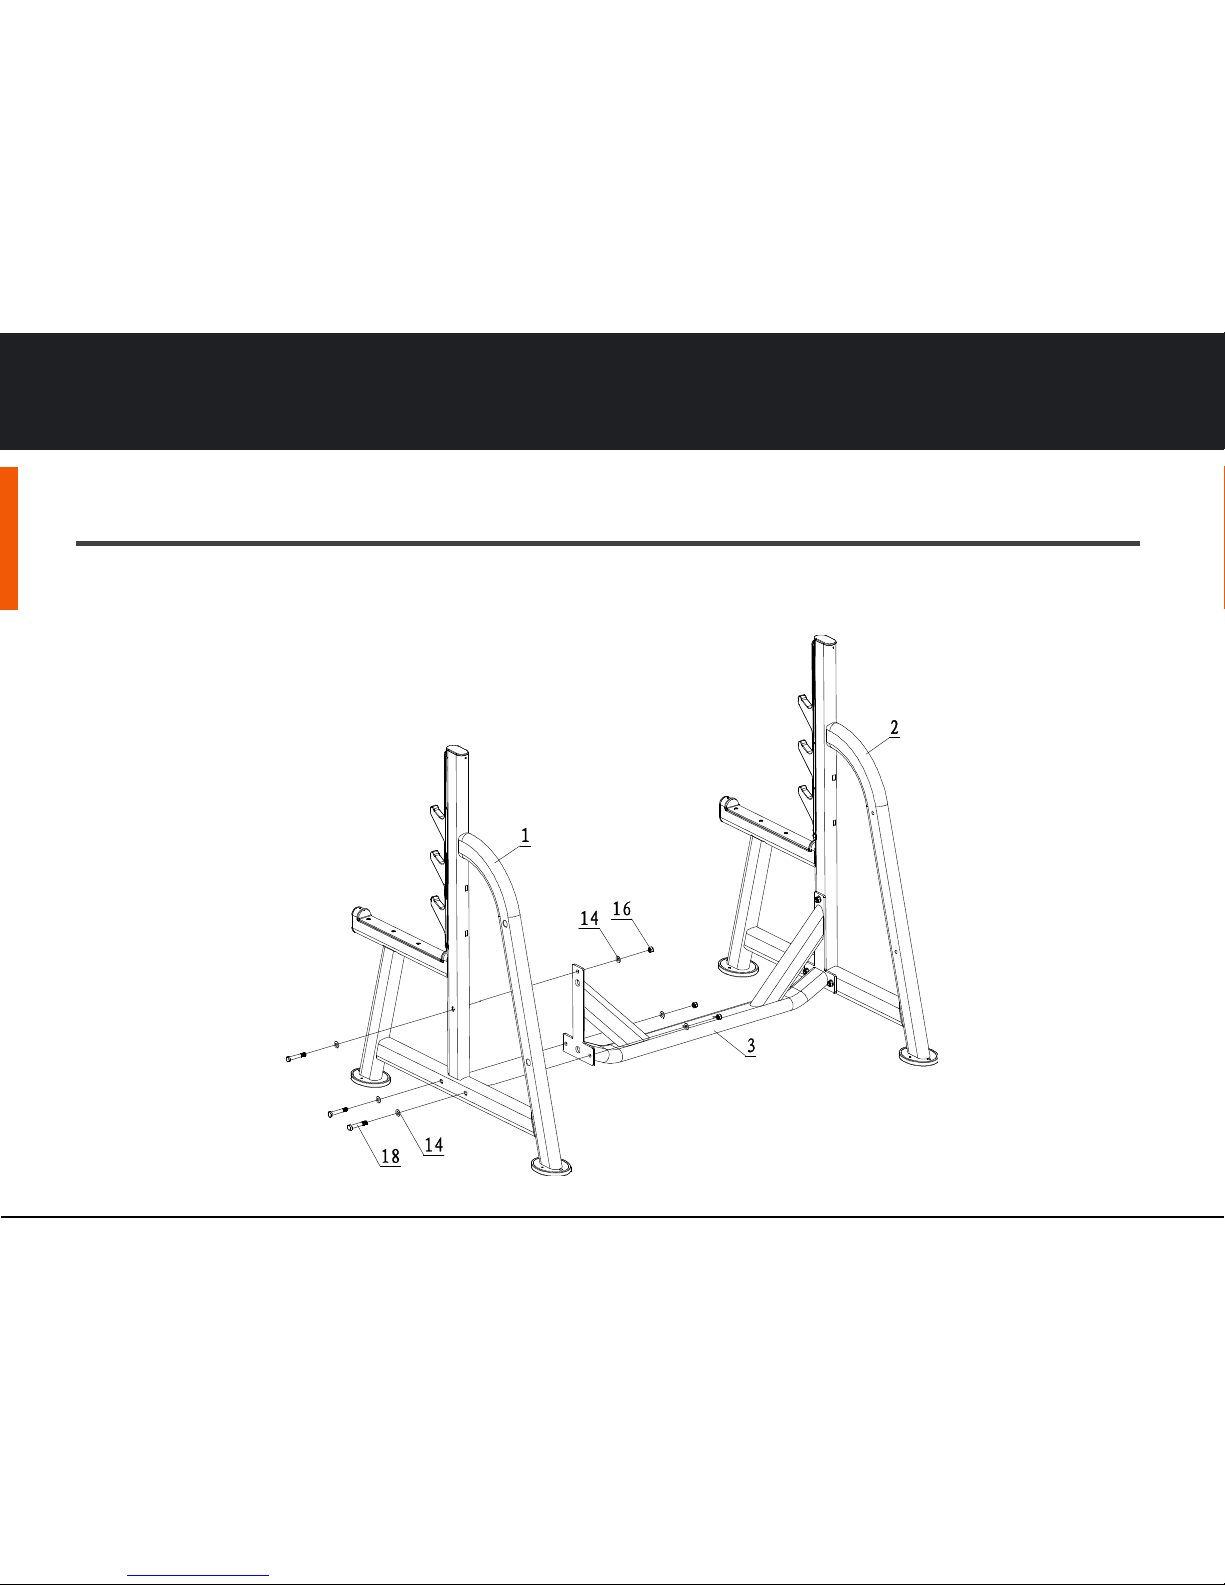
Step 1: MAXX OLYMPIC Rack
Assemble Upright Frame(1&2) and Cross Frame (3) using Flat Washer Φ13.5*Φ24*2.5(14), Nut M12(16) and
Hex Bolt M12*75(18).
page 9
ASSEMBLYSAFETY
Page 10
4.2 ASSEMBLY INSTRUCTIONS
MAXXBENCH
INSTRUCTIONS
MAINTANENCE
WARRANTY
MAXX BENCH | WILKES-BARRE PA | WWW.MAXXBENCH.COM
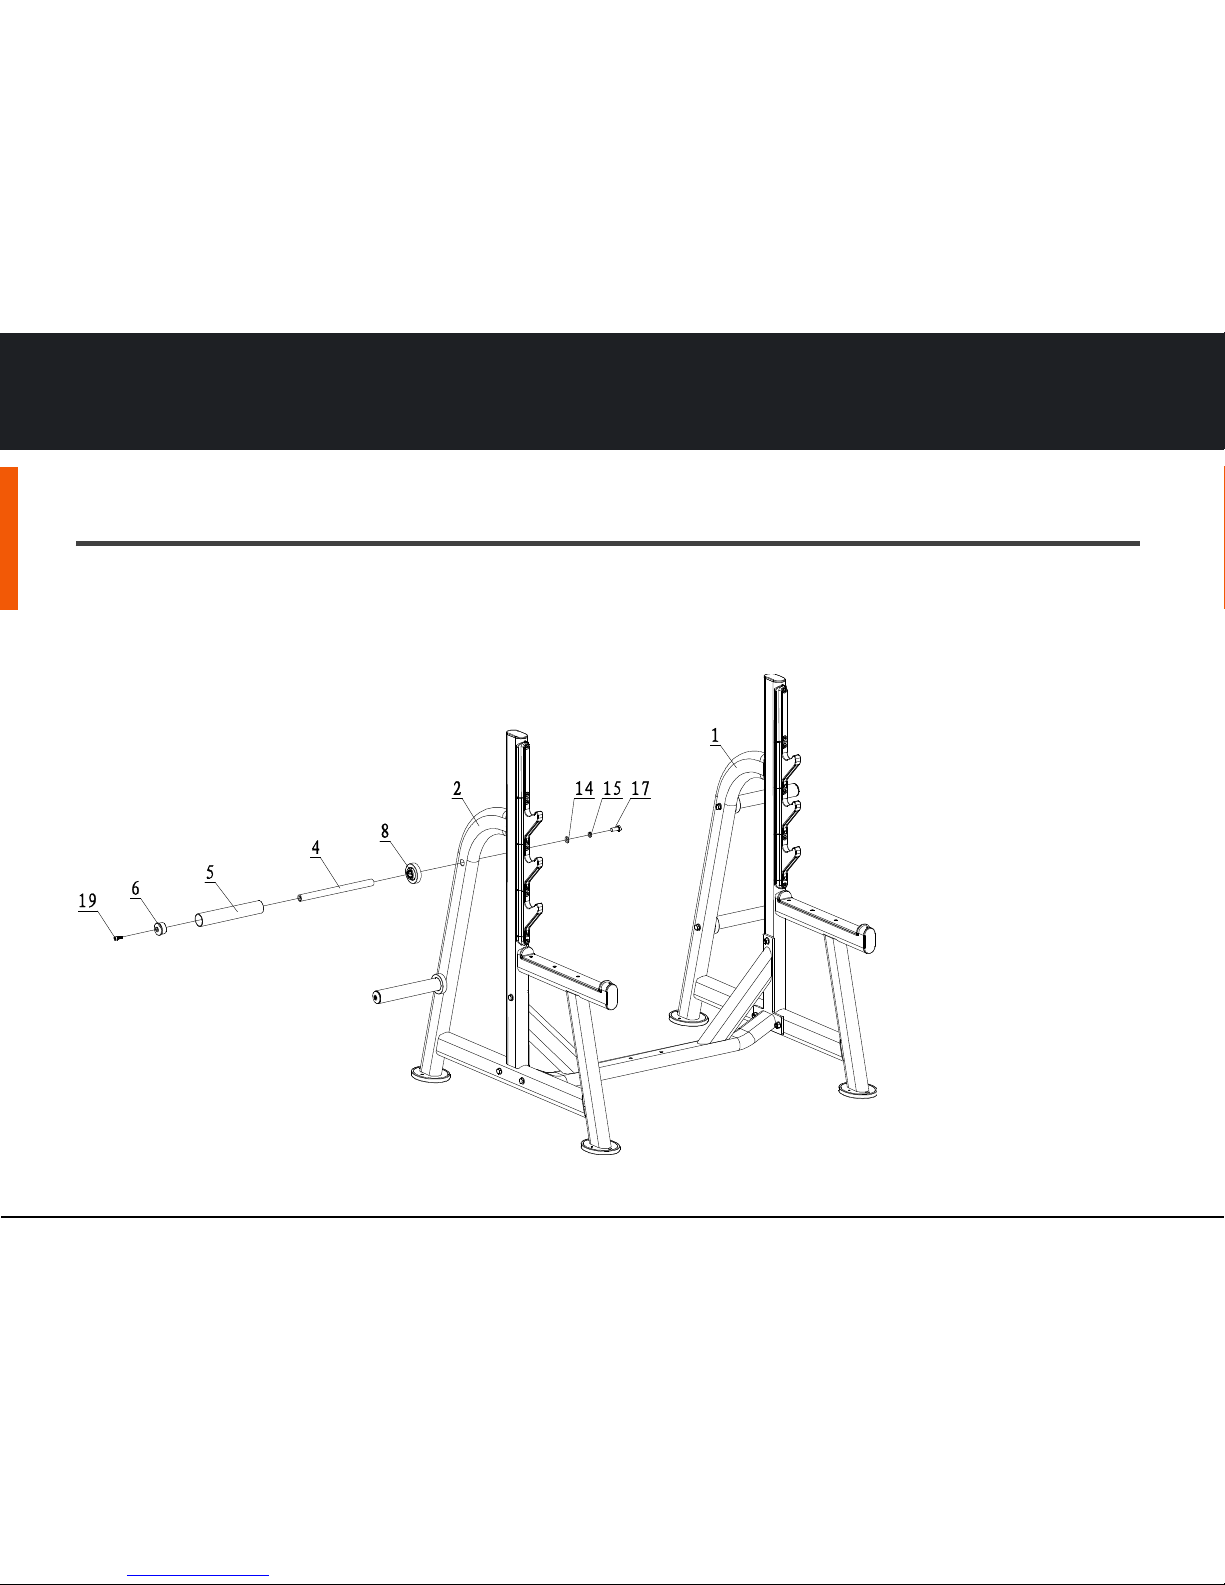
Step 2: MAXX OLYMPIC Rack
Install Bumper Plate(4), Bar Holder Φ48*2.5*280(5), End Cap Φ8.5*Φ47.5*30(6), Rubber Bushing
Φ75*Φ26*Φ48.5*25(8) to Upright Frame (1&2) using Flat Washer Φ13.5*Φ24*2.5(14), Spring Washer Φ12(15), Hex
Bolt M12*30(17) and Hex Bolt M8*25(19) as show.
page 10
ASSEMBLYSAFETY
Page 11
4.3 ASSEMBLY INSTRUCTIONS
MAXXBENCH
INSTRUCTIONS
MAINTANENCE
WARRANTY
MAXX BENCH | WILKES-BARRE PA | WWW.MAXXBENCH.COM
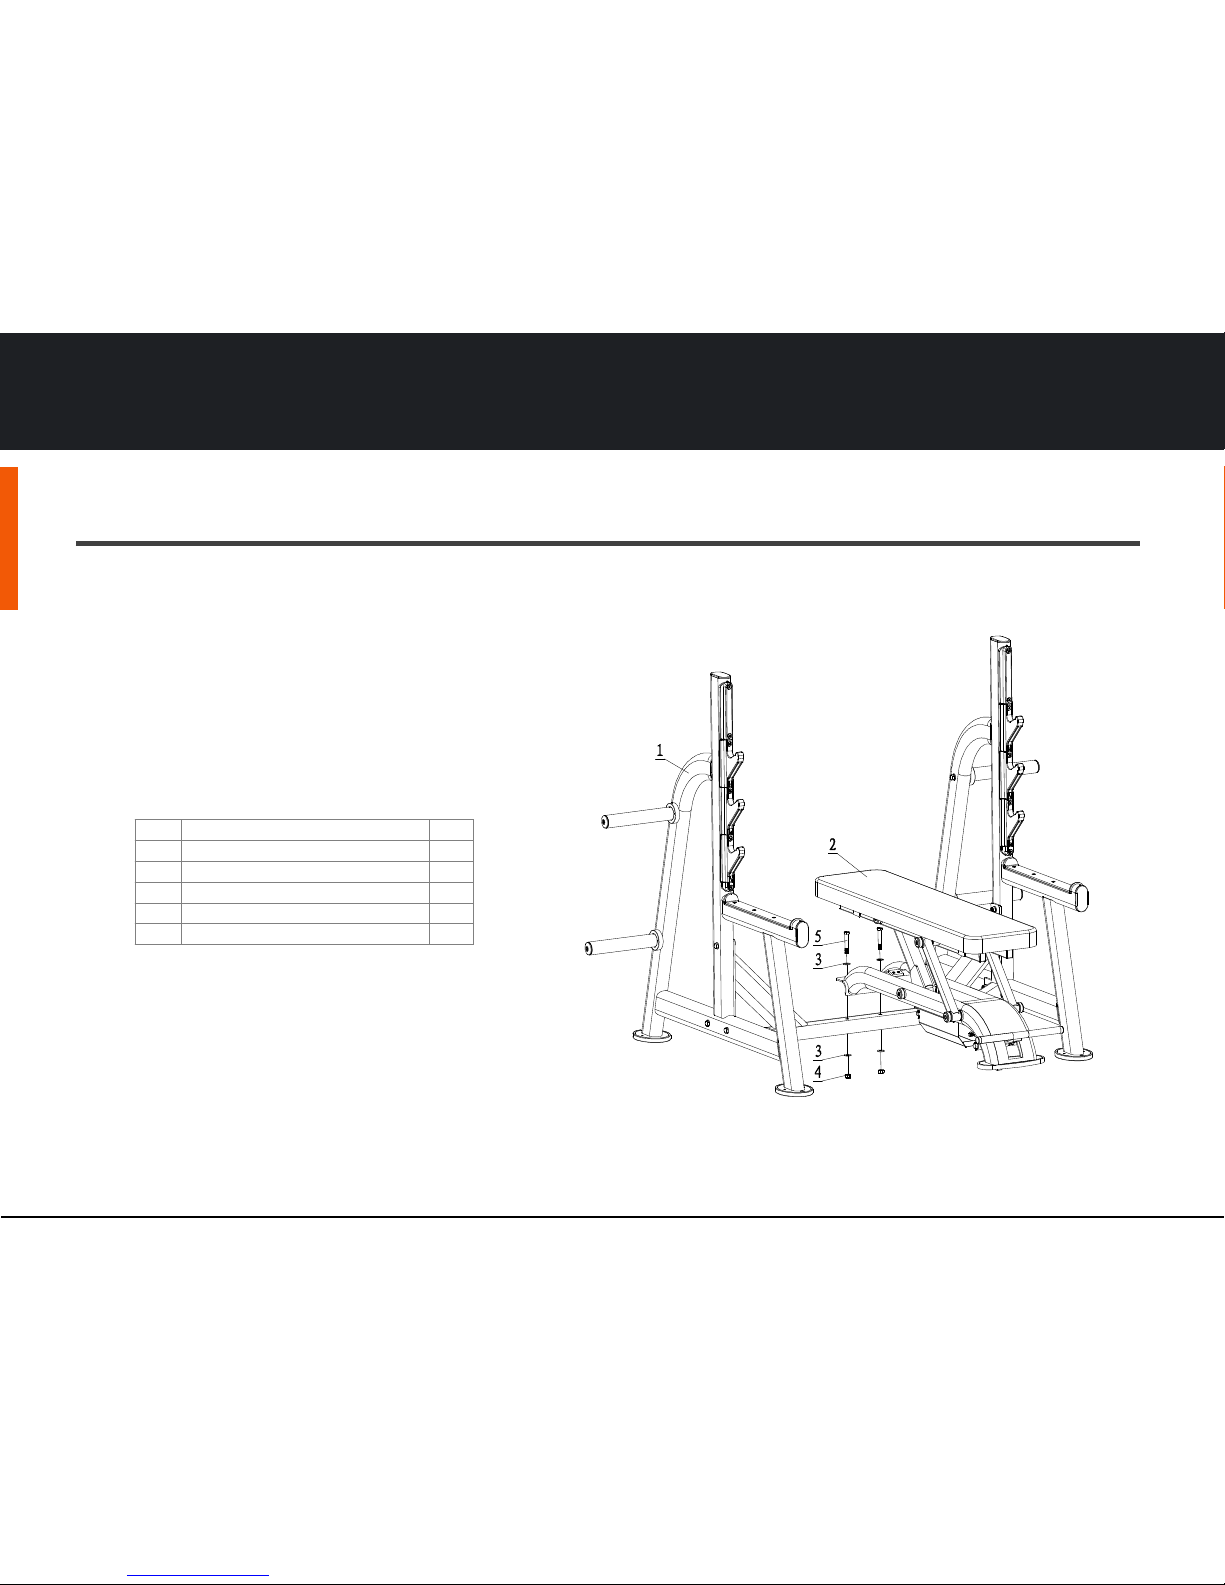
MAXX OLYMPIC FLAT BENCH: ATTACH BENCH TO RACK
Part
Description
Q’ty
1
Main Frame
1
2
Bench
1
3
Flat Washer Ф13.5*Ф24*2.5
4
4
Nut M12
2
5
Hex Bolt M12*75
2
Assemble Main Frame (1) & Bench(2) using Flat Washer Ф13.5*Ф24*2.5(3), Nut M12(4) and Hex Bolt
M12*75(5).
page 11
ASSEMBLYSAFETY
Page 12
4.4 ASSEMBLY INSTRUCTIONS
MAXXBENCH
INSTRUCTIONS
MAINTANENCE
WARRANTY
MAXX BENCH | WILKES-BARRE PA | WWW.MAXXBENCH.COM
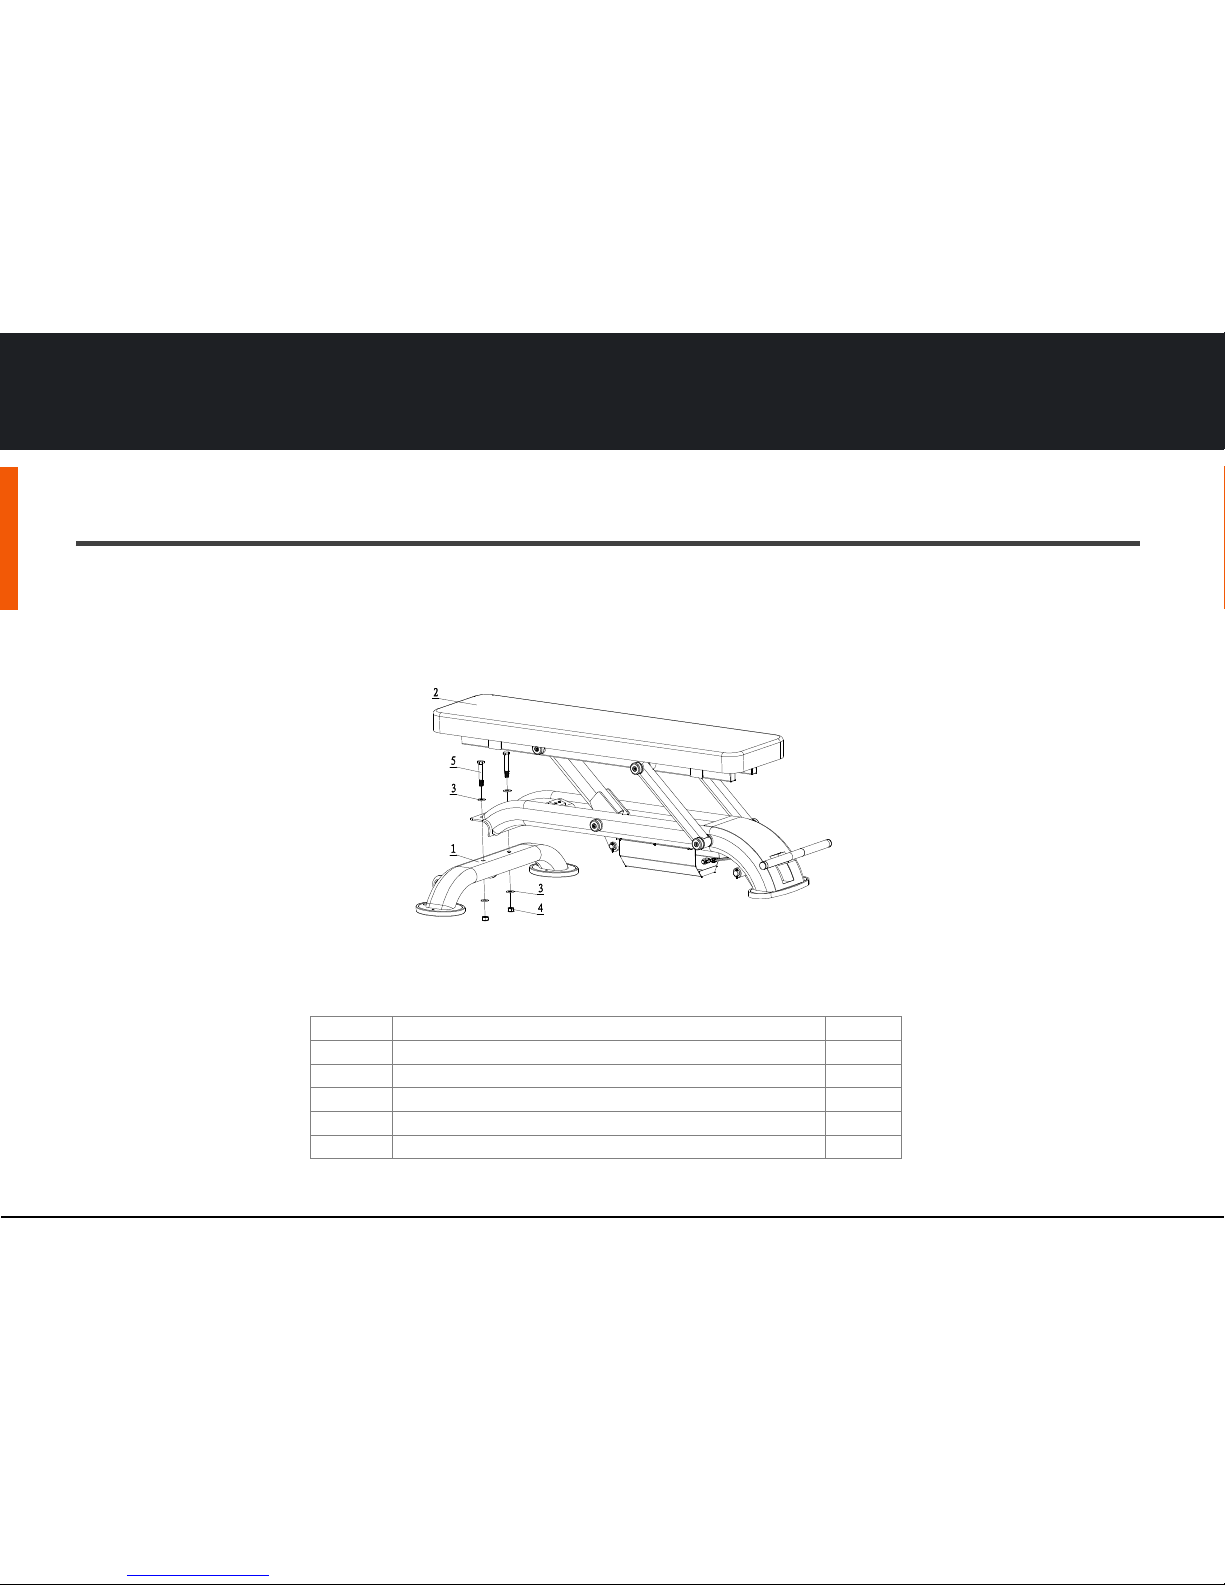
MAXX FLAT BENCH: ATTACH BENCH TO WHEELSET
Assemble Base Frame(1) & Bench(2) using Flat Washer Ф13.5*Ф24*2.5(3), Nut M12(4) and Hex Bolt
M12*75(5).
Part No.
Description
Q’ty
1
Base Frame
1
2
Bench
1
3
Flat Washer Ф13.5*Ф24*2.5
4
4
Nut M12
2
5
Hex Bolt M12*75
2
page 12
ASSEMBLYSAFETY
Page 13
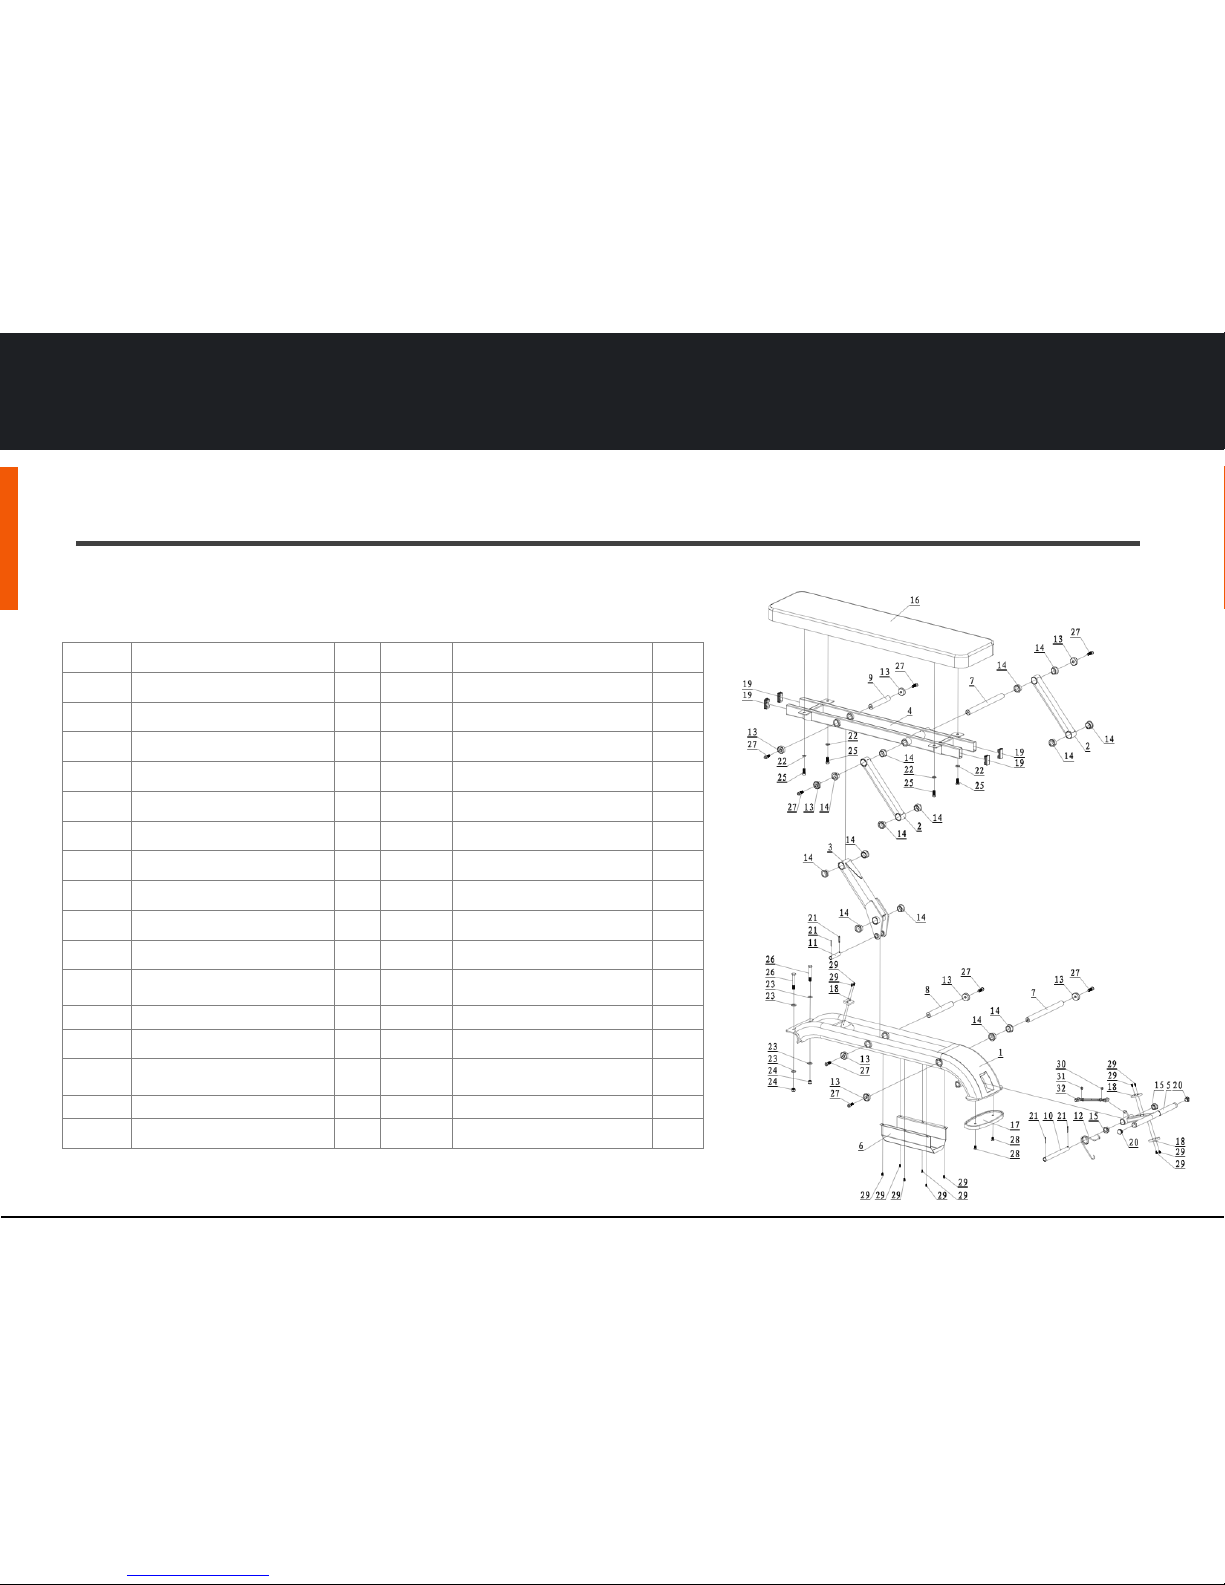
5.1 PARTS LIST AND EXPLODED DRAWING
MAXXBENCH
INSTRUCTIONS
MAINTANENCE
WARRANTY
MAXX BENCH | WILKES-BARRE PA | WWW.MAXXBENCH.COM
MAXX OLYMPIC Bench
Part No.
Description
Q’ty
Part No.
Description
Q’ty
1
Base Frame
117Rubber Foot 270*113*16
1
2
Font Rolling Frame
218Rubber Bushing 45*35*8
2
3
Rear Rolling Frame
119End Cap 25*50*2
4
4
Pad Support Frame
120End Cap Ф25*3
2
5
Adjustable Frame for Foot
121Shaft Ф3.2*25
4
6
Cover for oil Cylinder
122Flat Washer Ф11*Ф20*2
4
7
Long Axis Ф25*293
223Flat Washer Ф13.5*Ф24*2.5
4
8
Short Axis Ф25*198
124Nut M12
2
9
Rear Axis Ф25*153
125Hex Bolt M10*25
4
10
Adjustable Rolling Axis Ф19*200
126Hex Bolt M12*75
2
11
Rolli ng Axi s fo r Oil Cyl ind er
Ф15.6*80
127Hex Bolt M10*25
8
12
Torsion Spring Ф45*22*Ф4
128Hex Bolt M8*15
2
13
End cap of Axis Ф38*14
829Screw M5*10
12
14
Metal Bushing
Ф38*Ф32*Ф25.2*18
1430Flat Nut 1/4
1
15
Busing Ф31*Ф25.4*Ф19.2*6
231Flat Nut 1/4L
1
16
Pad 1220*300*65
132Flange Bolt KUUD-1/4*4
1
page 13
ASSEMBLYSAFETY
Page 14
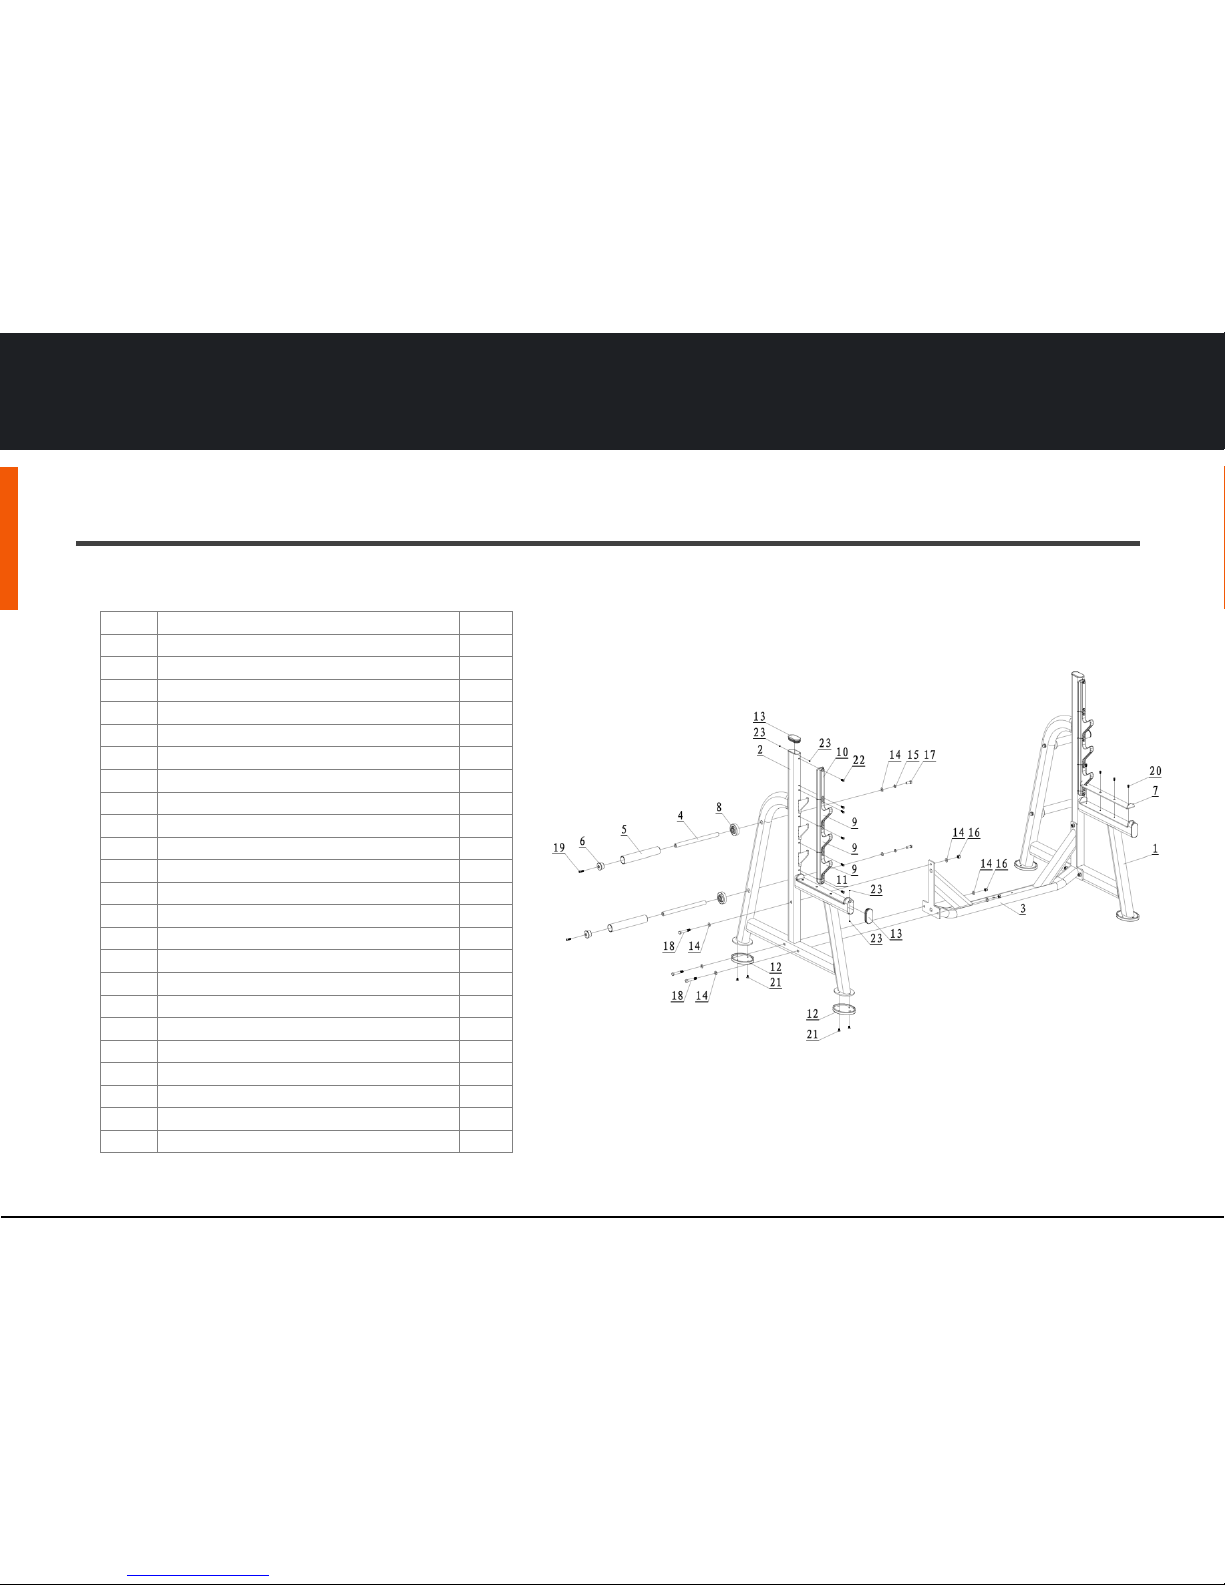
5.2 PARTS LIST AND EXPLODED DRAWING
MAXXBENCH
INSTRUCTIONS
MAINTANENCE
WARRANTY
MAXX BENCH | WILKES-BARRE PA | WWW.MAXXBENCH.COM
MAXX OLYMPIC RACK
Part
Description
Q’ty
1
Left Upright Frame
1
2
Right Upright Frame
1
3
Cross Frame
1
4
Inner Frame for Bumper Plate
4
5
Bar Holder Φ48*2.5*280
4
6
End Cap Φ8.5*Φ47.5*30
4
7
Protect Board 505*47.5*30
2
8
Rubber Bushing Φ75*Φ26*Φ48.5*25
4
9
Cover 183*114*50
6
10
Upper Cover 220*50*34
2
11
Lower Cover 50*34*37
2
12
Rubber Foot 169*126*16
4
13
End Cap 50*100*3
4
14
Flat Washer Φ13.5*Φ24*2.5
16
15
Spring Washer Φ12
4
16
Nut M12
6
17
Hex Bolt M12*30
4
18
Hex Bolt M12*75
6
19
Hex Bolt M8*25
4
20
Hex Bolt M6*15
8
21
Hex Bolt M8*15
8
22
Hex Bolt M8*25
12
23
Screw M6*6
8
page 14
ASSEMBLYSAFETY
Page 15
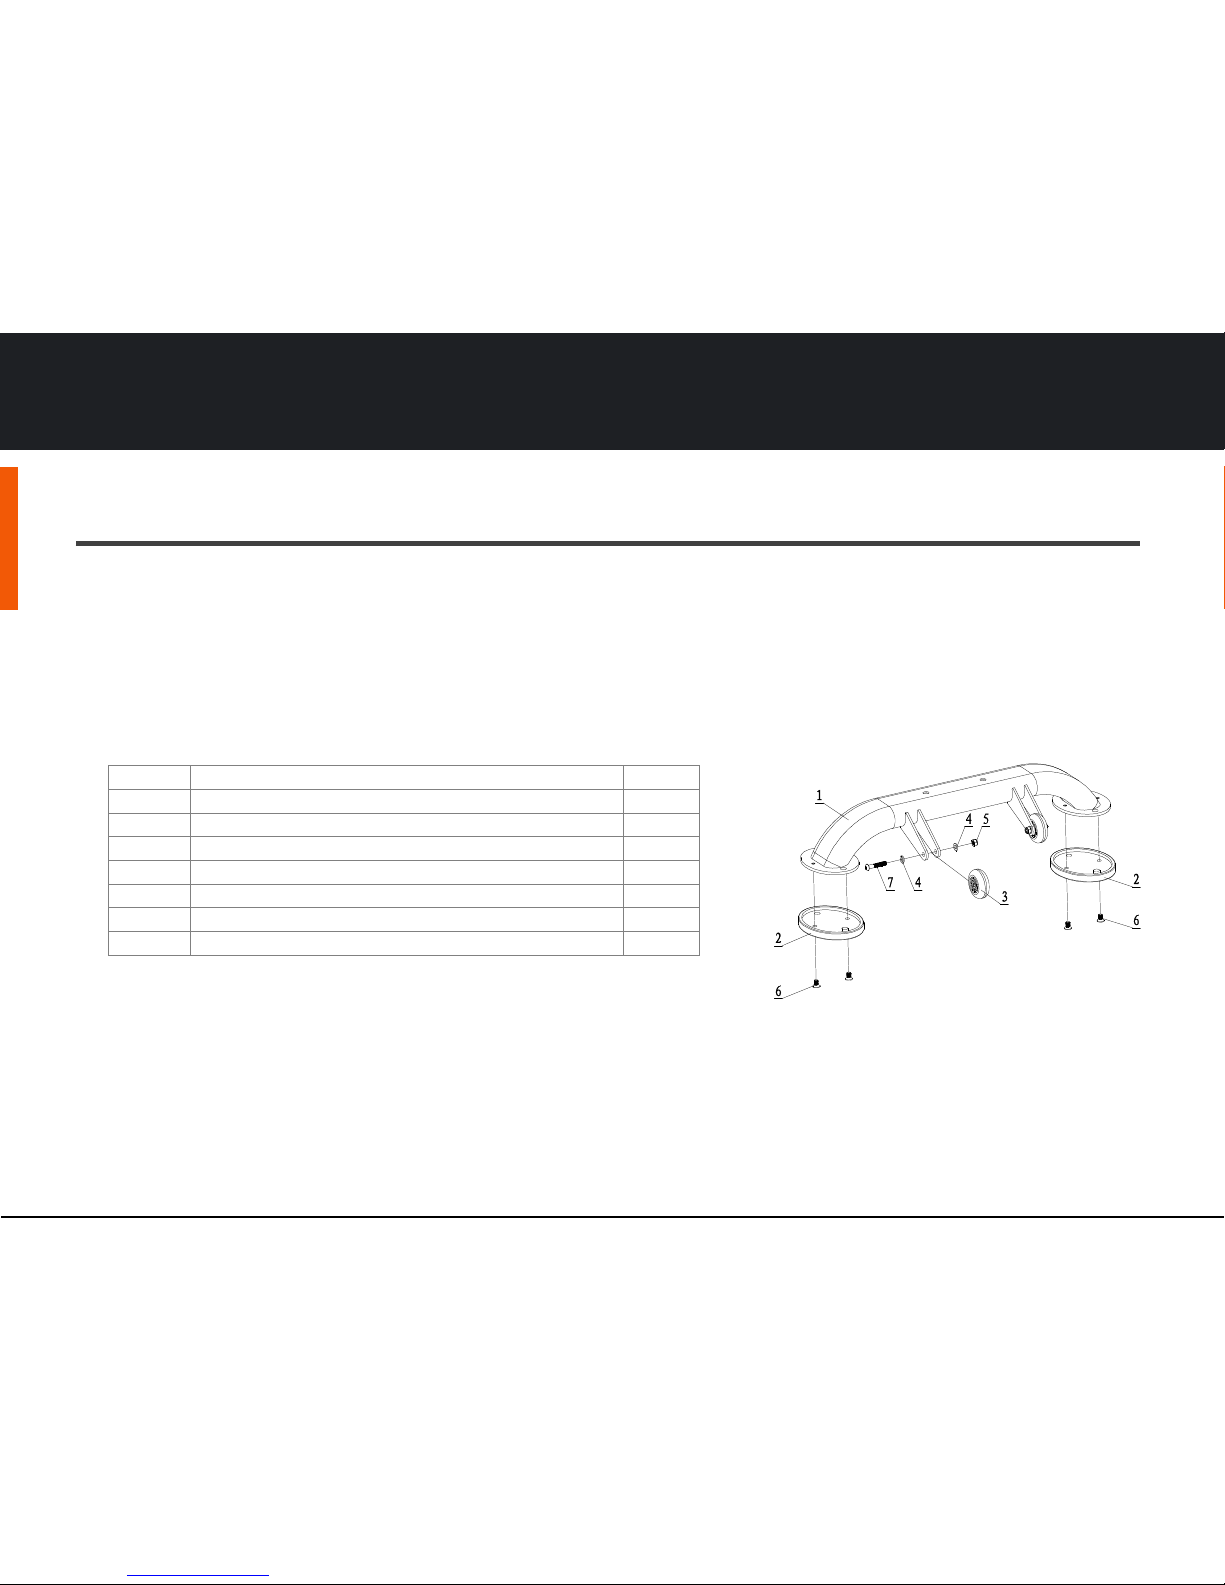
5.3 PARTS LIST AND EXPLODED DRAWING
MAXXBENCH
ASSEMBLY
INSTRUCTIONS
MAINTANENCE
WARRANTY
SAFETY
MAXX BENCH | WILKES-BARRE PA | WWW.MAXXBENCH.COM
MAXX WHEELSET
Part No.
Description
Q’ty
1
Base Frame
1
2
Rubber Foot 169*129*6
2
3
Wheel Ф63*24
2
4
Flat Washer Ф9*Ф16*1.6
4
5
Nut M8
2
6
Hex Bolt M8*15
4
7
Hex Bolt M8*45
2
page 15
Page 16
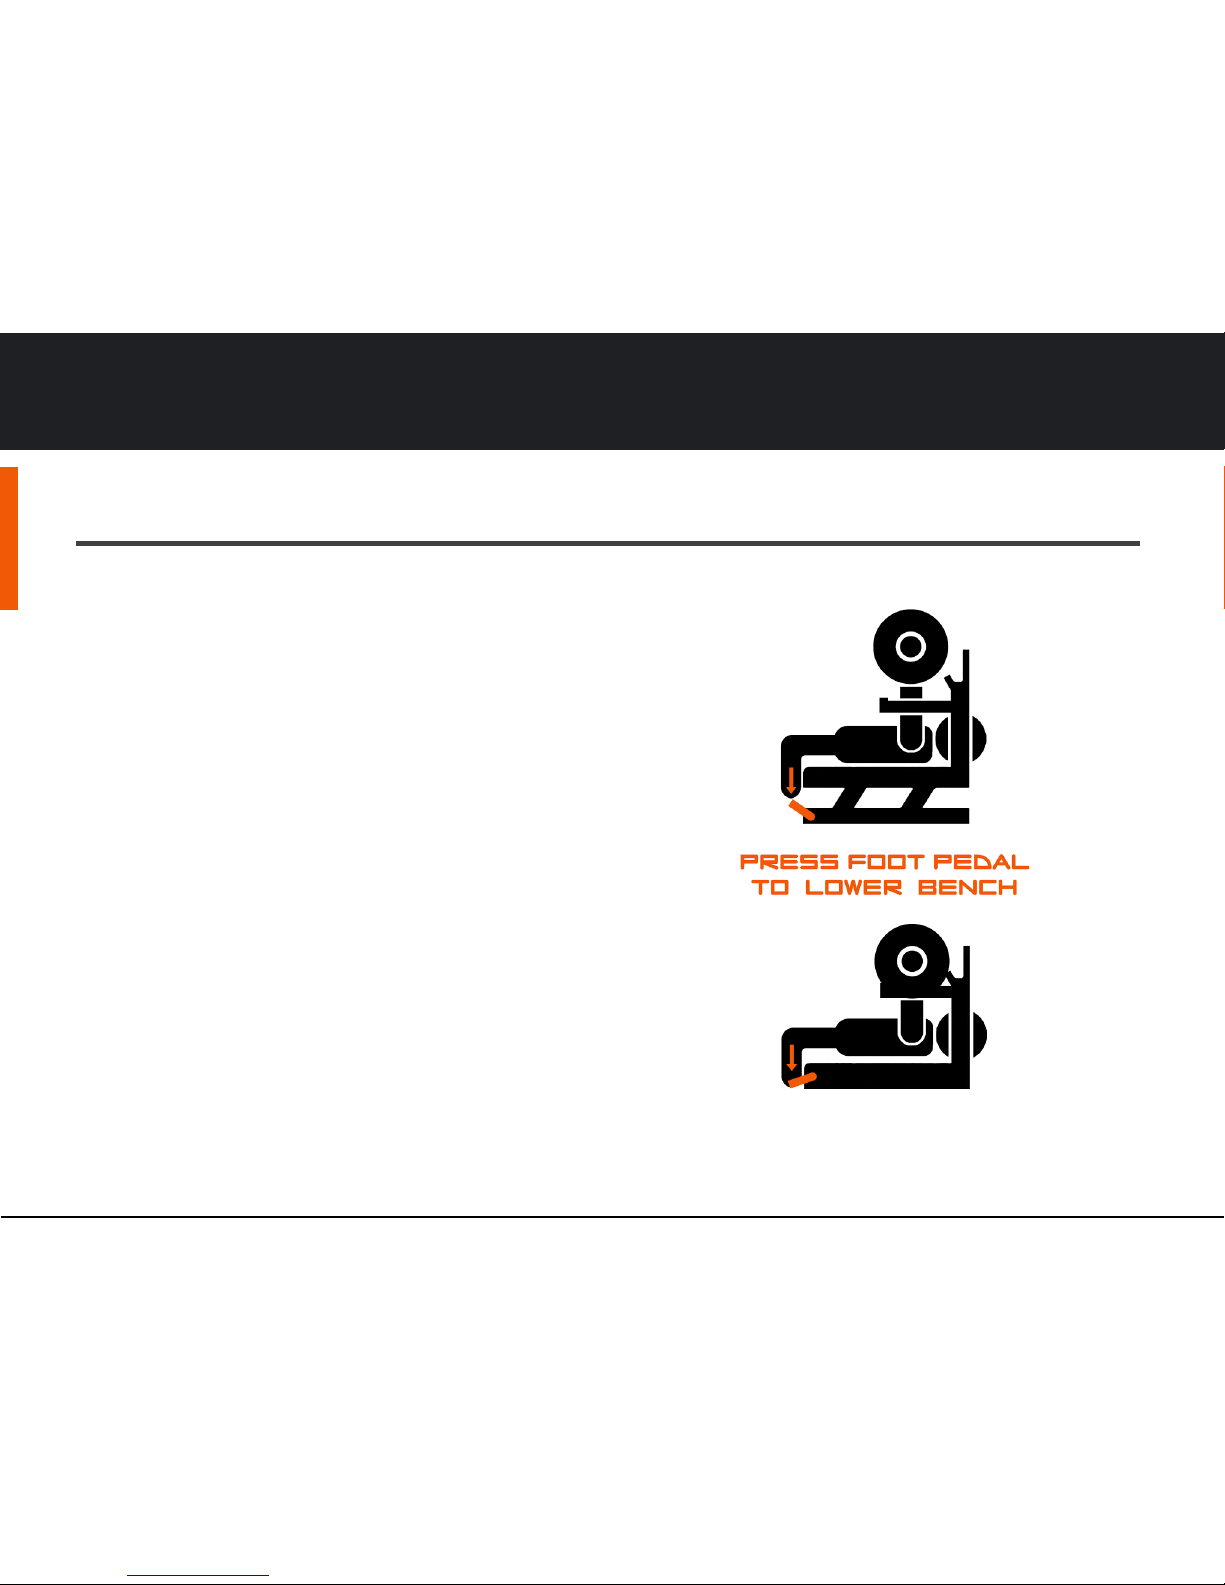
6.1 operating instructions
MAXXBENCH
ASSEMBLY
INSTRUCTIONS
MAINTANENCE
WARRANTY
SAFETY
MAXX BENCH | WILKES-BARRE PA | WWW.MAXXBENCH.COM
Remember to always use a spotter.
•
To lower bench, press and hold foot pedal down while body
weight is on back pad.
•
To raise bench, release foot pedal and remove body weight
from back pad.
•
To adjust height, press foot pedal down momentarily while
body weight is on back pad. Release foot pedal when bench
is has lowered to desired height.
page 16
Page 17
6.2 maintenance
MAXXBENCH
ASSEMBLY
INSTRUCTIONS
MAINTANENCE
WARRANTY
SAFETY
MAXX BENCH | WILKES-BARRE PA | WWW.MAXXBENCH.COM
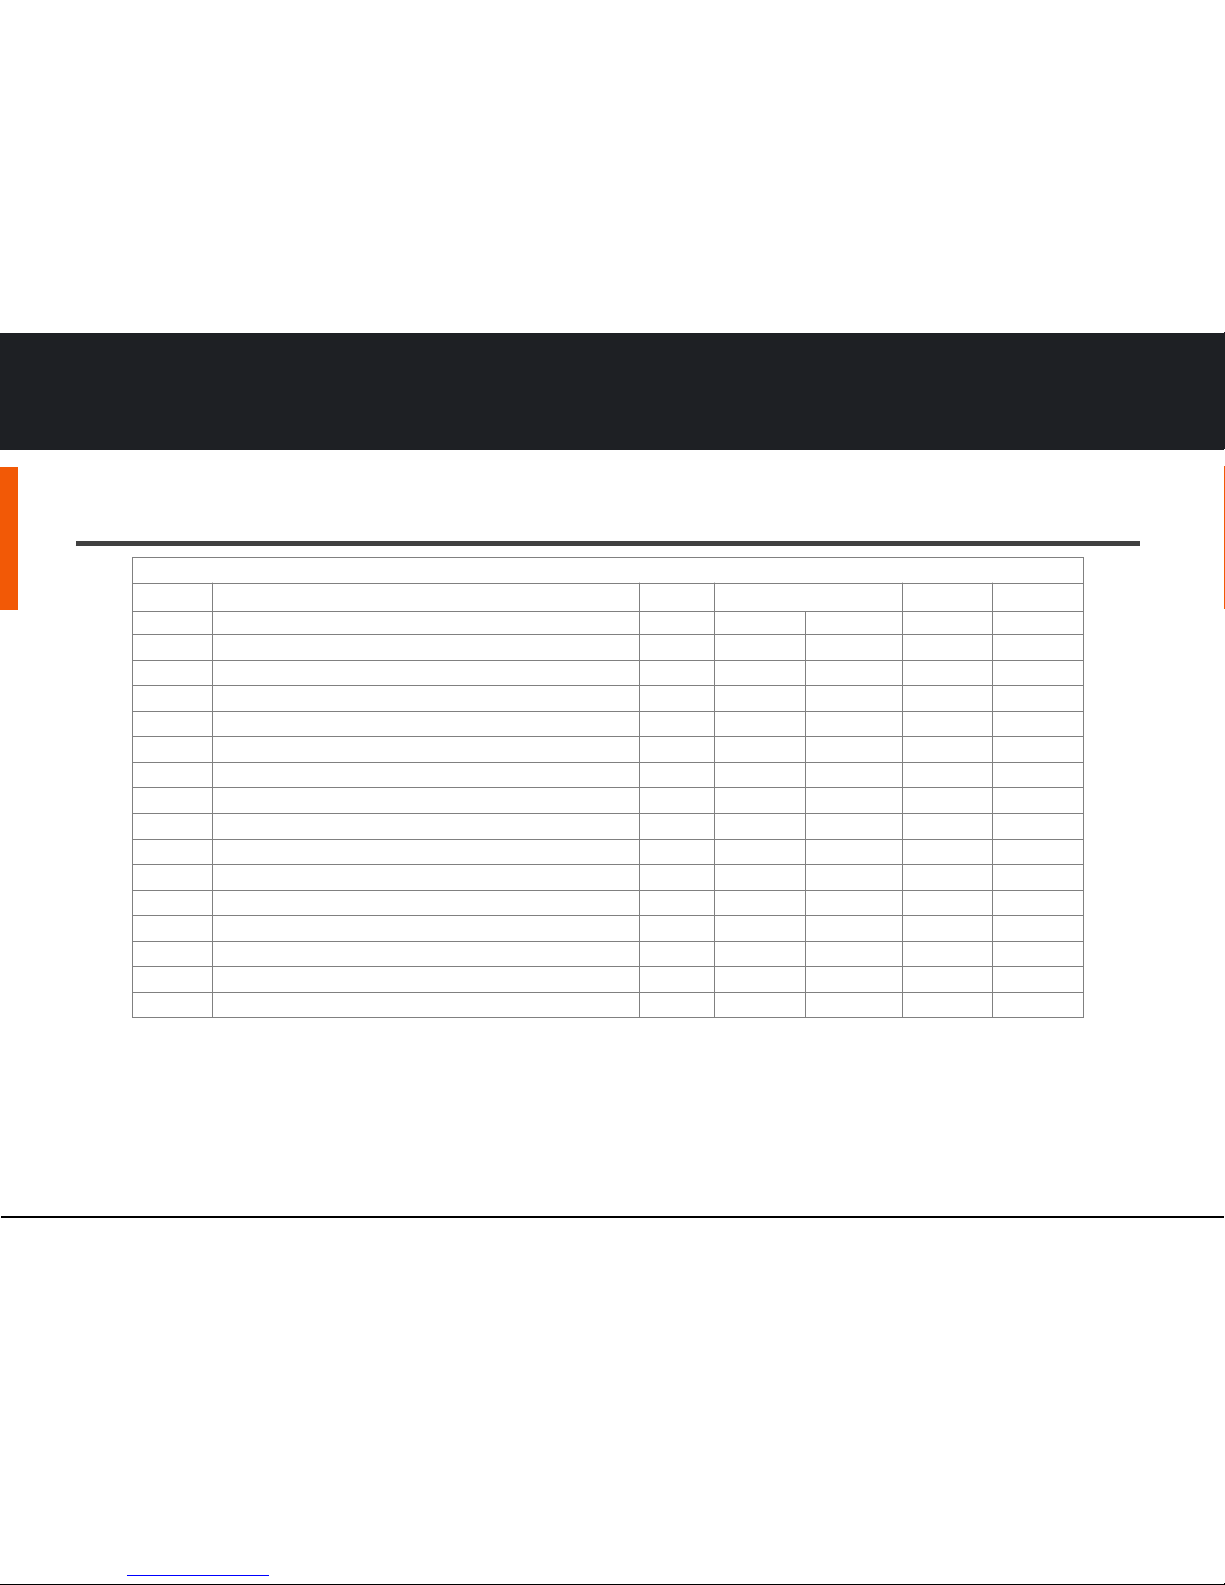
MAINTANENCE SCHEDULE
Item No.
Description
DAILY
WEEKLY
MONTHLY
YEARLY
5 YEAR
1
Clean and inspect upholstery
X
2
Inspect pads for wear
X
3
Clean and inspect equipment frames
X
4
Check warning and instruction labels for readability
X
5
Check that all fasteners are properly secured
X
6
Check hydraulic cylinder for oil leakage
X
7
Check seat adjustment and auto-return
X
8
Check drop speed
X
9
Condition and deep clean upholstery
X
10
Inspect frame and struts.
X
11
Inspect all fasteners
X
12
Inspect foot pedal linkage
X
13
Clean and lubricate pivot points
X
14
Inspect and Lubricate Bushings and Pivot Points
X
15
Check cylinder air pressure
X
16
Replace hydraulic cylinder
X
Maintenance Tips:
Upholstery: Wipe clean using a mild soap and water solution or other appropriate cleaner for vinyl.
Structural: Wipe clean using a mild soap and water solution.
Pivot Points: Lubricate struts and pivot points with silicone spray lubricant.
Important: Hydraulic cylinder warranty is 5 years. Cylinder must be replaced by an approved service technician.
page 17
Page 18

MAXXBENCH
ASSEMBLY
INSTRUCTIONS
MAINTANENCE
WARRANTY
SAFETY
MAXX BENCH | WILKES-BARRE PA | WWW.MAXXBENCH.COM
Inspect All Fasteners
Be sure to check fasteners at bolted joints to make sure the connections are secure. If a fastener is loose but in good condition, retighten it. If
you are concerned about the integrity of the fastener, remove it, clean the threads and inspect it for any damage such as cracks, bad threads,
corrosion, or rust. Reinstall the fastener if it appears to be in good condition. Otherwise, remove the equipment from service until a new
fastener can be installed properly. You can order new fasteners from Customer Support.
Important: Fastener quality and specifications vary considerably. Replace only with the Maxx Bench approved fastener specifically
engineered for the precise application. Failure to do so will void the Maxx Bench Limited Warranty.
Maxx Bench products are assembled with Grade 5 fasteners or better. Periodically inspect all nuts, bolts, hex key bolts, screws, and other
fasteners to ensure they are tight and installed correctly.
page 18
extended descriptions and definitions
6.2 maintenance
Page 19
MAXXBENCH
ASSEMBLY
INSTRUCTIONS
MAINTANENCE
WARRANTY
SAFETY
MAXX BENCH | WILKES-BARRE PA | WWW.MAXXBENCH.COM
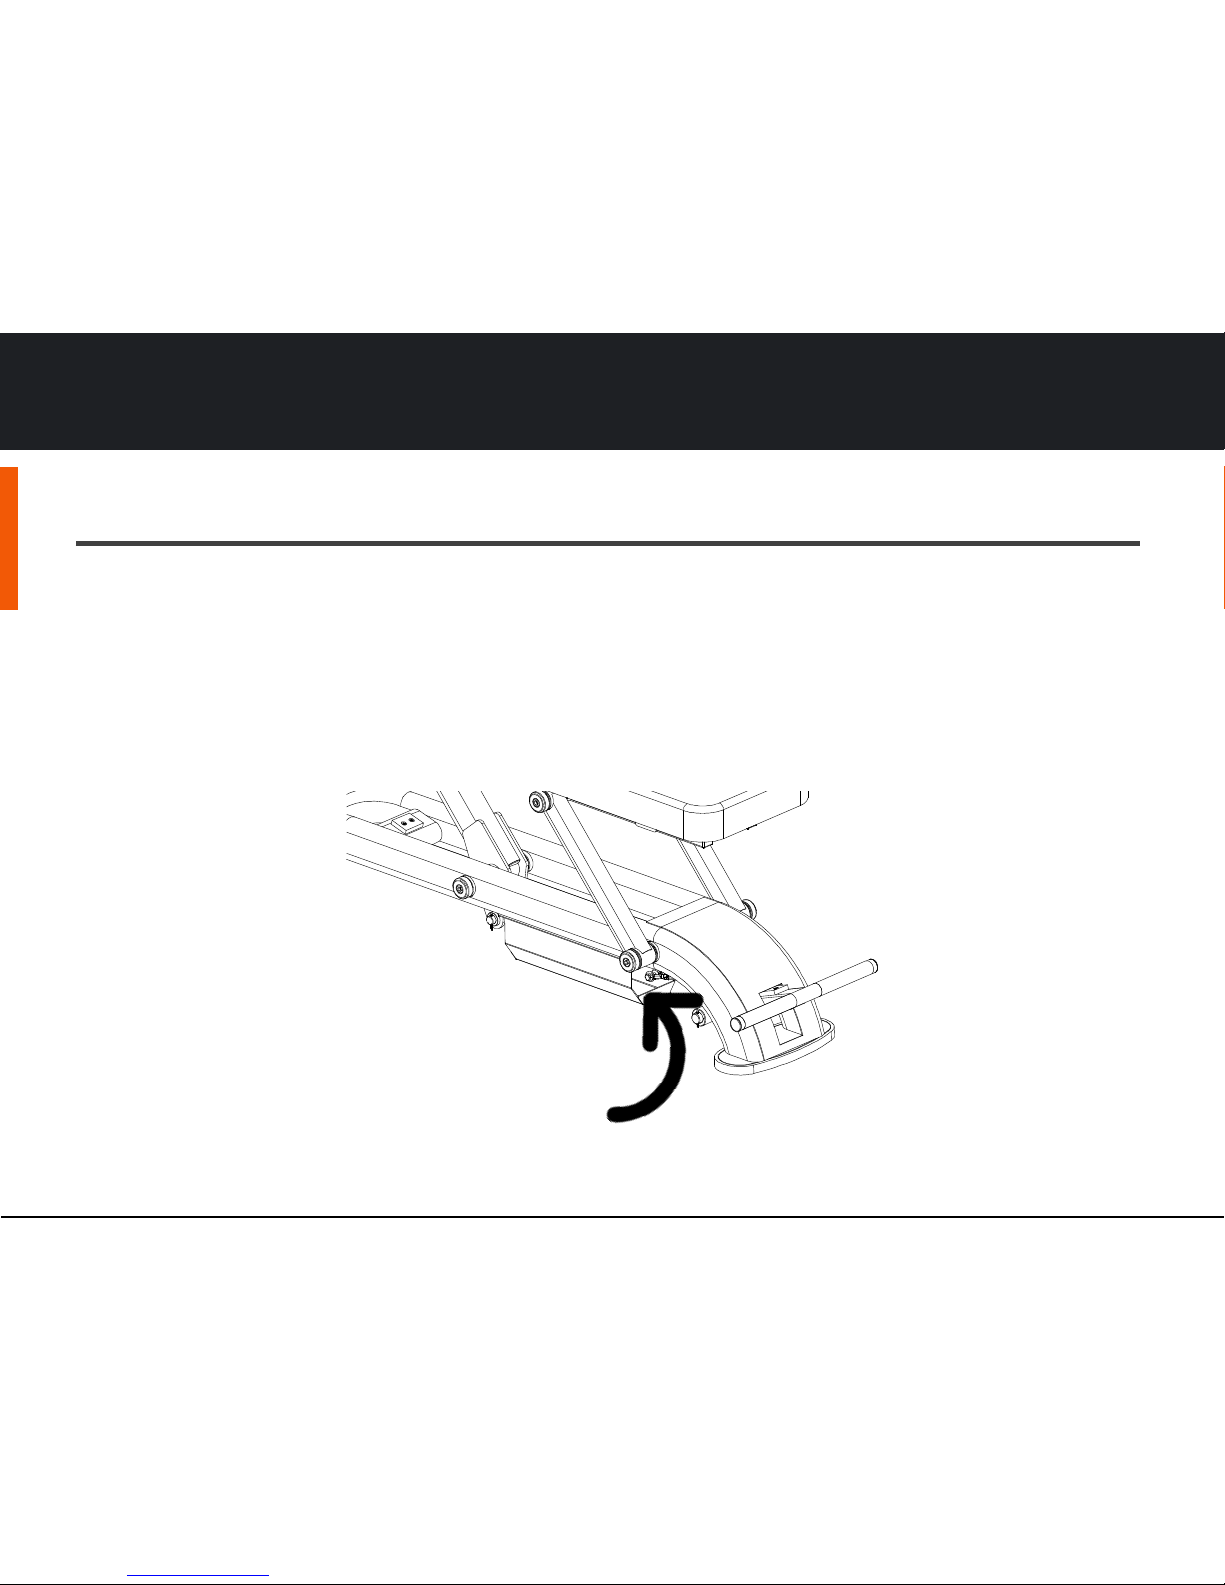
Check for Excessive Oil Leakage
Be sure to check the cylinder cover for excessive oil leakage. Minor amounts of oil leakage (a few drops) is normal over the life of a hydraulic
cylinder. If oil seems to be leaking excessively or pooling on the cylinder cover, please contact a Maxx Bench service technician immediately.
page 19
extended descriptions and definitions
Check for excessive oil
leakage inside cylinder
cover
6.2 maintenance
Page 20
MAXXBENCH
ASSEMBLY
INSTRUCTIONS
MAINTANENCE
WARRANTY
SAFETY
MAXX BENCH | WILKES-BARRE PA | WWW.MAXXBENCH.COM
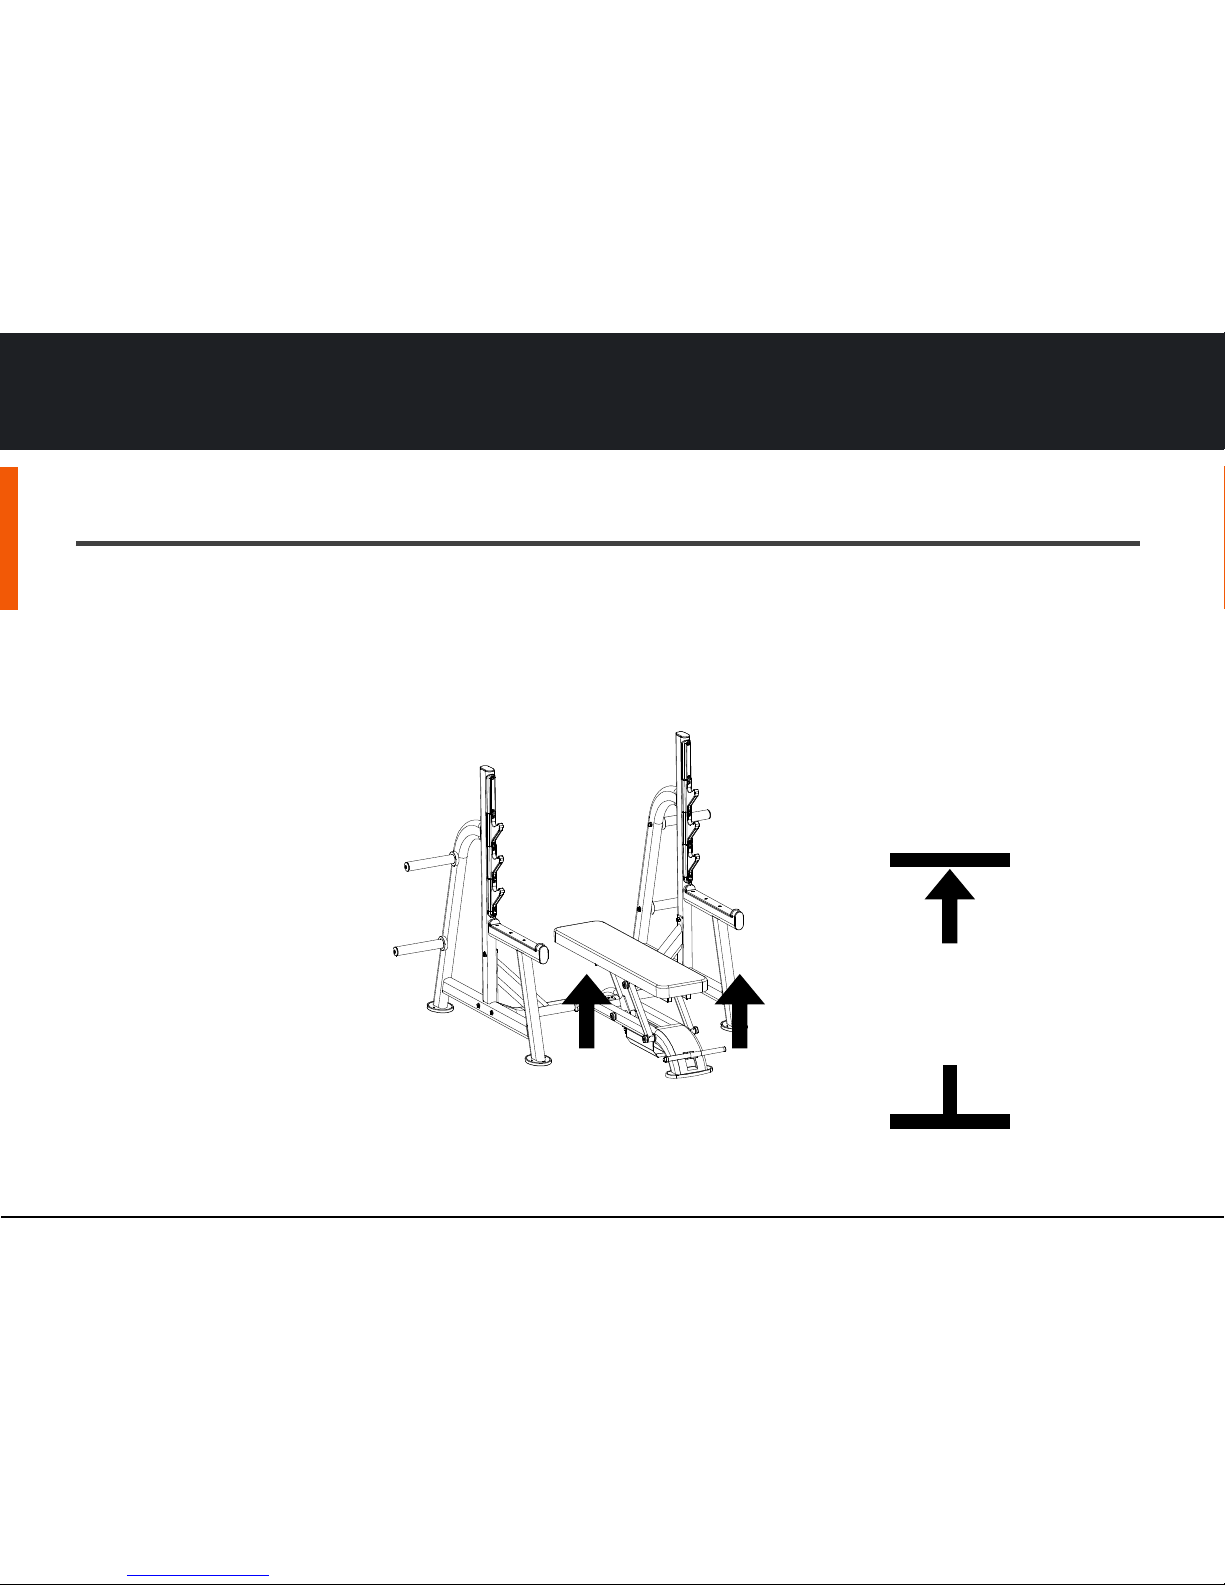
Check Seat Adjustment and Auto-Return
The hydraulic cylinder in your Maxx Bench is pressurized to allow the auto-return feature. If the auto-return is not functioning appropriately,
contact a Maxx Bench certified service technician to re-pressurize your cylinder for service.
page 20
extended descriptions and definitions
When all weight is removed from
the bench (including body
weight), the bench will return to
the starting height.
AUTO-RETURN
6.2 maintenance
Page 21
MAXXBENCH
ASSEMBLY
INSTRUCTIONS
MAINTANENCE
WARRANTY
SAFETY
MAXX BENCH | WILKES-BARRE PA | WWW.MAXXBENCH.COM
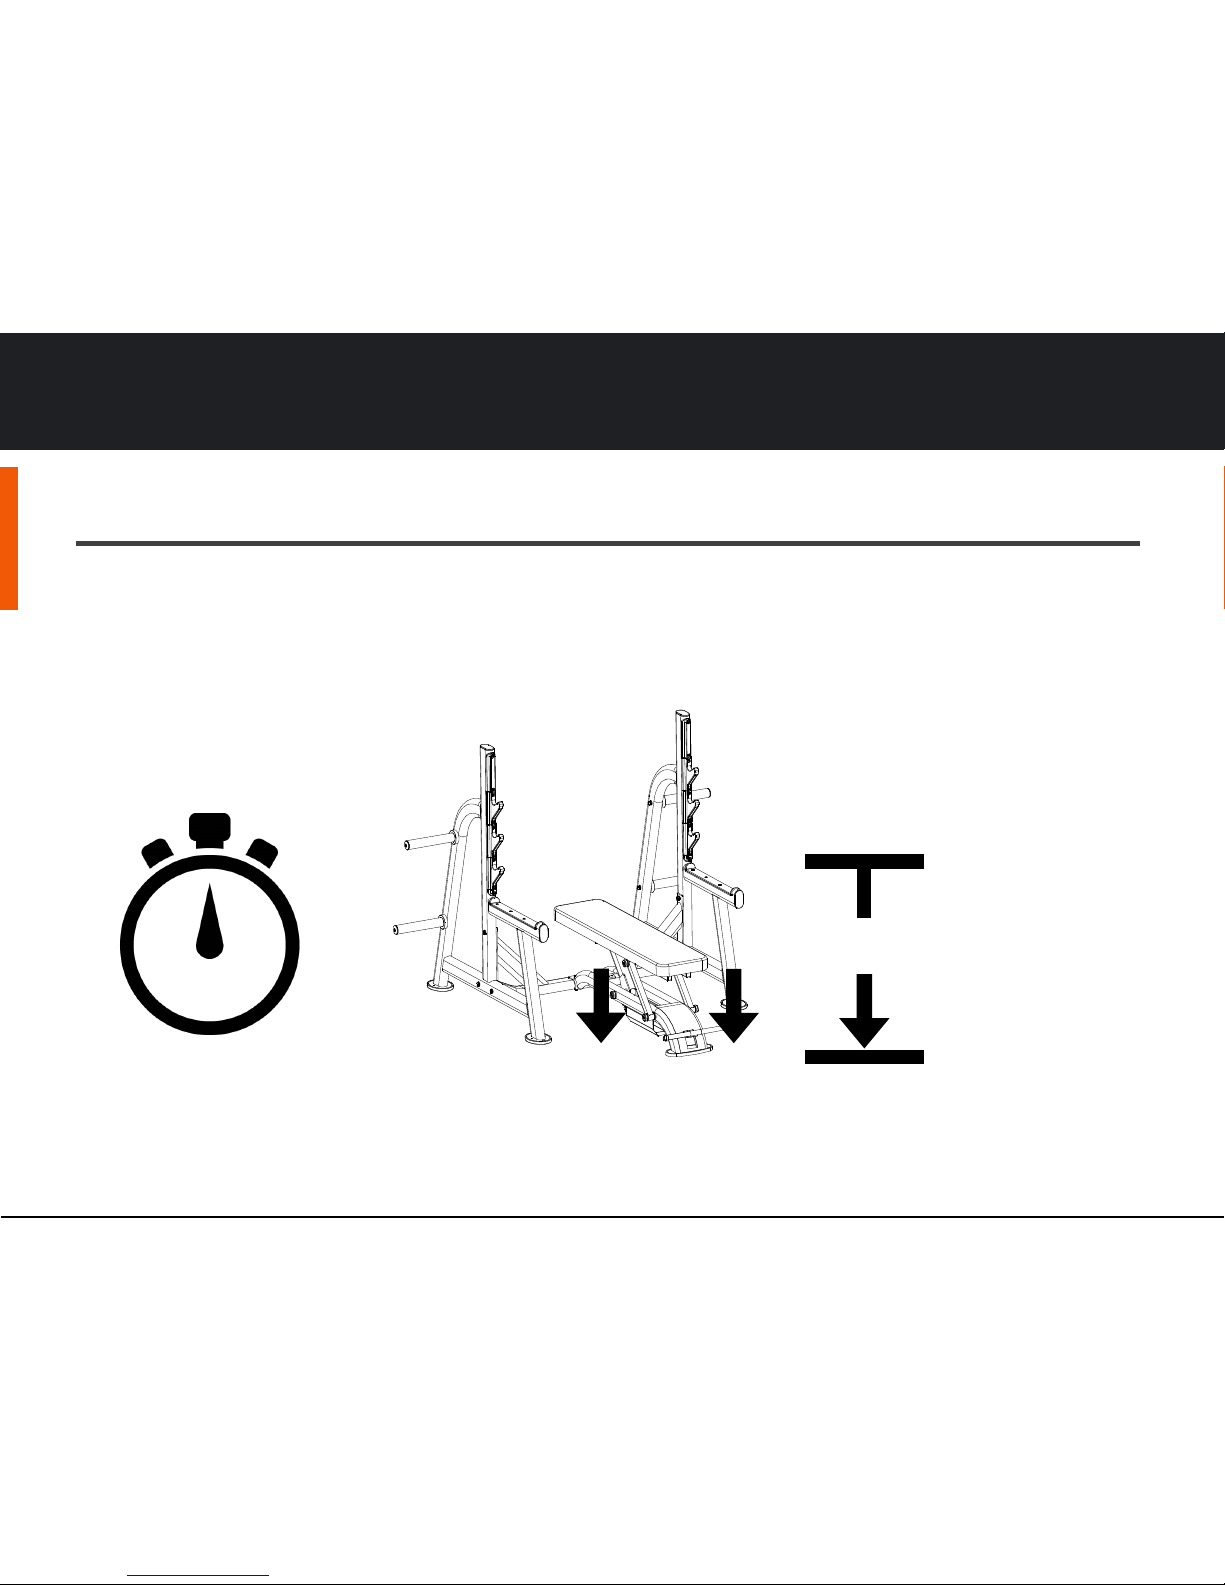
Check Drop Speed
If the bench drop speeds appears to be different from factory setting (1.5 seconds from maximum height to minimum height with 185 lb
person and no added weight), contact a Maxx Bench certified service technician to service your cylinder.
page 21
extended descriptions and definitions
1.5 s
Maximum Bench Height
Minimum Bench Height
6.2 maintenance
Page 22
MAXXBENCH
ASSEMBLY
INSTRUCTIONS
MAINTANENCE
WARRANTY
SAFETY
MAXX BENCH | WILKES-BARRE PA | WWW.MAXXBENCH.COM
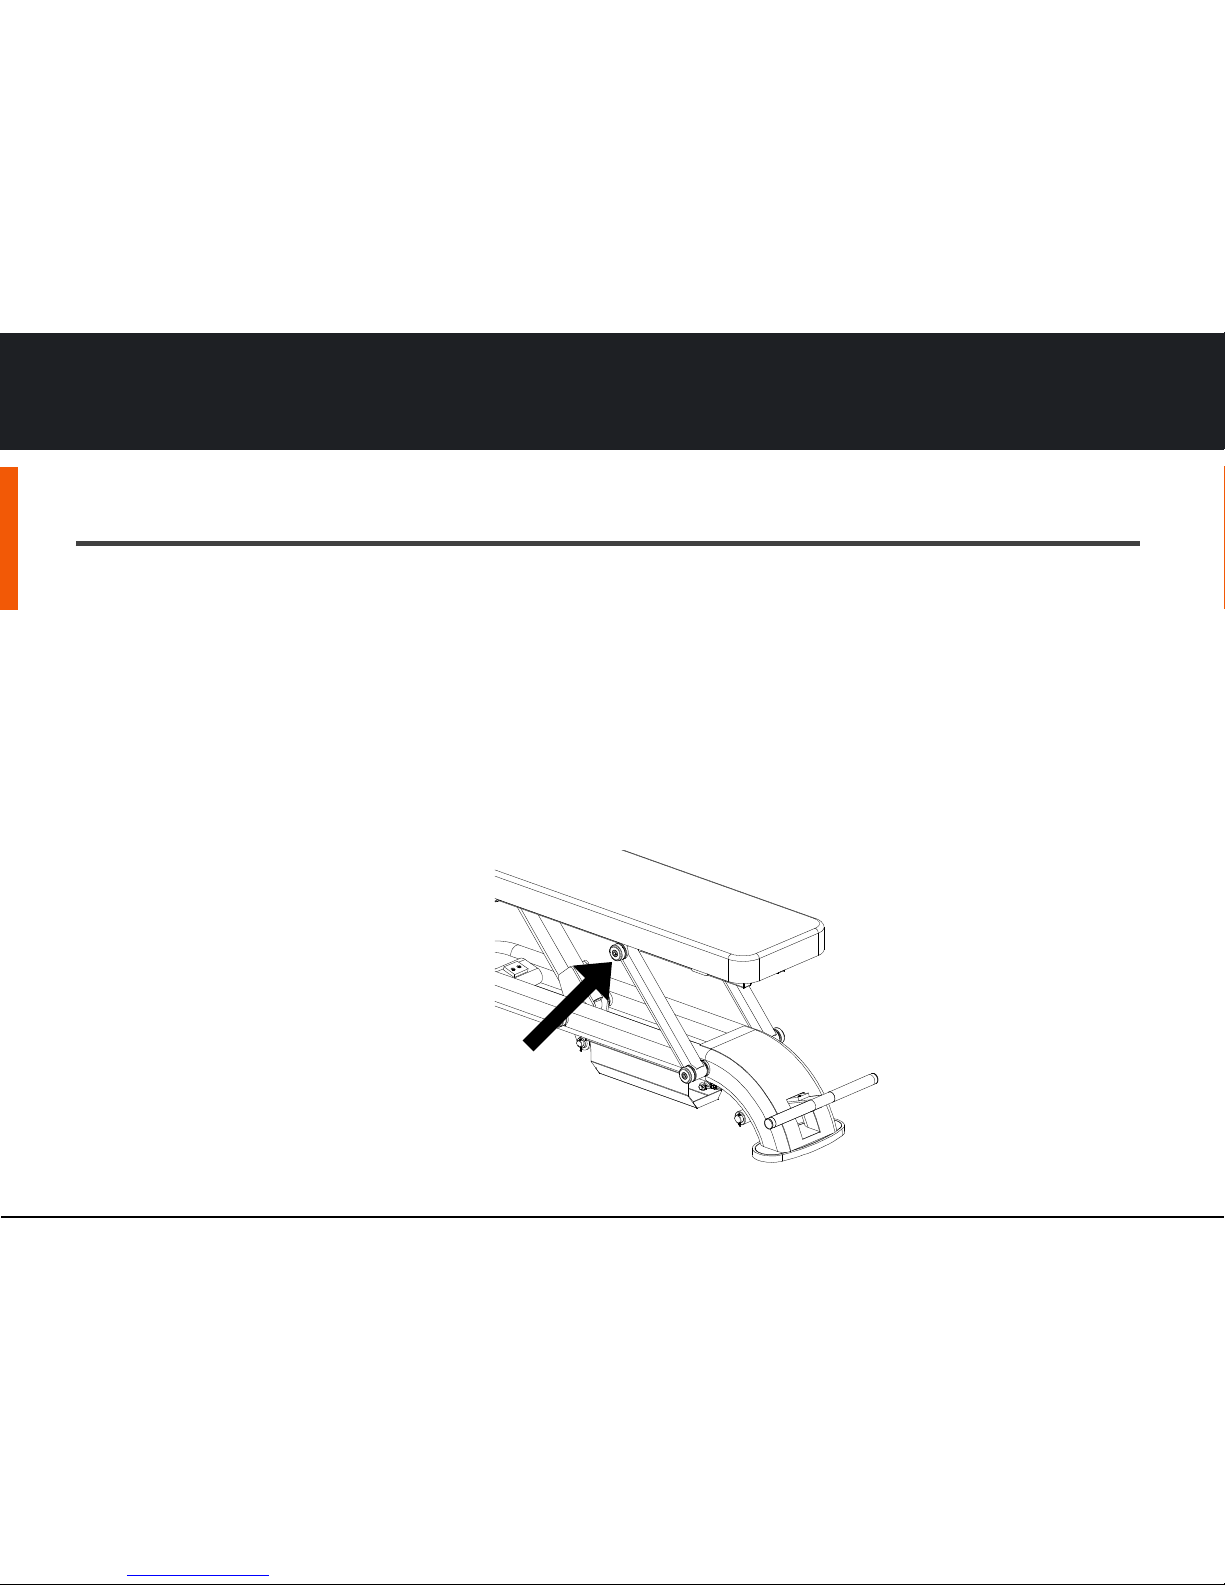
Inspect and Lubricate Bushings and Pivot Points
Maxx Bench uses high quality bearings designed for strength applications and long service life. Each year, do the following to maintain the
bushings on the equipment:
Bronze bushings:
•
Maxx Bench recommend using a small amount of silicone spray lubricant to lubricate the bushings. Spray directly onto the pivot point
and run through its complete range of motion several times. Inspect bushings for excessive wear and damage. Be careful when using
the spray lubricant; it can stain carpet and clothing. Wipe off any excess lubricant with a cloth.
page 22
extended descriptions and definitions
Bronze Bushings
6.2 maintenance
Page 23
MAXXBENCH
ASSEMBLY
INSTRUCTIONS
MAINTANENCE
WARRANTY
SAFETY
MAXX BENCH | WILKES-BARRE PA | WWW.MAXXBENCH.COM
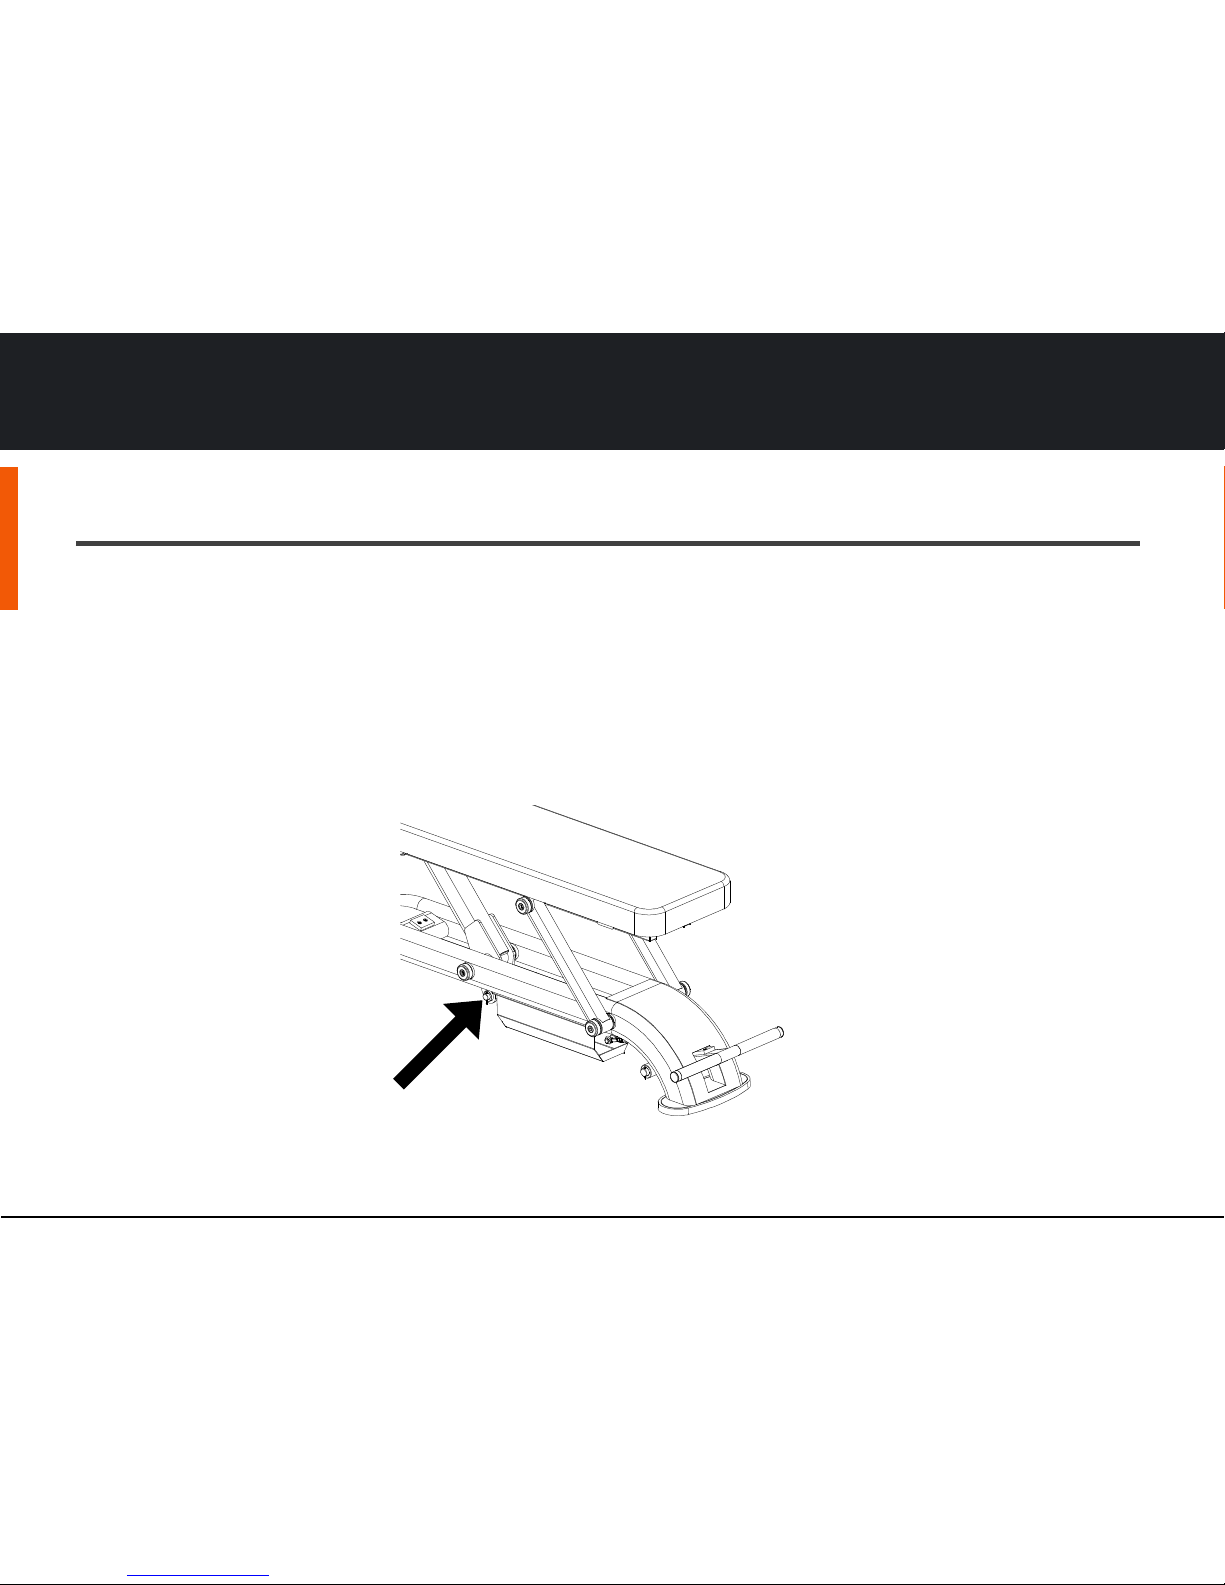
Inspect and Lubricate Bushings and Pivot Points
Cylinder Pivot Point
•
Maxx Bench designed the pivot point of the cylinder rod and main strut for maximum strength. Lubricate the pivot point by applying a light
coat of silicone spray lubricant directly to the pivot point. With a cloth, wipe off excess lubricant.
page 23
extended descriptions and definitions
Cylinder Pivot Point
(1 Location)
6.2 maintenance
Page 24

7.1 limited warranty
MAXXBENCH
ASSEMBLY
INSTRUCTIONS
MAINTANENCE
WARRANTY
SAFETY
MAXX BENCH | WILKES-BARRE PA | WWW.MAXXBENCH.COM
Maxx Bench guarantees to the original owner that each weight bench is well made of good material and workmanship.! Maxx Bench agrees that if,
within the time period specified below, after the date of purchase, any part so guaranteed should fail because of defective material or workmanship
in its manufacture, Maxx Bench will replace or repair the part free of charge.! The Buyer shall return the allegedly defective part to the company’s
factory with shipping paid by the Buyer. !Replacement parts will be sent to the buyer with return shipping and replacement part fees covered by
Maxx Bench. !Technical support will be provided!for installation through a Maxx Bench approved service technician.
Upon delivery, inspect your order for any damage they may have occurred during shipment. !Damage claims from shipping must be reported to
Maxx Bench within 15 days of delivery."
!"
This warranty does not cover misuse, negligence, or normal wear.! If the equipment has been repaired or tampered with outside of a Maxx Bench
repair center, this warranty is void.! Sole discretion of this warranty is determined by the manufacturer..
Should you have any questions or concerns, please contact us directly.
Te le p ho n e: 1. 8 88 . 23 2 .1 9 14
Email: [email protected]
Warranty Period and Converage
Item No.
Description
Warranty
Periord
1
Structural (Not Including Coating)
10 years
2
Parts and Wear Items
5 Years
3
Cylinder
3 years
4
Upholstery
90 days
page 24
Page 25

7.2 Warranty Registration
MAXXBENCH
ASSEMBLY
INSTRUCTIONS
MAINTANENCE
WARRANTY
SAFETY
MAXX BENCH | WILKES-BARRE PA | WWW.MAXXBENCH.COM
Thank You and Welcome to Maxx Bench
To allow us to serve you better, please take a few moments
to complete and return your warranty registration online at:
www.maxxbench.com/warranty
If you have questions or need additional information, contact
your local dealer or call Maxx Bench Customer Support at
1.888.202.1914
page 25
Page 26

8.1 SPECIFICATIONS
MAXXBENCH
ASSEMBLY
INSTRUCTIONS
MAINTANENCE
WARRANTY
SAFETY
MAXX BENCH | WILKES-BARRE PA | WWW.MAXXBENCH.COM
•
Overall Dimensions (Olympic Flat Bench with Rack): 65”W x 72”D x 55”H
•
Overall Dimensions (Olympic Flat Bench with Rack): 30”W x 54”D x 19.5”H
•
Back Pad Dimensions: 12” x 48” x 2”
•
Bench Height: Adjustable from 10” to 19.5”
•
Tubing: 11 Gauge Steel
•
Rubber Feet
•
Heavy Duty Plastic Covers on Barbell and Safety Racks
•
Maximum Weight Rating: 500 lbs
•
Maximum User Weight Rating: 300 lbs
page 26
 Loading...