

Page 1
Спасибо, что выбрали утюг Maxwell
MW-3008.indd 1MW-3008.indd 1 14.12.2009 17:35:2614.12.2009 17:35:26
Page 2
2
MW-3008.indd 2MW-3008.indd 2 14.12.2009 17:35:2814.12.2009 17:35:28
Page 3

РУССКИЙ
Техника MAXWELL проходит 7 шагов
контроля качества и безопасности:
• Контроль модели при вводе в ассортимент
• Государственная сертификация модели
• Сертификация производителя
• Контроль процесса сборки
• 100% тестирование готовых изделий
• Предпродажный контроль качества на
складах
• Послепродажный мониторинг качества
ПАРОВОЙ УТЮГ
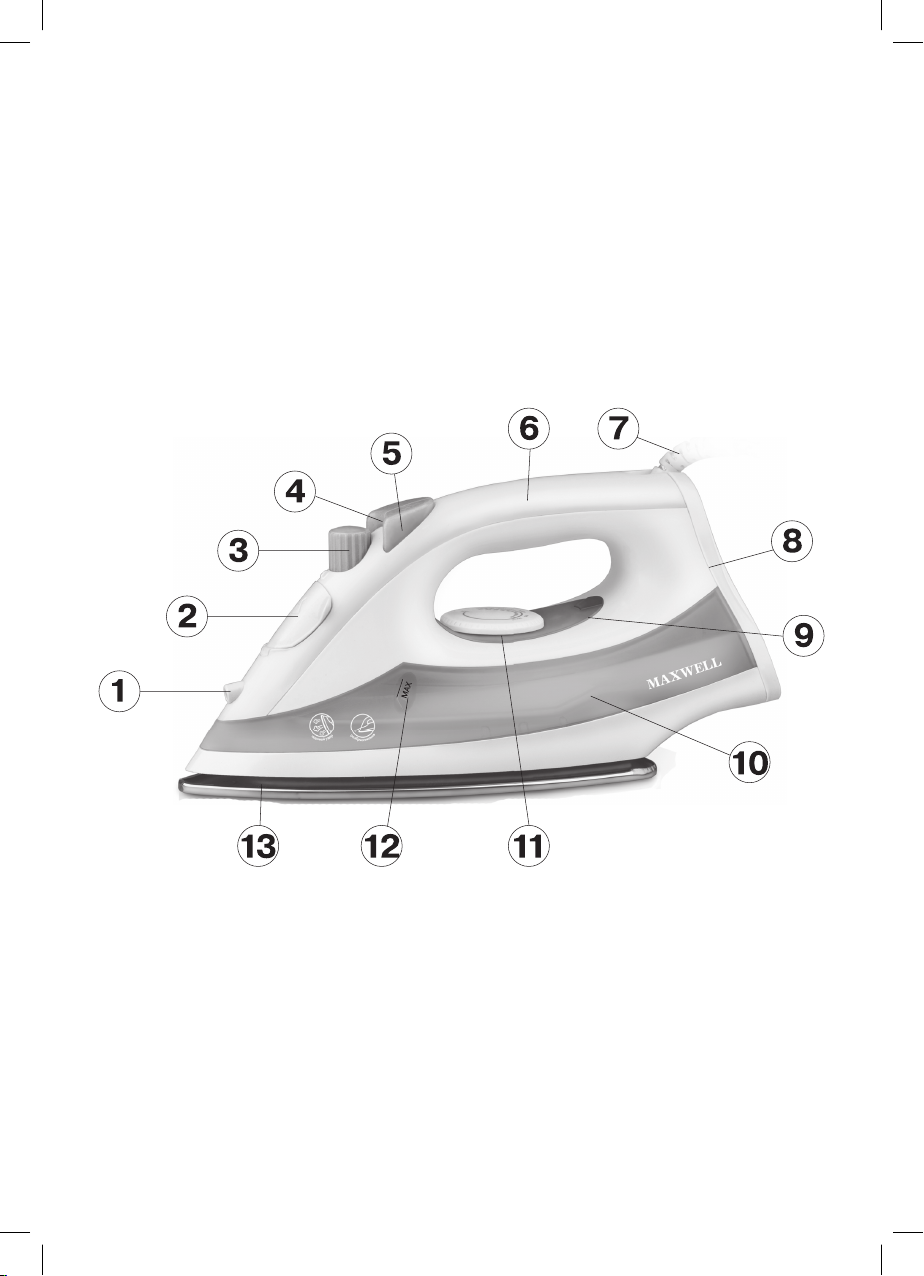
ОПИСАНИЕ
1. Сопло разбрызгивателя воды
2. Крышка заливочного отверстия
3. Регулятор постоянной подачи пара
4. Кнопка разбрызгивателя воды
5. Кнопка дополнительной подачи пара
6. Ручка
7. Защита сетевого шнура
8. Основание утюга
9. Индикатор включения/выключения на-
гревательного элемента
10. Резервуар для воды
11. Регулятор температуры
12. Указатель максимального уровня воды
13. Подошва утюга
МЕРЫ БЕЗОПАСНОСТИ
Перед эксплуатацией внимательно прочитайте инструкцию, а также обратите
внимание на иллюстрации.
• Перед включением убедитесь, что напряжение в сети соответствует рабочему
напряжению утюга.
• Сетевой шнур снабжен «евровилкой»;
включайте ее в розетку, имеющую надежный контакт заземления.
• Чтобы избежать риска возникновения
пожара, не используйте переходники
при подключении прибора к электрической розетке.
• Во избежание перегрузки электрической
сети не включайте одновременно несколько приборов с большой потребляемой мощностью.
• Используйте утюг только в тех целях, которые предусмотрены инструкцией.
• Пользуйтесь утюгом только на гладильной доске.
• Ставьте утюг на ровную устойчивую поверхность.
• При наполнении резервуара водой всегда отключайте утюг от сети.
• При пользовании утюгом крышка заливочного отверстия должна быть плотно
закрыта.
• Будьте особенно внимательны при использовании прибора в непосредственной близости от детей и людей с ограниченными возможностями.
• Не оставляйте включенный утюг без присмотра.
• Всегда отключайте утюг от сети, если не
пользуетесь им.
• Чтобы избежать поражения электрическим током, не погружайте утюг в воду или
в любую другую жидкость.
• Запрещается заливать в резервуар для
воды ароматизирующие жидкости, уксус,
раствор крахмала, реагенты для удаления накипи, химические вещества и т.д.
• Избегайте контакта открытых участков
кожи с горячими поверхностями утюга
или выходящим паром, чтобы избежать
получения ожогов.
• Следите, чтобы сетевой шнур не свешивался с края гладильной доски и не касался горячих поверхностей.
• При отключении утюга от электрической
сети всегда держитесь за сетевую вилку,
никогда не тяните за сетевой шнур.
• Перед тем как убрать утюг, слейте остатки воды и дайте ему полностью остыть.
• Сливайте воду только после отключения
утюга от сети.
• Не используйте утюг с поврежденной сетевой вилкой, сетевым шнуром, а также с
любыми другими неисправностями.
• Во избежание поражения электрическим
током никогда не разбирайте утюг самостоятельно, при обнаружении неисправности обращайтесь в авторизованный
сервисный центр.
ПЕРЕД ПЕРВЫМ ИСПОЛЬЗОВАНИЕМ
• Извлеките утюг из упаковки, при наличии
защиты на подошве (13) удалите ее.
3
MW-3008.indd 3MW-3008.indd 3 14.12.2009 17:35:2814.12.2009 17:35:28
Page 4
РУССКИЙ
• Убедитесь, что напряжение в сети соответствует рабочему напряжению утюга.
Примечание
При первом включении нагревательный
элемент утюга обгорает, поэтому возможно появление небольшого количества дыма или постороннего запаха - это
нормальное явление.
ВЫБОР ВОДЫ
Для наполнения резервуара используйте
водопроводную воду. Если водопроводная вода жесткая, то рекомендуется смешивать ее с дистиллированной водой в
соотношении 1:1, при очень жесткой воде
смешивайте ее с дистиллированной водой
в соотношении 1:2 или используйте только
дистиллированную воду.
Примечание
Запрещается заливать в резервуар для
воды (10) ароматизирующие жидкости,
уксус, раствор крахмала, реагенты для
удаления накипи, химические вещества и т.д.
НАПОЛНЕНИЕ РЕЗЕРВУАРА ДЛЯ ВОДЫ
Прежде чем залить воду в утюг, убедитесь,
что он отключен от сети.
• Установите регулятор постоянной подачи пара (3) в положение - подача пара
выключена.
• Откройте крышку заливочного отверстия
(2).
• Залейте воду, плотно закройте крышку
(2).
Примечание
• Не наливайте воду выше отметки
«MAX».
• Если во время глаженья необходимо
долить воду, то отключите утюг и выньте сетевую вилку из розетки.
• После того как вы закончите гладить, выключите утюг, дождитесь его
полного остывания, затем откройте
крышку заливочного отверстия (2),
переверните утюг и слейте остатки
воды.
ТЕМПЕРАТУРА ГЛАЖЕНЬЯ
Перед началом эксплуатации протестируйте нагретый утюг на кусочке ткани, чтобы
убедиться в том, что подошва утюга (13) и
резервуар для воды (10) чистые.
• Всегда перед глаженьем вещей смотрите на ярлык изделия, где указана рекомендуемая температура глаженья.
• Если ярлык с указаниями по глаженью
отсутствует, но вы знаете тип материала, то для выбора температуры глаженья
воспользуйтесь таблицей.
Обозначения Тип ткани (температура)
•
синтетика, нейлон, акрил, полиэстер
(низкая температура)
••
шелк/шерсть (средняя температура)
•••
хлопок/лен (высокая температура)
• Таблица применима только для гладких
материалов. Если материал другого типа
(гофрированный, рельефный и т.д.), то
лучше всего его гладить при низкой температуре.
• Сначала отсортируйте вещи по температуре глаженья: синтетику - к синтетике,
шерсть - к шерсти, хлопок - к хлопку и
т. д .
• Утюг нагревается быстрее, чем остывает.
Поэтому сначала рекомендуется гладить
вещи, которые требуют низкой температуры (например, синтетические ткани). После чего переходите на глаженье
при более высоких температурах (шелк,
шерсть). Изделия из хлопка и льна гладьте в последнюю очередь.
• Если в состав ткани входят смесовые
волокна, то необходимо установить температуру глаженья самую низкую (например, если изделие состоит на 60%
из полиэстера и на 40% из хлопка, то его
следует гладить при температуре, подходящей для полиэстера «•»).
• Если вы не можете определить состав
ткани, то найдите на изделии место, которое незаметно при носке, и опытным
путём выберите температуру глаженья
(всегда начинайте с самой низкой температуры и постепенно повышайте её, пока
не добьётесь желаемого результата).
4
MW-3008.indd 4MW-3008.indd 4 14.12.2009 17:35:2814.12.2009 17:35:28
Page 5

РУССКИЙ
• Вельветовые и другие ткани, которые
быстро начинают лосниться, следует
гладить строго в одном направлении (в
направлении ворса) с небольшим нажимом.
• Чтобы избежать появления лоснящихся
пятен на синтетических и шелковых тканях, гладьте их с изнаночной стороны.
УСТАНОВКА ТЕМПЕРАТУРЫ ГЛАЖЕНЬЯ
• Поставьте утюг на основание (8).
• Вставьте вилку сетевого шнура в розетку.
• Поворотом регулятора (11) установите
требуемую температуру глаженья: «•»,
«••», «•••» или «МАХ» (в зависимости
от типа ткани), при этом загорится индикатор (9).
• Когда температура подошвы утюга (13)
достигнет установленной температуры,
индикатор (9) погаснет, можно приступать к глаженью.
Примечание: при паровом глаженье необходимо устанавливать температуру
глаженья «••», «•••» или «МАХ».
РАЗБРЫЗГИВАТЕЛЬ ВОДЫ
• Вы можете увлажнить ткань, нажав несколько раз на кнопку разбрызгивателя
(4).
• Убедитесь, что в резервуаре (10) достаточно воды.
СУХОЕ ГЛАЖЕНЬЕ
• Поставьте утюг на основание (8).
• Вставьте вилку сетевого шнура в розетку.
• Поворотом регулятора (11) установите
требуемую температуру глаженья: «•»,
«••», «•••»или «МАХ» (в зависимости
от типа ткани), при этом загорится индикатор (9).
• Когда температура подошвы утюга (13)
достигнет установленной температуры,
индикатор (9) погаснет, можно приступать к глаженью.
• После использования утюга установите
регулятор температуры (11) в положение
«MIN».
• Выньте вилку сетевого шнура из розетки
и дождитесь полного остывания утюга.
ПАРОВОЕ ГЛАЖЕНЬЕ
При паровом глаженье необходимо устанавливать температуру глаженья «•••» или
«МАХ».
• Поставьте утюг на основание (8).
• Вставьте вилку сетевого шнура в розетку.
• Убедитесь, что в резервуаре (10) достаточно воды.
• Поворотом регулятора (11) установите
требуемую температуру глаженья: «•••»
или «МАХ», при этом загорится индикатор (9).
• Когда температура подошвы утюга (13)
достигнет установленной температуры,
индикатор (9) погаснет, можно приступать к глаженью.
• Регулятором постоянной подачи пара (3)
установите необходимую интенсивность
парообразования, пар начнет выходить
из отверстий подошвы утюга (13).
• После использования утюга установите
регулятор температуры (11) в положение
«MIN», а регулятор постоянной подачи
пара (3) - в положение подача пара выключена.
• Выньте вилку сетевого шнура из розетки
и дождитесь полного остывания утюга.
ВНИМАНИЕ!
Если во время работы не происходит постоянной подачи пара, проверьте правильность
положения регулятора температуры (11).
ДОПОЛНИТЕЛЬНАЯ ПОДАЧА ПАРА
Функция дополнительной подачи пара полезна при разглаживании складок и может
быть использована только при высокотемпературном режиме глаженья (регулятор
температуры (11) в положении «•••» или
«МАХ»).
• При нажатии кнопки дополнительной подачи пара (5) пар из подошвы утюга будет выходить более интенсивно.
Примечание: во избежание вытекания
воды из паровых отверстий нажимайте
кнопку дополнительной подачи пара (5)
с интервалом в 4-5 секунд.
5
MW-3008.indd 5MW-3008.indd 5 14.12.2009 17:35:2814.12.2009 17:35:28
Page 6
РУССКИЙ
ОЧИСТКА ПАРОВОЙ КАМЕРЫ
Для увеличения срока службы утюга рекомендуется регулярно выполнять очистку
паровой камеры, особенно в регионах с
«жесткой» водопроводной водой.
• Наполните резервуар (10) водой до отметки «MAX» (12).
• Поставьте утюг на основание (8).
• Вставьте вилку сетевого шнура в розетку.
• Поворотом регулятора (11) установите
максимальную температуру нагрева подошвы утюга «МАХ», при этом загорится
индикатор (9).
• Когда температура подошвы утюга (13)
достигнет установленной температуры,
индикатор (9) погаснет, можно проводить
очистку паровой камеры.
• Выключите утюг, установив регулятор
температуры (11) в положение «MIN».
• Выньте вилку сетевого шнура из розетки.
• Расположите утюг горизонтально над раковиной, установите и удерживайте регулятор (3) в положении – SELF CLEAN.
• Кипящая вода и пар вместе с накипью будут выбрасываться из отверстий подошвы утюга (13).
• Слегка покачивайте утюг вперед-назад,
пока вся вода не выйдет из резервуара
(10).
• Поставьте утюг на основание (8) и дайте
ему полностью остыть.
• Когда подошва утюга (13) полностью остынет, протрите ее кусочком сухой ткани.
• Прежде чем убрать утюг на хранение,
убедитесь, что в резервуаре (10) нет
воды, а подошва утюга (13) сухая.
• Не используйте для чистки подошвы и
корпуса утюга абразивные чистящие
средства.
• Избегайте контакта подошвы утюга с острыми металлическими предметами.
ХРАНЕНИЕ
• Поверните регулятор температуры (11)
против часовой стрелки до положения
«MIN», установите регулятор постоянной
подачи пара (3) в положение - подача
пара выключена.
• Выньте вилку сетевого шнура из розетки.
• Откройте крышку заливочного отверстия
(2), переверните утюг и слейте оставшуюся воду из резервуара для воды (10).
• Закройте крышку (2).
• Поставьте утюг вертикально и дайте ему
полностью остыть.
• Храните утюг в вертикальном положении.
ТЕХНИЧЕСКИЕ ХАРАКТЕРИСТИКИ
Напряжение питания: 220-240 В ~ 50 Гц
Потребляемая мощность: 1450-1750 Вт
Производитель сохраняет за собой
право изменять дизайн и технические
характеристики прибора без предварительного уведомления.
Срок службы прибора - 3 года
Данное изделие соответствует
всем требуемым европейским и
российским стандартам безопасности и гигиены.
УХОД И ЧИСТКА
• Прежде чем чистить утюг, убедитесь, что
он отключен от сети и уже остыл.
• Протирайте корпус утюга слегка влажной
тканью, после этого вытрите его насухо.
• Отложения на подошве утюга могут быть
удалены тканью, смоченной в уксусноводном растворе.
• После удаления отложений отполируйте
поверхность подошвы утюга сухой тканью.
MW-3008.indd 6MW-3008.indd 6 14.12.2009 17:35:2814.12.2009 17:35:28
Изготовитель: компания Tushcom
Trading Limited Republic of Cyprus (Тушком
Трейдинг Лимитед Республика Кипр)
Адрес: Тисеос, 4, Энгоми, а/я 2413,
Никосия, Кипр
6
Page 7

ENGLISH
STEAM IRON
DESCRIPTION
1. Water spray nozzle
2. Water tank lid
3. Steam supply regulator
4. Spray button
5. Additional steam release button
6. Handle
7. Power cord protection
8. Base
9. Heating element on/off indication
10. Water tank
11. Temperature regulator
12. Maximal water level indication
13. Iron sole
SAFETY MEASURES
Before using the unit, please read the instructions carefully and pay attention to the
illustrations.
• Before switching on the unit, make sure that
your home electricity supply corresponds to
the voltage of current specified on the unit.
• Power cord is equipped with a euro plug; insert it into the socket, with secure grounding.
• In order to avoid risk of fire do not use adapters while connecting the appliance to the outlet.
• In order to avoid overloading of the power network do not switch on several appliances with
high power consumption simultaneously.
• Use the unit only for the intended purposes.
• Use the iron only on the ironing board.
• Place the iron on a flat stable surface.
• Provide that the power cord is not hanging
over the edge of the ironing board and make
sure that it does not touch heated surfaces.
• To unplug the unit always take it by the plug,
do not pull by the power cord.
• Before taking the unit away for keeping, pour
out the remaining water and let the unit cool
down.
• Pour out water only after you have unplugged
the unit.
• Do not use the unit if the plug or the power
cord is damaged or if there are other damages
in the unit.
• In order to avoid electric shock do not repair the
unit yourself. If there are some damages in the
unit apply to the authorized service center.
BEFORE USAGE
• Take out the iron from the package and remove the protective cartoon covering from the
iron sole (13).
• Make sure that the electrical supply voltage
corresponds to the iron's operating voltage.
Note:
The iron's heating element is broken in
during the first use; it is normal for a small
amount of smoke to be released.
CHOICE OF WATER
• To fill the water tank use regular tap water. If
the water is hard then it is recommended to
mix it with distilled water at a ratio of 1:1, if the
water is very hard, mix it with distilled water at
a ratio of 1:2 or use only distilled water.
• Always unplug the unit while filling the water
tank with water.
• While operating the unit, provide that the water
tank lid is firmly closed
• Close supervision is necessary when children
or infirm persons are near the unit.
• Never leave the operating unit unattended.
• Always unplug the unit if you do not use it.
• In order to avoid electric shock do not immerse the unit into water or other liquids.
• Do not fill the water tank with scented liquids,
vinegar, starch solution, descaling reagents,
chemical agents etc.
• Avoid contact with hot surfaces or outgoing steam of the iron in order to avoid getting
burns.
MW-3008.indd 7MW-3008.indd 7 14.12.2009 17:35:2814.12.2009 17:35:28
Note:
Do not fill the water tank (10) with scented
liquids, vinegar, starch solutions, descaling
reagents, chemical substances etc.
FILLING THE WATER TANK
Make sure that the iron is disconnected from
electrical power before filling it with water.
• Set the steam release regulator (3) to the position of steam vapor OFF.
• Open the water tank lid (2).
• Fill it with water. Close the lid (2).
Note:
• Do not fill it with water above MAX. indication.
7
7
Page 8
ENGLISH
• If you need to refill the water tank during
ironing, turn off the iron and unplug the
power cord from the outlet.
• After you finish ironing, open the water
tank lid (2) and drain the remaining water.
IRONING TEMPERATURE
Before operating test the heated iron on the old
cloth to be sure that the iron sole (13) and the
water tank (10) are clean.
• Always check the recommended iron temperature indicated on the tag before ironing.
• If the tag does not list the recommended ironing temperature, but you know the type of fabric, then use the following table to determine
the proper temperature.
Signs Fabric type/temperature
Synthetics, nylon, acryl, polyester
•
••
•••
• This table is only for smooth materials. Fabrics
of other types (crimped, raised etc.) are best
ironed at low temperature.
• First sort items by ironing temperature: wool
with wool, cotton with cotton etc.
• The iron heats up faster than is cools down.
For this reason it is recommended to begin
ironing at low temperature (for instance synthetic fabrics). After that, move to higher temperature ironing. Cotton and linens should be
ironed last.
• If an item is made from a mix of fabrics, then
the iron should be set for the fabric with the
lowest ironing (for instance if an item is made
from 60% polyester and 40% cotton, it should
be ironed at the temperature used for ironing
polyester “•”).
• If you cannot define the fabric the item is
made from, find a place on it that is hidden
while wearing and, on practice select the ironing temperature (always start at the lowest
and gradually raise it until you get the desired
result.)
• Corduroy and other fabrics that start glossy
quickly should be ironed strictly in one direction (along the lines) with slight pressure.
• To avoid appearance of glossy spots on the
synthetic and silk fabrics, iron them backside.
(low temperature)
Silk/wool (medium temperature)
Cotton/flax (high temperature)
SETTING THE IRONING TEMPERATURE
• Place the iron on the base (8).
• Insert the power plug into the outlet.
• Set the temperature regulator (11) to the re-
quired ironing temperature: “•”, “••”, “•••”
or “max” (depending on the type of fabric),
the (9) indicator will light up.
• When the sole temperature (13) reaches the
desired temperature value, the (9) indicator
will go out, you can start ironing.
Note: While steam ironing set the temperature «•••» or «МАХ».
WATER SPRAYER
• You can dampen the fabric by pressing the
spray button (4) several times.
• Make sure that there is enough water in the
water tank (10).
IRONING
• Place the iron on the base (8).
• Insert the power plug into the outlet.
• Set the temperature regulator (11) to the required ironing temperature: “•”, “••”, “•••”
or “max” (depending on the type of fabric),
the (9) indicator will light up.
• When the sole temperature (13) reaches the
desired temperature value, the (9) indicator
will go out, you can start ironing.
• After you finish ironing set the (11) regulator to
the “min” position.
• Pull the plug out of the socket and let the iron
cool down completely.
STEAM IRONING
For steam ironing set the temperature regulator
to «•••» or «МАХ».
• Place the iron on the base (8).
• Insert the power plug into the outlet.
• Make sure that there is enough water in the
water tank (10), the (11) indication is not lighting.
• Set the temperature regulator (11) to the required ironing temperature: “•••” or “max”,
the (9) indicator will light up.
• When the sole temperature (13) reaches the
desired temperature value, the (9) indicator
will go out, you can start ironing.
• Turn the steam supply regulator (3) to set the
intensity of steaming, steam will start outgoing from the openings of the sole (13).
8
MW-3008.indd 8MW-3008.indd 8 14.12.2009 17:35:2814.12.2009 17:35:28
Page 9

ENGLISH
• After you finish ironing set the (11) regulator
to the “min” position and the steam supply
regulator (3) to the off steam position.
• Pull the plug out of the socket and let the iron
cool down completely.
ATTENTION!
If during the operation steam is not constantly
supplied, check whether the temperature regulator (11) is set properly.
ADDITIONAL STEAM RELEASE
Additional steam release function is useful when
ironing folds and can only be used at high ironing
temperatures (when the iron temperature regulator (11) is set to “•••” or “max”).
• When the additional steam release button (5)
is pressed, steam will be vigorously released
from the openings in the iron sole.
Note: In order to avoid leakage of water from
steam openings, press the additional steam
supply button (5) with 4-5 sec. interval.
STEAM CHAMBER CLEANING
To prolong lifetime of the iron we recommend
cleaning the steam chamber, especially in the
regions with “hard” water.
• Fill the water tank (10) till the MAX mark (12).
• Put the iron on the base (8).
• Insert the power plug into the outlet.
• Set the temperature regulator (11) to the MAX.
temperature: “max” the (9) indicator will light
up.
• When the sole temperature (13) reaches the
desired temperature value, the (9) indicator
will go out, you can start cleaning of the iron
chamber.
• Unplug the iron, set the temperature regulator
(11) to the «MIN» position.
• Pull the plug out of the socket.
• Hold the iron above the sink, set and hold the
regulator (3) to the position – SELF CLEAN.
• Boiling water together with scale will be throwing out from the openings in the iron sole
(13).
• Slightly sway the iron back and forth, until water goes out of the water tank (10).
• Place the iron on the base (8) and let it cool
down completely.
• When the sole (13) cools down completely,
wipe it with a dry cloth.
• Before you take the iron for storing, make sure
that there is no water in the water tank (10) and
that the iron sole (13) is completely dry.
CARE AND CLEANING
• Before cleaning the iron, make sure that it is
turned off and has cooled completely.
• Wipe the iron's outer surface with a damp
cloth and then wipe dry.
• Sediment on the iron sole can be removed
with a cloth soaked in vinegar-water solution.
• After removing sediment, polish the sole with a
dry cloth.
• Do not use abrasive substances to clean the
sole and body of the iron.
• Avoid touching the iron sole with sharp metal
objects.
STORAGE
• Turn the temperature regulator (11) anticlockwise till MIN position, set the steam release
regulator (3) to the position - steam release
OFF position.
• Remove the power plug from the outlet.
• Open the water tank lid (2), turn over the iron and
drain any remaining water from the water tank (10).
• Close the lid (2).
• Set the iron vertically and allow it to cool completely.
• Store the iron vertically.
TECHNICAL CHARACTERISTICS
Power requirements: 220-240 V ~ 50 Hz
Power consumption: 1450-1750 W
Specifications subject to change without prior
notice.
MINIMUM SERVICE LIFE - 3 YEARS
GUARANTEE
Details regarding guarantee conditions can be
obtained from the dealer from whom the appliance was purchased. The bill of sale or receipt
must be produced when making any claim under
the terms of this guarantee.
This product conforms to the EMCRequirements as laid down by the
Council Directive 89/336/EEC and to
the Law Voltage Regulation (73/23
EEC)
9
MW-3008.indd 9MW-3008.indd 9 14.12.2009 17:35:2814.12.2009 17:35:28
Page 10

DEUTSCH
BÜGELEISEN
BESCHREIBUNG
1. Sprühdüse
2. Deckel der Wassereinfüllöffnung
3. Regler der konstanten Dampfzufuhr
4. Sprühtaste
5. Taste der zusätzlichen Dampfzufuhr
6. Handgriff
7. Netzkabelschutz
8. Bügeleisenfußplatte
9. Indikator der Ein/Ausschaltung des
Heizkörpers
10. Wasserbehälter
11. Temperaturregler
12. Wasserstandgrenzlinie
13. Gleitsohle
SICHERHEITSMAßNAHMEN
Vor der Inbetriebnahme des Geräts lesen
Sie aufmerksam diese Betriebsanleitung
durch, achten Sie auf die Abbildungen.
Vor der ersten Inbetriebnahme vergewissern
Sie sich, dass die Spannung des Geräts mit der
Netzspannung übereinstimmt.
• Das Netzkabel ist mit einem „Eurostecker“
ausgestattet; schalten Sie diesen in die
Steckdose mit sicherer Erdung.
• Verwenden Sie keine Verlängerungen beim
Anschließen des Geräts an das Stromnetz, um
Brandrisiko zu vermeiden.
• Es ist nicht gestattet, mehrere Geräte
mit hoher Verbrauchsleistung gleichzeitig einzuschalten, um die Überlastung des
Stromnetzes zu vermeiden.
• Nutzen Sie das Gerät nut gemäß der
Bedienungsanleitung.
• Bügeln Sie nur auf dem Bügelbrett.
• Stellen Sie das Bügeleisen auf eine gerade
stabile Oberfl äche auf.
• Beim Auffüllen des Wasserbehälters schalten
Sie das Bügeleisen vom Stromnetz immer
ab.
• Der Deckel der Einfüllöffnung soll beim
Bügeln dicht geschlossen sein.
• Besondere Vorsichtsmaßnahmen sind in den
Fällen angesagt, wenn sich Kinder oder behinderte Personen während der Nutzung des
Geräts in der Nähe aufhalten. Lassen Sie das
eingeschaltet Gerät nie unbeaufsichtigt.
• Schalten Sie das Gerät nach dem Gebrauch
vom Stromnetz immer ab.
• Tauchen Sie das Gerät nie ins Wasser oder
andere Flüssigkeiten, um Stromschlagrisiko
zu vermeiden.
• Es ist nicht gestattet, Aromafl üssigkeiten,
Essig, Stärkelösung, Reagenzien für die
Entfernung von Kalkstein, chemische
Lösungen usw. ins Wasserbehälter einzugießen.
• Vermeiden Sie die Berührung der Haut mit
heißen Oberfl ächen des Bügeleisens oder
austretendem Dampfes, um Verbrennungen
zu vermeiden.
• Achten Sie darauf, dass das Gerät vom
Bügeleisenbrett nicht frei hängt oder heiße
Oberfl äche nicht berührt.
• Es ist nicht gestattet, das Gerät beim
Abschalten vom Stromnetz am Netzkabel zu
ziehen, halten und ziehen Sie ihn am Stecker.
• Vor der Reinigung schalten Sie das Gerät vom
Stromnetz ab, gießen
Sie das Wasser ab und lassen Sie es abküh-
len.
• Gießen Sie das Wasser nur nach dem
Abschalten des Bügeleisens vom Stromnetz
ab.
• Es ist nicht gestattet, das Gerät zu nutzen,
wenn das Netzkabel oder der Netzstecker
beschädigt oder bei anderen Störungen.
• Es ist nicht gestattet, das Gerät selbständig zu
reparieren, um Stromschläge zu vermeiden.
Bei der Feststellung von Beschädigungen
wenden Sie sich an den autorisierten
Kundenservicedienst.
VOR DER ERSTNUTZUNG DES GERÄTS
• Vor der ersten Nutzung nehmen Sie das
Bügeleisen aus der Verpackung heraus und
entfernen Sie das Schutzmaterial von der
Gleitsohle (13).
• Vergewissern Sie sich, ob die Spannung des
Geräts mit der Netzspannung übereinstimmt.
Anmerkung:
Bei der ersten Einschalten des Bügeleisens
verbrennen das Heizelement, es kann zur
Entstehung des Rauches oder eines fremden
Geruchs führen – es ist normal.
WASSERAUSWAHL
Zum Auffüllen des Wasserbehälters des
Bügeleisens nutzen Sie Leitungswasser. Wenn
das Leitungswasser hart ist, wird empfohlen,
10
10
MW-3008.indd 10MW-3008.indd 10 14.12.2009 17:35:2814.12.2009 17:35:28
Page 11

DEUTSCH
es mit destilliertem Wasser im Verhältnis 1:1 zu
mischen, bei der Nutzung des Wassers mit sehr
hoher Härte wird empfohlen, es mit destilliertem
Wasser im Verhältnis 1:2 oder nur destilliertes
Wasser zu nutzen.
Anmerkung:
Es ist nicht gestattet, Aromafl üssigkeiten, Essig,
Stärkelösung, Reagenzien für die Entfernung
von Kalkstein, chemische Lösungen usw. ins
Wasserbehälter (10) einzugießen.
AUFFÜLLEN DES WASSERBEHÄLTERS
Vor dem Auffüllen des Bügeleisens mit Wasser,
vergewissern Sie sich, dass es vom Stromnetz
abgeschaltet ist.
• Stellen Sie den Regler der konstanten
Dampfzufuhr (3) in Position „Dampf ausgeschaltet“.
Öffnen Sie den Deckel der
Wassereinfüllöffnung (2).
• Gießen Sie Wasser ein, schließen Sie den
Deckel (2) zu.
Anmerkung:
Es ist nicht gestattet, das Gerät mit Wasser über
die Grenzlinie MAX zu füllen.
• Wenn sie während des Bügelns Wasser nachgießen sollen, schalten Sie das Bügeleisen
aus und ziehen Sie den Netzstecker aus der
Steckdose.
• Nach dem Bügeln schalten Sie das Gerät
aus, lassen Sie es abkühlen, danach öffnen
Sie den Deckel der Einfüllöffnung (2), drehen Sie das Bügeleisen um und gießen Sie
Restwasser aus.
TEMPERATUR BEIM BÜGELN
Vor der Inbetriebnahme prüfen Sie das aufgeheizte Bügeleisen auf einem Tuch, ob die
Gleitsohle (13) und der Wasserbehälter (10)
sauber sind.
• Vor dem Bügeln sollen Sie die Überschriften
auf dem Etikett der Kleidung beachten, wo
die empfohlene Temperatur angegeben ist.
• Wenn das Etikett mit den Hinweisen fehlt,
aber Sie kennen den Stofftyp, so entnehmen
Sie die Temperaturangaben der folgenden
Tabelle:
11
Bezeichnungen des Stofftyps (Temperatur)
•
••
•••
• Die Tabelle ist nur für glatte Stoffe geeignet.
Wenn Sie das Material eines anderen Typs
verwenden (gaufriert, geriffelt usw.), dann
soll es bei der niedrigen Temperatur gebügelt
werden.
• Zuerst sollen Sie die Sachen nach
der Bügeltemperatur aussortieren:
Synthesefaser zu Synthesefaser, Wolle zu
Wolle, Baumwolle zu Baumwolle usw.
• Das Bügeleisen wird schneller aufgeheizt als
abgekühlt. Aus diesem Grund wird empfohlen, die Sachen bei der niedrigen Temperatur
zu bügeln (z.B. synthetische Stoffe). Danach
können Sie auch zum Bügel bei höheren
Temperaturen übergehen (Seide, Wolle).
Erzeugnisse aus Baumwolle und Leinen sollen zuletzt gebügelt werden.
• Wenn das Kleidungsstück aus Mischfasern
ist, soll die Temperatur auf die niedrigste Stufe eingestellt werden (z.B. wenn das
Kleidungsstück zu 60% aus Polyester und zu
40% aus Baumwolle Besteht, so soll es bei
der Temperatur gebügelt werden, die für das
Bügeln von Polyester geeignet ist "•“)
• Wenn Sie den Stofftyp nicht bestimmen können, woraus das Kleidungsstück hergestellt
ist, fi nden Sie darauf ein unbemerkbare Stelle
beim Tragen, und wählen Sie durch das Prüfen
die Temperatur des Bügelns aus (fangen Sie
immer von der niedrigsten Temperatur an
und erhöhen Sie diese, bis das gewünschte
Ergebnis nicht erreicht wird).
• Kordstoffe und andere Stoffe, die sehr schnell
beginnen zu glänzen, sollen unter leichtem
Druck streng in einer Richtung gebügelt werden (in Richtung des Strichs).
• Um die Entstehung von Glanzfl ecken auf den
synthetischen und seidenen Stoffen zu vermeiden, bügeln Sie diese von der Innenseite.
EINSTELLEN DER BÜGELTEMPERATUR
• Stellen Sie das Bügeleisen auf die
Bügeleisenfußplatte (8) auf.
• Stecken Sie den Stecker des Netzkabels in
die Steckdose.
Synthesefaser, Nylon, Acryl,
Polyester (niedrige Temperatur)
Seide/Wolle (mittlere Temperatur)
Baumwolle/Leinen (hohe
Temperatur)
MW-3008.indd 11MW-3008.indd 11 14.12.2009 17:35:2814.12.2009 17:35:28
Page 12

DEUTSCH
• Stellen Sie mit dem Regler (11) die gewünsch-
te Bügeltemperatur ein: „•“, „••“, „•••“
oder "MAX" (abhängig vom Stofftyp), dabei
wird der Indikator (9).
• Wenn die Temperatur der Gleitsohle (13) auf
die gewünschte Temperatur steigt und der
Indikator (9) erlöscht, können Sie zum Bügeln
übergehen.
Anmerkung: Beim Bügeln mit Dampf soll die
Temperatur in die Position „•••“oder „MAX“
eingestellt werden.
WASSERSPRÜHER
• Sie können den Stoff anfeuchten, indem Sie
den Sprühknopf (4) einige Male drücken.
• Vergewissern Sie sich, dass es genug Wasser
im Wasserbehälter (10) vorhanden ist.
TROCKENES BÜGELN
• Stellen Sie das Bügeleisen auf die
Bügeleisenfußplatte (8) auf.
• Stecken Sie den Stecker des Netzkabels in
die Steckdose.
• Stellen Sie mit dem Regler (11) die gewünschte Bügeltemperatur ein: „•“, „••“, „•••“
oder "MAX" (abhängig vom Stofftyp), dabei
wird der Indikator (5) aufl euchten.
• Wenn die Temperatur der Gleitsohle (13) auf
die gewünschte Temperatur steigt und der
Indikator (9) erlöscht, können Sie zum Bügeln
übergehen.
Schalten Sie das Bügeleisen aus, indem Sie
den Temperaturregler (11) in die Position
„MIN“ stellen.
• Schalten Sie das Gerät vom Stromnetz ab
und warten Sie ab, bis diese abgekühlt wird.
BÜGELN MIT DAMPF
Beim Bügeln mit Dampf soll die Temperatur in
die Position „•••“oder „MAX“ eingestellt wer-
den.
• Stellen Sie das Bügeleisen auf die
Bügeleisenfußplatte (8) auf.
• Stecken Sie den Stecker des Netzkabels in
die Steckdose.
• Vergewissern Sie sich, dass es genug Wasser
im Wasserbehälter (10) vorhanden ist.
• Stellen Sie mit dem Regler (11) die gewünschte Bügeltemperatur ein: „•••“ oder "MAX",
dabei wird der Indikator (9) aufl euchten.
• Wenn die Temperatur der Gleitsohle (13) auf
12
die gewünschte Temperatur steigt und der
Indikator (9) erlöscht, können Sie zum Bügeln
übergehen.
• Stellen Sie den Regler der konstanten
Dampfzufuhr (3) die gewünschte Intensität
der Dampfbildung ein, dabei fängt der Dampf
an, aus den Öffnungen der Gleitsohle (13)
des Bügeleisens auszutreten.
Schalten Sie das Bügeleisen aus, indem Sie
den Temperaturregler (11) in die Position
„MIN“ und den Regler der konstanten
Dampfzufuhr (3) in die linke Endposition stellen.
• Schalten Sie das Gerät vom Stromnetz ab
und warten Sie ab, bis diese abgekühlt wird.
ACHTUNG!
Wenn konstante Dampfzufuhr während des
Betriebs des Geräts nicht passiert, prüfen
Sie die Richtigkeit der Positionierung des
Temperaturreglers (11).
ZUSÄTZLICHE DAMPFZUFUHR
Die Funktion der zusätzlichen Dampfzufuhr ist
fürs Glätten der Falten nützlich und kann nur
beim Hochtemperaturbetrieb des Bügelns verwendet werden Temperaturregler (11) in der
Position "•••“ oder „MAX“.
• Bei Drücken der Taste der zusätzlichen
Dampfzufuhr (5) wird der Dampf intensiver
aus der Gleitsohle austreten.
Anmerkung: Um das Auslaufen des Wassers aus
den Dampföffnungen zu vermeiden, drücken
Sie den die Taste der zusätzlichen Dampfzufuhr
mit dem Intervall von 45 Sekunden.
REINIGUNG DER DAMPFKAMMER
Für die Erhöhung der Nutzungsfrist des
Geräts wird empfohlen, die Reinigung der
Dampfkammer regelmäßig durchzuführen, besonders in den Regionen mit hartem
Leitungswasser.
• Füllen Sie den Wasserbehälter (10) mit
Wasser bis zum maximalen Füllstand MAX
(12) auf.
• Stellen Sie das Bügeleisen auf die
Bügeleisenfußplatte (8) auf.
• Stecken Sie den Stecker des Netzkabels in
die Steckdose.
• Stellen Sie durch den Regler (11) die maximale Temperatur (13) der Aufheizung der
MW-3008.indd 12MW-3008.indd 12 14.12.2009 17:35:2814.12.2009 17:35:28
Page 13

DEUTSCH
Gleitsohle in die Position “MAX”, es wird dabei der Indikator (9) aufl euchten.
• Wenn die Temperatur der Gleitsohle (13)
auf die gewünschte Temperatur steigt und
der Indikator (9) erlöscht, können Sie zur
Reinigung der Dampfkammer übergehen.
Schalten Sie das Bügeleisen aus, indem Sie
den Temperaturregler (11) in die Position
„MIN“ stellen.
• Ziehen Sie den Netzstecker aus der
Steckdose.
• Stellen Sie das Bügeleisen in horizontaler
Position über dem Waschbecken auf und
halten Sie den Selbstreinigungsknopf SELF
CLEAN (3) an.
• Kochendes Wasser und der Dampf werden
zusammen mit dem Kalk aus den Öffnungen
der Gleitsohle (13) austreten.
• Schaukeln Sie das Bügeleisen hin und
zurück, bis das ganze Wasser aus dem
Wasserbehälter (10) entfernt wird.
• Stellen Sie das Bügeleisen auf die Fußplatte
(9) und lassen Sie es vollständig abkühlen.
• Wenn die Gleitsohle des Geräts (13) vollständig abgekühlt wird, wischen Sie diese mit
einem Tuch ab.
• Bevor Sie das Bügeleisen zur Aufbewahrung
wegpacken, vergewissern Sie sich, dass
im Wasserbehälter (10) kein Wasser übrig geblieben ist und die Gleitsohle (13) des
Bügeleisens vollständig trocken ist.
REINIGUNG UND PFLEGE
• Vor der Reinigung des Bügeleisens vergewissern Sie sich, dass es vom Stromnetz abgeschaltet und abgekühlt ist.
• Wischen Sie das Gehäuse des Bügeleisens
mit einem feuchten Tuch, danach trocknen
Sie es.
• Ablagerungen an der Gleitsohle des
Bügeleisens können Sie mit einem Stoff abwischen, der mit Essiglösung angefeuchtet
ist.
• Nach der Entfernung des Kalkablagerungen
polieren Sie die Gleitsohle des Bügeleisens
mit einem trockenen Tuch.
• Es ist nicht gestattet, Abrasivmittel für die
Reinigung der Gleitsohle und des Gehäuses
des Bügeleisens zu nutzen.
• Vermeiden Sie den Kontakt der Gleitsohle
mit scharfen Metallgegenständen.
AUFBEWAHRUNG
• Drehen Sie den Temperaturregler (11) gegen
Uhrzeigesinn in die Position „MIN“, stellen
Sie den Regler der Dampfzufuhr (3) in Position „Dampf ausgeschaltet“.
• Ziehen Sie den Netzstecker aus der
Steckdose.
• Öffnen Sie den Deckel der
Wassereinfüllöffnung (2) und gießen Sie das
Restwasser aus dem Wasserbehälter (10).
• Schließen Sie den Deckel (2) zu.
• Stellen Sie das Bügeleisen senkrecht auf und
lassen Sie es vollständig abkühlen.
• Bewahren Sie das Bügeleisen in der senkrechten Lage auf.
TECHNISCHE EIGENSCHAFTEN
Stromversorgung: 220-240 V ~ 50 Hz
Leistung: 1450-1750 W
Der Hersteller behält sich das Recht vor die
Charakteristiken des Gerätes ohne Vorbescheid
zu ändern.
Die Lebensdauer des Gerätes beträgt nicht
weniger, als 3 Jahre
Gewährleistung
Ausführliche Bedingungen der Gewährleistung
kann man beim Dealer, der diese Geräte
verkauft hat, bekommen. Bei beliebiger
Anspruchserhebung soll man während der
Laufzeit der vorliegenden Gewährleistung den
Check oder die Quittung über den Ankauf vorzulegen.
Das vorliegende Produkt entspricht den Forderungen
der elektromagnetischen
Verträglichkeit, die in 89/336/EWG
-Richtlinie des Rates und den
Vorschriften 73/23/EWG über die
Niederspannungsgeräte vorgesehen sind.
13
MW-3008.indd 13MW-3008.indd 13 14.12.2009 17:35:2914.12.2009 17:35:29
Page 14

ҚАЗАҚ
ҮТІК
СИПАТТАМАСЫ
1. Су шашыратқыштың соплосы
2. Су құятын саңылау қақпағы
3. Үнемі бу шығару реттегіші
4. Су шашыратқышының түймешігі
5. Қосымша бу шығару түймешігі
6. Тұтқасы
7. Желі шнурын қорғау
8. Үтіктің негізі
9. Қыздырушы элементті қосу/сөндіру
айқандағышы
10. Резервуар
11. Температура реттегіші
12. Судың ең көп деңгейінің көрсеткіші
13. Үтіктің табаны
ҚАУІПСІЗДІК ШАРАЛАРЫ
Пайдаланар алдында нұсқаулықты
мұқият оқып шығыңыз, сондай-ақ
көрнекіліктерге незер аударыңыз.
• Қосар алдындажелідегі кернеу үтіктің
жұмыс кернеуіне сəйкес келетіндігін
тексеріңіз.
• Желі шнуры «евроашамен»
жабдықталған; оны мықтап жерге
қосылған розеткаға қосыңыз.
• Құрылғыны электр розеткасына қосу
кезінде өрттің пайда болу қаупін
болдырмау үшін қоспа өткізушіге
қоспаңыз.
• Электр желісінің шамадан тыс
болмауы үшін бір уақытта үлкен қуатты
пайдаланатын бірнеше құрылғыны
қоспаңыз.
• Үтікті нұсқаулықта қарастырылған
мақсаттарда ғана пайдаланыңыз.
• Үтікті үтіктеуіш тақтаның үстінде ғана
пайдаланыңыз.
• Үтікті тегіс тұрақты жерге қойыңыз.
• Резервуарды сумен толтыру кезінде
үтікті желіден ажыратыңыз.
• Үтікті пайдаланған кезде су құю
саңылауының қақпағы тығыз жабылуы
керек.
• Құрылғыны тікелей балаларға немесе
мүмкіншілігі шектеулігі адамдарға жақын
жерде пайдаланған кезде аса мұқият
болыңыз.
• Қосулы үтікті қараусыз қалдырмаңыз.
• Егер үтікті пайдаланбасаңыз үнемі
желіден ажыратып отырыңыз.
• Электр тогының соғуын болдырмас
үшін оны суға немесе кез келген басқа
сұйықтыққа батырмаңыз.
• Су құюға арналған резервуарға хош
иістендіргіш сұйықтарын, сірке суын,
крахмал ерітіндісін, қақтарды жоюға
арналған реагенттерді, химиялық
заттарды жəне т.б., құюға тыйым
салынады.
• Күйіп қалмас үшін, терінің ашық жерінің
үтіктің ыстық беттеріне немесе шығатын
буға тиюден сақтаныңыз.
• Желі шнуры үтіктеуіш тақтаның шетінен
салбырап тұрмауын қадағалаңыз,
сондай-ақ ыстық беттерге тиюден
сақтаңыз.
• Үтікті электр желісінен ажыратқан кезде
үнемі желі ашасынан ұстаңыз, ешқашан
желі шнурынан тартпаңыз.
• Үтікті алып тастамас бұрын, қалған суды
ағызып тастаңыз да, оны толығымен
суытыңыз.
• Үтікті желіден ажыратқаннан кейін ғана
суды ағызып тастаңыз.
• Бүлінген желі ашасы, желі шнуры бар,
сонымен бірге кез келген ақаулары бар
үтікті пайдаланбаңыз.
• Электр тогының соқпауы үшін үтікті
өз бетіңізше ашпаңыз, ақау тапқан
жағдайда рұқсаты бар сервис
орталығына жолығыңыз.
АЛҒАШҚЫ ПАЙДАЛАНАР АЛДЫНДА
• Үтікті қораптан шығарып алыңыз, оның
табанында қорғаныш қабаты (13) болса
оны алып тастаңыз.
• Желідегі кернеу үтіктің жұмыс кернеуіне
сəйкес келетінін тексеріңіз.
Ескертпе
Алғашқы рет қосқан кезде үтіктің
қыздырушы элементі күйеді, сондықтан
аз мөлшерде түтін немесе бөтен иістің
пайда болуы мүмкін – бұл қалыпты жағдай.
14
14
MW-3008.indd 14MW-3008.indd 14 14.12.2009 17:35:2914.12.2009 17:35:29
Page 15

ҚАЗАҚ
Суды таңдау
Резервуарды толтыру үшін құбырдағы суды
пайдаланыңыз. Егер құбырдағы су тығыз
болса, онда оны 1:1 ара қатынасында
тазартылған сумен араластырған жөн,
су өте тығыз болған жағдайда оны 1:2
ара қатынасында тазартылған сумен
араластыру керек немесе тек тазартылған
суды пайдаланыңыз.
Ескертпе
Су құюға арналған резервуарға (10) хош
иістендіргіш сұйықтарын, сірке суын,
крахмал ерітіндісін, қақтарды жоюға
арналған реагенттерді, химиялық
заттарды жəне т.б., құюға тыйым
салынады.
СУҒА АРНАЛҒАН РЕЗЕРВУАРДЫ
ТОЛТЫРУ
Суды үтікке құймас бұрын оның желіден
ажыратулы тұрғандығын тексеріңіэ.
• Үнемі бу шығару реттегішін (3) сол
орнатыңыз – бу шығару ажыратулы.
• Құятын саңылаудың қақпағын ашыңыз (2).
• Суды оны құюға арналған ыдысты,
қақпақты мықтап жабыңыз(2).
Ескертпе:
• Суды MAX белгісінен асырып
құймаңыз.
• Егер үтіктеу кезінде үстіне су құю
керек болса, онда үтікті сөндіріп
желі ашасын розеткадан суырып
тастаңыз.
• Сіз үтіктеп болғаннан кейін үтікті
сөндіріп оның толық сууын күтіңіз,
бұдан кейін су құю саңылауының
қақпағын (2) ашыңыз, үтікті аударып
қалған суды төгіп тастаңыз.
ҮТІКТЕУ ТЕМПЕРАТУРАСЫ
Пайдалану алдында қызып тұрған үтікті
матаның қиығына тексеріп көріңіз, бұл
үтіктің түбі (13) мен су резервуары (10)
таза екенін тексреу үшін қажет.
• Киімдерді үтіктер алдында үнемі үтіктеу
температурасы көрсетілген затбелгіні
қараңыз.
• Егер үтіктеу нұқсаулығы көрсетілген
затбелгі жоқ болса, бірақ сіз материал
түрін білетін болсаңыз, онда үтіктеу
температурасын таңдау үшін кестеін
қараңыз.
Беліглер Матаның түрі (температура)
синтетика, нейлон, акрил, полиэстер
•
•• жібек/жүн(орташа температура)
••• Мақта/зығыр(жоғарғы температура)
• Кесте тек тегіс материалдарда ғана
қолдануға жарамды. Егер материал түрі
басқа болатын болса (кеңірдектенген,
рельефті т.с.с.) онда оны төменгі
температурада үтіктеген жөн.
• Алдымен заттарды үтіктеу
температурасы бойынша сұырптаңыз:
синтетиканы – синтетикаға, жүнді жүнге, мақтаны – мақтаға жəне т.б.
• Үтіктің сууынан қызуы тез. Сондықтан
заттарды төменгі температурада
үтіктеген жөн (мысалы, синтетикалық
маталар). Бұдан кейін аса жоғары
температураларда үтіктеуге көшіңіз
(жібек, жүн). Мақта мен зығырдан
жасалған заттарды соңғы кезекте
үтіктеңіз.
• Егер матаның құрамына аралас
талшықтар кірген болса, онда ең төменгі
үтіктеу температурасын орнату керек
(мысалы, бұйымның 60% полиэстерден
жəне 40% мақтадан тұрса, онда оны
полиэстерге қолайлы температурада
үтіктеу керек «•»).
• Егер сіз матаның құрамын анықтай
алмасаңыз, онда киімнің кигаен кезде
білінбейтін жерін туаып алып тəжірибелі
түрде үтіктеу температурасын таңдаңыз
(əрқашан ең төменгі температурадан
бастап, қалаған нəтижеге қол
жеткізбейінше оны біртіндеп көбейтіңіз.).
• Ши барқыт жəне басқа тез жылтырайтын
маталарды тек бір бағатта ғана сəл
басыңқырап (түктің ығының бағыты
бойынша) үтіктеу қажет.
• Синтетикалық жəне жібек маталарда
15
(төменгі температура)
MW-3008.indd 15MW-3008.indd 15 14.12.2009 17:35:2914.12.2009 17:35:29
Page 16

ҚАЗАҚ
жылтырау дақтарын пайда болдырмас
үшін оларды ішкі жағынан үтіктеңіз.
ҮТІКТЕУ ТЕМПЕРАТУРСЫН ОРНАТУ
• Үтікті оның негізіне (8) қойыңыз.
• Желі шнурының ашасын розеткаға
сұғыңыз.
• Реттегішті (11) бұрап қажетті үтіктеу
температурасын орнатыңыз: «•», «••»,
«•••» немесе «МАХ» (матаның түріне
байланысты) осы кезде көрсеткіш (9)
жанады.
• Үтік табанының температурасы (13)
білгленген температураға жеткен кезде,
көрсеткіш (9) сөнеді, үтіктеуге кірісуге
болады.
Ескертпе: Бумен үтіктеу кезінде
үтіктеу температурасын орнату
керек «•••» немесе «МАХ».
СУ ШАШЫРАТҚЫШ
• Сіз шашыратқыш түймешігін (4) бірнеше
рет басып матаны ылғалдандыра
аласыз.
• Резервуардағы (10) судың жеткіліктігін
тексеріңіз.
ҚҰРҒАҚ ҮТІКТЕУ
• Үтікті оның негізіне қойыңыз (8).
• Желі шнурының ашасын розеткаға
сұғыңыз.
• Реттегішті (11) бұрап, қажетті үтіктеу
температурасын орнатыңыз: «•», «••»,
«•••» немесе «МАХ» (матаның түріне
байланысты) осы кезде көрсеткіш (9)
жанады.
• Үтік табанының температурасы (13)
білгленген температураға жеткен кезде,
көрсеткіш (9) сөнеді, үтіктеуге кірісуге
болады.
• Үтікті пайдаланып болғаннан кейін
температура реттегішін (11) «MIN» күйіне
қойыңыз.
• Желі шнурының ашасын розеткадан
суырып тастаңыз да, үтіктің əбден сууын
күтіңіз.
БУМЕН ҮТІКТЕУ
Бумен үтіктеген кезде «•••» немесе «МАХ»
үтіткеу температурасын орнату қажет.
• Үтікті оның негізіне қойыңыз (8).
• Желі шнурының ашасын розеткаға
сұғыңыз.
• Резервуарда (101) судың жеткілікті
екендігін тексеріңіз.
• Реттегішті (11) бұрап, қажетті үтіктеу
температурасын орнатыңыз: «•••»
немесе «МАХ» осы кезде көрсеткіш (9)
жанады.
• Үтік табанының температурасы (13)
білгленген температураға жеткен кезде,
көрсеткіш (9) сөнеді, үтіктеуге кірісуге
болады.
• Үнемі бу шығару реттегіші (3)
арқылы будың пайда болуының
қажетті қарқынын орнатыңыз, бу үтік
табанындағы саңылаулардан (13)
шығады.
• Үтікті пайдаланып болғаннан кейін
температура реттегішін (11) «MIN» күйіне
қойыңыз, ал үнемі бу шығару реттегішін
(3) сол жақ шеткі күйге орнатыңыз.
• Желі шнурының ашасын розеткадан
суырып тастаңыз да, үтіктің əбден сууын
күтіңіз.
НАЗАР АУДАРЫҢЫЗ!
Егер жұмыс үстінде бу үнемі шығып
тұрмаса температура реттегіші (11) күйінің
дұрыстығын тексеріңіз.
ҚОСЫМША БУ ШЫҒАРУ
Қосымша бу шығару функциясы
жиырылған жерлерді тегістеу
үшін пайдалы жəне ол тек жоғары
температуралы үтіктеу күйінде ғана
пайдаланыла алады (температура
реттегіші (11) «•••» немесе «МАХ» күйінде).
• Қосымша бу шығару түймешігін (5)
басқан кезде үтік табанының астынан бу
аса қарқынды болып шығады.
Ескертпе: бу шығатын саңылаулардан
судың ағуын болдырмас үшін қосымша
бу шығару түймешігін (5) 4-5 секунд
аралығымен басыңыз.
16
MW-3008.indd 16MW-3008.indd 16 14.12.2009 17:35:2914.12.2009 17:35:29
Page 17

ҚАЗАҚ
БУ КАМЕРАСЫН ТАЗАРТУ
Үтіктің қызмет ету мерзімін ұзарту үшін
бу камерасын тазартуды жүйелі түрде
орындап отыруға кеңес береді, əсіресе
«тығыз» құбыр суы бар аймақтарда.
• Резервуарды (10) MAX белгісіне дейін
(12) сумен толтырыңыз.
• Үтікті оның негізіне қойыңыз (8).
• Желі шнурының ашасын розеткаға
сұғыңыз.
• Реттегішті (11) бұрап, «МАХ» ең ыстық
үтіктеу температурасын орнатыңыз, осы
кезде көрсеткіш (9) жанады.
• Үтік табанының температурасы (13)
белгленген температураға жеткен кезде,
көрсеткіш (9) сөнеді, бу камерасын
тазартуға кірісуге болады.
• Температура реттегішін (11) «MIN»
күйіне қойып үтікті сөндіріңіз
• Желі шнурын розеткадан суырыңыз.
• Үтікті раковинаның үстіне көлденең қойыңыз,
реттегішті (3) сол жақ шеткі күйге – SELF
CLEAN орнатып ұстап тұрыңыз.
• Қайнап жатқан су мен бу қақпен бірге
үтіктің табанындағы саңылаудан сыртқа
шығарылады (13).
• Резервуардағы (10) барлық су
шықпайынша үтікті сəл алдыға-артқа
шайқаңыз.
• Үтікті оның негізіне (8) қойыңыз да, оның
əбден суытыңыз.
• Үтік табаны (13) əбден суыған кезде, оны
құрғақ матамен сүртіа жіберіңіз.
• Үтікті сақтауға алып қоймас бұрын,
резервуарда (10) судың жоқтығын, ал
үтік табаны (13) құрғақ болуын тексеріңіз.
КҮТІМ ЖƏНЕ ТАЗАРТУ
• Үтікті тазарту алдында, ол желіден
ажыратылып, суығанын тексеріңіз.
• Үтіктің корпусын сəл дымқыл матамен
сүртіңіз, осыдан кейін оның құрғатып
сүртіңіз.
• Үтік табанындағы қалдықтар сірке суы
қосылған су ерітіндісіне малынған
матамен алынып тасталады.
• Қалдықтарды алып тастағаннан кейін
табанның бетін құрғақ матамен ысқылап
жіберіңіз.
• Үтіктің табаны мен корпусын тазарту
үшін қажайтын тазартқыш заттарды
пайдаланбаңыз.
• Үтік табанының өткір метал заттарына
тиюінен сақтаңыз.
САҚТАУ
• Температура реттегішін (11) сағат тіліне
кері қарай «MIN» күйіне дейін бұраңыз,
үнемі бу шығару реттегішің (3) сол жақ
шеткі күйге орнатыңыз – бу шығару
сөндірілді.
• Желі шнурының ашасын розеткадан
суырыңыз.
• Құятын саңылау қақпағын ашыңыз
(2), үтікті аударып, суға арналған
резервуардан (10) қалған суды ағызып
тастаңыз.
• Қақпақты жабыңыз(2).
• Үтікті тігінен қойып, əбден суытыңыз.
• Үтікті тік күйінде сақтаңыз.
ТЕХНИКАЛЫҚ СИПАТТАРЫ
Қорек алу кернеуі: 220-240 В ~ 50 Гц
Пайдаланатын қуаты: 1450-1750 Вт
Өндіруші алдын ала хабарламастан
аспаптың сипаттамаларын өзгертуге
құқылы.
Аспаптың қызмет мерзімі 3 жылдан
кем емес
Гарантиялық мiндеттiлiгi
Гарантиялық жағдайдағы қаралып жатқан
бөлшектер дилерден тек сатып алынған
адамға ғана берiледi. Осы гарантиялық
мiндеттiлiгiндегi шағымдалған жағдайда
төлеген чек немесе квитанциясын көрсетуi
қажет.
Бұл тауар ЕМС – жағдайларға
сəйкес келедi негiзгi
Мiндеттемелер 89/336/EEC
Дерективаның ережелерiне
енгiзiлген Төменгi Ережелердiң
Реттелуi (73/23 EEC)
17
MW-3008.indd 17MW-3008.indd 17 14.12.2009 17:35:2914.12.2009 17:35:29
Page 18

ROMÂNĂ
FIER DE CĂLCAT CU ABURI
Descriere
1. Duză de pulverizare a apei
2. Capac al orifi ciului pentru umplere
3. Regulator de livrare continuă a aburilor
4. Buton de stropire cu apă
5. Buton de livrare suplimentară de aburi
6. Mâner
7. Cablu electric protejat
8. Baza fi erului de călcat
9. Indicator de conectare/deconectare a elementului încălzitor
10.Rezervor pentru apă
11.Regulator de temperatură
12.Indicator al nivelului maxim de apă
13.Talpa fi erului de călcat
MĂSURI DE SIGURANŢĂ
Înainte de exploatare citiţi cu atenţie instrucţiunea si studiaţi ilustraţiile.
• Înainte de conectare asiguraţi-vă că tensiu-
nea din reţea corespunde cu tensiunea de
lucru a fi erului de călcat.
• Cablul electric este dotat cu fi să de tip
„euro”; conectaţi aparatul la priză cu contact sigur cu pământul.
• Pentru evitarea riscului de apariţie a incen-
diului nu utilizaţi mason de reducţie la conectarea aparatului în priza electrică.
• Pentru a evita supraîncărcarea reţelei elec-
trice nu conectaţi concomitent mai multe
aparate electrice cu o putere mare de consum.
• Utilizaţi fi erul de călcat doar în scopurile
prevăzute de această instrucţiune.
• Folosiţi fi erul de călcat doar pe masa de
călcat.
• Plasaţi fi erul de călcat pe o suprafaţă dreap-
tă si stabilă.
• Întotdeauna deconectaţi fi erul de călcat de
la reţea atunci când umpleţi rezervorul cu
apă.
• În momentul utilizării fi erului de călcat capa-
cul orifi ciului pentru umplere trebuie să fi e
bine închis.
• Fiţi deosebit de precauţi atunci cînd utilizaţi
aparatul în nemijlocită apropiere de copii
sau persoane cu dizabilităţi
• Nu lăsaţi aparatul conectat nesupravegheat.
• Întotdeauna deconectaţi fi erul de călcat de
la reţea atunci cînd nu-l utilizaţi.
• Pentru a evita riscul electrocutării nu scufundaţi fi erul de călcat în apă sau în alte
lichide.
• Nu turnaţi în rezervorul pentru apă lichide
aromatice, oţet, soluţie de amidon, reactive
pentru îndepărtarea depunerilor de calcar,
substanţe chimice, etc.
• Evitaţi contactul pielii cu suprafeţele fi erbinţi
ale fi erului de călcat sau aburii acestuia
pentru a evita riscul de apariţie a arsurilor.
• Urmăriţi ca cablul electric să nu atârne de
pe masa de călcat si să nu contacteze cu
suprafeţe fi erbinţi.
• Deconectând fi erul de călcat de la reţeaua
electrică, nu trageţi de cablu, ci apucaţi de
fi să.
• Înainte de a stoca fi erul de călcat, vărsaţi
apa care a rămas si lăsaţi-l să se răcească
complet.
• Vărsaţi apa din rezervor doar după deconectarea fi erului de călcat de la reţea.
• Nu folosiţi fi erul de călcat dacă observaţi
deteriorări ale fi sei, ale cablului de alimentare sau orice alte defecte.
• Pentru a evita riscul electrocutării, niciodată nu demontaţi fi erul de călcat; Dacă aţi
depistat careva defecte, adresaţi-vă la un
centru autorizat de service.
Înainte de prima utilizare
• Scoateţi fi erul de călcat din ambalaj; dacă
pe talpa fi erului de călcat (13) este pusă
protecţia, înlăturaţi-o.
• Asiguraţi-vă că tensiunea din reţea corespunde cu tensiunea de lucru a fi erului de
călcat.
Remarcă
În timpul primei conectări, elementul încălzitor
al fi erului de călcat se pârleste, de aceea este
posibilă apariţia unei cantităţi mici de fum sau
miros străin – este un fenomen normal.
18
18
MW-3008.indd 18MW-3008.indd 18 14.12.2009 17:35:2914.12.2009 17:35:29
Page 19

ROMÂNĂ
Alegerea apei
Pentru umplerea rezervorului utilizaţi apă din
sistemul de aprovizionare cu apă. Dacă apa
din sistem este dură, se recomandă amestecarea ei cu apă distilată în proporţie de 1:1.
Dacă apa este foarte dură, amestecaţi-o cu
apă distilată în proporţie de 1:2 sau utilizaţi
doar apă distilată.
Remarcă
Nu tunaţi în rezervorul pentru apă (10) lichide
aromatice, oţet, soluţie de amidon, reactive
pentru îndepărtarea depunerilor de calcar,
substanţe chimice, etc.
Umplerea rezervorului pentru apă
Înainte de a turna apă în rezervorul fi erului de
călcat, asiguraţi-vă că el este deconectat de
la reţeaua electrică.
• Setaţi regulatorul de livrare continuă a aburilor (3) în poziţia extremă stângă – livrarea
aburilor este activată.
• Deschideţi capacul orifi ciului pentru apă
(2).
• Turnaţi apă în rezervor (10), închideţi bine
capacul (2).
Remarcă
• Nu turnaţi apă mai sus de marcajul „MAX”.
• Dacă în timpul călcării este nevoie de reumplerea rezervorului cu apă, deconectaţi
fi erul de călcat si scoateţi fi sa din priză.
• După ce aţi fi nisat călcatul, deconectaţi
fi erul de călcat, asteptaţi până acesta se
răceste complet, apoi deschideţi capacul
orifi ciului pentru apă (2), răsturnaţi fi erul de
călcat si vărsaţi apa care a rămas.
Temperatura de călcare
Înainte de începutul exploatării testaţi fi erul de
călcat încălzit pe o bucată de ţesătură, pentru
a vă asigura că talpa fi erului de călcat (13) si
rezervorul pentru apă (10) sunt curate.
• Întotdeauna, înainte de călcare, uitaţi-vă pe
eticheta articolului pe care vreţi să-l călcaţi,
acolo unde se indică temperatura de călcare recomandată.
• Dacă eticheta cu indicaţii pentru călcare
lipseste, însă Dvs. cunoasteţi tipul de ţesătură, atunci pentru alegerea temperaturii de
călcare utilizaţi tabelul următor.
Notarea Tipul ţesăturii (temperatura)
sintetică, nailon, acril, poliester
•
(temperatură joasă)
mătase/lână (temperatură medie)
••
bumbac/in (temperatură înaltă)
•••
• Tabelul poate fi aplicat doar în cazul ţesăturilor netede. Dacă ţesătura este de alt tip
(gofrată, reliefată, etc.), atunci se recomandă călcarea acesteia la temperaturi joase.
• Mai întâi sortaţi lucrurile după temperatura
lor de călcare: separaţi articolele din ţesături sintetice, cele din lână, cele din bumbac, etc.
• Fierul de călcat se încălzeste mai repede
decât se răceste. De aceea, se recomandă călcarea în primul rând a lucrurile care
se calcă la temperaturi joase (de exemplu
cele din ţesături sintetice). Apoi treceţi la
călcarea la temperaturi mai ridicate (mătase, lână). Articolele din bumbac si din in
călcaţi-le în ultimul rând.
• Dacă ţesătura este compusă din diferite tipuri de fi bre, temperatura trebuie setată la
cel mai jos nivel (de exemplu, dacă ţesătura
constă din 60% poliester si 40% bumbac,
atunci ea trebuie călcată la temperatura
pentru poliester „•”).
• Dacă nu puteţi determina tipul ţesăturii, găsiţi o porţiune de articol care nu se vede în
timpul purtării si găsiţi temperatura potrivită prin metoda încercărilor (începeţi, întotdeauna, de la cele mai joase temperaturi si
treptat măriţi-o, până la obţinerea rezultatului dorit).
• Ţesăturile din velvet (catifea) si alte tipuri
de ţesătură care repede încep a luci, trebuie călcate doar într-o singură direcţie (în
direcţia de orientare a fi relor) cu o mică presiune.
• Pentru a evita apariţia petelor lucitoare pe
ţesăturile sintetice si din mătase, călcaţi-le
pe dos.
19
MW-3008.indd 19MW-3008.indd 19 14.12.2009 17:35:2914.12.2009 17:35:29
Page 20

ROMÂNĂ
Setarea temperaturii de călcare
• Plasaţi fi erul de călcat pe bază (8).
• Introduceţi fi sa cablului electric în priză.
• Rotind regulatorul (11) setaţi temperatura
necesară pentru călcare: „•”, „••”, „•••” sau
„МAX” (în dependenţă de tipul ţesăturii) –se
va conecta indicatorul (9).
• Atunci când temperatura tălpii fi erului de
călcat (13) va atinge temperatura setată,
indicatorul (9) se va deconecta si puteţi începe călcatul.
Remarcă:
pentru călcarea cu aburi trebuie setată temperatura de călcare „•••” sau „MAX”.
Pulverizatorul de apă
• Puteţi să umeziţi ţesătura, apăsând de câteva ori pe butonul de pulverizare (4).
• Asiguraţi-vă că în rezervor (10) este o cantitate sufi cientă de apă.
Călcarea uscată
• Plasaţi fi erul de călcat pe bază (8).
• Introduceţi fi sa cablului electric în priză.
• Rotind regulatorul (11) setaţi temperatura
necesară pentru călcare: „•”, „••”, „•••” sau
„МAX” (în dependenţă de tipul ţesăturii)
– se va conecta indicatorul (9).
• Atunci când temperatura tălpii fi erului de
călcat (13) va atinge temperatura setată,
indicatorul (9) se va deconecta si puteţi începe călcatul.
• După utilizarea fi erului de călcat setaţi regulatorul de temperatură (11) în poziţia
„MIN”.
• Extrageţi fi sa cablului electric din priză si
lăsaţi fi erul de călcat să se răcească complet.
necesară pentru călcare: „•••” sau „МAX”,
în consecinţă se va conecta indicatorul (9).
• Atunci când temperatura tălpii fi erului de
călcat (13) va atinge temperatura setată,
indicatorul (9) se va deconecta si puteţi începe călcatul.
• Utilizând regulatorul de livrare continuă a
aburilor (3) setaţi gradul necesar de intensitate a aburului. În rezultat aburii vor începe
să iasă prin orifi ciile din talpa fi erului de călcat (13).
• După utilizarea fi erului de călcat setaţi regulatorul de temperatură (11) în poziţia
„MIN”, iar regulatorul de livrare continuă a
aburilor (3) în poziţia „livrarea aburilor este
dezactivată”.
• Extrageţi fi sa cablului electric din priză si
lăsaţi fi erul de călcat să se răcească complet.
ATENŢIE!
Dacă în timpul lucrului nu are loc livrarea continuă a aburilor, verifi caţi dacă regulatorul de
temperatură (11) este setat în poziţie corectă.
Livrare suplimentară de aburi
Funcţia de livrare suplimentară a aburilor este
utilă la netezirea pliurilor si poate fi utilizată
doar la regim de călcare la temperatură înaltă
(regulator de temperatură (11) în poziţia „•••”
sau „MAX”).
• La apăsarea butonului de livrare suplimentară a aburilor (5) aburii vor iesi mai intensiv
din talpa fi erului de călcat.
Remarcă: pentru a evita scurgerea apei din
orifi ciile pentru aburi apăsaţi butonul de livrare suplimentară a aburilor (5) cu intervalul de
45 secunde.
Călcarea cu aburi
Pentru călcarea cu aburi trebuie setată temperatura de călcare „•••” sau „MAX”.
• Plasaţi fi erul de călcat pe bază (8).
• Introduceţi fi sa cablului electric în priză.
• Asiguraţi-vă că în rezervor (10) este o cantitate sufi cientă de apă.
• Rotind regulatorul (11) setaţi temperatura
MW-3008.indd 20MW-3008.indd 20 14.12.2009 17:35:2914.12.2009 17:35:29
Curăţarea compartimentului de aburi
Pentru a prelungi perioada de funcţionare a
fi erului de călcat se recomandă curăţarea regulată a compartimentului de aburi, mai ales
în regiuni cu apă „dură” în sistemul de aprovizionare cu apă.
• Umpleţi rezervorul (10) cu apă până la marcajul „MAX” (12).
20
Page 21

ROMÂNĂ
• Plasaţi fi erul de călcat pe bază (8).
• Introduceţi fi sa cablului electric în priză.
• Rotind regulatorul (11) setaţi temperatura
maximă de încălzire a tălpii fi erului de călcat „MAX”, în rezultat se va conecta indicatorul (9).
• Atunci când temperatura tălpii fi erului de
călcat (13) va atinge nivelul setat, indicatorul (9) se va deconecta si veţi putea să
curăţaţi compartimentul de aburi.
• Deconectaţi fi erul de călcat, setând regulatorul de temperatură (11) în poziţia „MIN”.
• Extrageţi fi sa cablului electric din priză.
• Ţineţi fi erul de călcat în poziţie orizontală
deasupra lavoarului, apăsaţi si ţineţi apăsat
butonul (14).
• Apa fi erbândă si aburii împreună cu depunerile de calcar vor fi aruncate din orifi ciile
din talpa fi erului de călcat (13).
• Legănaţi usor fi erul de călcat înainte-înapoi,
până va iesi toată apa din rezervor (10).
• Plasaţi fi erul de călcat pe bază (8) si lăsaţi-l
să se răcească complet.
• Atunci când talpa fi erului de călcat (13) se
va răci complet, stergeţi-o cu o bucată de
ţesătură uscată.
• Înainte de a pune fi erul de călcat la păstrare, asiguraţi-vă că în rezervor (10) nu este
apă, iar talpa fi erului de călcat (13) este uscată.
Îngrijirea si curăţarea
• Înainte de a curăţa fi erul de călcat, asiguraţi-vă că el este deconectat si rece.
• Stergeţi carcasa fi erului de călcat atent cu o
bucată de ţesătură umedă, iar apoi stergeţil cu o bucată de ţesătură uscată.
• Depunerile de pe talpa fi erului de călcat pot
fi îndepărate cu ajutorul unei bucăţi de ţesătură înmuiate în soluţie de apă si oţet.
• După înlăturarea depunerilor, lustruiţi suprafaţa tălpii fi erului de călcat cu o bucată
de ţesătură uscată.
• Nu utilizaţi pentru curăţarea tălpii si a carcasei fi erului de călcat substanţe abrazive.
• Evitaţi contactul tălpii fi erului de călcat cu
obiecte metalice ascuţite.
Păstrare
• Rotiţi regulatorul de temperatură (11) împotriva mersului acelor de ceasornic până
în poziţia „MIN”, setaţi regulatorul de livrare
continuă a aburilor (3) în poziţia de livrare a
aburilor dezactivată.
• Extrageţi fi sa cablului electric din priză.
• Deschideţi capacul orifi ciului pentru apă
(2), răsturnaţi fi erul de călcat si vărsaţi din
rezervor (10) apa rămasă.
• Închideţi capacul (2).
• Plasaţi fi erul de călcat în poziţie verticală si
lăsaţi-l să se răcească complet.
• Păstraţi fi erul de călcat în poziţie verticală.
Caracteristici tehnice
Tensiunea de alimentare: 220- 240 V ~ 50 Hz
Putere de consum: 1450 -1750 W
Producătorul îi rezervează dreptul de a schimba caracteristicile aparatelor fără anunţare
prealabilă.
Termenul de exploatare a aparatului – 3
ani.
Garanţie
În legătură cu oferirea garanţiei pentru produsul dat, rugăm să Vă adresaţi la distribuitorul regional sau la compania, unde a fost
procurat produsul dat. Serviciul de garanţie
se realizează cu condiţia prezentării bonului
de plată sau a oricărui alt document fi nanciar,
care confi rmă cumpărarea produsului dat.
Acest produs corespunde cerinţelor EMC, întocmite în conformitate
cu Directiva 89/336/EEC i Directiva
cu privire la electrosecuritate/joasă
tensiune (73/23 EEC).
21
MW-3008.indd 21MW-3008.indd 21 14.12.2009 17:35:2914.12.2009 17:35:29
Page 22

ČESKÝ
ŽEHLIČKA
POPSÁNÍ
1. Dýza rozstřikovače vody
2. Víko nálevového otvoru
3. Regulátor stalého dodávky páry
4. Tláčítko rozstřikovače vody
5. Tlačítko dodatečné dodávky páry
6. Držadlo
7. Ochrana sít´ové šn´ůry
8. Pata žehličky
9. Indikátor zapnutí/vypnutí ohřívacího porvku
10. Nádrž na vodu
11. Regulátor teploty
12. Indikátor úrovně vody
13 . Podrážka žehličky
BEZPEČNOSTNÍ OPATŘENÍ
Před exploatací pozorně přečtěte instrukci, a dejte pozor na ilustrace.
• Před zapnutím zjistěte, že nápětí v síti se
shoduje s pracovním nápětím v síti.
• Sít´ má evropskou vidlici; dejte ji do zásůvky,
která má spolehlivé uzemnění.
• Aby nevznikl požár nepoužívejte přechodové
přístroje když zapojujete přístroj do zásůvky.
• Aby nebylo přetížení elektrické sítě nezapí-
nejte několik elektrických přístrojů s velkou
spotřebou.
• Používejte žehličku jen v účelech, které jsou
v instrukcích.
• Používejte žehličku jen na žehlicím prkně.
• Dávejte žehličku jenom na plochý ustalený
povrch.
• Když nepln´ujete nádrž vodou, odepínejte
přístroj od sítě.
• Když používáte žehličku, víko musí být těsně
zavřeno.
• Nejpozorněji používejte žehličku v přítom-
nosti dětí a lidí s omezenými možnostmi.
• Nenechávejte zapnutou žehličku bez dohle-
du.
• Vždy odepínejte žehličku, když nepoužíváte
ji.
• Abyste unikli porážce elektrickým proudem,
neponořujte žehličku do vody nebo jiné tekutiny.
• Zakazuje se zalévaní do nádrže aromatic-
kých tekutin, octu, roztok škrobu, reagenty
na odstranění usazeniny, chemické latky
atd.
• Unikejte kontáktu pleti s horkými povrchy
žehličky nebo párou, abyste se nepopalili.
• Pozorujte, aby šn´ůra nevisela z rubu žehlicího prkna a nesáhala po horkých površích.
• Když odepínáte žehličku od zásůvky vždy držte vidlici a nikdy netáhejte sít´ovou šn´ůru.
• Když dáváte žehličku pryč, vylijte vodu aby
se úplně zchladl.
• Vylijte vodu před vypnutím žehličky.
• Nepoužívejte žehličku s poškozenou vidlicí,
sít´ovou šn´ůrou a jinými poruchami
• Pro zamezení porážky elektrickým proudem
nikdy nerozebírejte žehličku samostatně a
při nalezení poruch jděte do autorizovaného
servisního střediska.
PŘED PRVNÍM POUŽITÍM
• Vyndejte žehličku z balení, když na podrážce
je chranicí povlak (13) odstran´te ho.
• Zjistěte, že nápětí v síti se shoduje s pracovním nápětím v síti.
Poznámka
Při prvním použití ohřívací prvek žehličky
ohořívá, a to může způsobit objev některého obsahu kouře nebo cizorodného pachu,
je to normální jev
VÝBĚR VODY
Pro zaplnění nádrže používejte vodovodní
vodu. Když je přiliš tvrdá, míchejte ji s distlovánou vodou v poměru 1:1, když je velmi tvrdá
míchejte ji s distilovánou vodou v poměru 1:2
nebo používejte distilovanou vodu.
Poznámka
Zakazuje se zalévaní do nádrže aromatických tekutin, octu, roztok škrobu, reagenty na
odstranění usazeniny, chemické latky atd.
ZÁPLNĚNÍ NÁDRŽE NA VODU
Až zalijete vodu do nádrže, zjistěte že je odepnuta od sítě.
• Nastavte regulátor dodávky páry (3) do stavu dodávka páry je vypnuta.
• Zavřete víko nálevového otvoru (2).
• Zalijte vodu a těsně zavřete víko (2).
22
MW-3008.indd 22MW-3008.indd 22 14.12.2009 17:35:2914.12.2009 17:35:29
Page 23

ČESKÝ
Poznámky:
• Nenalívejte vodu výš než je kota MAX.
• Když během žehlení je třeba dolít vody,
vypněte žehličku a dejte vidlici pryč ze
zásůvky.
• Po ukončení žehlení, vypněte žehličku,
dočkejte až zchladne a po tom otevřete
víko zalevného otvoru (2), otočte žehličku a vylijte vodu.
TEPLOTA ŽEHLENÍ
Před exploatací testujte ohřátou žehličku kousíčkem látky, abyste zjistili, že podrážka (13) a
nádrž (10) čisté.
• Před žehlením latek se vždy musíte podívat
na nálepku na šatech, tam musí být napsana
doporučena teplota žehlení.
• Když nalepka s poznámkami o žehlení chybí
ale znáte druh latky, podívejte se do tabulky.
Označení Druh latky (teplota)
•
••
•••
• Tabulka se používá jen pro hladké latky. Když
je to latka jiného druhu (vlnitá, reliéfová atd.),
nejlepší bude hladit ji při nizké teplotě.
• Zpočátku utřid´te šaty podle teploty žehlení:
sintetické, vlněné, bavlnené atd.
• Žehlička se ohřívá rychleji, než vychladuje. Proto se diporučuje začínat s věcmi
s nizkou teplotou žehlení (např., sintetické latky). Po tom pokračujte s průměrnou
teplotou(hedvabí, vlna). Naposled žehlete
šaty z bavlny a lnu.
• Když v latce jsou kombinovaná vlakna, je třeba nastavit nejnizší teplotu latky (např. když
má 60% polyestéru a 40% bavlny, je třeba ji
žehlit s teplotou vhodnou pro polyestér «•»).
• Když nemůžete určit druh latky, najděte na
šatech místo které není vidět když se do
ně oblekáte, a zkuste vybrat teplotu žehlení
(vždy začínejte nejnizší teplotou a postupně
ji zvětšujte, pokud nenajdete výsledek který
potřebujete).
• Manšestrové a jiné latky, které se brzy dělají
lesklé je třeba žehlit jiným směrem (stranou
vlasků) s malým stisknutím.
Sintetická latka, nylon, akryl,
polyestér (nizká teplota)
hedvabí/vlna (průměrná teplota)
Bavlna/len (vysoká teplota)
• Abyste unikli vzniku lesklých skvrn na sintetických a hedvabných latkách, žehlete je
náruby.
Nastavení teploty žehlení
• Dejte žehličku do paty (8).
• Dejte vidlici sít´ové šn´ůry do zásůvky.
• Otačením regulátoru (11) nastavte potřebnou teplotu žehlení: «•», «••», «•••» nebo
«MAX» (podle druhu latky) a zasvítí indikátor
(9).
• Když teplota podrážky žehličky (13) dosahne nastavené teploty, indikátor (9) zhasne,
můžete začít žehlit.
Poznámka: Při parovém žehlení je třeba
nastavovat teplotu «•••» nebo «MAX».
ROZSTŘIKÁVAČ VODY
• Můžete zvlhčit latku stisknutím rozstřikávače
několikrát (4).
• Zjistěte, že v nádrži (10) je dost vody.
Suché žehlení
• Dejte žehličku do paty (8).
• Dejte vidlici sít´ové šn´ůry do paty.
• Otačením regulátoru (11) nastavte potřebnou teplotu žehlení: «•», «••», «•••» nebo
«MAX» (podle druhu latky) a zasvítí indikátor
(9).
• Když teplota podrážky žehličky (13) dosahne nastavené teploty, indikátor (9) zhasne,
můžete začít žehlit.
• Po použití žehličky nastavte regulátor (11) do
stavu «MIN».
• Vyndejte vidličku sít´ové šn´ůry ze zásůvky a
dočkejte až žehlička ochladne.
PÁROVÉ ŽEHLENÍ
Když žehlíte párou je třeba nastavovat teplotu
žehlení «•••» nebo «MAX».
• Dejte žehličku do paty (8).
• Dejte vidlici sít´ové šn´ůry do zásůvky.
• Zjistěte, že v nádrži je dost vody (10).
• Otačením regulátoru (11) nastavte potřebnou teplotu žehlení: «•••» nebo «MAX» a
musí zasvítit indikátor (9).
• Když teplota podrážky žehličky (13) dosahne nastavené teploty, indikátor zhasne (9) a
bude možné začít žehlit.
23
MW-3008.indd 23MW-3008.indd 23 14.12.2009 17:35:2914.12.2009 17:35:29
Page 24

ČESKÝ
• Regulátorem dodávky páry (3) nastavte
potřebnou intenzivitu tvoření páry, pára bude
vycházet z podrážky žehličky (13).
• Po použití žehličky nastavte regulátor teploty
(11) do stavu «MIN» a regulátor stalé dodávky páry do(3) stavu.
• Dejte sít´ovou vidlici pryč ze zásůvky.
POZOR!
Když není stalá dodávka páry, zkontrolujte jestli
regulátor(11) je nastaven správně.
DODATEČNÁ DODÁVKA PÁRY
Funkce dodatečné dodávky páry je užitečná
na rozžehlení vrás a může být použita jen při
vysoceteplotním režímu žehlení (regulátor teploty (11) ve stavech «•••» nebo «MAX»).
• Při stisknutí tlačítka dodatečné dodávky páry
(5) pára z podrážky žehličky bude vystoupat
intenzivněji.
Poznámka: pro vyloučení výteku vody
z parních otvoru stískejte tlačítko dodatečné dodávky páry (5) s časovým rozsahem
4-5 vteřin.
ČISTĚNÍ PÁRNÍHO PROSTORU
Aby žehlička fungovala co možná déle se
doporučuje pravidelně čistění parního prostoru nejspíš v krajich s tvrdou vodovodní vodou
• Napln´te nádrž (10) vodou do poznámky
MAX (12).
• Dejte žehličku do paty (8).
• Dejte vidlici sít´ové šn´ůry do zásůvky.
• Otačením regulátoru (11) nastavte největší
teplotu ohřívaní podrážky žehličky «MAX»,
musí zasvítit indikátor (9).
• Když teplota ohřívaní podrážky žehličky (13)
dosáhne nastavené teploty, indikátor (9) zhasne a bude možné začít čistit parní prostor.
• Vypněte žehličku a nastavte regulátor teploty (11) do stavu «MIN».
• Dejte vidlici sít´ové šn´ůry pryč ze zásůvky.
• Nastavte žehličku gorizontálně k dřezu,
nastavte a držte regulátor (3) v stavu – SELF
CLEAN.
• Vařicí voda a pára s usazeninou budou vyhozené z otvoru podrážky žehličky (13).
• Trochu potřeste žehličku dopředu a dozadu,
pokud v nádrži nebude voda (10).
• Dejte žehličku do paty (8) aby se úplně
ochladila.
• Když podrážka žehličky (13) úplně schladně,
utřete ji kousíčkem suché látky.
• Až schováte žehličku, zjistěte že v nádrži není
voda (10), a pata žehličky (13) je suchá.
ÚDRŽBA A ČISTĚNÍ
• Před čistěním žehličky zjistěte, že je odepnutá od sítě a ochladila se.
• Utírejte těleso žehličky trochu vlhkou latkou
potom utřete ho dosucha.
• Usazování žehličky mohou být odstraněná
latkou zmočenou v octovodním roztoku.
• Po odstraběbí usazování odleštěte povrch
podrážky suchou latkou.
• Nepoužívejte brousicí čisticí prostředky na
čistění podrážky a tělesa.
• Uníkejte kontáktu tělesa a podrážky s ostrými kovovými předměty.
CHRANĚNÍ
• Otočte regulátor teploty (11) proti směru
hodinové ručičky do stavu «MIN» nastavte
regulátor stalé dodávky páry (3) do nejlevšího stavu – dodávka páry je vypnuta
• Dejte vidlici pryč ze zásůvky.
• Otevřete víko zalevného otvoru (2) otočte
žehličku a vylijte vodu z nádrže na vodu (10).
• Zavřete víko (2).
• Dejte žehličku do vertikálního stavu a počkejte až se ochladí.
• Dejte žehličku do vertikálního stavu
TECHNICKÉ ÚDAJE
Nápětí napájení: 220-240 Vt ~ 50 Hz
Spotřeba: 1450-1750 W
Životnost přístroje - 3 let
Záruka
Podrobné záruční podmínky poskytne prodejce přístroje. Při uplatňování nároků během
záruční lhůty je třeba předložit doklad o zakoupení výrobku.
Tento výrobek odpovídá požadavkům na elektromagnetickou kompatibilitu, stanoveným direktivou
89/336/EEC a předpisem 73/23/
EEC Evropské komise o nízkonapěťových přístrojích.
24
MW-3008.indd 24MW-3008.indd 24 14.12.2009 17:35:2914.12.2009 17:35:29
Page 25

УКРАЇНЬСКИЙ
ПРАСКА
ОПИС
1. Сопло розбризкувача води
2. Кришка заливального отвору
3. Регулятор постійної подачі пари
4. Кнопка розбризкувача води
5. Кнопка додаткового подавання пари
6. Ручка
7. Захист мережного шнура
8. Основа праски
9. Індикатор увімкнення/вимкнення
нагрівального елементу
10. Резервуар для води
11. Регулятор температури
12. Вказівник максимального рівня води
13. Підошва праски
ЗАХОДИ БЕЗПЕКИ
Перед початком експлуатації приладу
уважно прочитайте інструкцію, а також
зверніть увагу на ілюстрації.
• Перш ніж увімкнути праску, переконайтесь,
що напруга в мережі відповідає робочій
напрузі праски.
• Мережний шнур оснащений
«євровилкою»; вмикайте її в розетку,
котра має надійний контакт заземлення.
• Щоб уникнути ризику виникнення пожежі,
не користуйтеся перехідниками під час
під’єднання приладу до електричної
розетки.
• Для запобігання перевантаженню
електричної мережі не вмикайте
одночасно кілька приладів з великою
споживаною потужністю.
• Використовуйте праску виключно з
метою, передбаченою інструкцією.
• Користуйтеся праскою тільки на
прасувальній дошці.
• Ставте праску на рівну стійку поверхню.
• Перед наповненням резервуара водою
неодмінно відмикайте праску від мережі.
• При користуванні праскою кришка
заливального отвору повинна бути щільно
закрита.
• Будьте вкрай пильними, коли
використовуєте прилад у безпосередній
близькості від дітей та людей з
обмеженими можливостями.
• Не залишайте ввімкнену праску без
нагляду.
• Завжди від’єднуйте праску від
електромережі, якщо не користуєтеся
нею.
• Для уникнення ураження електричним
струмом не занурюйте праску у воду чи в
будь-яку іншу рідину.
• Забороняється заливати в резервуар для
води ароматизуючі рідини, оцет, розчин
крохмалю, реагенти для видалення
накипу, хімічні речовини тощо.
• Уникайте контакту оголених ділянок
шкіри з гарячими поверхнями праски або
парою, що з неї виходить, аби не дістати
опіків.
• Стежте, щоб мережний шнур не звисав
із краю прасувальної дошки, а також не
дотикався до гарячих поверхонь.
• Від’єднуючи праску від електричної
мережі, завжди тримайте за мережну
вилку, ніколи не тягніть за мережний
шнур.
• Перш ніж прибрати праску, злийте
залишки води та дайте їй час повністю
охолонути.
• Зливайте воду тільки після від’єднання
праски від мережі.
• Не використовуйте праску з пошкодженою
мережною вилкою, мережним
шнуром, а також з будь-якими іншими
несправностями.
• Щоб уникнути ураження електричним
струмом, ніколи не розбирайте праску
самотужки, у разі виявлення несправності
звертайтеся до авторизованого
сервісного центру.
ПЕРЕД ПЕРШИМ ВИКОРИСТАННЯМ
• Дістаньте праску з упаковки, при наявності
захисту на підошві (13) видаліть її.
• Переконайтеся, що напруга в мережі
відповідає робочій напрузі праски.
Примітка
Коли праску вмикають уперше, її
нагрівальний елемент обгоряє, тому
може з'явитися незначна кількість
диму або сторонній запах – це цілком
нормальне явище.
25
25
MW-3008.indd 25MW-3008.indd 25 14.12.2009 17:35:2914.12.2009 17:35:29
Page 26

УКРАЇНЬСКИЙ
ВИБІР ВОДИ
Для наповнення резервуара використовуйте
водопровідну воду. Якщо водопровідна
вода жорстка, рекомендується змішувати
її з дистильованою водою у співвідношенні
1:1, у разі ж дуже жорсткої води змішуйте її з
дистильованою водою у співвідношенні 1:2
або застосовуйте лише дистильовану воду.
Примітка
Забороняється заливати в резервуар
для води (10) ароматизуючі рідини,
оцет, розчин крохмалю, реагенти для
видалення накипу, хімічні речовини
тощо.
НАПОВНЕННЯ РЕЗЕРВУАРА ДЛЯ ВОДИ
Перш ніж залити воду в праску,
пересвідчіться, що вона відімкнена від
електромережі.
• Установіть регулятор постійного
подавання пари (3) у позицію – подавання
пари не відбуватиметься.
• Відкрийте кришку заливального отвору
(2).
• Залийте воду, щільно закрийте кришку
(2).
Примітки:
• Не наливайте воду вище за позначку
MAX.
• Якщо під час прасування виникає
потреба в доливанні води, обов’язково
вимкніть праску та витягніть мережну
вилку з розетки.
• Після того як ви закінчите прасувати,
вимкніть праску, дочекайтесь її
повного остигання після чого відкрийте
кришку заливального отвору (2),
переверніть праску і злийте залишки
води.
ТЕМПЕРАТУРА ПРАСУВАННЯ
Перед початком експлуатації протестуйте
нагріту праску на клаптику тканини, щоб
переконатися в тому, що підошва праски
(13) та резервуар для води (10) чисті.
• Завжди перед прасуванням речей
дивіться на ярлик виробу, де зазначена
рекомендована температура прасування.
• Якщо ярлик із вказівками щодо
Позначки Тип тканини (температура)
• Цією таблицею можна користуватися
• Спершу відсортуйте речі за температурою
• Праска нагрівається швидше, ніж
• Якщо до складу тканини входять
• Якщо Ви не в змозі визначити
• Вельветові та інші тканини, які швидко
• Щоб уникнути появи лискучих плям
прасування відсутній, проте Вам відомий
тип матеріалу, то для вибору температури
прасування послуговуйтеся таблицею.
•
••
•••
тільки стосовно гладких матеріалів.
Якщо тканина іншого типу (гофрована,
рельєфна тощо), то найкраще прасувати
її за низької температури.
прасування: синтетику – до синтетики,
шерсть - до шерсті, бавовну - до бавовни і
т. д .
вистигає. Тому спочатку рекомендується
прасувати речі за низької температури
(наприклад, синтетичні тканини). Потому
переходьте на прасування за вищих
температур (шовк, вовна). Вироби з
бавовни та льону прасуйте в останню
чергу.
змішувальні волокна, необхідно
встановити найнижчу температуру
прасування (приміром, коли виріб
складається на 60% з поліестеру і на 40%
із бавовни, то його слід прасувати при
температурі, що підходить для поліестеру
«•»).
склад тканини, знайдіть на виробі
місце, котре не помітне при
носінні, і дослідним шляхом оберіть
температуру прасування (завжди
починайте з найнижчої температури
й поступово підвищуйте її, доки не
досягнете бажаного результату).
починають вилискувати, потрібно
прасувати чітко в одному напрямку (у
напрямі ворсу) з незначним натиском.
синтетика, нейлон, акрил,
поліестер (низька температура)
шовк/вовна (середня
температура)
Бавовна/льон (висока
температура)
26
MW-3008.indd 26MW-3008.indd 26 14.12.2009 17:35:2914.12.2009 17:35:29
Page 27

УКРАЇНЬСКИЙ
на синтетичних і шовкових тканинах,
прасуйте їх з виворітного боку.
УСТАНОВЛЕННЯ ТЕМПЕРАТУРИ
ПРАСУВАННЯ
• Поставте праску на основу (8).
• Вставте вилку мережевого шнуру в
розетку.
• Поворотом регулятора (11) встановіть
необхідну температуру прасування: «•»,
«••», «•••» або «МАХ» (залежно від типу
тканини) при цьому загориться індикатор
(9).
• Коли температура підошви праски (13)
досягне встановленої температури,
індикатор (9) погасне, можна приступати
до прасування.
ПРИМІТКА: При паровому прасуванні
необхідно встановлювати температуру
прасування «•••» або «МАХ».
РОЗБРИЗКУВАЧ ВОДИ
• Ви можете зволожити тканину, натиснувши
кілька разів на кнопку розбризкувача (4).
• Переконайтеся, що в резервуарі (10)
достатньо води.
СУХЕ ПРАСУВАННЯ
• Поставте праску на основу (8).
• Вставте вилку мережевого шнуру в
розетку.
• Поворотом регулятора (11) встановіть
необхідну температуру прасування: «•»,
«••», «•••» або «МАХ» (залежно від типу
тканини) при цьому загориться індикатор
(9).
• Коли температура підошви праски (13)
досягне встановленої температури,
індикатор (9) погасне, можна приступати
до прасування.
• Після використання праски встановіть
регулятор температури (11) в положення
«MIN».
• Витягніть вилку мережного шнура з
розетки та дочекайтесь, доки праска
повністю охолоне.
встановлювати температуру прасування
«•••» або «МАХ».
• Поставте праску на основу (8).
• Вставте вилку мережевого шнуру в
розетку.
• Переконайтесь, що в резервуарі (10)
достатньо води.
• Поворотом регулятора (11) встановіть
необхідну температуру прасування:
«•••» або «МАХ» при цьому загориться
індикатор (9).
• Коли температура підошви праски (13)
досягне встановленої температури,
індикатор (9) погасне, можна приступати
до прасування.
• Регулятором постійної подачі пари
(3), установіть необхідну інтенсивність
пароутворення, пара почне виходити з
отворів підошви праски (13).
• Після використання праски встановіть
регулятор температури (11) в положення
«MIN», а регулятор постійної подачі пари
(3) в положення.
• Витягніть вилку мережного шнура з
розетки та дочекайтесь, доки праска
повністю охолоне.
УВАГА!
Якщо під час роботи пара не подається
постійно, перевірте правильність положення
регулятора температури (11).
ДОДАТКОВЕ ПОДАВАННЯ ПАРИ
Функція додаткової подачі пари може стати
корисною під час розпрасовування складок
і може використовуватись лише при
високотемпературному режимі прасування
(регулятор температури (11) у положенні
«•••» або «МАХ»).
• У разі натискання кнопки додаткової
подачі пари (5) пара з підошви праски
виходитиме більш інтенсивно.
ПРИМІТКА: Для уникнення витікання
води з парових отворів натискайте
кнопку додаткового подавання пари (5)
з інтервалом 4-5 секунд.
ПАРОВЕ ПРАСУВАННЯ
При паровому прасуванні необхідно
MW-3008.indd 27MW-3008.indd 27 14.12.2009 17:35:2914.12.2009 17:35:29
ОЧИЩЕННЯ ПАРОВОЇ КАМЕРИ
Для подовження терміну роботи праски
27
Page 28

УКРАЇНЬСКИЙ
рекомендується регулярно здійснювати
очищення парової камери, особливо в
регіонах із «жорсткою» водопровідною
водою.
• Наповніть резервуар (10) водою до
позначки MAX (12).
• Поставте праску на основу (8).
• Вставте вилку мережевого шнуру в
розетку.
• Поворотом регулятора (11) встановіть
максимальну температуру нагрівання
підошви праски «МАХ» при цьому
загориться індикатор (9).
• Коли температура підошви праски (13)
досягне встановленої температури,
індикатор (9) погасне, можна здійснювати
очищення парової камери.
• Вимкніть праску, встановивши регулятор
температури (11) в положення «MIN».
• Витягніть вилку мережного шнура з
розетки.
• Розташуйте праску горизонтально над
раковиною, встановіть і утримуйте
регулятор (3) в положенні – SELF CLEAN.
• Кипляча вода та пара разом із накипом
будуть викидатися з отворів підошви
праски (13).
• Злегка погойдайте праску вперед-назад,
доки вся вода не вийде з резервуара
(10).
• Поставте праску на основу (8) і дозвольте
їй повністю охолонути.
• Коли підошва праски (13) повністю
остигне, протріть її клаптиком сухої
тканини.
• Перш ніж сховати праску для зберігання,
переконайтесь, що в резервуарі (10)
відсутня вода, а підошва праски (13)
суха.
ДОГЛЯД ТА ЧИЩЕННЯ
• Перш ніж чистити праску, переконайтеся,
що вона відімкнена від електромережі та
вже охолонула.
• Протріть корпус праски злегка
зволоженою тканиною, після чого витріть
її досуха.
• Відкладення на підошві праски можуть
бути видалені тканиною, змоченою в
оцтово-водному розчині.
• Після усунення відкладень пополіруйте
поверхню підошви сухою тканиною.
• Не використовуйте для чищення підошви
і корпусу праски абразивні засоби для
чищення.
• Уникайте контакту підошви праски з
гострими металевими предметами.
ЗБЕРІГАННЯ
• Поверніть регулятор температури (11)
проти годинникової стрілки до позначки
«min», установіть регулятор постійного
подавання пари (3) у крайнє ліве
положення – подача пари вимкнена.
• Витягніть вилку мережного шнура з
розетки.
• Відкрийте кришку заливального отвору
(2), переверніть праску і злийте рештки
води з резервуара для води (10).
• Закрийте кришку (2).
• Поставте праску вертикально та дайте їй
час повністю охолонути.
• Зберігайте праску у вертикальному
положенні.
ТЕХНІЧНІ ХАРАКТЕРИСТИКИ
Напруга живлення: 220-240 В ~ 50 Гц
Споживана потужність: 1450-1750 Вт
Виробник залишає за собою право
змінювати характеристики приладу без
попереднього повідомлення.
Термін служби приладу - 3 рок.
Гарантія
Докладні умови гарантії можна отримати
в дилера, що продав дану апаратуру. При
пред’явленні будь-якої претензії протягом
терміну дії даної гарантії варто пред’явити
чек або квитанцію про покупку.
Даний виріб відповідає вимогам
до електромагнітної сумісності,
що пред’являються директивою
89/336/ЄЕС Ради Європи й
розпорядженням 73/23 ЄЕС по
низьковольтних апаратурах.
28
MW-3008.indd 28MW-3008.indd 28 14.12.2009 17:35:2914.12.2009 17:35:29
Page 29

БЕЛАРУСКI
ПРАС
АПІСАННЕ
1. Сапло распырсквальніка вады
2. Крышка залівачнай адтуліны
3. Рэгулятар пастаяннай падачы пары
4. Кнопка распырсквальніка вады
5. Кнопка дадатковай падачы пары
6. Ручка
7. Ахова сеткавага шнура
8. Аснова праса
9. Індыкатар уключэння/выключэння
награвальнага элемента
10. Рэзервуар для вады
11. Рэгулятар тэмпературы
12. Паказальнік максімальнага ўзроўню
вады
13. Падэшва праса
МЕРЫ БЯСПЕКІ
Перад эксплуатацыяй уважліва
прачытайце інструкцыю, а таксама
звярніце ўвагу на малюнкі.
• Перад уключэннем пераканайцеся, што
напружанне сеткі адпавядае рабочаму
напружанню праса.
• Сеткавы шнур забяспечаны "еўравілкай";
уключайце яе ў разетку, якая мае надзейны
кантакт зазямлення.
• Каб пазбегнуць рызыкі ўзнікнення
пажару не карыстайцеся пераходнікамі
пры падключэнні прыстасавання ў
электрычную разетку.
• Каб пазбегнуць перагрузкі электрычнай
сеткі не ўключайце адначасова некалькі
прыбораў з вялікай спажывальнай
магутнасцю.
• Карыстайцеся прасам толькі з мэтай,
прадугледжанай у інструкцыі.
• Карыстайцеся прасам толькі на
прасавальнай дошцы.
• Стаўце прас на роўную ўстойлівую
паверхню.
• Пры запаўненні рэзервуара вадой
заўсёды адключайце прас ад сеткі.
• Пры карыстанні прасам крышка
залівачнай адтуліны павінна быць
шчыльна зачынена.
• Будзьце асабліва ўважлівы пры карыстанні
прыстасаваннем у непасрэднай блізкасці
29
29
да дзяцей і людзей з абмежаванымі
магчымасцямі.
• Не астаўляйце ўключаны прас без
нагляду.
• Заўсёды адключайце прас ад сеткі, калі
не карыстаецеся ім.
• Каб пазбегнуць паражэння электрычным
токам, не апускайце прас у ваду ці ў
любую іншую вадкасць.
• Забараняецца заліваць у рэзервуар
для вады араматызуючыя вадкасці,
воцат, раствор крухмалу, рэагенты для
ачышчэння ад накіпу, хімічныя сродкі і
т. д .
• Пазбягайце кантакту адкрытых участкаў
скуры з гарачымі паверхнямі праса
ці выходячай парай, каб пазбегнуць
атрымання апёкаў.
• Сачыце, каб сеткавы шнур не звешваўся
з краю прасавальнай дошкі, а таксама не
дакранаўся да гарачых паверхняў.
• Пры адключэнні праса ад электрычнай
сеткі заўсёды трымайцеся за сеткавую
вілку, ніколі не цягніце за сеткавы шнур.
• Перад тым як схаваць прас, зліце рэшткі
вады і дайце яму поўнасцю астыць.
• Злівайце ваду толькі пасля адключэння
праса ад сеткі.
• Не карыстайцеся прасам з
пашкоджанай сеткавай вілкай, сеткавым
шнурам, а таксама з любымі іншымі
няспраўнасцямі.
• Каб пазбегнуць паражэння электрычным
токам ніколі не разбірайце прас
самастойна, пры выяўленні няспраўнасці
звяртайцеся ў аўтарызаваны сэрвісны
цэнтр.
ПЕРАД ПЕРШЫМ КАРЫСТАННЕМ
• Дастаньце прас з упакоўкі, калі маецца
ахова на подэшве (13) здыміце яе.
• Пераканайцеся, што напружанне сеткі
адпавядае рабочаму напружанню праса.
Заўвага
Пры першым уключэнні награвальны
элемент праса абгарае, пагэтаму
магчыма з’яўленне невялікай колькасц
дыму ці іншага паху - гэта нармальная
з’ява.
MW-3008.indd 29MW-3008.indd 29 14.12.2009 17:35:2914.12.2009 17:35:29
Page 30

БЕЛАРУСКI
ВЫБАР ВАДЫ
Для запаўнення рэзервуара
выкарыстоўвайце водаправодную ваду.
Калі водаправодная вода жорсткая,
то рэкамендуецца змешваць яе з
дыстыляванай вадой у суадносінах 1:1,
пры вельмі жорсткай вадзе змешвайце яе
з дыстыляванай вадой у суадносінах 1:2
ці выкарыстоўвайце толькі дыстыляваную
ваду.
Заўвага: Забараняецца заліваць у
рэзервуар для вады (10) араматызуючыя
вадкасці, воцат, раствор крухмалу,
рэагенты для ачышчэння ад накіпу,
хімічныя сродкі і т.п.
НАПАЎНЕННЕ РЭЗЕРВУАРА ДЛЯ ВАДЫ
Перад тым як заліць воду ў прас,
пераканайцеся, што ён адключаны ад
сеткі.
• Устанавіце рэгулятар пастаяннай падачы
пары (3) ў становішча - падача пары
выключана.
• Адчыніце крышку залівачнай адтуліны
(2).
• Заліце ваду, шчыльна зачыніце крышку
(2).
Заўвагі:
• Не налівайце ваду вышэй меткі MAX.
• Калі пад час прасавання неабходна
даліць ваду, то адключыце прас і
выцягніце сеткавую вілку з разеткі.
• Пасля того як вы закончыце прасаваць,
выключце прас, дачакайцеся яго
поўнага астывання пасля чаго
адчыніце крышку залівачнай адтуліны
(2), перавярніце прас і зліце рэшткі
вады.
ТЭМПЕРАТУРА ПРАСАВАННЯ
Перад пачаткам эксплуатацыі пратэстуйце
нагрэты прас на кавалку тканіны, каб
пераканацца, што падэшва праса (13) і
рэзервуар для вады (10) чыстыя.
• Заўсёды перад прасаваннем рэчаў
глядзіце на ярлык вырабу, дзе
ўказана рэкамендуемая тэмпература
прасавання.
• Калі ярлык з указаннямі па прасаванню
адсутнічае, але вы ведаеце тып
матэрыялу, то для выбару тэмпературы
прасавання глядзіце табліцу.
Абазначэнні Тып тканіны (тэмпература)
••
•••
• Табліца падыходзіць толькі для гладкіх
матэрыялаў. Калі матэрыял іншага тыпу
(гафрыраваны, рэльефны і г.д.), то лепш
прасаваць яго пры нізкай тэмпературы.
• Спачатку адсартуйце рэчы па
тэмэпературы прасавання: шэрсць - да
шэрсці, бавоўна – да бавоўны і г.д.
• Прас награецца хутчэй, чым астывае.
Пагэтаму спачатку рэкамендуецца
прасаваць рэчы, пры нізкай тэмпературы
(напрыклад, сінтэтычныя тканіны).
Пасля чаго прасуйце пры больш высокіх
тэмпературах (шоўк, шэрсць). Вырабы
з бавоўны і лёну прасуйце ў апошнюю
чаргу.
• Калі выраб зроблены са смесавых
валокан, то неабходна ўстанавіць
самую нізкую тэмпературу прасавання
(напрыклад, калі рэч складаецца на 60%
з поліэстэра і на 40% з бавоўны, то яе
трэба прасаваць пры тэмпературы, якая
падыходзіць для поліэстэра «•»).
• Калі вы не можаце вызначыць матэрыял,
з якой зроблена рэч, знайдзіце на
ёй месца, якое не прыметна пры
носцы, і доследным шляхам выбярыце
тэмпературу прасавання (заўсёды
пачынайце з самай нізкай тэмпературы
і паступова павышайце яе, пакуль не
атрымаеце жадаемага рэзультату.).
• Вельветавыя і іншыя тканіны, якія хутка
пачынаюць ільсніцца, трэба прасаваць
толькі ў адным накірунку (у накірунку
ворсу) з невялікім націсканнем.
• Каб пазбегнуць з'яўлення бліскучых
плям на сінтэтычных і шоўкавых тканінах,
прасуйце іх са сподняга боку.
30
сінтэтыка, нейлон, акрыл, поліэстэр
•
(нізкая тэмпература)
шоўк/шэрсць (сярэдняя
тэмпература)
бавоўна/лён (высокая тэмпература)
MW-3008.indd 30MW-3008.indd 30 14.12.2009 17:35:2914.12.2009 17:35:29
Page 31

БЕЛАРУСКI
УСТАНОЎКА ТЭМПЕРАТУРЫ
ПРАСАВАННЯ
• Пастаўце прас на аснову (8).
• Устаўце вілку сеткавага шнура ў разетку.
• Паварочваючы рэгулятар (11) устанавіце
патрэбную тэмпературу прасавання:
«•», «••», «•••» ці «МАХ» (у залежнасці
ад тыпу тканіны) пры гэтам загарыцца
індыкатар (9).
• Калі тэмпература падэшвы праса (13)
дасягне ўстаноўленай тэмпературы,
індыкатар (9) патухне, можна прыступаць
прасаваць.
Заўвага: Пры паравым прасаванні
неабходна устанаўліваць тэмпературу
прасавання «•••» ці «МАХ».
РАСПЫРСКВАЛЬНІК ВАДЫ
• Вы можаце намачыць тканіну, нажаўшы
некалькі разоў на кнопку распырсквальніка
(4).
• Пераканайцеся, што ў рэзервуары (10)
дастаткова вады.
СУХОЕ ПРАСАВАННЕ
• Пастаўте прас на аснову (8).
• Устаўце вілку сеткавага шнура ў разетку.
• Павярнуўшы рэгулятар (11) устанавіце
неабходную тэмпературу прасавання:
«•», «••», «•••» ці «МАХ» (у залежнасці
ад тыпу тканіны) пры гэтам загарыцца
індыкатар (9).
• Калі тэмпература падэшвы праса (13)
дасягне ўстаноўленай тэмпературы,
індыкатар (9) патухне, можна прыступаць
прасаваць.
• Пасля карыстання прасам устанавіце рэгулятар
тэмпературы (11) ў становішча «MIN».
• Выцягніце вілку сеткавага шнура з разеткі
і дачакайцеся поўнага астывання праса.
ПАРАВОЕ ПРАСАВАННЕ
Пры паравым прасаванні неабходна
ўстанаўліваць тэмпературу прасавання
«•••» ці «МАХ».
• Пастаўце прас на аснову (8).
• Устаўце вілку сеткавага шнура ў разетку.
• Пераканайцеся, што ў рэзервуары (10)
дастаткова вады.
31
• Павярнуўшы рэгулятар (11) устанавіце
неабходную тэмпературу прасавання:
«•••» ці «МАХ» пры гэтам загарыцца
індыкатар (9).
• Калі тэмпература падэшвы праса (13)
дасягне ўстаноўленай тэмпературы,
індыкатар (9) патухне, можна прыступаць
прасаваць.
• Рэгулятарам пастаяннай падачы пары
(3) ўстанавіце неабходную інтэнсіўнасць
параўтварэння, пара пачне выходзіць з
адтулін падэшвы праса (13).
• Пасля карыстання прасам устанавіце
рэгулятар тэмпературы (11) ў становішча
«MIN», а рэгулятар пастаяннай падачы
пары (3) ў становішча off.
• Выцягніце вілку сеткавага шнура з разеткі
і дачакайцеся поўнага астывання праса.
УВАГА!
Калі пад час працы не адбываецца
пастаянная падача пары, праверце
правільнасць становішча рэгулятара
тэмпературы (11).
ДАДАТКОВАЯ ПАДАЧА ПАРЫ
Функцыя дадатковай падачы пары
карысна пры разгладжванні складак
і можа быць выкарыстана толькі пры
высокатэмпературным рэжыме прасавання
(рэгулятар тэмпературы (11) ў палажэнні
«•••» ці «МАХ»).
• Пры націсканні на кнопку дадатковай
падачы пары (5) пара з падэшвы праса
будзе выходзіць больш інтэнсіўна.
Заўвага: Каб пазбегнуць выцякання
вады з паравых адтулін націскайце на
кнопку дадатковай падачы пары (9) з
інтэрвалам ў 4-5 секунд.
АЧЫСТКА ПАРАВОЙ КАМЕРЫ
Для прадаўжэння тэрміну службы праса
рэкамендуецца рэгулярна праводзіць
ачыстку паравой камеры, асабліва ў рэгіёнах
з «жорсткай» водаправодной вадой.
• Запоўніце рэзервуар (10) вадой да меткі
MAX (12).
• Пастаўце прас на аснову (8).
• Устаўце вілку сеткавага шнура ў разетку.
MW-3008.indd 31MW-3008.indd 31 14.12.2009 17:35:2914.12.2009 17:35:29
Page 32

БЕЛАРУСКI
• Павярнуўшы рэгулятар (11) устанавіце
максімальную тэмпературу нагрэву
падэшвы праса «МАХ» пры гэтым
загарыцца індыкатар (9).
• Калі тэмпература падэшвы праса (13)
дасягне ўстаноўленай тэмпературы,
індыкатар (9) патухне, можна праводзіць
ачыстку паравой камеры.
• Выключце прас, устанавіўшы рэгулятар
тэмпературы (11) ў становішча «MIN».
• Выцягніце вілку сеткавага шнура з
разеткі.
• Размясціце прас гарызантальна над
ракавінай, устанавіце і ўтрымліваючы
рэгулятар (3) у становішчы – SELF
CLEAN.
• Кіпячая вада і пара разам з накіпам
будуць выкідвацца з адтулін падэшвы
праса (13).
• Злёгку пакалыхвайце прас уперад-назад,
пакуль уся вада не выйдзе з рэзервуара
(10).
• Пастаўце прас на аснову (8) і дайце яму
поўнасцю астыць.
• Калі падэшва праса (13) поўнасцю
астыне, пратрыце яе кавалачкам сухой
тканіны.
• Перад тым як схаваць прас на захоўванне,
пераканайцеся, што ў рэзервуары (10)
няма вады, а падэшва праса (13) сухая.
ДОГЛЯД І ЧЫСТКА
• Перад тым як чысціць прас,
пераканайцеся, што ён адключаны ад
сеткі і ўжо астыў.
• Працірайце корпус праса злегку
вільготнай тканінай, пасля гэтага
пратрыце яго насуха.
• Асадкі на падэшве праса могуць быць
ачышчаны тканінай, якую патрэбна
намычыць ў воцатна-водным растворы.
• Пасля ачышчэння ад асадку адпаліруйце
паверхню падэшвы сухой тканінай.
• Не выкарыстоўвайце абразіўныя
чысцячыя сродкі для чысткі падэшвы і
корпуса праса.
• Пазбягайце кантакту падэшвы праса з
вострымі металічнымі прадметамі.
ЗАХАВАННЕ
• Павярніце рэгулятар тэмпературы
(11) супраць гадзіннікавай стрелкі да
становішча «MIN», устанавіце рэгулятар
пастаяннай падачы пары (3) ў становішча
- подача пары выключана.
• Выцягніце вілку сеткавага шнура з
разеткі.
• Адчыніце крышку залівачнай адтуліны
(2), перавярніце прас і зліце застаўшуюся
ваду з рэзервуара для вады (10).
• Зачыніце крышку (2).
• Пастаўце прас вертыкальна і дайце яму
поўнасцю астыць.
• Захоўвайце прас у вертыкальным
становішчы.
ТЭХНІЧНЫЯ ХАРАКТАРЫСТЫКІ
Напружанне сілкавання: 220-240 В ~ 50 Гц
Спажываемая магутнасць: 1450-1750 Вт
Вытворца пакідае за сабой права змяняць
характарыстыкі прыбора без папярэдняга
паведамлення.
Тэрмін працы прыбора - 3 гад.
Гарантыя
Падрабязнае апісанне умоў гарантыйнага
абслугоўвання могут быць атрыманы у таго
дылера, ў якога была набыта тэхніка. Пры
звароце за гарантыйным абслугоўваннем
абавязкова павінна быць прад'яўлена
купчая альбо квітанцыя аб аплаце.
Дадзены выраб адпавядае
патрабаванням ЕМС, якiя
выказаны ў дырэктыве ЕС
89/336/ЕЕС, i палажэнням
закона аб прытрымлiваннi
напружання (73/23 EC)
32
MW-3008.indd 32MW-3008.indd 32 14.12.2009 17:35:2914.12.2009 17:35:29
Page 33

ЎЗБЕК
DAZMOL
TA’RIFI
1. Suv purkagichining tuynugi
2. Suv quyish teshigining qopqog’i
3. Bug’ni doimiy berish sozlagichi
4. Suv purkagichining tugmasi
5. Bug’ni qo’shimcha berishning tugmasi
6. Dazmol dastasi
7. Tarmoq simining himoyasi
8. Dazmol asosi
9. Isitish elementini yoqish/o’chirish
indikatori
10. Suv uchun sig’im
11. Haroratning sozlagichi
12. Suvning maksimal darajasining
ko’rsatkichi
13. Dazmol tagligi
EHTIYOT CHORALARI
Foydalanishdan avval yo’riqnomani diqqat
bilan o’qing, shuningdek rasmlarga e’tibor
bering.
• Dazmolni yoqishdan avval tarmoqda
kuchlanish dazmolning ish kuchlanishiga
mos kelishiga ishonch hosil qiling.
• Tarmoq simi "evrovilka" bilan jihozlangan;
uni ishonchli yerga tutashish simi bo’lgan
rozetkaga yoqing.
• Yong’in kelib chiqishi xavfi bo’lmasligi
uchun asbobni elektr rozetkaga ulashda
moslashtirgichlardan foydalanmang.
• Elektr tarmoqqa ortiqcha yuk tushmasligi
uchun bir vaqtning o’zida katta iste’mol
quvvati bo’lgan bir nechta asbobni
yoqmang.
• Dazmoldan faqat yo’riqnomada ko’rsatilgan
maqsadlarda foydalaning.
• Dazmoldan faqat dazmollash taxtasida
foydalaning.
• Dazmolni tekis barqaror yuzaga qo’ying.
• Idishni suv bilan to’ldirishda doimo dazmolni
tarmoqdan o’chiring.
• Dazmoldan foydalanganda suv quyish
tuynugining qopqog’i zich yopilgan bo’lishi
lozim.
• Bolalar va imkoniyati cheklangan kishilarga
yaqin joyda asbobdan foydalanganda
ayniqsa ehtiyot bo’ling.
• Yoqilgan dazmolni qarovsiz qoldirmang.
• Dazmoldan foydalanmaganda doimo uni
tarmoqdan o’chirib qo’ying.
• Elektr toki bilan shikastlanmaslik uchun
dazmolni suvga yoki boshqa istalgan
suyuqlikka botirmang.
• Suv idishiga xushbo’ylashtiradigan
suyuqliklarni, sirka, ohor eritmasini,
quyqani tozalash uchun reagentlar,
kimyoviy moddalar va hokazolarni quyish
taqiqlanadi.
• Kuymaslik uchun terining ochiq joylariga
dazmolning issiq qismlari yoki chiqayotgan
bug’ tegib ketishidan ehtiyot bo’ling.
• Tarmoq simi dazmollash taxtasining
chetidan osilib tushmasligi, shuningdek
issiq yuzalarga tegmasligini kuzatib turing.
• Dazmolni elektr tarmog’idan o’chirganda
doimo tarmoq vlkasidan ushlang, hech
qachon tarmoq simidan tortmang.
• Dazmolni olib qo’yishdan avval suvning
qolganini to’kib tashlang va uning to’liq
sovishini kuting.
• Faqat dazmol tarmoqdan o’chirilganidan
keyingina suvni to’kib tashlang.
• Tarmoq vilkasi, simi shikastlangan,
shuningdek boshqa har qanday nosozliklari
bo’lgan dazmoldan foydalanmang.
• Elektr toki bilan shikastlanmaslik
uchun hech qachon dazmolni mustaqil
qismlarga ajratmang, nosozlik
aniqlanganda rasmiy servis markaziga
murojaat qiling.
BIRINCHI FOYDALANISHDAN AVVAL
• Dazmolni o’ramdan ochib oling va dazmol
tagligida (13) karton himoyasi bo’lganda uni
olib tashlang.
• Tarmoqdagi kuchlanish dazmolning ish
kuchlanishiga mosligiga ishonch hosil
qiling.
Eslatma:Birinchi yoqilganda dazmolning
isitish elementi ozgina kuyadi, shuning uchun
ozgina tutun yoki begona hidi chiqishi mumkin
- bu normal holat.
33
MW-3008.indd 33MW-3008.indd 33 14.12.2009 17:35:2914.12.2009 17:35:29
Page 34

ЎЗБЕК
SUVNI TANLASH
Idishni to’ldirish uchun suv quvuridagi suvdan
foydalaning.
Agar suv quvuridagi suv qattiq - tuzli bo’lsa,
uni 1:1 nisbatda distillangan suv bilan
aralashtirish tavsiya etiladi, o’ta qattiq suv
bo’lganda uni 1:2 nisbatda distillangan suv
bilan aralashtiring yoki faqat distillangan
suvdan foydalaning.
Eslatma
Suv uchun sig’imga (10)
xushbo’ylashtiradigan suyuqliklarni, sirka,
ohor eritmasini, quyqani tozalash uchun
reagentlar, kimyoviy moddalar va hokazolarni
quyish taqiqlanadi.
SUV SIG’IMINI TO’LDIRISH
Dazmolga suv quyishdan avval u tarmoqdan
o’chirilganligiga ishonch hosil qiling.
• Bug’ni doimiy berish sozlagichini (3) eng
chap holatiga o’rnating - bug’ning berilishi
o’chirilgan bo’ladi.
• Suv quyish teshigining qopqog’ini oching
(2).
• Suv quyish uchun, qopqoqni yoping (2).
Eslatmalar:
• Suvni MAX belgisidan ko’proq quymang.
• Agar dazmollash paytida suvni yana quyish
kerak bo’lsa, dazmolni o’chiring va tarmoq
vilkasini rozetkadan oling.
• Dazmollashni tugatganingizdan keyin
dazmolni o’chiring, unin to’liq sovishini
kuting, keyin suv quyish tuynugi qopqog’ini
(2) oching, dazmolni ag’daring va suvning
qolganini to’kib tashlang.
DAZMOLLASH HARORATI
Foydalanishdan avval dazmolning tagligi
(13) va suv uchun sig’im (10) toza ekanligiga
ishonch hosil qilish uchun qizigan dazmolni
mato bo’lagida tekshiring.
• Doimo narsalarni dazmollashdan avval
tavsiya etilgan harorat ko’rsatilgan buyum
yorlig’iga qarang.
• Agar dazmollash yuzasidan ko’rsatmalar
bo’lgan yorliq bo’lmasa, lekin Siz matoning
turini bilsangiz, dazmollash haroratini
tanlash uchun jadvalga qarang.
Belgilanishlar Matoning turi/harorat
Sun’iy toalalar (sintetika), neylon, akril,
•
•• shoyi/jun (o’rtacha harorat)
••• ip-gazlama /zig’ir (yuqori harorat)
• Jadval faqat silliq matolar uchun mos
keladi. Agar mato boshqacha turda bo’lsa
(gofre qilingan, relefl i va hokazo), uni eng
yaxshisi past haroratda dazmollash lozim.
• Avval byuumlarni dazmollash haroratiga
ko’ra saralab oling: jun – junli buyumlar,
ip-gazlama – shunday buyumlar bilan va
hokazo.
• Dazmol sovishiga qaraganda tezroq
isiydi. Shuning uchun avval buyumlarni
past haroratda dazmollash tavsiya etiladi
(masalan, sun’iy matolar). Shundan keyin
yuqoriroq haroratlarda dazmollashga o’ting
(shoyi, jun). Ip-gazlama va zig’ir buyumlarni
oxirgi navbatda dazmollang.
• Agar buyum tarkibiga aralash tolalar kirsa,
eng past dazmollash haroratini belgilash
lozim (masalan, buyum 60% ga poliester
va 40% ga ip-gazlamadan iborat bo’lsa, uni
poliester uchun mos keladigan haroratda
«•» dazmollash lozim).
• Agar Siz buyum matosining tarkibini
aniqlay olmasangiz, undagi kiyilganda
ko’rinmaydigan joyini toping hamda tajriba
yo’li bilan azmollash haroratini tanlang
(doimo eng past haroratdan boshlang va
to kerakli natijaga erishmaguncha uni astasekin oshirib boring).
• Velvet va tez yaltiray boshlaydigan boshqa
matolarni faqat bir yo’nalishda (tuklari
yo’nalishida) ozgina bosib dazmollash
lozim.
• Sun’iy va shoyi matolarda yaltiroq dog’lar
paydo bo’lishining oldini olish uchun ularni
orqa (astar) tomonidan dazmollang.
DAZMOLLASH HARORATINI O’RNATISH
• Dazmolni asosiga qo’ying (8).
• Tarmoq simini rozetkaga kiriting.
poliester(past harorat)
34
MW-3008.indd 34MW-3008.indd 34 14.12.2009 17:35:3014.12.2009 17:35:30
Page 35

ЎЗБЕК
• Sozlagichni (11) burab kerakli dazmollash
haroratini belgilang: «•», «••», «•••» yoki
«max» (matoning turiga qarab), bunda
indikator (9) yonadi.
• Dazmol tagining harorati (13) belgilangan
haroratga yetganda, indikator (9) o’chadi,
dazmollay boshlash mumkin.
Eslatma: Bug’li dazmollashda dazmollash
haroratini «•••» yoki «max» etib belgilash
lozim.
SUVNI PURKAGICH
• Siz bir necha marta suv purkagich (4)
tugmasini bosib, matoni namlashingiz
mumkin).
• Sig’imda (10) suv yetarli bo’lishiga ishonch
hosil qiling.
QURUQ DAZMOLLASH
• Dazmolni asosiga qo’ying (8).
• Tarmoq simini rozetkaga kiriting.
• Sozlagichni (11) burab kerakli dazmollash
haroratini belgilang: «•», «••», «•••» yoki
«max» (matoning turiga qarab), bunda
indikator (9) yonadi.
• Dazmol tagining harorati (13) belgilangan
haroratga yetganda, indikator (9) o’chadi,
dazmollay boshlash mumkin.
• Dazmolni ishlatishdan keyin harorat
sozlagichini (11) «min» holatiga qo’ying.
• Tarmoq simini rozetkadan oling va
dazmolning to’liq sovishini kuting.
BUG’LI DAZMOLLASH
Bug’li dazmollashda «•••» yoki «max»
dazmollash haroratini belgilash lozim.
• Dazmolni asosiga qo’ying (8).
• Tarmoq simini rozetkaga kiriting.
• Sig’imda (10) suv yetarli ekanligiga.
• Sozlagichni (11) burab kerakli dazmollash
haroratini belgilang: «•••» yoki «max»
(matoning turiga qarab), bunda indikator (9)
yonadi.
• Dazmol tagining harorati (13) belgilangan
haroratga yetganda, indikator (9) o’chadi,
dazmollay boshlash mumkin.
• Bug’ni doimiy berish sozlagichini (3)
burab bug’ hosil qilishning yetarli quvvatini
belgilang, dazmol tagligi teshiklaridan (13)
bug’ chiqa boshlaydi.
• Dazmolni ishlatishdan keyin harorat
sozlagichini (11) «min» holatiga, bug’ni
doimiy berish sozlagichini (3) esa eng chap
holatiga qo’ying.
• Tarmoq simini rozetkadan oling va
dazmolning to’liq sovishini kuting.
DIQQAT!
Agar ish paytida bug’ doimiy berilib turmasa,
harorat sozlagichining (11) to’g’ri holatini
tekshiring.
QO’SHIMCHA BUG’ BERILISHI
Qo’shimcha bug’ berilishi funktsiyasi
burmalarni dazmollashda foydali bo’ladi va
faqat yuqori haroratli dazmollash rejimida
ishlatilishi mumkin (harorat sozlagichi (11)
«•••» yoki «max» holatida).
• Qo’shimcha bug’ berilishi tugmasi (5)
bosilganda dazmol tagligidan bug’ kuchliroq
chiqadi.
Eslatma: Bug’ teshiklaridan suv oqib
chiqmasligi uchun qo’shimcha bug’ berilishi
tugmasini (5) 4-5 soniya oralatib bosing.
BUG’ KAMERASINI TOZALASH
Dazmolning xizmat qilish muddatini uzaytirish
uchun, ayniqsa «qattiq» suvi bo’lgan
mintaqalarda bug’ kamerasini muntazam
tozalash tavsiya etiladi.
• Sig’imni (10) suv bilan MAX belgisigacha
(12) to’ldiring.
• Dazmolni asosiga qo’ying (8).
• Tarmoq simini rozetkaga kiriting.
• Sozlagichni (11) burab dazmol tagligining
«max» haroratini belgilang, bunda indikator
(9) yonadi.
• Dazmol tagining harorati (13) maksimal
haroratga yetganda, indikator (9) o’chadi,
dazmol bug’ kamerasini tozalash jarayonini
boshlash mumkin.
• Harorat sozlagichini (11) «min» holatiga
qo’yib, dazmolni o’chiring.
• Tarmoq simining vilkasini rozetkadan oling.
35
MW-3008.indd 35MW-3008.indd 35 14.12.2009 17:35:3014.12.2009 17:35:30
Page 36

ЎЗБЕК
• Dazmolni chig’anoq ustida gorizontal ushlab
turing, sozlagichni (3) eng o’ng holatiga
– SELF CLEAN o’rnating va ushlab turing.
• Qaynayotgan suv va bug’ quyqa bilan birga
dazmol tagligining teshiklaridan chiqib
turadi (13).
• To suvning hammasi sig’imdan (10) chiqib
ketmaguncha dazmolni oldinga-orqaga
ozgina chayqatib turing.
• Dazmolni asosga qo’ying (8) va uning to’liq
sovishini kuting.
• Dazmolning tagligi (13) to’liq soviganda, uni
mato bo’lagi bilan arting.
• Dazmolni saqlash uchun olib qo’yishdan
avval sig’imda (10) suv yo’qligi, dazmolning
tagligi (13) mutlaqo quruqligiga ishonch
hosil qiling.
PARVARISh QILISH VA TOZALASH
• Dazmolni tozalashdan avval u tarmoqdan
o’chirilganligi va soviganligiga ishonch hosil
qiling.
• Dazmol korpusini ozgina nam mato bilan
arting, keyin uni quriguncha arting.
• Dazmol tagligidagi qoplamlar sirkasuv eritmasiga namlangan mato bilan
ketkazilishi mumkin.
• Qoplamlar ketkazilganidan keyin taglik
yuzasini quruq mato bilan silliqlab arting.
• Dazmol tagligi va korpusini tozalash uchun
abraziv moddalardan foydalanmang.
• Dazmol tagligini o’tkir metall buyumlarga
tegishidan asrang.
TEXNIK TAVSIFLAR
Ta’minot kuchlanishi: 220-240 V ~ 50 Hz
Iste’mol qilish quvvati: 1450-1750 Vt
Ишлаб чиқарувчи жиҳоз хусусиятларини
олдиндан маълум қилмасдан ўзгартириш
ҳуқуқини сақлаб қолади.
Жиҳознинг ишлаш муддати 3 йилдан
кам эмас
Кафолат шартлари
Ушбу жиҳозга кафолат бериш масаласида
худудий дилер ёки ушбу жиҳоз харид
қилинган компанияга мурожаат қилинг.
Касса чеки ёки харидни тасдиқловчи бошқа
бир молиявий ҳужжат кафолат хизматини
бериш шарти ҳисобланади.
Ушбу жиҳоз 89/336/ЯЕC
Кўрсатмаси асосида
белгиланган ва Қувват кучини
белгилаш Қонунида (73/23 ЕЭС)
айтилган ЯХС талабларига
мувофиқ келади.
SAQLASH
• Harorat sozlagichini (11) soat miliga qarshi
«min» holatigacha burang, bug’ni doimiy
berish sozlagichini (3) eng chap holatiga
o’rnating - bug’ning berilishi o’chirilgan
bo’ladi.
• Tarmoq simining vilkasini rozetkadan oling.
• Suv quyish tuynugining qopqog’ini (2)
oching, dazmolni ag’daring va suv idishidan
(10) suvning qolganini to’kib tashlang.
• Qopqoqni yoping (2).
• Dazmolni vertikal qo’ying va uning to’liq
sovishini kuting.
• Dazmolni vertikal holda saqlang.
36
MW-3008.indd 36MW-3008.indd 36 14.12.2009 17:35:3014.12.2009 17:35:30
Page 37

RUS
Дата производства изделия указана в серийном номере на табличке
с техническими данными. Серийный номер представляет собой
одиннадцатизначное число, первые четыре цифры которого обозначают
дату производства. Например, серийный номер 0606ххххххх означает, что
изделие было произведено в июне (шестой месяц) 2006 года.
GB
A production date of the item is indicated in the serial number on the technical
data plate. A serial number is an eleven-unit number, with the first four figures
indicating the production date. For example, serial number 0606ххххххх means
that the item was manufactured in June (the sixth month) 2006.
DE
Das Produktionsdatum ist in der Seriennummer auf dem Schild mit technischen
Eigenschaften dargestellt. Die Seriennummer stellt eine elfstellige Zahl dar, die
ersten vier Zahlen bedeuten dabei das Produktionsdatum. Zum Beispiel bedeutet die Seriennummer 0606xxxxxxx, dass die Ware im Juni (der sechste Monat)
2006 hergestellt wurde.
KZ
Бұйымның шығарылған мерзімі техникалық деректері бар кестедегі сериялық
нөмірде көрсетілген. Сериялық нөмір он бір саннан тұрады, оның бірінші
төрт саны шығару мерзімін білдіреді. Мысалы, сериялық нөмір 0606ххххххх
болса, бұл бұйым 2006 жылдың маусым айында (алтыншы ай) жасалғанын
білдіреді.
RO
Data fabricării este indicată în numărul de serie pe tabelul cu datele tehnice.
Numărul de serie reprezintă un număr din unsprezece cifre, primele patru cifre
indicînd data fabricării. De exemplu, dacă numărul de serie este 0606xxxxxxx,
înseamnă că produsul dat a fost fabricat în iunie (luna a asea) 2006.
CZ
Datum výroby spotřebiče je uveden v sériovém čísle na výrobním štítku s technickými údaji. Sériové číslo je jedenáctimístní číslo, z nichž první čtyři číslice znamenají datum výroby. Například sériové číslo 0606xxxxxxx znamená, že spotřebič byl
vyroben v červnu (šestý měsíc) roku 2006.
UA
Дата виробництва виробу вказана в серійному номері на табличці з
технічними даними. Серійний номер представляє собою одинадцятизначне
число, перші чотири цифри якого означають дату виробництва. Наприклад,
серійний номер 0606ххххххх означає, що виріб був виготовлений в червні
(шостий місяць) 2006 року.
MW-3008.indd 37MW-3008.indd 37 14.12.2009 17:35:3014.12.2009 17:35:30
Page 38

BEL
Дата вытворчасці вырабу паказана ў серыйным нумары на таблічке з
тэхнічнымі дадзенымі. Серыйны нумар прадстаўляе сабою адзінаццатае
чысло, першыя чатыры лічбы якога абазначаюць дату вытворчасці.
Напрыклад, серыйны нумар 0606ххххххх азначае, што выраб быў зроблен ў
чэрвені (шосты месяц) 2006 года.
UZ
Жиҳоз ишлаб чиқарилган муддат техник хусусиятлар кўрсатилган
лавҳачадаги серия рақамида кўрсатилган. Серия рақами ўн битта сондан
иборат бўлиб уларнинг биринчи тўрттаси ишлаб чиқарилган вақтни ифода
этади. Мисол учун 0606ххххххх серия рақами жиҳоз 2006 йилнинг июн ойида
(олтинчи ойда) ишлаб чиқарилганлигини билдиради.
MW-3008.indd 38MW-3008.indd 38 14.12.2009 17:35:3014.12.2009 17:35:30
Page 39

MW-3008.indd 39MW-3008.indd 39 14.12.2009 17:35:3014.12.2009 17:35:30
Page 40

MW-3008.indd 40MW-3008.indd 40 14.12.2009 17:35:3014.12.2009 17:35:30
 Loading...