

Page 1

VuQube II
MXL023/G & MXLO23/W
Owners Manual
Bedienungsanleitung
UK contact:
Helpline: +44 (0)1553 811000
Email: support@maxview.co.uk
Web: ww w.max vi ew.co.u k
Maxvi ew reserve the rig ht to change spec ificatio ns without prio r notice
Technische Änderungen sowie Irrtümer vorbehalten.
911120 0 Iss 10
23609 RE V A
DE Kontakt:
Helpline: +49 (0)8145 9969980
Email: info@maxview.de
Web: www.maxview.de
Page 2
Introduction/Einführung
Thank you for purchasing this product, should you have any difficulty using your VuQube II Satellite System
please contact our friendly Customer Helpline on (01553) 811000. The VuQube II Satellite System is easily
configured to lock onto the appropriate satellites necessary to receive your favourite TV channels.
Please retain these instructions for future reference.
Vielen Dank und herzlichen Glückwunsch, dass Sie sich für die VuQube II Satelliten - Antenne entschieden haben.
Sollten sich bei der Inbetriebnahme Schwierigkeiten ergeben kontaktieren Sie bitte unseren
Kundendienst unter +49 (0) 8145 9969980. Die VuQube II wird mit einer Steuerbox geliefert an der Sie den
gewünschten Satelliten auswählen. Bitte bewahren Sie die Anleitung gut auf
This pack includes:
• Antenna Unit
• Power Inserter
• 1 x 10m ‘F’ to ‘F’ Cable
• 1 x 0.5m ‘F’ to ‘F’ Cable
• 2 x Velcro Control Box Mounting Pads
• Cigarette Adaptor 12V Power Supply
You will also need
• TV & Satellite Receiver (separates or integrated)
• Cable(s) to connect receiver to TV (e.g HDMI)
• Optional Cable Entry Product (see page 10)
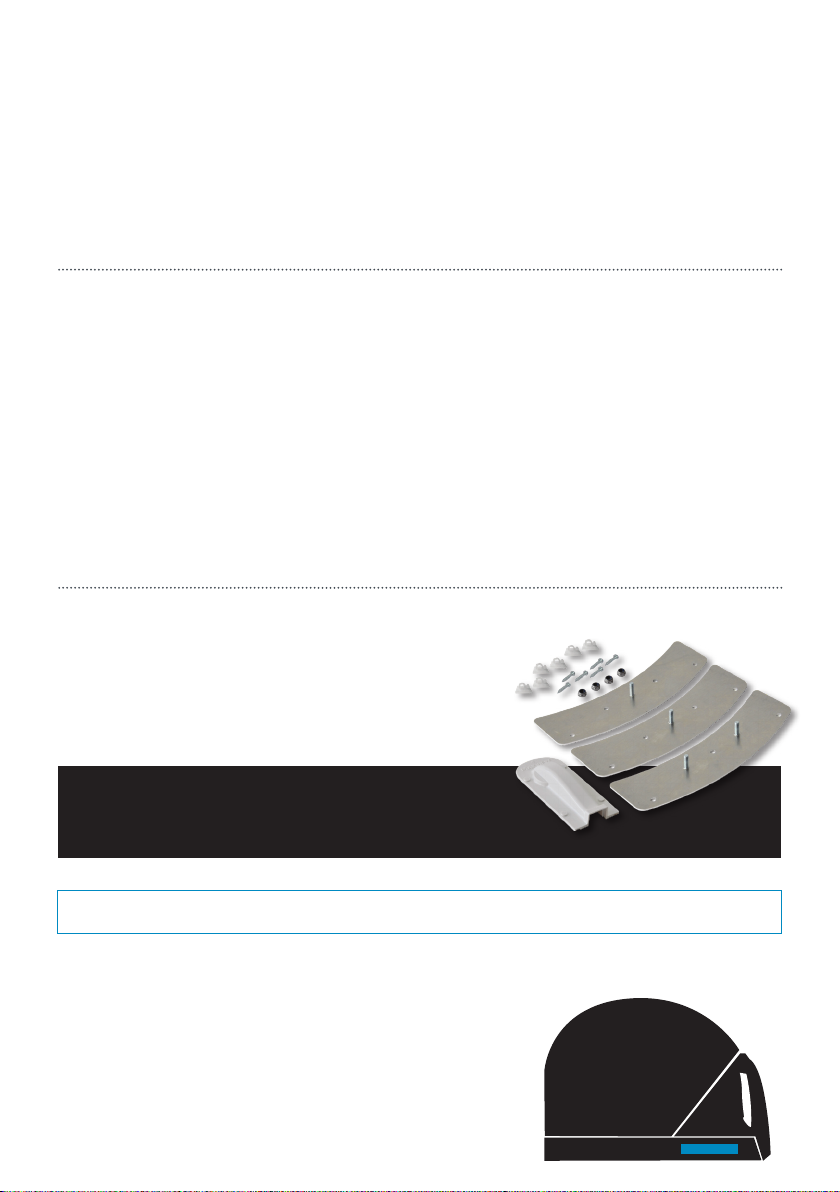
VuQube II Roof Mount Pack - Available separately
VuQube II Dachbefestigung - optional erhältlich
If you wish to mount your VuQube II to your vehicle roof permanently
you will need to purchase our Roof Mount Pack*. Order MXL023/FKIT
Wenn Sie die VuQube II fest auf Ihr Dach befestigen möchten,
benötigen Sie den Dachmontagesatz*. Bestellnummer: 70630
* PLEASE NOTE: If you mount your Vuqube II without using the
Maxview Roof Mount Pack your warranty will be void.
* BEACHTEN SIE BITTE: Wenn Sie die VuQube II ohne die vorgeschriebene
Dachbefestigung auf dem Dach fest montieren erlischt die Garantie.
Dieses Packet enthält:
• Antenneneinheit
• Steuergerät
• 1 x 10m Koax-Kabel
• 1 x 0.5m Micro-Koax-Kabel
• 2 x Klettband
• 1 x 230 V Netzteil
• 1 x 12 V Anschlusskabel
Was Sie noch benötigen:
• TV-Gerät mit integrierten Receiver oder Receiver separat
• Verbindungskabel vom Receiver zum Fernseher z.B. HDMI
• Evtl. eine Außensteckdose für den Antennenanschluss
(siehe Seite 10)
Record your purchase/Bitte ausfüllen
**SERIAL NUMBER/SERIENNUMBER __________ PURCHASE DATE/KAUFDATUM _______________
Please fill in the details above once purchased. This information will be required in the unlikely event of a fault
occurring with this system.
**This can be located at the bottom of the VuQube II near the F connector
ports below the handle (highlighted in blue on the image)
Bitte fügen Sie alle relevanten Daten ein, diese werden im Falle
einer Garantiereparatur benötigt.
* Die Seriennummer finden Sie unten an der Antenne in der Nähe der
F-Anschlüsse.
02
Page 3

Safety precautions
To avoid tripping over and injury always route cable carefully.
Maintenance
The VuQube II has been designed to be maintenance and trouble free. For optimum signal strength, keep the
cover clean from dirt, bugs, and other debris. Periodic washing of the top cover with mild soap and water is
recommended.
1. Always handle the antenna and VuQube II Power Inserter with care. Do not drop the antenna or VuQube II
Power Inserter . Avoid excessive shock or vibration to the antenna or VuQube II Power Inserter
2. Use caution when carrying the antenna. Always carry the antenna by the handle.
3. Do not remove the cover of the antenna or VuQube II Power Inserter. Doing so is not recommended by the
manufacturer and will void the limited guarantee.
4. Do not stack the antenna or VuQube II Power Inserter on top of or below other electronic devices as this can
cause heat build-up or block the satellite signal from reaching the antenna.
5. Never power wash the antenna. Keep the enclosure clean from dirt, bugs, and other debris by hand washing
with mild soap and water.
DO NOT USE SOLVENTS TO CLEAN VUQUBE II. DO NOT DROP OR EXPOSE TO JARRING MOVEMENTS.
Please note
In very extreme rain fall and snowing conditions you may loose some TV & Radio channels temporarily.
Terms & conditions
In no event shall Maxview be liable for any indirect, incidental, or consequential damages from the sale or use
of the product. This disclaimer applies both during and after the term of the guarantee. This guarantee gives you
specific legal rights, but does not affect your statutory rights. See page 16 further details.
Sicherheitsmaßnahmen
Verlegen Sie das Koax-Anschlusskabel der Antenne sorgfältig. Vermeiden Sie Stolperfallen.
Wartung
Die VuQube II ist so konzipiert, dass sie keine Wartung benötigt. Für optimale Signalwiedergabe halten Sie die
Abdeckung mit einem feuchten Lappen sauber. Verwenden Sie auf keinen Fall Scheuermittel oder
Waschbenzin.
1. Behandeln Sie die Antenne vorsichtig, vermeiden Sie ein Werfen oder Fallenlassen der Antenne. Setzen Sie
die Antenne keine starken Vibrationen aus. Ein Transport im Caravan ist selbstverständlich unbedenklich.
2. Tragen Sie die Antenne nur an den dafür vorgesehenen Griff um ein “Fallenlassen“ zu vermeiden.
3. Öffnen Sie nicht die Abdeckung der Antenne. Ein Öffnen des Gehäuses zieht einen Garantieverlust mit sich.
4. Platzieren Sie die Antenne nicht auf elektronische Geräte z.B. Gleichrichter oder Generatoren das kann einen
schlechten oder gar keinen Empfang zufolge haben.
5. Waschen Sie die Antenne nie mit einem Dampfstrahler. Verwenden Sie nur einen feuchten Lappen zur
Säuberung der Oberfläche.
Bitte beachten Sie
Um die bestmögliche Empfangsleistung zu erzielen ist es unabdingbar die originalen respektive die
mitgelieferten Koaxial-Kabel zu verwenden. Bitte beachten Sie auch, dass bei Außensteckdosen hochwertige
Koaxial-Kabel verlegt sind (100 db Abschirmung ist ideal). Ebenso bei Fernsehgeräten gibt es einen großen
Qualitätsunterschied hinsichtlich des Tuners. Wenn Sie ein Gerät vom Fachhandel haben können Sie davon
ausgehend, dass das Gerät den Anforderungen entspricht.
03
Page 4
Set up for portable application/Aufbau
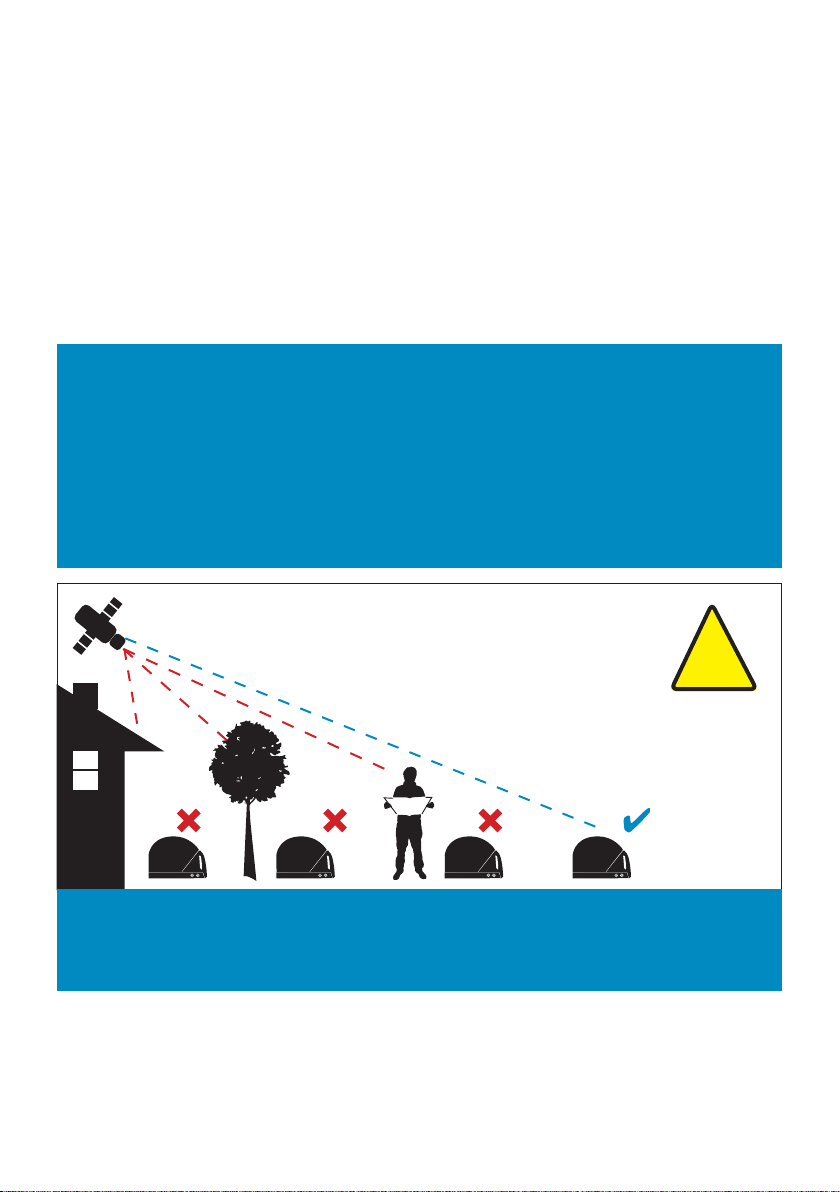
1. Place the VuQube II on a stable surface with a clear view of the southern sky.
(With its built-in levelling feature, the VuQube II does not need to be level, but make sure it is stable to prevent
movement during operation.)
Point the handle approximately to the north (this will speed up search time).
2. Make the connections as shown on the next page.
1. Positionieren Sie die VuQube II auf einer stabilen Grundfläche mit ungehinderter Sicht Richtung Süden.
Die VuQube - Auto gleicht Unebenheiten vom Boden von selbst aus.
2. Stellen Sie die Verbindung IN DER REIHENFOLGE her wie es auf der nächsten Seite beschrieben ist.
IMPORTANT! HAND TIGHTEN COAX CONNECTIONS.
DO NOT USE A WRENCH.
Do not allow the coax cable to become bent or kinked.
Do not leave the coax cable where it can be tripped on or run over by a vehicle.
WICHTIG! Schrauben Sie das Koax-Kabel nur per Hand an die VuQube II.
NICHT MIT EINEM SCHRAUBENSCHLÜSSEL!
Bitte beachten Sie, dass das Koax-Kabel nicht geknickt oder zu stark gebogen wird.
Achten Sie darauf, dass das Koax-Kabel nicht dahin verlegt wird wo es zur Stolperfalle wird oder von
Fahrzeugen überfahren wird. Verwenden ausschließlich die im Lieferumfang enthaltenen Koaxial-und
Spannungsversorgungskabel-,
Satellite line of sight
Freie Sicht zum Satelliten
IMPORTANT Do not block the antenna’s line of sight to satellites in the southern sky at any time.
WICHTIG! Um den gewünschten Satelliten zu finden dürfen keine Hindernisse wie z.B.: Bäume, Häuser
usw zwischen der VuQube II und Richtung Süden sein. Also freie Sicht Richtung Süden.
04
!
Page 5
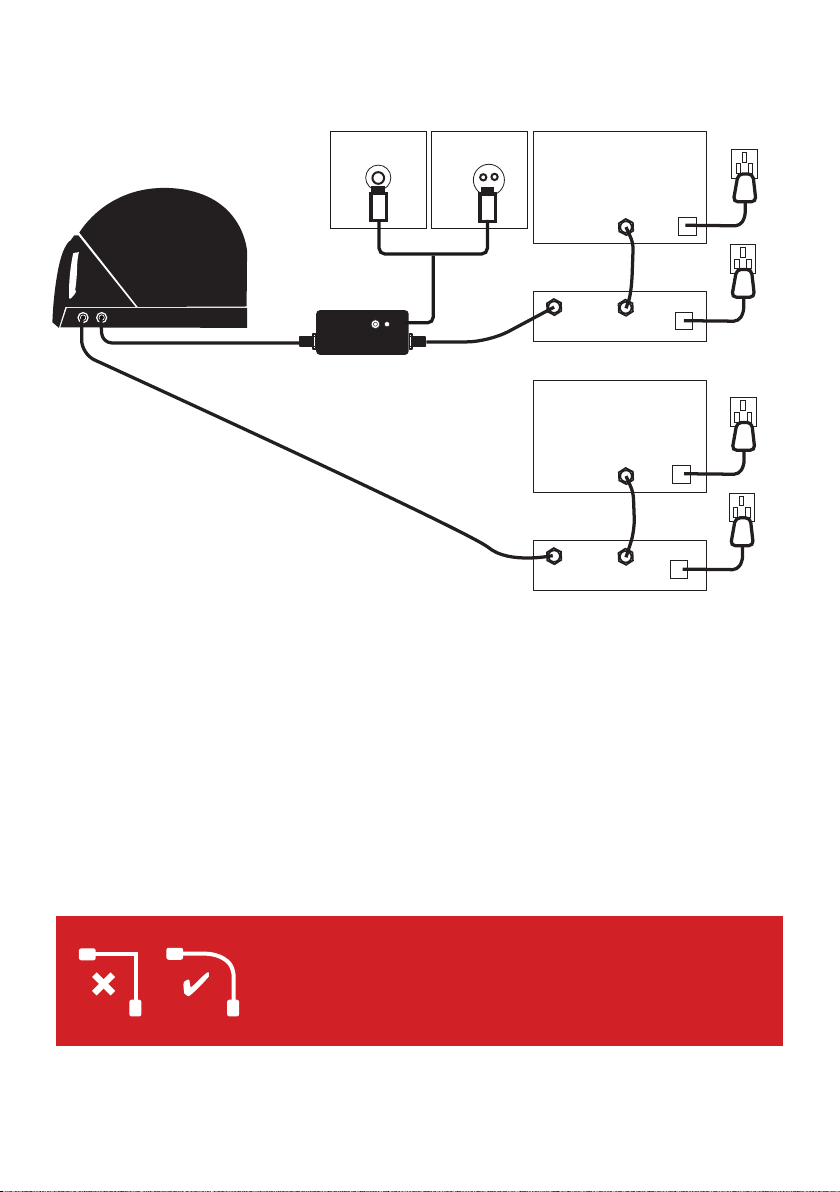
Set up diagram/Anschlussdiagramm
12V (UK & EU)
A
F
H
AUX
Optional
Twin Output
Nur bei
Twin-Ausführung
ANT REC
C
Key
A. VuQube II System Outside vehicle
B. Supplied 0.5m ‘F’ to ‘F’ Cable
C. VuQube II Power Inserter
D. Satellite Receiver
E. Scart Lead OR HDMI Cable (HD or SD compatibility)
F. Cigarette Adapter 12V Power Supply
G. Wall Adaptor 12V Power Supply
*
H. 1 x 10m ‘F’ to ‘F’ Cable
* Not included in UK variant.
230V*
Main TV
12/24V
Hauptfernsehgerät
G
SAT IN
B
D
PWR
E
PWR
12/24V
2nd TV (optional)
2. Fernsehgerät
E
SAT IN
D
PWR
Erklärung
A. VuQube II außerhalb des Fahrzeugs
B. Mitgeliefertes Koax-Kabel mit F-Stecker
C. VuQube II Steuergerät
D. Satelliten Receiver ODER Sky Box
E. Scart-Kabel oder HDMI-Kabel (HD oder SD kompatibel)
F. 12 V Anschlusskabel
G. 230 V Netzteil
H. 1 x 10 Koax-Kabel
If you require a 12V PSU we recommend a switching PSU rated at minimum of 2 amps.
ATTENTION!
Avoid sharp bends when routing cable
ACHTUNG!
Vermeiden Sie ein starkes Knicken des Koax- Kabels
05
Page 6
Powering and operation
The VuQube II is preset to Astra 2, this means your system is ready to search for your favourite UK
channels. (The Mainland European VuQube II is preset to Astra 1, this means European users can also
immediately search for their favourite channels.)
In most cases your pre-set satellite will be the one you wish to search for, in this case, please skip to the
Satellite Search Section now (page 8).
The VuQube II supports the following Satellites: Astra 1 - Astra 2 - Astra 3 - Hotbird.
Please see table below to understand how the lights correspond to these satellites.
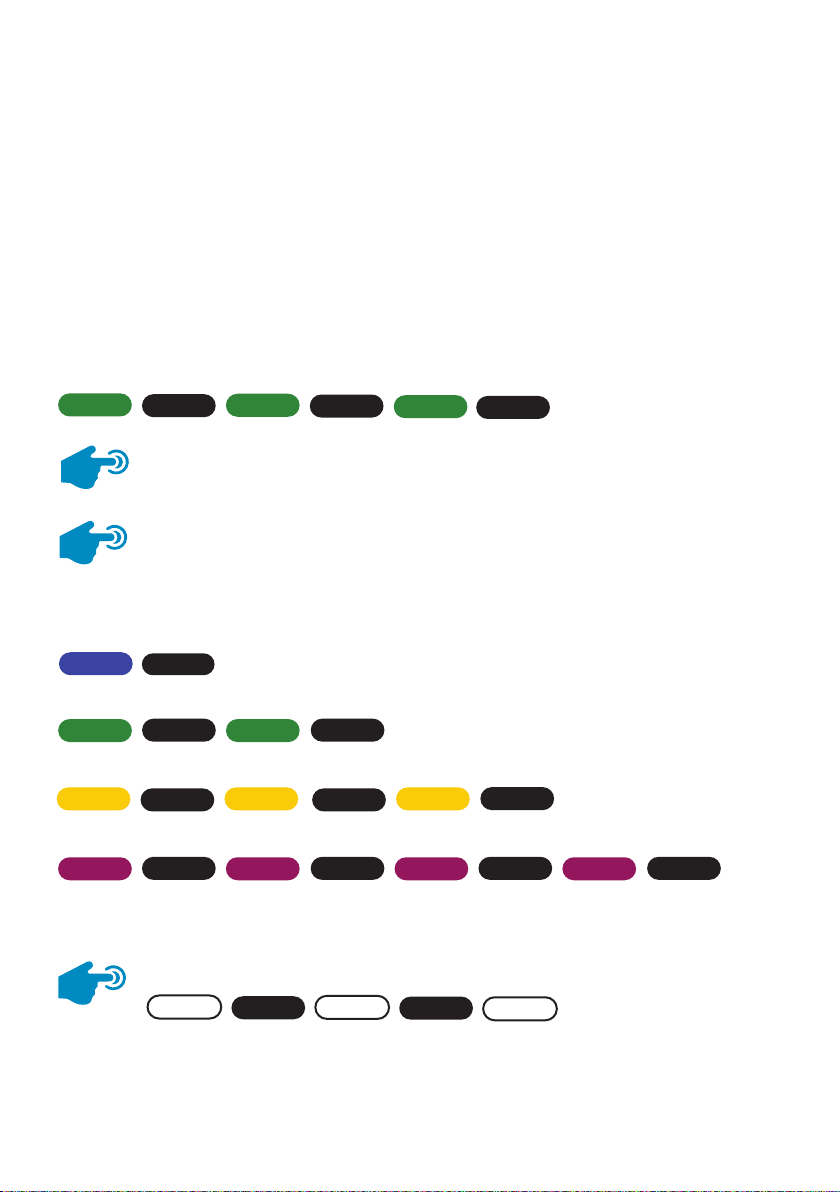
If you would like to change the satellite which your VuQube II searches for please use the following process:
If your VuQube II is new skip this step and go straight to page 8
Make sure the LED is flashing green (ready to scan)
Green
1. To enter the Configuration Mode - Press and hold (6 seconds) the
power insterer button until one of the options below appears.
2. Press and release as needed to choose satellite below
ASTRA 1
Blue
ASTRA 2
Green Green
ASTRA 3
Yellow Yellow
HOTBIRD
Purple Purple Purple Purple
Off
Off
Off
Off Off
Off Off Off
3. Press and hold (3 seconds) until LED flashes chosen satellite colour - (Ready to to scan)
Green
Pattern repeats
Off
Off
Green
Pattern repeats
Yellow
Off
Off
Pattern repeats
Off
Pattern repeats
06
Chosen
Note. This will now remain the pre-set satellite on the power inserter until this process is
repeated. Go to page 8 to start scan. The LED will flash on and off unless you have enabled
the alarm function (see page 10) in which case the LED will flash the colour and white.
Off
Chosen
Off
Chosen
Page 7

Inbetriebnahme
Die VuQube II ist werksseitig auf Astra 1 eingestellt und das Alarm-System ist deaktiviert.
In den meisten Fällen ist der werksseitig eingestellte Satellit (Astra 1), der Satellit den Sie empfangen möchten.
Ist dies der Fall, können Sie auf Seite 9 - Satellitensuche fortfahren.
Die VuQube II unterstützt folgende Satelliten: Astra 1 - Astra 2 - Astra 3 - Hotbird
Bitte lesen Sie die folgende Tabelle, um zu verstehen, welche LED-Farbe welchen Satelliten entspricht.
Wenn Sie den Satellit ändern möchten, gehen Sie wie folgt vor:
Achtung: Im nachfolgenden wird der Vorgang mit deaktiviertem Alarm-System erläutert!
Wenn die LED BLAU blinkt dann ist das Steuergerät bereit den Satelliten zu suchen.
Blau
1. Um in den Satellitenkonfigurations-Modus zu wechseln, halten Sie die
Taste am Steuergerät 6 Sekunden gedrückt, bis eine der folgenden Optionen angezeigt wird.
2. Nun können Sie per kurzem Tastendruck Ihren gewünschten Satellit auswählen.
ASTRA 1
Blau
ASTRA 2
Grün Grün
ASTRA 3
Gelb Gelb
HOTBIRD
Lila Lila Lila Lila
Aus
Aus
Aus
Aus Aus
Aus Aus Aus
Blau
Wiederholt sich
Aus
Aus
Blau
Wiederholt sich
Gelb
Aus
Aus
Wiederholt sich
Aus
Wiederholt sich
3. Um den ausgewählten Satellit einzuspeichern, halten Sie den Knopf ca. 3 Sekunden
gedrückt, bis die LED in der Farbe des ausgewählten Satelliten blinkt (die Antenne ist nun
bereit für den Suchlauf).
Satelliten-Farbe
Achtung: Ihr ausgewählter Satellit bleibt nun so lange gespeichert bis Sie wieder einen anderen
Satelliten auswählen. Wenn Sie den Suchvorgang nun starten möchten fahren Sie mit Seite 9 fort.
Der Vorgang zum Wechsel des Satellit mit aktiviertem Alarm-System wird auf Seite 11 erklärt.
Aus
Satelliten-Farbe
Aus
Satelliten-Farbe
07
Page 8

Satellite Search
1. Make sure all connections are made as shown on page 5.
2. Turn on the TV and satellite receiver if not integrated.
3. Press POWER on the VuQube II Power Inserter
The Power Insterter LED will pulsate orange while powering up (this will take about 10 seconds).
Pulsing orange
When ready to scan the LED will flash green.
This colour flashing is indicating that Astra 2 is selected if you wish to change see page 6 for details
Green
Press and immediately release the power inserter button to start a scan.
The LED will flash quickly green during the scan. The antenna unit may lock onto the satellite in as little as
2 minutes, nut may occasionaly take up to 10-15 minutes.
Green
When scan is complete and the satellite is found, the LED will turn solid green.
Watch TV!
Dim Orange
!
Power down
After a period of inactivity, the VuQube II will enter standby mode. You will know the system is in standby mode
as the light turns dim orange. The system will continue to function in standby mode.
Off
Off
If the satellite is not found the LED will turn solid dim orange.
Verify all connections are properly made and that the receiver is on. Check for line of sight
obstructions, and if need be, move the antenna to have a better view of the southern sky.
Press the button to start a new scan.
Green
Green
Off
Green
Green
Off
Off
Green
Off
To exit standby mode, the button must be pressed. You will know the system has now exited standby mode as
the light will come on.
Note: You will not need to rescan your VuQube II on exiting standby mode unless the antenna has been moved.
08
Page 9

Satellitensuche
1. Vergewissern Sie sich, dass alle Verbindungen so wie auf Seite 5 gezeigt hergestellt worden sind.
2. Wenn das Steuergerät mit einer Stromquelle verbunden wird, schaltet es sich sofort ein.
Während dieser Zeit blinkt die LED am Steuergerät ungefähr 10 Sekunden orange.
Blinkt orange
Wenn die Antenne breit zur Suche des Satelliten ist blinkt die LED blau.
Die blaue LED zeigt an, dass die Antenne bereit ist den Astra 1 zu suchen. Wenn Sie einen anderen
Satelliten suchen möchten, gehen Sie bitte wie auf Seite 7 beschrieben vor.
Blau
Drücken Sie nun kurz die Taste auf dem Steuergerät um den Suchvorgang zu starten.
Der Suchvorgang kann bis zu 10 Minuten dauern, in den meisten Fällen aber wesentlich weniger.
Beim Suchvorgang blinkt die LED schneller.
Blau
Wenn der Suchvorgang abgeschlossen ist und der Satellit gefunden wurde, leuchtet die LED durchgehend blau.
Jetzt können Sie fernsehen!
Permanent
Rot
!
Aus
Blau
Aus
Wenn der Satellit nicht gefunden wurde, leuchtet die LED durchgehend rot.
Der gewünschte Satellit konnte nicht identifiziert werden. Gründe hierfür sind z. B.: Keine
freie Sicht zum Satelliten die Signale werden geblockt von Hindernissen, diese können sein:
Fahrzeuge, Bäume, Gebäude usw. oder aber auch, dass die Antenneneinheit während des
Suchvorgangs bewegt wurde oder auf einer instabilen Standfläche steht.
Stellen Sie die Antenne dort hin, wo die Sicht Richtung Süden frei ist und starten Sie erneut
den Suchvorgang.
Blau
Aus
Blau
Blau
Aus
Aus
Blau
Aus
Ausschalten
Wenn das TV-Gerät ausgeschaltet wurde, fällt das Steuergerät nach 2 min. in den Standby-Modus.Die LED
leuchtet gedimmt orange. Der Stromverbrauch liegt nun im Alarm-Modus bei 150 mA, bei nicht eingeschaltenen
Alarm bei 20 mA.
Um den Standby-Modus zu beenden, schalten Sie einfach Ihren Receiver oder das TV-Gerät ein. Die LED am
Steuergerät beginnt wieder, in der Farbe des zuvor ausgewählten Satelliten, zu blinken.
Hinweis: Sie müssen Ihre VuQube Auto II im beendeten Standby-Modus nicht erneut suchen lassen, es sei denn,
die Antenneneinheit wurde bewegt.
09
Page 10

Alarm Feature
This unit has a built in alarm feature if the coaxial cable is disconnected from the unit.
This unit is shipped from the factory with the alarm feature off
Turning the alarm feature on or off
A. To change settings, press and hold the power inserter button for 6 seconds (6
flashes of the LED light).
One of the options below will appear.
B. Press and release button to choose desired settings.
ASTRA 1 (Alarm disabled)
Pattern repeats
Blue
ASTRA 2 (Alarm disabled)
Green
ASTRA 3 (Alarm disabled)
Yellow
HOTBIRD (Alarm disabled)
Purple
ASTRA 1 (Alarm enabled)
Blue
Off
Off
Off
Off
White
Green
Yellow
Purple
Off
Off
Off
Off
Pattern repeats
Pattern repeats
Yellow
Purple
Off
Off
Pattern repeats
Purple
Off
Pattern repeats
ASTRA 2 (Alarm enabled)
Green
ASTRA 3 (Alarm enabled)
Yellow
HOTBIRD (Alarm enabled)
Purple
WHEN ALARM IS ENABLED - The power inserter alarm will sound when the coax is disconnected from the
antenna unit or from the “antenna” side of the power inserter. To stop the alarm, reconnect the coax or
press the power inserter button.
Time Out Function: If you do not press the button for one minute, the Power Inserter will go back to
flashing (ready to scan) and whatever configuration was currently displayed on the LED will be saved.
White White
White White White
White White
C. When desired mode is displayed, press and hold button for about 3 seconds until the
LED begins to flash the desired satelliet colour. The antenna is now ready to scan (go to page 8).
Green
Yellow
Purple Purple
Yellow
Off
Pattern repeats
White
Off
Purple
Pattern repeats
White
10
Off
Pattern repeats
Page 11

Alarm-System
Das im Lieferumfang enthaltene Steuergerät verfügt über ein integriertes Alarm-System.
Wenn das Koax-Kabel von der Antenneneinheit getrennt wird, wird umgehend der Alarm ausgelöst.
Alarm-System aktivieren & deaktivieren
A. Um die Einstellungen zu ändern, halten Sie die Taste am Steuergerät für ca. 6
Sekunden gedrückt.
Eine der unteren aufgezeigten Optionen wird erscheinen.
B. Per kurzem Tastendruck können Sie Ihre gewünschte Einstellung auswählen.
ASTRA 1 (Alarm deaktiviert)
Blau
ASTRA 2 (Alarm deaktiviert)
Grün
ASTRA 3 (Alarm deaktiviert)
Gelb
HOTBIRD (Alarm deaktiviert)
Aus
Aus
Aus
Wiederholt sich
Grün
Gelb
Aus
Aus
Wiederholt sich
Gelb
Aus
Wiederholt sich
Lila
ASTRA 1 (Alarm aktiviert)
Blau
ASTRA 2 (Alarm aktiviert)
Grün
ASTRA 3 (Alarm aktiviert)
Gelb
HOTBIRD (Alarm aktiviert)
Lila
Wenn der Alarm ausgelöst wurde können Sie ihn über die Taste am Steuergerät wieder ausschalten.
Time Out-Funktion: Wenn Sie sich im Satellitenkonfigurationsmodus befinden und ca. 60 Sekunden nichts
am Steuergerät machen, wird der Satellit mit Alarm-System deaktiviert oder aktiviert automatisch
abgespeichert, nun blinkt die LED in der Farbe des ausgewählten Satelliten und ist für den Suchlauf bereit.
Aus
Weiß
Weiß Weiß
Weiß Weiß Weiß
Weiß Weiß
C. Wenn der gewünschte Satellit mit Alarm-System aktiviert oder deaktiviert
angezeigt wird, halten Sie für ca. 3 Sekunden die Taste am Steuergerät gedrückt, bis die LED
wieder anfängt in der Farbe des gewünschten Satelliten zu blinken. Nun können Sie den Suchlauf
nach Ihrem ausgewählten Satellit mit Alarm-System aktiviert starten.
Lila
Aus
Grün
Gelb
Lila Lila
Aus
Wiederholt sich
Lila
Aus
Gelb
Aus
Wiederholt sich
Weiß
Lila
Aus
Lila
Aus
Wiederholt sich
Weiß
Wiederholt sich
Aus
Wiederholt sich
11
Page 12

Security/Diebstahlsicherung
The VuQube II can be secured to an object using a padlock and cable. (not included)
Die VuQube II kann am Griff mit einem Stahlseil oder einer Kette zusätzlich gegen Diebstahl gesichert werden.
To secure object
zur Diebstahlbefestigung
Optional Weatherproof Sockets/Original Außensteckdosen
Optional weatherproof socket - Recommended
for a neat watertight connection externally to and
from your Vuqube II
Code B2020 (Single socket)
Code B2007 (Twin socket)
Available from most Maxview Dealerships or order
online at www.maxview.co.uk
Unsere Außensteckdosen sind empfehlenswert
für einen sauberen und wasserdichten Eingang in das
Fahrzeuginnere.
Art.Nr.: 5015 (Außensteckdose mit F-Anschluß)
Art.Nr.: 5026 (Außensteckdose TWIN mit F. und Koax-Anschluß)
Art.Nr.: 5027 (Außensteckdose mit 2 F-Anschlüssen)
Fragen Sie Ihren Händler danach oder schauen Sie auf unsere
Homepage: www.maxview.de
12
Page 13

Footprint Maps/Ausleuchtzone
The footprint of a satellite is the ground area where the signal is available and determines the satellite dish size
required to receive each transponder’s signal. The footprints below show areas in which this 38 cm dish
(equivalent to 50cm performance) can receive signals when used with a compatible satellite receiver. Each
satellite has it’s own footprint & transmits it’s own channels. Use these maps for general guidance only.
Die Ausleuchtzonen der einzelnen Satelliten zeigt in welchem Gebiet Sie mit der VuQube - Auto Empfang
haben. Es kann auf Grund schlechter Wetterverhältnisse zu Beeinträchtigungen kommen, sodass nicht alle Sender
empfangbar sind oder gar kein Satellitenfernsehen möglich ist.
ASTRA 2F (28.2°)
Most UK TV channels can be found within this footprint map shown
left. Channels include...
All BBC TV and Radio Channels
All ITV Channels
Channel 4
Film 4
Five
SKY Channels*
Radio Channels and many more
ASTRA 2
South Beam
Channels
include...
SKY NEWS
BBC NEWS 24
CNN
SKY CHANNELS*
RADIO CHANNELS
and many more
ASTRA 2
North Beam
Channels
include...
SKY CHANNELS*
(SKY BOX OFFICE
UKTV
SKY SPORTS
SKY 1, 2, 3)
any many more
* Only available when using a SKY™ receiver. Channel listings will be dependent on
SKY™ subscription package.
HOTBIRD (13°)
Programmliste...
ARD
ZDF
Euro News
DW-T V
Und viele mehr
ASTR A 1 (19.2°)
Programmliste...
ARD
ZDF
Sat1
Pro7
Kabel 1
VOX
RTL
und viele mehr
13
Page 14

Troubleshooting
SYMPTOM
The power inserter light
does not come on.
Solid dim orange light
on power inserter.
Flashing red and blue
continuously
Power inserter indicates a
satellite has been found
with a solid LED
light after searching;
however my TV has no
picture.
POSSIBLE CAUSE
No power to the Power Inserter.
The satellite could not be located,
reasons for this include:
A line of sight obstruction between
the antenna and the satellite.
(Maybe due to incorrect orientation
of handle)
Surface may be too uneven for the
VuQube II to overcome.
Surface may be unstable.
Problem with connection between
power inserter, receiver or TV.
Error with your F to F lead
connection between the antenna
and the control box.
Receiver isn’t set to correct satellite.
CAUSE OF ACTION
Verify power supply is properly
connected to VuQube II Power
Inserter.
Move unit to have a better view of
the Southern sky and rescan.
Inclement weather can occasionally
cause loss of signal. Wait till weather
improves and re-scan.
Move the unit to flatter ground and
re-scan.
Move unit to a more stable surface
to ensure it doesn’t move whilst
scanning.
Power off, check connections, power
on and re-scan.
Ensure the ‘F’ lead is properly
connected using the diagram on
page 5.
Turn off power inserter, ensure cables
are properly connected between
receiver and/or TV.
Set receiver to correct satellite
using receiver manufacturers owners
manual.
Specifications
Weight: 3.5kg
LNB: Universal 10.7-12.75 GHz/Noise 0.2dB
CB Power
Consumption
(typical at 12V): Searching =500mA
Elevation Range: 18° to 43°
Dish Size: 35 cm
Dish Gain: 30dBi
14
Page 15

Troubleshooting
FEHLERMELDUNG
Die LED am Steuergerät
leuchtet nicht auf.
Dauerhaft rot
aufleuchtende LED am
Steuergerät. Nach einem
Suchlauf.
LED blinkt rot
MÖGLICHER GRUND
Steuergerät ist nicht am Strom
angeschlossen.
Der Satellit kann nicht gefunden
werden. Gründe hierfür:
Hindernisse versperren die
Sicht zum Satelliten.
Der Untergrund ist zu uneben auf
dem die VuQube Auto II steht.
Der Untergrund ist möglicherweise zu instabil.
Fehler zwischen Antenne
und Steuerbox.
LÖSUNG
Überprüfen Sie den 12 V Stecker,
vergewissern Sie sich, dass Spannung an
der Steckdose anliegt. Bei Verwendung
des 230 V Netzteils, vergewissern Sie sich,
dass dieses richtig in der Steckdose sitzt.
Verwenden Sie nur das original Netzteil
mit mind. 1 A Ausgangsleistung
Stellen Sie die Antenne dahin, wo frei
Sicht nach Süden ist.
Stellen Sie die VuQube Auto II auf einen
ebeneren Untergrund.
Stellen Sie die VuQube Auto II auf einen
stabileren Untergrund.
Ziehen Sie den Netzstecker vom
Steuergerät und schließen ihn danach
wieder an. Starten Sie den Suchlauf
erneut, wenn das Steuergerät bereit für
den Suchlauf ist.
Vergewissern sich, dass das
Koax-Kabel korrekt angeschlossen ist.
Auf Seite 5 sehen Sie ein Diagramm dazu.
Das Steuergerät findet den
Satelliten, aber die LED
leuchtet in der Farbe des
gesuchten Satelliten permanent. Jedoch erscheint
kein Bild im Fernseher.
Spezifikationen
Gewicht: 3.5kg
LNB: Universal 10.7-12.75 GHz/Rauschmaß 0,2 dB
Spannungsaufnahme
während des
Suchvorgang: 500 mA
Das TV-Gerät hat die Speicherung
verloren.
Anschlusskabel vom Steuergerät
zum Receiver/TV-Gerät defekt
Es wurde der falsche Satellit
programmiert
Laden Sie die Programmliste wieder hoch.
Vermeiden Sie hierbei einen
kompletten Re-Scan, ansonsten werden
Ihnen alle Programme durcheinander
gespeichert (ca. 1300).
Sollten Sie nicht wissen, wie Sie die
Programmliste wieder hochladen,
setzenSie sich mit dem Kundendienst
des TV Herstellers in Verbindung.
Verwenden Sie ein anderes
Koaxial-Kabel.
Programmieren Sie das Steuergerät auf
den richtigen Satelliten (Astra 1 blau).
Elevationsbereich: 18° bis 43°
Spiegelgröße: 35 cm
Gewinn: 30dBi
15
Page 16

2 year guarantee
Every Maxview VuQube II Satellite System is thoroughly inspected and tested before leaving the factory, and is
covered by the following two year parts limited guarantee from the date of original purchase:
Two year parts guarantee: The customer is not responsible for the cost of replacement parts if the original part
is determined to be defective under the terms of the guarantee. The customer is responsible for the cost of
replacement parts after two years.
Should any problems develop during the guarantee period, contact Maxview. You must contact Maxview before
the guarantee period expires. The customer must supply proof of purchase (such as a dated sales receipt) when
requesting warranty service. If customer cannot supply proof, warranty period shall start 30 days after date of
manufacture.
Only Maxview will perform guarantee evaluations and repairs.
If it is determined that the unit needs to be returned to Maxview, the customer must return COMPLETE product,
to: Customer Services, Maxview Ltd, Common Lane, Setchey, King’s Lynn, Norfolk, PE33 0AT
When returning product, Maxview will supply a Product Return Number (PRN). This number must be clearly
written on the box. Failure to clearly write PRN number on box may result in delays in processing claim.
Along with product, customer should include in the box: his/her name, address, daytime phone number, proof
of purchase and description of the problem.
If inspection shows the trouble is caused by defective workmanship or material, Maxview will repair
(or replace if necessary) without charge.
This guarantee does not cover installation and external wiring, or re-manufactured units. This guarantee does
not cover damage caused by the use of a mounting bracket other than a Maxview mounting bracket designed
for the product. This guarantee is not transferable from the original owner.
Due to the expanding and changing satellite market, Maxview cannot be held responsible for changes made to
satellite services. Software updates to address such issues are not covered under guarantee.
This guarantee also does not apply where:
• The product has been abused, misused, improperly installed or improperly maintained.
• The product has been installed without the use of a Maxview mounting bracket designed for the product.
• Repairs have been made or attempted by others that are not certified by Maxview to do such repairs.
• Repairs are required because of normal wear and tear.
• Alterations have been made to the product.
• The antenna unit has been opened without authorisation.
• Damage has been caused by power washing.
• Circumstances beyond the control of Maxview cause the product to no longer operate correctly.
• Customer is not the original owner.
TERMS & CONDITIONS
In no event shall Maxview be liable for any indirect, incidental, or consequential damages from the sale or use
of the product. This disclaimer applies both during and after the term of the guarantee.
This guarantee gives you specific legal rights, but does not affect your statutory rights.
16
Page 17

2 Jahre Garantie
Jedes VuQube Satellitensystem wird gründlich geprüft und getestet, bevor es das Werk verlässt, und ist von der
folgenden eingeschränkten 2-Jahre-Garantie abgedeckt, die ab Kaufdatum gilt:
Zwei Jahre Garantie: Der Kunde ist nicht verantwortlich für die Kosten des Austauschs von Teilen, wenn das
Originalteil gemäß den Garantiebestimmungen als defekt anerkannt wird. Der Kunde ist nach zwei Jahren
verantwortlich für die Kosten des Austauschs.
Sollten während des Garantiezeitraums Probleme auftreten, wenden Sie sich an die Maxview Vertriebs
GmbH. Sie müssen sich an die Maxview Vertriebs-GmbH wenden, bevor der Garantiezeitraum abgelaufen ist.
Der Kunde muss den Kaufbeleg (z. B. eine Quittung mit Datum) vorlegen, wenn er eine Garantieleistung in
Anspruch nimmt. Wenn der Kunde keinen Beleg vorweisen kann, beginnt der Garantiezeitraum 30 Tage nach
dem Herstellungsdatum.
Garantiebewertungen und Reparaturen werden nur von der Maxview Vertriebs-GmbH durchgeführt. Wenn
entschieden wird, dass das Gerät an die Maxview Vertriebs-GmbH zurückgesendet werden muss, muss der
Kunde das KOMPLETTE Produkt an folgende Adresse senden:
Maxview Vertriebs-GmbH, Gewerbegebiet Kugelbichl, Benzstr. 8, D-82291 Mammendorf/Obb.
Neben dem Produkt sollte der Kunde dem Paket Folgendes beilegen: Name, Anschrift, Telefonnummer,
Kaufbeleg und Beschreibung des Problems.
Wenn die Überprüfung zeigt, dass das Problem durch falsche Fertigung oder fehlerhaftes Material hervorgerufen wird, repariert (oder ersetzt) Maxview das Gerät kostenlos. Diese Garantie gilt nicht für Installation und
externe Verkabelung oder wiederaufbereitete Geräte.
Diese Garantie gilt nicht für Schäden, die durch die Verwendung einer anderen Halterung als der von Maxview
für das Produkt entwickelten Halterung entstehen. Diese Garantie kann nicht vom Originaleigentümer
übertragen werden.
Aufgrund des wachsenden und sich verändernden Satellitenmarktes kann Maxview nicht für Änderungen an
Satellitendiensten zur Verantwortung gezogen werden. Softwareaktualisierungen zur Behebung dieser
Probleme sind von der Garantie nicht abgedeckt.
Diese Garantie gilt unter folgenden Voraussetzungen ebenfalls nicht:
• Das Produkt wurde falsch angewendet, gebraucht, installiert oder gewartet.
• Das Produkt wurde ohne Verwendung einer Maxview Halterung installiert, die für das Produkt entwickelt
wurde.
• Es wurden Reparaturen von anderen durchgeführt oder versucht, die von Maxview nicht für solche
Reparaturen zertifiziert wurden.
• Reparaturen sind aufgrund normaler Abnutzung erforderlich.
• Es wurden Änderungen am Produkt vorgenommen.
• Die Antenneneinheit wurde ohne Autorisierung geöffnet.
• Durch Hochdruckreinigung wurden Schäden verursacht.
• Umstände außerhalb der Kontrolle von Maxview führen dazu, dass das Produkt nicht mehr korrekt
funktioniert.
• Der Kunde ist nicht der Originaleigentümer.
ALLGEMEINE GESCHÄFTSBEDINGUNGEN
In keinem Fall haftet Maxview für indirekte, zufällige oder Folgeschäden, die durch den Verkauf oder die
Verwendung des Produkts entstehen. Dieser Haftungsausschluss gilt sowohl während als auch nach dem
Garantiezeitraum.
Diese Garantie gewährt Ihnen bestimmte gesetzliche Rechte, beeinträchtigt jedoch nicht Ihre gesetzlichen
Ansprüche.
Die Garantie erstreckt sich über die Zeit von 2 Jahren ab Kaufdatum. Der Hersteller oder Importeur übernimmt
keine Haftung für Schäden, die durch nicht bestimmungsgemäßen Gebrauch entstehen.
Page 18

Elektrogeräte müssen getrennt vom Haushaltsabfall entsorgt werden. Das Produkt muss gem.
der örtlichen Entsorungsvorschriften der Wiederverwertung zugeführt werden.
Das Gerät erfüllt die Bestimmungen zur Einfuhr und zum
Betrieb innerhalb der Europäischen Union.
Verwendung nur im Innenbereich.
Schutzklasse II.
Bitte lesen Sie für weitere Informationen die Bedienungsanleitung.
Schutzart.
Versorgungsspannung: Gleichstrom.
Page 19

 Loading...