

Maxview MXL010 VUQUBE AUTO Owner's Manual
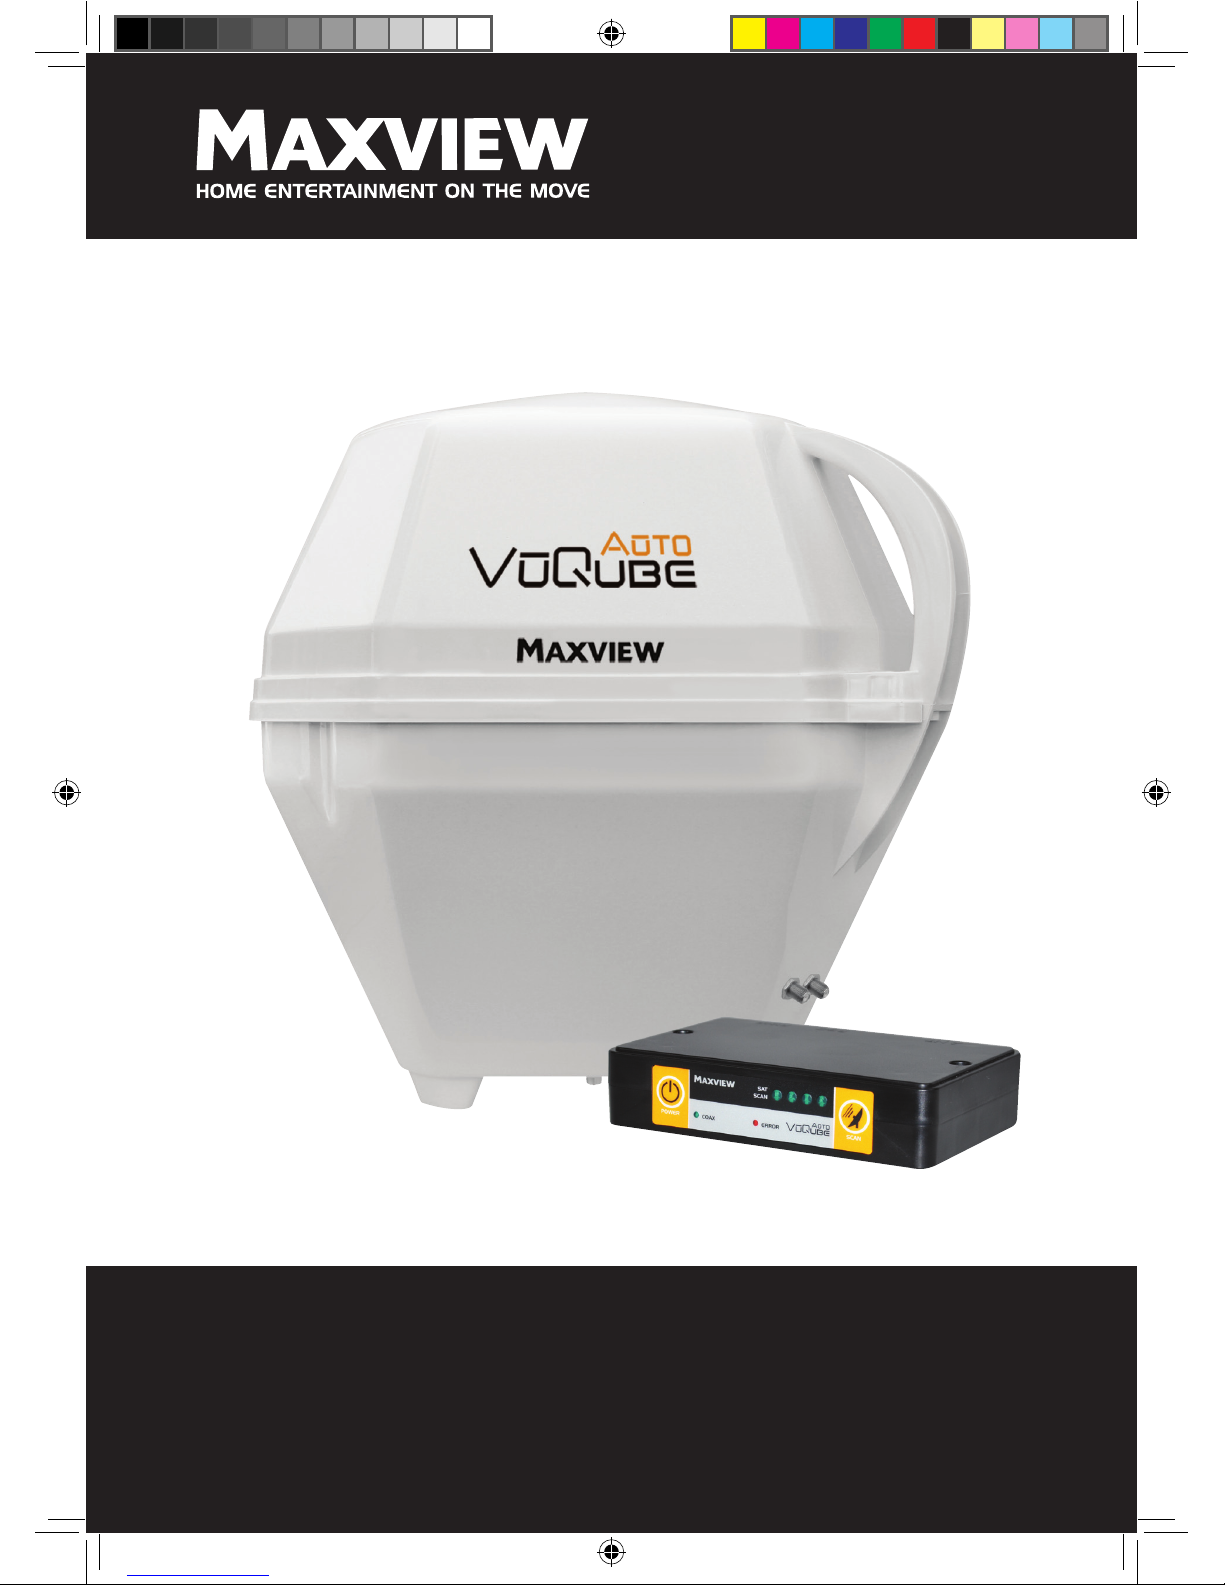
MXL010
VUQUBE AUTO
OWNERS MANUAL
BEDIENUNGSANLEITUNG
UK - Keep these instructions for future reference.
DE - Bitte bewahren Sie diese Anleitung gut auf.
MXL010 INSTRUCTIONS up issue.indd 1 05/09/2013 08:44
UK
Thank you for purchasing this product, should you have any difficulty using your Portable
Satellite System please contact our friendly Customer Helpline on (01553) 811000.
The VuQube Auto Portable Satellite System is easily configured to lock onto the appropriate
satellites necessary to receive your favourite TV channels.
Please retain these instructions for future reference.
DE
Vielen Dank und herzlichen Glückwunsch, dass Sie sich für die VuQube - Auto Satelliten Antenne entschieden haben.
Sollten sich bei der Inbetriebnahme Schwierigkeiten ergeben kontaktieren Sie bitte unseren
Kundendienst unter +49 (0) 8145 9969980.
Die VuQube – Auto wird mit einer Steuerbox geliefert an der Sie den gewünschten
Satelliten auswählen. Bitte bewahren Sie die Anleitung gut auf
Introduction/Einführung
Page 2
Record your purchase/Bitte ausfüllen
UK - Please fill in the details above once purchased. This information will be required in the
unlikely event of a fault occuring with this system.
* This can be located at the bottom of the VuQube Auto near the F connector ports below
the handle.
DE - Bitte fügen Sie alle relevanten Daten ein, diese werden im Falle einer
Garantiereparatur benötigt.
* Die Seriennummer finden Sie unten an der Antenne in der Nähe der F-Anschlüsse.
PURCHASE DATE/KAUFDATUM _______________________________
*SERIAL NUMBER/SERIENNUMMBER _______________________________
MXL010 INSTRUCTIONS up issue.indd 2 05/09/2013 08:44
Page 3
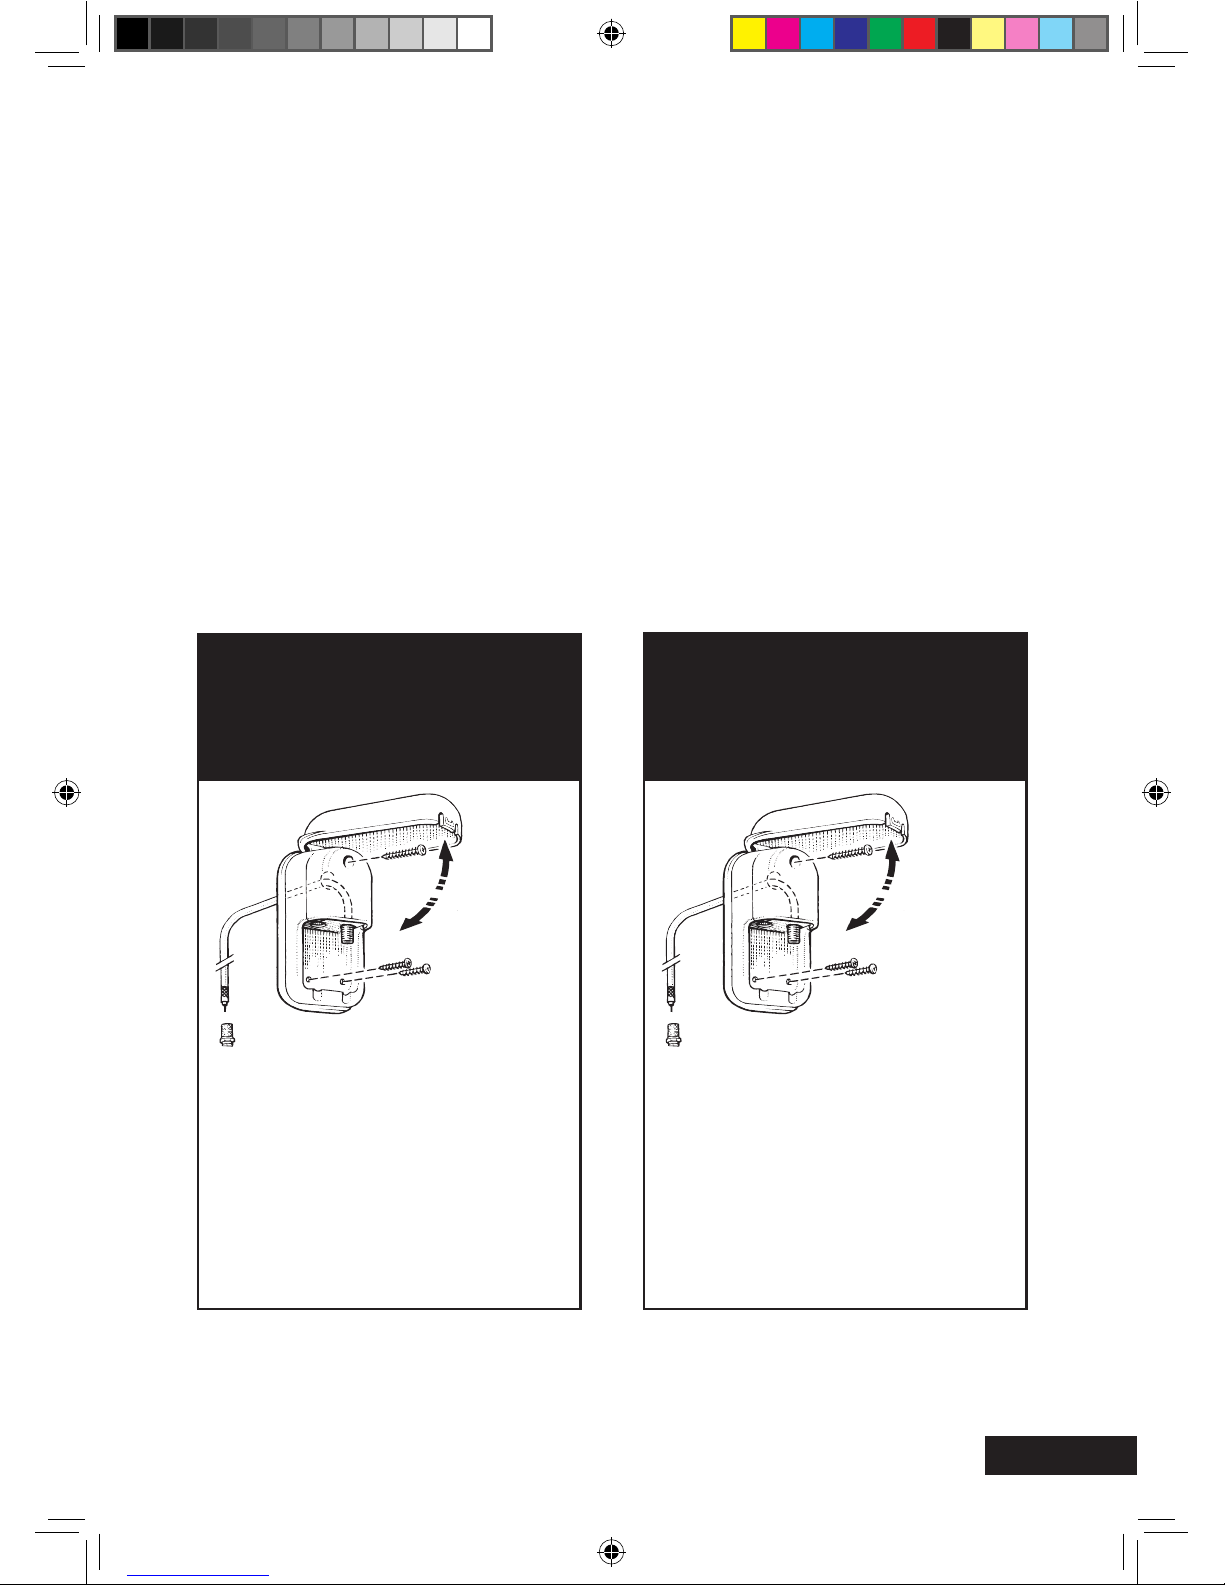
This pack includes:
• Antenna Unit
• VuQube Auto Control Panel
• 2 x 10m ‘F’ to ‘F’ Cables
• 1 x 0.9m ‘F’ to ‘F’ Cable
• 2 x Velcro Control Box Mounting Pads
• Cigarette Adaptor 12V Power Supply
You will also need (sold separately):
• TV
• Satellite receiver
• Cable(s) to connect receiver to TV
Kit contents/Lieferumfang:
Dieses Packet enthält:
• VuQube - Auto
• VuQube - Auto Steuerbox
• 2 x 10m Koax-Kabel
• 12V Anschluß-Kabel
Des weiteren benötigen Sie
(nicht Lieferumfang enthalten):
• Fernsehgerät
• Free to Air oder SKY Satelliten Receiver
• Verbindungskabel zum TV-Gerät
OPTIONAL WEATHEPROOF SOCKETS.
Recommended for a neat, watertight
connection externally to and from
your VuQube Auto.
Code B2020 (Single socket)
Code B2007 (Twin socket)
Available from most Maxview
Dealerships or order online at
www.maxview.co.uk
Sie erhalten bei uns auch
Außensteckdosen. Empfehlenswert
für einen sauberen und wasserdichten
Eingang in das Fahrzeuginnere.
Art.Nr.: 5015 (Außensteckdose mit
F-Anschluß)
Art.Nr.: 5026 (Außensteckdose TWIN
mit F. und Koax-Anschluß)
Fragen Sie Ihren Händler danach oder
schauen Sie auf unsere Homepage:
www.maxview.de
MXL010 INSTRUCTIONS up issue.indd 3 05/09/2013 08:44

Page 4
UK
1. Place the VuQube Auto on a stable surface with a clear view of the southern sky.
(With its built-in levelling feature, the VuQube Auto does not need to be level, but make
sure it is stable to prevent movement during operation.) Point the handle approximately to
the north (this will speed up search time).
2. Make the connections
as shown on the next
page.
DE
1. Positionieren Sie die VuQube
Auto auf einer stabilen
Grundfläche mit ungehinderter
Sicht Richtung Süden.
Die VuQube - Auto gleicht
Unebenheiten vom Boden
von selbst aus.
2. Stellen Sie die Verbindung
IN DER REIHENFOLGE her
wie es auf der nächsten
Seite beschrieben ist.
Set up/Aufbau
IMPORTANT! HAND TIGHTEN COAX CONNECTIONS. DO NOT USE A WRENCH.
Do not allow the coax cable to become bent or kinked.
Do not leave the coax cable where it can be tripped on or run over by a vehicle.
WICHTIG! Schrauben Sie das Koax-Kabel nur per Hand an die VuQube Auto.
NICHT MIT EINEM SCHRAUBENSCHLÜSSEL!
Bitte beachten Sie das, dass Koax-Kabel nicht geknickt oder zu stark gebogen wird.
Achten Sie darauf das, dass Koax-Kabel nicht dahin verlegt wird wo es zur
Stolperfalle wird oder von Fahrzeugen überfahren wird.
A. Satellites in
southern sky.
Satelliten in
Richtung Süden.
B. Top view.
Draufsicht.
C.Point handle
approximately North.
Handgriff Richtung
Norden.
A.
B.
C.
MXL010 INSTRUCTIONS up issue.indd 4 05/09/2013 08:44

Page 5
UK - key
A - VuQube System Outside vehicle
B - Supplied ‘F’ Cable
C - VuQube Auto Control Box
D - Satellite Receiver
E - TV
F - Scart Lead OR HDMI Cable
(HD or SD compatibility)
G - Cigarette Adapter 12V Power Supply
C
D
E F
B
A
MAIN TV
HAUPTFERNSEHGERÄT
2ND TV (OPTIONAL)
ANT
REC
AUX
SAT IN
PWR
PWR
12V
D
E
F
SAT IN
PWR
ATTENTION! Avoid sharp
bends when routing cable
ACHTUNG ! Vermeiden Sie
das Knicken des Koax-Kabels,
wenn es angeschlossen ist.
!IMPORTANT Do not block the antenna’s line of sight to satellites in the southern sky at any time.
WICHTIG! Um den gewünschten Satelliten zu finden dürfen keine Hindernisse wie z.B.: Bäume,
Häuser usw zwischen der VuQube - Auto und Richtung Süden sein. Also freie Sicht Richtung Süden.
DE - Erklärung
A - VuQube – Auto außerhalb des Fahrzeugs
B - Mitgelieferte ‘F’-Kabel
C - VuQube Auto Steuerbox
D - Satelliten Receiver ODER Sky Box
E - Fernseher
F - Scart-Kabel oder HDMI-Kabel
(HD oder SD kompatibel)
G - 12 V Anschlusskabel
Set up diagram/Anschlussdiagram
2TES FERNSEHGERÄT
12/24V
12/24V
G
MXL010 INSTRUCTIONS up issue.indd 5 05/09/2013 08:44
UK
1. Make sure all connections are made as shown on page 5.
2. Turn on the TV and satellite receiver.
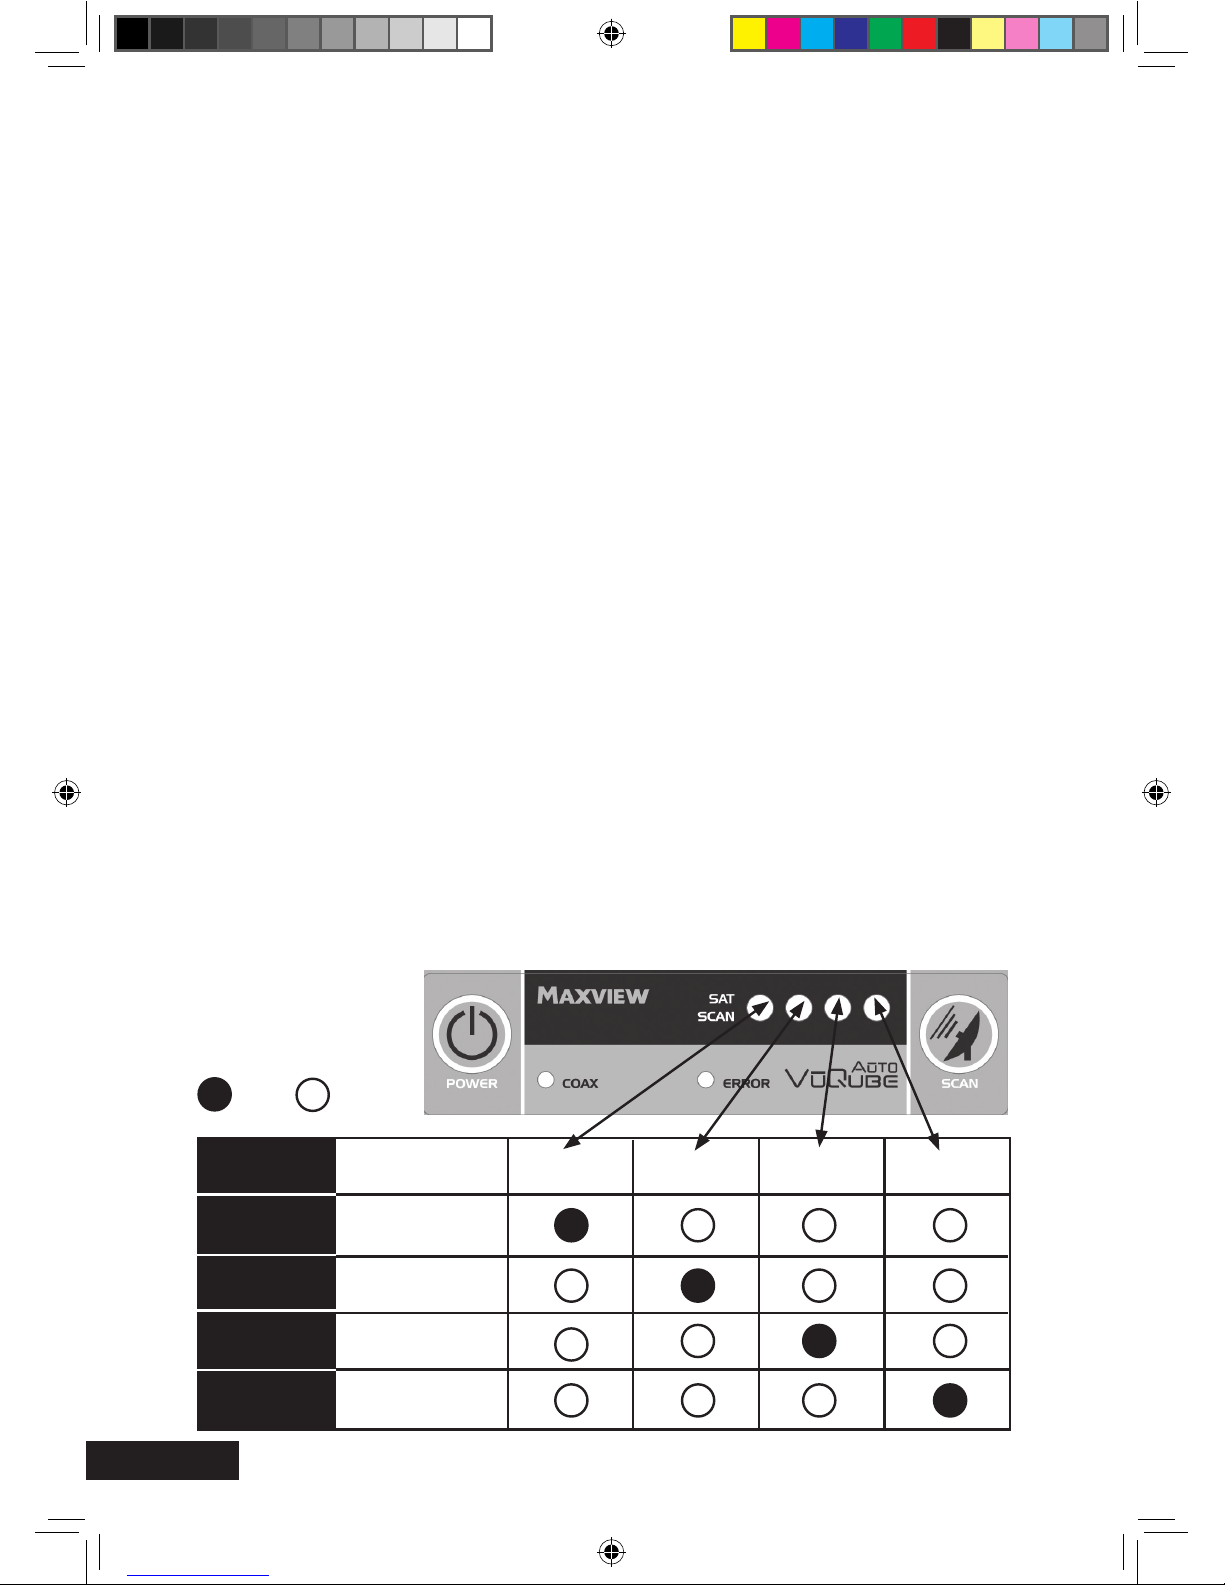
3. Press POWER on the VuQube Auto control panel.
If the unit is properly connected, the COAX light should flash for 10 seconds before turning
solid. This indicates the VuQube Auto is ready to search for satellites. If the ERROR light
appears, there is a problem with your connection, please see troubleshooting. You will also
notice, 1 of 4 SAT SCAN lights will flash 3 times. This indicates which satellite the system is
currently set to.
The VuQube Auto supports the following Satellites:Astra 1 - Astra 2 - Astra 3 - Hotbird
Please see table below to understand how the lights correspond to these satellites.
DE
1. Vergewissern Sie sich, dass alle Verbindungen, wie auf Seite 5 beschrieben
durchgeführt worden sind.
2. Starten Sie Ihr Fernsehgerät und den Receiver.
3. Drücken Sie den “POWER” Knopf auf der Steuerbox der VuQube - Auto.
Wenn das Gerät richtig angeschlossen ist, sollte die COAX-LED erst für 10 Sekunden blinken
und dann dauerhaft leuchten. Dies zeigt an, dass die VuQube - Auto betriebsbereit ist.
Sollte die “ERROR”LED leuchten gibt es ein Problem mit der Verkabelung, siehe hierzu die
Fehlerbehebung. Die Sat-Scan LED 1-4 zeigt an welchen Satellit Sie zur Suche ausgewählt
haben. Die LED blinkt dreimal auf
Die VuQube Auto unterstützt folgende Satelliten: Astra 1, Astra 2, Astra 3 und Hotbird
Siehe Tabelle unten, um zu verstehen welche LED welchen Satelliten entspricht.
Key/Erklärung:
On/An: Off/Aus:
Power up/Inbetriebnahme
Page 6
Euro channels
UK channels
Euro channels
Euro channels
Satellite/Satelliten:
ASTRA 1 (19.2E)
ASTRA 2 (28.2E)
ASTRA 3 (23.5E)
HOTBIRD(13.0E)
Light/Licht 1 Light/Licht 2 Light/Licht 3 Light/Licht 4
3
41 2
MXL010 INSTRUCTIONS up issue.indd 6 05/09/2013 08:44
 Loading...