

Page 1

HOME ENTERTAINMENT ON THE MOVE
INSTALLATION, OPERATION
& USER MANUAL
MXL002 & MXL002/TWIN OMNISAT DOME
Common Lane, Setchey, King’s Lynn,
Norfolk , PE33 0AT. England
Helpline : +49 (0) 1553 811000
Tel: +49 (0 ) 1553 813300
Email: cust_serv @maxview.co.uk
Web: w ww.maxvi ew.co.uk
9111325 Iss 2
Page 2

We thank you for buying the Maxview Omnisat Dome Satellite System.
The Omnisa t Dome has been designed f or permanent atta chment to the roof of your veh icle.
It will receive satellite reception almost anywhere in Europe.
The Max view Omnisat Dome is de signed to be used to recei ve and watch satellit e broadcasts in road ve hicles
e.g. caravans , minibuses, RVs and lor ries while these vehi cles are parked.
The Omnisa t Dome is easy to use, but ple ase read through this manua l thoroughly prior to st arting
the installation.
If you should re quire any technical ass istance please cont act 01553 811000
Maxvi ew reserves the rig ht to change specificat ions without prior no tice
432
Page 3

CONTENTS Page/s
SECTION 1 - INSTALLATION 4
Importantant Safety Instructions 5
Before starting installatio ns 5
Tool List 5
Vehicle Installation 6/7
Electrical Installation 8/9
SECTION 2 - O PERATING 10
Operating T he System 11
Precautions 11
Receiver B uttons and Functio ns 11
Connection Diagram MXL003 variant 12
Connection Diagram MXL003/t win variant 13
First In stallation and TV S ettings 14
Channel Selection 14
Infobar 14
Tele text 14
Channel Lis t - Selection of the Lis t Type 15/16
Channel lis t - Operatin Manual 17-20
Rad io 21
Favourite Channel List 21
Satellite Selection 21
Main Menu 22
Installation 22
Transponder List 23
Changing Prog ram Settings 24/25
Automatic Search 26
System 27
OSD Settings 27
TV Settings 28
Time and Date 28
Parental Settings 29
Other Settings 30
Service Menu 30
Timers 31
Extras 32
Games 33
Electronic Program Guide - EPG 33
Common Interface (optional) 33
Menu Map 34
Troubleshooting 35
System Specifications 36/37
SECTION 3 - U SER MANUAL 38
Usage 39
Guarantee and Exemptions 4 0
342
Page 4

SECTION 1
INSTALLATION
414
Page 5

IMPORTANT SAFETY INSTRUCTIONS
Do not open th e cover of the unit. No user -serviceable par ts inside. To open the cover c ancels the
guarantee of t he unit. Refer to an aut horised dealer.
Make sure that t he ventilation holes o f the receiver are not bloc ked, this prevents ove rheating.
To protect your unit from permanent damage do not connect non-recommended equipment.
The recei ver supplied with this s ystem is not a standa rd satellite receive r. It canno t be used with a normal
antenna dish . It can only be used wit h the Maxview Omni sat Dome. If you connec t an LNB to the output
of this unit i t may cause damage to the LNB or r eceiver.
The antenna p art of the system in stalled on the vehicle a dds extra height. It i s very important t o be
aware of this e xtra height when the v ehicle is on the move.
On instal lation personal safe ty should be consider ed when using power/han d tools and working at heig ht.
The user is le gally responsible for th e antenna mounted on top of t he vehicle.
BEFORE STARTING THE INSTALLATION - PLEASE READ
Always follow manufacturer’s instructions
Decide whe re you wish to mount your Omni sat Dome, taking into a ccount any obstacles t hat might interfere
with the t racking of the satelli te. It is recommended tha t you do a dry run to find the be st position.
The insta llation surface shou ld be smooth, flat and rigid .
Import ant: All 4 Fixing Pl ates must be level to avoid d istortion of the s ystem (see the nex t page).
Before st arting the instal lation of the antenna, ma ke sure that the surface on w hich the antenna is to be
mounted is dry and clean.
Please make sure that all connections have been made to the system before the power is connected,
failure to do so may result in damage to the system and may void the guarantee.
RECOMMENDED PARTS/TOOL LIST
Drill and dr ill bits
Screwdriver
Adhesive, s uch as Sikaflex®-512 and/or cl eaner and activator *
Multimeter
Side cutt ers and pliers
* always follow manufacturers instructions.
40 5
GUARANTEE
The Maxview Omnisat Dome is guaranteed against defective parts or workmanship for
2 years from t ime of purchase. This exc ludes any malfunctio n caused by improper use ,
accident al or malicious damage or remov al of outer cover. This does not a ffect your
statutory rights.
EXEMPTIONS
Maxvi ew is not liable for:
1. Damage caused by fi res, natural disaste rs (such as thunder, eart hquake, etc.), a third
party, acc idents, misuse or any ot her improper use.
2. Damage caus ed by incorrectly fo llowing the instruc tions described in t he operating or
installation manual.
3. Malfunction through simultaneous use of this product and other non-recommended equipment.
Page 6
Remove the Om nisat Dome from the pack aging and check it visual ly.
PACK CONTENTS
Satellite system
Satellite Receiver
2 x ‘F’ connec tors
1 x Boot
INSTALLATION ON THE VEHICLE
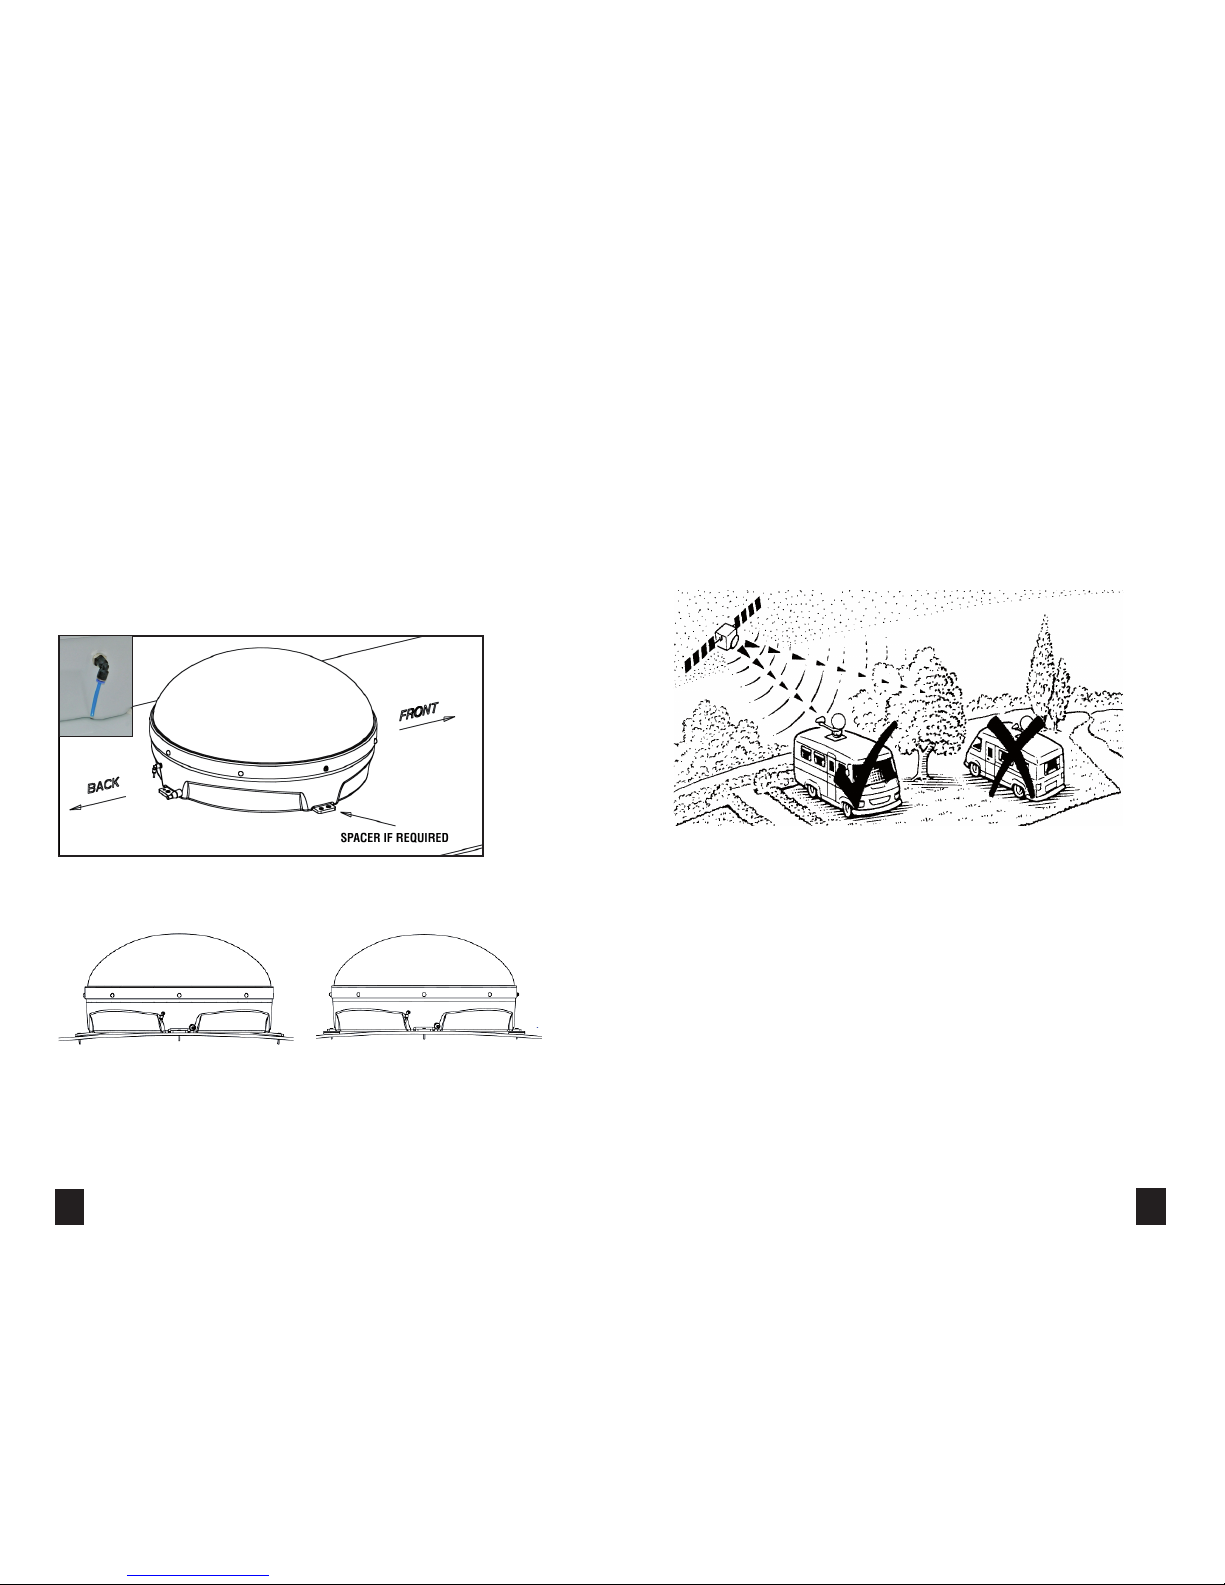
1. Position the O mnisat Dome on top of the ve hicle carefully, in your ch osen location.
The ‘F’ conn ector and blue pressur e balancing pipe should be di rected to the rear of the v ehicle.
Caution: Installation which is made without using spacers on irregular surfaces may cause distortion
of the sys tem. This may effec t the operation of the eq uipment and cause perm anent damage.
If the surf ace of the vehicle slopes , the left and right side d plates of the antenna wi ll not
lie flat on the su rface. In such cases , use spacers (not includ ed) to fill the gaps.
Receiver a nd power cable
Remote cont rol handset x 2 AAA b atteries
Screw and was her pack (x 8 of each)
Cable entr y cover
8m Coaxia l cable
‘F’ to ‘F’ coa xial lead
Infra Red ex tender
Receiver brackets
✘
✘
6 39
While the s ystem is operating a fai nt motor sound can be heard , this is normal.
Satellit e reception is only pos sible when the dome is posi tioned so that it has dir ect line of sight in the di rection
of the desire d satellite and there a re no obstructions b locking the view, e.g. tre es, buildings.
The signal re ceiving performa nce of the system may dec rease with heavy ra infall or snowfall. T he same result
may occur if th e antenna is covered wit h snow. In such a case, gentl y remove the snow from the an tenna cover.
Dirt on the d ome may decrease the signa l receiving perfor mance over a period of tim e. To preven t decrease of
perform ance gently clean the an tenna cover periodica lly.
Do not use abras ive cleaners as they may da mage the product’s sur faces.
Do not use sol vent based cleaning agen ts on plastic part s.
To turn off the s ystem press power bu tton on the front pane l of the receiver or “STAN DBY” button on the
remote cont rol handset. The LED on t he front panel will go out a nd the system swit ches off.
USAGE
Press the “ ” bu tton on the front pan el of the receiver or the “ STANDBY” button on t he remote control handse t
to operate t he system. The LED on th e front panel will come on a nd the system will st art to operate.
When the sy stem is operating, t he antenna start s to search for the selec ted satellite. The se arch is completed
in about 20 sec onds. After the sat ellite is found, the sy stem defines the most s uitable antenna posi tion by finetuning and the n stops. After the s atellite has been foun d the receiver channels c an be watched.
Page 7

2. Follow the adhesive manufacturer’s guidelines for surface preparation.
3. Apply th e adhesive to the unders ide of each fixing area (as sh own). Drill and fix sc rews
provided, e nsuring the system is l evel and there is no disto rtion to the base of the
system . We always recommend usi ng screws and adhesive fo r fixing.
4. We recomme nd you follow the adhesive m anufacturer’s guide lines for
curing time before driving your vehicle.
38 7
SECTION 3
USER GUIDE
39
38
Important Note:
Your system ma ybe fitted with a “ant i rotation tag” to pre vent antenna rotatio n during transit.
If this is the c ase this MUST BE REMOV ED before installa tion.
This can be si mply removed by cutt ing with side cutte rs.
!
Page 8

ELECTRICAL INSTALLATION
The antenna c able is taken from the top o f the vehicle to the inside. T he antenna cable
should not be lo nger than 15 meters. Fit the c able entry cover ont o the cable going
through the c able gland. Now atta ch the ‘F’ connector t o the external end of th e cable.
Decide on loc ation for cable entr y cover into vehicle (ab ove an overhead locker or ward robe etc.). Check fo r
cables wi thin roof space before dr illing. Drill a hole thro ugh the roof and push cable in to vehicle.
Ensure roof su rface is clean and dry a nd apply sealant/adh esive to the back of the flang e on the cable entry
cover. Now apply co ver firmly to roof. Clip cab le to vehicle roof using clip s supplied.
8 37
TECHNICAL SPECIFICATIONS
SATELLITE SYSTEM
Dish motion : Two axis; a zimuth and elevation
Satellite tracking: At stationar y position
Connect ion: Via coaxi al cable
Horizontal (azimuth) moving range: 0° ~ 360° unlimited
Horizontal (azimuth) moving speed: 60°/second
Vertical ( elevation) moving ra nge: 20 ° ~ 70°
Vertical (elevation) moving speed: 38°/second
Operating v oltage range: 11V ~ 25V DC
Operating power consumption: 40W
Dimension s: 69cm x 69c m x 34cm (width x leng th x height)
Wrapped Dim ensions: 81cm x 81xm x 48cm (wi dth x length x height)
Weight: 12 kg
Storage tempe rature: -30°C ~ 70°C
Operating t emperature: -15°C ~ 50°C
Operating r elative humidity r ange: 0 ~ 9 0 %
SATELLITE RECIVER
TUNER
Standard: DVB-S
Input signal l evel: -65…-25 dBm
Frequenc y range: 950 -2150 MHz
Demodulation: QPSK
Symbol rate : 1-45 M sps
Code rates : 1/2, 2/ 3, 3/4, 5/6 and 7/8
Reed Solomo n: 2 04, 188, 8
System: SCPC, MCPC
Channel lock: PLL
Output: Loop-through output
Input and out put impedances: 75ohmes
Connect ors: F type , Female
AUDIO / VIDEO
Audio sys tem: MPEG Layer 1-2
Sampling: 32, 44.1, 48kHz
Audio outpu t mode: M ono, Dual mono, Stereo
Video sy stem: MPEG 2 ISO/IEC 13818-1
Resolution: 720*576
Video mode: PAL
A/V CONNECTIONS
RCA: Video ( CVBS), Audio ( Stereo) output
Page 9

Note: The ‘ F’ connector on the Om nisat Dome side of the cab le is connected to the fe male ‘F’
connect or socket on the antenna. T he plastic ‘F’ connec tor boot on the antenna c able is pushed
onto the ‘F’ c onnector.
Inside vehicle route cable to satellite receiver and fit ‘F’ connector.
The 12-24V DC supply volt age should be taken from the c orrect point of the veh icle to
supply volt age to the Control Box. T he 12-24V DC supply vo ltage is supplied via a
2 x 0.75mm2 power co rd to connect to the Cont rol Box.
The antenna c able coming from the Omn isat Dome is connecte d to the input of the
Control Box v ia an ‘F’ connector.
If a Set-Top-Box i s used, connection b etween the Contro l Box and Set-Top-Box can be
made with the provided Loop through cable.
Once the elec trical connect ions to the Control Box an d Set-Top- Box (optional) are
complete d, the Control Box and Set-Top- Box (optional) shoul d be securely fastene d to
prevent vibration.
SEE PAGE 12 FOR RECEIV ER CONNECTION DI AGRAM
936
GENERAL SPECIFICATIONS
• AnimatedOSD
• 8000Channels
• Smartchannelscan
• Veryfastchannelswitch
• Mosaicchanne ls(15stillpicture,1livepictu re)
• PictureinGraphics(PIG)
• VariousGames
• VariousUtilities
• CustomOSD- Radiobackgrounds
• Channellistbackup
• 16favoritechannelgroups
• Advancedchannelediting( Multiplede letion,multiplemove,hide,skip)
• DVBandTeletex tSubtitle
• VBIandOSDTeletext
• Electroni cProgramGuide( EPG)
• Multilingualaudiosupport
• MultilingualOSD
• Parental,se tupanddevicelock
• 8VCRtimers(once,dailyandwee klymodes)
• Firmwareandc hannellistupdatefromPCorot herbox
• SCPC-MCPCcompliant
• 200MHzmainCPU
• 16MBFlash
• CI(CommonInterface)slo t(optional )
TECHNICAL SPECIFICATIONS
SYSTEM SOURCES
CPU (Cent ral Processing Unit) : 200 MHz RISC
RAM : 128 Mb R AM
Flash memor y: 16 Mb
DATA
Standard: RS232, 115200, 8, n, 1
Connect or: 9 pin, D-t ype, male
POWER SUPPLY
Type: Switch Mode
Power consumption: 30W
Operating v oltage: 12V.…24V DC
GENERAL
Dimension s: 185 x 202 x 60 mm
Weight: 1400 gr
Operating temperature: 5~40 °C
Page 10

SECTION 2
OPERATION
3510
TROUBLESHOOTING
If you have a probl em with your unit, bef ore
contacting the technical ser vice, check the following:
PROBLEM
The unit doe s not operate at all
(The LED o n the front panel does not c ome on).
The unit men us appear on the TV but t here
is no sound or pic ture.
During digital programs, audio interruptions
and video ske w occurs.
A digital pr ogram that was previous ly
watched is not available any more.
Remote control is not working.
Picture is available, but weak or no sound.
REASON
Make sure the power connection is correct.
The input power fuse may have blown.
Make sure that t he unit is connected to t he
Omnisat an tenna correctly. Als o make sure
that the prog ram settings of the u nit are set
to one of the pro grams included in the
satellite that you want to watch.
Signal emit ted by the antenna is not s trong enough.
Make sure that t here is no problem with th e cable.
The freque ncy, polarity, symbo l rate or PID values of that
program migh t have changed.
Check bat teries and replace if re quired. Ensure that the
sensor on th e unit is not obscured.
Make sure that t he volume of your TV and
satellite receiver is at an adequate level.
Page 11

OPERATING THE SYSTEM
Please make sure that all connections have been made to the system before the power is connected,
failure to do so may result in damage to the system and may void the guarantee.
1. Switch on t he Control Box. Check t he system is operat ing by listening to the soun d of the
antenna.
2. The power v oltage of the Control B ox should be measured using a mu ltimeter to ensure
that the supp ly voltage is not less tha n 12V DC under o perating conditions .
3. Switch on t he Set-Top-Box, if used . Check different cha nnels to see if the video a nd audio
is being received correctly.
PRECAUTIONS
> No user-serviceable part s inside.
> Use a dry clo th to clean the unit. Do no t allow electrical e quipment to be expos ed to rain or moisture.
> If there is a pro blem DO NOT remove the cover. Cont act an authorised d ealer.
> Your receiver is d esigned for use in a bus, bo at, caravan or similar ve hicles.
> Do not connec t any unsuitable equi pment to the unit as this co uld cause permanent dam age or danger.
> Remove the ba tteries from the rem ote control handset if i t is not to be used for long
periods. N on-removal could res ult in damage to the handset c aused by leaking batt eries.
> Dispose of batteries correctly in order to protect the environment.
> This recei ver is a non standard sate llite receiver and is on ly to be used with the
Maxvi ew Omnisat Dome Auto S atellite System. If you c onnect an LNB to the out put
of this unit , it may cause damage to the LN B and/or receiver
RECEIVER FUNCTIONS & CONNECTIONS
5. LNB Input
6. Loop Out
7. RCA Au dio Outputs (Lef t, Right)
8. RCA Video Outputs
9. Scart Connection
10. Power Input
11. Serial Port
12. Infrared Remote Control
5 6 7 8 9 10 11 12
1. Stand- by (On/off )
2. Programme Down
3. Programme Up
4. LED Display
1
4
2
3
34 11
MENU MAP
Page 12

CONNECTION DIAGRAM - FOR SINGLE LNB VARIANT - MXL003
CONNECTIONS
Before mak ing any connections to t he unit ensure that the mai ns input has been disconn ected. Connect to t he
mains once all connections have been completed correctly. Incorrect connections may cause permanent
damage to the uni t. If you are unsure on how to co nnect the unit cont act your installer or Cu stomer Service.
> VCR (Vide o Cassette Record er) Connection
A VCR connec tion can be made by connec ting it to the VIDEO ou tput of the satellite r eceiver. The VCR OSD (On
Screen Dis play) menus are displayed on t he TV screen. The VCR i s set to on, even when the re ceiver is switched
off. When t he receiver is off the v olume of the TV is cont rolled by the TV, however, when t he receiver is on, the
volume can be c ontrolled using the rec eiver.
> TV Conne ction
Video RC A output should be connec ted to TV Video RC A inputs. Audio RCA o utputs can be conne cted to TV
Audio RCA in puts.
> Audio Amplifier Connection
Connection through RCA Outputs
You may connect yo ur unit to an audio amplifie r through RCA output s. For this purpose, us e AUDIO-L and
AUDIO- R stereo outputs of yo ur unit.
OR
Audio Amplifer
PC Infrared Remote
Control
TV or VCR
(an additon al cable will be
required to l ink VCR to TV)
+12V/ +24V
12 33
GAMES
> When in the “M ain Menu”, go to “Games” by using
“ ”/“ ” and “✘”/ “✘” buttons and pres s the “OK”
button. The “Games” sub-menu is entered.
ELECTRONIC PROGR AM GUIDE - EPG
Broadcasted timetables will be available with some
programs. You may us e the “EPG” feature of the u nit
to get this information.
> Press the “ EPG” button on the remote c ontrol when
no menu is displa yed. The “EPG” menu appea rs on
the screen.
> You will see in the “ EPG” menu a list of the
channels, t imetable, star t and finish times, name and
summary of the channel.
> You may use “✘”/“✘” bu ttons to move bet ween
channels and t o display data on the scree n. Every time
you change the c hannel, you will see a live p icture of
the new chann el on the upper left hand s ide.
> You will see the s tart and finish time s and the day
that the tim etable covers. A red li ne shows the current time.
> You may use the “EP G” menu as a r eminder menu.
If you selec t a channel other than the c urrent channel
at a later tim e and press the “OK” button , its box will
become red . When it is time for the sel ected channel
your receiv er will automatical ly go to that channel. To
cancel thi s feature, press the “OK” but ton again, on
the same box .
COMMON INTERFACE (OPTIONAL)
Some Troya II Digi tal Satellite rece iver models have a
CI (Common Interface) module. CI modules are used
with a smar t card.
With a cor rect CI module and corre ct smart card
existi ng and future scrambled c hannels can be
watched.
Insert t he smart card into the slo t in the CI module
and then sele ct the scrambled chan nel. The scrambled
channel wil l be available in a few secon ds.
✘
✘
Page 13

CONNECTION DIAGRAM - TWIN LNB VARIANT - MXL003/TWIN
32 13
EXTRAS
> When in the “M ain Menu”, go to “Extras” by u sing
“ ”/“ ” and “✘”/ “✘” buttons and pres s the “OK”
button. “ Extras” sub-m enu is accessed. You can acce ss
some useful programs in this menu.
> While in the “ Extras” menu, go to t he “Calendar” by
using “✘”/“✘” butt ons and press the “OK” butt on. A
calendar ap pears on the screen. Th e calendar covers
the dates fr om 1980 to 20 99. “Year” is selecte d by
“✘”/“✘” but tons and “Month” is sel ected by
“ ”/“ ” but tons. Press “EXIT” or “MENU” buttons
to exit th e calendar.
> While in the “ Extras” menu, go to “C alculator” by
using “✘”/“✘” butt ons and press the “OK” butt on. A
calculato r appears on the screen . Simple arithmetic
calculat ions can be made by using numbe r, “✘”/“✘”
“ ”/“ ” and “OK” but tons in this menu. Pre ss
“EXIT” or “MENU” bu ttons to exit the
calculator.
✘
✘
✘
✘
✘
✘
Audio Amplifer
PC Inf rared Remote
Control
+12V/ +24V
HDMI or
Scart
Freesat P VR or SKY HD receiver
If a satelllite adjustment is
required yo u will need to
connect yo ur TV directly to
the Dome receiver
Page 14

14 31
TIMERS
Timers are u sed to turn the unit on /off at
programmed times. Your receiver contains 8 timers.
For timer settings:
> Enter the “Ma in Menu” and then go to the “ Timers”
sub menu.
> Select t he timer that you want to cha nge by using
“✘”/“✘” but tons, and then press t he “OK” button.
The “Timer Details” menu is displayed.
> In the “Ti mer Details” menu sele ct the channel that
you want to set u sing the “ ”/“ ” butto ns. Enter the
date of the pro gram in “Date”. Enter the “Star t time”
and “End time ” by using the number butt ons on the
handset. ( If the start time o f the program is later than
the end time i t is assumed to be the nex t day.)
> “Mode” can b e selected as “Once”, “Daily ” or
“Weekl y” by using “ ”/“ ” butt ons.
•Ifyouchoose“Once”:Itturnsonthereceive ronly
on the date tha t you entered in “Date”. “Weekd ay”
option becomes unavailable.
•Ifyouchoose“ Daily”,“Weekday”and“Date”
become unavailable. The program selected will turn
on/of f at that time, every da y.
•Ifyouchoose“ Weekly ”,“Date”becomes
unavailable b ut you can change the day in “ Weekday”.
If you entere d a day in the “Date”, every week i t will
turn on/ off on the day that you have c hosen.
> “Active” sho uld be set to “Yes” to acti vate the timer.
> Save the chang es by pressing the “BLUE” button.
> After co mpleting the changes, pr ess “MENU” or
“EXIT” but ton to exit from the “ Timers” menu.
Notes:
If the power fa ils for any reason, all tim er settings will
be deleted a nd all timers turned of f.
Before adju sting the timers, ti me and date should be
entered in “Time & Date” sub-menu.
The set tings should not conflic t with one another.
✘
✘
✘
✘
FIRST INSTALLATION AND TV SETTINGS
When you have c ompleted the require d connections to your sa tellite receiver, plug in t he mains lead and switch
on (Pleas e refer to “Connections” (page 12) to verif y their correctn ess).
Turn on the TV an d satellite receive r and press the “MENU” button on the satellite receiver remote control
handset. I f you are using a scart conn ection to the TV, no T V settings are requ ired. Whenever you tur n on your
TV and rec eiver, the TV will autom atically display the r eceiver screen. (S ome TVs may not have automa tic scart
switchi ng. In this case, you need t o enter the AV mode using the T V remote control hands et).
CHANNEL SELECTION
You may use several m ethods for channel sele ction.
> You may select a c hannel by pressing “✘”/“✘” b uttons while any prog ram is being displayed. Th e number
and name of the c hannel that you have selec ted will be displayed un der the screen.
> You may select a c hannel, using the number bu ttons. The number of t he channel you have selec ted will be
displayed und er the screen. You may apply th is method in three ways :
1. Press the chan nel number as four digit s. For example, to selec t the channel 1875, press 1, 8, 7, 5, and to selec t
the channel 27, press 0 , 0, 2, 7.
2. Press the c hannel number only and th en wait a few seconds. For e xample, to select cha nnel 168, press 1, 6
and 8 and wait . To selec t channel 56, press 5 and 6, a nd then wait.
3. For fast acce ss to the channels, whil e entering the channel num ber, keep pr essing the last number. For
example, to a ccess channel 3, press an d hold button 3. To access chann el 14, pres s 1 and then press and hold
button 4.
> You may call the “Chan nel List” by pressi ng
the “OK” butt on, if the “Channel List ” menu is
not displaye d. (Please see “Channel List”).
INFOBAR
INFOBAR i s displayed at the lower sid e of the screen with eac h channel change. This bar w ill
show channel n umber, channel name, signal leve l and some information r elating to the
channel bei ng displayed. Various sym bols will show if the chann el, is on the favourite li st, has
alternat ive languages for that cha nnel, is a radio channel, if t he channel is scrambled and i f teletext is availa ble.
TELETEXT
If your TV d oes not have Teletext func tion you may use your rece iver’s Teletext func tion.
> The teletext data is available on some channels only.
> Select t he teletext channel y ou would like to view and pres s the “TXT” button.
> You may use the “✘”/ “✘” buttons to alter th e page number.
> For direct a ccess to requested pr ograms you may use the numbe r buttons.
> Pressing t he “TXT” button while Telete xt is active makes the Tele text page transparen t.
> To exit the Telete xt press “MENU” button.
Page 15

30 15
OTHER SETTINGS
> Enter the “Ma in Menu” and then the “Ot her
Settings” sub-menu from the “System” menu.
> If you are using a de dicated LNB, the LNB p ower of
your satellite receiver must be switched on. A common
LNB is used for satellite distribution systems. Since the
common LNB is powered by the distribution centre,
the LNB suppl y of your equipment must b e switched
off. Set th e “LNB Power” option t o “On” or “Off” using
“ ”/“ ” but tons.
> If “Automatic P ower-on” is set to “Of f” when
the main power fails, your satellite receiver will be
set to sta nd-by when the power is re stored. Set to
“Automatic Po wer-on” option “On” or “O ff” by using
“ ”/“ ” but tons.
SERVICE MENU
> Enter the “Ma in Menu” and then the “Se rvice”
sub-menu from the “System” menu.
> While in “In formation”, press the “OK” but ton. The
“Information” menu is displayed. In this menu some
hardware and software information is displayed.
> “Factor y Reset” option is u sed to return to the
last channe l information which wa s loaded to your
receiver v ia data connection . The PIN is required to
enter this m enu. After the PIN has b een entered, a
message, “ Fact ory settings wi ll be restored. Are you
sure? ” will appear. If you press t he “OK” button, the
factory settings are restored.
> “Backup Cha nnel List”: The PIN i s required to enter
this menu. Af ter the PIN has been en tered a message,
“Are you sure that you want to backup channel
list?” wi ll appear. If you press the “OK” but ton, the
channel list is backed up.
> “Recall B ackup List”: The PI N is required to enter
this menu. Af ter the PIN has been en tered, a message,
“Are you sure that you want to recall database
backup?” wil l appear. If you press the “OK” but ton,
the spare channel list is reloaded.
✘
✘
✘
✘
> If “Automatic S earch” is set to “On”, the
receiver w ill periodically s earch for new channels
while in stand-by mode.
> Press “MENU” or “ EXIT” button to exi t from
the “Other S ettings” menu. A me ssage, “Do you
want to store?” w ill be displayed if you have
made any change s. Press the “OK” button t o
store. Pre ss “MENU” or “EXIT” button t o exit
without s toring the changes.
CHANNEL LIST – LIST TYPE SELECTION
> If you press t he “OK” button when
no menu is displa yed, the “Channel
List” w ill be displayed on the scre en.
> The channel s may be listed as diffe rent
types i n the “Channel List” me nu. Press the “RED”
button to s elect the list ty pe. After pressing t he
“RED” butto n, you can select a dif ferent list type
by using “✘”/ “✘” buttons. Once you have
selecte d the list type you wan t, press
the “OK” butt on.
> Press the “GREEN” b utton to access the
“Ops Menu” to e nable changes to be made.
> Press the “ YELLOW” button to l ist channels.
> Press the “ INFO” button to list th e channels in
alphabetical order.
> SELECT SAT: The first listi ng type is to list the
channels according to the satellite selected. After
pressing the “RED” button i n the “Channel List”, press
the “OK” butt on when “Select Sat ” is highlighted in
the pop up menu. A “Satellite List” menu comes up.
All the chan nels are listed in this me nu. Move to the
desired satellite by pressing “✘”/“✘” bu ttons and
press the “OK” bu tton. If you select ”All ”, all the
satellite channels are listed. Only the channels belonging to the selected satellite will be shown.
> TV/RAD: The second list ing type is listing t he
channels dep ending on whether the ch annel is a TV or
Radio channe l. After pressing th e “RED” button in the
“Channel Lis t”, highl ight “Tv/Rad” by usin g “✘”/“✘”
buttons a nd press the “OK” button. T he options are
“All”, “TV” a nd “Radio” in this menu. Hig hlight the desired opti on by using “✘”/“✘” butto ns and press the
“OK” button. I f you select “All”, all the TV an d Radio
channels wi ll be listed. If you selec t “Radio”, only radio
channels wi ll be listed and if you sele ct “TV”, only TV
channels will be listed.
> The program s prefixed with a (not e) symbol
radio programs.
Page 16

16 29
PARENTAL SETTINGS
> Enter the “Ma in Menu” and then the “Pare ntal Settings”
sub-menu from the “System” menu.
> “Enter Pin” m essage will be displaye d. Enter the 4 digit
password by using the number buttons. (Factory setting of
your receiv er is 0000.)
> The “Paren tal Settings” men u is displayed once the PIN
has been cor rectly entered.
> If “Recei ver Lock” is “On”, the PIN is asked fo r every
time the receiver is switched on.
> If you don’t wan t your receiver sett ings changed by
somebody e lse, you can use “Setup L ock” option. If “Se tup
Lock” is “On ”, the PIN is re quired to enter the menus
where the cha nnel information and s ettings are changed .
> To change the PIN, hi ghlight “Change PIN” and pr ess
the “OK” butt on. “Enter New PIN” be comes active. Ente r
the new PIN by u sing the number button s. After you have
entered th e new PIN, “Confirm New PI N” becomes activ e.
Enter the ne w PIN again. After you have p ressed the last
number a “Pi n changed” message is disp layed. Press the
“OK” button to c onfirm.
> Press “MENU” or “ EXIT” button to exi t from the
“Parenta l Settings” menu. A me ssage, “Do you want to
store? ” will be displayed if you have m ade any changes.
Press the “OK” bu tton to store. Pres s “MENU” or “EXIT”
button to e xit without sto ring the changes.
FTA/SCRAMBLED: The third lis ting type is listi ng the
channels dep ending on whether they a re FTA (Free to
air) or Scrambl ed (coded) channels. A fter pressing the
“RED” butto n in the “Channel List” hi ghlight “FTA/
Scrambled ” by using “✘”/“✘” butto ns and press the
“OK” button. T he options are “All”, “FTA Only ” and
“the scram bled channel names” in thi s menu.
Highlight t he desired option by usin g “✘”/“✘”
buttons a nd press the “OK” button. I f you select “All”,
all the channe ls are listed. If you sele ct “FTA Only”,
only FTA chan nels will be listed and i f you select “one
of the Scramb led channels”, the coded channe ls that
belong to tha t scrambled channel wil l be listed.
> The program s prefixed with a “ ” sym bol are
scrambled c hannels in the “Channel Lis t”.
FAV GROUP: The fourt h listing type is li sting the
channels according to favourite groups. After pressing
the “RED” but ton in the “Channel List ”, highligh t “Fav
Group” by using “✘”/ “✘” buttons and pre ss the “OK”
button. T he options are “All”, “Only Favs” an d “the
other favou rite channel groups”( that you’ve created
in this menu ). Select the desire d option by using
“✘”/“✘” but tons and press the “OK” but ton. If you
select “All ”, all the chan nels are listed. If you se lect
“Only Favs”, only favorite channels will be listed and
if you selec t one of the favourite cha nnels that you’ve
created, t he favourite channels t hat belong to that
group will be listed.
ALPHA SORT: The final listi ng type is listing the
channels depending on alphabetical order. After
pressing the “RED” button i n the “Channel List”,
highlight “Alp ha. Sort” by using “✘”/ “✘” buttons and
press the “OK” bu tton. The options ar e “Normal”,
“A..Z” and “ Z..A” in this menu. Sele ct the desired
option by usi ng “✘”/“✘” buttons and p ress the “OK”
button. I f you select “Normal ”, the channe ls are listed
according to t he order recorded. If you sel ect “A..Z”,
the channels a re listed according to alp habetical order.
If you selec t “Z..A”, the channels are lis ted in reverse
alphabetical order.
> Press “MENU” or “ EXIT” button to exi t the
“Channel List” menu.
Page 17

28 17
TV SETTINGS
> When in the “M ain Menu”, select “System” b y using
“ ”/“ ” and “✘”/ “✘” buttons and pres s the “OK”
button. H ighlight “TV Set tings” and press the “ OK”
button again. The “TV Settings” sub-menu is accessed.
> In “TV S ettings” you can se lect the TV syst em as
“NTSC”, PAL B/ G” or “PAL I” in the “System” op tion
using “ ”/“ ” bu ttons.
> You can set the Br ightness, Contras t and Saturation
value bet ween 0-100 by using “ ”/“ ” but tons.
> Press “MENU” or “ EXIT” button to exi t from the
“TV Se ttings” sub-me nu. A message, “Do you want to
store?” w ill be displayed if you have m ade any
changes. Pr ess the “OK” button to st ore. Press
“MENU” or “EXIT” bu tton to exit wit hout storing the
changes.
TIME AND DATE
> Enter the “Ma in Menu” and then the “T ime & Date”
sub-menu from the “System” menu.
> “Mode” can b e selected as “Auto”, “Manual” or
“Selec ted tp”. In “Manual” mode the time i s set by the
user. In “Auto” mode th e time is fixed by channel. In
“Selec ted tp” mode the time is fixe d by the selected
transponder.
> You can highlight “ Date” and “Time” by usi ng
“✘”/“✘” but tons and change them by usi ng the
number buttons.
> Press “MENU” or “ EXIT” button to exi t from the
menu. A mess age “Do you want to store?” wil l be
displayed if y ou have made any changes. Pres s the
“OK” button to s tore. Press “MENU” or “EXIT” button
to exit wi thout storing the cha nges.
Note: If the equ ipment power fails for any re ason, the
time and date w ill be lost if they were e ntered using
the manual mod e. “Time Zone” should be e ntered to
ensure auto matic time storage. It is m andatory to set
the time and date before adjusting the timers.
✘
✘
✘
✘
✘
✘
CHANNEL LIST – OPERATION MENU
Differe nt operations are also p ossible in the
“Channel Lis t” menu. Press the “GREEN” bu tton
to select o peration type. Af ter pressing the
“GREEN” button i n the “Channel List”, highligh t
“Operatio n” by using “ ”/“ ” button s. There
are 8 symbo ls in the “Channel List” r epresenting
these operations.
> NAME: The firs t symbol at the top lef t of the
column in “Chan nel List” is used for ch anging
the channel na me. Select by using “ ”/ “ ”
buttons a nd press the “OK” butto n to access the
“Name” oper ation. You can select the c hannel
that you want t o rename by using “✘”/“✘”
buttons . When you press the “OK” bu tton
again, a keybo ard appears on the screen .
Press“✘”/“✘”, “ ”/“ ” and the “OK” bu ttons
on the remote c ontrol to enter the desi red letters
on the keyboa rd. The channel name may have
up to 32 charact ers. You can use uppercas e or
lowercase , numbers, -, & and space in th e
channel name.
> DELETE: You can del ete channels you don’t
want in the “Cha nnel List” by using the “ Delete”
operatio n. Press the “GREEN” button t o enter
“Operatio n” menu. Select by using “ ”/ “ ”
buttons a nd press the “OK” button to a ctivate
“Delete” o peration. When you pre ss the “OK”
button, t he current channel is se lected. You
can highlig ht the channel you want to dele te by
“✘”/“✘” but tons. If you press the “OK” bu tton
again the highlighted channel is deleted
immediately. All channels belonging to that
list will b e deleted if the “YELLOW” button i s
pressed.
> FAV GROUP: Press the “GR EEN” button to
enter “Oper ation” menu. Select by u sing
“ ”/“ ” but tons, “Fav Group” is act ivated
and by pressi ng the “OK” button the “Fav Ops .”
menu appear s. The options in this me nu are,
adding/ removing a new channel to /from the
favourite channel group, creating a new favourite
channel group, renaming and deleting an
existi ng group, locking and unlock ing a group.
To add a new group, pres s the “OK” button while
“Add/Rem . Channel” is selecte d. A keyboard
appears on t he screen. You can now create a ne w
favourite group using the keyboard.
✘
✘
✘
✘
✘
✘
✘
✘
✘
✘
Page 18

18 27
SYSTEM
> The second s ub-menu in “Main Menu” i s “System”
menu. When in the “Main Menu”, highlight “System”
using “ ”/“ ” an d “✘”/“✘” buttons and pr ess the
“OK” button. “System” sub-menu is displayed.
> There are “OSD S ettings”, “Time and Dat e”,
“Parenta l Settings”, “Other Set tings” and “Ser vice”
options in this menu.
OSD SETTINGS
> When in the “M ain Menu”, highlight “System”
by using “ ”/“ ” a nd “✘”/“✘” buttons and p ress
the “OK” butt on. Select “OSD Sett ings” and press
the “OK” button again. “OSD Settings” sub-menu is
accessed.
> Highlight “OS D Language” and select a la nguage
using “ ”/“ ” bu ttons.
> “Prim. Aud io Lang”, “Sec. Audio Lang ”: Primary and
Secondary audio languages. Some channels broadcast
in multiple l anguages. The languages t hat are selected
using these o ptions will be the chos en language for
the channel.
> “Subtitle Language”: Some channels broadcast in
multiple su btitle languages. If t he channel that you
are watching h as subtitle languages, i t is displayed
automatically.
> If you highligh t “Transparency” the t ransparency
can be adjus ted to “0%”, “20%”, “40%” o r “60%”.
> “Channel Swi tching” is, freezing t he picture,
blanking the s creen or fast. Selec t “Fast”, “Freeze” or
“Blank” by u sing “ ”/“ ” buttons.
> “Infobar Du ration” can be set from 1 s econd to 5
seconds.
✘
✘
✘
✘
✘
✘
> “OSD Background” and “Radio Background”:
There is one s tandard OSD and radio backg round
(“Def ault”) in your rece iver. You can lo ad different
picture s from your PC to the recei ver. They ap pear
in this
option and yo u can select the pic ture that you
want.
> Press “MENU” or “ EXIT” button to exi t from
“OSD Sett ings” sub-menu. A mes sage “Do you
want to store?” w ill be displayed if you have
made any
changes. Pr ess the “OK” button to sto re. Press
“MENU” or “EXIT” bu tton to exit wit hout storing
the changes.
✘
✘
After you h ave created a new “Favouri te Group” you
can change th e name of the group. To do this the
“Rename Grou p” option is used. To add a channel t o
the created group, highlight “Add/Rem. Channel” and
press the “OK” bu tton. The menu on the ri ght appears
on the scree n. The “Channel List” a ppears as the left
column and th e favourite group list a ppears as the
right colum n. Select a channel fro m the “Channel List”
and press th e “OK” but ton. That channel wil l now be
added to the “ Favour ite Channel” list.
LOCK: Press t he “GREEN” button to enter th e
“Operatio n” menu in the “Channel List ”. Selec t by
using “ ”/“ ” bu ttons. “Lock” op eration is activa ted
and by pressi ng the “OK” button the “PIN ” menu
appears. E nter the 4 digit passwo rd by using the
number buttons on the remote control. (Factory
setti ng of your receiver is 000 0). The “Lock” m enu
is accessed. By using “✘”/“✘” butto ns go to the
channel to be lo cked and press the “OK” but ton. That
channel wil l be locked and prefixed by t he “ ” in the
“Channel List”.
The “Paren tal lock” operatio n can also be used on
channels by us ing this option. The “PI N” menu
appears wh en you want to access thes e channels and
the correc t PIN must be used to gain a ccess.
✘
✘
Page 19

26 19
AUTOMATIC SEARCH
> When in the “M ain Menu”, go to “Installati on” by
using “ ”/“ ” an d “✘”/“✘” buttons and pr ess the
“OK” button. P ress the “OK” button agai n to enter
the “Automat ic Search” option. Sele ct the “All Scan”
sub-menu.
> A satellit e can be selected by hig hlighting “Satelli te”
and using the “ ”/ “ ” buttons.
> If “Metho d” is highlighted “Fi xed Sr” or
“Transponder ” can be selected. I f you select
“Transponder” as “Method”, all relevant
transponde rs will be searched. If y ou want to search
by symbol ra te, select “Fixed S r” in “Method” and
then enter t he “Symbol Rate” by using “ ”/ “ ” or
number buttons.
> Select “O nly TV”, “Only Radio” or “All ” scan type in
“TV /Rad” by using “ ”/“ ” bu ttons.
> If you want to sc an for Free-to-A ir channels,
highlight “F TA/Scrambled ” and select “FTA Onl y”. If
you want to sc an for both Free-to- Air and other
channels, select “All”.
> “Netw ork Search”: A networ k information table is
sent by some pr ograms and it shows the lo cation of
other progr ams. If “Network Se arch” option is “Yes”,
the receiv er tries to find the new prog rams according
to the net work information ta ble.
✘
✘
✘
✘
✘
✘
✘
✘
> MOVE: Pre ss the “GREEN” button to ent er
“Operatio n” menu in the “Channel List ”. Selec t by
using “ ”/“ ” bu ttons. “Move” opera tion is
activa ted. When you press the “OK” bu tton the menu
on the right ap pears. The “Channel Lis t” appears as
the left c olumn and the channels to be m oved as the
right colum n. Select the channel yo u want to move
and press th e “OK” but ton. That channel goes t o the
right colum n. In this menu press the “GREEN” bu tton
to go to the lis t on the right. If you selec t a channel
and press th e “OK” but ton again that channel goe s
back to the le ft column, it can be rem oved from the
channel lis t to be moved. All the chann els to be moved
are in the righ t column.
> Press the “ YELLOW” button to m ove the selected
channels to t heir desired positio n. In the left column,
by using “✘”/ “✘” buttons go to the place t he channels are to be mov ed to and press the “OK” butt on. All
the channels t hat are moved will go to the t op of that
selected channel position.
> SWAP: Pre ss the “GREEN” button to ente r
“Operatio n” menu in the “Channel List ”. Selec t by
using “ ”/“ ” bu ttons, “Swap” opera tion is
activa ted. Highlight the firs t channel that you want
to swap and pre ss “OK” button. Then hig hlight the
second chan nel that you want to swap, pre ss the “OK”
button aga in. The two channels ha ve now replaced
each other.
✘
✘
✘
✘
Page 20

20 25
> PID Setting: When you pre ss the “GREEN” button,
“PID” menu c omes up. The values in this m enu are set
automati cally while searching , so it is not necessar y to
change these values.
> AUDIO Setting: When you pre ss the “YELLOW”
button, “Audio” menu comes up.
> “Mode” is “St ereo” unless any changes a re made.
“Mode” can a lso be set to “Left ”, “Right ” or “Mono”
using “ ”/“ ” bu ttons.
> The volume of s ome programs may be higher or
lower than th e others. This can ca use the volume to
increase or de crease abruptly. In order t o compensate
for such volume differences, the “Volume offset” option in the “Audio ” menu can be used.
> When you incr ease the volume offs et, the volume
of the program w ill increase, and when yo u decrease
the volume of fset (with – valu es), the volume of the
program wil l decrease accordingly. Wh en in “Volume
Offse t”, adjust the volume dif ference between +10
and -10 by using “ ”/“ ” but tons.
> Access to Au dio Track s: Some programs can be
broadcas t in several languages. Pre ss the “OK” button
when you have hig hlighted “Audio Tracks”. Select t he
language you wan t.
> Press “MENU” or “ EXIT” button to exi t from the
“Audio” sub-m enu. A message, “Do you want to
store?” w ill be displayed if you have m ade any
changes. Pr ess the “OK” button to sto re. Press
“MENU” or “EXIT” bu tton to exit wit hout storing the
changes.
✘
✘
✘
✘
> SKIP: Press the “GREEN” but ton to enter
“Operatio n” menu in the “Channel List ”. Selec t
by using “ ”/“ ” b uttons, “Skip” ope ration is
activa ted. If there is a channel t hat you want to skip
while chang ing channels in the “Channel L ist”,
highlight th at channel by using “✘”/“✘” b uttons and
press the “OK” bu tton. The channel name w ill be prefixed by the “ ” sig n. This channel will be sk ipped
from now on wh en using the remote contro l handset.
However, you may st ill access that channe l by entering
its number using the remote control.
> HIDE: Press t he “GREEN” button to enter
“Operatio n” menu in the “Channel List ”. Selec t by
using “ ”/“ ” bu ttons. If you selec t “Hide
Channels” op tion, “Hide” operati on is activated. Ea ch
channel you se lect via the “OK” butto n will be
hidden. If you select the “Show hidden chs.” option
you can see th e hidden channels again. If yo u press
the “OK” butt on while on a hidden channel, t hat
channel bec omes visible. If you sele ct “Don’t show
hiddens” in the menu below the selected channels
become invisible again.
> Press “MENU” or “ EXIT” button to exi t the
“Channel Lis t” menu. If you’ve made a chan ge to the
“Channel Lis t”, a mess age, “Do you want to save
changes” will appear o n the screen. Press the “ OK”
button to s tore the changes or pres s “MENU” or
“EXIT” but ton to exit withou t storing.
✘
✘
✘
✘
Page 21

24 21
> Select “ Search” in “Transponder” m enu to begin the
scanning process for your selected transponder. All
the TV and R adio channels for that tra nsponder will be
found and disp layed on the screen.
> When the Sc anning is completed, a me ssage “...
channel (s) are found. Do you want to save them?”
will appea r on the screen. If you pres s the “OK”
button, a ll the channels that have b een found will be
stored. If a c hannel already exis ts in the memory it wi ll
not be saved . If you press “MENU” or “EXIT” but ton,
no channels will be stored.
CHANGING PROGRAM SETTINGS
> Display the pr ogram to which you want to cha nge
the settings.
> Enter the “I nstallation” menu f rom the “Main
Menu” and the n “Manual Edit / Search” sub -menu.
> By using “ ”/ “ ” buttons you can change
“Satelli te”, “Freq uency”, “Polarity ” and “Symbol Rate”
information. When you enter correct information,
the Signal Qual ity and the Signal Stre ngth levels will
appear in the b ars at the bottom of th e menu. By
pressing the “RED” button i n this menu you can scan
a transponde r at a particular freq uency. If you press
the “BLUE” but ton, that channel wi ll be added to the
end of the lis t as another channel.
> Scan TP: W hen you press the “RED” but ton, the
frequenc y that you have chosen wi ll be scanned.
✘
✘
RADIO
Pressing t he “RADIO” button act ivates the “Only
Radio” mode. B y using “✘”/“✘” and number bu ttons
you can sele ct a radio channel. You can des elect the
radio mode by pre ssing the “RADIO” button again.
If you press t he “RADIO” button again, “Al l” mode is
selecte d, and if you press the “RADIO” button agai n
“Only TV ” mode is selected.
FAVOURITE CHANNEL LIST
> Press the “ FAV” button, whil e there is no menu on
the screen . The “Favourite Selec tion” menu appears
on the scree n. You can s elect your favourite g roup in
this menu and o nly select the channe ls that appear in
the selec ted group. If you want to see a ll the channels,
select t he “All Cha nnels” option.
> Press “MENU” or “ EXIT” button to exi t without
select ing any option.
SATELLITE SELECTION
> If you want to wa tch the programs of a part icular
satellit e, you can select that s atellite from a list .
> Press the “ SAT” button whe n there is no menu on
the screen . The “Satellite Sel ection” menu appear s.
Highlight t he satellite that you wa nt by using “✘”/“✘”
buttons and pressing the “OK” button .
> You will see only t he programs for the sate llite that
you have chose n from the program list . If the option
“All Sats” is s elected, you will be a ble to watch the
programs included for all the satellites.
> Press “MENU” or “ EXIT” button to exi t from the
satellite list.
Page 22

TRANSPONDER LIST
> While in the “ Main Menu”, go to “Installat ion” by
using “ ”/“ ” an d “✘”/“✘” buttons and pr ess the
“OK” button. P ress the “OK” button agai n on “Transponder” op tion. The “Transponder L ist” sub-menu is
entered.
> There is a tran sponder list of a part icular satellite in
the left c olumn and the program list b elonging to that
transponde r in the right column show n in the
“Transponder L ist” menu. Press t he “RED” button
to select a s atellite. When the “GREEN” b utton is
pressed, t he cursor moves to the “P rogram List”
column. You can add a n ew transponder by press ing
the “BLUE” but ton or you can delete a tr ansponder by
pressing the YELLOW” button.
> While in the “ Transpo nder List” menu, go to a ny
transponder and press the “OK” button.
“Transponder ” menu appears. There a re ”Ops. Menu”
and “Search” o ptions in this menu.
> Press the “OK” bu tton when “Ops. Menu ” is
selected. “Transponder Settings” menu is accessed.
Select t he satellite you want to ma ke changes to by
using “ ”/“ ” bu ttons.
> By using “✘”/ “✘” buttons, you can hig hlight
“Frequenc y”, “Symbol Rate” and “Pola rity”. By using
“ ”/“ ” or numb er buttons on the remo te control
their value s may be changed. By view ing the Signal
Strengt h and Signal Quality at th e bottom of the menu
it can be see n if the correct infor mation has been
entered. I f it has, press the “BLUE” bu tton to store the
information.
✘
✘
✘
✘
✘
✘
22 23
MAIN MENU
Pressing t he “MENU” button when the re is no menu
shown on the s creen will access the “ Main Menu”
By using the “ ”/ “ ” and “✘”/“✘” butto ns you
can move the cu rsor right, left , up and down. You
can move onto t he symbol you want and en ter the
sub-menu b elonging to that symb ol by pressing the
“OK” button.
> There are “I nstallation”, “System”, “Ti mers”,
“Extras” and “Games” sub-menus in the “Main Menu”.
> You can move the cur sor up and down in the
sub-menu s by using the “✘”/“✘” but tons.
> Exit fr om the “Main Menu” and sub- menus by
pressing “MENU” or “EXIT” button.
INS TALLATION
> When in the “M ain Menu” go to “Instal lation” by
using “ ”/“ ” an d “✘”/“✘” buttons and pr ess the
“OK” button. The “Installation” sub-menu is displayed.
> There are “S atellite”, “Transponder”, “Manual E dit /
Search” and “Auto matic Search” options i n this menu.
✘
✘
✘
✘
 Loading...