

Page 1
Installation & operating instructions
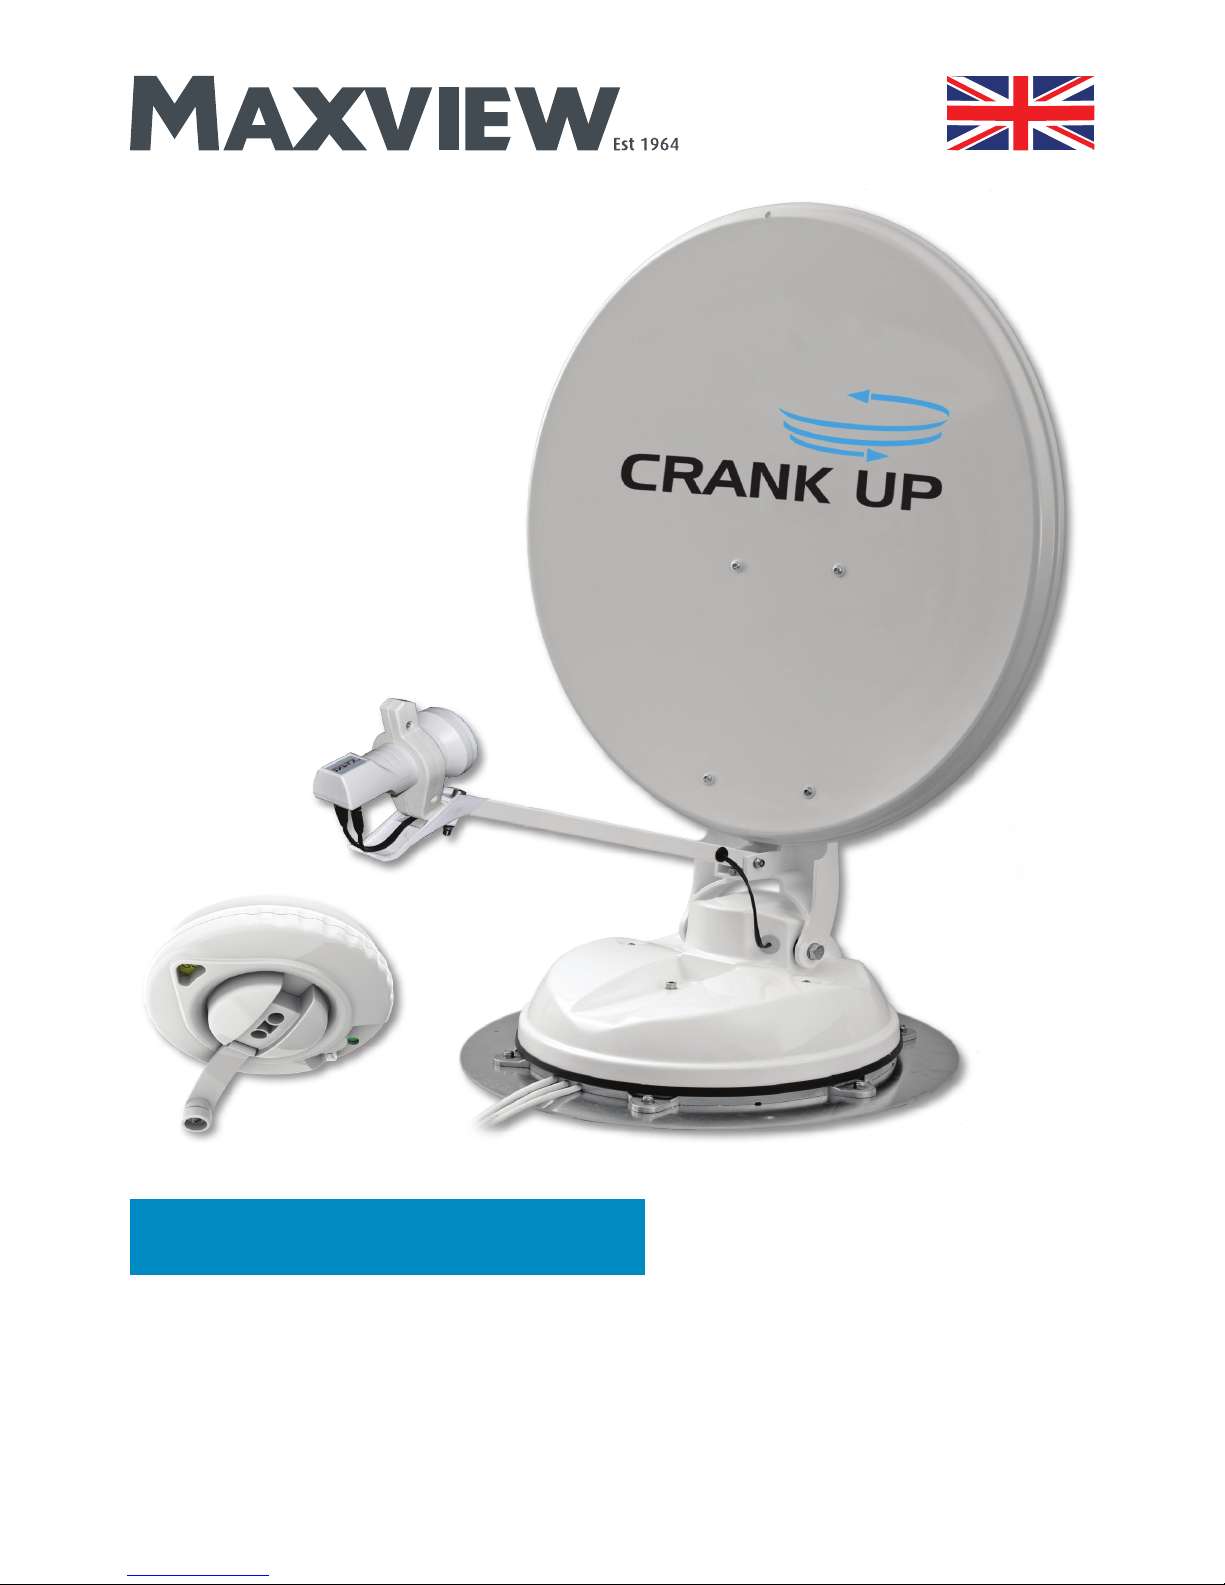
B2590/65 & B2590/85 Crank Up
UK contact:
Helpline: +44 (0)1553 811000
Email: support@maxview.co.uk
Web: www.maxview.co.uk
Maxview reserve the right to change specifications without prior notice
9111410 Is s 3
Page 2

Contents:
Introduction 2
Proper use & operation 2
Safety precautions 3
Application example 4
Product contents 4
Required tools and equipment 4
Selecting an installation location 5
Attaching Antenna Mount Plate 6
and LNB Park Plate
Attaching Antenna Unit to 7
Mount Plate
Introduction:
Please read these instructions fully before using the antenna for the first time. The operation of the antenna has
been designed to be as simple as possible however should you require any technical assistance please contact
Maxview customer service on +44 (0)1553 811000 or visit www.maxview.co.uk.
Proper use & operation:
The Crank Up is designed to be installed in a motorhome, caravan or horsebox to automatically locate a television
broadcast satellite when the vehicle is stationary.
The Antenna which is to be permanently mounted externally to the roof structure of a motorhome/caravan
horsebox. The construction of the roof structure should be suitably robust and have no protruding obstacles
Use of the equipment for any other purpose than the one specified is not permitted and will invalidate the
warranty.
All instructions and models are subject to change. In accordance with policy of progressive product, the company
reserve the right to alter specifications.
Copyright© these instructions are the sole property of Maxview Ltd and may not be reproduced.
Please keep these instructions safe for future reference.
Recycle packaging where facilities exist.
Page 2
Installing cables 8
Installing Handle 9
Attaching Satellite Dish to Unit 12
Finding a satellite 13
Start a search 13
Lowering antenna 15
Skew adjustment 16
Warranty 17
Specifications 18
Quick reference table 19
Satellite Zone Map 20
Page 3

Safety precautions:
Read this manual carefully and become familiar with your satellite antenna. Understand its applications, its
limitations and any hazards involved. Failure to follow all instructions listed below may result in electric shock,
fire and/or serious injury. Maxview declines all responsibility in the event of incident or accident if they are due
to a non observation of the installation instructions or the way the product is used.
No modifications are permissible to the Antenna Unit or Handle Assembly
Installation
• Installation should be carried out by a competent person.
• Take care when working at heights keeping work area clean and tidy to avoid trip hazards
• Use creeper boards where necessary to ensure roof construction can support your weight
• Use a recommended adhesive from page 4 to bond the antenna unit to vehicle roof and follow the
manufacturer’s instructions during application
• Do not travel until adhesive has cured noting that curing times vary with weather conditions
• Power tools should be used in accordance with manufacturer’s instructions
• All electrical work should be carried out by a competent person. If in doubt seek advice from a qualied
electrician
Operation
• Before starting your journey check that antenna is in the park position
• The maximum speed of vehicle with antenna mounted on roof is 81mph (130km/h)
• Never operate the antenna if someone is in close proximity of the antenna
• If high winds or electrical storms are anticipated lower antenna to park position
• Do not allow children to operate the antenna unit
• Do not operate the Crank Up with snow or ice on the antenna
Servicing
• If in the event that you do experience a problem with the system call Maxview Customer Service
+44 (0)1553 811000
• Any inspection or repair must be carried out by Maxview or an appointed representative of the manufacturer
• No regular maintenance required on the system
• Do not remove cover on Antenna
• Do not use solvent or abrasive cleaning agents on the system
• Use a suitable mild detergent to clean the Antenna Unit
• Do not pressure wash the Antenna Unit
• Check the Antenna Unit xings for mechanical integrity at least once a year
Page 3
Page 4

Page 4
Application example:
A
B
Product contents:
> Antenna Unit
> Handle Assembly
> 65/85cm Antenna (separate carton)
> Accessory Pack
> LNB Park Plate x 1
> No.10 Screws for plastic (small) x 10
> M4 Screws for Plastic x 5
> Cable Clips x 12
> M6 Button Head Screw x 4
> M6 Locking Nut x 4
> 6mm Plastic Washer x 4
> Aluminium 20mm Tube x 1
> Steel 4mm Spindle x 1
> Self Adhesive Zone Map x 1
> Compass x 1
> M5 Washers x 2
> Hexagonal socket key 4mm
> Deburrer/Round File/Emery paper
> Conduit (recommend method for securing cables)
*Maxview recommends the following adhesives:
> Sikaflex®-512 Caravan
> Geocel® Geobond HM
> Sik aflex®-252
Required tools and equipment (not supplied):
> 32mm hole saw
> 2.5mm and 8mm twist drill
> Power Drill
> Hacksaw
> No.2 Phillips screwdriver
> Weather Resistant Elastic Adhesive* and Applicator gun
> Surface Cleaner
> 10mm spanner
Page 5
Page 5
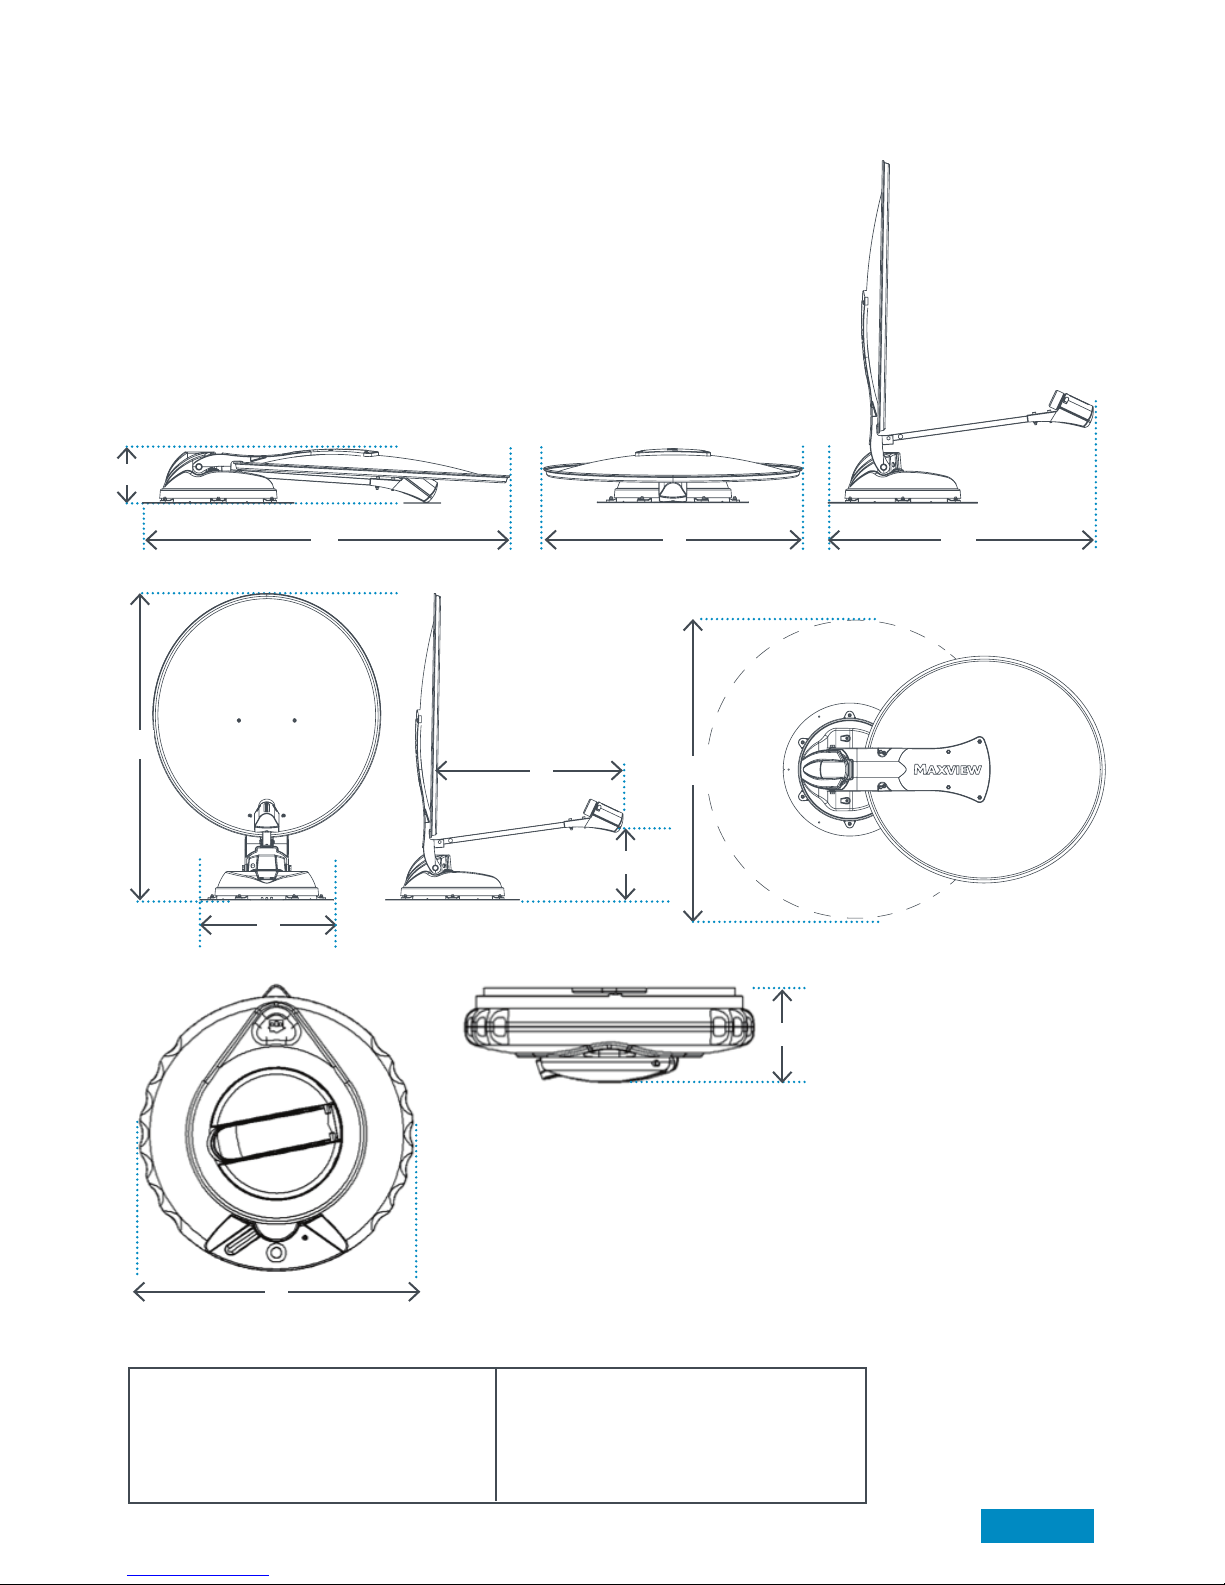
Selecting an installation location:
Positioning the Antenna Unit and the Handle Assembly
Decide where you wish to mount your satellite system, taking into account
obstacles both on the roof and inside the vehicle. The system MUST be pointing
towards the rear of the vehicle
> Check for obstructions such as roof lights and vents.
> Check for electrical cables beneath screw fixing points.
> Check the ‘F’ cables will reach satellite receiver (Maxview can supply extended
cables).
> Do not allow the dish to overhang the edge of the vehicle
> Clearance around antenna system when in use is shown with reference I
> Ensure adequate clearance of the handle assembly from cupboard doors and
light fittings
Key dimensions (cm) and weights
65cm Crank Up: System weight 10kg
A: 17
B: 100
C: 67
D: 65
E: 96
F: ø43*
85cm Crank Up: System weight 11kg
A: 17
B: 117
C: 85
D: 87
E: 113
F: ø43*
E
A
D
B C
H
G
F
I
G: 52
H: 15
I: 110
G: 64
H: 14
I: 125
J
K
J: 16
K: 5
J: 16
K: 5
Page 6
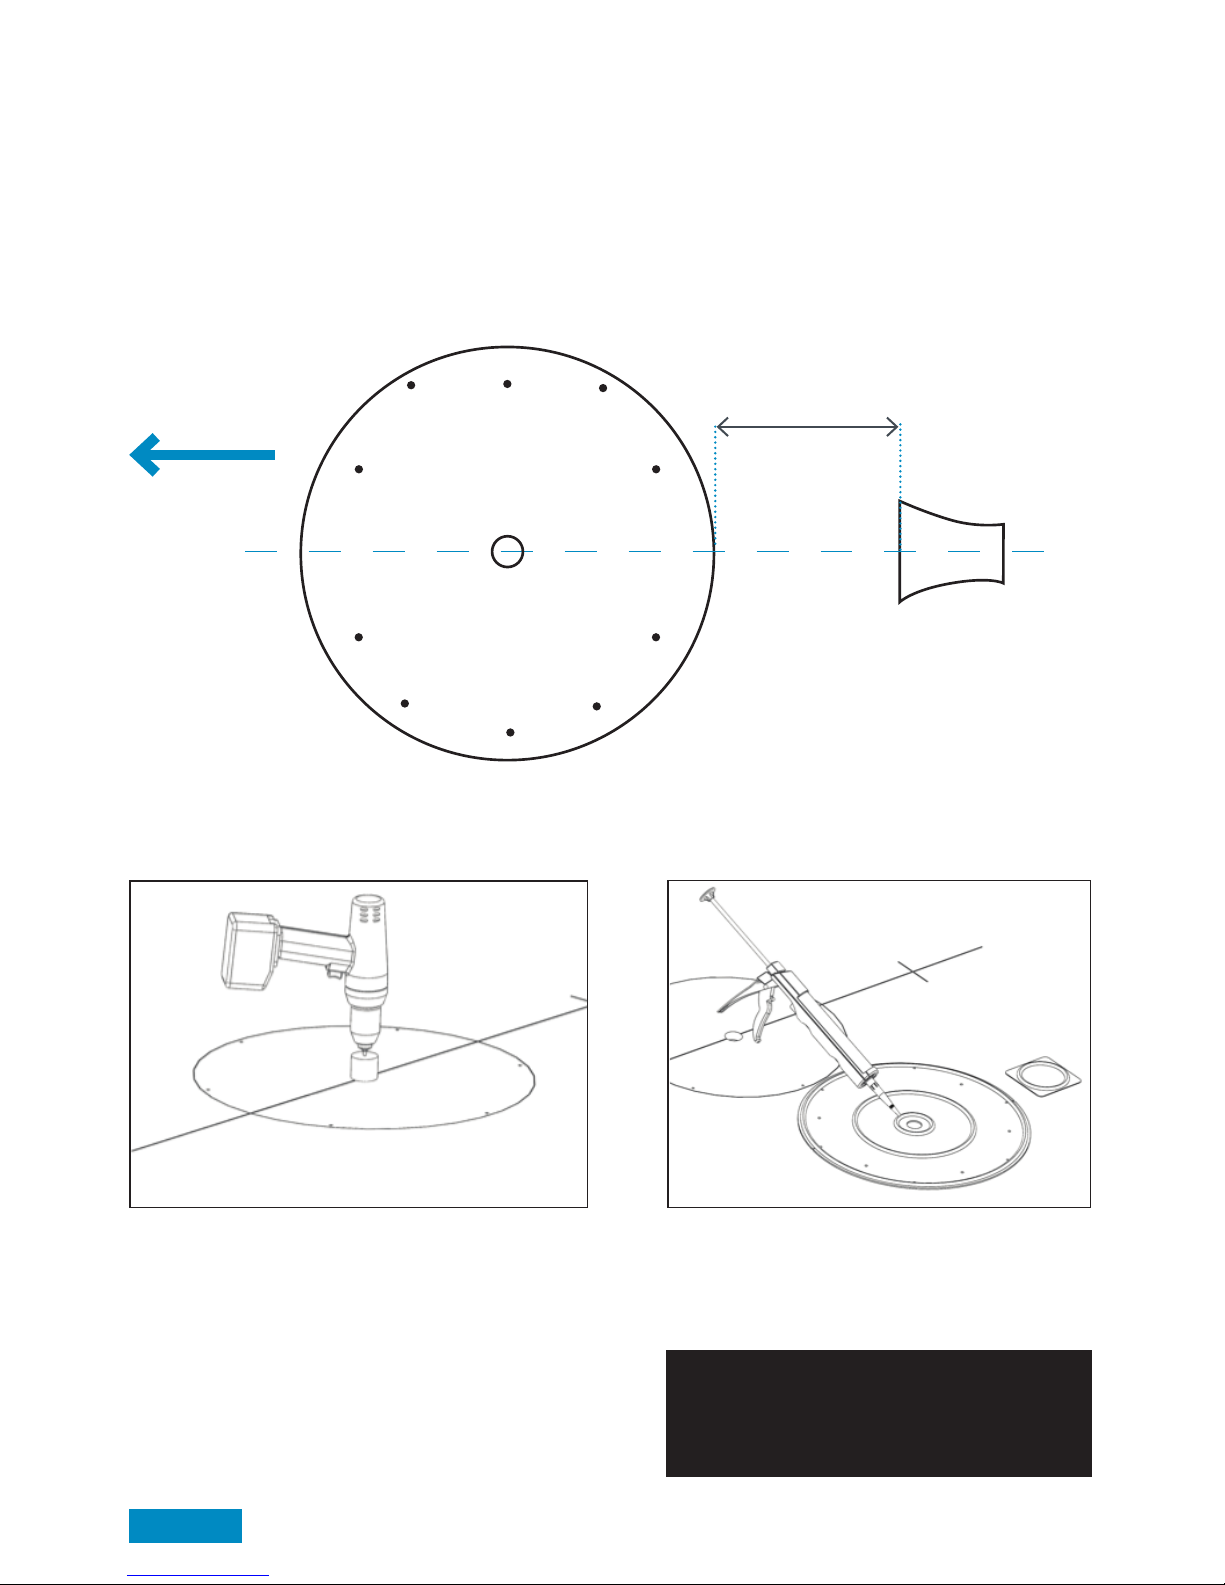
Attaching Antenna Mount Plate & LNB Park Plate:
1. Remove antenna unit from wooden transit packaging
2. Remove mounting plate from Antenna Unit by removing 6 x M6 nuts using 10mm spanner
3. Clean roof, Mounting Plate and LNB Park Plate in accordance with adhesive manufacturer’s guidelines
4. Mark a centre line for the antenna making sure dish will not overhang vehicle
5. Align notches on plate with centre line
6. Mark the position of 6 screw fixing holes and centre hole
7. Mark position of LNB Park Plate
Page 6
10. Apply rings of adhesive* (see page 4) to
surface of Antenna Mounting Plate and LNB
Park Plate and firmly place them into position.
Important Note:
Adhesive MUST be used to give a water tight
seal between mounting plate and installation
surface.
8. Drill 6 x 2.5mm pilot holes into the roof
9. Using a 32mm holesaw drill the centre hole
through the roof
230mm 65cm (B2590/65)
350mm 85cm (B2590/85)Direction of travel
Central Line
Antenna Mount Plate
LNB Park
Plate
Page 7

Page 7
11. Place a small amount of adhesive into each pilot hole before screwing plate to roof.
12. Wipe off excess adhesive with a cloth.
Note:
> Follow manufacturer’s instructions when applying adhesive. Do not travel until adhesive has cured noting
that curing times vary with weather conditions.
> Take care when working at heights. Always follow ladder manufacturer’s safety advice.
> Use creeper boards where necessary to ensure roof construction can support your weight.
> Power tools should be used in accordance with manufacturer’s instructions.
Attach Antenna Unit to Mounting Plate
Carefully lower the antenna unit onto the Mounting Plate and re-attach the M6 Nuts and Washers that were
previously removed.
Caution: Replace Nylon locking nuts if they have been removed more than twice. The locking action of the
Nylon becomes less effective if repeatedly assembled and disassembled.
7 x No. 10 screws (large)
Note:
DO NOT remove transit tape x 2
Note: LNB image shows different model.
Page 8

Page 8
Installing Cable Entry Cover:
1. Plan your installation
2. Drill hole in roof
3. Prepare surface for adhesion
4. Apply sealant as shown in A,B,C
(we recommend Sikaflex-512 Caravan)*
5. Position top hat
6. Position cable entry cover
7. Wipe excess sealant with a dry cloth
Applying sealant example:
!
!
!
= Generously apply
wet seal adhesive
!
Top hat
Hole location
tabs
Cable
32mm ø
A
B
C
Direction of travel
(front of vehicle)
Installing cables:
1. Check there are no hidden cables in the roof structure and that the hole location is clear of obstructions both
internally and externally.
2. See below for Cable Entry Cover instructions
Application example:
Note: To prevent trip hazards it is recommended that cables are concealed in PVCu conduit (not supplied)
where access is required to the roof of the vehicle.
Use extra Cable Entry Cover
to route 2nd Sat feed to a
different location.
Available to order from
Maxview MXL018
Direction of travel
(front of vehicle)
Note: LNB
image shows
different
model.
Page 9

Page 9
1. Push the aluminium tube into the plastic coupler and insert into the antenna unit through the hole in the
ceiling With the plastic coupler pushed up tight to the ceiling, mark the aluminium tube along all four sides.
Installing the handle:
Drilled hole
Aluminium tube
Coupler
Note: LNB
image shows
different
model.
Page 10

Page 10
2. Cut the 20mm square tube with a hacksaw.
Make the cut so that the line is left on the
discarded part of the tube.
3. Now mark and cut the 4mm spindle so that it is
40mm longer than the tube.
40mm
4. With the Coupler Bush aligned to the rear of the vehicle insert the Tube and Coupler Bush through the ceiling
hole and into the antenna unit.
Aluminium Tube should not protrude past
the coupler bush
Rear of vehicle
Page 11

Page 11
Note:
Add the 2 x M5 washers as image below before
fixing the elevation handle
7. Place the 4mm spindle into the elevation handle
and fix to the Dish Direction Unit with two M4
screws.
5. Place the Base Plate over the Coupler Bush. Point
the arrow to the rear of the vehicle. Mark the
four fixing holes. Drill four 2.5mm pilot holes or
use a bradawl. With four No.10 screws fix the
Base Plate to the ceiling.
6. Take the Dish Direction Unit and turn the azimuth
lock lever to the red position to release the brake.
Locate the Dish Direction onto the Coupler Bush
and use three M4 screws fix it in place.
Rear of vehicle Align arrows
Azimuth lock lever
Red = Unlocked
Green = Locked
(safe to travel)
Page 12

Page 12
4. Fix satellite dish to Antenna Arm using M6
Button Head Screws, M6 Nuts and 6mm
Plastic Washers. The 65cm and 85cm satellite
dishes have different fixing hole positions.
Therefore 4 of the holes will be unused.
5. Remove all tools, packaging and obstructions
from roof.
Attaching the Satellite Dish to the Antenna Unit
1. Ensure Antenna Unit is free from obstacles.
2. Turn the azimuth lock lever to the green position (locked for travel)
3. Elevate the antenna to 25 degrees (25 turns = 25 degrees)
Azimuth Lock is Green - LOCKED for travel
Wind handle clockwise 25 turns to reach 25 degrees
Note: The Home Position will go past the Elevation Window during the 25 turns, this is normal operation
Antenna upElevation Window
Azimuth Lock is green - LOCKED for travel Wind handle clockwise 25 turns to reach 25 degrees
6. Finally, carefully remove the green transit tape
from Antenna Unit in 2 places.
Caution: Replace Nylon locking nuts if they
have been removed more than twice.
The locking action of the Nylon becomes less
effective if repeatedly assembled and
disassembled.
Page 13

Page 13
Finding a Satellite
Before starting check there is a clear line of sight to the southern sky. All television broadcasting satellites have
a geostationary orbit which means their location is fixed above the earth’s equator. Satellites also have a
limited range of transmission so use the Zone maps included in the appendix to check your location is suitable
for reception. If your location is near the limit of reception it is recommended to adjust the skew angle of the
LNB to maximise signal quality and strength (see page 16 for details)
Note:
Ensure the TV and Satellite Receiver are connected in accordance to the manufacturer’s instructions.
The Zone map can be stuck to the wall if needed near the Dish Direction Unit.
Start a search
1. Open elevation handle
2. We recommend always winding the Antenna Handle 25 turns to 25 degrees as a starting position.
3. Determine the approximate dish elevation required from the zone map (see back page).
4. Adjust the elevation handle and wind to elevation shown on the zone map.
(Compensate the elevation angle accordingly if your vehicle is not level)
Elevation read out
and dish direction
pointer
Elevation Handle
Antenna Down
Antenna Up
Page 14

Page 14
5. Now Turn the Azimuth Lock Lever to the RED position to disengage the brake and turn Dish
Direction Unit to a South Easterly direction as indicated by the compass.
6. Slowly scan from South East to South whilst checking for a picture on the Television.
7. If no satellite is found adjust the elevation by 2 degrees and repeat the scan.
8. When the satellite is found fine adjustment of the satellite system may now be required to achieve
the best possible signal.
9. Turn the Azimuth Lock Lever to the GREEN position to apply the brake.
Azimuth lock lever
Red = Unlocked
Green = Locked
SE
S
Park position indicator
Dish direction pointer
Azimuth lock lever
Unlock Azimuth Lock Rotate Dish Direction Unit
Lock Azimuth
Page 15

Page 15
1. Rotate the Dish Direction Unit until it aligns with
the Base Plate and Lock Azimuth (green).
2. Lower the antenna by rotating the Elevation
Handle anti-clockwise (approximately 25 turns
from 25 degrees until you see home position in
the window).
NOTE: The Home Position will go past the
Elevation window once during the lowering
operation before you see the Home Position for
the second time. This is normal operation.
3. Slowly turn the handle until elevation indicator
fully shows the home position and you feel
some park resistance. Do not over wind the
handle as this may damage the satellite system.
CAUTION: As a manual system we always
recommend the ‘3 point safety check’
Before travelling;
1. Elevation readout must show the Home
position (check park resistance felt)
2. Azimuth Lock Lever must be in the Green
Position and Park arrows aligned
3. Visual check on your roof to ensure the
Antenna is fully lowered.
Lock Azimuth Lock
Antenna Down
Align Dish Direction
Pointer to Base plate
Arrows align
for travel
Elevation
home
position
Lowering antenna:
Page 16

Page 16
Skew adjustment:
Skew adjustment is required when signal strength
is weak at the limit of a given satellites’ reception
area. It involves adjusting the angle of the LNB
on the roof mounted antenna unit.
Caution:
Follow general safety advice on page 3
when adjusting Antenna Unit.
Note: LNB image shows different model.
+ -
Astra 2 - 28.2°
Astra 1 - 19.2°
Page 17

Page 17
3 year guarantee:
Every new Crank Up system is thoroughly inspected and tested before leaving the factory and is covered by our
three years guarantee from the date of original purchase.
Maxview is responsible for the cost of a replacement part if the original part is determined to be defective
under the terms of guarantee. The customer is responsible for the cost of replacement parts after three years.
This guarantee does not cover installation or external wiring.
Should any trouble develop during the guarantee period please contact Maxview before the expiry date.
If you do experience a problem with the product contact Maxview Customer Services on
+44 (0)1553 811000 or email support@maxview.co.uk
Please make sure you have the following ready when you call:
• Model number • Serial number • Date of purchase • Clear and concise details of the fault
• Details of who installed the product
The warranty does not apply where:
• The product has been abused, misused, improperly installed or improperly maintained.
• Repairs have been made or attempted by a third party other then Maxview
• Repairs are required due to normal wear and tear
• Modications have been made to the product
• The antenna unit has been opened
• Damaged caused by abrasive cleaning or power washing
• Circumstances beyond the control of Maxview that have caused the product to no longer operate correctly
• Customer is not the original owner or cannot provide proof of purchase
In no event shall Maxview be liable for any indirect, incidental, or consequential damages from the sale or use
of the product. This disclaimer applies both during and after the term of the warranty. This does not affect your
statutory rights
Page 18

Page 18
Operating:
Low stream line profile, only 17cm in park position
Power:
Powering: Manual operation no power required
System:
Elevation Range: 10º to 70º
Azimuth Range: 380º
Skew Angle: ±45º
Cable Type: CAI approved 100 coaxial cable
UV Protection: All external plastic parts are UV stabilised
Testing: Fully weatherproof and watertight construction
System has passed extensive water ingress test
LNB:
Type: High Quality 0.2dB Universal Twin LNB
Output: Twin
Typical Gain: 65cm - 36dB 85cm - 38.1dB
Frequency Range: 10.7-12.75GHz
Arm Cable: RG179
Antenna:
Material: Aluminium
Reflector Thickness: 1mm
Finish: Powder coated with U.V. inhibited polyester-based
Outside Dims: 65cm dish: 67.0 x 71.5 cm 85cm dish: 85.0 x 90.5 cm
Reflecting Dims: 65cm dish: 63.0 x 67.5 cm 85cm dish: 81.5 x 87 cm
Mounting:
Plate Material: Aluminium
Fixing Method: Recommended adhesive (Sikaflex, Geocel or equivalent)
Fixing Studs: 6 x M5 studs for system removal
Cable Entry: Coaxial cable joining cover under antenna system
Specifications:
Page 19

Your locations - Add your favourite locations for quick reference for future use
Satellite Location Elevation Number Notes
(degrees) of turns
Astra 28.2E King’s Lynn 25 25 Crank Up Manufacturer Location
Page 19
Quick reference table:
Page 20

 Loading...