

Page 1

Gasoline Powered
Pressure Washer
Operating Instructions and Parts List PW2515
Carefully read and understand these instructions
before operating your pressure washer.
© 2006 Campbell Hausfeld/Scott Fetzer
IN467900AV 8/06
Getting To Know Your Pressure Washer . . . . . . . . . . . . . . . . . . . . . . . . . . . . . .2
Frequently Asked Questions . . . . . . . . . . . . . . . . . . . . . . . . . . . . . . . . . . . . . . . .3
Safety and Warning Information . . . . . . . . . . . . . . . . . . . . . . . . . . . . . . . . . . . .4
Pre-Operation . . . . . . . . . . . . . . . . . . . . . . . . . . . . . . . . . . . . . . . . . . . . . . . . .5 - 6
Operation . . . . . . . . . . . . . . . . . . . . . . . . . . . . . . . . . . . . . . . . . . . . . . . . . . . .6 - 9
Maintenance and Technical Information . . . . . . . . . . . . . . . . . . . . . . . . . . . . .10
Service Record . . . . . . . . . . . . . . . . . . . . . . . . . . . . . . . . . . . . . . . . . . . . . . . . . .11
Replacement Parts Lists
• Pump . . . . . . . . . . . . . . . . . . . . . . . . . . . . . . . . . . . . . . . . . . . . . . . . . . . . .12
• Cart . . . . . . . . . . . . . . . . . . . . . . . . . . . . . . . . . . . . . . . . . . . . . . . . . . . . . .13
Troubleshooting Chart . . . . . . . . . . . . . . . . . . . . . . . . . . . . . . . . . . . . . . . . . . .14
Warranty . . . . . . . . . . . . . . . . . . . . . . . . . . . . . . . . . . . . . . . . . . . . . . . . . . . . . .16
Contents Page
For parts, product & service information
visit www.chpower.com
Please record Model No. and Serial No. for use when contacting
the manufacturer:
Model No. ______________ Purchase date ____________________
Serial No. ______________ Purchase place ____________________
For Information About This Product, call 1-800-330-0712
REMINDER: Keep your dated proof of purchase for warranty purposes! Attach it to this manual or file it for safekeeping.
Model PW2515
Page 2
Pressure Washer
2
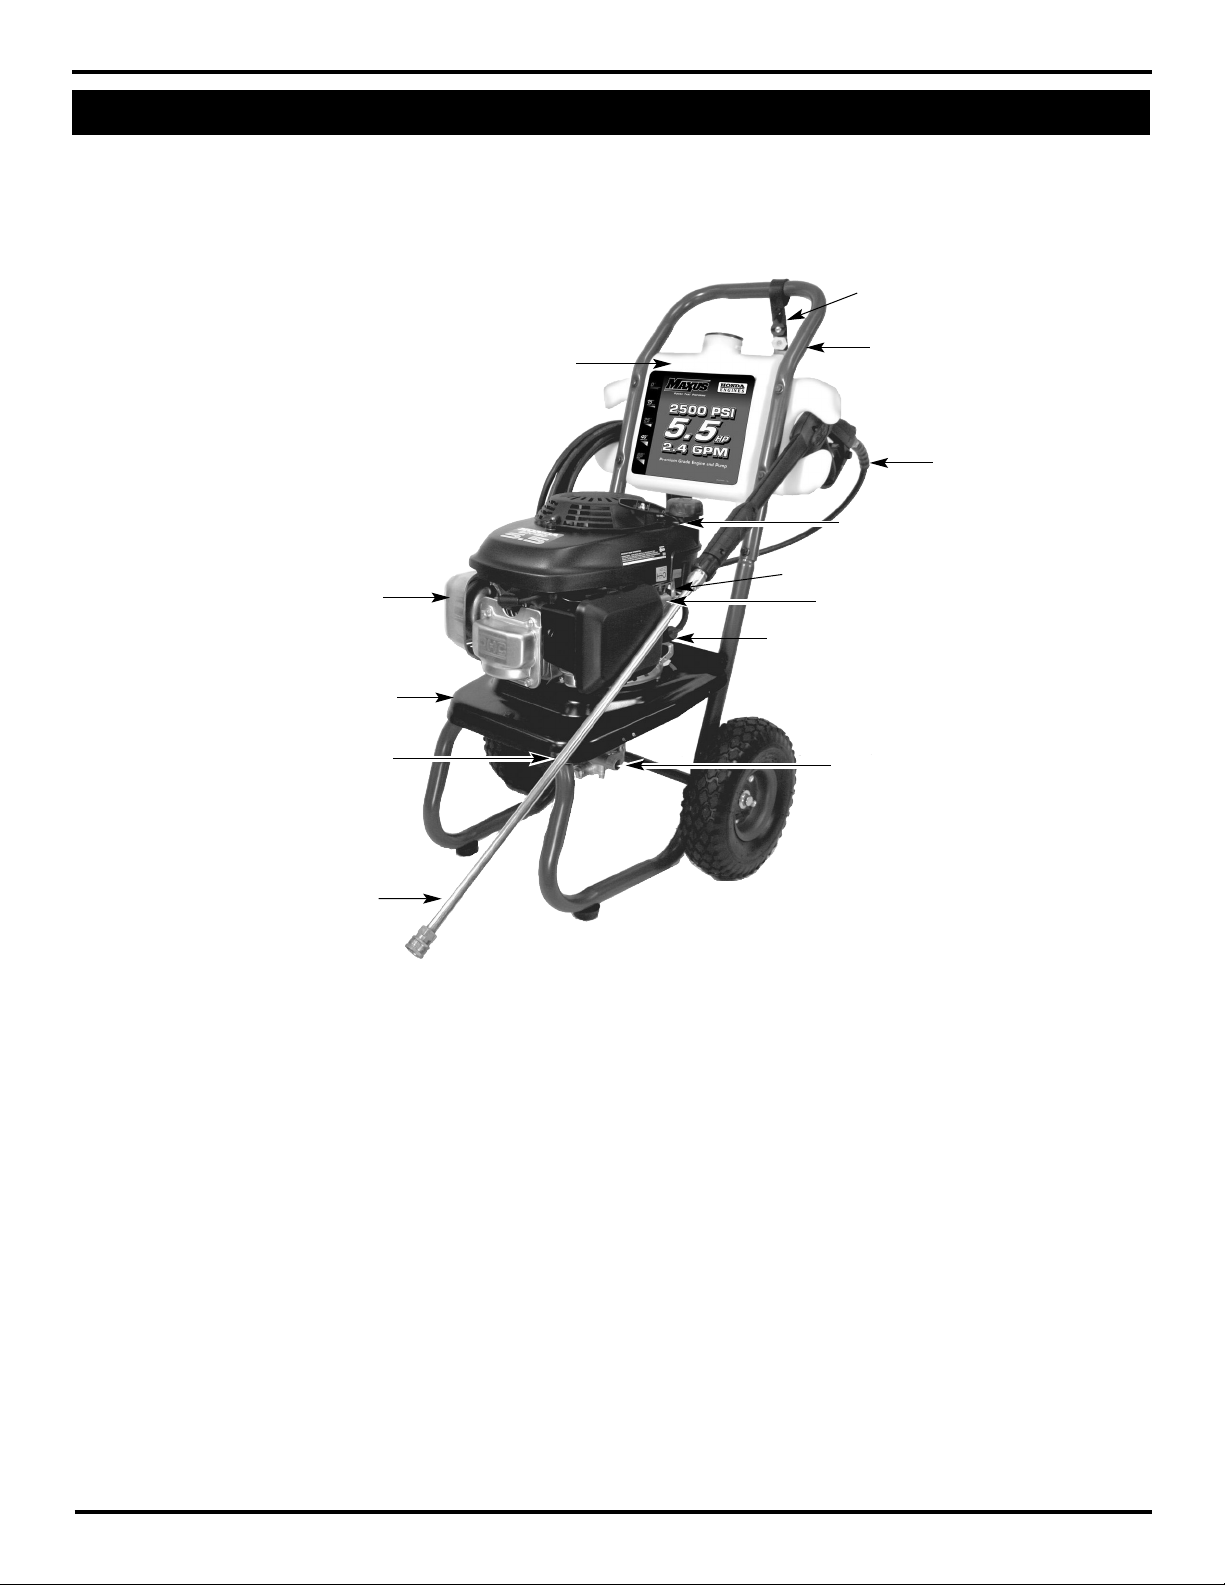
1 Detergent Tank
2 Muffler
3 Location of Serial Number/Product Decal
4 (Pump) Inlet Connection for Garden Hose
5 Lance with Quick Connect
6 Tip Holder with Spray Tips
7 Handle
8 Gun with trigger
9 Fuel Tank
10 Choke
11 Engine switch - On/Off
12 Fuel Valve - On/Off
13 (Pump) Outlet Connection for High Pressure
Hose
1
2
3
6
9
10
11
12
13
PW2515
www.chpower.com
Getting To Know Your Pressure Washer
5
4
7
8
Page 3

Pressure Washer
How do I start my pressure
washer?
1. Make sure you have gas and oil in the engine. The
engine DOES NOT COME FILLED WITH OIL.
2. Turn the water on, then trigger the gun to make sure the
water will flow smoothly out of the tip.
3. Open the fuel shutoff valve by turning the knob
counterclockwise until it stops.
4. Close the choke (if engine is cold) by moving the choke
ring fully to the right.
5. Set the shut off switch to “ON.”
6. Pull the trigger (to relieve any back pressure in the pump)
while pulling the starter cord.
What type of oil do I use?
ENGINE DOES NOT COME FILLED WITH OIL: See Page 10 for
engine oil types, quantities, and oil changing instructions.
Pump: The pump comes filled with the correct amount of
oil and should not need changing or filling.
Why don’t I have any water
pressure?
• Is the water hose attached to the pressure washer?
• Is the water turned on?
• Check for any kinks, leaks, or blockage in the hoses,
fittings, or the nozzle.
• Is the 15º (yellow) spray tip inserted into the end of the
lance (See Page 8)?
• Is the inlet filter screen free of debris? Check and remove
debris if needed.
How do I get high pressure?
• For high pressure, insert the 15º (yellow) spray tip into
the end of the lance (See Page 8).
How do I get the soap suction to
work?
1. Connect the clear plastic chemical suction tube to the
plastic hose barb on detergent tank.
2. Fill the detergent tank with detergent forumlated for use
with pressure washers.
3. To spray soap, insert the 65° (black) soap spray tip into
the end of the lance (see page 8).
3
Why doesn’t the pressure
washer apply detergents with
high pressure?
Detergents “bounce” off cleaning surfaces as fast as they are
applied. The pressure washer’s features allow for a detergent
to be drawn while in low pressure mode only. By applying
detergent at low pressure, the effect of “bouncing” is
reduced. Also, detergents are only effective when time is
allowed for them to work on the surface of whatever is
being cleaned. After applying the detergent, wait 1-3
minutes while it works, and then proceed to rinse the surface
with high pressure.
What maintenance do I need to
perform on my pressure washer?
1. After turning off the pressure washer and the water,
depressurize the hose by triggering the gun.
2. Remove the garden hose and high pressure hose from the
pump.
3. Pull the start rope slowly five times to purge water from
the pump. This will help protect the pump from damage.
4. Do not store your pressure washer in an area where the
temperature will drop below 32˚ F.
5. Follow proper storage and winterizing instructions found
on page 9.
What do I do if I’m missing a
part?
Call Campbell Hausfeld at 1-800-330-0712 and we will
promptly replace your missing parts. DO NOT RETURN THE
PRESSURE WASHER TO THE RETAILER!
Where can I buy accessories for
my pressure washer?
• If you can’t find accessories at the store where you
purchased your pressure washer, call Campbell Hausfeld
at 1-800-330-0712 or visit our website at
www.chpower.com.
Who do I call if I have questions
or problems?
Call Campbell Hausfeld at
1-800-330-0712 (U.S.A.)
www.chpower.com
Frequently Asked Questions
Page 4
www.chpower.com
• Always follow detergent manufacturer’s label
recommendations for proper use of detergents. Always
protect eyes, skin, and respiratory system from detergent
use.
Do not use pressure that exceeds the
operating pressure of any of the parts
(hoses, fittings, etc.) in the pressurized system. Ensure all
equipment and accessories are rated to withstand the
maximum working pressure of the unit.
Explosion hazard.
• NEVER spray flammable liquids or use pressure washer in
areas containing combustible dust, liquids, or vapors.
• Never operate this machine in a closed building or in or
near an explosive environment.
• Do not remove fuel tank cap or fill fuel tank while engine
is hot or running (allow engine to cool two minutes
before refueling). Always fill the tank slowly.
• Never disconnect the high pressure discharge hose from
the machine while the system is pressurized. To
depressurize machine, turn power and water supply off,
then press the gun trigger 2-3 times.
• Never permanently engage the trigger mechanism on the
gun.
• Never operate the machine without all components
properly connected to the machine (handle, gun/wand
assembly, nozzle, etc.).
Equipment damage.
• ALWAYS turn water supply “ON” before turning pressure
washer “ON.” Running pump dry causes serious damage.
• Do not operate the pressure washer with the inlet water
screen removed. Keep screen clear of debris and
sediment.
• NEVER operate pressure washer with broken or missing
parts. Check equipment regularly and repair or replace
worn or damaged parts immediately.
• Use only the nozzle supplied with this machine.
• Never leave the wand unattended while the machine is
running.
• Never tamper with the engine governor or attempt to
alter factory settings. Altering factory settings could
damage the unit and will void the warranty.
• Always hold gun and wand firmly when starting and
operating the machine.
• NEVER allow the unit to run with the trigger released
(off) for more than one minute. Resulting heat buildup
will damage the pump.
• NEVER store the pressure washer outdoors or where it
could freeze. Freezing temperatures can seriously damage
the pump.
• Release the trigger when changing from high to low
pressure modes. Failure to do so could result in damage
to the nozzle.
Keep hose away from sharp objects.
Bursting hoses may cause injury. Examine
hoses regularly and replace if damaged. Do not attempt to
mend a damaged hose.
Safety Guidelines
This manual contains information that is very important to
know and understand. This information is provided for
SAFETY and to PREVENT EQUIPMENT PROBLEMS. To help
recognize this information, observe the following symbols.
Danger indicates an imminently
hazardous situation which, if not
avoided, WILL result in death or serious injury.
Warning indicates a potentially
hazardous situation which, if not
avoided, COULD result in death or serious injury.
Caution indicates a potentially hazardous
situation which, if not avoided, MAY
result in minor or moderate injury.
Notice indicates important information, that
if not followed, may cause damage to
equipment.
NOTE: Information that requires special attention.
Important Safety Instructions
SAVE THESE INSTRUCTIONS
When using this product, basic precautions should always be
followed, including the following:
1. Read all instructions before using the product.
2. To reduce the risk of injury, close supervision is necessary
when the product is used near children.
3. Follow all safety codes as well as the Occupational Safety
and Health Act (OSHA).
4. Ensure safety devices are operating properly before each
use. DO NOT remove or modify any part of the gun or unit.
5. Know how to stop this product and bleed pressure quickly.
Be thoroughly familiar with the controls.
6. Stay alert – watch what you are doing.
7. Do not operate the product when fatigued or under the
influence of alcohol or drugs.
8. Keep operation area clear of all persons.
9. Do not overreach or stand on unstable support. Keep good
footing and balance at all times.
10. Follow the maintenance instructions specified in the
manual.
Risk of injection or severe injury. Keep
clear of nozzle. Do not discharge streams
at persons. This product is to be used only by trained
operators. Always remove lance from gun before cleaning
debris from tip.
• Keep clear of nozzle. NEVER direct high pressure spray at
a person, animal, or yourself.
• Always wear safety glasses or goggles and protective
equipment (hearing protection, gloves, rubber boots,
protective clothing) when operating or performing
maintenance.
• Never put hand or fingers over the spray tip while
operating the unit.
• Never try to stop or deflect leaks with any body part.
• Always engage the trigger safety latch in the safe
position when spraying is stopped even if only for a few
moments.
Safety and Warning Information
Pressure Washer
4
!
DANGER
!
WARNING
!
CAUTION
NOTICE
!
WARNING
!
WARNING
!
WARNING
!
WARNING
NOTICE
!
CAUTION
Page 5
UNPACKING
Remove the equipment and all parts from
the carton. The carton should contain the
following.
• One pressure washer (pump, engine,
cart base)
• One cart handle assembly
• One detergent tank
• One spray gun
• One lance
• One tip holder with 2 spray tips.
Additional tips available for purchase,
see Page 13
• One high pressure hose
• One pack of nuts, bolts, and manuals
• One bottle of engine oil
If any parts are missing, DO NOT RETURN THE UNIT TO THE
RETAILER. Know the unit’s model number (located on the
serial number tag on the pressure washer frame) and call 1800-330-0712 for replacement parts.
After unpacking the product, inspect it carefully for any
damage that may have occurred during transit. Make sure to
tighten fittings and bolts before using the pressure washer.
Do not operate the unit if it’s damaged
during shipping, handling, or use.
Damage could result in bursting and cause injury or property
damage.
ASSEMBLY
Use two adjustable or 7/16” wrenches to assemble the
pressure washer.
1. Slide the handle assembly over the lower legs of the cart
base. Use the supplied nuts and bolts to secure the handle
to the legs. See Figure 1.
2. Attach detergent tank to backside of handle. Use the 4 hex
bolts with flat washer under hex head and 4 nuts provided.
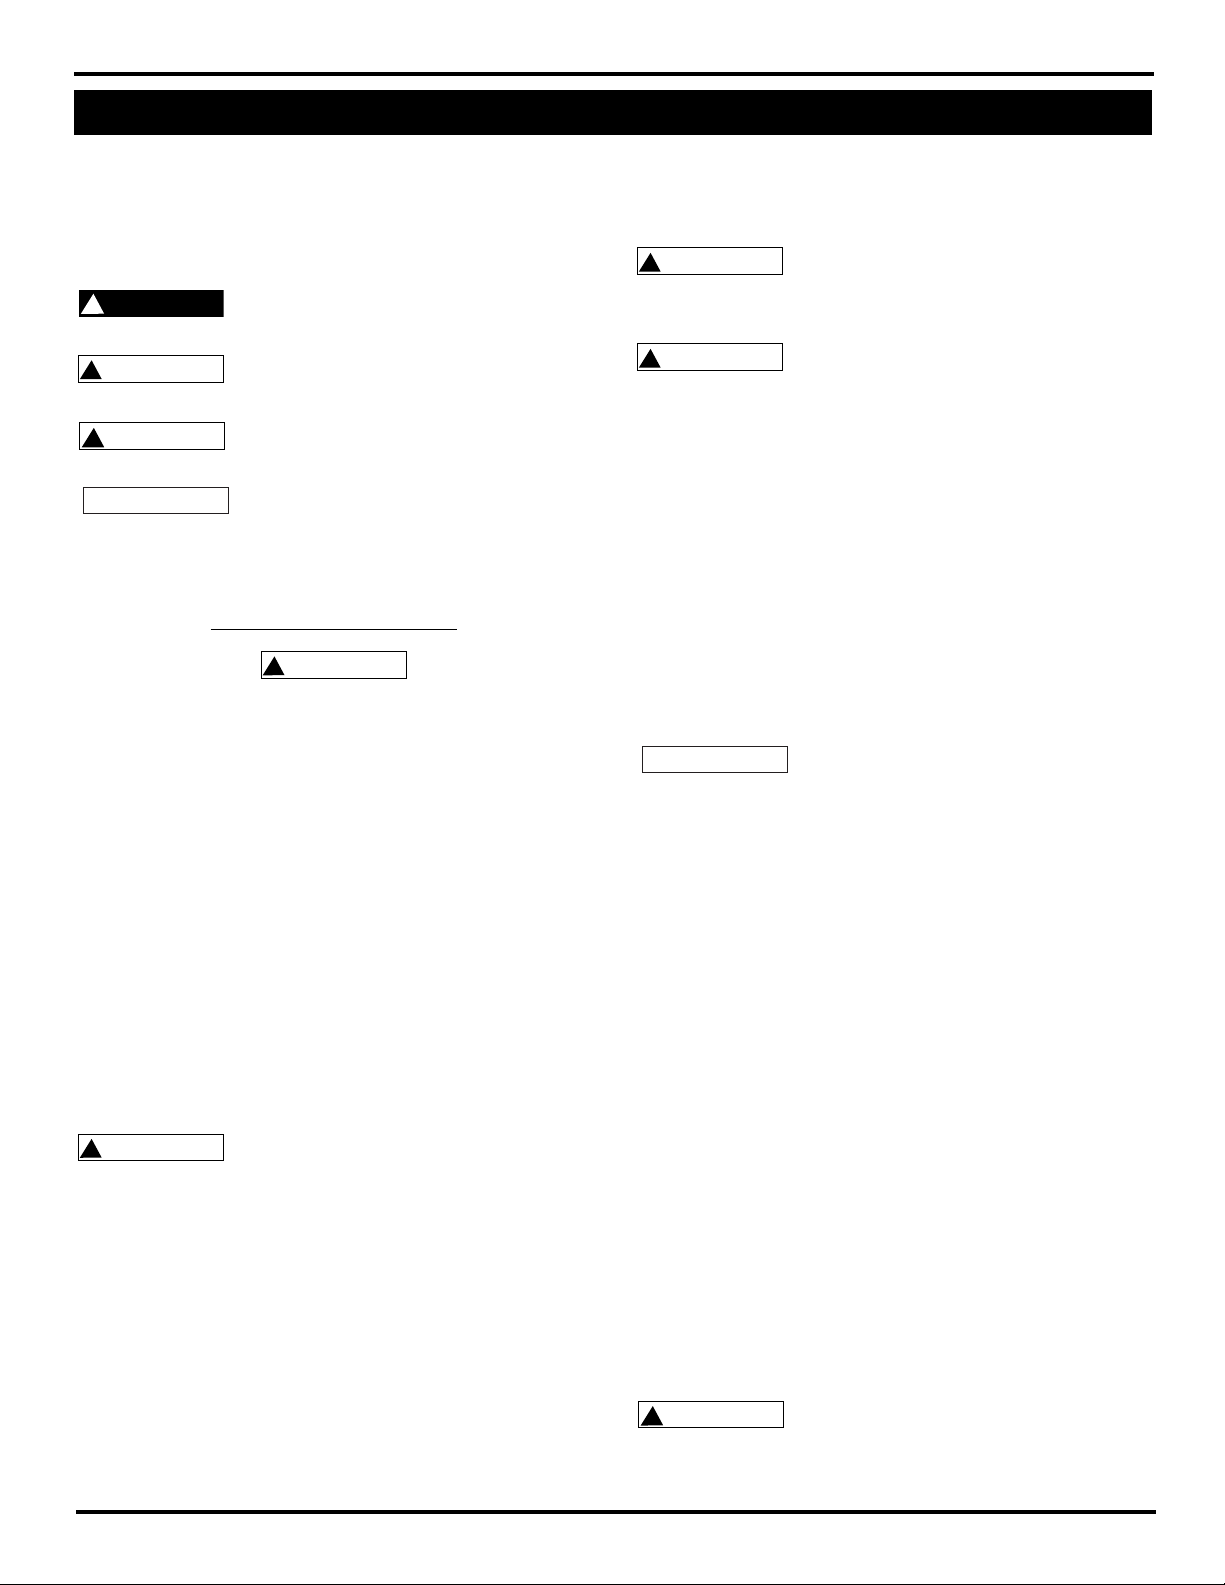
3. Slide clear plastic hose attached to leg onto plastic hose barb
of detergent tank (see Figure 3).
4. Brass Swivel Adaptor (See Figure 2). If it’s not already
attached to the pump inlet, assemble the brass swivel adapter
and attach it to the pump inlet (See Figure 4 and Figure 5). Be
sure to connect the correct side of the brass swivel adapter to
the pump.
5. Secure garden hose (not included) to the inlet connection
on pump.
Pressure Washer
5
Pre-Operation
Figure 1 – Assemble Handle
Figure 3 – Attach suction tube to barb
fitting
Figure 4 - Brass swivel adapter
Connect this end to garden hose
Connect this end to pump
Washer
Washer
with filter
screen
Figure 5 - Connect the brass swivel to
the pump
Brass swivel adapter
Pump inlet
Figure 2 - Pump hook up
Brass swivel
adapter
Garden hose
Pump inlet
Pump
outlet
Chemical injector
hose barb
High
pressure
hose
Thermal
relief valve
www.chpower.com
!
WARNING
Page 6
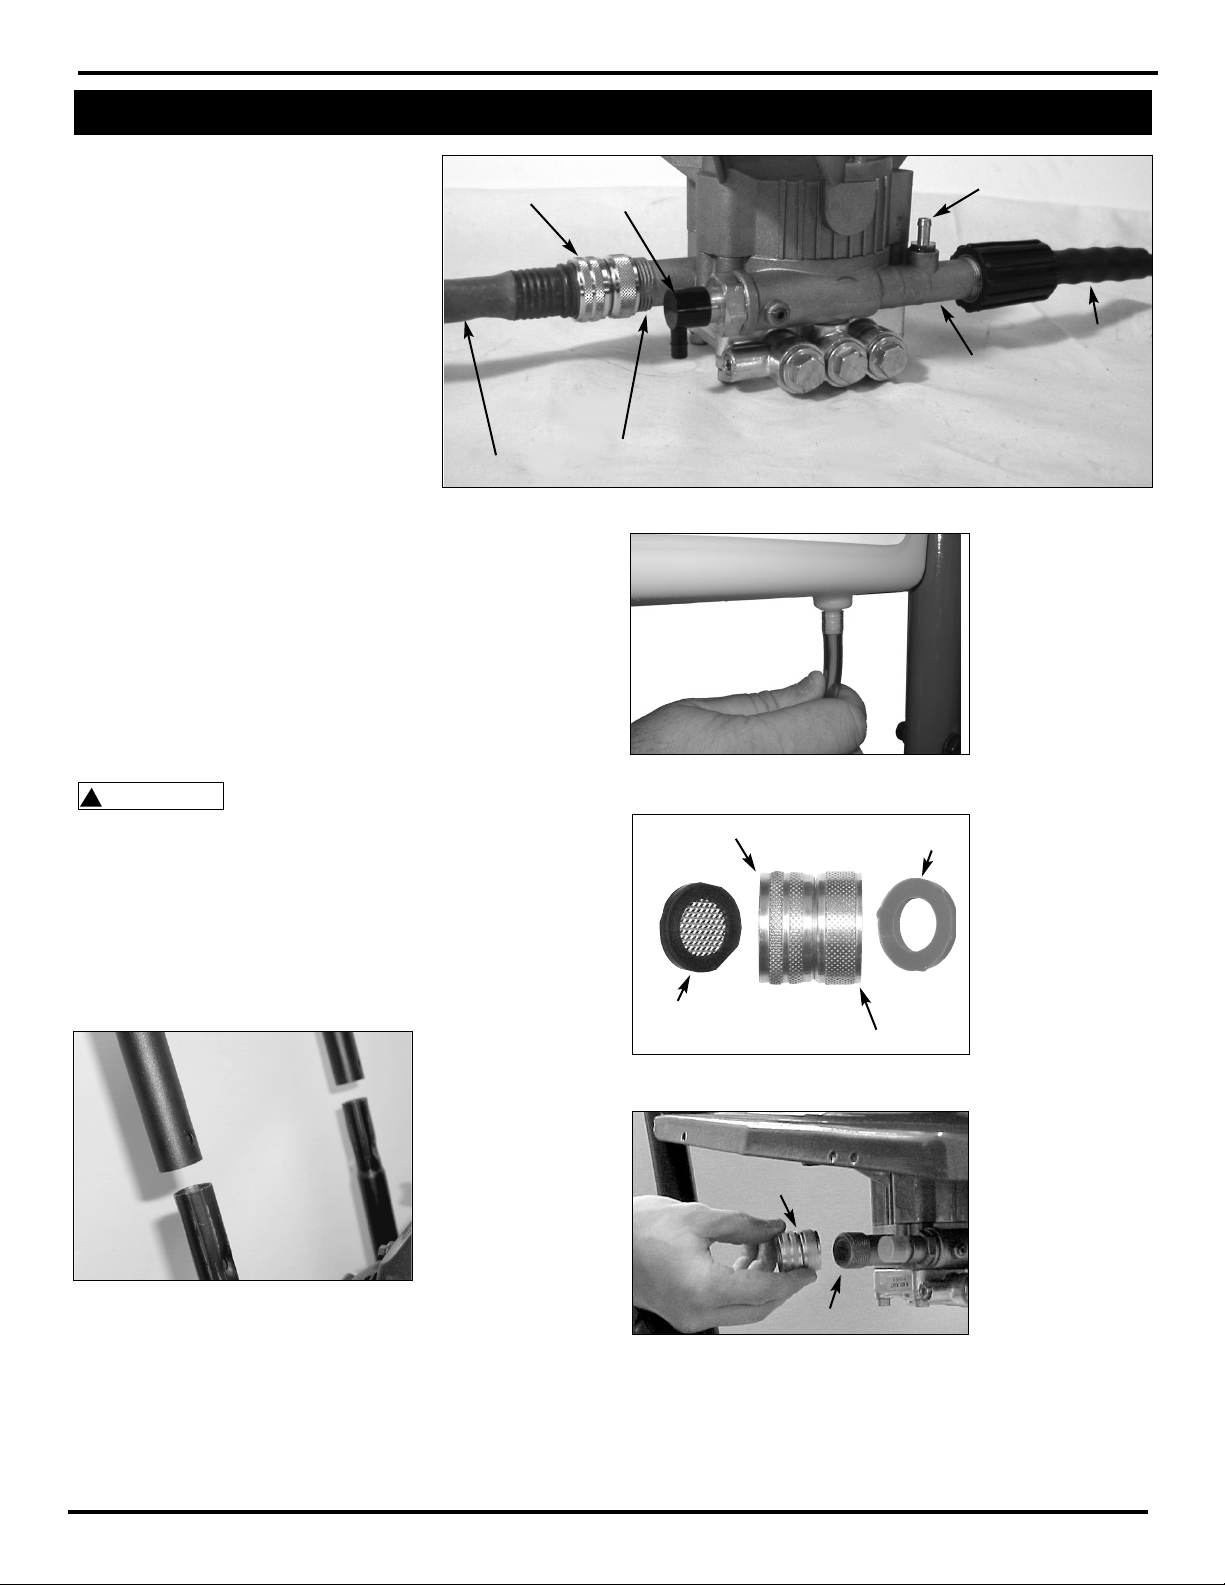
8. Install quick connect tip by pulling back on collar and pressing
in tip. Release collar, make sure it completely returns to its
forward position and tip is secure (see Figure 8).
Figure 10a - Trigger locked Figure 10b - Trigger unlocked
Engaged
6
Pre-Operation (Continued)
6. Connect the high pressure hose to the pump outlet (See Figures
2 and 6).
7. Attach the lance to the gun (see Figure 7).
Pressure Washer
Figure 6 – Connect high pressure hose to pump
www.chpower.com
Disengaged
Figure 7– Attach lance to gun
9. Install quick connect tips to tip holder and secure to the
pressure washer handle. See Figure 9.
TRIGGER SAFETY LATCH
In the engaged position, the trigger safety latch prevents the
gun from being triggered accidentally. Push the latch fully up to
engage it (See Figure 10).
Always engage the trigger safety latch when the unit is not in
use.
Figure 8 - Installing Quick Connect Tip
Pull collar back
Figure 9 - Insert spray tips into the rubber tip holder
Page 7

the trigger on the gun, pull the starter rope rapidly and firmly
(See Figure 11). Continue holding the rope as it returns. Repeat
these steps until the engine starts.
When pulling the starter rope, make
sure to keep your hand and arm clear of
the engine and cart components.
Never let the starter rope return by itself.
Doing so could jam the recoil system.
8. If the engine does not start after two or three pulls or if the
rope is hard to pull, squeeze the gun trigger to release the
pressure that has built up in the high pressure hose. Repeat
Steps 7 and 8 until the engine starts.
Spray the cleaning surface with water to clear off any dirt or
grime that may have collected on the surface. Doing so allows
the detergent to attack the deep down dirt that has worked its
way into the cleaning surface.
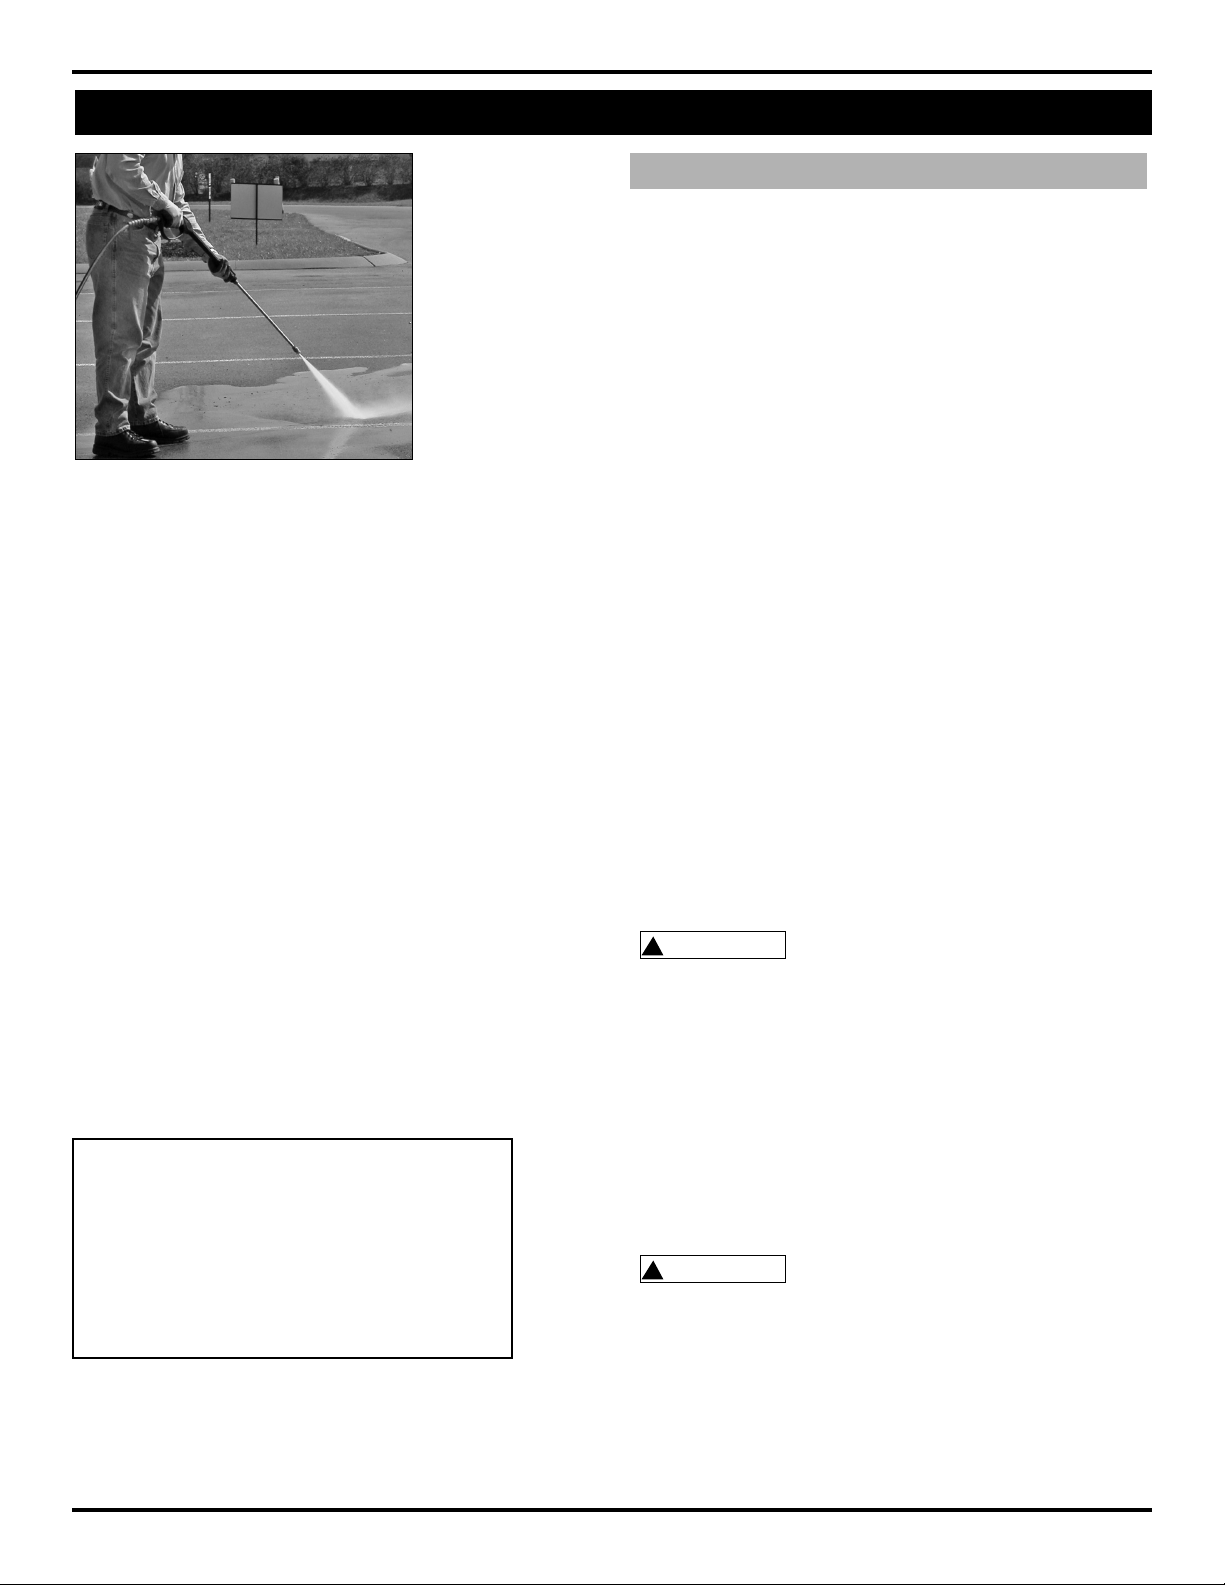
ANGLE TO THE CLEANING SURFACE
When spraying water against a surface, you can generate
maximum impact by striking the surface head on. However,
this type of impact can cause dirt particles to embed in the
surface and can prevent the desired cleaning action.
The optimum angle for spraying water against a cleaning
surface is 45 degrees (see Figure 12).
Spray water against a surface at a 45 degree angle to achieve
the most beneficial impact force and to efficiently remove
debris.
The following cleaning procedure will help you organize
your cleaning task and ensures that you will achieve the best
results in the shortest amount of time. Remember to use the
spraying / cleaning techniques mentioned in the following
section.
Before starting a pressure washer cleaning job, prepare the
surface you intend to clean. Clear furniture from the area
and make sure that all windows and doors are closed tightly.
Also, protect all plants and trees near the cleaning area with
a drop cloth. A covering ensures that your plants won’t be
sprayed by the detergents.
ALWAYS use the following start up procedure to ensure that the
unit is started safely and properly.
If water has frozen in the pressure
washer, thaw the pressure washer in a
warm room before starting. DO NOT pour hot water on or
into the pump; internal parts will be damaged.
1. Check engine oil levels. Add oil as necessary.
2. Check fuel level. Add unleaded gasoline (rated 86 octane or
higher) as required
DO NOT refuel a hot engine. Refueling
a hot engine could cause a fire. Use only
fresh, clean regular or unleaded gasoline. Close the fuel
shutoff valve during refueling.
3. Attach a garden hose to the inlet side of the pump and
connect it to the water supply. Use a hose with an internal
diameter (I.D.) of 5/8” (1.58 cm) and a length of 50 ft. (15 m) or
less.
Some local plumbing codes require
backflow prevention when connecting to
a fresh water supply. Install a backflow preventer upstream
from the pump if necessary.
a. If inlet water pressure is over 100 psi, install a regulating
water valve at the garden hose connection.
b. Do not exceed 100˚ F (38˚ C) inlet water temperature.
NOTE: The inlet water supply must have a minimum flow rate of
5 gpm (19 lpm).
4. Turn the water supply ON.
Never run the unit dry. Be sure the
water supply is completely turned on
before operating the unit.
5. Trigger the gun until water sprays smoothly from the tip
indicating that all air is purged from the system. Lock the
trigger safety latch.
6. Open the fuel valve by turning the knob counterclockwise
until it stops. Close the choke (if engine is cold) by moving
the choke ring fully to the right. Turn the ignition switch to
“ON”.
7. Start the engine (See Figure 10). Unlock the trigger safety
latch on the gun. Grasp the starter rope and brace one foot on
the chassis. Point the gun in a safe direction. While squeezing
Figure 11 - Start the engine
Operation
Pressure Washer
7
www.chpower.com
1. Surface Preparation
2. Start Up
3. Initial High Pressure Rinse
!
NOTICE
!
WARNING
!
NOTICE
!
NOTICE
!
CAUTION
!
NOTICE
Page 8
Pressure Washer
DISTANCE FROM CLEANING SURFACE
The distance between the spray tip and the cleaning surface is
another factor that affects the impact force of the water. The
impact force of the water increases as the spray tip is moved
closer to the surface.
HOW TO AVOID DAMAGING SURFACES
Damage to cleaning surfaces occurs because the impact force
of the water exceeds the durability of the surface. You can
vary the impact force by controlling the spray tip angle to
the cleaning surface and the distance from the cleaning
surface and by changing the spray tip. NEVER use a narrow
high impact stream on a surface that is susceptible to
damage. Avoid spraying windows with a narrow high impact
stream. Doing so may break the window. The most sure way
to avoid damaging surfaces is to follow these steps:
1. Before triggering the gun, make sure the quick connect
tip you are using is appropriate for the application.
2. Place the spray tip approximately 4-5 feet (1,22-1,52 m)
away from the cleaning surface. Then hold the lance and
spray tip at a 45 degree angle to the cleaning surface.
Trigger the gun.
3. Vary the fan pattern spray angle and the distance to the
cleaning surface until optimum cleaning efficiency is
achieved without damaging the surface.
NOTE: Use only detergents formulated for pressure washers.Test
detergent in an inconspicuous area before use.
DETERGENTS
The use of detergents can dramatically reduce cleaning time
and assist in the removal of difficult stains. Many detergents
are customized for pressure washer use on specific cleaning
tasks. Pressure washer detergents are as thick as water.
Using thicker detergents – like dish soap – will clog the
chemical injection system and prevent the application of the
detergent.
Once applied to a cleaning surface, detergents take time to
break down dirt and grime. Detergents work best when applied
at low pressure.
You can effectively clean surfaces by combining the chemical
action of detergents with high pressure rinses. On vertical
surfaces, apply the detergent starting at the bottom and work
your way upward. This method prevents the detergent from
sliding down and causing streaks. Begin high pressure rinsing at
the bottom and work your way upward. On particularly tough
stains, use a brush in combination with detergents and high
pressure rinsing.
1. Follow manufacturer’s label directions for mixing correct
concentrations of soap/detergents. The soap detergent to
water ratio through the pump is approximately 12% (1 to
8).
2. Pour detergent into the detergent tank. The tank capacity is
1.5 gallons.
3. Install 65º (Black) Low Pressure Detergent Tip in the quick
connect fitting on the end of the lance.
NEVER replace quick connect tip when gun
is triggered. Always engage trigger lock on
gun before removing or installing quick connect tips.
GENERAL CLEANING TIPS
1. Apply the detergent so that it thoroughly covers the
cleaning surface. Apply the detergent from bottom to top
to prevent the detergent from sliding down and streaking.
Wait a couple of minutes for the detergent to break down
the dirt and grime. Use a brush to lightly scrub heavily
soiled areas. Never allow the detergent to dry on the
cleaning surface.
2. Replace black 65º quick connect tip with the yellow 15º tip
and complete final rinse.
NEVER replace quick connect tip when gun
is triggered. Always engage trigger lock on
gun before removing or installing quick connect tips.
3. NOTE: After using detergents, flush the suction system by
rinsing out tank with clean water and running unit with
black 65º tip flushing clean water from tank through the
pump.
8
www.chpower.com
Operation (Continued)
4. Detergent Application
The color of the tip shows what spray angle it is:
Red – 0° – Maximum Duty*
Yellow – 15° – Heavy Duty
Green – 25° – General Duty*
White – 40° – Light Duty*
Black – 65° – Low Pressure Detergent
* = Not Included
Figure 12 - Optimum angle to cleaning
surface
!
WARNING
!
WARNING
Page 9
The easiest way to regulate the cleaning power of your
pressure washer is by changing the distance from the surface
you are cleaning. Begin spraying while standing several feet
from the surface. Slowly move closer to the object you are
cleaning until you find the most effective cleaning technique.
The final rinse should start at the bottom and work upward.
Make sure that you thoroughly rinse the surface and that you
remove all detergent.
To reduce the risk of bodily injury or property damage, always
follow this procedure whenever spraying is stopped, when work
is completed, and before checking or repairing any part of the
system.
1. Engage the trigger safety latch.
2. Turn the unit off.
3. Shut off the water supply.
4. Disengage the trigger safety latch and trigger the gun to
relieve pressure.
5. Re-engage the trigger safety latch.
6. When checking or repairing unit, remove the ignition cable
from the spark plug.
7. Before overnight storage, long term storage, or transporting
unit, disconnect the water supply and turn off the fuel supply
valve.
1. Be sure all detergent is flushed from system.
2. Turn the engine OFF.
3 Turn the water supply OFF.
4. After the engine and water supply are turned off, trigger the
gun to depressurize the system.
NEVER turn the water supply off before
turning the engine/motor off. Serious
damage could occur to the pump and/or engine/motor.
NEVER disconnect the high pressure
discharge hose from the machine while the
system is pressurized. To depressurize, turn engine/motor off, turn
water supply off and squeeze gun trigger 2-3 times.
5. After each use, wipe all surfaces of the pressure washer with
a clean, damp cloth.
• Do not store the pressure washer outdoors.
• Do not store the pressure washer where it might freeze
unless it has been properly winterized.
5. Cleaning Power
7. Pressure Relief Procedure
8. Shutdown
9. Storage
6. Final Rinse
Operation (Continued)
Pressure Washer
www.chpower.com
9
LONG TERM STORAGE INSTRUCTIONS (MORE THAN 30 DAYS
IN STORAGE)
1. Remove fuel from the tank and run the pressure washer in a
normal operating mode until the engine stops from a lack of
fuel. Normal operating mode means actually spraying water
from the gun while the engine is running.
Alternate method – Add fuel stabilizer to gas in the tank and
run in normal operating mode for at least five minutes.
2. Stop the engine, turn off the water supply, and trigger the
gun to release pressure in the high-pressure hose.
3. Disconnect the water supply and high pressure hose from the
pump.
4. Allow the engine to cool.
5. Disconnect the spark plug wire and remove the spark plug.
6. Pour 1/2 oz. of engine oil into the spark plug hole.
Never pull the starter rope on the engine
when the spark plug is removed unless the
spark plug hole is covered. Fuel vapor from the hole can ignite by
a spark.
7. Place a rag over the spark plug hole and slowly pull the
starter rope several times to distribute the oil.
WINTERIZING INSTRUCTIONS
1. Follow and complete the Long Term Storage Instructions
above.
2. Disconnect the spark plug wire.
3. Disconnect the high pressure hose from the pump.
4. Insert a 12” to 14” piece of garden hose into the pump inlet.
5. Place a funnel in the other end of the garden hose.
Read the manufacturer’s instructions for
safe handling and disposal of RV
antifreeze.
6. Pour approximately 6 oz. of RV antifreeze into the funnel.
7. Pull the starter rope several times until the RV antifreeze
comes out of the pump outlet.
8. Disconnect the high pressure hose from the gun and drain
the hose. Hold the gun and lance in a vertical position and
squeeze the trigger to drain the water out.
TIPS FOR EXTENDING THE LIFE OF YOUR PRESSURE WASHER
1. Never operate the unit without water.
2. Your pressure washer is not meant to pump hot water. Never
connect your pressure washer to a hot water supply as it will
significantly reduce the life of the pump.
3. Running the unit for more than one minute without spraying
water causes heat to build up in the pump. Running the unit
without spraying water can damage pump components.
!
NOTICE
!
CAUTION
!
WARNING
NOTICE
Page 10

Engine Oil Type SAE 10W-30
SAE 30W (Above 60˚ F)
Engine Oil Capacity
Honda engines 18.5 fl. oz.
Engine Fuel Capacity
Honda engines 0.29 gal
Pump Oil Type
Wobble pumps SAE20W or SAE30W
non-detergent oil
Pump Oil Capacity
Vertical wobble pumps 4.0 fl. oz.
Pump Detergent Suction
Water to detergent ratio 8 to 1 (12% detergent)
Water Supply Requirements
Minimum inlet pressure 20 psi
Maximum inlet pressure 100 psi
Maximum inlet temperature 100˚ F
Minimum inlet flow rate 5 gpm
Inlet garden hose size 5/8” I.D.
Maximum inlet garden
hose length 50 ft
Daily
After first 5 hours of
operation
Every 25 hours of
operation
Every 50 hours of
operation
Each 100 hours of
operation or every 3
months
• Check water inlet screen and
filter.
• Check engine oil levels. Fill as
necessary.
• Check gasoline level. Fill as
necessary.
• Change engine break-in oil.
Use SAE30 or 10W-30
detergent oil.
• Change oil if operating under
heavy load or high ambient
temperature.
• Clean or replace paper air
cleaner cartridge. Tap gently
to remove dirt.
• Change oil.
• Replace spark plug.
• Replace paper air cleaner
cartridge.
• Change engine oil.
Maintenance Schedule Action needed
Maintenance Schedule
Vertical Oriented Pressure Washers
Technical and Consumer Information
Pressure Washer
10
Maintenance
Observe regular maintenance intervals to ensure maximum
performance and life from the pressure washer. Refer to the
schedule for recommended maintenance. If you operate the
pressure washer in dusty conditions, perform maintenance
checks more often.
ENGINE OIL CHANGING INSTRUCTIONS
Before tipping the
engine or equipment to
drain oil, drain fuel from the fuel tank.
NOTE: Change oil while the engine is cool.
1. Disconnect the spark plug wire from the spark plug.
2. Locate and remove the engine oil drain plug (See Figure
13).
3. Drain old oil.
4. Replace the drain plug and set the unit upright.
5. Refill the unit with new oil of a recommended type and
quantity. Fill the unit to the proper level shown on the dipstick.
PUMP OIL CHANGING INSTRUCTIONS
Changing or refilling the oil in the pump requires removal of
the pump from the engine and should not be required unless
oil has leaked out due to worn or damaged oil seals in the
pump. If oil has leaked out of the pump, bring the pressure
washer to a certified Campbell Hausfeld service center for
repair.
Figure 13 - Oil Drain Location
www.chpower.com
!
CAUTION
Page 11

www.chpower.com
11
Service Record
Pressure Washer
Date Maintenance performed Replacement components required
Page 12
5
6
7
8
1
2
3
4
39
11
12
16
17
18
19
13
14
15
20
21
22
23
28
29
24
25
26
10
9
27
30
31
32
37
33
34
35
36
38*
Ref.
Description
Part
Qty
.
No. Number
12
Pressure Washer
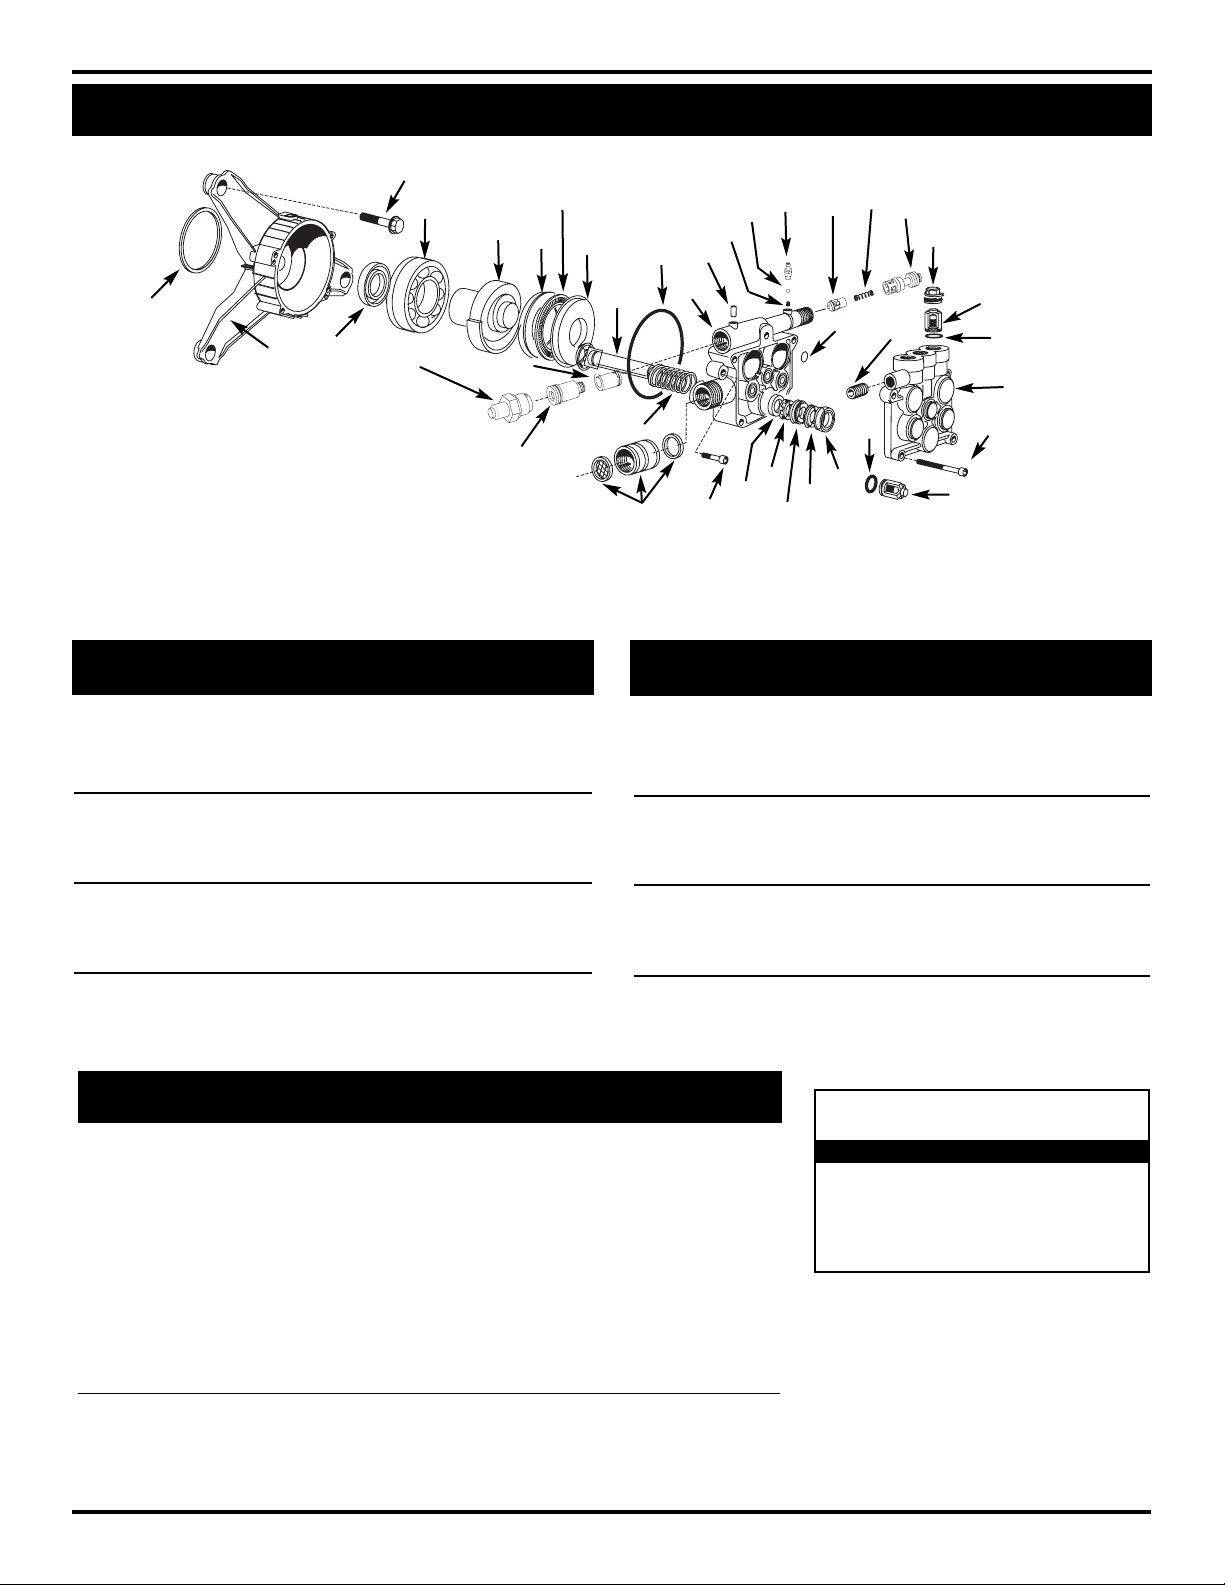
Replacement Parts List — Pump PM341000SJ
For Replacement Parts, Call 1-800-330-0712
Please provide following information:
- Model number
- Serial number (if any)
- Part description and number as shown in parts list
Address parts correspondence to:
Campbell Hausfeld
Attn: Customer Service
100 Mundy Memorial Drive
Mt. Juliet, TN 37122
Housing assembly (Includes one each of items 1-5) PM255230SV 1
Unloader assembly (Includes one each of items 7-10 and 26) PM344900SV 1
Oil seal kit (Includes three each of item 12) PM256500SV 1
Piston guide kit (Includes three each of items 13-15) PM344905SV 1
Water seal kit (Includes three each of item 16) PM344910SV 1
Outlet valve kit (Includes three each of items 21 and 22) PM064304SV 1
Inlet valve kit (Includes three each of items 17 and 18) PM064740SV 1
Valve cap kit (Includes three each of item 23) PM064750SV 1
O-ring kit (Includes three each of items 17 and 21
and one each of items 25 and 33) PM058000SV 1
Detergent injector kit (Includes one each of items 27-29) PM064305SV 1
Piston kit (Includes three each of items 32 and 34) PM344920SV 1
Needle bearing kit (Includes one each of items 35-37) PM041840SV 1
Notes
* Available Separately
Oil capacity: 4 fl. oz.
OIl type: SAE 30W (non-detergent)
PAR T
SERVICE KITS NUMBER QTY.
TORQUE SPECIFICATIONS
(in-lbs)
Ref. No. Description Torque
6 Thermal relief valve 110
11 Screw 96
19 Head bolt 96
23 Valve cap 240
21 O-ring –
22 Outlet valve assembly –
23 Valve cap –
24 Plug PM064301SV 1
25 O-ring PM041870SV 1
26 Chemical injector assembly PM341015SV 1
27 Spring –
28 Ball –
29 O-ring and hose barb –
30 Screw PM064302SV 1
31 Piston body PM341020SV 1
32 Piston spring –
33 O-ring, 85 x 2.5 –
34 Piston –
35 Thrust shoe –
36 Needle bearing –
37 Bearing disk –
38* Bolt MJ101211AV 3
39 Brass swivel assembly PM041360SV 1
Ref.
Description
Part
Qty
.
No. Number
1 Dust ring –
2 Pump housing –
3 Oil seal ring –
4 Bearing –
5 Wobble plate –
6 Thermal relief valve PM005405SV 1
7 Unloader valve body assembly –
8 Body guide assembly –
9 Check valve body assembly –
10 Check valve spring 1
11 Screw PM007500SV 2
12 Oil seal –
13 Oil seal spacer –
14 Seat seal ring –
15 Anti-extrusion ring –
16 Water seal –
17 O-ring –
18 Suction valve –
19 Head bolt PM025100SV 4
20 Head, 12 mm PM255240SV 1
www.chpower.com
Page 13

Pressure Washer
13
Replacement Parts List — Vertical Shaft Pressure Washer
Ref
Description
Product
Qty
No. Number
1 Handle tube PM344830BH 1
2 * 1/4” - 20 Bolt (handle) PM001903AV 2
3 * Flat washer PM002000AV 18
4 * 1/4” - 20 Nylon lock nut ST073808AV 7
5 * 1/4” - 20 Bolt (base) PM001902AV 3
6 Left leg PM344828BH 1
7 Right leg PM345100BH 1
8 Rubber bumper AL062300AV 2
9 * 1/4” - 20 x 3/4 Self tapping
screw MJ102100AV 2
10 Wheel WA005600AV 2
11 Pushnut PM066300AV 2
12 * 1/4” - 20 Bolt (axle) PM001904AV 2
13 Axle PM344831BH 1
14 Baseplate PM345520AV 1
15 Detergent tank assembly PM252000SJ 1
16 1/4” - 20 Serrated nut (tank) PM031101AV 4
17 1/4” - 20 Bolt, (tank)" MJ101104AV 4
For Replacement Parts, Call 1-800-330-0712
Please provide following information:
- Model number
- Serial number (if any)
- Part description and number as shown in parts list
Address parts correspondence to:
Campbell Hausfeld
Attn: Customer Service
100 Mundy Memorial Drive
Mt. Juliet, TN 37122
Ref
Description
Product
Qty
No. Number
18 Cap PM252450AV 1
19 Detergent tube PM013700SV 1
20 Gun PM005136AV 1
21 O-ring (gun) PM245800SV 1
22 Hose PM344302AV 1
23 Lance PM035120AV 1
24 Tip, 15° (yellow) PM039880AV 1
25 Tip, 65° (black) PM039820AV 1
26 Holder, QC Tip PM344304AV 1
* Item available at local hardware store
Tip Accessories Available for PW2515:
(Not supplied with unit)
Tip, 0° (Red) PM039870AV
Tip, 25° (Green) PM039890AV
Tip, 40° (White) PM039900AV
1
2
3
4
5
6
7
8
9
10
12
13
14
15
16
17
18
19
20
21
22
23
24
25
26
3
11
www.chpower.com
Page 14

Pressure Washer
Troubleshooting Chart - Gasoline Powered Pressure Washers Only
Symptom Possible Cause(s) Corrective Action(s)
Engine will not start or is hard
to start
Engine misses or lacks power
Low pressure and/or pump
runs rough
Water leakage from under
pump manifold
Water in pump crankcase
(milky oil)
Frequent or premature failure
of the pump water seals
Strong surging at the inlet
and low pressure
Oil leakage between the
engine and the pump
Fluctuating pressure
Pressure drops after period of
normal use
Pump noisy / pump runs
rough
Pressure washer will not spray
detergent
1. No gasoline in fuel tank or carburetor
2. Low oil
3. Start/Stop switch in stop position
4. Water in gasoline or old fuel
5. Dirty air cleaner filter
6. Spark plug dirty, wrong gap or wrong type
7. Spray gun closed
8. Other causes
1. Partially plugged air cleaner filter
2. Spark plug dirty, wrong gap or wrong type
1. Worn or wrong size tip
2. Inlet filter on pump clogged
3. Worn water seals, abrasives in water, or natural wear
4. Fouled or dirty inlet or discharge valves
5. Restricted inlet
6. Worn inlet or discharge valves
7. Leaking high pressure hose
8. Pump drawing in air
9. Unloader valve seat faulty or worn
Worn water seals
1. Humid air condensing inside crankcase
2. Oil seals leaking
1. Scored damaged or worn plungers
2. Abrasive material in the fluid
3. Inlet water temperature too high
4. Overpressurizing pump
5. Excessive pressure due to partially plugged or
damaged tip
6. Pump running too long without spraying
7. Pump running dry
Foreign particles in the inlet or discharge valve or worn
inlet and/or discharge valves
Worn oil seals and/or o-ring
1. Valve worn, dirty or stuck
2. Pump drawing in air
3. Tip clogged
1. Worn pump water seals
2. Nozzle worn
3. Valve worn, dirty or stuck
4. Unloader valve seat worn or dirty
1. Pump drawing in air/low water supply
2. Valves dirty or worn
3. Worn bearings
4. Water too hot
1. Nozzle not pushed up far enough
2. Clog, kink, or hole in detergent suction hose
3. Hose length too long
4. Lance not functioning properly
1. Fill the tank with gasoline,open fuel shut off valve.
Check fuel line and carburetor
2. Check oil level. Fill if necessary
3. Move switch to start position
4. Drain fuel tank and carburetor. Use new fuel and dry
spark plug
5. Remove and clean or replace
6. Clean, adjust the gap, or replace
7. Trigger spray gun
8. See engine owner’s manual
1. Remove and clean or replace
2. Clean, adjust the gap, or replace
1. Replace with tip of proper size
2. Clean. Check more frequently
3. Check filter. Replace water seals. See service center
4. Clean inlet and discharge valve assemblies. Check filter
5. Check garden hose, may be collapsed or kinked. Check
inlet water flow
6. Replace worn valves
7. Replace high pressure hose
8. Ensure hoses and fittings are tight
9. Check and replace
Install new water seals. See service center
1. Change oil as specified in maintenance schedule
2. Install new oil seals. See service center
1. Install new plungers. See service center
2. Install proper filtration on pump inlet plumbing
3. Check water temperature; may not exceed 100
o
F.
4. Do not modify any factory set adjustments.
5. Clean or replace tip.
6. Never run pump more than 2 minutes without spraying
7. Do not run pump without water
Clean or replace valves. See service center
Replace oil seals and/or o-ring. See service center
1. Check and replace
2. Ensure hoses and fittings are tight. Purge air from garden hose
3. Check or replace
1. Check and replace
2. Check and replace
3. Check, clean or replace
4. Check, clean or replace
1. Ensure fittings are tight. Increase water pressure
2. Check, clean or replace
3. Check and replace
4. Reduce temperature below 100oF
1. Push nozzle forward as far as it will go.
2. If clean, unkink or replace hose.
3. Use only hose length provided with initial purchase of
pressure washer. Detergent suction will not function if
more than one section of hose is attached to unit.
4. Remove lance from gun. If detergent is dispensed
through gun, the lance must be replaced. If no detergent is dispensed through gun, remove 1” tapered
detergent barb from pump. Clean the barb, and make
sure that ball and spring are properly aligned with
tapered portion of the spring facing the ball. The ball
should be on top of the spring.
14
www.chpower.com
Page 15

www.chpower.com
Pressure Washer
15
Notes
Page 16

Pressure Washer
16
www.chpower.com
Limited Warranty
1. DURATION: From the date of purchase by the original purchaser as follows: One Year
2. WHO GIVES THIS WARRANTY (WARRANTOR): Campbell Hausfeld / Scott Fetzer Company, 100 Mundy Memorial Drive,
Mount Juliet, TN 37122, Telephone: (800) 330-0712
3. WHO RECEIVES THIS WARRANTY (PURCHASER): The original purchaser (other than for purposes of resale) of the Campbell
Hausfeld pressure washer.
4. WHAT PRODUCTS ARE COVERED UNDER THIS WARRANTY: Any Campbell Hausfeld Pressure Washer supplied or manufactured by the Warrantor.
5. WHAT IS COVERED UNDER THIS WARRANTY: Substantial defects on material and workmanship which occur within the duration of the warranty period with the exceptions noted below.
6. WHAT IS NOT COVERED UNDER THIS WARRANTY:
A. Implied warranties, including those of merchantability and FITNESS FOR A PARTICULAR PURPOSE ARE LIMITED FROM THE
DATE OF ORIGINAL PURCHASE AS STATED IN THE DURATION. If this pressure washer is used for commercial, industrial or
rental purposes, the warranty will apply for ninety (90) days from the date of purchase. Some States do not allow limitation on how long an implied warranty lasts, so the above limitations may not apply to you.
B. ANY INCIDENTAL, INDIRECT, OR CONSEQUENTIAL LOSS, DAMAGE, OR EXPENSE THAT MAY RESULT FROM ANY DEFECT,
FAILURE, OR MALFUNCTION OF THE CAMPBELL HAUSFELD PRESSURE WASHER. Some States do not allow the exclusion or
limitation of incidental or consequential damages, so the above limitation or exclusion may not apply to you.
C. Any failure that results from shipping damage, accident, purchaser’s abuse, neglect or failure to install and operate pres-
sure washer in accordance with instructions provided in the owner’s manual(s) supplied with product.
D. Pre-delivery service, i.e. assembly, oil or lubricants and adjustment.
E. Items or service normally required to maintain the pressure washer.
F. Gasoline engine and components are expressly excluded from coverage under this limited warranty. Such components
should be returned by the purchaser to the original manufacturer or to its authorized repair stations for service.
G. Additional items not covered under the warranty:
1. Normal wear items such as high pressure hoses, water and oil seals, o-rings, valves, lances and spray tips.
2. Motor brushes (Electric models only).
3. Cosmetic defects that do not interfere with functionality.
4. Rusted components.
5. Pump wear or valve damage caused by using improper oil, oil contamination or by failure to follow proper oil maintenance guidelines.
7. RESPONSIBILITIES OF WARRANTOR UNDER THIS WARRANTY: Repair or replace, at Warrantor’s option, pressure washer or
component which is defective, has malfunctioned and/or failed to conform within duration of the warranty period.
8. RESPONSIBILITIES OF PURCHASER UNDER THIS WARRANTY:
A. Provide dated proof of purchase and maintenance records.
B. Deliver or ship the Campbell Hausfeld pressure washer or component to nearest Campbell Hausfeld Authorized Service
Center. Freight costs, if any, must be borne by the purchaser.
C. Use reasonable care in the operation and maintenance of the pressure washer as described in the owner’s manual(s).
9. WHEN WARRANTOR WILL PERFORM REPAIR OR REPLACEMENT UNDER THIS WARRANTY: Repair or replacement will be
scheduled and serviced according to the normal work flow at the servicing location, and depending on the availability of
replacement parts.
This Limited Warranty applies in the U.S., Canada and Mexico only and gives you specific legal rights. You may also have other
rights which vary from state to state or country to country.
Page 17

Nettoyeur haute
pression à essence
Instructions d’Utilisation et Manual de Pièces PW2515
Veuillez lire attentivement et bien comprendre ces instructions
avant de faire fonctionner votre nettoyeur haute pression.
© 2006 Campbell Hausfeld/Scott Fetzer
IN468000AV 8/06
Apprendre à connaître votre nettoyeur haute pression . . . . . . . . . . . . . . . . .2
Questions fréquemment posées . . . . . . . . . . . . . . . . . . . . . . . . . . . . . . . . . . . . .3
Information de sécurité et avertissements . . . . . . . . . . . . . . . . . . . . . . . . . . . .4
Pré-opération . . . . . . . . . . . . . . . . . . . . . . . . . . . . . . . . . . . . . . . . . . . . . . . . .5 - 6
Fonctionnement . . . . . . . . . . . . . . . . . . . . . . . . . . . . . . . . . . . . . . . . . . . . . . .6 - 9
Information technique et entretien . . . . . . . . . . . . . . . . . . . . . . . . . . . . . . . . .10
Registre de service . . . . . . . . . . . . . . . . . . . . . . . . . . . . . . . . . . . . . . . . . . . . . . .11
Liste de pièces de rechange
• Pompe . . . . . . . . . . . . . . . . . . . . . . . . . . . . . . . . . . . . . . . . . . . . . . . . . . . .12
• Chariot . . . . . . . . . . . . . . . . . . . . . . . . . . . . . . . . . . . . . . . . . . . . . . . . . . . .13
Tableau de dépannage . . . . . . . . . . . . . . . . . . . . . . . . . . . . . . . . . . . . . . . . . .14
Garantie . . . . . . . . . . . . . . . . . . . . . . . . . . . . . . . . . . . . . . . . . . . . . . . . . . . . . . .16
Contenu Page
Modèle PW2515
Veuillez inscrire le No de modèle et le No de série à utiliser pour
contacter le fabricant :
No modèle ______________ Date d’achat ____________________
No série ______________ Endroit d’achat ____________________
Pour de l’information sur le produit, composez le 1-800-330-0712
MÉMENTO : Gardez votre preuve datée d'achat à fin de la garantie !
Joignez-la à ce manuel ou classez-la dans un dossier pour plus de sécurité.
Page 18

Pulvérizateur Haute Pression
Fr 2
1 Réservoir de Détergent
2 Silencieux
3 Emplacement du numéro de série/décalque
du produit
4 (Pompe) Connexion d’aspiration du tuyau
d’arrosage
5 Lance à connexion rapide
6 Porte-buse et buses de pulvérisation
7 Manche
8 Pistolet et gâchette
9 Réservoir de carburant
10 Starter
11 Interrupteur On/Off (marche/arrêt) du
moteur
12 Valve de carburant On/Off (ouvert/fermé)
13 (Pompe) Connexion de sortie pour tuyau
haute pression
1
2
3
6
9
10
11
12
13
PW2515
Apprendre à connaître votre nettoyeur haute pression
5
4
7
8
Page 19

Pulvérizateur Haute Pression
Comment démarre mon
pulvérisateur haute pression ?
1. Assurez-vous d’avoir du carburant et de l’huile dans le
moteur. Le moteur est délivré SANS HUILE.
2. Ouvrir l’alimentation d’eau, puis tirer de la gâchette du
pistolet pour s’assurer que l’eau puisse sortir facilement
de la buse.
3. Ouvrir la soupape de contrôle du carburant en tournant
complètement le bouton dans le sens antihoraire jusqu’à
l’arrêt.
4. Fermer le starter (si le moteur est froid) en mouvant
l’anneau du starter complètement à droite.
5. Placer l’interrupteur de marche/arrêt sur « ON » (marche).
6. Tirer de la gâchette (pour soulager toute retro pression
de la pompe) tandis qu’on tire le cordon de marche.
Quel type d’huile devrais-je
utiliser ?
LE MOTEUR EST DÉLIVRÉ SANS HUILE. Voir page Fr 10 pour
les types d’huile, les quantités et les instructions pour
changer l’huile.
Pompe : La pompe est fournie remplie de la bonne quantité
d’huile et ne devrait pas avoir besoin d’être changée ou
remplie.
Pourquoi est-ce que je n’ai aucune
pression d’eau ?
• Est-ce que le tuyau d’eau est attaché au pulvérisateur ?
• L’eau est-elle en marche ?
• Vérifiez les tortillements, fuites, blocages de flexibles,
raccords ou gicleur.
• Est-ce que la buse de 15º (jaune) a été insérée dans
l’extrémité de la lance (voir page Fr 8)?
• Est-ce que l’écran du filtre d’aspiration est libre de débris ?
Vérifiez et retirez les débris au besoin.
Comment puis-je obtenir une
haute pression ?
• Pour haute pression, insérer la buse de 15º (jaune) dans
l’extrémité de la lance (voir page Fr 8).
Comment puis-je faire fonctionner
l’aspiration de savon ?
1. Connectez le tube d’aspiration de produits chimiques de
plastique transparent à la tétine de flexible de plastique
sur le réservoir du détergent.
2. Remplissez le réservoir du détergent avec un type à
formule spéciale pour les pulvérisateurs à haute pression.
Fr 3
3. Pour pulvériser le savon, insérer la buse de 65º (noire) pour
le savon dans l’extrémité de la lance (voir page Fr 8).
Pourquoi est-ce que le
pulvérisateur haute pression
n’applique pas de détergents avec
une haute pression ?
Les détergents « rebondissent » sur les surfaces de nettoyage à la
même vitesse qu’ils sont appliqués. Les fonctions du
pulvérisateur de lavage permettent à un détergent d’être tiré
seulement en mode de basse pression. En appliquant le
détergent à basse pression, l’effet de « rebondissement » est
réduit. Les détergents sont seulement efficaces lorsqu’on leur
donne le temps de travailler sur la surface à nettoyer. Après avoir
appliqué le détergent, attendre 1 à 3 minutes pendant qu’il
fonctionne, puis passer au rinçage de la surface avec une haute
pression.
Quel entretien dois-je effectuer
sur mon pulvérisateur haute
pression ?
1. Après avoir fermé le pulvérisateur haute pression et l’eau,
enlevez la pression du flexible en pressant la gâchette du
pistolet.
2. Retirez le tuyau d’arrosage et le flexible haute pression de la
pompe.
3. Tirez lentement la corde de lancement cinq fois pour purger
l’eau de la pompe. Ceci aidera à protéger la pompe de tout
dommage.
4. Ne rangez pas votre pulvérisateur haute pression dans un
endroit où la température tombera sous 0˚ C.
5. Suivre les instructions concernant le rangement et
préparation pour l’hiver appropriées, en page Fr 9.
Que faire s’il me manque une
pièce ?
Appelez Campbell Hausfeld au 1-800-330-0712 et nous
remplacerons rapidement toutes les pièces manquantes.
NE RETOURNEZ PAS LE PULVÉRISATEUR AU DÉTAILLANT !
Où puis-je acheter des accessoires
pour mon pulvérisateur
haute pression ?
• Si vous ne pouvez en trouver chez votre détaillant,
appelez Campbell Hausfeld au 1-800-330-0712.
Qui dois-je appeler si j’ai des
questions ou des problèmes ?
Appelez Campbell Hausfeld au
1-800-330-0712
www.chpower.com
Questions Fréquemment Posées
Page 20

• Suivez toujours les recommandations du fabricant de
détergents pour la bonne utilisation du produit. Protégez
toujours les yeux, la peau et le système respiratoire du
détergent.
N’utilisez pas de pression
qui dépasse la pression
d’exploitation de toute pièce (flexibles, raccords, etc.) du
système sous pression. Assurez-vous que tout équipement et
accessoires sont du calibre voulu pour résister à la pression
d’exploitation maximum de l’appareil.
Danger d’explosion.
• NE pulvisérez JAMAIS de liquides inflammables et
n’utilisez jamais le pulvérizateur haute pression dans des
endroits contenant de la poussière, des liquides ou des
vapeurs combustibles.
• Ne faites jamais fonctionner cet appareil dans un édifice
fermé ou dans ou près d’un environnement explosif.
• Ne retirez pas le bouchon du réservoir de combustible et ne
remplissez pas le réservoir tandis que le moteur est chaud ou
en marche (laissez le moteur refroidir deux minutes avant de
faire le plein). Remplissez toujours le réservoir lentement.
• Ne débranchez jamais le flexible de décharge de haute
pression de la machine tandis que le système est sous
pression. Pour décompresser, coupez le courant et l’eau,
puis pressez la gâchette du pistolet 2 ou 3 fois.
• N’engagez jamais en permanence le mécanisme de la
gâchette sur le pistolet.
• Ne faites jamais fonctionner la machine sans que tous les
composants soient bien raccordés à l’appareil (poignée,
pistolet/ rallonge, gicleur, etc.).
Dommage à l’equipement
• Mettez TOUJOURS l’eau à “ON” avant de mettre le
pulvérizateur haute pression en marche“ON”.
Faire fonctionner la pompe à sec cause de graves
dommages.
• Ne faites pas fonctionner le pulvérizateur haute pression
avec l’écran d’entrée d’eau retiré. Gardez l’écran libre de
tous débris et sédiments.
• NE faites JAMAIS fonctionner le pulvérizateur haute
pression avec des pièces brisées ou manquantes. Vérifiez
régulièrement l’équipement et réparez immédiatement
toutes pièces usées ou endommagées.
• Utilisez seulement le gicleur fourni avec l’appareil.
• Ne laissez jamais la rallonge sans surveillance tandis que
la machine est en marche.
• Ne modifiez jamais le régulateur du moteur et n’essayez
pas de modifier les réglages d’usine. Ceci pourrait
endommager l’appareil et annulera la garantie.
• Tenez toujours le pistolet et la rallonge bien fermement
en démarrant et en faisant fonctionner l’appareil.
• Ne laissez JAMAIS l’appareil fonctionner avec la gâchette
dégagée (arrêt) pendant plus d’une minute. L’accumulation
de chaleur pourrait endommager la pompe.
• NE rangez JAMAIS le pulvérizateur haute pression à
l’extérieur ou à des endroits où il pourrait geler. Le gel
peut endommager gravement la pompe.
• Dégagez la gâchette en changeant de haute à basse
pression sinon vous pourriez endommager le gicleur.
Gardez le flexible loin des objets
tranchants. Les flexibles qui
éclatent peuvent provoquer des blessures. Examinez régulièrement
les flexibles et remplacez ceux qui sont endommagés. N’essayez
pas de les réparer.
Directives de Sécurité
Ce manuel contient de l’information très important à
connaître et comprendre fournie pour votre SÉCURITÉ et
pour PRÉVENIR LES PROBLÈMES D’ÉQUIPEMENT. Pour aider à
reconnaître cette information, observez les symboles suivants.
Danger indique une situation
dangereuse imminente qui, si elle
n’est pas évitée, MÊNERA à la mort ou à une blessure grave.
Avertissement indique une
situation dangereuse possible
qui, si elle n’est pas évitée, POURRAIT mener à la mort ou à une
blessure grave.
Attention indique une situation
dangereuse possible qui, si elle
n’est pas évitée, POURRAIT mener à des blessures mineures ou
modérées.
Avis indique de l’information
importante qui, si elle n’est pas
respectée, pourrait provoquer des dommages à l’equipement.
NOTE: Information qui exige une attention spéciale.
Importantes Instructions de Sécurité
CONSERVEZ CES INSTRUCTIONS
En utilisant ce produit, ces précautions de base doivent être
respectées, dont:
1. Lire toutes les instructions avant d’utiliser ce produit.
2. Pour réduire les risques de blessures, il faut superviser
étroitment en présence d’enfants.
3. Suivez tous les codes de sécurité ainsi que l’Occupational
Safety and Health Act (OSHA).
4. Assurez-vous que tous les dispositifs de sécurité
fonctionnenet correctement avec chaque utilisation. NE
retirez PAS et ne modifiez pas toute pièce du pistolet ou
de l’appareil.
5. Sachez comment arrêter ce produit et dégager
rapidement la pression. Soyez bien au fait des contrôles.
6. Restez alerte – surveillez ce que vous faites.
7. N’utilisez pas l’appareil fatigué ou sous l’influence de
l’alcool ou drogues.
8. Gardez le secteur d’opération libre de toutes personnes.
9. Ne vous penchez pas trop et ne vous tenez pas sur un
support instable. Restez bien debout et en équilibre
en tous temps.
10. Suivez les instructions d’entretien spécifiées dans le manuel.
Risque d’injection ou de
blessures graves. Restez loin du
gicleur. Ne déchargez pas de jets vers les personnes. Ce
produit doit être utilisé seulement par un opérateur formé.
Retirez toujours la tige du pistolet avant de nettoyer les
débris de l’embout.
• Restez loin du gicleur. NE dirigez JAMAIS le jet haute
pression vers une personne, un animal, ou vous-même.
• Portez toujours des lunettes de sécurité et de
l’équipement de protection (protection auditive, gants,
bottes de caoutchouc, vêtements protecteurs) en faisant
fonctionner ou entretenant l’appareil.
• Ne mettez jamais la main ou les doigts sur l’embout de
pulvérisartion en opérant l’appareil.
• N’essayez jamais d’arrêter ou de dévier les fuites vers
toute partie du corps.
• Engagez toujours le verrou de sécurité de la gâchette en
position sûre à la fin de la pulvérisation même si ce n’est
que pour quelques instants.
Information de Sécurité et Avertissements
Pulvérizateur Haute Pression
Fr 4
!
DANGER
!
AVERTISSEMENT
!
ATTENTION
AVIS
!
AVERTISSEMENT
!
AVERTISSEMENT
!
AVERTISSEMENT
!
AVERTISSEMENT
AVIS
!
ATTENTION
Page 21

DÉBALLAGE
Retirer l’équipement et toute pièce de son
emballage. L’emballage doit contenir ce
qui suit.
• Un pulvérizateur haute pression
(pompe, moteur, base du chariot)
• Un assemblage de poignée du chariot
• Un réservoir de détergent
• Un pistolet de pulvérisation
• Una lance
• Un porte-buse avec 2 buses de
pulvérisation. De buses additionnelles
sont disponibles pour l’achat, voir
page Fr 13
• Un flexible haute pression
• Un paquet d’écrous, boulons et manuels
• Une bouteille d’huile à moteur
S’il manque des pièces, NE RETOURNEZ PAS L’APPAREIL AU
DÉTAILLANT. Notez le numéro de modèle de l’appareil
(situé sur l’étiquette du numéro de série du cadre du
pulvérizateur haute pression) et composez le 1-800-330-0712
pour les pièces de rechange.
Après le déballage, inspectez attentivement pour tout
dommage durant le transit. Assurez-vous de bien resserrer les
raccords et boulons avant d’utiliser le pulvérizateur haute
pression.
Ne faites pas fonctionner
l’appareil s’il a été endommagé
durant le transport, la manipulation ou l’utilisation car les
dommages pourraient provoquer l’éclatement et causer des
blessures ou des dommages à la propriété.
ASSEMBLAGE
Utilisez deux clés réglables ou de 7/16 po pour assembler le
pulvérisateur.
1. Glissez la poignée sur les pieds inférieurs de la base du
chariot. Utiliser les boulons and écrous fournis pour fixer
le manche aux pattes. Voir la Figure 1.
2. Fixer le réservoir de détergent à l’arrière de la poignée.
Utiliser les 4 boulons hexagonaux avec une rondelle plate
sous la tête hexagonale et 4 écrous fournis.
3. Glisser le tuyau de plastique transparent fixé au pied sur
la barbelure de tuyau de plastique du réservoir de
détergent (voir figure 3).
4. Adaptateur pivotant en laiton (voir la figure 2). Si ce
n’est pas déjà fait, assemblez l’adaptateur articulé de
laiton et fixez-le à l’entrée de la pompe (voir figures 4 et
5). Assurez-vous de raccorder le bon côté de l’adaptateur
articulé de laiton à la pompe.
Pulvérizateur Haute Pression
Fr 5
Pré-opération
Figure 1 – Assemblez la poignée
Figure 3 – Fixez le tube d’aspiration à la
tétine
Figure 4 - Adaptateur articulé de laiton
Connectez cette extrémité au tuyau d’arrosage
Connectez cette extrémité à
la pompe
Rondelle
Rondelle
avec écran
de filtre
Figure 5 - Connectez l’articulation
de laiton à la pompe
Adaptateur articulé
de laiton
Entrée de pompe
Figure 2 - Raccord de pompe
Adaptateur
pivotant
en laiton
Boyau d’arrosage
Entrée de la pompe
Sortie de
pompe
Barbelure de
tube d’injecteur
chimique
Tuyau
haute
pression
Soupape de
sûreté
thermique
!
AVERTISSEMENT
Page 22

7. Fixer la lance au pistolet (voir figure 7).
8. Installer la buse de connexion rapide en tirant vers l’arrière le
collier et en insérant la buse. Dégager le collier et s’assurer qu’il
revient complètement à sa position à l’avant et que la buse est
fixe (voir figure 8).
Figure 10a - Gâchette Figure 10b - Gâchette
verrouillée déverrouillée
Engagée
Fr 6
Pré-opération (Suite)
5. Fixez le tuyau d’arrosage (non inclus) au raccord d’entrée
de la pompe.
6. Connectez le flexible haute pression à la sortie de la
pompe (voir les figures 2 et 6).
Pulvérizateur Haute Pression
Figure 6 - Raccorder le tuyau haute pression à la
pompe
Désengagée
Figure 7 - Fixer la lance au pistolet
9. Mettre les buses de connexion rapide dans le support pour les
buses et le fixer sur le manche du nettoyeur haute pression.
Voir la figure 9.
VERROU DE SÉCURITÉ DE LA GÂCHETTE
En position engagée, le verrou de sécurité de la gâchette
empêche le déclenchement accidentel du pistolet.
Pousser
complètement le verrou de sécurité pour l’engager (voir
figure 10).
Engagez toujours le verrou de sécurité de la gâchette
lorsque vous n’utilisez pas l’appareil.
Figure 8 – Installation de la buse de connexion rapide
Tirer le collier
vers l’arrière
Figure 9 – Insérer les buses de pulvérisation dans le support
pour les buses.
Page 23

7. Démarrez le moteur (voir la figure 10). Déverrouillez le
verrou de sécurité de la gâchette sur le pistolet. Agrippez
la corde de lancement et appuyez un pied sur le châssis.
Pointer le pistolet dans une direction sans danger.
Tirez rapidement et fermement la corde de lancement
tout en pressant la gâchette du pistolet (voir la figure 11).
Continuez à tenir la corde quand elle revient. Répétez ces
étapes jusqu’à ce que le moteur démarre.
En tirant le lancement,
assurez-vous de garder la main
et le bras loin du moteur et des composants du chariot.
Ne laissez jamais la corde
de lancement revenir par elle-
même car cela pourrait bloquer le système de retour.
8. Si le moteur ne démarre pas après deux ou trois
enclenchements ou si la corde est difficile à tirer, pressez
la gâchette du pistolet pour dégager la pression
accumulée dans le flexible haute pression. Répétez les
étapes 7 et 8 jusqu’à ce que le moteur démarre.
Pulvérisez d’eau la surface à nettoyer pour enlever toute
poussière ou saleté accumulée sur la surface. Ceci permet au
détergent de s’attacher à la poussière en profondeur qui a
pénétré dans la surface à nettoyer.
ANGLE À LA SURFACE DE NETTOYAGE
En pulvérisant l’eau contre une surface, vous pouvez obtenir
un impact maximum en frappant la surface directement. Ce
type d’impact peut toutefois faire pénétrer les particules
de poussières dans la surface et ainsi empêcher d’avoir
l’action recherchée.
L’angle optimum de pulvérisation d’eau contre une surface de
nettoyage est de 45 degrés.
Pulvérisez l’eau contre une surface à un angle de 45 degrés pour
atteindre le meilleur impact et retirer efficacement les débris.
La procédure de nettoyage suivante vous aide à vous
organiser pour la tâche de nettoyage et pour vous assurer
d’atteindre les meilleurs résultats dans le temps le plus court.
Rappelez-vous d’utiliser les techniques de pulvérisation/
nettoyage mentionnées dans les sections suivantes.
Avant de commencer un travail de nettoyage à haute
pression, préparez la surface à nettoyer. Enlevez les meubles
et assurez-vous que toutes les fenêtres et portes sont bien
fermées. Protégez aussi toutes vos plantes et arbres près du
secteur à nettoyer en couvrant d’une toile pour ne pas les
pulvériser de détergent.
Utilisez TOUJOURS cette procédure de démarrage pour
assurer un démarrage exact et sans danger.
Si l’eau a gelé dans le
pulvérizateur à haute pression,
laissez-la dégeler à température ambiante avant de
commencer. NE versez PAS d’eau chaude sur ou dans la
pompe; les pièces intérieures seraient endommagées.
1. Vérifiez les niveaux d’huile à moteur. Ajoutez de l’huile
au besoin.
2. Vérifiez le niveau d’huile.
NE remettez PAS de carburant
avec un moteur chaud car cela
pourrait causer un incendie. Utilisez seulement de l’essence
sans plomb ou régulière propre, fraîche. Fermez le robinet
d’arrêt de carburant durant le remplissage.
3. Fixez un tuyau d’arrosage côté entrée de la pompe et
raccordez-le à l’alimentation d’eau. Utilisez un flexible de
D.I. de 5/8 po et d’une longueur de 50 pi (15 m) ou moins.
Certains codes de plomberie
locaux exigent un dispositif de
prévention de retour d’eau en connectant à une source d’eau
fraîche. Installez un dispositif de prévention de retour en
amont de la pompe, au besoin.
a. Si la pression d’eau d’alimentation dépasse 690 kPa,
installez une soupape régulatrice d’eau au raccord du
tuyau d’arrosage.
b. Ne dépassez pas 38˚ C de température d’eau
d’alimentation.
NOTE : L’approvisionnement d’eau d’alimentation doit avoir
un débit minimum de 19 lpm.
4. Ouvrez l’alimentation d’eau.
Ne laissez jamais l’appareil
fonctionner à sec. Assurez-vous
que l’alimentation d’eau est en marche avant de faire
fonctionner l’appareil.
5. Tirer de la gâchette jusqu’à ce que de l’eau puisse se pulvériser
facilement de la buse, ce qu’indique que tout air a été purgé
du système. Engager le verrou de sécurité de la gâchette.
6. Ouvrir la soupape de carburant en tournant complètement
le bouton dans le sens antihoraire jusqu’à l’arrêt. Fermer le
starter (si le moteur est froid) en mouvant l’anneau du
starter complètement à droite. Placer l’interrupteur
d’allumage sur « ON ».
Figure 11 - Démarrez le moteur
Opération
Pulvérizateur Haute Pression
Fr 7
1. Préparation de la surface
2. Démarrage
3.
Rinçage initial à haute pression
AVIS
!
AVERTISSEMENT
AVIS
AVIS
!
ATTENTION
AVIS
Page 24

Pulvérizateur Haute Pression
DISTANCE DE LA SURFACE À NETTOYER
La distance entre le gicleur de pulvérisation et la surface de
nettoyage est un autre facteur qui affecte la force d’impact
de l’eau. Celle-ci augmente au fur et à mesure où vous
déplacez le gicleur plus près de la surface.
COMMENT ÉVITER D’ENDOMMAGER LES SURFACES
Les dommages aux surfaces à nettoyer se produisent à cause
de la force d’impact de l’eau qui dépasse la durabilité de la
surface. On peut varier la force d’impact en contrôlant
l’angle de la buse de pulvérisation avec la surface à nettoyer,
la distance de la surface à nettoyer et en changeant la buse
de pulvérisation. NE JAMAIS utiliser un jet étroit à fort
impact sur une surface susceptible d’être endommagée.
Éviter de pulvériser les fenêtres avec un jet étroit à fort
impact. Ceci pourrait casser la fenêtre. Le meilleur moyen
d’éviter d’endommager les surfaces est de suivre ces étapes :
1. Avant de tirer de la gâchette, s’assurer que la buse de
connexion rapide utilisée est appropriée pour le travail.
2. Placer la buse à environ 1,2 à 1,5 m (4 à 5 pieds) de la
surface à nettoyer. Ensuite, tenir la lance et la buse de
pulvérisation à un angle de 45º avec la surface à nettoyer.
Tirer de la gâchette du pistolet.
3. Variez l’angle du jet à eventail et la distance à la surface à
nettoyer jusqu’à ce que vous atteigniez l’efficacité optimale
de nettoyage sans endommager la surface.
NOTE : Utilisez seulement les détergents formulés pour les
pulvérizateurs haute pression. Testez le détergent dans un
endroit retiré avant de l’utiliser.
DÉTERGENTS
Utiliser des détergents peut réduire de beaucoup le temps de
nettoyage et aider à retirer les taches rebelles. De nombreux
détergents sont faits pour le pulvérizateur haute pression pour
des tâches de nettoyage précises. Les détergents de
pulvérizateur haute pression sont aussi épais que l’eau. Le fait
d’utiliser des détergents plus épais - comme le savon de vaisselle
- bloquera le système d’injection chimique et empêchera
l’application de détergent.
Appliqués sur la surface, les détergents prennent du temps
pour s’attaquer à la poussière et à la saleté. Les détergents
fonctionnent mieux appliqués à basse pression.
Vous pouvez nettoyer efficacement les surfaces en combinant
l’action chimique des détergents avec les rinçages à haute
pression. Pour les surfaces verticales, appliquez le détergent en
commençant au bas pour aller vers le haut. La méthode
empêche le détergent de glisser vers le bas et de faire des
coulisses. Commencez le rinçage haute pression au bas et allez
vers le haut. Pour les taches particulièrement rebelles, utilisez
une brosse en plus des détergents et du rinçage haute pression.
1. Suivez les directives du fabricant sur l’étiquette pour les
bonnes concentrations de mélange de savon/détergents. La
proportion de détergent savon à eau dans la pompe est
d’environ 12 % (1 à 8).
2. Versez le détergent dans le réservoir de détergent. La
capacité du réservoir est de 1,5 gallons (5,67 litres).
3. Installer la buse basse pression (noire) à 65º sur la
connexion rapide à l’extrémité de la lance.
NE JAMAIS changer la buse de
connexion rapide au même temps
qu’on tire de la gâchette. Engager toujours le verrou de la
gâchette avant de quitter ou installer une buse de connexion
rapide.
CONSEILS GÉNÉRAUX DE NETTOYAGE
1. Appliquez le détergent pour couvrir entièrement la surface
à nettoyer, de bas en haut pour éviter qu’il ne glisse vers le
bas et fasse des marques. Attendez quelques minutes pour
que le détergent s’attaque à la poussière et à la saleté.
Utilisez une brosse pour frotter un peu les endroits
rebelles. Ne laissez jamais le détergent sécher sur la surface
à nettoyer.
2. Remplacer la buse noire 65º de connexion rapide par la buse
jaune 15º et faire le rinçage final.
NE JAMAIS changer la buse de
connexion rapide au même temps
qu’on tire de la gâchette. Engager toujours le verrou de la gâchette
avant de quitter ou installer une buse de connexion rapide.
3. REMARQUE : Après l’utilisation de détergents, laver le
système d’aspiration en rinçant le réservoir à l’eau fraîche et
faire fonctionner l’appareil avec la buse noire 65º en rinçant
à l’eau fraîche le réservoir jusqu’à la pompe incluse.
Fr 8
Opération (Suite)
4.
Application de détergent
La couleur de la buse indique l’angle de
pulvérisation :
Rouge - 0° - Travail extrêmement lourd*
Jaune – 15° – Travail lourd
Vert -25° - Travail géneral*
Blanc -40° - Travail léger*
Noir – 65° – Détergeant basse pression
* = Non incluse
Figure 12 - Angle optimum par rapport
à la surface à nettoyer
!
AVERTISSEMENT
!
AVERTISSEMENT
Page 25

La façon la plus facile de réguler la capacité de nettoyage de
votre nettoyeur haute pression est en variant la distance de
la surface à nettoyer. Commencer la pulvérisation à une
distance de quelques mètres de la surface. Doucement se
déplacer plus près de l’objet que vous voulez nettoyer
jusqu’à rencontrer la technique de nettoyage las plus
effective.
Le dernier rinçage devrait commencer du bas vers le haut.
Assurez-vous de bien rincer toute la surface et de retirer toute
trace de détergent.
Pour réduire les risques de blessures ou de dommages à la
propriété, suivez toujours cette procédure lorsque la
pulvérisation est arrêtée, à la fin du travail et avant de vérifier
ou réparer toute pièce du système.
1. Engagez le verrou de sécurité de la gâchette.
2. Fermez l’appareil.
3. Coupez l’alimentation d’eau.
4. Désengagez le verrou de sécurité de la gâchette et pressez
sur la gâchette pour décompresser.
5. Réengagez le verrou de sécurité de la gâchette.
6. Pour vérifier ou réparer l’appareil, quitter le câble d’allumage
de la bougie.
7. Avant de ranger pour la nuit, de ranger à long terme ou de
transporter l’appareil, déconnectez l’alimentation d’eau et
fermez la soupape d’alimentation de carburant.
1. Assurez-vous que tout le détergent est vidé du système.
2. Coupez le moteur.
3 Fermez l’alimentation d’eau.
4. Après avoir coupé le moteur et fermé l’alimentation
d’eau, pressez la gâchette pour décompresser le système.
NE fermez jamais l’alimentation
d’eau avant de couper le moteur.
Cela pourrait endommager la pompe et/ou moteur.
NE déconnectez jamais le
flexible de décharge de haute
pression de l’appareil tandis que le système est sous pression.
Décompressez en coupant le moteur, fermant l’alimentation d’eau
et pressant la gâchette 2 ou 3 fois.
5. Après chaque utilisation, essuyez les surfaces du pulvérizateur
haute pression avec un chiffon propre et humide.
• Ne rangez pas le pulvérizateur haute pression à l’extérieur.
• Ne rangez pas le pulvérizateur haute pression à un endroit
où il pourrait geler à moins de le préparer pour l’hiver.
5. Puissance de nettoyage
7. Procédure de décompression
8.
Arrêt
9.
Rangement
6.
Dernier Rinçage
Opération (Suite)
Pulvérizateur Haute Pression
Fr 9
INSTRUCTIONS DE RANGEMENT À LONG TERME (PLUS DE
30 JOURS)
1. Retirez le carburant du réservoir et faites fonctionner le
pulvérizateur haute pression en mode d’opération normal
jusqu’à ce que le moteur s’arrête faute de carburant. Ce
mode signifie que vous pulvérisez de l’eau du pistolet
tandis que le moteur est en marche.
Autre méthode – Ajoutez du stabilisateur de carburant à
l’essence dans le réservoir et faites fonctionner en mode
d’opération normal pendant au moins cinq minutes.
2. Coupez le moteur, fermez l’alimentation d’eau et pressez la
gâchette pour décompresser dans le flexible haute pression.
3. Déconnectez l’alimentation d’eau et le flexible haute pression
de la pompe.
4. Laissez le moteur refroidir.
5. Déconnectez le fil de la bougie et retirez la bougie.
6. Versez 14,8 mL d’huile à moteur dans le trou de la bougie.
Ne tirez jamais la corde de
lancement du moteur lorsque la
bougie est retirée jusqu’à ce que le trou de la bougie soit
couvert car les vapeurs du trou peuvent s’enflammer avec une
étincelle.
7. Placez un chiffon sur le trou de la bougie et tirez
lentement sur la corde de lancement plusieurs fois pour
distribuer l’huile.
INSTRUCTIONS POUR L’HIVER
1. Suivez et respectez les instructions de rangement à long terme
plus haut.
2. Déconnectez le fil.
3. Déconnectez le flexible haute pression de la pompe.
4. Insérez une longueur de tuyau d’arrosage de 12 à 14 po
dans l’entrée de la pompe.
5. Placez un entonnoir dans l’autre extrémité du tuyau
d’arrosage.
Lisez les instructions du
fabricant pour manipuler et
éliminer correctement l’antigel RV.
6. Versez environ 0,18 L d’antigel RV dans l’entonnoir.
7. Tirez la corde de lancement plusieurs fois jusqu’à ce que
l’antigel sorte de la sortie de la pompe.
8. Déconnectez le flexible haute pression du pistolet et
drainez le flexible. Tenez le pistolet et la tige en position
verticale et pressez la gâchette pour drainer toute l’eau.
CONSEILS POUR PROLONGER LA DURÉE DE VIE DE
VOTRE PULVERIZATEUR HAUTE PRESSION
1. Ne faites jamais fonctionner l’appareil sans eau.
2. Votre pulvérizateur haute pression ne doit pas pomper
d’eau chaude. Ne connectez jamais votre pulvérizateur
haute pression à une source d’eau chaude car cela réduira
de beaucoup la vie de la pompe.
3. Faire fonctionner l’appareil pendant plus d’une minute
sans pulvériser d’eau fera accumuler la chaleur dans la
pompe. Faire fonctionner l’appareil sans pulvériser d’eau
pourrait endommager les composants de la pompe.
AVIS
!
ATTENTION
!
AVERTISSEMENT
AVIS
Page 26
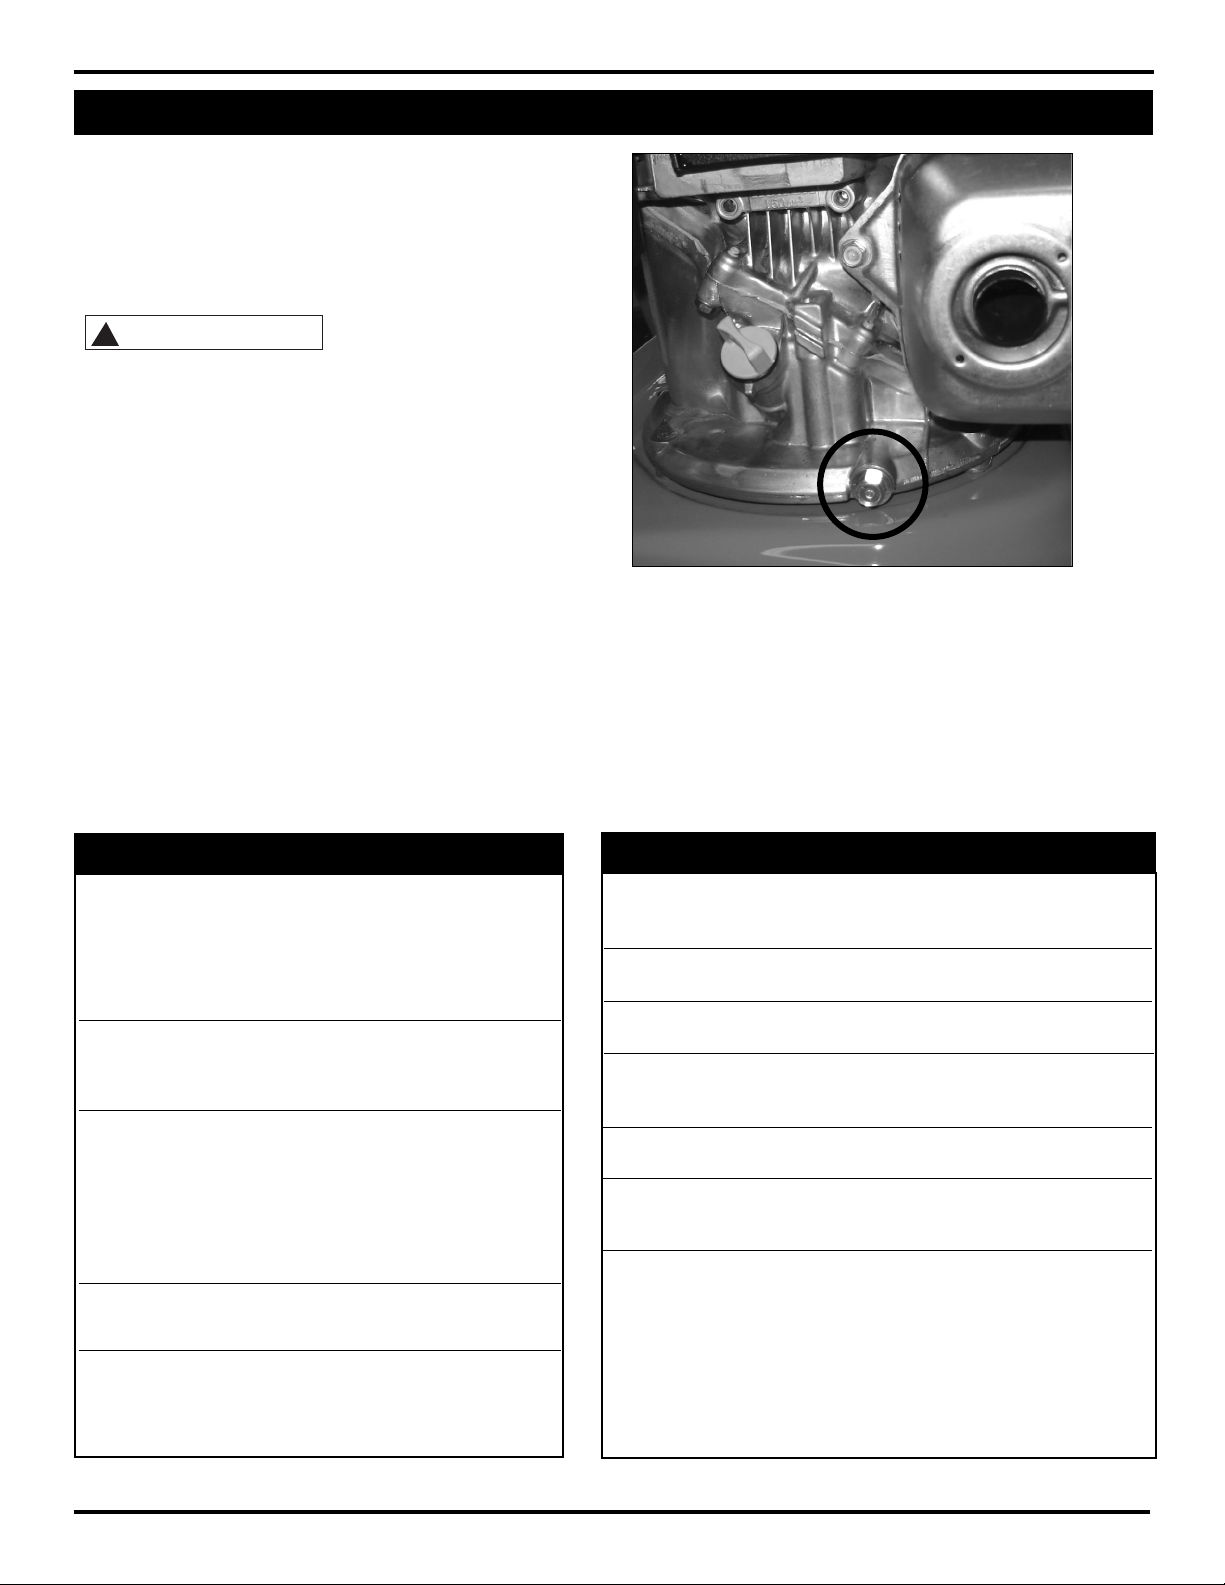
Type d’huile à moteur SAE 10W-30
SAE 30W
(plus de 15˚ C)
Capacité de l’huile à moteur
Moteurs Honda 0,55 L
Capacité de carburant du moteur
Moteurs Honda 1,44 L
Type d’huile de pompe
Pompes à plateau oscillant SAE20W ou SAE30W
huile non-détergent
Capacité d’huile de pompe
Pompes verticales à plateau oscillant 0,12 L
Aspiration de détergent de la pompe
Ratio eau à détergent 8 à 1
(12% détergent)
Exigences en alimentation d’eau
Pression d’entrée minimum 138 kPa
Pression d’entrée maximum 690 kPa
Température d’entrée maximum 38˚ C
Débit d’entrée minimum 19 Lpm
Taille de tuyau d’arrosage d’entrée 5/8 po D.I.
Longuer max. du tuyau d’arrosage 50 pieds
Chaque jour
Après les 5 premières
heures d’opération
Toutes les 25 heures
d’opération
Toutes les 50 heures
d’opération
Toutes les 100 heures
d’opération ou tous
les 3 mois
• Vérifiez l’écran et le filtre
d’entrée d’eau.
• Vérifiez les niveaux d’huile à
moteur. Remplissez au besoin.
• Vérifiez le niveau d’essence.
Remplissez au besoin.
• Changez l’huile de rodage et
utilisez de l’huile détergent
SAE30 ou 10W-30.
• Changez l’huile si vous utilisez
sous des charges lourdes ou à
température ambiante élevée.
• Nettoyer ou remplacer le
cartouche de papier du filtre
d’air. Frapper doucement pour
retirer la saleté.
• Changez l’huile.
• Remplacez la bougie.
• Remplacer le cartouche de
papier du filtre d’air.
• Changez l’huile du moteur.
Horaire d’entretien Mesure à prendre
Horaire d’entretien
Vertical Oriented Pressure Washers
Information technique et entretien
Pulvérizateur Haute Pression
Fr 10
Entretien
Respectez les intervalles d’entretien régulier pour assurer une
performance maximum et une longue durée de vie du
pulvérizateur. Reportez-vous à l’horaire d’entretien
recommandé. Si vous faites fonctionner votre pulvérizateur
haute pression dans des conditions poussiéreuses, faites les
vérifications d’entretien plus souvent.
INSTRUCTIONS DE CHANGEMENT D’HUILE À MOTEUR
Avant de pencher le moteur
ou l’équipement pour drainer
l’huile, drainez le carburant du réservoir de carburant.
NOTE: Changez l’huile à moteur froid.
1. Déconnectez le fil de la bougie de la bougie.
2. Trouver et quitter le tapon de drainage de l’huile du
moteur (voir figure 13).
3. Drainez la vieille huile.
4. Replacez le bouchon de drainage et relevez l’appareil.
5. Remplissez de nouvelle huile du type et selon la quantité
recommandée. Remplir l’appareil au niveau d’huile
approprié indiqué sur la jauge de remplissage.
INSTRUCTIONS DE CHANGEMENT D’HUILE DE LA POMPE
Pour changer ou remplir l’huile dans la pompe, il faut retirer la
pompe du moteur et cela ne devrait pas être nécessaire à
moins qu’il n’y ait eu une fuite à cause de joints d’huile usés
ou endommagés dans la pompe. S’il y a eu fuite d’huile hors
de la pompe, apportez le pulvérizateur haute pression à un
centre de réparations certifié Campbell Hausfeld.
Figure 13 - Site de drainage d’huile
!
ATTENTION
Page 27

Fr 11
Registre de service
Pulvérizateur Haute Pression
Date L’entretien a exécuté Les composants de rechange ont exigé
Page 28

5
6
7
8
1
2
3
4
39
11
12
16
17
18
19
13
14
15
20
21
22
23
28
29
24
25
26
10
9
27
30
31
32
37
33
34
35
36
38*
N°
Numero
de Description
de Pièce
Qté.
Ref.
Fr 12
Pulvérizateur Haute Pression
Pompe - Liste de pièces de rechange PM341000SJ
Pour pièces de rechange, appeler 1-800-330-0712
S’il vous plaît fournir l’information suivante :
- Numéro du Modèle
- Numéro de Série (si présent)
- Description de la Pièce et son numéro sur la liste
Correspondance :
Campbell Hausfeld
Attn: Customer Service
100 Mundy Memorial Drive
Mt. Juliet, TN 37122
Montage de carter (Comprend un chaque d’articles 1-5) PM255230SV 1
Montage de déchargeur (Comprend un chaque d’articles 7-10 et 26) PM344900SV 1
Trousse de bague d’étanchéité d’huile PM256500SV 1
Nécessaire de guide-piston (Comprend trois chaque d’articles 13-15) PM344905SV 1
Nécessaire de joint hydraulique (Comprend trois chaque d’article 16) PM344910SV 1
Nécessaire de soupape d’admission (Comprend trois chaque d’articles 17 et 18)PM064740SV 1
Nécessaire de soupape de sortie (Comprend trois chaque d’articles 21 et 22) PM064304SV 1
Nécessaire de capuchon de soupape (Comprend trois chaque d’article 23) PM064750SV 1
Nécessaire de joint torique (Comprend trois chaque d’articles 17 et 21
et un chaque d’articles 25 et 33) PM058000SV 1
Nécessaire d’injecteur de détergent (Comprend un chaque d’articles 27-29) PM064305SV 1
Nécessaire de piston (Comprend trois chaque d’articles 32 et 34) PM344920SV 1
Nécessaire de roulements à aiguille (Comprend un chaque d’articles 35-37) PM041840SV 1
Notes
* Disponible séparément
Capacité d’huile: 118 mL
Type d’huile: SAE 30W (sans détergent)
Numero
JEUX DE PIÈCES POUR LE SERVICE de Pièce Qté.
SPÉCIFICATIONS DE COUPLE
(kg-cm)
Nº de Réf. Description Couple
6 Soupape de
soulagement
thermique 110
11 Vis 96
19 Boulon à tête 96
23 Capuchon de
soupape 240
21 Joint torique –
22 Montage de soupape de sortie –
23 Capuchon se soupape –
24 Bouchon PM064301SV 1
25 Joint torique PM041870SV 1
26 Assemblage d’injecteur chimique PM341015SV 1
27 Ressort –
28 Boule –
29 Joint torique et barbillon de tuyau –
30 Vis PM064302SV 1
31 Corps de piston PM341020SV 1
32 Ressort de piston –
33 Joint torique, 85 x 2.5 –
34 Piston –
35 Coude de butée –
36 Roulement à aiguilles –
37 Disque de roulement –
38* Boulon MJ101211AV 3
39 Assemblage d’adaptateur pivotant
en laiton PM041360SV 1
N°
Numero
de Description
de Pièce
Qté.
Ref.
1 Bague de poussière –
2 Carter de pompe –
3 Anneau de bague d’étanchéité d’huile –
4 Roulement –
5 Plaque d’oscillation –
6 Soupape de soulagement thermiquePM005405SV 1
7 Assemblage du corps de clapet de
décharge –
8 Assemblage de guide du corps –
9 Assemblage du corps du clapet –
10 Ressort de clapet 1
11 Vis PM007500SV 2
12 Bague d’étanchéité d’huile –
13 Entretoise de joint d’étanchéité –
14 Bague de joint de siège –
15 Bague anti-refoulage –
16 Joint hydraulique –
17 Joint torique –
18 Soupape d’aspiration –
19 Boulon à tête PM025100SV 4
20 Tête, 12 mm PM255240SV 1
Page 29

Pulvérizateur Haute Pression
Fr 13
Pulvérisateur de Lavage à Arbre Vertical
No de
Description
Numero
Qté
Ref. de piéce
1 Tube du manche PM344830BH 1
2 * Boulon, 6,4 mm (1/4 po) -
20 (manche) PM001903AV 2
3 * Rondelle plate PM002000AV 18
4 * Écrou de serrage en nylon,
1/4 po - 20 ST073808AV 7
5 * Boulon, 6,4 mm (1/4 po) -
20 (Base) PM001902AV 3
6 Patte, gauche PM344828BH 1
7 Patte, droite PM345100BH 1
8 Pare-chocs en caoutchouc AL062300AV 2
9 * Vis autotaraudeuse 1/4 po -
20 x 3/4 po MJ102100AV 2
10 Roue Roue WA005600AV 2
11 Écrou poussoir PM066300AV 2
12 * Boulon, 6,4 mm (1/4 po) -
20 (Arbre de roue) PM001904AV 2
13 Arbre de roue PM344831BH 1
14 Plaque de base PM345520AV 1
Pour pièces de rechange, appeler 1-800-330-0712
S’il vous plaît fournir l’information suivante :
- Numéro du Modèle
- Numéro de Série (si présent)
- Description de la Pièce et son numéro sur la liste
Correspondance :
Campbell Hausfeld
Attn: Customer Service
100 Mundy Memorial Drive
Mt. Juliet, TN 37122
No de
Description
Numero
Qté
Ref. de piéce
15 Réservoir de Détergent PM252000SJ 1
16 Écrou dentelé, 6,4 mm
(1/4 po) - 20 PM031101AV 4
17 Boulon, 1/4 po - 20 (Réservoir) MJ101104AV 4
18 Capuchon PM252450AV 1
19 Tube de détergent PM013700SV 1
20 Pistolet PM005136AV 1
21 Joint torique (Pistolet) PM245800SV 1
22 Tuyau PM344302AV 1
23 Lance PM035120AV 1
24 Buse, 15° (jaune) PM039880AV 1
25 Buse, 65° (noire) PM039820AV 1
26 Porte-buse, buse QC à
connexion rapide PM344304AV 1
* Disponible à votre quincaillerie locale.
Accessoires de buse disponibles sur commande pour
PW2515 : (non fourni avec l’appareil)
Buse, 0° (rouge) PM039870AV
Buse, 25° (vert) PM039890AV
Buse, 40° (blanc) PM039900AV
1
2
3
4
5
6
7
8
9
10
12
13
14
15
16
17
18
19
20
21
22
23
24
25
26
3
11
Page 30

Pulvérizateur Haute Pression
Tableau de dépannage - Pulvérizateur haute pression à essence seulement
Symptôme Cause(s) possible(s) Mesure(s) corrective(e)
Le moteur ne démarre pas
ou démarre difficilement
Râtés du moteur ou
manque de puissance
Faible pression et/ou
pompe tourne de manière
irrégulière
Fuite d’eau sous le
collecteur de pompe
De l’eau dans le carter de
la pompe (huile crémeuse)
Défaillance fréquente ou
prématurée des joints
hydrauliques de la pompe
Forte pompage à l’entrée
et faible pression
Fuite d’huile entre le
moteur et la pompe
Pression fluctuante
Chutes de pression après la
période d’utilisation
normale
Pompe bruyante/pompe
fonctionne de manière
irrégulière
Ne tire pas de détergent
1. Aucune essence dans le réservoir de carburant ou dans
le carburateur
2. Niveau d’huile faible
3. Commutateur démarrage/arrêt est en position d’arrêt
4. De l’eau dans l’essence ou carburant vieux
5. Filtre d’air sale
6. Bougies sales, mauvais écart ou mauvais type
7. Pistolet de pulvérisation fermé
8. Autres causes
1. Filtre d’air partiellement bloqué
2. Bougies sales, mauvais écart ou mauvais type
1. Embout usé ou de mauvaise taille
2. Filtre d’entrée de la pompe bloquée
3. Joints hydrauliques usés, abrasifs dans l’eau ou usure
normale
4. Entrée ou soupapes de décharge polluées ou sales
5. Entrée restreinte
6. Entrée ou soupapes de décharge usées
7. Fuite de flexible haute pression
8. Pompe aspire de l’air
9. Joint de soupape de décharge défectueux ou usé
Joints hydrauliques usés
1. Condensation d’air humide dans le carter
2. Fuites d’huile
1. Pistons usés ou endommagés et rayés
2. Matériau abrasif dans le fluide
3. Température d’eau d’entrée trop élevée
4. Surpression de la pompe
5. Trop de pression suite à un embout endommagé ou
partiellement bloqué
6. Pompe tourne trop longtemps sans pulvériser
7. Pompe tourne à sec
Particules étrangères dans la soupape d’entrée ou de
décharge ou soupapes de décharge et/ou entrée usées
Joints d’huile et/ou joint torique usés
1. Soupape usée, sale ou bloquée
2. Pompe aspire de l’air
3. Embout bloqué
1. Joints hydrauliques de pompe usés
2. Gicleur usé
3. Soupape usée, sale ou bloquée
4. Joint de soupape de décharge usé ou sale
1. Pompe aspire de l’air/faible alimentation d’eau
2. Soupapes sales ou usées
3. Roulements usés
4. Eau trop chaude
1. L’embout n’est pas poussé assez loin.
2. Blocage, tortillement ou trou dans le flexible
d’aspiration du détergent
3. Flexible trop long
4. Le jet ne fonctionne pas correctement
1. Remplissez le réservoir d’essence, ouvrez la
soupape d’arrêt Vérifiez la conduite d’essence et le
carburateur
2. Vérifiez le niveau d’huile. Remplissez au besoin
3. Déplacez le communateur en position de démarrage
4. Vidangez le réservoir de carburant et le carburateur. Utilisez
du nouveau carburant et asséchez la bougie
5. Retirez, nettoyez et remplacez
6. Nettoyez, ajustez l’écart ou remplacez
7. Pressez la gâchette de pulvérisation
8. Consultez le manuel du propriétaire du moteur
1. Retirez, nettoyez et remplacez
2. Nettoyez, ajustez l’écart ou remplacez
1. Remplacez en utilisant un embout de la bonne taille
2. Nettoyez. Vérifiez plus souvent
3. Vérifiez le filtre. Remplacez les joints hydrauliques.
Consultez le centre de réparations
4. Nettoyez les assemblages de soupape de décharge et
d’entrée. Vérifiez le filtre
5. Vérifiez le tuyau d’arrosage qui pourrait être enfoncé ou
tortillé. Vérifiez le débit d’eau d’entrée
6. Remplacez les soupapes usées
7. Remplacez le flexible haute pression
8. Assurez-vous que les tuyaux et raccords soient bien serrés
9. Vérifiez et remplacez
Installez de nouveaux joints hydrauliques. Consultez le centre de
réparations.
1
. Changez l’huile tel qu’indiqué dans l’horaire d’entretien
2. Installez de nouveaux joints d’huile. Consultez le centre de
réparations.
1. Installez de nouveaux pistons.
Consultez le centre de
réparations.
2. Installez la bonne filtration sur la plomberie d’entrée de la
pompe
3. Vérifiez la température de l’eau; ne doit pas dépasser 38˚C.
4. Ne modifiez pas les réglages en usine
5. Nettoyez ou remplacez l’embout
6. Ne faites jamais fonctionner la pompe pendant plus de
2 minutes sans pulvériser
7. Ne pompez pas sans eau
Nettoyez ou remplacez les soupapes.
Consultez le centre
de réparations.
Remplacez les joints d’huile et/ou joints toriques.
Consultez le
centre de réparations.
1. Vérifiez et remplacez
2. Assurez-vous que les flexibles et raccords sont serrés.
Drainez l’air du tuyau d’arrosage
3. Vérifiez ou remplacez
1. Vérifiez et remplacez
2. Vérifiez et remplacez
3. Vérifiez, nettoyez ou remplacez
4. Vérifiez, nettoyez ou remplacez
1. Assurez-vous que les raccords sont bien serrés. Augmentez
la pression d’eau
2. Vérifiez, nettoyez ou remplacez
3. Vérifiez et remplacez
4. Réduisez la température sous 38˚C
1. Poussez l’embout vers l’avant aussi loin que possible
2. Si c’est propre, étirez ou remplacez le flexible.
3. Utilisez seulement la longueur fournie lors de l’achat initial
du pulvérisateur haute pression. L’aspiration de détergent
ne fonctionne pas si plus d’une section de flexible est fixé à
l’appareil.
4. Retirez le jet du pistolet. Si le détergent est distribué par le
pistolet, le jet doit être remplacé. Si aucun détergent n’est
distribué par le pistolet, retirez 1 po de tétine de détergent
effilée de la pompe. Nettoyez la tétine et assurez-vous que
la boule et le ressort soient bien alignés avec la partie
effilée du ressort face à la boule. La boule devrait être sur le
ressort.
Fr 14
Page 31

Pulvérizateur Haute Pression
Fr 15
Notes
Page 32

Pulvérizateur Haute Pression
Fr 16
Garantie Limitée
1. DURÉE: À partir de la date d’achat par l’acheteur originel comme suit: Un An.
2. GARANTIE ACCORDÉE PAR (GARANT): Campbell Hausfeld / Scott Fetzer Company, 100 Mundy Memorial Drive, Mt. Juliet,
TN, 37122, Téléphone: (800) 330-0712.
3. BÉNÉFICIAIRE DE CETTE GARANTIE (ACHETEUR): L’acheteur originel (sauf en cas de revente) du pulvérisateur de lavage
Campbell Hausfeld.
4. PRODUITS COUVERTS PAR CETTE GARANTIE: Tous les Pulvérisateurs de Lavage Campbell Hausfeld qui sont fournis ou
fabriqués par le Garant.
5. COUVERTURE DE LA PRÉSENTE GARANTIE: Défauts de matière et de fabrication considérables qui se révèlent pendant la
période de validité de la garantie avec les exceptions indiquées ci-dessous.
6. LA PRÉSENTE GARANTIE NE COUVRE PAS:
A. Les garanties implicites, y compris celles de commercialisabilité et D’ADAPTION À UNE FONCTION PARTICULIÈRE SONT
LIMITÉES À PARTIR DE LA DATE D’ACHAT INITIALE TELLE QU’INDIQUÉE DANS LA SECTION DURÉE. Si le pulvérisateur de
lavage est utilisé pour une fonction commerciale, industrielle ou pour la location, la durée de la garantie sera
quatre-vingt-dix (90) jours à compté de la date d’achat. Les pulvérisateurs de lavage de marque Maxus et ceux à service
extrême (extreme duty) ne sont pas limités à une garantie de quatre-vingt-dix (90) jours lorsqu'ils sont utilisés dans des
applications d'entrepreneur et commerciales. Quelques Provinces (États) n’autorisent pas de limitations de durée pour les
garanties implicites. Les limitations précédentes peuvent donc ne pas s’appliquer.
B. TOUT DOMMAGE, PERTE OU DÉPENSE FORTUIT OU INDIRECT POUVANT RÉSULTER DE TOUT DÉFAUT, PANNE OU
MAUVAIS FONCTIONNEMENT DU PULVÉRISATEUR CAMPBELL HAUSFELD. Quelques Provinces (États) n’autorisent pas
l’exclusion ni la limitation des dommages fortuits ou indirects. La limitation ou exclusion précédente peut donc ne pas
s’appliquer.
C. Toute panne résultant d’un accident, de dommage pendant l’expédition, d’une utilisation abusive, de la négligence ou
d’une utilisation ne respectant pas les instructions données dans le(s) manuel(s) accompagnant le produit.
D. Service avant livraison; montage, huile ou lubrifiants, et réglages par exemple.
E. Articles ou service normalement requis pour l’entretien du pulvérisateur de lavage.
F. Les moteurs à essence et les pièces détachées sont expressément exclus de cette garantie limitée. L’acheteur doit
retourner les pièces détachées du moteur à essence au fabricant originel ou à son centre de service autorisé.
G. Articles additionnels qui ne sont pas couverts sous cette garantie:
1. Articles d’usure normal tels que; tuyaux haute pression, joints d’huile et hydrauliques, joints toriques, soupapes,
lances, et buses de pulvérisation.
2. Brosses de moteur (Modèles électriques seulement).
3. Les défauts esthétiques qui n’affectent pas la fonction.
4. Pièces détachées rouillées.
5. Usure de la pompe ou le dommage aux soupapes causé par l’utilisation de type d’huile incorrect, la contamination de
l’huile ou par le manque de suivre les directives d’entretien d’huile.
7. RESPONSABILITÉS DU GARANT AUX TERMES DE CETTE GARANTIE: Réparation ou remplacement, au choix du Garant, du
pulvérisateur de lavage ou de pièce détachée qui se sont révélés défectueux pendant la durée de la garantie.
8. RESPONSABILITÉS DE L’ACHETEUR AUX TERMES DE CETTE GARANTIE:
A. Fournir une preuve d’achat datée et un état d’entretien.
B. La livraison ou expédition du pulvérisateur de lavage ou pièce détachée Campbell Hausfeld au Centre De Service Autorisé
Campbell Hausfeld. Taux de frais, si applicables, sont la responsabilité de l’acheteur.
C. Utilisaton et entretien du pulvérisateur de lavage avec un soin raisonable, ainsi que le décri(vent)t le(s) manuel(s)
d’utilisation.
9. RÉPARATION OU REMPLACEMENT EFFECTUÉ PAR LE GARANT AUX TERMES DE LA PRÉSENTE GARANTIE: La réparation ou le
remplacement sera prévu et exécuté en fonction de la charge de travail dans le centre de service et dépendra de la
disponabilité des pièces de rechange.
Cette Garantie Limitée s’applique aux É.-U., au Canada et au Mexique seulement et vous donne des droits juridiques précis.
L’acheteur peut également jouir d’autres droits qui varient d’une Province, d’un État ou d’un Pays à l’autre.
Page 33

Lavadoras a Presión
con Motor a Gasolina
Manual de Instrucciones y Lista de Piezas PW2515
Lea atentamente estas instrucciones y compréndalas
antes de poner en funcionamiento su lavadora a presión
© 2006 Campbell Hausfeld/Scott Fetzer
IN468100AV 8/06
Conozca su lavadora a presión . . . . . . . . . . . . . . . . . . . . . . . . . . . . . . . . . . . . . .2
Preguntas formuladas con frecuencia . . . . . . . . . . . . . . . . . . . . . . . . . . . . . . . .3
Información de advertencia y seguridad . . . . . . . . . . . . . . . . . . . . . . . . . . . . . .4
Previo al funcionamiento . . . . . . . . . . . . . . . . . . . . . . . . . . . . . . . . . . . . . . .5 - 6
Funcionamiento . . . . . . . . . . . . . . . . . . . . . . . . . . . . . . . . . . . . . . . . . . . . . . .6 - 9
Información técnica y mantenimiento . . . . . . . . . . . . . . . . . . . . . . . . . . . . . . .10
Registro de servicio . . . . . . . . . . . . . . . . . . . . . . . . . . . . . . . . . . . . . . . . . . . . . .11
Lista De Repuestos
• Bomba . . . . . . . . . . . . . . . . . . . . . . . . . . . . . . . . . . . . . . . . . . . . . . . . . . . .12
• Carro . . . . . . . . . . . . . . . . . . . . . . . . . . . . . . . . . . . . . . . . . . . . . . . . . . . . .13
Tabla diagnóstico de averías . . . . . . . . . . . . . . . . . . . . . . . . . . . . . . . . . . . . . .14
Garantía . . . . . . . . . . . . . . . . . . . . . . . . . . . . . . . . . . . . . . . . . . . . . . . . . . . . . . .16
Índice Página
Sírvase registrar el Nº de modelo y el Nº de serie para usarlo cuando se
ponga en contacto con el fabricante:
Modelo Nº ______________ Fecha de compra _________________
Serie Nº ______________ Lugar de compra _________________
Para mayor información sobre este producto, comuníquese con el
distribuidor de Campbell Hausfeld más cercano a su domicilio
Modelo PW2515
RECORDATORIO: ¡Guarde su comprobante de compra con fecha para fines de la garantía!
Adjúntela a este manual o archívela en lugar seguro.
Page 34

Lavadoras a Presión
Sp 2
1 Tanque de Detergente
2 Silenciador
3 Ubicación del número de serie/etiqueta
adhesiva del producto
4 (Bomba) conexión de entrada para la
manguera de jardín
5 Lanza con conexión rápida
6 Soporte para boquilla con boquillas de
pulverización
7 Mango
8 Pistola con gatillo
9 Tanque de combustible
10 Toma de aire
11 Interruptor de encendido/apagado (on/off)
del motor
12 Válvula del combustible abierto/cerrado
(on/off)
13 (Bomba) conexión de salida para la
manguera de alta presión
1
2
3
6
9
10
11
12
13
PW2515
Conozca su lavadora a presión
5
4
7
8
Page 35

Lavadoras a Presión
¿Cómo enciendo mi lavadora a
presión?
1. Asegúrese de que tiene gasolina y aceite en el motor. El
motor SE ENTREGA SIN ACEITE.
2. Abra el pase de agua, luego presione el gatillo para
asegurarse de que el agua fluya con facilidad desde la
boquilla.
3. Abra la válvula de cierre de combustible girando la perilla
en sentido antihorario hasta que llegue al tope.
4. Cierre la toma de aire (si el motor está frío) moviendo el
anillo de la toma de aire totalmente a la derecha.
5. Coloque la válvula de cierre de combustible en “ON”
(abierto).
6. Hale el gatillo (para aliviar toda retropresión de la
bomba) mientras hala el cordón de arranque.
¿Qué tipo de aceite uso?
EL MOTOR SE ENTREGA SIN ACEITE. Vea la página Sp 10 para
los tipos y cantidades de aceite y las instrucciones para los
cambios de aceite.
Bomba: La bomba se entrega con la cantidad correcta de aceite
y no debe necesitar cambios o cantidades adicionales. Refiérase
a las páginas 9 y 10 de este manual para las instrucciones del
cambio de aceite, los tipos y cantidades de aceite.
¿Por qué no tengo presión de
agua?¿Por qué no tengo presión
de agua?
• ¿La manguera de agua está conectada a la lavadora a
presión?
• ¿Está abierta el agua?
• Verifique si hay algún pliegue, pérdida u obstrucción en las
mangueras, accesorios o en la boquilla.
• ¿La boquilla de 15º (amarilla) ha sido insertada en el
extremo de la lanza (ver página Sp 8)?
• Revise la rejilla del filtro de entrada para verificar si tiene
residuos.
¿Cómo consigo presión alta?
• Para alta presión, inserte la boquilla de 15º (amarilla)
en el extremo de la lanza (ver página Sp 8).
¿Cómo hago para que funcione la
succión de jabón?
1. Conecte el tubo de plástico transparente de succión de
productos químicos al conector plástico dentado de la
manguera que se encuentra en el tanque de detergente.
2. Llene el tanque de detergente con un detergente formulado
para usar con lavadoras a presión.
Sp 3
3. Para pulverizar jabón, inserte la boquilla de 65º (negra)
para el jabón en el extremo de la lanza (ver página Sp 8).
¿Por qué la lavadora a presión no
aplica detergentes con presión
alta?
Los detergentes “resbalan” de las superficies de limpieza tan
pronto como se apliquen. Las características de la lavadora de
presión permiten que el detergente se succione sólo en el modo
de presión baja. Aplicando el detergente en baja presión, se
reduce el efecto de “resbalamiento”. Además, los detergentes
son eficaces cuando se permite un tiempo de contacto para que
trabajen en la superficie de lo que se quiera limpiar. Después de
aplicar el detergente, deje que trabaje de 1 a 3 minutos, y luego
proceda a enjuagar la superficie con alta presión.
¿Qué tipo de mantenimiento debo
realizar en mi lavadora a presión?
1. Después de apagar la lavadora a presión y el agua,
despresurice la manguera presionando el gatillo de la
pistola.
2. Quite la manguera de jardín y la manguera de alta presión
de la bomba.
3. Tire del cordón de encendido lentamente cinco veces para
purgar el agua de la bomba. Esto ayudará a proteger a la
bomba contra los daños.
4. No guarde su lavadora a presión en un área en la que la
temperatura pueda descender a menos de 0º C.
5. Siga las instrucciones para el almacenamiento y preparación
invernal adecuados, en pág. Sp 9.
¿Qué hago si me falta una pieza?
Llame a Campbell Hausfeld al 1800-330-0712 y reemplazaremos
rápidamente las piezas faltantes. ¡NO DEVUELVA LA
LAVADORA DE PRESIÓN AL COMERCIANTE!
¿Dónde puedo comprar accesorios
para mi lavadora a presión?
• Para mayor información sobre este producto, comuníquese
con el distribuidor de Campbell Hausfeld más cercano a su
domicilio.
¿A quién llamo si tengo preguntas
o problemas?
Llame a Campbell Hausfeld al
1-800-330-0712 (U.S.A.)
Preguntas formuladas con frecuencia
Page 36

ojos, la piel y el sistema respiratorio contra el uso del detergente.
No use una presión que exceda
la presión de funcionamiento de
cualquiera de las piezas (mangueras, accesorios, etc.) del sistema
presurizado. Asegúrese de que todo el equipo y los accesorios
estén clasificados para soportar la presión de funcionamiento
máxima de la unidad.
Peligro de explosión.
• NUNCA rocíe líquidos inflamables ni utilice la lavadora a
presión en áreas que contengan polvos, líquidos o vapores
combustibles.
• Nunca haga funcionar esta máquina en un edificio cerrado o
en un ambiente que presente riesgo de explosión o próximo
al mismo.
• No quite la tapa del tanque de combustible ni llene el
tanque de combustible mientras el motor está caliente o en
funcionamiento (permita que el motor se enfríe durante dos
minutos antes de volver a cargarlo). Siempre llene el tanque
lentamente.
• Nunca desconecte la manguera de descarga de alta presión
de la máquina mientras el sistema está presurizado. Para
despresurizar la máquina, apague la fuente de energía y
cierre el suministro de agua, luego presione el gatillo de
la pistola 2 ó 3 veces.
• Nunca trabe permanentemente el mecanismo de gatillo de
la pistola.
• Nunca haga funcionar la máquina sin todos los compo-
nentes adecuadamente conectados a la máquina (mango,
ensamblaje de la pistola / varilla, boquilla, etc.).
Daño al equipo.
• SIEMPRE ABRA el suministro de agua antes de ENCENDER la
lavadora de presión. Hacer funcionar la bomba en seco
provocará daños graves.
• No haga funcionar la lavadora a presión sin la pantalla de
agua de entrada. Mantenga la pantalla libre de restos y
sedimentos.
• NUNCA haga funcionar la lavadora a presión con piezas
rotas o faltantes. Revise el equipo con regularidad y repare
o reemplace inmediatamente las piezas desgastadas o
dañadas.
• Use sólo la boquilla que se proporciona con esta máquina.
• Nunca deje la varilla sin atención mientras la máquina está
funcionando.
• Nunca intente modificar el controlador del motor ni intente
alterar el ajuste de fábrica. La alteración del ajuste de fábrica
puede dañar la unidad y anulará la garantía.
• Siempre sostenga la pistola y la varilla con firmeza cuando
inicie y maneje la máquina.
• NUNCA permita que la unidad funcione con el gatillo suelto
(sin activar) durante más de un minuto. El calor resultante
se acumulará y dañará la bomba.
• NUNCA guarde la lavadora a presión a la intemperie o en
un lugar donde pueda congelarse. Las temperaturas por
debajo del punto de congelamiento pueden dañar seriamente la bomba.
• Libere el gatillo cuando cambie entre los modos de alta y
baja presión. Si no lo hace puede dañar la boquilla.
Mantenga la boquilla alejada
de objetos filosos. Las
mangueras que explotan pueden causar lesiones. Inspeccione
regularmente las mangueras y reemplácelas si están dañadas.
No intente reparar una manguera dañada.
Medidas de seguridad
Este manual contiene información que es muy importante que
sepa y comprenda. Esta información se la suministramos como
medida de SEGURIDAD y para EVITAR PROBLEMAS CON EL
EQUIPO. Debe reconocer los siguientes símbolos.
Peligro indica que hay una
situación de peligro inminente
que si no se evita, le OCASIONARÁ la muerte o heridas de
gravedad.
Advertencia le indica que hay
una situación potencialmente
peligrosa que, si no evita le PODRÍA ocasionar la muerte o
heridas graves.
Precaución le indica que hay
una situación potencialmente
peligrosa que si no se evita PUEDE ocasionarle lesiones
moderadas o menores.
Aviso le indica que se trata de
información importante que de
no seguirla le podría ocasionar daños al equipo.
NOTA: Información que requiere atención especial.
Instrucciones de Seguridad Importantes
GUARDE ESTAS INSTRUCCIONES
Cuando use este producto, siempre debe cumplir con las
precauciones básicas, incluyendo lo siguiente:
1. Lea todas las instrucciones antes de usar el producto.
2. Para reducir el riesgo de lesión, es necesario una supervisión
atenta cuando el producto se utiliza cerca de los niños.
3. Cumpla con todos los códigos de seguridad así como tam-
bién con la Ley sobre salud y seguridad ocupacional (OSHA).
4. Asegúrese de que los dispositivos de seguridad estén funcio-
nando adecuadamente antes de cada uso. NO quite ni modifique ninguna pieza de la pistola o de la unidad.
5. Aprenda cómo detener este producto y purgar la presión
rápidamente. Familiarícese con los controles.
6. Permanezca alerta, mire lo que está haciendo.
7. No haga funcionar este producto cuando esté fatigado o
bajo la influencia de alcohol o fármacos.
8. Mantenga el área de funcionamiento sin personas.
9. No se estire ni se pare en apoyos inestables. Mantenga un
buen apoyo y equilibrio en todo momento.
10. Siga las instrucciones de mantenimiento especificadas
en el manual.
Riesgo de inyección o lesión
severa. Mantenga la boquilla
libre. No apunte los chorros a las personas. Este producto debe
ser usado sólo por operadores capacitados. Siempre quite la
lanza de la pistola antes de limpiar restos de la punta.
• Manténgase alejado de la boquilla. NUNCA dirija el rociado
de alta presión a otra persona, animal o a sí mismo.
• Use siempre gafas protectoras y equipo de protección (pro-
tección para los oídos, guantes, botas de goma, vestimenta
protectora) cuando haga funcionar o le haga el mantenimiento a la máquina.
• Nunca ponga su mano ni sus dedos sobre la punta de rocia-
do mientras la unidad está en funcionamiento.
• Nunca intente detener o desviar pérdidas con ninguna parte
de su cuerpo.
• Siempre coloque el seguro del gatillo en la posición de
seguridad cuando deja de rociar, incluso si se detiene sólo
por unos momentos.
• Siempre siga las recomendaciones que aparecen en la eti-
queta del fabricante del detergente. Protéjase siempre los
Información de Advertencia y seguridad
Lavadoras a Presión
Sp 4
!
PELIGRO
!
ADVERTENCIA
!
PRECAUCION
AVISO
!
ADVERTENCIA
!
ADVERTENCIA
!
ADVERTENCIA
!
ADVERTENCIA
AVISO
!
PRECAUCION
Page 37

DESEMPACADO
Retire el equipo y todas las piezas de la
caja. La caja debe contener lo siguiente.
• Una lavadora a presión
(bomba, motor, base del carro)
• Un ensamblaje para el mango del
carro
• Un tanque de detergente
• Una pistola rociadora
• Una lanza
• Un soporte para boquilla con 2
boquillas. Por boquillas adicionales
para la venta, ver página Sp 13
• Una manguera de alta presión
• Un paquete con tuercas, pernos y manuales
• Una botella de aceite para motor
Si falta alguna pieza, NO DEVUELVA LA UNIDAD AL RE-
VENDEDOR.
Conozca el número de modelo de la unidad (ubicado en la
etiqueta del número de serie en el marco de la lavadora a
presión). Llame a Campbell Hausfeld al 1-800-330-0712
(U.S.A.).
Después de desempacar el producto, inspecciónelo
detenidamente para detectar cualquier daño que pueda
haber ocurrido durante su traslado. Asegúrese de ajustar
todos los accesorios y tuercas antes de usar la lavadora
a presión.
No ponga en funcionamiento
la unidad si se dañó durante el
envío, la manipulación o el uso. Un daño puede dar como
resultado una explosión y causar lesiones o daño a la propiedad.
ENSAMBLAJE
Utilice dos llaves ajustables o de 7/16" para ensamblar la
lavadora a presión.
1. Deslice el ensamblaje del mango sobre las patas inferiores
de la base del carro. Utilice la tuerca y el perno estándar
para asegurar la pata trasera derecha. Vea la Figura 1.
2. Sujete el
tanque de detergente a la parte de atrás del mango. Use
los 4 pernos hexagonales con la arandela plana bajo la
cabeza hexagonal y las 4 tuercas incluidas.
3. Deslice la manguera plástica transparente unida a la pata
en el conector dentado de plástico negro de la manguera
del tanque de detergente (vea la Figura 3).
4. Adaptador giratorio de bronce (vea la Figura 2). Si ya
no está conectado a la entrada de la bomba, arme el
eslabón adaptador y conéctelo a la entrada de la bomba
(Figura 4 y Figura 5). Asegúrese de conectar el lado
correcto del eslabón adaptador a la bomba.
Lavadoras a Presión
Sp 5
Antes de Poner en Funcionamiento
Figura 1 – Ensamblaje del mango
Figura 3 – Conecte el tubo de succión al
conector dentado
Figura 4 - Eslabón adaptador de bronce
Conecte este extremo a la manguera de jardín
Conecte este extremo a la bomba
Arandela
Arandela
con filtro de
pantalla
Figura 5 - Conecte el eslabón adaptador
a la bomba
Eslabón adaptador de
bronce
Entrada de la bomba
Figura 2 - Conexión de la bomba
Eslabón
adaptador de
bronce
Manguera de jardín
Entrada de la bomba
Salida de
la bomba
Conector para
manguera del
inyector de
productos químicos
Manguera
de alta
presión
Válvula de
desfogue
térmico
!
ADVERTENCIA
Page 38

5. Asegure la manguera de jardín (no se incluye) a la
conexión de entrada de la bomba.
6. Conecte la manguera de alta presión a la salida de la
bomba (vea las Figuras 2 y 6).
7. Conecte la lanza con la boquilla a la pistola (vea la Figura
7).
8. Instale la boquilla de conexión rápida halando hacia atrás el
anillo retráctil y presione la boquilla hacia adentro. Suelte el
anillo, asegúrese de que vuelva por completo a su posición
hacia adelante y que la boquilla quede firmemente insertada
(ver figura 8).
Figura 10a - Gatillo trabado Figura 10b - Gatillo sin trabar
Trabado
Sp 6
Antes de Poner en Funcionamiento (Continuación)
Lavadoras a Presión
Figura 6 – Conecte la manguera de alta presión a la
bomba
Sin trabar
Figura 7 – Conecte la lanza a la pistola
9. Instale las boquillas de conexión rápida en el soporte para
boquillas y sujételo al mango de la lavadora a presión. Vea la
figura 9.
SEGURO DEL GATILLO
En la posición de trabado, el seguro evita que la pistola se dispare accidentalmente. Presione el seguro totalmente hacia abajo
para destrabarlo (Ver Figura10).
Siempre trabe el seguro del gatillo cuando la unidad no se está
usando.
Figura 8 – Instalación de la boquilla de conexión
rápida
Hale el anillo
retráctil hacia
atrás
Figura 9 – Inserte las boquillas de pulverización en el soporte
de caucho
Page 39

7. Encienda el motor (Ver Figura 11). Destrabe el seguro del
gatillo en la pistola. Tome el cordón de encendido y coloque
un pie sobre el armazón. Apunte la pistola en una dirección
segura. Mientras presiona el gatillo en la pistola, tire del
cordón de encendido con un movimiento rápido y firme (Ver
Figura 11). Continúe sosteniendo el cordón cuando regrese.
Repita estos pasos hasta que el motor se encienda.
Cuando tire del cordón de
encendido, asegúrese de
mantener sus manos y brazos alejados del motor y de los
componentes del carro.
Nunca deje que el cordón de
encendido regrese por sí solo.
Hacer esto podría trabar el sistema de retroceso.
8. Si el motor no se enciende después de tirar tres veces o si el
cordón está demasiado duro para tirarlo, apriete el gatillo
de la pistola y libere la presión acumulada en la manguera
de alta presión. Repita los pasos 7 y 8 hasta que se
encienda el motor.
Rocíe la superficie a limpiar con agua para quitar la suciedad o
las manchas que puedan haberse acumulado sobre la superficie.
Hacer esto permite que el detergente ataque la suciedad
profunda que se ha introducido dentro de la superficie a limpiar.
ÁNGULO CON RESPECTO A LA SUPERFICIE A LIMPIAR
Cuando rocíe agua contra una superficie, puede generar un
impacto máximo al apuntar a la superficie en un ángulo
perpendicular. Sin embargo, este tipo de impacto puede causar
que las partículas de suciedad se incrusten en la superficie
evitando así que se logre la acción deseada.
El mejor ángulo para rociar el agua contra la superficie de
limpieza es de 45º.
Rocíe agua contra una superficie en un ángulo de 45 grados
para lograr el impacto de mayor beneficio y quitar de esta
forma los restos eficientemente.
El siguiente procedimiento de limpieza le ayudará a organizar
su tarea de limpieza y asegura que logrará el mejor resultado
en la menor cantidad de tiempo. Recuerde usar las técnicas de
rociado/ limpieza que se mencionan en las secciones siguientes.
Antes de comenzar un trabajo de limpieza de lavado a presión,
prepare la superficie que pretende limpiar. Despeje el
mobiliario del área y asegúrese de que todas las ventanas y
puertas estén bien cerradas. Además proteja todas las plantas y
árboles próximos al área de limpieza cubriéndolos con una
tela. Al cubrirlos se asegura que sus plantas no sean rociadas
con los detergentes.
Si el agua se ha congelado en
la lavadora a presión, descongele
la lavadora a presión en una habitación templada antes de
encenderla. NO vierta agua caliente sobre o dentro de la bomba;
esto puede dañar las piezas interiores.
1. Verifique los niveles de aceite del motor. Agregue aceite según
sea necesario.
2. Revise el nivel de combustible.
No agregue combustible a un
motor caliente. Recargar
combustible en un motor caliente puede causar un incendio. Use
sólo gasolina sin uso, limpia, regular o sin plomo. Cierre la
válvula de corte de combustible durante la recarga.
3. Conecte una manguera de jardín al lado interno de la
bomba y conéctela al suministro de agua. Utilice una
manguera con un diámetro interior de 15,9 mm (5/8") y un
largo de 15 m (50 pies) o menos.
Algunos códigos locales de
plomería exigen una prevención
de retroceso cuando se realiza una conexión a un suministro
de agua fresca. Instale un dispositivo para evitar el retroceso
del flujo de agua de la bomba si fuera necesario.
a. Si la presión de entrada de agua es superior a 6,90 bar,
instale una válvula reguladora de agua en la conexión de
la manguera de jardín.
b. No supere una temperatura de entrada de agua de 38º C
(100ºF).
NOTA: El suministro de agua de entrada debe tener una velocidad mínima de flujo de 19 lpm.
4. ABRA el suministro de agua.
Nunca haga funcionar la
unidad sin agua. Asegúrese de
que el suministro de agua esté totalmente abierto antes de
hacer funcionar la unidad.
5. Hale el gatillo de la pistola hasta que pulverice el agua
suavemente de la boquilla indicando que todo el aire ha sido
purgado del sistema. Trabe el seguro del gatillo.
6. Abra la válvula del combustible girando la perilla en sentido
antihorario hasta que llegue al tope. Cierre la toma de aire
(si el motor está frío) moviendo el anillo de la toma de aire
totalmente a la derecha. Coloque el interruptor de
encendido en la posición “ON” (encendido).
Figura 11 - Encienda el motor
Funcionamiento
Lavadoras a Presión
Sp 7
1. Preparación de la Superficie
2. Encendido
3. Enjuague Inicial de Alta Presión
AVISO
!
ADVERTENCIA
AVISO
AVISO
!
PRECAUCION
AVISO
Page 40

Lavadoras a Presión
DISTANCIA A LA SUPERFICIE DE LIMPIEZA
La distancia entre la boquilla de rociado y la superficie de
limpieza es otro factor que afecta la fuerza de impacto del
agua. La fuerza de impacto del agua aumenta a medida que la
boquilla se acerca a la superficie.
CÓMO EVITAR DAÑOS A LA SUPERFICIE
El daño a las superficies de limpieza ocurre cuando la fuerza de
impacto del agua excede la resistencia de la superficie. Puede
variar la fuerza de impacto variando el ángulo de la boquilla
de pulverización con la superficie de limpieza, la distancia de
la superficie, y cambiando la boquilla. NUNCA utilice un
chorro angosto de alto impacto sobre una superficie
propensa a ser dañada. Evite rociar las ventanas con un
chorro angosto de alto impacto. Hacer esto puede quebrar la
ventana. La forma más segura de evitar dañar las superficies
es seguir estos pasos:
1. Antes de halar el gatillo de la pistola, asegúrese de que la
boquilla que está usando es apropiada para el uso.
2. Coloque la boquilla aproximadamente a 4-5 pies
(1,22 – 1,52 m) de distancia de la superficie de limpieza.
Luego sostenga la boquilla en un ángulo de 45 grados
con respecto a la superficie de limpieza. Hale el gatillo.
3. Varíe el ángulo de rociado del patrón de abanico y la
distancia a la superficie de limpieza hasta que se logre una
eficiencia de limpieza óptima sin dañar la superficie.
NOTA: Use sólo detergentes formulados para lavadora a
presión. Pruebe el detergente en un área poco aparente antes
de usarlo.
DETERGENTES
El uso de detergentes puede reducir en gran forma el tiempo de
limpieza y puede ayudar a quitar las manchas difíciles. Muchos
detergentes están diseñados para ser usados con lavadoras a
presión en tareas de limpieza específicas. Los detergentes para
lavadoras a presión son igual de espesos que el agua. Si se
utilizan detergentes más espesos, como por ejemplo detergentes
para lavar vajilla, obstruirán el sistema de inyección de productos
químicos y evitarán la aplicación de detergentes.
Una vez aplicados a la superficie a limpiar, los detergentes
toman un tiempo para ejercer una acción sobre la suciedad y las
manchas. Los detergentes funcionan mejor cuando se aplican a
baja presión.
Usted puede limpiar superficies de un modo efectivo
combinando la acción química de los detergentes junto con
los enjuagues de alta presión. Sobre superficies verticales,
aplique el detergente de abajo hacia arriba. Este método evita
que el detergente se deslice y provoque marcas. Comience el
enjuague con alta presión de abajo hacia arriba. En manchas
particularmente difíciles, utilice un cepillo en combinación con
los detergentes y el enjuague a alta presión.
1. Siga las indicaciones del fabricante, que aparecen en la
etiqueta, para utilizar las concentraciones de mezcla
correctas de los jabones/detergentes. La proporción de
jabón/detergente con respecto al agua para la bomba es
de aproximadamente 12% (1 a 8).
2. Vierta el detergente dentro del tanque de detergente. La
capacidad del tanque es de 1,5 galones.
3. Instale la boquilla (negra) de 65º para detergente a baja
presión en la conexión rápida en el extremo de la lanza.
NUNCA reemplace una boquilla
de conexión rápida cuando el
gatillo de la pistola esté presionado. Siempre trabe el seguro del
gatillo de la pistola antes de quitar o instalar las boquillas de
conexión rápida.
CONSEJOS GENERALES DE LIMPIEZA
1. Aplique el detergente para que cubra totalmente la
superficie a limpiar. Aplique el detergente de abajo hacia
arriba para evitar que éste se deslice hacia abajo y deje
marcas. Espere un par de minutos para que el detergente
actúe sobre la suciedad y las manchas. Utilice un cepillo
para cepillar levemente las áreas más sucias. Nunca permita
que el detergente se seque sobre la superficie a limpiar.
2. Reemplace la boquilla negra de 65º de conexión rápida con
la boquilla amarilla de 15º y termine el enjuague final.
NUNCA reemplace una boquilla
de conexión rápida cuando el
gatillo de la pistola esté presionado. Siempre trabe el seguro del
gatillo de la pistola antes de quitar o instalar las boquillas de
conexión rápida.
3. NOTA: Después de usar detergentes, enjuague el sistema de
succión lavando el tanque con agua limpia y trabajando la
unidad con la boquilla negra de 65º enjuagando con agua
limpia el tanque y la bomba.
Sp 8
Funcionamiento (Continuación)
4. Aplicación de Detergente
El color de la punta muestra cuál ángulo de
rociado es:
Rojo – 0º - Máximo trabajo pesado*
Amarillo – 15º - Trabajo pesado
Verde – 25º - Trabajo general*
Blanco – 40º - Trabajo liviano*
Negro – 65º - Detergente a baja presión
* = No se incluye
Figura 12 - Mejor ángulo de limpieza
de superficies
!
ADVERTENCIA
!
ADVERTENCIA
Page 41

La forma más fácil de regular el poder de limpieza de su
lavadora a presión es cambiando la distancia a la superficie
que está limpiando. La forma más fácil de regular el poder
de limpieza de su lavadora a presión es cambiando la
distancia a la superficie que está limpiando. Empiece a
pulverizar desde varios pies de distancia de la superficie.
Acérquese lentamente al objeto que está limpiando hasta
que encuentre la técnica de limpieza más eficaz.
El enjuague final debe comenzar de abajo hacia arriba.
Asegúrese de enjuagar totalmente la superficie y de quitar
todo el detergente.
Para reducir el riesgo de lesiones corporales o daño a la
propiedad, siempre siga este procedimiento cuando detiene el
rociado, cuando finaliza el trabajo y antes de revisar o reparar
cualquier parte del sistema.
1. Coloque el seguro del gatillo.
2. Apague la unidad.
3. Cierre el suministro de agua.
4. Suelte el seguro del gatillo y apriete el gatillo de la pistola
para liberar la presión.
5. Vuelva a colocar el seguro del gatillo.
6. Cuando revise o repare la unidad, retire de la bujía el cable
de ignición.
7. Antes de guardarla hasta el otro día, durante mucho tiempo,
o antes de trasladar la unidad, desconecte el suministro de
agua y cierre la válvula de suministro de combustible.
1. Asegúrese de enjuagar todo el detergente del sistema.
2. Apague el motor.
3 Cierre el suministro de agua.
4. Después de apagar el motor y cerrar el suministro de agua,
presione el gatillo de la pistola para despresurizar el sistema.
NUNCA cierre el suministro de
agua antes de apagar el motor.
Pueden ocurrir daños graves a la bomba y/o al motor.
Nunca desconecte la manguera
de descarga de alta presión
desde la máquina mientras el sistema está presurizado. Para
despresurizar apague el motor, cierre el suministro de agua
y presione el gatillo 2-3 veces.
5. Después de cada uso, limpie todas las superficies con un
paño húmedo y limpio.
• Nunca vaya a guardar la lavadora a presión a la
intemperie.
• No guarde la lavadora a presión en un lugar en el que
pueda congelarse, a menos que haya sido preparada
adecuadamente para el invierno.
5. Poder de limpieza
7.
Procedimiento de liberación de
presión
8. Apagado
9. Almacenamiento
6. Enjuague Final
Funcionamiento (Continuación)
Lavadoras a Presión
Sp 9
INSTRUCCIONES PARA ALMACENAMIENTO A LARGO
PLAZO (MÁS DE 30 DÍAS)
1. Quite el combustible del tanque y haga funcionar la lavadora a
presión en el modo de funcionamiento normal hasta que el
motor se detenga por falta de combustible. El modo de
funcionamiento normal significa que funciona rociando agua
realmente de la pistola mientras el motor está funcionando.
Método alternativo – Agregue un estabilizador de combustible a la gasolina en el tanque y haga funcionar en el
modo de funcionamiento normal durante un mínimo de
cinco minutos.
2. Detenga el motor, apague el suministro de agua, y presione
el gatillo de la pistola para liberar la presión en la manguera
de alta presión.
3. Desconecte el suministro de agua y la manguera de alta
presión de la bomba.
4. Deje que se enfríe el motor.
5. Desconecte el cable de la bujía y a contiuación quite la bujía.
6. Vierta 1/2 oz. de aceite para motor en el orificio de la bujía.
Nunca tire del cordón de
encendido del motor cuando la
bujía no está colocada, a menos que el orificio de la bujía esté
cubierto. Los vapores del combustible del orificio pueden
encenderse con una chispa.
7. Coloque un trapo sobre el orificio de la bujía y lentamente tire
del cordón de encendido varias veces para distribuir el aceite.
INSTRUCCIONES DE PREPARACIÓN PARA EL INVIERNO
1. Siga y complete todas las instrucciones para almacenamiento
a largo plazo que se encuentran arriba.
2. Desconecte el cable de la bujía.
3. Desconecte la manguera de alta presión de la bomba.
4. Introduzca un trozo de manguera de jardín de 30,48 cm
(12") a 35,56 cm (14") dentro de la entrada de la bomba.
5. Coloque un embudo en el otro extremo de la manguera de
jardín.
Lea las instrucciones del
fabricante para manejar y
desechar con seguridad el anticongelante RV.
6. Vierta aproximadamente 177 mL (6 oz.) de anticongelante
RV dentro del embudo.
7. Tire del cordón de encendido varias veces hasta que el
anticongelante RV salga por la salida de la bomba.
8. Desconecte la manguera de alta presión de la pistola y drene
la manguera. Sostenga la pistola y la lanza en posición
vertical y presione el gatillo para drenar el agua.
CONSEJOS PARA PROLONGAR LA VIDA DE SU LAVADORA
A PRESIÓN
1. Nunca haga funcionar la unidad sin agua.
2. Su lavadora a presión no está diseñada para bombear agua
caliente. Nunca conecte su lavadora a presión a un suministro
de agua caliente ya que esto reducirá en forma significativa
la vida de la bomba.
3. Hacer funcionar la unidad durante más de un minuto sin
rociar agua provoca que se acumule calor en la bomba.
Hacer funcionar la unidad sin rociar agua puede dañar los
componentes de la bomba.
AVISO
!
PRECAUCION
!
ADVERTENCIA
AVISO
Page 42

Tipo de aceite para el motor SAE 10W-30
SAE 30W
(Por encima de 15˚ C)
Capacidad de aceite para el motor
Motores Honda 0,55 L
Capacidad de combustible para el motor
Motores Honda 1,10 L
Tipo de aceite para la bomba
Bombas oscilantes SAE20W o SAE30W
aceite no detergente
Capacidad de aceite para la bomba
Bombas oscilantes verticales 0,12 L
Succión de detergente de la bomba
Proporción de agua a detergente 8 a 1
(12% detergente)
Requisitos del abastecimiento de agua
Presión mínima de entrada 1,38 bar
Presión máxima de entrada 6,90 bar
Temperatura máxima de entrada 38˚ C
Velocidad mínima de flujo de entrada 19 Lpm
Tamaño de la manguera de entrada 15,9 mm (5/8")
diámetro interior
Largo máximo de la manguera
de entrada 15,24 m (50 pies)
Diariamente
Después de las
primeras 5 horas de
funcionamiento
Cada 25 horas de
funcionamiento
Cada 50 horas de
funcionamiento
Cada 100 horas de
funcionamiento o
cada 3 meses
• Revisar la pantalla y el filtro
de entrada de agua.
• Revisar los niveles de aceite
del motor. Llenar según sea
necesario.
• Revisar el nivel de gasolina.
Llenar según sea necesario.
• Cambiar el aceite de ablande
del motor. Usar aceite
detergente SAE30 o 10W-30.
• Cambiar el aceite si funciona
con carga pesada o a una
temperatura ambiente alta.
• Limpie o reemplace el
cartucho de papel del filtro de
aire. Golpee suavemente para
quitar la suciedad.
• Cambiar el aceite
• Reemplazar la bujía
• Reemplace el cartucho de
papel del filtro de aire.
• Cambiar el aceite del motor
Plan de Mantenimiento Acción Necesaria
Plan de Mantenimiento
Lavadoras a Presión de Orientación Vertical
Información Técnica y Para el Consumidor
Lavadoras a Presión
Sp 10
Mantenimiento
Para asegurar una vida y un rendimiento máximos de la
lavadora a presión, cumpla con intervalos de mantenimiento
regulares. Remítase al plan de mantenimiento recomendado.
Si usted hace funcionar la lavadora a presión en ambientes con
mucho polvo, realice revisiones de mantenimiento con más
frecuencia.
INSTRUCCIONES PARA EL CAMBIO DE ACEITE DEL MOTOR
Antes de voltear el motor o
el equipo para drenar el aceite,
drene el combustible del tanque de combustible.
NOTA: Cambie el aceite mientras el motor está frío.
1. Desconecte el cable de la bujía.
2. Localice y retire el tapón de drenaje de aceite del motor
(vea la figura 13).
3. Drene el aceite usado.
4. Vuelva a colocar el tapón de drenaje y enderece la
unidad.
5. Vuelva a llenar la unidad con aceite nuevo del tipo y la
cantidad recomendada. Llene la unidad al nivel apropiado
indicado en la varilla de medición.
INSTRUCCIONES PARA EL CAMBIO DE ACEITE DE LA
BOMBA
Para cambiar o llenar el aceite de la bomba es necesario
quitar la bomba del motor, y esto no debería ser necesario a
menos que exista una pérdida de aceite debido a juntas
dañadas o desgastadas en la bomba. Si goteó aceite de la
bomba, lleve la lavadora a presión a un centro de servicio
certificado de Campbell Hausfeld para que sea reparada.
Figure 13 - Ubicaciones de los drenajes de aceite
!
PRECAUCION
Page 43

Sp 11
Registro de Servicio y Mantenimiento
Lavadoras a Presión
Fecha Mantenimiento efectuado Reemplazo necesario de componentes
Page 44

5
6
8
1
2
3
4
39
11
12
16
17
18
19
13
14
15
20
21
22
23
28
29
24
25
26
10
9
27
30
31
32
37
33
34
35
36
38*
No. de
Descripción
Número del
Ctd.
Ref. repuesto
Sp 12
Lavadoras a Presión
Bombas PM341000SJ
Para ordenar repuestos, sírvase llamar al
1-800-330-0712 (En los Estados Unidos,
o llame a su distribuidor local)
Sirvase darnos la siguiente información:
- Número del Modelo
- Número de serie (de haberlo)
- Descripción y número del repuesto según la lista
Puede escribirnos a:
Campbell Hausfeld
Attn: Customer Service
100 Mundy Memorial Drive
Mt. Juliet, TN 37122
Ensamblaje de la cubierta (Incluye 1 de c/u de las piezas #1-5) PM255230SV 1
Ensamblaje del descargador (Incluye 1 de c/u de las piezas #7-10 y 26) PM344900SV 1
Juego de anillos para sellar el sistema de lubricación (Incluye 3 piezas #12) PM256500SV 1
Juego de la guía del pistón (Incluye 3 de c/u de las piezas #13-15) PM344905SV 1
Juego de anillos para sellar el agua (Incluye 3 piezas #16) PM344910SV 1
Juego de válvulas de entrada (Incluye 3 piezas #17 y 18) PM064740SV 1
Juego de válvulas de salida (Incluye 3 piezas #21 y 22) PM064304SV 1
Juego de tapas de válvulas (Incluye 3 piezas #23) PM064750SV 1
Juego de anillos en o (Incluye 3 piezas #17 y 21 y 1 de c/u de las piezas #25 y 33) PM058000SV 1
Juego de inyector de detergentes (Incluye 1 de c/u de las piezas #27-29) PM064305SV 1
Juego de pistónes (Incluye 3 piezas #32 y 34) PM344920SV 1
Juego de cojinetes de aguja (Incluye 1 de c/u de las piezas #35-37) PM041840SV 1
Notas
* Se venden por separado
Capacidad de Aceite: 118 mL
Tipo de Aceite: SAE 30W (sin detergente)
NÚMERO
JUEGOS DE PIEZAS PARA EL SERVICIO DE PIEZA CTD.
ESPECIFICACIONES DE TORQUES
(kg-cm)
Ref. No. Descripción Torque
6 Válvula de relieve
térmico 126,8
11 Tornillo 110,7
19 Perno de la culata 110,7
23 Tapa de la válvula 276,7
21 Anillo en o
–
22 Ensamblaje de la válvula de salida –
23 Tapa de la válvula
–
24 Tapón PM064301SV 1
25 Anillo en o PM041870SV 1
26 Ensamble del inyector de productos químicos PM341015SV 1
27 Resorte –
28 Bola –
29 Anillo en o y conector de mangueras –
30 Tornillo PM064302SV 1
31 Cuerpo del pistón PM341020SV 1
32 Resorte del pistón –
33 Anillo en o, 85 x 2.5 –
34 Pistón –
35 Zapata de presión –
36 Cojinete de agujas –
37 Disco de cojinetes –
38* Perno MJ102302AV 3
39 Ensamble de pivote de bronce PM041360SV 1
No. de
Descripción
Número del
Ctd.
Ref. repuesto
1 Anillo para el polvo –
2 Cubierta de la bomba –
3 Anillo para sellar el sistema de lubricación –
4 Cojinete –
5 Placa oscilante –
6 Valvula de relieve térmico PM005405SV 1
7 Ensamble del cuerpo de la válvula de descarga –
8 Ensamble de la guía del cuerpo –
9 Ensamble del cuerpo de la válvula de retención –
10 Resorte de la válvula de retención 1
11 Tornillo PM007500SV 2
12 Sello del sistema de lubricación –
13 Separador del anillo del sistema de lubricación –
14 Anillo para sellar el asiento –
15 Anillo anti-extrusión –
16 Anillo para sellar el agua –
17 Anillo en o –
18 Válvula de succión –
19 Perno de la culata PM025100SV 4
20 Culata, 12 mm PM255240SV 1
7
Page 45

Lavadoras a Presión
Sp 13
Hidrolavadora de Eje Vertical
No. de
Descripción
Número del
Ctd.
Ref. repuesto
1 Tubo del mango PM344830BH 1
2 * Perno de 6,4 mm (1/4") -
20 (mango) PM001903AV 2
3 * Arandela plana PM002000AV 18
4 * Tuerca de seguridad de nilon
de 6,4 mm (1/4") - 20 ST073808AV 7
5 * Perno de 6,4 mm (1/4") -
20 (base) PM001902AV 3
6 Pata izquierda PM344828BH 1
7 Pata derecha PM345100BH 1
8 Defensa de caucho AL062300AV 2
9 * Tornillo autorrosc. 0,64 cm
(1/4") - 20 x 19,1 mm (3/4") MJ102100AV 2
10 Rueda WA005600AV 2
11 Tuerca de presión PM066300AV 2
12 * Perno de 6,4 mm (1/4") -
20 (Eje) PM001904AV 2
13 Eje PM344831BH 1
14 Placa de base PM345520AV 1
15 Ensamblaje del tanque de
detergente PM252000SJ 1
Para ordenar repuestos, sírvase llamar al 1-800-330-0712
(En los Estados Unidos, o llame a su distribuidor local)
Sírvase darnos la siguiente información:
- Número del modelo
- Número de série (de haberlo)
- Descripción y número del repuesto según la lista de repuestos
Puede escribirnos a:
Campbell Hausfeld
Attn: Customer Service
100 Mundy Memorial Drive
Mt. Juliet, TN 37122
16 Tuerca estriada de 6,4 mm (1/4")
- 20 (Tanque) PM031101AV 4
17 Perno de 6,4 mm (1/4") -
20 (Tanque) MJ101104AV 4
18 Tapón PM252450AV 1
19 Tubo del detergente PM013700SV 1
20 Pistola PM005136AV 1
21 Anillo en O (pistola) PM245800SV 1
22 Manguera PM344302AV 1
23 Lance PM035120AV 1
24 Boquilla, 15° (amarilla) PM039880AV 1
25 Boquilla, 65° (negra) PM039820AV 1
26 Soporte, boquillas QC PM344304AV 1
* Artículo disponible en ferreterías locales.
Accesorios para boquillas disponibles para PW2515:
(no incluido con la unidad)
Boquilla, 0° (roja) PM039870AV
Boquilla, 25° (verde) PM039890AV
Boquilla, 40° (blanca) PM039900AV
1
2
3
4
5
6
7
8
9
10
12
13
14
15
16
17
18
19
20
21
22
23
24
25
26
3
11
No. de
Descripción
Número del
Ctd.
Ref. repuesto
Page 46

Lavadoras a Presión
Tabla de diagnóstico de averías - Sólo lavadoras a presión con motor a gasolina
Sp 14
Problema Posible(s) causa(s) Acción a tomar
El motor no enciende o le
cuesta encender
El motor pierde o le falta potencia
La presión baja y/o la bomba
funciona toscamente
Pérdida de agua debajo
del distribuidor
Agua en el cárter de la bomba
(aceite lechoso)
Fallas frecuentes o prematuras
de los sellos de agua de la
bomba
Fuertes pulsaciones en la entrada y baja presión
Pérdidas de aceite entre el
motor y la bomba
Presión fluctuante
Disminuye la presión luego de
un período de uso normal
Bomba ruidosa / la bomba
funciona toscamente
No succiona detergente
1. No hay gasolina en el tanque de combustible o en el
carburador
2. Bajo nivel de aceite
3. Interruptor de arranque/parada en la posición de
parada
4. Agua en la gasolina o combustible viejo
5. Filtro del limpiador de aire está sucio
6. Bujía sucia, espacio equivocado o tipo equivocado
7. Pistola de rociado cerrada
8. Otras causas
1. Filtro limpiador de aire tapado parcialmente
2. Bujía sucia, espacio equivocado o tipo equivocado
1. Punta desgastada o del tamaño equivocado
2. Filtro de entrada o bomba obstruida
3. Sellos de agua desgastados, abrasivos en el agua, o
desgaste natural
4. Válvulas de descarga o de entrada sucias
5. Entrada restringida
6. Válvulas de descarga o de entrada desgastadas
7. Manguera de alta presión con pérdidas
8. Bomba aspira aire
9. Asiento de la válvula de descarga fallado o desgastado
Sellos de agua desgastados
1. Aire húmedo se condensa dentro del cárter
2. Sellos de aceite con pérdidas
1. Émbolos rayados, dañados o desgastados
2. Material abrasivo en el fluido
3. Temperatura del agua de entrada demasiado alta
4. La bomba presuriza demasiado
5. Presión excesiva debido a una punta dañada o parcialmente obstruida
6. La bomba funciona demasiado sin rociar
7. La bomba funciona sin agua
Partículas extrañas en la válvula de entrada o de descarga
o válvulas de entrada y/o de descarga desgastadas
Anillo O y/o sellos de aceite desgastados
1. Válvula desgastada, sucia o trabada
2. La bomba aspira aire
3. Punta obstruida
1. Sellos de agua de la bomba desgastados
2. Boquilla desgastada
3. Válvula desgastada, sucia o atorada
4. Asiento de la válvula de descarga desgastado o sucio
1. Bomba aspira aire/bajo suministro de agua
2. Válvulas sucias o desgastadas
3. Juntas desgastadas
4. Agua demasiado caliente
1. La boquilla no se empujó hacia arriba lo suficiente
2. Hay una obstrucción, pliegue o perforación en la
manguera de succión de detergente
3. La manguera es demasiado larga
4. La lanza no está funcionando adecuadamente
1. Llene el tanque con gasolina, abra la válvula de cierre de
combustible. Revise la línea de combustible y el carburador
2. Revise el nivel de aceite. Llénelo si es necesario
3. Mueva el interruptor a la posición de arranque
4. Drene el tanque de combustible y el carburador. Use combustible nuevo y seque la bujía
5. Quítelo y límpielo o reemplácelo
6. Límpiela, ajuste el espacio o reemplácela
7. Apriete el gatillo de la pistola de rociado
8. Consulte el manual del propietario del motor
1. Quítelo y límpielo o reemplácelo
2. Límpiela, ajuste el espacio o reemplácela
1. Reemplácela con una punta del tamaño adecuado
2. Límpiela. Verifique con más frecuencia
3. Revise el filtro. Cambie los sellos de agua. Consulte el centro de servicio
4. Limpie los ensamblajes de las válvulas de entrada y descarga. Revise el filtro
5. Revise la manguera de jardín, puede estar colapsada o plegada. Revise el flujo de entrada de agua
6. Reemplace las válvulas desgastadas
7. Reemplace la manguera de alta presión
8. Asegúrese de que las mangueras y los accesorios estén ajustados
9. Revíselo y reemplácelo
Instale nuevos sellos de agua. Consulte al centro de servicio
1. Cambie el aceite como se especifica en el plan de mantenimiento
2. Instale nuevos sellos de aceite. Consulte al centro de servicio
1. Instale émbolos nuevos. Consulte al centro de servicio
2. Instale un filtrado adecuado en la tubería de entrada de la
bomba
3. Verifique la temperatura del agua; no puede exceder los
38° C.
4. No modifique ningún valor de fábrica.
5. Limpie o reemplace la punta.
6. Nunca haga funcionar la bomba durante más de 2 minutos
sin rociar
7. No haga funcionar la bomba sin agua
Limpie o reemplace las válvulas. Consulte al centro de servicio
Reemplace el anillo O y/o los sellos de aceite. Consulte el centro
de servicio
1. Revise y reemplace
2. Asegúrese de que las mangueras y los accesorios están ajustados. Purgue el aire de la manguera de jardín
3. Revise o reemplace
1. Revise y reemplace
2. Revise y reemplace
3. Revise, limpie o reemplace
4. Revise, limpie o reemplace
1. Asegúrese de que las juntas están ajustadas. Aumente la
presión de agua
2. Revise, limpie o reemplace
3. Revise y reemplace
4. Reduzca la temperatura por debajo de 38˚ C
1. Empuje la boquilla hasta el tope.
2. Si está limpia, elimine los pliegues o cambie la manguera.
3. Utilice únicamente el largo de manguera que se proporcionó con la compra inicial de la lavadora a presión. La succión del detergente no funciona si se conecta más de una
sección de manguera a la unidad.
4. Quite la lanza de la pistola. Si se pasa detergente a través
de la pistola, la lanza se debe reemplazar. Si no pasa detergente a través de la pistola, quite 1" del conector de detergente ahusado de la bomba. Limpie el conector, y
asegúrese de que la bola y el resorte estén alineados adecuadamente con la porción ahusada del resorte que está
frente a la bola. La bola debe estar encima del resorte.
Page 47

Lavadoras a Presión
Sp 15
Notas
Page 48

Lavadoras a Presión
Sp 16
Garantía Limitada
1. Duración: De la fecha de compra por el comprador original y de acuerdo a las siguientes clasificaciones:
Uno Año.
2. QUIÉN OTORGA DA ÉSTA GARANTÍA (EL GARANTE): Campbell Hausfeld / Scott Fetzer Company,
Mount Juliet, TN, 37122, Teléfono: (800) 330-0712.
3. QUIÉN RECIBE ÉSTA GARANTÍA (EL COMPRADOR): El comprador original (que no sea revendedor) de la
Lavadora de Presión Campbell Hausfeld.
4. PRODUCTOS CUBIERTOS POR ESTA GARANTÍA: Cualquier Lavadora de Presión Campbell Hausfeld fabricada
o distribuida por el garante.
5. LO QUÉ ESTÁ CUBIERTO POR ESTA GARANTÍA: Los defectos de material y/o de manufactura que ocurran dentro
del período de garantía con las excepciones anotadas abajo.
6. LO QUÉ NO ESTÁ CUBIERTO POR ESTA GARANTÍA:
A. Las garantías implícitas, incluyendo las garantías de comercialización y adecuación para un fin particular,
son limitadas a partir de la fecha de compra como se indica en el parrafo DURACIÓN. Si ésta lavadora de
presión es usada para trabajos comerciales, industriales o para renta, la garantía aplicada es de (90) días
a partir de la fecha de compra. En algunos estados no se permiten limitaciones a la duración de las garantías,
en tal caso esta limitación no es aplicable.
B. CUALQUIER PÉRDIDA, DAÑO INCIDENTAL INDIRECTO O CONSECUENTE QUE PUEDE RESULTAR DE UN
DEFECTO, FALLA, O MALFUNCIONAMIENTO DE LA LAVADORA DE PRESIÓN CAMPBELL HAUSFELD. En
algunos estados no se permiten la exclusión o limitación de daños incidentales o consecuentes y en tal caso
esta limitación o exclusión no es aplicable.
C. Cualquier falla que resulte por daños en la transportación, accidente, abuso, negligencia o incumplimiento
de las instrucciones de funcionamiento e instalacion indicadas en el manual suministrado con el producto.
D. El servicio al producto antes de la venta. Ejemplo ensamblaje, aceites o lubricantes, ajustes, etc.
E. Partes o ajustes requeridos normalmente en el mantenimiento de la lavadora de presión.
F. El motor de gasolina y sus componentes están expresamente excluídos de ésta garantía limitada.
Estos componentes deben de ser devueltos por el comprador al fabricante original o a su taller de reparación
autorizado.
G. Partes adicionales no cubiertos en ésta garantía:
1. Desgaste normal en partes tales como mangueras de alta presión, sellos de agua o aceite, anillos,
válvulas y boquillas de spray.
2. Escobillas del motor (modelos eléctricos solamente).
3. Defectos esternos que no interfieren con su funcionamiento.
4. Componentes oxidados.
5. Desgaste de la bomba o daño de la válvula causado por uso de aceite inapropiado, contaminación del
aceite o por no seguir adecuadamente las recomendaciones de mantenimiento.
7. RESPONSABILIDADES DEL GARANTE BAJO ÉSTA GARANTÍA: Repare o reemplazar, como lo decida el garante,
ya sea la lavadora de presión o alguna de sus partes que se encuentre defectuoso, no funcione adecuadamente
y/o no cumpla de conformidad dentro del período de duración de la garantía.
8. RESPONSABILIDADES DEL COMPRADOR BAJO ESTA GARANTÍA:
A. Proporcionar prueba de la fecha de compra y registros de mantenimiento.
B. Entregar o enviar la lavadora de presión o su componente al centro de servicio autorizado Campbell
Hausfeld más cercano. Los costos de embarque, si son aplicables, serán pagados por el comprador.
C. Ser cuidadoso con el funcionamiento y mantenimiento de la lavadora de presión de acuerdo al manual(s)
del propietario.
9. CUANDO EFECTUARÁ EL GARANTE LA REPARACIÓN O REEMPLAZO CUBIERTO POR ESTA GARANTÍA: La
reparación o reemplazo del equipo tomara el tiempo normal y de acuerdo a la carga de trabajo en ese
momento el el centro de servicio y de acuerdo a la disponibilidad de refacciones.
Esta garantía limitada es válida sólo en los EE.UU., Canadá y México y otorga derechos legales específicos.
También usted podría tener otros derechos los cuales varían de estado a estado o de país a país.
 Loading...