

MaxTronic Orion 410SR, Orion NAS 410SR User Manual

Orion NAS 410SR User Manual
42-30000-5114
Version 1.2

MaxTronic Orion 410SR
RAID Enabled NAS System
User Manual


Maxtronic Orion 410SR User Guide
Table of Contents
Preface
About this Manual ......................................................................................................i
Copyright Notice .........................................................................................................i
Conventions .................................................................................................................i
Safety Instructions .....................................................................................................ii
Limited Warranty ....................................................................................................iv
EMC Certificate .........................................................................................................v
1 Introducing Orion 410SR
Product Features .......................................................................................................1
Package List ...............................................................................................................2
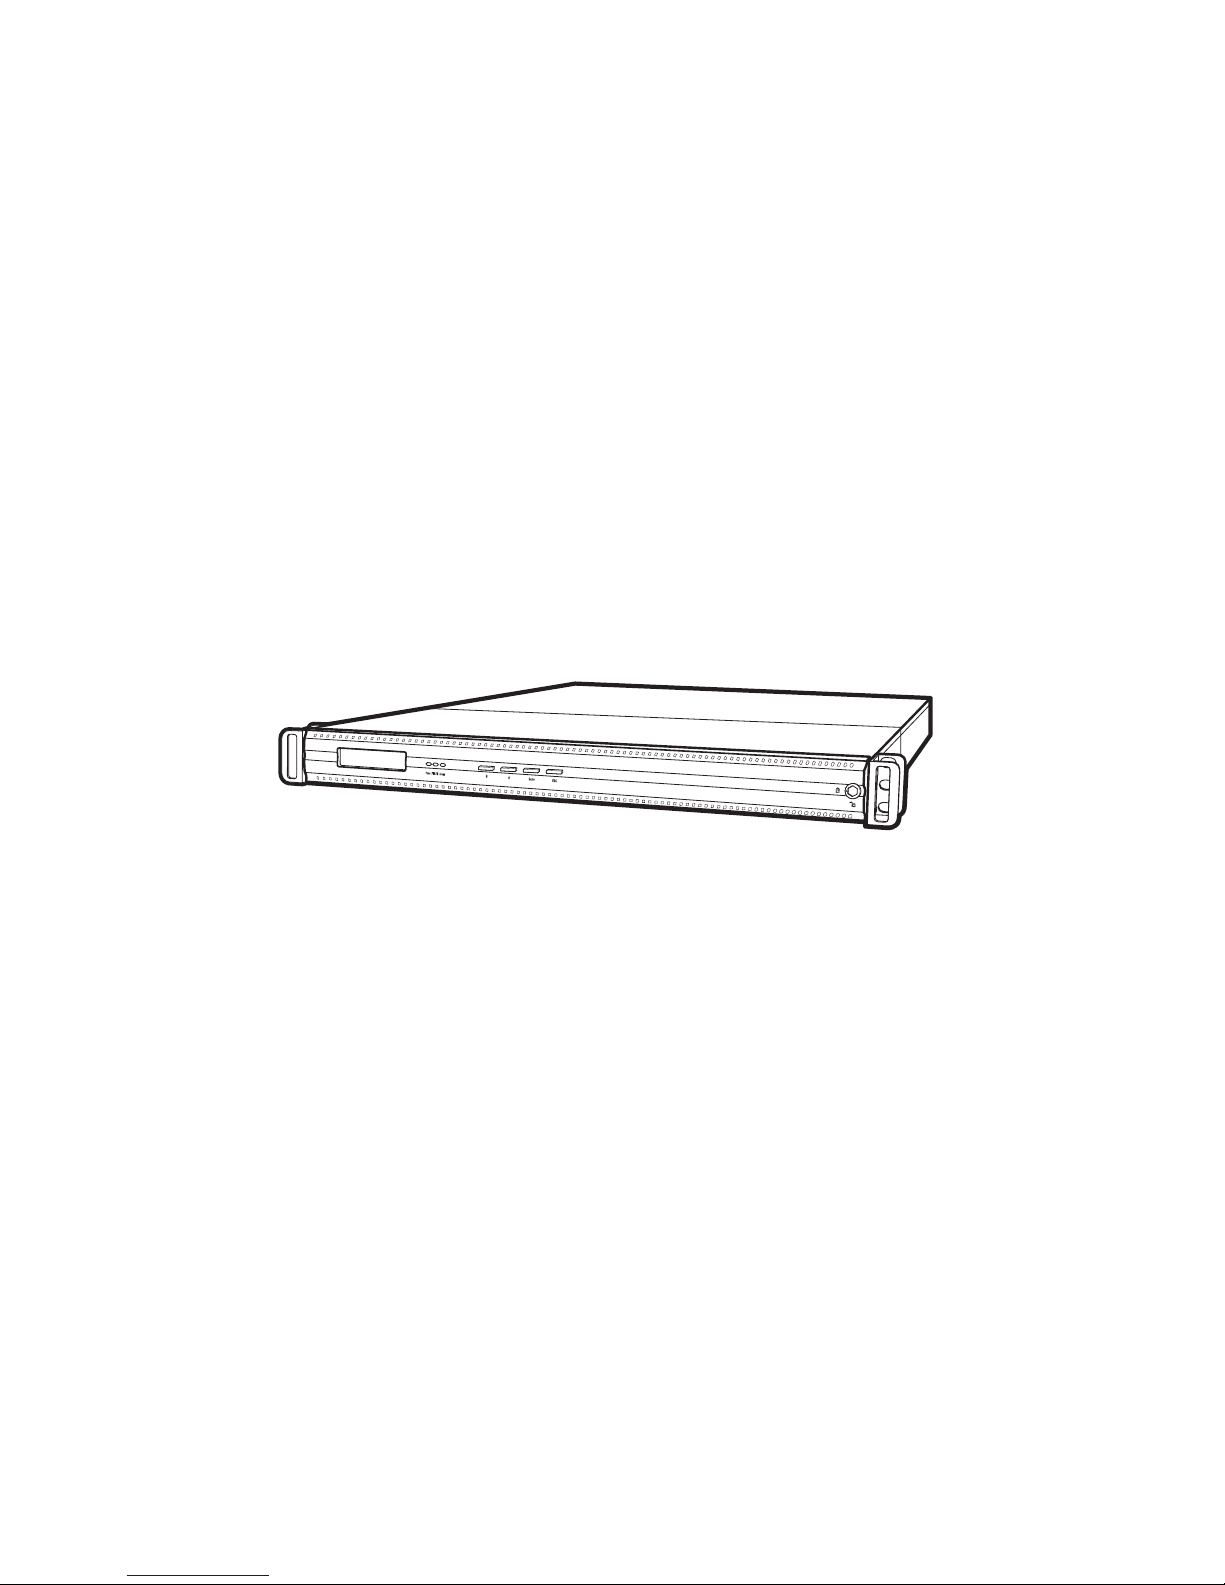
Components of the Orion 410SR ..............................................................................3
Front View...............................................................................................................3
Back View................................................................................................................3
Important Notice......................................................................................................3
2 Getting Started
Hardware Installation ...............................................................................................5
Power Connection....................................................................................................5
Network Connection................................................................................................6
Hard Disk Drive Installation....................................................................................7
Mounting in a Rack .................................................................................................10
Installing the Rail Extender ...................................................................................11
Using the Front Control Panel ...............................................................................12
Control buttons ......................................................................................................12
LED indicators.......................................................................................................13
3 Orion 410SR System Setup
System Boot-up ........................................................................................................15
System Setup ............................................................................................................15
System Login.........................................................................................................16
Main Menu.............................................................................................................16
Resetting the Administrator Password...................................................................23
Resetting to Factory Default Settings....................................................................23
4 Configuring the User Interface
Using User Interface ................................................................................................25
System Status.........................................................................................................26

Maxtronic Orion 410SR User Guide
Quick Configuration.............................................................................................. 29
5 Administrator Tools
Administrator Login ............................................................................................... 37
Instant Configuration ............................................................................................. 38
System Setup Screen ............................................................................................... 38
Event Notification................................................................................................. 38
SNMP.................................................................................................................... 39
Factory Defaults.................................................................................................... 41
UPS........................................................................................................................ 41
Updating Firmware ............................................................................................... 42
Network Setup Settings .......................................................................................... 42
For Windows......................................................................................................... 43
For Unix ................................................................................................................ 45
For Apple............................................................................................................... 47
FTP........................................................................................................................ 50
Storage Setup Settings ............................................................................................ 51
Volume Setup........................................................................................................ 53
Share Setup............................................................................................................ 55
N-Sync Setup......................................................................................................... 56
User Privilege Settings ............................................................................................ 62
Groups................................................................................................................... 62
Users...................................................................................................................... 64
Quotas.................................................................................................................... 68
Privilege Setup ...................................................................................................... 69
File Manager ......................................................................................................... 71
Backup-sync ............................................................................................................. 73
Jobs........................................................................................................................ 74
Logs....................................................................................................................... 77
Backing Up Jobs.................................................................................................... 78
Diagnostic Mode ...................................................................................................... 79
Starting Diagnostic Mode...................................................................................... 79
Downloading Diagnostic Mode Logs ................................................................... 81
Logging Out/Shutting Down ................................................................................. 82
Logout ................................................................................................................... 82
User Level Access .................................................................................................... 83
Password Setup ..................................................................................................... 83
File Manager ......................................................................................................... 84
Backup - sync........................................................................................................ 84
Logout ................................................................................................................... 84
Appendix ................................................................................................... 85

Maxtronic Orion 410SR User Guide
Orion 410SR FTP Setting Guide ............................................................................85
IP sharing unit setup (Broadband Router) .............................................................85
IP sharing unit (Broadband Router)
D-Link DI-704UP..................................................................................................85
Enabling passive mode for the FTP tool................................................................90

Maxtronic Orion 410SR User Guide
i
Preface
About this Manual
This manual is designed to make the Orion 410SR NAS System as easy to use as possible.
Information contained in this document has been checked for accuracy, but no guarantee is
given that the contents are correct. Information and specifications are subject to change without notice.
Copyright Notice
Copy right reserved. Do not duplicate.
© Copyright 2006 MaxTronic International Co., Ltd.
All rights reserved. This Orion 410SR NAS System and related documentation are protected
by copyright and are distributed under licenses restricting their use, copying, and distribution.
No part of this documentation may be reproduced in any form, by any means without prior
written authorization of the company and its licensors, if any.
Conventions
Caution
This symbol is used to remind users to pay attention to import ant d escriptions
regarding usage and maintenance (repair) or additional important information
related to this Orion 410SR NAS System.
Note
This symbol is used to provide users with useful information that can make
procedures such as configuration easier to accomplish.
ii
Maxtronic Orion 410SR User Guide
Safety Instructions
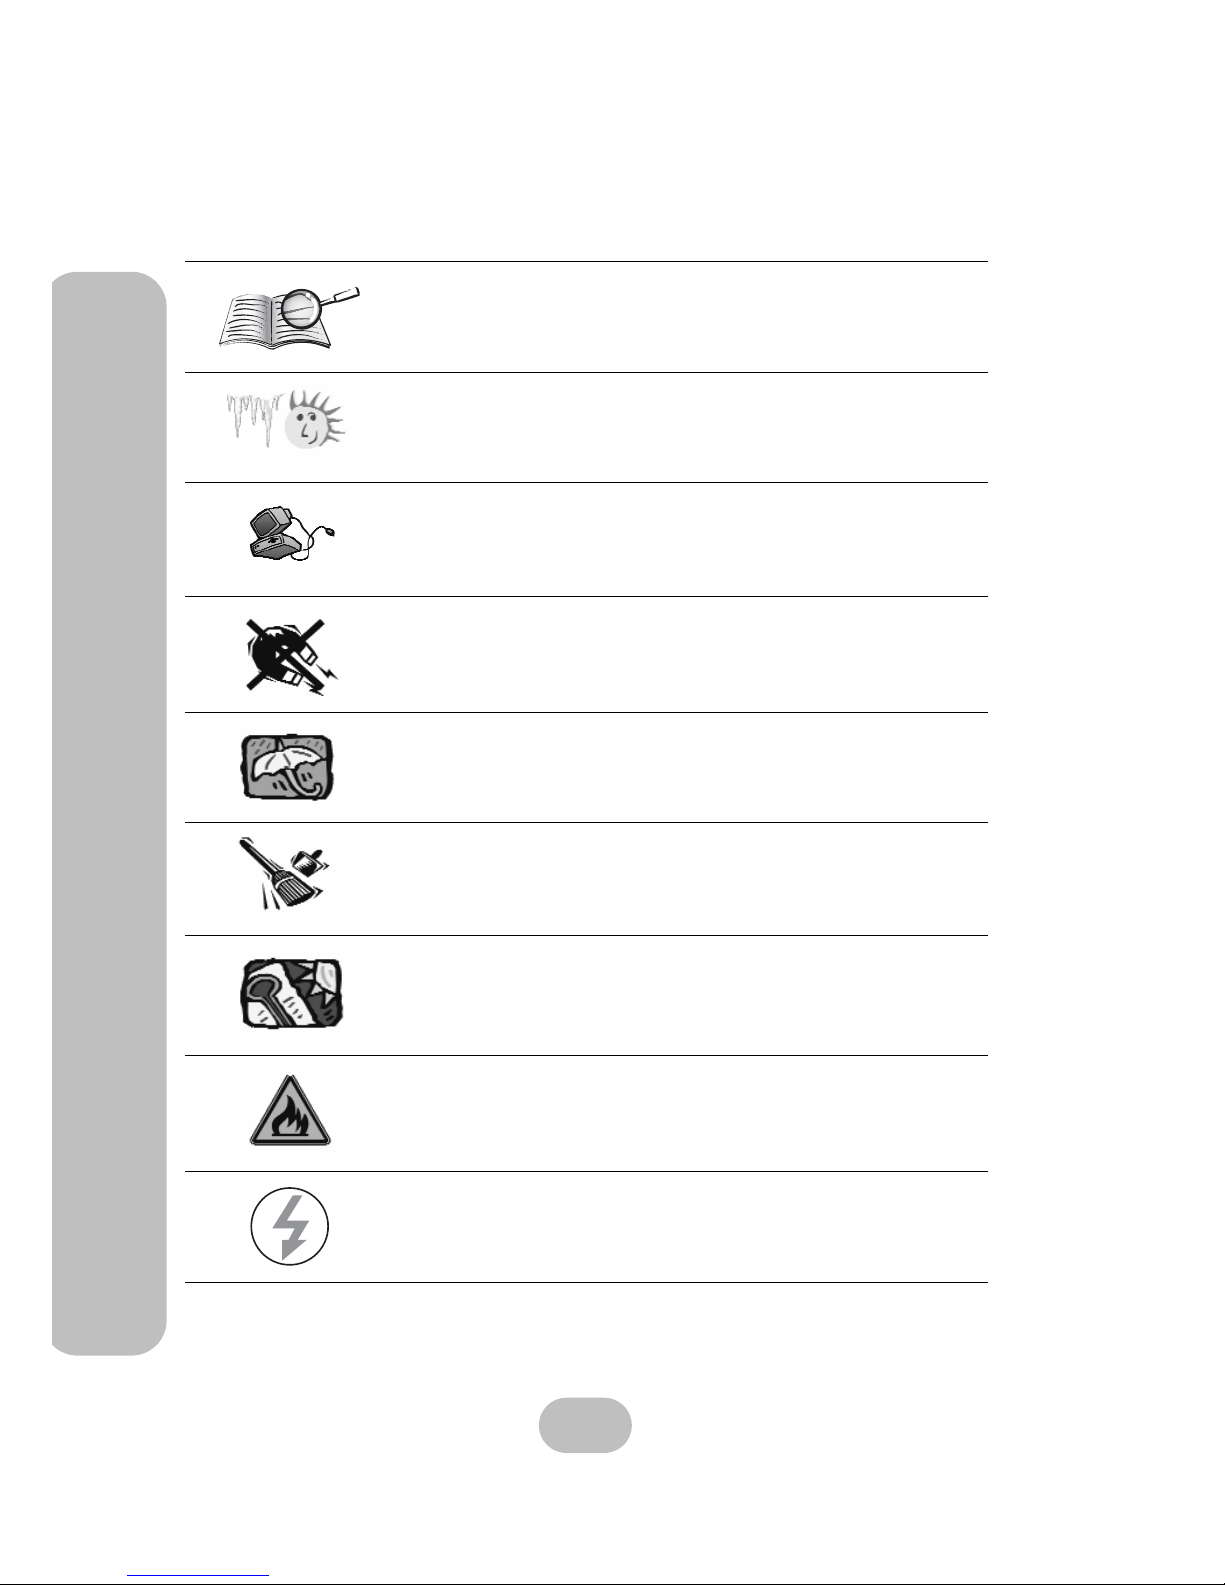
Safety Instructions
Before starting, take a few minutes to read this manual. Read all of
these instructions and save this manual for later reference.
Protect the Orion 410SR NAS System from extremely high or low
temperatures. Let the NAS system warm (or cool) to room temperature before using it.
Protect the Orion 410SR NAS System from being bumped or
dropped. Do not place the Orion 410SR on an unstable cart, stand,
or table. It may fall, causing serious damage to the product.
Keep the Orion 410SR NAS System away from magnetic forces.
Do not use the Orion 410SR NAS System near water.
Keep the Orion 410SR NAS System away from dust, sand, or dirt.
Gaps and openings in the cabinet are provided for ventilation. Never
block or cover these openings, because the Orion 410SR NAS System may overheat and become unreliable in operation. Don’t place
the Orion 410SR NAS System on a bed, sofa, rug, or other similar
surface.
Do not place the Orion 410SR NAS System near or over a radiator or
other heat source.
Refer to the rating plate for the correct voltage and ensure that the
appliance voltage corresponds to the supply voltage.
V
Maxtronic Orion 410SR User Guide
iii
Safety Instructions
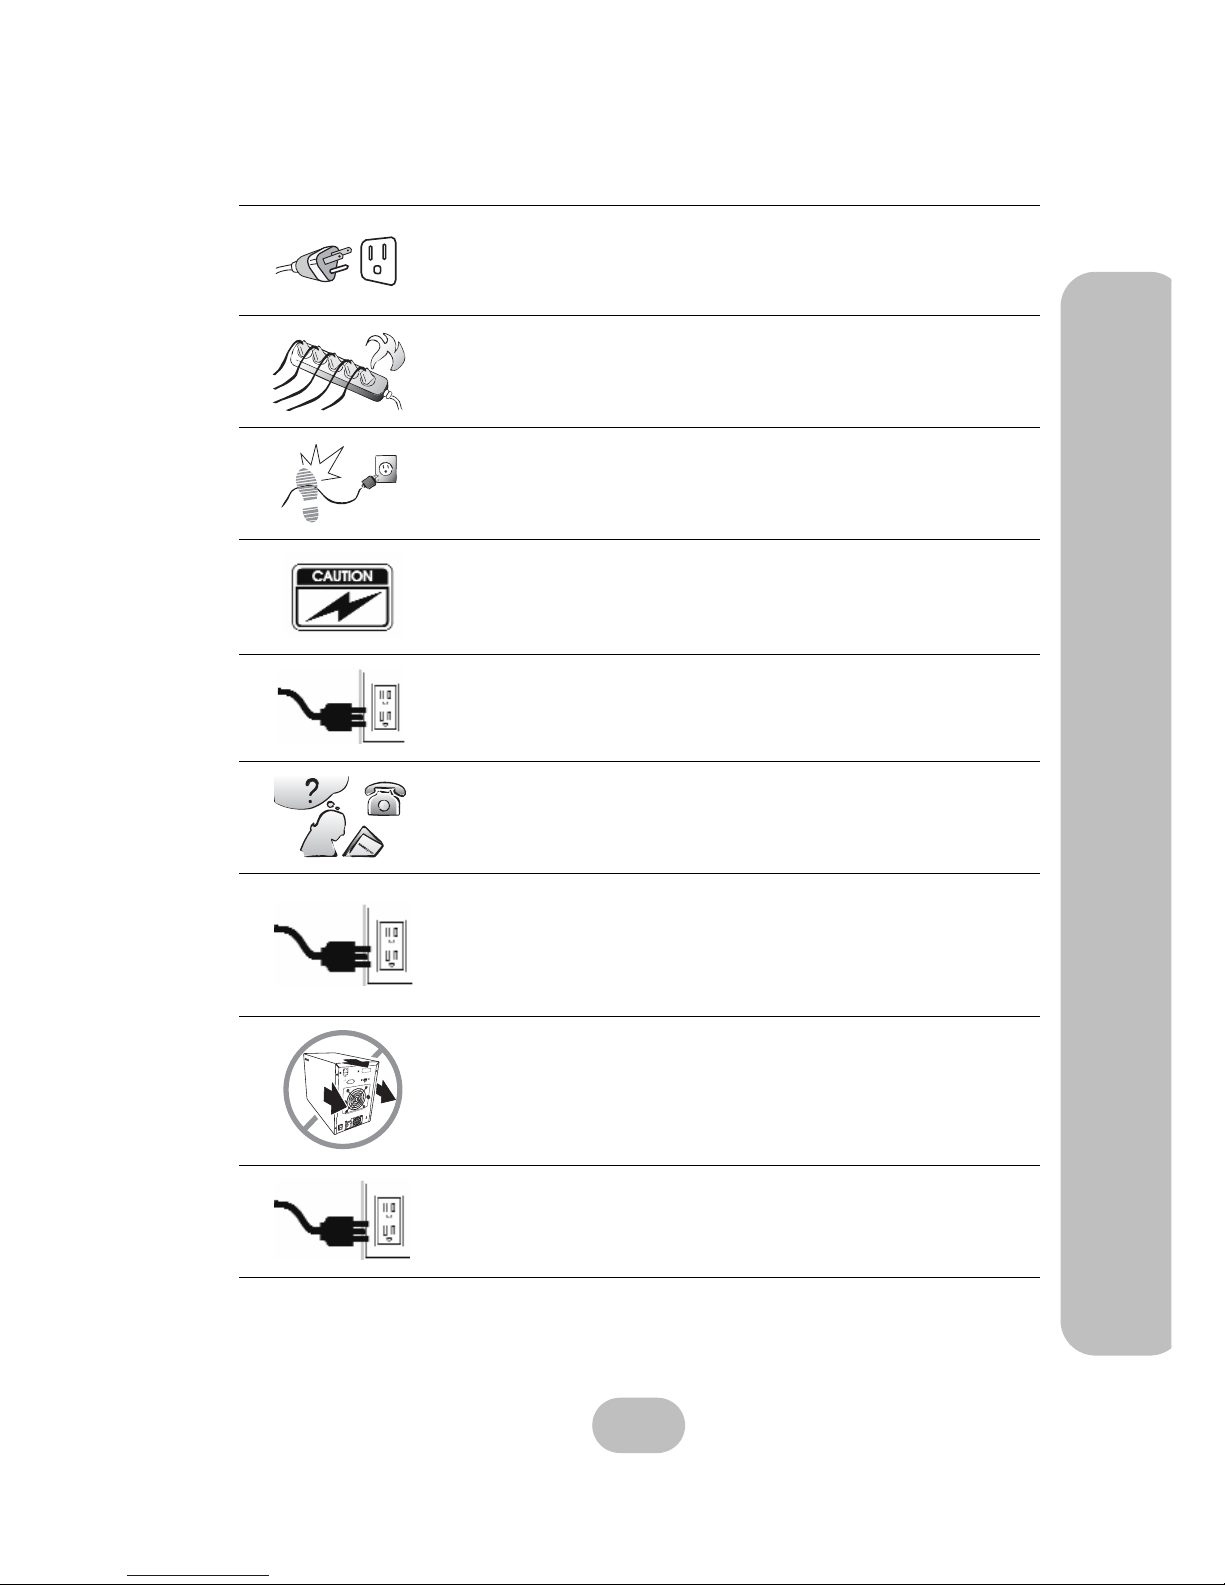
The appliance must be grounded. The Orion 410SR NAS System is
equipped with a 3-wire grounded type of power cord. This power
cord will only fit into a grounded type of power outlet.
If an extension cord or a power center is used with the Orion 410SR
NAS System, make sure that the total current consumption of all
products plugged into the wall outlet does not exceed the ampere
rating.
Do not place the Orion 410SR NAS System where the cord will be
walked on.
Never push any object into the Orion 410SR NAS System through
cabinet gaps and openings, since it may touch dangerous voltage
points and cause a risk of fire or electric shock.
Unplug the power cord from the wall outlet before cleaning. Keep the
Orion 410SR NAS System dry. Do not use liquid cleaners, aerosol
cleaners, or a wet cloth. Use a damp cloth for cleaning.
Except as specifically explained in this User Manual, do not attempt
to service the Orion 410SR NAS System by yourself. Opening or
removing the covers may expose you to dangerous voltages.
Unplug this product from the wall outlet and refer servicing to qualified service personnel under the following conditions.
• If the Orion 410SR NAS System has been exposed to water or
any liquid.
• If the Orion 410SR NAS System has been dropped or the cabinet
damaged.
Users should not remove the cover of the Orion 410SR NAS System.
Disconnect all power supply cords before servicing, and only authorized personnel should perform servic ing tasks.

iv
Maxtronic Orion 410SR User Guide
Limited Warranty
Limited Warranty
MaxTronic International Co., Ltd. guarantees all Orion 410SR NAS Systems are precisely
tested before they leave the factory and able to function normally under general conditions. In
case of any system malfunction under normal usage during the warranty period, MaxTronic
international Co., Ltd. and its local representatives will be responsible for the repair without
charging.
Placement Notes
• The NAS system LCD panel can be damaged by exposure to direct
sunlight. Limit exposure to subdued or indirect sunlight only.
• The NAS system should be used only in clean environments that are
free from airborne contaminants such as dust, dirt, and smoke. Excessive moisture or oil particles in the air can also hinder NAS system
performance.
• To reduce the possibility of data errors caused by electromagnetic
interference, locate the NAS system at least five feet away from electrical appliances and equipment that generate magnetic fields.
Power Supply Safety Notes
• To avoid electric shocks, do not use an extended power cord or an
outlet that does not match the NAS system plug or leaves the plug
exposed.
• The NAS system has a 3-wire grounded plug. The third pin connects
to ground; do not remove it.
• If the power cord or plug is damaged or worn, unplug it immediately
and contact a qualified service technician for maintenance.
• To avoid fire or electric shocks, do not overload electric power outlets.
CAUTION : MULTIPLE POWER SORUCES
Disconnect all AC cords to completely remove power from the unit.
CAUTION
Risk of explosion if battery is replaced by an incorrect type.
Dispose of used batteries according to the instructions.
CAUTION : MULTIPLE POWER SORUCES
The thumbscrews on the rear surface shall be secured by the screwdriver, which
cannot be loosened by bare hands to prevent the unintentional access to the hazardous parts inside the equipment.

Maxtronic Orion 410SR User Guide
v
EMC Certificate
MaxTronic International Co., Ltd. is not responsible for any damage or loss of data, deemed
to be caused by its products. It is highly recommended that users conduct the necessary
backup practices.
EMC Certificate
This product has passed FCC ClassB inspection. Appropriate certifications have also been
approved. E.g. CE, UL, CB, C-Tick and BSMI.


1
1 Introducing Orion410SR
The Orion 410SR NAS System of MaxTronic International Co., Ltd. is a RAID-enabled NAS
(Network Attached Storage) system. The Orion 410SR NAS System is able to conduct continual self-tests, beyond unsymmetrical fault tolerance, and comes with data validation functions provided by RAID 0, RAID 1, RAID 3, and RAID 5. The availability of cooling fans
and hot-swap features make the Orion 410SR with RAID function is more reliable and easier
to use.
Product Features
• Automatic detection of overheating, System fan speed and power supply DC voltage
3.3V, 5V, and 12V
• Automatic formatting, data synchronization and recovery
• Firmware upgradeable
• User-friendly configuration interface
• OS-independent networking storage system
• Hard disk drive error LED indicator
• Supports hard disk drive hot-swapping
• Supports one RJ45 ethernet port (10/100/1000)
• Supports UPS devices via USB interface
• System status and OS configuration display on front LCD screen

2
Maxtronic Orion 410SR User Guide
Package List
Package List
If any of them is missing or damaged, please contact with your local dealer.
Power Cord
User Manual
RJ45 Cable(2M)
Screws bag
Key-Tray Plastic
Orion 410SR NAS System
Rail Kit
Maxtronic Orion 410SR User Guide
3
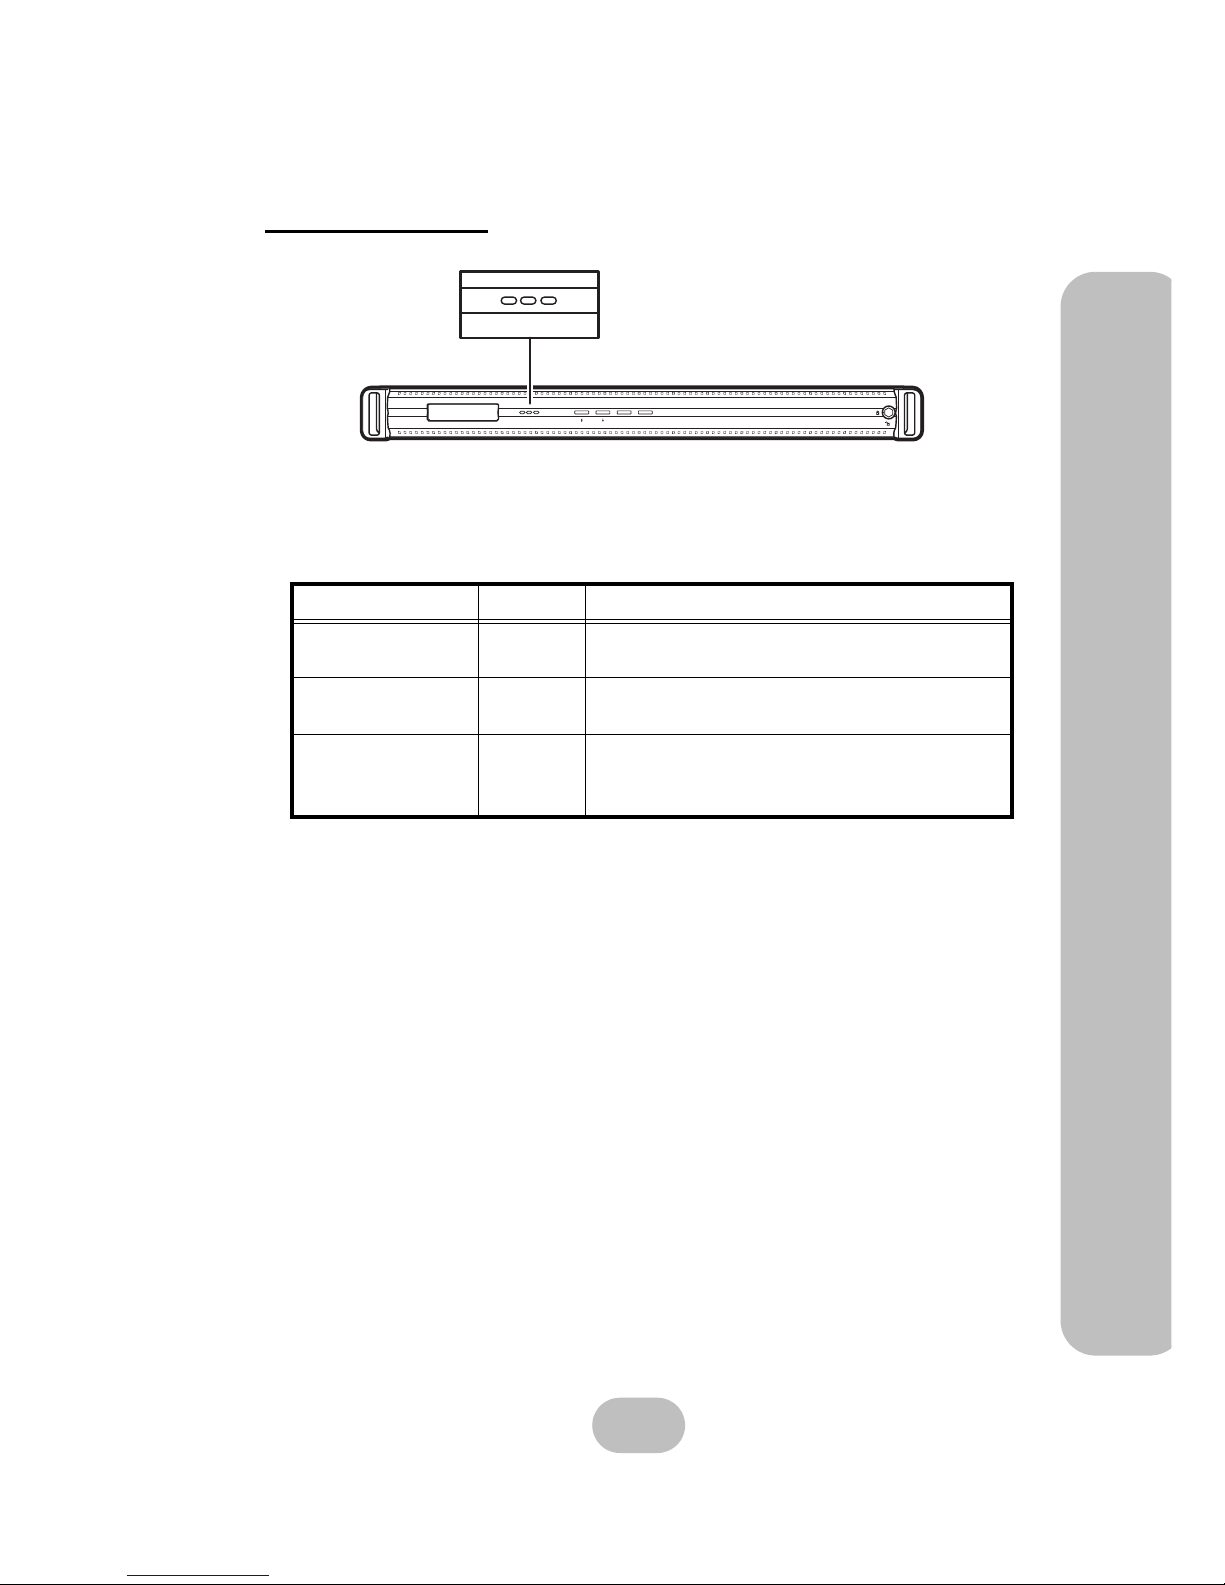
Components of the Orion 410SR
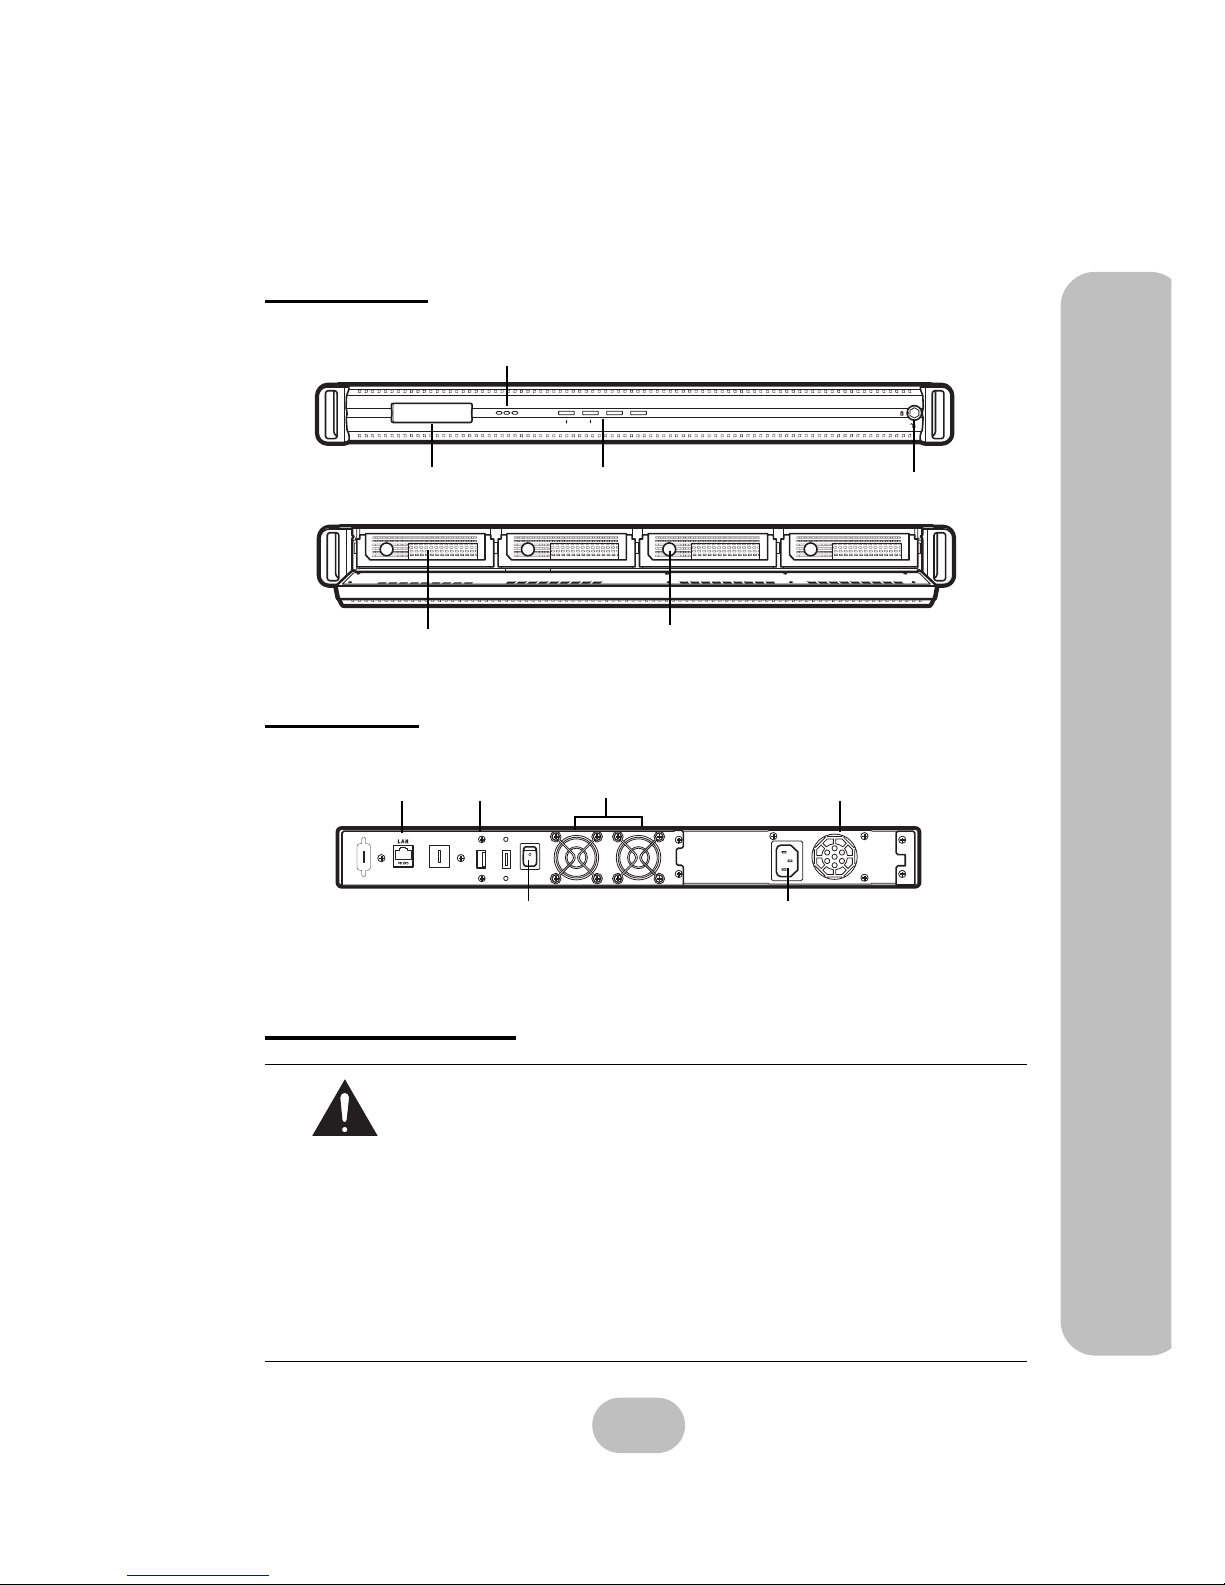
Components of the Orion 410SR
Front View
Back View
Important Notice
Follow the procedures below carefully to initialize your Orion 410SR
NAS System:
1. Connect the power cord and LAN cable.
2. Remove the HDD caddy(s) from the system.
3. Power on the system.
4. Hot plug the HDD caddy(s) into the system. Please make sure the
‘HDDx added OK’ displays on the LCD screen then continue the
next drive installation till the whole process is done.
5. Start configuration through the front control panel or the
browser interface.
Refer to the “Hard Disk Drive Installation” on page 7 section in
Chapter 2 for detailed information.
Power
LED indicator
Control buttons
LCD screen
HDD caddy (x4)
HDD caddy Lock (x4)
ESCEnter
Power
P/S
Fail Access
Front Panel Lock
UPS
Connector
System
Fan
Power Supply
LAN
Connector
Three-pin power
connector
Power Switch

4
Maxtronic Orion 410SR User Guide
Components of the Orion 410SR
5
2 Getting Started
Hardware Installation
The basic hardware setup includes:
• Orion 410SR NAS System
• 4 hot-swappable caddies
• 1 power cord
• 1 network cable
• 1 set of keys
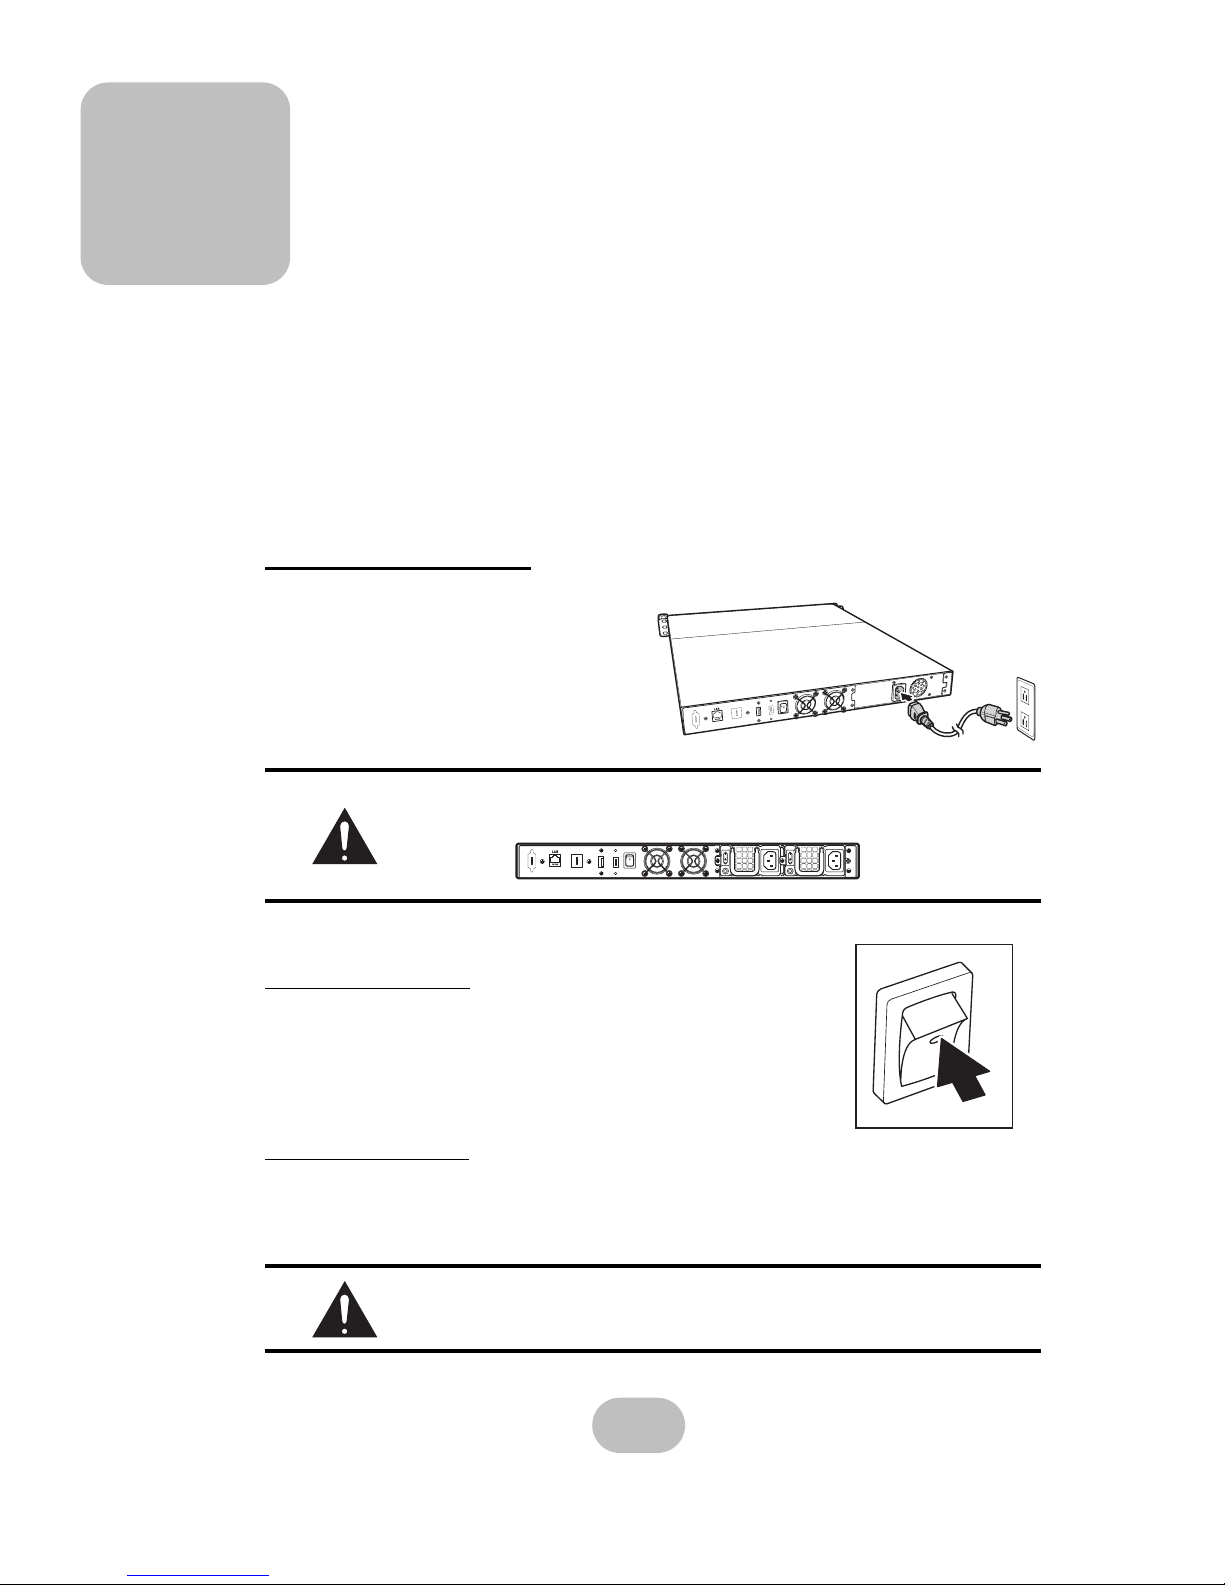
Power Connection
Use the power cord provided in the package
for proper power supply.
1. Connect the receptacle into the power
connector on the rear side of the
Orion 410SR.
2. Connect the three-pin power plug into a
power outlet.
Turn on the Power
Press the power switch at the rear side of the Orion 410SR.
Turn off the power
To shutdown the system properly, please use the “Shutdown” function in the administrator
tools via web browser.
Please refer to “Logging Out/Shutting Down” on page 82 for detailed information.
The optional model with redundant power supply for 410SR is av ailable.
The power LED on front panel only applies to this option.
Do not turn off the power directly from the power source while the system
is still running or may encounter unexpected error.
6
Maxtronic Orion 410SR User Guide
Hardware Installation
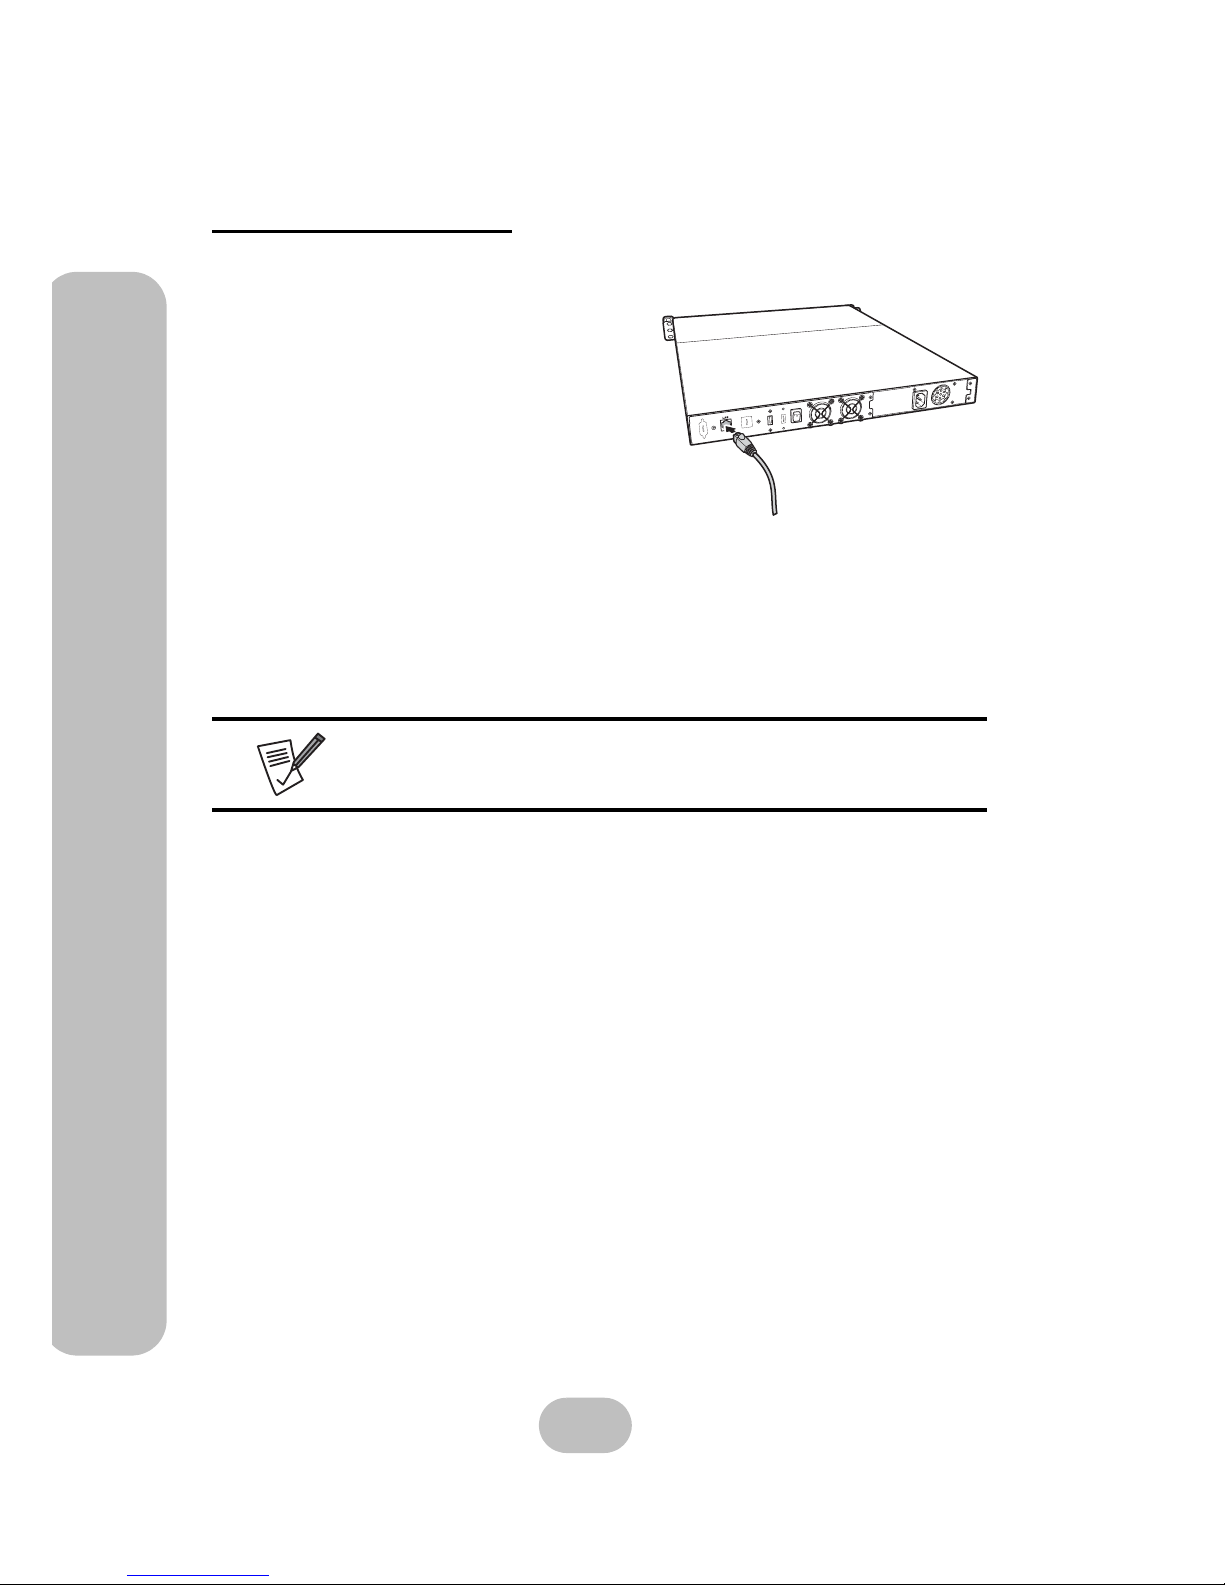
Network Connection
Use the provided LAN cable to connect to network. Before the network is connected, the Network LED indicator will be lit orange.
1. Insert one end of the LAN cable into the
router.
2. Insert the other end of the LAN cable into the
LAN connector on the rear side of the
Orion 410SR.
When network connection is set, the Network LED indicator located on the front control
panel starts flashing.
Please refer to the ‘LED indicators’ under “Using the Front Control Panel”
on page 12 for detailed information.

Maxtronic Orion 410SR User Guide
7
Hardware Installation
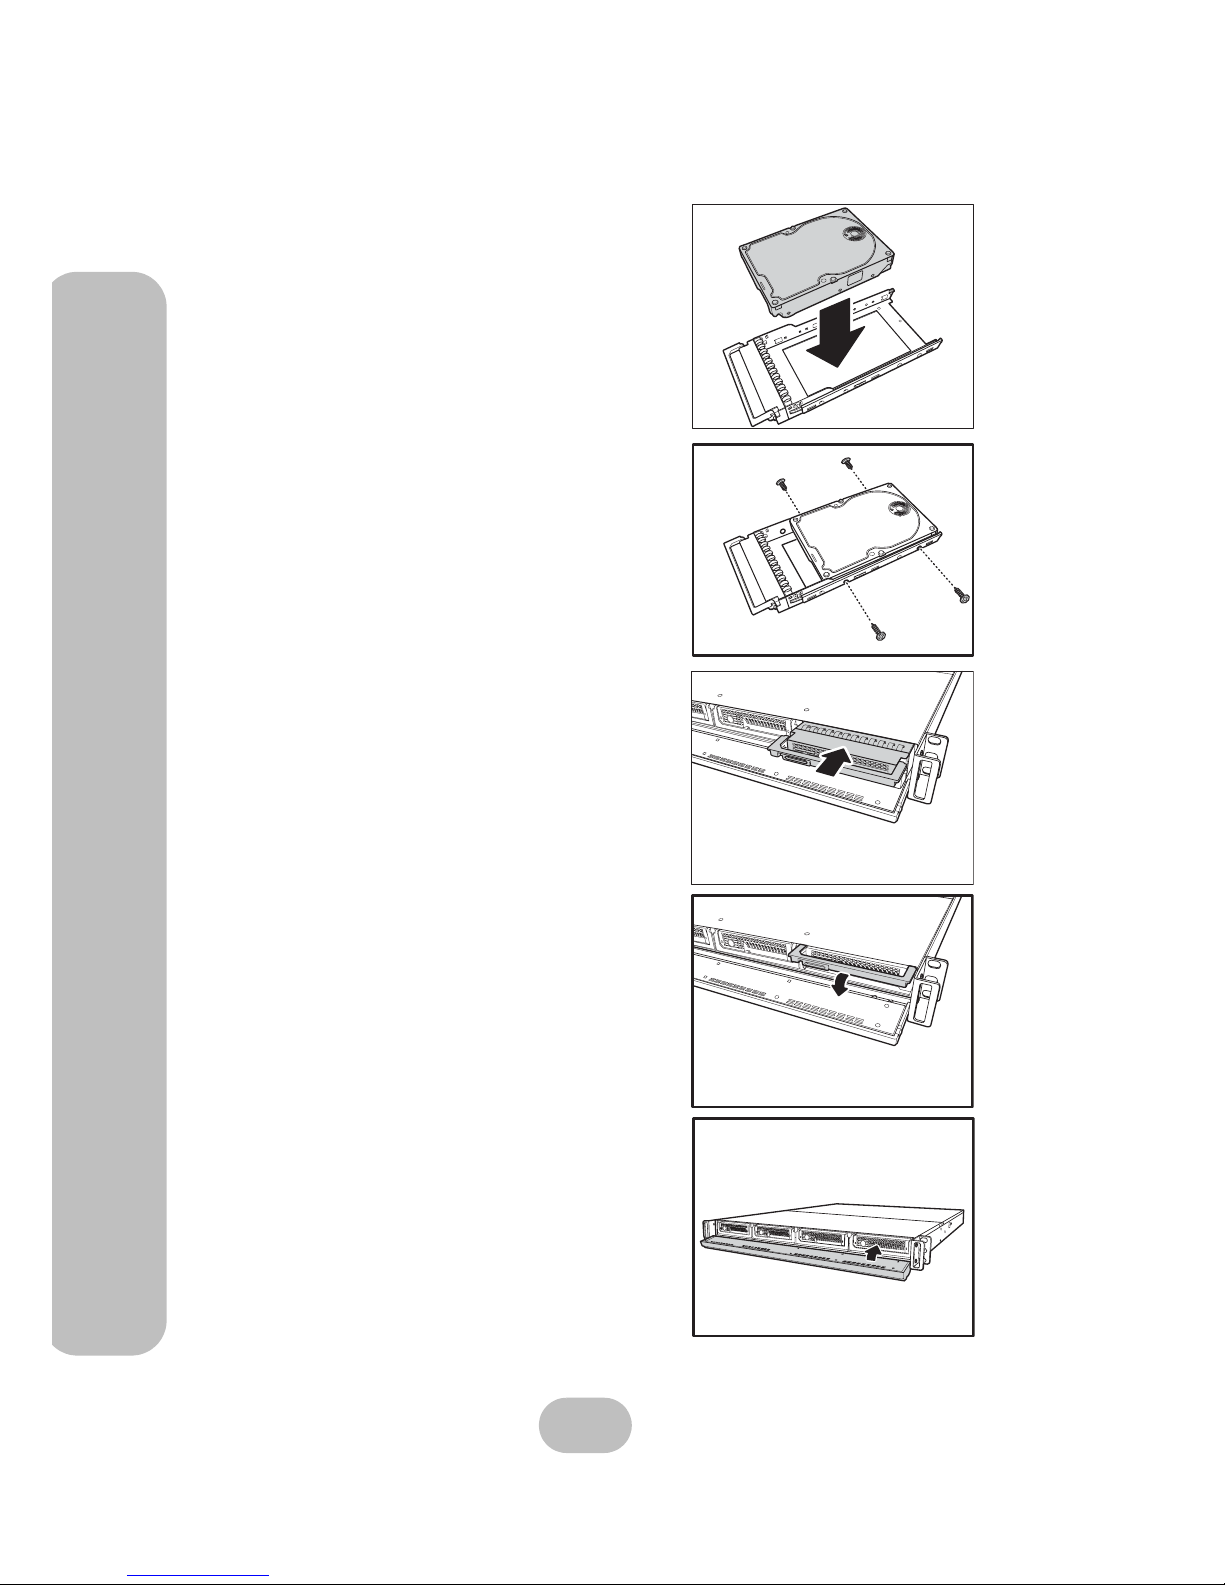
Hard Disk Drive Installation
When installing the HDDs for the first time, please follow the procedures below carefully to
initialize the Orion 410SR NAS System:
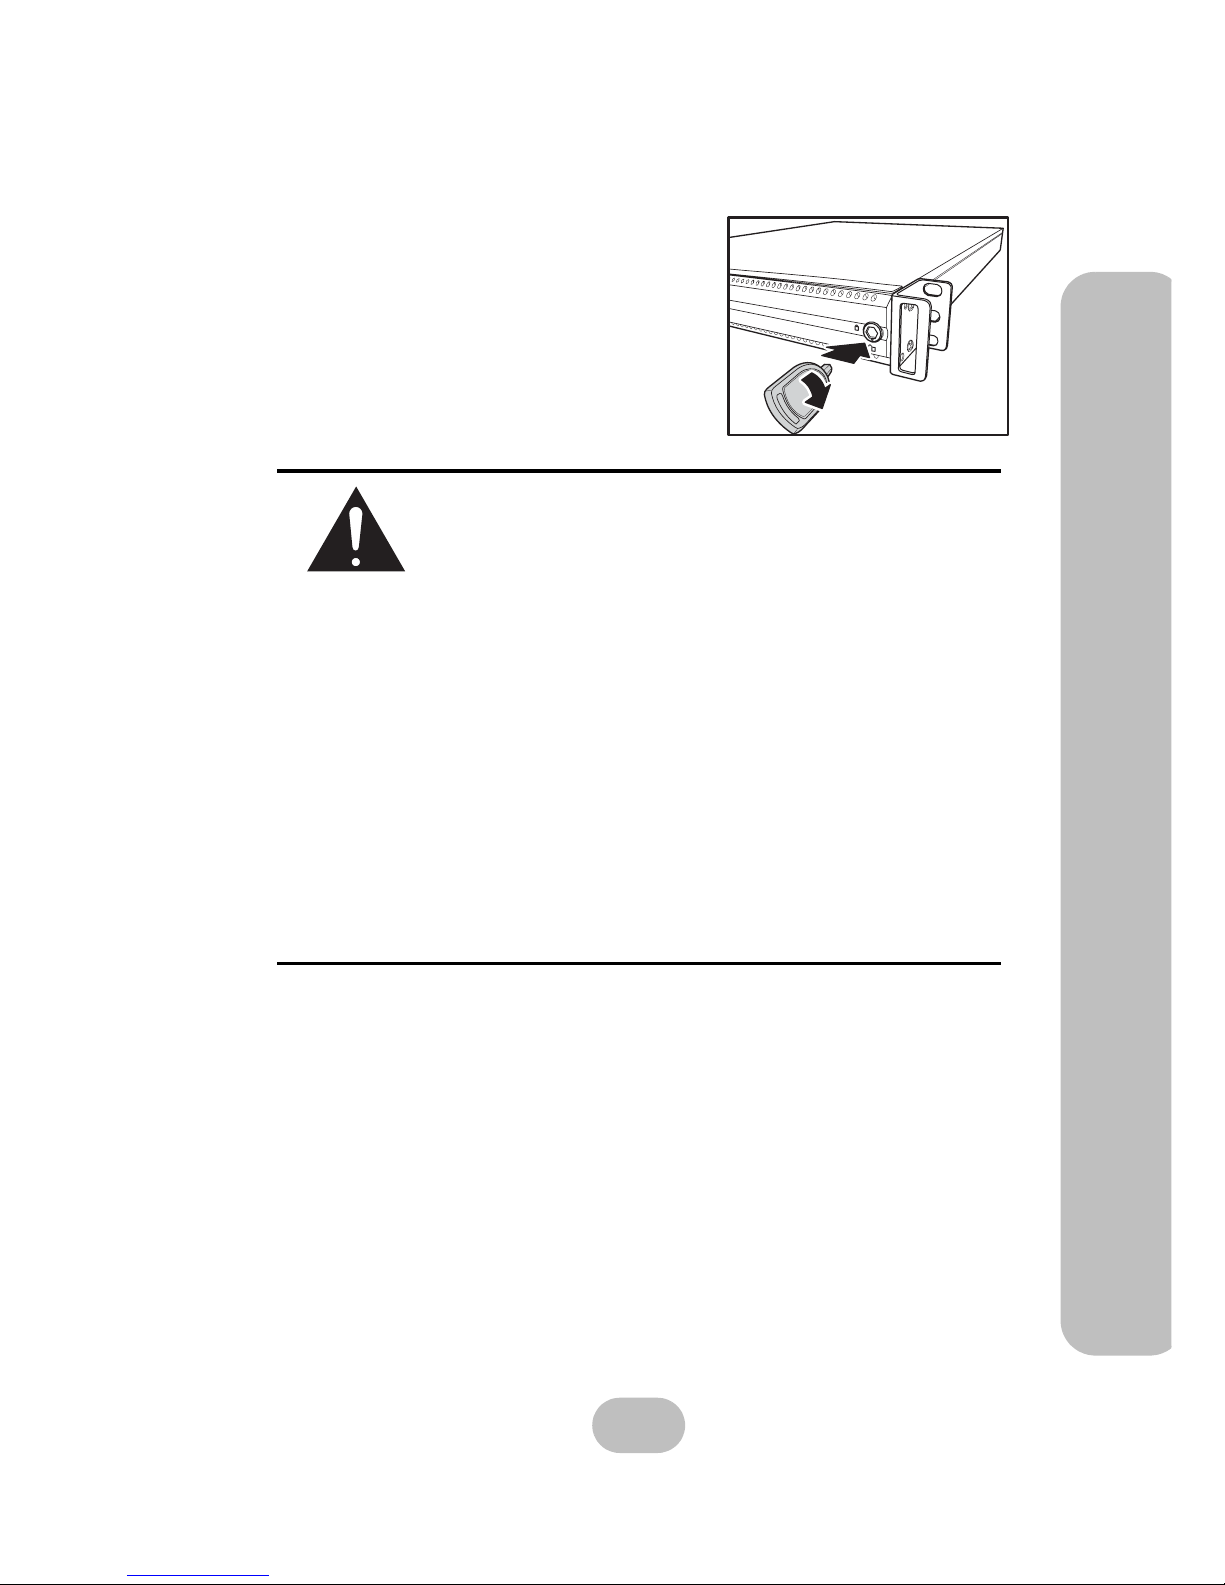
1. Unlock the fornt panel door lock.
2. Open front panel door softly till face down.
3. Press the silver button to release caddy handle
(four caddies).
4. Pull out HDD caddy by handle (four caddies).
8
Maxtronic Orion 410SR User Guide
Hardware Installation
5. Placed hard disk into HDD caddy firmly.
6. Screw in at lease 4 screws to fixed the hard disk in
proper position. In order to make correct contact
between hard disk with back plane, please make
sure the screw in position toward to last screw
hole near end.
7. Slide in HDD caddy with installed hard disk back
into system softely.
8. Till the HDD caddy fully connected with back
plane then press down handle to lock the caddy
safely.
9. Repeat the steps above till all hard disk been
installed finished.
Maxtronic Orion 410SR User Guide
9
Hardware Installation
10. Now you could push back the front panel door
and locked for next setp.
Do not install the HDD(s) into the Orion 410SR NAS System while it’s powered off under any conditions.
The following are exceptions:
1. The HDD(s) have been initialized by the same Orion 410SR
and have been performing daily routine tasks.
2. Performing “Disk Ro aming” procedure to reduce system
down time.
To perform “Disk Roaming“:
a. Power off the old NAS system.
b. Execute Factory Default on the new NAS system and
then power it off.
c. Remove the HDD(s) from the old NAS system.
d. Insert the HDD(s) into the new NAS system. Please be
sure the model and firmware of the new system are the
same as the old one.
e. Power on the new NAS system and Disk roaming is com-
plete.
Hot plugging previously initialized HDD(S) will overwrite existing
user configurations, RAID settings, an d any da ta in the drive.
10
Maxtronic Orion 410SR User Guide
Mounting in a Rack
Mounting in a Rack
When the disk array system is completely set up, it can be installed in a standard 19 inch rack.
Follow the instructions in this section to install the disk array system in a rack.
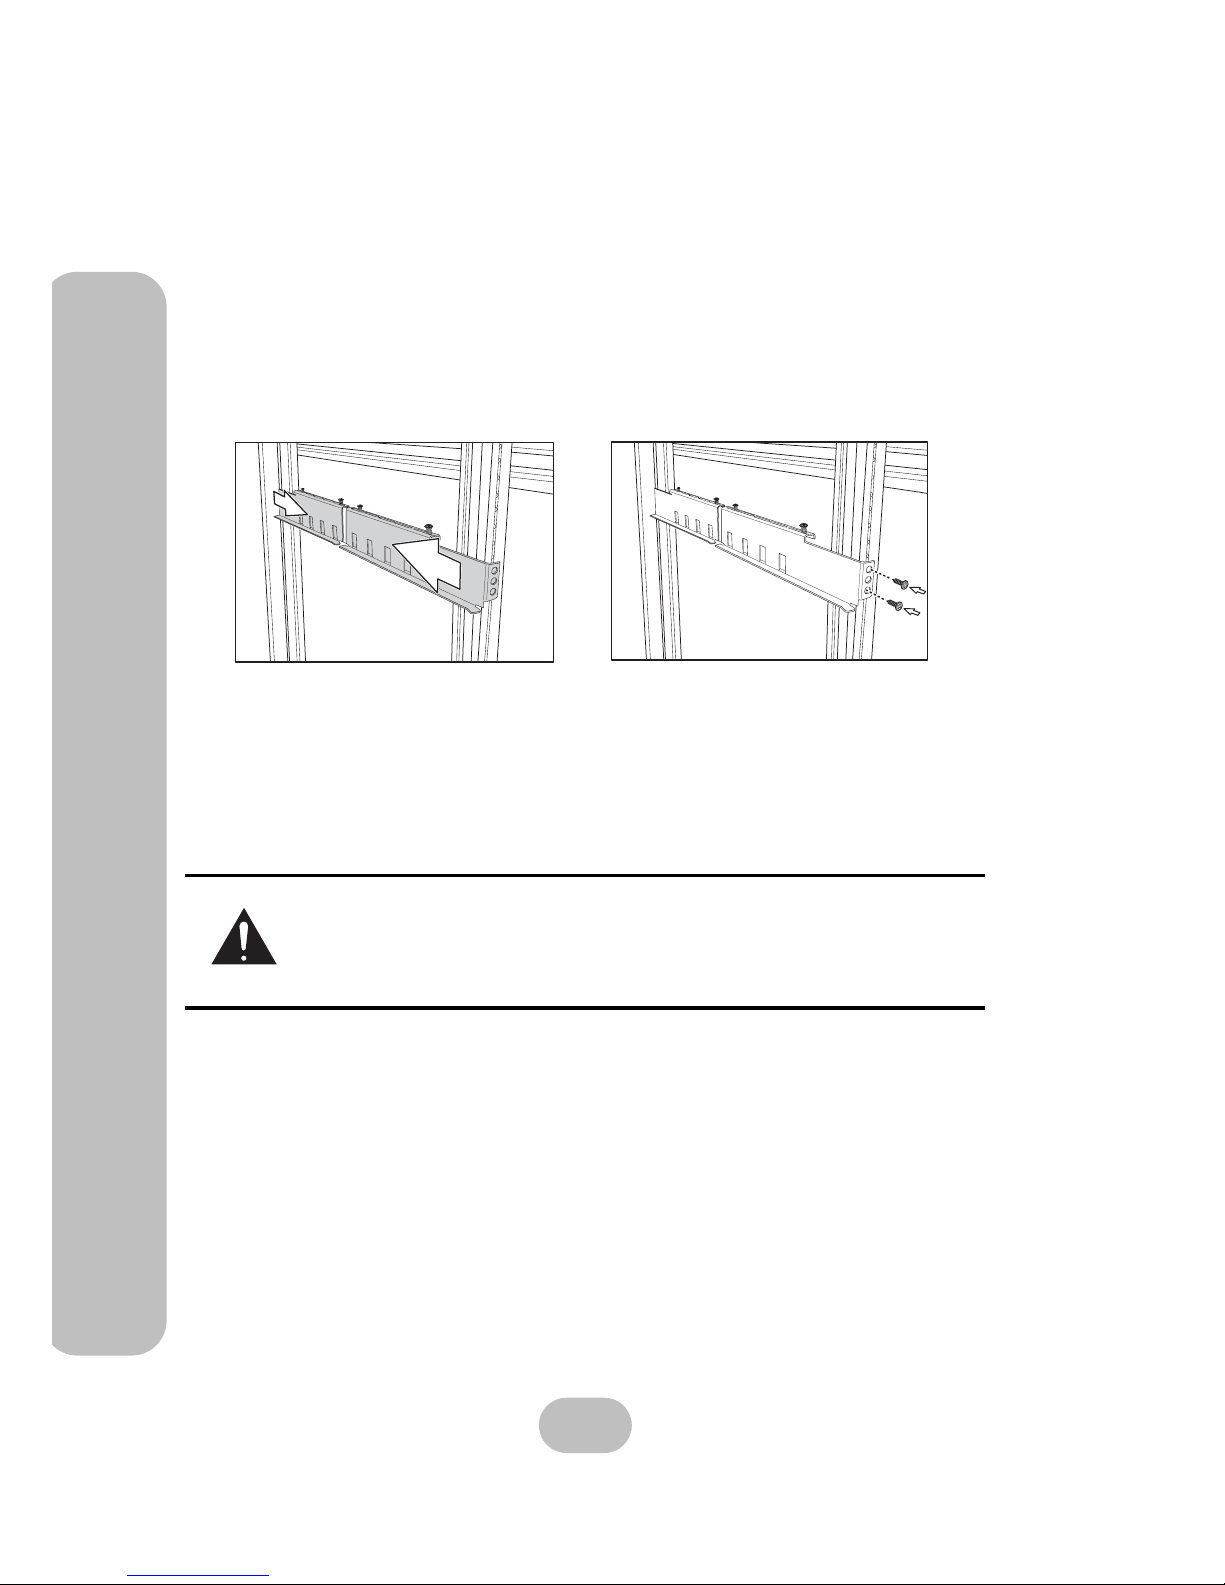
1. Clip eight rack unts supplied with your rack, into the rack, taking care that they correspond with the mounting points on the rails.
2. Extend both of the rails so that they are the right length to fit in your rack.
3. Bolt the rails into the rack using the rack bolts supplied with your rack.
You will need four nuts and bolts (not include) for each rail; two at the front and two at the
back.
4. Tighten the locking screws when they are correct length.
5. Slide the disk array system into the rack and bolt it into place with the supplied fixing
screws.
Caution
This product is heavy. Attempting to install the NAS system in a rack by
yourself could result in injury or damage to the product.
Maxtronic Orion 410SR User Guide
11
Installing the Rail Extenders
Installing the Rail Extenders
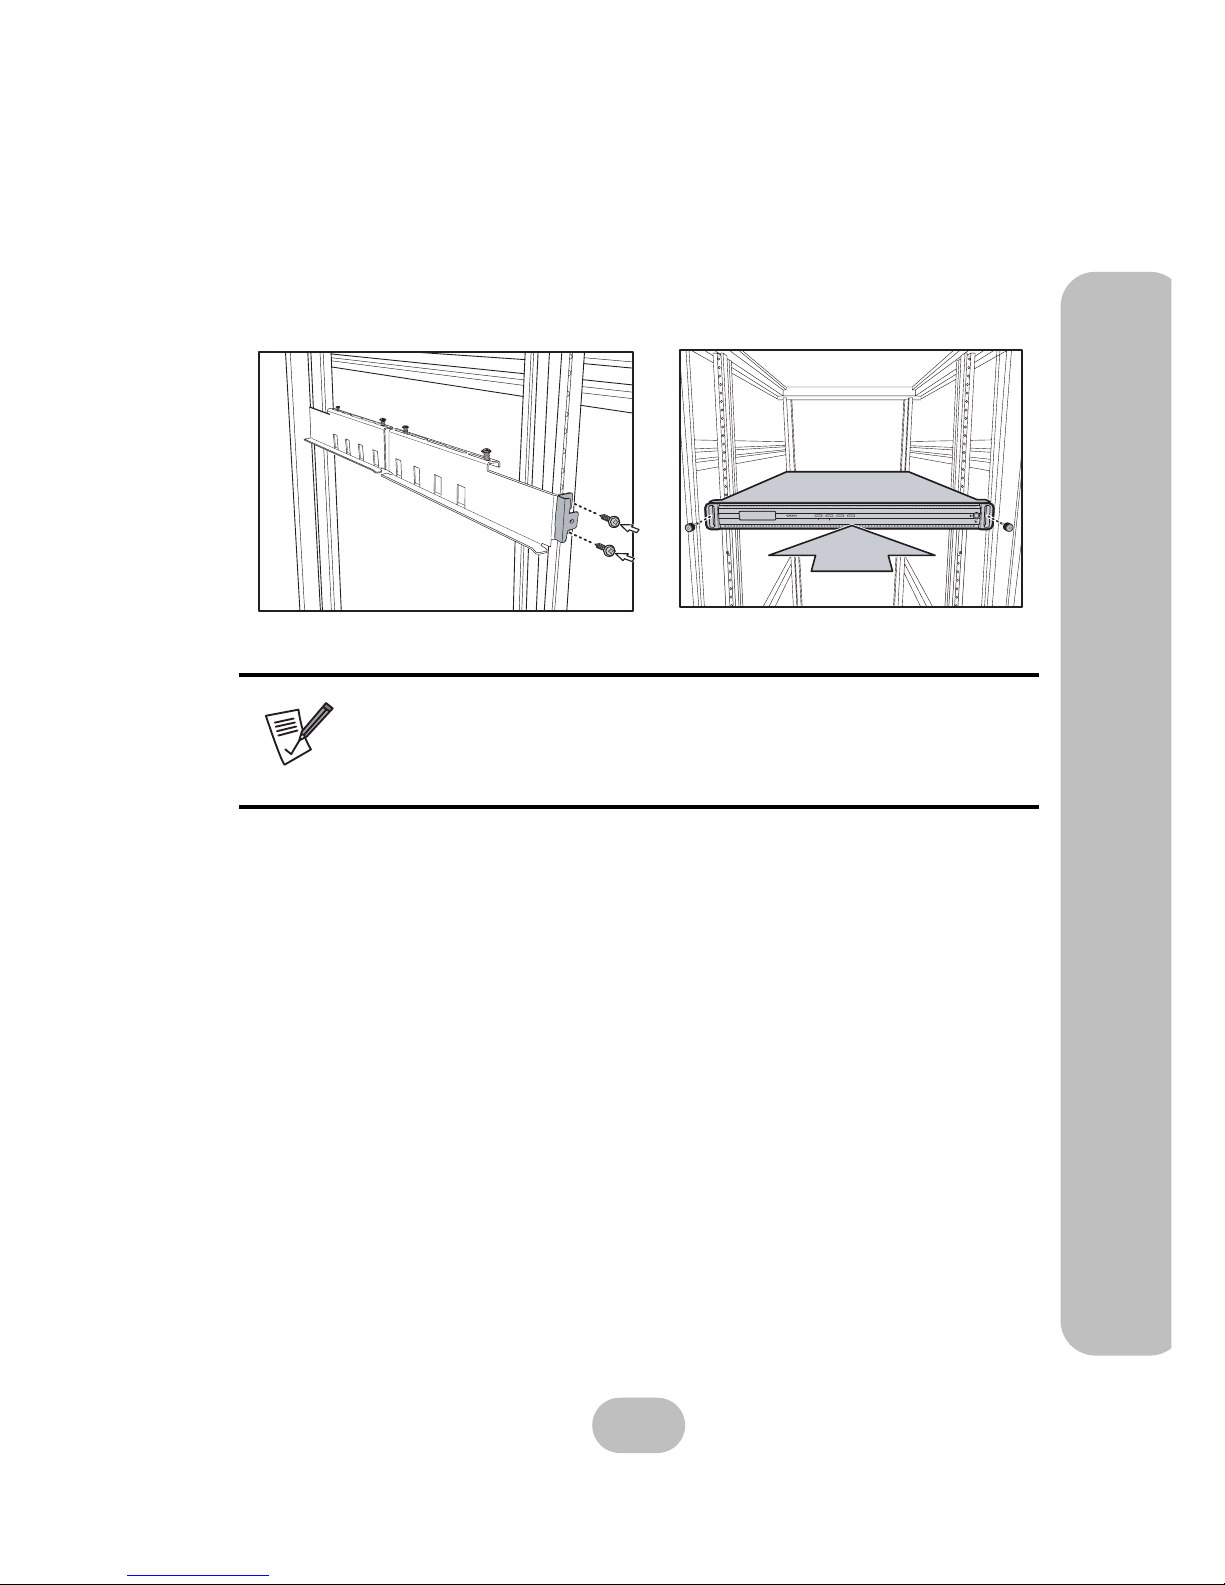
Follow these instructions to fit the rail extenders if required.
1. If required, bolt the rail extenders into place as shown using the small bolts provided.
2. Slide the disk array system into the rack and bolt it into place with the screws.
Note
The rail extenders may be required to allow the NAS system room for the
front door to open correctly.
ESCEnter
Power
P/S
FailAccess
12
Maxtronic Orion 410SR User Guide
Using the Front Control Panel
Using the Front Control Panel
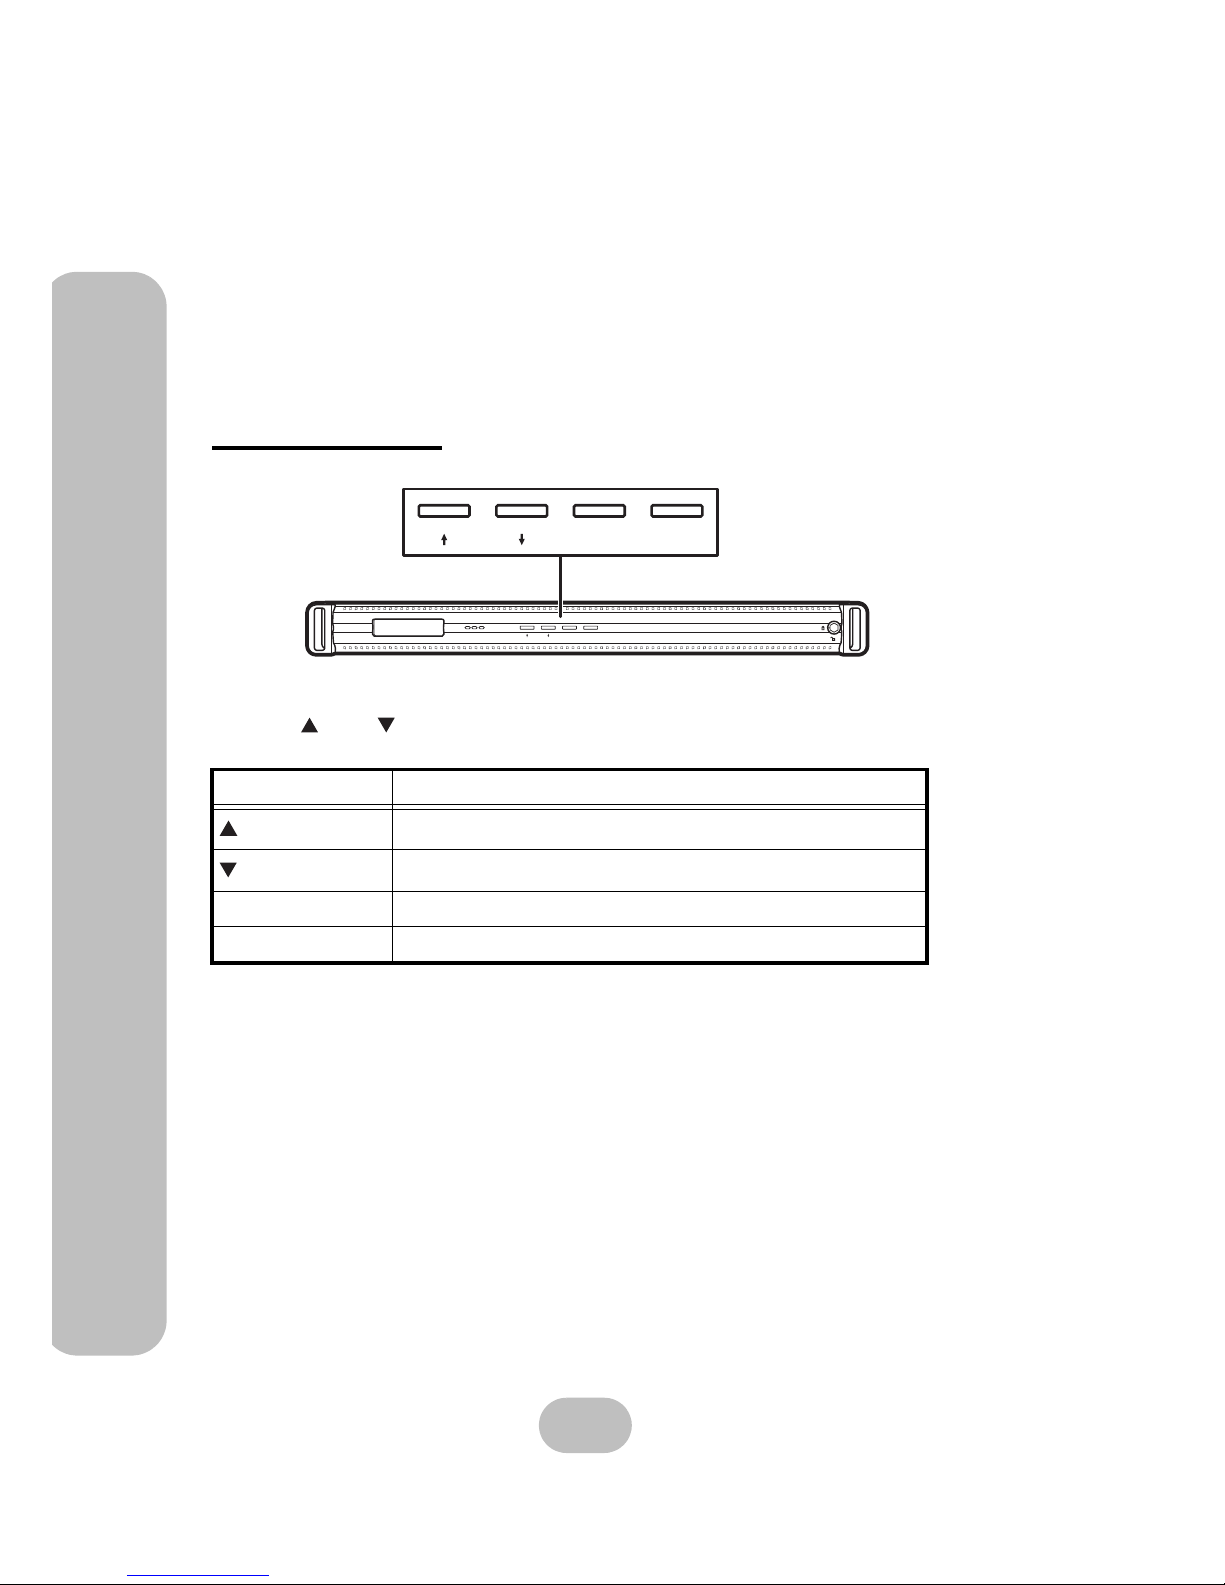
By using the front control panel of the Orion 410SR, the user can easily configure basic system settings.
Elements contained in front control panel:
• 4 control buttons
• 3 LED indicators besides control buttons
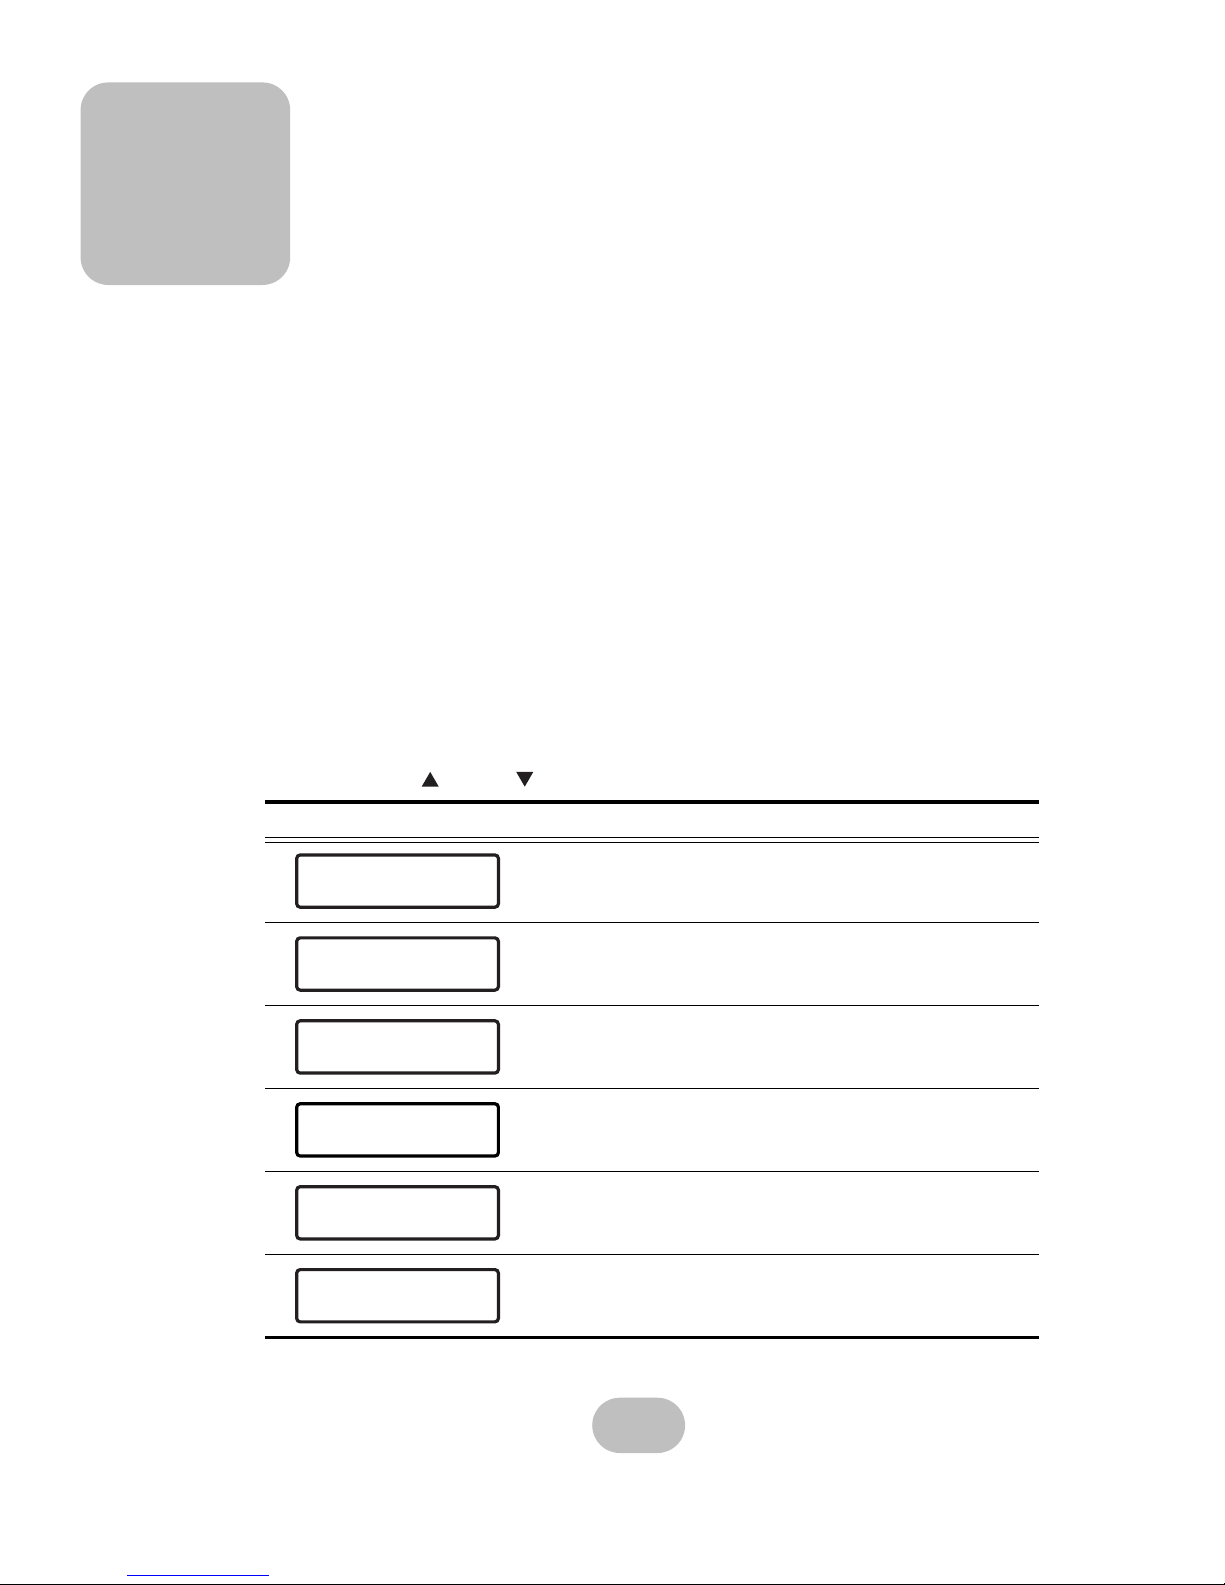
Control buttons
Use the up , down , Enter, and ESC (escape) buttons to configure settings and view menus
in different layer.
Button Description
Up
Move to next item of setting menu
Down
Move to previous item of setting menu
Enter Enter the selected menu and confirm the selection
ESC (Escape) Escape and return to the previous layer of menu
Power
P/S
Fail Access
ESCEnter
ESCEnter
Control buttons at front panel
Maxtronic Orion 410SR User Guide
13
Using the Front Control Panel
LED indicators
LED Color Description
Power Green
Shows the Orion 410SR is powered on and is
operating normally.
P/S Fail Red
With Redundant power supply model, it will turn
red when power failed
Access Orange
If the indicator is flashing, the Orion 410SR is connected to the Network.
If the indicator is off, please check all connections.
ESCEnter
Power
P/S
Fail Access
Power
P/S
Fail Access
Power LED indicators at front panel

14
Maxtronic Orion 410SR User Guide
Using the Front Control Panel
15
3 Orion410SR System Setup
This chapter introduces how to use the front control panel to configure basic hardware setup.
System Boot-up
Every time the Orion 410SR is booted, the system will automatically performs self configuration. This includes checking system memory size, HDD detecting, Network connections, and
other system applications. This is to ensure normal system operation.
After the self-configuration is complete, various system parameters will continually show on
the front control panel LCD screen while the Orion 410SR is operated normally.
Each parameter is displayed for about 2 seconds on the LCD screen, including:
• Product model name
• System name (can be changed later)
• CPU temperature and system fan 1&2 speed (RPM)
• Time/Date
• Ethernet IP address
System Setup
By pressing the up or down button, users can configure system information.
LCD screen display Description
Product model name
Ethernet IP address
System memory size information
CPU and processor frequency information
Use this function to reset the default administra tor p assword
Use this function to reset to factory default settings
Orion 410SR
Ethernet CHO
10.0.10.103
System mem Size
256 MB
Geode (TM) Integr
500MHz
Passwd Reset
For Admin Passwd
Factory Default
Restore Settings

16
Maxtronic Orion 410SR User Guide
System Setup
System Login
Press the ENT button on the front control panel and enter password to access system settings.
Main Menu
After the administrator password is entered, the main menu screen will be displayed on the
front control panel LCD screen. Three system setup items are under the main menu:
•Network
•System
•Misc
1 Network Menus
11 Channel 0
Press ENT to proceed.
111 CH0 Status
1. Press ENT button to enter ‘00000000’ (8 zeros).
2. Press ESC button to confirm and enter the main menu.
• The default administrator password is ‘00000000’ (8 zeros).
• To change the administrator password, please refer to “Misc” on page22.
The administrator can change network settings under
this menu.
Since the Orion 410SR provides only one LAN connector, only ‘Channel 0’
will be shown.
1. Press ENT to view detailed CH0 status informa-
tion.
2. If the LAN cable is connected, an
‘ON CONNECTED’ message will be displayed.
Enter Passwd
000
1Network
11Channel 0
11Channel 0
111CH0 Status
ON CONNECTED
111CH0 Status
 Loading...