

Page 1

Max Telecom Ltd. | 115 G, Tzarigradsko shousse Blvd. | Megapark, fl. 14 | Sofia 1784 | Bulgaria
tel: 0999 111 | email: [email protected]
1
WiMAX Mobile Router
User Manual
Biscuit
Page 2

Max Telecom Ltd. | 115 G, Tzarigradsko shousse Blvd. | Megapark, fl. 14 | Sofia 1784 | Bulgaria
tel: 0999 111 | email: [email protected]
2
Table of contents
1. Attention ............................................................................................................ 3
2. Introduction ....................................................................................................... 3
3. How to use Device ............................................................................................... 5
4. Configuring Device .............................................................................................. 7
Page 3
Max Telecom Ltd. | 115 G, Tzarigradsko shousse Blvd. | Megapark, fl. 14 | Sofia 1784 | Bulgaria
tel: 0999 111 | email: [email protected]
3
1. Attention
• Keep away from high humidity.
• Use in a clean place.
• Place on a stable platform to avoid dropping.
• Don’t keep around electromagnetic waves.
• Don’t place on heavy things.
• Don’t expose to direct sunlight.
• Don’t throw to avoid breakage.
• Don’t place on hot objects.
• Keep away from pets and children.
• Keep away from water.
• Don’t hold power adaptor with wet hands.
2. Introduction
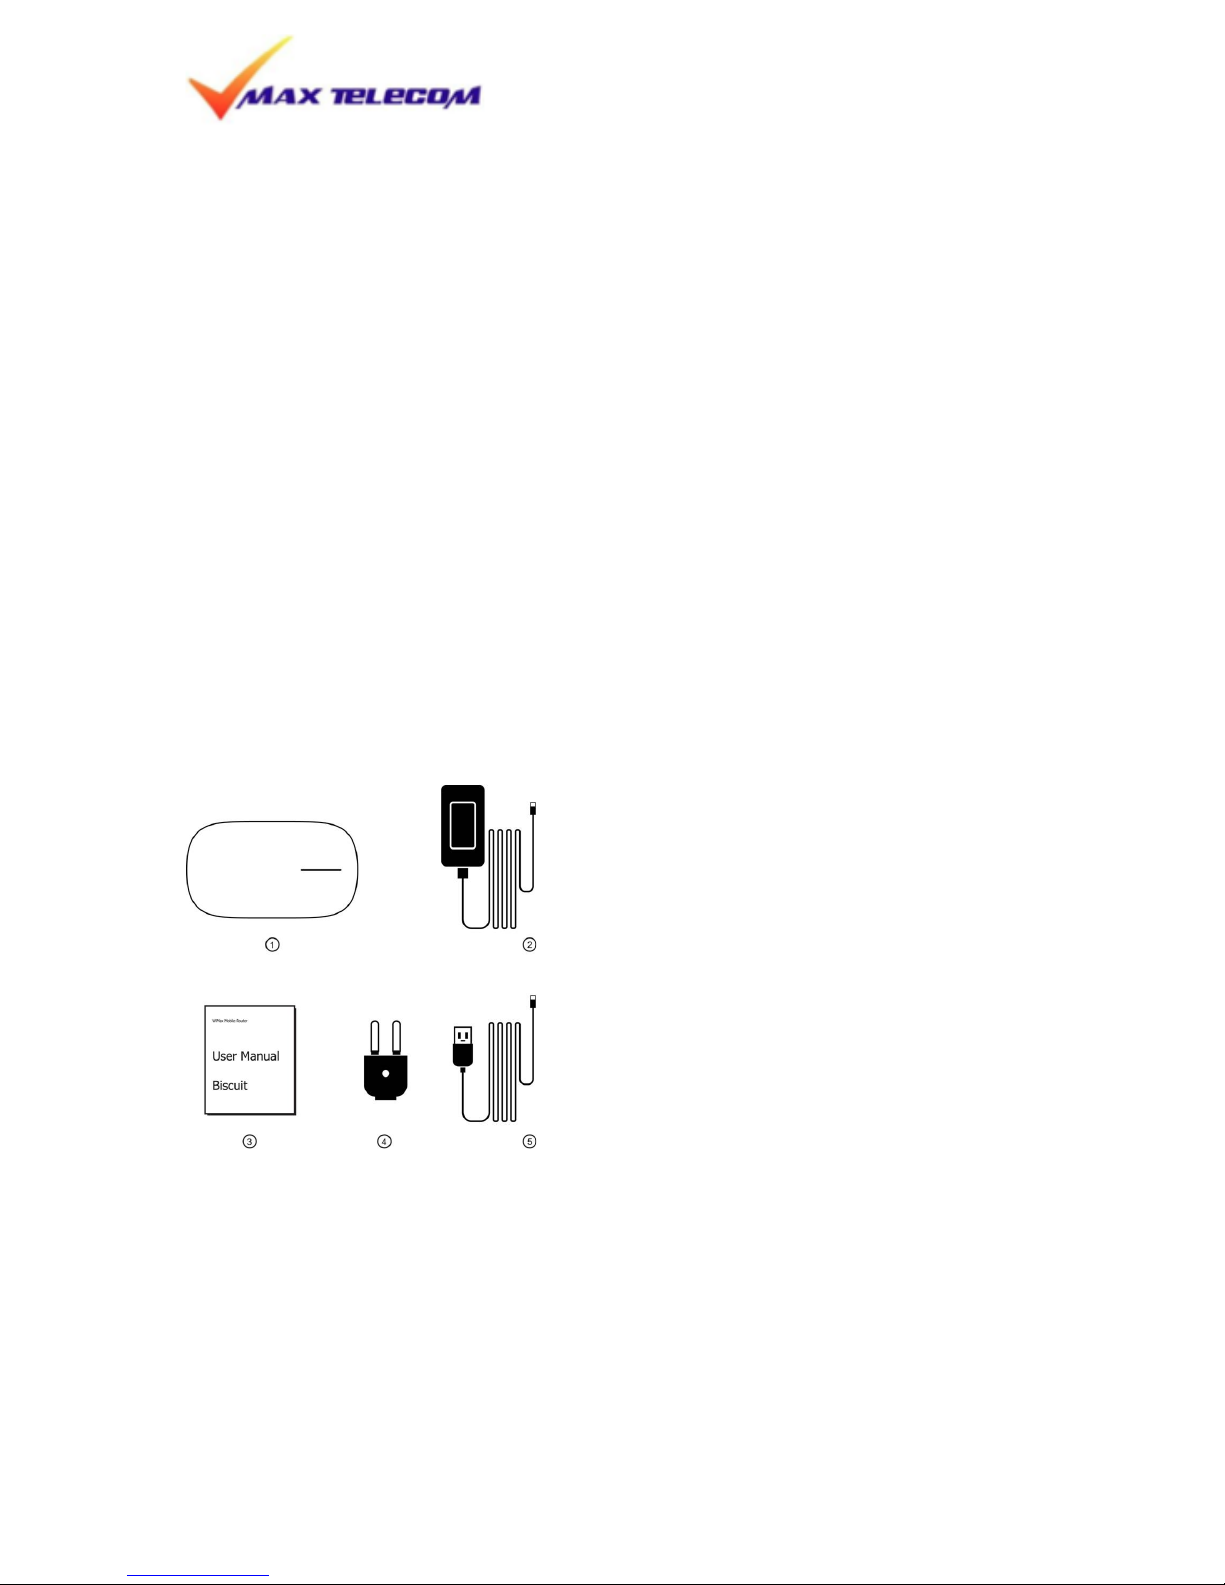
Components List in the package:
1. Main unit;
2. Charger [5V/2A]
3. User’s Manual
4. Plug
5. USB Cable
6. Pouch
Page 4
Max Telecom Ltd. | 115 G, Tzarigradsko shousse Blvd. | Megapark, fl. 14 | Sofia 1784 | Bulgaria
tel: 0999 111 | email: [email protected]
4
Specification
Items
Description
WiMAX
WiMAX Standard Compliance
IEEE 802.16e-2005
Air Interface
Internal Antenna(0dBi)
Max output Power
23dBm
WiFi
Network Standard
IEEE 802.11 b/g
Frequency/Channels
2.4GHz/12Ch.
Power
Battery
Built-in LiPolymer(3.7V/2700mA)
Adaptor
5V / 2A
Dimension / Weight
110mm×64mm×18mm / 120g
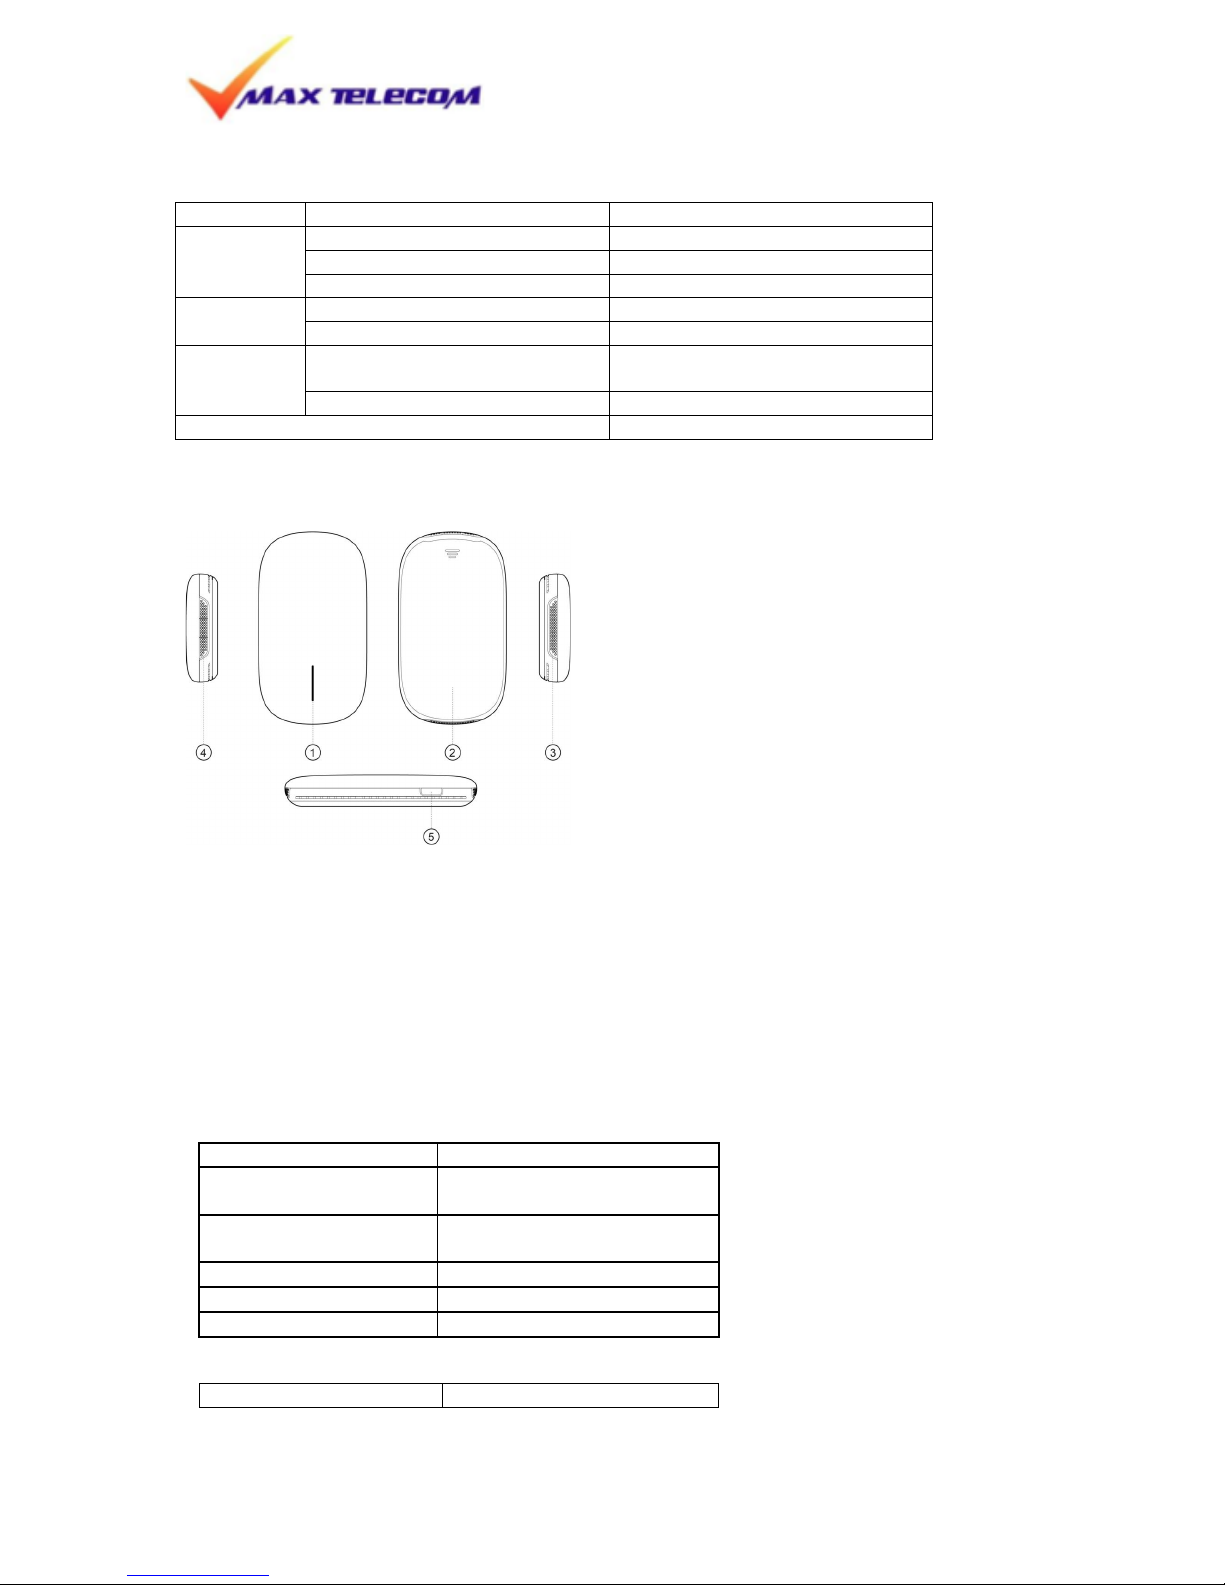
① Status LED : WiMAX signal status and WiFi status LED
(Color : Blue / Yellow / Green / Red)
② Battery Cover
③ Ventilation Hole
④ USB Port : Battery charging and Tethered operation
⑤ Power button and Battery Status : Power turn On/Off and battery status
LED indication
WiMAX Signal LED
LED Off
Power Off
Yellow LED On and Off
Frequency scanning or
ready
Red LED On and Off
Connecting with WiMAX
network
Red LED On
WiMAX signal level 1
Yellow LED On
WiMAX signal level 2 ~ 3
Green LED On
WiMAX signal level 4 ~ 5
WiFi LED
WiFi AP On
Blue color
Page 5
Max Telecom Ltd. | 115 G, Tzarigradsko shousse Blvd. | Megapark, fl. 14 | Sofia 1784 | Bulgaria
tel: 0999 111 | email: [email protected]
5
Power LED
Battery status (100%
~ 60%)
Green color
Battery status (60% ~
30%)
Yellow color
Battery status (30% ~
0%)
Red color
Battery charging
Red color
Battery full charged
Green color
3. How to use Device
Power ON/OFF
Power ON : Push and hold power button until WiMAX LED turn on
Power OFF : Push and hold power button for 5 seconds and release power button
Factory Reset: Push and hold power button for 15 seconds
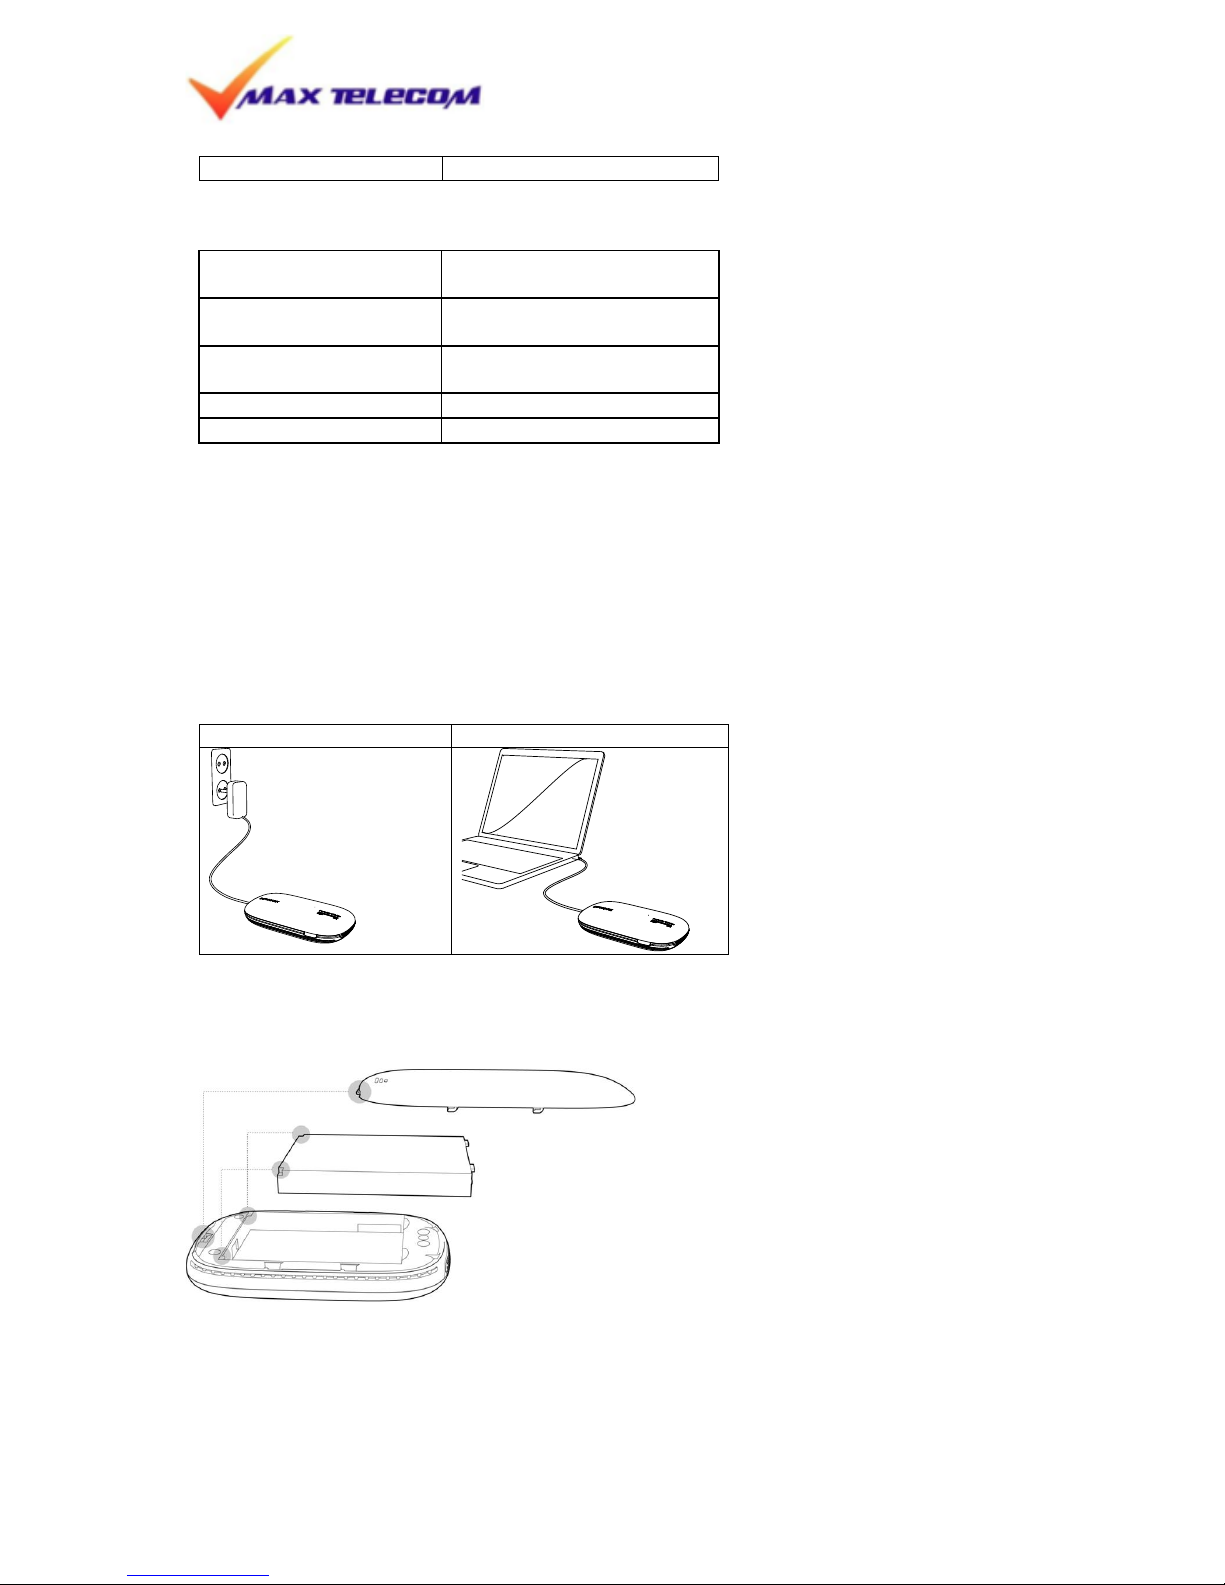
How to charge battery
Using Power Adaptor
Using USB Cable from PC
How to insert Battery in device
Page 6
Max Telecom Ltd. | 115 G, Tzarigradsko shousse Blvd. | Megapark, fl. 14 | Sofia 1784 | Bulgaria
tel: 0999 111 | email: [email protected]
6
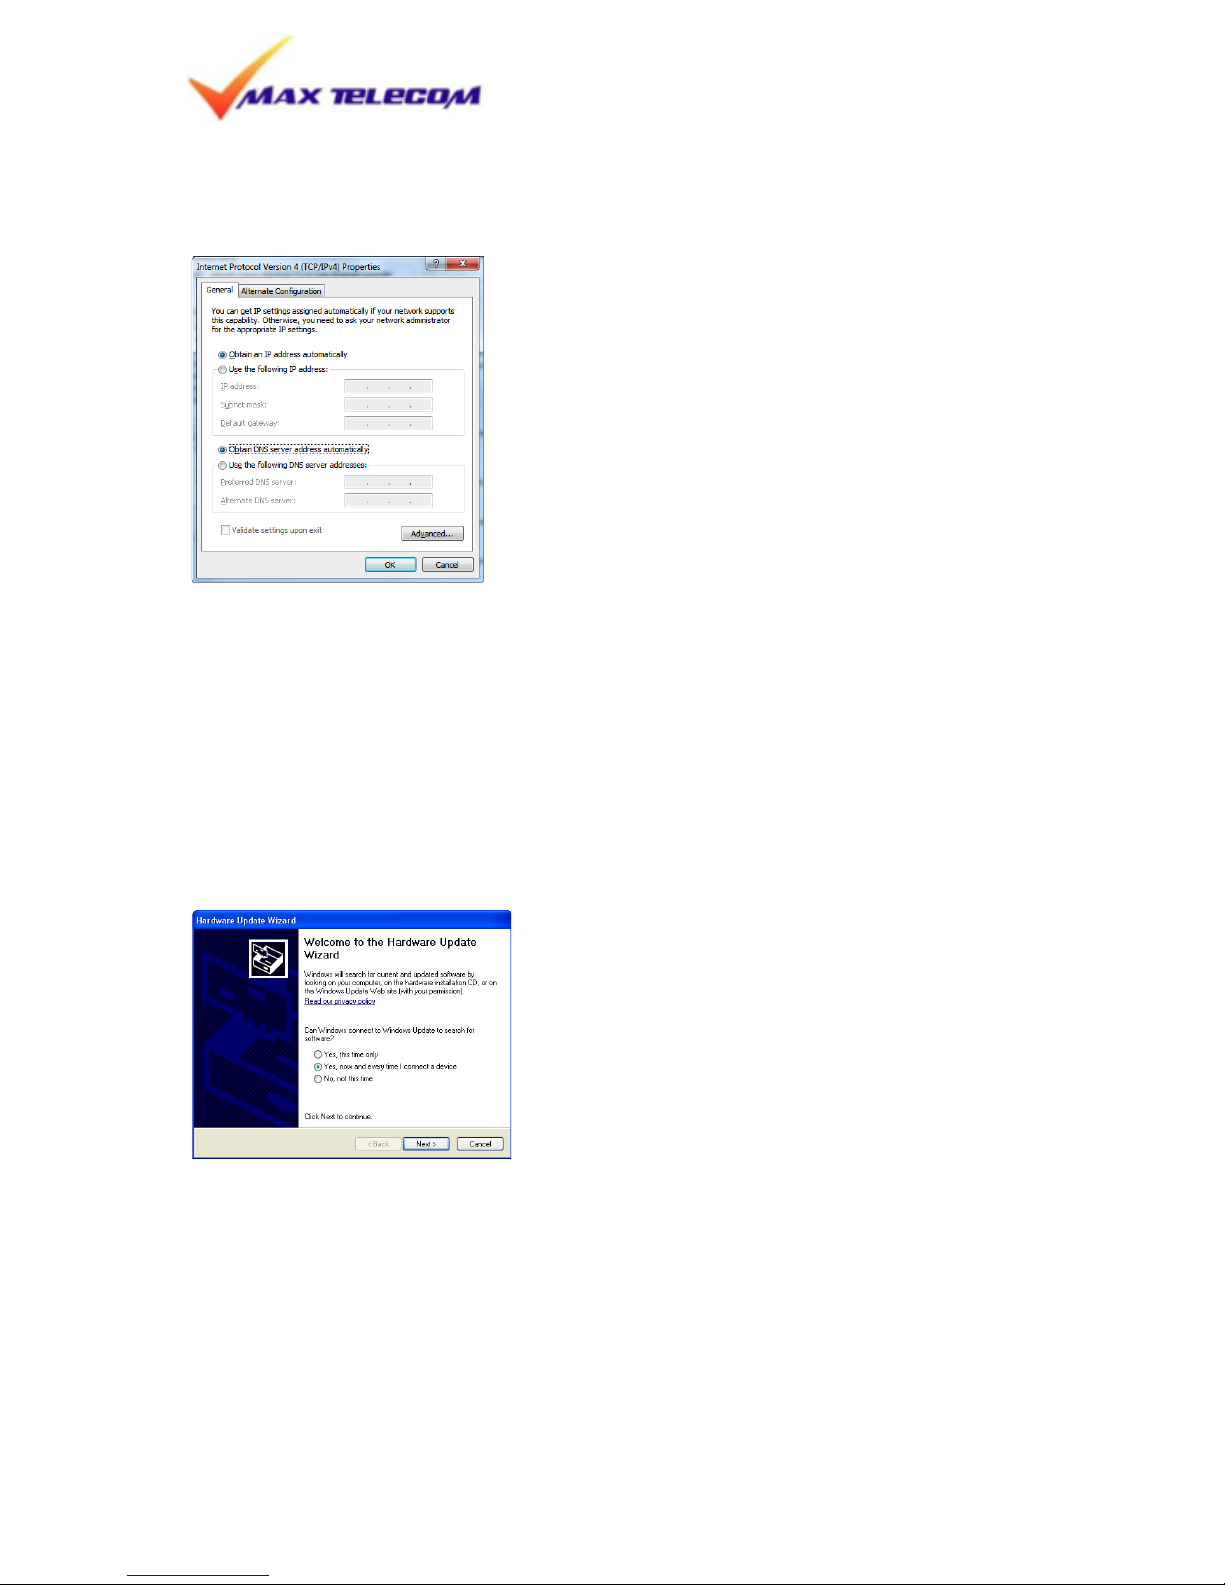
Setting of the WiFi AP
Notice : Configuration of WiFi AP has to be set to “Obtain IP address and DNS server
address automatically”.
Settings of USB (RNDIS)
Notice :
1. Over WiFi
Your PC is connected to web server of MOBILE ROUTER through WiFi.
RNDIS driver can be downloaded from web UI page of MOBILE ROUTER.
2. Over USB Cable
RNDIS driver can be installed into your PC over USB cable.
Settings with Window XP
1. MOBILE ROUTER should be connected with PC by USB cable.
2. Below are the RNDIS installation steps
[Additional function - “CD-ROM”mode and “RNDIS” mode]
This function is very useful where the PC has no in-built WiFi interface.
The MOBILE ROUTER’s default is “CD-ROM” mode and the default setting can be changed
For ”RNDIS” mode when pushing power button 3 times within 3 second and LED will flash
yellow color three times.
Page 7
Max Telecom Ltd. | 115 G, Tzarigradsko shousse Blvd. | Megapark, fl. 14 | Sofia 1784 | Bulgaria
tel: 0999 111 | email: [email protected]
7
4. Configuring Device
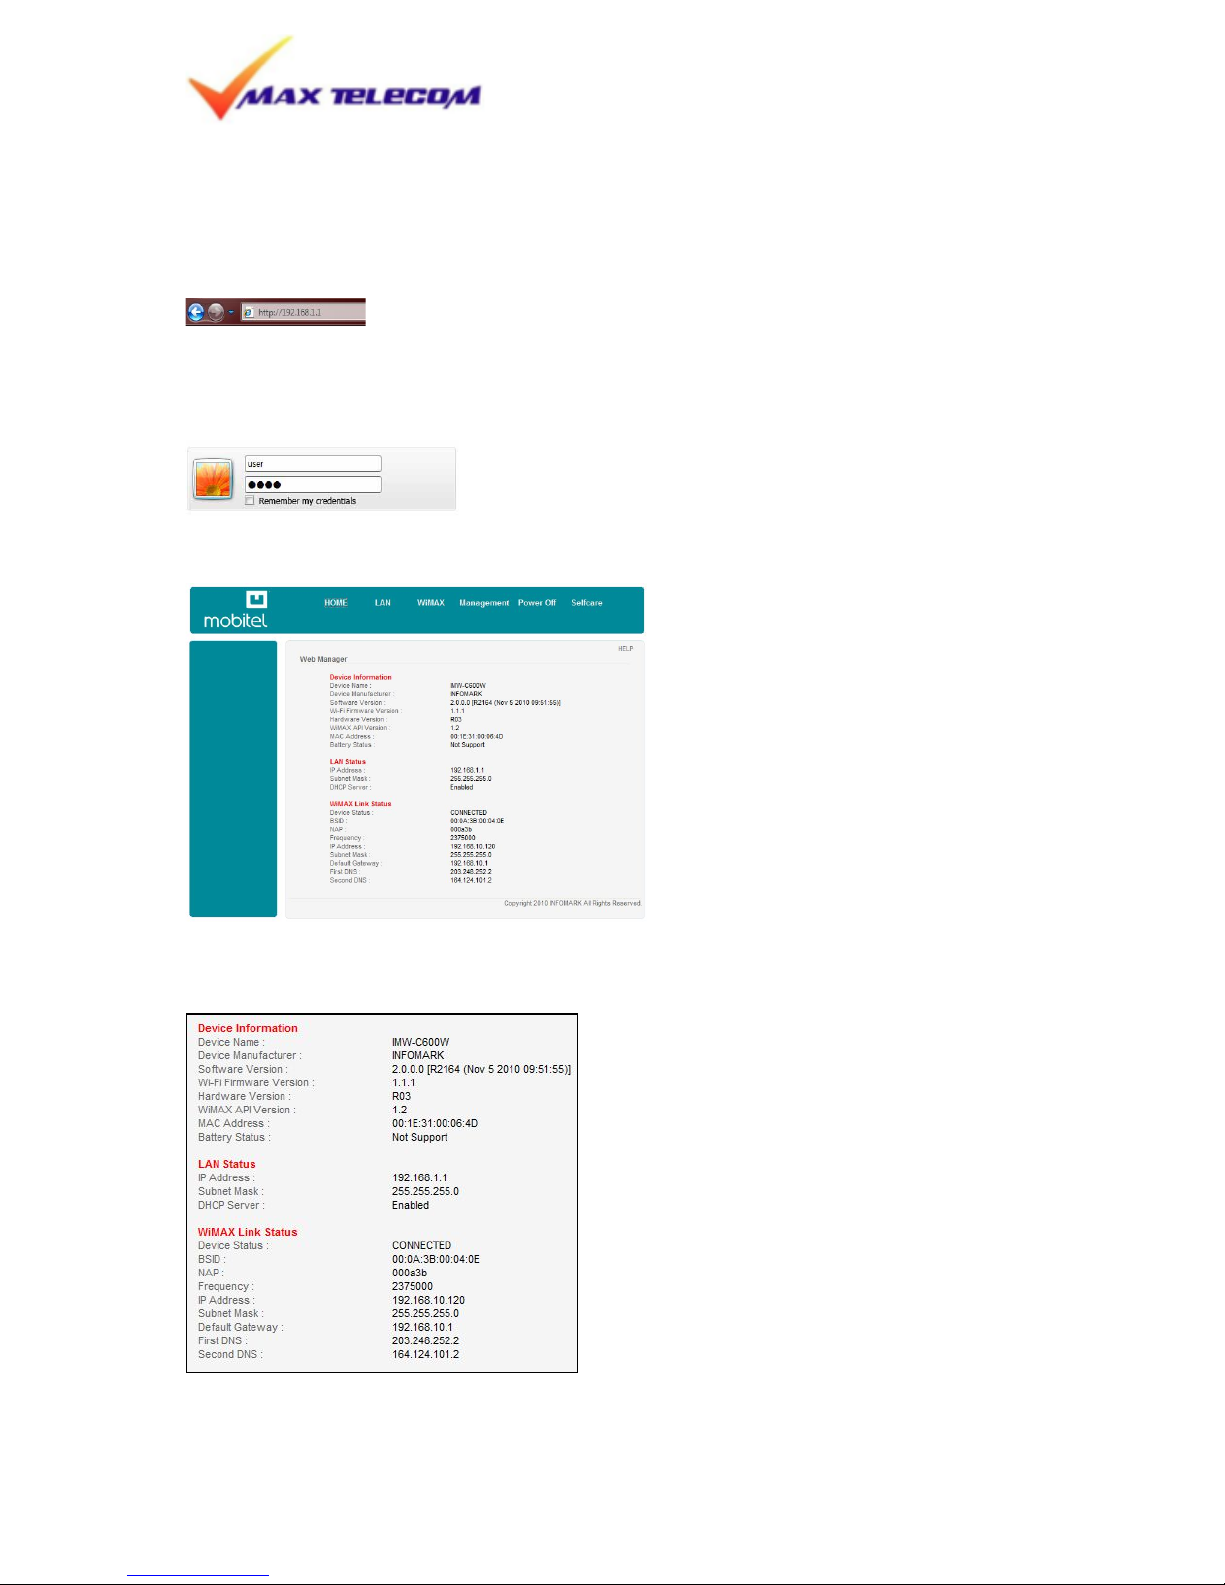
Connect to Web User Interface (Web Connection Manager)
Start Web User Interface
- Use web browser to connect Web User Interface
- Type Address 192.168.1.1
Input ID/Password
- A Pop-up window will request for specific ID and Password to enter into Web CM
ID : user / Password : user
* User password can be modified. Please see Management section
- Home of Web UI
Main Menu bar: User can choose settings of LAN, WiMAX, Management and Power off
Home
- Device Information
Page 8
Max Telecom Ltd. | 115 G, Tzarigradsko shousse Blvd. | Megapark, fl. 14 | Sofia 1784 | Bulgaria
tel: 0999 111 | email: [email protected]
8
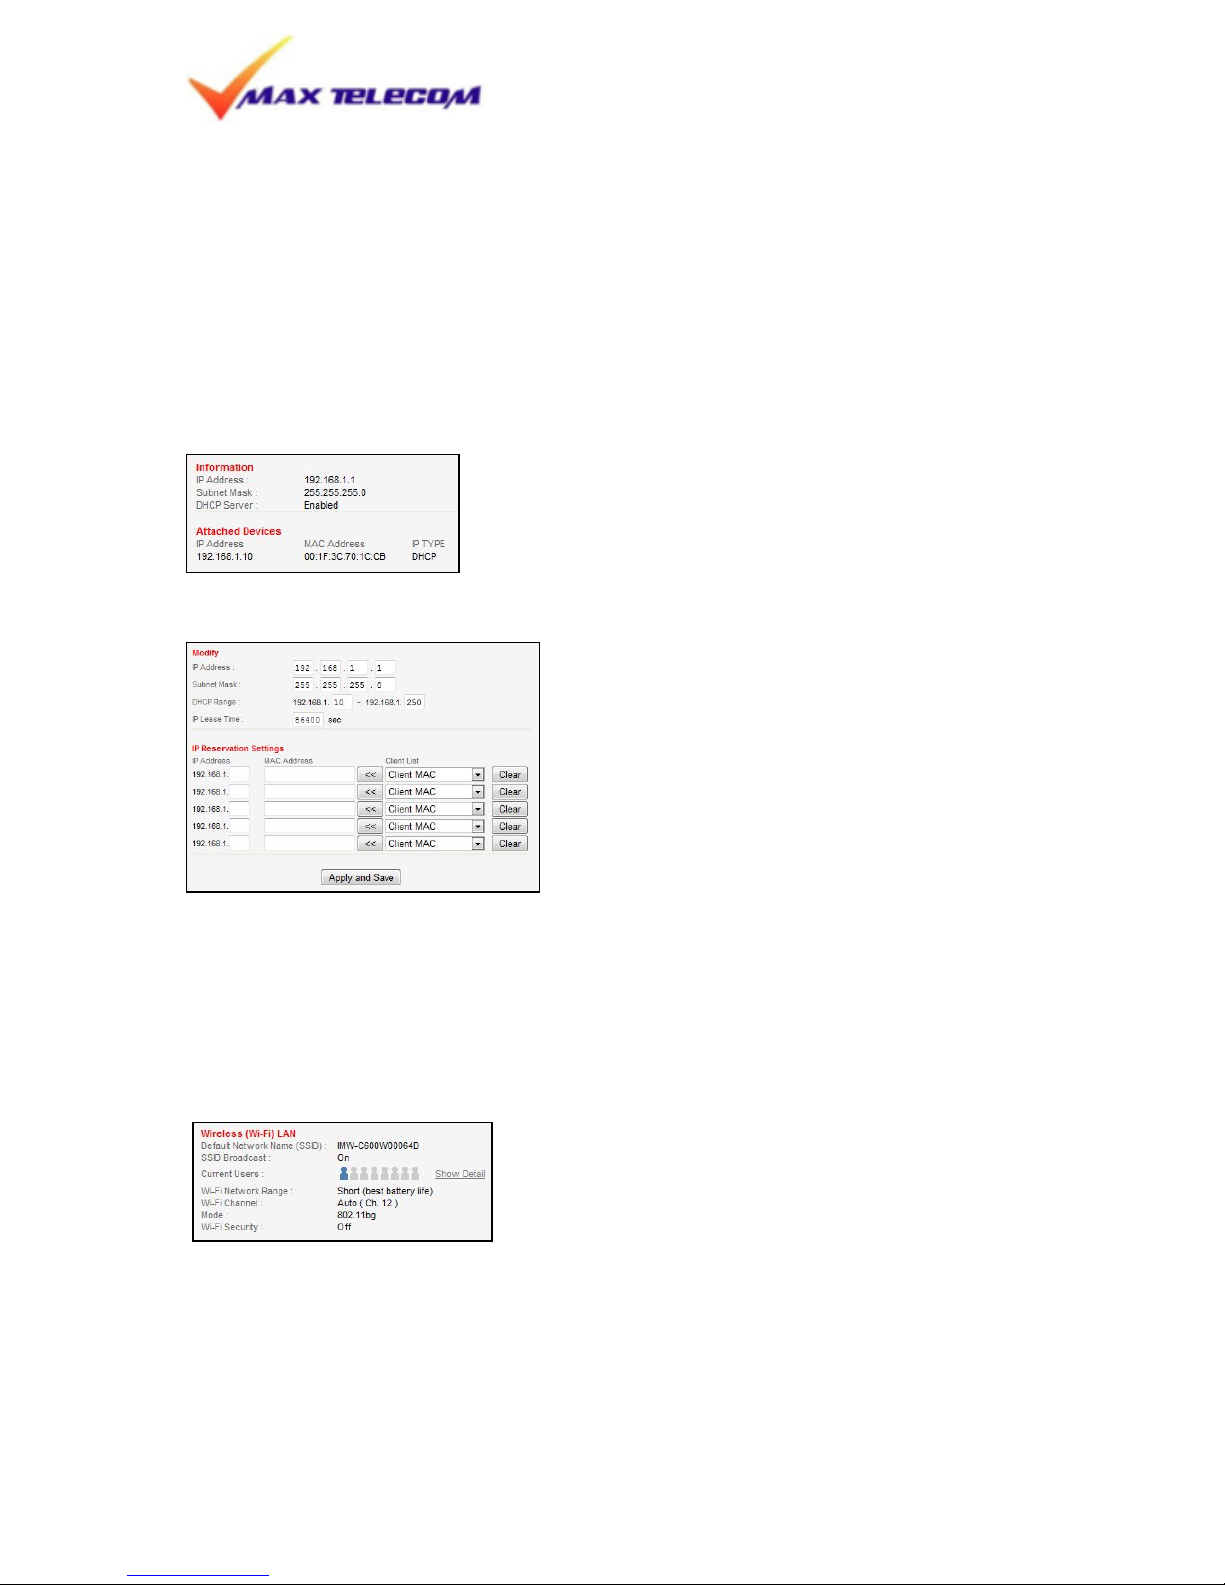
It shows description of Device such as name of device, manufacturer, software version,
hardware version, API version and MAC address
- LAN Status
It shows IP Address, Subnet Mask and setting of DHCP Server
- WiMAX status information
It shows connection status of WiMAX and Network
LAN
- LAN Status
It shows web address of local area network information.
- LAN Setting
Modify:
Input desired IP address and subnet mask that user wants to use for Local Area Network
Attached Device
This shows device and MAC Address is currently attached to biscuit
IP Reservation Settings
It is to assign IP address of device with MAC address
- WiFi Status
It shows Wi-Fi’s Status information
- WiFi Setting
Page 9
Max Telecom Ltd. | 115 G, Tzarigradsko shousse Blvd. | Megapark, fl. 14 | Sofia 1784 | Bulgaria
tel: 0999 111 | email: [email protected]
9
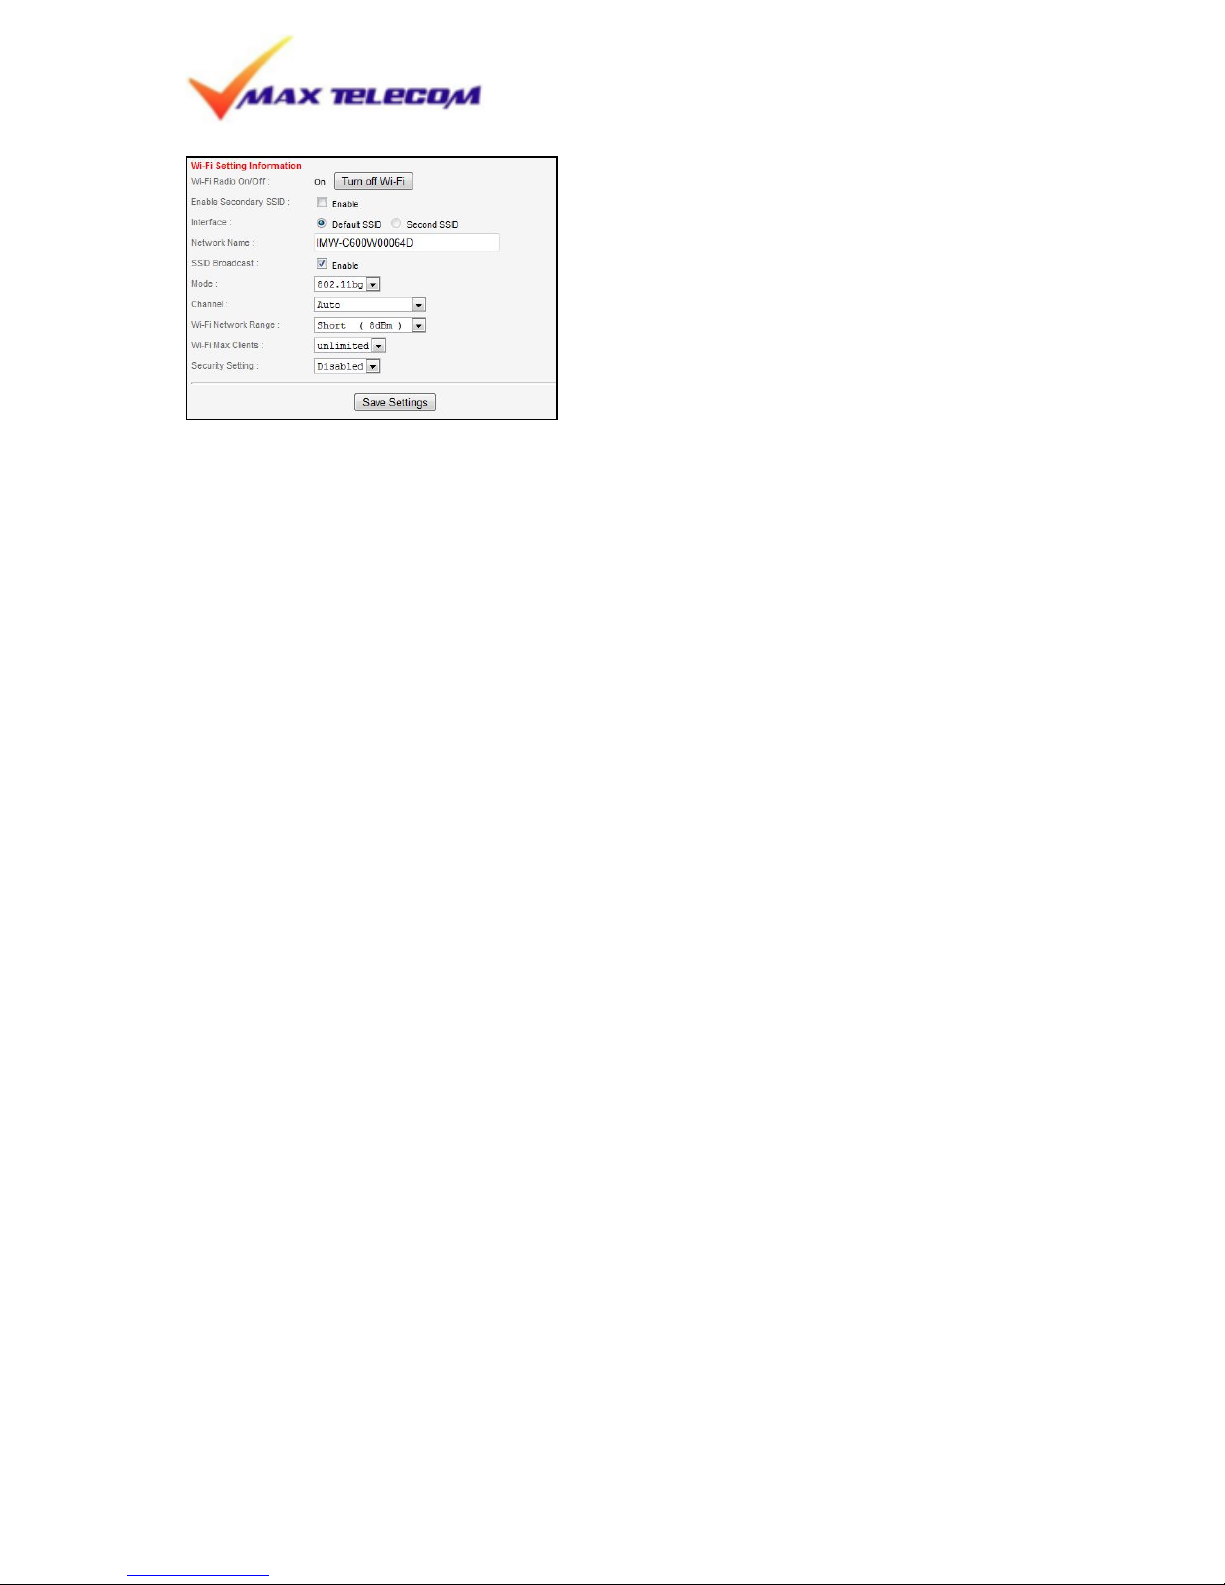
Wi-Fi Setting Information
User can turn off Wi-Fi when USB mode is used. Please do not turn off Wi-Fi when it is the
only communication method.
Enable Second SSID
The portable router provides two SSID at a time. When check box is enabled, user can
name second SSDI.
Network Name:
Network Name is identical to SSID, where the client device receives this broadcasted SSID
from their access points The device comes with SSID of ‘KWI-B2200’. This SSID can be
changed as preferred.
SSID Broadcast:
SSID of device cannot be broadcasted by this option
Mode:
User can choose 802.11b, 802.11g or both 802.11b/g as desired
Channel:
User can choose Wi-Fi channel as desired
Wi-Fi Network Range
User can choose Wi-Fi Range as desired.
Wi-Fi Max Clients
User can choose number of client device as desired.
Security Setting:
Default setting of Security is ‘Disabled’. If changed, ‘Save Setting’ button should be
clicked.
WEP (Wired Equivalent Privacy):
This Device provides 64/128 bit encryption for network protection.
Authentication type: In case of selecting WEP, default setting is ‘Auto’.
▶ Auto : This supports both open system and shared key.
▶ Open System: Open system allows link to all clients and permits communication to
clients that have same WEP key.
▶ Shared Key: Shared Key allows link and communication to clients that have identical
shared key as AP.
- Key Length: For user convenience, select 64bit or 128 bit encryption.
Page 10
Max Telecom Ltd. | 115 G, Tzarigradsko shousse Blvd. | Megapark, fl. 14 | Sofia 1784 | Bulgaria
tel: 0999 111 | email: [email protected]
10
- Key Pass Phrase: WEP Key is generated automatically. Input random character to
generate key. Please make a separate note of the key in order to connect to the device.
WPA
This Device provides WPA, WPA2 and also supports both at the same time
▶ WPA(Wi-Fi Protected Access) : WPA protocol implements the majority of the IEEE
802.11i standard. WPA is based on TKIP(Temporal Key Integrity Protocol) and it provides
higher security of wireless communication.
▶ WPA2 : AES(Advanced Encryption Standard) use additional encryption algorithm and it
comply with WAP.
▶ Use Both: It provides both WPA and WPA2 and it is default value when selecting WPA.
- Encryption: It is to encrypt Unicast packets and support Auto, TKIP, AES-CCMP. Default
is Auto.
- Key Pass Phrase: Input WPA key value to blank and click ‘Save settings’
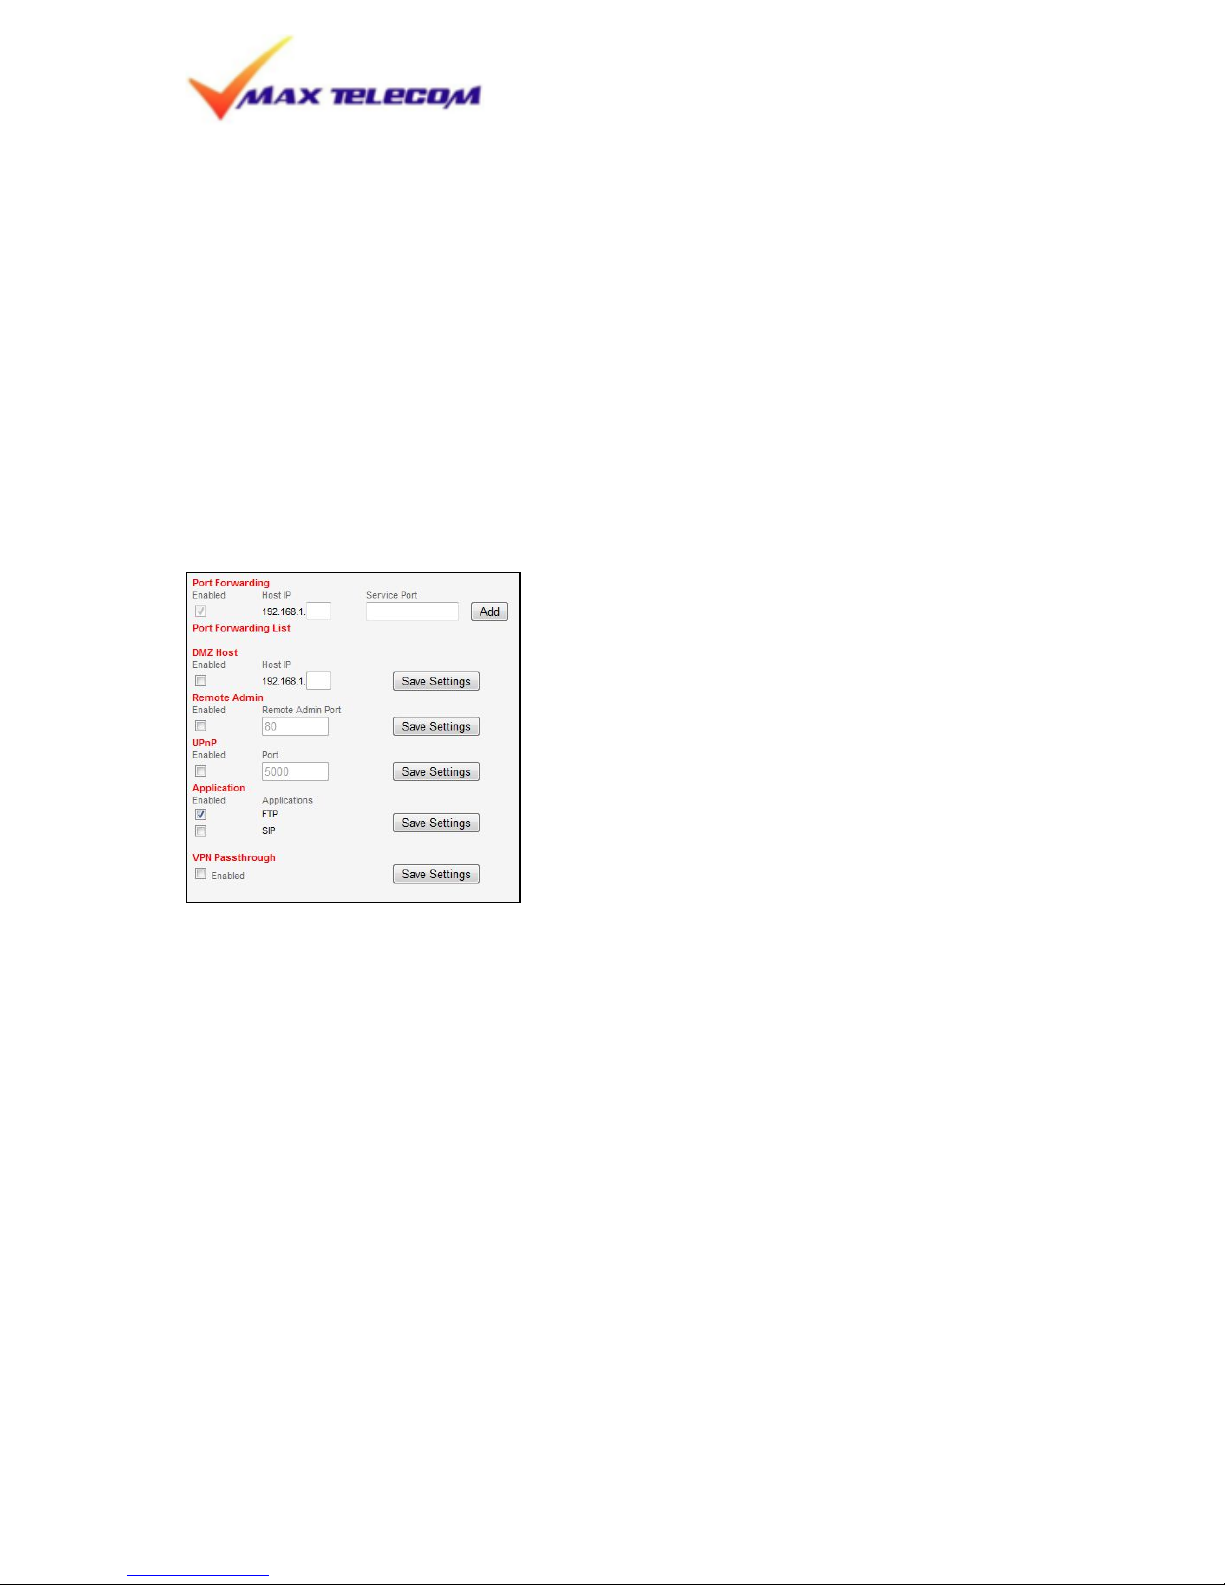
NAT Setting
Port forwarding setting:
Port forwarding is the practice of forwarding a TCP/IP packet in a network address
translator gateway to a predetermined network port on a host within a masqueraded,
typically private network based on the port number on which it was received from the
originating host. The technique is used to permit communications by external hosts with
services provided within a private local area network.
Port Forwarding List:
When this option is enabled, user can use DMZ function with specific IP address. Please
input Host IP address which is desire to be used for DMZ IP address
DMZ Host :
When this option is enabled, user can use DMZ function with specific IP address. Please
input the preferred Host IP address.
Remote Admin :
When this option is enabled, user can designate specific Remote Administration Port for
security purpose
Application
This enables FTP and SIP.
Page 11
Max Telecom Ltd. | 115 G, Tzarigradsko shousse Blvd. | Megapark, fl. 14 | Sofia 1784 | Bulgaria
tel: 0999 111 | email: [email protected]
11
VPN Pass-through
This enables VPN Pass-through function
CPE Mode
User can change the NAT mode or Bridge mode
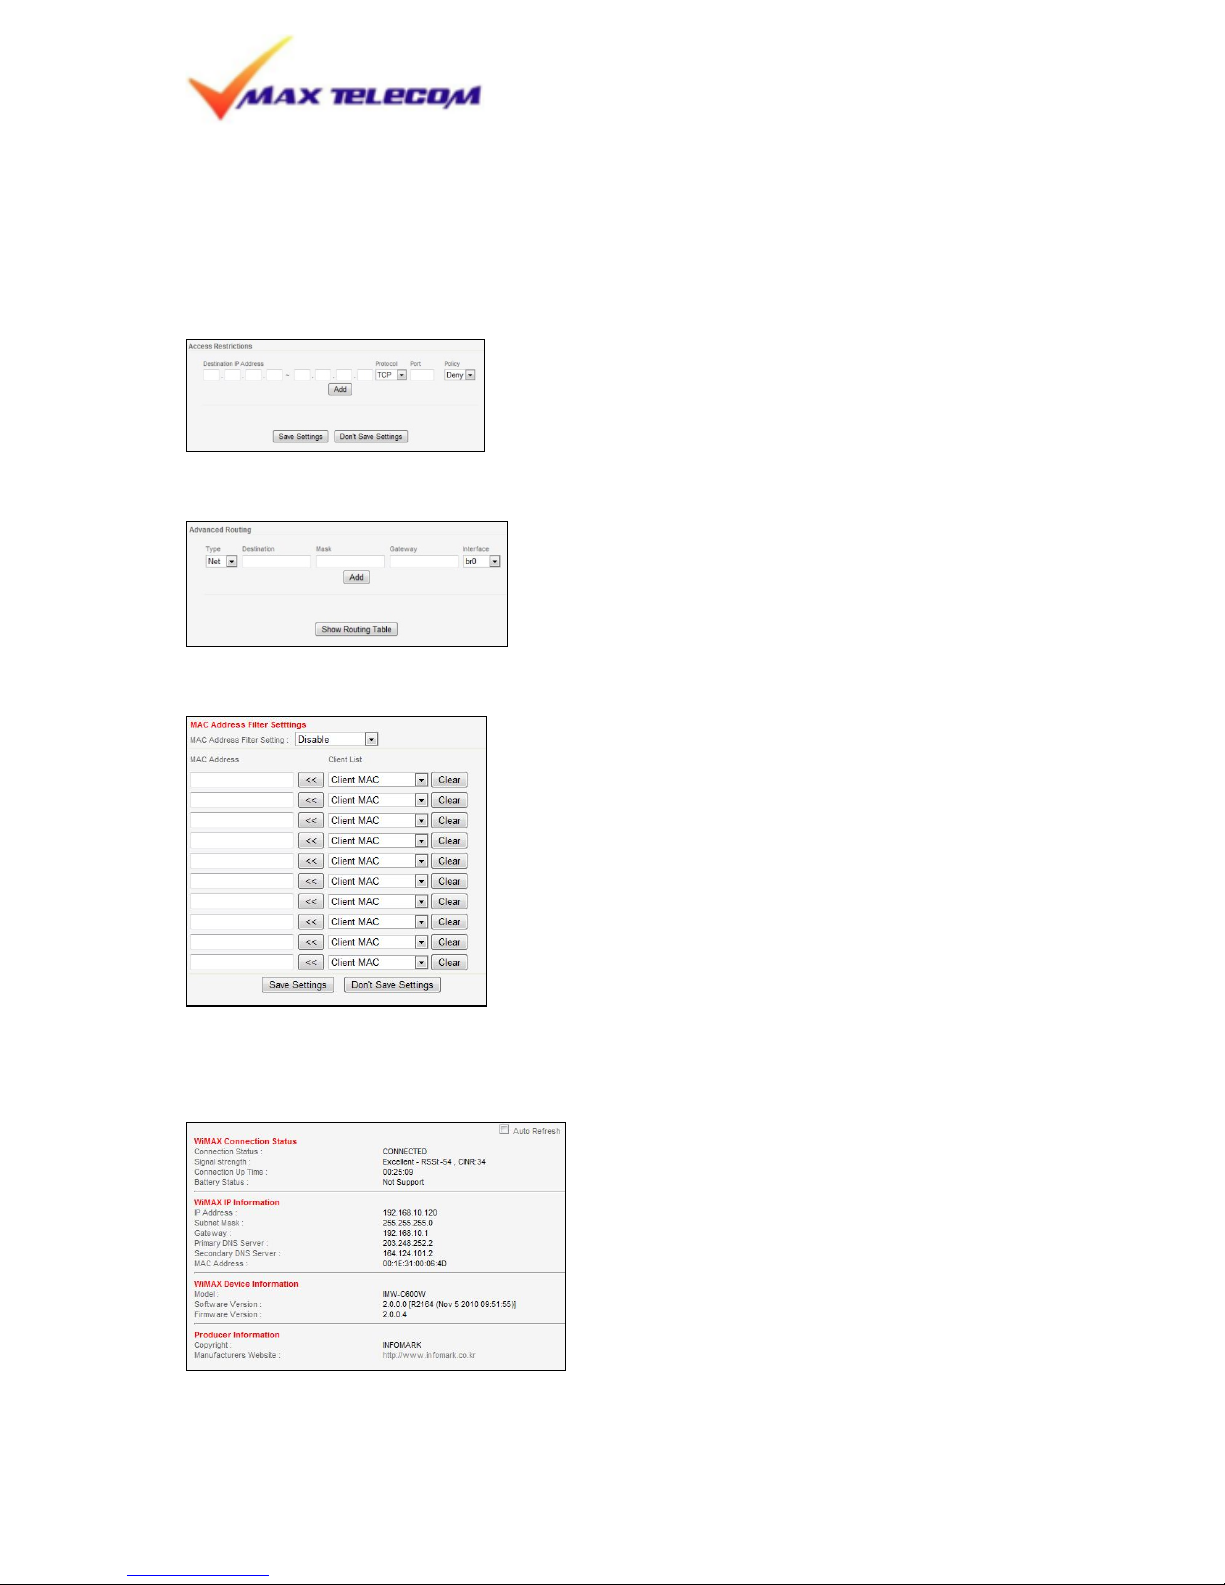
Access Restrictions
Some IP address range can be blocked by protocol/port.
Advanced Routing
Dynamic routing setting.
MAC Filter
When this option is on, user can either Deny or Allow connected MAC address. MAC
address can be selected from client’s list.
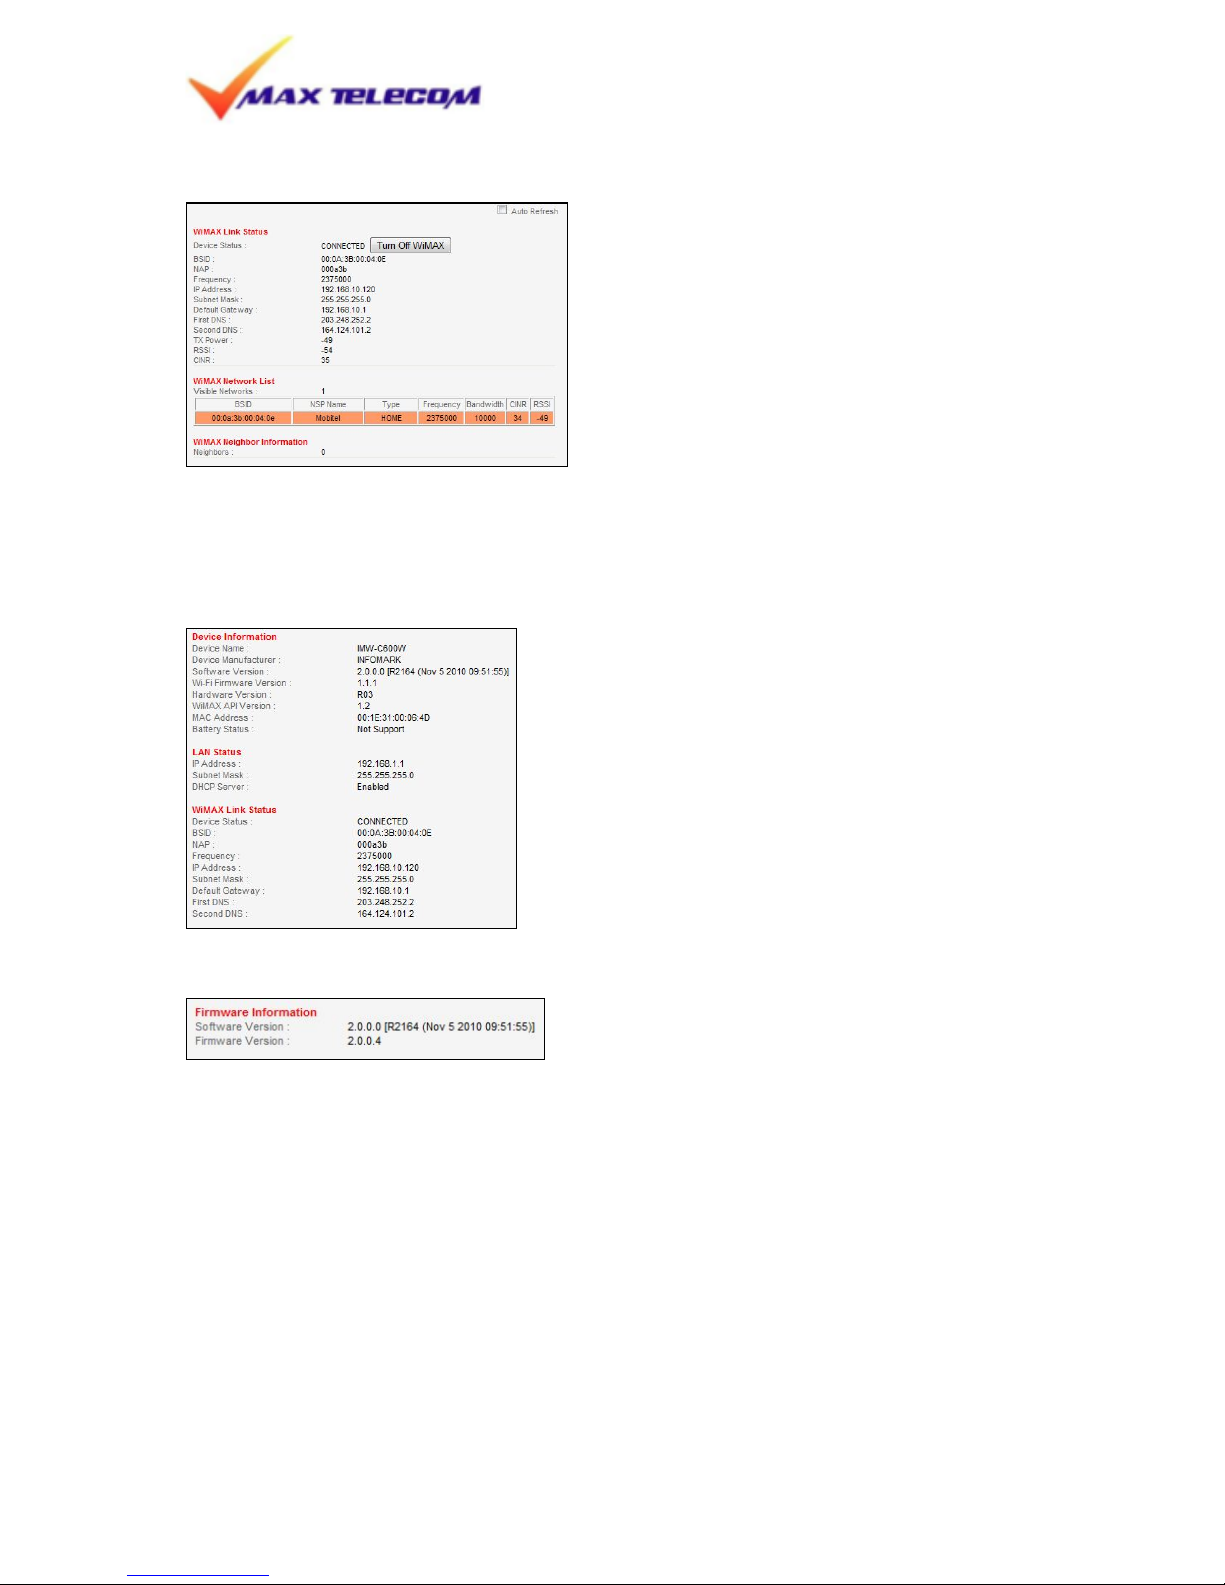
WiMAX Connection Info.
This page shows WiMAX connection status
Page 12

Max Telecom Ltd. | 115 G, Tzarigradsko shousse Blvd. | Megapark, fl. 14 | Sofia 1784 | Bulgaria
tel: 0999 111 | email: [email protected]
12
Auto Refresh: When check box is enabled, Network and MAC status of device is monitored
in real time.
Page 13
Max Telecom Ltd. | 115 G, Tzarigradsko shousse Blvd. | Megapark, fl. 14 | Sofia 1784 | Bulgaria
tel: 0999 111 | email: [email protected]
13
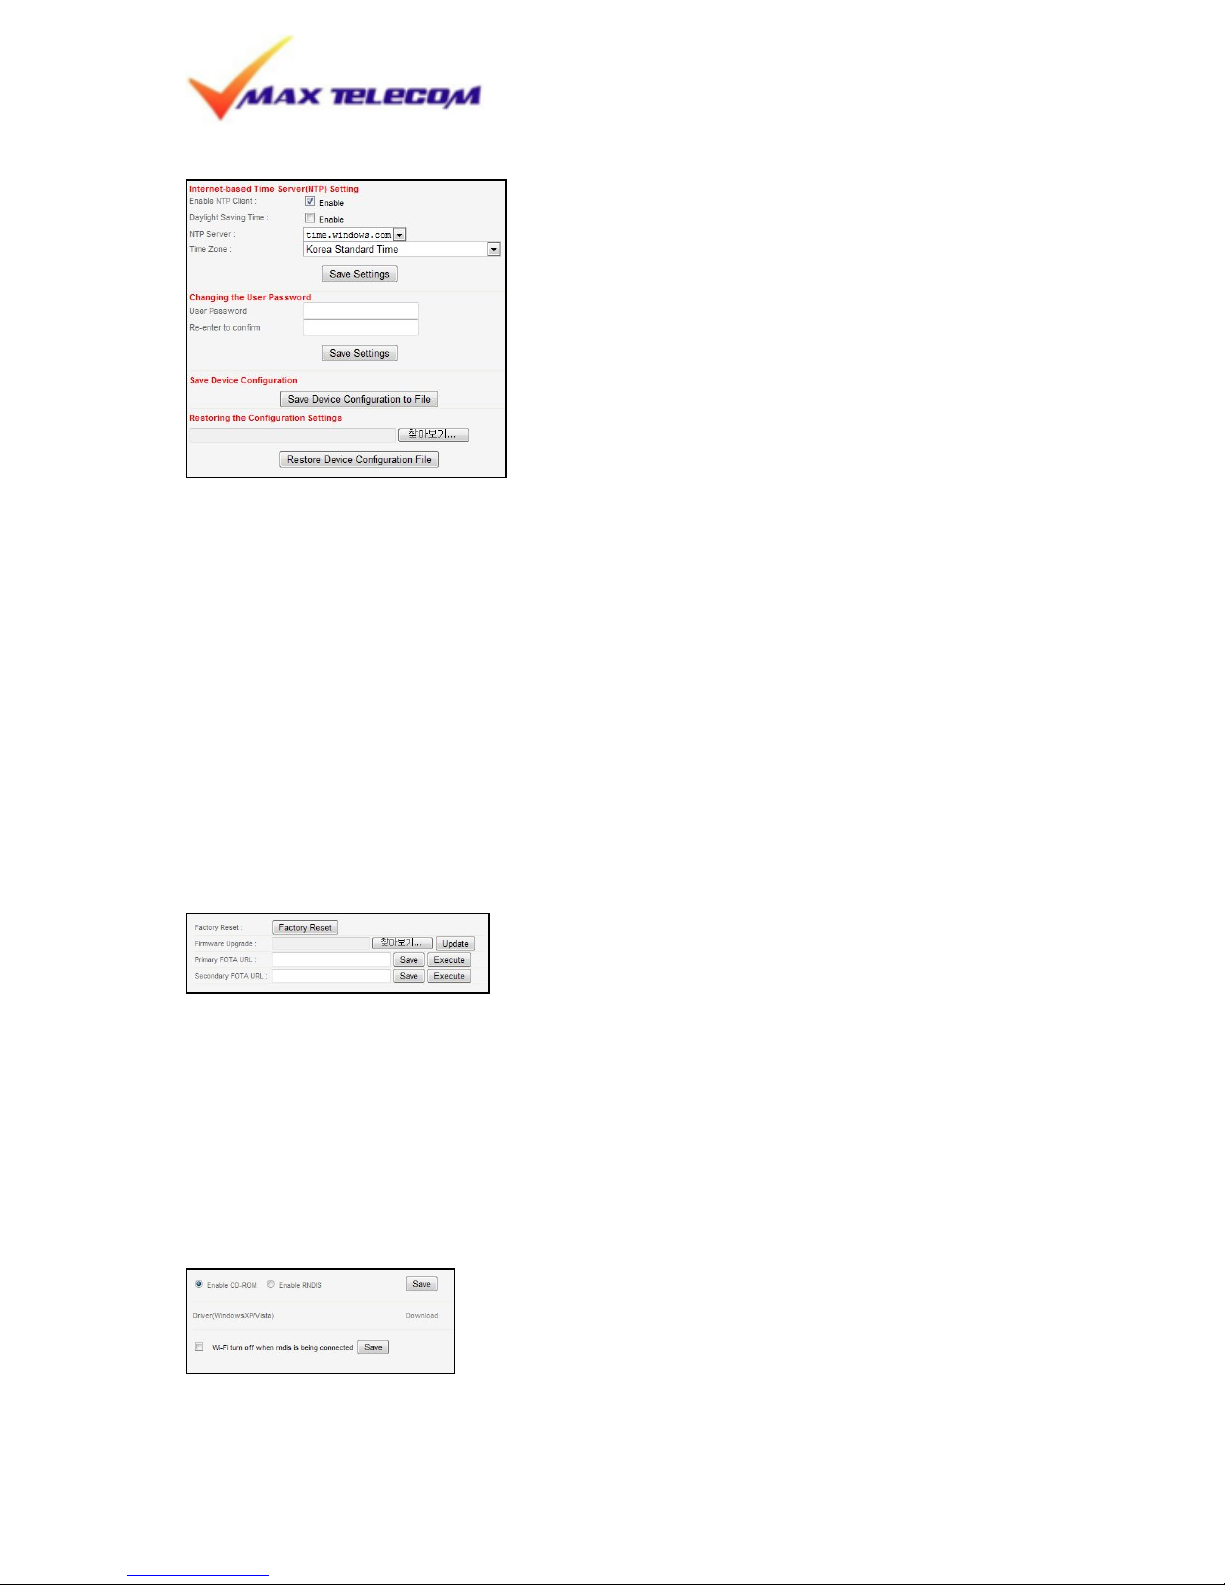
Network Info.
This page shows WiMAX link status and Neighbor information of BS
Auto Refresh : When check box is enabled, Network and MAC status of device is monitored
in real time.
Management
Status
This page can be seen when you enter into web UI.
Firmware information
This page shows software and firmware version
Page 14
Max Telecom Ltd. | 115 G, Tzarigradsko shousse Blvd. | Megapark, fl. 14 | Sofia 1784 | Bulgaria
tel: 0999 111 | email: [email protected]
14
Administration
Internet-based Time Server (NTP) Setting
This option enables Network Time Protocol for this Personal Hotspot to acquire current
time from time server.
Default setting of time server is [time.windows.com] If this time server is not working,
please try time.nist.gov, time-nw.nist.gov, time-nw.nist.gov, time-a.nist.gov or timeb.nist.gov
Please select your Time Zone where this Hotspot is being used
Changing the User Password
User can change password of web UI as desired.
Save Device Configuration
This is to save current setting of device and this can be restored when device is turned
into factory default settings.
Restoring the Configuration Settings
This is to restore saved configuration file.
Upgrade
Factory Reset
The device can be restored to factory default with this option
Firmware Upgrade
If there is updated firmware from operator, this will help to update firmware of the device.
Find the target firmware and click update. This process will take a few minutes.
FOTA URL
If there is URL provided from operator, this will automatically compare the firmware
version and execute update.
RNDIS
Driver Download
Page 15

Max Telecom Ltd. | 115 G, Tzarigradsko shousse Blvd. | Megapark, fl. 14 | Sofia 1784 | Bulgaria
tel: 0999 111 | email: [email protected]
15
Users requiring the USB driver for windows XP/Vista/Win7 operating systems may use this
button to download the appropriate software.
Wi-Fi turn off
This option allows the user to disable Wi-Fi connectivity when USB data mode is enabled.
Power off
This button will make the device turn off without touching physical power button.
 Loading...