


Solar Powered Charger
Now you have purchased a MAXTEK® product you can
rest assured in the knowledge that as well as your 3 year
parts and labour warranty you have the added peace of
mind of dedicated helplines and web support
User Guide
01. Contents
02. Welcome Section
03. General Information and Safety Instructions
04. Battery Handling and Usage
05. Accessories and Features
06. Controls
07. Charging The Solar Charger
08. Charging External Devices
09. Technical Specications
10. Warranty Card
11. Fault Report Card
Contents 1
2
Chapter

Welcome Section 2
3
Congratulations!
You have made an excellent choice with the purchase of this quality
MAXTEK® brand product. By doing so you now have the assurance and
peace of mind which comes from purchasing a product that has been
manufactured to the highest standards of performance and safety,
supported by the high quality standards of MAXTEK.
We want you to be completely satised with your purchase so this MAXTEK®
product is backed by a comprehensive manufacturer’s 3 year warranty and
an outstanding after sales service through our dedicated Helpline. We hope
you will enjoy using your purchase for many years to come. If you require
technical support or in the unlikely event that your purchase is faulty please
telephone our Helpline for immediate assistance. Faulty product claims
made within the 3 year warranty period will be repaired or replaced free of
charge provided that you have satisfactory proof of purchase (keep your till
receipt safe!). This does not affect your statutory rights. However, be aware
that the warranty will become null and void if the product is found to have
been deliberately damaged, misused or disassembled.

General Information & Safety Instructions 3
3
4
Please read through the following safety information before rst use.
The lightening ash and
arrowhead within the triangle is
a warning sign alerting you of
dangerous voltage inside the
product
The exclamation mark within
the triangle is a warning sign
alerting you of important safety
instructions concerning the
product
C A U T I O N
RISK OF ELECTRIC SHOCK
DO NOT OPEN
• To avoid risk of electric shock do not attempt to open this appliance.
• Keep away from re.
• Do not expose this product to water, rain or dampness.
• Keep this appliance away from naked ames.
• Keep this appliance away from strong magnets.
• Avoid placing heavy objects on top of the appliance.
• Always disconnect the appliance from mains power before cleaning.
• Clean the exterior of the appliance with a soft cloth only.
4
4
5
Battery Handling and Usage
Electric and electronic equipment (EEE) contains materials, parts and
substances which can be dangerous to the environment and harmful to
human health. Once this appliance has reached the end of its life span,
the unit in its entirety should be taken to a recycling centre. Please
contact your local authority for details of recycling schemes in your
area.
Disposal of Your Old Product
Battery Safety
• Never throw batteries into re or expose to excessive heat sources.
• If batteries are swallowed, please seek immediate medical attention.
• Do not recharge non-rechargeable batteries
Do not dispose of batteries in your household waste. Please
contact your local authority for details on safe disposal.
Do not dispose of this product in your household waste. Please
contact your local authority for details of recycling schemes in
your area.

Accessories and Features 5
5
6
Accessories
• 5 x Phone Adaptors (iPod/iPhone, Nokia N70, 8210, Micro USB, Motorola V3)
• USB Cable
• Carry strap
Features
• Small and compact in size for portability.
• LED charge indicator.
• Aluminium casing.
• High charging current.
• Charge time: USB 0 - 2hrs, Sunlight 20hrs.
• Lithium polymer battery
• Dimensions 43 x 94 x 10.5mm
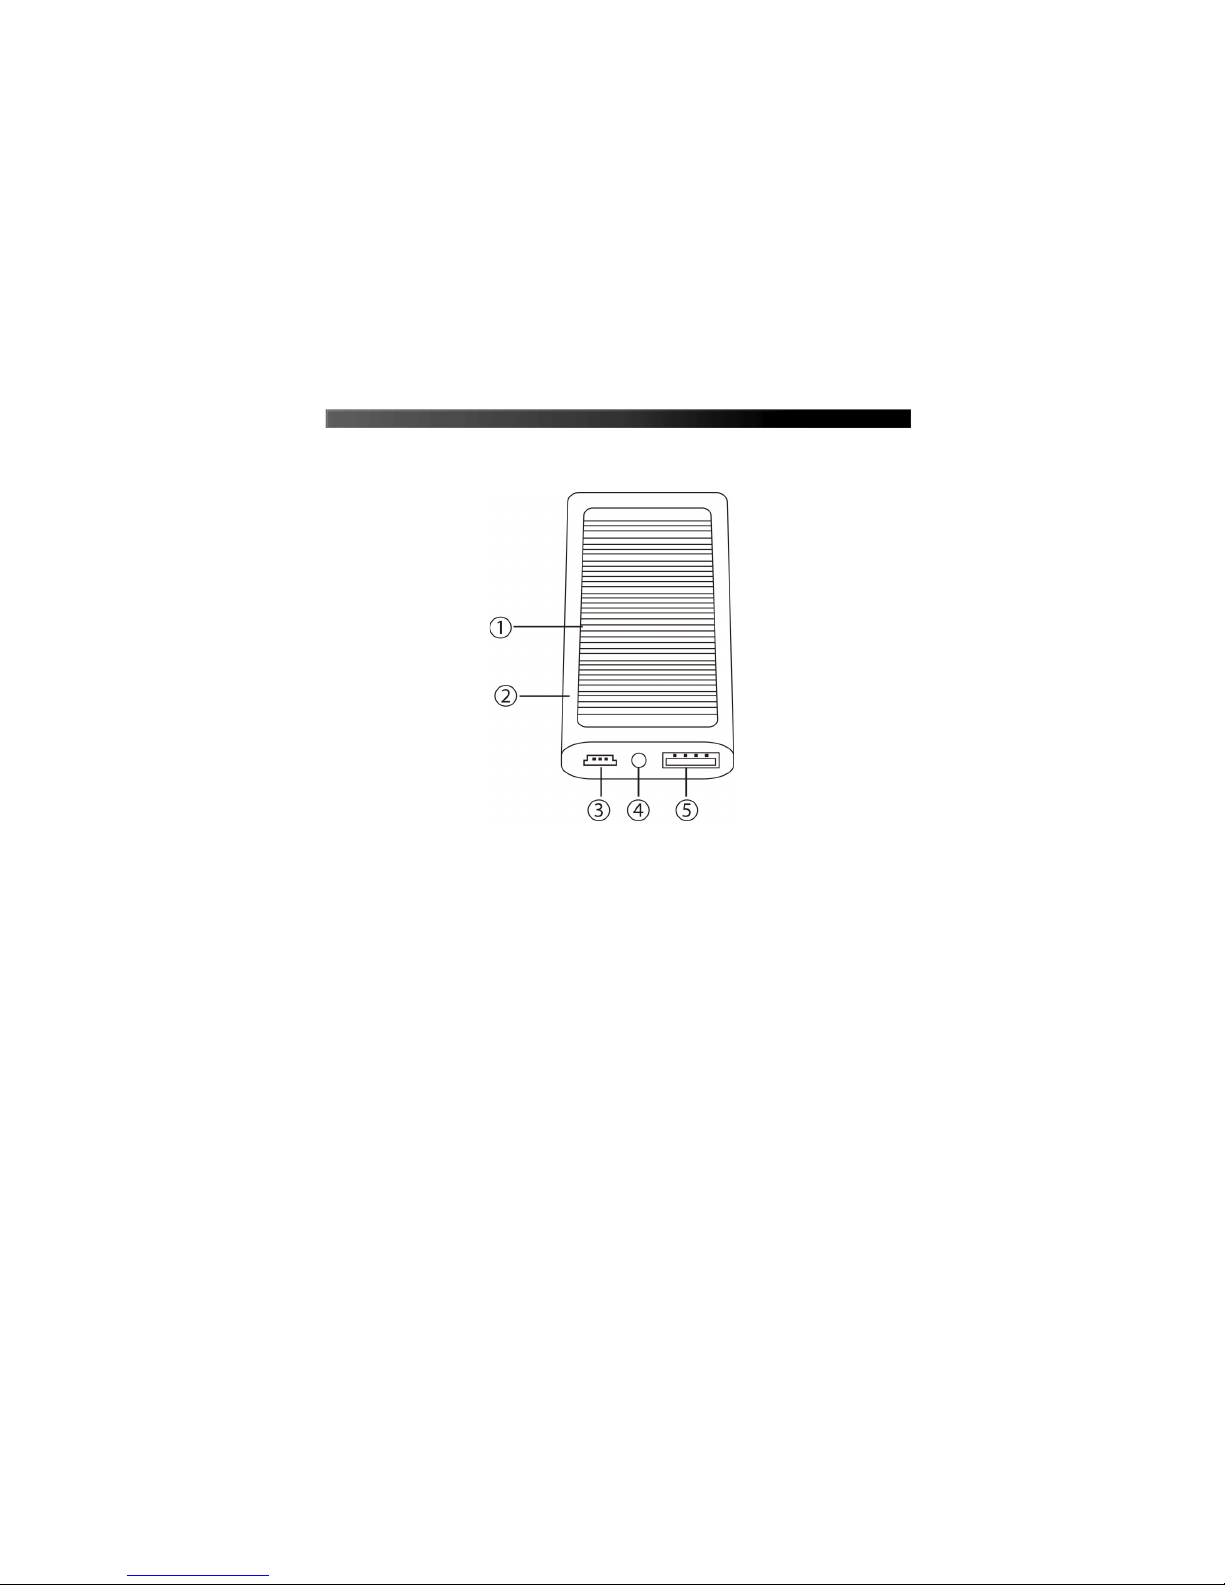
Controls 6
6
7
1. Solar cell panel.
2. Aluminium case.
3. External energy source connection for the built-in battery.
4. Blue LED – indicates charging.
5. USB connection for charging mobile phones, MP3 players, digital
cameras, etc.

Charging The Solar Charger
7
8
7
Before the solar charger is used for the rst time, the unit must be
charged via a computer USB port or similar for at least 10 hours.
1. Connect the external charging source to the solar charger’s input
(3) using the supplied cable.
2. The blue LED indicates the battery is charging.
3. When the Blue LED goes out, the battery is fully charged.
After the rst charge you can then use the sun to charge the built in
battery. Point the solar panel directly at sunlight to start charging.
The blue LED will then be shown on the status indicator.
The charger requires at least 400 LUX of sunlight to charge. This is the
equivalent of dawn/dusk on a day with good weather. In ideal
conditions, with the solar cell directed towards strong sunlight,
the battery will take at least 20 hours to charge.
Please Note: The product is intended to provide instant power to
a drained or low on power digital device. It is ideal for
situations where a conventional charger or the mains socket
is not available. The solar charger charges compatible digital
devices. Despite that, it does not replace conventional
chargers.

9
1. Select the appropriate adaptor for your device and connect it to
the charger using the USB cable.
2. Check your device to see if it is charging. If not, there may not be
any charge remaining in the Solar Powered Charger. Please charge
the the Solar Powered Battery Charger rst.
8 Charging External Devices

8
10
Technical Specication 9
Solar Cell Panel 0.3W, 5.5V
Battery 1200mAh lithium polymer battery
Input Voltage 4.5 - 5.5V DC/350-650 mA
Output Voltage 5.3V± 0.2V/650-750 mA
Operating Environment -20 ºC - +50 ºC
Storage Environment -20 ºC - +55 ºC
USB charging time (90%) 0-2 hours
Discharge time 0-85 minutes
Size 43 x 94 x 10.5mm
Weight 46g
 Loading...