

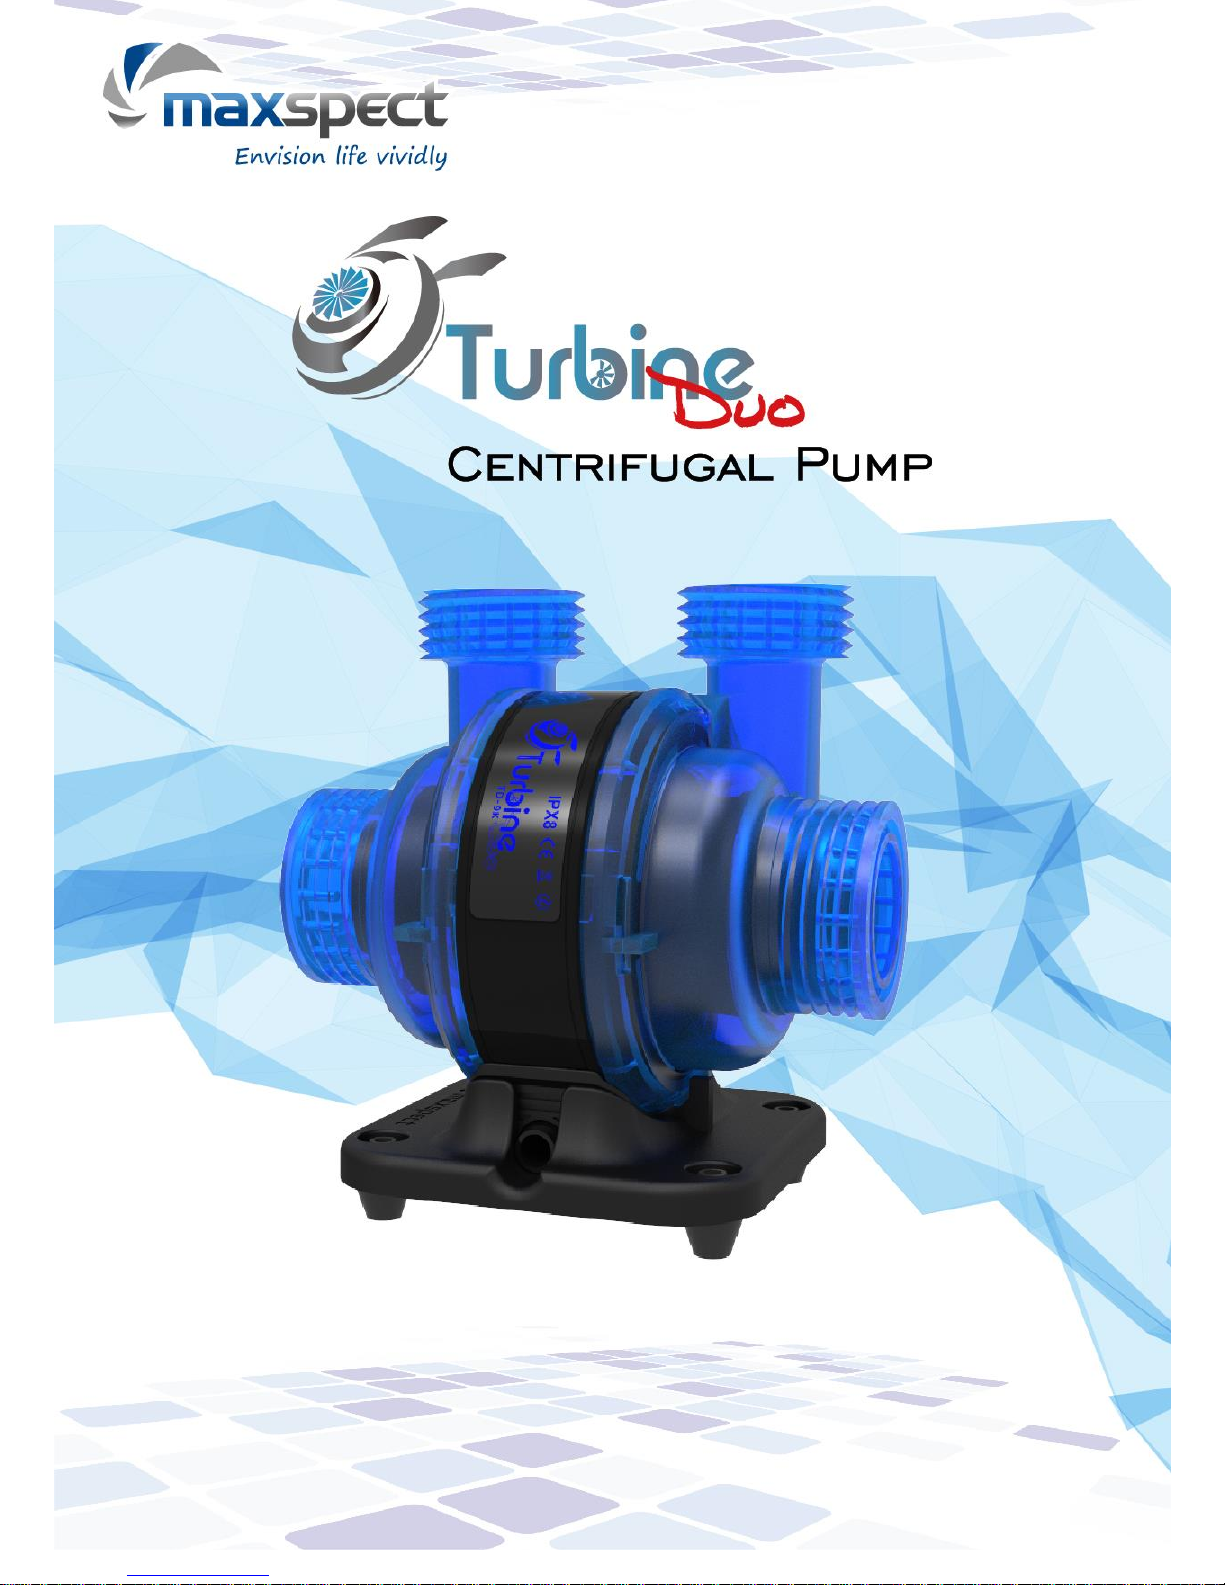
Maxspect TD-6K, TD-9K, TD-12K Owner's Manual
Owner’s Manual
Bedienungsanleitung
Mode d’emploi
Manuali dei Prodotti
Manual do Proprietário
Instrukcja Obsługi
用户手册
使用說明書


1
Dear Customer,
Thank you for purchasing this product.
For optimum performance and safety, please read these instructions carefully.
User Memo:
Date of purchase:
Dealer name:
Dealer address:
Dealer website:
Dealer email:
Dealer phone no.:
Please visit us on facebook or twitter!
https://www.facebook.com/Maxspect
http://twitter.com/maxspectled
English
2
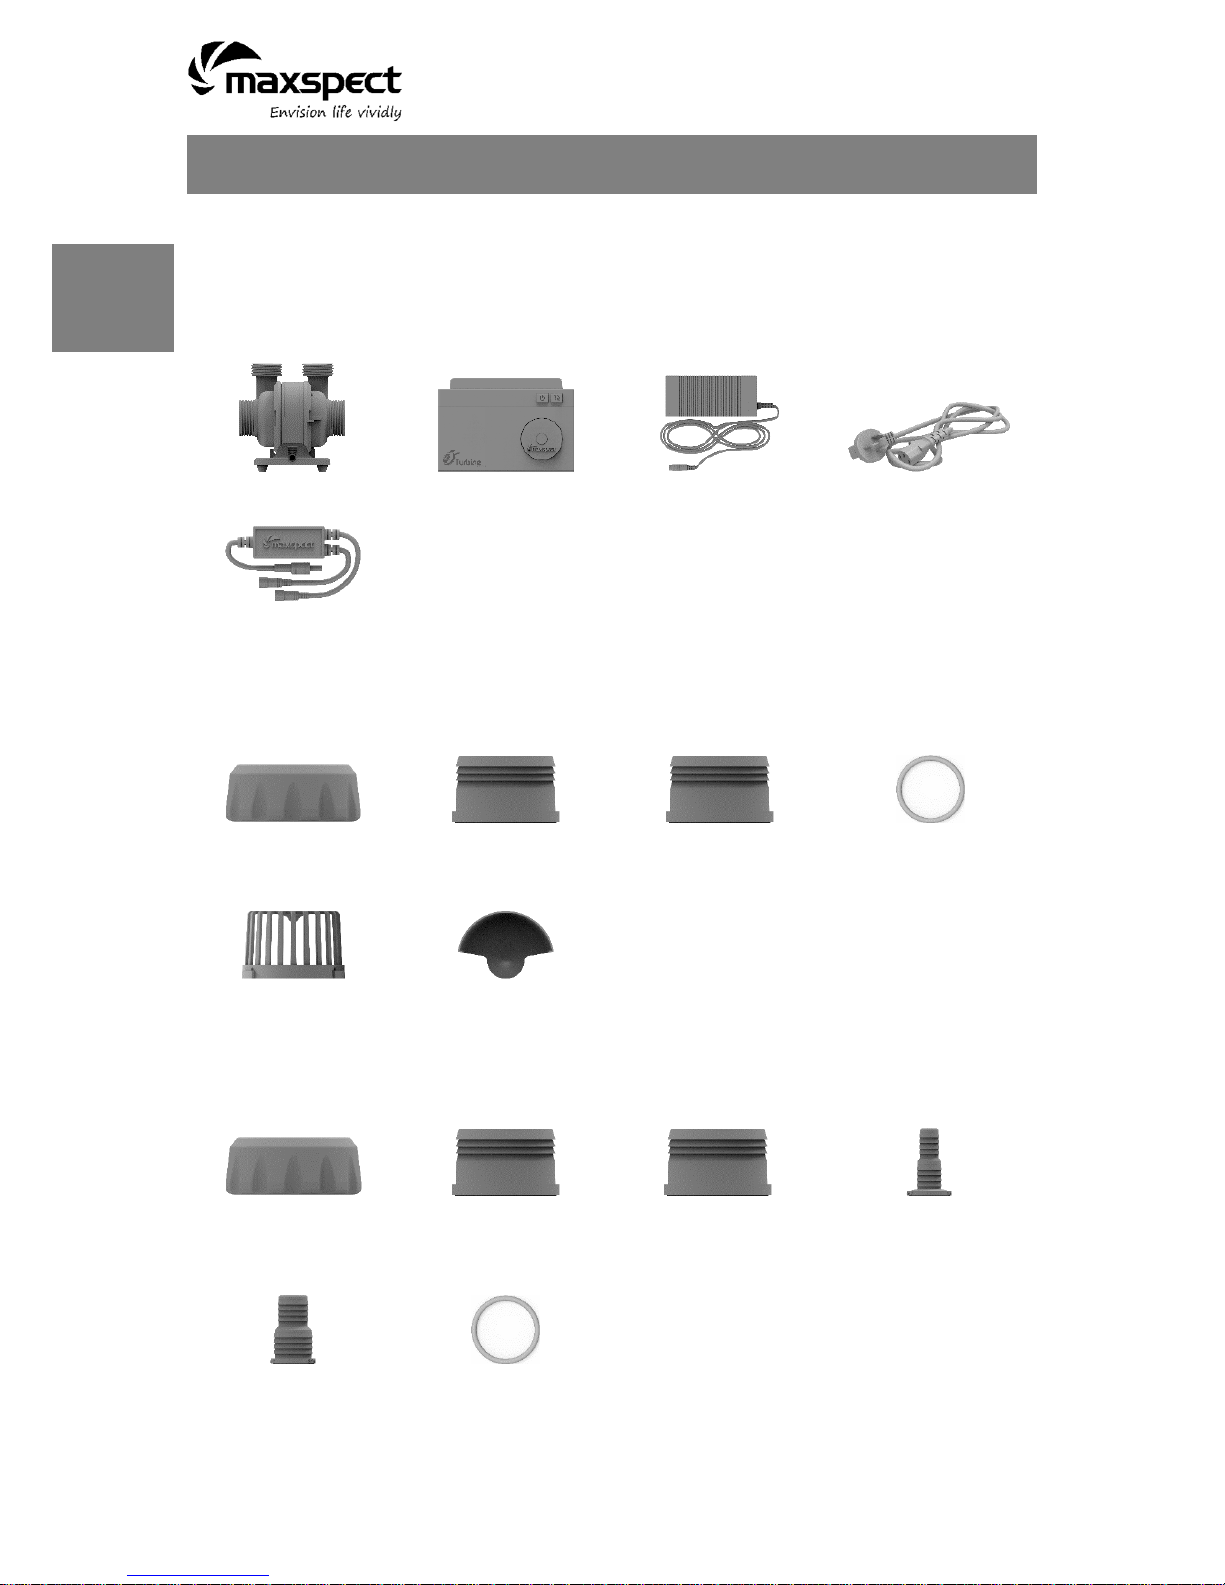
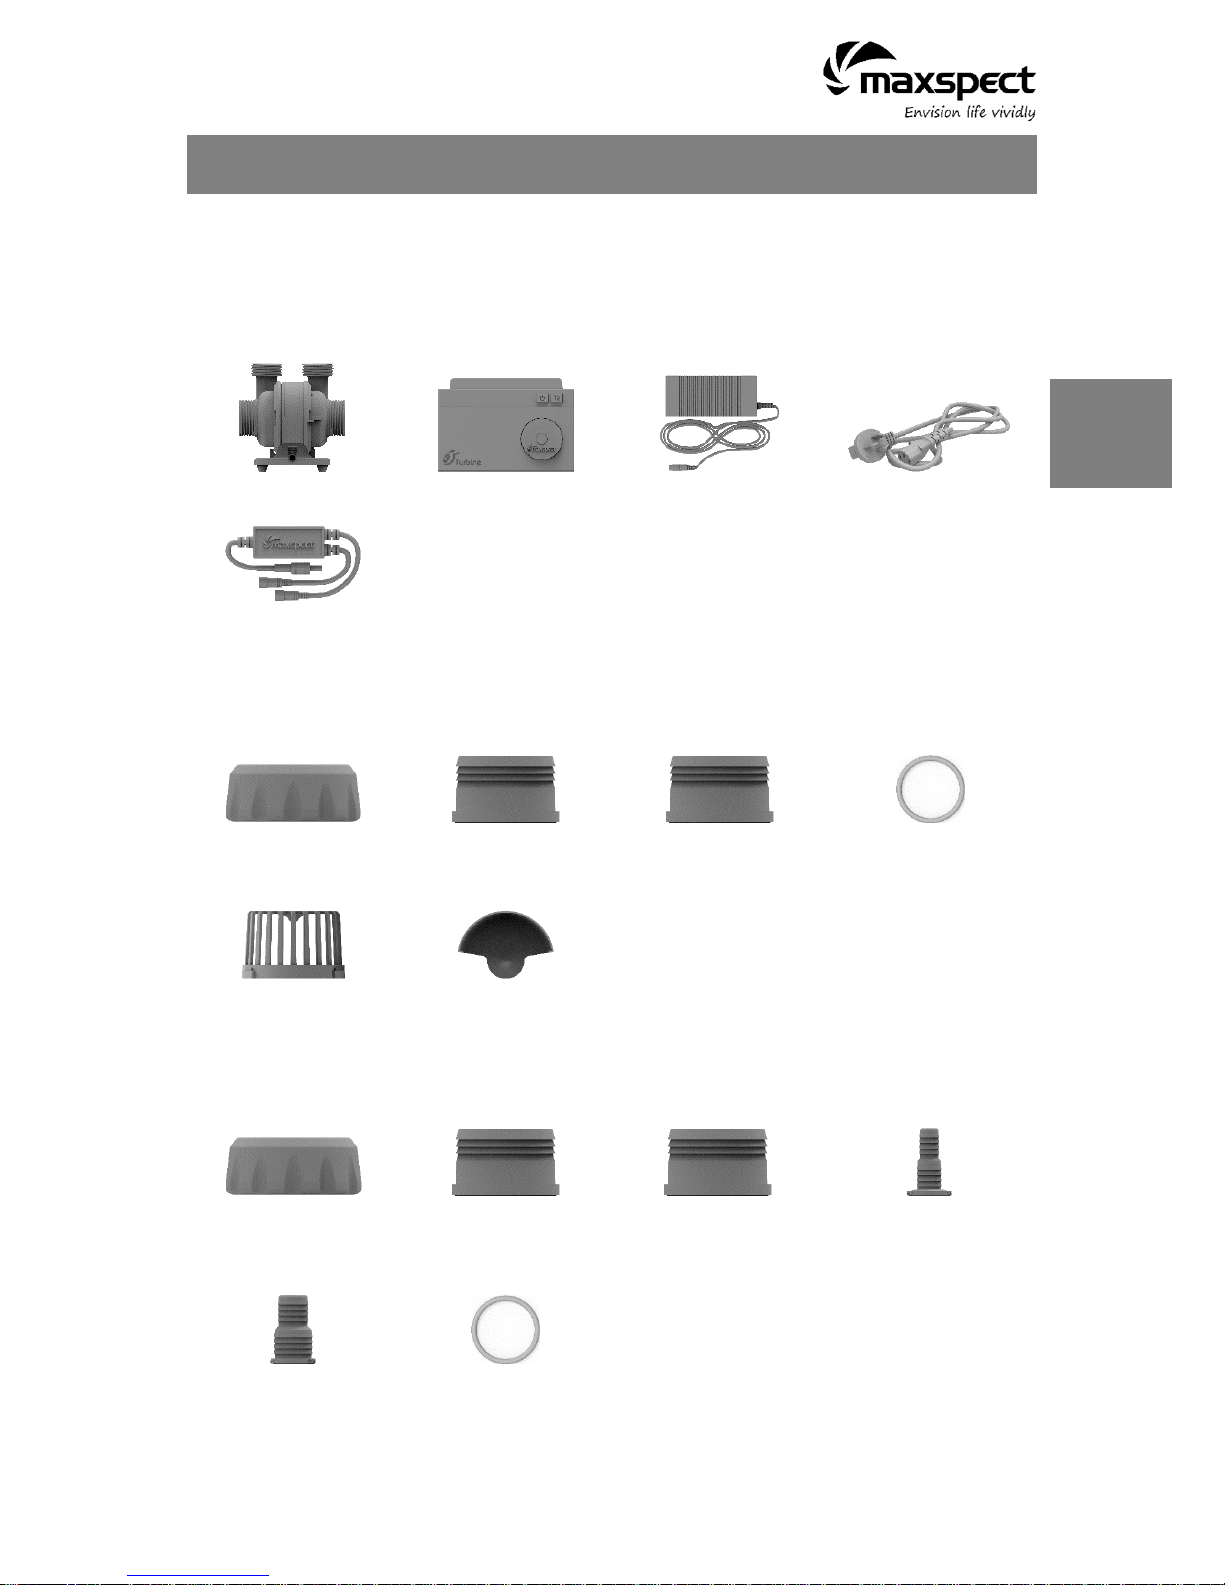
Package Content
Please check the content in the package.
Main Components
Pump Unit
Controller
Power Supply Unit
Power Cable
Backup Battery
Adaptar
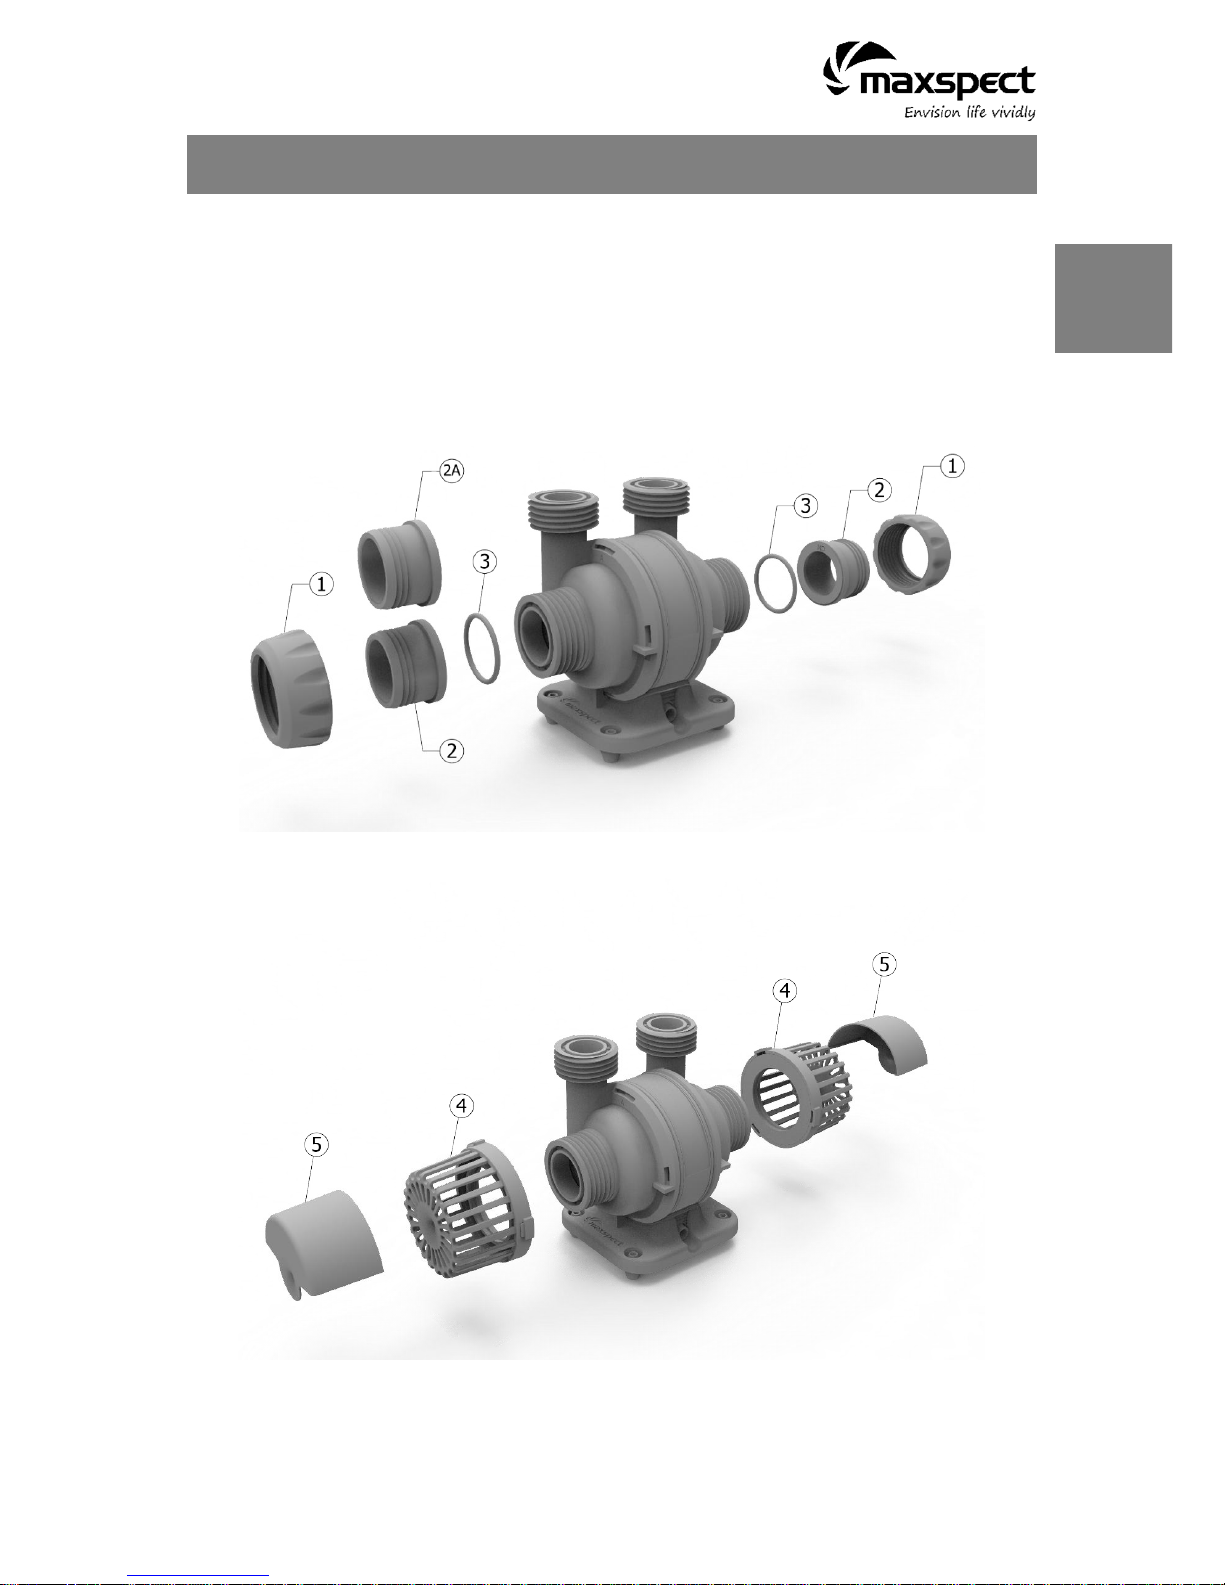
Inlet Spare Parts
1. Ф58mm 2pcs
2. 1” 2pcs
2A. Ф32mm 2pcs
3. Ф40mm 2pcs
4. 2pcs
5. 2pcs
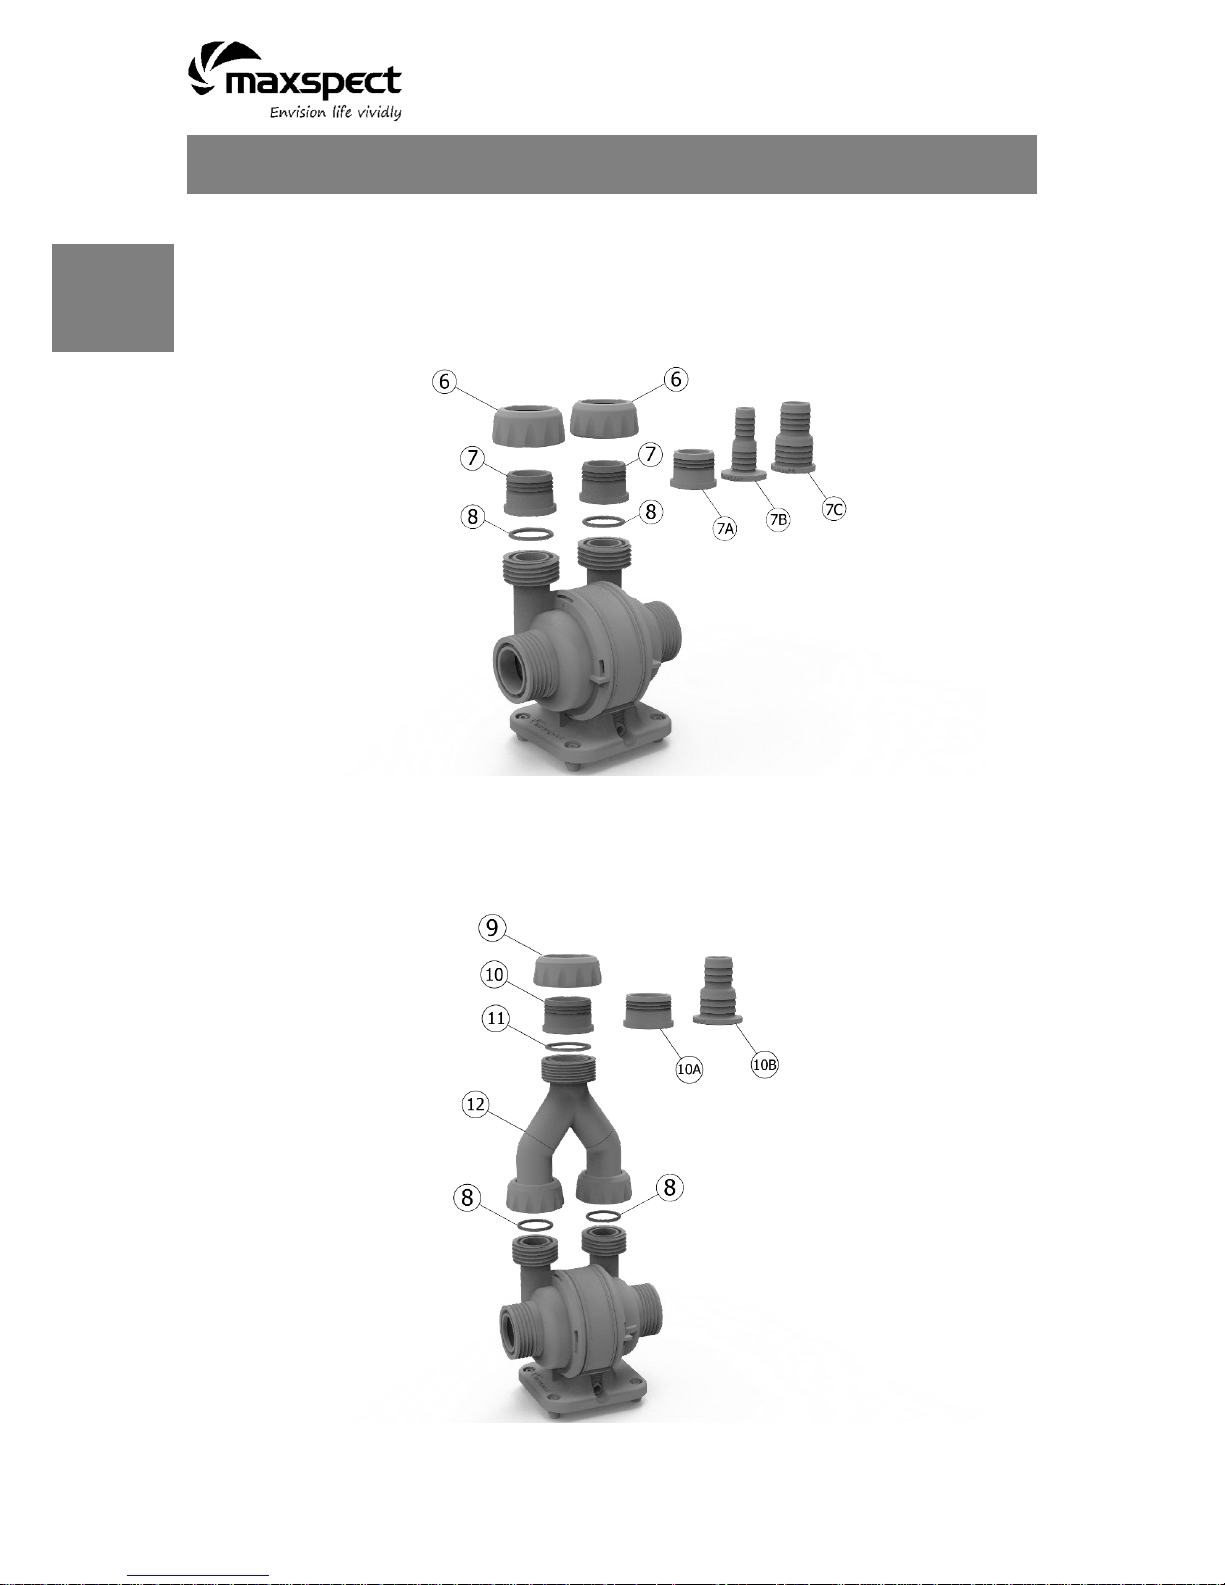
Duo Outlet Spare Parts
6. Ф51mm 2pcs
7. ¾” 2pcs
7A. Ф25mm 2pcs
7B. Ф16mm/½” 2pcs
Ф20mm/ ¾” 2pcs
7C. Ф25mm/1” 2pcs
Ф32mm/1¼” 2pcs
8. Ф32mm 2pcs
English
3
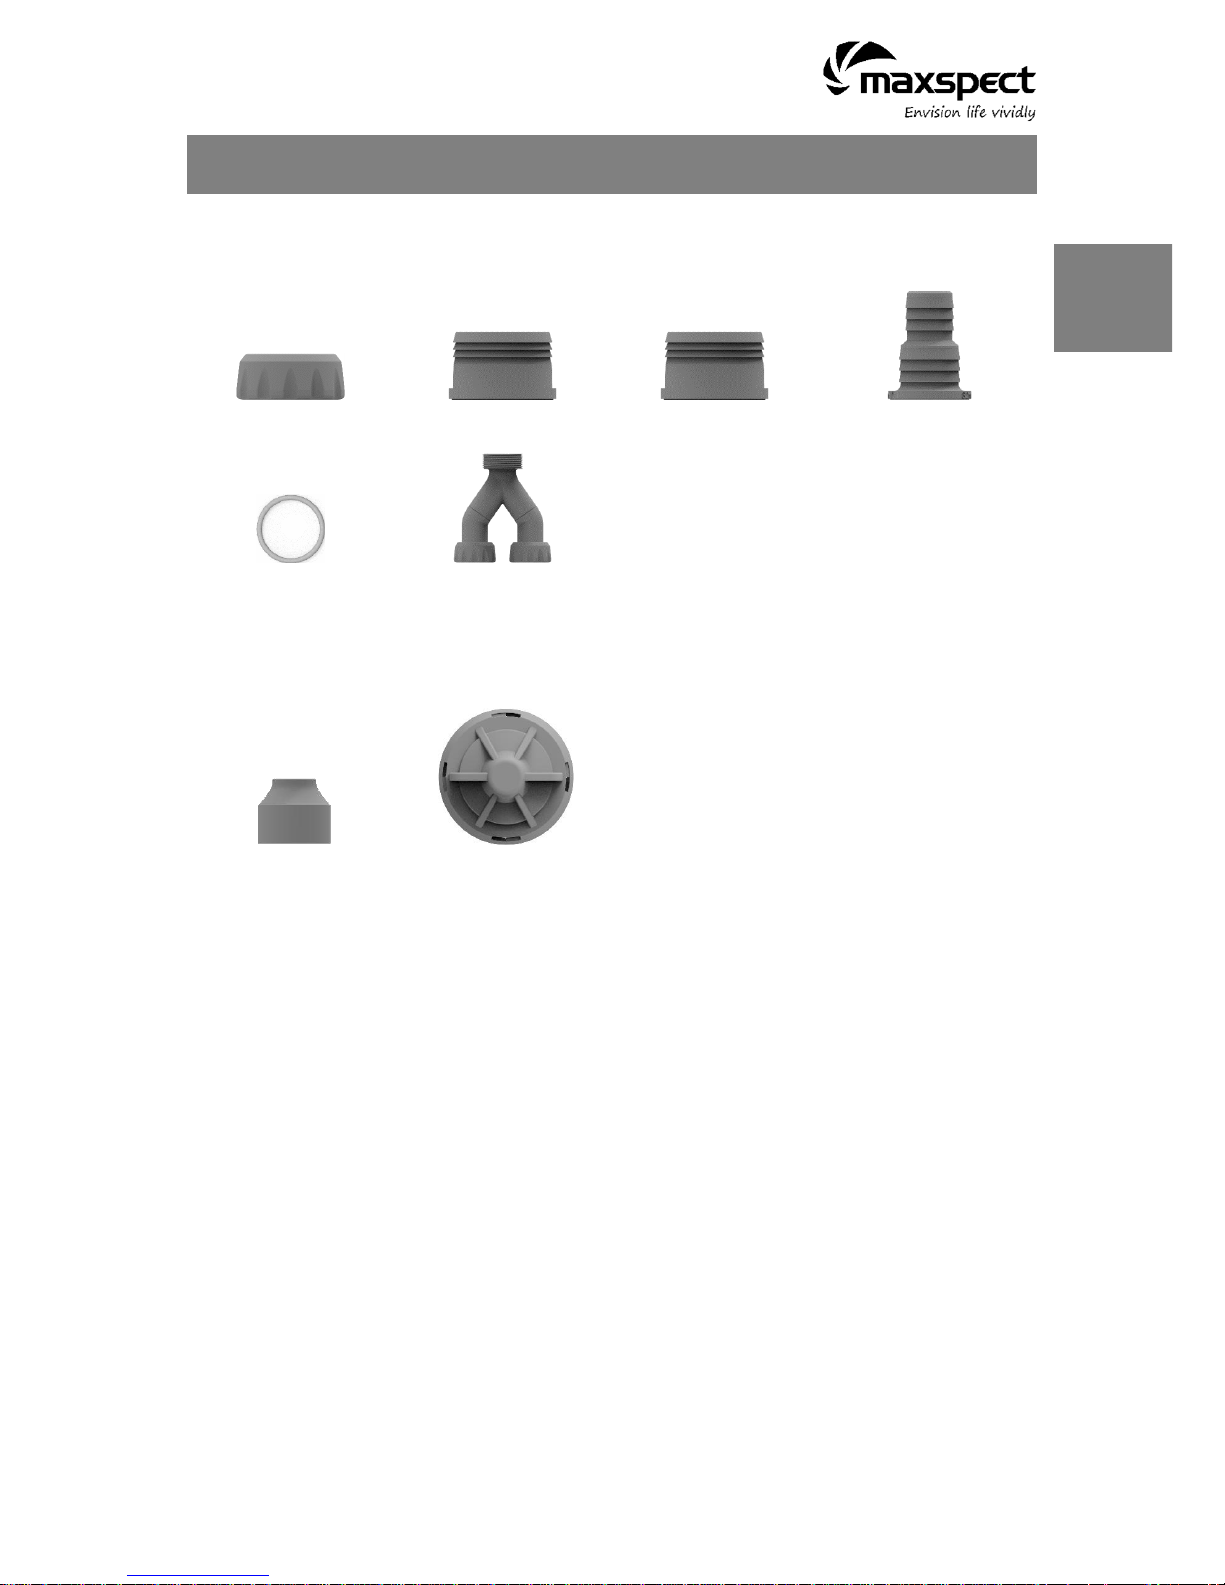
Package Content
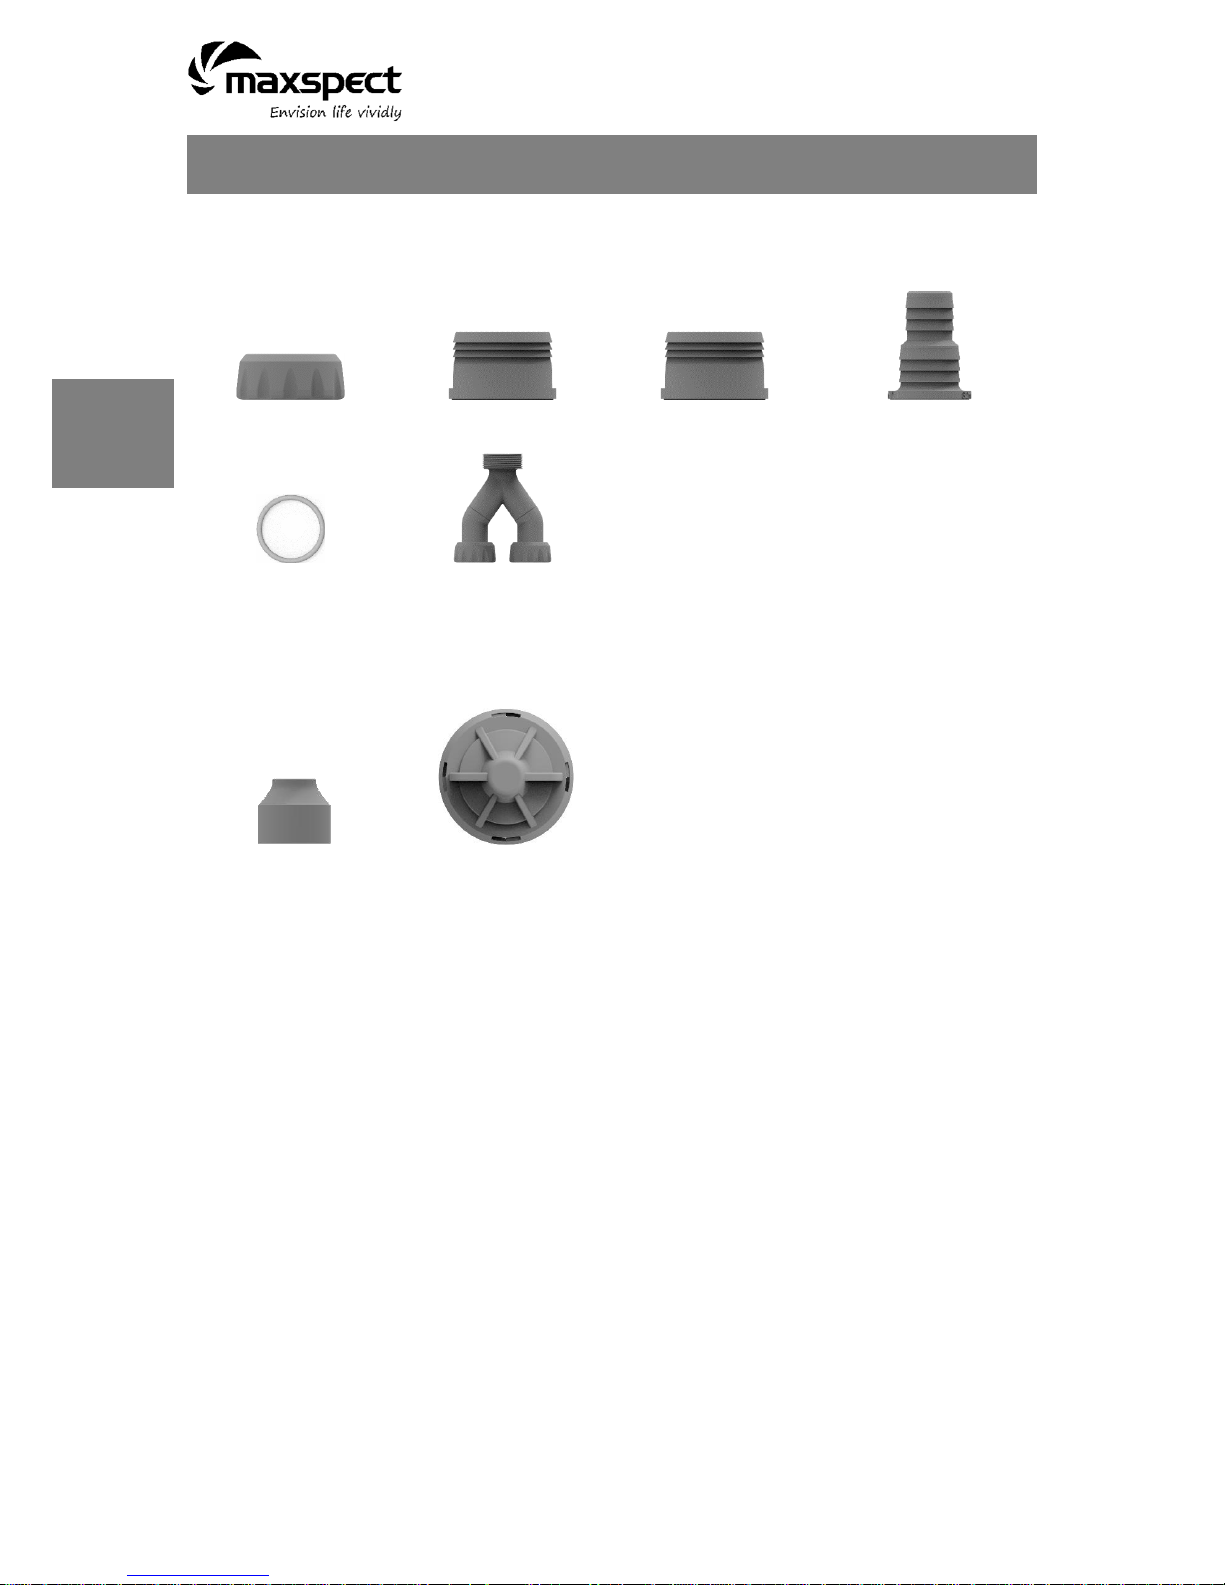
Y-Tubing Spare Parts
9. Ф58mm 1pc
10. 1” 1pc
10A. Ф32mm 1pc
10B. Ф25mm/1” 1pc
Ф32mm/1¼” 1pc
11. Ф40mm 1pc
12. 1pc
Single Outlet Spare Parts
13. 1pc
14. 1pc
English

4
Precautions
READ AND FOLLOW ALL SAFETY INSTRUCTIONS
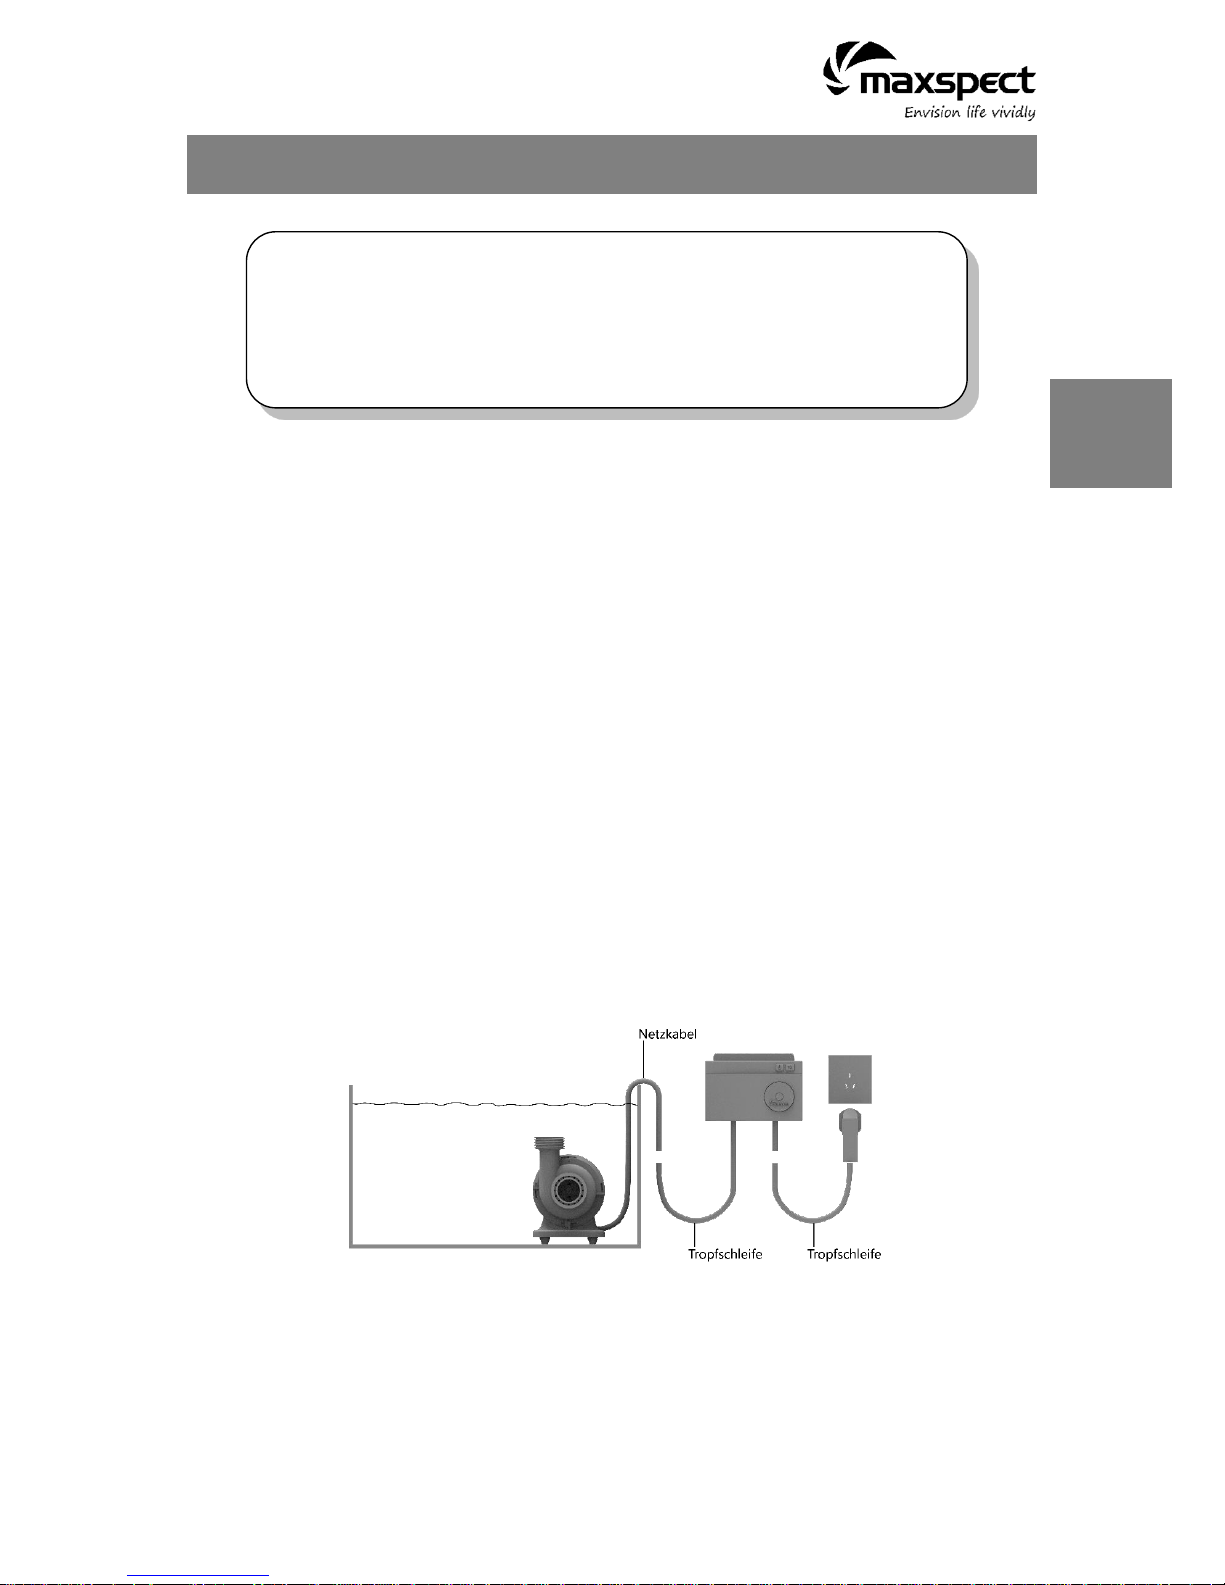
1. DANGER – To avoid possible electric shock, special care should be taken since water is
employed in the use of aquarium equipment. For each of the following situations, do not
attempt to repair by yourself; return the appliance to an authorized service facility for
service or discard the appliance.
a) If the appliance shows any sign of abnormal water leakage, immediately unplug
it from the power source.
b) Carefully examine the appliance after installation. It should not be plugged in if
there is water on parts not intended to be wet.
c) Do not operate any appliance if it has a damaged cord or plug, or if it is
malfunctioning or has been dropped or damaged in any manner.
d) To avoid the possibility of the appliance plug or receptacle getting wet, position
aquarium stand and tank to one side of a wall-mounted receptacle to prevent
water from dripping onto the receptacle or plug. A “drip-loop” shown in the figure,
should be arranged by the user for each cord connecting an aquarium appliance
to a receptacle. The “drip-loop” is that part of the cord below the level of the
receptacle, or the connector if an extension cord is used, to prevent water
traveling along the cord and coming in contact with the receptacle. If the plug or
socket does get wet, DON’T unplug the cord. Disconnect the fuse or circuit
breaker that supplies power to the appliance. Then unplug and examine for
presence of water in the receptacle.
2. Close supervision is necessary when any appliance is used by or near children.
3. To avoid injury, do not contact moving parts or hot parts such as heaters, reflectors, lamp
bulbs, and the like.
Before using this Maxspect™ Turbine Duo DC Pump please read these
operating instructions carefully. Take special care to follow the safety
suggestions listed below.
Afterwards keep this manual handy for future reference.
English
5
Precautions
4. Always unplug an appliance from an outlet when not in use, before putting on or taking
off parts, and before cleaning. Never yank cord to pull plug from outlet. Grasp the plug
and pull to disconnect.
5. Do not use an appliance for other than intended use. The use of attachments not
recommended or sold by the appliance manufacturer may cause an unsafe condition.
6. Do not install or store the appliances where it will be exposed to the weather or to
temperatures below freezing.
7. Make sure an appliance mounted on a tank is securely installed before operating it.
8. Read and observe all the important notices on the appliance.
9. If an extension cord is necessary, a cord with a proper rating should be used. A cord
rated for less amperes or watts than the appliance rating may overheat.
10. The power supply cords should be routed so that they are not likely to be walked on or
pinched by items placed upon or against them. Never take hold of the plug or cord if your
hand is wet, and always grasp the plug body when connecting or disconnecting it.
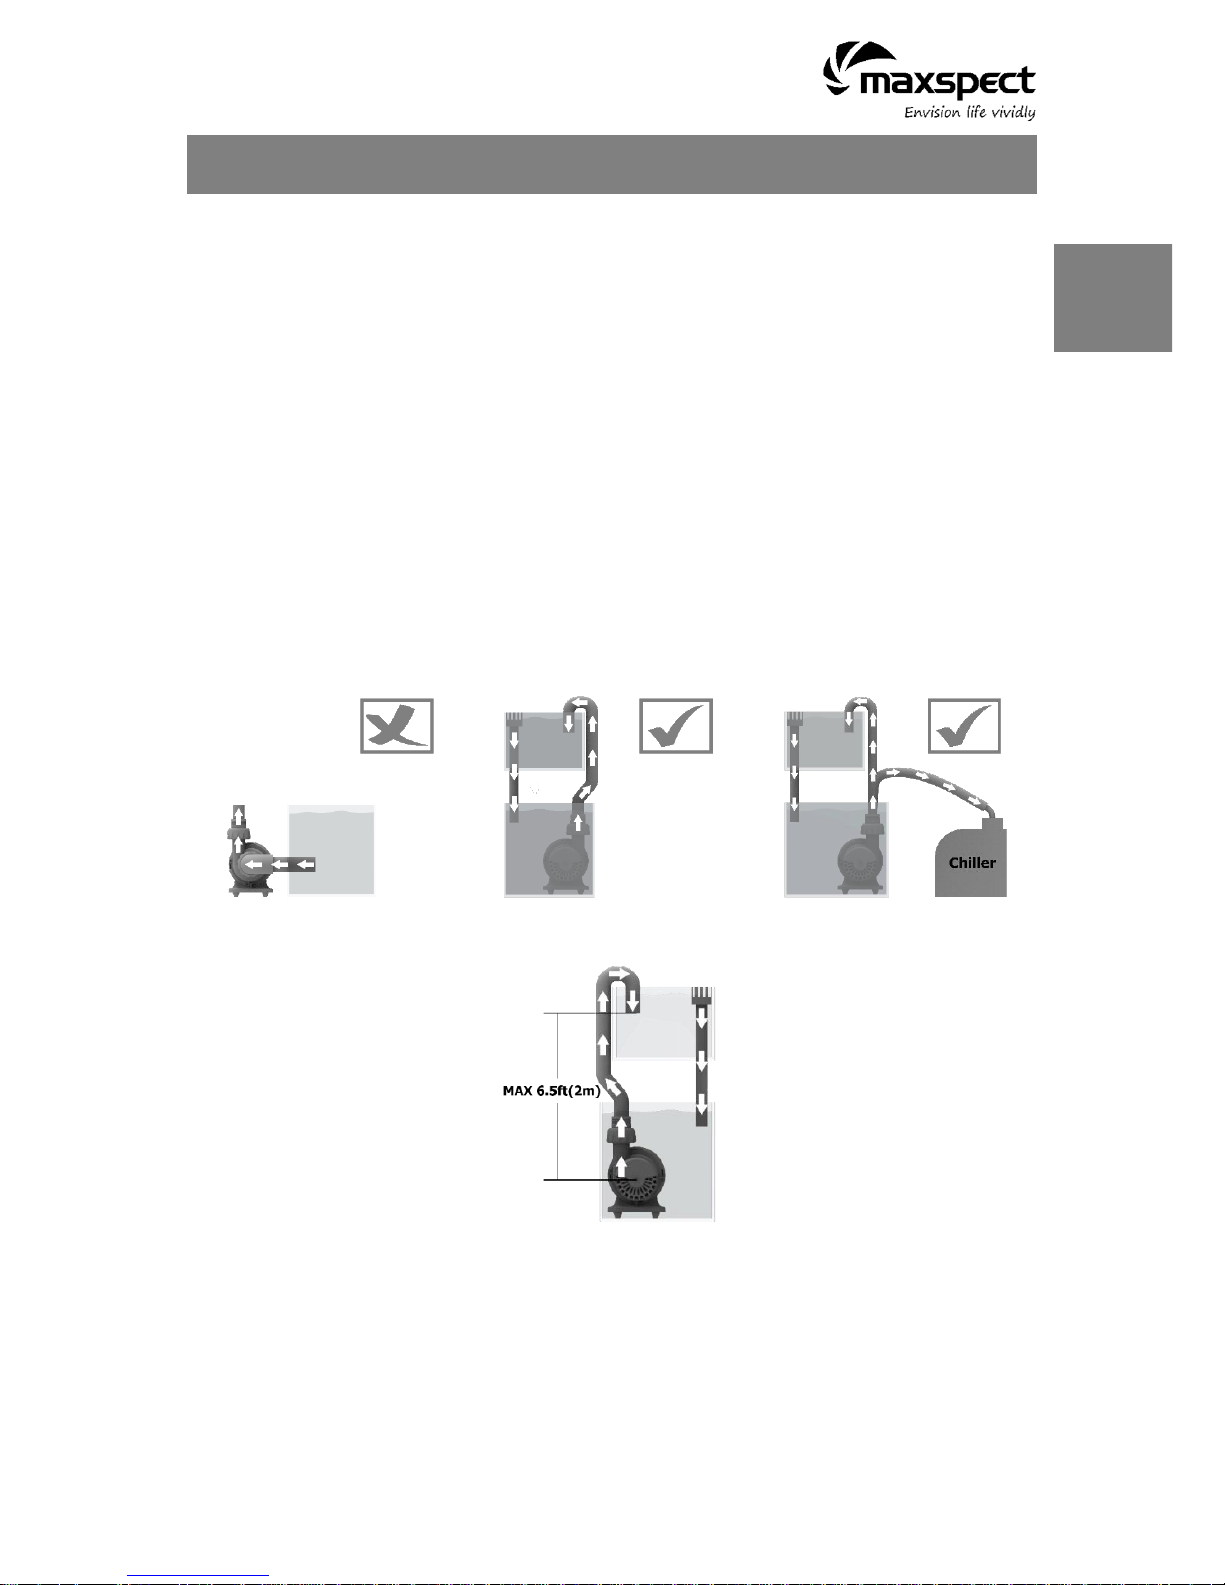
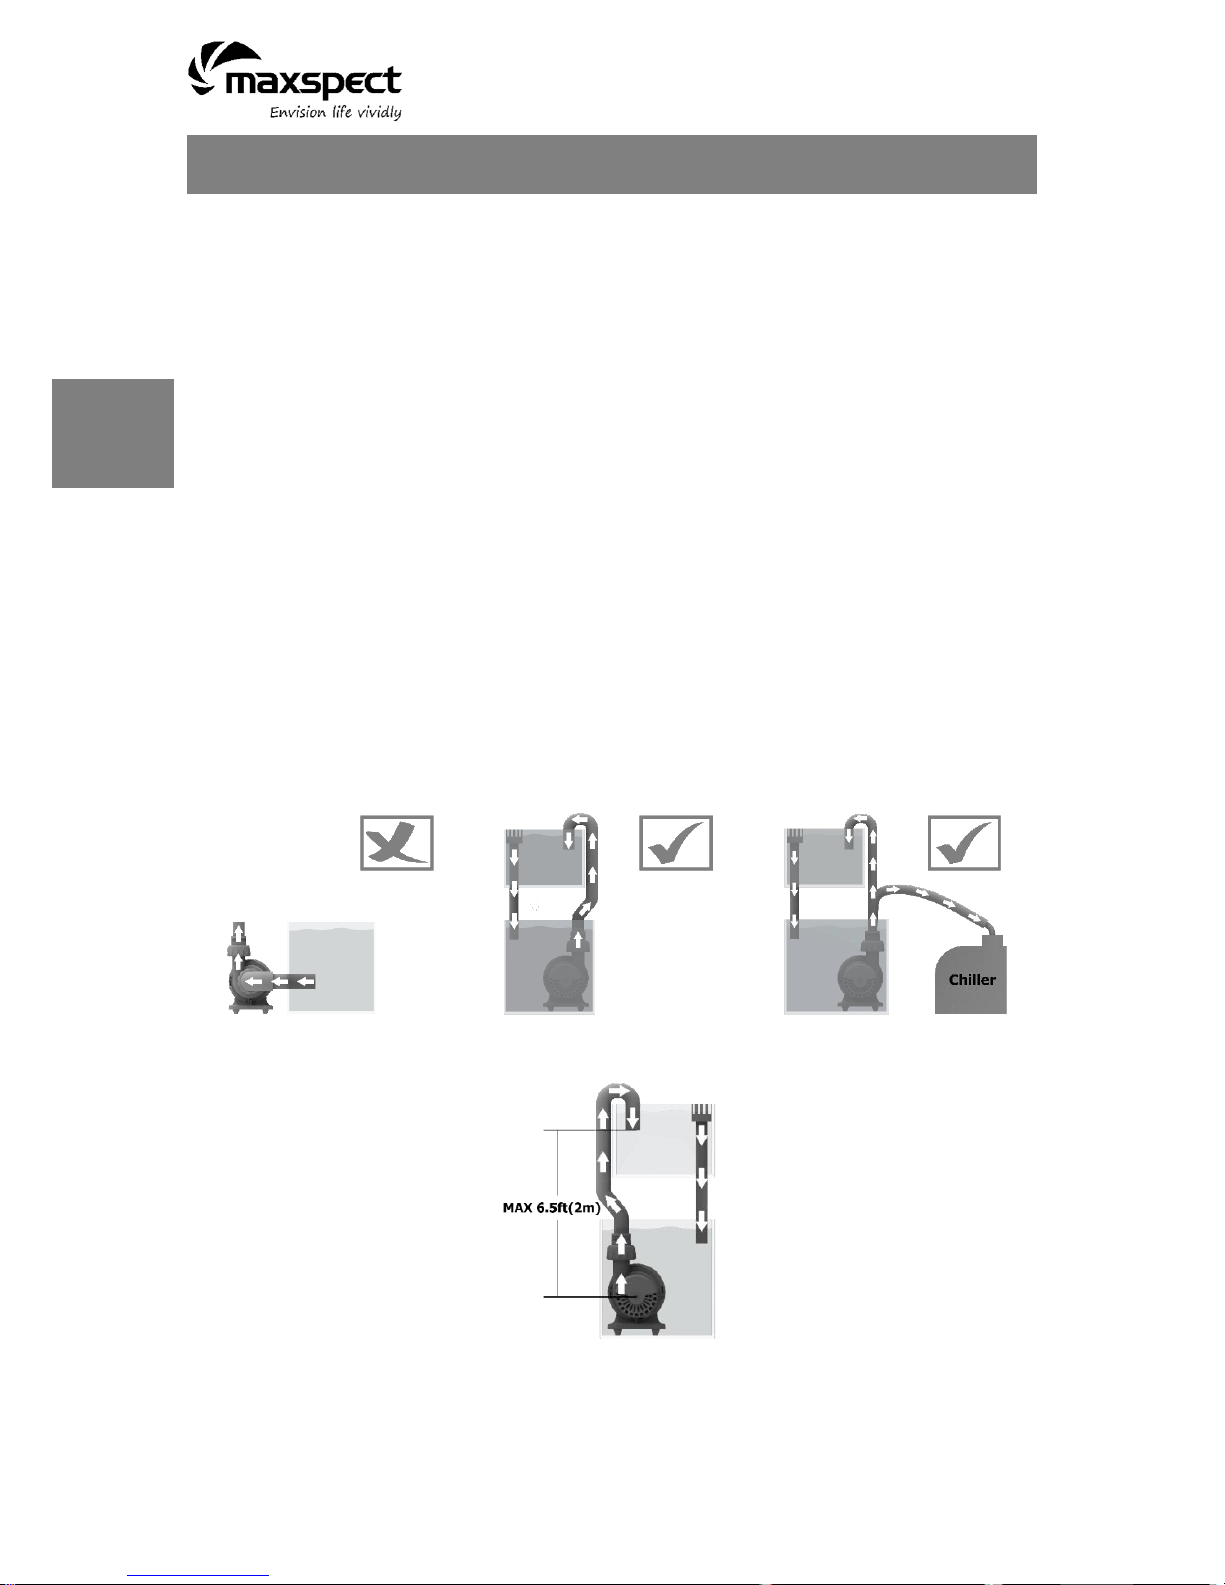
11. The appliance is designed to be used in the water ONLY, the entire body of the appliance
must be submersed in the water.
12. To maintain the good performance of the appliance, it should be installed where the
vertical distance between the outlet and inlet is less than 6.5ft (2m).
English
6
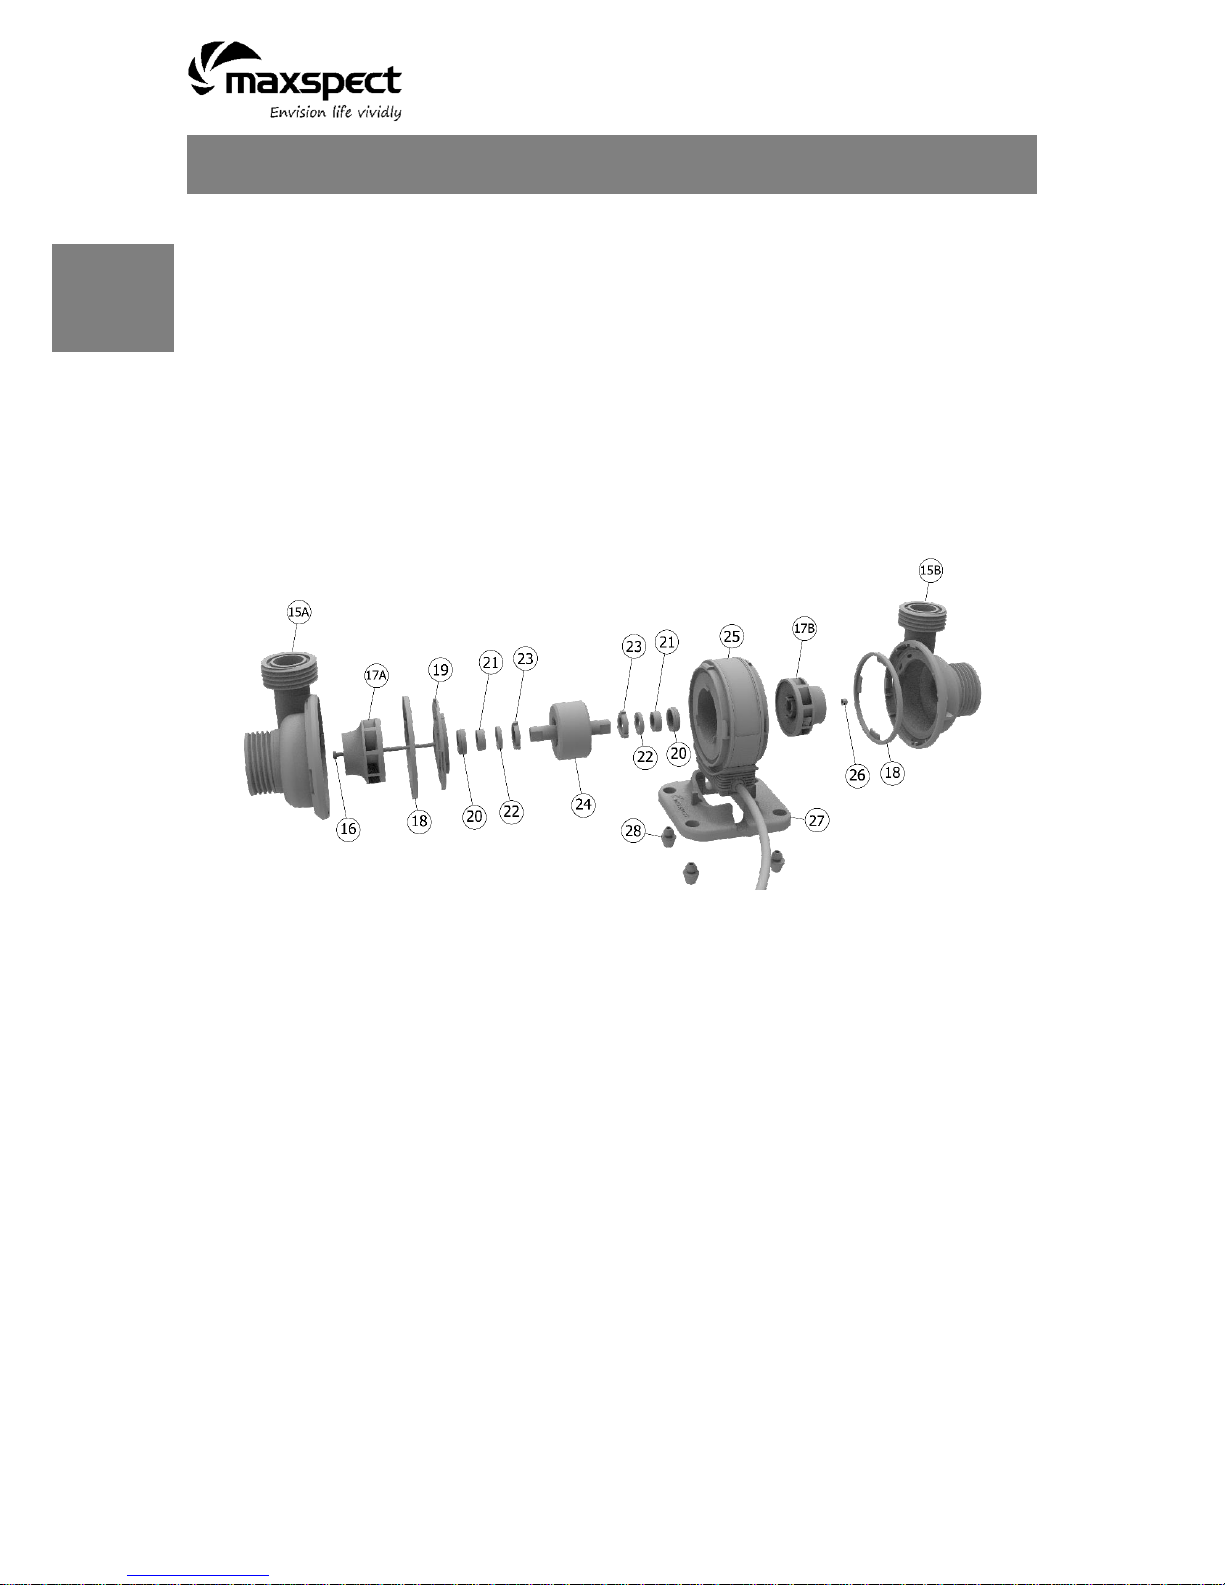
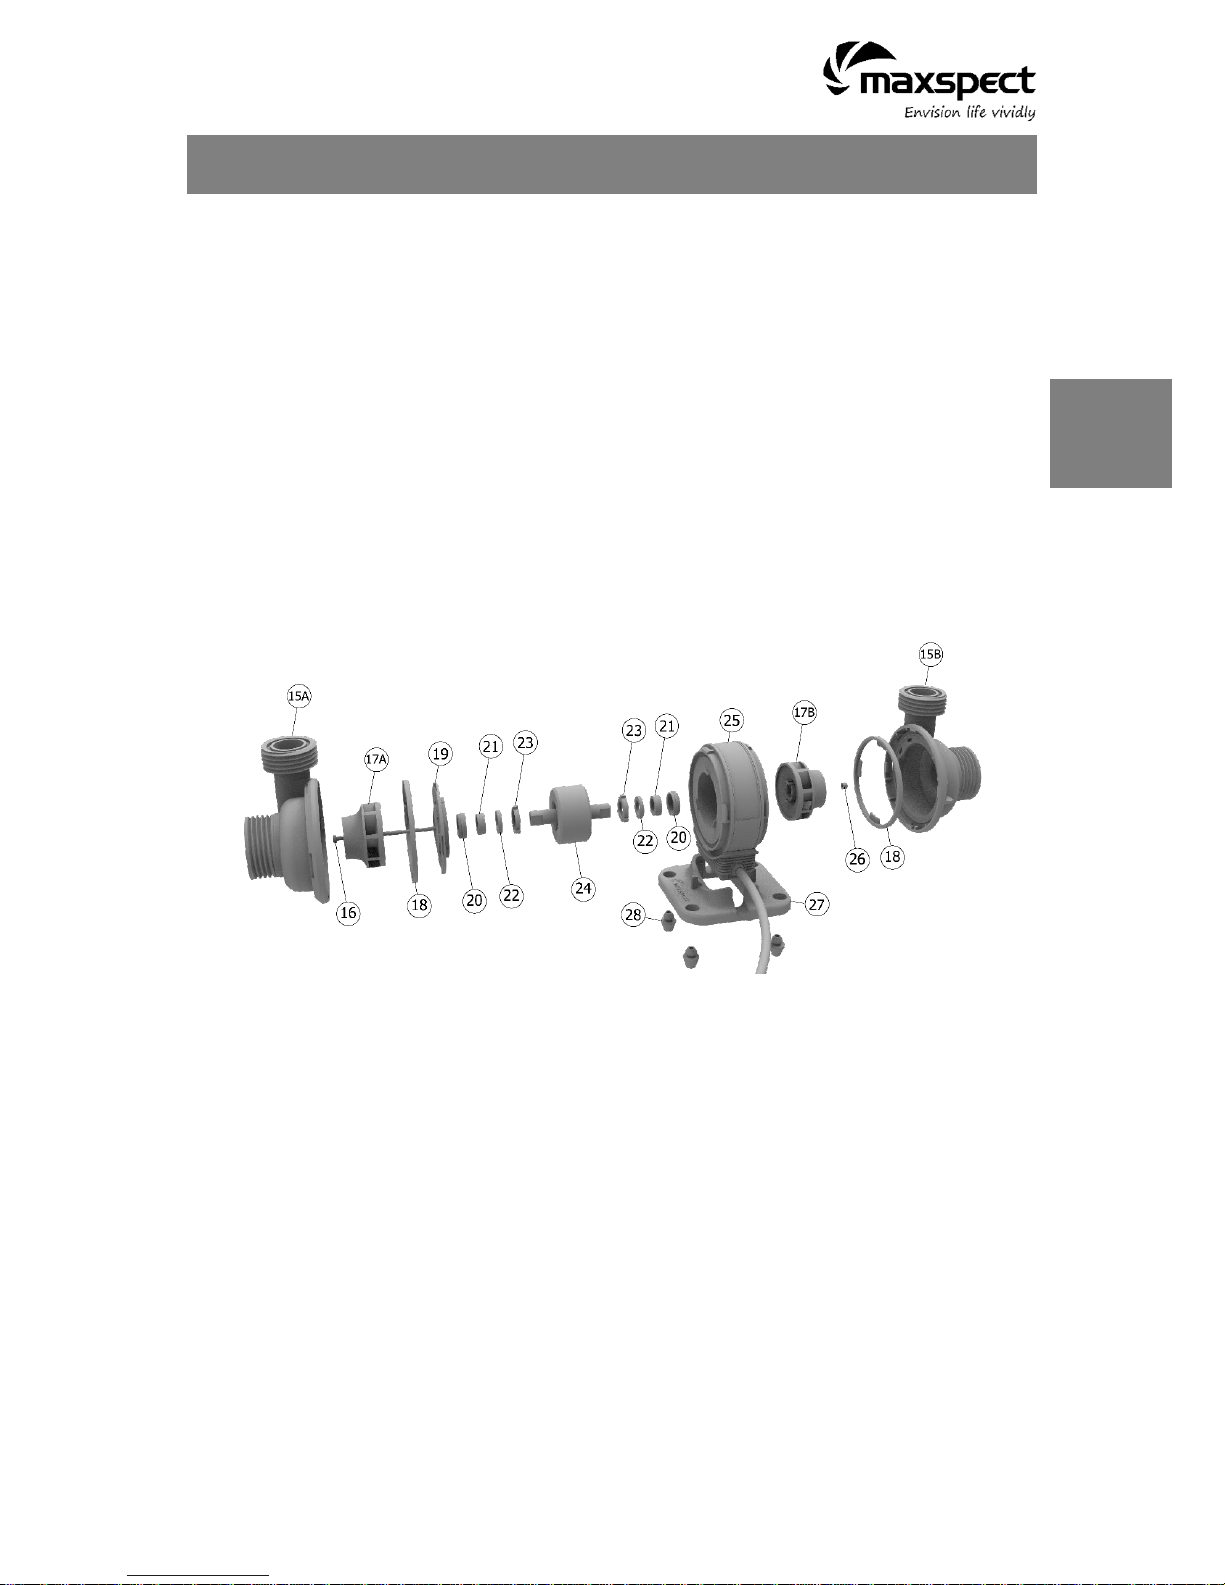
Regular Pump Unit Maintenance
Maintenance of the Appliance
Your Turbine Duo DC Pump is designed to operate optimally with little attention after initial
setup. However, due to the harsh conditions of a saltwater aquarium and resulting buildup of
algae and other organic matter, it is advisable to clean the pump to ensure the longevity of
appliance. Maxspect recommends doing a cleaning every 6 months or as necessary. This can
be accomplished by opening the impeller housing and gently brushing the impeller and inside
of impeller housing with a soft brush under running water. If there is calcium buildup, it may
be necessary to soak these parts in a mild acid solution such as vinegar. Do not use strong
acids, because these may damage the components. After cleaning, reassemble the appliance.
15A. Impeller Housing(A)
15B. Impeller Housing(B)
16. Screw
17A. Impeller(A)
17B. Impeller(B)
18. Sillicon Seal
19. Rotor Cover
20. Sillicon Pad
21. Bearing
22. Ceramic Bearing
23. Sillicon Pad
24. Rotor
25. Stator
26. Nut
27. Pump Base
28. Sillicon Pad
English
7
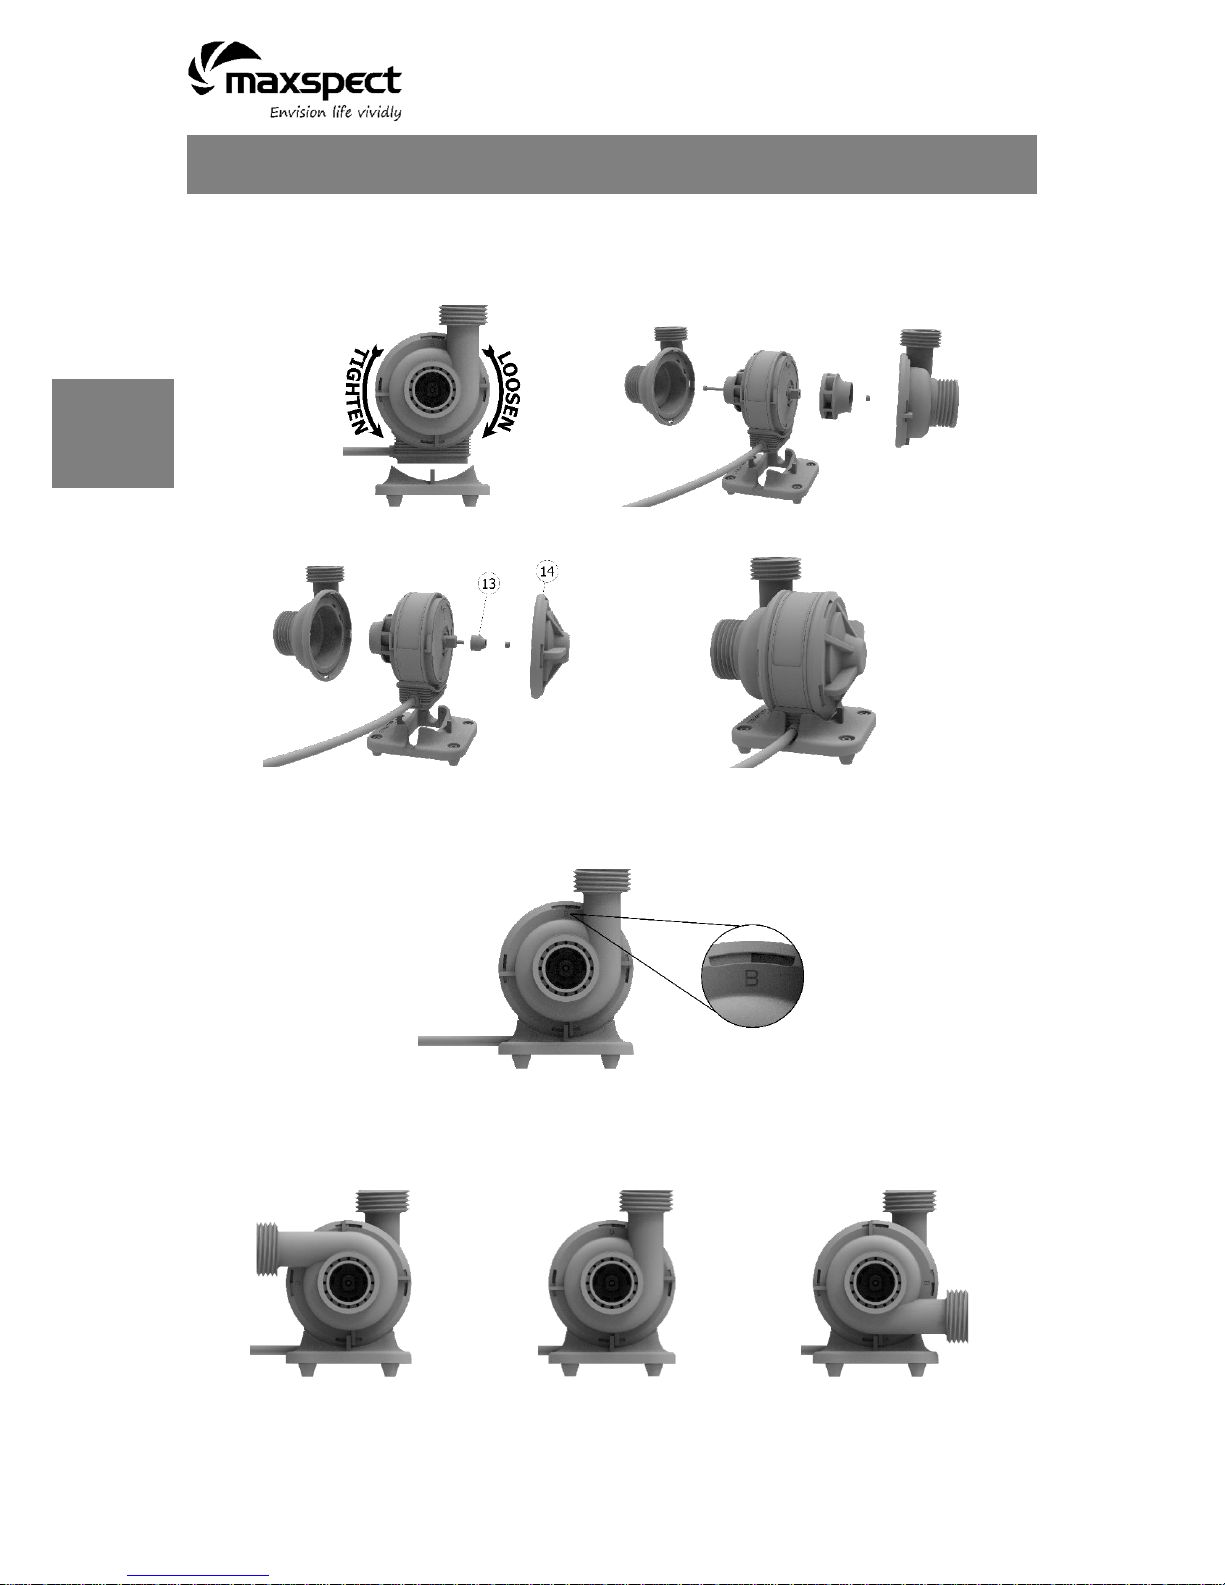
Installation
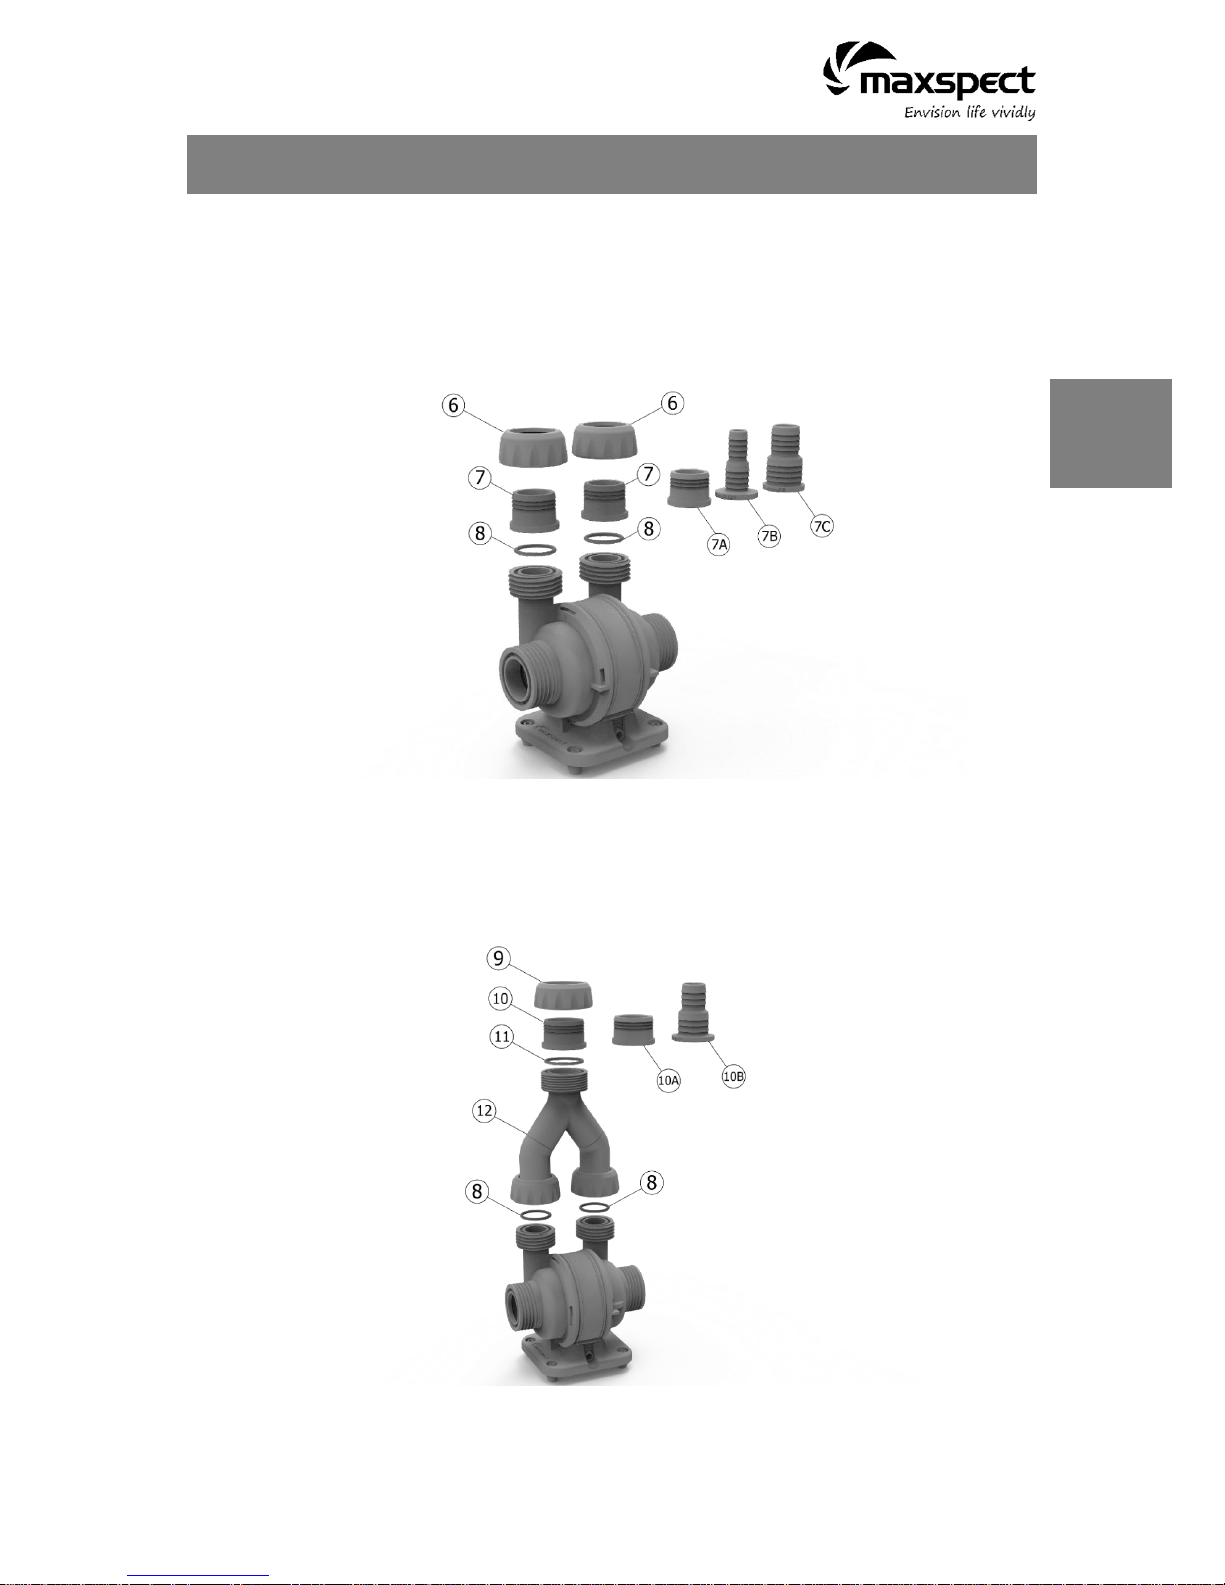
Inlet Installation
You can switch the union coupling between 2/2A to fit a different size pipe while Turbine Duo
runs as a closed loop pump.
Or you can also install two intake grids while it runs as a return pump.
English
8
Installation
Outlet Installation
Duo Outlets: Switch the union couplings among 7/7A/7B/7C to a fit different size pipe or
hose.
Combined Outlet using Y-Tubing: Switch the union couplings among 10/10A/10B to a fit
different size pipe or hose.
English

9
Installation
Single Outlet: You can also replace the B impeller housing by the cap to make it a
single outlet DC pump.
1
2
3
4
Important: Only B impeller housing can be replaced by the cap.
Pump Base must be installed before putting into use.
Direction of Outlet
Both A and B impeller housings can be installed in three directions.
0°
90°
180°
English
10
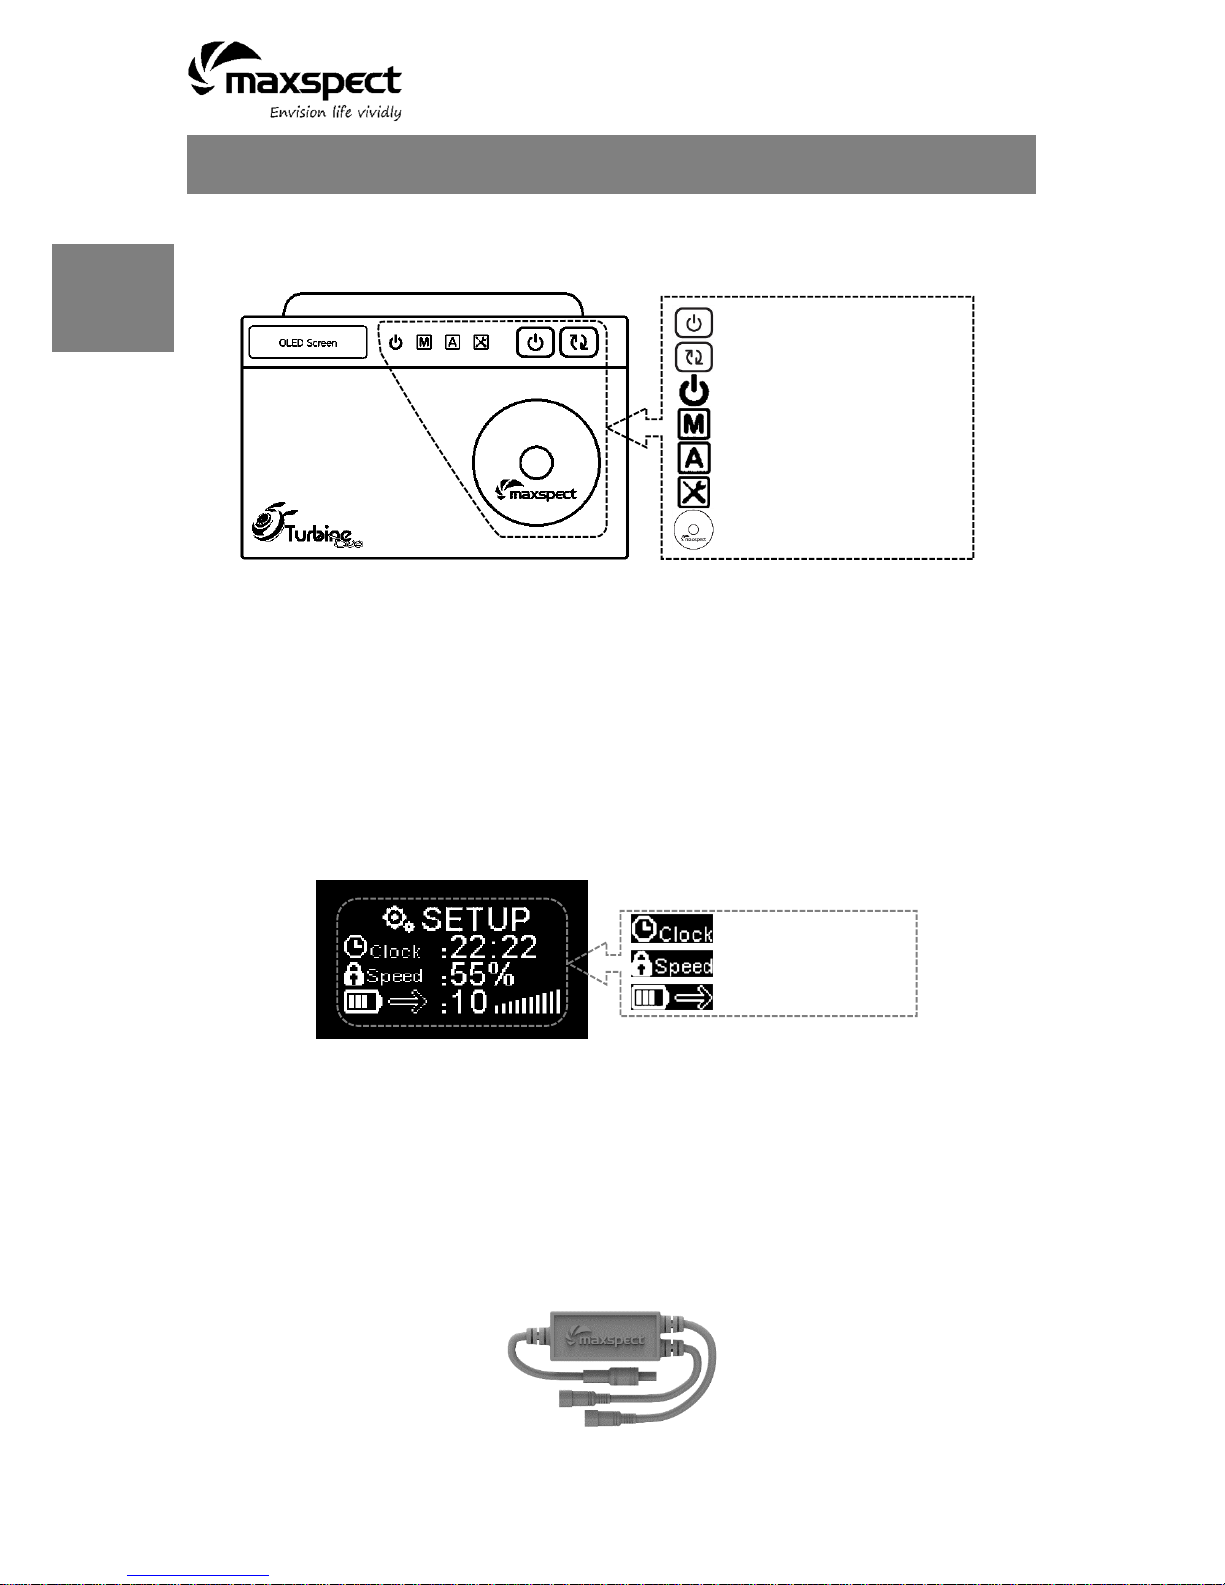
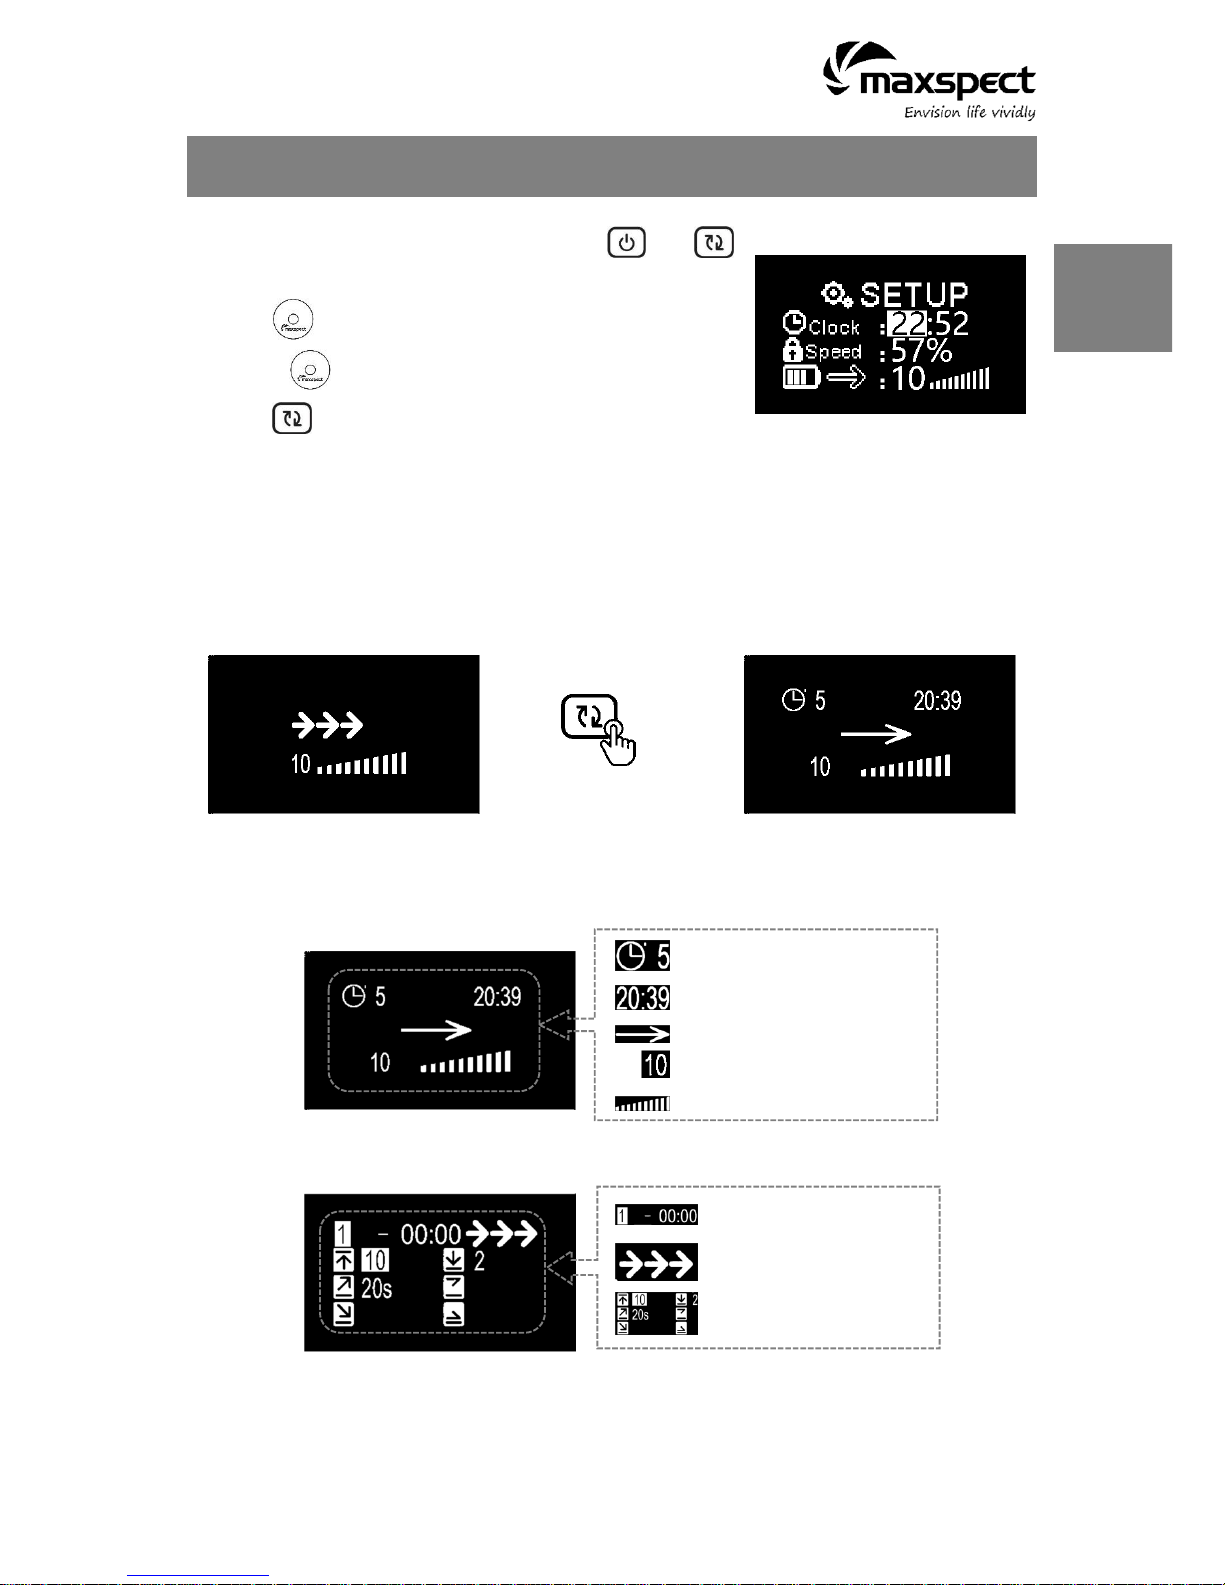
The Turbine Duo Controller Unit
Switch ON/OFF of the Turbine Duo
Press and hold the ON/FF button over 4s can turn on or off the appliance. While the appliance
is turned off, the pump will stop working, the indicators and OLED screen of the controller will
be shut down. However, if the appliance is connected to an ICV6 (sold spearately), it still can
be activated by the Syna-G App.
Initialize Your Turbine Duo
Before using the appliance, there are some basic setting you need to do for your Turbine Duo.
Clock: Set up the system clock to match with your local time.
Speed: Set up the minimum head flow for the pump of all time. It means the setting of
minimum water flow for all water movement modes will be calculated based on this
value. The adjustable minimum head flow range is between 1% and 90%.
Battery Mode: Set up the working speed of the pump while it is powered by a backup battery.
The product is packed with a power switch adapter which featured with two power
source cables, one end connects to the power supply unit offered by Maxspect, the
other end connects to a DC12v battery (sold separately). When the power from the
PSU is cut, the power source will be switched to the battery automatically.
Operating Instructions
ON/OFF, Feed Mode Button
Mode Switch, Setup Button
Power Indicator
Manual Mode Indicator
Automatic Mode Indicator
Setting Indicator
Control Dial
System Clock
Minimum Head Flow
Battery Mode
English
English
11
1. While the OLED screen is activated, press both and
buttons simultaneously to enter the setup page.
2. Press to switch between the settings.
3. Rotator to set a value.
4. Press to save the setting.
Switching between Automatic and Manual Mode
Manual Mode: Manually set a water movement mode and flow level for your Turbine Duo.
Auto Mode: A set of programs with programmable water movement mode and flow level
which will be cycled every 24hrs.
Manual Mode Interface
Auto Mode Interface
< 3s >
Interface Introduction
Operating Instructions
Main Interface
Current Time Point
Current Time
Water Movement Mode
Flow Level
Level Indicator
Setting Page
Time Point(Total 24)
Water Movement Mode
Configurable Variables
English

12
OLED Screen Icon
Water Movement Modes
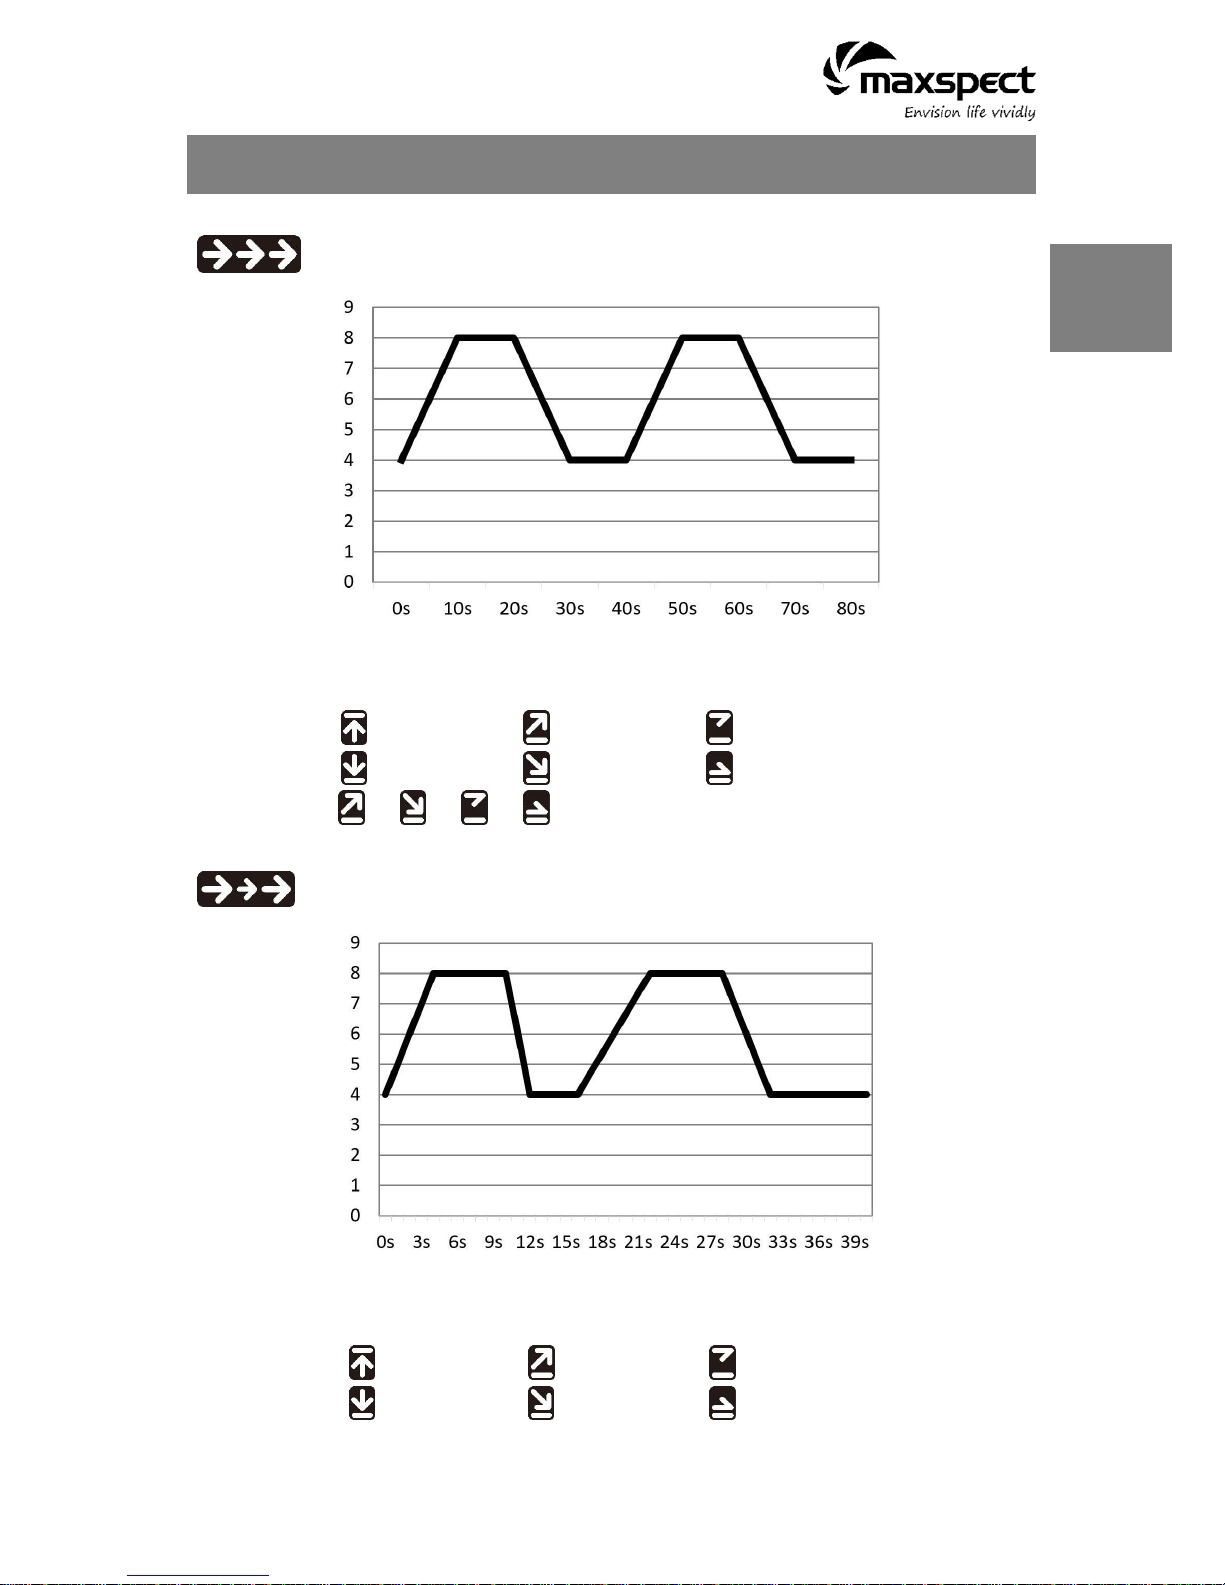
Constant Speed Mode
Pulsing Mode
Random Mode
Advanced Pulsing Mode
Variables
Maximum Flow
Ramp Up Time
Maximum Flow Time
Minimum Flow
Wind Down Time
Minimum Flow Time
Variables Illustration
Water Movement Mode Illustration
Constant Speed Mode
Configurable Variables
Flow range: 1-10
Level 8
N/A N/A
N/A N/A N/A
Operating Instructions
English
English
13
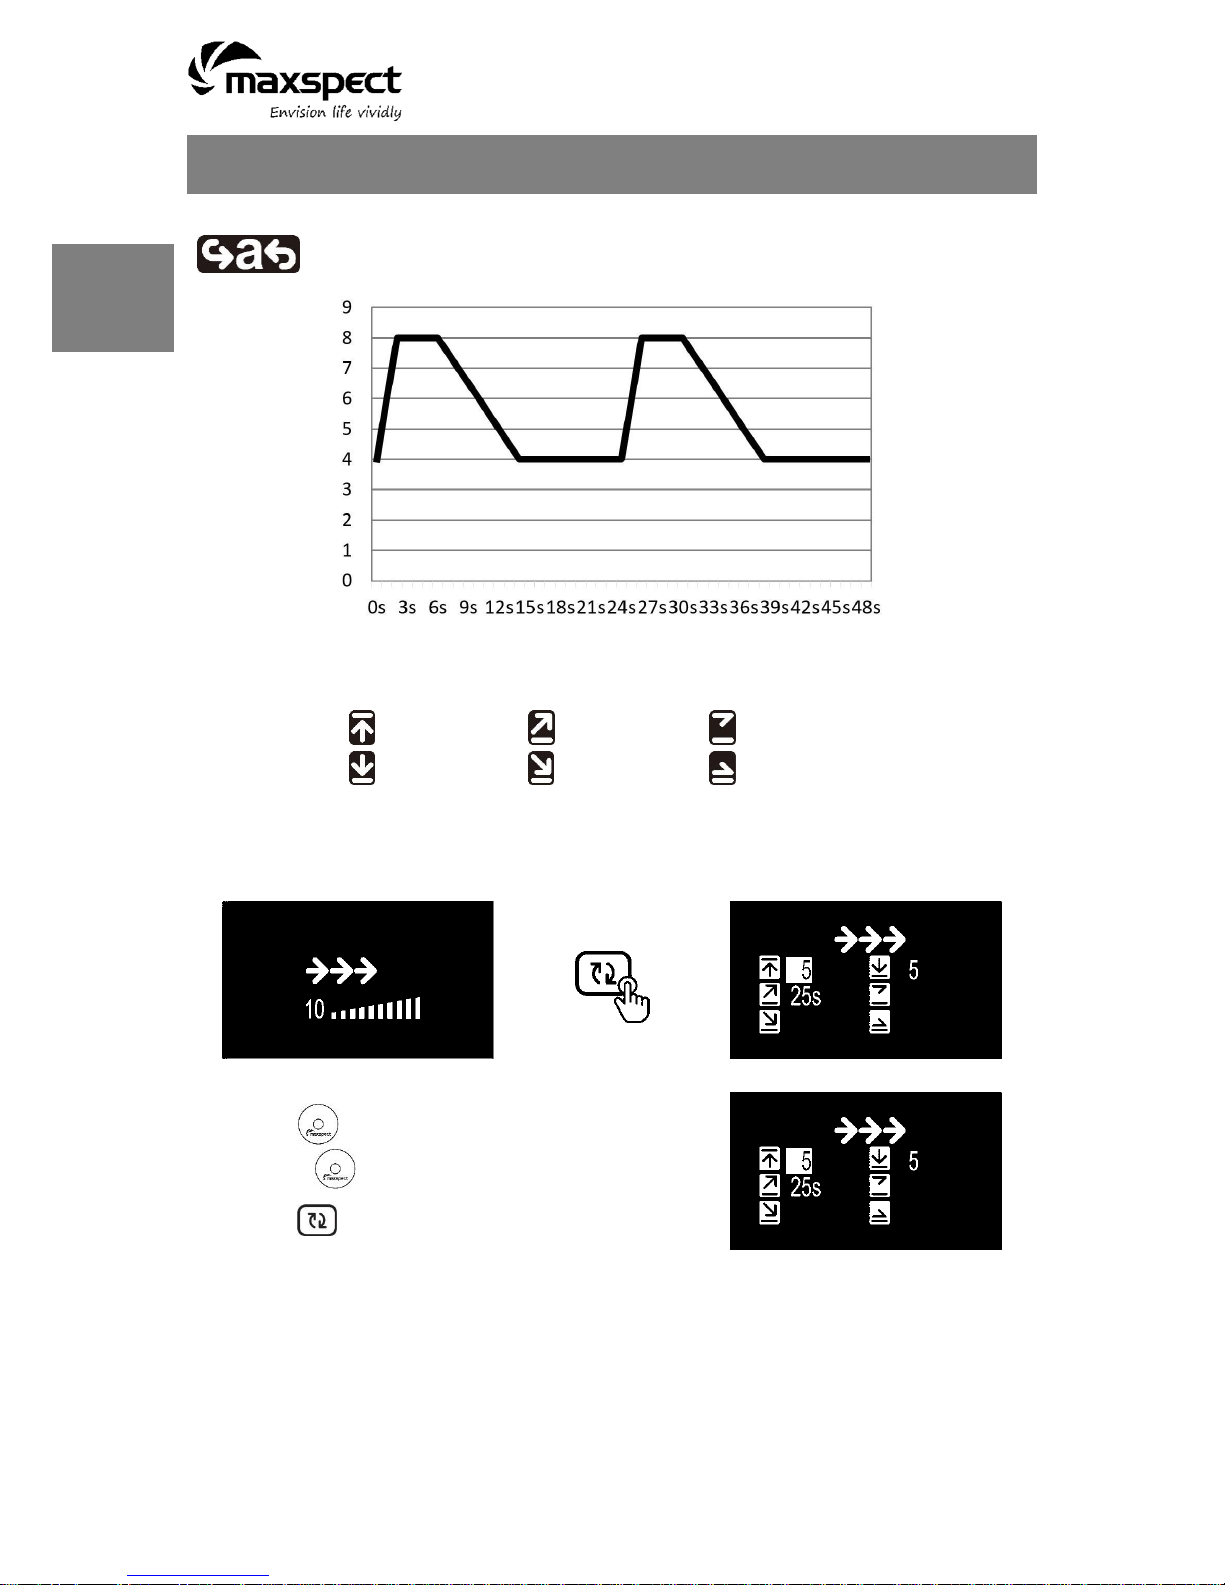
Pulsing Mode
Configurable Variables
Flow range:1-10 Time range: 2-30s
Level 8
10s
N/A
Level 4
N/A
N/A
= = = = 10s
Random Mode
Configurable Variables
Max flow range:2-10, Min flow range: 1-9
Level 8
N/A N/A
Level 4
N/A N/A
Operating Instructions
English
14
Operating Instructions
Advanced Pulsing Mode
Configurable Variables
Flow range: 1-10 Time range: 2s-5m
Level 8
2s
4s
Level 4
8s
20s
Manual Mode
Main Interface
Setting Page
< >
1. Press to switch between the settings.
2. Rotator to set a value.
3. Press to save the setting.
English

15
Operating Instructions
Automatic Mode
< >
1. Press to switch between the settings.
2. Rotator to set a value.
3. Press to save the setting.
Feed Mode
In either main interface, press to enter Feed Mode.
1. Press to activate the setting.
2. Press to switch between the settings.
3. Rotator to set a value.
4. Press to save the setting.
Feed Time(Max 60m)
Count Down
Flow Level
English
16
Maintenance Instructions
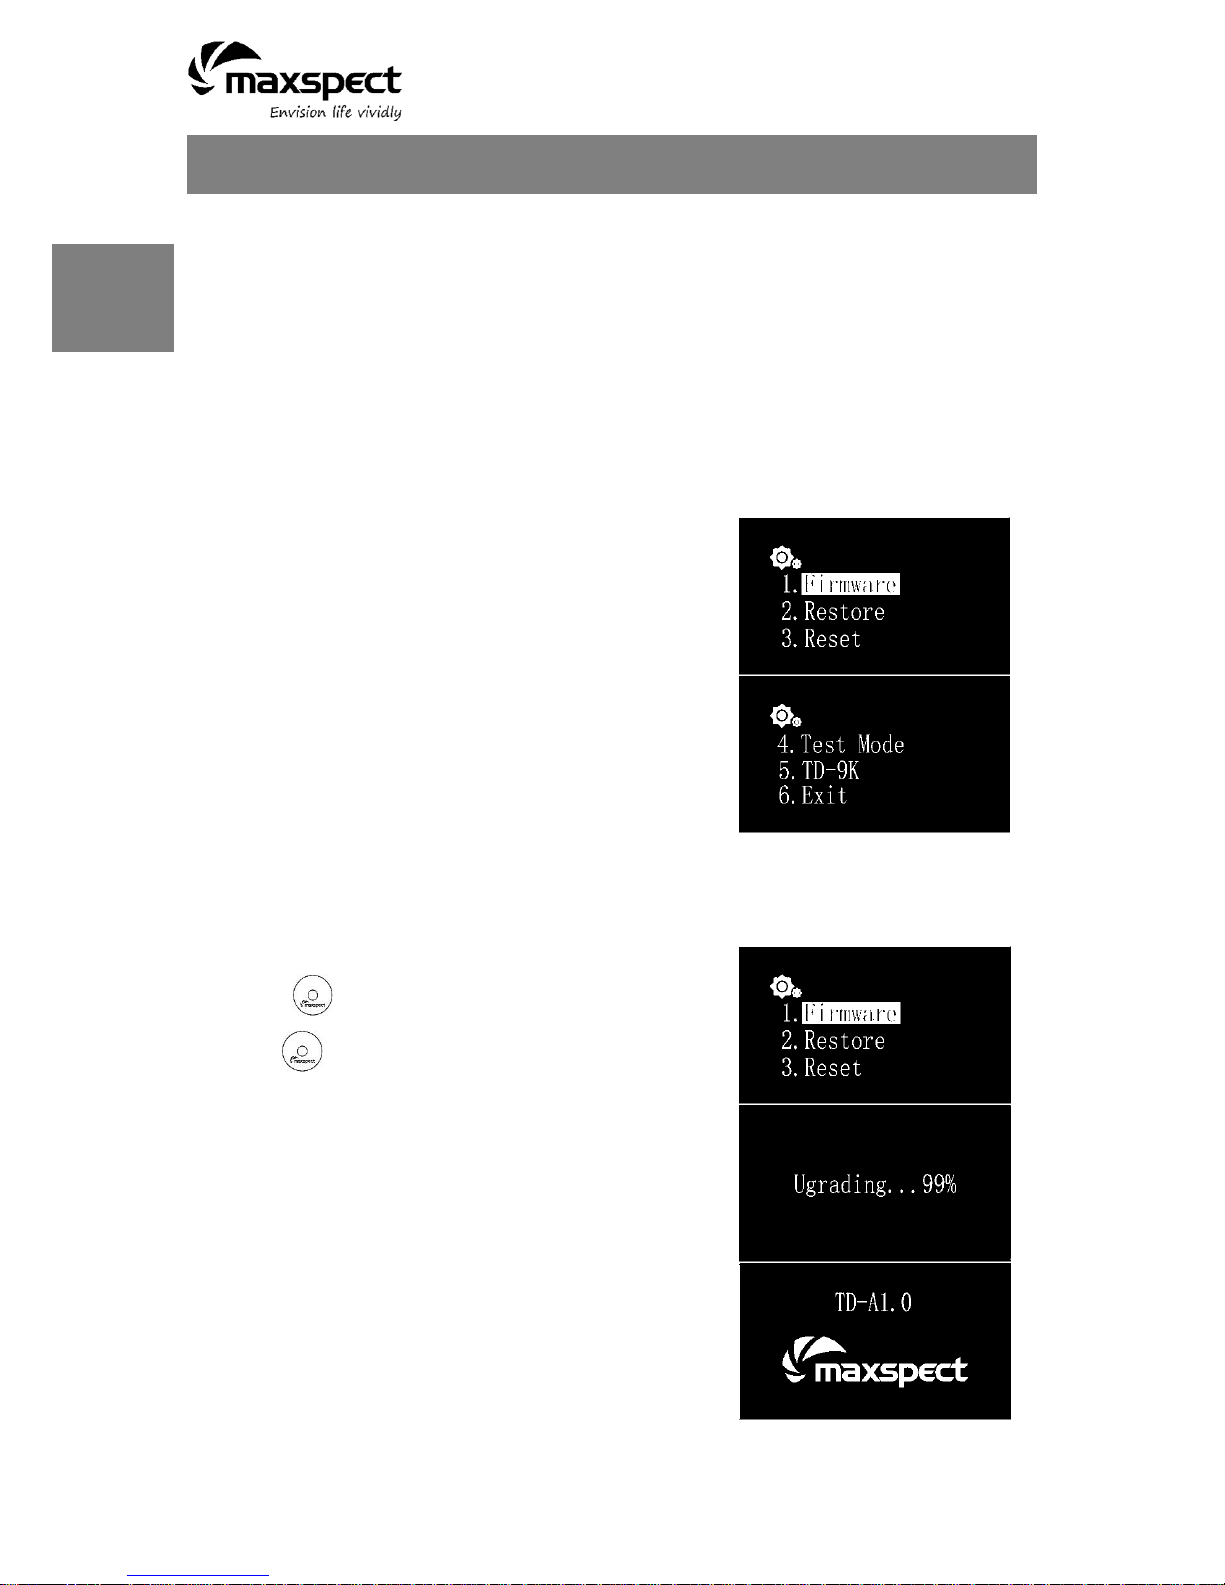
System Setup
System Setup features a set of functions allowing you to do perform maintenance on the
appliance.
To enter the System Setup page, first turn off the appliance, then press and hold control dial
while turning the appliance back on. Keep on holding the control dial until the system setup
page is shown on OLED monitor.
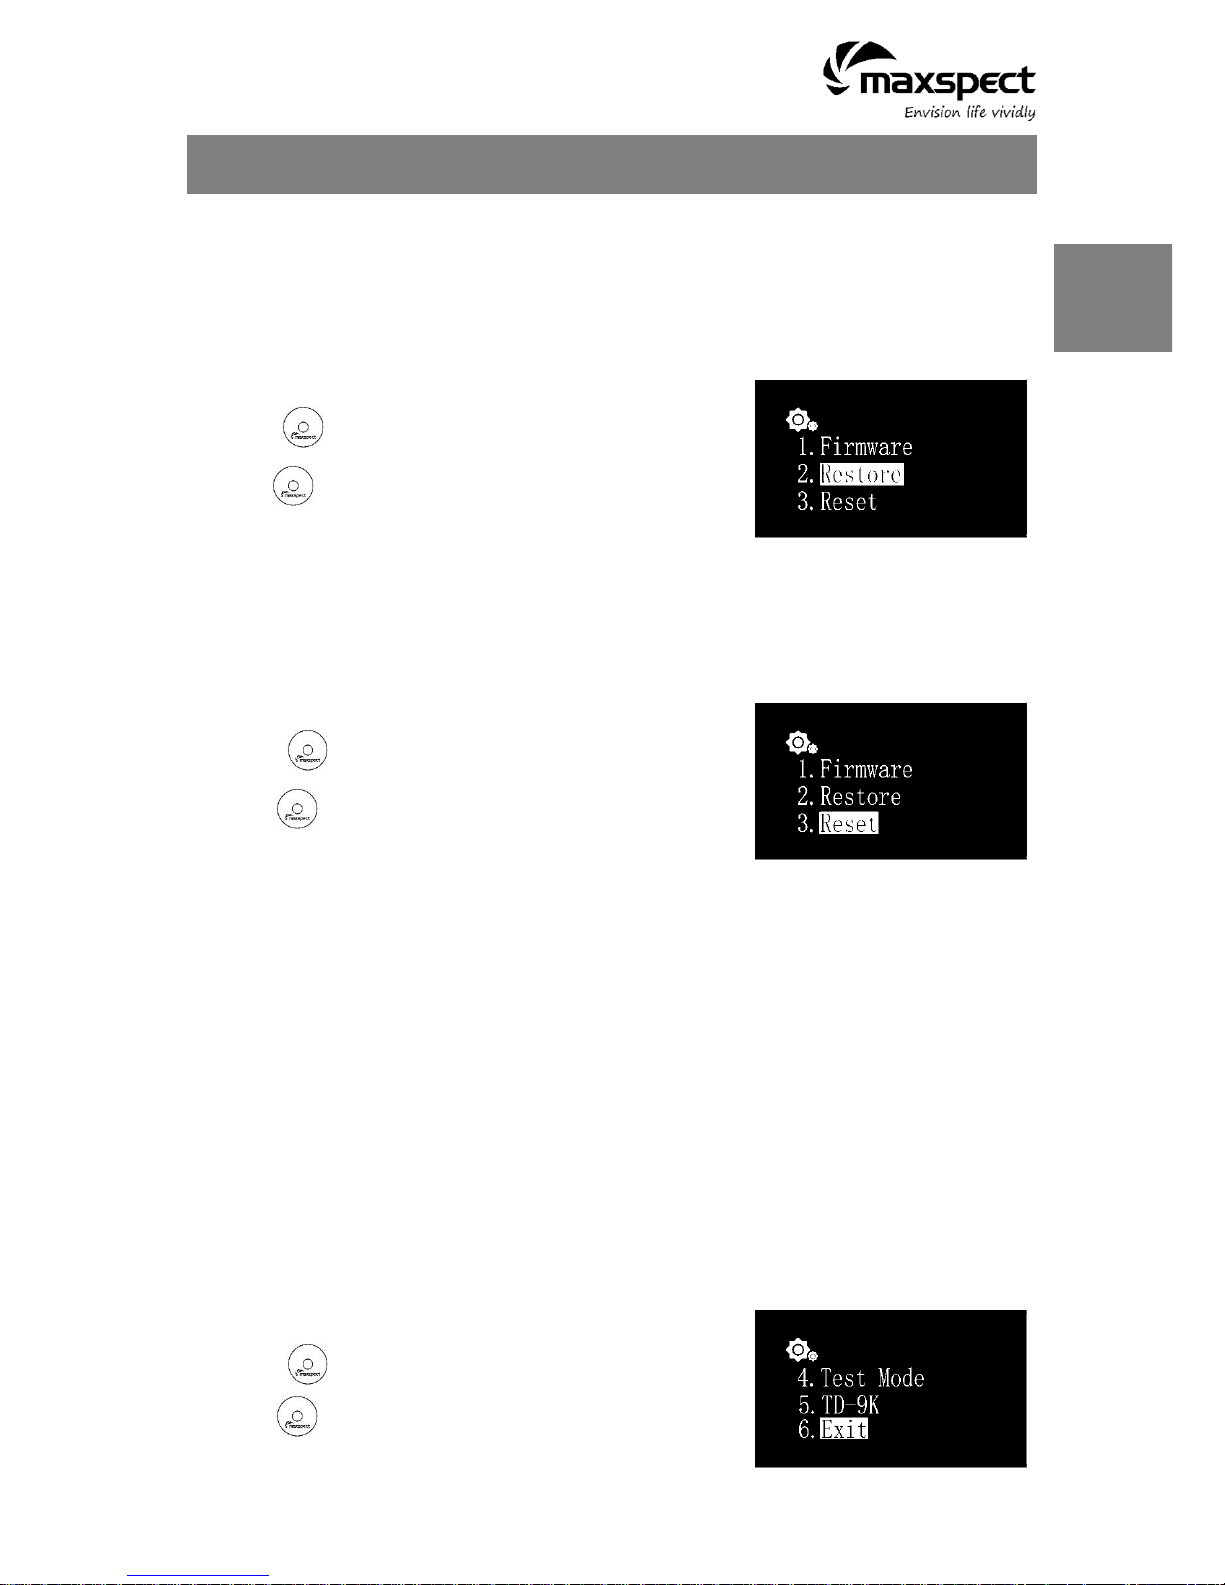
There are 5 functions in the System Setup screen.
1. Firmware
2. Restore
3. Reset
4. Test Mode
5. Model Number
6. Exit
1. Firmware
This function allows you to update the firmware.
1. Rotate to select “Firmware”.
2. Press to begin the firmware update.
1. When there is no micro SD card or invalid firmware in the
micro SD card, “NO SD Card” or “Wrong File” will be
shown on the screen.
2. Otherwise the firmware update progress will be shown.
Once the firmware has been updated successfully, the
appliance will restart automatically and the new firmware
version number will be shown on the screen.
English
17
Maintenance Instructions
2. Restore
This function allows you to restore the firmware to its original factory version. After finish
restoring the firmware, it’ll restart automatically and the firmware version number will be
shown on the screen.
1. Rotate to select “Restore”.
2. Press to restore the firmware.
3. Reset
This function allows you to reset the appliance back to its factory settings. After finish
resetting the appliance, it’ll restart automatically.
1. Rotate to select “Reset”.
2. Press to factory reset the appliance.
4. Test Mode
This function allows you to put the appliance in the test mode, which would help our customer
service representative to diagnose the appliance. This should only be done by the users
when told by authorized dealer or customer representative to perform certain test
on the appliance.
5. Model Number
This function will display the model number of the fixture, which also double serves as the ID
name when the Turbine Duo is connected to an iOS or Android device through the Syna-G
system. Under normal circumstances this value should not be changed.
6. Exit
1. Rotate to select “Exit”.
2. Press to factory restart the appliance.
English

18
Limited Warranty
Maxspect (HongKong) Limited warrants all Maxspect™ Turbine Duo DC pump products against
defects in workmanship for a period of 12-months from the date of purchase. If a defect exists
during the warranty period, Maxspect (HongKong) Limited at its option will either repair (using
new or remanufactured parts) or replace (with a new or remanufactured unit) the product at
no charge.
THE WARRANTY WILL NOT APPLY TO THE PRODUCT IF IT HAS BEEN DAMAGED BY MISUSE,
ALTERATION, ACCIDENT, IMPROPER HANDLING OR OPERATION, OR IF UNAUTHORIZED
REPAIRS ARE ATTEMPTED OR MADE. SOME EXAMPLES OF DAMAGES NOT COVERED BY
WARRANTY INCLUDE, BUT ARE NOT LIMITED TO, USING AFTER-MARKET LED BULBS AND
MODIFICATION OF THE CIRCUITRY, WHICH ARE PRESUMED TO BE DAMAGES RESULTING
FROM MISUSE OR ABUSE.
DISCLAIMER OF CONSEQUENTIAL AND INCIDENTAL DAMAGES:
You and any other user of Maxspect (HongKong) Limited products shall not be entitled to any
consequential or incidental damages, including without limitation, loss of use of the unit,
inconvenience, damage to personal property, phone calls, lost income or earnings. This
warranty gives you specific legal rights and you may also have other rights, which vary from
state to state.
MAXSPECT LTD. MAKES NO WARRANTY OR REPRESENTATION, EITHER EXPRESS OR
IMPLIED, WITH RESPECT TO THE PRODUCT'S QUALITY, PERFORMANCE, MERCHANTABILITY,
OR FITNESS FOR A PARTICULAR PURPOSE. AS A RESULT, THIS PRODUCT, IS SOLD "AS IS,"
AND YOU THE PURCHASER ASSUME THE ENTIRE RISK AS TO ITS QUALITY AND
PERFORMANCE.
IN NO EVENT WILL MAXSPECT LTD BE LIABLE FOR DIRECT, INDIRECT, SPECIAL,
INCIDENTAL, OR CONSEQUENTIAL DAMAGES RESULTING FROM ANY DEFECT IN THE
PRODUCT OR ITS DOCUMENTATION.
The warranty, disclaimer, and remedies set forth above are exclusive and replace all others,
oral or written, expressed or implied. At no time will any Maxspect (HongKong) Limited dealers,
agents, or employees be authorized to make any modifications, extension, or addition to this
warranty.
Some states do not allow the exclusion or limitation of implied warranties or liability for
incidental or consequential damages, so the above limitation or exclusion may not apply to
you.
English

19
Specifications
Specifications
For the latest specifications of Turbine Duo DC Pump, please visit: www.maxspect.com
English
20
Sehr geehrter Kunde,
vielen Dank für den Kauf dieses Produkts.
Für eine optimale Leistung und Sicherheit, lesen Sie bitte diese Anleitung sorgfältig.
Nutzer-Memo:
Kaufdatum
Händler:
Händleradresse:
Händlerwebsite:
Händler-E-Mail:
Händlertelefon
Bitte besuchen Sie uns auf Facebook oder Twitter!
https://www.facebook.com/Maxspect
http://twitter.com/maxspectled
Deutsch
21
Packungsinhalt
Bitte überprüfen Sie den Lieferumfang auf Vollständigkeit.
Hauptbestandteile
Pumpe
Steuereinheit
Netzteil
Stromkabel
Backup-Batterie-
Adapter
Pumpeneingangsteile
1. Ф58mm 2pcs
2. 1” 2pcs
2A. Ф32mm 2pcs
3. Ф40mm 2pcs
4. 2pcs
5. 2pcs
Doppelpumpe-Auslassteile
6. Ф51mm 2pcs
7. ¾” 2pcs
7A. Ф25mm 2pcs
7B. Ф16mm/½” 2pcs
Ф20mm/ ¾” 2pcs
7C. Ф25mm/1” 2pcs
Ф32mm/1¼” 2pcs
8. Ф32mm 2pcs
Deutsch
22
Packungsinhalt
Y-Rohrteile
9. Ф58mm 1pc
10. 1” 1pc
10A. Ф32mm 1pc
10B. Ф25mm/1” 1pc
Ф32mm/1¼” 1pc
11. Ф40mm 1pc
12. 1pc
Einzelpumpe -Auslassteile
13. 1pc
14. 1pc
Deutsch
23
Sicherheitshinweise
LESEN UND FOLGEN SIE ALLE SICHERHEITSHINWEISE
1. GEFAHR - Um einen möglichen elektrischen Schlag zu vermeiden, sollte besondere Vorsicht
geboten werden, da Wasser bei der Verwendung von Aquariengeräten eingesetzt wird. Für
jede der folgenden Situationen, versuche nicht, selbst zu reparieren; Bringen Sie das Gerät
an eine autorisierte Kundendienststelle zurück oder verwerfen Sie das Gerät.
a) Wenn das Gerät irgendwelche Anzeichen einer anormalen Wasserleckage aufweist,
ziehen Sie es sofort aus der Stromquelle.
b) Das Gerät nach der Installation sorgfältig prüfen. Es sollte nicht eingesteckt werden,
wenn es Wasser auf nicht beabsichtigte Teile gibt.
c) Betreiben Sie das Gerät nicht, wenn es beschädigtes Kabel oder Stecker hat oder wenn
es fehlerhaft ist oder in irgendeiner Weise fallengelassen oder beschädigt wurde.
d) Um die Möglichkeit zu vermeiden, dass der Gerätestecker oder die Steckdose nass wird,
positionieren Sie den Aquarienständer und den Tank auf eine Seite einer
Wandsteckdose, um zu verhindern, dass Wasser auf die Steckdose oder den Stopfen
tropft. Eine "Drip-Loop", die in der Abbildung gezeigt wird, sollte vom Benutzer für jede
Schnur angeordnet werden, die ein Aquariumgerät mit einer Steckdose verbindet. Die
"Tropfschleife" ist der Teil des Kabels unterhalb des Niveaus des Behälters oder der
Stecker, wenn ein Verlängerungskabel verwendet wird, um zu verhindern, dass Wasser
entlang der Schnur fährt und mit dem Behälter in Berührung kommt. Wenn der Stecker
oder die Steckdose nass wird, ziehen Sie den Netzstecker nicht ab. Trennen Sie die
Sicherung oder den Schutzschalter, der das Gerät mit Strom versorgt. Dann trennen
und prüfen auf Vorhandensein von Wasser in der Steckdose.
2. Die Überwachung ist erforderlich, wenn ein Gerät von oder in der Nähe von Kindern benutzt
wird.
3. Um Verletzungen zu vermeiden, wenden Sie sich nicht an bewegliche Teile oder heiße Teile
wie Heizkörper, Reflektoren, Lampenkolben und dergleichen.
Vor der ersten Inbetriebnahme des Maxspect™ DC pump Turbine Duo
sollten Sie diese Bedienungsanleitung sorgfältig lesen. Bitte beachten Sie
die folgenden Sicherheitshinweise mit großer Sorgfalt.
Bewahren Sie diese Anleitung auch zum späteren Nachschlagen auf.
Deutsch
24
Sicherheitshinweise
4. Ziehen Sie das Gerät immer aus der Steckdose, bevor Sie es benutzen, bevor Sie es
anziehen oder abnehmen, bevor Sie es reinigen. Niemals das Kabel ziehen, um den Stecker
aus der Steckdose zu ziehen. Fassen Sie den Stecker an und ziehen Sie ihn abziehen
5. Verwenden Sie kein Gerät für andere als den vorgesehenen Gebrauch. Die Verwendung
von Anhängen, die vom Gerätehersteller nicht empfohlen oder verkauft werden, kann zu
einem unsicheren Zustand führen.
6. Installieren oder lagern Sie die Geräte nicht dort, wo sie dem Wetter ausgesetzt sind, oder
Temperaturen unter dem Gefrierpunkt.
7. Stellen Sie sicher, dass ein Gerät, das an einem Tank montiert ist, vor dem Betrieb sicher
installiert ist.
8. Lesen und beachten Sie alle wichtigen Hinweise auf dem Gerät.
9. Wenn ein Verlängerungskabel erforderlich ist, sollte ein Netzkabel mit einer korrekten
Bewertung verwendet werden. Ein Kabel, das für weniger Ampere oder Watt als das Gerät
bewertet wird, kann überhitzen.
10. Die Stromversorgungskabel sollten so verlegt werden, dass sie nicht wahrscheinlich auf
Gegenstände gelegt oder eingeklemmt werden. Nehmen Sie niemals den Stecker oder
das Kabel, wenn Ihre Hand nass ist, und greifen Sie immer den Stecker Körper beim
Anschließen oder Trennen.
11. Die Pumpe wurde so konzipiert, dass sie NUR im Wasser verwendet werden kann.
Deswegen muss der gesamte Körper der Pumpe GANZ im Wasser eingetaucht sein.
12. Um die optimale Leistung der Pumpe zu erzielen, sollte der vertikale Abstand zwischen
dem Auslass und Einlass der Pumpe nicht mehr als 2 Meter betragen.
Deutsch
25
Regelmäßige Wartung der Pumpeneinheit
Wartung der Pumpe
Ihre Gleichstrom Pumpe, Turbine Duo, ist so konzipiert dass sie optimal mit wenig
Aufmerksamkeit, nach der Ersteinrichtung, funktioniert. Jedoch, aufgrund der harten
Bedingungen in Salzwasseraquarien und der Ansammlung von Algen und anderen organischen
Stoffen, ist es sehr ratsam, die Pumpe zu reinigen um seine Langlebigkeit zu gewährleisten.
Aus diesem Grund, empfehlt Maxspect die Pumpe mindestens alle 6 Monate oder bei Bedarf
auch öfter zu reinigen. Dafür, ist es notwendig, die Pumpe auseinander zu bauen und dann
mittels einer weichen Bürste, das Schaufelrad sowie das Inneren des Körpers der Pumpe,
unter fließendem Wasser, sanft reinigen. Bei Kalkablagerungen, können die Teile in einer
Lösung aus Wasser und Essig eingeweicht werden. Verwenden Sie keine starken Säuren oder
andere Reinigungsmittel, da dies die Komponenten beschädigen könnte. Nach der Reinigung
das Gerät wieder zusammenbauen.
15A. Schaufelradgehäuse (A)
15B. Schaufelradgehäuse (B)
16. Schraube
17A. Schaufelrad (A)
17B. Schaufelrad (B)
18. Silikondichtung
19. Rotorabdeckung
20. Silikonauflage
21. Lager
22. Keramiklager
23. Silikonauflage
24. Rotor
25. Stator
26. Schraubenmutter
27. Pumpenbasis
28. Silikonauflage
Deutsch

26
Installation
Einlassinstallation
Bei Verwendung der Turbine Duo Pumpe in einem geschlossenem System, können die
Anschlusskupplung 2 oder 2A, je nach Durchmesser der Röhren oder Schläuchen, eingesetzt
werden
Bei Verwendung der Turbine Duo Pumpe als Rücklaufpumpe, können die zwei Einlaufgitter
installiert werden.
Deutsch
27
Installation
Ausganginstallation
Doppelausgang: Bei Verwendung der Turbine Duo Pumpe mit den Doppelausgängen,
können die Anschlusskupplung 7 / 7A / 7B / 7C, je nach Durchmesser der Röhren oder
Schläuchen, eingesetzt werden.
Gekoppelter Auslass mit Y-Rohr: Bei Verwendung der Turbine Duo Pumpe mit dem YRohr, können die Anschlusskupplung 10 / 10A / 10B, je nach Durchmesser der Röhren
oder Schläuchen, eingesetzt werden.
Deutsch
28
Installation
Einzelauslass: Bei Verwendung der Turbine Duo Pumpe mit nur einem Auslass, muss das
B-Laufradgehäuse durch die Abdeckung 14 ersetzt werden.
1
2
3
4
Wichtig: Nur das B-Laufradgehäuse kann durch die Abdeckung 14 ersetzt
werden. Die Pumpenbasis muss vor Inbetriebnahme wieder installiert werden.
Richtung der Auslässe
Die Laufradgehäuse A und B können in drei Richtungen eingerichtet werden.
0°
90°
180°
Deutsch
 Loading...