

Maxspect Gyre 300 Owner's Manual

Owner’s Manual
Bedienungsanleitung
Mode d’emploi
Manuali dei Prodotti
Manual do Proprietário
Manual de Usuario
Instrukcja Obsługi
用户手册
使用說明書


Dear Customer,
Date of purchase:
Dealer name:
Dealer address:
Dealer website:
Dealer email:
Dealer phone no.:
https://www.facebook.com/Maxspect
http://twitter.com/maxspectled
Thank you for purchasing this product.
For optimum performance and safety, please read these instructions carefully.
User Memo:
EN
Please visit us on facebook or twitter!
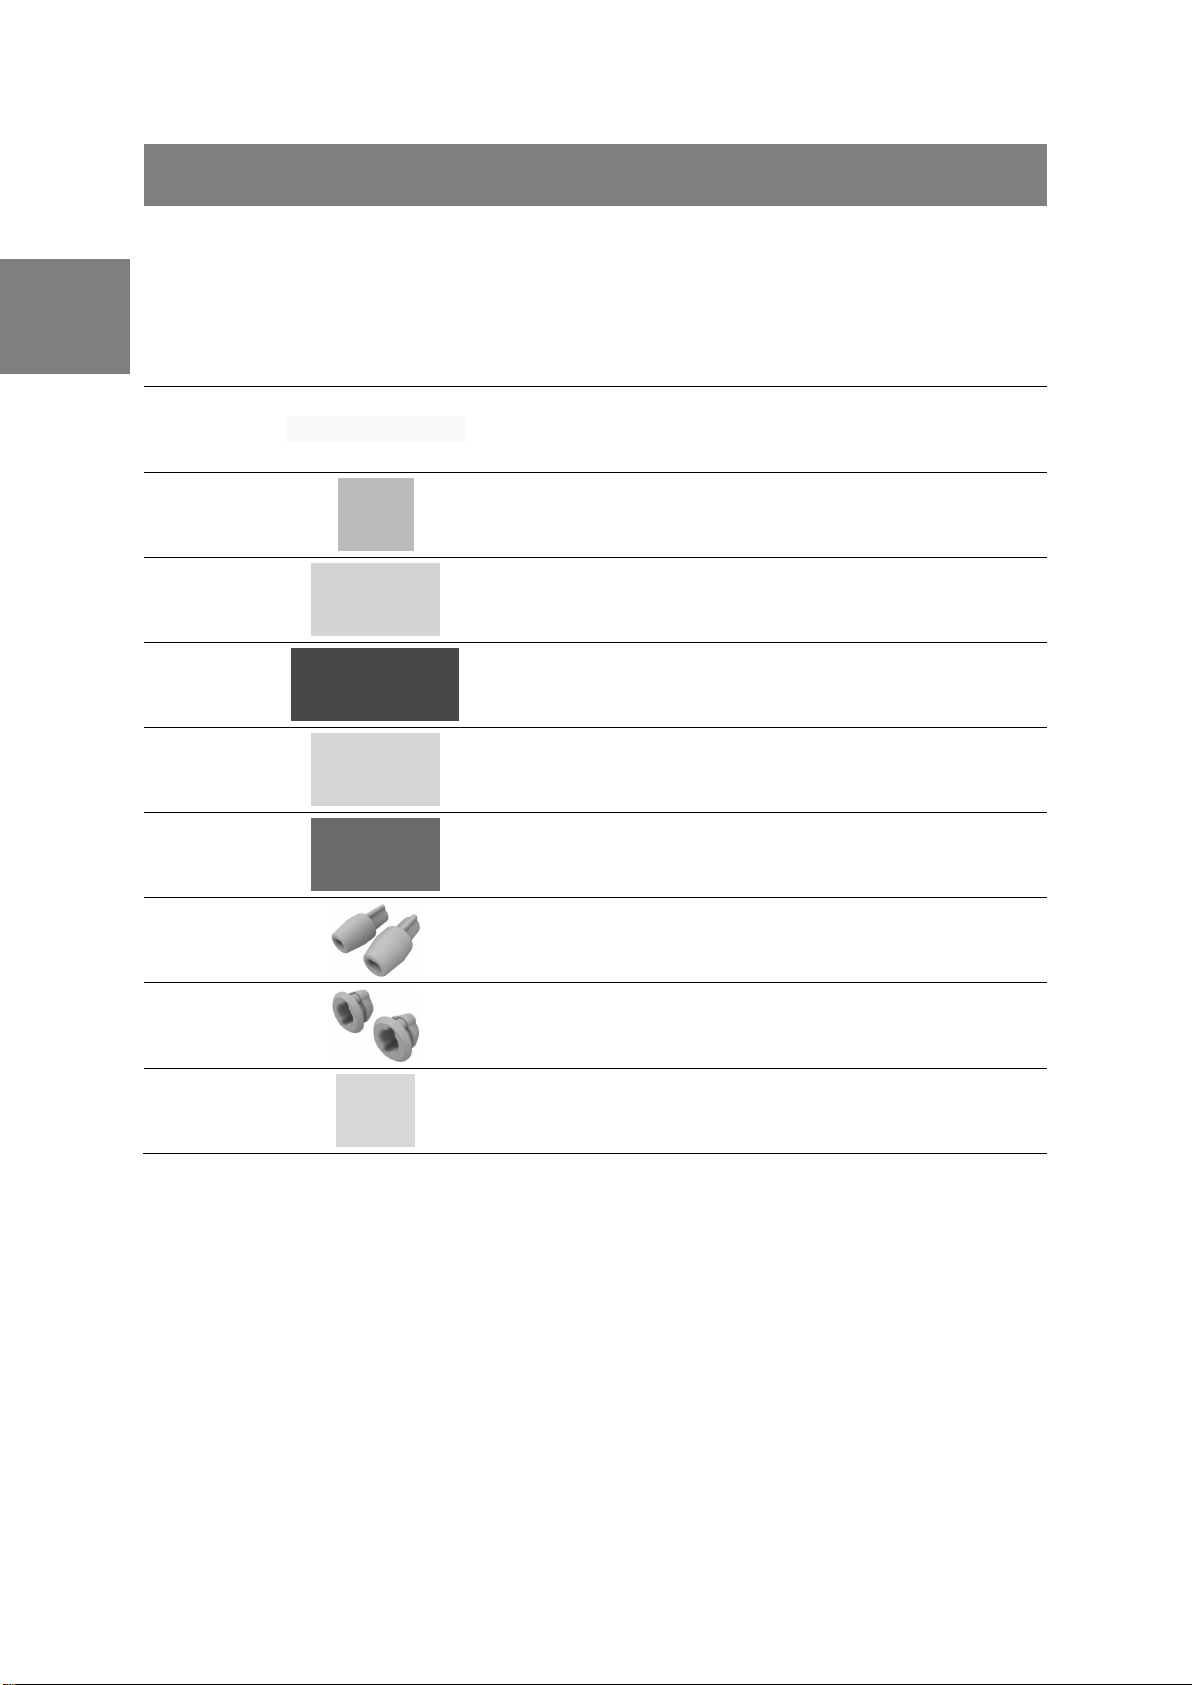
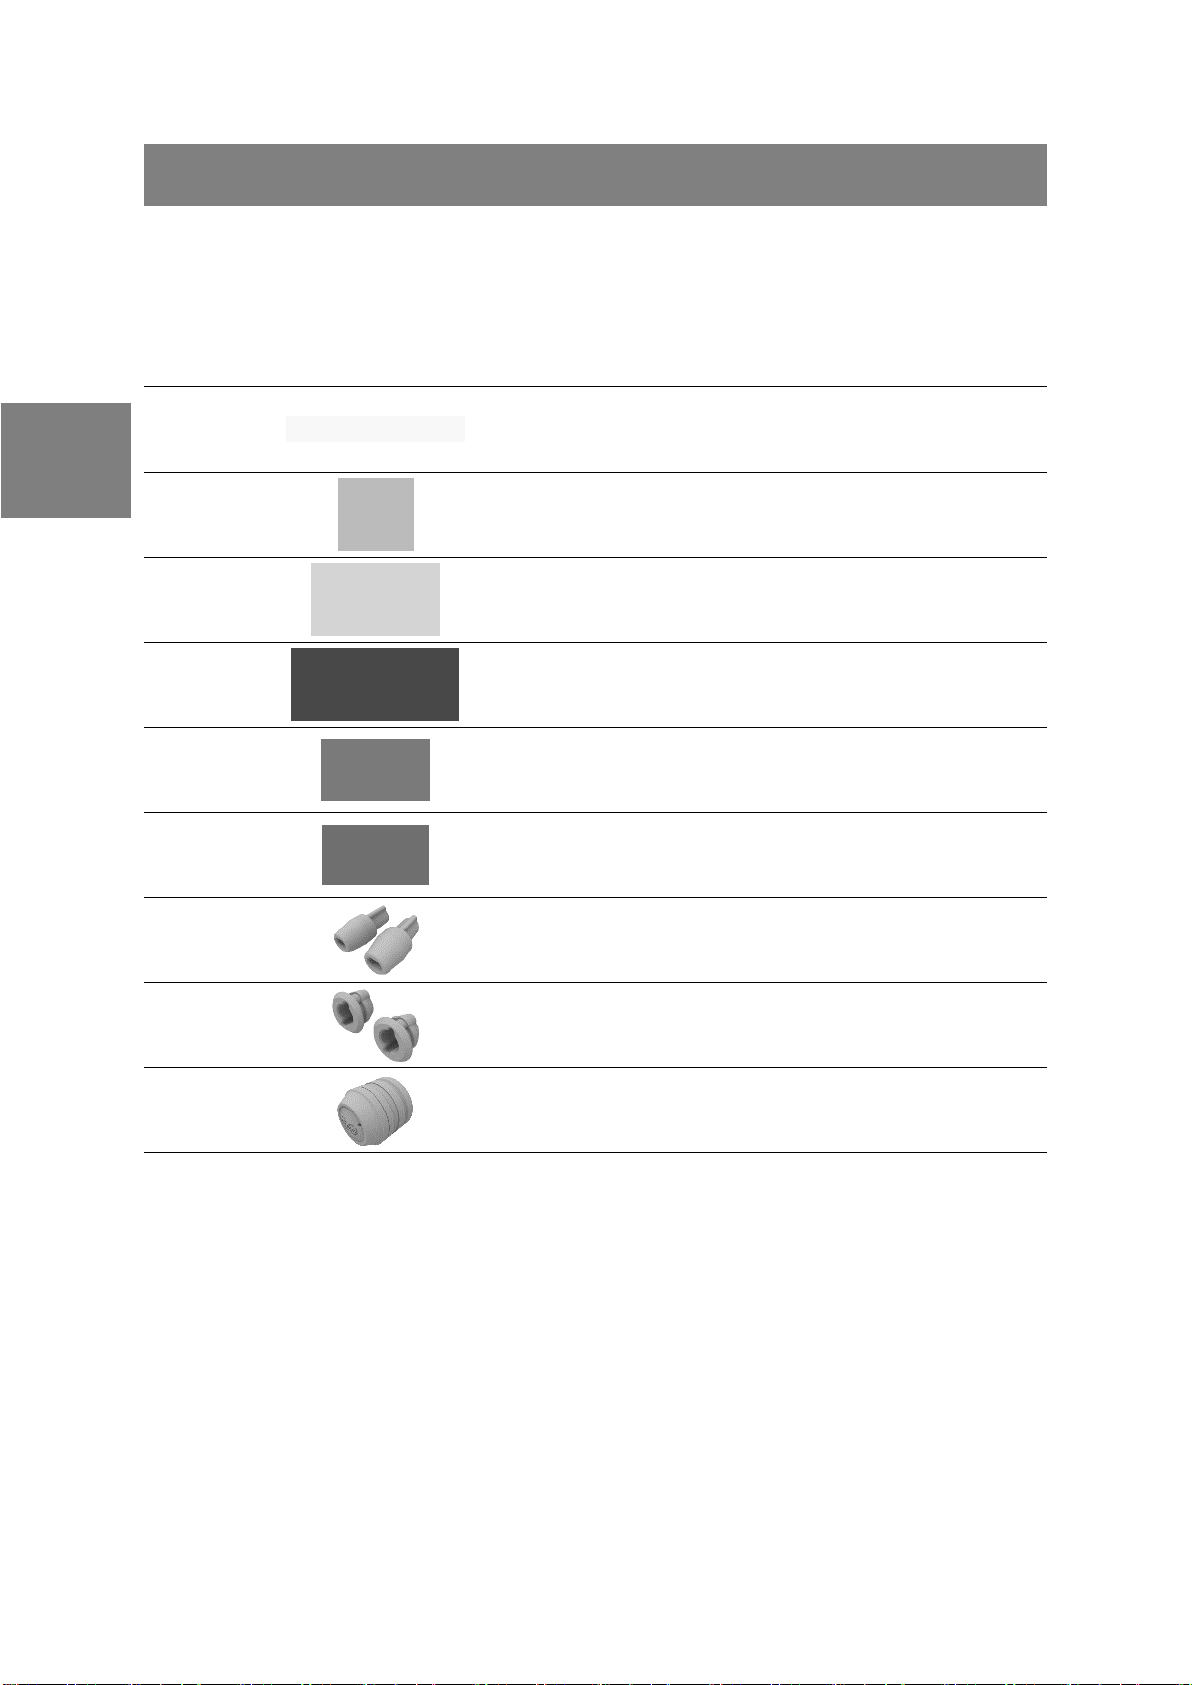
Package Content
No.
Component
Standard
Package
Dual Gyres
Package
1.
x1
x2
2.
x1
x1
3.
x1
x2
4.
x1
x2
5.
x2
x4
6.
x2
x4
7.
x2
x4
EN
Please check the content in the package.
8.
9.
x2 x4
x1
(XF330 only)
x2
(XF330 only)
2

Precautions
READ AND FOLLOW ALL SAFETY INSTRUCTIONS
Before using this Maxspect™ Gyre™ 300 Series Gyre Flow Pump please read
these operating instructions carefully. Take special care to follow the safety
suggestions listed below. Afterwards keep this manual handy for future
1. DANGER – To avoid possible electric shock, special care should be taken since water is
employed in the use of aquarium equipment. For each of the following situations, DO NOT
attempt to repair by yourself; return the appliance to an authorized service facility for service or
discard the appliance.
a) If the appliance shows any sign of abnormal water leakage, immediately unplug it from the
power source.
b) Carefully examine the appliance after installation. It should not be plugged in if there is
water on parts not intended to be wet.
c) DO NOT operate any appliance if it has a damaged cord or plug, or if it is malfunctioning or
has been dropped or damaged in any manner.
d) To avoid the possibility of the appliance plug or receptacle getting wet, position aquarium
stand and tank to one side of a wall-mounted receptacle to prevent water from dripping
onto the receptacle or plug. A “drip-loop” shown in the figure, should be arranged by the
user for each cord connecting an aquarium appliance to a receptacle. The “drip-loop” is
that part of the cord below the level of the receptacle, or the connector if an extension
cord is used, to prevent water traveling along the cord and coming in contact with the
receptacle. If the plug or socket does get wet, DO NOT unplug the cord. Disconnect the
fuse or circuit breaker that supplies power to the appliance. Then unplug and examine for
presence of water in the receptacle.
EN
2. Close supervision is necessary when any appliance is used by or near children.
3. To avoid injury, DO NOT contact moving parts or hot parts such as heaters, reflectors, lamp
bulbs, and the like.
4. Always unplug an appliance from an outlet when not in use, before putting on or taking off
parts, and before cleaning. Never yank cord to pull plug from outlet. Grasp the plug and pull to
disconnect.
5. DO NOT use an appliance for other than intended use. The use of attachments not
recommended or sold by the appliance manufacturer may cause an unsafe condition.
6. DO NOT install or store the appliances where it will be exposed to the weather or to
temperatures below freezing.
7. Make sure an appliance mounted on a tank is securely installed before operating it.
3

Precautions
EN
8. Read and observe all the important notices on the appliance.
9. If an extension cord is necessary, a cord with a proper rating should be used. A cord rated for
less amperes or watts than the appliance rating may overheat.
Safety on Power Supply
1. Power Source – DO NOT defeat the safety purpose of the polarized or grounding-type plug. A
polarized plug has two blades with one wider than the other. A grounding-type plug has two
blades and a third grounding prong. The wide blade or the third prong is provided for your
safety. If the plug does not fit into your outlet, consult an electrician for replacement of the
obsolete outlet.
2. Power Cord Protection – The power supply cords should be routed so that they are not likely to
be walked on or pinched by items placed upon or against them. Never take hold of the plug or
cord if your hand is wet, and always grasp the plug body when connecting or disconnecting it.
3. Installation – Install indoor only, and use the attachments and accessories provided and
specified by the manufacturer.
Safety on Magnet Mount
1. CAUTION - Very strong magnetic mount included in the package.
2. CAUTION - keep the magnet mount out of reach of children, as there is risk of severe personal
injury otherwise!
3. Handle the magnet mount with their proper handle, and DO NOT bring the both side together
directly. DO NOT put your fingers between the magnet mounts.
4. Magnet mount can attract metal objects, keep clear of metal objects when handling the
magnetic mount to avoid injuries.
5. Magnet mount can also damage electronic and magnetic storage devices such as USB storage
devices, pacemakers, credit cards, etc. Keep clear of these devices when handling the magnetic
mount to avoid damaging them.
Safety on Pulsing Motion generated by the Gyre System
1. Making pulses and waves with the Gyre System can place additional stress on the aquarium
glass/acrylic and its joints. Not all aquariums are able or designed to withstand this stress and
failure of the glass/acrylic and/or joints could result. Please consult with your aquarium
2. Manufacturer to determine if the aquarium construction is adequate to withstand the additional
stress generated by the pulses and waves motion. Please also check to assure that your
aquarium stand or furniture is properly leveled, which will help reduce the additional stress
resulting from wave generation.
3. Maxspect DISCLAIMS AND WILL NOT BE LIABLE FOR, damage to any aquarium or their
surroundings, water damage, or any other consequential damages resulting from wave
generation. MAKE PULSES AND WAVES AT YOUR OWN RISK.
4

Operation – Controller Unit
Precautions
1. Operation – Always follow the operation instructions set forth in this manual when using this
controller unit.
2. Heat – The controller unit should be situated away from heat sources such as radiators, and DO
NOT expose to excessive heat such as sunshine, fire or the like.
3. Moisture – To reduce the risk of fire or electric shock, DO NOT expose the controller unit to rain,
moisture, dripping or splashing.
4. Water Damage – DO NOT immerse in water. If the controller unit falls into the water, DO NOT
reaches for it! First unplug it and then retrieve it. If electrical components of the appliance get
wet, unplug the appliance immediately.
Operation – Gyre Pump
1. Placement – The Gyre pump creates high levels of flow within your aquarium. Please place the
Gyre in an area where corals are not too close to the output flow of the pump.
2. Stall – In the event of a motor stall, the Gyre pump may have stopped for a few possible reasons.
You should first check that there is not something blocking the rotors from spinning.
3. Overheating – The Gyre pump is designed to run underwater. DO NOT run the Gyre pump when
it is not submerged in water. Doing so will cause the Gyre pump module to overheat and could
damage the pump component.
4. Cleaning – Please follow the instruction in this manual to clean the Gyre regularly.
5. Power Outage – During power outage, if a battery backup accessory is added to the Gyre pump,
the pump will automatically switch to Battery Backup mode during a power outage. The pumps
will run at the minimum speed to maximize their run time during this critical period.
EN
5
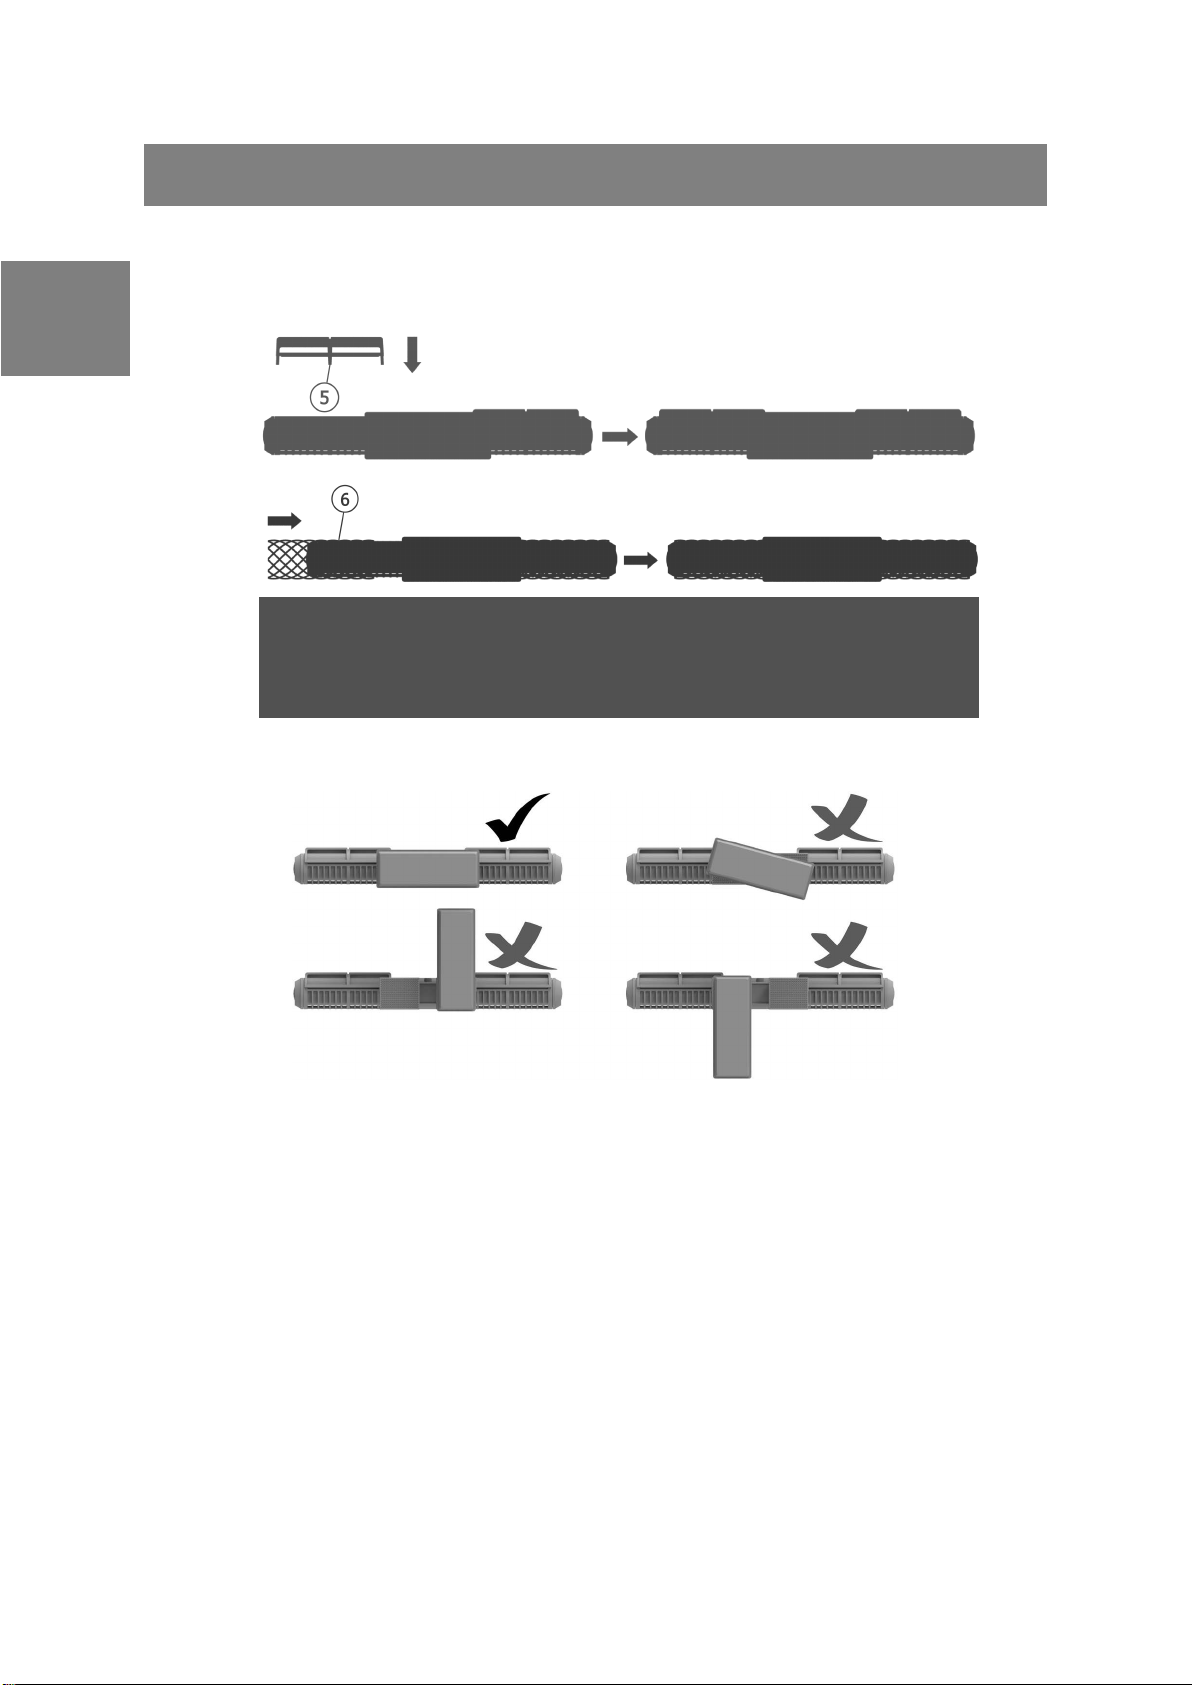
Installation
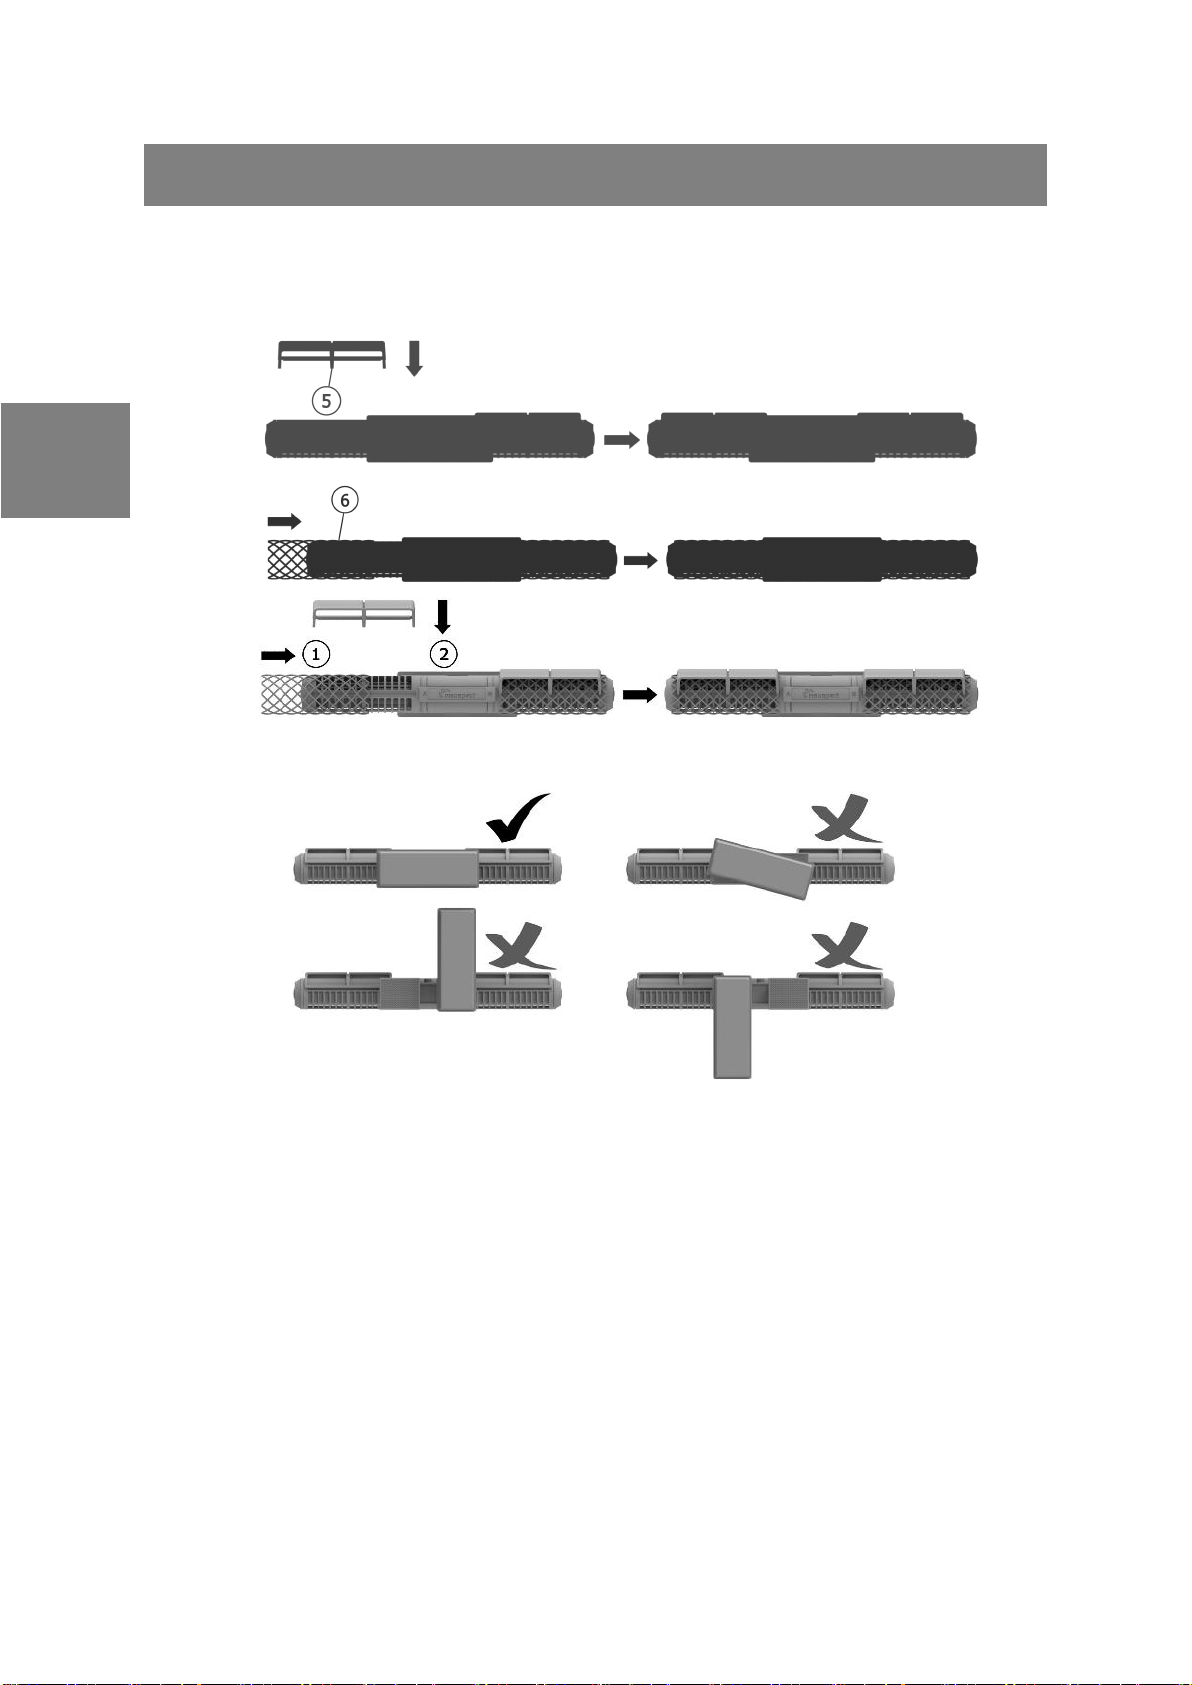
Installation
1).
or
2).
or
3).
EN
1. Mesh and Flow Director.
2. Magnet
3. XF330 Single impeller working mode. User can replace the left or right side impeller with
a cap to make it a single side gyre flow pump.
6
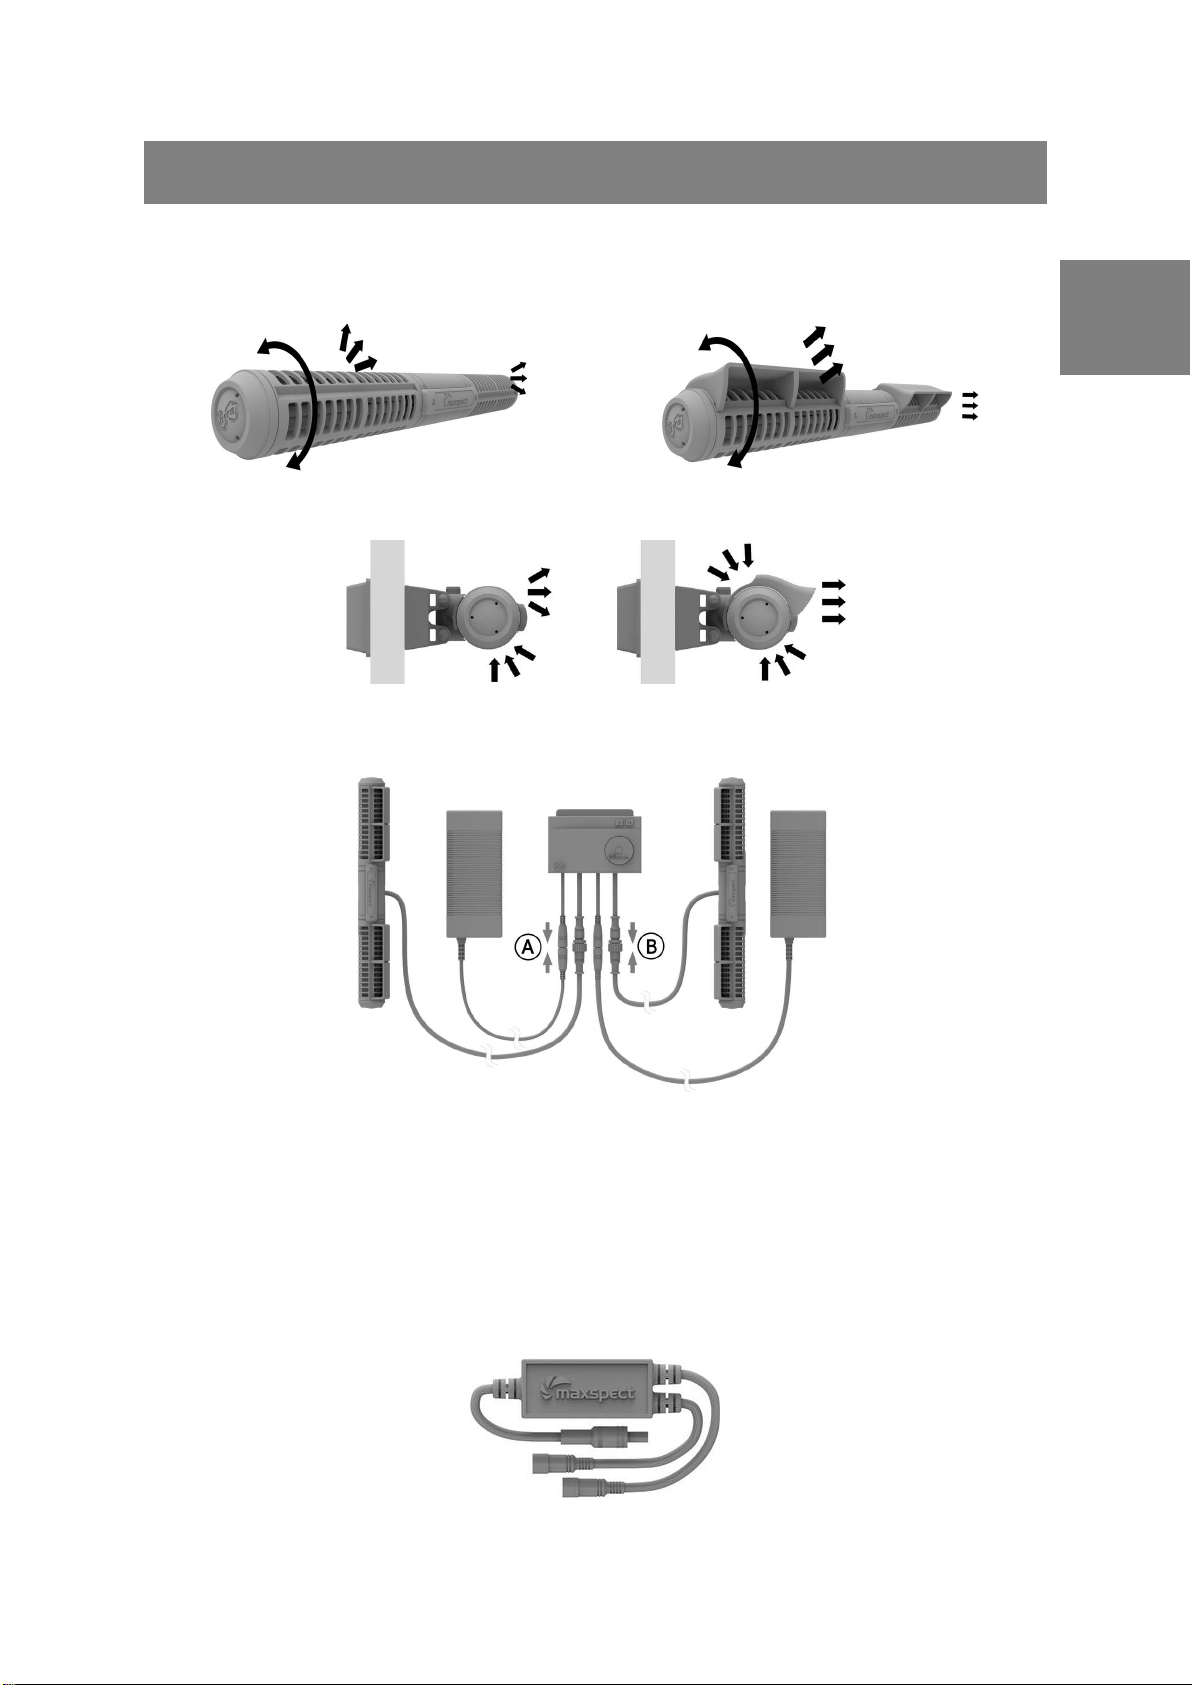
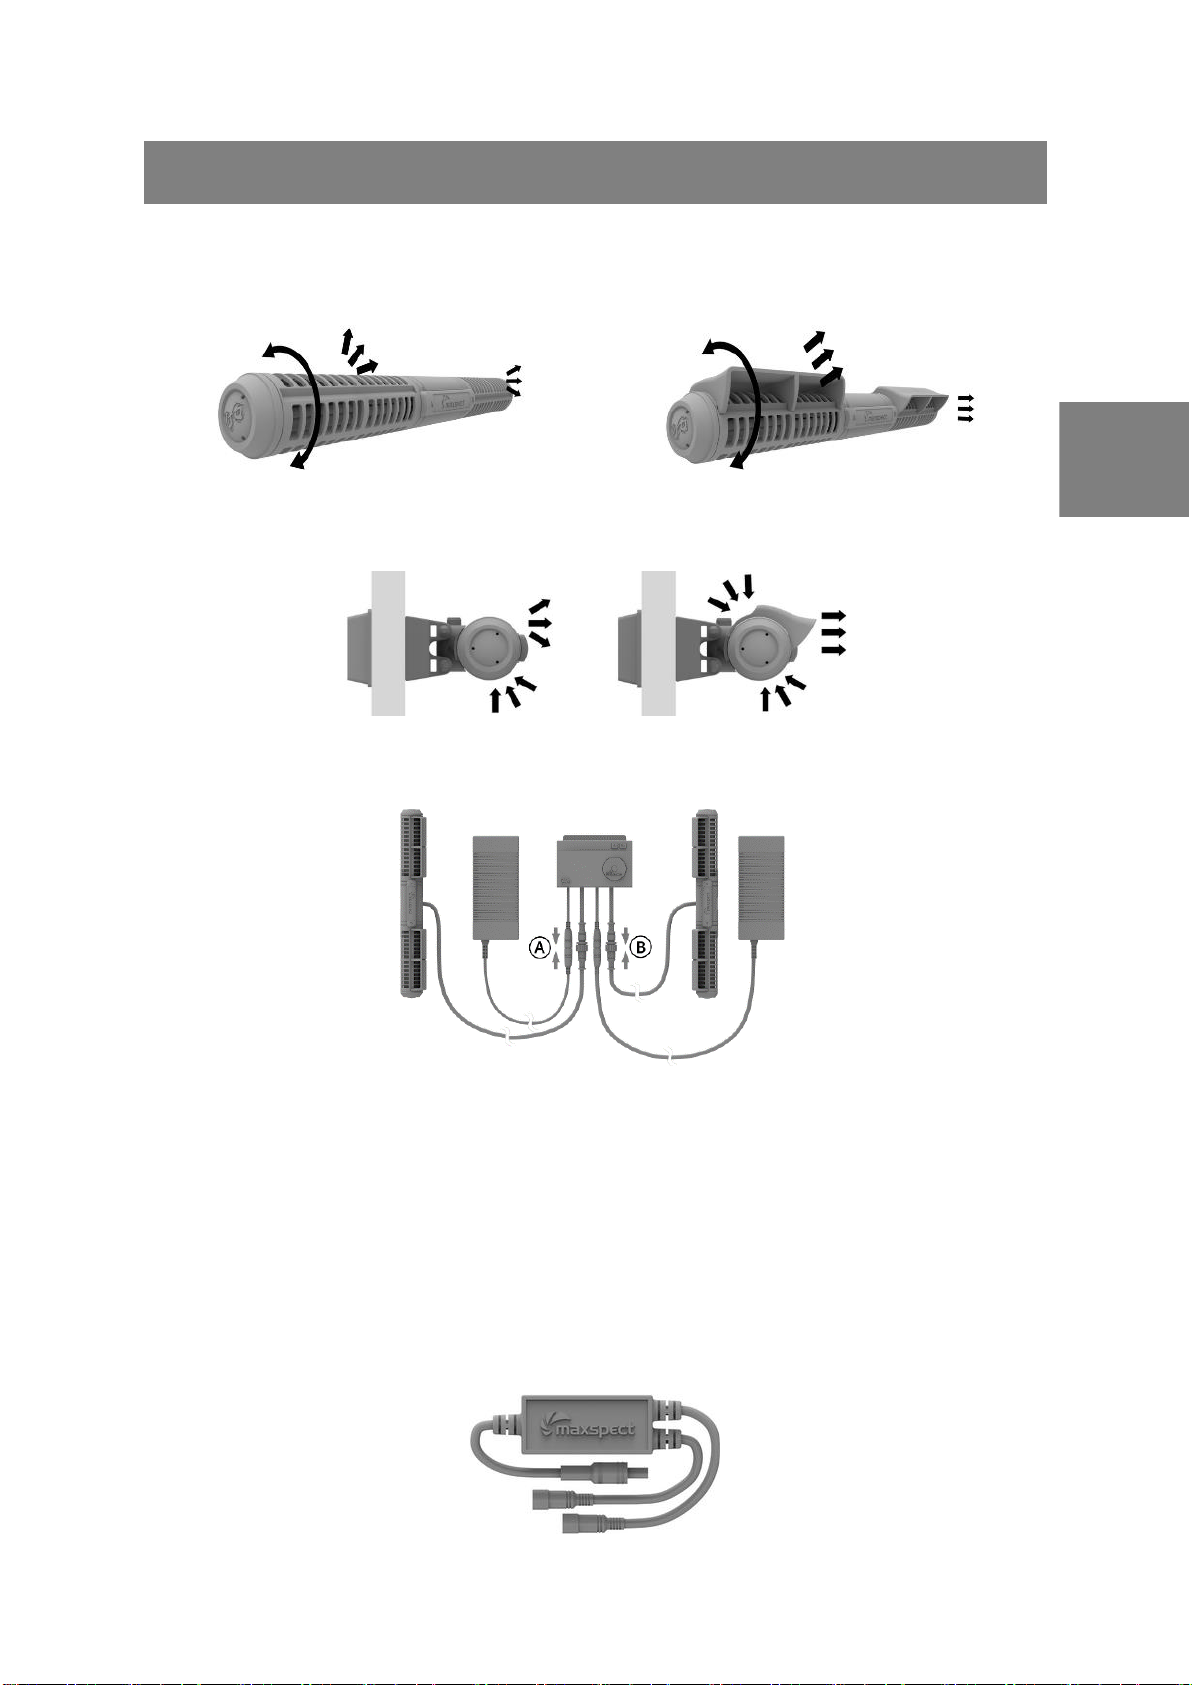
Water Flow Direction Adjustment
Installation
1. Rotate the flow cage to adjust the water flow direction.
2. The use of flow director can help to concentrate and increase roughly 10% water flow.
Connection of the system
EN
When you have ONLY one Gyre. You need to connect it to line A to power both the Gyre
and the controller.
DO NOT use XF330’s PSU on XF350, however XF350’s PSU can be used on XF330.
Power Switch Adapter(sold separately) is a component features with two power source
cables, the one labeled in 24v connect to PSU, the other one labeled in 12v connect to
backup battery(self-prepared by user), when you have ONLY one Power Switch Adapter,
you need to connect it to line A to drive the Gyre connected by the same side.
7
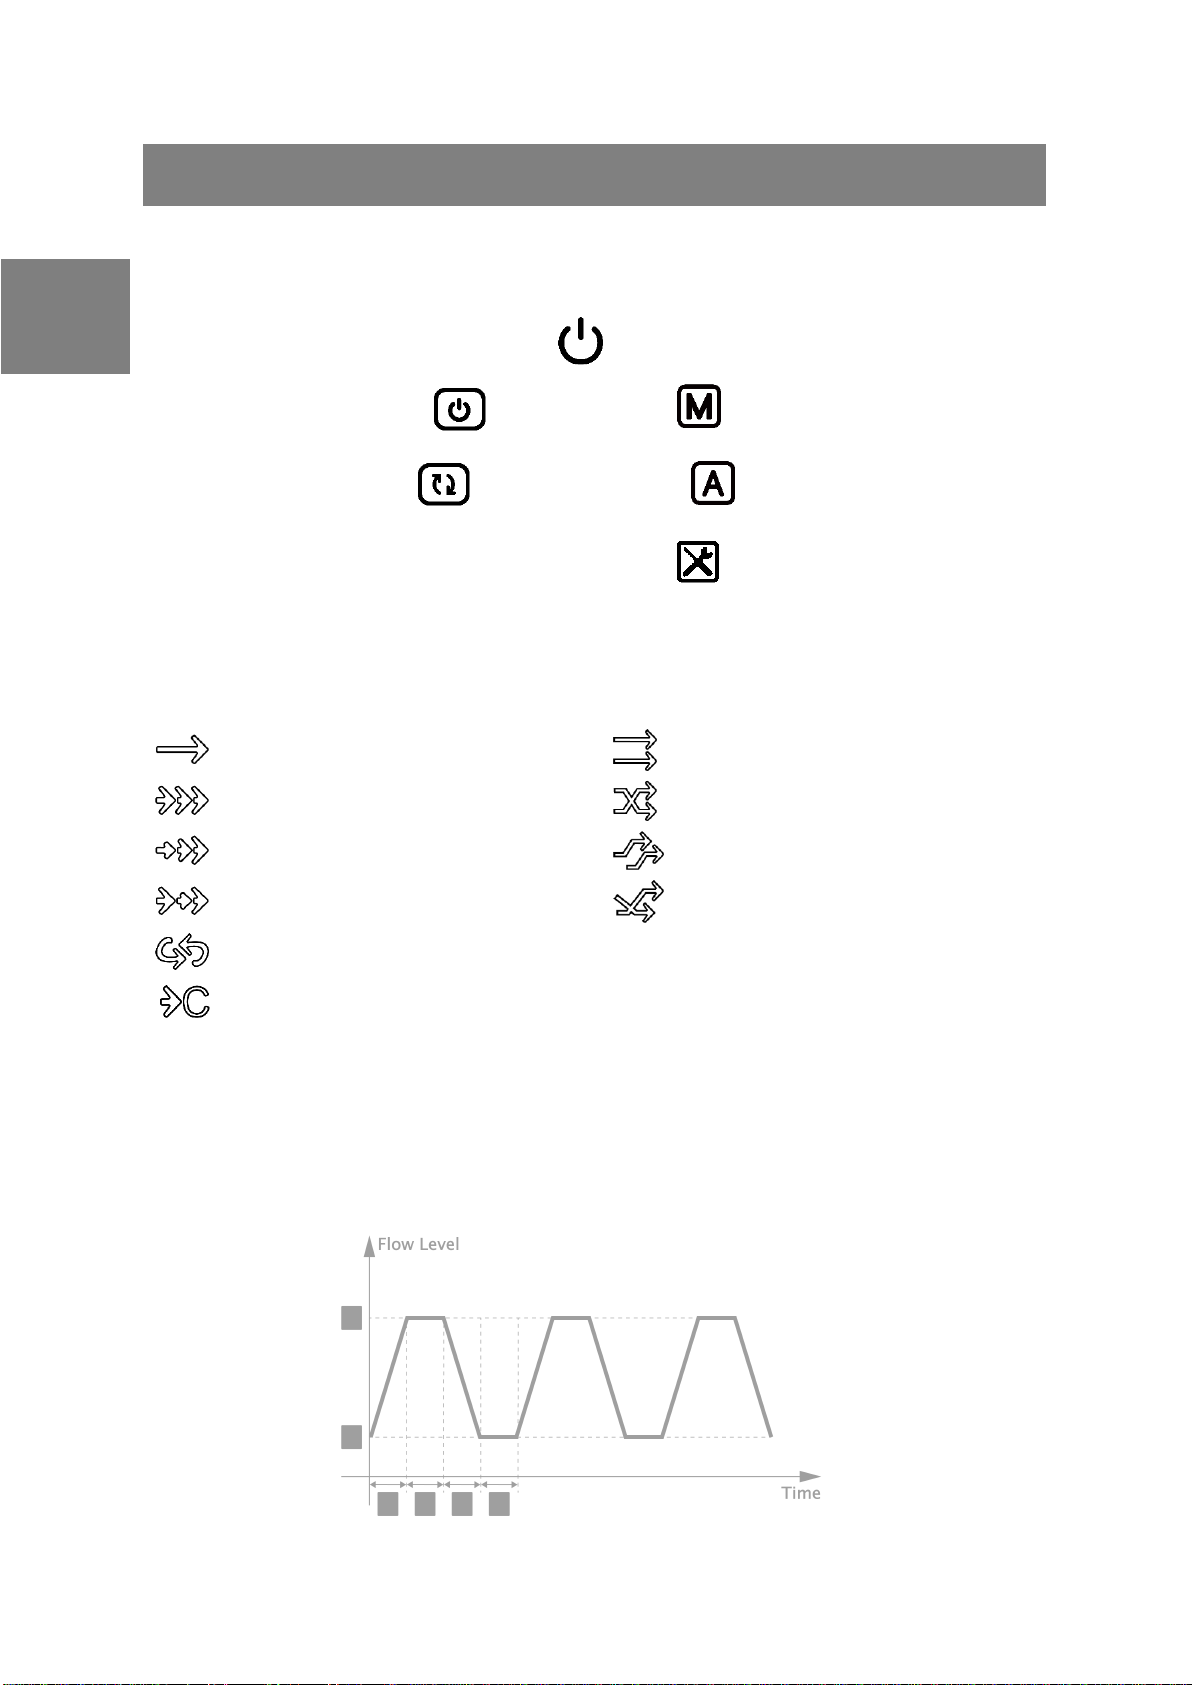
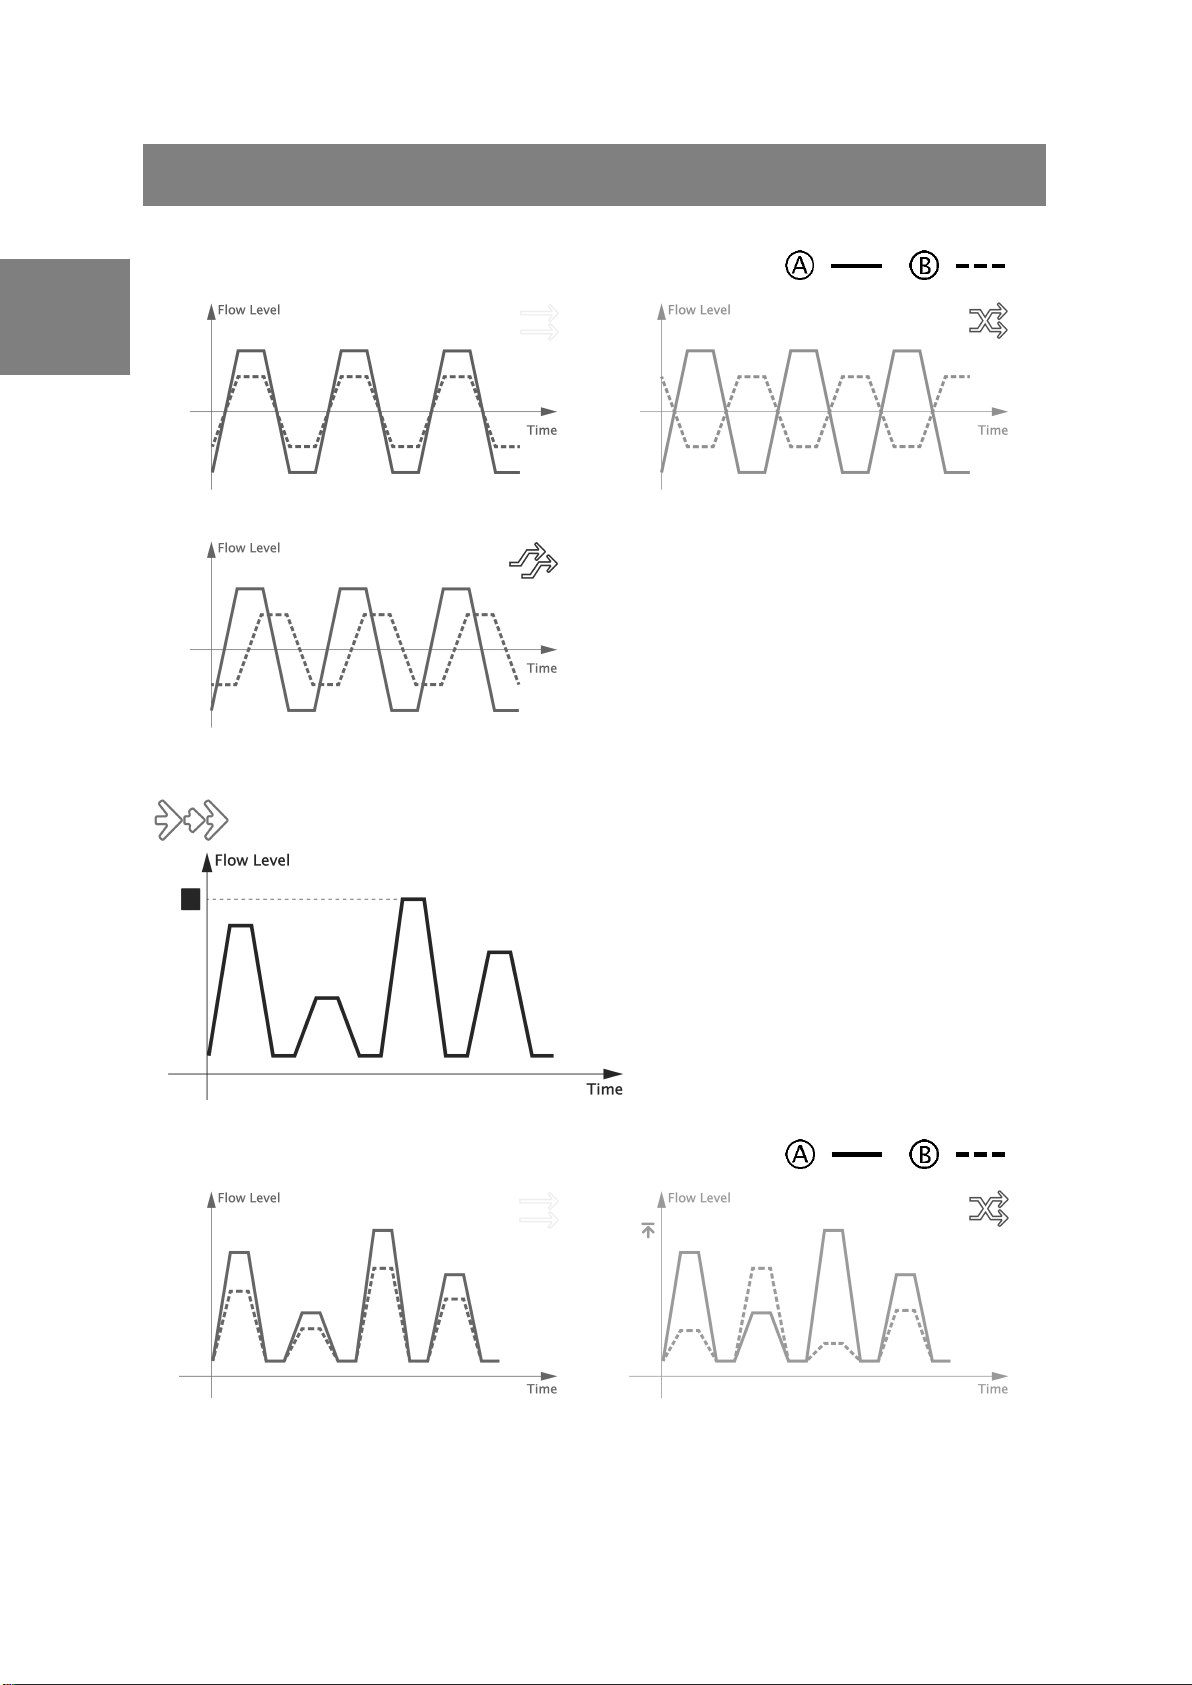
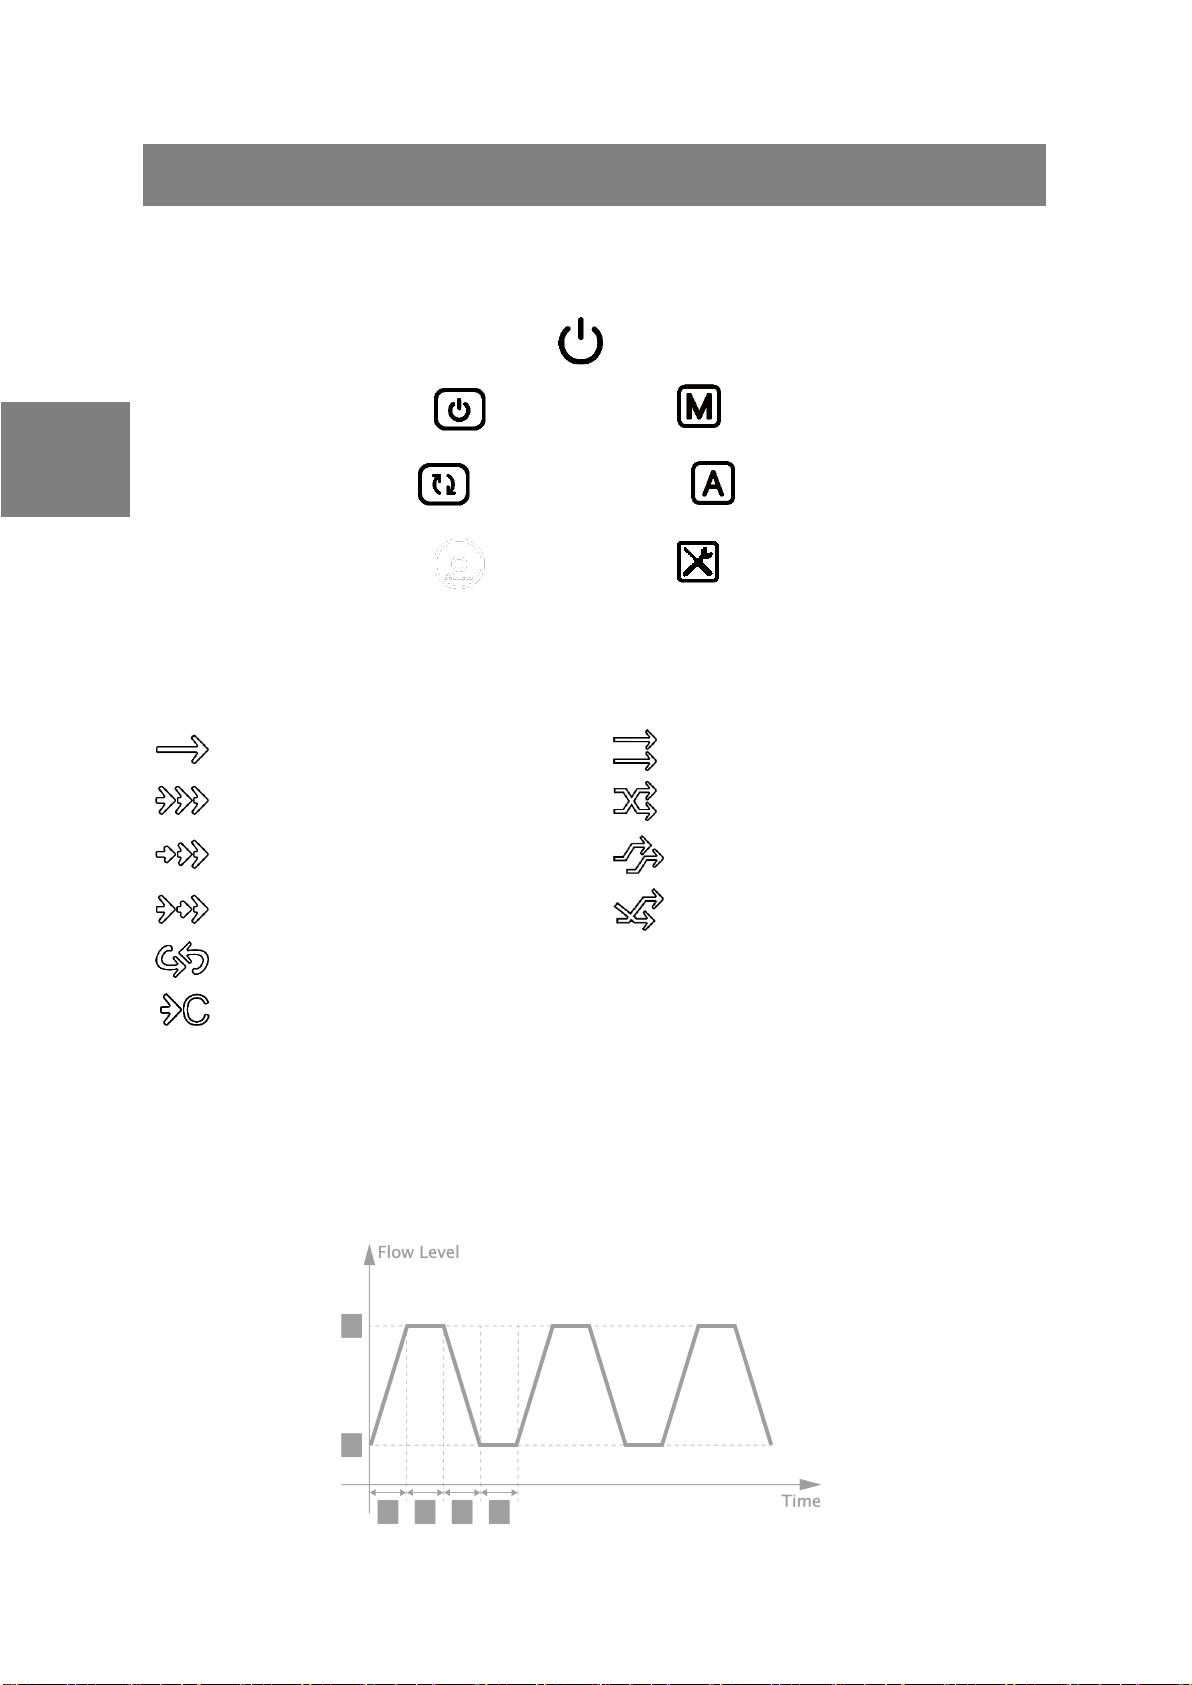
Water Movement Modes
Link-Up Methods
Constant Speed Mode
Synchronized
Pulsing Mode
Anti-Synchronized
Gradual Pulsing Mode
Timed Delay
Random Mode
Reversed Timed Delay
Alternating Gyre Mode
Custom Wave Mode(only adjustable on SYNA-G APP)
Variables
Maximum Flow
Ramp Up Time
Maximum Flow Time
Minimum Flow
Wind Down Time
Minimum Flow Time
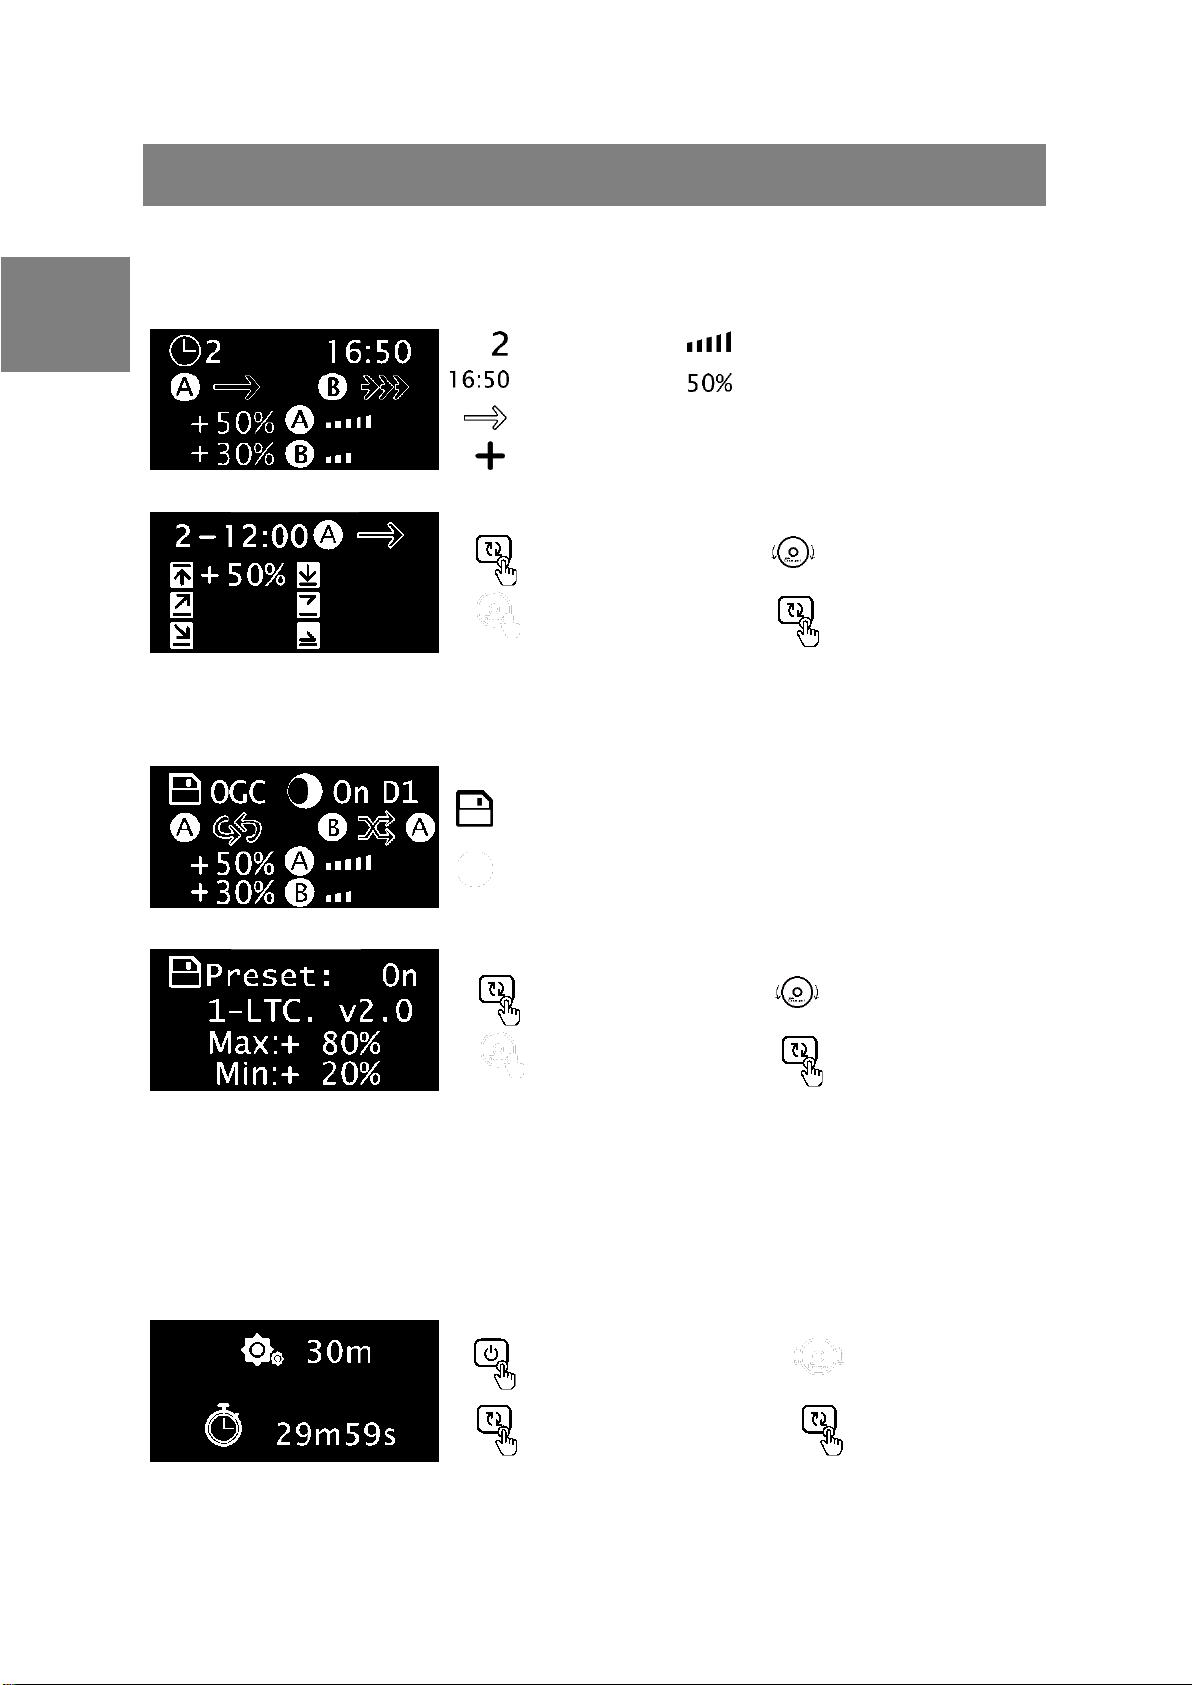
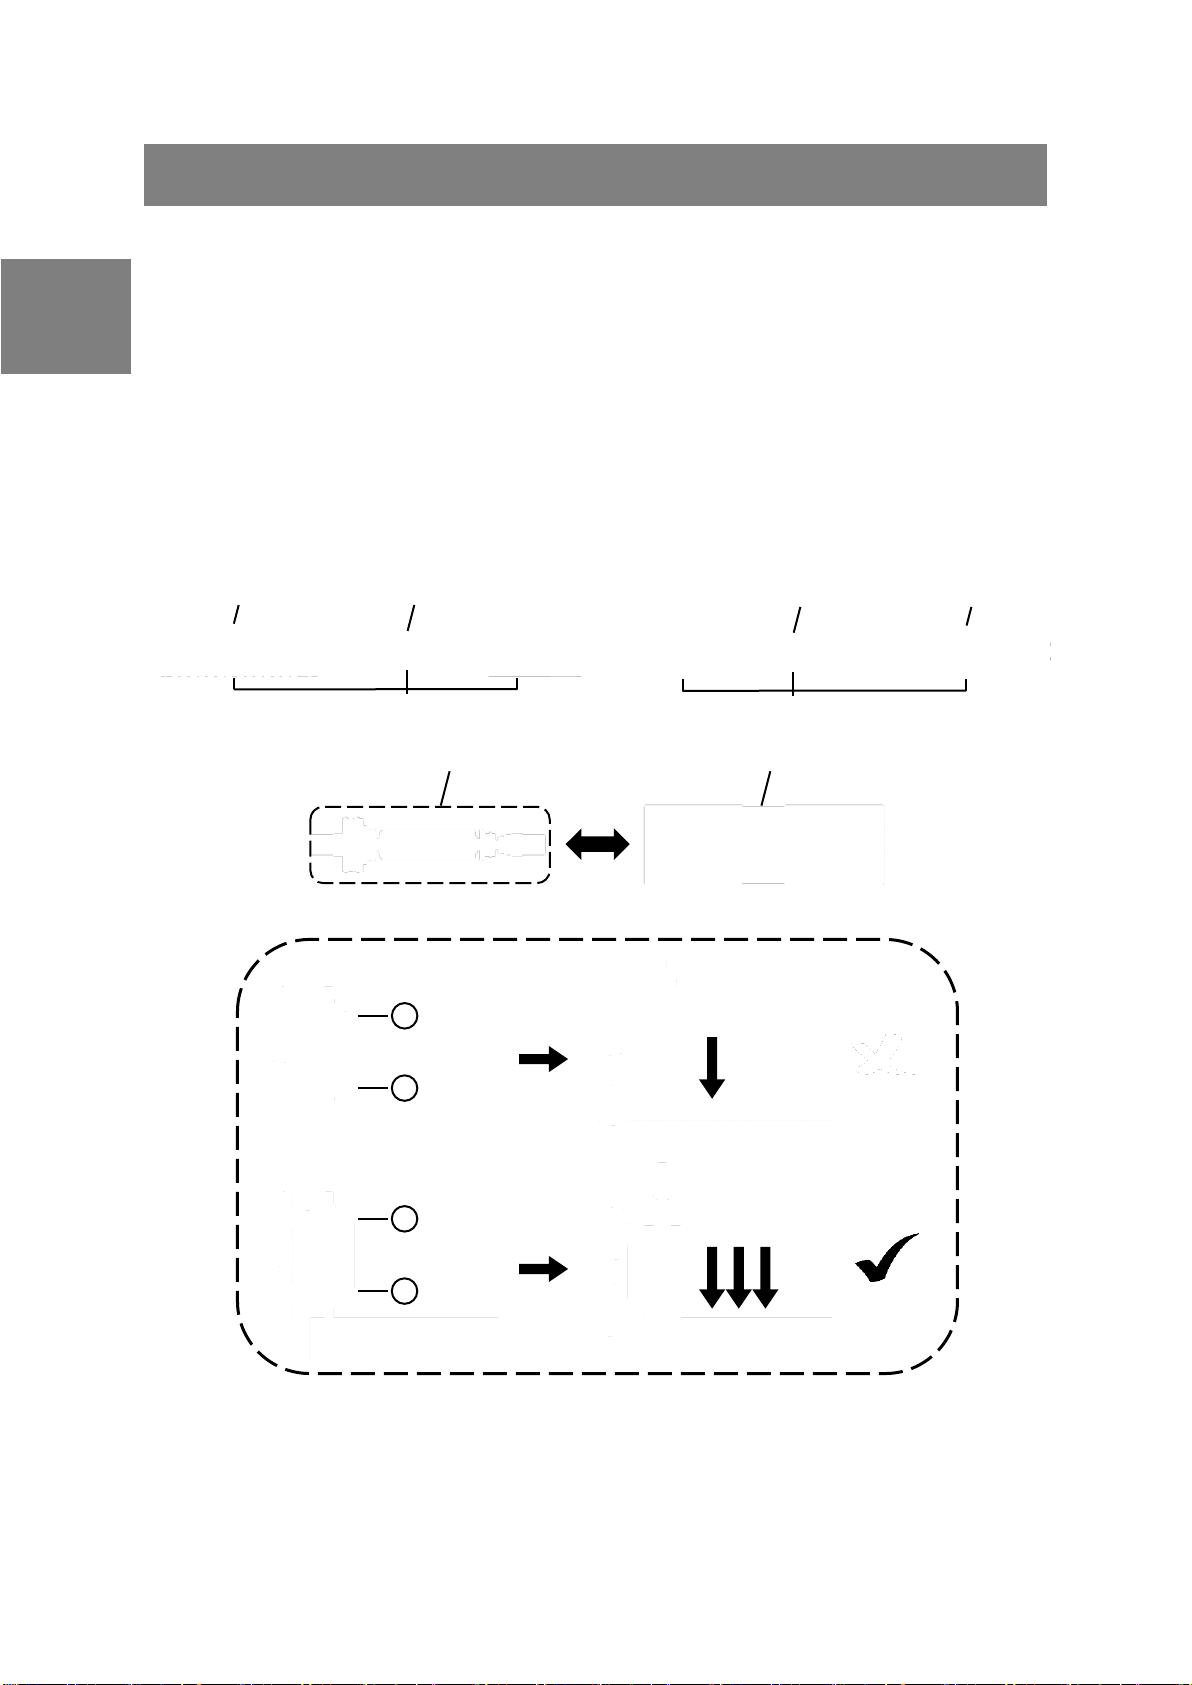
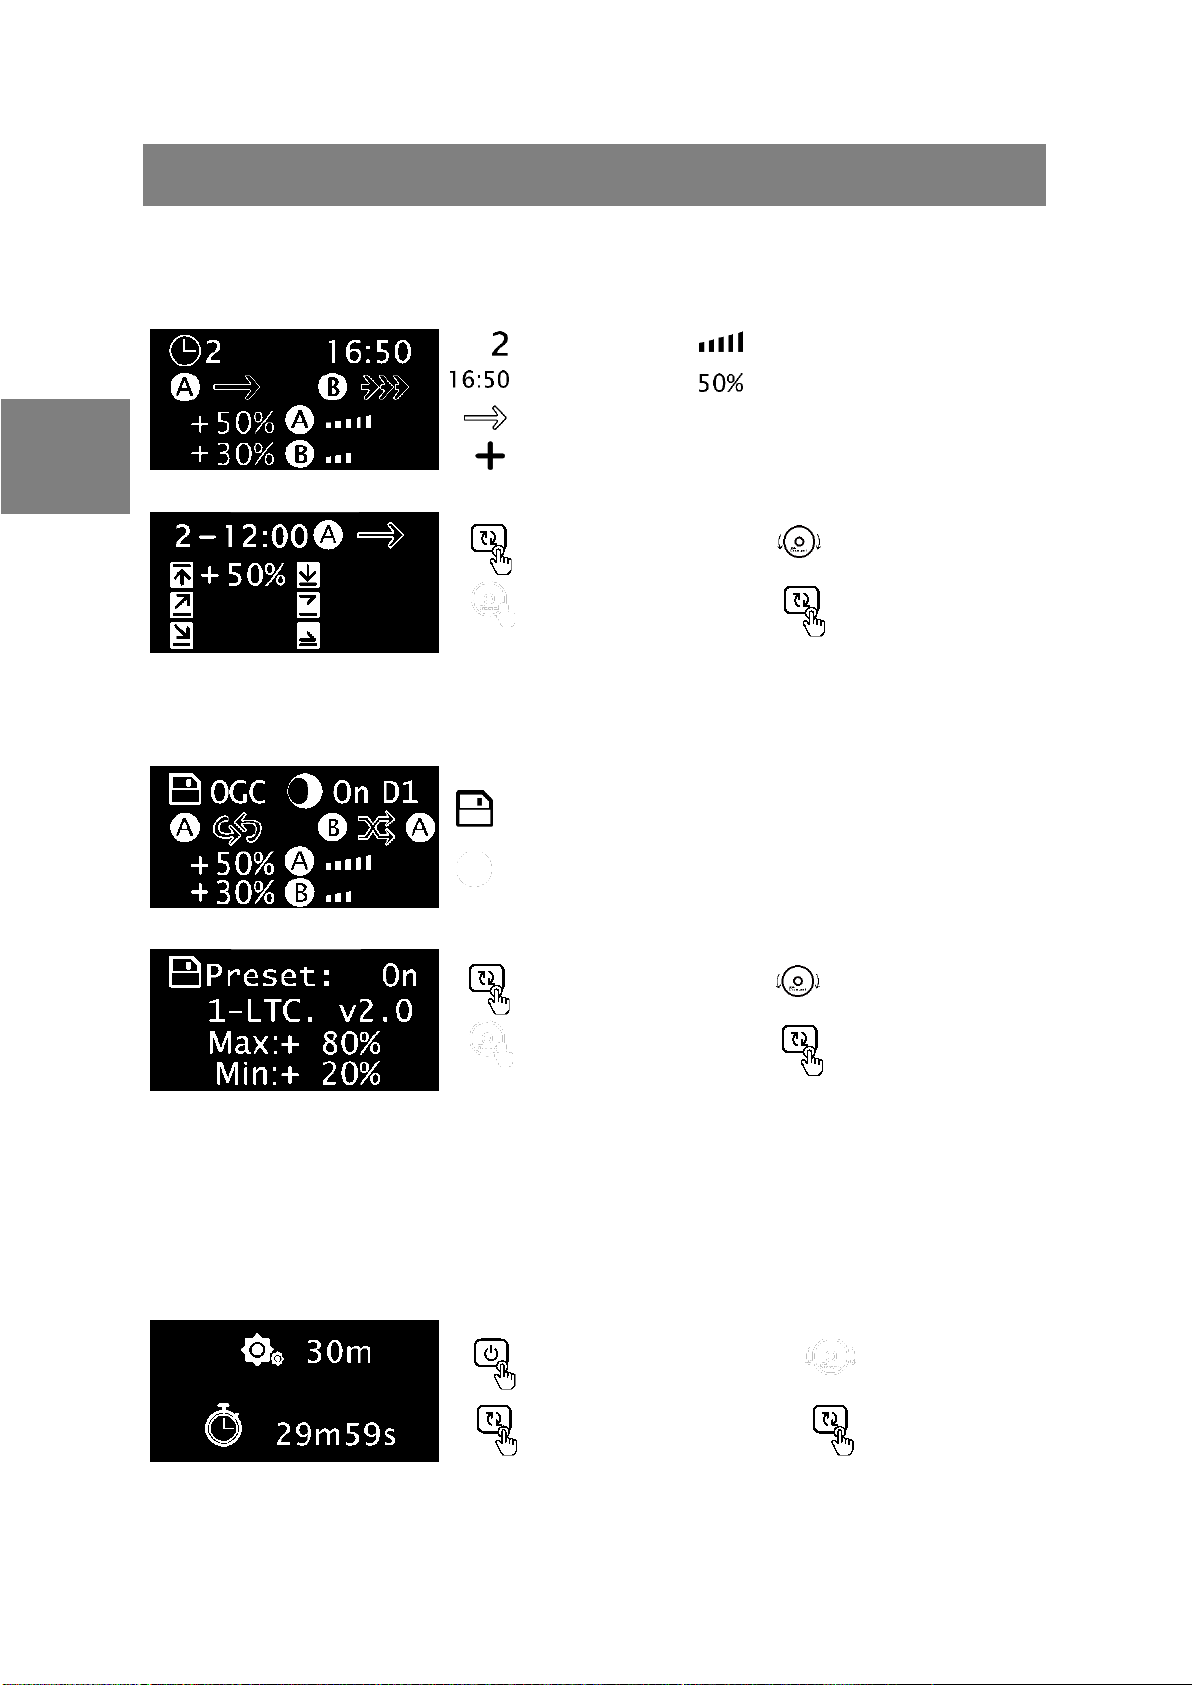
Operating Instructions Operating Instructions
ON/OFF, Feed Mode Button
Mode Switch, Setup Button
Control Dial
Power Indicator
Manual Mode Indicator
Automatic Mode Indicator
Setting Indicator
EN
Controller Unit Introduction
OLED Screen Icon
Variables Illustration
8

Turn ON/OFF the Gyre
1.
Enter setup page.
3.
Set parameter.
2.
Switch between settings.
4.
Save the setting.
Manual Mode: Manually set water movement mode
and flow level for your Gyre.
Auto Mode: A set of program with programable water
movement modes and flow levels which will be cycled
every 24hrs.
Auto Mode Preset: Two presets (LTC & OGC) allow user
to choose from the system.
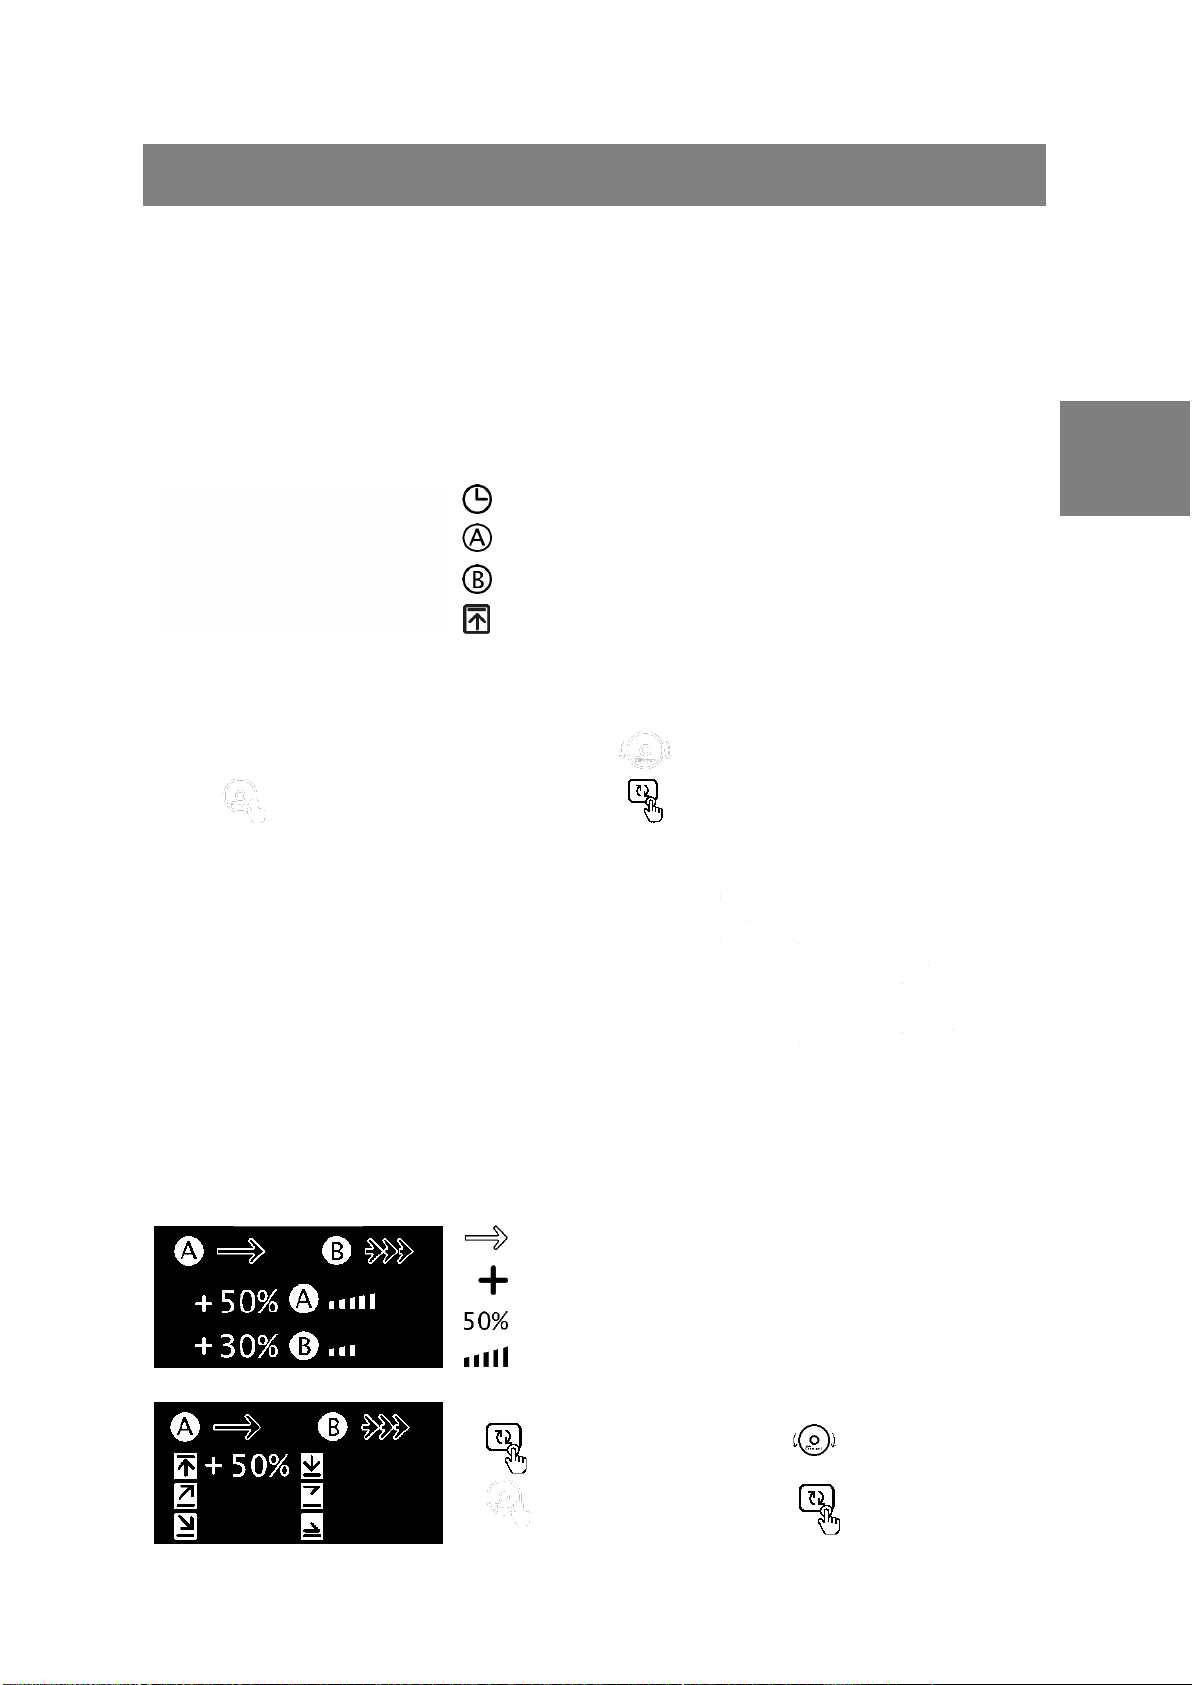
Operating Instructions Operating Instructions
Set system clock.
Set model number for line A.
Set model number for line B.
Set flow level for backup battery working mode.
Note: The Gyre will be fixed on Constant Speed Mode in backup battery working mode.
Current water movement mode.
Impeller rotation direction.
Instant flow level.
Flow level indicator.
Main Interface
Setup Interface
1.
Enter setup page.
2.
Switch between settings.
3.
Set parameter.
4.
Save the setting.
Press the ON/FF button over 3s can turn on or off the appliance. While the appliance is
turned off, the Gyre will stop working, the indicators and OLED screen of the controller will
be shut down. However, if the appliance is connected to an ICV6 (sold separately), it can be
activated by the SYNA-G App.
Initialize the Gyre
Before running the Gyre, there are some basic settings you need to do for the system.
Switch between Modes
EN
Manual Mode
9
Operating Instructions
Main Interface
Current water movement mode.
Impeller rotation direction.
Instant flow level.
Flow level indicator.
Current duration.
System clock.
Setup Interface
1.
Enter setup page.
2.
Switch between settings.
3.
Set parameter.
4.
Save the setting.
Main Interface
Current Preset
Tidal indicator
LTC: Lunar Tidal Cycle is a 24hrs cycle that mimics the kind of water current in the ocean during high
and low tides.
OGC: Ocean Gyre Cycle is a 24hrs cycle that creats a gentle alternating gyre circulation within your
aquarium.
Tidal Indicator: While the tidal indicator is on the cycle will be counted in 24hrs 48mins.
Setup Interface
1.
Enter setup page.
2.
Switch between settings.
3.
Set parameter.
4.
Save the setting.
1.
Enter/Exit the Feed Mode.
2.
Enter setup page.
3.
Set parameter.
4.
Save the setting.
EN
Auto Mode
Auto Mode Preset
Feed Mode
10
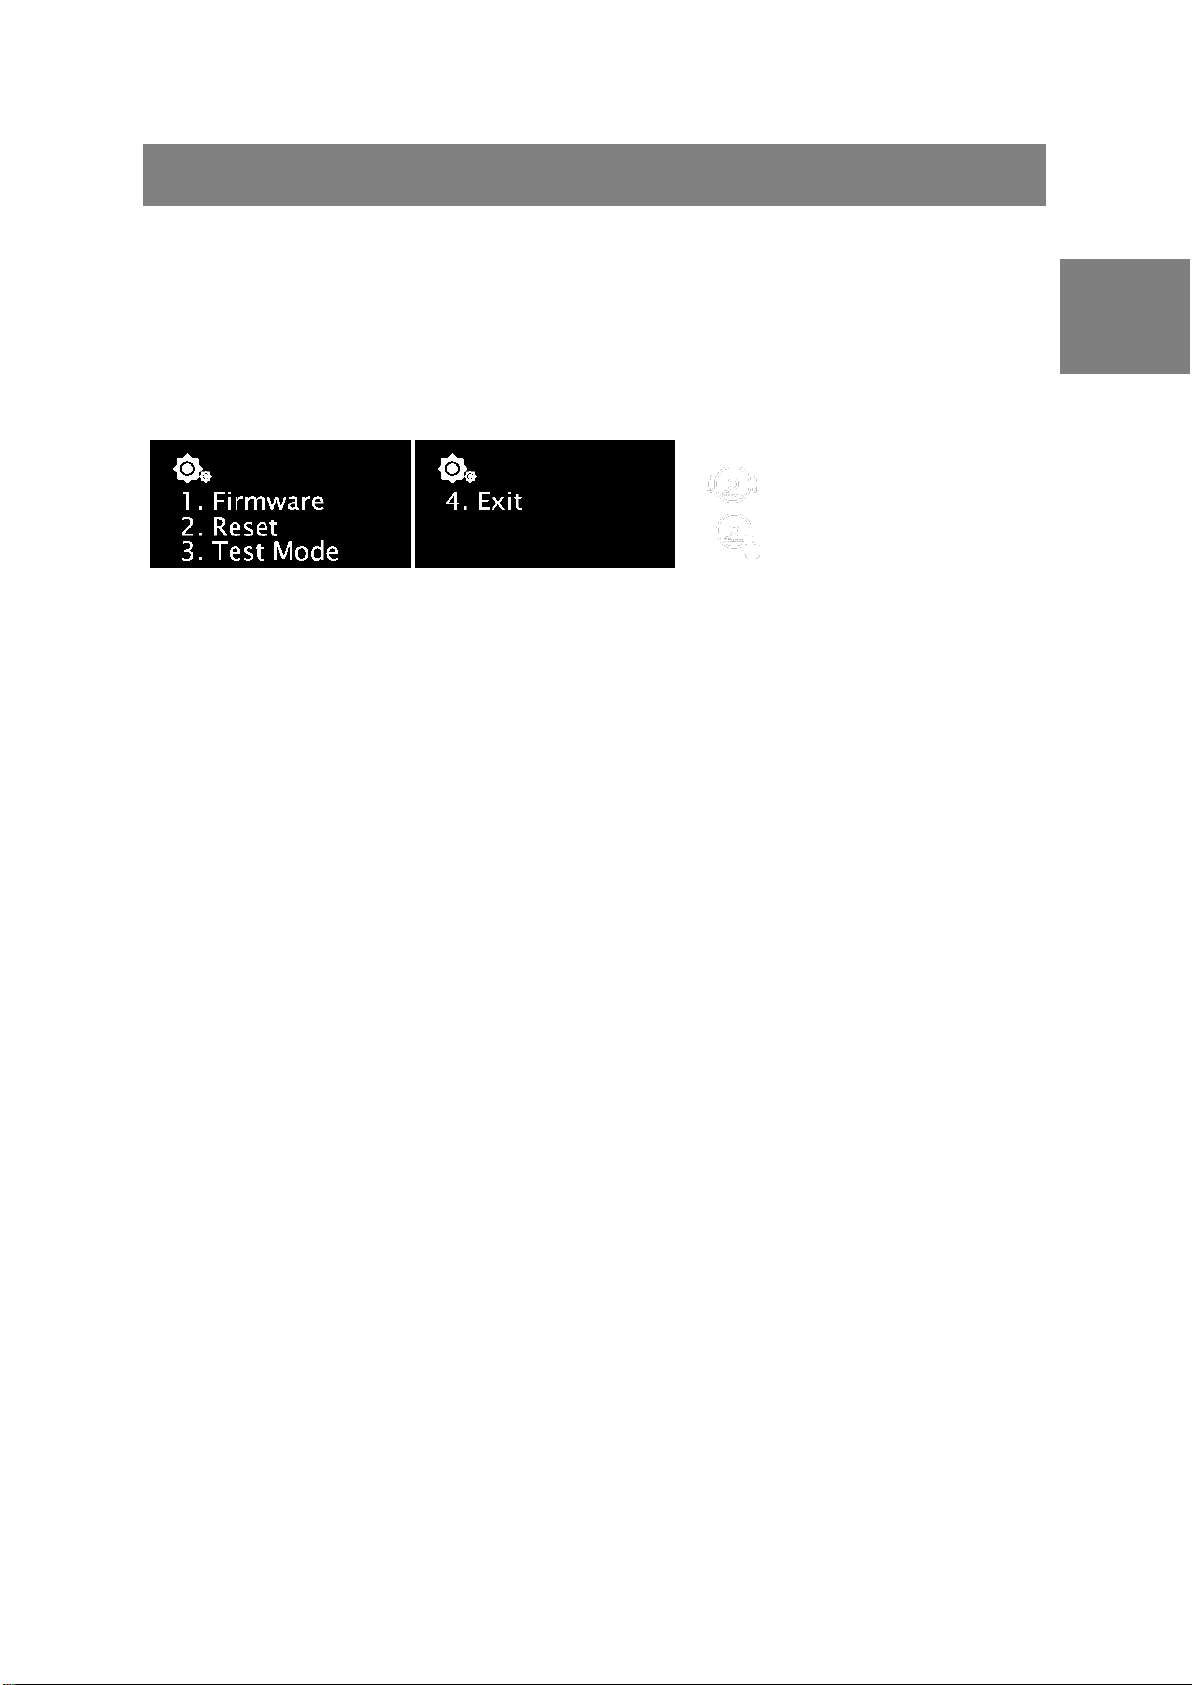
System Setup
Operating Instructions
2.
Apply the function.
1.
Switch between functions.
System Setup features a set of functions which allows you to perform maintenance on the
appliance. To enter the System Setup page, first disconnect line A’s PSU from the controller
unit, then press and hold the control dial and reconnect the PSU. Keep on holding the
control dial until the system setup page is shown on OLED monitor.
Firmware – Upgrade or downgrade system’s firmware.
Reset – Reset user setting to default factory setting.
Test Mode – This function should only be conducted by the users when told by authorized
dealer or customer representative to perform certain test on the appliance.
Exit – Reboot the system to the normal operating status.
EN
11
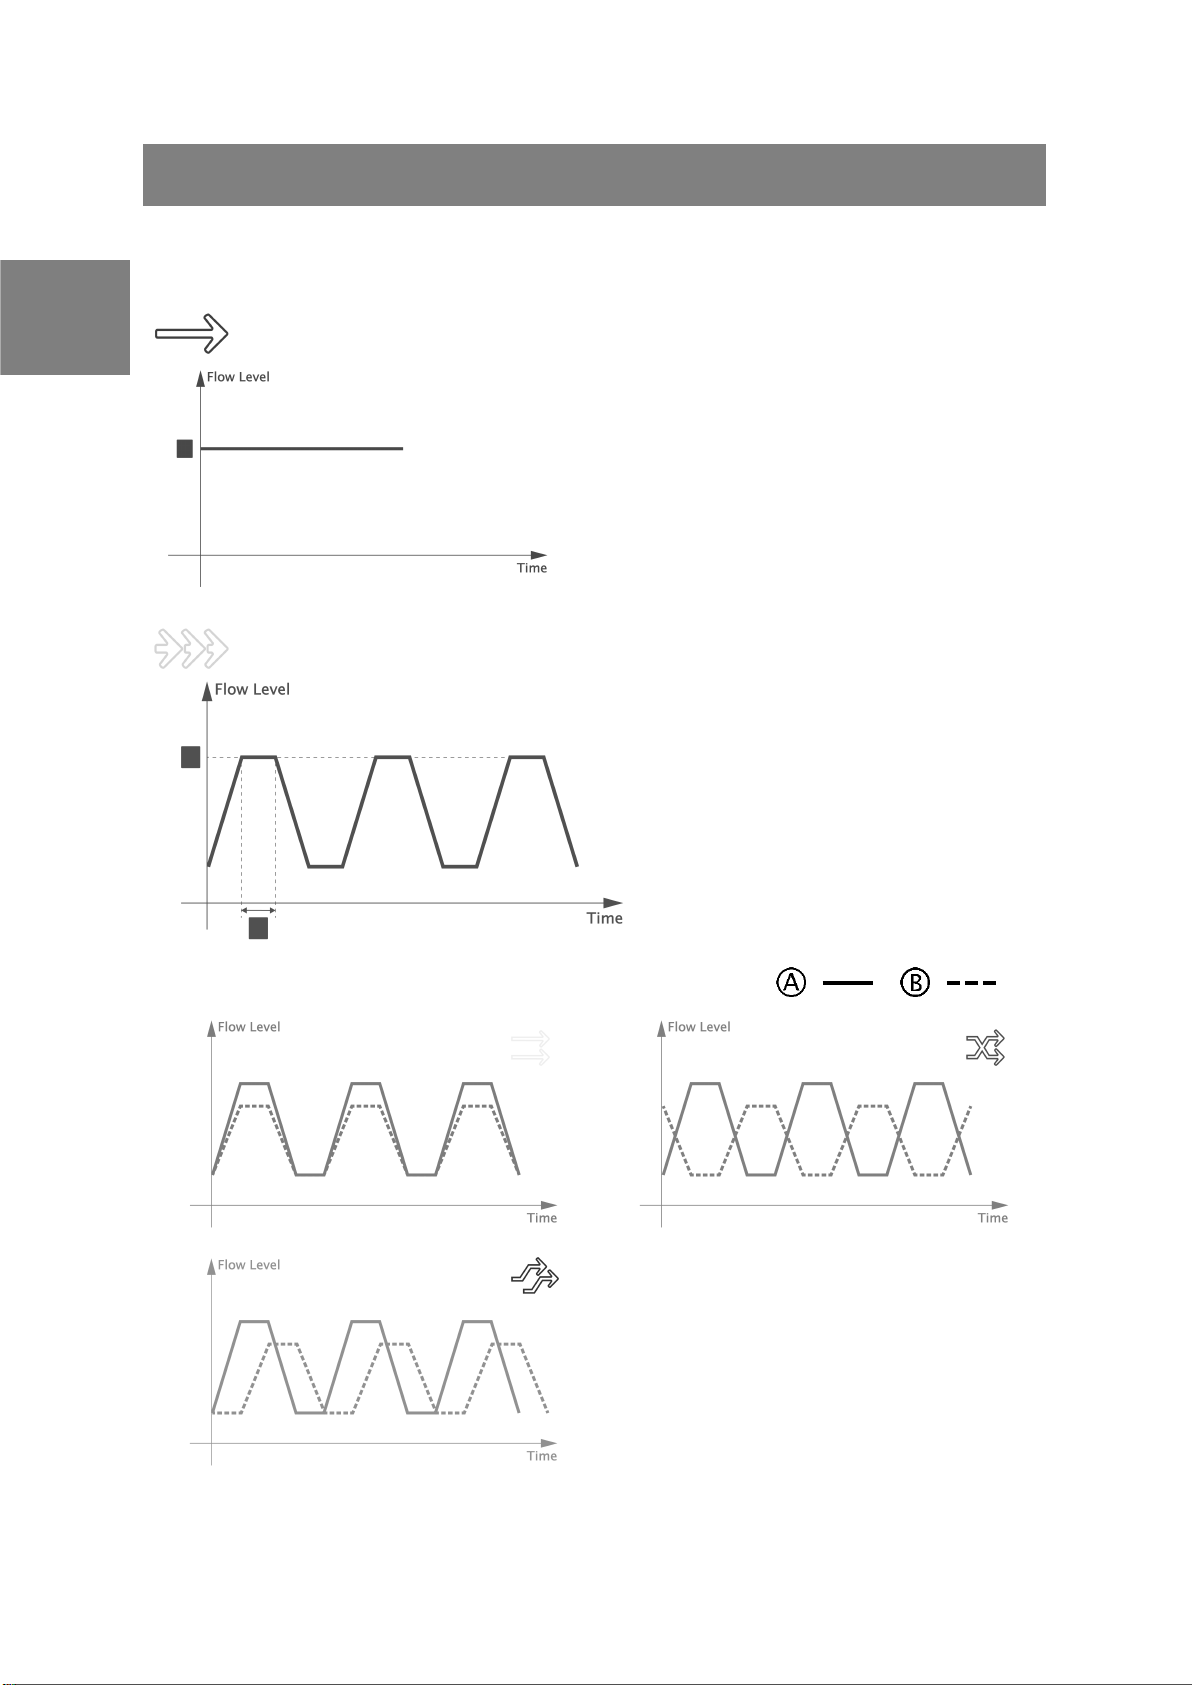
Water Movement Mode Illustration
Constant Speed Mode
√
N/A
N/A
N/A
N/A
N/A
Pulsing Mode
√
N/A
N/A
N/A
N/A
√
Available Link-Up Methods for Dual Gyres.
Operating Instructions
EN
Flow range: -100% - +100%
Flow range: -100% - +100%, Time Range: 0.4s-10s
12
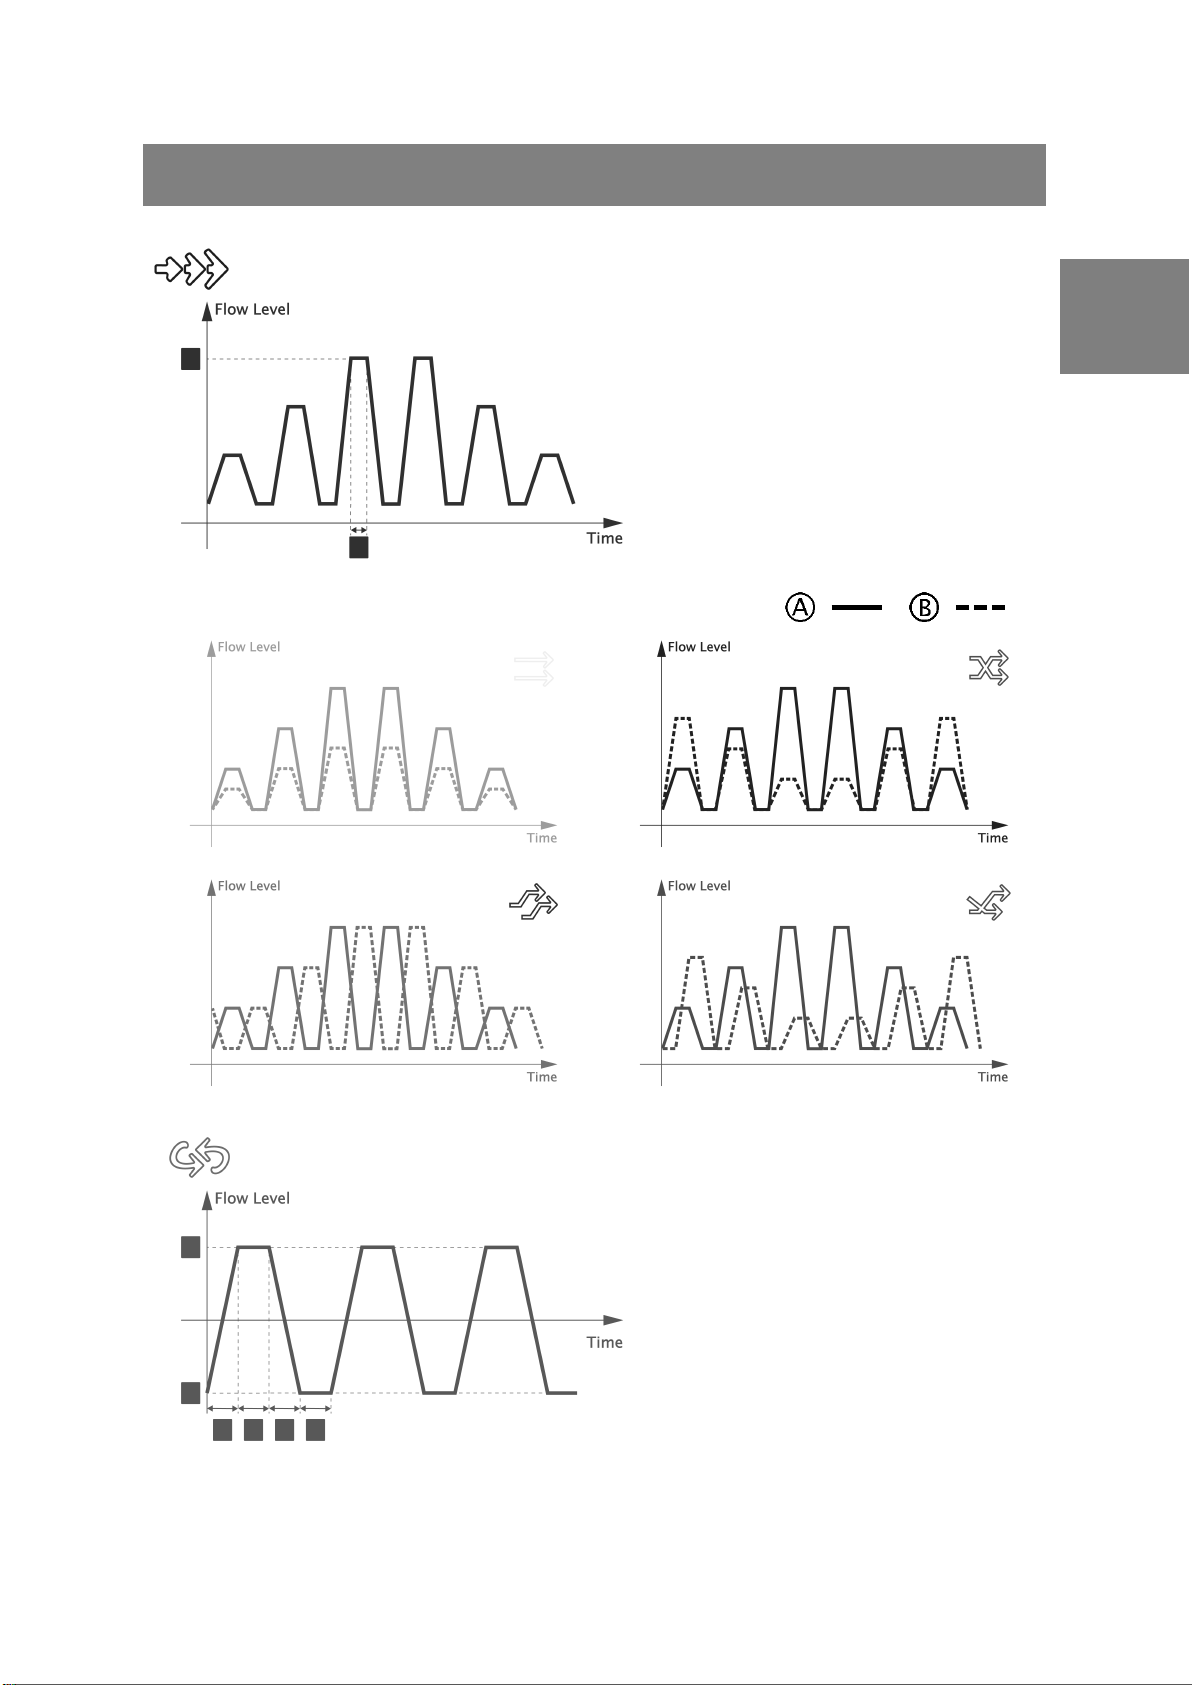
Gradual Pulsing Mode
Flow range: -100% - +100%, Time Range: 0.4s-10s
√
N/A
N/A
N/A
N/A
√
Available Link-Up Methods for Dual Gyres.
√ √ √√√
√
Operating Instructions
EN
Alternating Gyre Mode
Flow range: -100% - +100%, Time Range: 2s-8hrs
13
Available Link-Up Methods for Dual Gyres.
Random Mode
√
N/A
N/A
N/A
N/A
N/A
Available Link-Up Methods for Dual Gyres.
Operating Instructions
EN
Flow range: -100% - +100%
14
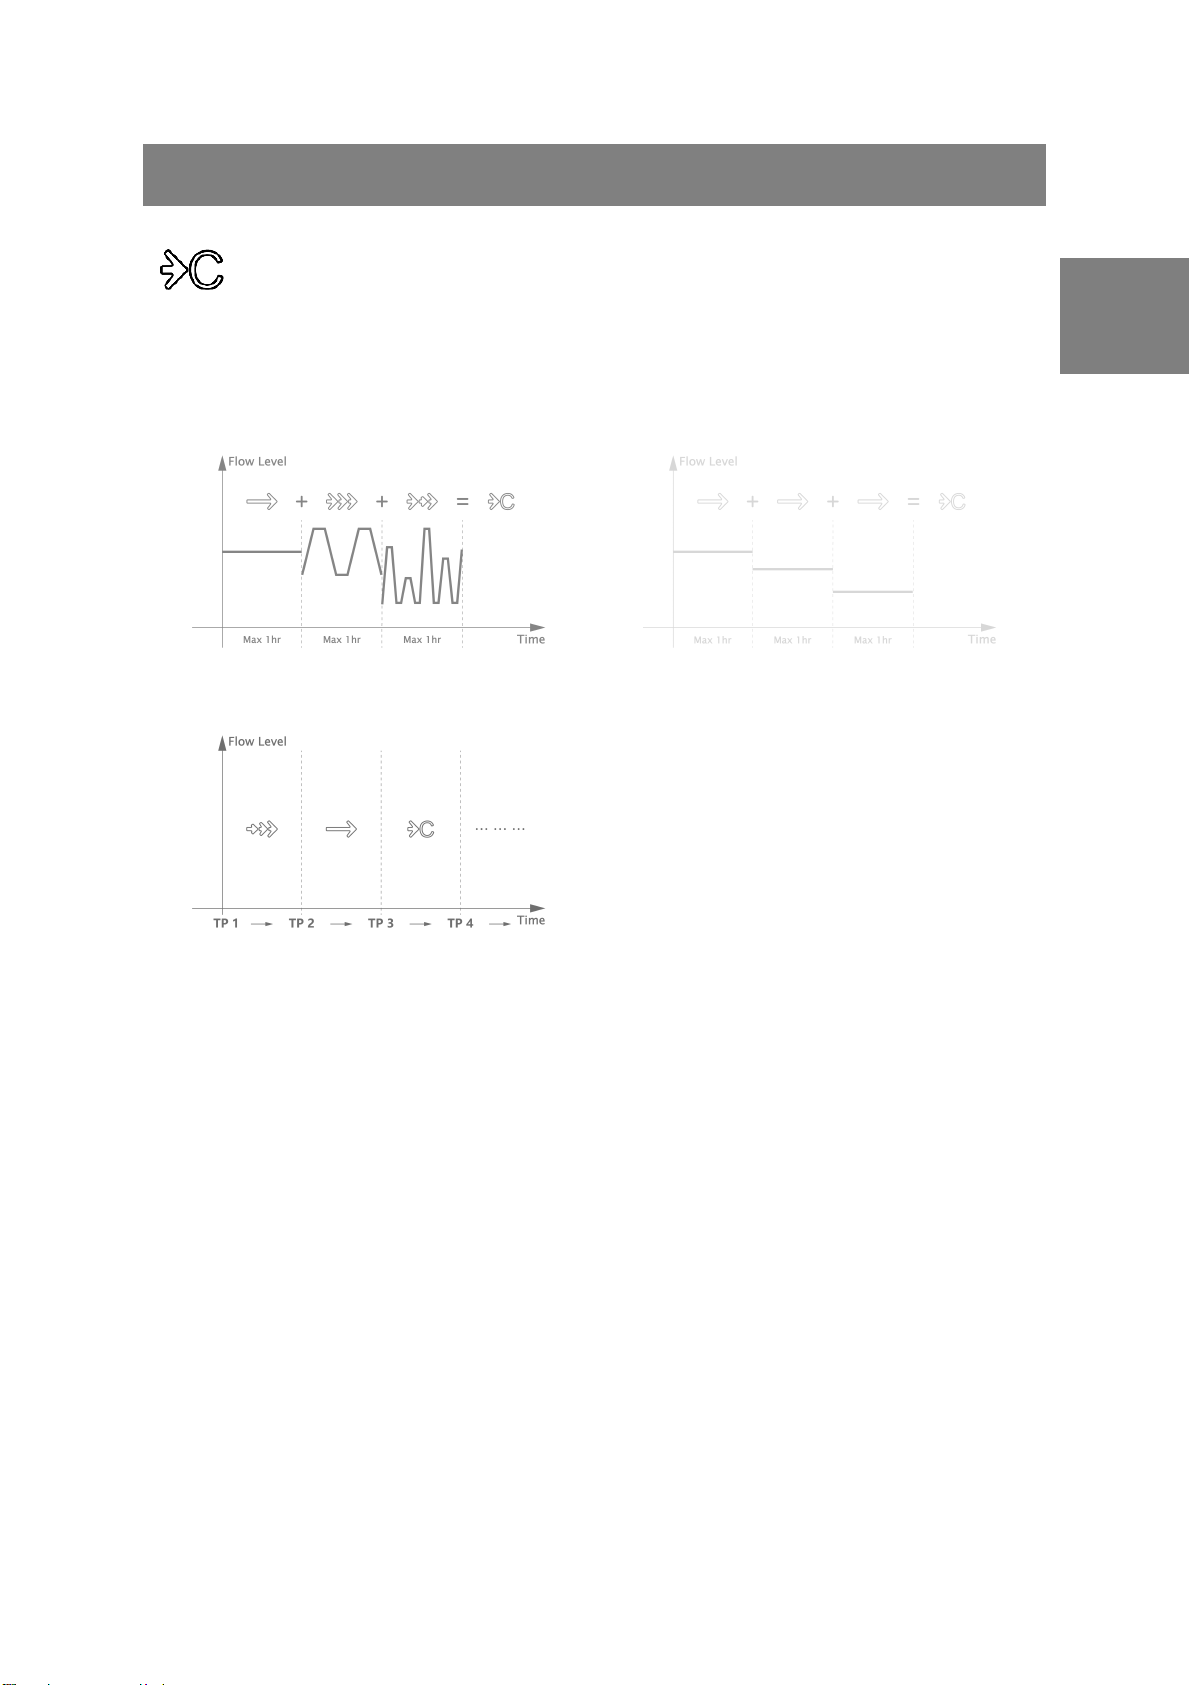
Custom Wave Mode(only adjustable on SYNA-G APP)
Custom Wave mode is an advanced water movement mode which allows you to
After finishing setting up the Custom Wave Mode, you can assign it to Manual Mode or any
period of time for Auto Mode.
Note: Though this mode is only adjustable on SYNA-G APP, there is a Preset saved for the
user who wants to control the gyre by the controller unit only.
Operating Instructions
combine three of five basic water movement modes together. The combination can be
the same or different basic water movement modes. For each one you choose, you can
do all the settings as the system allows when you set it as a basic water movement
mode, then you can set a duration for it from 10 seconds to 1 hour.
EN
15
Maintenance
Maintenance of the Appliance
EN
Your Gyre flow Pump is designed to operate optimally with little attention after initial setup.
However, due to the harsh conditions of a saltwater aquarium and resulting buildup of algae
and other organic matter, it is advisable to clean the pump to ensure the longevity of appliance.
Maxspect recommends doing a cleaning every 6 months or as necessary. This can be
accomplished by opening the impeller housing and gently brushing the impeller and inside of
impeller housing with a soft brush under running water. If there is calcium buildup, it may be
necessary to soak these parts in a mild acid solution such as vinegar. DO NOT use strong acids,
because these may damage the components. After cleaning, reassemble the appliance.
10A 11A
A
12 13
11B 10B
B
A
B
A
B
10. Flow Cage 11. Impller 12.
Note: Please note that the impellers and flow cages must be installed to the correct side when
reassembling the gyre after cleaning.
Push Hard
Rotor
13.
Stator
16

Maxspect (HongKong) Limited warrants all Maxspect™ Gyre 300 Series Gyre Flow Pump
Limited Warranty
products against defects in workmanship for a period of 12-months from the date of purchase.
If a defect exists during the warranty period, Maxspect (HongKong) Limited at its option will
either repair (using new or remanufactured parts) or replace (with a new or remanufactured
unit) the product at no charge.
THE WARRANTY WILL NOT APPLY TO THE PRODUCT IF IT HAS BEEN DAMAGED BY MISUSE,
ALTERATION, ACCIDENT, IMPROPER HANDLING OR OPERATION, OR IF UNAUTHORIZED
REPAIRS ARE ATTEMPTED OR MADE. SOME EXAMPLES OF DAMAGES NOT COVERED BY
WARRANTY INCLUDE, BUT ARE NOT LIMITED TO, USING AFTER-MARKET LED BULBS AND
MODIFICATION OF THE CIRCUITRY, WHICH ARE PRESUMED TO BE DAMAGES RESULTING FROM
MISUSE OR ABUSE.
DISCLAIMER OF CONSEQUENTIAL AND INCIDENTAL DAMAGES:
You and any other user of Maxspect (HongKong) Limited products shall not be entitled to any
consequential or incidental damages, including without limitation, loss of use of the unit,
inconvenience, damage to personal property, phone calls, lost income or earnings. This
warranty gives you specific legal rights and you may also have other rights, which vary from
state to state.
EN
MAXSPECT LTD. MAKES NO WARRANTY OR REPRESENTATION, EITHER EXPRESS OR IMPLIED,
WITH RESPECT TO THE PRODUCT'S QUALITY, PERFORMANCE, MERCHANTABILITY, OR
FITNESS FOR A PARTICULAR PURPOSE. AS A RESULT, THIS PRODUCT, IS SOLD "AS IS," AND
YOU THE PURCHASER ASSUME THE ENTIRE RISK AS TO ITS QUALITY AND PERFORMANCE.
IN NO EVENT WILL MAXSPECT LTD BE LIABLE FOR DIRECT, INDIRECT, SPECIAL, INCIDENTAL,
OR CONSEQUENTIAL DAMAGES RESULTING FROM ANY DEFECT IN THE PRODUCT OR ITS
DOCUMENTATION.
The warranty, disclaimer, and remedies set forth above are exclusive and replace all others,
oral or written, expressed or implied. At no time will any Maxspect (HongKong) Limited
dealers, agents, or employees be authorized to make any modifications, extension, or
addition to this warranty.
Some states do not allow the exclusion or limitation of implied warranties or liability for
incidental or consequential damages, so the above limitation or exclusion may not apply to
you.
17

Specifications
EN
Note:For the latest specifications of the Gyre, please visit: www.maxspect.com
18

Sehr geehrter Kunde,
Kaufdatum
Händler:
Händleradresse:
Händlerwebsite:
Händler-E-Mail:
Händlertelefon
https://www.facebook.com/Maxspect
http://twitter.com/maxspectled
vielen Dank für den Kauf dieses Produkts.
Für eine optimale Leistung und Sicherheit, lesen Sie bitte diese Anleitung sorgfältig.
Nutzer-Memo:
DE
Bitte besuchen Sie uns auf Facebook oder Twitter!
19
Packungsinhalt
No.
Komponente
Standard
Paket
Doppel Gyres
Paket
1.
x1
x2
2.
x1
x1
3.
x1
x2
4.
x1
x2
5.
x2
x4
6.
x2
x4
7.
x2
x4
8.
9.
DE
Bitte überprüfen Sie den Lieferumfang auf Vollständigkeit.
x2 x4
x1
(XF330 nur)
x2
(XF330 nur)
20

Sicherheitshinweise
LESEN UND FOLGEN SIE ALLE SICHERHEITSHINWEISE
Vor der ersten Inbetriebnahme des Maxspect™ Gyre™ 300 Series Gyre Flow
Pump sollten Sie diese Bedienungsanleitung sorgfältig lesen. Bitte beachten Sie
die folgenden Sicherheitshinweise mit großer Sorgfalt.
Bewahren Sie diese Anleitung auch zum späteren Nachschlagen auf.
1. GEFAHR - Um einen möglichen elektrischen Schlag zu vermeiden, sollte besondere Vorsicht
geboten werden, da Wasser bei der Verwendung von Aquariengeräten eingesetzt wird. Für jede
der folgenden Situationen, versuche nicht, selbst zu reparieren; Bringen Sie das Gerät an eine
autorisierte Kundendienststelle zurück oder verwerfen Sie das Gerät.
a) Wenn das Gerät irgendwelche Anzeichen einer anormalen Wasserleckage aufweist, ziehen
Sie es sofort aus der Stromquelle.
b) Das Gerät nach der Installation sorgfältig prüfen. Es sollte nicht eingesteckt werden, wenn
es Wasser auf nicht beabsichtigte Teile gibt.
c) Betreiben Sie das Gerät nicht, wenn es beschädigtes Kabel oder Stecker hat oder wenn es
fehlerhaft ist oder in irgendeiner Weise fallengelassen oder beschädigt wurde.
d) Um die Möglichkeit zu vermeiden, dass der Gerätestecker oder die Steckdose nass wird,
positionieren Sie den Aquarienständer und den Tank auf eine Seite einer Wandsteckdose,
um zu verhindern, dass Wasser auf die Steckdose oder den Stopfen tropft. Eine "DripLoop", die in der Abbildung gezeigt wird, sollte vom Benutzer für jede Schnur angeordnet
werden, die ein Aquariumgerät mit einer Steckdose verbindet. Die "Tropfschleife" ist der
Teil des Kabels unterhalb des Niveaus des Behälters oder der Stecker, wenn ein
Verlängerungskabel verwendet wird, um zu verhindern, dass Wasser entlang der Schnur
fährt und mit dem Behälter in Berührung kommt. Wenn der Stecker oder die Steckdose
nass wird, ziehen Sie den Netzstecker nicht ab. Trennen Sie die Sicherung oder den
Schutzschalter, der das Gerät mit Strom versorgt. Dann trennen und prüfen auf
Vorhandensein von Wasser in der Steckdose.
DE
2. Die Überwachung ist erforderlich, wenn ein Gerät von oder in der Nähe von Kindern benutzt
wird.
3. Um Verletzungen zu vermeiden, wenden Sie sich nicht an bewegliche Teile oder heiße Teile wie
Heizkörper, Reflektoren, Lampenkolben und dergleichen.
4. Ziehen Sie das Gerät immer aus der Steckdose, bevor Sie es benutzen, bevor Sie es anziehen
oder abnehmen, bevor Sie es reinigen. Niemals das Kabel ziehen, um den Stecker aus der
Steckdose zu ziehen. Fassen Sie den Stecker an und ziehen Sie ihn abziehen
5. Verwenden Sie kein Gerät für andere als den vorgesehenen Gebrauch. Die Verwendung von
Anhängen, die vom Gerätehersteller nicht empfohlen oder verkauft werden, kann zu einem
unsicheren Zustand führen.
6. Installieren oder lagern Sie die Geräte nicht dort, wo sie dem Wetter ausgesetzt sind, oder
Temperaturen unter dem Gefrierpunkt.
7. Stellen Sie sicher, dass ein Gerät, das an einem Tank montiert ist, vor dem Betrieb sicher
installiert ist.
21

Sicherheitshinweise
DE
8. Lesen und beachten Sie alle wichtigen Hinweise auf dem Gerät.
9. Wenn ein Verlängerungskabel erforderlich ist, sollte ein Netzkabel mit einer korrekten
Bewertung verwendet werden. Ein Kabel, das für weniger Ampere oder Watt als das Gerät
bewertet wird, kann überhitzen.
Sicherheit zu Stromversorgung
1. Stromquelle - Setzen Sie die sicherheitsrelevanten Merkmale eines gepolten oder eines
geerdeten Steckers nicht außer Kraft. Ein geerdeter Stecker verfügt über zwei Stifte und über
einen dritten Erdungsstift. Der Erdungsstift ist zu Ihrer Sicherheit vorhanden. Sollte der Stecker
nicht in Ihre Steckdose passen, kontaktieren Sie einen Elektriker, um die veraltete Dose
austauschen zu lassen.
2. Netzkabel - Die Netzkabel sollten so verlegt werden, dass man nicht darüber steigen muss und
sie auch nicht von Gegenständen beschädigt werden können, die unter oder neben den Kabeln
liegen. Fassen Sie den Stecker oder das Kabel nie mit nassen Händen an und greifen Sie den
Stecker beim Einstecken oder Abziehen immer direkt an.
3. Installation - Nur im Innenbereich benutzen und verwenden Sie nur die vom Hersteller
mitgelieferten Zubehörteile, Befestigungsrahmen und Aufhängsysteme.
Sicherheit zu Magnetbefestigung
1. VORSICHT - Sehr starke Magnethalterung im Lieferumfang enthalten.
2. VORSICHT - halten Sie die Magnethalterung außerhalb der Reichweite von Kindern, da es sonst
Gefahr von schweren Verletzungen geben könnte!
3. Behandeln Sie die Magnethalterung mit sicherem Griff und bringen Sie nicht die beiden Seiten
direkt zusammen. Fassen Sie nicht mit den Fingern zwischen den Kontaktflächen der
Magnethalterungen.
4. Magnet zieht Metallteile und andere Magneten mit großer Kraft an! Beim Hantieren mit dem
Magnet sollten sich keine Metallteile, andere Magneten, Klingen oder Messer im Umkreis
befinden, um Verletzungen zu vermeiden.
5. Vorsicht bei magnetisch empfindlichen Gegenständen, z.B. Herzschrittmachern, Datenträger,
Kreditkarten usw. Halten Sie sich von diesen Geräten beim Umgang mit der Magnethalterung
fern, um Beschädigung zu vermeiden!
Sicherheit zu flutende Bewegungen erzeugt vom Gyre System
1. Das Erzeugen von Fluten und Wellen mit dem Gyre System kann eine zusätzliche Belastung für
das Glas / Acryl Aquarium und seine Nähte werden. Nicht alle Aquarien sind entwickelt oder in
der Lage diesen Belastungen standzuhalten. Es könnte zum Versagen des Glas / Acryl- und / oder
Nähte führen. Bitte wenden Sie sich an Ihren Aquarium Hersteller, um nachzufragen, ob die
Aquarium Konstruktion ausreichend ist, um die zusätzlichen Belastungen durch die erzeugten
Fluten- und Wellenbewegungen Deutsch standzuhalten. Bitte überprüfen Sie dass, Ihr Aquarium
sicher steht und dass das Untergestell oder Möbel richtig ausgerichtet ist, damit diese dazu
beitragen, die zusätzliche Belastung durch Wellenerzeugung stand zu halten.
2. Maxspect SCHLIESST JEDE HAFTUNG AUS FÜR Schäden an Aquarien oder ihr Umfeld,
Wasserschäden oder sonstige Folgeschäden, die durch die Benutzung des Gyre Systems und
deren Wellenerzeugung entstehen. MACHEN SIE WELLEN AUF EIGENE GEFAHR.
22

Bedienung - Steuerungseinheit
Sicherheitshinweise
1. Bedienung – Befolgen Sie immer die Bedienhinweise dieses Handbuch, wenn Sie die Gyre
Steuereinheit nutzen.
2. Hitze – Das Gerät sollte fern von Wärmequellen, wie zum Beispiel Heizkörpern, aufgestellt
werden und darf keiner großen Hitze, wie etwa Sonneneinstrahlung oder Feuer, ausgesetzt
werden.
3. Feuchtigkeit – Zur Verringerung der Stromschlaggefahr darf das Gerät nicht mit Regen,
Feuchtigkeit, Tropf- und Spritzwasser in Kontakt kommen.
4. Wasserschaden – Steuereinheit NICHT ins Wasser eintauchen. Wenn diese ins Wasser fällt, nicht
DANACH GREIFEN! Erst die Steuereinheit ausstecken, bevor Sie diese vom Wasser
herausnehmen. Sind elektrische Komponenten des Gerätes nass, entfernen Sie sofort den
Stecker des Geräts von der Stromquelle.
Bedienung – Gyre Pumpe
1. Platzierung – Die Gyre Pumpe kann eine starke Strömung erzeugen. Aus diesem Grund, sollte
die Gyre in einem Bereich, wo Korallen nicht zu nahe an dem Ausgangsstrom der Pumpe sind,
angebracht werden.
2. Ausfall – Einen Motorausfall der Gyre Pumpe kann verschiede Gründe haben. Bitte überprüfen
Sie als aller erstens ob nicht etwas zum Blockieren der Rotoren geführt hat.
3. Ü berhitzung – Die Gyre pumpe wurde ausschließlich für eine Benutzung unter Wasser
entwickelt. Benutzen Sie die Gyre Pumpe nicht außerhalb von Wasser, ansonsten könnte die
Pumpe dadurch überhitzen und es könnten Schäden daran entstehen.
4. Reinigung – Bitte folgen Sie den Anweisungen in diesem Handbuch für die regelmäßige
Reinigung der Gyre.
5. Stromausfall – Bei Stromausfall, wenn eine Batterie an der Gyre Pumpe hängt, wechselt diese
automatisch zum Batterie-Modus um. Die Pumpe wird dann bei minimaler Geschwindigkeit
laufen, um die Laufzeit in dieser kritischen Zeit zu maximieren.
DE
23
Installation
1).
or
2).
or
3).
DE
Installation
1. Schutznetz und Strömungsrichter
2. Magnet
3. XF330 Betriebsmodus mit einem einzelnen Rotor. Es ist möglich, den linken oder rechten
Rotor durch eine Endkappe zu ersetzen, um eine Pumpe mit nur einer Strömung auf
einer Seite zu erhalten.
24
Einstellung der Strömungsrichtung
Installation
1. Drehen Sie den Strömungsrichter um die Strömungsrichtung einzustellen.
2. Die Verwendung des Strömungsrichter ermöglicht es, den Wasserfluss zu
konzentrieren.
Anschluss des Systems
DE
Wenn Sie nur EINE Gyre haben, müssen Sie diese an Anschluss A anschließen damit der
Controller und die Gyre mit Strom versorgt werden.
Verwenden Sie das Netzteil der XF330 NICHT mit der XF350. Das Netzteil der XF350 kann
jedoch mit der XF330 verwendet werden.
Der Netzschalteradapter (separat erhältlich) ist ein Komponent mit zwei Stromkabeln, der
mit 24v beschriftete Kabel wird an das Netzteil angeschlossen, der andere mit 12v wird
an die vom Benutzer bereitgestellte Pufferbatterie angeschlossen. Wenn Sie nur EINEN
Netzschalteradapter haben, müssen Sie diesen an der gleichen Leitung wie Gyre A
verbinden, um sie zu betreiben.
25
Wasser Bewegungsmodus
Verbindungsmethoden
Permanent Strömungsmodus
Synchron
Pulsierender Modus
Anti-Synchro
Ansteigender
Pulsierender-Modus
Zeitverzögerung
Zufallsmodus
Umgekehrt Zeitverzögerung
Wechselnder Wirbelmodus
Benutzerdefinierte Wellenmodus (nur einstellbar auf der SYNA-G APP)
Variablen
Maximaler Fluß
Anstiegszeit
Maximale Fließzeit
Mindestdurchfluss
Abstiegszeit
Minimale Fließzeit
Operating Instructions Bedienungsanleitung
ON / OFF, Futtermodus-Taste
Modus-Taste, Setup-Taste
Einstellrad
Power-Anzeige
Manuellen-Modusanzeige
Automatik-Modusanzeige
Einstellanzeige
DE
Steuereinheit Einführung
OLED Screen Icon
Dargestellten Verfahren
26
Ein- / Ausschalten der Gyre
1.
Einstellungsseite aufrufen.
3.
Parameter einstellen.
2.
Zwischen den Einstellungen
wechseln.
4.
Einstellungen speichern.
Manueller Modus: Manuelles Einstellen des
Wasserbewegungsmodus und der
Ausgangsleistung für die Gyre.
Auto-Modus: Unterschiedliche Einstellungen
mit programmierbarem wasser bewegungs
modus und der Ausgangsleistung für einen 24
Stunden Zyklus.
Auto-Modus voreingestellt: Zwei im System vorhandene Voreinstellungen (LTC und OGC)
können vom Benutzer ausgewählt werden.
Operating Instructions Bedienungsanleitung
Stellen Sie die.
Modellnummer für die Linie A festlegen.
Modellnummer für die Linie B festlegen.
Stellen Sie die Strömungsgeschwindigkeit für den
Betriebsmodus mit der Pufferbatterie ein.
Achtung: Der Gyre wird im Konstantgeschwindigkeitsmodus betrieben, wenn sie von der BackupBatterie versorgt wird.
Aktueller Wasser Bewegungsmodus.
Drehrichtung des Rotors.
Momentaner Strömungswert.
Leistunsanzeige
Hauptanzeige
Einstellungsanz
1.
Einstellungsseite aufrufen.
2.
Zwischen den
Einstellungen wechseln.
3.
Parameter einstellen.
4.
Einstellungen speichern.
Die ON / OFF-Taste 3s lang gedrückt halten um die Pumpe ein- oder ausschalten. Wurde
ausschalten gewählt, schalten sich die Pumpe, sowie die Anzeigen und der OLED-Bildschirm
der Steuereinheitlers, aus. Wenn die Pumpe jedoch über einen ICV6 angeschlossen ist
(separat erhältlich), kann diese trotzdem über die Syna-G App gesteuert werden.
Einrichtung der Gyre
Bevor Sie Ihre Gyre in Betrieb nehmen, müssen einige Grundeinstellungen vorgenommen
werden.
DE
Umschalten zwischen Modus
Manueller Modus
27
Bedienungsanleitung
Hauptanzeige
Aktueller Wasser Bewegungsmodus.
Drehrichtung des Rotors.
Sofortiger Durchfluss.
Leistunsanzeige
Aktueller Zeitpunkt
Aktuelle Uhrzeit
Einstellungsanz
1.
Einstellungsseite aufrufen.
2.
Zwischen den
Einstellungen wechseln.
3.
Parameter einstellen.
4.
Einstellungen speichern.
Hauptanzeige
Aktuelle Voreinstellung
Flutanzeige
LTC: Lunar Tidal Cycle ist ein 24-Stunden-Zyklus, der die Art des Wasserstroms in den Ozeane, während
Ebbe und Flut nachbildet
OGC: Ocean Gyre Cycle ist ein 24-Stunden-Zyklus, der eine sanfte wechselnde Gyre Zirkulation im
Aquarium schafft.
Flutanzeige: Wenn die Flutanzeige leuchtet, beträgt der Zyklus 24 Stunden und 48 Minuten.
Einstellungsanz
1.
Einstellungsseite aufrufen.
2.
Zwischen den
Einstellungen wechseln.
3.
Parameter einstellen.
4.
Einstellungen speichern.
1.
Eingabe / Verlassen des
Futter-Modus.
2.
Einstellungsseite aufrufen.
3.
Parameter einstellen.
4.
Einstellungen speichern.
DE
Auto-Modus
Auto Mode Preset
Futter-Modus
28
 Loading...