

Maxspect Celectial Owner's Manual

Owner’s Manual
Bedienungsanleitung
Mode d’emploi
Manuali dei Prodotti
Manual do Proprietário
用户手册
使用說明書
Instrukcje obslugi

1
2
Dear Customer,
Thank you for purchasing this product.
For optimum performance and safety, please read these instructions carefully.
User Memo:
Date of purchase:
Dealer name:
Dealer address:
Dealer website:
Dealer email:
Dealer phone no.:
Please visit us on facebook or twitter!
https://www.facebook.com/Maxspect
http://twitter.com/maxspectled
English
3
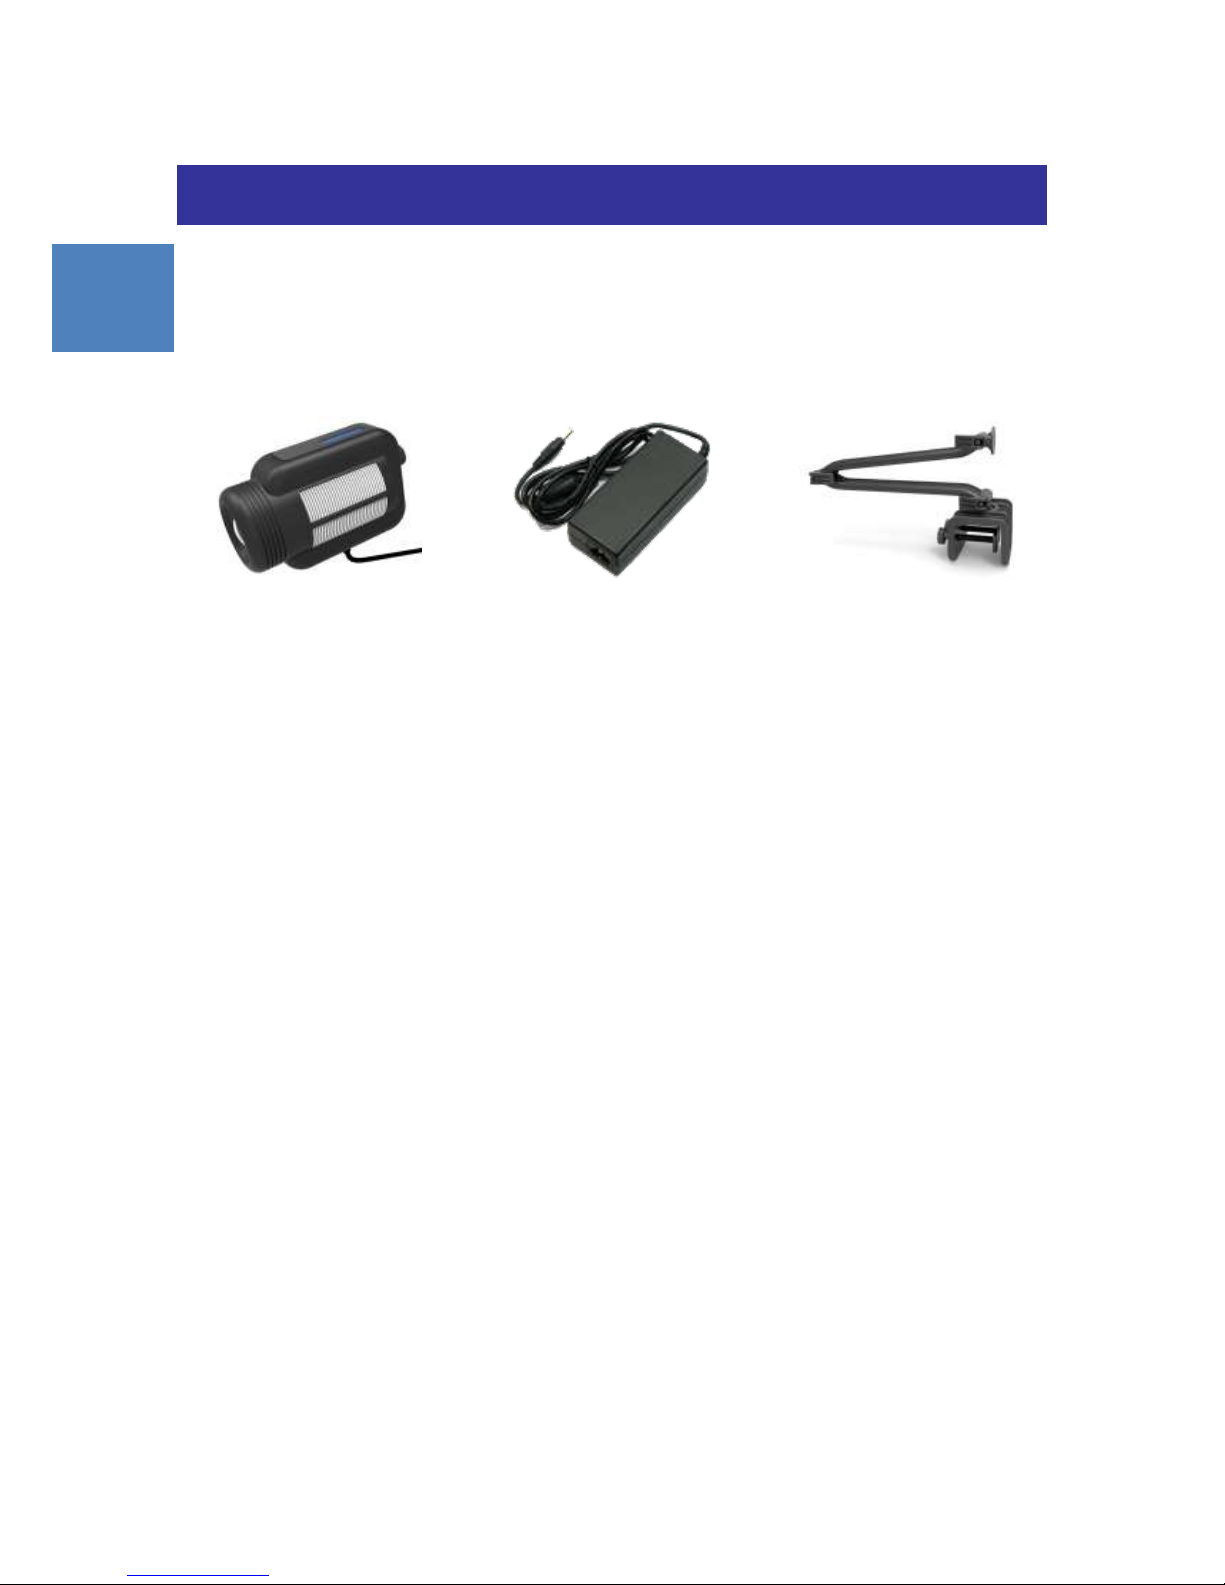
Package Content
Please check the content in the package.
Celestial LED Module
Power Supply Unit
Stand
English
4
Precautions
Before using the Maxspect™ Celestial LED Lighting System
1. Remove any plastic bags and packaging material protecting the fixture.
2. Never look directly at the LED bulbs when you switch on the system. Incorrect use of this
apparatus will increase eye hazard.
On Safety
1. Power Source – Do not defeat the safety purpose of the polarized or grounding-type
plug. A polarized plug has two blades with one wider than the other. A grounding-type
plug has two blades and a third grounding prong. The wide blade or the third prong are
provided for your safety. If the plug does not fit into your outlet, consult an electrician for
replacement of the obsolete outlet.
2. Power Cord Protection – The power supply cords should be routed so that they are not
likely to be walked on or pinched by items placed upon or against them. Never take hold
of the plug or cord if your hand is wet, and always grasp the plug body when connecting
or disconnecting it.
3. Installation – Install indoor only, and use the attachments, mounting frames, hanging
kit and accessories provided and specified by the manufacturer.
On Operation
1. Operation – Always follow the operation instructions set forth in this manual when using
this Celestial LED Lighting System.
2. Heat – The apparatus should be situated away from heat sources such as radiators, and
do not expose to excessive heat such as sunshine, fire or the like.
3. Moisture – To reduce the risk of fire or electric shock, do not expose this apparatus to
rain, moisture, dripping or splashing.
4. Ventilation – The apparatus should be situated so that its location or position does not
interfere with its proper ventilation.
5. Magnetism – The apparatus should be situated away from equipment or devices that
generate strong magnetism.
6. Cleaning – Clean only with dry cloth.
Before using this Maxspect™ Celestial LED Lighting System please read
these operating instructions carefully. Take special care to follow the safety
suggestions listed below.
Afterwards keep this manual handy for future reference.
English

5
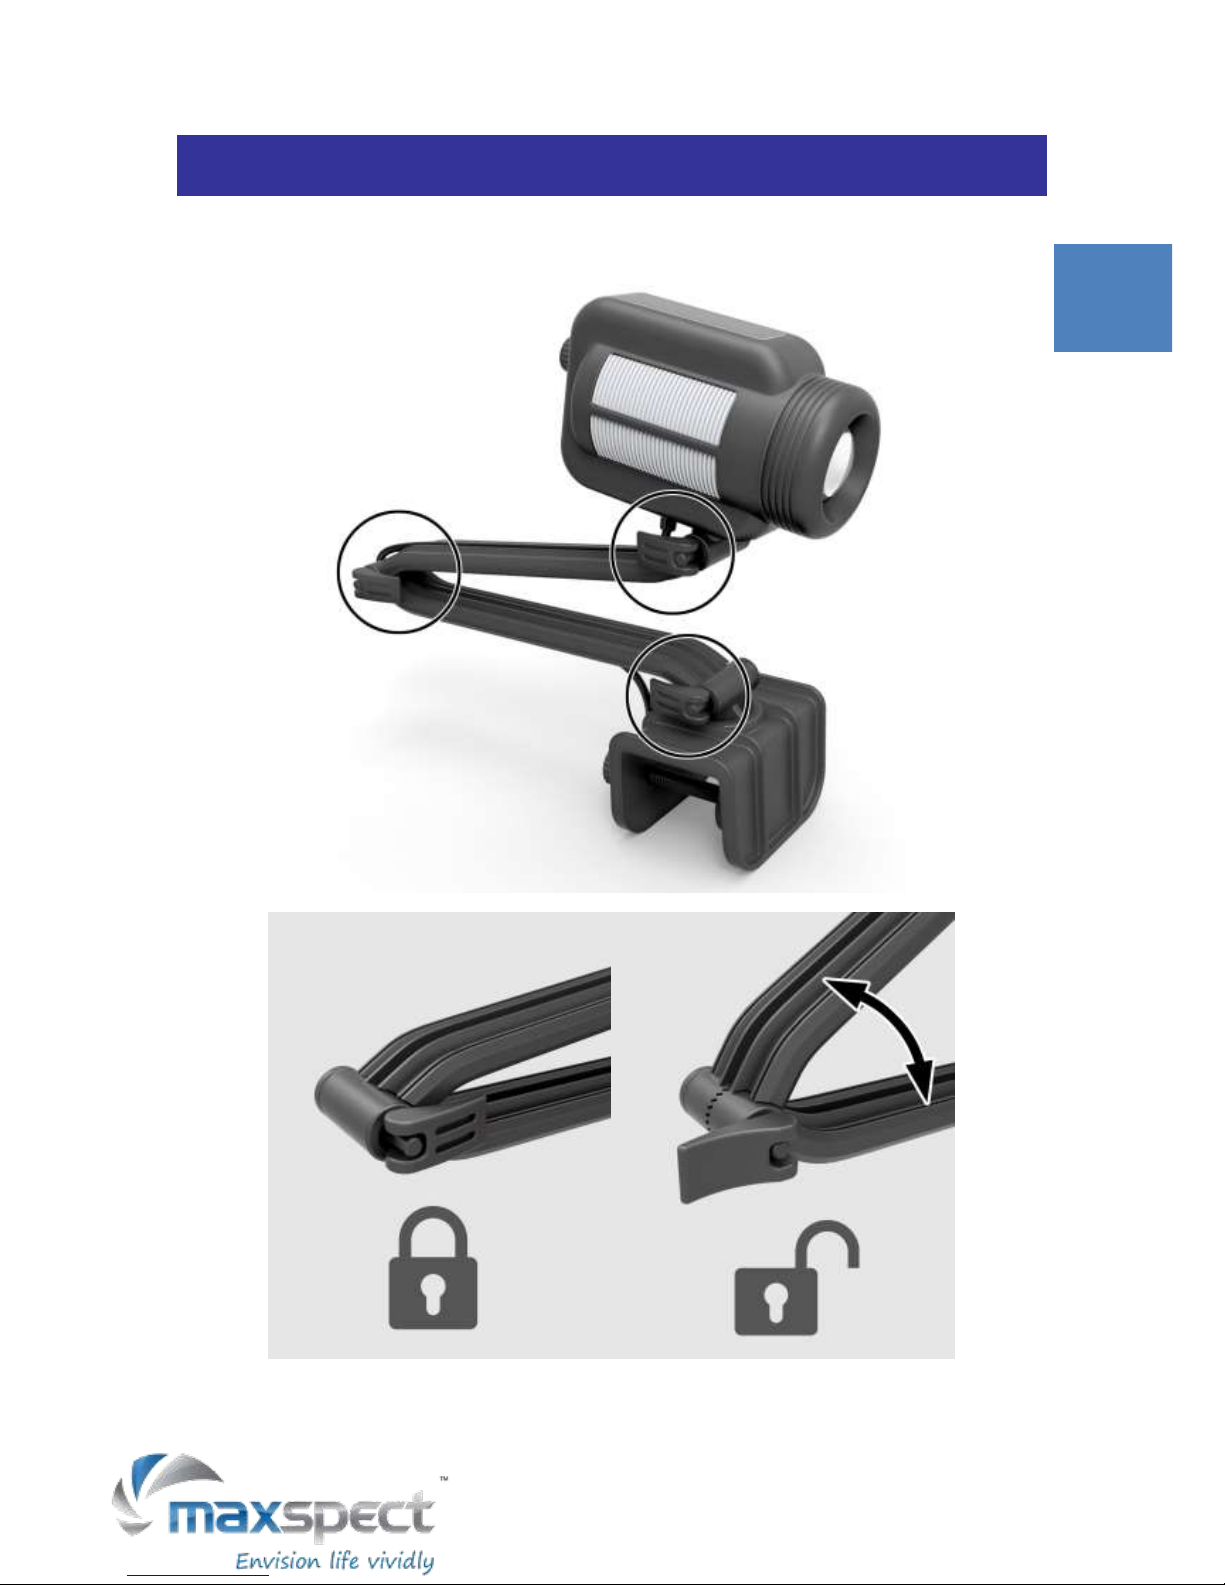
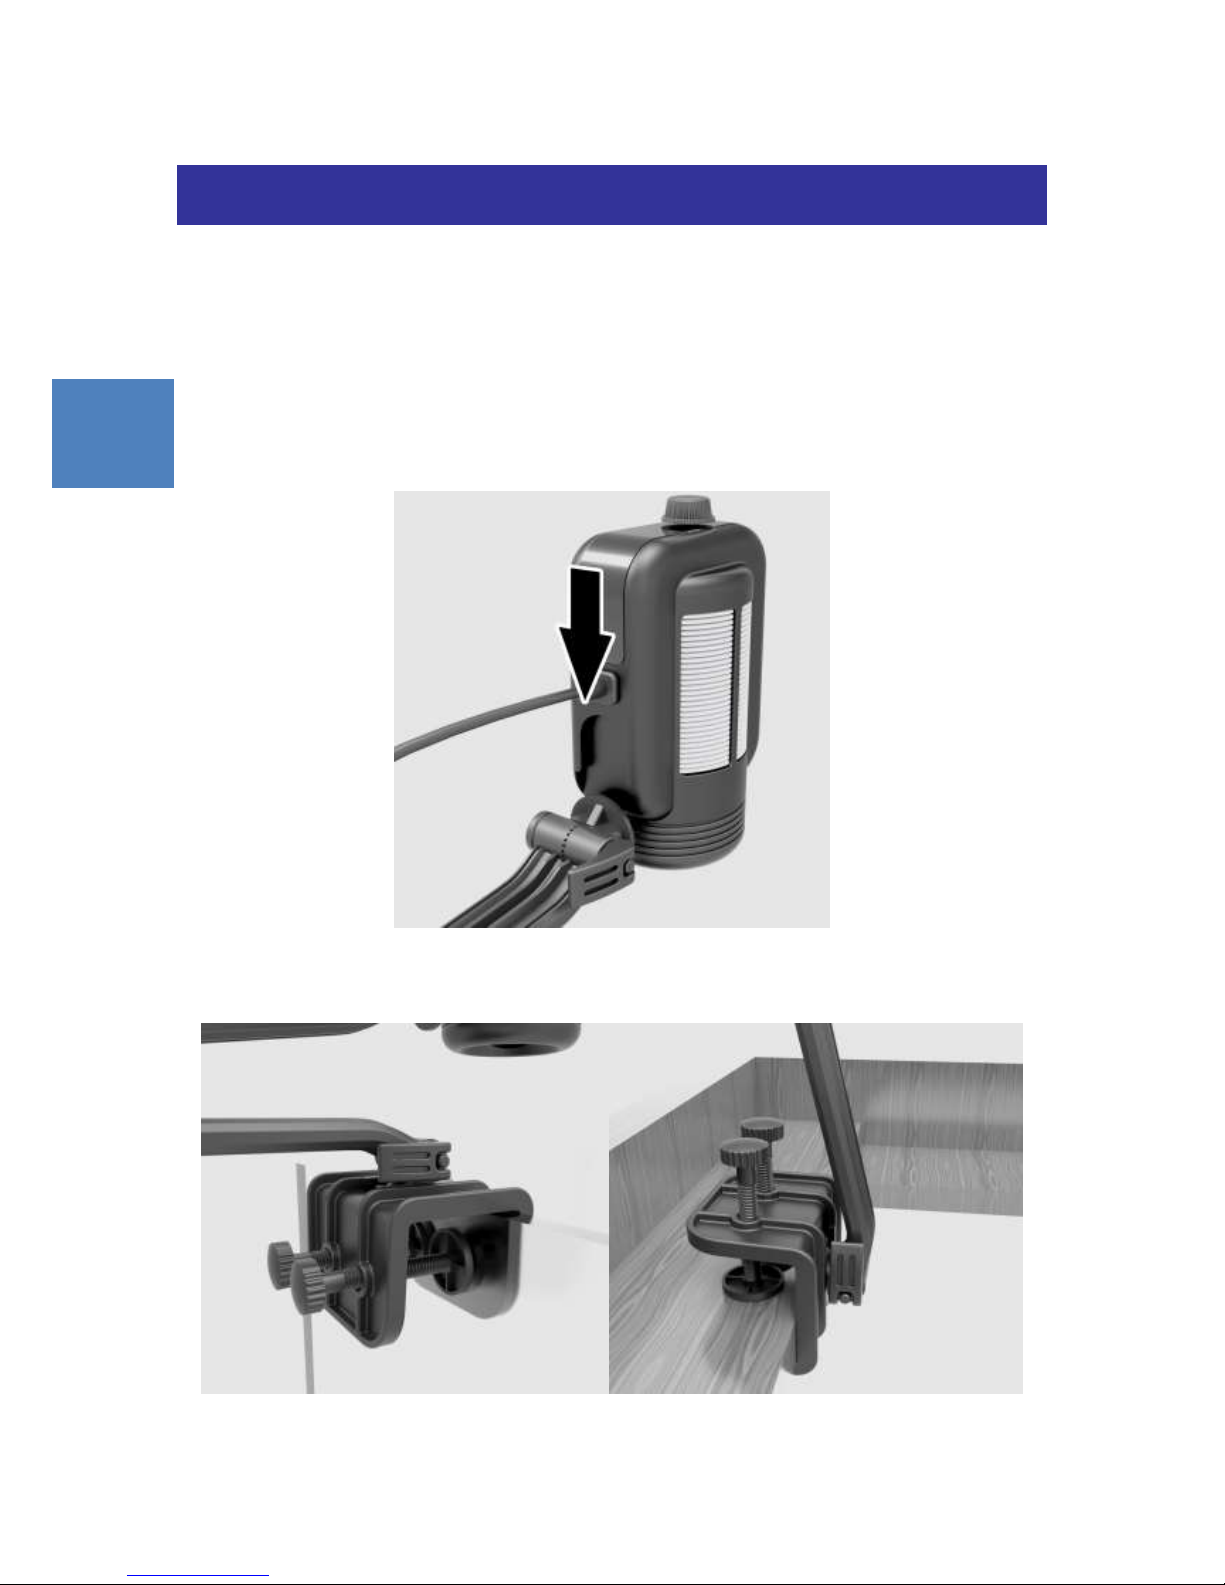
Installation
Mounting the Celestial LED Lighting System
Before connecting the LED Modules to Power Supply, first mount the system by using the
provided Stand.
1. Assemble the Stand.
Assemble the stand by inserting the rails into side of the Celestial LED Module, as
illustrated in the following diagram.
2. Tighten the Thumb Screws.
Tighten the thumb screws to secure the position of the stand.
English
6
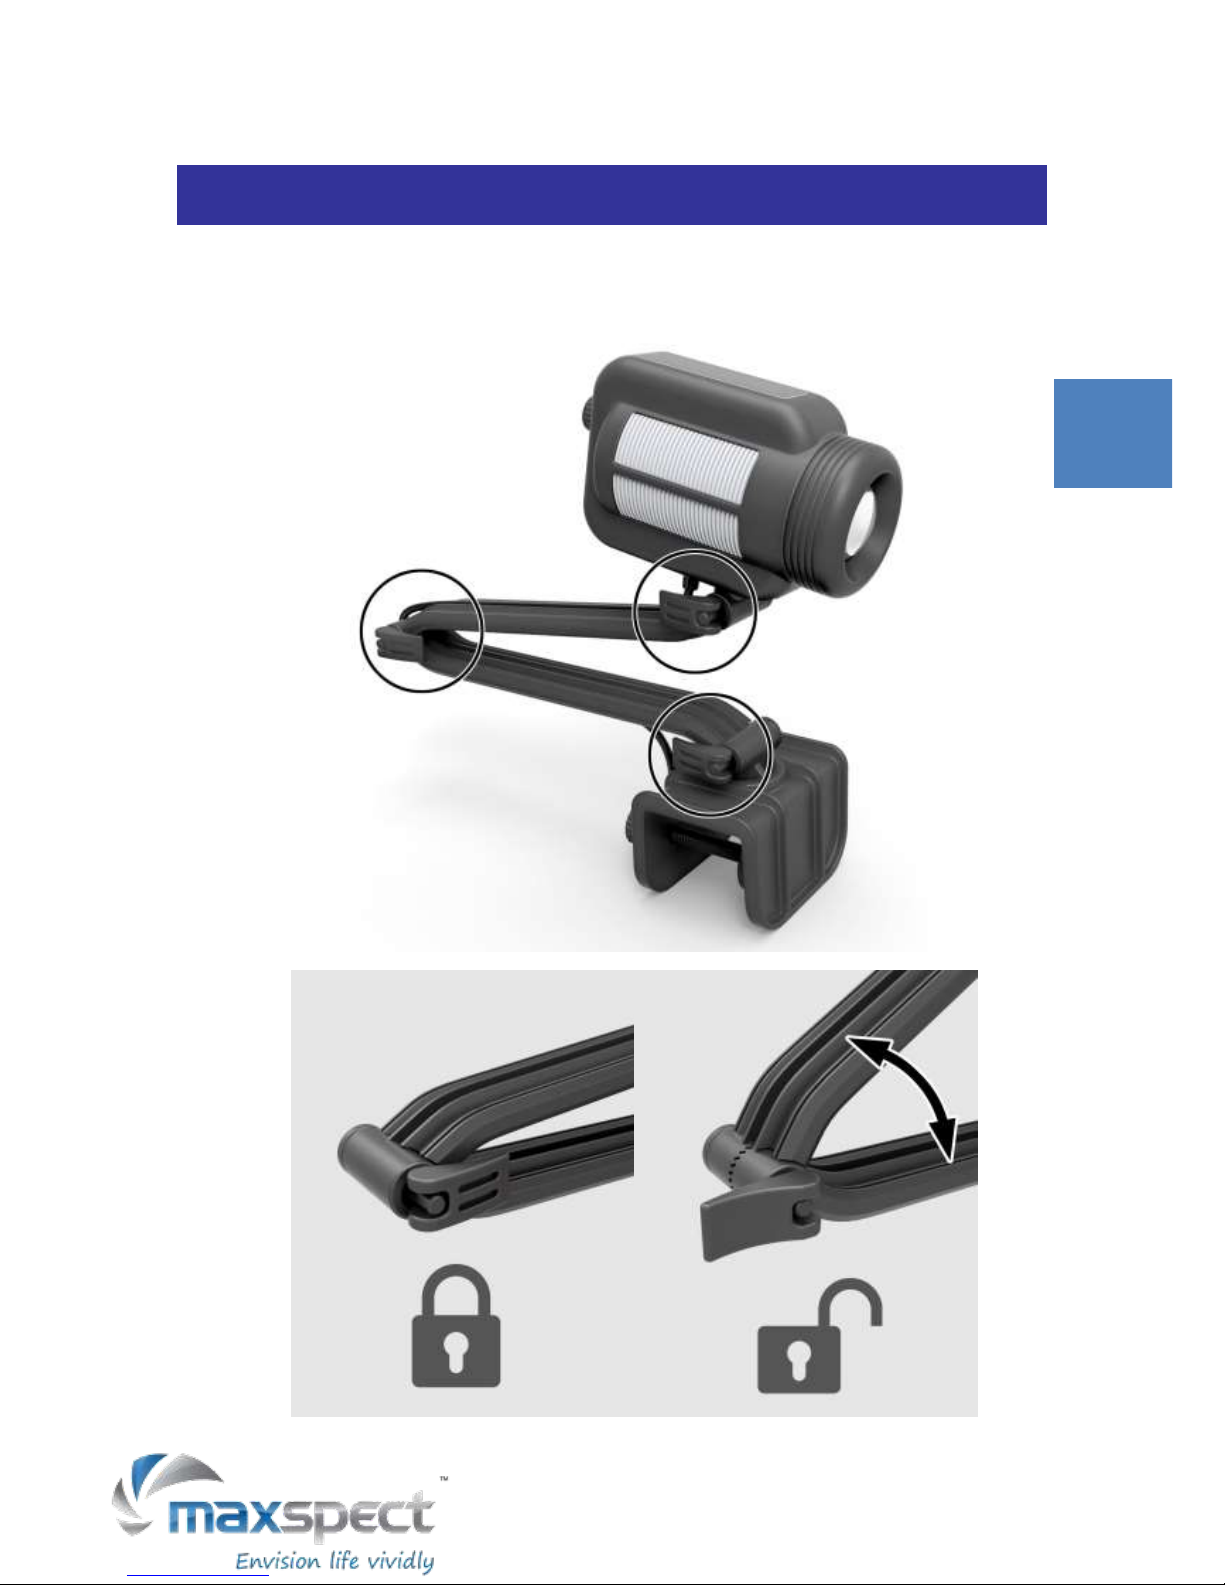
Installation
3. Adjust the angle.
English

7
Operating Instructions
Basic Operations
Follow the instructions below to operate and program the Celestial LED Module.
Note
The LED Module turns on automatically when power is connected, and
turns off when power is cut.
When power is resumed, the LED Module will restore to the previous saved setting
automatically, whether it was last set at Manual, Preset or Automatic Mode, and the intensity
level of all the LED channels.
The Maxspect logo will be displayed with the firmware version when power
is connected.
MAXSPECT c1.1
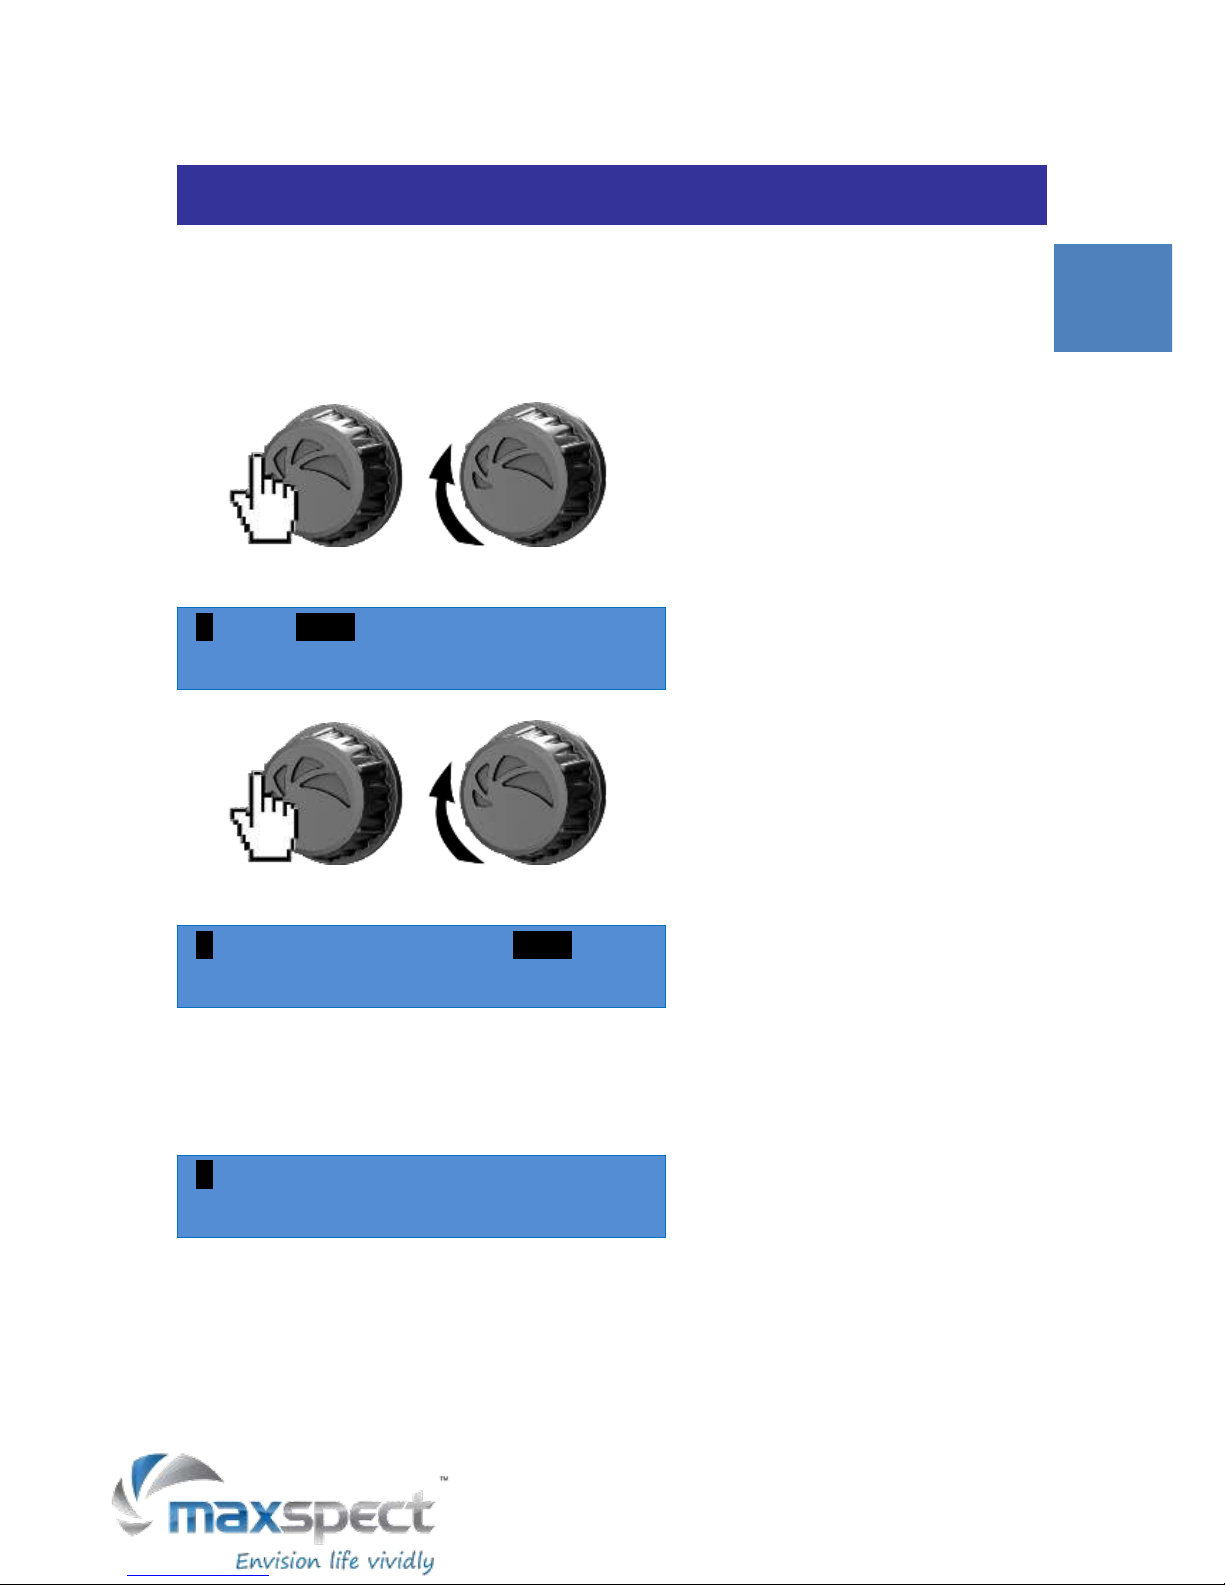
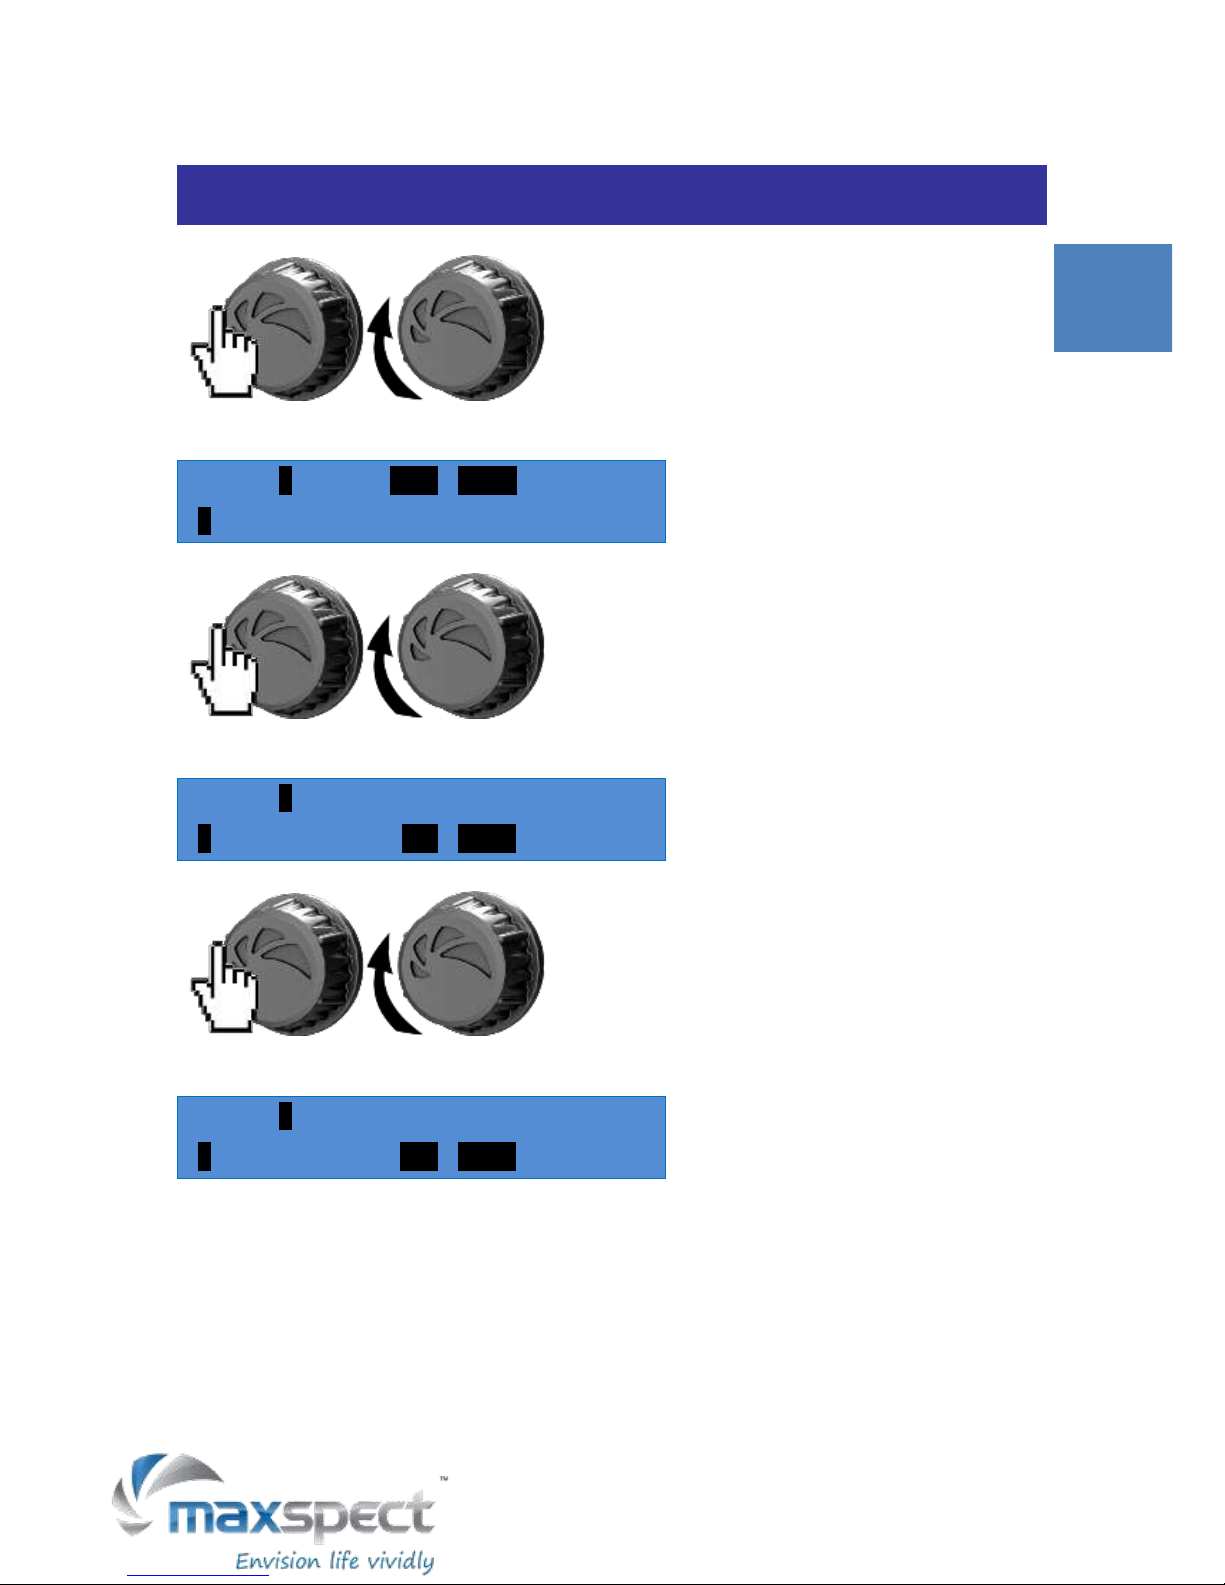
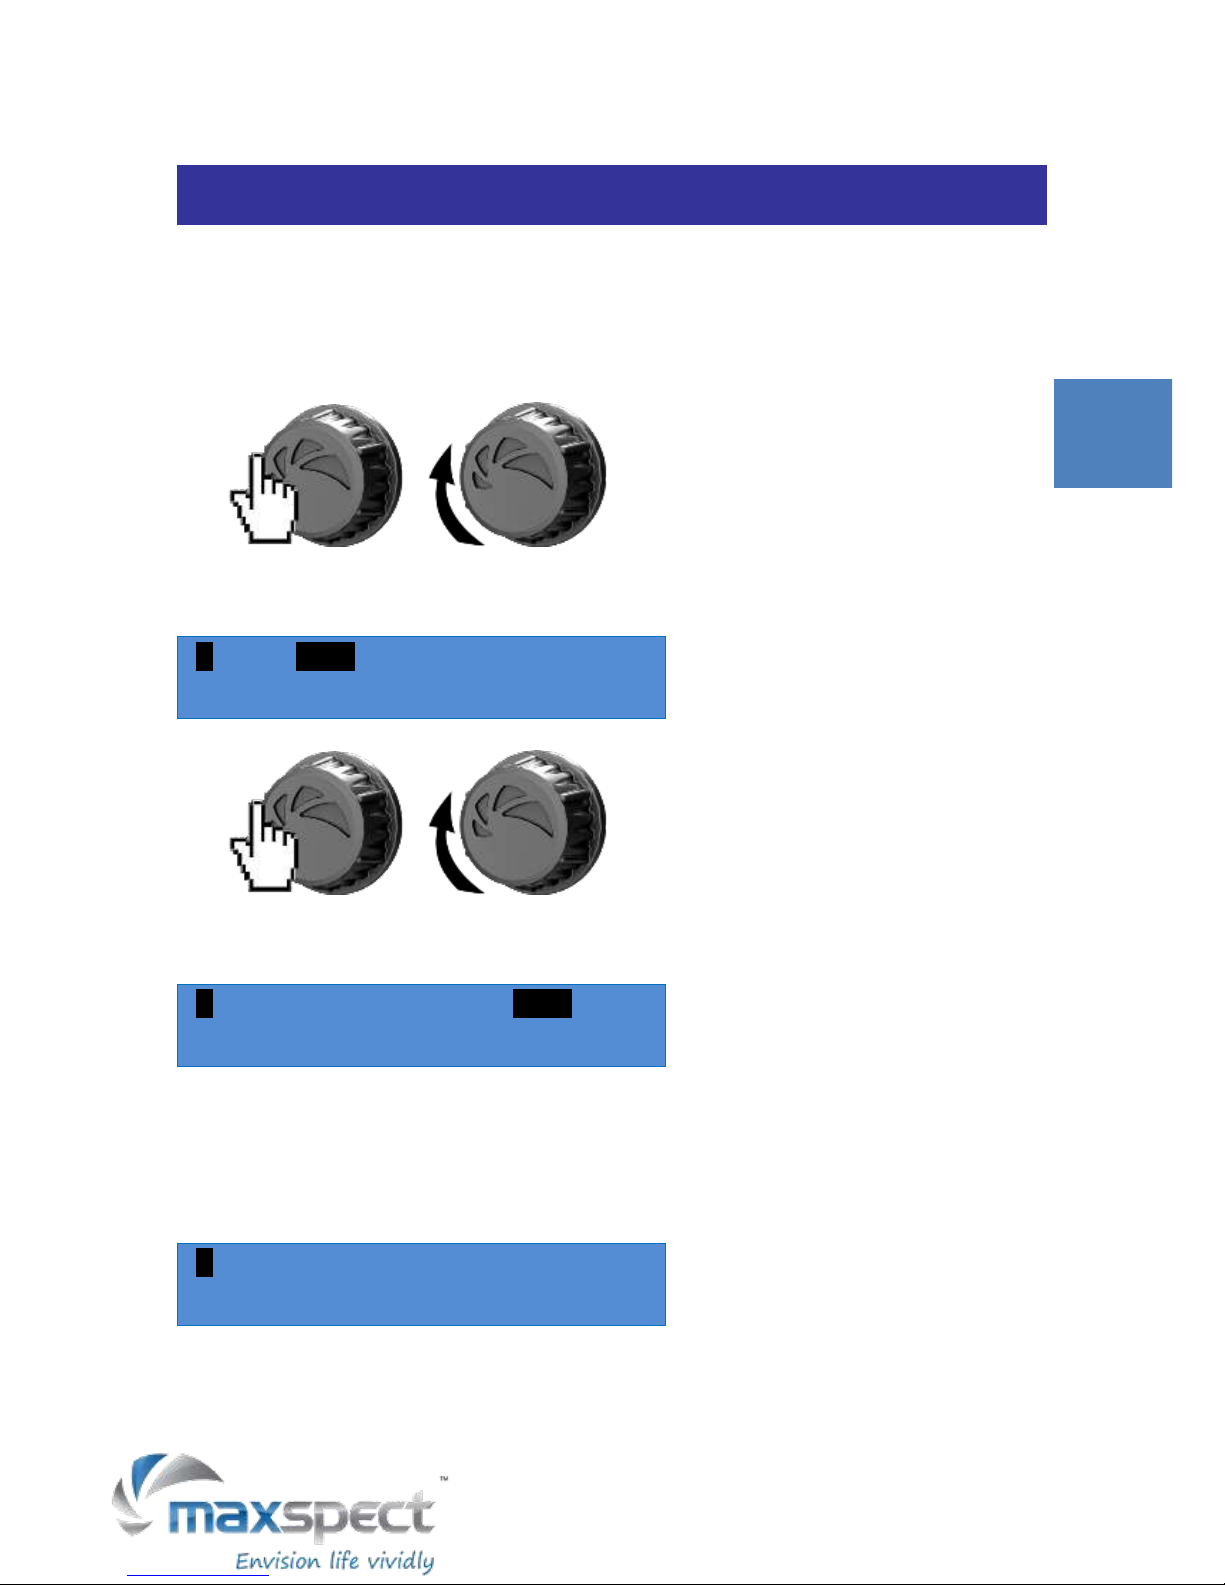
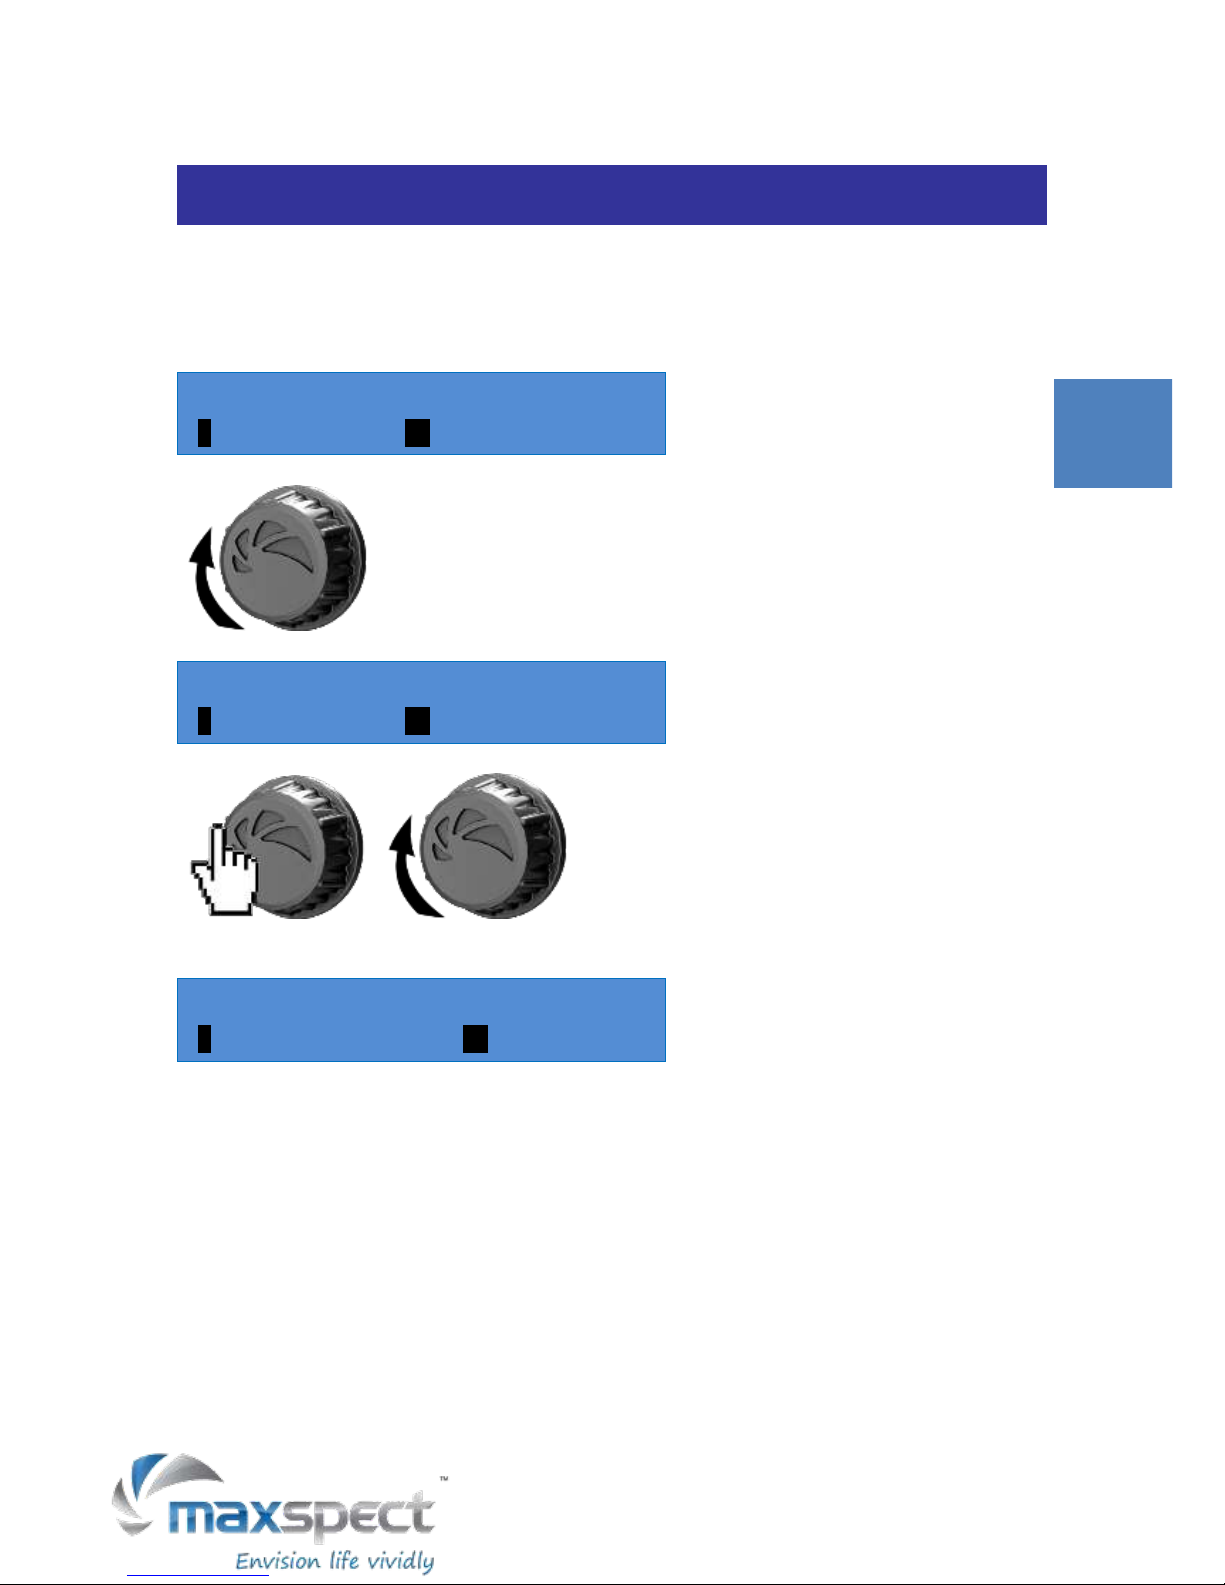
Switching between Manual and Automatic Mode
1. Press and hold the control dial for 2 seconds to switch between the 2 modes. The
LCD panel will display “M” and “A” accordingly.
Manual Mode:
M
A:
100%
B:
100%
C:
100%
D:
100%
Automatic Mode:
A 12:
30
A:
100%
B:
100%
English
8
Operating Instructions
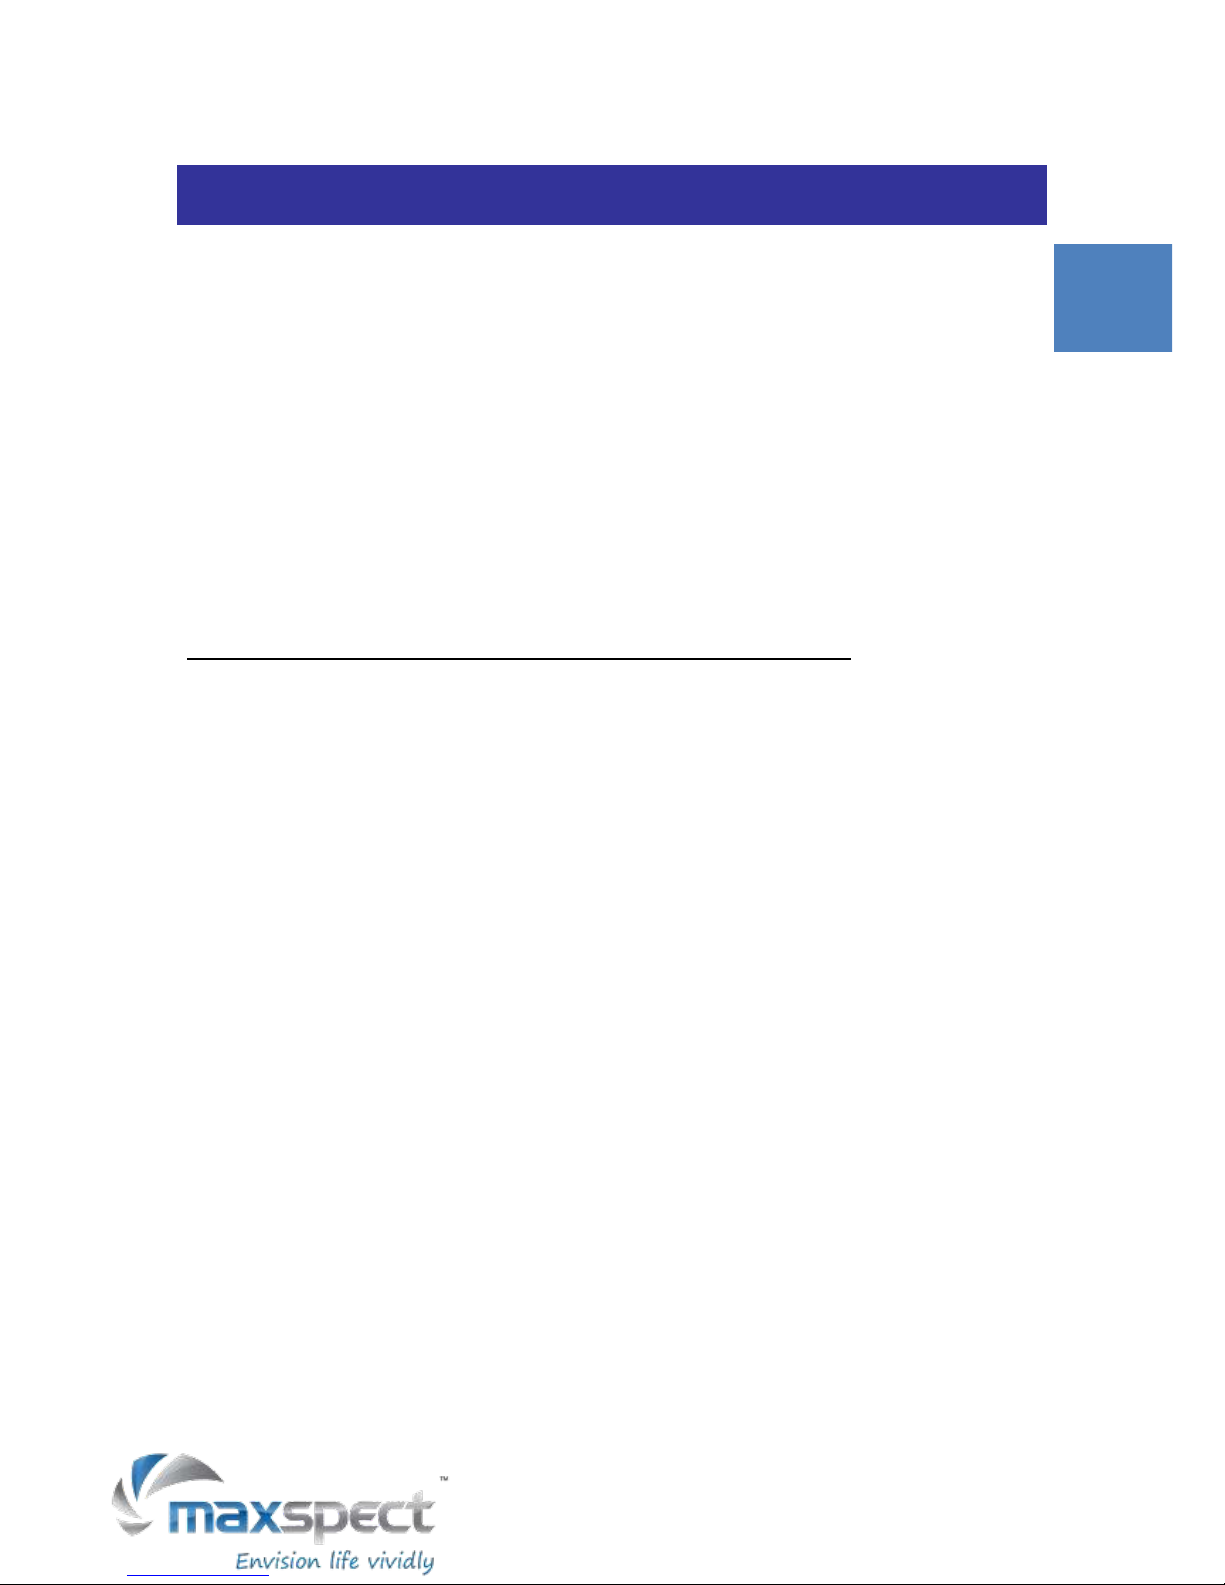
Manual Mode “M”
Under Manual mode, user can adjust the brightness of the two channels by using the control
dial.
1. Press the control dial once to enter setup. Channel A will be selected by default.
Rotate the dial to adjust its brightness.
M
A:
100%
B:
100%
C:
100%
D:
100%
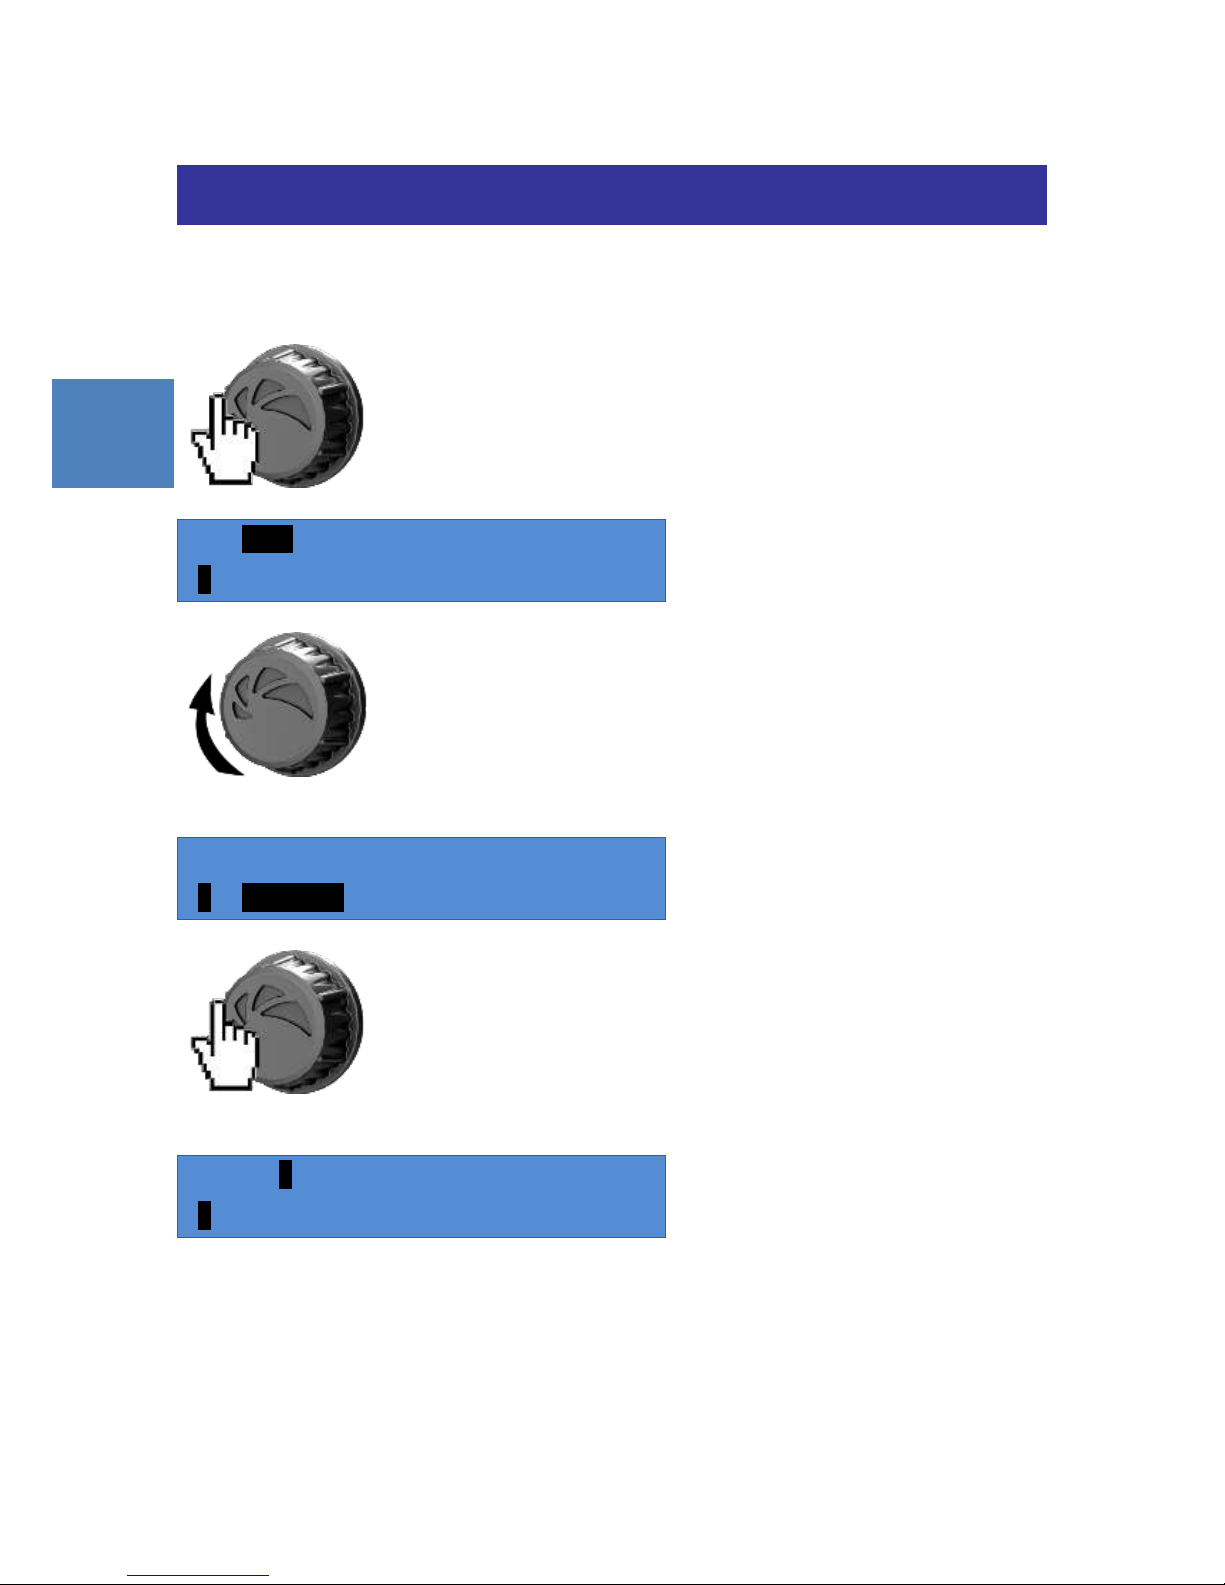
2. Press the control dial again to switch to Channel B. Rotate the dial to adjust its
brightness. Repeat the same for the other channels.
M
A:
60%
B:
100%
C:
100%
D:
100%
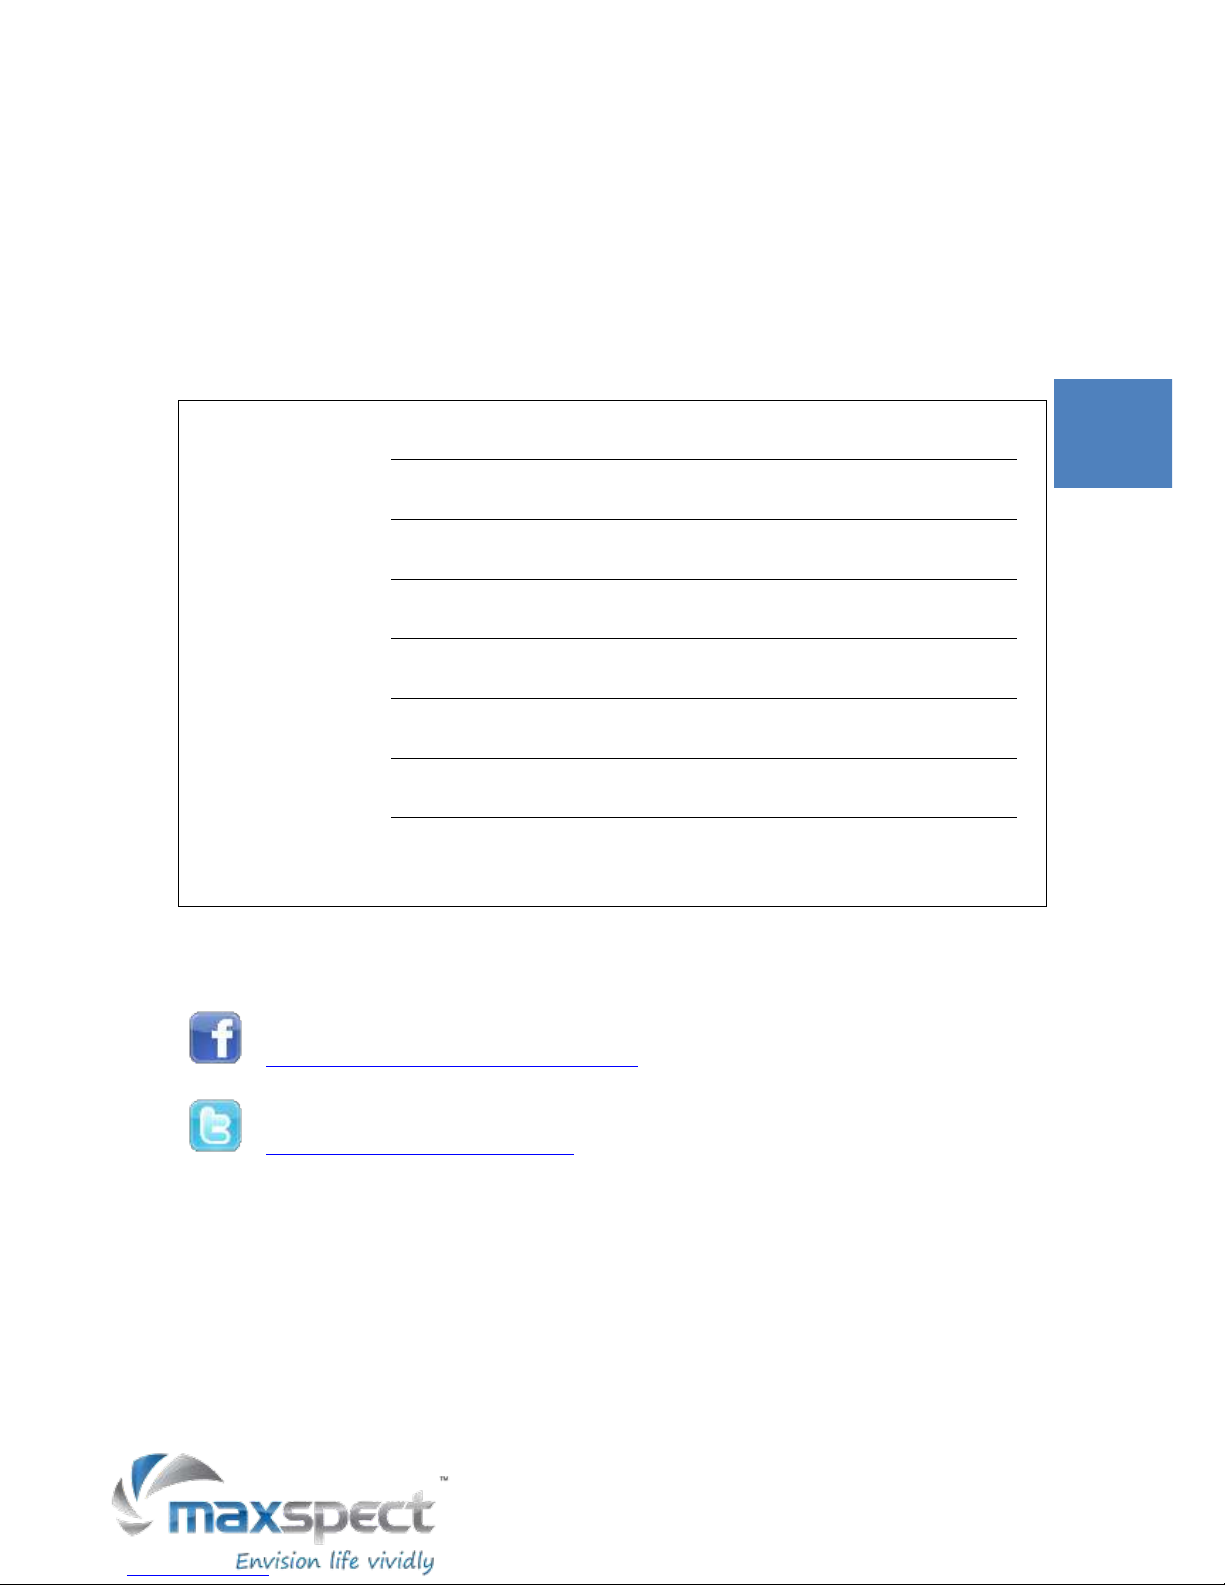
3. Press the control dial one more time to exit.
4. Note that C35-F/C70-F models have 4 channels, while C35-S/C35-A models only
have 2 channels, the interface would look slightly different as illustrated below.
M
A:
100%
B:
100%
English
9
Operating Instructions
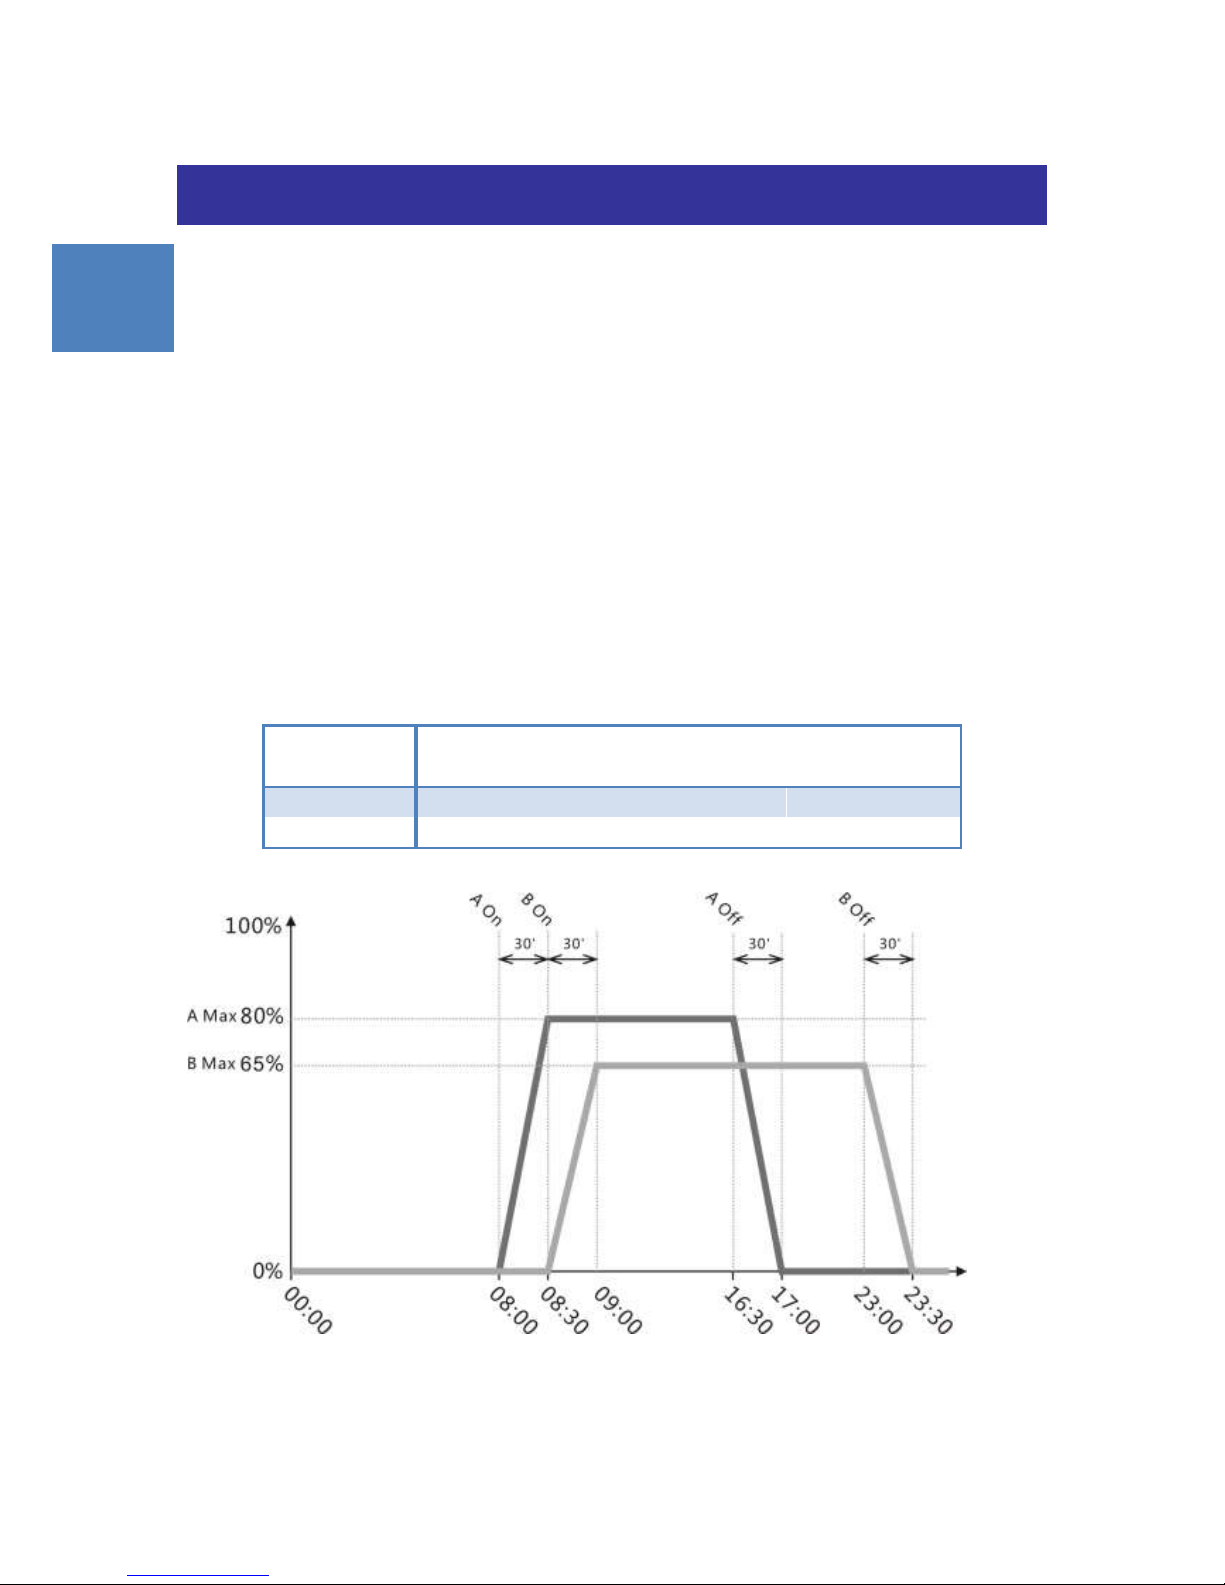
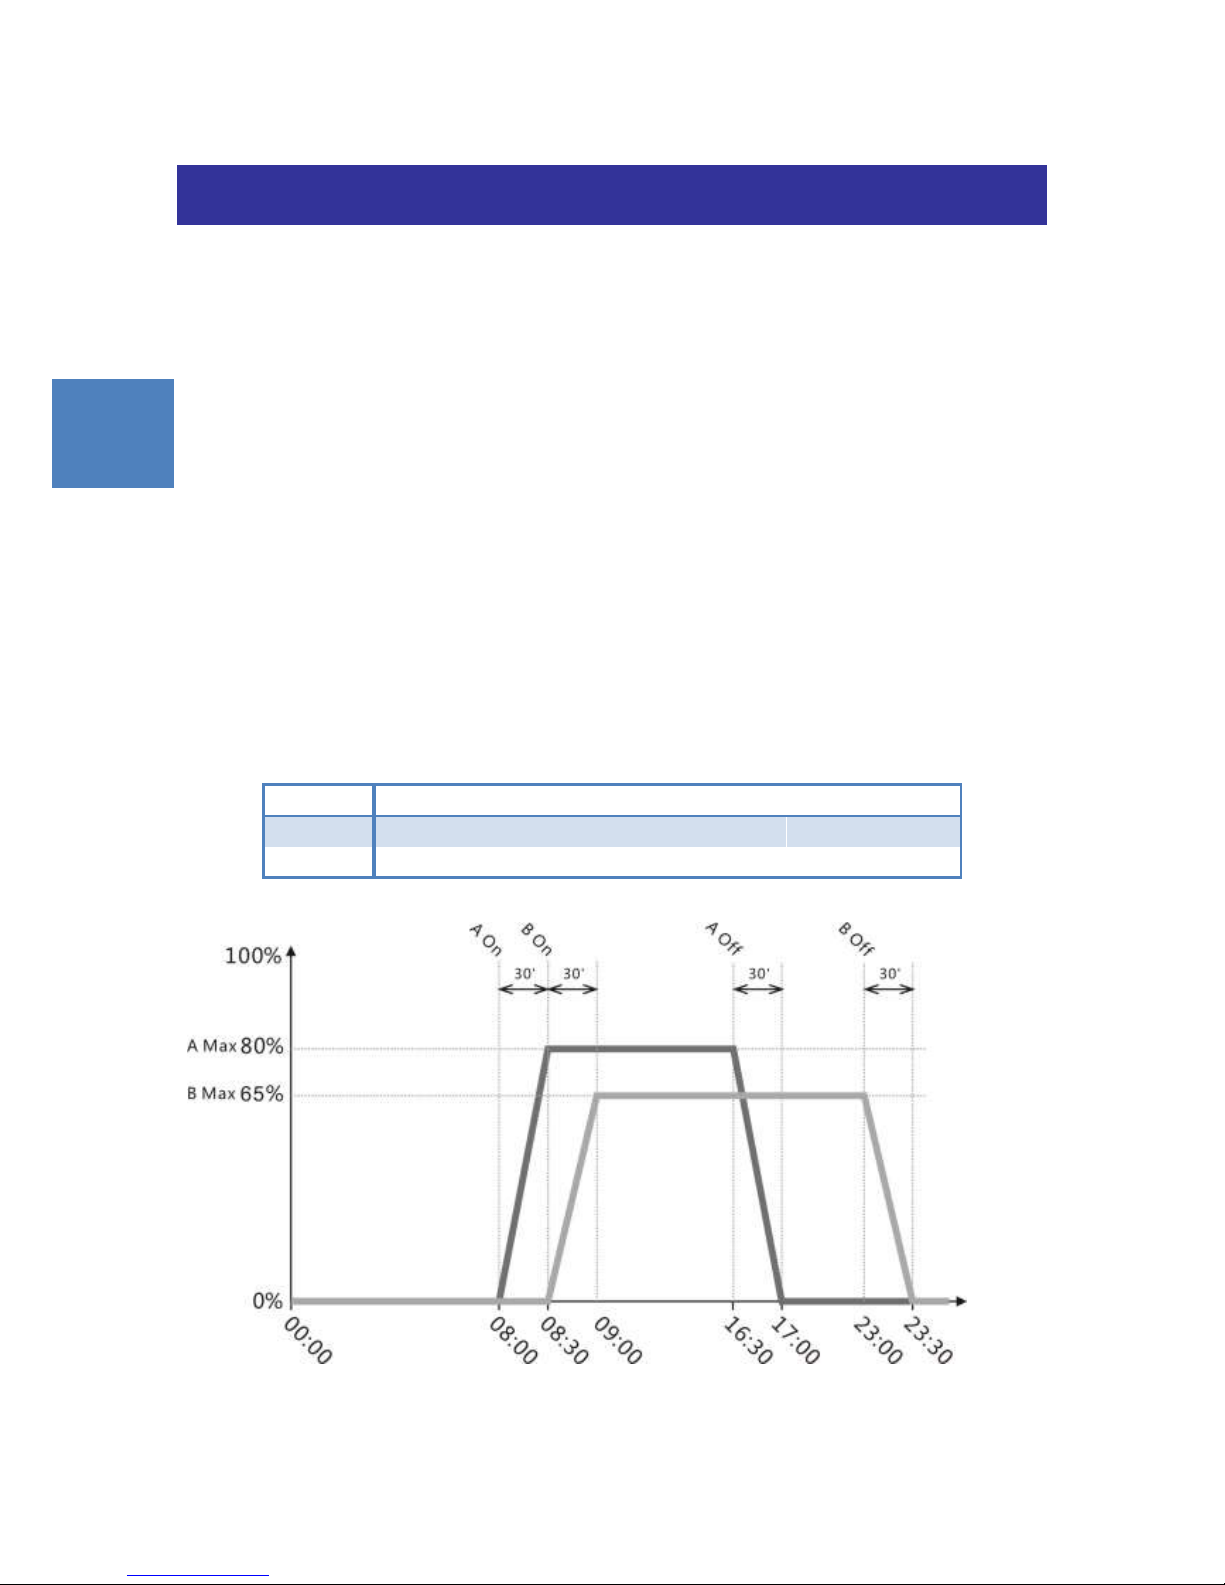
Automatic Mode “A”
Under the Automatic mode, users can program their own photo-period profile using the On
Time, Off Time and Maximum Brightness settings of each channel.
The Channel will turn itself on at the On Time, starting from 0% brightness and slowly over a
period of 30 minutes increases and reaches the Maximum Brightness set for that channel.
Then it’ll start to decrease brightness starting at the Off Time, over a period of 30 minutes
then turn itself off.
For example, the following table demonstrates how you could program the channels such that
Channel A would light up from 8:00am, reaches 80% brightness at 8:30am and remain there
until 4:30pm, then decrease until turning off at 5:00pm. Similarly, Channel B would light up
from 8:30am, reaches 60% brightness at 9:00am and remain there until 11:00pm, then
decrease until turning off at 11:30pm.
Maximum
Brightness
On Time
Off Time
Channel A
80%
08:00
16:30
Channel B
65%
08:30
23:00
English
10
Operating Instructions
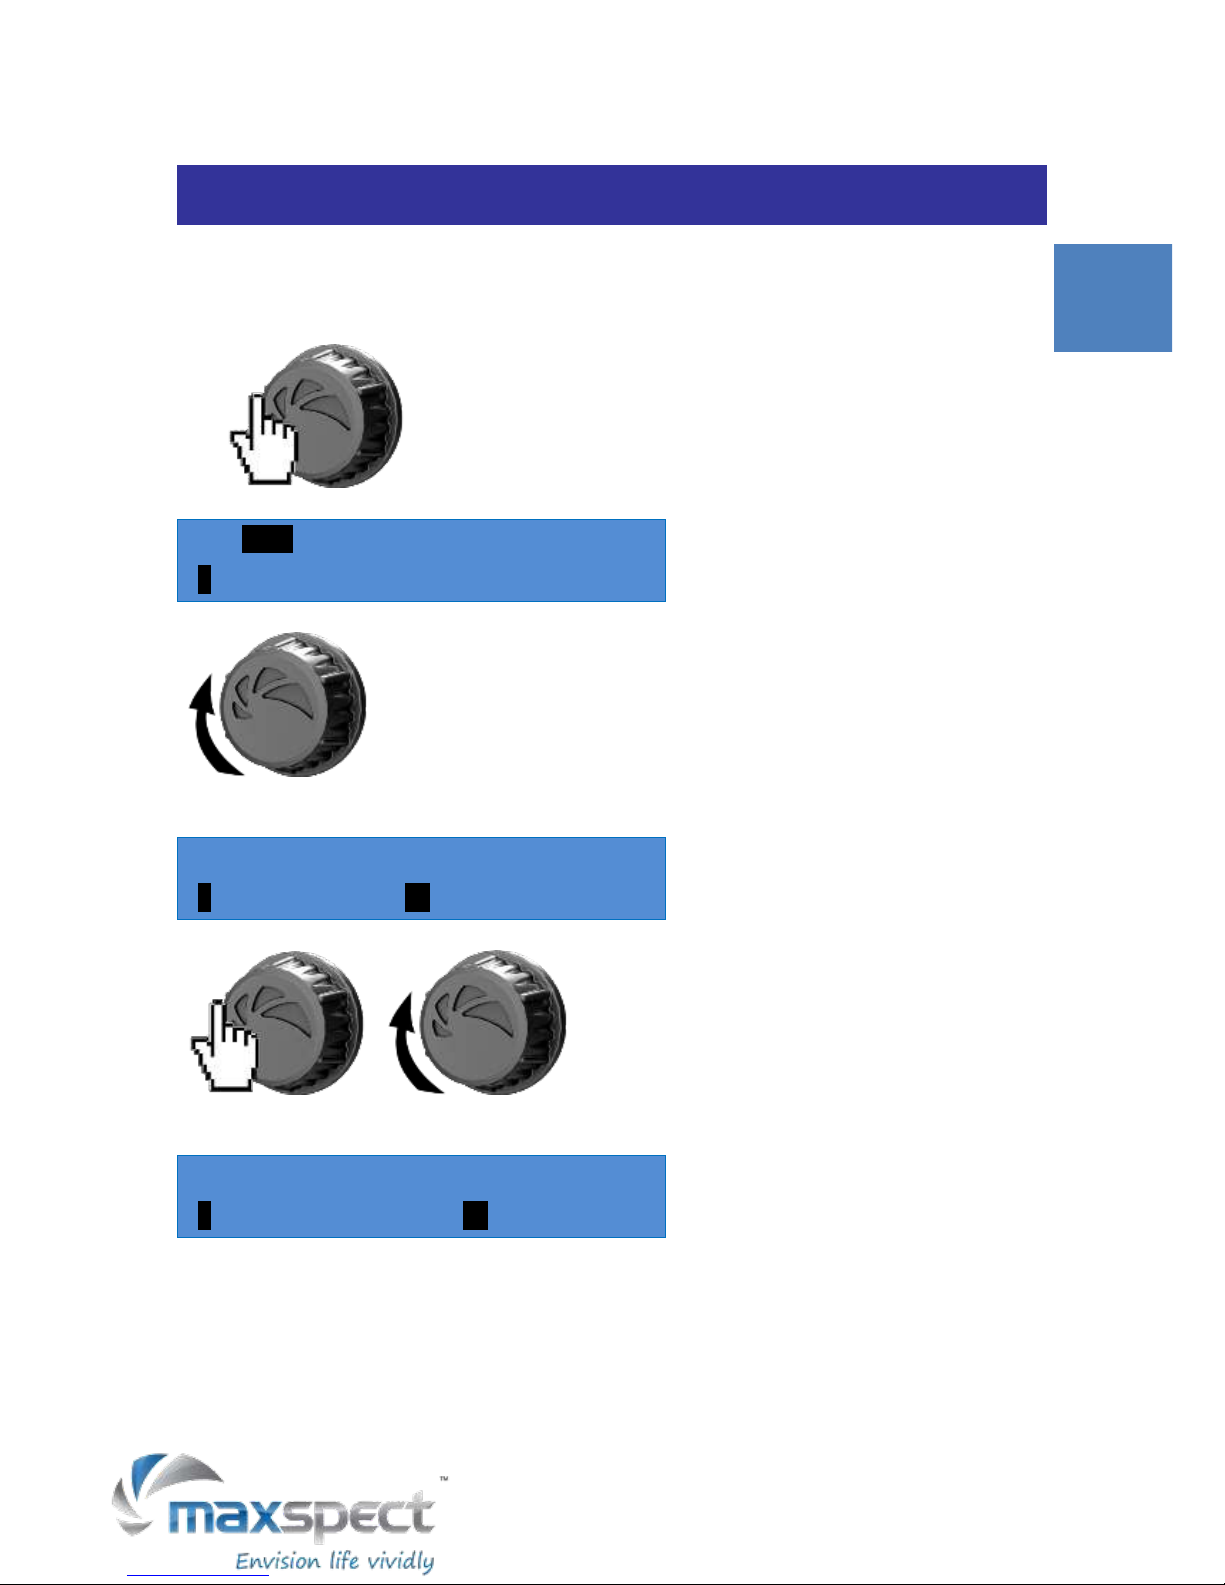
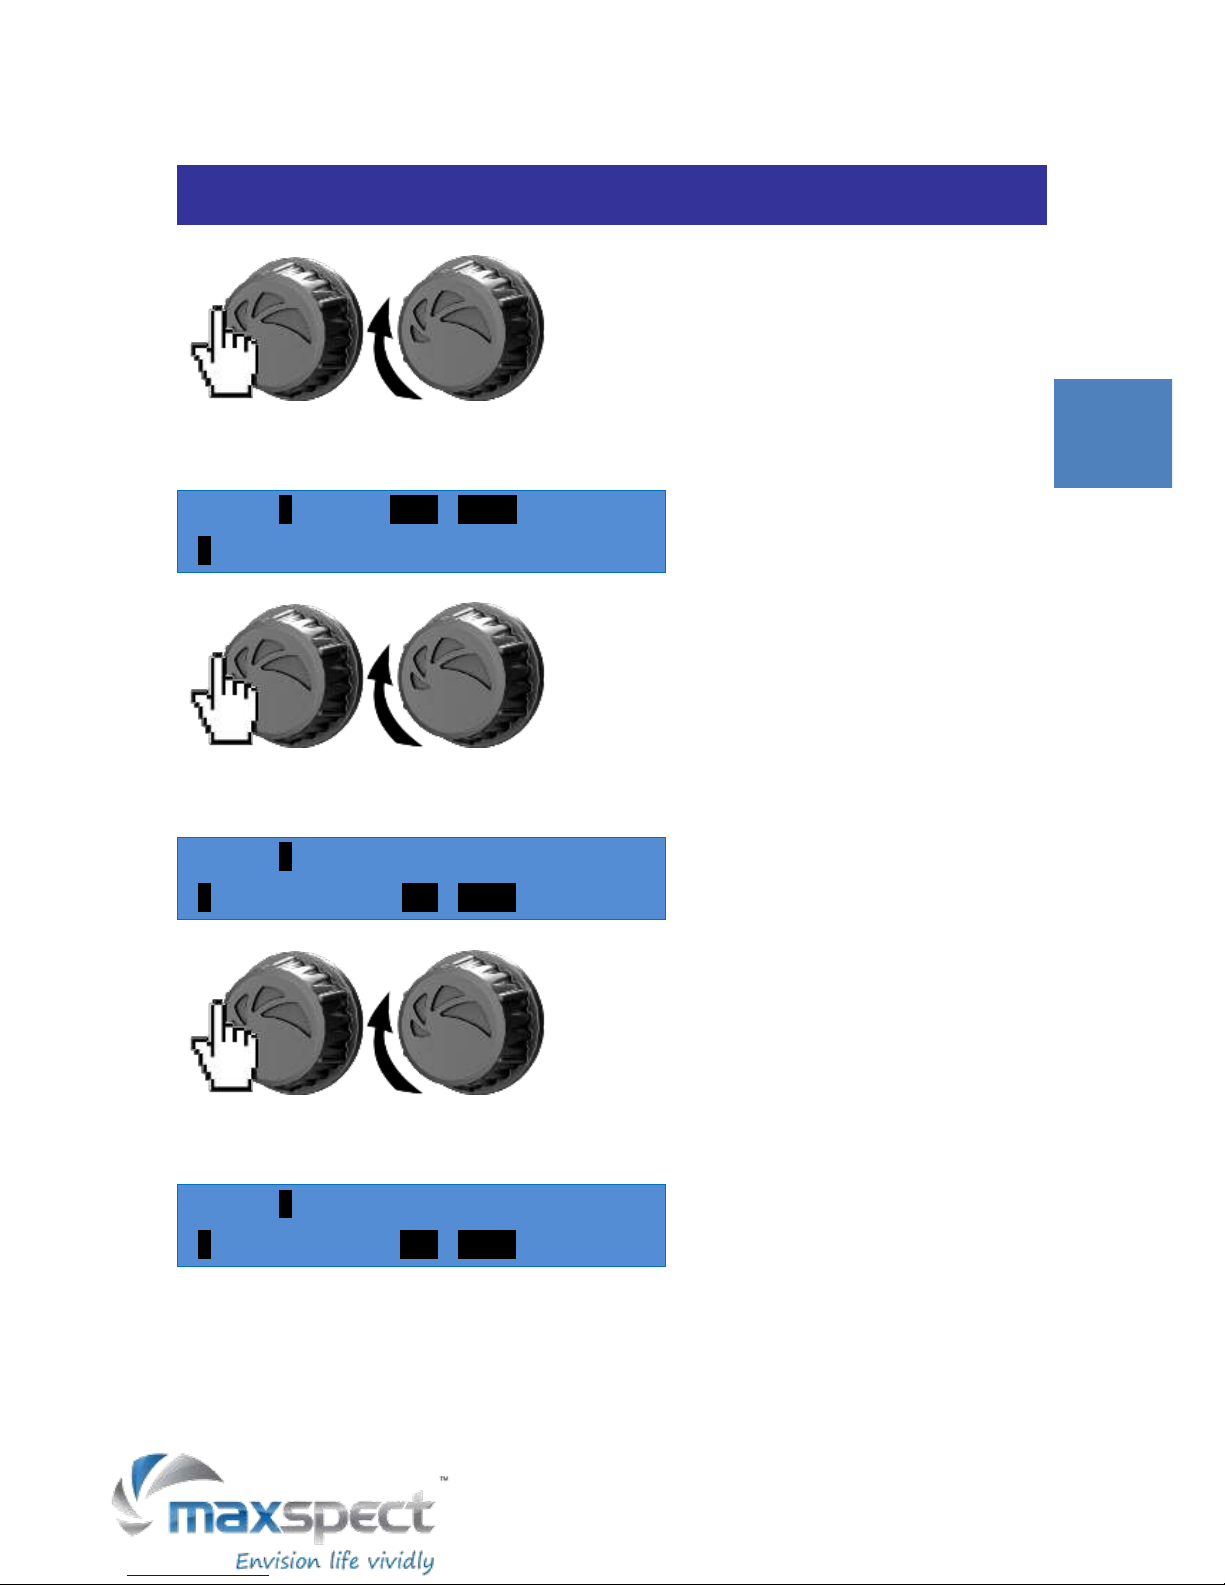
Automatic mode – Setting the clock
1. Press the control dial once to enter setup.
A
TIME
S
PROGRAM
2. Once you are in the clock setting mode, the hour digit is selected by default. Rotate
the dial to set the hour. (e.g. 06:30 08:30)
A
TIME:
S 08:
30
3. Press the control dial to change to the minute digit. Rotate the dial to set the
minute.
A
TIME:
S 08:
30
4. When finished, press and hold the control dial for 2 seconds to exit setup.
English
11
Operating Instructions
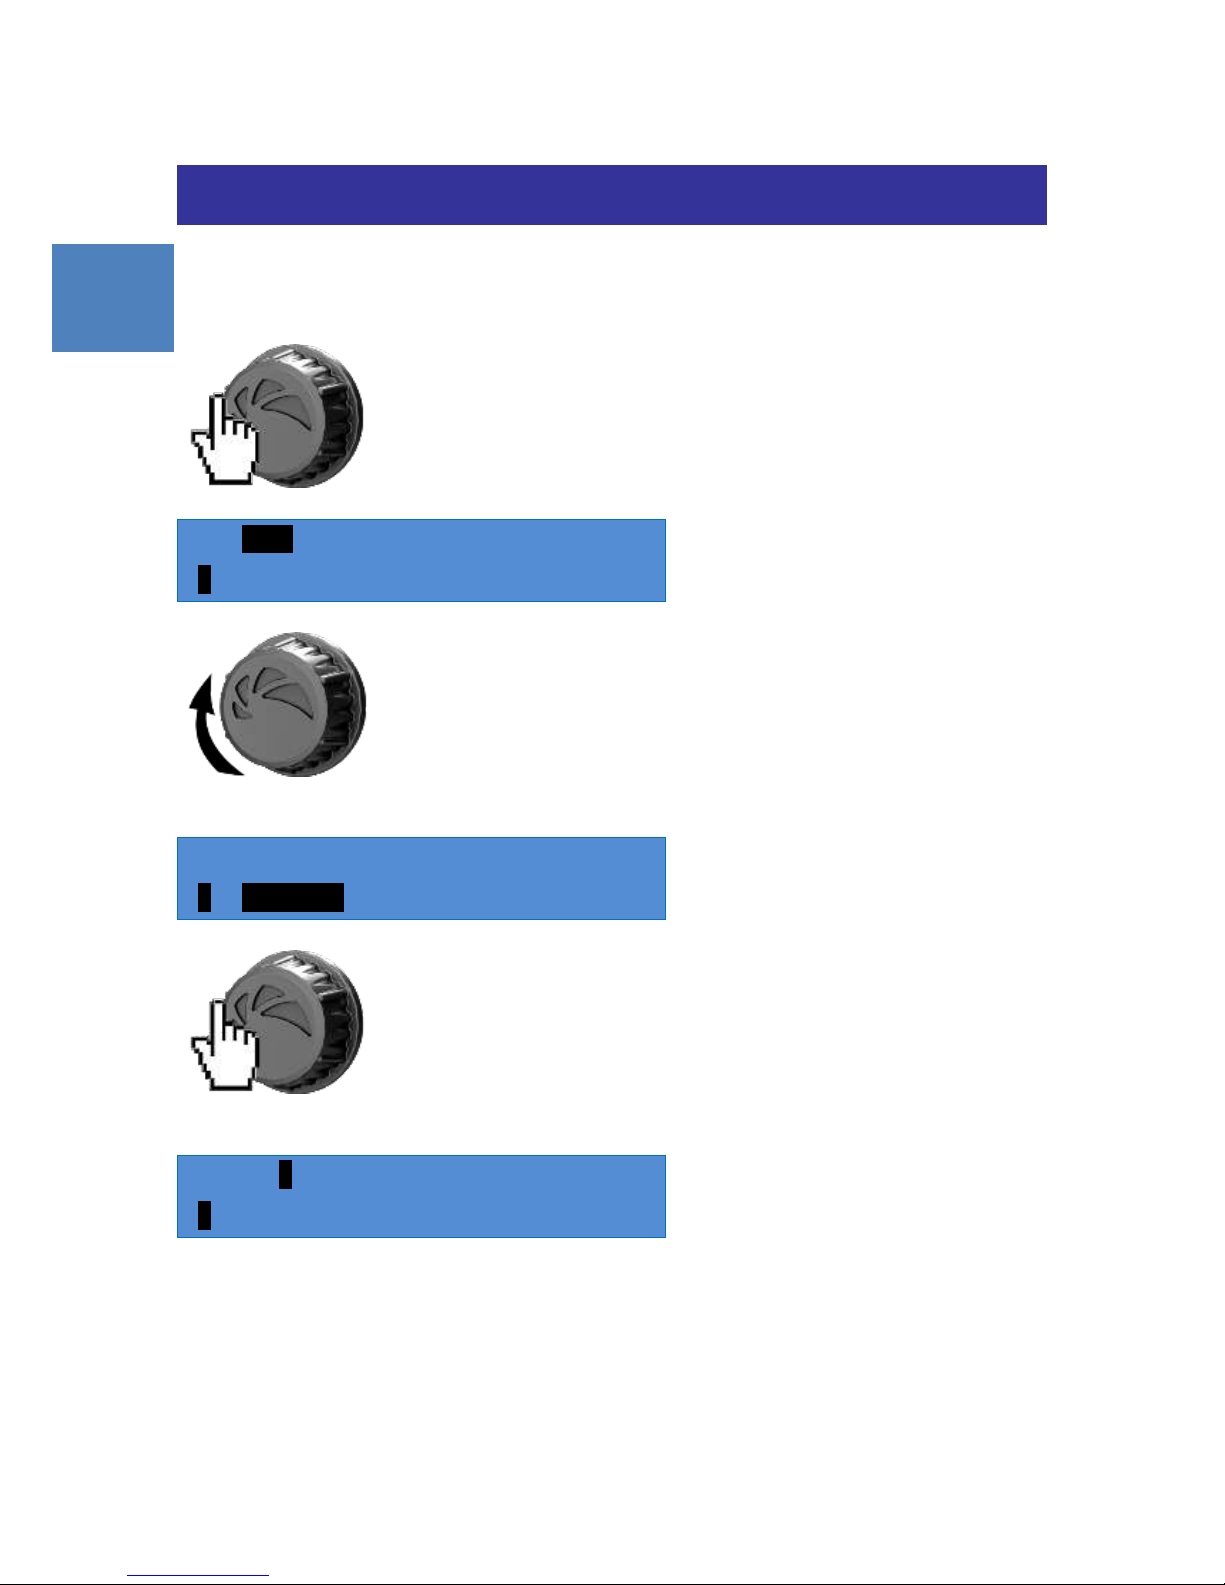
Automatic mode – Programming the Photo-Period
1. Press the control dial once to enter setup.
A
TIME
S
PROGRAM
2. Rotate the dial to select between which setting you wish to change. (e.g. Time
Program)
A
TIME
S
PROGRAM
3. Press the control dial again to select the setting, the first channel (A) is selected.
Rotate the dial to change the channel. (e.g. A B)
A A Max:
100%
S
On:
00:00
English
12
Operating Instructions
4. Press the control dial to change to the brightness setting. Rotate the dial to adjust
the brightness. (e.g. 100% 80%)
A B Max:
100%
S
On:
00:00
5. Press the control dial to change to the On Time setting. Rotate the dial to adjust
the On Time, the time increments every 30 minutes. (e.g. 00:00 08:30)
A B Max:
80%
S On:
00:00
6. Press the control dial again to change to the Off Time setting. Rotate the dial to
adjust the Off Time, the time increments every 30 minutes. (e.g. 00:00 22:30)
A B Max:
80%
S Off:
00:00
7. When finished, press and hold the control dial for 2 seconds to exit setup.
English

13
Operating Instructions
English
14
Limited Warranty
Maxspect Ltd. warrants all Maxspect™ Celestial LED Lighting System products against defects
in workmanship for a period of 12-months from the date of purchase. If a defect exists during
the warranty period, Maxspect Ltd. at its option will either repair (using new or
remanufactured parts) or replace (with a new or remanufactured unit) the product at no
charge.
THE WARRANTY WILL NOT APPLY TO THE PRODUCT IF IT HAS BEEN DAMAGED BY MISUSE,
ALTERATION, ACCIDENT, IMPROPER HANDLING OR OPERATION, OR IF UNAUTHORIZED
REPAIRS ARE ATTEMPTED OR MADE. SOME EXAMPLES OF DAMAGES NOT COVERED BY
WARRANTY INCLUDE, BUT ARE NOT LIMITED TO, USING AFTER-MARKET LED BULBS AND
MODIFICATION OF THE CIRCUITRY, WHICH ARE PRESUMED TO BE DAMAGES RESULTING
FROM MISUSE OR ABUSE.
DISCLAIMER OF CONSEQUENTIAL AND INCIDENTAL DAMAGES:
You and any other user of Maxspect Ltd. products shall not be entitled to any consequential or
incidental damages, including without limitation, loss of use of the unit, inconvenience,
damage to personal property, phone calls, lost income or earnings. This warranty gives you
specific legal rights and you may also have other rights, which vary from state to state.
MAXSPECT LTD. MAKES NO WARRANTY OR REPRESENTATION, EITHER EXPRESS OR
IMPLIED, WITH RESPECT TO THE PRODUCT'S QUALITY, PERFORMANCE, MERCHANTABILITY,
OR FITNESS FOR A PARTICULAR PURPOSE. AS A RESULT, THIS PRODUCT, IS SOLD "AS IS,"
AND YOU THE PURCHASER ASSUME THE ENTIRE RISK AS TO ITS QUALITY AND
PERFORMANCE.
IN NO EVENT WILL MAXSPECT LTD BE LIABLE FOR DIRECT, INDIRECT, SPECIAL,
INCIDENTAL, OR CONSEQUENTIAL DAMAGES RESULTING FROM ANY DEFECT IN THE
PRODUCT OR ITS DOCUMENTATION.
The warranty, disclaimer, and remedies set forth above are exclusive and replace all others,
oral or written, expressed or implied. At no time will any Maxspect Ltd. dealers, agents, or
employees be authorized to make any modifications, extension, or addition to this warranty.
Some states do not allow the exclusion or limitation of implied warranties or liability for
incidental or consequential damages, so the above limitation or exclusion may not apply to
you.
English

15
Specifications
LED Module
Dimensions (L x W x H)
Celestial
C35-F, C35-S, C35-A
140mm × 85mm x 65mm
(5.5” x 3.3” x 2.5”)
Celestial
C70-F
150mm × 100mm x 85mm
(6” x 4” x 3.3”)
Weight
Celestial
C35-F, C35-S, C35-A
250g (0.6 lb)
Celestial
C70-F
400g (0.9 lb)
Power Supply Unit
Model
GM50-240200-F (C35)
GM601-240300 (C70)
Input Voltage / Current
1.5A/100-240vAC 50/60Hz
Output Voltage / Current
24vDC 2A (C35)
24vDC 3A (C70)
Weight
250g /0.6 lb (C35)
250g /0.8 lb (C70)
Note:
For latest specifications on LED layout, types and color spectrum, please visit our website at
www.maxspect.com
Specifications are subject to change without notice.
Weight and dimensions are approximate.
English
16
Sehr geehrter Kunde,
vielen Dank für den Kauf dieses Produkts.
Für eine optimale Leistung und Sicherheit, lesen Sie bitte diese Anleitung sorgfältig.
Nutzer-Memo:
Kaufdatum
Händler:
Händleradresse:
Händlerwebsite:
Händler-E-Mail:
Händlertelefon
Bitte besuchen Sie uns auf Facebook oder Twitter!
https://www.facebook.com/Maxspect
http://twitter.com/maxspectled
Deutsch

17
Packungsinhalt
Bitte überprüfen Sie den Lieferumfang auf Vollständigkeit.
Celestial LED Modul
Netzteil
Aufsetzsystem
Deutsch
18
Sicherheitshinweise
Vor der Benutzung des Maxspect™ Celestial LED-Beleuchtungssystems
1. Falls vorhanden, entfernen Sie vor der Benutzung alle Schutzfolien.
2. Schauen Sie nie direkt in die LED-Leuchten wenn Sie das System einschalten. Die
unsachgemäße Nutzung dieses Geräts kann eine Gefahr für die Augen bedeuten.
Zur Sicherheit
1. Stromquelle – Setzen Sie die sicherheitsrelevanten Merkmale eines gepolten oder eines
geerdeten Steckers nicht außer Kraft. Ein geerdeter Stecker verfügt über zwei Stifte und
über einen dritten Erdungsstift. Der Erdungsstift ist zu Ihrer Sicherheit vorhanden. Sollte
der Stecker nicht in Ihre Steckdose passen, kontaktieren Sie einen Elektriker, um die
veraltete Dose austauschen zu lassen.
2. Netzkabel – Die Netzkabel sollten so verlegt werden, dass man nicht darüber steigen
muss und sie auch nicht von Gegenständen beschädigt werden können, die unter oder
neben den Kabeln liegen. Fassen Sie den Stecker oder das Kabel nie mit nassen Händen
an und greifen Sie den Stecker beim Einstecken oder Abziehen immer direkt an.
3. Installation – Nur im Innenbereich benutzen und verwenden Sie nur die vom Hersteller
mitgelieferten Zubehörteile, Befestigungsrahmen und Aufhängsysteme.
Zum Betrieb
1. Bedienung – Befolgen Sie immer die Bedienhinweise dieses Handbuchs, wenn Sie das
Celestial LED-Beleuchtungssystem nutzen.
2. Hitze – Das Gerät sollte fern von Wärmequellen, wie zum Beispiel Heizkörpern,
aufgestellt werden und darf keiner großen Hitze, wie etwa Sonneneinstrahlung oder
Feuer, ausgesetzt werden.
3. Feuchtigkeit – Zur Verringerung der Stromschlaggefahr darf das Gerät nicht mit Regen,
Feuchtigkeit, Tropf- und Spritzwasser in Kontakt kommen.
4. Belüftung – Das Gerät sollte so aufgestellt werden, dass Standort und Position die
Belüftung des Geräts nicht beeinträchtigen.
5. Magnetismus – Das Gerät sollte fern von Anlagen oder Geräten aufgestellt werden, die
starken Magnetismus erzeugen.
6. Reinigung – Reinigen Sie das Gerät nur mit einem trockenen Tuch.
Deutsch
Vor der ersten Inbetriebnahme des Maxspect™ LED-Beleuchtungssystems
Celestial sollten Sie diese Bedienungsanleitung sorgfältig lesen. Bitte
beachten Sie die folgenden Sicherheitshinweise mit großer Sorgfalt.
Bewahren Sie diese Anleitung auch zum späteren Nachschlagen auf.
19
Installation
Montieren des Celestial LED-Beleuchtungssystems
Bevor Sie die LED-Module mit dem Steuergerät verbinden, montieren Sie zunächst das System
mit Hilfe des Aufsetzsystems.
1. Montage des Aufsetzsystems
Montieren Sie das Celestial Befestigungssystem durch Einfügen der Schienen in den dafür
vorgesehenen Bereich des LED-Moduls, wie in den folgenden Schaubildern dargestellt.
2. Festziehen der Handschrauben.
Die Schrauben festziehen um die Position des Aufsetzsystems zu sichern.
Deutsch
20
Installation
3. Einstellen des gewü nschten Winkel.
Deutsch

21
Bedienungsanleitung
Benutzung
Befolgen Sie die nachstehenden Anweisungen um die Maxspect Celestial bedienen und
Programmieren.
Hinweis
Sobald Die Celestial an das Stromnetz angeschlossen wird schaltet sie sich
automatisch ein, und schaltet sich aus, wenn sie vom Stromnetz getrennt
wird
Wenn die Stromversorgung wieder eingeschaltet wird, kehrt die Celestial auf die früheren
automatisch gespeicherten Einstellungen wieder zurück.
Das Maxspect Logo wird mit der Firmware-Version angezeigt, wenn die
Stromversorgung angeschlossen ist.
MAXSPECT c1.1
Wechseln zwischen Manuel und Automatikmodus
1. Drücken und halten Sie den Drehregler für 2 Sekunden um zwischen den 2 Modi zu
wechseln. Das LCD-Display zeigt "M" und "A" entsprechend an.
Manuel Modus:
M
A:
100%
B:
100%
C:
100%
D:
100%
Automatik Modus:
A 12:
30
A:
100%
B:
100%
Deutsch
22
Bedienungsanleitung
Manuel Modus “M”
Im manuellen Modus können Sie die Helligkeit der beiden Kanäle mithilfe des
Drehreglers manuell anpassen.
1. Drücken Sie den Drehregler einmal um in das Setup-Menu zu gelangen. Kanal A
wird standardmäßig ausgewählt. Drehen Sie den Drehregler um die Helligkeit
anzupassen.
M
A:
100%
B:
100%
C:
100%
D:
100%
2. Drücken Sie den Drehregler einmal um den Kanal B auszugewählen. Drehen Sie
den Drehregler um die Helligkeit anzupassen. Wiederholen Sie das gleiche für die
anderen beide Kanäle.
M
A:
60%
B:
100%
C:
100%
D:
100%
3. Drücken Sie den Drehregler noch einmal um das Setup-Menu zu verlassen.
4. Beachten Sie, dass die C35-F/C70-F Modelle 4 Kanäle haben, während die
C35-S/C35-A Modelle nur 2 Kanäle haben. Dadurch sieht das Display etwas anders
aus, wie nachstehend dargestellt.
M
A:
100%
B:
100%
Deutsch
23
Bedienungsanleitung
Automatik Modus “A”
In dem Automatik-Modus, können Sie Ihr eigenes Fotoperiodenprofil einstellen mit der
Programmierung der “On Time“ und “Off Time“ sowie die “Maximum Brightness“ der
einzelnen Kanäle.
Der Kanal stellt sich auf “On Time“ die Helligkeit startet bei 0% und nimmt langsamm über
einen Zeitraum von jewals 30 Minuten zu bis “Maximum Brightness“ für diesen Kanal
erreicht ist. Dann beginnt “Off Time“, mit dem veringern der Helligkeit ebenso über einen
Zeitraum von jewals 30 bis die Leuchte sich ausschaltet.
Zum Beispiel zeigt die folgende Tabelle, wie Kanal A programmiert wurde so dass ab 8h00 der
Kanal A an geht und eine Helligkeit von 80% um 8h30 erreicht und dies bis 16h30. Ab dann
wird die Helligkeit nachlassen bis Kanal A 0% um 17h00 erreicht hat. Ebenso würde Kanal B so
programmiert das er ab 8h30 anfängt zu leuchten bis er um 9h00 60% Helligkeit erreicht hat
und diese bis 23h00. Ab dieser Zeit wird wird die Helligkeit nachlassen bis Kanal B 0% um
23h30 erreicht hat.
Maximum Brightness
On Time
Off Time
Kanal A
80%
08:00
16:30
Kanal B
65%
08:30
23:00
Deutsch
24
Bedienungsanleitung
Automatik Modus – Einstellen der Uhrzeit
1. In dem Zeiteinstellungsmodus sind die Stunden-Ziffern standardmäßig ausgewählt.
A
TIME:
S 06:
30
2. Drehen Sie den Drehregler um die Stunden einzustellen. (z.B. 06:30 auf 08:30)
A
TIME:
S 08:
30
3. Drücken Sie den Drehregler um zu den Minuten-Ziffern zu gelangen. Drehen Sie
den Drehregler um die Minuten einzustellen. (z.B. 08:30 auf 08:45)
A
TIME:
S 08:
30
4. Wenn Sie fertig sind, drücken und halten Sie den Drehregler 2 Sekunden lang, um
aus dem Setup Modus zu gelangen.
Deutsch
25
Bedienungsanleitung
Automatik Modus – Programmierung der Leuchtperiode
1. Drücken Sie den Drehregler einmal um in das Setup Menu zu gelangen.
A
TIME
S
PROGRAM
2. Drehen Sie den Drehregler um auszuwählen welche Einstellungen Sie ändern
möchten. (z.B.: Time auf Program)
A
TIME
S
PROGRAM
3. Drücken Sie den Drehregler um Kanal A zu wählen. Drehen Sie den Drehregler um
Kanal B auszuwählen. (z.B.: A B)
A A Max:
100%
S
On:
00:00
Deutsch
26
Bedienungsanleitung
4. Drücken Sie den Drehregler um in das “Maximum Brightness“ Menu zu
gelangen. Drehen Sie den Drehregler um die Helligkeit anzupassen. (z.B. 100% auf
80%).
A B Max:
100%
S
On:
00:00
5. Drücken Sie den Drehregler um in das “On Time“ zu gelangen. Drehen Sie den
Drehregler um die Einschaltezeit zu programmieren, die Zeitänderung ist im 30mn
Abstand. (z.B. 8h00 auf 8h30).
A B Max:
80%
S On:
00:00
6. Drücken Sie den Drehregler erneut um in das “Off Time“ Menu zu gelangen.
Drehen Sie den Drehregler um die Ausschaltzeit zu programmieren, die
Zeitänderung ist im 30mn Abstand. (z.B. 0h00 auf 22h30).
A B Max:
80%
S Off:
00:00
7. Wenn Sie fertig sind, drücken und halten Sie den Drehregler 2 Sekunden lang, um
aus dem Setup Modus zu gelangen.
Deutsch

27
Bedienungsanleitung
Deutsch
28
Garantie
Maxspect Ltd. haftet für alle Produkte des Maxspect™ Celestial LED- Beleuchtungssystems gegen
Mängel in der Ausführung für einen Zeitraum von 12 Monaten ab dem Kaufdatum. Wenn ein Mangel
während der Garantiezeit vorliegt, wird Maxspect Ltd das Produkt kostenlos nach eigenem Ermessen
entweder reparieren (mit neu- oder Austauschteilen) oder das Produkt ersetzen (durch ein neues oder
ein Austauschgerät).
DIE GARANTIE GILT NICHT FÜ R PRODUKTE, DIE DURCH FALSCHE ANWENDUNG, VERÄ NDERUNGEN,
UNFÄLLE, UNSACHGEMÄSSE HANDHABUNG ODER EINGRIFFE BESCHÄDIGT WURDEN ODER AN
DENEN REPARATUREN ODER REPARATURVERSUCHE VON NICHT-AUTORISIERTEN PERSONEN
VORGENOMMEN WURDEN. ZU MÖ GLICHEN SCHÄDEN, DIE NICHT VON DER GARANTIE ABGEDECKT
SIND, GEHÖ REN UNTER ANDEREM (ABER NICHT AUSSCHLIESSLICH) DER EINSATZ VON
NACHGEMACHTEN LED-LEUCHTEN UND VERÄNDERUNGEN AN DEN SCHALTKREISEN, DIE
VERMUTLICH SCHÄDEN AUFGRUND VON FALSCHER ANWENDUNG ODER MISSBRAUCH SIND.
HAFTUNGSAUSSCHLUSS FÜ R FOLGE- UND ZUFALLSSCHÄDEN:
Sie und alle anderen Nutzer der Produkte von Maxspect Ltd. haben kein Recht auf Entschädigung bei
Folge – und Zufallsschäden, einschließlich und ohne Einschränkung bei Verlust des Geräts,
Unannehmlichkeiten, Schäden am Privateigentum, Telefonanrufe, entgangenes Einkommen und
entgangene Umsätze. Diese Garantie gesteht Ihnen bestimmte Rechte zu und Sie können zudem
weitere Rechte haben, die von Land zu Land unterschiedlich sein können.
MAXSPECT LTD. GIBT KEINE GARANTIE UND Ü BERNIMMT KEINE VERANTWORTUNG FÜ R DAS
PRODUKT, WEDER AUSDDRÜ CKLICH NOCH IMPLIZIT, IN BEZUG AUF DIE QUALITÄT, LEISTUNG,
MARKTGÄNGIGKEIT ODER EIGNUNG FÜR EINEN BESTIMMTEN ZWECK. DAHER WIRD DAS PRODUKT
IN DER VORLIEGENDEN FORM („AS IS“) VERKAUFT UND SIE ALS KÄUFER TRAGEN DAS GESAMTE
RISIKO IN BEZUG AUF QUALITÄT UND LEISTUNG.
MAXSPECT LTD IST IN KEINEM FALL HAFTBAR FÜR DIREKTE, INDIREKTE, ZUFÄLLIGE SCHÄDEN BZW.
FOLGESCHÄDEN, DIE AUS EINEM FEHLER DES PRODUKTS ODER SEINER BEDIENUNGSANLEITUNG
ENTSTEHEN KÖ NNTEN.
Die oben dargelegte Garantie, Haftungsausschlüsse und Rechtsbehelfe sind exklusiv und ersetzen alle
anderen mündlichen oder schriftlichen, ausdrücklichen oder impliziten Absprachen. Zu keinem
Zeitpunkt sind die Maxspect Ltd. Händler, Agenten oder Mitarbeiter berechtigt, irgendwelche
Änderungen, Erweiterungen oder Zusätze an dieser Garantie vorzunehmen.
Einige Länder erlauben den Ausschluss oder die Beschränkung von implizierten Garantien oder
Haftungen für Zufalls- oder Folgeschäden nicht, so dass die oben genannten Beschränkungen oder
Ausschlüsse eventuell nicht auf Sie zutreffen.
Deutsch

29
Technische Angaben
LED Modul
Abmessungen (L x B x H)
Celestial
C35-F, C35-S, C35-A
140mm × 85mm x 65mm
(5.5” x 3.3” x 2.5”)
Celestial
C70-F
150mm × 100mm x 85mm
(6” x 4” x 3.3”)
Gewicht
Celestial
C35-F, C35-S, C35-A
250g (0.6 lb)
Celestial
C70-F
400g (0.9 lb)
Netzteil
Model
GM50-240200-F (C35)
GM601-240300 (C70)
Eingangsspannung / Strom
1.5A/100-240vAC 50/60Hz
Ausgangsspannung / Strom
24vDC 2A (C35)
24vDC 3A (C70)
Gewicht
250g /0.6 lb (C35)
250g /0.8 lb (C70)
Hinweis:
Für neusten technischen Daten, LED-Layout, LED-Typen und Farbspektrum besuchen Sie bitte unsere
Internetseite unter www.maxspect.com
Technische Angaben können sich ohne Vorankündigung ändern.
Gewicht und Abmessungen sind ungefähre Werte.
Deutsch
 Loading...