

Page 1
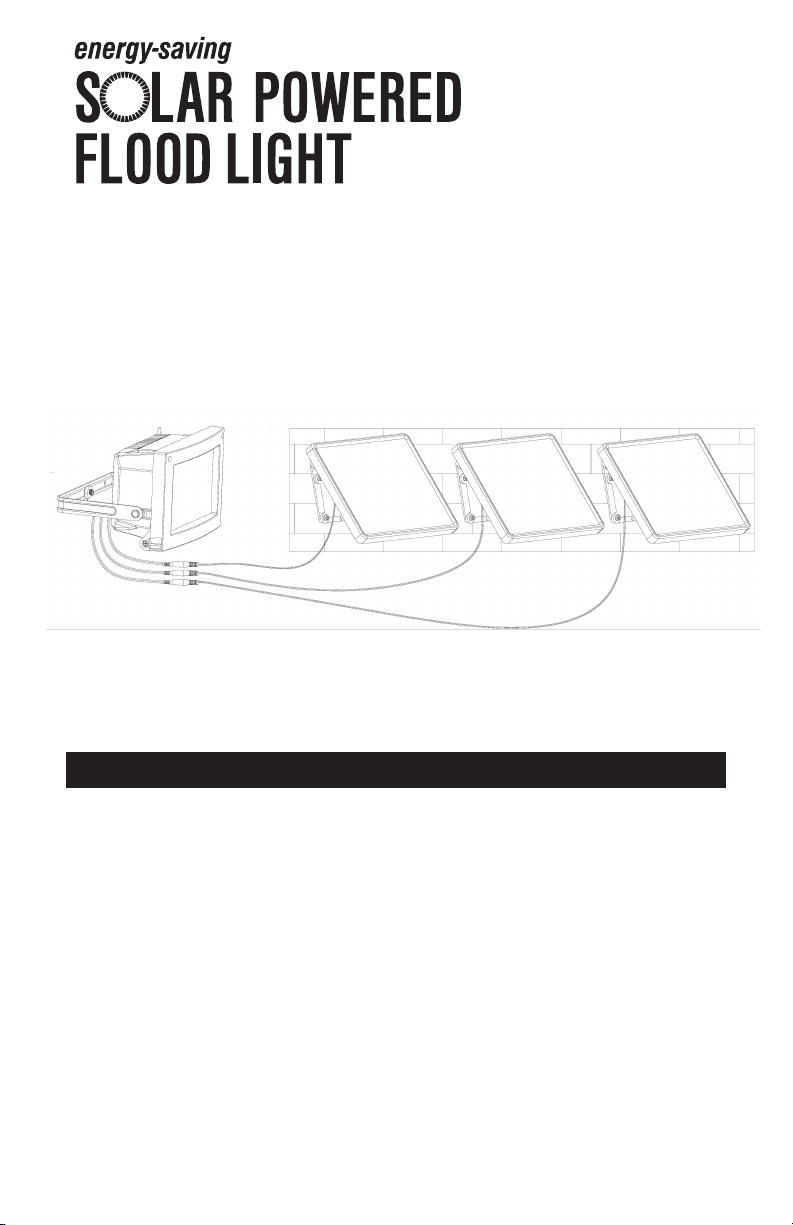
Model #: 40331
Perfect for flags, signs, gardens, driveways, parking lots, outdoor storage spaces,
decks, porches, or any large outdoor area where lighting is needed.
ASSEMBLY & OPERATING INSTRUCTIONS
IMPORTANT: READ ALL INSTRUCTIONS CAREFULLY BEFORE USE
ABOUT YOUR SOLAR POWERED FLOOD LIGHT
Your MAXSA Solar Powered Flood Light converts sunlight into electricity during the day,
enabling the 12 LED lights to turn on automatically at night. With this light, walking into the
dark will no longer be a problem. You can also save the environment by conserving energy
with these energy-efcient solar powered LED lights.
Your Solar Powered Flood Light will activate automatically when it gets dark and can light
for up to 6 hours at full power and up to 12 hours at half power / brightness when the
battery is fully charged. The unit includes 3.7V 2X2200 mAh rechargeable Lithium Ion
batteries.
Page 2
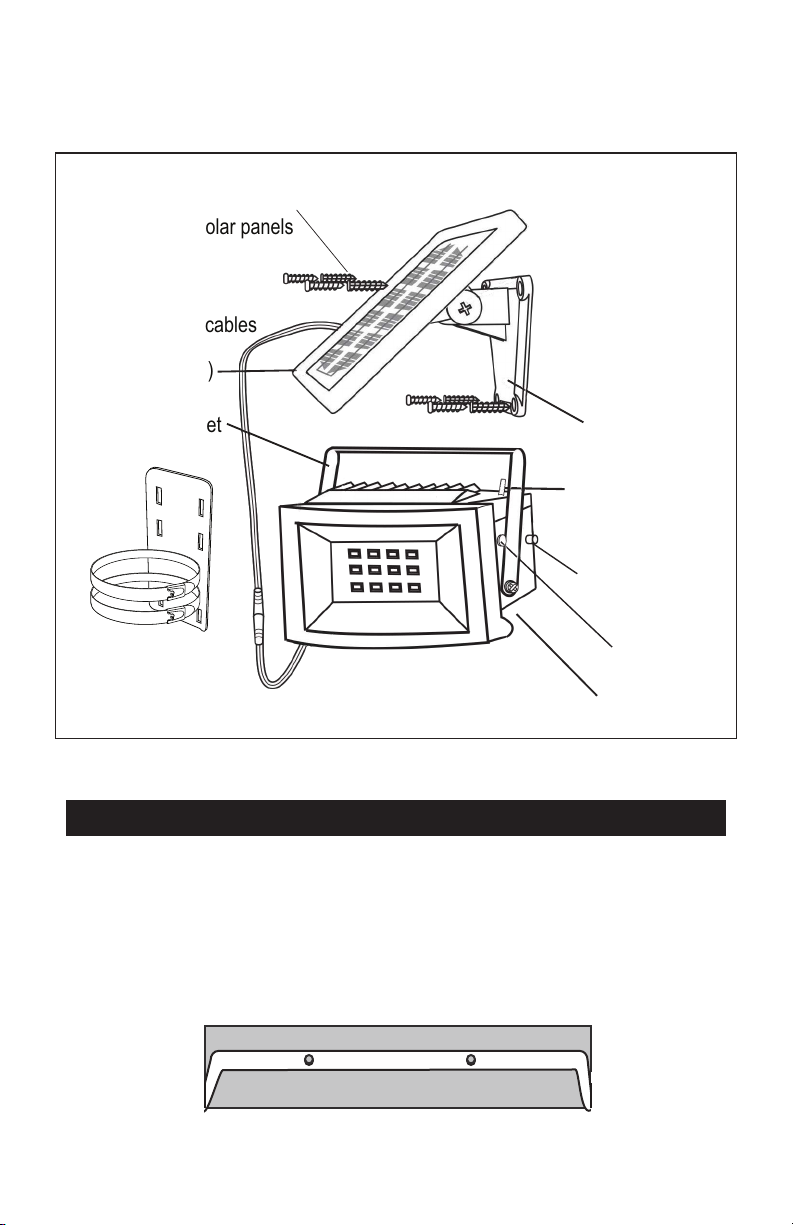
Carefully remove and identify all the parts from their protective packaging and lay them out in front
of you.
INCLUDED PARTS:
12 screws and 12 anchors for
mounting the 3 solar panels
Solar panel angle pivot
10 foot power cables
Solar panel (3)
Mounting bracket
Solar panel
mounting bracket
On/Off Switch
Brightness
control switch
Pole Mounting
Photosensor
Straps and
Bracket
Main flood light unit
HOW TO INSTALL YOUR SOLAR POWERED FLOOD LIGHT
MOUNTING TO A WALL, ROOF OR SIGN
If necessary, remove the mounting bracket from your Solar Powered Flood Light by taking
1.
out the two screws on the left and right sides of the main body
2. Take the other two screws supplied with this product and install the mounting bracket
onto a solid surface. Put the mounting bracket and the main body back together by
using the two screws taken out in Step 1.
2
Page 3
MOUNTING TO A FLAGPOLE
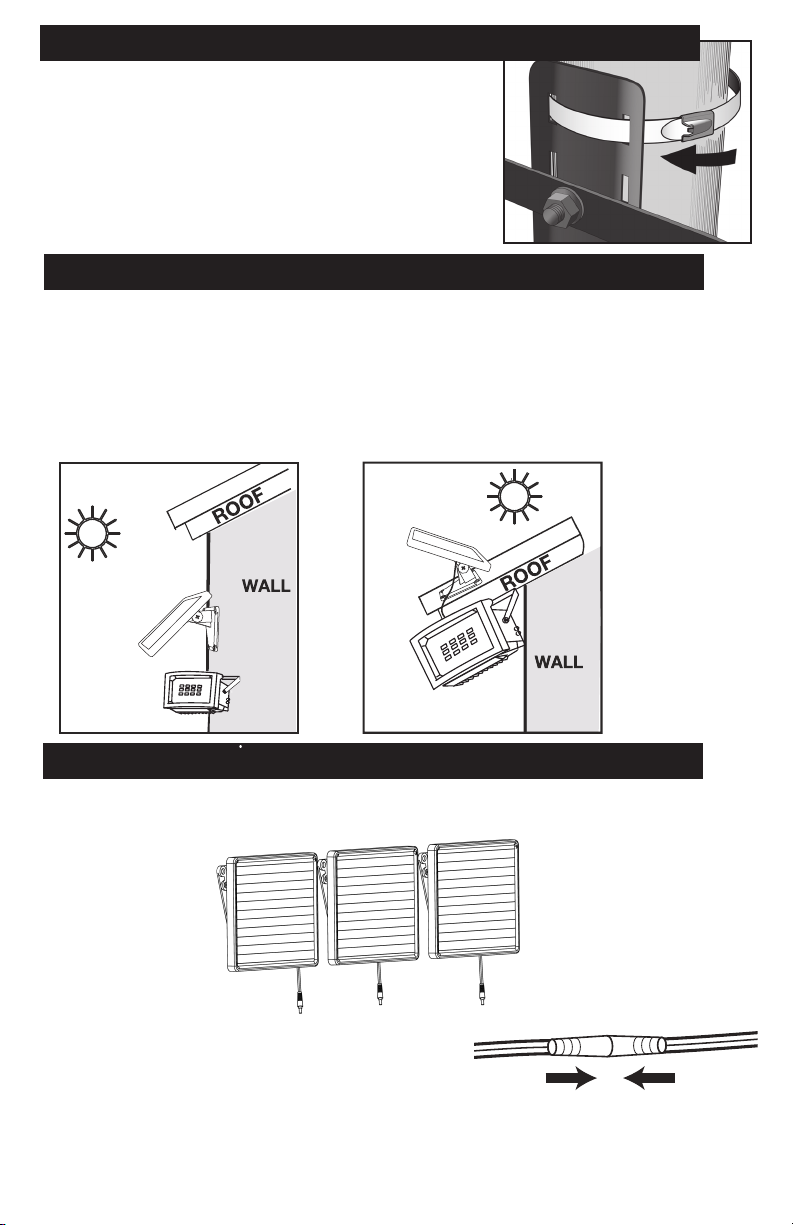
To mount on a agpole, position the agpole mounting
bracket supplied against the agpole and run the two
supplied metal bands through the bracket as shown.
*CAUTION: Do not tighten the metal bands until your Solar
Powered Flood Light is where you want it as they cannot
be re-opened. Put the bracket up to the pole and close
the metal bands around the pole, making sure the bands
are pulled tight so the light is firmly secured.
TO MOUNT THE SOLAR PANEL TO A WALL OR ROOF
The 3 solar panels can be mounted to a wall or roof, or set on the ground.
Use four (4) wood/sheet metal screws supplied to mount each solar panel onto a solid
surface. You can adjust the angle of the solar panel by gently rotating it to a different
locking position. Remember to mount the panels facing South, which will maximize the
direct sunlight exposure.
HOW TO MOUNT THE THREE SOLAR PANELS
We recommend the panels be oriented to the south to maximize sunlight all year round.
We recommend this since as the seasons change, the sun’s angle and direction changes
slightly.
Once you have mounted the solar panel in the
desired location, connect the solar panel to your
Solar Powered Flood Light by plugging the 10 foot
cord into the cord attached to the bottom of the
Solar Powered Flood Light. Firmly turn and twist the
cords while pressing together for a tight connection.
3
Page 4

BEFORE THE FIRST USE OF YOUR SOLAR POWERED FLOOD LIGHT
1.
Charge the batteries without activating the unit. Turn
the power switch on the main body of your Solar
Powered Flood Light to the OFF setting.
Leave the switch in this position for 3 days while the
2.
solar panels are in direct sunlight. This will ensure
that the batteries in your Solar Powered Flood Light
have a full charge prior to normal operation.
After the initial 3 day charge of your Solar Powered Flood Light, flip the power switch
3.
on the main body to the ON position to make the light turn on automatically after
sundown. Your Solar Powered Flood Light is now ready for use. Depending on how
long you prefer the light to last, you can double the light duration and reduce the
brightness by pushing the brightness control button labelled "Brightness Full/Half".
NOTE: When you first turn the light on, it should activate immediately regardless of
lighting conditions. This is a test activation to show there is power flowing from the
battery to the light. It should last roughly 5 seconds. After this test activation, the light will
function normally.
MAINTENANCE TIPS
The LED lights in your Solar Flood Light will last up to 30,000 hours and before needing
replacement.
To keep your Solar Flood Light working great, keep the solar panel and light free of dust
and deposits by wiping occasionally with a dry cloth or with warm soapy water if
necessary. A dirty solar panel will not allow the batteries to fully charge thereby
shortening the life of the batteries and possibly causing the light to malfunction.
STORAGE
If you wish to store your light indoors for more than two or three days, turn the power
switch to the OFF position to prevent damaging the batteries. Battery capacity may be
reduced during prolonged storage. For optimal performance, we recommend that you do
not store your Solar Powered Flood Light for prolonged periods of time.
CHOOSING A LOCATION FOR YOUR SOLAR POWERED FLOOD LIGHT
The Solar Powered Flood Light is ideal for signs, flags, gardens, backyards,
driveways, parking lots, entrance doors, decks, porches, sheds, or any large
outdoor area where you need extra light!
Your Solar Powered Flood Light comes complete with (3) solar panels with 10-foot power
cords. For optimum sun exposure and longer light output, place the solar panels where
they will receive 6-8 hours of direct sunlight per day. Placing the panels in a shaded
location or behind a glass window will not allow the batteries to charge fully, thereby
reducing the number of hours the light will operate per evening.
The Solar Powered Flood Light is equipped with a light-sensitive trigger to automatically
turn the light on at dusk. For best performance, ensure that the Flood Light is not placed
near nighttime light sources such as porch lighting and street lighting.
4
Page 5
TROUBLESHOOTING
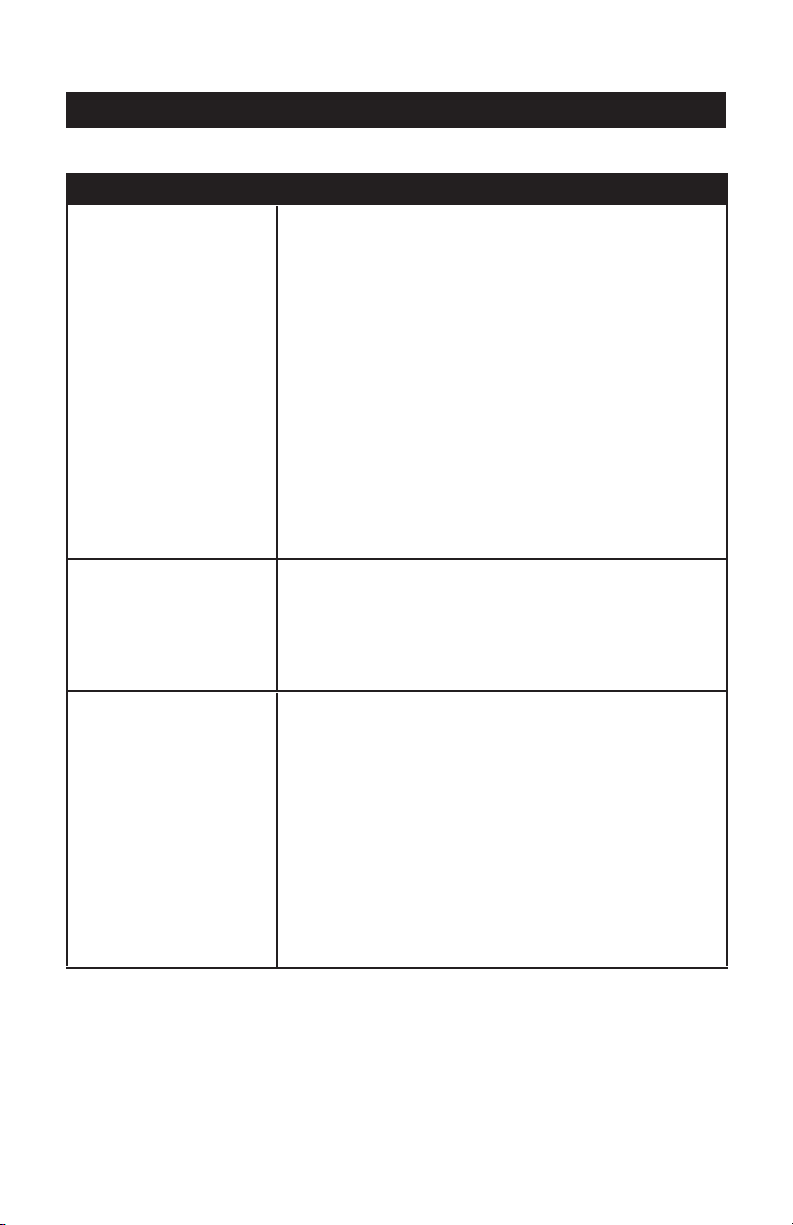
PROBLEM POSSIBLE SOLUTIONS
•
Ensure that the on/off switch on the main body has
been turned to the ON position.
•
Ensure that the batteries have been fully charged in
direct sunlight for 3 sunny days (
Light will not
switch on.
First Time Use
section on page 4). Artificial light will not charge the
battery. It must charge in sunlight.
•
Check to see that the solar panels are
and
that they receive 6-8 hours of sunlight per day,
enabling the batteries to fully charge.
of
refer to the “Before
Your
Solar Powered Flood Light”
facing South
Light quickly
ashes on and off.
Light is not as
bright as normal
Check to see that the flood light is not near
•
light sources such as street lights that cause the photo
sensor to not turn on.
•
Battery charge may be low. Turn the power switch to
the OFF position and charge the batteries for three
(3) sunny days, ensuring the solar panels have
been placed in direct sunlight, ideally facing the
Southern sky.
Battery charge may be low. Turn the power switch to
•
the OFF position and charge the batteries for three
(3) sunny days, ensuring the solar panels have been
placed in direct sunlight, ideally facing the Southern
sky.
The brightness control switch might be set to HALF
•
keep the light illuminated for a longer time period.
Check to make sure solar panels are facing South,
•
and that they receives 6-8 hours of sunlight per day.
nighttime
mode, which is designed to use less power and
5
Page 6

MADE IN CHINA
MAXSA Innovations, LLC
8412 Cathedral Forest Drive
Fairfax Station, Va 22039
Tel: 703-495-0661
www.maxsainnovations.com
ONE YEAR LIMITED WARRANTY
1 YEAR LIMITED WARRANTY: MAXSA Innovations, LLC warrants to the original
consumer/purchaser that this product shall be free of defects in material and workmanship
under normal use and circumstances for a period of one (1) year from the date of original
purchase for use. When the original consumer/purchaser returns the product pre-paid
(consumer pays return shipping) to MAXSA Innovations, LLC, 8412 Cathedral Forest Dr;
Fairfax Station, VA 22039; USA within the warranty period, and if the product is defective,
MAXSA Innovations, LLC will at its option repair or replace such. This warranty shall
constitute the sole liability of MAXSA Innovations, LLC concerning the product. MAXSA
Innovations, LLC expressly disclaims all other warranties INCLUDING, WITHOUT
LIMITATION, THE WARRANTIES OF MERCHANT ABILITY AND FITNESS FOR A
PARTICULAR PURPOSE. NO PERSON, FIRM, OR COPORATION IS AUTHORIZED
TO ASSUME FOR MAXSA Innovations, LLC ANY OTHER LIABILITY IN CONNECTION
WITH THE SALE AND USE OF THE PRODUCT. MAXSA Innovations, LLC and agents
and distributors will bear no liability whatsoever for incidental or consequential damages
or charges of any kind. Some states do not allow the reclusion or limitation of incidental
or consequential damages, so the above disclaimer regarding incidental or consequential
damages may not apply to you. This warranty is void if the product has been damaged
or tampered with or if the product or any such parts have been opened. In all cases of
damage during shipment, a claim must be led with the shipping carrier and not with
MAXSA Innovations, LLC. This warranty gives you specic legal rights; you may also have
other rights which vary from state to state.
EXTENSION CORDS:
A 15-foot extension cord is available for this product for $14.95, or (3) for $29.95, which
covers shipping and handling costs as well. This extension cord allows the solar panel
to be placed higher or further away from the security light to ensure maximum direct
sunlight exposure. For more information, please call 703-495-0661 and ask for
extension cord model
EXT-Black.
Please save these instructions for future reference.
SPECIFICATIONS
Power Source: Solar (3 Panels) Amorphous
Lumens: 240 full/120 half
Light Color: 6500K (Cool White or Daylight color)
Function: Dusk-to-dawn
Power Storage: 3.7V 2X2200 mAh rechargeable Lithium Ion battery
Max Runtime: up to 12 hours @ half-power; up to 6 hours @ full-power
Weatherproof Rating: IP44
6
v16-1
©2016 MAXSA Innovations, LLC
Page 7
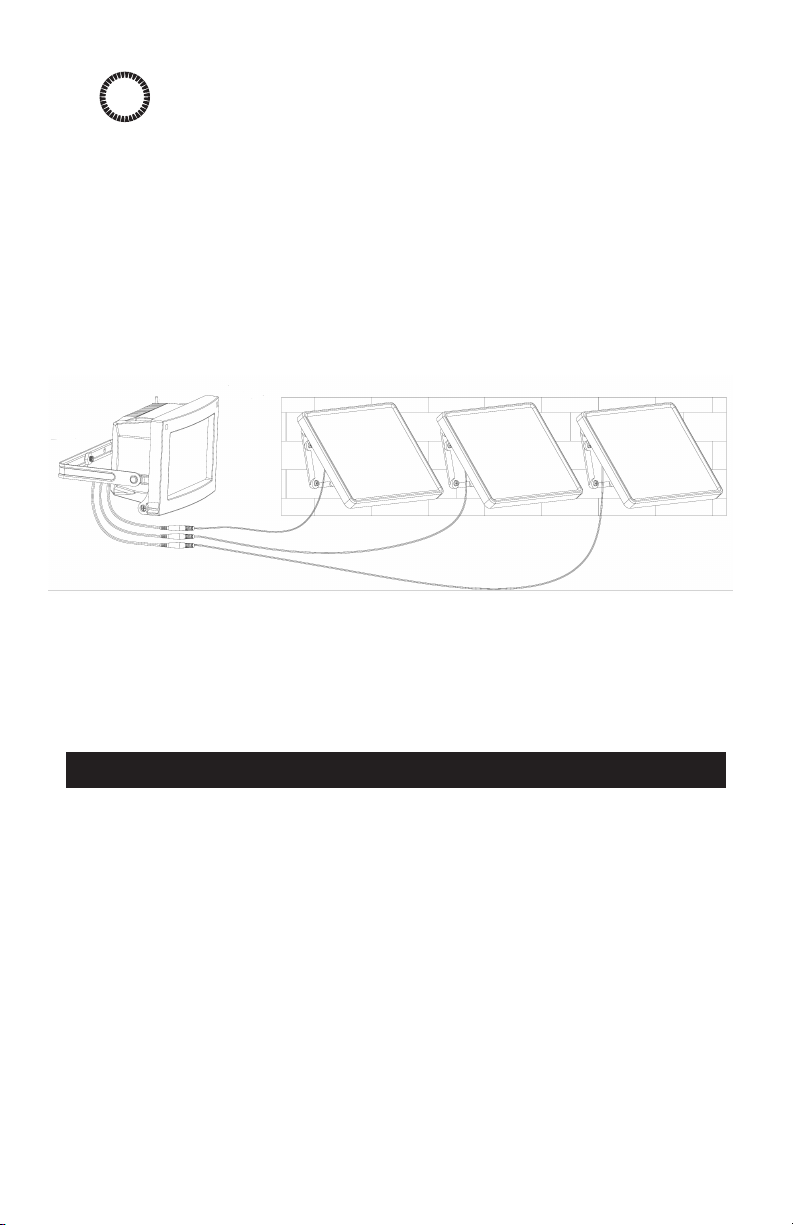
économie d'énergie
Pr
Parfait pour les drapeaux, les panneaux, les allées, les garages, les carports, les
parkings, les entrées, les porches, ou tous les coins où il y a besoin d’éclairage
jecteur Solaire
INSTRUCTIONS D'INSTALLATION ET DE FONCTIONNEMENT
Modèle #: 40331
ATTENTION: Il FAUT LIRE TOUTES LES INSTRUCTIONS AVANT L'UTILISATION
DESCRIPTION DU PRODUIT
Votre MAXSA Projecteur Solaire transforme la lumière du soleil en électricité pendant
la journée pour permettre la lumière 12 DEL de briller au soir. Il n’y a plus un
problème d’aller à la voiture pendant la nuit. Vous conservez l’environnement tout en
conservant l’énergie avec ce Projecteur Solaire qui est économe en énergie
S’il est complètement chargé, votre Projecteur Solaire peut fonctionner pendant 6 heures
à maximum, et 12 heures à demi-clarté. Il y a 3.7V 2x2200 mAh lithium ion rechargeable
piles qui sont incluses et qui vont fonctionner pendant 3-5 années, après qu’il faut les
remplacer.
Page 8
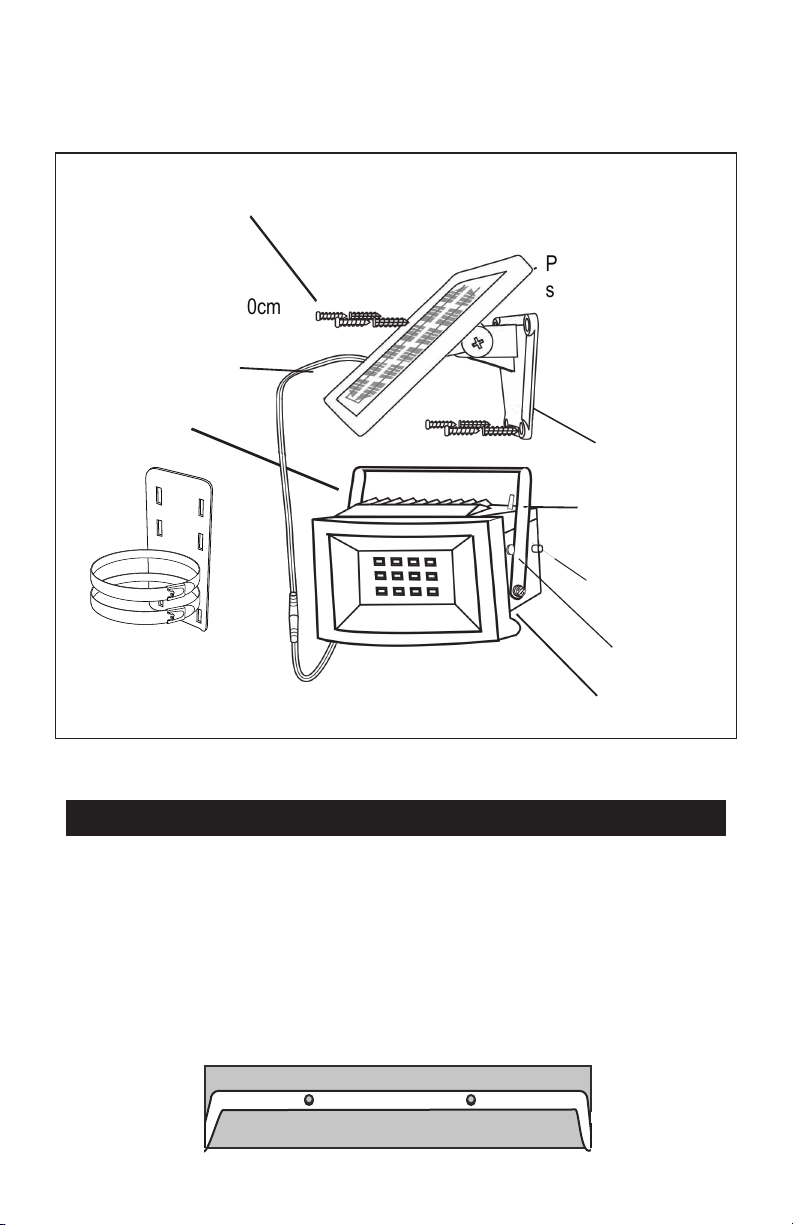
Il faut sortir toutes les pièces de leur emballage de protection et les identifier
PIÈCES INCLUSES
12 vis et 12 ancrages
pour monter les
panneaux solaires
Câble électrique de 300cm
Pivot du panneau
solaire
3 Panneaux
Support de
montage
solaires
Support du
panneau solaire
Interrupteur ON/
OFF
Interrupteur du
réglage de la
luminosité
Sangle de
Photocapteur
montage sur
poteau et
support
Projecteur principal
INSTRUCTIONS D'INSTALLATION
MONTAGE SUR UN MUR SIGN
1. S'il est necessaire, sortez le support de montage de votre Projecteur Solaire par
dévisser les deux vis surles deux côtés.
2.
En utilisant les deux autres vis qui sont incluses avec ce produit, montez le support sur
une surface solide. Remettez ensemble le support de montage et le projecteur en
utilisant les deux vis de la première étape.
2
Page 9
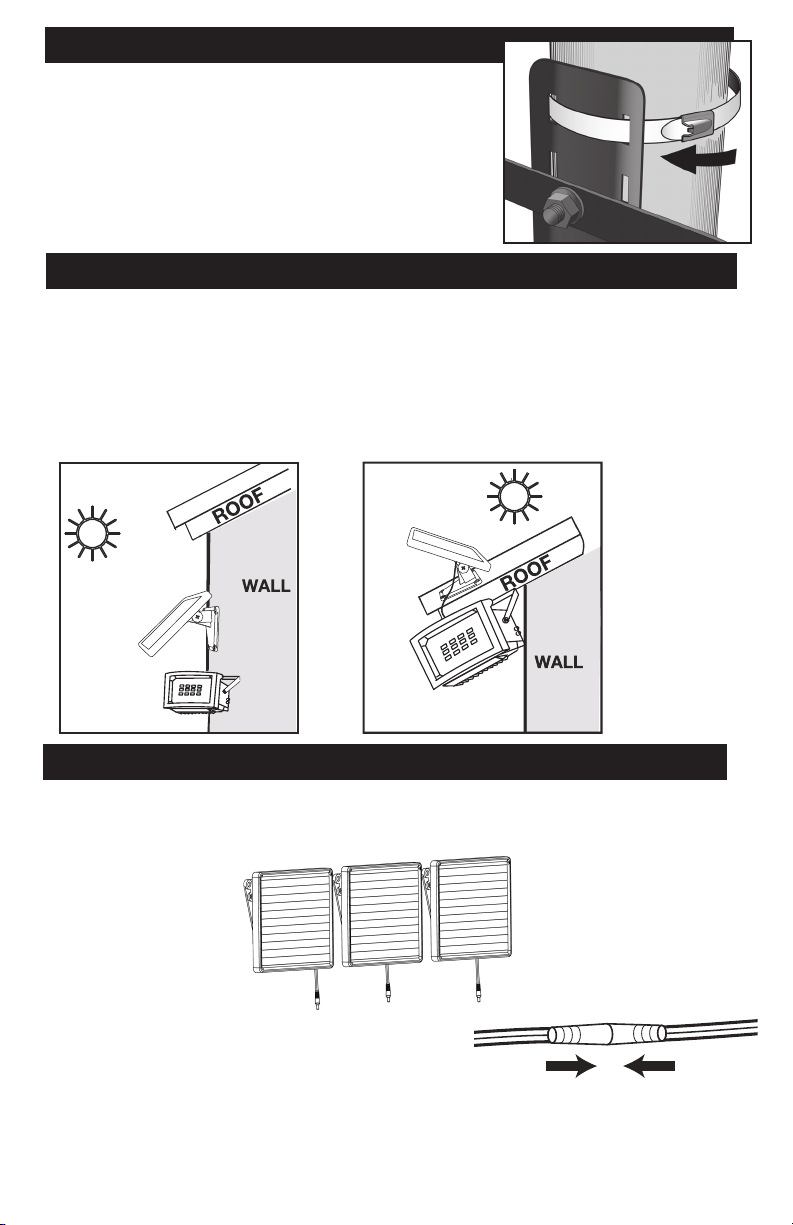
0217$*(685 81327($8
3RXUOHPRQWDJHVXUXQSRWHDXLQVWDOOHz OHVXSSRUWGH
PRQWDJHVXUOHSRWHDXHWIDLtesSDVVHUOHVGHX[VDQJOHVj
WUDYHUVGXVXSSRUW
*$WWHQWLRQQHserrez pas OHVVDQJOHVDYDQWO¶LQVWDOODWLRQGH
YRWUHSURMHFWHXUGDQVODSRVLWLRQGpVLUpH9RXVQHSRXYH]
SDVOHVURXYULU3RVLWLRQQHzOHVXSSRUWVXUOHSRWHDXHW
IHUPHzOHVVDQJOHVDXWRXUGXSRWHDX6HUUHzIHUPHPHQW
OHVVDQJOHVSRXUELHQDWWDFKHUOHSURMHFWHXU
0217$*('ES3$11($8X62/$,5(S$80852872,7
9RXVSRXYH]PRQWHUOHsSDQQHDXxVRODLUHsDXPXUDXWRLWDXVRORXDXSURMHFWHXU
OXLPrPH
8WLOLVHzOHVYLVTXLVRQWLQFOXVHVSRXUPRQWHUOHsSDQQHDXxVRODLUHsVXUXQHVXUIDFH
VROLGH9RXVSRXYH]DUUDQJHUO¶DQJOHGXSDQQHDXVRODLUHSDUWRXUQHUOHSLYRWYHUVXQH
SRVLWLRQGLIIpUHQWH1'oubliez pasGHPRQWHUOHSDQQHDXRULHQWpDXVXGSRXUJDJQHUOD
OXPLqUHGXVROHLODXWDQWTXHSRVVLEOH
MONTAGE DES PANNEAUX SOLAIRES
Nous recommendons que les panneux solaires sont vers le sud pour maximum lumière
du soleil. Depuis la direction de le soliel change dans chaque saison, nous
recommendons que les panneux solaires sont monter comme en dessous.
Après monter le projecteur sur la surface
désirée, raccorder le panneau solaire au
projecteur par brancher le câble électrique dans
le câble attaché au fond du panneau.
Tournez et détournez fermement les deux
câbles tout en les poussant ensemble pour un
bon raccord.
3
Page 10

AVANT LA PREMIÈRE UTILISATION DU PRODUIT
1.
Chargez les batteries sans les activer. Il faut éteindre
le projecteur par tourner l’interrupteur à la position
OFF.
2.
Laissez l’interrupteur dans cette position tout en
plaçant le panneau au soleil. Faites les deux pendant
trois jours pour assurer qu’il y aura une charge
complète avant la première utilisation.
3.
Après les trois jours, tournez l’interrupteur à la position ON pour allumer
automatiquement le projecteur, et tournez-le à la position OFF pour allumer le
projecteur à la main. Votre projecteur solaire est maintenant prêt à l’utilisation. Pour
conserver la batterie du projecteur, vous pouvez réduire la luminosité.
Attention : Après allumer la lumière pour la première fois, il va activer immédiatement en
dépit des conditions de la clarté. Ce n’est qu’un test pour vérifier qu’il y a un courant
d’énergie entre la batterie et le projecteur. Il va durer pendant 5 secondes, après qu’il va
fonctionner normalement.
CONSEILS DE MAINTENANCE
Les lumières DEL dans votre projecteur durent jusqu’à 30,000 heures sans
remplacement. Pour garder propre votre Projecteur Solaire, essuyez occasionnellement
la lentille et les lumineux solaires avec un chiffon sec. Si votre panneau solaire est salle,
il ne pourra pas charger complètement les piles. Il va aussi diminuer les batteries.
ENTREPOSAGE
Pour entreposer le projecteur à l’intérieur plus de 3 jours, il faut tourner l’interrupteur à
la position OFF pour garder la batterie. La capacité de la batterie peut être réduite
pendant l’entreposage très long. Nous recommandons que vous ne stockiez pas le
projecteur pendant des périodes de temps prolongées.
CHOISIR L'EMPLACEMENT DE VOTRE PROJECTEUR SOLAIRE
Votre projecteur est parfait pour les drapeaux, les panneaux, les allées, les garages, les
carports, les parkings, les entrées, les porches, ou tous les coins où il y a besoin
d’éclairage.
Avec votre projecteur, il y a trois panneaux solaires et des câbles de 300 cm. Pour
gagner l’exposition optimale du soleil, installez le panneau où il recevra 6-8 heures du
soleil par jour. Si vous le placez à l’ombre ou derrière une fenêtre en verre, vous réduirez
la durée de vie de la batterie.
Il possède aussi un mécanisme qui allume l’éclairage au crépuscule. Pour les meilleures
performances, il est nécessaire que le projecteur d'être placé à une distance à partir
d'autres sources de lumière, par exemple, des réverbères.
4
Page 11
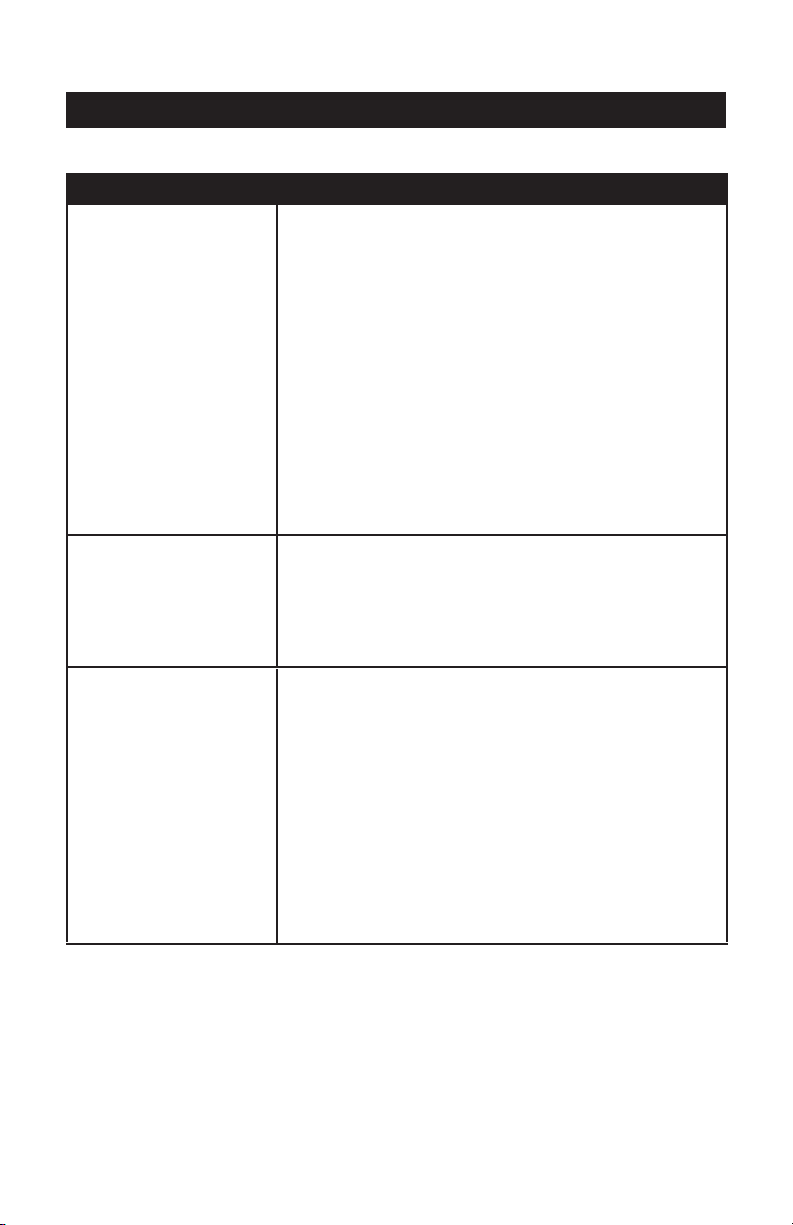
RÈSOLUTION DES PROBLÈMES TYPIQUES
PROBLÈME RESOLUTIONS POSSIBLES
• Vérifiez que vous avez tourné l’interrupteur ON/OFF
sur le corps du projecteur à la position ON.
• Chargez les batteries au soleil pendant 3 jours
ensoleillés (comme dit la section « avant la
première utilisation du projecteur solaire » sur page
La lumière ne
va pas
allumer.
La lumière s’allume
et s’éteindre
rapidement
La brillance de
la lumière est
faible
4). Vous ne pouvez pas charger la batterie en
lumière artificielle.
•
Vérifiez que les panneaux solaires est face à sud
pour recevoir 6-8 heures du soleil par jour.
Vérifier que le projecteur est loin des autres
•
lumières artificiels du soir comme des réverbères.
• Il est possible que la charge de la batterie soit
basse. Tournez l’interrupteur ON/OFF à la position
OFF et chargez les batteries pendent trois jours
ensoleillés tout en vérifiant que le panneau solaire
est placé au soleil direct.
• Il est possible que la charge de la batterie soit
basse. Tournez l’interrupteur ON/OFF à la position
OFF et chargez les batteries pendent trois jours
ensoleillés tout en vérifiant que le panneau solaire
est placé au soleil direct.
• Il est possible que l’interrupteur du réglage de la
luminosité soit à la position HALF. Cette position
utilise moins d’énergie mais elle dure plus longtemps.
• Vérifiez que le panneau solaire est face à sud pour
recevoir 6-8 heures du soleil par jour.
5
Page 12

FABRIQUÉ EN CHINE
MAXSA Innovations, LLC
8412 Cathedral Forest Drive
Fairfax Station, Va 22039
Tel: 703-495-0661
www.maxsainnovations.com
GARANTIE LIMITÈE D'UNE (1) ANNÈE
GARANTIE LIMITEE D’UNE (1) ANNÈE : MAXSA Innovations, LLC garantit au client que ce
produit ne présente aucun défaut de
matériel ou de fabrication avec l’utilisation
normale pour une période d’une année suivant l’achat. Si le client rend le produit, qui doit être
défectueux, à MAXSA Innovations, LLC, 8412 Cathedral Forest Dr, Fairfax Station, VA
22039 (et le client doit payer l’expédition), dans la période de la garantie, MAXSA
Innovations, LLC choisira de le réparer ou de le remplacer. Cette garantie constitue
l’unique responsabilité de MAXSA Innovations, LLC, en concernant ce produit. MAXSA
Innovations désavoue toutes les autres garanties Y COMPRIS, MAIS SANS SE LIMITER À
LES GARANTIES DE QUALITÉ MARCHANDE ET D’ADÉQUATION À UNE
UTILISATION PARTICULIER. AUCUNE PERSONNE, ENTREPRISE, OU
CORPORATION N’EST AUTHORISÉ À ASSUMER POUR MAXSA Innovations, LLC
TOUTE AUTRE RESPONSABILITÉ CONCERNANT LA VENTE ET L’UTILISATION DU
PRODUIT. MAXSA Innovations, LLC, ses agents et ses distributeurs n’assumeront
aucune autre responsabilité des charges de dommage accidentel ou conséquent. Il est
possible que cette limitation de responsabilité ne vous concerne pas, SI vous habitez à
une province qui ne permet pas la réclusion ou la limitation des dommages indirects ou
conséquents. Cette garantie est compostée si le produit a été endommagé ou altéré, ou si le
produit et ses pièces ont été ouverts. Si le produit est endommagé pendant
l’expédition, il faut déposer une réclamation avec le porteur d’exposition, et pas avec
MAXSA Innovations, LLC. Cette garantie vous donne des droits légaux spécifiques ; Il est
possible que vous ayez des autres droits qui varient d’une province à l’autre.
RALLONGES ÉLECTRIQUES
Vous pouvez acheter une rallonge électrique au prix de $14.95, ou trois au prix de
$29.95 qui comprend l’expédition et la manutention. Cette rallonge électrique permet
au panneau solaire de s’installer plus loin ou plus haut du projecteur pour assurer
une exposition directe au soleil maximal. Pour plus d’informations, appelez
1-703-495-0661 et demandez une rallonger électrique de modèle : EXT-Black.
GARDER LES INSTRUCTIONS
SPÉCIFICATIONS
Source d'Énergie: Solaire Amorphous
Lumens: 240 maximum /120 demi-clarté
Couleur de la lumière : 6500K (Blanche ou lumière du jour)
Fonction: Crépuscule à l’aube
Stockage d'Énergie: 3.7V 2x2200 mAh rechargeables lithium ion
Durée maximum : 12 heures à demi-puissance et 6 heures à maximum
Classement Étanche : IP44
6
v16-1
©2016 MAXSA Innovations, LLC
 Loading...