

Page 1
© MAXON Lift Corp. 2005
DRAFT
OPERA TING INSTRUCTIONS
FOR
WHEELCHAIR LIFT
MODEL NO. WL7
DOT-Public Use Lift
PATENTS PENDING
MP-04-02
REV . C
SEPTEMBER 2005
Page 2

P ATENTS PENDING
Page 3

TABLE OF CONTENTS
INTRODUCTION ................................................................4
SAFETY SUMMARY...........................................................4
DAIL Y PRE-OPERATION & OPERA TION CHECKLIST .......6
MAINTENANCE SCHEDULE ..............................................7
LIFT COMPONENTS & TERMINOLOGY ..........................8
DECALS AND DECAL PLACEMENT ..............................10
ANTI-SLIP & SAFETY STRIPING ....................................13
OPERA TING INSTRUCTIONS ..........................................15
ENTER VEHICLE............................................................15
EXIT VEHICLE ................................................................17
STOW LIFT FROM VEHICLE FLOOR .............................19
STOW LIFT FROM GROUND LEVEL .............................19
MANUAL PUMP OPERA TION..........................................21
LOADING & UNLOADING OCCUP ANT ..........................21
P A TENTS PENDING
Page 4

INTRODUCTION
This manual contains safety information and operating
instructions for the Maxon Wheelchair and Standing
Occupant Lift. Read and understand the W ARNINGS,
SAFETY CONSIDERA TIONS, and operating instructions
in this manual, before operating the Lift.
SAFETY SUMMARY
1. This Wheelchair Lift is intended for Commercial
Use and to be operated by an Attendant. Do Not
attempt to ride Lift without the assistance of an
Attendant.
2. Incorrect operation of this Lift can result in serious
personal injury . Comply with the WARNINGS and
Lift operating instructions in this manual. Do not
allow untrained persons to operate the Lift. If you
need to replace an Operator’s Manual, additional
copies are available from:
MAXON Lift Corp.
11921 Slauson A ve
Santa Fe Springs, CA 90670
(800) 227-4116
3. Do not exceed rated load capacity of Lift which is
800 lbs. (364 kg).
P A TENTS PENDING
4
Page 5

4. Do not allow any part of your body , or the Lift
occupant’s body, to be placed under , within, or
around any portion of the moving Lift or its mechanisms, or in a position that would trap them between the platform and the ground (or vehicle)
when Lift is operated.
5. Consider the safety and location of bystanders and
location of nearby objects when operating the Lift.
Stand to one side of plat form while operating the
Lift. Be certain that the area the Lift will move
through during operation is clear of all obstacles.
6. Fasten Occupant Restraint Belt Before Operating
Lift, but never tighten the belt. Leave a minimum of
3” - 4” slack in the belt. Lift will not operate correctly
and may become a hazard if belt is tight.
7. If Lift is not operated for several days or more it
may need to be repressurized. Use manual pump
to pressurize the system before operating the Lift
again. Low hydraulic pressure may cause Lift to
operate incorrectly and become a hazard.
8. Always operate the Lif t with the vehicle emergency
brake set and vehicle parked on Level ground.
Operating Lift without emergency brake set or
parked on an incline may create a hazard for
occupant and attendant.
9. Comply with all attached instruction decals and
warning decals.
10. Above all, USE GOOD COMMON SENSE when
operating this Lift.
1 1. Do not move vehicle when door is open.
ADDITIONAL SAFETY CONSIDERA TIONS
1. When using the Lift, wheelchair may face outboard
or inboard. If possible, position the wheelchair with
occupant facing outboard.
2. An ambulatory (st anding) occupant may face
outboard or inboard. If possible, position ambulatory occupant on the Lift, facing the direction of
travel (face vehicle when entering or face away
when exiting), and holding on the handrails.
5
P A TENTS PENDING
Page 6

DAILY PRE-OPERATION & OPERATION CHECKLIST
NOTE: PRE-OPERA TION and OPERATION CHECKS
should be performed by the Lift Operator.
PRE-OPERATION CHECKS
Park vehicle on level ground, shift vehicle
transmission to P ARK, and set vehicle emergency
brake before doing the following checks..
Visually check Lift for bent or broken parts, or for
hydraulic fluid around base. Have hydraulic fluid leaks,
and the fluid level in reservoir, checked by a qualified
technician.
Check for hydraulic fluid leaking from cylinders. Lift
may be operated if cylinders are “weeping” a light film
of hydraulic fluid. If hydraulic fluid drips from either
cylinder, have it checked by a qualified technician.
Check that all Decals are in place, undamaged, and
legible (see DECALS pages).
Check that all anti-slip and safety striping is in place
(see ANTI-SLIP & SAFETY STRIPING pages).
If the Lift is dirty, clean it.
Make sure the ON/OFF switch on the Pump Cover
is turned ON. If indicator on the switch is illuminated, Lift has power to operate.
P A TENTS PENDING
NOTE: If any of the PRE-OPERA TION CHECKS
have incorrect indications, do not operate
the Lift until repairs are performed by a
qualified technician.
OPERATION CHECKS
Operate the Lift through one full cycle to do
the following checks.
Use Lift operating instructions in this manual to
UNFOLD, LOWER, RAISE, and FOLD platform.
Make sure the Lift responds properly to hand
control switches.
Listen for unusual noises while the Lift operates.
Watch for uneven movement of the Lift arms,
platform, and inboard and outboard rollstop s.
NOTE: If any of the OPERA TION CHECKS have
incorrect indications, discontinue operating Lift until repairs are performed by a
qualified technician.
6
Page 7

MAINTENANCE SCHEDULE
NOTE: The Lift Controller counts the number of cycles &
lifts over the lifetime of the Lift. One CYCLE is
counted each time the Lift is unfolded from the
stowed position to floor level, lowered to the ground,
raised to floor level, and then stowed. One LIFT is
counted each time the Lift is lowered from floor
level to the ground, and raised back to floor level.
Read the LIFTS and CYCLES counts from the Lift
Controller display window periodically so you know
when to do the maintenance checks listed below.
NOTE: Only a qualified technician should do the sched-
uled maintenance on this page and confirm
compliance with Federal Motor Vehicle Safety
Standard 403. For the compliance checks, refer
to the COMPLETED LIFT INST ALLATION
CHECKLIST in Installation Manual MP-04-01.
EVERY 500 LIFTS
Visually check the Lift for bent, broken, or worn out parts,
and broken welds.
Check the electrical wiring for worn insulation, and the
terminals for corrosion and secure fit. Apply dielectric
grease to connections if needed.
Check for loose fasteners (nuts, bolts, screws & rivets).
Also, check cotter pins, clevis pins, retaining ring pins &
retaining rings for noticeable wear and damage.
Check that all Decals are in place, undamaged, and
legible (see DECALS pages).
Check that all anti-slip and safety striping is in place and
undamaged (see ANTI-SLIP & SAFETY STRIPING pages).
EVERY 2500 CYCLES
Replace both latch Solenoids P/N 266955-01
EVERY 3000 LIFTS
Check the Inboard Rollstop Actuator Assembly wiring
connections, routing, and condition from Actuator to
Controller. Repair if needed.
EVERY 5000 LIFTS
Check the large bearing on slider-end of Actuator. If
bearing looks worn at first inspection, remove and reinstall
bearing with the ends reversed. Replace bearing P/N
266545-03, if follow-on inspections reveal more wear.
Replace both Platform light bulbs P/N 906475-01.
EVERY 10000 LIFTS
Check both Hydraulic Cylinders for leaks. If a film of
hydraulic fluid is visible on cylinder seals Lift can still be
operated. However, if fluid is dripping from the cylinders,
replace them.
7
P A TENTS PENDING
Page 8
INBOARD
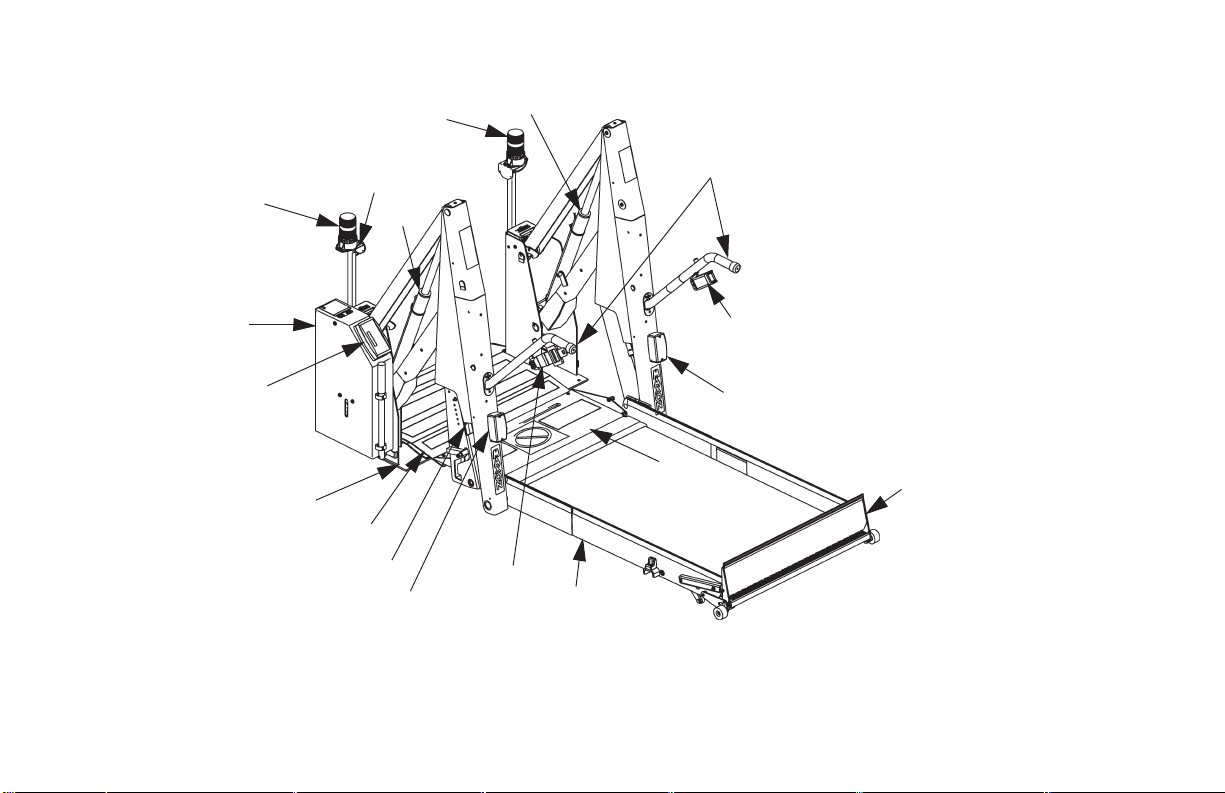
LIFT COMPONENTS & TERMINOLOGY
12
8
RIGHT
P A TENTS PENDING
12
9
10
LEFT
11
13
8
1
7
14
3
4
5
3
14
6
LIFT COMPONENTS (SEE TABLE 9-1)
FIG. 8-1
8
2
OUTBOARD
Page 9

ITEM NAME DESCRIPTION
p
1. THR ESHH O LD PLATE Componen t t hat bridges t he entr y way, through
2. OUT BO AR D ROLLSTOP Barrier to prevent the Wh eelchair from rollin g off
3. SEAT BELT Belt that ac ts as an addit ional barrier to keep the
4. PLATFORM Con tains t he Wheelchair and Occu pant durin g
5. HANDRAILS (Left/Right) Provides a hand hold for the Lift
6. INBOARD ROLLSTOP Barrier to prevent the Wheelchair from rolling off
7. ELECTRICAL ACTUATOR Raises/ lowers Inboard Rollst op.
the Lift, into t he vehicle. Detects if that portion of
Lift is oc cupied durin g "UP/DOWN" operat ion
between vehicle floor and th e ground.
of the Platf or m. Also prov ides entry/ex it ramp for
Platform on the groun d.
Wheel chair or am bulatory occupant on the
Platform. Belt must be fastened for Lift to
erate.
o
"UP/DOWN" oper ation between vehicl e floor and
the ground.
Occupant.
inboard side of Platform. Al s o, prov ides bridge
between Platform and Threshhold.
ITEM NAME DESCRIPTION
8. HY DR AULIC CYLINDER (Left /Right ) Tele sc oping steel tube and rod,
9. HYDRAULIC POWER UNIT
10. LI FT CONT ROLLER Electr onic device t hat contr ol s and monitors Lift
11. BASE Stru c ture that s ec ures Lift to the vehicle floor.
12. THRESHHOLD WARNI NG
13. THRESHHOLD WARNI NG
TABLE 9-1
9
(COVER I S SHOWN)
BEACON
ALARM
pressu rized by hydraulic fluid, that fol ds and
unfolds the Lift and moves the Lift up and down.
Contains motor ized hydraulic pump, manually
operated backup pum p, fl uid l in es , an d control s
to operate t he hydraul ic cylinders.
operation and the interlock connect ion with th e
vehicle.
Flash in g red l ight indicates T hresh h o l d is
occupied by a person or object du ring
"UP/DOWN" operation be t ween vehicl e f loor
and t he grou nd.
Audible alarm sounds w hen Th reshhold is
occupied by a person or object du ring
"UP/DOWN" operation be t ween vehicl e f loor
and t he grou nd.
P A TENTS PENDING
Page 10

DECALS AND DECAL PLACEMENT
DECAL (ALARM)
DECAL “C”
DECAL “A”
DECAL “O”
SERIAL PLA TE
DECAL “K”
DECAL “B”
SERIAL
PLATE
DECAL “L”
DECAL “M”
DECAL “F”
DECAL “P”
All WARNING, CAUTION, and OPERATION decals
provided with Wheelchair Lift must always be in place on
the Lift and must always be legible. If decals are missing
or illegible, get free replacement decals from:
MAXON Lift Corp. - Customer Service
11921 Slauson Ave., Santa Fe S prings, CA 90670
Phone: (800) 227-4116 F AX: (888) 771-7713
E-mail: cservice@maxonlift.com
DISPLAY
OVERLAY
DECAL “D”
DECAL“N”
DECAL “I”
DECAL“J”
DECAL “G”
DECAL“N”
DECAL
“E”
DECAL “H”
P A TENTS PENDING
10
Page 11

DECAL SET P/N 266704-01
FIG. 11-1
11
P A TENTS PENDING
Page 12

DECALS AND DECAL PLACEMENT - Continued
P A TENTS PENDING
DECAL (ALARM)
P/N 266686-01
DECAL SET P/N 266704-01
FIG. 12-1
12
SERIAL PLATE
P/N 905246-8
DECAL-OVERLAY
P/N 266990-01
Page 13

ANTI-SLIP
T APE
PN 096014-10
ANTI-SLIP
TAPE
(ROLLSTOP)
PN 096015-10
ANTI-SLIP & SAFETY STRIPING
(30” WIDE PLATFORM)
YELLOW TAPE
(BOTTOM-ROLLSTOP)
PN 905293-17
ANTI-SLIP TAPE
(TOP-ROLLSTOP)
PN 096012-10
YELLOW TAPE
(THRESHOLD PLATE)
PN 905293-12
YELLOW TAPE
PN 905293-11
YELLOW TAPE
PN 905293-14
13
ANTI-SLIP TAPE
PN 096013-10
YELLOW TAPE
(OUTBOARD)
PN 905293-11
YELLOW TAPE
(OUTBOARD)
PN 905293-14
YELLOW TAPE
(INBOARD)
PN 905293-16
YELLOW TAPE
(INBOARD & OUTBOARD)
PN 905293-13
P A TENTS PENDING
Page 14

ANTI-SLIP & SAFETY STRIPING - Continued
(33” WIDE PLATFORM)
YELLOW TAPE
(BOTTOM-ROLLSTOP)
PN 905293-18
ANTI-SLIP TAPE
(TOP-ROLLSTOP)
PN 096012-11
ANTI-SLIP TAPE
PN 096013-11
ANTI-SLIP TAPE
PN 096014-11
P A TENTS PENDING
ANTI-SLIP TAPE
(ROLLSTOP)
PN 096015-11
YELLOW TAPE
(THRESHOLD PLATE)
PN 905293-14
YELLOW TAPE
PN 905293-11
14
YELLOW TAPE
YELLOW TAPE
PN 905293-14
YELLOW TAPE
(OUTBOARD)
PN 905293-11
YELLOW TAPE
(OUTBOARD)
PN 905293-14
(INBOARD)
PN 905293-16
YELLOW TAPE
(INBOARD & OUTBOARD)
PN 905293-15
Page 15

OPERATING INSTRUCTIONS
ENTER VEHICLE
NOTE: If equipped, Seat Belt must be fastened for Lift
to operate.
1. Fully open and secure
Wheelchair Lift access
door(s) on the vehicle.
2. Apply power to the Lift
by turning ON switch on
the Pump Cover (FIG.
15-2). The switch is
illuminated when
turned ON.
POWER SWITCH
(LH PUMP SHOWN)
FIG. 15-1
PUMP
COVER
3. Push the UNFOLD switch on
HAND CONTROL (FIG. 15-2)
to unfold PLATFORM to
horizontal position
(FIG. 15-3).
15
FOLD
UNFOLD
UP
DOWN
HAND CONTROL
FIG. 15-2
UNFOLD PLA TFORM
FIG. 15-3
P A TENTS PENDING
Page 16

OPERATING INSTRUCTIONS - Continued
4. Push the DOWN switch on
HAND CONTROL (FIG . 14-1)
to lower PLATFORM to
ground level (FIG. 16-1).
5. If equipped, unfasten
SEAT BELT (FIG. 16-2),
and place on hanger
provided.
P A TENTS PENDING
LOWER PLATFORM
TO GROUND
FIG. 16-1
UNFASTENING SEA T BEL T
FIG. 16-2
6. Position wheelchair or
ambulatory occupant on
the center of PLA TFORM
(FIG. 16-3). SET
WHEELCHAIR BRAKES
or SWITCH OFF POWERED WHEELCHAIR.
POSITIONING OCCUP ANT
ON PLA TFORM A T
GROUND LEVEL
FIG. 16-3
7. If equipped, fasten SEA T
BEL T allowing 3” - 4” of
slack (FIG. 16-4).
FASTENING SEA T BEL T
FIG. 16-4
16
Page 17

8. Push the UP switch on HAND
CONTROL (FIG. 17-1) to
raise PLA TFORM to vehicle
floor level (FIG. 17--2).
UP
DOWN
9. RELEASE WHEELCHAIR
BRAKES or SWITCH ON
POWERED WHEELCHAIR.
Move wheelchair or ambulatory
occupant inside the vehicle.
RAISING LIFT UP TO VEHICLE FLOOR LEVEL
FIG. 17-2
FOLD
UNFOLD
HAND CONTROL
FIG. 17-1
EXIT VEHICLE
1. Fully open and secure Wheelchair Lift access door(s) on the
vehicle.
2. Push the UNFOLD switch on
HAND CONTROL (FIG. 17-1)
to unfold PLA TFORM to horizontal position (FIG. 17-3).
3. If equipped, make sure SEA T
BELT is fastened (FIG. 17-4)
with 3” - 4” of slack in belt.
UNFOLD PLA TFORM
FIG. 17-3
FASTENING SEA T BEL T
FIG. 17-4
17
P A TENTS PENDING
Page 18

OPERATING INSTRUCTIONS - Continued
4. Position wheelchair or
ambulatory occupant on
the center of platform
(FIG. 18-1).
SET WHEELCHAIR
BRAKES OR SWITCH
OFF POWERED
WHEELCHAIR.
5. Push the DOWN switch
on hand control (FIG.
16-1) to lower PLA T FORM to ground level
(FIG. 18-2).
POSITIONING OCCUP ANT ON
PLA TFORM A T FLOOR LEVEL
FIG. 18-1
LOWERING PLA TFORM
TO GROUND
FIG. 18-2
6. If equipped, unfasten SEA T
BELT (FIG. 18-3) and place
on hanger provided.
UNFASTENING SEA T BEL T
FIG. 18-3
7. RELEASE WHEELCHAIR
BRAKES or SWITCH ON
POWERED WHEELCHAIR.
Move wheelchair or ambulatory occupant into the
passenger unloading zone.
8. If equipped, make sure
SEA T BELT is fastened
(FIG. 18-4) with 3” - 4” of
slack in belt.
FASTENING SEA T BEL T
FIG. 18-4
P A TENTS PENDING
18
Page 19

STOW LIFT FROM VEHICLE FLOOR
STOW LIFT FROM GROUND LEVEL
UP
DOWN
Push the FOLD switch on HAND
CONTROL (FIG.19-1) to close
PLATFORM (FIG. 19-2). Fold
operation will stop automatically
when completed.
FOLD
UNFOLD
HAND CONTROL
FIG. 19-1
FOLDING PLA TFORM
UP INTO VEHICLE
FIG. 19-2
1. If equipped, fasten SEA T
BEL T allowing 3” - 4” of slack
(FIG. 19-3).
2. Push the UP switch on
HAND CONTROL (FIG.
19-1) to raise PLA TFORM to
vehicle floor level (FIG. 19-4).
RAISING LIFT UP TO VEHICLE FLOOR LEVEL
3. Push the FOLD switch on
HAND CONTROL (FIG. 19-1) to
fold PLATFORM (FIG. 19-2).
Fold operation will stop automatically when completed.
19
FASTENING SEA T BEL T
FIG. 19-3
FIG. 19-4
P A TENTS PENDING
Page 20

THIS PAGE INTENTIONALLY LEFT BLANK
P A TENTS PENDING
20
Page 21
OPERATING INSTRUCTIONS - Continued
MANUAL PUMP OPERATION
NOTE: If possible, keep the Lift power ON/OFF switch
turned ON. In most cases, operating the Lift with
Manual Pump may be easier if power is ON.
Manual pump operating instructions for the Lift
are also located on Pump Cover. See DECALS
AND DECAL PLACEMENT in this manual.
If possible, apply power to
the Lift by turning ON
switch on the Pump Cover
(FIG. 21-1). The switch
is illuminated when
turned ON.
COVER
POWER SWITCH
(LH PUMP SHOWN)
FIG. 21-1
PUMP
LOADING & UNLOADING OCCUPANT
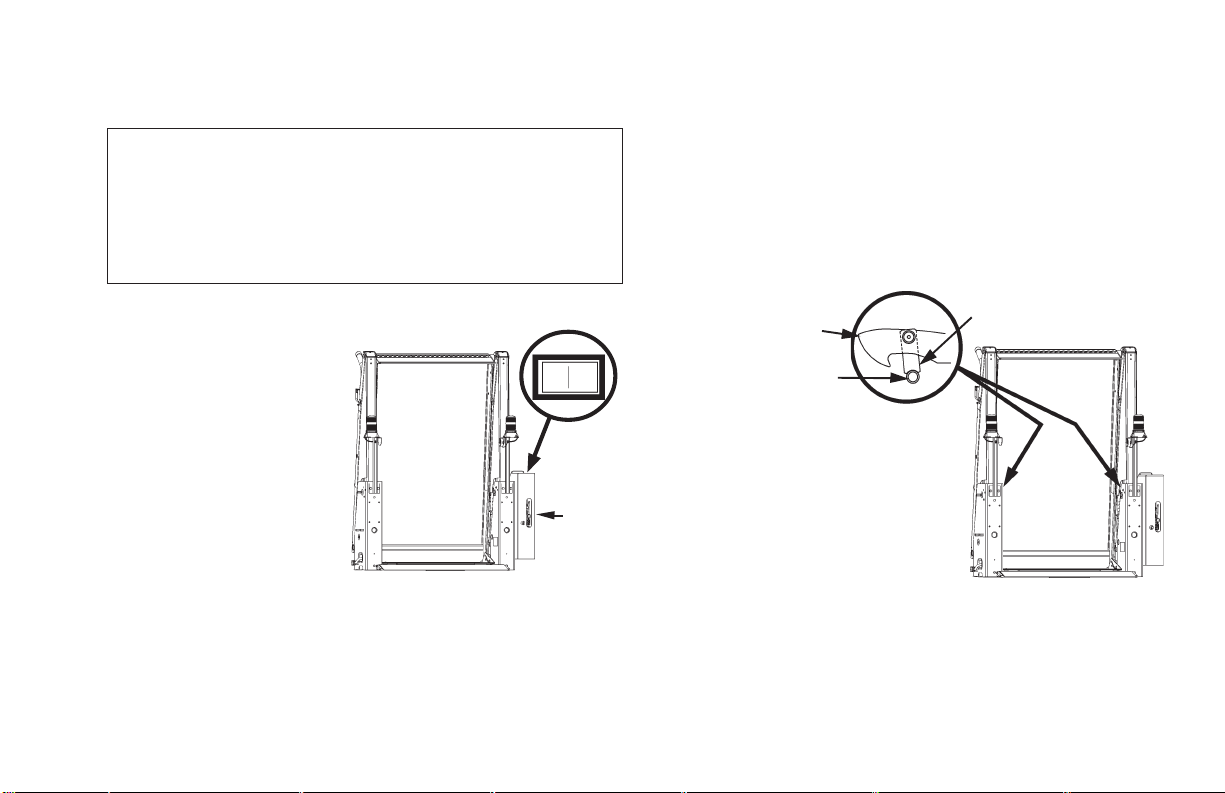
1. Reposition latches to manually unfold the Lift as
follows. Raise latch off anchor pin (FIG. 21-2B) on LH
side of Lift. Position the standoff to hold latch in place
above the anchor pin (FIG. 21-2B). Repeat for latch
on RH side of Lift.
STANDOFF
LATCH
ANCHOR PIN
REPOSITIONED
LA TCH &
ST ANDOFF
FIG. 21-2B
LIFT - BACK VIEW
FIG. 21-2A
21
P A TENTS PENDING
Page 22

OPERATING INSTRUCTIONS - Continued
MANUAL PUMP OPERATION - Continued
2. Remove the MANUAL
BACKUP HANDLE from
clips on the Pump Cover
(FIG. 22-1).
3. Unfold the PLA TFORM as
follows. Open pressure
release valve on Manual
Pump by turning MANUAL
BACKUP HANDLE counterclockwise (FIG. 23-2).
St art with 1/4 turn and
slowly increase to 1/2 turn
counter-clockwise.
P A TENTS PENDING
PUMP
COVER
HANDLE
MANUAL BACKUP HANDLE
(LH PUMP SHOWN)
FIG. 22-1
1/4 - 1/2 TURN
OPEN PRESSURE
RELEASE V ALVE
FIG. 23-2
4. Observe the PLATFORM
unfolding to horizontal
position at vehicle floor
level (FIG. 22-3) .
UNFOLD PLA TFORM
FIG. 22-3
5. When the PLA TFORM reaches
floor level, close pressure release
valve on Manual Pump by turning
MANUAL BACKUP HANDLE
clockwise until tight (FIG. 23-4).
TIGHTEN
CLOSE PRESSURE
RELEASE V ALVE
FIG. 23-4
22
Page 23

6. Ensure OUTBOARD
ROLLSTOP is raised up all
the way (FIG. 23-1).
7. If equipped, make sure
SEA T BELT is fastened
(FIG. 23-2) with 3” - 4” of
slack in belt.
OUTBOARD
ROLLSTOP
OUTBOARD ROLLSTOP
RAISED UP
FIG. 23-1
FASTENING SEA T BEL T
FIG. 23-2
NOTE: If there are no occupants to unload
from vehicle, skip step 8.
8. Position wheelchair or
ambulatory occupant on
the center of Platform
(FIG. 23-3).
SET WHEELCHAIR
BRAKES OR SWITCH
OFF POWERED
WHEELCHAIR.
9. Lower the PLA TFORM as follows.
Re-enter the vehicle to access Manual
Pump. Open pressure release valve
on Manual Pump by turning MANUAL
BACKUP HANDLE counterclockwise (FIG. 23-4). Start with
1/4 turn and slowly increase to
1/2 turn counter-clockwise. Lower
the Lift slowly below floor level
and check if Inboard Rollstop
raises up all the way .
23
POSITIONING OCCUPANT
ON PLA TFORM
FIG. 23-3
1/4 - 1/2 TURN
OPEN PRESSURE
RELEASE V ALVE
FIG. 23-4
P A TENTS PENDING
Page 24

OPERATING INSTRUCTIONS - Continued
MANUAL PUMP OPERATION - Continued
NOTE: If the Inboard Rollstop
automatically rises
all the way, skip step
10. Do not unpin the
Actuator
10. If the Inboard Rollstop does
not raise up all the way,
unpin Actuator and manually RAISE the INBOARD
ROLLSTOP and Actuator
(FIG . 24-2). Pin ACTUATOR to closest matching
hole on Closer Arm (FIG.
24-1).
11. Watch PLATFORM (FIG. 24-2)
as it lowers occupant to the
ground.
P A TENTS PENDING
PIN
ACTUAT OR
INBOARD
ROLLSTOP
FIG. 24-1
LOWER PLA TFORM
TO GROUND
FIG. 24-2
CLOSER
ARM
12. When PLA TFORM rests on the
ground, close pressure release
valve on Manual Pump by
turning MANUAL BACKUP
HANDLE clockwise until tight
(FIG. 24-3).
TIGHTEN
CLOSE PRESSURE
RELEASE V ALVE
FIG. 24-3
13. If equipped, unfasten SEA T
BELT (FIG. 24-4). Store on
hanger provided.
UNFASTENING SEA T BEL T
FIG. 24-4
24
Page 25

14. Ensure OUTBOARD
ROLLSTOP on Lift
PLA TFORM is opened to
the horizontal position
(FIG. 25-1).
OUTBOARD ROLLSTOP IN
HORIZONT AL POSITION
NOTE: If there are no occupants
to unload, skip step 15.
15. RELEASE WHEELCHAIR
BRAKES or SWITCH ON
POWERED WHEELCHAIR.
Move wheelchair or ambulatory
occupant into the unloading zone.
FIG. 25-1
OUTBOARD
ROLLSTOP
NOTE: If there are no occupants to load on
Platform, skip step 16.
16. Position wheelchair or
ambulatory occupant on
the center of Platform
(FIG. 25-3).
SET WHEELCHAIR
BRAKES OR SWITCH
OFF POWERED
WHEELCHAIR.
17. If equipped, fasten SEA T
BELT FIG. 25-4). Allow
3” - 4” of slack in belt.
POSITIONING OCCUPANT
ON PLATFORM
FIG. 25-3
FASTENING SEAT BEL T
FIG. 25-4
25
P A TENTS PENDING
Page 26

MANUAL PUMP OPERATION - Continued
CAUTION
Prevent the MANUAL BACKUP HANDLE from
getting damaged. Before you start pumping with
the HANDLE, line up notches on tip of HANDLE as
shown in FIG. 26-1. Then fully engage HANDLE
with Manual Pump as shown in FIG. 26-2.
NOTCHES LINED
UP VERTICAL
18. Raise the PLA TFORM as
follows. Insert MANUAL
BACKUP HANDLE in
Manual Pump actuator.
Pump the handle up and
down (FIG. 26-2) until
PLA TFORM is raised up
even with the vehicle floor
(FIG. 26-4) and Inboard
Rollstop lowers to rest on
Threshhold Plate.
PUMPING MANUAL
BACKUP HANDLE
FIG. 26-3
HANDLE - NOTCHES
LINED UP CORRECTL Y
FIG. 26-1
P A TENTS PENDING
HANDLE FULL Y ENGAGED
FIG. 26-2
RAISING LIFT TO
VEHICLE FLOOR
FIG. 26-4
26
Page 27

CAUTION
To prevent damage to Lift and vehicle, Inboard
Rollstop must be lowered on the Threshhold Plate
before stowing the Lift. If the Inboard Rollstop
does not automatically lower, it must be lowered
manually. If lowered manually, pin it in position as
close as possible to Threshhold Plate.
NOTE: If the Inboard Rollstop automatically lowered to
Threshhold Plate, skip step 19. Do not unpin
the Actuator.
20. Manually LOWER the
INBOARD ROLLSTOP
to THRESHHOLD
PLATE (FIG.27-2).
Then pin ACTUA TOR
to nearest hole on
Closer Arm
THRESHOLD
(FIG. 27-2).
STANDARD
POSITION
PIN
INBOARD
ROLLSTOP
PLATE
CLOSER ARM
PIN ACTUATOR AT
NEAREST HOLE
FIG. 27-2
19. If the ACTUA TOR will
not lower Inboard
Rollstop at floor level,
unpin ACTUATOR
from the Closer Arm
(FIG. 27-1).
PIN
ACTUATOR
CLOSER
FIG.27-1
ARM
NOTE: If there are no occupants to
load on Platform, skip step 21.
21. RELEASE WHEELCHAIR BRAKES
or SWITCH ON POWERED WHEELCHAIR. Move wheelchair or ambula-
tory occupant inside the vehicle.
27
P A TENTS PENDING
Page 28

MANUAL PUMP OPERATION - Continued
CAUTION
To prevent damage to Lift and vehicle, after Lift
is restored to correct operation, pin the Inboard
Rollstop in STANDARD position ( FIG . 27-2).
22. Stow the Lif t as follows.
Pump the MANUAL
BACKUP HANDLE up and
down (FIG. 28-1) until
PLA TFORM folds up tightly
inside the vehicle (FIG.
28-2)
PUMPING MANUAL
BACKUP HANDLE
FIG. 28-1
FOLDING PLA TFORM
UP INTO VEHICLE
FIG. 28-2
P A TENTS PENDING
23. Store MANUAL BACKUP
HANDLE on Pump Cover
(FIG. 28-3) using the clips
provided.
28
PUMP
COVER
HANDLE
MANUAL BACKUP HANDLE
(LH PUMP SHOWN)
FIG. 28-3
Page 29

 Loading...