

Page 1
WX-80
SAME
Weather Monitor
Operating Instructions
Page 2

Table of Contents
I. FCC Information.....................................................................
II. About Topaz3.........................................................................
III. About Your WX-80..................................................................
IV. Unpacking and Checking Equipment.......................................
V. Getting to Know Your WX-80.................................................
VI. Powering the Weather Monitor.............................................
Installing the Backup Battery.................................................
Connecting the Weather Monitor to AC Power.............................
Using the Built-In Antenna.....................................................
VII. Listening to a Weather Broadcast..........................................
VIII. Programming Your WX-80.....................................................
Factory Default Programming................................................
Setting the Alert Type..........................................................
Setting the Backlight............................................................
Understanding SAME Geographic (FIPS) Codes.........................
Monitoring Single or Multiple Locations...................................
Entering FIPS Location Codes................................................
IX. Alert Tones............................................................................
X. Finding the Best Location for Your WX-80 Monitor................
Testing the Alert Tone..........................................................
XI. Using the Alert Function........................................................
Setting the Alert Tone Volume...............................................
Setting the WX-80's "All Signals" Code..................................
Reviewing Overlapping Alerts................................................
When a Test or Demo Alert Occurs........................................
Undefined Weather Descriptions............................................
Test Mode.........................................................................
XII. NWS Weather Event Descriptions..........................................
XIII. Specifications........................................................................
XIV. Maintenance..........................................................................
XV. Warranty Service Instructions...............................................
XVI. Warranty Statement..............................................................
i
1
2
2
4
4
6
6
7
8
8
9
9
12
14
15
17
19
21
26
26
27
28
29
30
31
31
32
34
38
39
39
40
Page 3

Contenido
I. Información Sobre FCC..........................................................
II. Acerca de Topaz3...................................................................
III. Información Acerca de Su WX-80............................................
IV. Desempaque y Verificación del Equipo...................................
V. Familiarizándose con la WX-80..............................................
VI. Conectando el Monitor Meteorológico...................................
Instalando la Batería de Respaldo.. .. ... .. ... .. .. ... .. ... .. .. ... .. ... .. .. ... .
Conectando el Monitor Meteorológico a Electricidad de AC..........
Usando la Antena Incorporada.................................................
VII. Escuchando Una Radio-Emisora Meteorológica......................
VIII. Programando Su WX-80.........................................................
Programación Default de Fábrica.............................................
Ajustando el Tipo de Alerta....................................................
Ajustando la Luz de Fondo......................................................
Comprendiendo los Códigos Geográficos SAME........................
Monitoreando Ubicaciones Únicas o Múltiples............................
Entrando los Códigos de Ubicación FIPS....................................
IX. Tonos de Alerta ......................................................................
X. Buscando la Mejor Ubicación para Su Monitor WX-80............
Probando el Tono de Alerta.....................................................
XI. Usando la Función de Alerta...................................................
Ajustando el Volumen de Tono de Alerta...................................
Ajustando el Código "Toda Señal" del WX-80's..........................
Revisando Alertas Solapadas.................................................
Cuando Ocurre una Alerta de Prueba o de Demostración..............
Descripciones Meteorológicas No Definidas..............................
Modo de Prueba...................................................................
XII. Descripción de Eventos Meteorológicos de NWS....................
XIII. Especificaciones...................................................................
XIV. Mantenimiento......................................................................
XV. Instrucciones Servicio de Garantía........................................
XVI. Declaración de Garantía........................................................
ii
42
43
44
45
46
48
48
50
50
51
52
52
55
57
58
61
62
65
70
71
72
73
73
75
76
77
78
80
84
85
85
86
Page 4

I. FCC INFORMATION
The FCC (Federal Communications Commission)
requires that you be advised of certain requirements
involving the use of this device. This equipment has
been tested and found to comply with the limits for a
Class B Digital Device, pursuant to Part 15 of the FCC
Rules and Regulations. These rules are designed to
provide reasonable protection against harmful interference in a residential environment.
This equipment uses and can generate radio frequency
(RF) energy. If not used in accordance with the instructions, it may cause interference to other radio communications. However, there is no guarantee that the
interference will not occur in another device's reception (which can be determined by turning the equipment off and on). The user is encouraged to correct the
interference by one or more of the following measures:
• Reorient or relocate the receiving antenna
• Increase the separation between the radio and other
devices
• Consult the manufacturer for technical assistance
FCC Warning: This equipment generates or uses radio
frequency (RF) energy. Changes or modifications not
expressly approved in writing may cause harmful
interference and void the user's authority to operate
this equipment.
1
Page 5

II. ABOUT TOPAZ3
Topaz3 is the exclusive supplier of Maxon®, Legacy and
TruTalk brand communication products.
Our product line ranges from two-way radios suitable for
Business and Industry (B&I) markets like farm, government,
law enforcement, utility, etc. to consumer communications
equipment for recreational and light-duty business markets.
Product offerings include a variety of UHF and VHF
handheld and mobile radios, repeaters and RF link modules,
as well as FRS (Family Radio Service), GMRS (General
Mobile Radio Service) radios, MURS (Multi User Radio
Service) radios, Citizen’s Band radios and weather monitors.
Available accessory items include a variety of carrying
cases, spare batteries, desktop and mobile chargers, ear
bud speaker microphones and more for each radio model.
For additional information on our product line, visit our
website:
www.topaz3.com
III. ABOUT YOUR WX-80
The WX-80 SAME Weather Monitor "hears" weather
alert broadcasts from the National Weather Service,
and announcements from the Emergency Alert System
to keep you aware of ever-changing conditions.
SAME (Specific Area Message Encoding) technology lets
you program the monitor to receive forecasts, updates
2
Page 6

III. ABOUT YOUR WX-80, Continued
targeted to your area. The unit stores up to 15 SAME
geographic codes, allowing you to hear weather events
in the counties you choose - not those far away from
you.
Other features of the TruTalk WX-80 include:
• Provides instant weather information anytime night or day - up to
50 miles from nearest transmitter
• Stores up to 15 SAME geographic codes - allowing you to hear
weather events in the counties you choose
• Meets EAS (Emergency Alert System) standards
• LED Indicators identify alert types: Statement, Watch and Warning
• Keypad selects weather channel, enters SAME geographic codes
and chooses alert type
• Backlit 8-character LCD shows specific emergency messages
• Variable alert tone and audio broadcast volume levels
• Built-in "test mode" confirms operation and resets to factory default
settings
• Separate alert "off" control button
• Telescopic antenna
• AC Power operation (AC power adaptor included)
• 9V Battery backup keeps you advised during power outage
(battery not included)
• Compact monitor can be used on counter or wall-mounted
• One Year Warranty
3
Page 7

IV. UNPACKING AND CHECKING EQUIPMENT
Carefully unpack the monitor and any accessories. Use
the item list below to identify the components included
in the product packaging, to ensure that no items are
discarded in the packing materials.
WX-80 Weather Monitor
AC Power adaptor
Wall mounting hardware
If any items are missing or damaged, you should
contact the Topaz3 Customer Service Department.
Dial 1-800-821-7848, Ext. 499 for assistance.
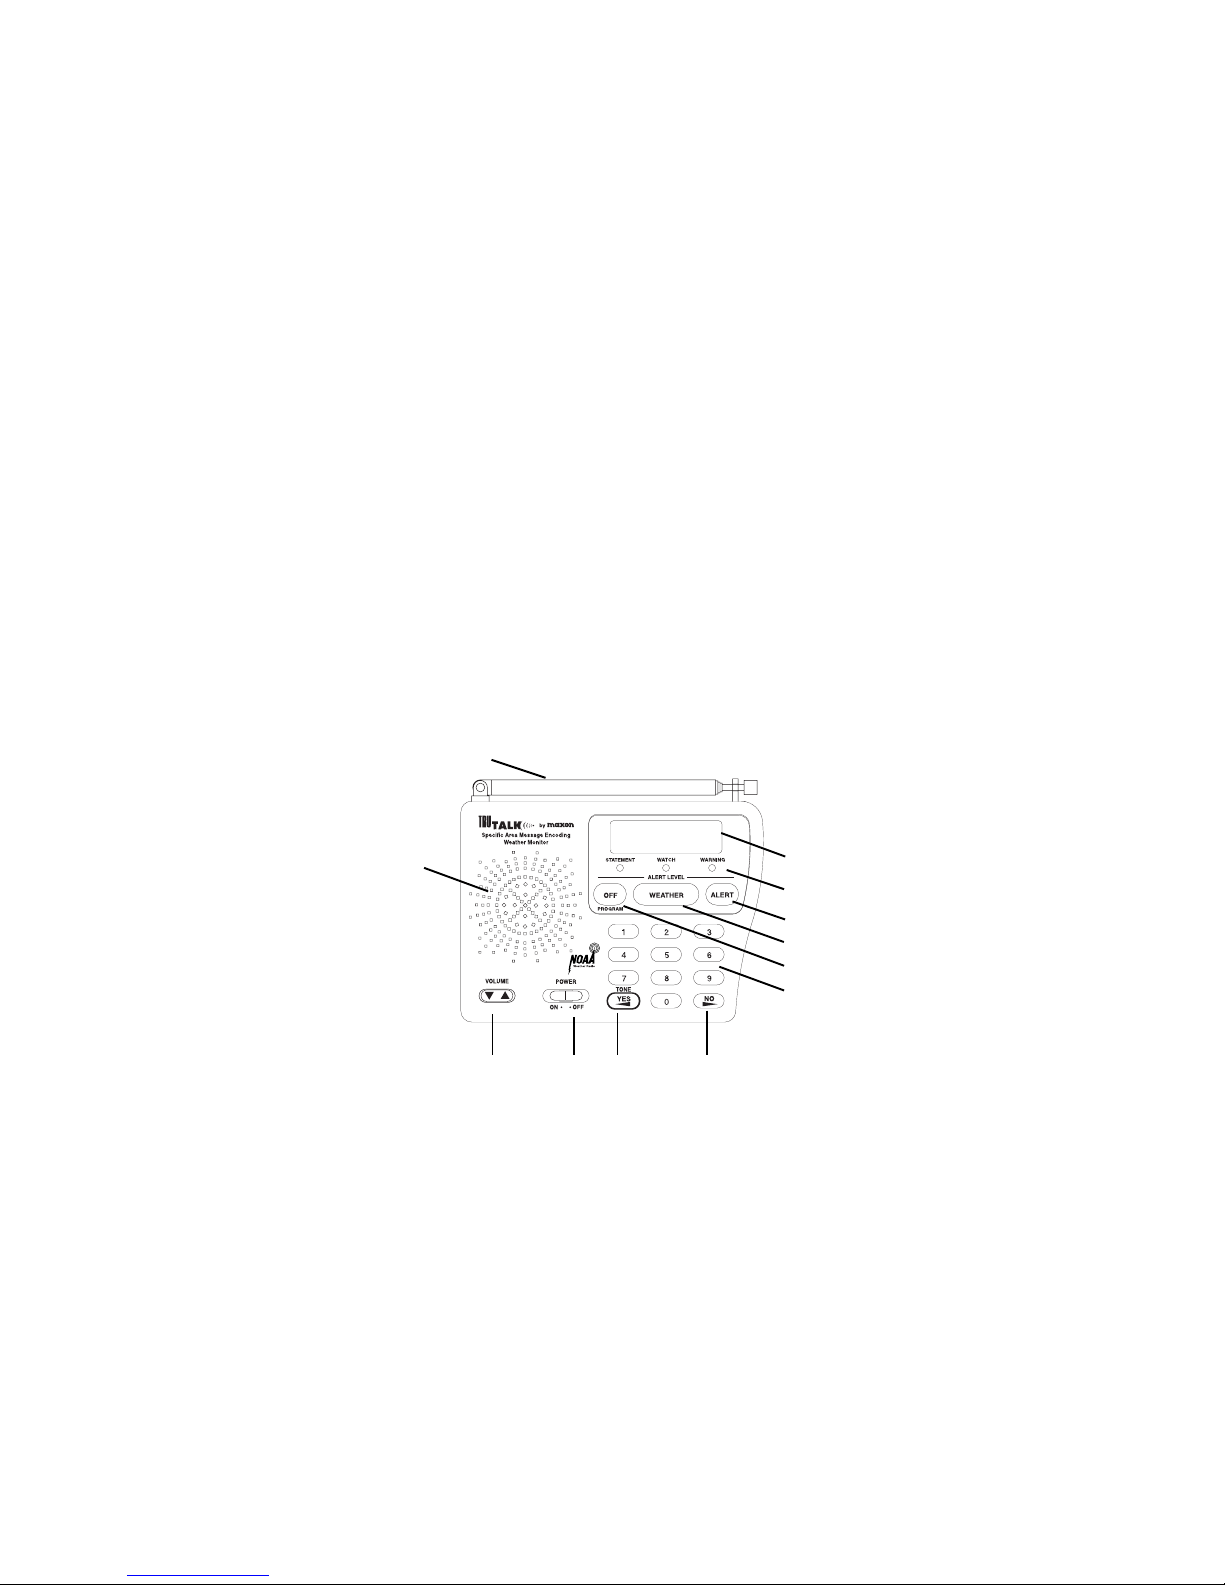
V. GETTING TO KNOW YOUR WX-80
A) Speaker - announces event messages and alert tones
B) Telescopic antenna - extends for maximum radio
reception
C) 8-Character LCD - displays event message, radio
alert status and low battery condition
D) Statement, Watch, Warning LED's - visually confirms
weather event status condition
E) ALERT Button - used to turn alert on or off
F) WEATHER Button - used to obtain NWS weather
announcements anytime night or day
G) OFF / PROGRAM Button - used to turn off weather
alert siren and enter programming mode
H) Numeric keypad - used to enter SAME geographic
codes
4
Page 8
V. GETTING TO KNOW..., Continued
I) NO Function selection button - declines function during
programming
J) YES / Tone Function button - selects function during
programming; adjusts alert siren tone
K) Power On / Off switch
L) Volume up / down switch
Monitor base (not shown):
Battery compartment door, Wall mounting keyholes
On Monitor side (not shown):
External antenna jack, DC Power jack
B
A
C
D
E
F
G
H
J
KL
5
I
Page 9

VI. POWERING THE WEATHER MONITOR
Your WX-80 weather monitor uses standard 12V DC
power for normal operation and one 9V battery (not
supplied) for backup power when standard power fails
or is temporarily disconnected. For the best performance
and longest life during power failure, we recommend
an alkaline battery. A fresh backup battery will power
the weather monitor for up to 1 hour with the weather
broadcast turned on or up to 8 hours in alert standby
mode. However, we recommend you always connect
the weather monitor to AC power for normal use.
Remember, when the unit is powered OFF, no alert
signal will be received, even with a backup battery
installed! The unit must be "ON" to receive alerts and
broadcasts.
Installing the Backup Battery
1. Place the monitor's power on / off switch into the
"OFF" position by sliding it to the right.
2. Press the tab on the battery compartment cover,
lift the cover up and set it aside.
3. Using a fresh 9V alkaline battery, "snap" the terminal
connector onto the battery, and place the battery
into the compartment, taking care not to crimp
or damage the wiring.
4. Replace the cover.
5. Power ON the WX-80 by sliding the power switch
to the left ("ON" position).
6
Page 10

VI. POWERING THE WEATHER..., Continued
Installing the Backup Battery, Continued
NOTE: Do NOT use a rechargeable-type battery in your
weather monitor. Use standard alkaline batteries only.
NOTE: If the backup battery becomes weak, your
weather monitor might not sound a tone when an
emergency or test alert is broadcast. Check the monitor's
reception periodically, and replace the battery as
needed.
CAUTION: Dispose of an old or weak battery promptly
and properly. Do not burn or bury it. Batteries can leak
chemicals that can cause personal injury and/or damage
to the monitor unit.
When "REPLACE BATTERY" appears on the radio
display or the weather monitor stops operating (while
under battery-only power), replace the battery with a
fresh one. "REPLACE BATTERY" will also appear on the
radio display if no backup battery is installed and the
weather monitor is connected to AC power and then
turned on. This is to remind you that the battery
backup capability will not work in times of AC power
outages without a battery installed!
Connecting the Weather Monitor to AC Power
1. Place the monitor's power on / off switch into the
"OFF" position by sliding it to the right.
7
Page 11

VI. POWERING THE WEATHER..., Continued
Connecting the Weather Monitor..., Continued
2. Plug the AC power adaptor into the power jack
on the left side of the monitor.
3. Plug the power adaptor into a standard, household
110V AC outlet.
Using the Built-In Antenna
The weather monitor's built-in telescoping antenna
lets you receive strong local signals. Lift the antenna
to a vertical position, then full extend it for optimum
reception.
To improve reception in remote areas, you can connect
an external 50 Ohm antenna to your weather monitor
using an optional adapter cable with an RCA plug
connected to the side panel EXT ANT (External Antenna)
jack. Your local electronics store sells a wide variety of
antennas. Follow the installation instructions provided
with the antenna to connect to the WX-80 monitor.
VII. LISTENING TO A WEATHER BROADCAST
Your weather monitor is pre-programmed with the 7
NOAA weather broadcast frequencies (Channels 1-7).
To select a frequency broadcast for your area, follow
steps outlined on the next few pages.
8
Page 12

VII. LISTENING TO A WEATHER..., Continued
1. With the WX-80 powered ON, push the "WEATHER"
button to activates the monitor audio circuitry.
2. Adjust the audio volume to the desired listening
level using the Volume Up / Down bar. Volume
settings range from 1 - the lowest setting, to
8 - the highest setting. The audio volume control
has a mute setting (volume setting 0) that will
allow you to temporarily mute all audio.
3. To turn off the weather broadcast, press the
WEATHER button again.
VIII. PROGRAMMING YOUR WX-80
Factory Default Programming
Your weather monitor is preprogrammed to receive
broadcasts for ALL area broadcasts and ALL weather
alert types. This is called "All Signals Code", (refer to
Table of Contents for page number). The first time
you use your weather monitor, you will find that it is
automatically set to use the NOAA weather broadcast
frequency 162.550 MHz (Channel 1).
Depending on your location, you may need to select a
different channel, determined by your local area NWS
transmitter frequency. Follow these steps to select your
local broadcast frequency.
IMPORTANT: During all programming modes, if there
9
Page 13

VIII. PROGRAMMING YOUR WX-80, Continued
Factory Default Programming, Continued
is a pause of 40 seconds without a key press, the WX-80
will store current settings and return to operations mode.
This will ensure that the WX-80 is operational, should
there be any interruptions during your programming
setup.
The following programming instructions are broken
down by specific function. Each programming topic
ends by terminating the programming and returning to
standby or operating mode.
All programming functions can be set in one session
should you desire to program multiple functions before
returning to operations mode. The YES key is used to
accept the current display setting and will continue to
advance you to the next programming step, allowing
you to skip options that you do not wish to change.
1. Power the WX-80 weather monitor "on" by sliding
the on/ off switch to the left. You will hear a tone
to confirm power is ON.
2. Press the OFF/PROGRAM button for 2 seconds to
begin the programming mode. The display will
show the last selected weather channel (possibly
the default setting frequency).
3. Press the WEATHER button to activate the weather
audio, then push the volume up or down key to
10
Page 14

VIII. PROGRAMMING YOUR WX-80, Continued
Factory Default Programming, Continued
adjust the broadcast volume to desired level.
4. Press the number keys, in sequence, from 1 through
7 to find the broadcast channel for your area, by
listening for the strongest signal. Re-adjust the
volume level if necessary, then listen briefly to
the announcement message to ensure information
about your local area is being broadcast. If another
channel seems strong, go to that channel and
listen to its broadcast. Choose the channel which
best represents information for your location.
Channel Frequency Channel Frequency
1 162.550 MHz
2 162.400
3 162.475
4 162.425
5. When you have selected the best channel for your
location, push the YES button to store your
selection and advance to the next programming
step, "Setting the Alert Type", or push the OFF /
PROGRAM key for 2 seconds to store the
selection and set mode to operate. The current
alert status (WEATHER ALRT ON or WEATHER
ALRT OFF) appears.
5 162.450
6 162.500
7 162.525
11
Page 15

VIII. PROGRAMMING YOUR WX-80, Continued
Setting the Alert Type
You can set the WX-80 weather monitor to respond to
an NWS alert broadcast in one of two ways. When the
monitor is powered on and activated by an alert signal,
the following will occur (by setting selection):
VOICE - when activated by an alert signal, the weather
monitor sounds an alert beep or siren for about 8
seconds, then automatically broadcasts the weather for
5 minutes. Then it returns to standby operation. The
display shows the alert description (such as TORNADO
WARNING) until the alert's effective time expires. An
alert could be in effect for several hours.
ALERT - when activated by an alert signal, the weather
monitor sounds an alert beep or siren continuously and
displays an alert description until the alert's effective
time expires. To turn off the alert sooner, press the OFF
button. To hear the NWS voice broadcast, press the
WEATHER button.
NOTE: When the weather monitor's alert expires or
you turn it off, you hear the NWS alert termination tone
(three bursts) for a few seconds before you hear the
voice broadcast. The NWS alert termination tone has
a different sound than the weather monitor's alert tone.
12
Page 16

VIII. PROGRAMMING YOUR WX-80, Continued
Setting the Alert Type, Continued
The weather monitor is set to the ALERT setting as
the factory default. To change the alert type setting to
VOICE (or to check the current selection), follow these
steps:
1. With the WX-80 powered on, push the
OFF/PROGRAM button for 2 seconds to
set mode to program.
2. Press the YES button once to advance to the Alert
Type setting. The current alert pattern selection
(VOICE or ALERT) appears on the display.
3. To select the alternate setting (choosing VOICE
instead of ALERT or choosing ALERT instead
of VOICE) press the NO button. The alternate
setting appears. To toggle between settings,
press the NO button more than once. Your
selection is saved by pressing the YES button.
NOTE: Pressing the NO button repeatedly will alternate
or toggle between the selection of ALERT and VOICE.
4. When your selection appears on the display, push
the YES button to store the selection and
advance to the next programming step, (Setting
the Backlight) or push the OFF/PROGRAM
button for 2 secondsto store the selection and
set mode to operate. The current alert status
13
Page 17

VIII. PROGRAMMING YOUR WX-80, Continued
Setting the Alert Type, Continued
(WEATHER ALRT ON or WEATHER ALRT OFF) will
appear in the display.
Setting the Backlight
Your weather monitor's display backlight automatically
turns on for about 10 seconds each time you press a
key. For extended use in low light situations, you can
set the backlight so it remains on continuously until
you turn it off. NOTE: The monitor must be connected
to AC power to have a continuous backlight setting.
Follow these steps to turn the backlight on or off.
1. With the WX-80 powered on, push the
OFF/PROGRAM button for 2 seconds
to set mode to program.
2. Press the YES button twice so "CONTINUO"
(continuous) and "BACKLITE" alternately flash
on the display.
3. Press the YES button to accept the continuous
backlight setting, or press the NO button to turn
off the continuous backlight. NOTE: If you
choose NO, the backlight setting will turn off
10 seconds after the last button press. The
display will advance to the next programming
step, "Single or Multiple Location Monitoring".
4. Push the OFF/PROGRAM button for 2 seconds to
14
Page 18

VIII. PROGRAMMING YOUR WX-80, Continued
Setting the Backlight, Continued
store the selection and set mode to operate. The
current alert status (WEATHER ALRT ON or
WEATHER ALRT OFF) appears.
Understanding SAME Geographic Codes
NOTE: In the following text, SAME Geographic Codes
are also known as FIPS Codes. The National Oceanic
and Atmospheric Administration (NOAA) began
broadcasting coded weather alert signals able to
identify specific areas where the weather emergency
is forecasted to occur. These Specific Area codes are
called FIPS (Federal Information Processing System)
codes. A unique FIPS code is assigned to every county
or parish throughout the United States and all US
territories.
Example: The 6-digit FIPS code to identify Kansas City,
Missouri (Jackson County) is 029095.
The first digit in a FIPS code identifies the county
subdivision, used only for extremely large counties or
counties with geographically unusual shapes such as
a long, narrow county. The next two digits identify the
state, and the last three digits identify the county or
parish.
15
Page 19

VIII. PROGRAMMING YOUR WX-80, Continued
Understanding SAME Geographic..., Continued
NOTE: Most FIPS codes begin with 0, which means
that FIPS code represents an entire county. The NWS
has future plans to subdivide some large counties.
When that happens, each subdivision will be assigned
a digit from 1 - 9, resulting in codes such as 129059,
229059, and so on.
Event Codes - Emergency events, such as weather
emergencies or civil emergencies, are also assigned
a code known as an Event Code. These event codes
are used to identify an emergency by type.
Example: (TOW) for Tornado Warning.
SAME - (Specific Area Message Encoding) combines
the FIPS Code to identify a specific area and an Event
Code to specify the particular emergency event for that
area. The area and event identification data is followed
by a voice message pertaining to the emergency
situation for that area. This data is then digitally
encoded and broadcast by your local NOAA
Weather Radio (NWR) station.
Your WX-80 weather monitor can receive all SAME
alert signals broadcast within about a 40 to 50 mile
radius of the NWR transmitter tower. To receive SAME
alerts about weather emergencies occurring only
16
Page 20

VIII. PROGRAMMING YOUR WX-80, Continued
Understanding SAME Geographic..., Continued
in particular counties of interest, you can program up
to 15 FIPS codes into the weather monitor's memory.
This allows you to avoid hearing an alert that applies
to an area that is possibly several counties from you.
Obtaining Your Area's FIPS Code(s)
To obtain the FIPS code for your current location,
call the National Weather Service toll free at
1-888-NWR-SAME (1-888-697-7263). Follow the
instructions as prompted to enter your state and county
location. The system will respond with the FIPS code
for that county. If you are close to a county line, you
might want to obtain the codes for the neighboring
county or other nearby counties of interest to you.
Monitoring Single or Multiple Locations
Your WX-80 Weather Monitor will monitor either a
single location or up to 15 locations, determined by
the number of SAME Geographic Codes you enter,
or choose to monitor.
To set the weather monitor to single or multiple
locations, use the following steps:
1. With the WX-80 powered on, push the
OFF/PROGRAM button for 2 seconds to set
mode to program.
17
Page 21

VIII. PROGRAMMING YOUR WX-80, Continued
Monitoring Single or Multiple..., Continued
2. Press the YES button three times so the word SINGLE
or MULTIPLE appears on the display.
3. To select the opposite setting (MULTIPLE rather than
SINGLE), press the NO button. The setting you
selected appears. Pressing the NO button
repeatedly will alternate the selection between
SINGLE and MULTIPLE until the YES button is
pressed.
4. Press the YES button to select the option of your
choice. The display will advance to the next
programming step, "Entering the FIPS Location
Codes". Whether you choose the SINGLE or
MULTIPLE location option, the first memory
location (LOC 1) and the FIPS Code stored will
now alternately flash on the display.
5. Push the OFF/PROGRAM key for 2 seconds to
store the selection and set mode to operate.
The current alert status (WEATHER ALRT ON
or WEATHER ALRT OFF) appears.
18
Page 22

VIII. PROGRAMMING YOUR WX-80, Continued
Entering FIPS Location Codes
Your weather monitor is preset to use a default "All
Signals" code (code 99), this lets the WX-80 receive
any weather alert broadcast within its reception range
(about a 50-mile radius in most locations). This code
is preset in the weather monitor's first memory location
(LOC 1 - 99).
To change the FIPS code in any of the memory location
cells (LOC 1 through LOC 15), press the NO button
while the LOC and code are flashing alternately.
Pressing "NO" tells the WX-80 that you do not want the
existing code and intend to change it to another code.
NOTE: This flashing code may be the default code of
'99'. This code value sets the WX-80 to monitor ALL
broadcasts within the area regardless of location code.
Follow these steps to program the weather monitor to
the FIPS code for your local county or counties that
you would like to monitor.
1. With the WX-80 powered on, push the
OFF/PROGRAM button for 2 seconds to set
mode to program.
2. Press the YES button four times so the word "LOC 1"
(location 1) and "99" (the default code or an
existing programmed FIPS code) flashes on the
display. If you choose to monitor multiple
19
Page 23

VIII. PROGRAMMING YOUR WX-80, Continued
Entering FIPS Location Codes, Continued
locations, this will be the first of fifteen FIPS
codes (LOC 1 - LOC 15) that can be stored and
monitored.
3. If you do NOT want to retain the existing FIPS code
in this location cell, press the NO button.
Proceed to Step 5 to enter the new FIPS code.
4. If you DO want to retain the FIPS code currently in
this location cell, press the YES button.
The WX-80 will advance to the next location
cell (2 - 15). At each location cell, you must
make the same choice to either keep the existing
FIPS code or to enter a new FIPS code.
5. To add or change a code in a different location,
press the YES button repeatedly until you see the
first unused memory location or the code you
want to change, then press the NO button to
clear the existing code. Six dashes (- - - - - -) will
appear allowing you to enter a new FIPS code
for that location cell. Use the number keys (0-9)
to enter the 6-digit FIPS code you want to store.
NOTE: If you make a mistake while entering the code
press NO to clear all digits. The dashes (- - - - - -) will
reappear and allow you to enter the correct code.
6. Press the YES button to store the desired codes in
memory.
20
Page 24

VIII. PROGRAMMING YOUR WX-80, Continued
Entering FIPS Location Codes, Continued
Reminder: If you set the weather monitor to its multiple
location mode, the code (if any) stored in the next
memory position appears. Repeat Steps 3-6 for each
code (up to 15) you want to change or add.
To reset the weather monitor to receive ALL SAME
signals within a 50-mile radius, simply enter 99 in the
first memory location. The display will read: LOC 1 99.
When you press the YES button to store a code in the
last location cell (LOC 15), the display will advance to
the next programming step, Alert Tones.
7. Push the OFF/PROGRAM button for 2 seconds
to store the selection and set mode to operate.
The current alert status (WEATHER ALRT ON
or WEATHER ALRT OFF) appears on the display.
IX. ALERT TONES
You have the option to activate or turn off various types
of "geographically confined" weather event alert tones
received by your weather monitor. Optional alerts such
as "Avalanche Watch", "Coastal Flood Warning" and
"Volcano Warning" are naturally confined to their
geographical restrictions.
IMPORTANT NOTE: Weather alerts for unpredictable
21
Page 25

IX. ALERT TONES, Continued
weather hazards such as "Tornado Warning" can
NOT be turned off by the user, and do not appear
as options on the chart below.
You can set the weather monitor so it sounds or does
not sound an alert tone during the following types of
events. NOTE: The weather monitor still detects and
displays information about alerts even after you disable
the tone for those alerts. Use this table to note the status
of each alert setting as you are programming.
Event Type Alert: On Off
Severe Thunderstorm Watch
Severe Weather Statement
Special Weather Statement
Flash Flood Watch
Flash Flood Warning
Flash Flood Statement
Flood Watch
Flood Warning
Flood Statement
Winter Storm Watch
Winter Storm Warning
Blizzard Warning
High Wind Watch
High Wind Warning
22
Page 26

IX. ALERT TONES, Continued
Event Type Alert: On Off
Hurricane Watch
Hurricane Statement
Coastal Flood Watch
Coastal Flood Warning
Special Marine Warning
Avalanche Watch
Avalanche Warning
Volcano Watch
Volcano Warning
Monthly Test
Test Message
Unknown Statement Tune TV
Demo Message
Your WX-80 uses three LED's to give you visual
distinc-tion between the type of event (Statement,
Warning or Watch) being broadcast. Statement means
"A statement contains follow-up information to a
warning, watch or emergency message. Statements
emphasize short term forecast information, making
use of observations and reports to heighten public
perception of personal risk. Stay informed of the latest
conditions and information by AM/FM radio, NOAA
weather radio, television or other means." Watch
means "There is potential for hazardous weather or
flood event, but its occurrence, location, and/or timing
23
Page 27

IX. ALERT TONES, Continued
is still uncertain. Stay informed of the latest conditions
and information by AM/FM radio, NOAA weather
radio, television or other means." Warning means "A
hazardous weather or flood event is imminent or
occurring. The severe weather event poses a significant
threat to public safety and/or property and the probability of occurrence and location is high. Use safety
procedures according to the type of event (ie: tornado;
move to the lowest level of home or building, away
from glass or windows, etc.). Stay informed of the latest
conditions and information using battery operated
AM/FM radio or battery operated NOAA weather radio both can move easily with you to your place of safety."
When the term Emergency displays, it means "An event
that by itself would not kill or injure persons, or result in
property damage but indirectly may cause other things
to happen that may result in a hazard. For example, a
major power or telephone loss in a large city alone is
not a direct hazard, but disruption to other critical
services could create a variety of conditions that could
directly threaten public safety."
As you proceed through the list of event types, you will
be shown the current status for each alert tone (On or
Off). Toggle between on and off settings by pressing the
NO button. After confirming the desired status of tone
(On or Off) for specific warning(s), save your selection
for by pressing the YES button.
24
Page 28

IX. ALERT TONES, Continued
(Example) Alert tone for "Winter Storm Warning". The
eight character LCD will scroll through and display the
message in up to three steps followed by the Alert Status
(On or Off) as shown:
WINTER
STORM
WARNING
TONE ON
To accept and store current alert status (Tone On), press
the YES button.
To change current alert status to (Tone Off), press the
NO button. The display will change to read:
WINTER
STORM
WARNING
TONE OFF
Again, continually pressing the NO button will toggle
between On and Off settings.
Press the YES button to store your selection. The display
will advance to the next optional alert type.
25
Page 29

X. FINDING THE BEST LOCATION FOR YOUR
WX-80 MONITOR
For your weather monitor to be effective, you must
place it where it can receive an emergency alert
broadcast and where you can hear its alert tone.
In the United States, the NWS broadcasts a weekly
Test Alert each Wednesday between 11 AM and 1 PM.
To find out the specific test schedule in your area,
contact your local NOAA or NWS office. These offices
are usually listed in the telephone book under "US
Government, Department of Commerce."
Important: The fact that you get clear reception of a
weather broadcast audio signal does NOT guarantee
that an emergency alert tone will trigger your weather
monitor's alert function. Be sure you choose the proper
location for the weather monitor and regularly check
the weather monitor to be sure it is operating properly.
Testing the Alert Tone
To manually test the weather monitor's alert tone and
select a suitable location, perform the following.
1. Turn on the WX-80 weather monitor while holding
down the OFF/PROGRAM button. All LED
indicators will glow and "TESTMODE" will
display on the LCD.
2. Press the ALERT button to test the alert tone function.
The weather monitor will sound the alert tone.
As the tone sounds, walk around the area where
26
Page 30

X. FINDING THE BEST LOCATION..., Continued
Testing the Alert Tone, Continued
you keep the weather monitor to make sure you
can hear the tone from other nearby rooms.
IMPORTANT NOTES:
• To make sure your weather monitor will sound the
alert tone when it receives an emergency signal
always keep the built-in antenna fully extended.
• Testing the alert tone only ensures that the weather
monitor's alert tone can be heard. It does not test
the weather monitor's receiver or guarantee you
will receive an emergency alert!
• An emergency alert broadcast might not trigger your
weather monitor's alert tone, even if it receives voice
transmission clearly or if the alert tone sounds when
you manually test it. Also, if you are in a fringe area,
your weather monitor might be triggered by a
broadcast when it is placed in one area, but not be
triggered if you place it somewhere else (even close
by).
XI. USING THE ALERT FUNCTION
The WX-80 alert function, using the ALERT button, is
what determines whether or not the WX-80 will sound
the alarm when alert signals are detected. With the
monitor powered on, read the display for the Alert
status message. To change the alert status press the
27
Page 31

XI. USING THE ALERT FUNCTION, Continued
"ALERT" button for 2 seconds. The WX-80 will sound
two beeps for "Alert Off' or one beep for "Alert On".
Release the "Alert" button and re-view the screen to
confirm your chosen setting.
IMPORTANT NOTE: If you programmed more than
one FIPS code into memory, be sure the weather
monitor is set to its multiple mode. Otherwise, the
weather monitor will only receive broadcast for the
FIPS code you stored in the first memory position
(LOC 1).
IMPORTANT: IF SEVERE WEATHER THREATENS,
DO NOT wait for an alert signal to trigger the alarm;
turn on the weather broadcast and monitor the weather
information.
Setting the Alert Tone Volume
The Alert Tone (siren or beep) has a separate adjustment than that of the audio volume. To set the alert
volume (Alert Audio Tone), perform the following:
1. With the WX-80 powered on, push the YES button
for 2 seconds. The WX-80 will sound a beep
indicating that the Alert Tone is now adjustable.
2. Press the volume Up / Down switch to adjust the
alert tone from setting 1 being the lowest to 6
being the loudest. Unlike the audio volume,
there is no mute setting on the alert tone
adjustment.
28
Page 32

XI. USING THE ALERT FUNCTION, Continued
Setting the WX-80's "All Signals" Code
To set the weather monitor to respond only to specific
FIPS codes you select, choose the codes you want to
program (up to 15 total codes), program those codes
into memory, and set the weather monitor to its multiple
location mode.
To operate the weather monitor using the "All Signals"
code and quickly switch to specific area monitoring,
perform the following steps:
1. Set the weather monitor to "single" as explained
in the "Monitoring Single or Multiple Locations"
section.
2. Program the first location cell (LOC 1) with the code
"99" as explained in the "Entering the FIPS
Location Codes" section.
With the All Signals code (99) stored in the first memory
location code and operating the WX-80 in the single
location mode, you will receive all alert signals - regardless of location. You can quickly switch between
"All Signals" and "Specific Area" monitoring.
With FIPS Codes / SAME Geographic codes stored in
any of the other memory location codes (LOC 2 - LOC
15) and operating the WX-80 in multiple location
mode, you will receive only the alert signals directed
to the counties you have specified with the FIPS Codes.
29
Page 33

XI. USING THE ALERT FUNCTION, Continued
Setting the WX-80's "All Signals" Code, Continued
By quickly switching the WX-80 from single to multiple
mode, you change the operation from "All Signals" to
"Specific Area" monitoring.
Reviewing Overlapping Alerts
Your weather monitor can store up to three different
alerts (with overlapping effective times) in its memory.
If the weather monitor receives a new alert while a
previous alert is still in effect, it automatically displays
the alert description and sounds an alert for the new
alert.
To scroll forward or backward through the weather
monitor's memory and review all effective alerts, press
the YES button (to scroll backward).
NOTE: The weather monitor sounds a high-pitched
tone if you try to scroll past the first or last alert in
memory. To continue, press the YES button to begin
scrolling in the opposite direction.
NOTE: If the weather monitor receives a new alert while
three previous alerts are still in effect, it stores the
newest alert and clears the oldest alert from memory always keeping the most recent three events in memory.
30
Page 34

XI. USING THE ALERT FUNCTION, Continued
When a Test or Demo Alert Occurs
The NWS sends out weekly test signals that you can use
to confirm that your WX-80 weather monitor is working
properly. To find out the specific test schedule in your
area, contact your local NOAA or NWS office. Those
offices are usually listed in the telephone book under
"US Government, Department of Commerce".
When the weather monitor's alert function is turned
on and the monitor receives a test broadcast for a FIPS
code you programmed into its memory, it responds in
one of these ways:
NWS Alert Type You See You Hear
Demo Message
(sent at random times) DEMO MESSAGE No sound
Required Weekly
SAME Test WEEKLY TEST Beeps
Required Monthly
SAME Test MONTHLY TEST Beeps
Undefined Weather Descriptions
The NWS might occasionally broadcast several types
of weather information intended for commercial or
other non-private use. This information could include,
for example, messages intended for automated weather
services (such as those used by radio or TV stations).
31
Page 35

XI. USING THE ALERT FUNCTION, Continued
Undefined Weather Descriptions, Continued
Your weather monitor's memory does not contain a
specific event code or corresponding description for
the event signals related to these commercial weather
types.
Additionally, your weather monitor is designed to
recognize all common weather alert types currently
used by the NWS. The NWS could, however, eventually create and broadcast new alert types (for which the
weather monitor's memory does not contain a specific,
corresponding description).
If your weather monitor receives a signal for a new alert
type, it is programmed to display UNKNOWN, the alert
description (EMERGENCY, STATEMNT, WARNING, or
WATCH), and TUNE TV, then sound a Siren Alert. The
display will show:
UNKNOWN
WARNING
TUNE TV
Test Mode
You can test basic functionality of the WX-80 weather
monitor by performing the following.
1. Turn on the WX-80 weather monitor while holding
down the OFF/PROGRAM button. All LED
32
Page 36

XI. USING THE ALERT FUNCTION, Continued
Test Mode, Continued
indicators will glow and "TESTMODE" will
display on the LCD.
2. Refer to the chart on next page, then press a number
key to test the desired function. The weather
monitor tunes to the corresponding channel,
and one of the following appears:
You Press: The weather monitor displays:
1 CH. 1 (with Audio open)
2 CH. 2 (with Audio open)
3 CH. 3 (with Audio open)
4 CH. 4 (with Audio open)
5 CH. 5 (with Audio open)
6 CH. 6 (with Audio open)
7 CH. 7 (with Audio open)
8 DEFAULT (reset to factory settings)
9 DEMO ON or DEMO OFF
(the weather monitor's demo mode)
NOTE: If you pressed 9 in this step, your weather
monitor can also perform these test functions while
TEST MODE appears.
If you press ALERT, the weather monitor continuously
sounds its alert siren. Press ALERT again to turn off the
siren.
If you press YES, the STATEMENT, WATCH, and
WARNING LEDs light at the same time.
33
Page 37

XI. USING THE ALERT FUNCTION, Continued
Test Mode, Continued
If you press NO, the STATEMENT, WATCH, and
WARNING LEDs turn off at the same time.
If you press WEATHER, all display characters (segments)
appear at the same time.
Turn off the weather monitor and store your selection.
Then turn it back on to begin using the new setting.
XII. NWS WEATHER EVENT DESCRIPTIONS
Your weather monitor can display these NWS Weather
Event descriptions. For easy reference, this list also
shows the type of alert (siren or beep) that sounds
during each alert.
Weather Event Type You See You Hear
Avalanche Warning AVALANCH WARNING Siren
Avalanche Watch AVALANCH WATCH Siren
Blizzard Warning BLIZZARD WARNING Siren
Civil Danger Warning CIVIL DANGER WARNING Siren
Civil Danger Watch CIVIL DANGER WATCH Siren
Civil Emergency TUNE TV
Coastal Flood Warning COASTAL FLOOD
Coastal Flood Watch COASTAL FLOOD WATCH Siren
(power on your
TV for available information;
call your local NWS office) Siren
WARNING Siren
34
Page 38

XII. NWS WEATHER EVENT..., Continued
Weather Event Type You See You Hear
Emergency Action EMERGENC ACTION
Warning WARNING Siren
Emergency Action EMERGENC ACTION
Termination TERMINAT Siren
Evacuate Immediately EVACUATE IMMEDIAT Siren
Fire Warning FIRE WARNING Siren
Flash Flood Statement FLASH FLOOD Beeps
Flash Flood Warning FLASH FLOOD WARNING Siren
Flash Flood Watch FLASH FLOOD WATCH Siren
Flood Statement FLOOD Beeps
Flood Warning FLOOD WARNING Siren
Flood Watch FLOOD WATCH Siren
Hazardous Material HAZARD MATERIAL
Warning WARNING Siren
Hazardous Material HAZARD MATERIAL
Watch WATCH Siren
High Wind Warning HIGH WIND WARNING Siren
High Wind Watch HIGH WIND WATCH Siren
Hurricane Statement HURRIACN Beeps
Hurricane Warning HURRIACN WARNING Siren
Hurricane Watch HURRIACN WATCH Siren
Immediate Evacuation IMMEDIAT EVACUATE
Warning WARNING Siren
Law Enforcement
Warning LAW ENFORCE WARNING Siren
35
Page 39

XII. NWS WEATHER EVENT..., Continued
Weather Event Type You See You Hear
Local Area Emergency LOACL AREA EMERGENC Siren
National Information
Center NATIONAL INFO CENTER Siren
Periodic National Test NATIONAL PERIODIC TEST Siren
Practice / Demo DEMO MESSAGE Nothing
Radiological Hazard RADIOLOG HAZARD
Warning WARNING Siren
Radiological Hazard RADIOLOG HAZARD
Watch WATCH Siren
Required Monthly Test MONTHLY TEST Beeps
Required Weekly Test WEEKLY TEST Beeps
Severe Thunderstorm SEVERE THUNDER
Warning WARNING Siren
Severe Thunderstorm SEVERE THUNDER
Watch WATCH Siren
Severe Thunderstorm
Statement SEVERE WEATHER Beeps
Shelter in-place SHELTER IN-PLACE
Warning WARNING Siren
Special Marine SPECIAL MARINE
Warning WARNING Siren
Special Weather
Statement SPECIAL WEATHER Beeps
Test Message TEST MESSAGE Nothing
Tornado Warning TORNADO WARNING Siren
36
Page 40

XII. NWS WEATHER EVENT..., Continued
Weather Event Type You See You Hear
Tornado Watch TORNADO WATCH Siren
Tsunami Warning TSUNAMI WARNING Siren
Unrecognized Event
Ending in S UNKNOWN STATEMNT TV Siren
Unrecognized Event UNKNOWN WARNING
Ending in W TUNE TV Siren
Unrecognized Event UNKNOWN WATCH
Ending in A TUNE TV Siren
Unrecognized Event UNKNOWN EMERGENC
Ending in E TUNE TV Siren
Volcano Warning VOLACNO WARNING Siren
Volcano Watch VOLACNO WATCH Siren
Winter Storm Warning WINTER STORM WARNING Siren
Winter Storm Watch WINTER STORM WATCH Siren
NOTE: TUNE TV might also indicate that the weather
monitor has received a signal for a new event code not
defined in the weather monitor's memory.
37
Page 41

XIII. SPECIFICATIONS
Number of Channels: 7
Receiver Frequencies (MHz):
Ch. 1 162.550 MHz
Ch. 2 162.400
Ch. 3 162.475
Ch. 4 162.425
Ch. 5 162.450
Ch. 6 162.500
Ch. 7 162.525
Receiving Sensitivity
(at 12 dB SINAD) 0.3uV
FIPS Code Sensitivity
@ +/- 3KHz Deviation /
90% Success Rate 0.3uV
Battery Back-up One 9-Volt Battery
Antenna Telescoping Rod
Antenna
Dimensions (H x W x D) 1.75" x 5.375" x 4.375"
(45 x 137 x 110mm)
Weight (without battery) 9.3 oz
38
Page 42

XIV. MAINTENANCE
Your WX-80 Weather Monitor is designed to be
maintenance free. To keep your radio in good working
condition:
• Unplug your WX-80 from the AC power outlet before
cleaning.
• Clean external surfaces with a clean cloth dampened
in a solution of dishwashing detergent diluted in
water. Apply the solution sparingly to avoid any
moisture leaking into cracks and crevices. Do not
submerge the weather monitor! Use a non-metallic
brush to dislodge stubborn particles, if necessary.
Dry the surface thoroughly with a soft, lint free
cloth.
• DO NOT use solvents or spirits for cleaning - they
may permanently damage the housing.
XV. WARRANTY SERVICE INSTRUCTIONS
Refer to these Operating Instructions for proper
operation and adjustments. If the problem cannot
be corrected by reference to this document, return
the product with proof of purchase (the sales receipt)
to the place of purchase, or call the Topaz3 Customer
Service Department for return instructions, toll-free:
1-800-821-7848, Ext. 499.
Purchase Date:____________
Purchased From: __________________________________
Serial Number: __________________
39
Page 43

XVI. WARRANTY STATEMENT
Topaz3, LLC (herein Topaz3), warrants each new radio product
manufactured or supplied by it to be free from defects in material
and workmanship under normal use and service for the time period
listed below, provided that the user has complied with the
requirements stated herein. The Warranty period begins on the date
of purchase from an Authorized Topaz3 Sales and Service Outlet.
This Warranty is offered to the original end user and is not
assignable or transferable. Topaz3 is not responsible for any
ancillary equipment which is attached to or used in conjunction
with Maxon, Legacy and TruTalk products.
Topaz3 offers to the original end user a Two (2) Year Limited
Warranty on all Maxon and Legacy Business and Industrial Radio
Products; TruTalk products carry a One (1) Year Limited Warranty.
Maxon and Legacy accessories carry a One (1) Year Limited
Warranty. TruTalk accessories carry either a One (1) Year Limited
Warranty, or a Ninety (90) Day Limited Warranty, dependent on
model.
During this period, if the product fails to function under normal
use because of manufacturing defect(s) or workmanship, it should
be returned to the Authorized Topaz3 Sales and Service Outlet from
which it was purchased. The Sales and Service Outlet will repair
the product, or return the product for repair to Topaz3 or its
Authorized Repair Depot. The user is responsible for the payment
of any charges or expenses incurred for the removal of the
defective product from the vehicle or other site of its use; for the
transportation of the product to the Sales and Service Outlet; for
the return of the repaired / replacement product to the site of its
use and for the reinstallation of the product.
Topaz3 shall have no obligation to make repairs or to cause
continued
40
Page 44

XVI. WARRANTY STATEMENT, Continued
replacement required which results from normal wear and tear or is
necessitated in whole or in part by catastrophe, fault or negligence
of the user, improper or unauthorized alterations or repairs to the
Product, incorrect wiring, use of the Product in a manner for which
it was not designed, or by causes external to the Product. This
warranty is void if the product serial number is altered, defaced or
removed.
Topaz3's sole obligation hereunder shall be to replace or repair the
Product covered in this Warranty. Replacement, at Topaz3's option,
may include a similar or higher-featured product. Repair may include
the replacement of parts or boards with functionally equivalent
reconditioned or new parts or boards. Replaced parts, accessories,
batteries or boards are warranted for the balance of the original
time period. All replaced parts, accessories, batteries or boards
become the property of Topaz3.
THE EXPRESS WARRANTIES CONTAINED HEREIN ARE IN
LIEU OF ALL OTHER WARRANTIES, EITHER EXPRESSED OR
IMPLIED OR STATUTORY, INCLUDING, WITHOUT LIMITATION,
ANY WARRANTY OF MERCHANTABILITY OR FITNESS FOR A
PARTICULAR PURPOSE.
FOR ANY PRODUCT WHICH DOES NOT COMPLY WITH THE
WARRANTY SPECIFIED, THE SOLE REMEDY WILL BE REPAIR
OR REPLACEMENT. IN NO EVENT WILL TOPAZ3 BE LIABLE
TO THE BUYER OR ITS CUSTOMERS FOR ANY DAMAGES,
INCLUDING ANY SPECIAL, INCIDENTAL, INDIRECT OR
CONSEQUENTIAL DAMAGES, OR THE LOSS OF PROFIT,
REVENUE OR DATA ARISING OUT OF THE USE OF OR THE
INABILITY TO USE THE PRODUCT.
This Warranty is void for sales and deliveries outside of the U.S.A. or
Canada.
41
Page 45

Contenido
I. Información Sobre FCC..........................................................
II. Acerca de Topaz3...................................................................
III. Información Acerca de Su WX-80............................................
IV. Desempaque y Verificación del Equipo...................................
V. Familiarizándose con la WX-80..............................................
VI. Conectando el Monitor Meteorológico...................................
Instalando la Batería de Respaldo.. .. ... .. ... .. .. ... .. ... .. .. ... .. ... .. .. ... .
Conectando el Monitor Meteorológico a Electricidad de AC..........
Usando la Antena Incorporada.................................................
VII. Escuchando Una Radio-Emisora Meteorológica......................
VIII. Programando Su WX-80.........................................................
Programación Default de Fábrica.............................................
Ajustando el Tipo de Alerta....................................................
Ajustando la Luz de Fondo......................................................
Comprendiendo los Códigos Geográficos SAME........................
Monitoreando Ubicaciones Únicas o Múltiples............................
Entrando los Códigos de Ubicación FIPS....................................
IX. Tonos de Alerta ......................................................................
X. Buscando la Mejor Ubicación para Su Monitor WX-80............
Probando el Tono de Alerta.....................................................
XI. Usando la Función de Alerta...................................................
Ajustando el Volumen de Tono de Alerta...................................
Ajustando el Código "Toda Señal" del WX-80's..........................
Revisando Alertas Solapadas.................................................
Cuando Ocurre una Alerta de Prueba o de Demostración..............
Descripciones Meteorológicas No Definidas..............................
Modo de Prueba...................................................................
XII. Descripción de Eventos Meteorológicos de NWS....................
XIII. Especificaciones...................................................................
XIV. Mantenimiento......................................................................
XV. Instrucciones Servicio de Garantía........................................
XVI. Declaración de Garantía........................................................
42
43
44
45
46
48
48
50
50
51
52
52
55
57
58
61
62
65
70
71
72
73
73
75
76
77
78
80
84
85
85
86
Page 46

I. INFORMACIÓN SOBRE FCC
La FCC (Comisión Federal de Comunicaciones) requiere
que usted sea informado sobre ciertos requisitos que
involucran el uso de este dispositivo. Este equipo ha
sido probado y encontrado que cumple con los límites
para un Dispositivo Digital Clase B, conforme con la
Parte 15 de las Reglas y Reglamentos de la FCC. Estas
reglas están diseñadas para proveer protección
razonable contra interferencias perjudiciales en un
ambiente residencial.
Este equipo utiliza y puede generar energía de
radiofrecuencia (RF). Si no se utiliza de acuerdo con
las instrucciones, puede causar interferencia a otras
radiocomunicaciones. Sin embargo, no existe una
garantía de que la interferencia no vaya a ocurrir en
la recepción de otro dispositivo (lo que puede
determinarse prendiendo y apagando el equipo). Se
alienta al usuario a corregir la interferencia por una o
más de las medidas siguientes:
• Reorientar o reubicar la antena receptora
• Aumentar la separación entre el radio y otros dispositivos
• Consultar al fabricante para recibir asistencia técnica
Advertencia de la FCC: Este equipo genera o utiliza
energía de radiofrecuencia (RF). Los cambios o
modificaciones no aprobados expresamente por escrito
pueden causar interferencia perjudicial y anular el
derecho del usuario para operar este equipo.
42
Page 47

II. ACERCA DE TOPAZ3
Topaz3 es el suplidor exclusivo de las marcas de productos
Maxon®, Legacy y TruTalk.
Nuestra línea de productos alcanza desde radios de dos vías
convenientes para mercados de Negocios e Industrias (B & I)
tales como granjas o fincas, gobierno, personal que ejecuta la
ley, servicio público, etc. a equipos para comunicaciones del
consumidor para uso de mercados recreacionales y de
negocios con funciones livianas.
Los productos incluyen una variedad de radios portátiles y
móbiles de UHF y VHF, repetidoras y módulos de RF Link,
tanto como Radios de Servicio Familiar (FRS), Servicio
General de Radios Móbiles (GMRS), Multi Servicio de
Radio del Utilizador (MURS), Radios de Banda Ciudadana
y monitores del tiempo.
Items de accesorios disponibles incluyen una variedad
de estuches para cargar los radios, baterías, cargadores de
escritorios y móbiles, micrófonos parlantes de oído y más
para cada modelo de radio.
Para información adicional de los productos de Topaz3, visite
nuestro website en
www.topaz3.com
43
Page 48

III. INFORMACIÓN ACERCA DE SU WX-80
El Monitor Meteorológico WX-80 SAME "oye" radioemisiones de alerta meteorológicas desde el Servicio
Meteorológico Nacional y anuncia mediante el Sistema
de Alerta de Emergencia para mantenerle al corriente
de las condiciones siempre cambiantes.
La tecnología SAME (Specific Area Message Encoding)
le permite programar el monitor para recibir pronósticos
y actualizaciones dirigidos a su zona. La unidad
almacena hasta 15 códigos geográficos SAME,
permitiéndole así escuchar eventos meteorológicos
en los condados que elija - no de aquellos alejados
de usted.
Otras características del TruTalk WX-80 incluyen:
• Provee información meteorológica instantánea en cualquier momento,
de noche o de día hasta 50 millas del transmisor más cercano
• Almacena hasta 15 códigos geográficos SAME - permitiéndole
escuchar eventos meteorológicos en los condados que elija
• Cumple con las normas EAS (Emergency Alert System)
• Los indicadores LED identifican los tipos de alerta: Informe,
Vigilancia y Advertencia
• El teclado selecciona el canal meteorológico, entra los códigos
geográficos SAME y elige el tipo de alerta
• La luz de fondo de la pantella de LCD de 8 caracteres muestra los
mensajes de emergencia específicos
• Niveles de volumen variables para tono de alerta y radio-emisión
en audio
44
Page 49

III. INFORMACIÓN ACERCA..., Continuación
• El "modo de prueba" incorporado confirma la operación y
restablece los parámetros default de fábrica
• Botón de control de alerta "off" separado
• Antena telescópica
• Operación con energía eléctrica de AC (adaptador eléctrico de AC
incluido)
• La batería de respaldo de 9V lo mantiene alertado durante cortes de
energía eléctrica (batería no incluida)
• El monitor compacto puede usarse sobre la mesa o montado en la
pared
• Garantía de un Año
IV. DESEMPAQUE Y VERIFICACIÓN DEL EQUIPO
Con cuidado, desempaque el monitor y su accesorios.
Use la lista de artículos de abajo para identificar los
componentes incluídos en el paquete del producto
para asegurar que no se deseche ningún artículo en
los materiales del embalaje.
Monitor Meteorológico WX-80
Adaptador de corriente AC
Ferretería de montaje en pared
Si cualquiera de los artículos faltaron o se dañaron, por
favor de hacer reclamo al departmento de Servicios al
Cliente de Topaz3 al 1-816-891-6320, extensión 499
para ayuda.
45
Page 50

V. FAMILIARIZÁNDOSE CON LA WX-80
A) Altavoz - anuncia mensajes de eventos y tonos de alerta
B) Antena telescópica - extensible para radio-recepción
máxima
C) LCD de 8 Caracteres - exhibe mensajes de evento,
estado de radio-alerta y estado de batería baja
D) LEDs de Informe, Vigilancia, Advertencia - confirma
visualmente el estado de un evento meteorológico
E) Botón ALERT - usado para poner la alerta encendido o
apagado
F) Botón WEATHER - usado para obtener anuncios
meteorológicos NWS en cualquier momento, de
noche o de día
G) Botón OFF / PROGRAM - usado para apagar la sirena de
alerta meteorológica y entrar al modo de programación
H) Teclado numérico - usado para entrar códigos
geográficos SAME
I) Botón de selección de función NO - rechaza la función
durante la programación
J) Botón de función YES / Tone - selecciona la función
durante la programación; regula el tono de sirena de
alerta
K) Interruptor eléctrico On (encendido) / Off (apagado)
L) Conmutador de volumen arriba / abajo
Base del Monitor (no mostrada):
Puerta de compartimiento de batería, bocallaves de
anclaje para montaje en pared
Costado del Monitor (no mostrado):
Jack para antena externa, jack para energía de DC
46
Page 51

V. FAMILIARIZÁNDOSE CON..., Continuación
B
A
C
D
E
F
G
H
J
KL
47
I
Page 52

VI. CONECTANDO EL MONITOR
METEOROLÓGICO
Su monitor meteorológico WX-80 utiliza energía
eléctrica estándar de 12V DC para su operación
normal y una batería de 9V (no suministrada) para
energía de respaldo cuando la energía estándar falle
o sea desconectada temporalmente. Para un mejor
desempeño y más larga vida durante un corte de
energía eléctrica, se recomienda una batería alcalina.
Una batería de respaldo nueva podrá energizar el
monitor meteorológico por hasta 1 hora con la emisión
meteorológica encendida o hasta 8 horas en el modo
de espera de alerta. Sin embargo, se recomienda que
conecte siempre el monitor meteorológico a la energía
eléctrica de AC para su uso normal.
Recuerde, cuando la unidad está apagada en "OFF",
no se recibirá señal de alerta, ¡incluso con la batería de
respaldo instalada! La unidad debe estar encendida en
"ON" para recibir alertas y radio-emisiones.
Instalando la Batería de Respaldo
1. Ponga el interruptor on / off del monitor en la
posición "OFF" deslizándolo a la derecha.
2. Oprima la oreja en la cubierta del compartimiento
de la batería, levante la cubierta y póngala a un
costado.
3. Usando una batería alcalina nueva de 9V, presione
el conectador terminal sobre la batería, y reponga
48
Page 53

VI. CONECTANDO EL MONITOR..., Continuación
Instalando la Batería de Respaldo, Continuación
la batería en el compartimiento, cuidando de no
deformar o dañar los cables de conexión.
4. Reponga la cubierta.
5. Encienda el WX-80 deslizando el interruptor hacia la
izquierda (posición "ON").
NOTA: NO use una batería del tipo recargable en su
monitor meteorológico. Use únicamente baterías
alcalinas estándar.
NOTA: Si la batería de respaldo se torna débil, su
monitor meteorológico podría no sonar un tono
cuando se radio-emite una alerta de emergencia o
de prueba. Verifique periódicamente la recepción
del monitor, y reemplace la batería según sea necesario.
PREACUCIÓN: Descarte pronto y adecuadamente toda
batería que esté vieja o débil. No la queme o entierre.
Las baterías pueden filtrar productos químicos que
pueden causar lesiones personales y/o daños a la
unidad monitora.
Cuando aparece "REPLACE BATTERY" en la pantalla
del radio o el monitor meteorológico deja de funcionar
(cuando con energía sólo de la batería), reemplace la
batería por una nueva. "REPLACE BATTERY" aparecerá
también en la pantalla del radio si no hay una batería
49
Page 54

VI. CONECTANDO EL MONITOR..., Continuación
Instalando la Batería de Respaldo, Continuación
de respaldo instalada y el monitor meteorológico está
conectado a energía eléctrica de AC y es luego
encendido. ¡Esto es para recordarle que la capacidad
de operar con batería de respaldo no funciona cuando
hay cortes de energía eléctrica de AC si no hay una
batería instalada!
Conectando el Monitor Meteorológico a
Electricidad de AC
1. Ponga el interruptor on / off del monitor en la
posición "OFF" deslizándolo a la derecha.
2. Enchufe el adaptador eléctrico de AC en el jack en
el costado izquierdo del monitor.
3. Enchufe el adaptador eléctrico a un receptáculo
casero estándar de 110V AC.
Usando la Antena Incorporada
La antena telescópica incorporada del monitor
meteorológico le permite recibir señales locales
potentes. Ponga la antena en su posición vertical,
extiéndala luego completamente para una recepción
óptima.
Para mejorar la recepción en zonas alejadas, usted
puede conectar una antena externa de 50 Ohm a su
monitor meteorológico usando un cable adaptador
opcional con un enchufe RCA conectado al jack EXT
50
Page 55

VI. CONECTANDO EL MONITOR..., Continuación
Usando la Antena Incorporada, Continuación
ANT (Antena Externa) en el panel lateral. Su tienda local
de electrónica vende una variedad de antenas. Siga las
instrucciones de instalación provistas con la antena
para conectarla al monitor WX-80.
VII. ESCUCHANDO UNA RADIO-EMISORA
METEOROLÓGICA
Su monitor meteorológico está preprogramado para
las 7 frecuencias de radio-emisión meteorológica de
NOAA (Canales 1-7). Para seleccionar una frecuencia
de radio-emisión para su zona, siga los pasos indicados
en las próximas páginas.
1. Con el WX-80 encendido, oprima el botón
"WEATHER" para activar el circuito de audio
del monitor.
2. Regule el volumen de audio al nivel de escucha
deseado usando la barra de Volumen Arriba /
Abajo. Las posiciones de volumen varían entre
1 - la posición más baja, hasta 8 - la posición más
alta. El control de volumen de audio tiene una
posición muda (posición de volumen 0) que le
permite enmudecer temporalmente todo el audio.
3. Para apagar la radio-emisión meteorológica, oprima
de nuevo el botón WEATHER.
51
Page 56

VIII. PROGRAMANDO SU WX-80
Programación Default de Fábrica
Su monitor meteorológico está preprogramado
para recibir radio-emisiones de TODAS las radioemisoras de la zona y TODOS los tipos de alertas
meteorológicas. Esto se llama "Código de Toda
Señal", (refiérase al Índice de Materias para el
número de página). La primera vez que usted use
su monitor meteorológico, encontrará que está
ajustado automáticamente para usar la frecuencia
de la radio-emisión meteorológica de NOAA
162.550 MHz (Canal 1).
Dependiendo de su ubicación, puede necesitar
seleccionar un canal diferente, determinado por la
frecuencia del transmisor NWS de su área local. Siga
estos pasos para seleccionar la frecuencia de radioemisión local.
IMPORTANTE: Durante todos los modos de
programación, si hay una pausa de 40 segundos sin
oprimir una tecla, el WX-80 almacena los parámetros
actuales y regresa al modo de operación. Esto asegura
que el WX-80 sigue siendo operacional, por si hubiera
cualquier interrupción durante la instalación de su
programación.
Las siguientes instrucciones de programación están
clasificadas por su función específica. Cada tópico de
52
Page 57

VIII. PROGRAMANDO SU WX-80, Continuación
Programación Default de Fábrica, Continuación
programación finaliza terminando la programación y
volviendo al modo de espera o de operación.
Todas las funciones de programación pueden ser
ajustadas en una sesión si usted quisiera programar
funciones múltiples antes de regresar al modo de
operación. La tecla YES se usa para aceptar la posición
de pantalla actual y continuará avanzándole al próximo
paso de programación, permitiéndole saltear opciones
que usted no desea cambiar.
1. Encienda el WX-80 deslizando el interruptor hacia
la izquierda (posición "ON"). Escuchará un tono
que le confirma que la energía está ENCENDIDO.
2. Oprima el botón OFF/PROGRAM por 2 segundos
para iniciar el modo de programación. La
pantalla mostrará el último canal meteorológico
seleccionado (posiblemente la frecuencia de
posición default).
3. Oprima el botón WEATHER para activar el audio
del tiempo, luego oprima la tecla de volumen
arriba o abajo para regular el nivel deseado de
volumen de radio-emisión.
4. Oprima las teclas numéricas en secuencia desde 1 a
7 para encontrar el canal de radio-emisión de su
zona, escuchando la señal más potente. Vuelva
53
Page 58

VIII. PROGRAMANDO SU WX-80, Continuación
Programación Default de Fábrica, Continuación
a regular el nivel de volumen si es necesario,
luego escuche brevemente el mensaje de
anuncio para asegurar que se está radioemitiendo información sobre su zona local. Si
hay otro canal que parece potente, vaya a ese
canal y escuche su radio-emisión. Escoja el canal
que mejor representa la información para su
ubicación.
Canal Frecuencia Canal Frecuencia
1 162,550 MHz
2 162,400
3 162,475
4 162,425
5. Cuando usted haya seleccionado el mejor canal
para su ubicación, oprima el botón YES para
almacenar su selección y avanzar al siguiente
paso de programación, "Ajustando el Tipo de
Alerta", u oprima la tecla OFF / PROGRAM por
2 segundos para almacenar la selección y ajustar
el modo de operación. Aparece el estado de
alerta actual (WEATHER ALRT ON o WEATHER
ALRT OFF).
5 162,450
6 162,500
7 162,525
54
Page 59

VIII. PROGRAMANDO SU WX-80, Continuación
Ajustando el Tipo de Alerta
Usted puede ajustar el monitor meteorológico WX-80
para responder a una radio-emisión de alerta NWS en
una de dos maneras. Cuando el monitor es encendido
y activado por una señal de alerta, ocurrirá lo siguiente
(mediante selección de la posición)
VOZ - cuando es activado por una señal de alerta, el
monitor meteorológico suena una alerta de bip o sirena
por unos 8 segundos, después radio-emite el estado del
tiempo por 5 minutos. Luego regresa a la operación de
espera. La pantalla muestra la descripción de la alerta
(tal como TORNADO WARNING) hasta que el tiempo
efectivo de la alerta expira. Una alerta puede estar en
efecto por varias horas.
ALERTA - cuando es activado por una señal de alerta, el
monitor meteorológico suena una alerta de bip o sirena
continuamente y exhibe una descripción de alerta
hasta que expira el tiempo efectivo de la alerta. Para
apagar la alerta más pronto, oprima el botón OFF. Para
escuchar la radio-emisión de voz de NWS, oprima el
botón WEATHER.
NOTA: Cuando la alerta del monitor meteorológico
expira o usted la apaga, usted escucha el tono de
terminación de alerta NWS (tres sonidos bruscos) por
55
Page 60

VIII. PROGRAMANDO SU WX-80, Continuación
Ajustando el Tipo de Alerta, Continuación
algunos segundos antes de que usted oiga la radioemisión de voz. El tono de terminación de alerta NWS
tiene un sonido diferente al del tono de alerta del
monitor meteorológico.
El monitor meteorológico está ajustado a la posición
ALERT como default de fábrica. Para cambiar la
posición del tipo de alerta a VOICE (o para verificar
la selección actual), siga estos pasos:
1. Con el WX-80 encendido, oprima el botón
OFF/PROGRAM por 2 segundos para ajustar
el modo para programar.
2. Oprima el botón YES una vez para avanzar a la
posición de Tipo de Alerta. La selección del
patrón de alerta actual (VOICE o ALERT)
aparece en la pantalla.
3. Para seleccionar la posición alternativa (eligiendo
VOICE en vez de ALERT o eligiendo ALERT en
vez de VOICE) oprima el botón NO. La posición
alternativa aparece. Para alternar entre
posiciones, oprima el botón NO, más de una
vez. Su selección es guardada oprimiendo el
botón YES.
NOTA: Oprimiendo el botón NO repetidamente
alternará entre la selección de ALERT y de VOICE.
56
Page 61

VIII. PROGRAMANDO SU WX-80, Continuación
Ajustando el Tipo de Alerta, Continuación
4. Cuando su selección aparece en la pantalla, oprima
el botón YES para almacenar la selección y
avanzar hacia el siguiente paso de programación,
(Ajustando la Luz de Fondo) u oprima el botón
OFF/PROGRAM por 2 segundos para almacenar
la selección y ajustar el modo para operar. El
estado de alerta actual (WEATHER ALRT ON or
WEATHER ALRT OFF) aparecerá en la pantalla.
Ajustando la Luz de Fondo
La luz de fondo de su monitor meteorológico se
enciende automáticamente por unos 10 segundos cada
vez que usted oprime una tecla. Para un uso extensivo
en situaciones de poca luz, usted puede ajustar la luz de
fondo para que quede prendida continuamente hasta
que usted la apague. NOTA: El monitor debe estar
conectado a la energía eléctrica de AC para tener una
posición de luz de fondo continua.
Siga estos pasos para prender y apagar la luz de fondo.
1. Con el WX-80 encendido, oprima el botón
OFF/PROGRAM por 2 segundos para ajustar
el modo a programa.
2. Oprima el botón YES dos veces para que
"CONTINUO" (continuous) y "BACKLITE"
destellen alternativamente en la pantalla.
57
Page 62

VIII. PROGRAMANDO SU WX-80, Continuación
Ajustando la Luz de Fondo, Continuación
3. Oprima el botón YES para aceptar la posición
de luz de fondo continua, u oprima el botón
NO para apagar la luz de fondo continua.
NOTA: Si usted elige NO, la posición de la luz
de fondo se apagará por 10 segundos después
de oprimir el último botón. La pantalla avanzará
hacia el siguiente paso de programación,
"Monitoreo de Ubicación Única o Múltiple ".
4. Oprima el botón OFF/PROGRAM por 2 segundos
para almacenar la selección y ajustar el modo
para operar. Aparece el estado de alerta actual
(WEATHER ALRT ON o WEATHER ALRT OFF).
Comprendiendo los Códigos Geográficos SAME
NOTA: En el texto siguiente, los Códigos Geográficos
SAME son también conocidos como Códigos FIPS.
La Administración Nacional Oceánica y Atmosférica
(NOAA) comenzó a radio-emitir señales de alerta
meteorológicas codificadas capaces de identificar
zonas específicas en donde una emergencia
meteorológica está pronosticada para ocurrir. Estos
códigos de Zona Específicos son conocidos como
códigos FIPS (Federal Information Processing System).
Hay un código FIPS único asignado a cada condado o
localidad por todos los Estados Unidos y sus territorios.
58
Page 63

VIII. PROGRAMANDO SU WX-80, Continuación
Comprendiendo los Códigos..., Continuación
Ejemplo: El código FIPS de 6 dígitos para identificar
Kansas City, Missouri (Jackson County) es el 029095.
El primer dígito en un código FIPS identifica la
subdivisión del condado y es usado sólo para
condados extremadamente grandes o condados
con formas geográficas poco usuales tales como
un condado alargado y angosto. Los dos dígitos
siguientes identifican el estado, y los tres dígitos
finales identifican el condado o localidad.
NOTA: La mayoría de los condados FIPS comienzan
con 0, lo que significa que el código FIPS representa
un condado entero. El NWS tiene planes futuros para
subdividir algunos condados grandes. Cuando esto
ocurra, cada subdivisión tendrá asignada un dígito de
1 a 9, resultando en códigos tales como 129059,
229059, y así sucesivamente.
Códigos de Evento - Los eventos de emergencia, tales
como emergencias meteorológicas o emergencias
civiles, tienen también asignado un código conocido
como Código de Evento. Estos códigos de evento se
usan para identificar una emergencia por su tipo.
Ejemplo: (TOW) para Tornado Advertencia.
59
Page 64

VIII. PROGRAMANDO SU WX-80, Continuación
Comprendiendo los Códigos..., Continuación
SAME - SAME (Codificación de Mensaje de Área
Específica) combina el Código FIPS para identificar un
área específica y un Código de Evento para especificar
el evento de emergencia particular de esa área. Los
datos de identificación de evento y área son seguidos
de un mensaje de voz correspondiente a la situación
de emergencia para esa área. Estos datos son entonces
codificados digitalmente y radio-emitidos por su
estación de Radio Meteorológica (NWR) de NOAA.
Su monitor meteorológico WX-80 puede recibir todas
las señales de alerta SAME radio-emitidas dentro de un
radio de unas 40 a 50 millas de la torre de transmisión
de NWR. Para recibir alertas SAME sobre emergencias
meteorológicas que han ocurrido sólo en condados
particulares de interés, usted puede programar hasta 15
códigos FIPS en la memoria del monitor meteorológico.
Esto le permite evitar escuchar una alerta que
corresponde a una zona que está posiblemente
a varios condados de usted.
Obteniendo el o los Códigos FIPS de su Zona
Para obtener el código FIPS para su ubicación actual,
llame sin cargo al Servicio Meteorológico Nacional
al 1-888-NWR-SAME (1-888-697-7263). Siga las
instrucciones que le instan a indicar el estado y
condado correspondientes a su ubicación. El sistema
60
Page 65

VIII. PROGRAMANDO SU WX-80, Continuación
Obteniendo el o los Códigos..., Continuación
le responderá dando el código FIPS de ese condado.
Si está cerca de un linde de condado, quizá desee
obtener los códigos para el condado vecino u otros
condados cercanos de interés para usted.
Monitoreando Ubicaciones Únicas o Múltiples
Su Monitor Meteorológico WX-80 puede monitorear ya
sea una ubicación única o bien hasta 15 ubicaciones,
determinado por el número de Códigos Geográficos
SAME que usted entre, o elija monitorear.
Para ajustar el monitor meteorológico para ubicación
única o múltiples, siga los pasos siguientes:
1. Con el WX-80 encendido, oprima el botón
OFF/PROGRAM por 2 segundos para ajustar
el modo a programa.
2. Oprima el botón YES tres veces de modo que la
palabra SINGLE o MULTIPLE aparezcan en la
pantalla.
3. Para seleccionar la posición opuesta (MULTIPLE en
vez de SINGLE), oprima el botón NO. Aparece
la posición que usted seleccionó. Oprimiendo
el botón NO repetidamente hará alternar la
selección entre SINGLE y MULTIPLE hasta que
se oprima el botón YES.
61
Page 66

VIII. PROGRAMANDO SU WX-80, Continuación
Monitoreando Ubicaciones..., Continuación
4. Oprima el botón YES para seleccionar la opción
que usted desea. La pantalla avanzará hacia el
paso siguiente de programación, "Entrando los
Códigos de Ubicación FIPS". Ya sea que usted
elija la opción de ubicación SINGLE o
MULTIPLE, la primera ubicación de memoria
(LOC 1) y el Código FIPS almacenado van ahora
a destellar alternadamente en la pantalla.
5. Oprima el botón OFF/PROGRAM por 2 segundos
para almacenar la selección y ajustar el modo
para operar. Aparece el estado de alerta actual
(WEATHER ALRT ON o WEATHER ALRT OFF).
Entrando los Códigos de Ubicación FIPS
Su monitor meteorológico está preajustado para usar
un código default "Toda Señal" (código 99), esto
permite que el WX-80 reciba cualquier radio-emisión
de alerta meteorológica dentro de su alcance de
recepción (aproximadamente un radio de 50 millas
en la mayoría de las ubicaciones). Este código está
preajustado en la ubicación de la primera memoria
del monitor meteorológico (LOC 1 - 99).
Para cambiar el código FIPS en cualquiera de las
células de ubicación de memoria (LOC 1 hasta
LOC 15), oprima el botón NO mientras el LOC y el
código estén destellando alternativamente. Si se oprime
62
Page 67

VIII. PROGRAMANDO SU WX-80, Continuación
Entrando los Códigos..., Continuación
"NO" esto le dice al WX-80 que usted no desea el
código existente e intenta cambiarlo a otro código.
NOTA: Este código destellante puede ser el código
default de '99'. Este valor de código ajusta el WX-80
para monitorear TODAS las radioemisiones dentro del
área sin importar cuál es el código de ubicación.
Siga estos pasos para programar el monitor
meteorológico con el código FIPS para su condado
local o condados que usted quisiera monitorear.
1. Con el WX-80 encendido, oprima el botón
OFF/PROGRAM por 2 segundos para ajustar
el modo a programa.
2. Oprima el botón YES cuatro veces para que
destellen en la pantalla la palabra "LOC 1"
(location 1) y "99" (el código default o un
código FIPS programado ya existente). Si usted
elige monitorear ubicaciones múltiples, este será
el primero de quince códigos FIPS (LOC 1 LOC 15) que pueden ser almacenados y
monitoreados.
3. Si usted NO desea retener el código FIPS existente
en esta célula de ubicación, oprima el botón
NO. Proceda al Paso 5 para entrar el nuevo
código FIPS.
63
Page 68

VIII. PROGRAMANDO SU WX-80, Continuación
Entrando los Códigos..., Continuación
4. Si usted DESEA retener el código FIPS actualmente
en esta célula de ubicación, oprima el botón
YES. El WX-80 avanzará a la siguiente célula de
ubicación (2 - 15). En cada célula de ubicación,
usted debe hacer la misma selección de ya sea
mantener el código FIPS existente o entrar un
nuevo código FIPS.
5. Para agregar o cambiar un código en una
ubicación diferente, oprima el botón YES
repetidamente hasta que vea la primera
ubicación de memoria no utilizada o el código
que desea cambiar, oprima entonces el botón
NO para borrar el código existente. Aparecerán
seis guiones (- - - - - -) permitiéndole entrar un
nuevo código FIPS para esa célula de ubicación.
Use las teclas numéricas (0-9) para entrar los 6
dígitos del código FIPS que desea almacenar.
NOTA: Si comete una equivocación al entrar el código
oprima NO para borrar todos los dígitos. Reaparecerán
los guiones (- - - - - -) para permitirle entrar el código
correcto.
6. Oprima el botón YES para almacenar los códigos
deseados en la memoria.
Recordatorio: Si usted ajusta el monitor meteorológico
para su modo de ubicación múltiple, aparece el código
(si lo hay) almacenado en la posición de memoria
64
Page 69

VIII. PROGRAMANDO SU WX-80, Continuación
Entrando los Códigos..., Continuación
siguiente. Repita los Pasos 3-6 para cada código (hasta
15) que usted desea cambiar o agregar.
Para restablecer el monitor meteorológico para recibir
señales TODAS SAME dentro de un radio de 50 millas,
entre sencillamente el 99 en la primera ubicación de
memoria. La pantalla mostrará: LOC 1 99.
Cuando usted oprime el botón YES para almacenar un
código en la última célula de ubicación (LOC 15), la
pantalla avanzará al siguiente paso de programación,
Tonos de Alerta.
7. Oprima el botón OFF/PROGRAM por 2 segundos
para almacenar la selección y ajustar el modo
para operar. Aparece en la pantalla el estado de
alerta actual (WEATHER ALRT ON o WEATHER
ALRT OFF).
IX. TONOS DE ALERTA
Usted tiene la opción de activar o desactivar varios
tipos de tonos de alerta de eventos meteorológicos
"geográficamente confinados" recibidos por su
monitor meteorológico. Las alertas opcionales tales
como "Avalanche Watch", "Coastal Flood Warning"
y "Volcano Warning" están naturalmente confinadas
a sus restricciones geográficas.
65
Page 70

IX. TONOS DE ALERTA, Continuación
NOTA IMPORTANTE: Las alertas meteorológicas para
peligros meteorológicos impredecibles, tales "Tornado
Warning" NO pueden ser apagadas por el usuario, y
no aparecen como opciones en la tabla de abajo.
Usted puede ajustar el monitor meteorológico para que
suene o no suene el tono de alerta durante los tipos de
evento siguientes. NOTA: El monitor meteorológico
detecta sin embargo y exhibe información sobre alertas
incluso después que usted desactiva el tono para esas
alertas. Use esta tabla para conocer el estado de cada
posición de alerta cuando está programando.
Tipo de Evento Alerta: Encendido Apagado
Severe Thunderstorm Watch
Severe Weather Statement
Special Weather Statement
Flash Flood Watch
Flash Flood Warning
Flash Flood Statement
Flood Watch
Flood Warning
Flood Statement
Winter Storm Watch
Winter Storm Warning
Blizzard Warning
High Wind Watch
High Wind Warning
66
Page 71

IX. TONOS DE ALERTA, Continuación
Tipo de Evento Alerta: Encendido Apagado
Hurricane Watch
Hurricane Statement
Coastal Flood Watch
Coastal Flood Warning
Special Marine Warning
Avalanche Watch
Avalanche Warning
Volcano Watch
Volcano Warning
Monthly Test
Test Message
Unknown Statement Tune TV
Demo Message
Su WX-80 usa tres LEDs para brindarle una distinción
visual entre tipos de evento siendo radio-emitidos:
Informe, Vigilancia o Advertencia. Informe significa "Un
informe contiene información de seguimiento hacia un
mensaje de advertencia, vigilancia o emergencia. Los
informes enfatizan la información de pronóstico a
corto plazo, utilizando observaciones e informes para
resaltar la percepción pública sobre riesgo personal.
Permanezca informado sobre las más recientes
condiciones e información mediante la radio AM/FM,
la radio meteorológica NOAA, la televisión u otros
medios."
67
Page 72

IX. TONOS DE ALERTA, Continuación
Vigilancia significa "Existe potencial para eventos
que indican tiempo peligroso o inundaciones, pero su
ocurrencia, ubicación y/o cronograma son aún inciertos.
Manténgase informado respecto de las condiciones
e información más reciente mediante la radio AM/FM,
la radio meteorológica de NOAA, la televisión u otros
medios." Advertencia significa "Es inminente que ocurra
un evento meteorológico o inundación peligrosos. El
evento meteorológico severo impone una amenaza
significativa a la seguridad pública y/o la propiedad y
las probabilidades de ocurrencia y de su ubicación son
altas. Utilice procedimientos de seguridad de acuerdo
con el tipo de evento (por ejemplo: tornado; vaya al nivel
más bajo de la casa o edificio, lejos de ventanas y vidrio,
etc.). Manténgase informado sobre las condiciones más
recientes e informaciones usando un radio AM/FM o
radio meteorológico NOAA operados a batería - ambos
pueden ser llevados con usted a un lugar seguro."
El término Emergencia significa "Un evento que por sí
mismo no sería causa de muerte o lesiones a personas,
ni resultaría en daños a la propiedad pero que
indirectamente puede causar que ocurran otras cosas
que puedan resultar en un peligro. Por ejemplo, una
gran interrupción de energía eléctrica o de teléfono en
una gran ciudad no es un riesgo directo en sí, pero la
interrupción de otros de otros servicios críticos podría
crear una variedad de condiciones que podrían
directamente amenazar la seguridad pública."
68
Page 73

IX. TONOS DE ALERTA, Continuación
A medida que usted recorre la lista de tipos de evento,
se le mostrará el estado actual para cada tono de alerta
(On o Off). Alterne entre las posiciones "On" y "Off"
oprimiendo el botón NO. Después de confirmar el
estado de tono deseado (On o Off) para advertencia(s)
específica(s), guarde su selección oprimiendo el botón
YES.
(Ejemplo) Tono de alerta para "Winter Storm Warning".
El LCD de ocho caracteres se desplazará y exhibirá el
mensaje en hasta tres pasos seguido del Estado de
Alerta (On o Off) como se muestra:
WINTER
STORM
WARNING
TONE ON
Para aceptar y almacenar el estado de alerta actual
(Tone On), oprima el botón YES.
Para cambiar el estado de alerta actual a (Tone Off),
oprima el botón NO. La pantalla cambiará para exhibir:
WINTER
STORM
WARNING
TONE OFF
Nuevamente, oprimiendo continuamente el botón NO
hará alternar entre las posiciones On y Off.
69
Page 74

IX. TONOS DE ALERTA, Continuación
Oprima el botón YES para almacenar su selección. La
pantalla avanzará hacia el siguiente tipo de alerta
opcional.
X. BUSCANDO LA MEJOR UBICACIÓN PARA
SU MONITOR WX-80
Para que su monitor meteorológico resulte efectivo,
usted debe colocarlo adonde pueda recibir una radioemisión de alerta de emergencia y donde usted pueda
oír su tono de alerta.
En los Estados Unidos, el NWS radio-emite
semanalmente una Alerta de Prueba cada miércoles
entre las 11 AM y la 1 PM. Para encontrar el
programa de pruebas específico de su zona, llame
a la oficina local de NOAA o NWS. Estas oficinas
están generalmente listadas en la guía de teléfono
bajo "US Government, Department of Commerce."
Importante: El hecho de que usted obtenga una
recepción clara de una señal de audio de una
radio-emisión meteorológica NO garantiza que un
tono de alerta de emergencia active la función de alerta
de su monitor meteorológico. Asegúrese de elegir la
ubicación apropiada para el monitor meteorológico y
verifique regularmente el monitor meteorológico para
asegurarse que está operando correctamente.
70
Page 75

X. BUSCANDO LA MEJOR..., Continuación
Probando el Tono de Alerta
Para probar manualmente el tono de alerta del monitor
meteorológico y elegir una ubicación adecuada, lleve a
cabo lo siguiente.
1. Prenda el monitor meteorológico WX-80 mientras
mantiene oprimido el botón OFF/PROGRAM.
Todos los indicadores LED se encenderán y se
exhibirá "TESTMODE" en el LCD.
2. Oprima el botón ALERT para probar la función de
tono de alerta. El monitor meteorológico hará
sonar el tono de alerta. Mientras suena el tono,
camine por el área adonde usted mantiene el
monitor meteorológico para asegurarse que
puede oír el tono desde otras habitaciones
cercanas.
NOTAS IMPORTANTES:
• Para asegurarse que su monitor meteorológico
sonará el tono de alerta cuando reciba una señal
de emergencia mantenga siempre la antena
incorporada completamente extendida.
• Probando el tono de alerta sólo asegura que el
tono de alerta del monitor meteorológico puede
ser escuchado. ¡No prueba el receptor del monitor
meteorológico ni garantiza que usted recibirá una
alerta de emergencia!
71
Page 76

X. BUSCANDO LA MEJOR..., Continuación
Probando el Tono de Alerta, Continuación
• Una radio-emisión de alerta de emergencia puede no
activar el tono de alerta de su monitor meteorológico,
incluso aunque reciba claramente la transmisión de
voz o si el tono de alerta suena cuando lo prueba
manualmente. Además, si usted está en una zona
periférica, su monitor meteorológico puede ser
activado por una radio-emisión cuando es colocado
en un área, pero no ser activado cuando es colocado
en alguna otra parte (incluso si es cercana).
XI. USANDO LA FUNCIÓN DE ALERTA
La función de alerta del WX-80, usando el botón
ALERT, es lo que determina que el WX-80 va a sonar
o no la alarma cuando se hayan detectado señales de
alerta. Con el monitor encendido, lea en la pantalla el
mensaje de estado de Alerta. Para cambiar este estado
de alerta oprima el botón "ALERT" por 2 segundos. El
WX-80 hará sonar dos bips para "Alerta Apagada' o un
bip para "Alerta Encendida". Suelte el botón "ALERT" y
vuelva mirar la pantalla para confirmar su posición
seleccionada.
NOTA IMPORTANTE: Si ha programado más de un
código FIPS en la memoria, asegúrese que el monitor
meteorológico esté puesto en su modo múltiple. De lo
contrario, el monitor meteorológico recibirá únicamente
radio-emisión para el código FIPS que usted almacenó
72
Page 77

XI. USANDO LA FUNCIÓN..., Continuación
en la primera posición de la memoria (LOC 1).
IMPORTANTE: SI EXISTE AMENAZA DE TIEMPO MUY
SEVERO, NO espere a que una señal de alerta active la
alarma; encienda la radio-emisión meteorológica para
monitorear la información sobre el tiempo.
Ajustando el Volumen de Tono de Alerta
El Tono de Alerta (sirena o bip) tiene una regulación
separada a la de volumen de audio. Para ajustar el
volumen de la alerta, haga lo siguiente:
1. Con el WX-80 encendido, oprima el botón YES
por 2 segundos. El WX-80 hará sonar un bip
indicando que el Tono de Alerta es ahora
regulable.
2. Oprima el conmutador de volumen Arriba / Abajo
para ajustar el tono de alerta siendo la posición 1
la más baja y la posición 6 la más alta. A diferencia
del volumen de audio, no existe posición muda
para la regulación del tono de alerta.
Ajustando el Código "Toda Señal" del WX-80's
Para ajustar el monitor meteorológico para que
responda solamente a códigos FIPS específicos que
usted seleccione, elija los códigos que quiere programar
(hasta un total de 15 códigos), programe esos códigos
73
Page 78

XI. USANDO LA FUNCIÓN..., Continuación
Ajustando el Código "Toda Señal"..., Continuación
en la memoria, y ponga el monitor meteorológico en su
modo de ubicaciones múltiples.
Para operar el monitor meteorológico usando el código
"Toda Señal" y cambiar rápidamente a monitoreo de
área específica, lleve a cabo los siguientes pasos:
1. Ponga el monitor meteorológico en "única" según
se explicó en la sección "Monitoreando
Ubicaciones Únicas o Múltiples".
2. Programe la primera célula de ubicación (LOC 1) con
el código "99" como se explicó en la sección
"Entrando los Códigos de Ubicación FIPS ".
Con el código de Toda Señal (99) almacenado en
el código de la primera ubicación de la memoria y
haciendo operar el WX-80 en el modo de ubicación
única, usted recibirá todas las señales de alerta - - no
importando qué ubicación. Usted puede rápidamente
cambiar entre monitoreo de "Toda Señal" y de "Área
Específica".
Con los Códigos FIPS / Geográficos SAME almacenados
en cualquiera de los demás códigos de ubicación de la
memoria (LOC 2 - LOC 15) y operando con el WX-80
en el modo de ubicación múltiple, usted puede recibir
solamente las señales de alerta dirigidas a los condados
que usted haya especificado con sus Códigos FIPS.
74
Page 79

XI. USANDO LA FUNCIÓN..., Continuación
Ajustando el Código "Toda Señal"..., Continuación
Cambiando rápidamente el WX-80 de modo único a
múltiple, usted cambia la operación de monitoreo de
"Toda Señal" a de "Área Específica".
Revisando Alertas Solapadas
Su monitor meteorológico puede almacenar hasta tres
alertas diferentes (con el solapado de tiempos efectivos)
en su memoria. Si el monitor meteorológico recibe una
nueva alerta mientras una alerta previa está aún en
efecto, exhibe automáticamente la descripción de la
alerta y hace sonar una alerta para la nueva alerta.
Para desplazarse hacia delante o atrás a través de la
memoria del monitor meteorológico y revisar todas las
alertas efectivas, oprima el botón YES (para desplazarse
hacia atrás).
NOTA: El monitor meteorológico hace sonar un tono
alto si usted trata de desplazarse más allá de la primera
o última alerta en la memoria. Para continuar, oprima el
botón YES para comenzar a desplazarse en dirección
opuesta.
NOTA: Si el monitor meteorológico recibe una nueva
alerta mientras las tres alertas previas están aún en
efecto, almacena la alerta más nueva y borra la alerta
75
Page 80

XI. USANDO LA FUNCIÓN..., Continuación
Revisando Alertas Solapadas..., Continuación
más antigua de la memoria manteniendo siempre los
tres eventos más recientes en la memoria.
Cuando Ocurre una Alerta de Prueba o de
Demostración
El NWS envía semanalmente señales de prueba que
usted puede usar para confirmar que su monitor
meteorológico WX-80 está funcionando bien. Para
encontrar el programa específico de prueba en su
zona, llame a su oficina local de NOAA o NWS.
Dichas oficinas están generalmente listadas en la
guía telefónica bajo "US Government, Department
of Commerce".
Cuando se enciende la función de alerta del monitor
meteorológico y el monitor recibe una radio-emisión
de prueba para un código FIPS que usted ha
programado, responde en una de estas formas:
Tipo de Alerta NWS Usted Ve Usted Oye
Mensaje Demostración MENSAJE DEMO No hay
(enviado a tiempos aleatorios) sonido
Requerido Semanalmente
Prueba SAME PRUEBA SEMANAL Bips
Requerido Mensualmente
Prueba SAME PRUEBA MENSUAL Bips
76
Page 81

XI. USANDO LA FUNCIÓN..., Continuación
Descripciones Meteorológicas No Definidas
El NWS puede ocasionalmente radio-emitir varios
tipos de información meteorológica destinada a uso
comercial u otro no privado. Esta información podría
incluir, por ejemplo, mensajes destinados a servicios
meteorológicos automatizados (tales como los usados
por las estaciones de radio o TV). La memoria de su
monitor meteorológico no contiene un código de
evento específico o la descripción correspondiente
a las señales de evento relacionadas con esos tipos
de servicios meteorológicos.
Adicionalmente, su monitor meteorológico está diseñado
para reconocer todos los tipos de alertas meteorológicas
comunes usadas actualmente por el NWS. El NWS podría
sin embargo eventualmente crear y radio-emitir nuevos
tipos de alerta (para los que la memoria del monitor
meteorológico no contiene una descripción específica
correspondiente).
Si su monitor meteorológico recibe una señal para un
nuevo tipo de alerta, está programado para exhibir
UNKNOWN en pantalla, la descripción de la alerta
(EMERGENCY, STATEMNT, WARNING, o WATCH),
y TUNE TV, y sonar después una Sirena de Alerta. La
pantalla mostrará:
UNKNOWN
WARNING
TUNE TV
77
Page 82

XI. USANDO LA FUNCIÓN..., Continuación
Modo de Prueba
Usted puede probar la funcionalidad básica del
monitor meteorológico WX-80 haciendo lo siguiente.
1. Encienda el monitor meteorológico WX-80 mientras
mantiene oprimido el botón OFF/PROGRAM.
Todos los indicadores LED brillarán y la pantalla
LCD exhibirá "TESTMODE".
2. Refiérase a la tabla, después oprima una tecla
numérica para probar la función deseada. El
monitor meteorológico sintoniza el canal
correspondiente, y aparece uno de los
siguientes:
Usted Oprime: El monitor meteorológico exhibe:
1 CH. 1 (con Audio abierto)
2 CH. 2 (con Audio abierto)
3 CH. 3 (con Audio abierto)
4 CH. 4 (con Audio abierto)
5 CH. 5 (con Audio abierto)
6 CH. 6 (con Audio abierto)
7 CH. 7 (con Audio abierto)
8 DEFAULT (restablecido a
parámetros de fábrica)
9 DEMO ON o DEMO OFF
(el modo demo del monitor
meteorológico)
NOTA: Si usted oprimió el 9 en este paso, su monitor
78
Page 83

XI. USANDO LA FUNCIÓN..., Continuación
Modo de Prueba, Continuación
meteorológico puede también realizar estas funciones
de prueba mientras aparece TEST MODE.
Si usted oprime ALERT, el monitor meteorológico
suena continuamente su sirena de alerta. Oprima
ALERT nuevamente para apagar la sirena.
Si usted oprime YES, los LEDs de STATEMENT,
WATCH, y WARNING se encienden al mismo tiempo.
Si usted oprime NO, los LEDs de STATEMENT,
WATCH, y WARNING se apagan al mismo tiempo.
Si usted oprime WEATHER, aparecen todos los
caracteres de pantalla (segmentos) al mismo tiempo.
Apague el monitor meteorológico y almacene su
selección. Luego enciéndalo nuevamente usando
el nuevo parámetro.
79
Page 84

XII. DESCRIPCIÓN DE EVENTOS
METEOROLÓGICOS DE NWS
Su monitor meteorológico puede exhibir estas
descripciones de Eventos Meteorológicos de NWS.
Para fácil referencia, esta lista muestra también el tipo
de alerta (sirena o bip) que suena durante cada alerta.
Tipo de Evento
Meteorológico Usted Ve Usted Oye
Avalanche Warning AVALANCH WARNING Sirena
Avalanche Watch AVALANCH WATCH Sirena
Blizzard Warning BLIZZARD WARNING Sirena
Civil Danger Warning CIVIL DANGER WARNING Sirena
Civil Danger Watch CIVIL DANGER WATCH Sirena
Civil Emergency TUNE TV
Coastal Flood Warning COASTAL FLOOD
Coastal Flood Watch COASTAL FLOOD WATCH Sirena
Emergency Action EMERGENC ACTION
Warning WARNING Sirena
Emergency Action EMERGENC ACTION
Termination TERMINAT Sirena
Evacuate Immediately EVACUATE IMMEDIAT Sirena
Fire Warning FIRE WARNING Sirena
Flash Flood Statement FLASH FLOOD Bips
Flash Flood Warning FLASH FLOOD WARNING Sirena
Flash Flood Watch FLASH FLOOD WATCH Sirena
(power on your
TV for available information;
call your local NWS office) Sirena
WARNING Sirena
80
Page 85

XII. DESCRIPCIÓN DE EVENTOS..., Continuación
Tipo de Evento
Meteorológico Usted Ve Usted Oye
Flood Statement FLOOD Bips
Flood Warning FLOOD WARNING Sirena
Flood Watch FLOOD WATCH Sirena
Hazardous Material HAZARD MATERIAL
Warning WARNING Sirena
Hazardous Material HAZARD MATERIAL
Watch WATCH Sirena
High Wind Warning HIGH WIND WARNING Sirena
High Wind Watch HIGH WIND WATCH Sirena
Hurricane Statement HURRIACN Bips
Hurricane Warning HURRIACN WARNING Sirena
Hurricane Watch HURRIACN WATCH Sirena
Immediate Evacuation IMMEDIAT EVACUATE
Warning WARNING Sirena
Law Enforcement
Warning LAW ENFORCE WARNING Sirena
Local Area Emergency LOACL AREA EMERGENC Sirena
National Information
Center NATIONAL INFO CENTER Sirena
Periodic National Test NATIONAL PERIODIC TEST Sirena
Practice / Demo DEMO MESSAGE Nada
Radiological Hazard RADIOLOG HAZARD
Warning WARNING Sirena
81
Page 86

XII. DESCRIPCIÓN DE EVENTOS..., Continuación
Tipo de Evento
Meteorológico Usted Ve Usted Oye
Monitorlogical Hazard RADIOLOG HAZARD
Watch WATCH Sirena
Required Monthly Test MONTHLY TEST Bips
Required Weekly Test WEEKLY TEST Bips
Severe Thunderstorm SEVERE THUNDER
Warning WARNING Sirena
Severe Thunderstorm SEVERE THUNDER
Watch WATCH Sirena
Severe Thunderstorm
Statement SEVERE WEATHER Bips
Shelter in-place SHELTER IN-PLACE
Warning WARNING Sirena
Special Marine SPECIAL MARINE
Warning WARNING Sirena
Special Weather
Statement SPECIAL WEATHER Bips
Test Message TEST MESSAGE Nada
Tornado Warning TORNADO WARNING Sirena
Tornado Watch TORNADO WATCH Sirena
Tsunami Warning TSUNAMI WARNING Sirena
Unrecognized Event
Ending in S UNKNOWN STATEMNT TV Sirena
Unrecognized Event UNKNOWN WARNING
Ending in W TUNE TV Sirena
82
Page 87

XII. DESCRIPCIÓN DE EVENTOS..., Continuación
Tipo de Evento
Meteorológico Usted Ve Usted Oye
Unrecognized Event UNKNOWN WATCH
Ending in A TUNE TV Sirena
Unrecognized Event UNKNOWN EMERGENC
Ending in E TUNE TV Sirena
Volcano Warning VOLACNO WARNING Sirena
Volcano Watch VOLACNO WATCH Sirena
Winter Storm Warning WINTER STORM WARNING Sirena
Winter Storm Watch WINTER STORM WATCH Sirena
NOTA: TUNE TV puede también indicar que el monitor
meteorológico ha recibido una señal para un nuevo código
de evento no definido en la memoria del monitor
meteorológico.
83
Page 88

XIII. ESPECIFICACIONES
Número de Canales: 7
Frecuencias de
Recepción (MHz): Canal 1 162,550 MHz
Canal 2 162,400
Canal 3 162,475
Canal 4 162,425
Canal 5 162,450
Canal 6 162,500
Canal 7 162,525
Sensibilidad de Recepción
(en 12 dB SINAD) 0.3uV
Código de Sensibilidad FIPS
@ Una Deviación de
+/- 3KHz / 90% Estimado
de Exito 0.3uV
Batería de Reserva Una 9-Vatios Batería
Antena Antena de Barra
Telescópica
Dimensiones
(Alto x Ancho x Hondo) 1,75" x 5,375" x 4,375"
(45 x 137 x 110mm)
Peso (sin batería) 9,3 onzas
84
Page 89

XIV. MANTENIMIENTO
Su Monitor Meteorológico WX-80 está diseñado
como libre de mantenimiento. Para mantener su
radio en buenas condiciones de funcionamiento:
• Desenchufe su WX-80 del receptáculo de AC antes
de limpiarlo.
• Limpie las superficies exteriores con un paño limpio
humedecido en una solución de detergente de
lavaplatos diluido en agua. Aplique la solución
moderadamente para evitar que la humedad
pueda penetrar en hendiduras o grietas. ¡No
sumerja en agua el monitor meteorológico! Si es
necesario useun cepillo no metálico para quitar
las partículas más tenaces. Seque la superficie
bien con un paño suave sin pelusa.
• NO use solventes, alcoholes o esencias volátiles para
la limpieza - podrían dañar permanentemente la caja.
XV. INSTRUCCIONES SERVICIO DE GARANTÍA
Refiérase a estas instrucciones de operación para los
correctas ajustes de función. Si el problema no puede
ser corregido por referencia a este documento, devuelva
el producto (con el recibo de compra) al lugar en el cual
lo compró, o llame al Departamento de Servicio para el
cliente de Topaz3 para asistirle, 1-800-821-7848,
extensión 499.
Fecha de Compra:_______________
Lugar de Compra: _______________________________
Numero de Serie: _____________________
85
Page 90

XVI. DECLARACIÓN DE GARANTÍA
Topaz3, LLC (en adelante Topaz3), garantiza cada nuevo producto
de radio por él fabricado o suministrado, de estar exento de
defectos en materiales y mano de obra bajo uso y servicio normales
por el período de tiempo listado abajo, provisto que el usuario haya
cumplido con los requisitos aquí establecidos. El período de Garantía
comienza en la fecha en que fue comprado a una Agencia Autorizada
de Ventas y Servicios de Topaz3. Esta Garantía se ofrece al usuario
final original y no es asignable o transferible. Topaz3 no se hace
responsable por ningún equipo auxiliar que esté adosado o sea usado
en conjunto con los productos Maxon, Legacy y TruTalk.
Topaz3 ofrece al usuario final original una Garantía Limitada de
Dos (2) Años en todos los Productos Comerciales e Industriales
de Radio de Maxon y Legacy; los productos TruTalk ofrecen una
Garantía Limitada de Un (1) Año. Los accesorios de Maxon y Legacy
ofrecen una Garantía Limitada de Un (1) Año. Los accesorios de
TruTalk ofrecen ya sea una Garantía Limitada de Un (1) Año, o una
Garantía Limitada de Noventa (90) Días, dependiendo del modelo.
Durante este período, si el producto falla al funcionar bajo uso
normal debido a defecto(s) de fabricación o mano de obra, deberá
ser devuelto a la Agencia Autorizada de Ventas y Servicio de Topaz3
en donde fue comprado. La Agencia de Ventas y Servicio reparará el
producto, o devolverá el producto para su reparación a Topaz3 o a
su Depósito Autorizado de Reparaciones. El usuario es responsable
por el pago de cualquier cargo o gasto incurridos para la remoción
del producto defectuoso del vehículo o de otro lugar de uso; por
el transporte del producto a la Agencia de Ventas y Servicio; por
el retorno del producto reparado o de reemplazo a su lugar de uso
y por la reinstalación del producto.
Topaz3 no tendrá la obligación de hacer reparaciones o de obtener
el reemplazo requerido que resulte de un uso y desgaste normales
o si se hace necesario en todo o en parte por motivo de catástrofe,
86
continuación
Page 91

XVI. DECLARACIÓN..., Continuación
culpa o negligencia del usuario, alteraciones o reparaciones
inadecuadas o no autorizadas del Producto, conexiones incorrectas,
uso del Producto de una forma para la que no fue diseñado, o por
causas externas al Producto. Esta garantía queda nula si el número
de serie del producto es alterado, desfigurado o quitado.
La única obligación de Topaz3 bajo esto será la de reemplazar o
reparar el Producto cubierto por esta Garantía. El reemplazo,
a la opción de Topaz3, puede incluir un producto similar o de
características superiores. La reparación puede incluir el reemplazo
de partes o tableros con partes o tableros nuevos o reacondicionados
funcionalmente equivalentes. Las partes reemplazadas, accesorios,
baterías o tableros están garantizados por el resto del período de
tiempo original. Todas las partes, accesorios, baterías o tableros
reemplazados se convierten en propiedad de Topaz3.
LAS GARANTÍAS EXPRESAS AQUÍ CONTENIDAS SON EN
LUGAR DE CUALQUIER OTRA GARANTÍA, YA SEA EXPRESA O
IMPLÍCITA O ESTATUTARIA, INCLUYENDO, SIN LIMITARSE A
ELLO, CUALQUIER GARANTÍA DE COMERCIABILIDAD O
CONVENIENCIA PARA UN PROPÓSITO EN PARTICULAR.
PARA CUALQUIER PRODUCTO QUE NO CUMPLA CON LA
GARANTÍA ESPECIFIACDA, EL ÚNICO RECURSO SERÁ
REPARAR O REEMPLAZAR. EN NINGÚN EVENTO TOPAZ3
SERÁ RESPONSABLE ANTE EL COMPRADOR O SUS CLIENTES
POR NINGÚN DAÑO, INCLUYENDO DAÑOS ESPECIALES
INCIDENTALES, INDIRECTOS O CONSECUENCIALES, O EL
LUCRO CESANTE, PÉRDIDA DE GANANCIAS O DE DATOS
RESULTANTES DEL USO O DE LA INHABILIDAD DE USAR EL
PRODUCTO.
Esta Garantía no es válida para ventas y entrega fuera de los EE.UU.
o de Canadá.
87
Page 92

Supplier of Maxon, Legacy
®
and TruTalk Communication Products
Topaz3, LLC
10828 NW Air World Drive
Kansas City, Missouri 64153
www.topaz3.com
Toll free: 800-821-7848
Phone: 816-891-6320
Printed in Thailand
Impreso en Tailandia P/N: 680-090-2025, Rev. A
• Fax: 816-891-8815
 Loading...