

Page 1
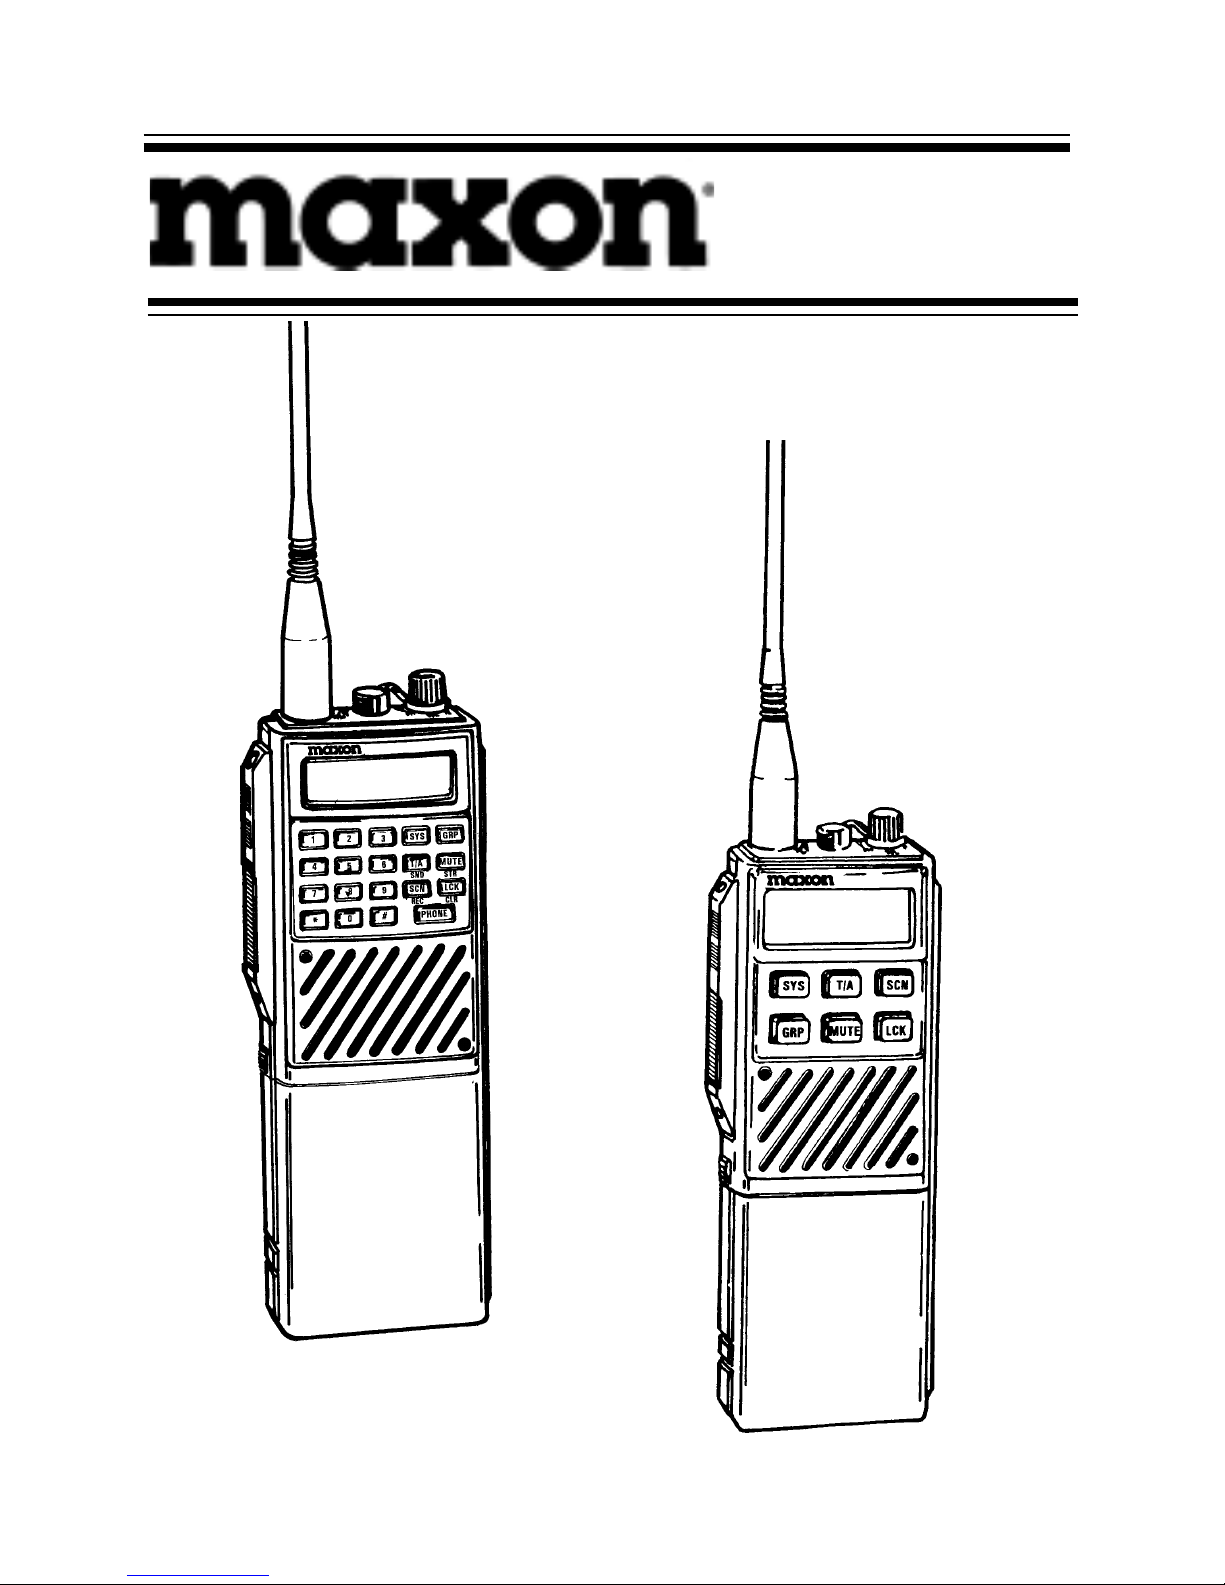
TP-4800 Series
800 MHz Transceiver
Operating Instructions
(Models TP-4800 and TP-4801)
Page 2

About Your TP-4800 Series Radio
Maxon's TP-4800 Series is a sophisticated, microprocessor
controlled transceiver which operates in the 800 MHz range.
Operation and functions for Maxon Model TP-4800 (with
DTMF keypad) and TP-4801 (non-DTMF version) radios
are described in this manual.
We urge you to thoroughly read this manual before
operating the radio.
The TP-4800 Series has been designed for ease of operation
and there are many features available. Many of the functions
described in this manual are dependent on the System in use.
Your Maxon Dealer has programmed the TP-4800 Series
Radio to optimize your requirements.
Should you have any questions regarding the operation of
the radio, please consult the Maxon Dealer from which you
purchased the radio.
About Maxon America, Inc.
Maxon America, Inc. designs and manufactures professional
FM two-way radio equipment to serve a wide variety of
communication needs. Maxon produces equipment for the
Land Mobile Radio and Specialized Mobile Radio markets
(business, industrial, government and public safety).
Page 3

Table of Contents
Safety Information 1
TP-4800 Series Features 2
Quick Reference Guide 3
Description of Radio Components 5
Controls and Connectors 5
Keypad 7
Display Information 11
TP-4800 Series Operation 13
Trunked and Conventional Mode 1 3
Channel Monitoring 13
System "Handshaking" 13
Transmitting 1 4
Receiving 1 5
T/A - Talk Around 15
Transpond Mode 16
Keypad Lock 16
Telephone Calls (Model TP-4800 only) 1 6
Placing a Telephone Call 1 7
Auto Interconnect Operation 17
Manual or Direct Dialing 1 8
Receiving A Telephone Call 1 9
Additional Telephone Calling Information 20
Entering Telephone Numbers 2 0
Clearing Telephone Numbers 2 0
To Store a Number In Memory 21
To Recall a Number Stored In Memory 21
Scan Modes 22
General 2 2
System Scan 22
System Lockout 22
Group Scan 2 3
Auto Group Scan 23
Manual Group Scan 2 4
Page 4

Transmitting While Scanning 24
Last Active (floating) System and Group 24
"Home" System and Group 2 5
Scan Resume Delay 25
RX Priority 26
First Available System Scan 2 6
Trunked Supervisory Tones 2 7
Busy Tone 27
Intercept Tone 27
Clear-To-Talk 27
Key Press Tone 28
Reorder Tone 28
Return Time Warning Tone 28
Conversation Time-Out Tone 2 8
System Ringback Tone 2 9
Display Messages 30
Battery Charging and Care 31
Extended Operations 33
FCC Licensing 3 4
Transceiver Service 35
TP-4800 Series Product Warranty 36
Page 5

Safety Information
The Federal Communications Commission (FCC), with
its action in General Docket 79-144, March 13, 1985, has
adopted a safety standard for the human exposure to Radio
Frequency (RF) electromagnetic energy emitted by FCC
regulated equipment. Proper operation of this radio will
result in user exposure far below the Occupational Safety
and Health Act and Federal Communication Commission
limits.
DO NOT hold the radio in such a manner that the antenna is
close to, or touching, exposed parts of the body -- especially
the eyes or face -- while the radio is transmitting.
DO NOT operate the radio near unshielded electrical
blasting caps or in an explosive atmosphere, unless it is a
type specifically designed and qualified for such use.
DO NOT operate the radio unless the antenna connector
is secure and any open connectors are properly terminated.
DO NOT allow children to operate transmitter-equipped
radio equipment.
This device complies with Part 15 of the FCC rules.
Operation is subject to the condition that this device
does not cause harmful interference.
1
Page 6

TP-4800 Series Features
• Choice of Model TP-4800 with DTMF keypad or
Model TP-4801 without DTMF keypad
• Up to 10 Systems selectable
• Up to 10 Groups selectable per System
• System scan
• System lockout when scanning
• Group Scan automatically or manually
• First Available System Scan when out of range of
Systems
• 7-character alpha-numeric LCD display with backlight
for System and Group identification and other
status information
• Operation in both Trunked and Conventional (nonTrunked) modes
• Repeater talkaround in Conventional and Trunkedmodes
• Standard telephone keypad for placing telephone
interconnect calls (Model TP-4800 only)
• Call indicator
• User-programmable storage of up to 8 telephone numbers
of up to 14 digits in length (Model TP-4800 only)
• Automatic System ringback if System is busy
• Transmit inhibit with busy tone
• Clear-to-Talk beep tone signal indicates when speaking
can begin
NOTE: System setup determines the specific operation
of some of the above features. Refer to the descriptions
in this manual for more information.
2
Page 7
Quick Reference Guide
Controls and Buttons
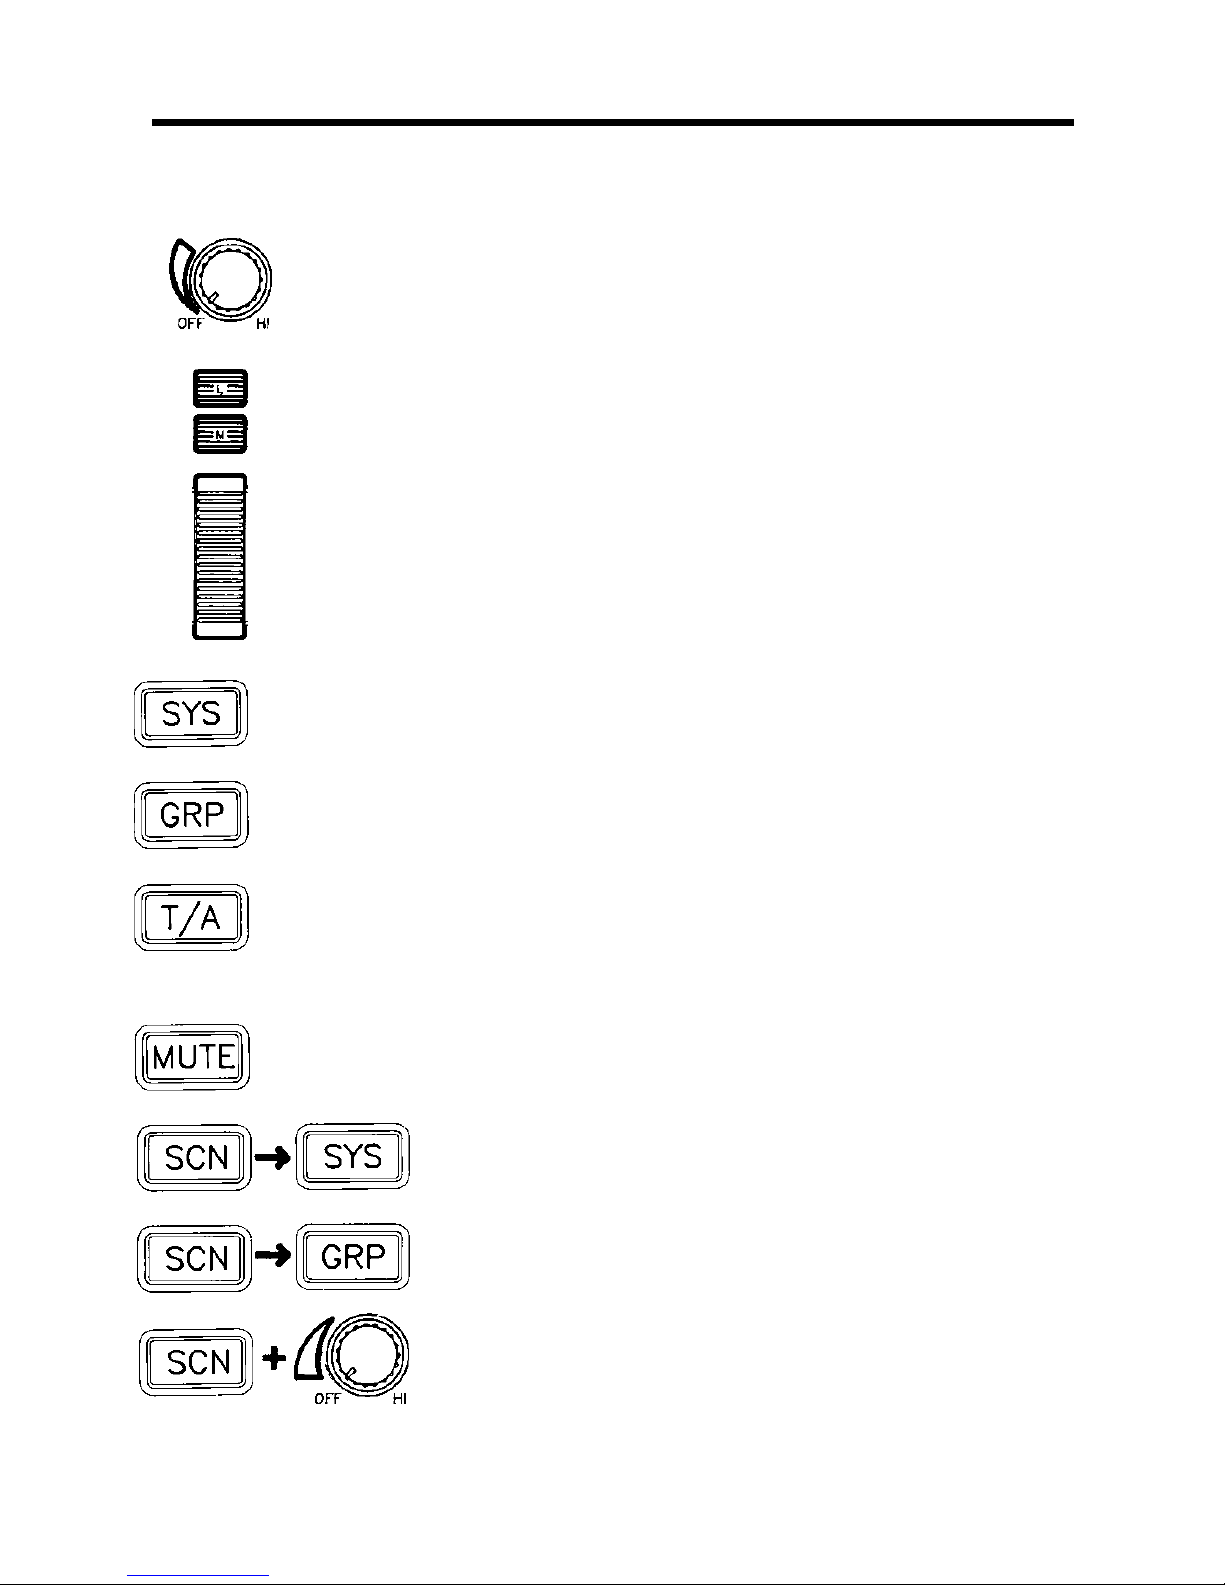
Turns transceiver on and adjusts audio
listening level
Lights up LCD display
Monitors channel activity (Conventional
Mode only)
Press-To-Talk places transceiver in
transmit mode
Keypad
Change SYStem number
Change GRouP number
Talk Around bypasses System when out
of range of System
Enable or disable "key press" tone
Turn SYStem SCaNning On/Off
Turn GRouP SCaNning On/Off
Enters First Available System Scan
(FASS) mode
3
Page 8
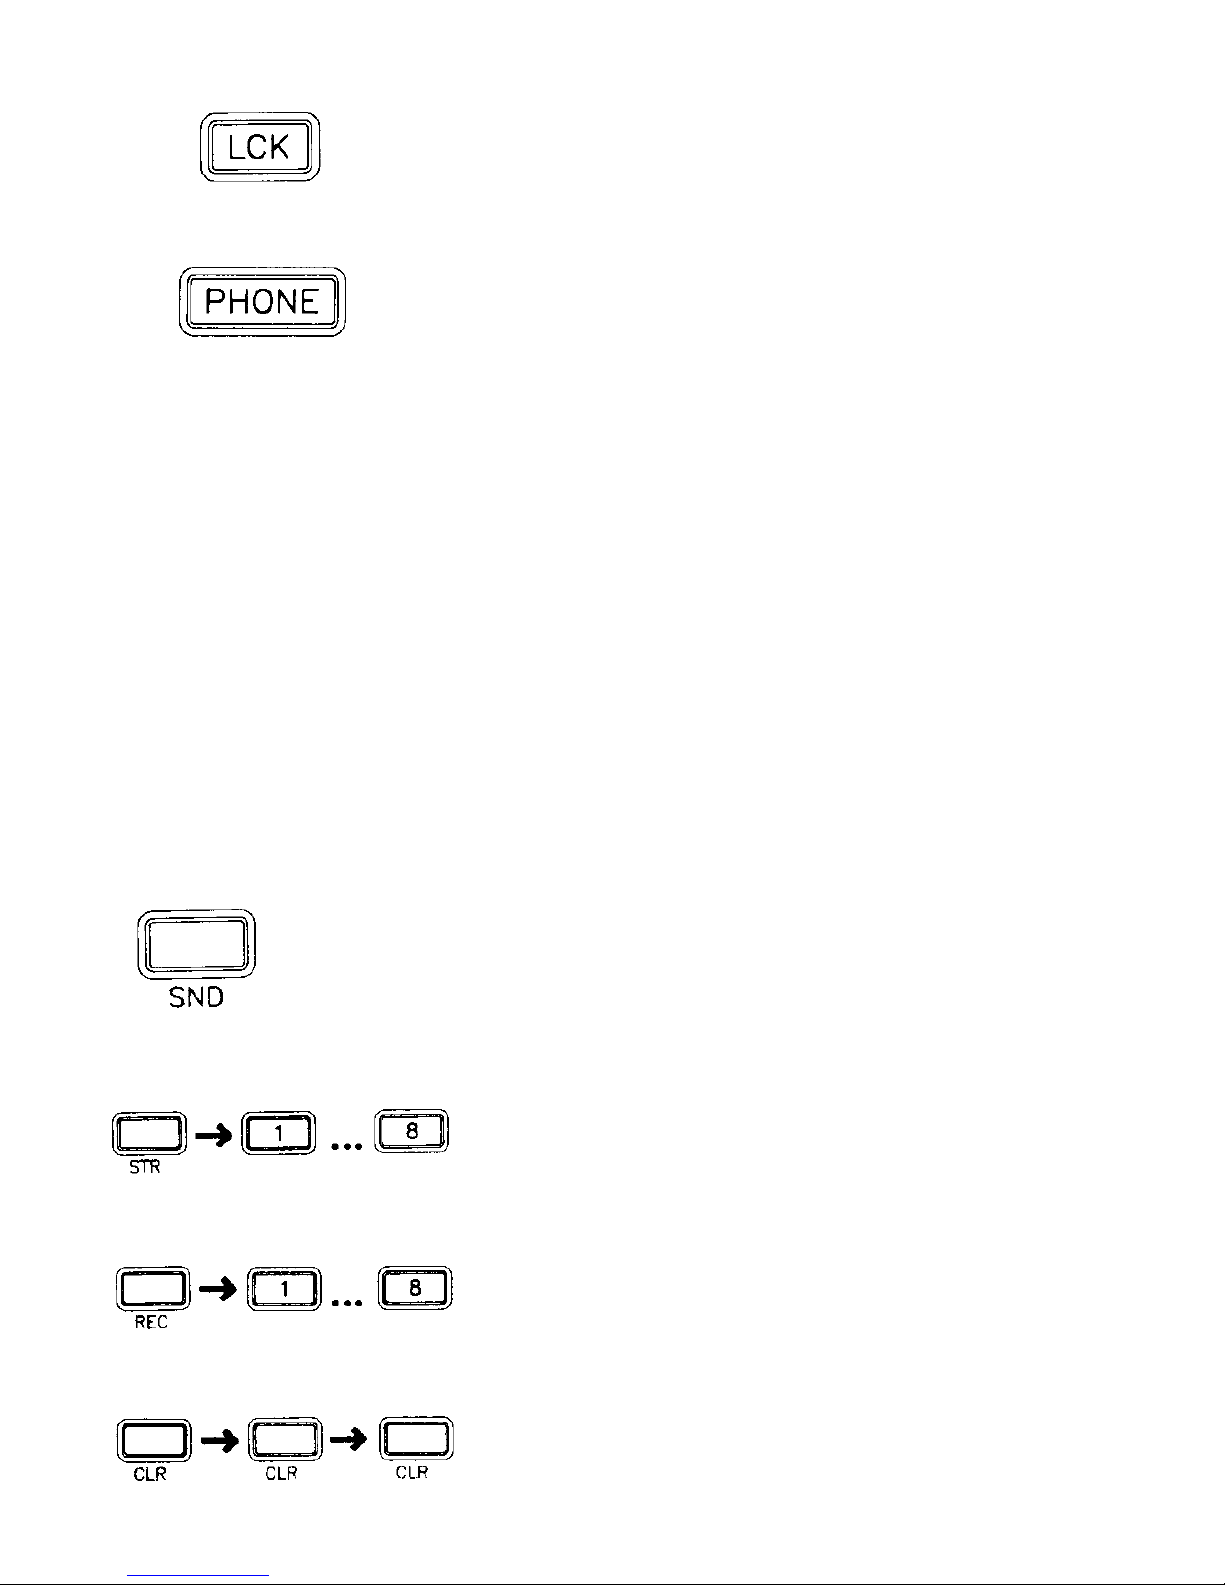
LoCK Keypad or displayed System out of
scan sequence
Enable or disable "Phone" mode (Model
TP-4800 only)
NOTE: In "Phone" mode, the T/A, MUTE, SCN and
LCK keys have the following functions; (SND) SeND,
(STR) SToRe, (REC) RECall and (CLR) CLeaR
respectively. The functions are indicated in the red letters
next to the primary function indicated on the keypad.
(Model TP-4800 only)
DTMF Enter telephone number to be called
Keypad (Model TP-4800 only)
SeND key automatically interconnects
with System and transmits displayed
telephone number (Model TP-4800 only)
SToRes displayed telephone number in
memory location 1 through 8
RECalls stored telephone number from
memory location 1 through 8
CLeaRs one digit at a time from display
4
Page 9
Description of Radio Components
Controls and Connectors
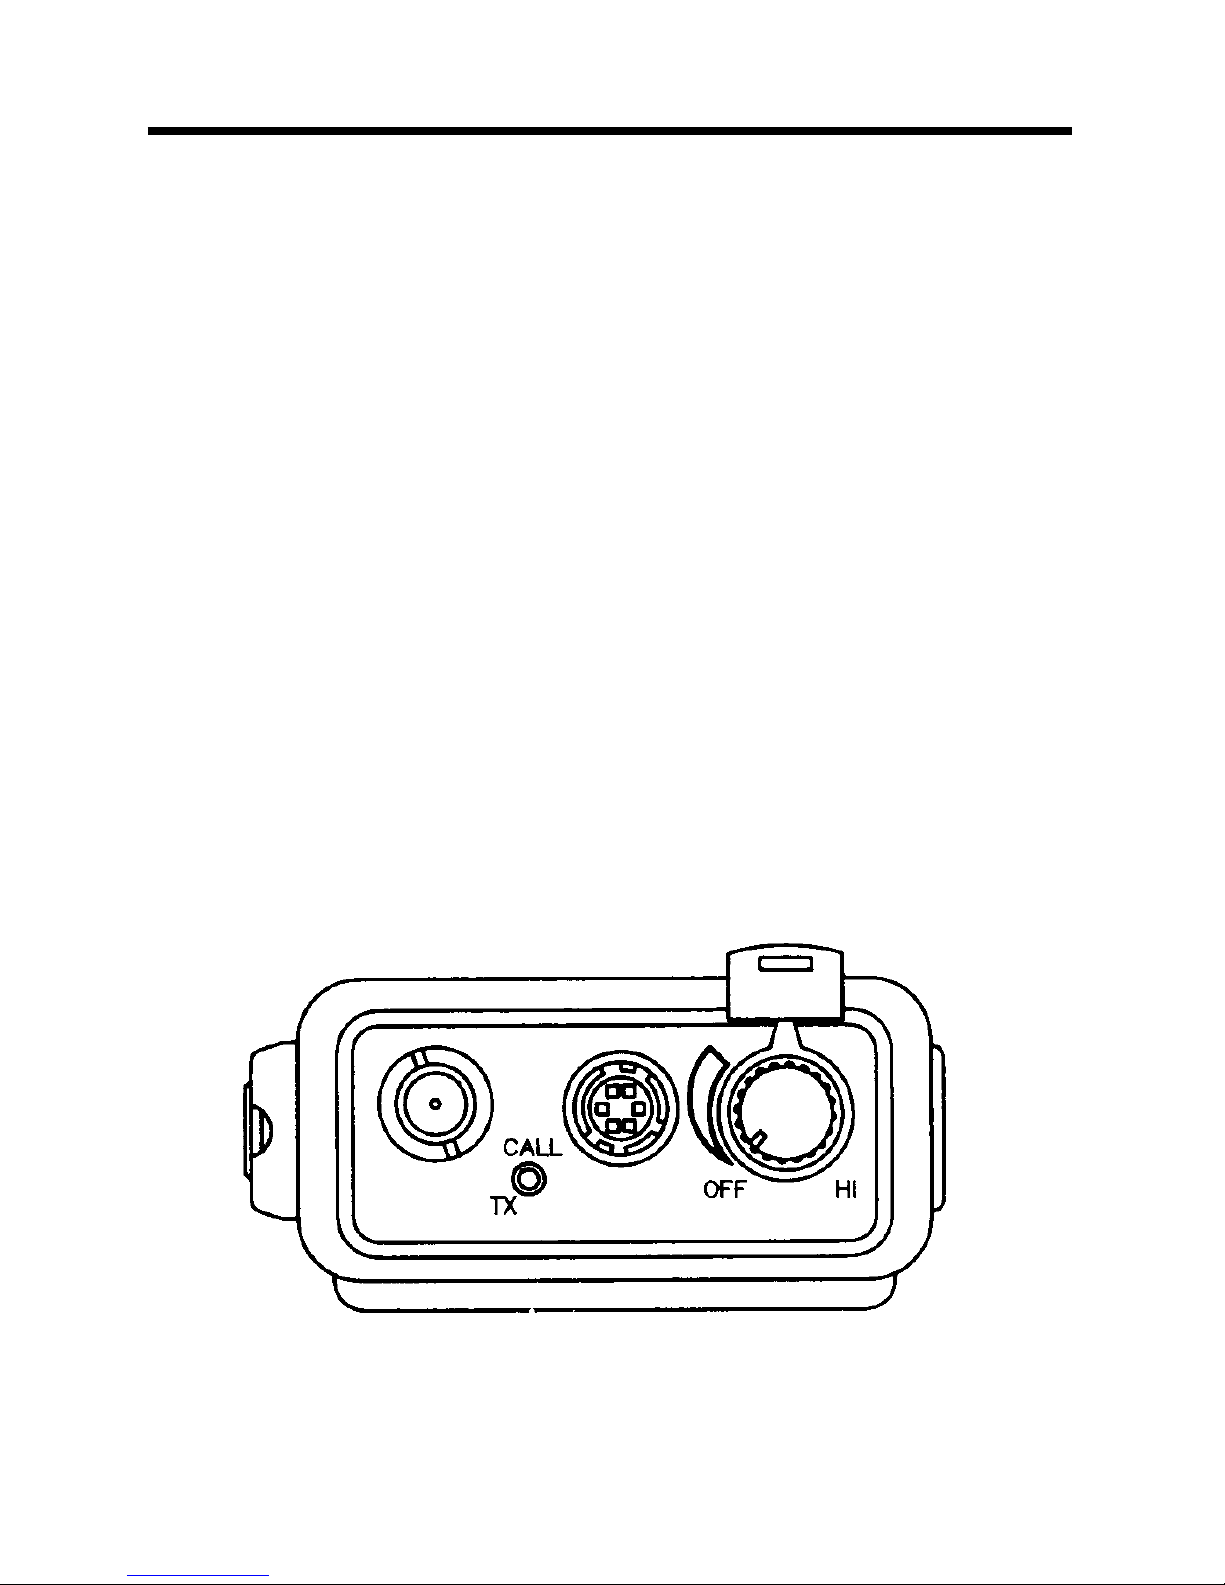
Antenna Connector - SMA type connector for Maxon
TA-801BK antenna or equivalent.
TX/CALL Indicator - Two color LED glows red when
radio is transmitting (TX) and green when radio is receiving
a call (CALL).
Accessory Connector - Interface for Maxon SA-1420
Speaker/microphone and programming cable.
On-Off/Volume Control - Turning this knob clockwise
supplies power to the radio and increases volume level. A
counter-clockwise rotation decreases volume level. To turn
transceiver power off, rotate knob counter-clockwise
to detent.
5
Page 10
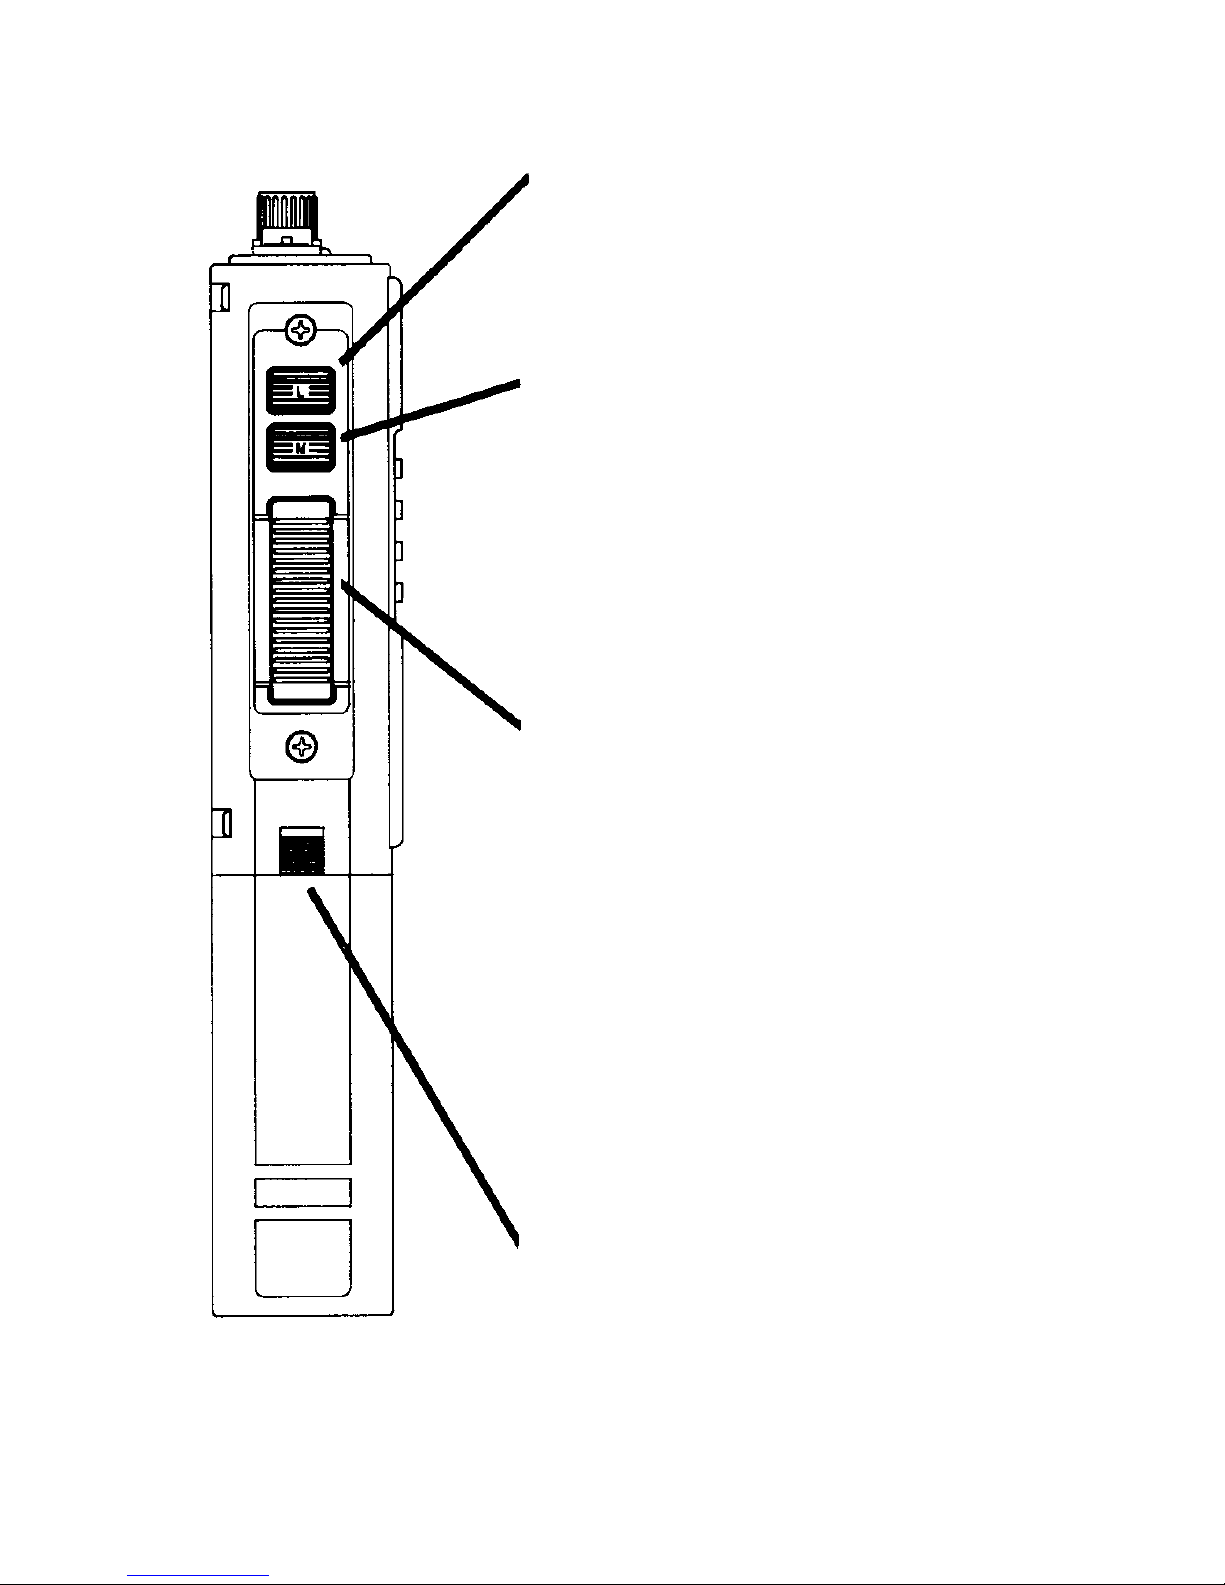
L-Backlight Button - Press the
L button once to illuminate the
display for low light conditions.
After pressing the L button, the
light will stay on for approximately 10 seconds.
M-Monitor Button - Press and
hold the M button to monitor
channel activity. This disables
any squelch system so that all
traffic is heard. The monitor
function is available only when
Conventional Systems are
programmed into the radio.
Push-To-Talk Button - Press
and hold the Push-To-Talk
(P-T-T) Button to place the
radio in transmit mode.When
transmitting, the TX indicator
located near the antenna will glow
red. In Trunked Systems, the radio
must first "handshake" with the
System to access an available
channel. This initial access may
cause the TX indicator to flash
momentarily.
Battery Latch - Lifting this latch
allows battery to be removed from
the radio. Place thumb under latch
and lift upward while sliding battery away from thumb. To
reinstall battery, slide toward latch until securely locked.
6
Page 11
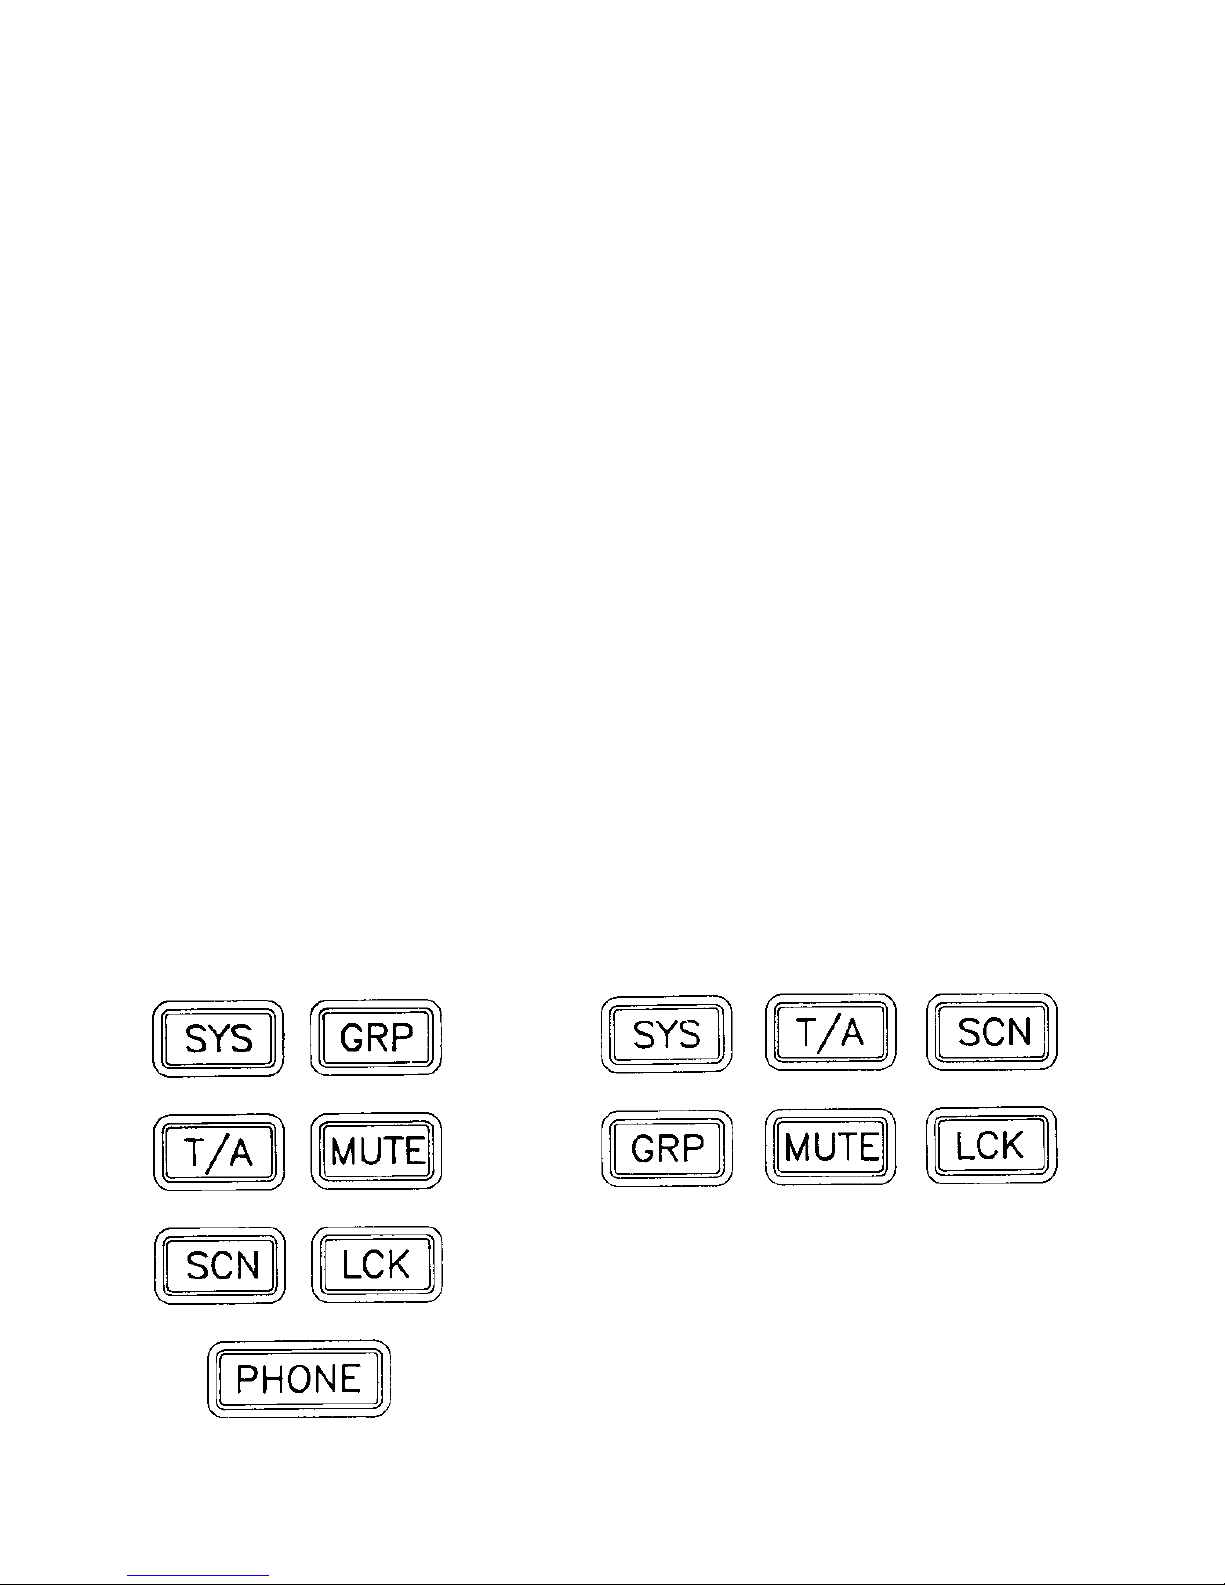
Keypad
SYS "System" - Pressing this key selects the next pro-
grammed System. Only those Systems programmed will
be displayed. System number selected is located in upper
left corner of display.
GRP "Group" - Pressing this key changes the selected
group. Only those groups programmed will be displayed.
Group number selected is located in lower left corner of
display. Group name or identifier is shown in main body
of display.
T/A "Talk Around" - Places the TP-4800 Series into the
Talk Around mode on Trunked and Conventional Systems
(Dealer programmable option). Allows direct radio-to-radio
communication when out of range of System.
MUTE "Silent" - Pressing the mute function key places
the radio into the "Silent" mode (none of the "key press"
tones will be heard through the speaker.) To enable "key
press" tone mode, press MUTE again.
7
SND
STR
REC
CLR
Page 12
NOTE: The TP-4800 Series will return to the "key press"
tone mode automatically when the unit is turned off and on.
(This is the power up default setting).
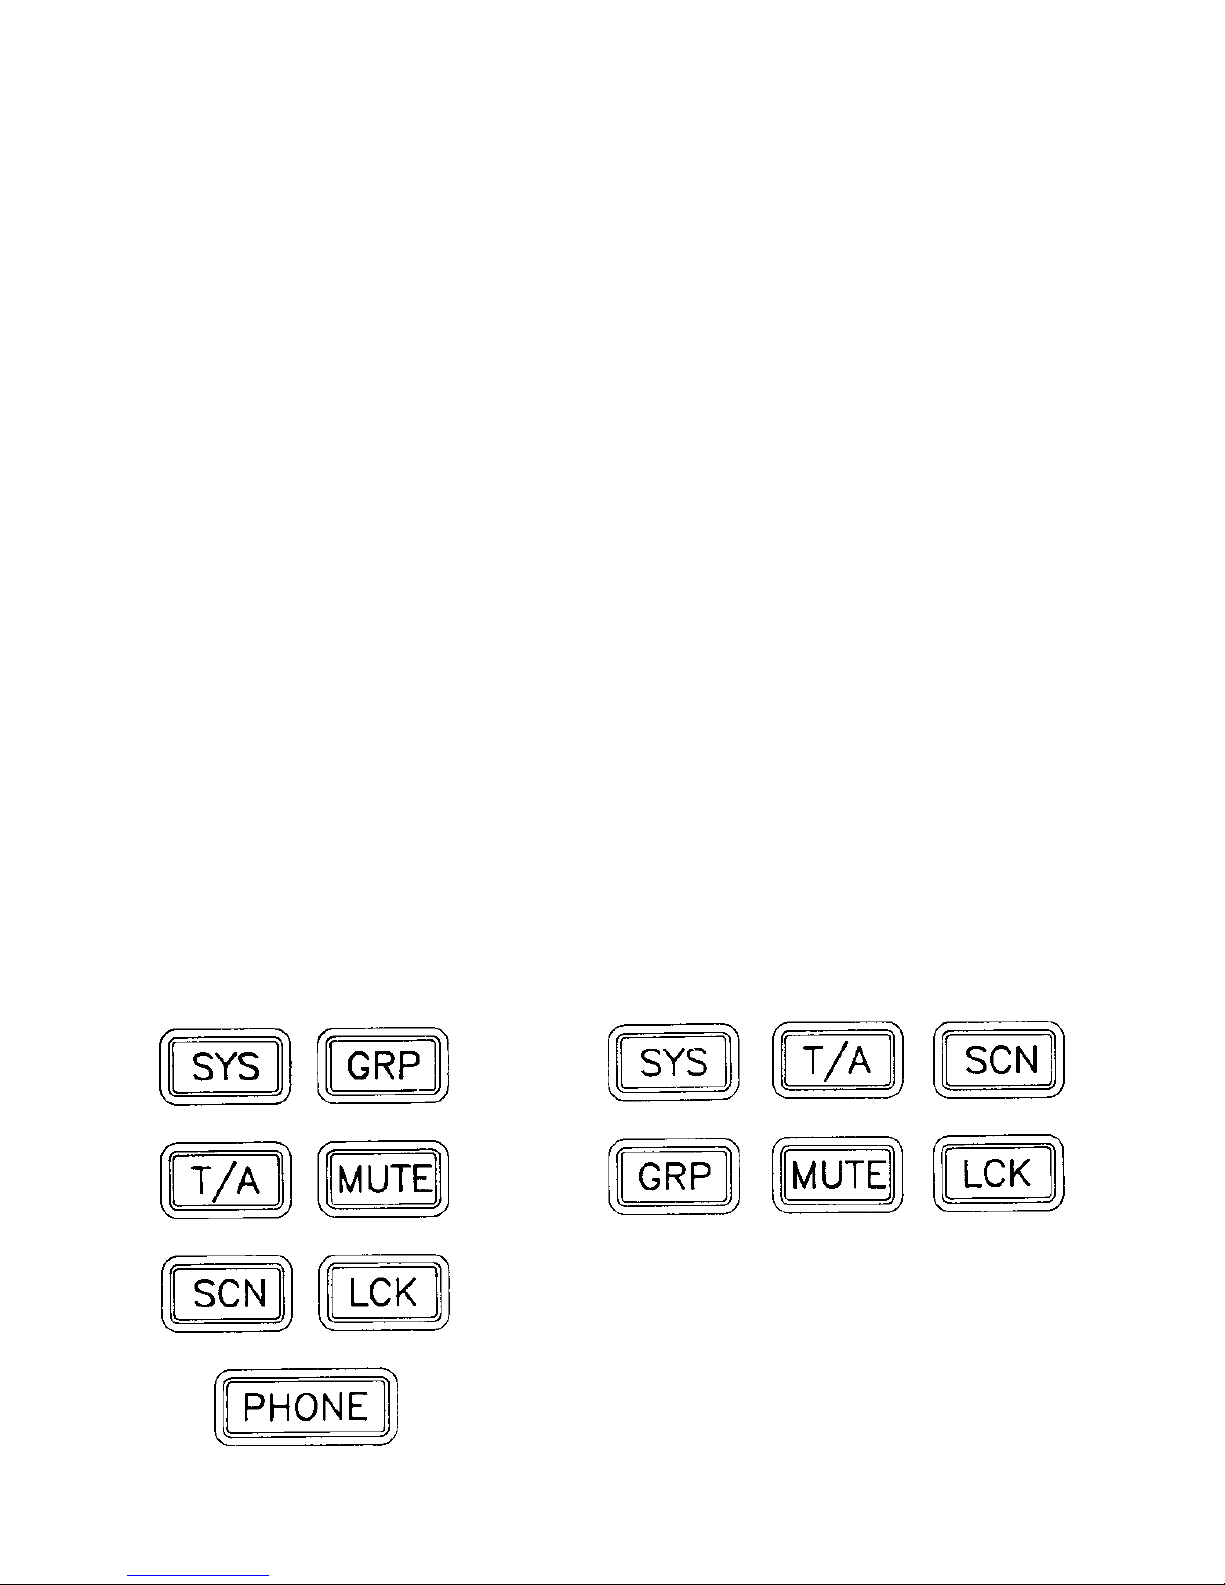
SCN "Scan" - Pressing this key initiates the scan feature.
When the SCN key is pressed followed by pressing either
the SYS (System) or GRP (Group) key, System scan or
Group scan is enabled. (See "Scan Modes").
LCK "Lock" - Disables keypad or used to lock System
or Systems out of the scan sequence so that they are not
scanned. This function is retained in memory and does not
need to be re-entered each time the radio is turned on.
(Refer to "Keypad Lock" or "System Lockout" for more
information).
PHONE "Phone" Mode (Model TP-4800 only) - Places
radio in or out of "Phone" mode. In "Phone" mode, activates
second function of dual function keys indicated by red
lettering on the radio and in parenthesis ( ) starting on next
page.
8
SND
STR
REC
CLR
Page 13

The following Keys are activated in "Phone" mode
(Model TP-4800 only) :
DTMF Keypad - Keys 0-9, and symbol keys "*" and "#"
for entering telephone numbers to send or store in memory.
NOTE: If more than 7 digits are entered or stored in a
memory location, a left facing arrow will appear at the
bottom of the LCD display. This represents there are more
digits entered than can be displayed. Only the last seven
digits entered are displayed. To display any digits not shown,
first (STR) "Store" the entire number into a memory location
and then use (REC) "Recall" to bring back the number. The
first digits will be displayed for 1 second and the remaining
7 digits will be displayed and remain shown until the function
is changed or the (REC) "Recall" key is again pressed.
9
!
SND
STR
REC
CLR
PHONE
SCN
LCK
T/A
MUTE
SYS
GRP
Page 14
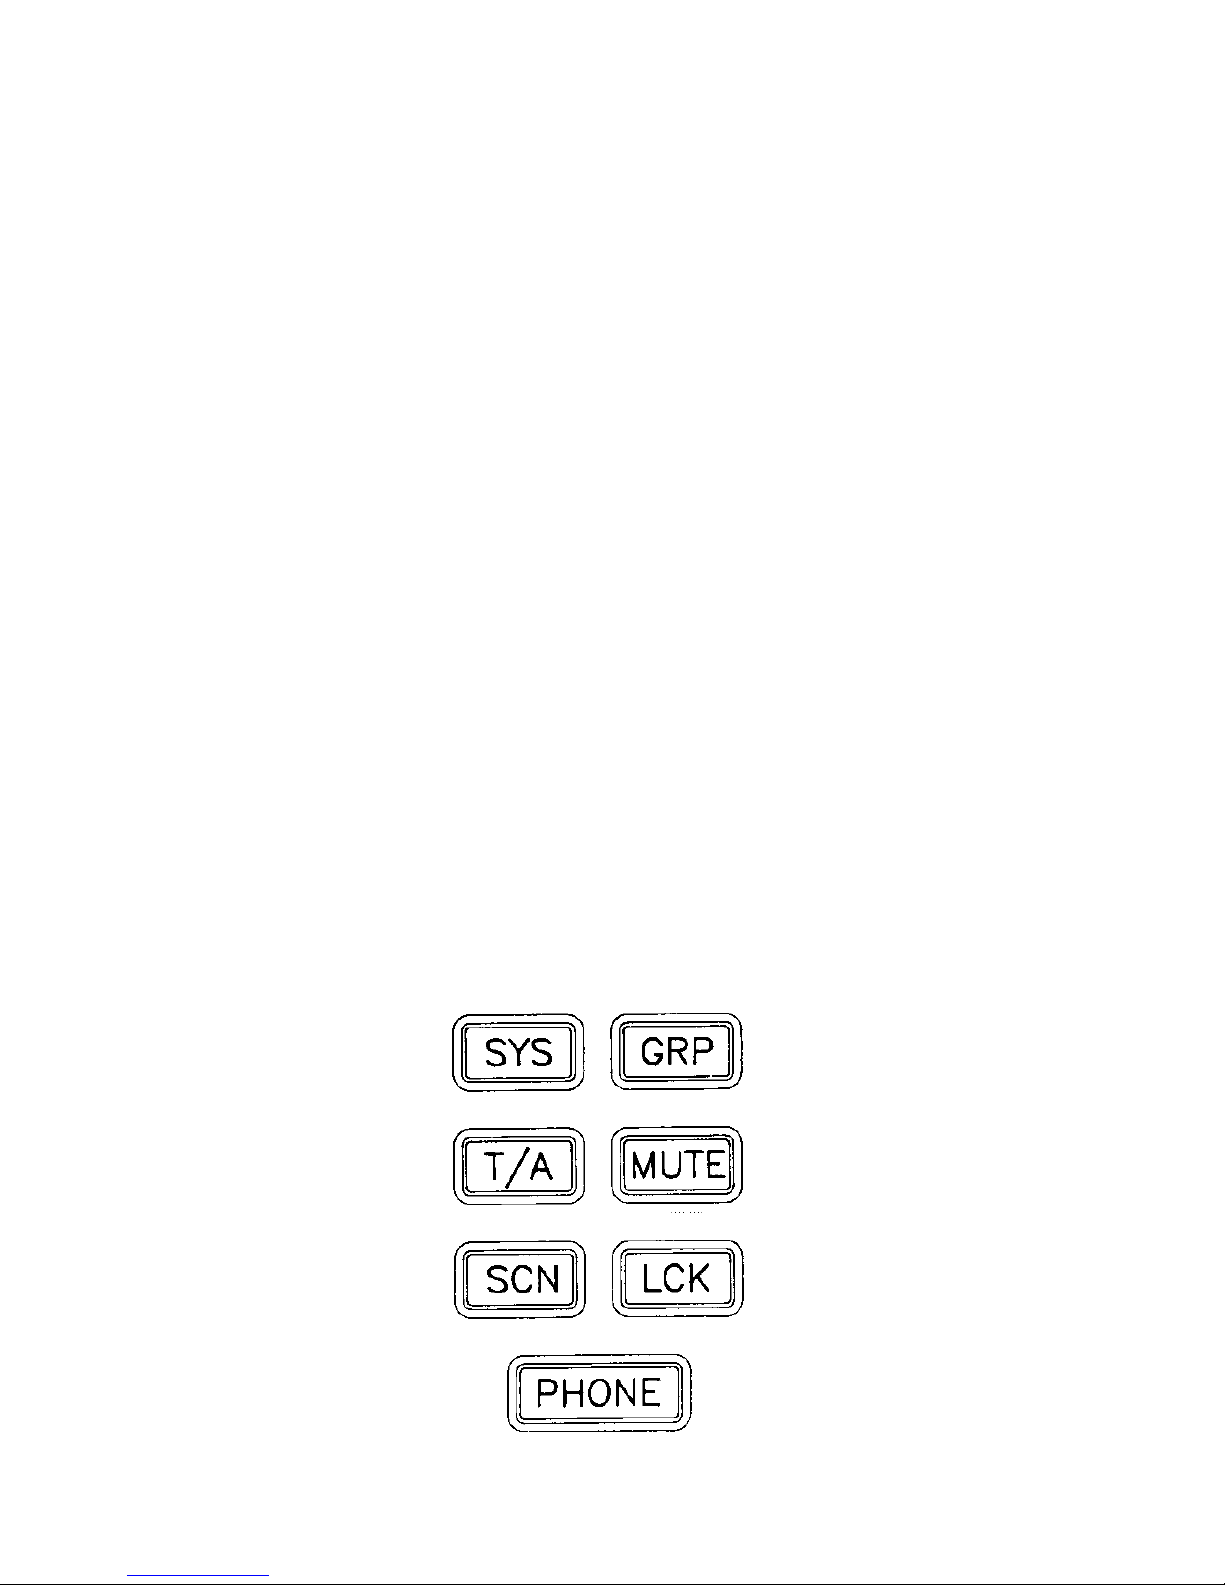
T/A (SND) "Send" - Transmits the telephone number
entered or recalled from memory on the LCD display.
MUTE (STR) "Store" - Stores a telephone number into
memory. To store a number shown in the LCD display,
press STR (Store) and a memory location number 1
through 8.
NOTE: Storing a displayed number will overwrite any
previously stored phone number!
SCN (REC) "Recall" - Used to recall a telephone number
from memory locations 1 through 8.
LCK (CLR) "Clear" - Deletes the last digit shown in the
display. To erase the display entirely, press "RECall" and the
"0" (zero) memory location. It is a dedicated "blank" display.
NOTE: The telephone number entered in the display will be
erased when the power is turned off.
10
SND
STR
REC
CLR
Page 15
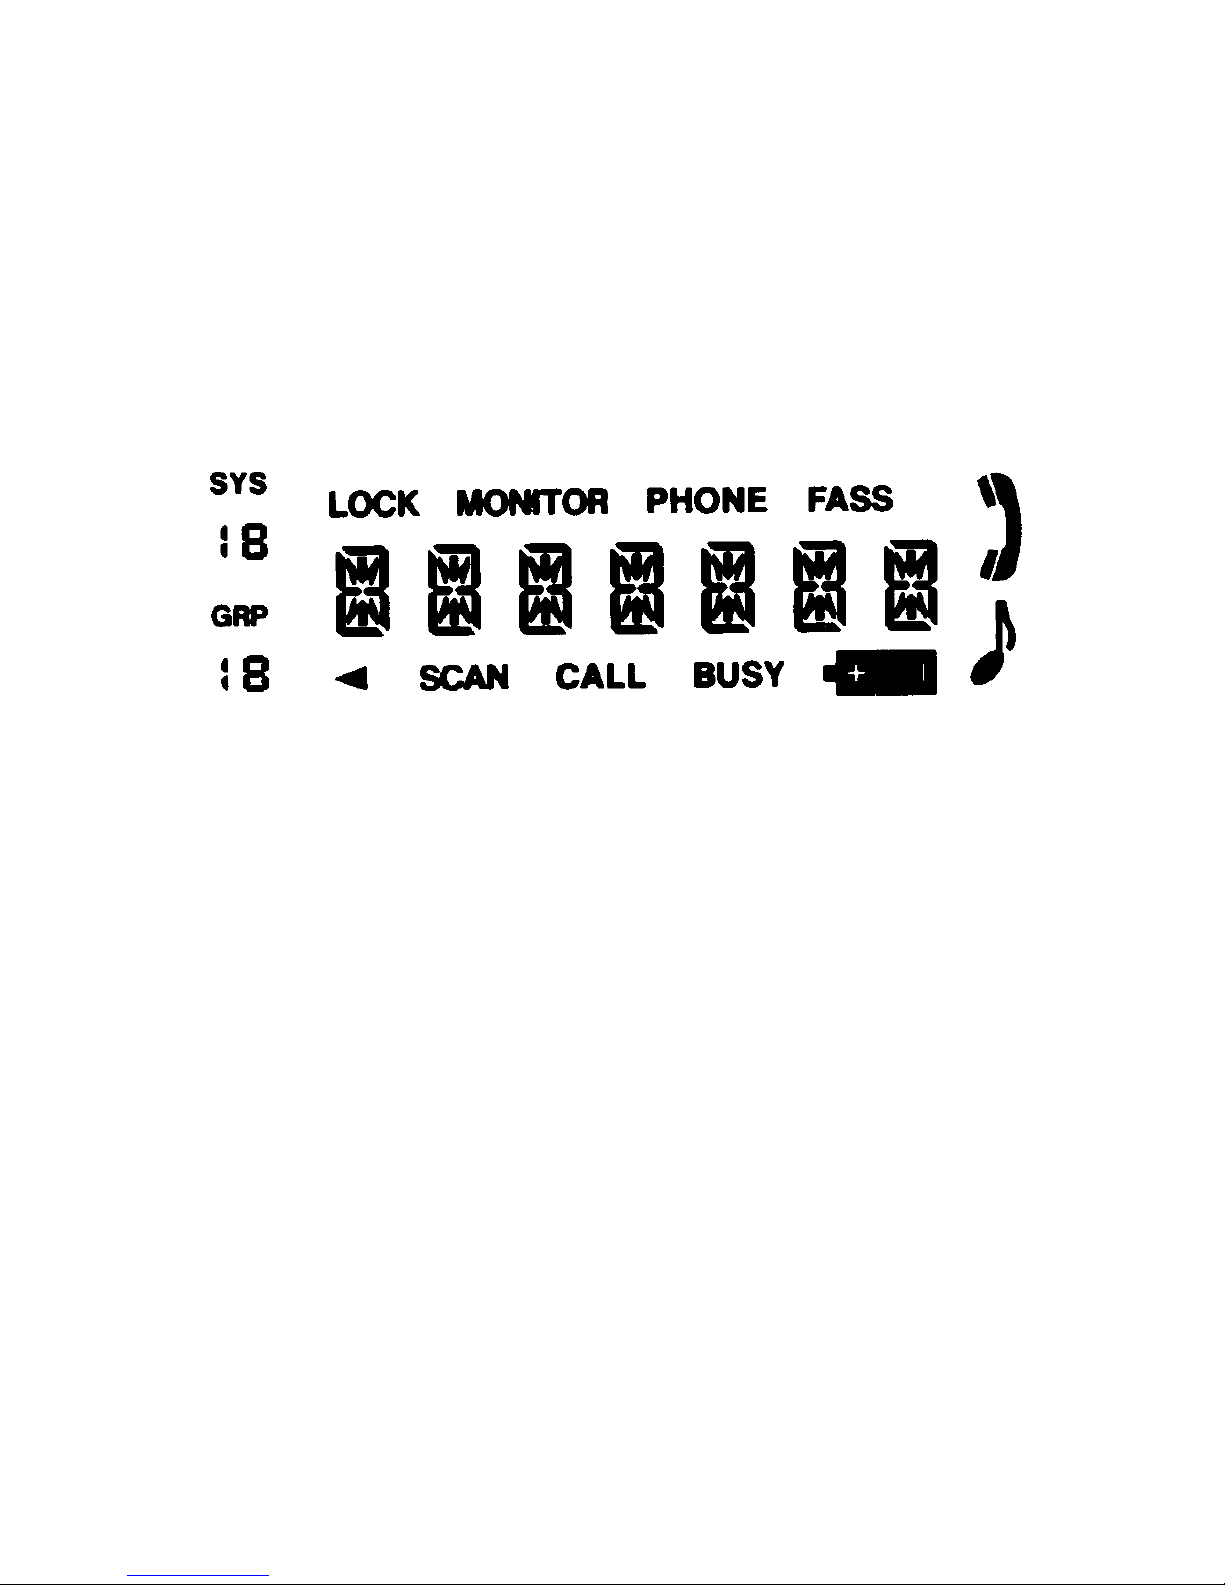
Display Information
Alpha-numeric Display - In the standard mode, this
7-character display identifies the selected System/Group
and those operating modes or error conditions as described
in "Display Messages". In the "Phone" mode, it indicates the
telephone number as well as the functions activated in
"Phone" mode (Model TP-4800 only).
SYS (System) -Displays above the System number
GRP (Group) -Displays above the Group number
LOCK -Indicates that the Keypad is disabled or
that System (or Systems) are locked out
of the scan sequence
MONITOR -Indicates that the "Monitor" mode has
been enabled by pressing the M Monitor
button in a Conventional System
PHONE -Indicates that the "Phone" mode has been
selected (Model TP-4800 only)
FASS -Indicates First Available System Scan has
been enabled
SCAN -Indicates that the "Scan" mode has been
selected by the SCN key
CALL -Indicates that a call has been received
BUSY -Indicates that the channel (Conventional )
or the System/Group (Trunked) you have
selected is busy
11
Page 16
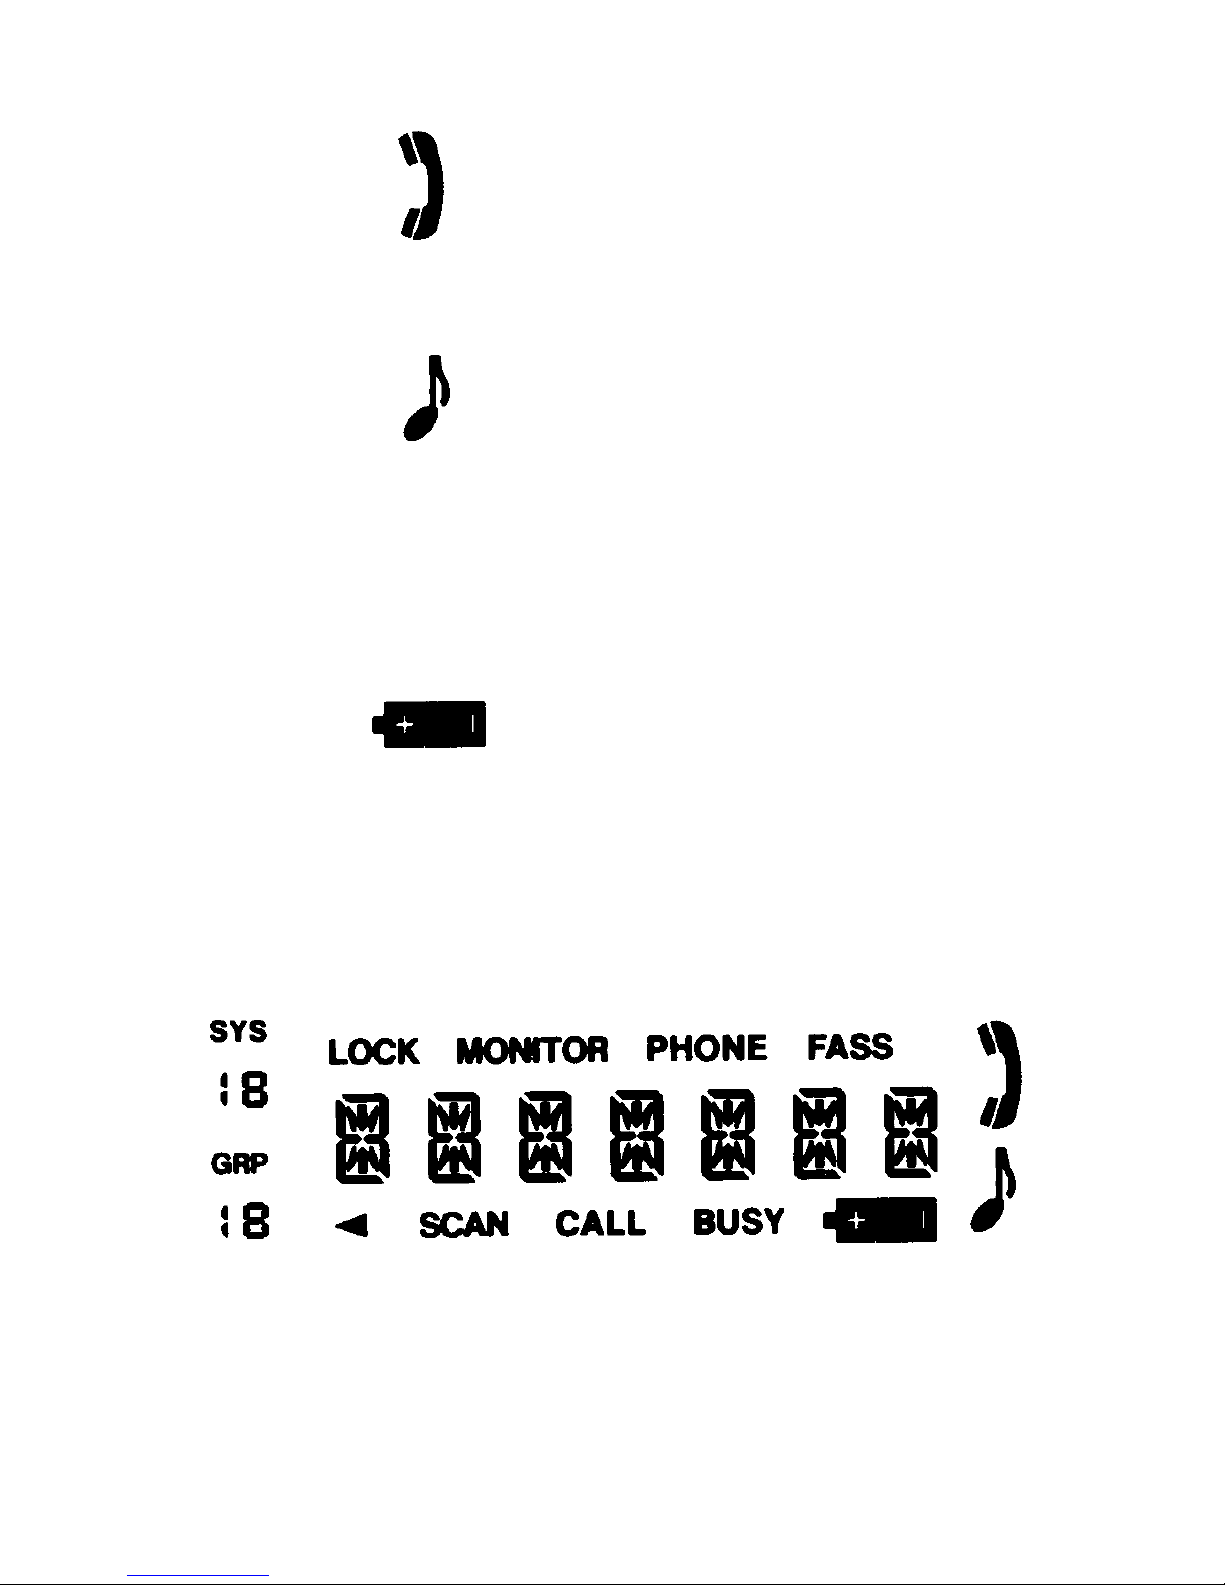
-Indicates that the displayed group
is programmed for telephone
interconnect (Model TP-4800
only)
-Indicates that the "key press"
tones are heard (Model TP-4800
only)
-Indicates that the battery is weak
and needs recharging
-Indicates that there are overflow
digits (the telephone number is
longer than 7 digits) (Model
TP-4800 only)
12
!
Page 17

TP-4800 Series Operation
NOTE: Fully charge your battery prior to operation.
Trunked and Conventional Mode
Your Maxon TP-4800 Series may be programmed to operate
with both Trunked and Conventional modes. Each System can
be individually programmed to operate in either the Trunked
or Conventional Systems. There are only a few differences in
their operation and these are detailed as follows.
Channel Monitoring
While on a Trunked System, channel monitoring is performed
automatically by the radio transceiver. In accordance with
the FCC Rules, while operating on a Conventional System
the channel must be monitored prior to transmitting. In both
Trunked and Conventional Systems, operation may vary from
System to System. Your Maxon Dealer will be able to assist
with particular operational parameters and procedures for the
various Systems and functions.
System "Handshaking"
In a Trunked System, when the P-T-T button is pressed, the
red TX indicator flashes momentarily to allow the transceiver
and System to connect properly. When the red TX indicator
glows steadily, voice transmission may begin. If your Maxon
Dealer has enabled the "Clear to Talk" tone option, the radio
will emit a short tone signalling voice transmission may occur.
In Conventional Systems, there is no System "handshaking"
and voice transmission may start immediately.
13
Page 18

Transmitting
A. Rotate the On-Off/Volume control clockwise to turn the
power on.
B. Adjust On-Off/Volume control further clockwise to
desired volume level. (Pressing any of the function
keys will provide a "key press" tone. Use this tone
to set desired audio level).
C. Press the "SYStem" and "GRouP" keys until the desired
System and Group are displayed.
D. If a Conventional System is selected, the channel must be
monitored before transmitting. Press and hold the M
Monitor button. This disables all squelch systems
and allows you to hear any transmissions on this
channel.
E. Press and hold the P-T-T button on the side of the
transceiver. (If a "Busy", "Intercept" or "Ringback"
tone is heard, refer to "Supervisory Tones"
descriptions for more information).
F. Listen for the "Clear to Talk" tone (or wait for the TX
indicator to glow steady) and begin talking. Hold
the transceiver 1 or 2 inches from your mouth,
speak clearly and distinctly into the microphone
area of the front grille.
G. Release the P-T-T button as soon as the message is
complete and listen for a response. The P-T-T
button must be pressed continuously while
talking and released to listen.
14
Page 19

Receiving
A. Turn power on and set the volume level as previously
described.
B. Select the desired System and Group.
C. When a message is received, the TX/Call indicator will
glow green.
D. Respond to message by pressing the P-T-T button on
the side of the transceiver. This switch must be
pressed continuously while talking and released to
listen.
If scanning, be sure to respond before scanning resumes,
if you do not, another call may be received and the selected
System and Group may have to be changed. Refer to
"System Scan" description for more information.
T/A - Talk Around
Talk Around mode, if enabled by your Maxon Dealer,
allows you to talk directly from radio to radio. This is
useful when your radios are out of range of any System.
If the radio can receive the System transmissions, then
Talk Around may be disabled.
A. Press the T/A key. The LCD display will indicate the
word "SIMPLEX" in place of the unique System /
Group identifier.
B. Transmit and receive as described in "Transmitting".
15
Page 20

Transpond Mode
If Transpond has been enabled by your Dealer, your radio
will automatically send (transpond) an acknowledgment to
the System indicating that your radio has received a transmission. Transpond is a Dealer programmable option.
Keypad Lock
LCK "Keypad Lock" - While your radio is on, this function
prevents inadvertant setting changes due to accidental key
presses.
A. To "Lock" Keypad - Press and hold the LCK key for
3 seconds and wait for 2 long beeps. The word
"LOCK" will blink in the upper left hand corner
of the LCD display to verify activation.
B. To "Unlock" Keypad - Hold the LCK key down for
3 seconds and wait for 3 short beeps. The word
"LOCK" will then disappear from the LCD
display.
NOTE:The "LCK" key will not work under two
conditions: 1) Editing phone numbers (while in the "Phone"
mode)(Model TP-4800 only) or 2) While in Manual System
or Group Scan mode.
Telephone Calls (Model TP-4800 only)
Telephone calls may be placed and received, provided that
your Dealer has programmed this feature into your Maxon
TP-4800 transceiver. The following instructions pertain to
placing telephone calls which are made in the Trunked mode
16
Page 21

17
only. Calls made in Conventional modes may vary depending
on the System setup. Consult your Maxon Dealer for specific
information.
Placing a Telephone Call (Model TP-4800 only)
Auto Interconnect Operation
A. Turn power on and set the volume as desired.
B. Select a System that contains an interconnect group.
The "telephone" icon will appear in the LCD
display. You may enter the phone mode from a noninterconnected group but the
System selected must
have at least one telephone interconnect Group.
(When the SND key is pressed the unit will
automatically select the first available interconnect
Group and transmit the displayed telephone
number).
C. Select the "Phone" mode by pressing the PHONE key.
The word "PHONE" will appear in the upper right
portion of the display.
D. Enter the number to be dialed, or recall a number from
memory locations 1-8, by pressing REC 1-8.
(Information on storing and recalling a number
from memory is detailed in the following sections).
E. Press the SND key. The Maxon TP-4800 will access the
Trunked Group, send the phone number and return
to the receive mode.
NOTE: In some Systems or with a very weak signal, it
may be necessary to press the P-T-T button to access
the dial tone and then press the SND key.
Page 22

18
F. When the called party answers, press the P-T-T button
to talk and release to listen.
G. To release the call (to hang up), press the P-T-T button
and press the pound sign (#) key for 1 to 2 seconds.
Release the P-T-T button.
NOTE: This step is important as well as good operating
practice. Pressing the pound sign (#) key instructs the
System that your call is completed. Additional interconnected billing time may be incurred before the System
automatically terminates the call. In most Systems this is 30
seconds, however it may vary. Consult your Maxon Dealer
for specific details.
Manual or Direct Dialing
A. Turn power on and set the volume as desired.
B. Select the System and Group that has been programmed
for telephone calls. The "telephone" icon will appear
in the LCD display.
C. Press and hold the P-T-T button to obtain the System
"Handshake". The red "TX" LED will glow
continuously and the Clear-To-Talk tone will sound
(if programmed).
D. Momentarily release the P-T-T button and listen for the
dial tone.
E. Press and hold the P-T-T button while "keying" the
telephone number using the DTMF keypad.
Page 23

19
F. Release the P-T-T button.
G. When the called party answers, press the P-T-T button to
talk and release to listen.
H. To release the call (to hang up), press the P-T-T button
and press the pound sign (#) key for 1 to 2 seconds.
Release the P-T-T button.
Receiving a Telephone Call
A. Turn power on and set the volume as desired.
B. Select or scan the System and Group programmed for
telephone calls. (When a Group programmed for
telephone calls is selected, the "telephone" icon
appears in the display).
C. When a telephone ringing sound is heard from the
speaker, answer the call in the normal manner
(press the P-T-T button to talk and release it to
listen). It is not necessary to select the "Phone"
mode to receive a call.
D. When the call is finished, release the System by pressing
the P-T-T button and the pound sign (#) key for 1 to
2 seconds.
NOTE:
This step is important as well as good operating
practice. Pressing the pound sign (#) key instructs the System
that your call is completed. Additional interconnected billing
time may be incurred before the System automatically terminates
the call. In most Systems this is 30 seconds, however it may vary.
Consult your Maxon Dealer for specific details.
Page 24

Additional Telephone Calling Information
Entering Telephone Numbers (Model TP-4800 only)
A. Press the PHONE key to enter the "Phone" mode.
The word "PHONE" will appear in the upper
right portion of the display. The numeric DTMF
telephone keypad is now enabled.
B. Enter the desired telephone number by pressing the
corresponding number keys.
The Maxon TP-4800 allows you to enter the telephone
number at any desired rate. Errors can be corrected before
sending the telephone number to be dialed. Numbers up to
14 digits in length can be entered. When there are more than
7 digits entered, the overflow icon will appear in the
lower left portion of the LCD display, next to the Group
number. Numbers which have been stored into memory
locations 1 through 8 and recalled will momentarily display
the first overflow digits, and then the last 7 digits entered.
Clearing Telephone Numbers (Model TP-4800 only)
When a phone number has been entered, it will remain in the
display whenever you enter "Phone" mode. To erase the last
digit entered depress the CLR key. To erase the entire
number, press CLR until no information is displayed (CLR,
CLR, CLR, etc.).
Tip: To quickly erase an entire number from the display,
press "RECall" and the "0" (zero) memory location. It is a
dedicated "blank" display.
20
!
Page 25

21
To Store a Number In Memory (Model TP-4800 only)
A. Press PHONE key to place the unit into the "Phone"
mode.
B. Enter the desired number. Example:
1 8 1 6 8 9 1 6 3 2 0
C. Press STR.
D. Press memory location 1 through 8 (for example, "2").
The number 1 816 891 6320 is now stored in
memory location 2.
E. Clear the existing digits by pressing CLR until no infor-
mation remains in the display.
F. Repeat above steps for other desired memory locations.
To Recall a Number Stored In Memory
(Model TP-4800 only)
The stored numbers can now be recalled and sent by
selecting the PHONE mode, pressing REC, the desired
memory number 1 through 8, and then SND.
Page 26

22
Scan Modes
General
Both System Scan and Group Scan are available in Maxon's
TP-4800 Series radio. Although your Maxon Dealer will
explain which option(s) he has programmed for you, the
following is a description of each.
System Scan
System Scan is initiated by pressing SCN SYS. To exit
Scan mode, press SCN and hold for 2 seconds. Scan mode
is indicated by the word "SCAN" displayed in the lower left
portion of the display. When scanning is actually occurring,
the words "IN SCAN" appear in the display in place of the
unique group identifier. In addition, the System numbers are
incremented. Scanning is sequential through all Systems,
Trunked and Conventional, unless they are locked out of
scan as described under "System Lockout". When an
incoming call is detected, scanning stops and the call is
received. The display will indicate the System and Group
identifier from which the call was received and the word
"SCAN" in the lower left portion of the display. When the
incoming call is complete, scanning resumes after a predetermined pause. (See "Scan Resume Delay" for additional
information regarding the pause).
System Lockout
All Systems, Trunked and Conventional, are scanned in
System Scan Mode. If you desire not to scan a particular
System, select that System with the SYS key and press the
LCK key. The word "LOCK" appears in the upper left
Page 27

23
portion of the display and that System will be deleted from
the scan list. When System Scan is initiated, the word
"LOCK" will be shown in the upper left portion of the
display along with the words "IN SCAN" denoting a
System or Systems have been locked out of scan. To restore
a System to the scan list manually select the "LOCKed"
System and press the LCK key. The word "LOCK" will
disappear and the System will now be scanned while in the
System Scan Mode. The "LOCK" information is stored in
memory and will not be affected by turning the power switch
off.
Group Scan
There are two different ways the TP-4800 Series does
Group Scanning. Your Maxon Dealer programs these
functions into the radio during initial setup. Only those
Groups your Dealer has “enabled” for Group Scan can
be scanned. Group scan is not available in Conventional
Systems.
Auto Group Scan
There is no action required to initiate Auto Group Scan.
Whenever a System is selected that is programmed for Auto
Group Scan, those Groups "enabled" will automatically be
scanned. When an incoming call on any "enabled" Group is
detected, the radio will switch to this Group, display the
Group number, and unique identifier. The radio will remain
on this Group until a message comes from another "enabled"
group, the SYStem key, and / or the GRouP key is pressed.
Page 28

24
Manual Group Scan
To initiate Manual Group Scan press SCN GRP. To exit
Group Scan mode, press SCN and hold for 2 seconds. Scan
mode is indicated by the word "SCAN" displayed in the
lower left portion of the display. When Group Scan is
actually occurring, the words "IN SCAN" appear in the
display in place of the unique group identifier. Group Scan
occurs only on those Groups "enabled" by your Maxon
Dealer for the selected System. When an incoming call is
detected, scanning stops and the incoming call is received.
The display changes to indicate the Group identifier on which
the call was received and the word "SCAN" in the lower left
portion of the display remains. When the incoming call is
complete, after a brief pause, scanning resumes. (See "Scan
Resume Delay" for additional information regarding the
pause).
Transmitting While Scanning
When a message is transmitted while scanning (i.e. the
words "IN SCAN" show in display), Dealer programming
determines if it is transmitted on the "Last Active (floating)"
or on a pre-set "Home" System and Group. The following
describes operation for each configuration.
Last Active (Floating) System and Group
During Scan (i.e. the words "IN SCAN" show in the display)
when you press the P-T-T button, you will transmit on the
System and Group that were selected prior to entering Scan
mode. If scanning stops for an incoming call, and you press
the P-T-T button during the pause prior to scanning resuming,
you will transmit on the System and Group displayed.
Page 29

25
Last active (floating) programming allows you to respond
(transmit) to an incoming call during Scan mode without
having to press the SYStem or GRouP keys.
"Home" System and Group
The "Home" System and Group are the System and Group
in which you require priority to transmit on. This is usually
the System and Group on which you will receive and
transmit most of your calls.
When you press the P-T-T button during scanning (i.e. "IN
SCAN" appears in the display) your TP-4800 Series radio
will
always transmit on the "Home" System and Group. This
applies whether scanning has stopped for an incoming call or
not.
Scan Resume Delay
After a message is received or transmitted in the "Scan"
mode, there is a delay period of 1-7 seconds before scanning
resumes. The exact length of this delay is programmed
by your Dealer. When a message is received, this delay
allows you to respond without having to change the selected
System and Group. If you do not respond until after scanning resumes (the words "IN SCAN" reappear in display),
another call may be received and the response may not
occur on the desired System or Group.
NOTE: If a "Home" System and Group is programmed for
scanning, then the above Scan Resume Delay does not allow
you to respond to the incoming call . Your transmission will
always be on your programmed "Home" System and Group.
Page 30

26
RX Priority
Your Maxon Dealer may have programmed a Group ID as
an RX PRIORITY (Receive Priority) ID. Whenever your
radio receives this ID, the LCD display will show the words
"RX PRI" in place of the normal alphanumeric System /
Group identifier. "RX PRI" will remain in the display until
you press any button or key on the radio. An RX priority
message takes priority over any other message, other than
a telephone interconnect message.
First Available System Scan
When you are Out of Range of any System when trying to
transmit, First Available System Scan (FASS) will scan
all Systems programmed and look for the first System that
is in range of the radio.
To enter First Available System Scan (FASS), rotate the
On-Off/Volume control counter clockwise to detent,
shutting off power to radio. Press and hold the SCN key
while turning the radio power back on. The word "FASS"
will show in the upper right portion of the display. When
you attempt to transmit and the selected System is out of
range, the radio will emit a short tone indicating the System
is out of range and "FASS" mode has started. When the
radio detects a System in range, scanning will stop and the
radio will emit a short series of tones (auto ringback tone)
to indicate a System is in range. Normal operation may
resume. To exit "FASS" mode, press SCN.
Page 31

27
Trunked Supervisory Tones
Busy Tone
This tone is similar to the standard telephone busy tone and
it indicates that the radio System is currently "busy". The
tone sounds for as long as the P-T-T button is pressed, and
the word "BUSY" appears in the lower right portion of the
display while this tone is sounding. If the Clear-to-Talk tone
is programmed, the "Busy" tone does not sound except when
making a telephone call. If "TX INHIB" is displayed while
this tone is sounding, the selected group is temporarily busy.
Intercept Tone
This is a siren-like tone (alternating high and low tones)
which indicates the following error conditions:
1) If this tone sounds after the transmit indicator flashes
several times and "RANGE" appears in the display, an
out-of-range condition is indicated. To complete a call, you
may need to get closer to your radio System. Once this tone
sounds, no more access attempts are made until the P-T-T
button is released and then pressed again.
2) If this tone sounds after the transmitter has been on for
an extended period and "TX TIME" also appears in the
display, the transmitter has been disabled by the Time-OutTimer feature.
Clear-To-Talk
When the Clear-To-Talk feature is programmed, it emits a
short tone which indicates when speaking can begin. (Refer
Page 32

28
to "Clear-To-Talk" description for more information).
Key Press Tone
This is a short tone that sounds to indicate when a key is
pressed. This tone can be enabled and disabled by pressing
the MUTE key.
NOTE: The following tones are heard only when
making telephone calls .
Reorder Tone (Model TP-4800 only)
Three beeps which indicate that the call has been terminated
by the System.
Return Time Warning Tone (Model TP-4800 only)
Two beeps which indicate that you have not transmitted
recently. If you do not transmit within 5 seconds, the call
will be terminated. The time between transmissions is one
of the parameters used by the System to determine when
a call is finished (if the pound sign (#) key has not been
detected).
Conversation Time-Out Tone (Model TP-4800 only)
Calls are limited to a certain length by the System. Thirty
seconds before this time is reached, a "tick" begins sounding
each second. When the thirty-second period expires, the
call is automatically terminated.
Page 33

29
System Ringback Tone (Model TP-4800 only)
If in First Available System Scan mode or after receiving
a "Busy" indication when attempting to access a System
(Trunked or Conventional), the TP-4800 will emit a one
second "ring" to indicate a System is now available.
Page 34

Display Messages
RANGE: This message accompanied by an intercept tone
(a "warbling" siren-type tone) indicates that the TP-4800
Series radio is Out Of Range, or too far from System site
to provide communications.
BUSY: Indicates that the channel is busy. This message is
accompanied by the intercept tone.
TX Time: This message indicates that the transmit TimeOut-Time has been exceeded. This message is accompanied
by the intercept tone.
TX DSBL: Transmit is disabled, allowing only reception
of signals. This message will be displayed and the warbling
intercept tone will sound. (Dealer programmed).
TX INHIB: Indicates that the frequency or Group selected
is temporarily busy. This message is accompanied by the
intercept tone. Try your transmission again in 15 to 30
seconds.
UNLOCK: This message indicates that the synthesizer has
become "unlocked". If this message should be displayed,
take the radio to your Maxon Dealer for service.
RX PRI: Indicates that a call has been received on a programmed priority channel. (Dealer programmed).
IN SCAN: Indicates that the Scan function has been
enabled.
30
Page 35

Battery Charging and Care
! WARNING !
Do not dispose of the battery pack in fire - it may explode,
causing injury or death.
Do not replace the battery in hazardous atmosphere
locations.
Your Maxon TP-4800 Series radio comes supplied with
one 7.2 volt 1100 mAh Ni-Cad battery pack, which can
be recharged from 500 to 1000 times before requiring
replacement. The actual number of charge / recharge
cycles vary depending upon usage.
We recommend that the battery be charged from 14 to 16
hours on the first charge cycle and then in accordance with
the charger model instructions thereafter. Although many
battery manufacturers no longer specify that the battery be
discharged completely (to a point where the unit no longer
operates) and recharged once per month, Maxon recommends
that this procedure be carried out, thus ensuring maximum
battery life.
To remove the battery pack, push up on the battery latch
and slide the battery pack to the right. To replace the battery,
align the battery on the track and slide to the left until a click is
heard, indicating the battery is correctly installed.
If the battery is to be charged while attached to radio, ensure
that the power switch is in the "Off" position before starting to
charge. Failing to turn the power switch "Off" during the
charge cycle will result in a less-than-full-charge condition,
which will noticeably reduce the operating time between
charges!
31
Page 36

32
Normal battery operation time is 8 hours. This may vary
depending upon how much the receiver audio is present
and how much you transmit. The actual time may vary
from day to day depending upon operational requirements.
Recycling/Disposal of Batteries
The U.S. Environmental Protection Agency (EPA) classifies
used Ni-Cd batteries as hazardous waste, unless certain
exemptions apply.
The battery should be recycled at the end of its useful life.
Under various state or local laws, such batteries must be
recycled or disposed of properly and cannot be dumped in
landfills or incinerators.
Maxon America, Inc. fully endorses and encourages the recycling of Ni-Cd batteries. A national program to collect and
recycle used Ni-Cd batteries is being implemented by the
Rechargeable Battery Recycling Corporation (RBRC™ ).
This program is being funded through the use of license fees
paid by the battery and product manufacturers to place the
RBRC Seal on the batteries.
The following is a list of recycling facilities where the
batteries can be shipped to be recycled. Contact these
facilities for proper packaging and shipping guidelines.
INMETCO Within New Jersey,
245 Portersville Road Wade Environmental Industries,
Ellwood City, PA 16117 Battery Division
TEL: (412) 758-2802 293-C Jackson Road
FAX: (412) 758-9311 Atco, NJ 08004
TEL: (609) 767-2760
FAX: (609) 767-0698
Within Minnesota,
U.S. Filter Recovery Services, Inc.
2430 Rose Place
Roseville, MN 55113
TEL: (800) 732-3226
FAX: (612) 788-0312
Page 37

Extended Operations
When operating in "Fringe Areas" at some distance from
the System, the other party may not receive your transmission clearly. Also you may notice that the background noise
will increase on received signals. Moving to higher ground
or moving closer to the System will help alleviate these
problems. If moving closer to the System is not practical,
communication may be improved by moving away from
shielding structures. If you are in a building interior, move
closer to a window (preferably one generally in the direction
of the System). At 800 MHz the wave length is very short,
sometimes moving a few inches to a few feet can make
significant signal strength changes. Finding the best location
can also be done while listening to the background noise
while moving about; attempt to find a spot where the
background noise is reduced to a minimum or eliminated
entirely. This may make the difference from not being
heard, to being heard loud and clear when operating in the
fringe areas of your System coverage.
The fringe distance will vary greatly from plains areas, hilly
terrain and mountaintop sites.
Consult your Maxon Dealer regarding the specific operational range and coverage of the System(s) programmed
into your TP-4800 Series radio.
33
Page 38

FCC Licensing
This unit may or may not require a specific FCC license to
operate. The FCC requires all transmitters in the conventional and some Trunked Systems to be licensed by the
Federal Communications Commission. Some Trunked
operations now are exempt from individual licensing
requirements but must be operated in a licensed System.
Consult your Maxon Dealer regarding specific licensing
information, or contact the Federal Communications
Commission.
For more information regarding the FCC license application
(Form 571), call 717-337-1212 for additional information
or contact the FCC District Office nearest your location.
34
Page 39

35
Transceiver Service
There are no user serviceable components inside the Maxon
TP-4800 Series radio. Altering the internal components
or adjustments may result in illegal emissions, including
off-frequency operation, or damage to the radio.
Should an "UNLOCK" condition be shown in the LCD
display, or the LCD fail to display information, or all icons
and display segments are shown, turn the power switch
"Off" then "On " to reset the microprocessor. Ensure that
the battery is fully charged and check that the antenna is
securely tightened.
If the radio still fails to operate properly, refer to an
Authorized Maxon Dealer for servicing.
Page 40

TP-4800 Series Product Warranty *
Maxon America, Inc. (herein "Maxon") warrants to the first
end user only, each new radio product manufactured or supplied
by it to be free from defects in material or workmanship under the
conditions of normal use and service for two (2) years for parts
and labor. The warranty period begins on the date of purchase
from an Authorized Maxon Sales and Service Outlet.
In the event of a defect, malfunction or failure during the
warranty period, Maxon will repair or replace, at its option,
the radio product or part(s) therein which upon examination by
Maxon shall appear to be defective or not up to factory specifications. Maxon will pay labor charges incurred in providing the
warranty service, against its rate schedule.
To obtain in-warranty or out-of-warranty service, the defective
product should be returned to the Authorized Maxon Sales
and Service Outlet from where it was purchased. Any and all
requests for warranty service must be accompanied by proof of
purchase, such as a bill of sale or cancelled check. The user is
responsible for the payment of any charges or expenses incurred
for the removal of the product from the vehicle or other site
of its use, for the installation of the repaired unit in such site,
for the transportation of the product to the place of repair and
for the return of the repaired product to its site of use.
The limited warranty does not extend to products which have
been subject to misuse, neglect, accident, incorrect wiring,
improper installation, catastrophe, the fault or negligence
of the user, or the use of the product in a manner for which
it was not designed. Nor does the warranty extend to units
on which the serial number has been removed, defaced or
changed. Maxon reserves the right to make changes or
improvements in its products during subsequent production,
Page 41

without incurring the obligation to install such changes or
improvements on previously manufactured equipment.
Maxon’s sole obligation hereunder shall be to repair or
replace the product covered in the above warranty.
THE EXPRESS WARRANTIES CONTAINED HEREIN
ARE IN LIEU OF ALL OTHER WARRANTIES, EITHER
EXPRESSED OR IMPLIED OR STATUTORY, INCLUDING, WITHOUT LIMITATION, ANY WARRANTY OF
MERCHANTABILITY OR FITNESS FOR A PARTICULAR
PURPOSE.
FOR ANY PRODUCT WHICH DOES NOT COMPLY
WITH THE WARRANTY SPECIFIED, THE SOLE REMEDY WILL BE REPAIR OR REPLACEMENT. IN NO
EVENT WILL MAXON BE LIABLE TO THE BUYER OR
ITS CUSTOMERS FOR ANY DAMAGES, INCLUDING
ANY SPECIAL, INCIDENTAL, INDIRECT, OR CONSEQUENTIAL DAMAGES, OR FOR THE LOSS OF PROFIT,
REVENUE OR DATA ARISING OUT OF THE USE OF
OR THE INABILITY TO USE THE PRODUCT, EVEN IF
MAXON HAS BEEN ADVISED OF THE POSSIBILITY
OF SUCH POTENTIAL LOSS OR DAMAGE.
* This warranty is void for sales and deliveries outside of the U.S.A.
For sales outside the U.S.A., contact Maxon America or your local
Maxon Dealer.
Page 42

Maxon America, Inc.
10828 NW Air World Drive
Kansas City, Missouri 64153
816 / 891-6320
Fax: 816 / 891-8815
Printed in Korea ---- P/N 936923A
 Loading...