

Maxon SP-150 Instructions Manual
SP-150 Series
UHF Trunked, Scanning
Portable Radio
Operating
Instructions

Table of Contents
About Your SP-150 / About Maxon America, Inc.
Safety Information
Unpacking Information
SP-150 Features
Description of Radio Components
Antenna Installation
Installing and Removing the Battery Pack
Attaching and Removing the Belt Clip
Battery Charging and Care
Accessory Connector
SP-150 Operation
Channel Monitoring
System "Handshaking"
Busy System Queuing
Talk-Around
Transpond Mode
Power On - Volume - Power Off
Transmitting on a Trunked System
Receiving on a Trunked System
Conventional Mode Operation
Transmitting on a Conventional System
Receiving on a Conventional System
Option Buttons
Status Indicators and Audible Alert Tones
Scan Modes
LTR®Manual Group Scan
LTR® Auto Group Scan
System Scan
Editing Group Scan List
Adding to Scan List
Deleting from Scan List
Priority Look Back
Conventional Scanning
Talk Back Scan
RX Only / TX Disable
Priority TX Scan
Priority Only TX
Priority Look Back Scan
Vacant Channel Scan
Nuisance Delete
Licensing and Service Information
Recycling / Disposal of Batteries
Software Copyrights
Maintenance
Product Warranty
.............................1
.............................................................................2
.....................................................................3
...............................................................................3
.....................................................4
...........................................................................5
.........................................5
..............................................5
................................................................6
.........................................................................6
..............................................................................7
..................................................................7
...............................................................7
................................................................7
..............................................................................8
.......................................................................8
..............................................8
............................................8
...............................................9
.................................................9
.....................................9
........................................10
................................................................................10
........................................11
.....................................................................................12
.........................................................12
...........................................................13
............................................................................13
...................................................................13
.................................................................14
..........................................................14
..........................................................................14
...................................................................14
........................................................................15
.............................................................15
......................................................................15
......................................................................15
..........................................................15
...............................................................16
.....................................................................16
..................................................16
....................................................17
........................................................................18
...................................................................................18
............................................................................19

Contenido
Acerca de su radio SP-150 / Acerca de Maxon America, Inc.
Información de seguridad
Información de desembalaje
Características del SP-150
Descripción de los componentes del radio
Instalación de la antena
Instalación y desmontaje de la batería
Colocación y remoción de la presilla para el cinturón
Carga y mantenimiento de la batería
Accesorio conector
Operación del SP-150
Monitoreo de canales
Establecimiento de comunicación del sistema
Espera por sistema ocupado
Conversación libre
Modo de transpondedor
Encendido - Volumen - Apagado
Transmisión en un sistema con troncal
Recepción en un sistema con troncal
Operación de modo convencional
Transmisión en un sistema convencional
Recepción en un sistema convencional
Botones de opción
Indicadores de estado y sonidos de alerta
Modos de escaneo
Escaneo de grupo manual LTR
®
Escaneo de grupo automático LTR
®
Escaneo del sistema
Edición de la lista de escaneo de grupo
Agregar a la lista de escaneo
Borrar de la lista de escaneo
Retroceso prioritario
Escaneo convencional
Escaneo de respuesta
Recepción solamente / Transmisión desactivada
Escaneo de transmisión prioridad
Transmisión sólo prioridad
Escaneo de retroceso prioritario
Escaneo de canal vacante
Eliminación de perturbaciones
Licencias e información de servicio
Reciclado y desecho de baterías
Derechos de autor del software
Mantenimiento
Declaración de garantía
..........20
................................................................21
............................................................22
................................................................22
..........................................23
....................................................................24
.............................................24
.....................24
...............................................25
...........................................................................25
.....................................................................26
..............................................................26
.........................26
.....................................................26
..................................................................27
..........................................................27
.............................................27
.....................................28
.......................................28
...........................................28
.................................29
...................................29
...........................................................................30
........................................31
...........................................................................32
................................................32
...........................................33
.................................................................33
...........................................33
....................................................34
....................................................34
........................................................................34
......................................................................34
................................................................35
.....................35
............................................35
.......................................................35
..............................................36
.........................................................36
................................................36
.................................................37
......................................................37
......................................................38
................................................................................39
...................................................................40

Table des matières
À propos de votre appareil radio SP-150 / Maxon America, Inc.
Renseignements sur la sécurité
Renseignements sur le déballage
Caractéristiques du SP-150
Descriptions des composants du système radio
Installation de l’antenne
Comment installer et enlever la batterie d’alimentation
Comment attacher et enlever la pince de ceinture
Chargement et entretien de la batterie
Connecteur accessoire
Comment opérer le SP-150
Contrôle de canaux
Mise en liaison du système
Mise en file du système d’attente d’occupation
Contournement du système
Mode de réponse
Mise en marche - Volume - Arrêt
Transmission sur un système d’interconnexion
Réception sur un système d’interconnexion
Opération au mode classique
Transmission sur un système classique
Réception sur un système classique
Boutons d’options
Indicateurs d’état et d’alerte sonores
Modes de balayage
Balayage manuel de groupes LTR
®
Auto-balayage de groupes LTR
®
Balayage de système
Mise à jour de liste de balayage de groupes
Comment ajouter à la liste de balayage
Comment enlever de la liste de balayage
Retour de détection de priorité
Balayage classique
Balayage d’interphone
Récepteur seulement / Émetteur hors service
Balayage de TX de priorité
Emetteur seulement de priorité
Balayage de retour de détection de priorité
Balayage de canal disponible
Suppression de brouillage
Renseignements d’autorisation et de service
Recyclage / Élimination des batteries
Droit de reproduction réservé du logiciel
Entretien
Garantie de produit
....41
.......................................................42
....................................................43
..............................................................43
...............................44
..................................................................45
..................45
..........................45
............................................46
....................................................................46
.............................................................47
.................................................................47
......................................................47
.......................48
.....................................................48
....................................................................48
............................................48
........................49
............................49
..................................................49
.....................................50
.........................................50
............................................................................51
...............................................52
.........................................................................53
...........................................54
................................................54
...............................................................54
...................................54
...................................55
...............................55
.......................................................55
...........................................................................56
............................................................56
.........................56
......................................................56
..............................................57
............................57
..................................................57
.......................................................57
..................................58
..............................................58
.......................................59
..........................................................................................60
........................................................................61

.............62
...........................................................63
....................................64
.................................................................64
..............................................65
.........................................................................66
.......................................................66
.......................................66
.............................67
....................................................................67
........................................................................68
.........................................................68
...........................................68
..........................................69
.................................................................69
...............................................69
.........................................................69
.................................70
....................................70
............................................70
...............................71
...................................71
.............................................................................72
...............................73
........................................................................74
............................................75
.......................................75
...............................................................75
............................................76
.....................................76
................................76
............................................................77
..................................................................77
...............................................77
...........................77
..........................77
...............................78
............................78
..........................................................78
...............................................79
....................79
.................................................80
...........................................................80
.......................................................................................81
....................................................................82
Indice analítico
Informações sobre o rádio SP-150 / a Maxon America, Inc.
Informações sobre segurança
Informações para a remoção da embalagem
Características do SP-150
Descrição dos componentes do rádio
Instalação da antena
Instalação e remoção da bateria
Instalação e retirada da presilha para cinto
Procedimentos para carregar e cuidar da bateria
Conector de acessórios
Operação do SP-150
Monitoramento de canais
“Envio e confirmação” do sistema
Espera em fila em sistema ocupado
Comunicação direta
Modo de resposta à transmissão
Liga – Volume – Desliga
Transmissão em um sistema troncalizado
Recepção em um sistema troncalizado
Operação no modo convencional
Transmissão em um sistema convencional
Recepção em um sistema convencional
Botões de opções
Indicadores de estado e tons de alerta audíveis
Modos de varredura
Varredura manual de grupos LTR
®
Varredura automática de grupos LTR
®
Varredura do sistema
Edição da lista de varredura de grupos
Para fazer adições à lista de varredura
Para fazer exclusões da lista de varredura
Procura por canal prioritário
Varredura convencional
Varredura de intercomunicação
Somente recepção / Transmissão desativada
Varredura de transmissão no canal prioritário
Transmissões somente no canal prioritário
Varredura de procura pelo canal prioritário
Varredura de canal livre
Exclusão de canais indesejáveis
Informações sobre licenciamento e assistência técnica
Reciclagem / disposição de baterias
Direitos autorais do software
Manutenção
Declaração de garantia

1
About Your SP-150 Radio
Maxon's SP-150 portable radios are compatible with LTR
®
Trunked Systems and Conventional radio system operation.
The SP-150 is capable of sixteen (16) Systems/ Groups
combined. Operation and functions for Maxon's SP-150
radios are described in this manual.
We urge you to thoroughly read this manual before operating
the radio.
Application of some of the functions described in this manual
are determined by the System in use. Your Maxon Dealer will
program your radio so that you have the greatest number of
functions possible relative to your needs.
Should you have questions regarding the operation of the
radio, please consult your Maxon Dealer.
About Maxon America, Inc.
Maxon America, Inc. designs and manufactures professional
FM two-way radio equipment to serve a wide variety of
communication needs. Maxon produces equipment for the
Land Mobile Radio and Specialized Mobile Radio markets
(business, industrial, government and public safety).
LTR is a registered tradename of E.F. Johnson Company

2
Safety Information
The Federal Communications Commission (FCC), with its
action in General Docket 79-144, March 13, 1985, has
adopted a safety standard for human exposure to Radio
Frequency (RF) electromagnetic energy emitted by FCC
regulated equipment. Maxon subscribes to the same safety
standard for the use of its products. Proper operation of this
radio will result in user exposure far below the Occupational
Safety and Health Act (OSHA) and Federal Communications
Commission limits.
WARNING - DO NOT hold the radio in such a manner that
the antenna is next to, or touching, exposed parts
of the body, especially the face or eyes, while
transmitting.
WARNING - DO NOT allow children to operate transmitter -
equipped radio equipment.
CAUTION - DO NOT operate the radio near unshielded
electrical blasting caps or in an explosive
atmosphere unless it is a type especially
designed and qualified for such use.
CAUTION - DO NOT press and hold the transmit switch
(P-T-T) when not actually wishing to transmit.
NOTE: This radio operates in FCC regulated frequency
bands. All radios must be licensed by the FCC before use.
Because this radio contains a transmitter, Federal law
prohibits unauthorized use or adjustments of this radio.

Unpacking Information
Remove and carefully inspect the contents of your package(s)
for the following items:
Radio
Battery Pack
Antenna
Spring Belt Clip
Operating Instructions
If any items are missing, please contact your Dealer or Maxon.
SP-150 Features
• LTR
®
Trunked radio operation
• Conventional radio operation
• Wideband frequency separation
• 1 Watt / 5 Watts Programmable output power
• Programmable 12.5/25 kHz channel spacing
• Two programmable option buttons
• Talk-around (Trunked operation)
• Busy System queuing
• Scanning function, including priority scanning
• Look back channel
• Scan list editing
• CTCSS/DCS (Conventional operation)
• Busy channel lockout
• Time-out-timer
3
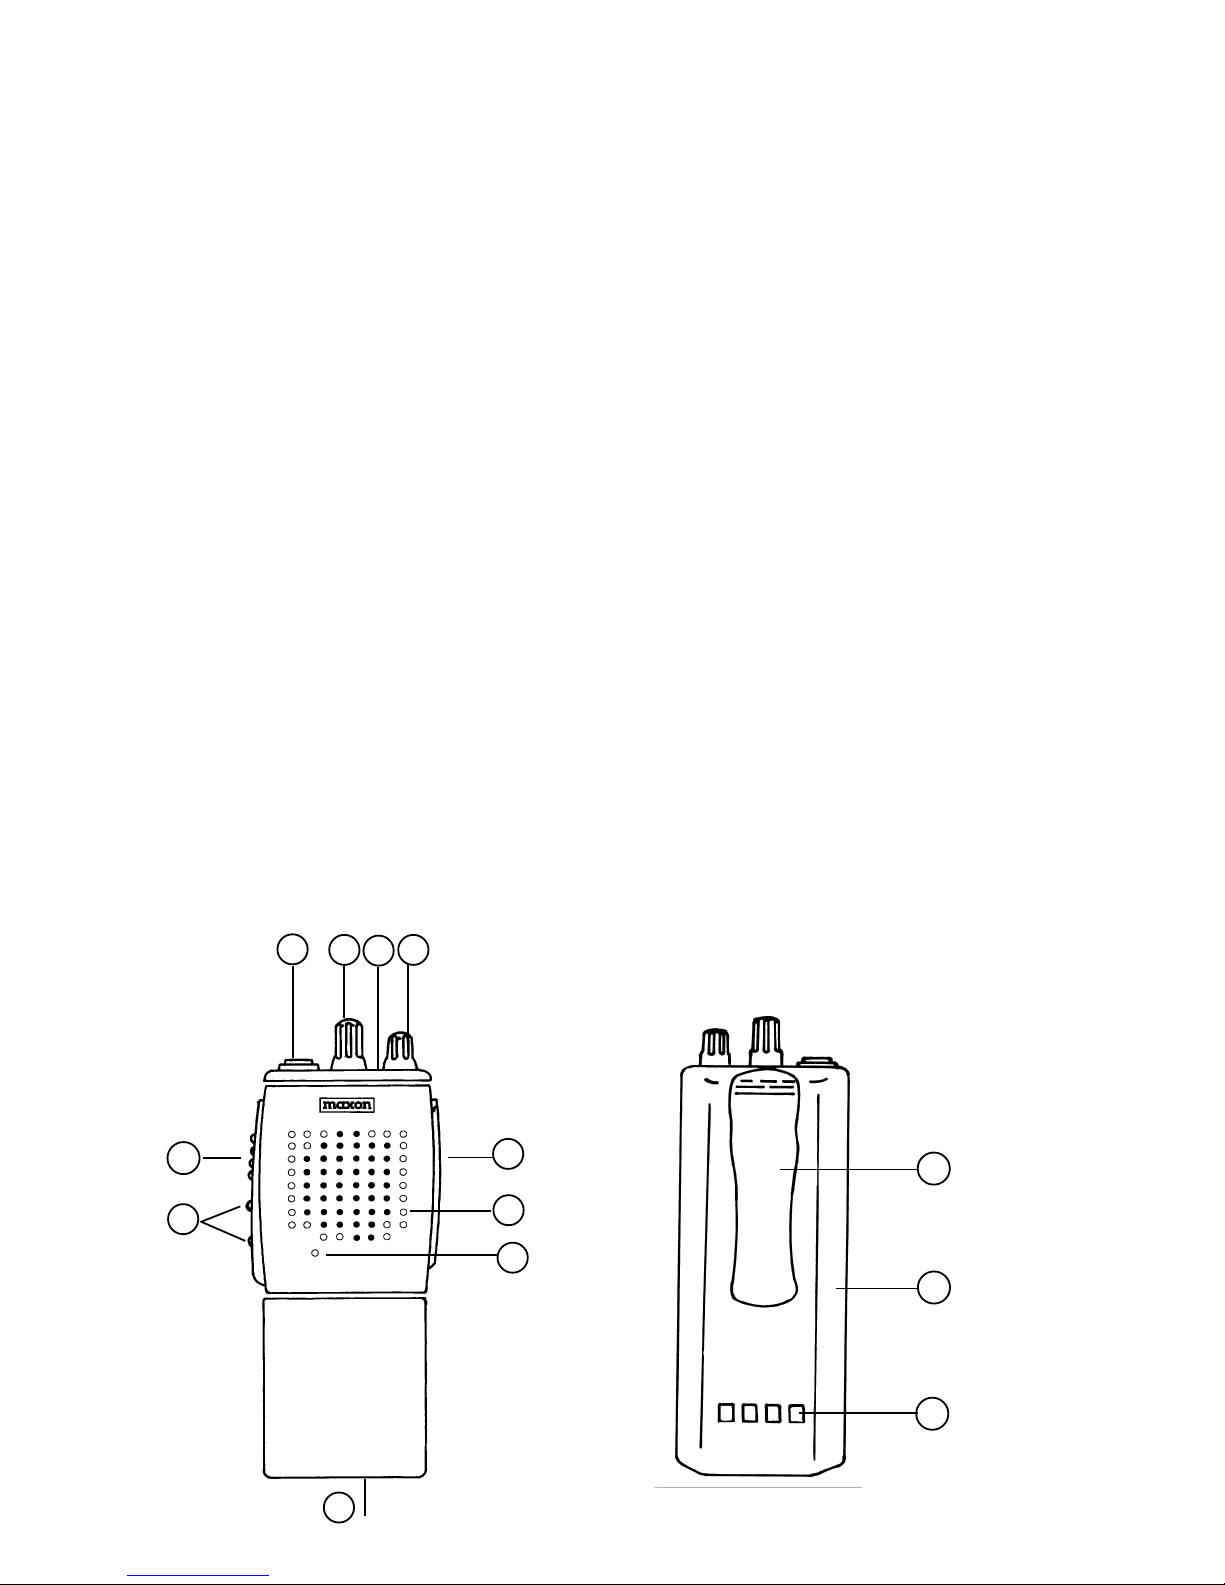
Description of Radio Components
Front view:
1) Antenna Receptacle
2) System/Group/Channel Selector Knob
3) Busy / TX / BT Indicator (top plate of radio)
4) On/Off - Volume Control Knob
5) Accessory Port
6) Speaker
7) Microphone
8) Battery Latch (bottom of radio)
9) Option Buttons
10) Push-To-Talk (P-T-T) Button
Back view:
11) Belt Clip
12) Battery
13) Battery Charge Contacts
4
1
Front view Back view
32
4
6
5
7
9
10
11
12
13
8

5
Antenna Installation
Attach the antenna by turning clockwise into the antenna
receptacle on top of the radio.
Installing and Removing the Battery Pack
Hold the radio face down in your hand. To attach the battery
pack, pick up the pack by the sides and hold it so that the four
charging contacts are facing upward, positioned toward the
bottom. Visually locate the "up" arrows embossed inside the
radio, then place the pack onto the radio, positioning the top
of the pack to slightly cover the arrows. Using your fingertips,
ensure the pack is flush with the radio sides. The channels in
the pack will align with guides on the radio.
Slide the battery pack upward slowly. A click will verify that
the battery pack is securely positioned.
Remove the battery pack by holding the radio face down
in your hand. Slide and hold the battery latch (at the base of
radio) then gently apply pressure to move the battery pack
slightly downward. The pack will release from the radio's
guide rails. Lift the battery pack straight up and away from
the radio.
Attaching and Removing the Belt Clip
The belt clip attaches to the radio's battery pack. To attach
the belt clip, hold the clip and slide it into the recessed area
at the top of the pack. A click will verify the clip is securely
positioned. To remove the clip, press and hold the release
tab toward the clip while gently pulling the belt clip assembly
off the radio.

Battery Charging and Care
To ensure maximum performance from your radio, the battery
pack must be fully charged before initial use. For continued
performance, periodically discharge the battery completely
and then fully recharge the pack. Proper care and charging
will extend life of your battery pack.
Maxon offers two chargers for use with the SP-150 radio. Each
model is sold separately and is available through your original
purchasing Dealer.
The QPA-1135 Pedestal Charger provides a slow overnight
charge of 12-16 hours. The charger has a single well which
charges a radio with battery attached.
The QPA-1130 Desktop Charger provides quick charging in
1.5 hours and normal "slow" charging. The charger has two
wells, one accommodates a radio with battery attached; the
other is for a battery removed from the radio.
Refer to the instructions accompanying each of these Maxon
chargers for more information.
Accessory Connector
Your SP-150 radio has an accessory port located on the side
of the unit. If you do not plan to use accessories when you
initially purchase the radio, keep the protective cover plate
installed to keep dust/debris from entering the radio.
If you choose to use accessories, remove the protective cover
plate and follow the instructions provided with your accessory
item to attach it to the radio. Note: Replace the cover plate
if you remove the accessory from the radio.
6

SP-150 Operation
Your Maxon SP-150 can be programmed to operate in
both Trunked and Conventional modes. Each System can
be individually programmed to operate in either Trunked
or Conventional Systems. There are only a few differences
in their operation and these are detailed as follows:
Channel Monitoring
While on a Trunked System, channel monitoring is performed
automatically by the radio transceiver. In accordance with
the FCC Rules, while operating on a Conventional System,
the channel must be monitored prior to transmitting. In both
Trunked and Conventional Systems, operation may vary from
System to System. Your Maxon Dealer will be able to assist
with particular operational parameters and procedures for the
various Systems and functions.
System "Handshaking"
In a Trunked System, when the P-T-T is pressed, the red TX
indicator flashes momentarily to allow the transceiver and
System to connect properly. When the red TX indicator glows
steady, voice transmission may begin. If your Maxon Dealer
has enabled the "Clear-to-Talk" tone option, the radio will
emit a short tone signaling voice transmission may occur. In
Conventional Systems, there is no System "handshaking" and
voice transmission may start immediately upon pressing the
P-T-T.
Busy System Queuing (Dealer Programmable Option)
If enabled by your Dealer, busy System queuing will monitor
the System for activity. Once the System becomes available,
the System will automatically be accessed and held for a
period of time (determined by your Dealer), allowing you to
transmit on the System. A tone will sound and a flashing
7

yellow TX/Call LED will indicate when queuing has begun.
The tone will sound again and the LED will flash red when the
System has been acquired.
Talk-Around (Dealer Programmable Option)
Talk-around mode, if enabled by your Dealer, allows you to
bypass the System and talk from radio to radio. This is useful
when your radios are out of range of any System. Talk-around
can be enabled by pressing one of the two option buttons*
located on the side of the unit. An audible alert will sound
(if enabled) when key is pressed, indicating the radio is active
for talk-around mode.
* The option button designated to enable talk-around is
determined by your Dealer.
Transpond Mode (Dealer Programmable Option)
If transpond has been enabled by your Dealer, your radio will
automatically send (transpond) an acknowledgment to the
System indicating that your radio has received a transmission.
Power On - Volume - Power Off
Turn the radio on by rotating the off/on - volume control
clockwise. You will hear a click and (if enabled via Dealer
programming) the radio's self-test alert tones. Increase the
radio volume by continuing the clockwise rotation. To turn
the radio off, rotate the control counter-clockwise to detent.
Transmitting on a Trunked System
1) Turn the radio on and adjust the volume to desired level.
2) Select the desired System and/or Group using the
System/Group/Channel selector knob, located on top
of the unit.
3) Press and hold the P-T-T button on the side of the radio.
(If a "Busy", "Intercept" or "Ringback" tone is heard, refer
to
"Status Indicators and Audible Alert Tones"
section for
more information).
8

9
4) Listen for the "Clear-to-Talk" tone (or wait for the TX
indicator to glow steady) and begin talking. Hold the radio
1 to 2 inches from your mouth, speak clearly and distinctly
into the microphone area of the front grill.
5) Release the P-T-T button as soon as the message is complete. The P-T-T button must be pressed continuously while
speaking.
Receiving on a Trunked System
1) Confirm that the radio is on and receiving power. Select the
desired System and Group.
2) When a message is received, the TX/Call indicator will glow
green.
3) Respond to a message by pressing the P-T-T button on the
side of the radio. Press the P-T-T continuously while talking
and release to listen.
Conventional Mode Operation
Your Maxon SP-150 may be programmed to operate in
Conventional modes. Conventional mode may or may
not require a Conventional repeater System. Radio to radio
communications can also be accomplished in Conventional
operation. How the Conventional mode is programmed is
determined by your Dealer.
Transmitting on a Conventional System
1) Turn the radio on and adjust the volume to desired level.
2) Select the desired channel using the System / Group /
Channel selector knob, located on top of the unit.
3) In a Conventional System it is necessary to monitor the
channel for activity before a transmission. Monitor by
pressing one of the two option buttons** located on the
side of the unit or by observing the TX / Call indicator for
a solid yellow or green color. If solid yellow or green is
observed, you must wait for the indication to leave before

a transmission can be made. ** The option button designated to enable monitor is determined by your Dealer.
4) Press and hold the P-T-T button on the side of the radio.
Hold the radio 1 to 2 inches from your mouth, speak clearly
and distinctly into the microphone area of the front grill.
5) Release the P-T-T button as soon as the message is complete.
The P-T-T button must be pressed continuously while
speaking.
Receiving on a Conventional System
1) Confirm that the radio is on and receiving power. Select the
desired channel.
2) When a message is received, the TX / Call indicator will glow
solid yellow or green (depending if CTCSS or DCS tone has
been programmed).
3) Respond to a message by pressing the P-T-T button on the
side of the radio. Press the P-T-T continuously while talking
and release to listen. If scanning modes are enabled, be sure
to respond before scanning resumes. If you do not, another
call may be received and the selected channel may have to
be changed. Scanning is indicated by flashing green TX /
Call indicator. Refer to
"Scan Modes"
section for more
information.
Option Buttons
Your SP-150 has two programmable option buttons located
on the side of the unit. These buttons can be programmed
by your Dealer to enable a number of features, including:
• Monitor: (Conventional Systems) When programmed,
pressing and holding the appropriate option button will
open the squelch of the radio, defeating the CTCSS/DCS
tone squelch and allowing you to listen for channel activity.
• Nuisance Delete: This function will allow you to temporarily
10

11
delete anunwanted channel from the scan list. Nuisance delete
can be activated only when receiving the unwanted channel.
The feature can be programmed alone on a single option
button or combined with the monitor function. Turning the
unit off and on will return the unit to the original scan list.
• Talk-around: When programmed, pressing the appropriate
option button once will activate talk-around mode. Pressing
the option button again, or rotating the channel selection knob
will disable talk-around function.
• Scan: When programmed, pressing the appropriate option
button will enable the radio's programmed scan function.
• Edit Group Scan List: When programmed, allows editing
of channels you wish to scan.
Status Indicators and Audible Alert Tones
Your SP-150 has a sophisticated microprocessor control
which provides a series of audible alert tones. Upon initial
power up, a single tone indicates that the self-test of the
microprocessor functions have been completed satisfactorily.
A series of tones may sound with any of these conditions:
• Busy System Queuing, indicates your radio has been placed
in the queuing mode and is attempting to access the System
• Low battery condition • Selecting a Channel with no
programmed frequency
(The following are all initially programmed into the radio
by your Dealer)
• Attempt to transmit on a System /Channel
that is already in use when busy channel lockout has been
programmed • Call Received • Clear-to-Talk/Transmit
indicates you may begin speaking • Transmit not available
indicates you are denied transmission on that System /
Channel • Time-Out-Timer indicates you have exceeded
the maximum transmission time

12
STATUS DESCRIPTION LED COLOR AUDIBLE TONE
NORMAL Power On - Ready Red, Yellow, Green Single Beep
(Single Flash Sequence)
Call Received w/Audio Yellow Single Beep
Call Received w /Tone Green Single Beep
Transmit Red Single Beep
Busy Channel
No Audio Yellow N/A
Transmit Not Allowed Yellow - Flashing Busy Tone - Repeated
TRUNKED Clear-To-Talk Red Single Beep
Talk-Around Yellow - Flashing N/A
Out of Range Red, Yellow - Flashing Single Beep
SCANNING In Scan Mode Green - Flashing N/A
Enter Scan List Edit Green - Flash four times Four Beeps
Exit Scan List Edit Red - Flash four times Four Beeps
In Scan List Green - Flash two times Two Beeps
Not in Scan List Red - Flash two times Two Beeps
WARNING Busy System Queuing Yellow - Flashing Three Beeps then a
Single Beep every 10 seconds
Busy System Access Red - Flashing Five Beeps
Queue Time-out N/A Single Tone
Time-Out-Timer Yellow - Flashing Single Tone
Low Battery Red - Flashing Four Beeps - Repeated
ERROR EEPROM Error Red - Flashing Single Beep - Repeated
Out of Lock Error Red - Flash two times Two Beeps - Repeated
Hardware Error Red - Flash three times Three Beeps - Repeated
NVRAM Error Red - Flash five times Five Beeps - Repeated
Note: LED and/or tones may be programmed off.
Scan Modes
Your SP-150 radio may be Dealer-programmed for one or
more scan modes depending upon your requirements.
LTR® Manual Group Scan
To enable LTR® Manual Group Scan, press the appropri-

13
ate option button on the side of the radio. In this scan
mode, the radio will scan all LTR® receive Group ID's
located in each selector knob position. Upon receiving
the correct ID the radio will allow transmission on that
Group ID until scanning resumes.
LTR
®
Auto Group Scan
To enable LTR® Auto Group Scan, rotate the selector knob
to the LTR® System which has Auto Group Scan enabled,
determined by your Dealer programming. Operation
is the same as for LTR® Manual Group Scan with the exception each rotary switch position can be programmed
by your Dealer for Auto Group Scan.
System Scan
To enable System Scan, press the appropriate option button
on the side of the radio. During System Scan the radio will
scan all Systems in the scan list programmed by your Dealer.
To enable Conventional Group Scan, press the appropriate option button on the side of the radio. Conventional
Group Scan performs in the same manner as LTR
®
Manual
Group Scan with the exception that ID codes are not
required. Only those Groups enabled in the Group scan
list will be scanned.
Editing Group Scan List
As a user, you can edit your pre-programmed Group scan list
by adding or deleting Groups from the Group Scan List for a
given System. To activate scan list editing, press the appropriate option button on the side of the radio. (Note: In order to
edit the Group scan list, the remaining option button must
be programmed to activate scan mode.) Upon entering the
edit scan list function, the LED located on top of the unit will

flash green four times and a beep will be heard with each LED
flash. To exit the edit scan list function, press the appropriate
option button again. The LED will flash red four times and a
beep will be heard with each LED flash.
Adding to Scan List
Once the option button has been enabled for scan list
editing, rotate the selector knob to the desired System
Group to be edited. To add this Group to the scan list,
press the option button programmed for scan. When a
Group is added, the LED will flash green two times and
a beep will sound with each flash.
Deleting from Scan List
Once the option button has been enabled for scan list
editing, rotate the selector knob to the desired System
Group to be edited. To delete this Group from the scan
list, press the option button programmed for scan. When
deleted, the LED will flash red two times and a beep will
sound with each flash.
Note: Priority and Priority Look Back Groups cannot be edited
from the scan list.
Priority Look Back
If Dealer-programmed, your SP-150 will "look back" to the
programmed priority channel if the selector knob is positioned
on a System / Channel other than the programmed priority
channel.
Conventional Scanning
Your SP-150 can be programmed for one of six different scan
types, as determined by your Dealer. To enable scan, press the
appropriate option button on the side of the radio. Only those
channel Groups pre-programmed by your Dealer will be in the
scan list.
14

Talk Back Scan
RX: The radio only receives calls from its selected channel
and channels in the selected channel scan list.
TX: The radio will transmit on the selected channel if a call
is not received. If a scanned call is received, the radio will
transmit on that scanned channel until scanning resumes.
RX Only/TX Disable
RX: The radio will only receive calls on the selected
channel and channels in the selected channel scan list.
TX: No transmissions are allowed. If transmission is
attempted, an alert will sound.
Priority TX Scan
RX: The radio will receive calls from its selected channel
and channels in the selected channels scan list.
TX: All transmissions will be made on the programmed
priority channel, no matter where the selector knob is
positioned. Transmissions can also be made only on
those scanned calls which have been received before
scanning resumes.
Priority Only TX
RX: The radio will receive calls from its selected channel
and channels in the selected channel scan list.
TX: All transmissions will be made on the programmed
priority channel, no matter where the selector knob ispositioned. No transmissions will be allowed on scanned calls.
Priority Look Back Scan
RX: The radio will receive calls on its selected and priority
channel. While the radio is receiving a call on its selected
channel, it will look for a call from the programmed
priority channel. If a call is detected on the priority
channel, the radio will leave the current call and receive
15

the priority call. After the priority call has ended, the radio
remains on the priority channel for the scan wait time.
When look back time expires, the radio will go back
to the selected channel and resume priority look back
operation.
TX: The radio will only transmit on the selected channel.
While transmitting, all receive operations will be disabled.
Transmission will be allowed on the priority channel only
after receiving a priority call.
Vacant Channel Scan
RX: Conventional operation on the selected channel occurs.
TX: The radio will step through the scan list and transmit
on the first non-busy channel.
Nuisance Delete
If a channel contained in the scan list is constantly being
scanned because of unwanted "chatter", you can temporarily delete the channel from your list by pressing the
appropriate option button, (usually the monitor button).
Nuisance delete can only be initiated when scan is active
and the radio has finished receiving the call on the channel
to be deleted. Nuisance delete can be deactivated for all
channels by turning scan off.
Licensing and Service Information
FCC Licensing
The Federal Communications Commission requires the
operator of this radio be properly licensed under the applicable Part and/or Parts of the FCC Rules and Regulations.
Consult with your Maxon Dealer, or contact the nearest FCC
field office for information about obtaining a license.
16

Service
Do not tamper with internal adjustments. Damage to the
equipment and/or improper operation may result. There
are no serviceable items inside the radio. It is recommended
that you return your radio to a qualified Maxon Dealer for
any service or repairs.
Recycling/Disposal of Batteries
The U.S. Environmental Protection Agency (EPA) classifies
used Ni-Cd batteries as hazardous waste, unless certain
exemptions apply.
The battery should be recycled at the end of its useful life.
Under various state and local laws, such batteries must be
recycled or disposed of properly and cannot be dumped in
landfills or incinerators. Maxon America, Inc. fully endorses
and encourages the recycling of Ni-Cd batteries.
A national program to collect and recycle used Ni-Cd batteries
has been implemented by the Rechargeable Battery Recycling
Corporation (RBRC
TM
). This program is being funded through
the use of license fees paid by the battery and product manufacturers to place the RBRC
TM
Seal on the batteries. Following
is a partial list of facilities where the batteries can be shipped
to be recycled. Contact these facilities for proper packaging
and shipping guidelines.
INMETCO Kinsbursky Brothers Inc.
245 Portersville Road 1314 N. Lemon Street
Ellwood City, PA 16117 Anaheim, CA 92801
TEL: (724) 758-2800 TEL: (714) 738-8516
FAX: (724) 758-2845 (800) 548-8797
FAX: (714) 441-0857
17

Software Copyrights
The Maxon product(s) described in this operating instruction
manual may include copyrighted Maxon software programs
stored in semi-conductor memories or other media. Laws in
the United States and other countries preserve for Maxon
certain exclusive rights for copyrighted software programs,
including the exclusive right to copy or reproduce in any
form the copyrighted software program. Accordingly, the
copyrighted Maxon software programs contained in the
Maxon products described in this operating manual may
not be copied or reproduced without the express written
permission of Maxon. Furthermore, the purchase of Maxon
products shall not be deemed to grant either directly or by
implication, estoppel, or otherwise, any license under the
copyrights, patents or patent applications of Maxon, except
for normal non-exclusive royalty free license to use that arises
by operation of law in the sale of a product.
Maintenance
Your SP-150 radio is designed to be maintenance-free. To
keep your radio in good working condition:
• Clean external surfaces with a clean cloth dampened in
a solution of dishwater detergent diluted in water. Apply the
solution sparingly to avoid any moisture leaking into cracks
and crevices - DO NOT submerge the radio. Use only a
non-metallic brush to dislodge particles, if necessary. Dry
the surface thoroughly with a soft, lint-free cloth.
• DO NOT use solvents or spirits for cleaning - they may
permanently damage the housing.
• Clean the battery and accessory port contacts with a lint-free
cloth to remove dirt, grease or foreign materials.
18

19
Maxon America, Inc. - Product Warranty
Maxon America, Inc. (hereinafter referred to as "Maxon"), warrants that its Products and their
included accessories will be free from defects in workmanship and materials under normal use for
a period of two (2) years from date of purchase by the original end user, provided that the buyer has
complied with the requirements stated herein. This warranty is offered to the initial end user and is
not assignable or transferable. Maxon is not responsible for any ancillary equipment which is
attached to or used in connection with Maxon products.
If the Product fails to function under normal use because of manufacturing defect(s) or workmanship during the two (2) year period following the date of purchase, it will be replaced or repaired at
Maxon's option at no charge when returned to the place of purchase. The defective unit must be
accompanied by proof of the date of purchase in the form of a sales receipt.
The user is responsible for the payment of any charges or expenses incurred for the removal of the
defective product from the vehicle or other site of its use, for the transportation of the product to the
place of repair, for the return of the repaired / replacement product to the site of its use and for the
reinstallation of the product.
Maxon shall have no obligation to make repairs or to cause replacement required which results
from normal wear and tear or is necessitated in whole or in part by catastrophe, the fault or
negligence of the user, improper or unauthorized alterations, repairs to the Product, incorrect
wiring, use of the Product in a manner for which it was not designed, or by causes external to
the Product. This warranty is void if the serial number is altered, defaced or removed.
Maxon's sole obligation hereunder shall be to replace or repair the product covered in this Warranty.
Replacement, at Maxon's option, may include a similar or higher-featured product. Repair may
include the replacement of parts or boards with functionally equivalent reconditioned or new parts
or boards. Replaced parts, accessories, batteries or boards are warranted for the balance of the
original time period. All replaced parts, accessories, batteries or boards become the property of
Maxon America, Inc.
THE EXPRESS WARRANTIES CONTAINED HEREIN ARE IN LIEU OF ALL
OTHER WARRANTIES, EITHER EXPRESSED OR IMPLIED OR STATUTORY,
INCLUDING, WITHOUT LIMITATION, ANY WARRANTY OF MERCHANTABILITY OR FITNESS FOR A PARTICULAR PURPOSE.
FOR ANY PRODUCT WHICH DOES NOT COMPLY WITH THE WARRANTY
SPECIFIED, THE SOLE REMEDY WILL BE REPAIR OR REPLACEMENT. IN
NO EVENT WILL MAXON AMERICA, INC. BE LIABLE TO THE BUYER OR
ITS CUSTOMERS FOR ANY DAMAGES, INCLUDING ANY SPECIAL,
INCIDENTAL, INDIRECT OR CONSEQUENTIAL DAMAGES, OR THE LOSS
OF PROFIT, REVENUE OR DATA ARISING OUT OF THE USE OF OR THE
INABILITY TO USE THE PRODUCT.
This warranty is void for sales and deliveries outside of the U.S.A.

Acerca de su radio SP-150
Los radios portátiles SP-150 de Maxon son compatibles con la
operación de los sistemas LTR® con troncales y los sistemas de
radio convencionales. El SP-150 acepta dieciséis (16) sistemas/
grupos combinados. En este manual se describen la operación
y funciones de los radios Maxon.
Le pedimos encarecidamente que lea completamente este
manual antes de operar el radio.
La aplicación de algunas funciones descritas en este manual
está determinada por el uso del sistema. Su vendedor de
Maxon programará su radio de manera que tenga la mayor
cantidad de funciones posibles relativas a sus necesidades.
En caso de que tenga preguntas acerca de la operación del
radio, consulte con su vendedor de Maxon.
Acerca de Maxon America, Inc.
Maxon America, Inc. diseña y fabrica equipos de radio de
dos vías FM profesionales para cubrir una amplia variedad
de necesidades de comunicación. Maxon produce equipo
para los mercados de Radios portátiles en terreno y Radios
portátiles especializados (comercial, industrial, gobierno y
seguridad pública).
LTR es una marca registrada de E.F. Johnson Compania
20

Información de seguridad
La Comisión Federal de Comunicaciones (Federal Communications Commission, FCC), con su medida de Libro Judicial
General 79-144, del 13 de marzo de 1985, ha adoptado el
estándar de seguridad para la exposición humana a la energía
electromagnética de las frecuencias de radio (RF) emitidas por
el equipo regulado por la FCC. Maxon está suscrito a los
mismos estándares de seguridad para el uso de sus productos.
La operación apropiada de este radio resultará en una
exposición del usuario muy por debajo de los límites de la
Ley de Seguridad y Salud Ocupacional (Occupational Safety
and Health Act, OSHA) y de la Comisión Federal de
Comunicaciones.
ADVERTENCIA: NO sostenga el radio de manera que la
antena esté cerca o toque partes del cuerpo,
especialmente la cara o los ojos, mientras está
transmitiendo.
ADVERTENCIA: NO permita que los niños operen el equipo
de radio equipado con transmisor.
PRECAUCIÓN: NO opere el radio cerca de dispositivos
de explosión eléctricos sin protección o en
atmósferas explosivas a menos que sea un tipo
especialmente diseñado y calificado para dicho
uso.
PRECAUCIÓN: NO presione ni mantenga presionado el
interruptor del transmisor (P-T-T) cuando no
desee transmitir.
NOTA: Este radio opera en bandas de frecuencia reguladas
por la FCC. Todos los radios deben tener licencia de la
FCC antes de usarse. Debido a que este radio contiene
un transmisor, la ley federal prohibe usos o ajustes no
autorizados de este radio.
21

Información de desembalaje
Retire e inspeccione cuidadosamente el contenido de su o sus
paquetes donde deben estar los siguientes artículos:
Radio
Batería
Antena
Presilla con resorte para el cinturón
Instrucciones de operación
Si falta alguno de estos elementos, llame a su vendedor o a
Maxon.
Características del SP-150
• Operación del radio LTR
®
con troncal SP-150
• Operación del radio convencional
• Separación de la frecuencia de banda ancha
• Potencia de salida programable de 1 vatio/5 vatios
• Separación de canal programable de 12,5/25 KHz
• Dos botones de opción programables
• Conversación libre (operación con troncal)
• Espera por sistema ocupado
• Función escaneadora, incluyendo escaneo prioritario
• Canal en retroceso
• Edición de la lista de escaneo
• CTCSS/DCS (Operación convencional)
• Seguro por canal ocupado
• Cronómetro de intervalo de espera
22
 Loading...