

Maxon SL25 User Manual

SL25 User Manual

SL25
This product is marked with
in accordance with the Class II product requirements
specified in the R&TTE Directive, 1999/5/EC.
We hereby declare that the above named product is
in conformity to all the essential requirements of
Directive 1999/5/EC.
French
Translation
Nous déclarons que le produit référencé ci-dessus
satisfait aux exigences R&TTE 1999/5/EC qui lui sont
applicables.
S
panish Translation
Certificamos que el aparato es conforme con lo
establecido en las disposiciones de la Directiva
1999/5/CE.
German
Translation
Wir möchten hiermit bekanntgeben, daß das oben
genannte Produkt in Übereinstimmung mit allen
erforderlichen Bedürfnissen der 1999/5/EC Direktive
seht
It
alian Translation
Con la presente dichiariamo che il prodotto suindicato
è conforme a tutti i requisiti essenziali della Direttiva
1999/5/CEE.
ENGLISH
1
0168 !

CONTENTS
ABOUT YOUR SL25 SERIES RADIO . . . . . . . . . . . . 3
SAFETY INFORMATION . . . . . . . . . . . . . . . . . . . . . . . . 3
DESCRIPTION OF RADIO . . . . . . . . . . . . . . . . . . . . . . 4
UNPACKING INFORMATION . . . . . . . . . . . . . . . . . . . . 5
SL25 SERIES FEATURES. . . . . . . . . . . . . . . . . . . . . . . 5
FITIING INSTRUCTIONS . . . . . . . . . . . . . . . . . . . . . . . 5
BATTERY CHARGING AND CARE . . . . . . . . . . . . . . . . 7
MAINTENANCE . . . . . . . . . . . . . . . . . . . . . . . . . . . . . . 7
SL25 SERIES OPERATION. . . . . . . . . . . . . . . . . . . . . 8
POWER ON/VOLUME. . . . . . . . . . . . . . . . . . . . . . . . . . 8
TRANSMIT . . . . . . . . . . . . . . . . . . . . . . . . . . . . . . . . . . 8
RECIEVE . . . . . . . . . . . . . . . . . . . . . . . . . . . . . . . . . . . 8
POWER OFF . . . . . . . . . . . . . . . . . . . . . . . . . . . . . . . . 8
STATUS IINDICATORS & AUDIBLE ALERT TONES . . . 9
SCAN MODES. . . . . . . . . . . . . . . . . . . . . . . . . . . . . . . . 9
NORMAL CHANNEL SCAN. . . . . . . . . . . . . . . . . . . . . . 9
SCAN CHANNEL DELETE . . . . . . . . . . . . . . . . . . . . . . 9
RADIO STATUS INDICATIONS . . . . . . . . . . . . . . . . . . 10
LICENCING AND SERVICE INFORMATION. . . . . . 11
LICENCING. . . . . . . . . . . . . . . . . . . . . . . . . . . . . . . . . 11
SERVICE. . . . . . . . . . . . . . . . . . . . . . . . . . . . . . . . . . . 11
RECYCLING/DISPOSAL OF BATTERIES . . . . . . . . . . 11
WARRANTY . . . . . . . . . . . . . . . . . . . . . . . . . . . . . . . . 11
ENGLISH
2

ABOUT YOUR SL25 SERIES RADIO
Maxons SL25 Series radios feature multi channel operation
with superior performance and reliability. Operation and
functions for Maxons SL25 Series radios are described in
this manual.
We urge you to thoroughly read this manual before
operating the radio.
Application of some of the functions described in this manual
is determined by the system used in your country. Your radio
will have been programmed so that you have the greatest
number of functions possible relative to the system in your
country.
Should you have questions regarding the operation of the
radio, please consult the retail outlet from which you
purchased your radio.
SAFETY INFORMATION
WARNING DO NOT hold the radio in such a manner that
the antenna is next to, or touching, exposed parts of the
body, especially the face or eyes, while transmitting.
WARNING DO NOT allow children to operate transmitter equipped radio equipment.
WARNING DO NOT operate the radio near unshielded
electrical blasting caps or in an explosive atmosphere unless
it is a type especially designed and qualified for such use.
WARNING DO NOT press and hold the transmit switch
(PTT) when not actually wishing to transmit.
WARNING DO NOT immerse your radio or expose your
radio to any fluids as this may cause damage to your radio.
ENGLISH
3
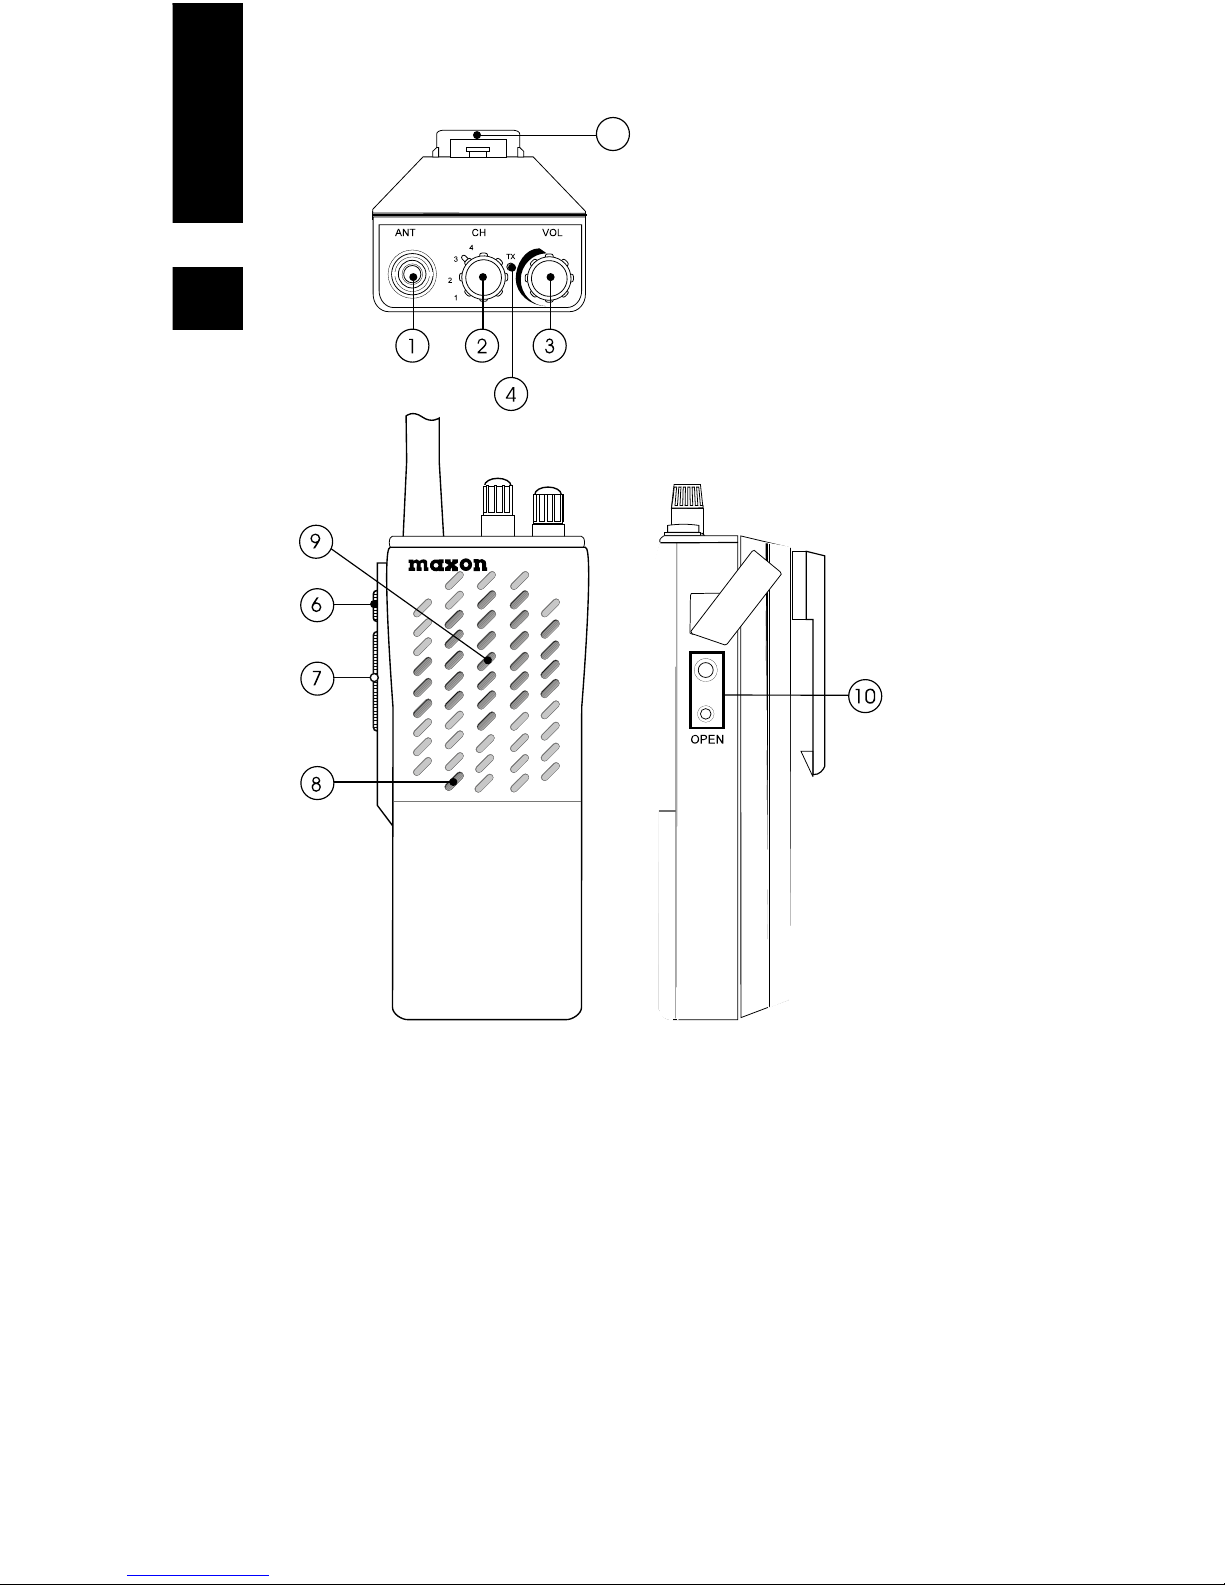
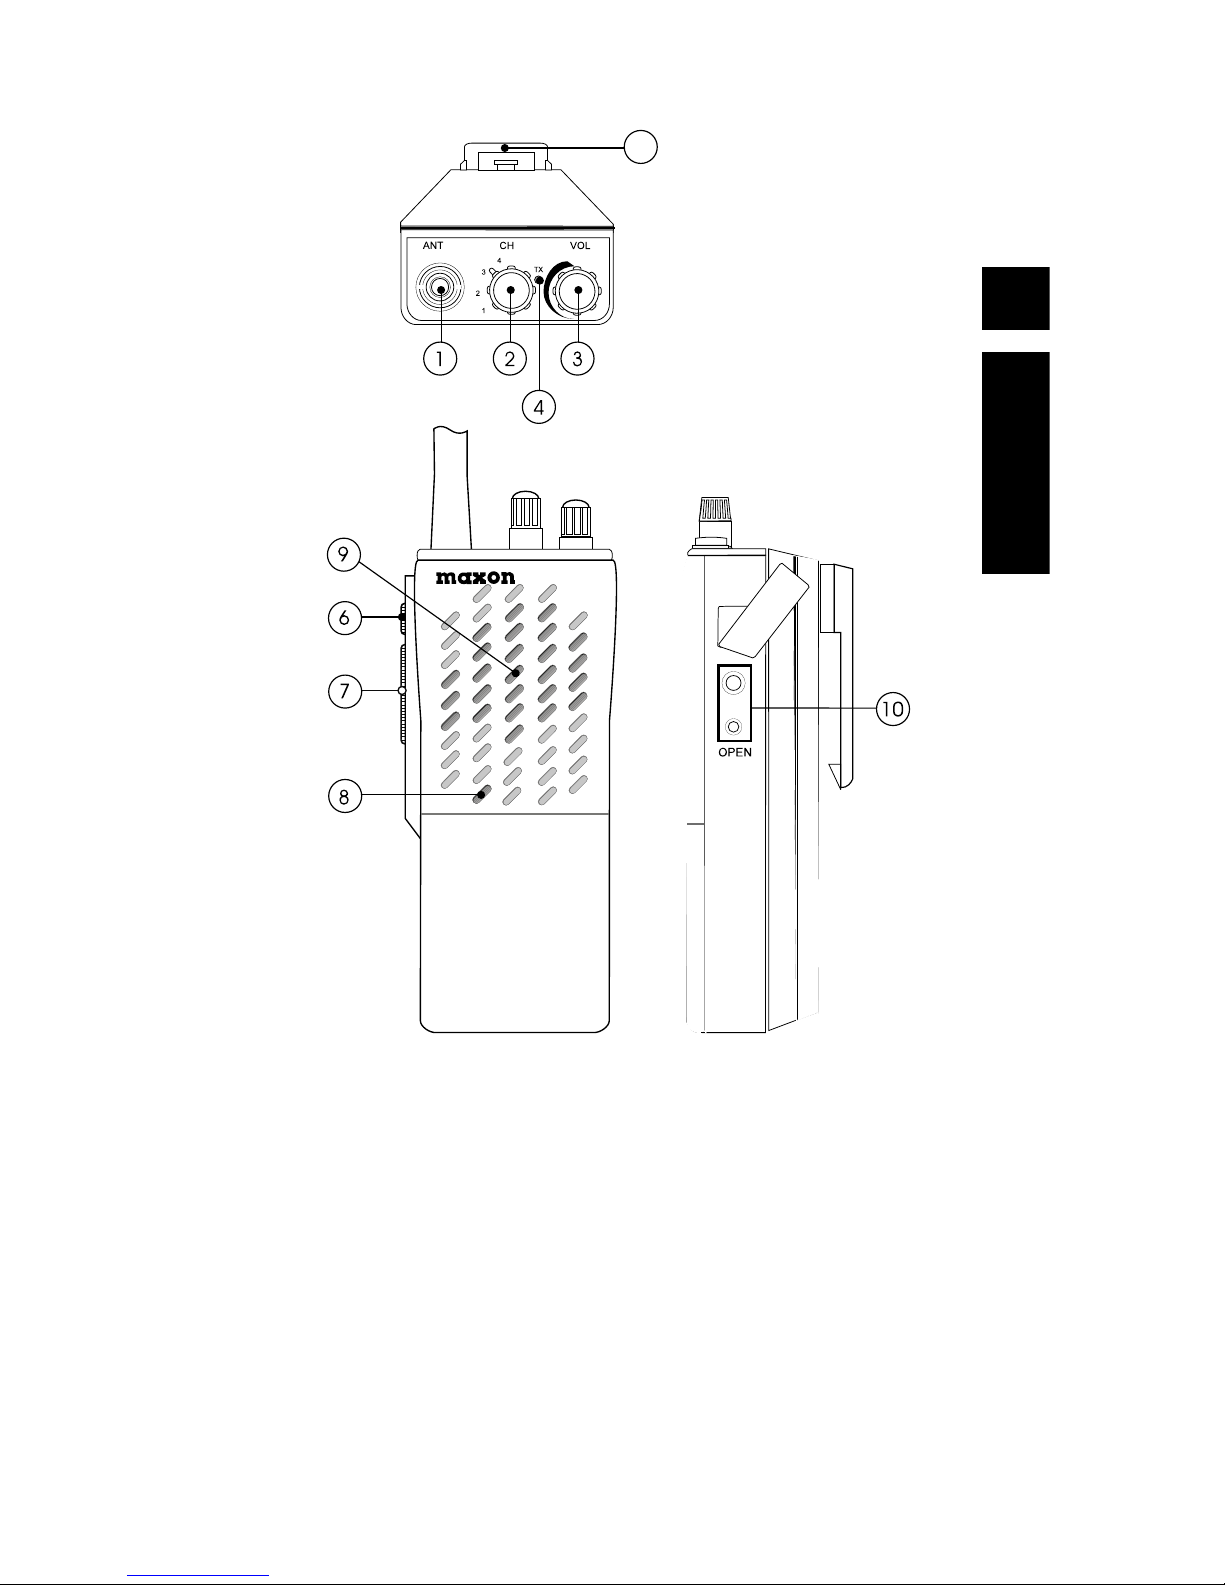
DESCRIPTION OF RADIO
1 Antenna Connector
(not applicable for PMR446)
2 Channel Select Switch
3 On/Off Volume Control
4 Channel Busy/Talk
5 Belt Clip
6 Channel Listen Button
7 Push To Talk Button (PTT)
8 Microphone
9 Speaker
10 Accessories Connector
ENGLISH
4
5

UNPACKING INFORMATION
Remove and carefully inspect the contents of your
package(s) for the following items:
Radio
Battery Pack
Antenna
Belt Clip
Operating Instructions
If any items are missing, please contact your retail outlet.
SL25 SERIES FEATURES
6 or 8 channel operation (market specific)
Channel scan (available in some countries)
CTCSS/DCS tone signalling
Rugged design
Detachable rechargeable battery
Charging facility via accessory socket
FITTING INSTRUCTIONS
Fitting the antenna
If your radio is supplied with a separate antenna, fasten to
the radio by turning the antenna clockwise into the socket À
on top of the radio.
Fitting the battery pack (Figure 1)
Position the guides of the battery in line with the radio
battery guide rails and slide the battery into position until a
click is heard.
To remove, hold the radio in one hand, slide and hold battery
lock. With the other hand, push the battery in downward
direction.
Fitting and removing the belt clip (Figure 2)
Install belt clip Ä on back of battery until it clicks into place.
To remove, pull release tab outward and push belt clip up.
ENGLISH
5
ENGLISH
6
Figure 1
Figure 2

BATTERY CHARGING AND CARE
To ensure peak performance from your radio, the battery
pack must be fully charged. Proper care and charging will
allow maximum performance and life of your battery pack.
The SL25 is available with an overnight wall charger. Turn
the radio off and insert the charging adapter into the lower
hole of the accessory connector É. The charging cycle with
this charger is overnight (12-16 hours).
The optional CH650 Desktop Charger provides one-hour
rapid charging and normal slow charging to one radio and
one battery. The high capacity 1200 mAh battey pack will
take longer to fully charge.
See accompanying instructions included with these chargers
for more information.
To receive maximum performance from your radio and
battery pack, periodically completely discharge and recharge
the battery pack.
MAINTENANCE
Clean external surfaces with a clean cloth dampened in a
solution of dishwasher detergent diluted in water. Apply
the solution sparingly to avoid any moisture leaking into
cracks and crevices. Do not submerge the radio in any
fluids or fire dust/sand. Use a non-metalic brush to
dislodge stubborn particles, if necessary. Dry the surface
thoroughly with a soft, lint free cloth.
DO NOT use solvents or spirits for cleaning they may
permanently damage the housing.
Clean the battery contacts on the back of the radio with a
lint free cloth to remove dirt, grease, or other foreign
material that may impede good electrical contact.
ENGLISH
7

SL25 SERIES OPERATION
POWER ON/VOLUME
Turn the radio on by rotating the on/off volume control Â
clockwise until you hear a click and the self-test alert tone.
TRANSMITT (talking to another person)
1. Press the Channel Listen button Å to listen to the
channel for activity. To avoid interrupting another user,
make sure the channel is clear before you begin
transmitting.
NOTE: The tri-colour LED located on the top panel can
help with channel monitoring. It will glow yellow if the
channel is being used by someone else or green if the
transmission has a CTCSS or DCS tone that matches a
tone programmed for receive in your radio.
2. When the channel is clear, hold the radio upright with the
antenna vertical and the front microphone Ç area about
8 to 10cms from the mouth, keeping the antenna away
from the face and eyes. Press and hold the PTT bar Æ
on the side of the radio, and speak slowly and clearly
into the microphone area.
NOTE: The LED indicator à will glow red when
transmitting. This indicator should be on continuously
while the PTT bar is being pressed and the radio is
transmitting. Should the red LED be flashing, the battery
needs to be recharged and transmission will cease.
Recharge the battery before attempting more than one
transmission.
RECIEVE (listening to another person)
When you have finished transmitting, release the PTT bar to
receive. You will hear another person talking from the
speaker È built into your radio.
POWER OFF
When finishing transmitting, receiving, monitoring etc. turn
the radio off by rotating the on/off volume control  fully
counter clockwise, to the off position.
ENGLISH
8
CAUTION
OPERATION OF THE TRANSMITTER WITHOUT A
PROPER ANTENNA INSTALLED MAY RESULT IN
PERMANENT DAMAGE TO THE RADIO.

STATUS INDICATORS &
AUDIBLE ALERT TONES
Your SL25 Series radio has a sophisticated microprocessor
control which provides a series of audible alert tones.
Upon initial power-up, a quick melody indicates that the radio
is ready to use. Tones also sound indicating the following
conditions:
Attempt to transmit on a channel that is already in use
Attempt to transmit on the scan channel
Low battery condition
SCAN MODES
Scanning is a feature available in some countries that allows
you to monitor a number of channels. Once the scan
channel is selected via the channel selector knob Á, scan is
initiated.
To check if your radio is capable of scanning, contact your
Maxon reseller.
NORMAL CHANNEL SCAN
If your radio is capable of scanning you can initiate scan.
Simply move the channel selector knob to the scan channel
position (last channel) and the radio will start to scan the
remaining channels on your radio. The top panel LED will
flash green as the radio is scanning.
If a conversation is detected on any of the other channels,
the radio will stop on that channel and you will be able to
hear the conversation. The radio will resume scanning once
you have completed your conversation. Scanning will
continue until the channel is changed.
SCAN CHANNEL DELETE
To temporarily delete a channel from the scan list, simply
press the monitor button while scanning has stopped on the
channel to be deleted. This will remove that channel from the
scan list until the channel is changed or the radios power is
reset.
When power is restored or the scan list channel position is
again selected, the original programmed scan list will be
activated.
ENGLISH
9

RADIO STATUS INDICATIONS
ENGLISH
10
STATUS DESCRIPTION LED AUDIBLE
COLOUR TONE
NORMAL Power on-Ready Melody
Busy Yellow
Correct Call Green
Transmit Red
Busy Lock Yellow Single tone
flashing
IN SCAN Scan is initiated Green
flashing
Battery Low Red Four tone,
flashing repeated
ERROR EEPROM Error Red Single tone
flashing repeated
PLL Error Red Double tone
flashing repeated
Filtering Error Red Three tone
flashing repeated

LICENSING AND SERVICE
INFORMATION
LICENCING
The licensing requirements for your SL25 radio differs from
country to country. You must comply with the legal
requirements for licensing in the country where you will use
your radio. For further information on local licensing you
should contact the retail outlet from which you purchased
your radio.
SERVICE
Do not tamper with internal adjustments. Damage to the
equipment and/or improper operation may result. There are
no user serviceable items inside the radio. Any tampering or
efforts to remove or make the radio type labels illegible will
invalidate warranty.
It is recommended that you return your radio to a qualified
Maxon Dealer for any service or repairs.
RECYCLING/DISPOSAL OF BATTERIES
The battery should be recycled at the end of its useful life.
Under various local laws, such batteries must be recycled or
dispoased of properly and cannot be discarded in landfills or
incinerators.
For further information on how to safely dispose of your used
batteries, contact the retail outlet from which you purchased
your radio.
WARRANTY
Your SL25 radio is provided with a minimum 12 months
warranty subject to providing proof of purchase.
The warranty may be invalidated if you:
Open the radio
Tamper with internal adjustments
Immerse the radio in any fluid or dust
Remove or make illegible any product labels
Cause damage to the radio through physical abuse
Check with your Maxon Reseller for further information.
ENGLISH
11

FRANÇAIS
12
SL25
This product is marked with
in accordance with the Class II product requirements
specified in the R&TTE Directive, 1999/5/EC.
Nous déclarons que le produit référencé ci-dessus
satisfait aux exigences R&TTE 1999/5/EC qui lui sont
applicables
0168 !

13
FRANÇAIS
TABLE DES MATIERES
AU SUJET DE VOTRE RADIO SERIE SL25 . . . . .14
INFORMATIONS SUR LA SURETE . . . . . . . . . . . . . . .14
DESCRIPTION DU RADIO . . . . . . . . . . . . . . . . . . . . .15
DEBALLAGE . . . . . . . . . . . . . . . . . . . . . . . . . . . . . . . .16
CARACTERISTIQUES DU
MODELE SERIE SL25 . . . . . . . . . . . . . . . . . . . . . . . .16
INSTRUCTIONS SUR LE MONTAGE . . . . . . . . . . . . .16
CHARGE ET ENTRETIEN DE LA BATTERIE . . . . . . .18
ENTRETIEN . . . . . . . . . . . . . . . . . . . . . . . . . . . . . . . .18
UTILISATION DU MODELE SERIE SL25 . . . . . . . .19
MISE SOUS TENSION/VOLUME . . . . . . . . . . . . . . . . .19
TRANSMISSION . . . . . . . . . . . . . . . . . . . . . . . . . . . . .19
RECEPTION . . . . . . . . . . . . . . . . . . . . . . . . . . . . . . . .19
MISE HORS TENSION . . . . . . . . . . . . . . . . . . . . . . . .20
INDICATEURS DETAT ET
TONALITES DALERTE SONORE . . . . . . . . . . . . . . . .20
MODES DE BALAYAGE . . . . . . . . . . . . . . . . . . . . . .20
BALAYAGE NORMAL DES CANAUX . . . . . . . . . . . . . .20
ANNULATION DU CANAL DE BALAYAGE . . . . . . . . . .21
INDICATIONS SUR LE SATUT DE LA RADIO . . . . . . .21
RENSEIGNEMENTS SUR LA LICENCE ET
LENTRETIEN . . . . . . . . . . . . . . . . . . . . . . . . . . . . . . .22
LICENCE . . . . . . . . . . . . . . . . . . . . . . . . . . . . . . . . . .22
ENTRETIEN . . . . . . . . . . . . . . . . . . . . . . . . . . . . . . . .22
RECYCLAGE/DESTRUCTION DES BATTERIES . . . . .22
GARANTIE . . . . . . . . . . . . . . . . . . . . . . . . . . . . . . . . .22

FRANÇAIS
14
AU SUJET DE VOTRE RADIO
SERIE SL25
Les portatifs SL25 Maxon reposent sur lutilisation dun
systéme multicanaux qui en font un produit aux
performances les plus avancées.
Lutilisation et les fonctions des radios Série SL25 de Maxon
sont décrites dans cette notice.
Nous insistons pour que vous lisiez complètement cette
notice avant dutiliser la radio.
Lapplication de certaines des fonctions décrites dans la
présente notice est fixée par le système en usage dans votre
pays. Votre radio aura été programmée de manière que vous
ayez le plus grand nombre de fonctions possible suivant le
système utilisé dans votre pays.
Si vous avez des questions concernant le fonctionnement de
votre radio, consultez le revendeur détaillant chez qui vous
avez acheté votre radio.
INFORMATIONS SUR LA SURETE
AVERTISSEMENT - NE TENEZ PAS la radio de manière
que lantenne soit proche ou en contact avec des parties
exposées du corps, en particulier la face ou les yeux,
pendant lémission.
AVERTISSEMENT - NE LAISSEZ PAS les enfants utiliser
du matériel radio équipé dun émetteur.
ATTENTION - NUTILISEZ PAS la radio près de capsules
détonnantes électriques non blindées ou dans une
atmosphère explosive sauf sil sagit dun type spécialement
conçu et certifié pour cet usage.
ATTENTION - NIMMERGEZ PAS votre radio et ne
lexposez pas dans des fluides car cela peut lendommager.
15
FRANÇAIS
DESCRIPTION DU RADIO
1. Connecteur D'Antenne
2. Commutateur Choisi De la Manche
3. Commande De Volume "Marche/Arrêt"
4. La Manche Busy/Talk
5. Agrafe De Ceinture
6. La Manche Écoutent Bouton
7. Poussez Au Bouton D'Entretien (les PTTS)
8. Microphone
9. Orateur
10. Connecteur D'Accessoires
5

FRANÇAIS
16
DEBALLAGE
Sortez et contrôlez avec soin le contenu de votre/vos
emballage(s) pour identifier les articles suivants :
Radio
Batterie
Antenne
Attache pour ceinture
Instructions sur lutilisation
Si des articles manquent, contactez votre revendeu
r.
CARACTERISTIQUES DU MODELE
SERIE SL25
6 ou 8 canaux (selon les marchés en vigueur)
Balayage de canal (disponible dans certains pays)
Signaux sonores CTCSS/DCS
Construction solide
Batterie séparable et rechargeable
Possibilité de charge sur prise daccessoire
INSTRUCTIONS SUR LE MONTAGE
Montage de lantenne
Si votre radio est fournie avec antenne séparée, attachez la
à la radio en la tournant dans le sens des aiguilles dune
montre dans la prise À sur le dessus de la radio.
Montage de la batterie (Figure 1)
Positionnez les guides de la batterie en les alignant sur les
rails guides batterie sur la radio et faites glissez la batterie
en place jusquà ce que vous entendiez un déclic.
Pour la sortir, tenez la radio dune main, faites glisser et
tenez le verrou de batterie. De lautre main, poussez la
batterie vers le bas.
Fixation et démontage de lattache ceinture
(Figure 2)
Installez lattache ceinture Ä à larrière de la batterie jusquà
ce quelle senclenche à sa place. Pour la sortir, tirez sur la
patte de libération et poussez lattache ceinture vers le haut.
 Loading...