

Maxon SL100 User Manual

SL100 User Manual

SL100
This product is marked with
in accordance with the Class II product requirements
specified in the R+TTE Directive, 1999/5/EC.
"We hereby declare that the above named product is
in conformity to all the essential requirements of
Directive 1999/5/EC".
French T
ranslation
Nous déclarons que le produit référencé ci-dessus
satisfait aux exigences
R&TTE 1999/5/EC qui lui sont applicables.
S
panish Translation
Certificamos que el aparato es conforme con lo
establecido en las disposiciones de la
Directiva 1999/5/CE.
German T
ranslation
"Wir möchten hiermit bekanntgeben, daß das oben
genannte Produkt in Übereinstimmung mit allen
erforderlichen Bedürfnissen der 1999/5/EC Direktive
seht"
It
alian Translation
Con la presente dichiariamo che il prodotto suindicato
è conforme a tutti i requisiti essenziali della Direttiva
1999/5/CEE.
ENGLISH
1
0168 !

CONTENTS
INTRODUCTION . . . . . . . . . . . . . . . . . . . . . . . . . . . . . .3
MAXON SL100 . . . . . . . . . . . . . . . . . . . . . . . . . . . . . . .3
KEY FEATURES . . . . . . . . . . . . . . . . . . . . . . . . . . . . . .3
DESCRIPTION OF RADIO . . . . . . . . . . . . . . . . . . . . . .4
NOTES TO THE USER . . . . . . . . . . . . . . . . . . . . . . . .5
SAFETY INFORMATION . . . . . . . . . . . . . . . . . . . . . . . .5
CARE OF THE EQUIPMENT . . . . . . . . . . . . . . . . . . . . .5
PREPARING FOR USE . . . . . . . . . . . . . . . . . . . . . . . .6
UNPACKING AND INSPECTION . . . . . . . . . . . . . . . . . .6
FITTING INSTRUCTIONS . . . . . . . . . . . . . . . . . . . . . .6
ATTACHING AND REMOVING THE ANTENNA . . . . . . .6
ATTACHING AND REMOVING THE BATTERY . . . . . . .6
ATTACHING AND REMOVING THE BELT CLIP . . . . . .6
RADIO PERFORMANCE . . . . . . . . . . . . . . . . . . . . . . .7
BATTERY CHARGING AND CARE . . . . . . . . . . . . . .8
RECYCLING / DISPOSAL OF BATERIES . . . . . . . .8
SL100 OPERATION . . . . . . . . . . . . . . . . . . . . . . . . . . .9
POWER ON/VOLUME/POWER OFF . . . . . . . . . . . . . . .9
CHANNEL SELECT . . . . . . . . . . . . . . . . . . . . . . . . . . . .9
TRANSMIT . . . . . . . . . . . . . . . . . . . . . . . . . . . . . . . . . .9
RECEIVE . . . . . . . . . . . . . . . . . . . . . . . . . . . . . . . . . .10
STATUS INDICATORS AND AUDIBLE ALERT TONES 10
DIAGNOSTIC MESSAGES . . . . . . . . . . . . . . . . . . . .11
SCAN MODES . . . . . . . . . . . . . . . . . . . . . . . . . . . . . . .12
NORMAL CHANNEL SCAN . . . . . . . . . . . . . . . . . . . . .12
PRIORITY CHANNEL SCAN . . . . . . . . . . . . . . . . . . . .12
LOOK BACK . . . . . . . . . . . . . . . . . . . . . . . . . . . . . . . .12
CHANNEL GROUP EDIT . . . . . . . . . . . . . . . . . . . . . . .14
PRIORITY CHANNEL EDIT . . . . . . . . . . . . . . . . . . . . .14
ACCESSORIES . . . . . . . . . . . . . . . . . . . . . . . . . . . . . .15
ENGLISH
2

INTRODUCTION
MAXON SL100
KEY FEATURES
Synthesized operation with 199 channel capability
1 or 5 Watt power output internally adjustable
12.5 / 20 / 25 kHz channel spacing
CTCSS /DCS Tone signalling
Busy channel lockout
Time out timer
All Channel Scan
Group scan
Priority Channel Scan
Look back channel
Scan list edit
Priority channel edit
Rugged and reliable construction
Tri-colour LED indicator shows you the status of the
radio
ENGLISH
3
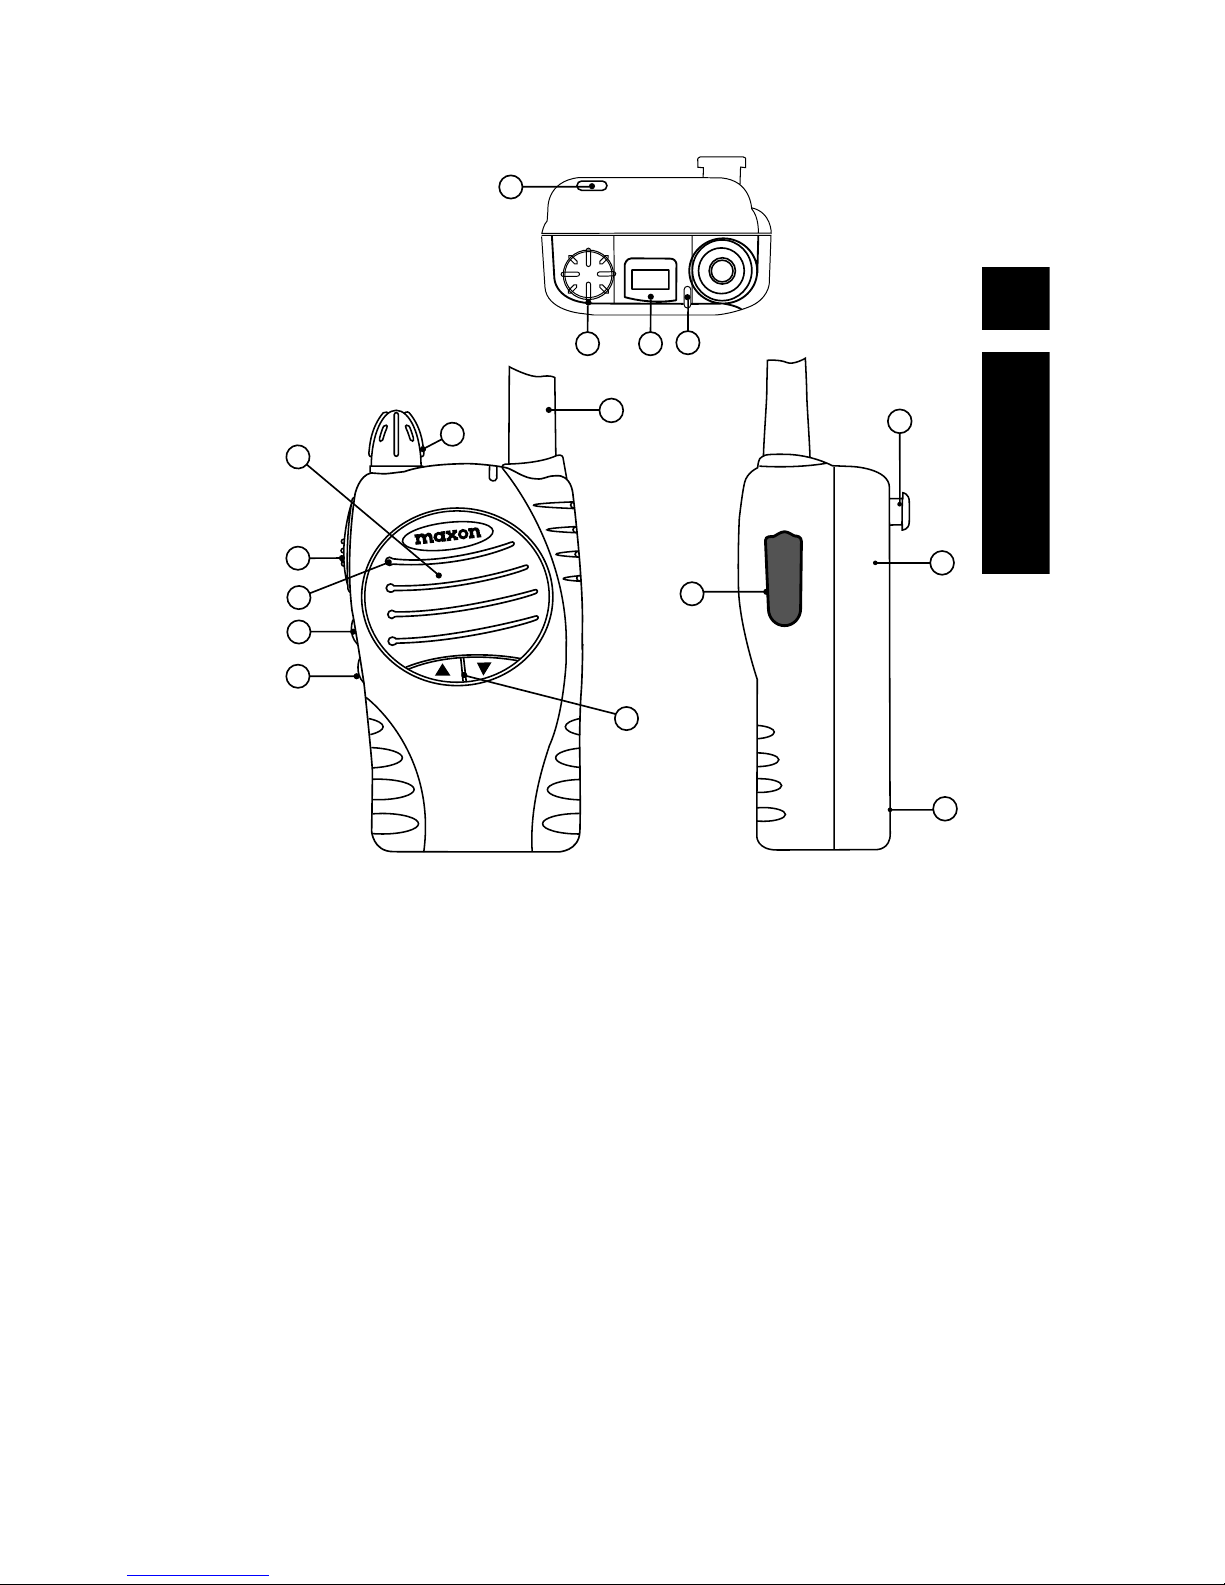
DESCRIPTION OF RADIO
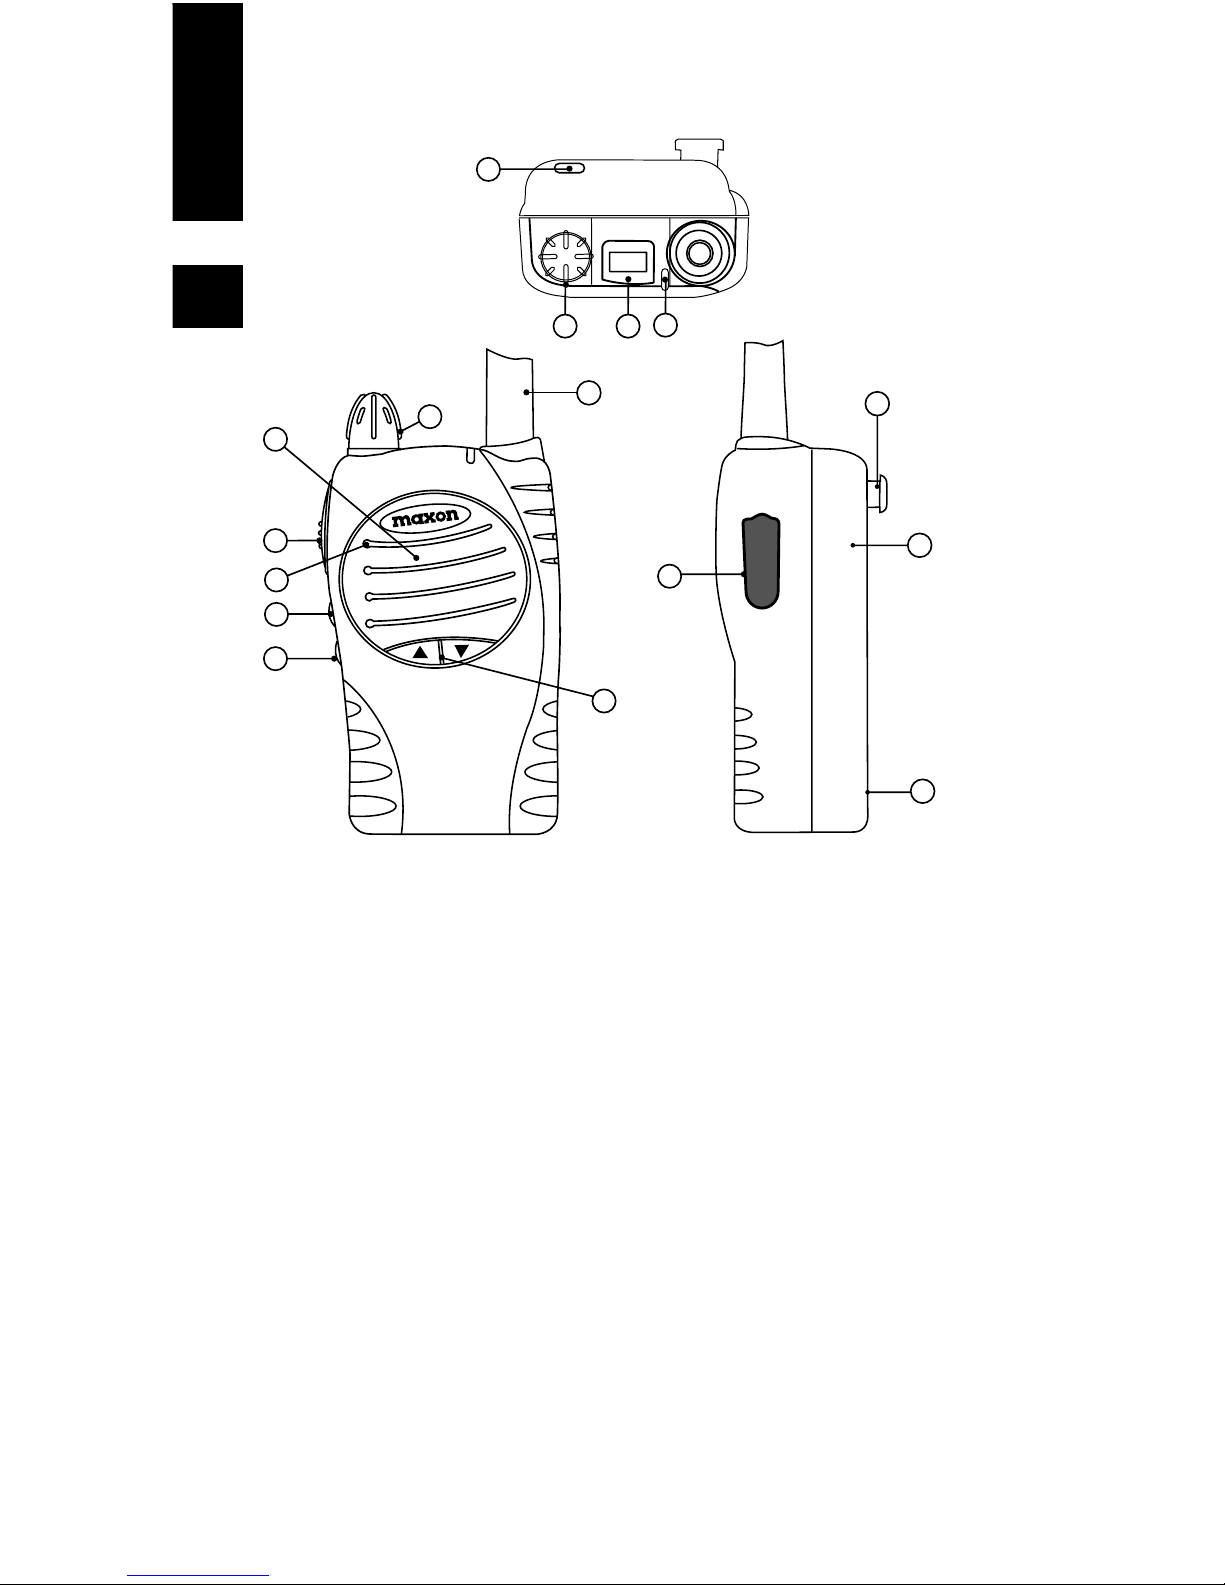
Description Of Radio
1 On / off / Volume control
2 LCD
3 LED
4 Antenna
5 Speaker
6 Accessory Connector
7 Channel selector buttons
8 Scan button
9 Monitor button
10 Microphone
11 Push To Talk (PTT)
12 Battery
13 Battery latch
14 Battery charge contacts
15 Belt clip holder
ENGLISH
4
12
3
13
4
10
9
11
5
1
7
8
12
6
14
15

NOTES TO THE USER
SAFETY INFORMATION
Do not hold the radio in such a manner that the antenna
is touching exposed parts of the body, especially the face
or eyes, while transmitting.
Do not transmit if antenna is damaged as minor burns
could occur if the metallic core is exposed and is touched.
Do not allow children to operate transmitter-equipped
radio equipment.
Do not operate the radio near unshielded electrical
blasting caps or in an explosive atmosphere.
Do not press and hold the transmit switch (PTT) when
not actually wishing to transmit.
Never use the radio in an aircraft.
Never use the radio near to sensitive medical equipment
or in areas where instructed, e.g. Petrol filling stations
When used in a vehicle, do not mount the radio unit on or
near the Airbag or Airbag activating device.
The use of an accessory not recommended or supplied
by Maxon may cause damage to equipment or injury to
personnel, and will invalidate warranty
When using any of the charging accessories, the mains
socket-outlet must be installed near the equipment. The
outlet must not be obstructed and must be easily accessible at all times.
Never attempt to disassemble, modify or repair the unit
unless the work is carried out by a Maxon approved
Reseller. Incorrect assembly, modification or repair may
cause irreparable damage to your unit and will invalidate
warranty. For service or repair always return your radio to
an authorized Maxon Reseller.
CARE OF THE EQUIPMENT
Keep the exterior of the radio clean using a soft damp
cloth.
Do not submerge the radio.
Do not use solvents or spirits for cleaning as they may
damage the radio housing.
Do not carry the radio by the antenna.
Keep battery contacts clean and free of corrosion.
Do not store batteries in a discharged state.
ENGLISH
5

PREPARING FOR USE
UNPACKING AND INSPECTION
Unpack the radio and check that you have received the following items:
SL100 hand-portable radio
Battery pack
Antenna
Belt clip
If any of these items are missing, please contact your
Reseller.
FITTING INSTRUCTIONS
ATTACHING AND REMOVING THE ANTENNA
A high quality matched antenna is supplied with the SL100
radio. Install the antenna by turning clockwise into the
antenna receptacle à on the top of the radio, until it is firmly
seated. Do not over tighten. To remove the antenna,
reverse the above procedure.
Never operate the radio without the antenna fitted.
Always use a Maxon approved antenna.
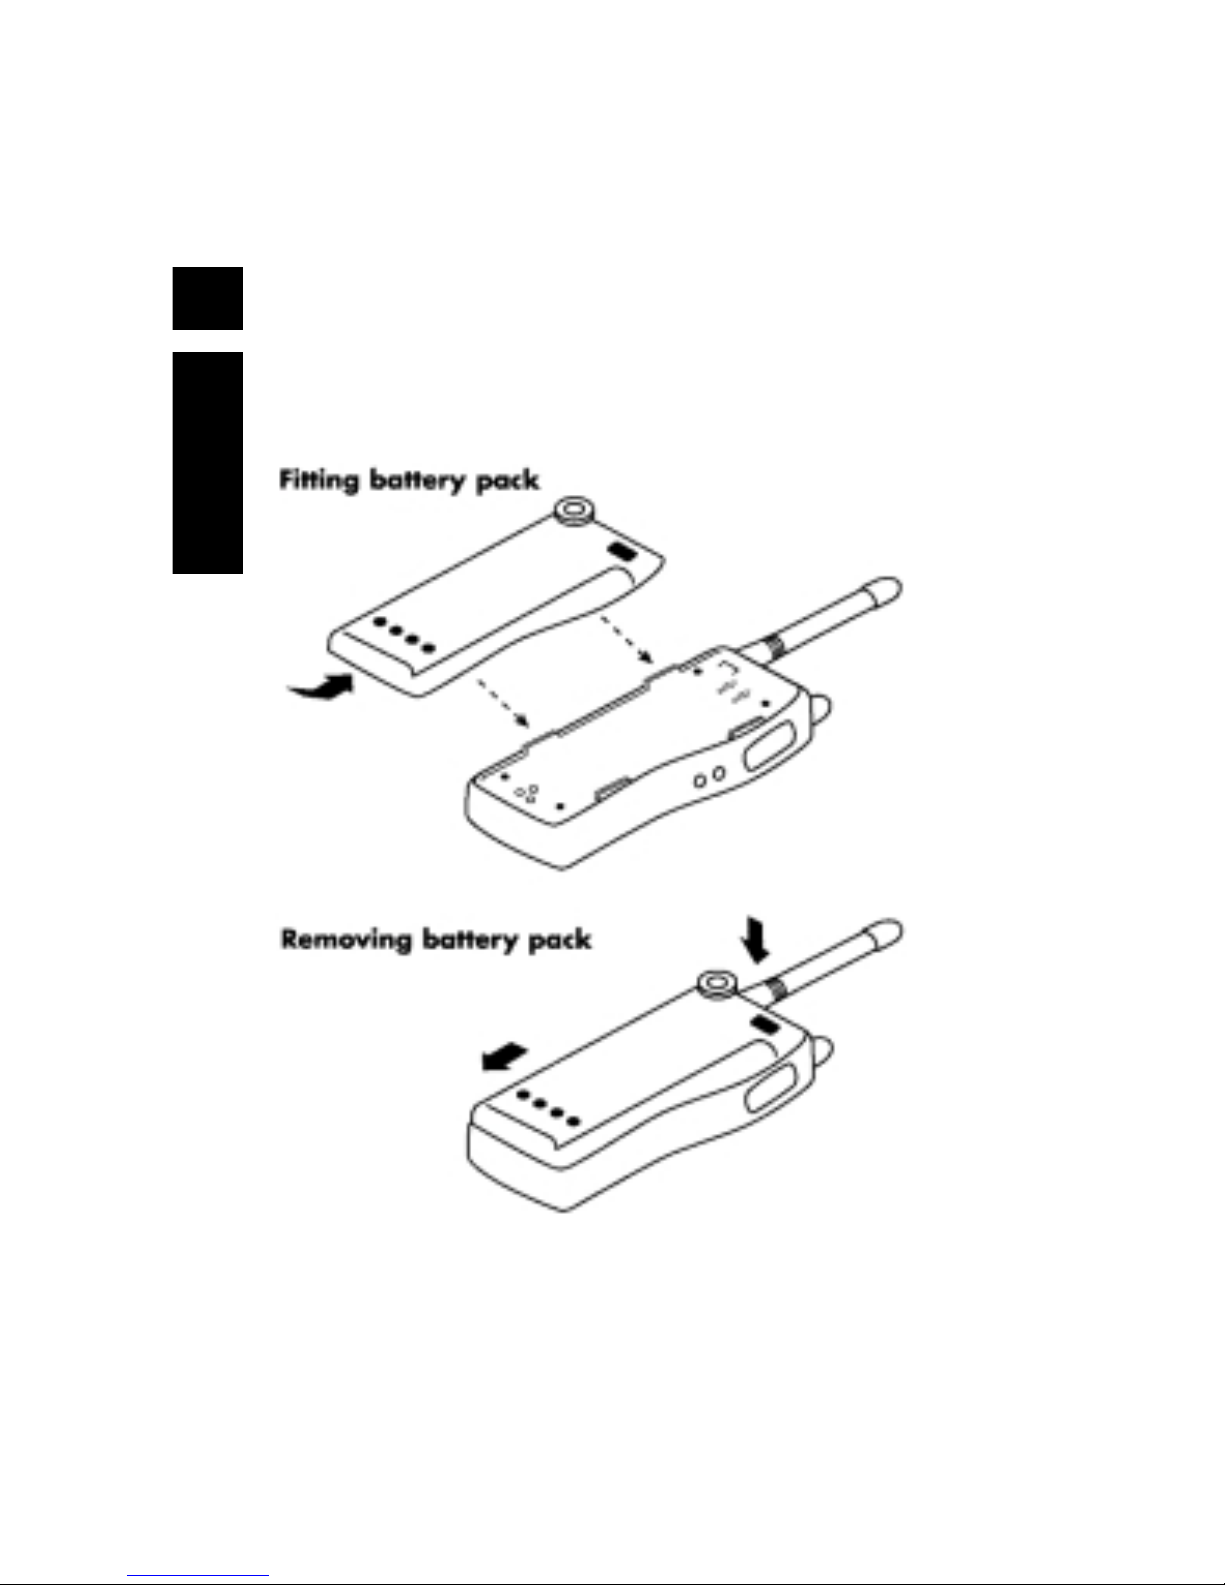
ATTACHING AND REMOVING THE BATTERY
See Fig. 1
To attach the battery pack , hold the radio face down in your
hand and position the guides of the battery in line with the
radio guide rails. Slide the battery upward until a click is
heard.
To remove the battery pack, hold the radio face down in
your hand and push the battery latch button 13 located in
the upper right hand corner of the battery pack. Hold the
battery latch button down, and slide the radio battery in a
downward direction.
Gently lift the battery pack away from the base of radio
when it is free from radio guide rails.
ATTACHING AND
REMOVING THE BELT CLIP
To attach the clip, hold the radio face down in your hand.
Locate the slot in the belt clip and align with holder on upper
left hand corner of the radio back. Push upward on belt clip
until a click is heard. To remove the clip, push and hold the
release button located at the top of the belt clip. Slide the
clip away from the belt clip holder.
ENGLISH
6
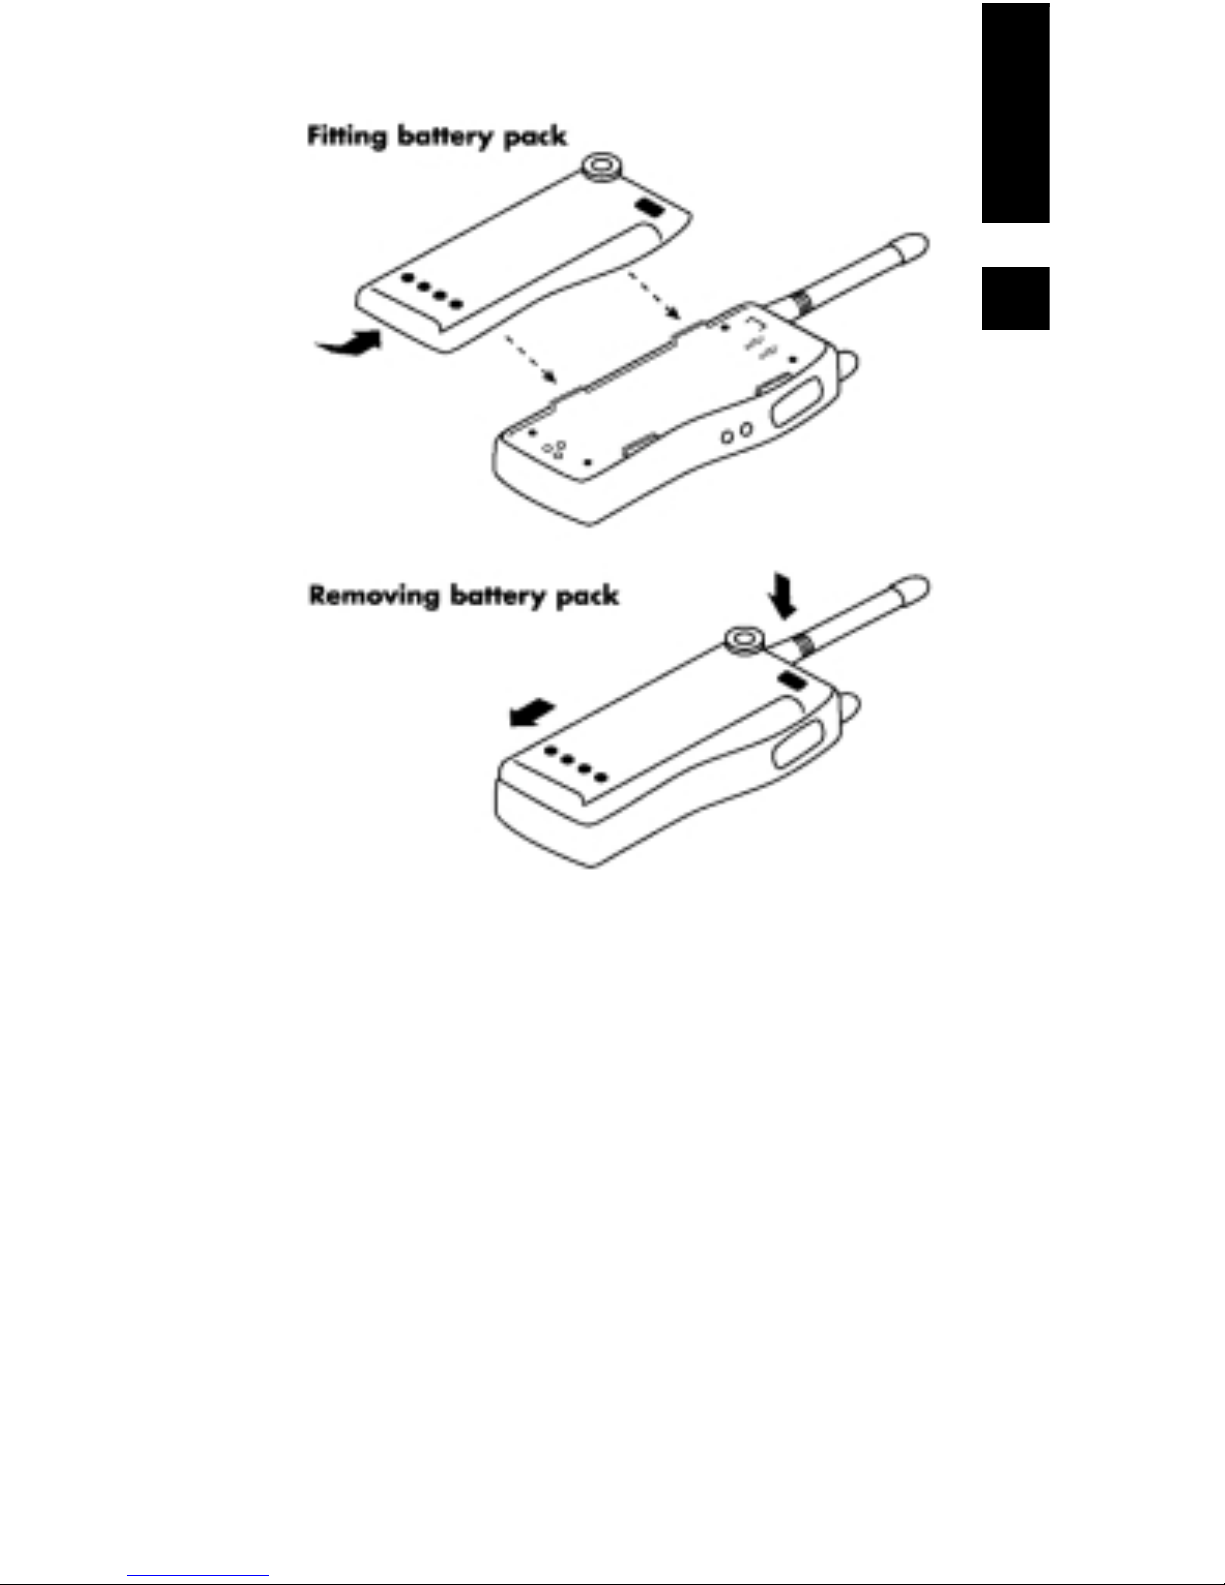
Figure 1
RADIO PERFORMANCE
Optimum positioning of the radio will significantly improve
the effective transmission range, i.e. hold the radio close
(approximately 5cm) to your mouth whilst talking. Mounting
the radio on a belt and using a lapel microphone may
degrade performance in marginal signal areas. In poor signal areas, moving the radio just a few metres may produce
a clearer signal.
ENGLISH
7

BATTERY CHARGING AND CARE
To ensure peak performance from your radio, the battery
pack must be fully charged. To obtain maximum capacity
and performance it is recommended that you cycle your new
batteries with at least 3 charges and 2 discharges.
Remove the charger base and power supply from the packaging, and plug in the power supplys DC connector into the
jack on the back of the charging base. Plug the AC power
cord into the standard mains AC outlet.
To charge a battery while attached to a radio, simply place
the radio into the front charging well. The charger will identify the battery condition, and then automatically initiate a
charge mode rapid or top-up / trickle.
To charge a battery removed from the radio, place the battery into the rear charging well. (Belt clip side facing rear.)
Again, the charger will identify the battery condition, and
automatically rapid charge or top-up / trickle charge, the battery pack.
Note the colour of the LED charge indicators: flashing red
for brief battery analysis, red for rapid charge cycle, green
for the top-up / trickle charge cycle.
When using both charging wells of the fast charger, only one
can rapid charge at a time. The front charging well always
has priority for rapid charging. After the front well cycles
from rapid to top-up / trickle charge, the back well will initiate
its rapid charge mode. Again, note the colour of the charging
wells LED to define the current charging cycle.
To prolong battery life in general usage, make sure that the
radio is programmed to use the power save mode.
RECYCLING / DISPOSAL OF BATERIES
The battery should be recycled at the end of its useful life.
Under various local laws, Ni-MH and Ni-Cad batteries must
be recycled or disposed of properly and cannot be discarded in landfills or incinerators.
For further information on how to safely dispose of your
used batteries, contact your reseller.
ENGLISH
8

SL100 OPERATION
POWER ON/VOLUME/POWER OFF
Turn the radio on by rotating the off/on/volume control À
clockwise.
You will hear a click and (if enabled via dealer programming), the radios self-test alert tones. Increase the radio
volume by continuing the clockwise rotation.
To turn the radio off, rotate the control anti-clockwise until a
click is heard.
CHANNEL SELECT
To change radio channels, simply press and release the buttons s or tÆuntil the desired channel is reached. Or, to
scroll through your programmed channels more quickly,
press and hold the s or t buttons. The channel numbers
will appear in the radios LCD Á (Located on top panel of
unit).
If your radio has been programmed for channel group scan,
you must enter the scan mode by pressing the scan button
Ç. The current channel group will display in the radios LCD.
If you wish to change that selection, use the s or t buttons
until the LCD displays the channel group you wish to scan.
To lock the Channel Select buttons (to prevent accidental
channel change) press and hold Scan button Ç for 4 seconds. LO will appear in the LCD display. To unlock the
Channel Select buttons, press and hold Scan button again
for 4 seconds.
TRANSMIT
Press the monitor button (and check the colour of the radios
top-panel LED Â. It will glow orange if carrier is present; it
will not be illuminated if the radio indicates a clear channel.
When the channel is clear, hold the radio microphone area
É approximately 5 8cm from your mouth, keeping the
antenna vertical. Press and hold the PTT button 11 on the
side of the radio, and begin speaking in a clear, normal
tone. Release the PTT button when you have finished
speaking.
CAUTION: Operation of the transmitter without a proper
antenna installed may result in permanent damage to
the radio.
ENGLISH
9

NOTE: The radios LED Â will glow red continuously when
you have the PTT button pressed and are transmitting. If the
red LED starts flashing, the battery needs to be recharged
and transmission will cease. Recharge the battery fully
before attempting more transmissions.
RECEIVE
When you have finished transmitting, release the PTT button to receive. You will hear another person talking from the
speaker Ä built into your radio.
STATUS INDICATORS AND
AUDIBLE ALERT TONES
Your SL100 radio has a sophisticated microprocessor control, which provides a range of audible alert tones. Upon
each power-up, a quick melody indicates that the self-test of
the microprocessor functions has been completed. A
sequence of audible tones* may be sounded with any of the
following conditions:
Attempt to transmit on a channel set for receive only
Attempt to transmit on a channel that is already in use
when busy channel lockout has been programmed into
the radio*
Transmitting time has exceeded time-out timer pro-
grammed length*
Low battery condition
Selecting a channel with no programmed frequency
* Indicates a function that is initially programmed into the
radio by your Maxon dealer.
See the Status Indicators and Audible Alert Tones chart for
full details.
ENGLISH
10

DIAGNOSTIC MESSAGES
In addition to the low battery condition, a flashing red status
LED may also indicate fault conditions.
Should your radio apparently not operate correctly, replace
the battery with one known to be fully charged. If the condition persists, or the radio emits an unexpected continuous
pattern of audio beeps, or will not transmit or receive as it
does normally, return the radio to your Maxon Reseller.
NOTE: All audible tones can be programmed off for silent
operation
ENGLISH
11
Status Description LED LCD Tone
Colour Indication
Normal Power On - 188 Melody
Call Received Orange Chan Number Correct Call Green Chan Number Busy Channel Orange Chan Number Transmit Red Chan Number Transmit Red Alternating UL/ 2 Beeps
Not Allowed Flashing Chan Number repeated
Channel - LO 2 short
Button Lock beeps
Scanning Normal scan Green Group Number -
mode Flashing
Priority Green - -
scan mode Flashing
Priority Green Lb / Channel -
Look Back Flashing Number
Scan Edit Edit scan list Single SE -
Red Flash
Priority Priority Two Red PE Edit channel edit Flashes
Warning Low Battery Red LC 3 Beeps
Flashing Repeated
Busy Channel Orange bL Single beep
Lockout repeated
Tx Inhibit - _h / r0 2 beeps
Time-out Timer - Pt Single beep/
3 beeps
repeated
Eprom Error - Er Single beep
repeated
Out of Lock - UL 2 Beeps
Repeated

SCAN MODES
Scanning is a dealer programmable feature that allows you
to monitor a number of channels or channels within a group.
Your dealer will help you define a scanning mode and your
channel scan list.
NORMAL CHANNEL SCAN
Once the scan list has been established, initiate scan by
pressing and releasing the scan button Ç. If a conversation
is detected on any of the channels in the scan list, the radio
will stop on that channel and you will be able to hear the
conversation.
If programmed for normal scan TX, you will be able to transmit on that active channel during the programmable scan
delay time.
(The scan delay time is the amount of time the radio will
stay on that channel once activity has ceased. Dealer programmable, 47 seconds is typical). The radio will resume
scanning once the scan delay time has expired, and will
continue to scan until the channel is changed. The LED Â
will flash green.
PRIORITY CHANNEL SCAN
The radio will scan list channels as in normal channel scan.
However, when the PTT button is pressed the radio will only
transmit on the priority channel. Upon release of the PTT
button the radio will resume scanning. To activate the
Priority scan mode, press and release the scan button Ç.
The LED Â will flash green.
LOOK BACK
This feature is ideal for those who do not need scan as
defined above, but want to make sure that they never miss
a call on the Priority channel if another channel has been
selected. Once a channel has been selected, the radio will
periodically look back at the priority channel. If activity is
detected on the priority channel, the radio will move to that
channel for as long as it remains active.
To enter the look back mode, press and hold the scan button Ç. Lb/Channel number will be shown in the display, the
LED Â will flash green.
NOTE: Look back requires that the radio leave the current
channel for a fraction of a second (at regular intervals) to
check the priority channel for activity. Depending upon how
the radio is programmed (scan speed etc.) this may or may
ENGLISH
12

not be noticeable as breaks on the current channel for that
same fraction of a second. A transmission will be made on
the active channel at all times.
Scan Channel Delete
To temporarily delete a channel from the scan list, simply
press the monitor button (while scanning and stopped on
the channel) to be deleted. This will remove that channel
from the scan list until the channel is changed or the radios
power is reset. When power is restored or the scan list
channel position is selected again, the originally programmed scan list will be activated.
Ctcss / Dcs Scanning
To help block out unwanted calls to your radio, the SL100
can be programmed by your dealer to scan for tones.
Normal Scan Tx
Allows a transmission only after a call is received, depending on the programmed scan delay time. After scan
resumes, and a transmission is made, the radio will sound
two beeps, display _h and will not allow a transmission.
Priority Scan Tx
Allows a transmission after a call is received depending on
programmed scan delay time. The transmission will be
made on the channel that the call was received. After the
scan resumes, if a transmission is made, the radio will transmit on the programmed priority channel.
Priority Only Tx
If scanning or listening to an active channel and the PTT bar
is pressed, the radio will only transmit on the priority channel.
Receive Only Scan
This allows only reception, not transmission. If a transmission is made at any time, the radio will sound two beeps,
display r0 and will not allow the transmission.
Scan List Edit
You can edit your radios original scan list and priority scan
channel at any time. Please note, if your radio has been
programmed for All-channel Scan, you will not be able to
edit your scan list, only your priority channel.
ENGLISH
13

Channel Group Edit
To edit the group scan list in a radio programmed for channel group scan, turn the radio off, press and hold scan button Ç.
While holding scan button, turn the radio on À and observe
a single red flash of the LED Â. The display Á will read SE.
Release the scan button.
The first group number will be displayed. If you do not wish
to edit the group you have selected press the s or t buttons Æ to select the desired channel groups you wish to
edit. After channel group selection has been made, press
and release the scan button.
The channel number within your selected channel group
may now be edited.
If the channel number Á is flashing, that channel is already
included in the scan list of the selected channel group. If the
channel number is solid, the channel can be added or deleted from the scan list. Press and release the monitor button
È, the selected channel will flash if it was added to the scan
list or be solid if it was deleted from the scan list.
To edit other channels, press the s or t buttons Æ to select
the desired channel within the channel group. To add or
delete the newly selected channel from the channel group
scan list, repeat the process detailed above. Upon completion of editing channels on your channel group scan list,
press and release the scan button Ç. Your new channel
group scan list should be entered at this time.
PRIORITY CHANNEL EDIT
Only one priority channel can be programmed into the radio.
To edit a priority channel, turn the radio off À, press and
hold scan button Ç. While holding the scan button, turn
radio on À, and release the scan button after the second
red flash of the LED Â.
PE will be shown in the display Á. Release the scan button.
The first channel number will be displayed. If displayed
channel is not your priority channel, press and release the
s or t buttons Æ to select the desired priority channel.
After you have selected the channel, a flashing channel
number indicates that the channel is already selected as priority. If channel number is solid, the channel is not selected
as priority. To add or delete the selected channel as the priority channel, press and release the monitor button È. The
selected channel will flash if it was added as a priority channel or will be solid if deleted as the priority. Upon completion
of adding or deleting the priority channel, press and release
the scan button. Your new priority channel should be
entered at this time.
ENGLISH
14

ACCESSORIES
A full range of Maxon accessories are available to use with
this product. Please contact your Maxon Reseller for more
information or visit www.maxon.co.uk
ENGLISH
15
SL100 : Guide d'utilisation
Ce produit porte le label
conformément aux exigences spécifiées dans la
directive R+TTE, 1999/5/EC pour les produits de
classe 11.
16
FRANÇAIS
0168 !

SOMMAIRE
INTRODUCTION . . . . . . . . . . . . . . . . . . . . . . . . . .18
MAXON SL100 . . . . . . . . . . . . . . . . . . . . . . . . . . . . . .18
PRINCIPALES CARACTÉRISTIQUES . . . . . . . . . . . . .18
DESCRIPTION DU RADIO . . . . . . . . . . . . . . . . . . . . .19
NOTES À L'ATTENTION DE L'UTILISATEUR . . . .20
SÉCURITÉ . . . . . . . . . . . . . . . . . . . . . . . . . . . . . . . . .20
ENTRETIEN DU MATÉRIEL . . . . . . . . . . . . . . . . . . . .20
PRÉPARATION AVANT UTILISATION . . . . . . . . . . .21
DÉBALLAGE ET INSPECTION . . . . . . . . . . . . . . . . . .21
INSTALLATION . . . . . . . . . . . . . . . . . . . . . . . . . . . . . .21
MISE EN PLACE ET RETRAIT DE L'ANTENNE . . . . .21
MISE EN PLACE ET RETRAIT DE LA BATTERIE . . . .21
MISE EN PLACE ET RETRAIT DE
LA PINCE DE CEINTURE . . . . . . . . . . . . . . . . . . . . . .22
PERFORMANCE DU RADIO . . . . . . . . . . . . . . . . . .23
RECHARGE ET ENTRETIEN DE LA BATTERIE . .24
RECYCLAGE / ÉLIMINATION DES BATTERIES . .24
FONCTIONNEMENT DU SL100 . . . . . . . . . . . . . . . .24
MARCHE/VOLUME/ARRÊT . . . . . . . . . . . . . . . . . . . .24
SÉLECTION DE CANAL . . . . . . . . . . . . . . . . . . . . . . .24
TRANSMISSION . . . . . . . . . . . . . . . . . . . . . . . . . . . . .25
RÉCEPTION . . . . . . . . . . . . . . . . . . . . . . . . . . . . . . . .25
INDICATEURS D'ÉTAT ET SONORITÉS D'ALARME . .25
MESSAGES DE DIAGNOSTIC . . . . . . . . . . . . . . . . .26
MODES DE BALAYAGE . . . . . . . . . . . . . . . . . . . . . .27
BALAYAGE DE CANAUX NORMAL . . . . . . . . . . . . . . .27
BALAYAGE A CANAL PRIORITAIRE . . . . . . . . . . . . . .27
RETOUR . . . . . . . . . . . . . . . . . . . . . . . . . . . . . . . . . . .27
ÉDITION DE GROUPE DE CANAUX . . . . . . . . . . . . . .29
ÉDITION DE GROUPE DE PRIORITAIRE . . . . . . . . . .30
ACCESSOIRES . . . . . . . . . . . . . . . . . . . . . . . . . . . . . .30
17
FRANÇAIS

INTRODUCTION
MAXON SL100
PRINCIPALES CARACTÉRISTIQUES
Fonctionnement synthétisé avec capacité de 199
canaux
Puissance d'émission 1 ou 5 watts, réglable en interne
Espacement des canaux 12.5 / 20 / 25 kHz
Signalisation CTCSS /DCS
Verrouillage de canal occupé
Temporisation
Balayage de tous les canaux
Balayage groupé
Balayage à canal prioritaire
Canal de retour
Edition de liste de balayage
Edition de canal prioritaire
Construction robuste et fiable
LED tricolore indique l'état du radio
18
FRANÇAIS
DESCRIPTION DU RADIO
Légende du diagramme :
1. Bouton Marche/Arrêt/Volume
2. Affichage à cristaux liquides
3. LED
4. Antenne
5. Haut-parleur
6. Connecteur d'accessoire
7. Boutons de sélection de canal
8. Bouton de balayage
9. Bouton de surveillance
10. Microphone
11. Push To Talk (PTT)
12. Batterie
13. Bouton de blocage de la batterie
14. Contacts de recharge de la batterie
15. Pince de ceinture
19
FRANÇAIS
12
3
13
4
10
9
11
5
1
7
8
12
6
14
15

NOTES A L'ATTENTION DE
L'UTILISATEUR
SÉCURITÉ
Ne pas tenir le radio de telle sorte que l'antenne touche
des parties exposées du corps, plus particulièrement le
visage ou les yeux, durant la transmission.
Ne pas transmettre si l'antenne est endommagée car des
brûlures légères peuvent se produire si l'âme métallique
est exposée et touchée.
Ne pas laisser des enfants utiliser de matériel radio
équipé de transmetteur.
Ne pas utiliser le radio près d'amorces électriques non
protégées ou dans une atmosphère explosive.
Ne pas appuyer sur le bouton de transmission (PTT)
quand vous ne souhaitez pas transmettre.
Ne jamais utiliser le radio à bord d'un avion.
Ne jamais utiliser le radio près de matériel médical
sensible ou dans des zones où il est interdit de le faire,
par ex. stations service.
Quand vous utilisez le radio dans un véhicule, ne pas le
monter sur ou près de l'airbag ou du dispositif de
déclenchement de l'airbag.
L'utilisation d'un accessoire non recommandé ou fourni
par Maxon peut endommager le matériel ou entraîner des
préjudices corporels et pourrait invalider la garantie.
Quand vous utilisez l'un des accessoires de recharge, la
prise secteur doit être installée près du matériel. La prise
ne doit pas être obstruée et doit être facilement accessi-
ble à tout moment.
Ne tentez jamais de démonter, modifier ou réparer
l'appareil sauf si le travail est exécuté par un revendeur
agréé par Maxon. Un montage, une modification ou une
réparation incorrects peuvent entraîner des dégâts irré-
parables et invalider la garantie. Pour les révisions et
réparations, adressez-vous toujours à un revendeur agréé
par Maxon.
ENTRETIEN DU MATÉRIEL
L'extérieur du radio doit toujours être propre. Utilisez un
chiffon doux humide.
Ne submergez jamais le radio.
N'utilisez ni solvants ni alcools pour le nettoyage car ils
risquent d'endommager le boîtier du radio.
Ne portez pas le radio par l'antenne.
Les contacts de la batterie doivent rester propres et sans
corrosion.
Ne stockez pas les batteries à l'état déchargé.
20
FRANÇAIS

PREPARATION AVANT UTILISATION
DÉBALLAGE ET INSPECTION
Déballez le radio et vérifiez que vous avez bien reçu les éléments suivants :
Radio portatif SL100
Batterie
Antenne
Pince de ceinture
Si l'un de ces éléments est manquant, contactez votre
revendeur.
INSTALLATION
MISE EN PLACE ET
RETRAIT DE L'ANTENNE
Une antenne adaptée de haute qualité est fournie avec le
radio SL100. Installez l'antenne en la faisant tourner dans le
sens des aiguilles d'une montre dans l'orifice à destiné à
l'antenne sur le dessus du radio, jusqu'à ce qu'elle soit fermement en place. Ne serrez pas trop. Pour retirer l'antenne,
inversez la procédure ci-dessus.
N'utilisez jamais le radio sans l'antenne.
Utilisez toujours une antenne agréée Maxon.
MISE EN PLACE ET
RETRAIT DE LA BATTERIE
Voir Fig. 1
Pour mettre la batterie en place, tenez le radio face vers le
bas et positionnez les guides de la batterie dans l'alignement des guides du radio. Faites glisser la batterie vers le
haut jusqu'à ce que vous entendiez un clic.
Pour retirer la batterie, tenez le radio face vers le bas et
enfoncez le bouton de blocage de la batterie situé en
haut à droite de la batterie. Enfoncez le bouton de blocage
de la batterie et faites glisser la batterie vers le bas.
Soulevez doucement la batterie de la base du radio une fois
qu'elle est dégagée des guides du radio.
21
FRANÇAIS
MISE EN PLACE ET
RETRAIT DE LA PINCE DE CEINTURE
Pour attacher la pince, tenez le radio face vers le bas.
Localisez la fente dans la pince de ceinture et alignez-la
avec le dispositif d'accrochage situé en haut à gauche du
dos du radio. Poussez vers le haut sur la pince de ceinture
jusqu'à ce que vous entendiez un clic. Pour retirer la pince,
poussez et enfoncez le bouton de dégagement situé sur le
dessus de la pince de ceinture. Faites glisser la pince en
l'éloignant de la ceinture.
Figure 1
22
FRANÇAIS

PERFORMANCE DU RADIO
Un positionnement optimal du radio améliorera considérablement la plage de transmission utile : tenez le radio
près (environ 5 cm) de votre bouche quand vous parlez. Le
montage du radio sur une ceinture et l'utilisation d'un microcravate dégradent la performance dans les zones de signal
marginal. Dans les zones de signal faible, le déplacement
du radio de quelques mètres seulement peut produire un
signal plus clair.
RECHARGE ET ENTRETIEN DE LA
BATTERIE
Pour assurer une performance optimale de votre radio, la
batterie doit être entièrement chargée. Pour obtenir une
capacité et une performance maximales, il est recommandé
de soumettre vos batteries neuves à un cycle d'au moins 3
recharges et 2 décharges.
Retirez le chargeur et l'alimentation de l'emballage et
branchez le connecteur CC de l'alimentation dans la prise
jack au dos du chargeur. Branchez le cordon d'alimentation
CA dans la prise secteur CA.
Pour recharger une batterie attachée à un radio, placez simplement le radio dans le support avant du chargeur. Le
chargeur identifiera l'état de la batterie et déclenchera
automatiquement un mode de recharge : rapide ou lent.
Pour recharger une batterie retirée du radio, placez la batterie dans le support arrière du chargeur. (Côté pince de
ceinture face à l'arrière). Ici aussi, le chargeur identifiera l'état de la batterie et déclenchera automatiquement un mode
de recharge rapide ou lente.
Notez la couleur des indicateurs LED de charge de la batterie : rouge clignotant pour brève analyse de batterie, rouge
pour cycle de recharge rapide, vert pour cycle de recharge
lent.
Quand vous utilisez le deux supports de recharge, vous ne
pouvez en utiliser qu'un seul à la fois pour la recharge rapide. Le support de chargeur avant a toujours la priorité pour
la recharge rapide. Quand le support avant passe de la
recharge rapide à la recharge lente, le support arrière passe
au mode de recharge rapide. Notez à nouveau la couleur de
l'indicateur LED du support de chargeur pour définir le cycle
de recharge courant.
Pour prolonger la durée de vie de la batterie en usage
général, assurez-vous que le radio soit programmé pour
utiliser le mode d'économie d'énergie.
23
FRANÇAIS
 Loading...