

Page 1

1
TABLE OF CONTENTS
CHAPTER 2 BASIC OPERATION
Turning The Phone On and Off ....20
Turning The Phone On .................20
Turning The Phone Off .................20
Installing SIM Card........................21
Basic Functions..............................23
Making a Call ................................23
Receiving Calls .............................24
International Call, Call to an Extension,
Emergency Call.............................25
Entering Letters and Numbers.....26
Key features..................................28
Chapter 3 Menu
Messages........................................30
SMS ..............................................30
MMS..............................................38
CB .................................................45
Page 2
TABLE OF CONTENTS
Settings ..........................................79
Time & Date ..................................79
Language ......................................81
Data...............................................82
Security .........................................83
Network .........................................87
Call Settings..................................90
Reset Setting ................................96
Camera............................................97
Preview .........................................98
My Photos .....................................88
Memory Status..............................99
TABLE OF CONTENTS
CHAPTER 4 PHONEBOOK
Look Up.......................................102
New .............................................104
PB Settings .................................106
Voice Mail NO .............................109
CHAPTER 5 MISCELLANEOUS
Menu Summary ..........................112
Cellular Phone in Brief ................117
Abbreviations and Acronyms ......118
Questions and Answers ..............121
Technical Data ............................124
CHAPTER 6 SAFETY
Safety Information for Wireless Hand-
held Phone..................................126
Cell Phone Care..........................128
Driving Safety..............................130
Electronic Devices ......................131
Other Safety Guidelines..............133
Cautions ......................................134
Warning.......................................135
FCC RF Exposure.......................136
Page 3
WELCOME
WELCOME
ABOUT THIS USER GUIDE
This user guide is written only for the MX-C110-series cellular handsets.
The contents of the user guide follow the same order as the phone menu system
goes.
Please note that some optional functions may not be shared by all models.
Inquiries regarding the user guide or phone handling can be addressed to:
Maxon Technical Marketing
Page 4

MEMO
CHAPTER 1
Package Includes
Handset Description
Main Display
Function Keys
Use Of SIM Card
Navigation Key
Using The Battery
Charging The Battery
Important Battery Information
BEFORE USING YOUR PHONE
Page 5
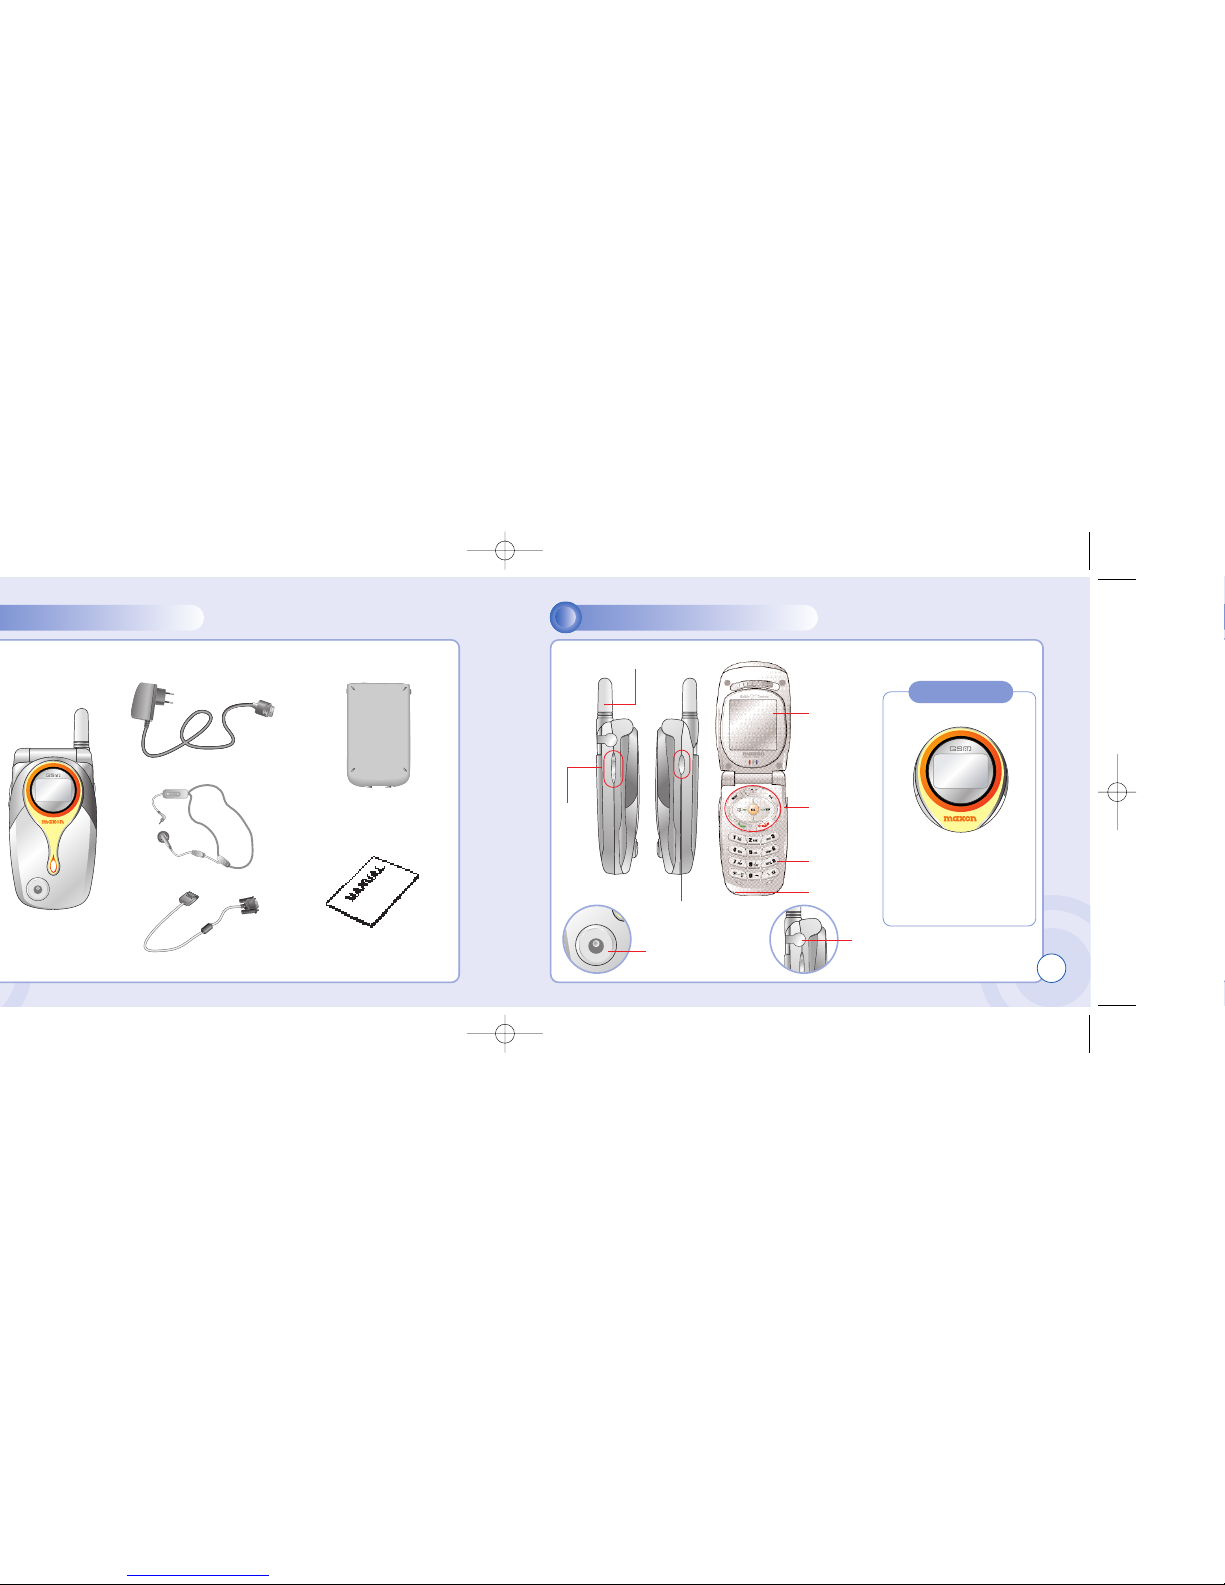
PACKAGE INCLUDES
HANDSET DESCRIPTION
Handset
Charger
Hands Free Kit
Data Cable (Optional)
Standard Battery
Earphone jack
Side
Key
Sub-Cam key
Camera
Antenna
User Manual
9
Display
Function
key
Key Pad
Microphone
Sub LCD
Displays a icon and a status
when you have a call or a
message or when you select
Bell/ Vibration/ Mute.
256OLED makes the screen
turn off.
Page 6
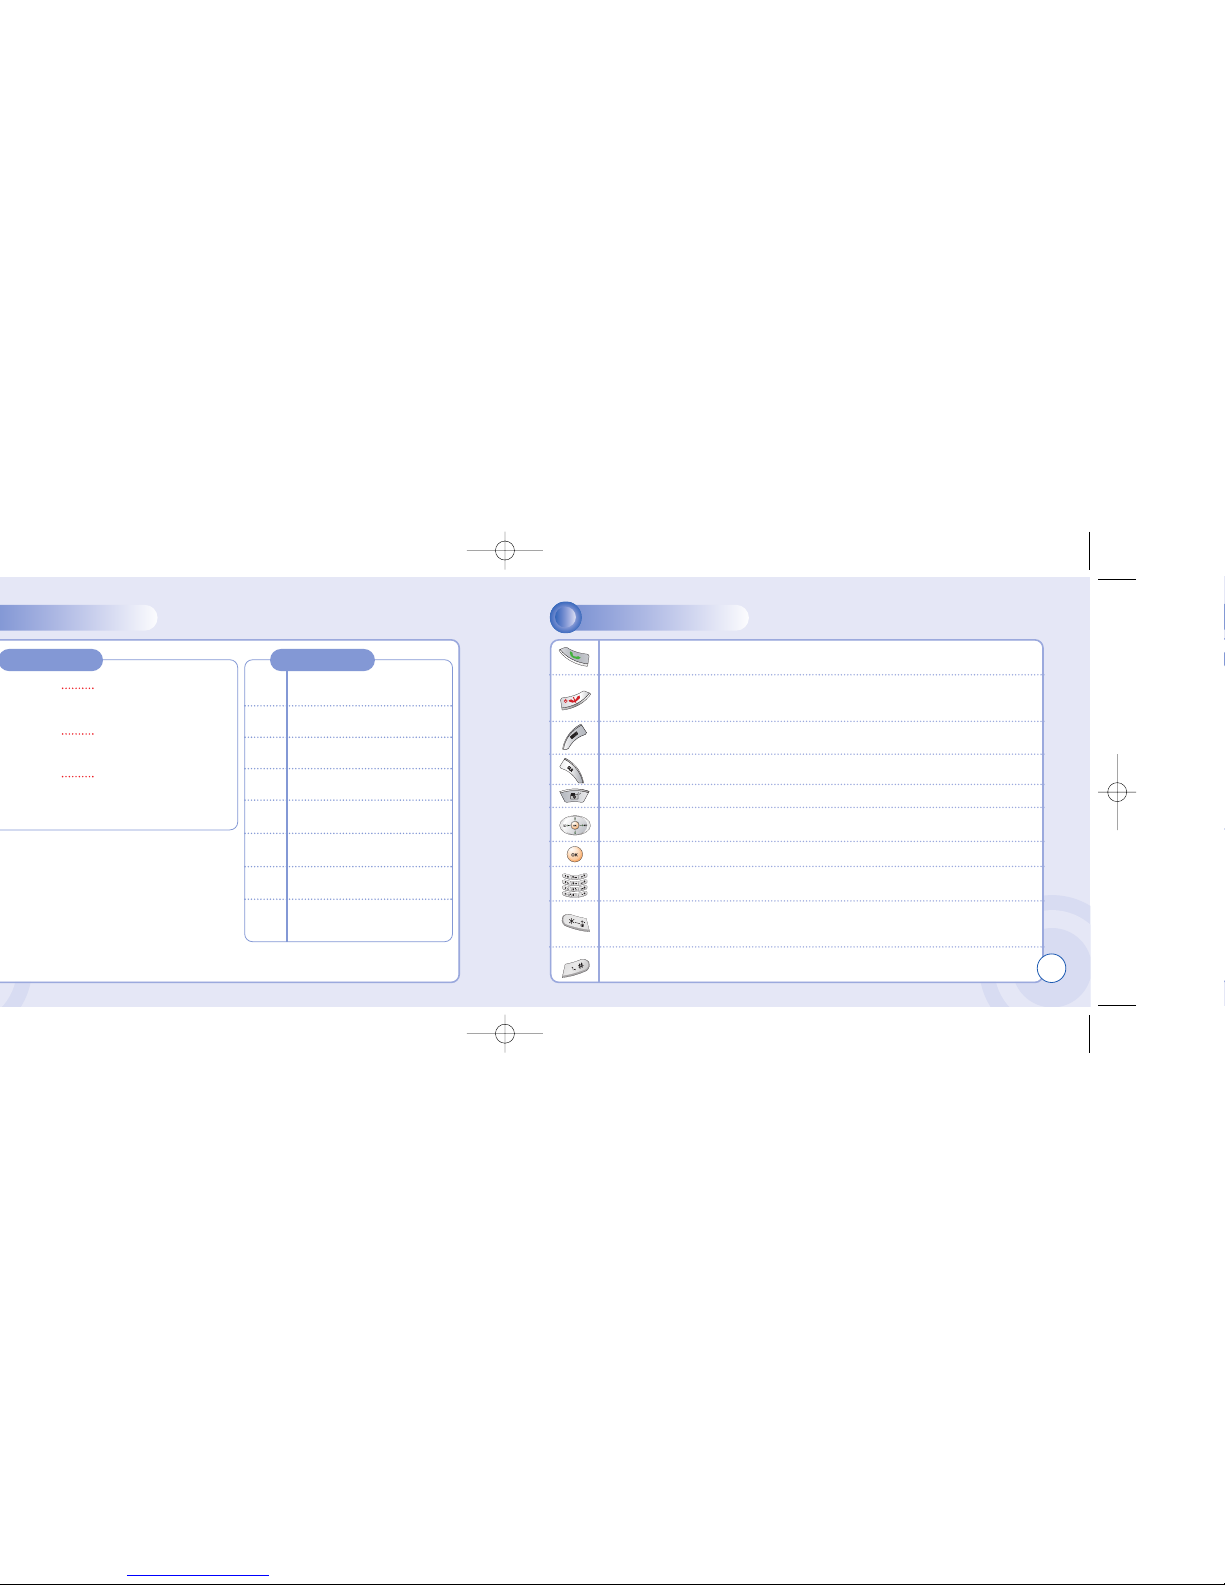
MAIN DISPLAY FUNCTION KEYS
Main Display Icons
Icon display – Shows
the current status of
phone
Signal Strength – The number
of bars shows signal strength.
[Soft1] – To place a call or redial a number.
Send/Redial Key.
[Soft2]
– To turn on and off the phone, and back key.
– To end of call.
Menu Key
– To browse the main menu.
Camera Key – To move directly to camera menu.
Clr Key – Clear and back key.
4-Direction navigation key
– To browse the SMS memu and phonbook menu.
OK Key - To select an option.
Keypad Keys - To enter letters and numbers.
*Key
- To place an international call.(+)
- To set a manner mode. (press and hold)
# Key
–Toggle between
#.,;:”’? and ! in standby. Controls “.(period)” in text editors.
Battery – Current battery charg-
ing level.
Alarm –Appears when an alarm
is set.
Call forwarding – Appears
when call forwarding is set.
Manner mode – Appears when
manner is set as a ring mode.
Vibration mode – Appears
when Vibration is set as a ring
mode.
Text message – Appears when
you have a new text message.
GPRS Signal – The phone
enters a GPRS service area.
Graphic display – Shows
phone numbers, text lines,
animations, pictures
Function display – Shows
each function of [soft1] and
[soft2] to help browse
through main menu.
11
Page 7
USE OF SIM CARD NAVIGATION KEY
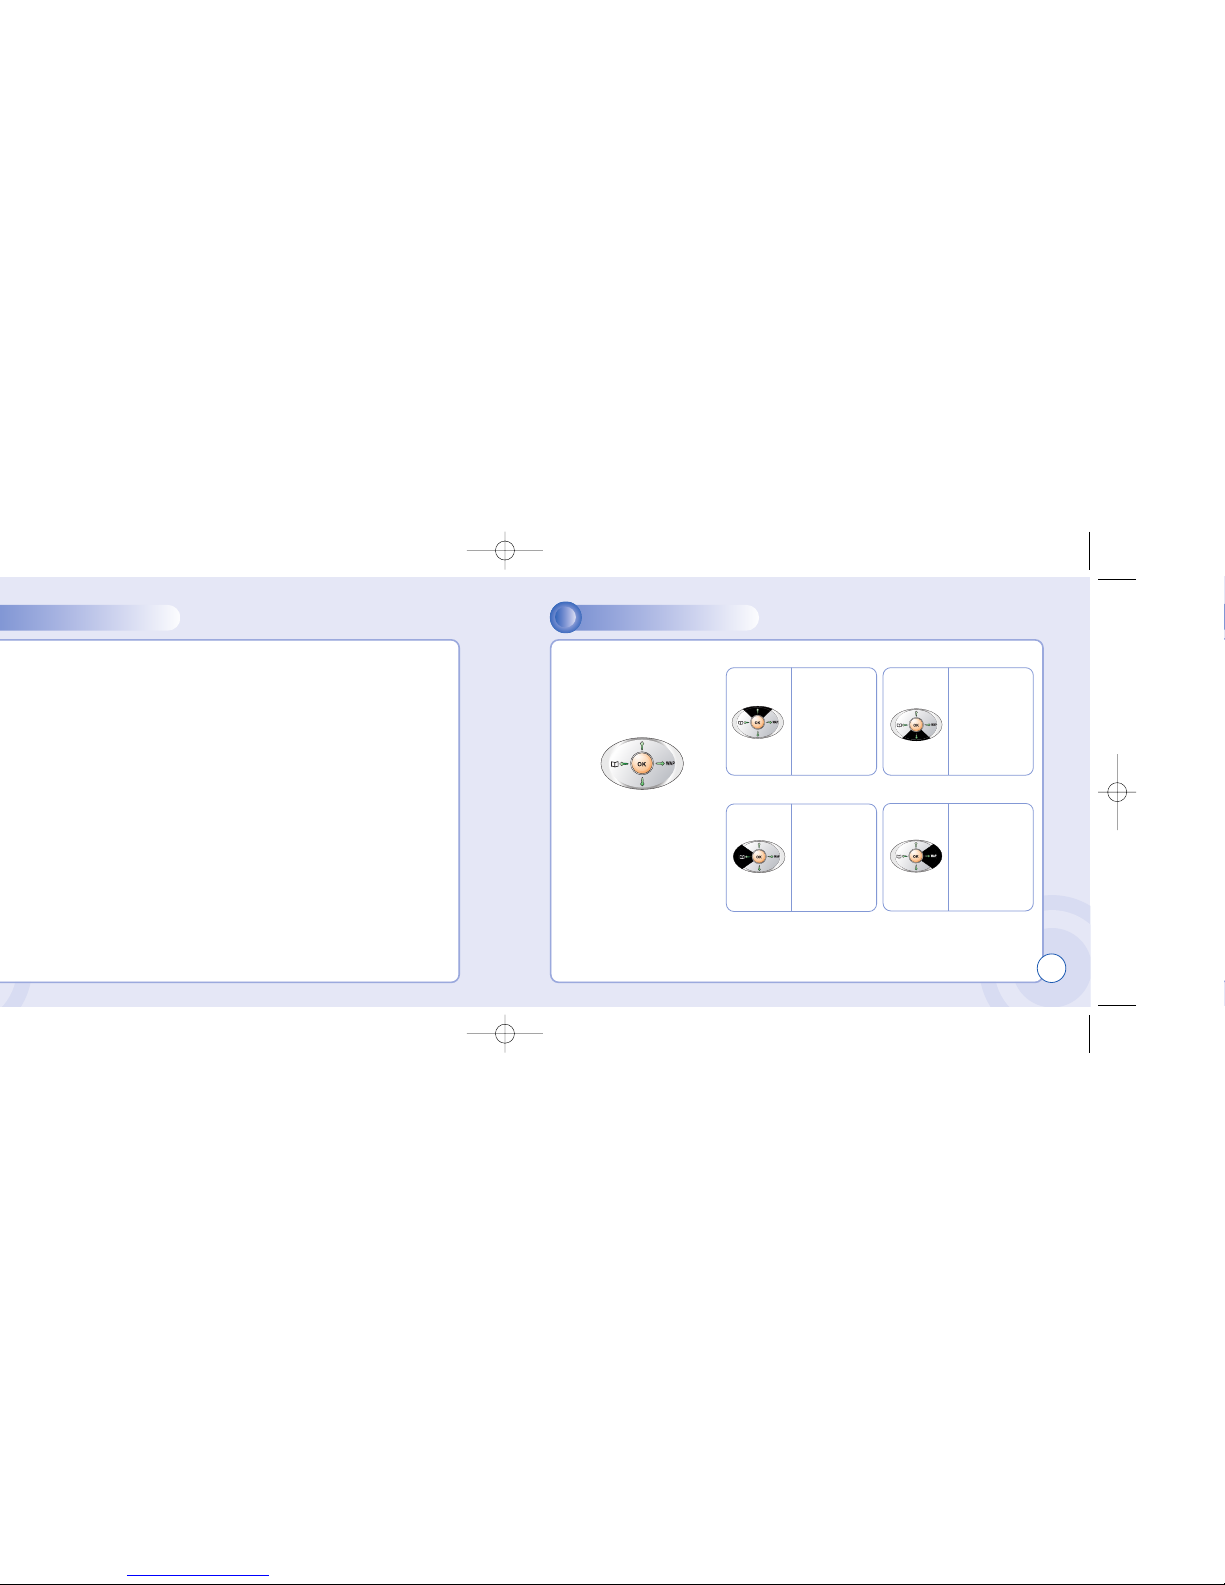
The navigation key is
used to search through
the menu.
13
[UP] –
To scroll up
and access
the look up
directly from
idle mode.
[LEFT] –
To access
the phonebook directly
from idle
mode.
[RIGHT] –
To access
the messages
menu directly
from idle
mode.
[DOWN] –
To scroll
down and
access the
dial list from
idle mode.
Page 8
15
USING THE BATTERY CHARGING THE BATTERY
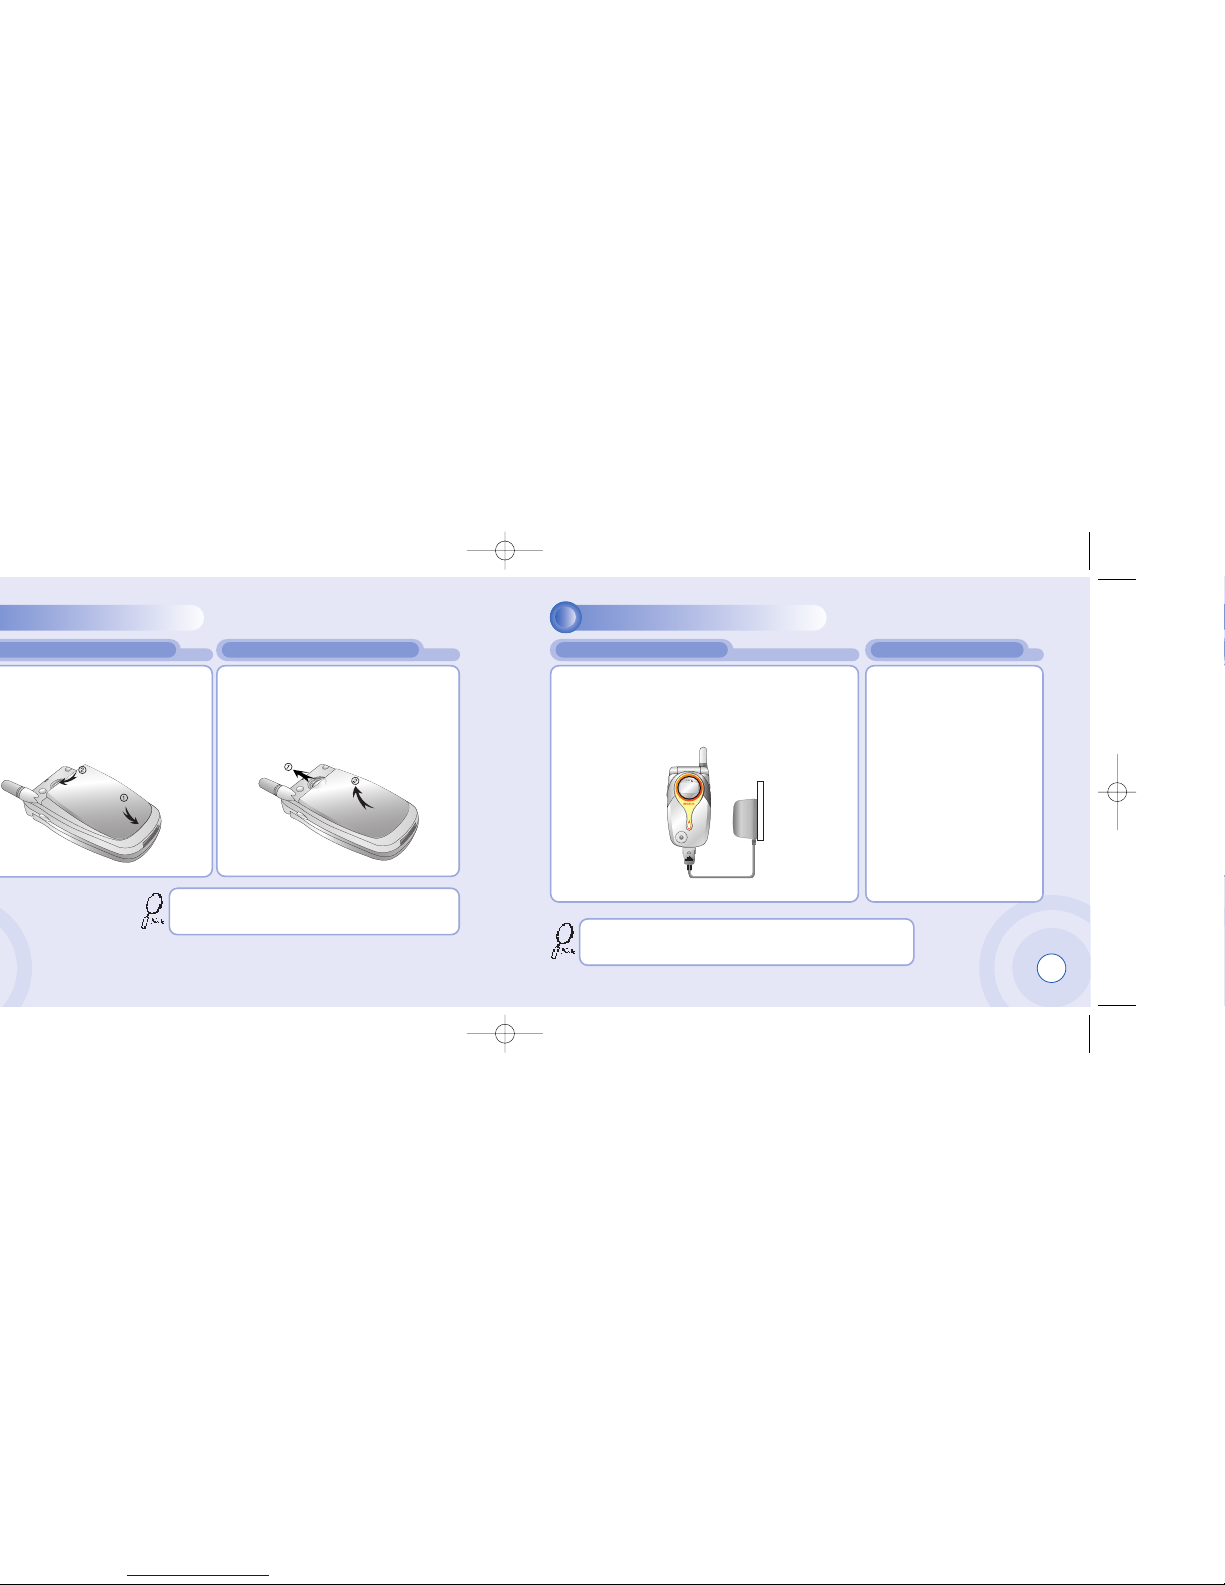
push down the battery until it
POWER CONNECTION CHARGING STATUS
1
1
Insert the contactor of charger into slot and plug
the charger into the outlet.
* Please note that the contactor should be placed
into slot, a certain side up.
When its battery is charged
in power off mode, the phone
shows an animation in LCD.
1
1
Pull down the tab with one hand
and lift the top of the battery to
separate from handset.
The battery must be securely placed in the battery compartment. If battery is improperly inserted, the handset
will not turn on or the battery may slip off during use.
Be sure to charge the battery for at least four hours prior to the
first time use. For extended battery life time, charge the battery
fully for a long time rather than frequently for a short time period.
Page 9
CHARGING THE BATTERY IMPORTANT BATTERY INFORMATION
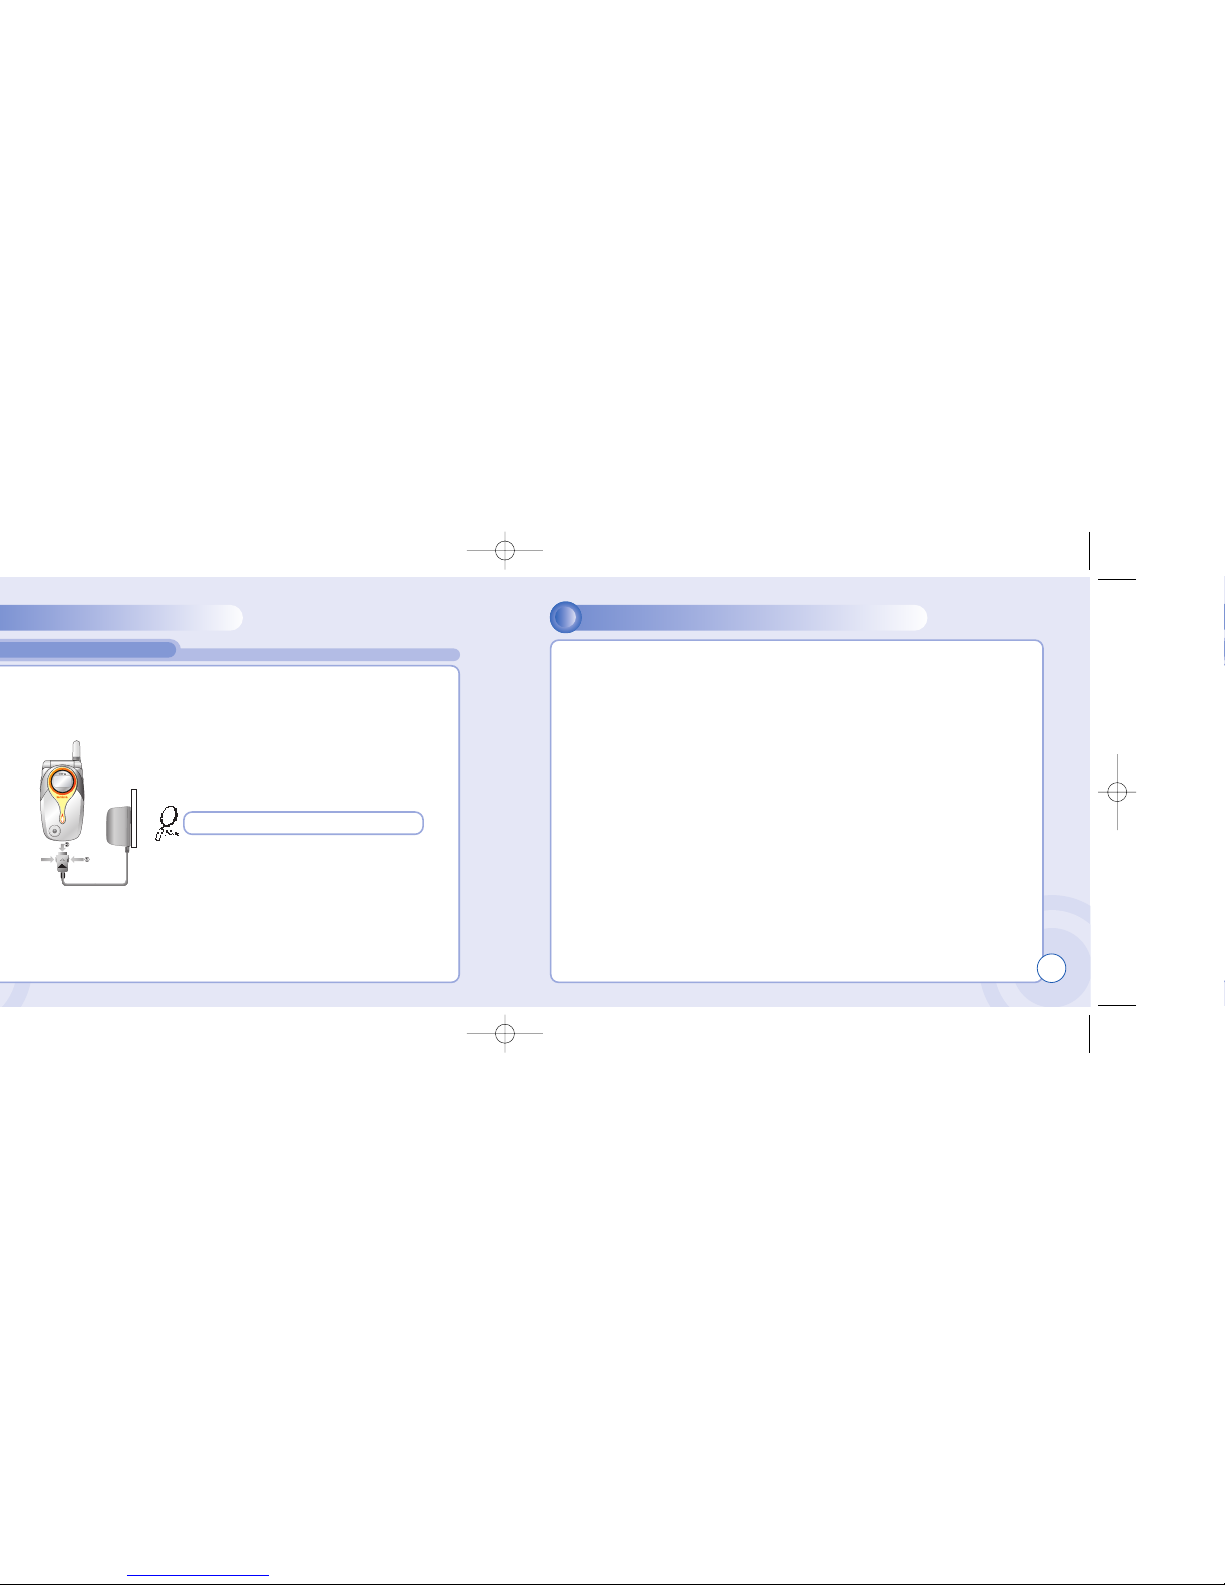
Press down the release latch and pull out the contactor of charger.
l Don’t keep a battery near a fire and attempt to disassemble it.
Use only the battery approved by manufacturer.
l
Never touch battery contactors with any metallic object, which lead to battery short
circuiting especially when carrying a battery in a pocket.
- Possible to cause burns due to blasting and hot temperature.
l Don’t drop a battery and apply any physical shock to the battery.
- Malfunction and fire are feasible.
l
Please keep a battery out of children’s reach and in a dry and cool area.
l Charge a battery and keep it in a room temperature.
- Extreme temperature prevents full charging and affects battery capacity in a
negative way.
l
Since a battery is an expendable product, the battery operating time decreases
through frequently repeated charge and discharge.
- A new battery to be purchased when the operating time is reduced halfway.
l Keep the contactors of battery clean and dry.
l Plug out a charger in order to protect the phone when a lightning strikes.
Don’t remove the charger by pulling its cable.
17
Page 10

MEMO
CHAPTER 2
Turning The Phone On and Off
(With SIM Card Installed.)
Installing SIM Card
Basic Functions
Entering Letters and Numbers
BASIC OPERATION
Page 11
TURNING THE PHONE ON AND OFF INSTALLING SIM CARD
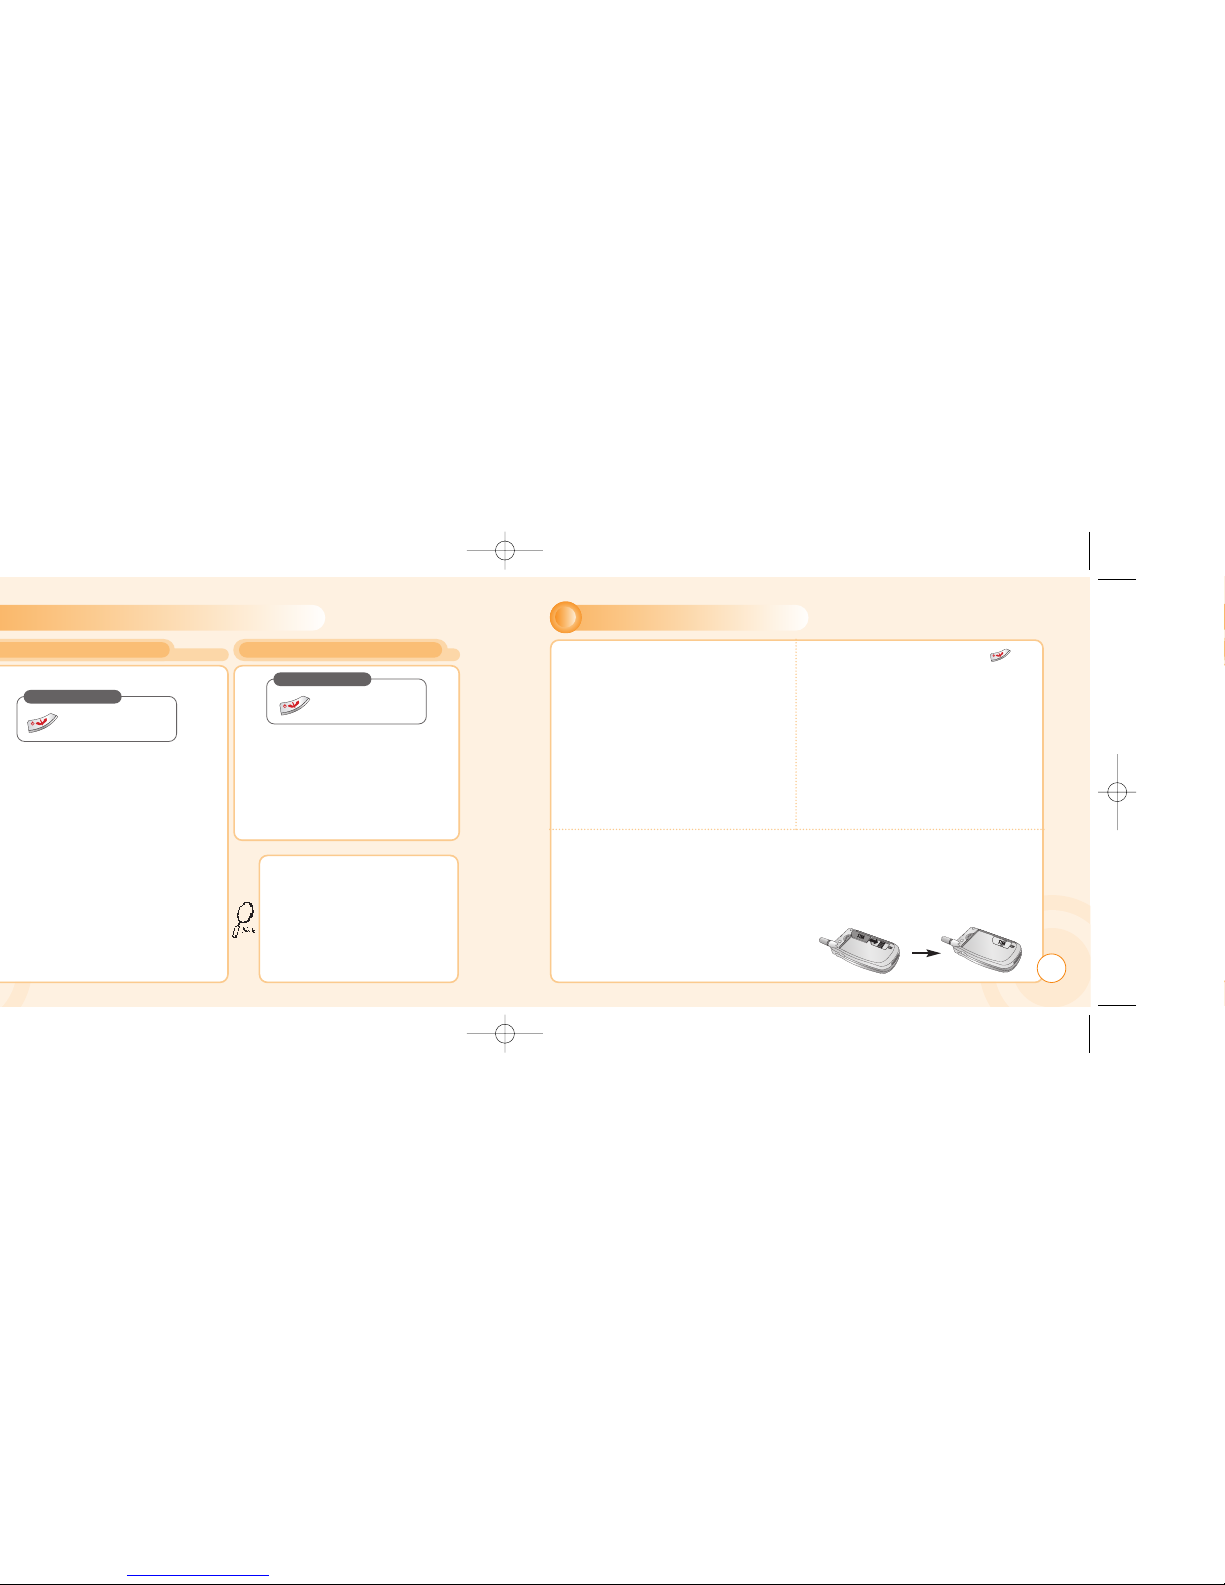
When SIM CARD is installed.
Press and Hold
Until LCD on.
Press and Hold
Until LCD off.
• If “LOW BATTERY WARNING
POWER OFF” is displayed and the
power goes off.
• Change or charge the battery
immediately.
• If the battery is removed while the
phone is on, any unsaved messages
or features could be lost and a dam
age might be caused to memory.
21
1
1
To connect to your network operator
your phone must have a SIM CARD
installed.
3
3
The SIM CARD slot is located beneath the battery.
Install the SIM CARD, gold-plated side down and the cut corner fit in the slot.
Never use force.
Avoid touching the gold-plated side of the SIM.
2
2
You are prompted to press [ ] to
display a list of available phone
languages.
Page 12
INSTALLING SIM CARD
7
7
5
5
You are prompted to enter the PIN
code.
Press and Hold
Until LCD on.
BASIC FUNCTIONS
MAKING A CALL
23
1
1
Enter a phone number.
To erase the last number you
entered, press [ ].
2
2
Press [ ].
t
• “NETWORK BUSY” or “CALL
FAILED” message is displayed when
the call does not connect.
• If you select the REDIAL in setting
menu (refer to p.86) function, the call
will be retried automatically for the time
you have selected.
• Press [ ] to end the call.
Page 13
BASIC FUNCTIONS
2
2
Open up folder and talk into
phone.
•
When folder is open, press [ ]
or [ ]button.
To end a call, close up the folder or
press [ ].
If you send a call, the called number
will be stored in the Dial list.
To retrieve a number, press [ ]
to open the list, scroll to an
appropriate number and
press [ ] to place a call.
With ear-microphone in use,
press and hold [send/end] on
the ear-microphone to receive
or end a call.
BASIC FUNCTIONS
INTERNATIONAL CALLS, CALL TO AN EXTENSION, EMERGENCY CALL
1
1
To make an international
call, press [ ] until “+” is
displayed.
Then enter country code,
area code if necessary and
finally phone number.
(no spaces allowed)
2
2
To make a call to an extension
line you may have to go
through an automated switchboard.
To do so:
- Enter a phone number.
- Press [ ] once.
- Enter the extensionnumber.
Press [ ].
- The call will automatically be
routed to the extension line.
3
3
You are able to make
emergency calls at all
times, even without a SIM
card installed. You will be
prompted to confirm your
call. (to avoid faulty calls)
Emergency call number
: 112
To make a domestic call, simply enter the desired number and press [ ] or [ ]
key. A calling or busy tone will sound. To end the call, press [ ].
Some countries (e.g. USA) use area codes. In this case you must enter an area code
before the a phone number (no space between them).
25
Page 14

ENTERING LETTERS AND NUMBERS
Press [ ], [ ], [ ].
Use [ ] or [ ] to find a word.
Press [ ] to select it and add a space.
B
ENTERING LETTERS AND NUMBERS
Press [ ], move to ‘ABC’ then, press [ ].
press a key to see its assigned alphabets and keep pressing
the key until an alphabet appears in the display.
ABC
Press [ ], move to ‘123’ then, press [ ].
enter numbers through keypad.
123
Press [ ], move to ‘Symbols’ then, press [ ].
press [ ] or [ ] to view a different set of symbols
assigned to each key.
press a key, and you will return to the previous mode.
SYMBOLS
27
Page 15
ENTERING LETTERS AND NUMBERS
Press [Soft1] to select an input mode; ABC, 123, Symbols, T9 language.
Press [Soft2] to clear a digit.
Press [Navigation key] to move a cursor.
Press [*] to select letter case (English mode only), or press and
hold it to change to symbol mode.
Press and hold [0] to change to 123 mode & T9 Pinyin.
Press [#] to enter # . , ; : ” ’? ! or press and hold it to change to
ABC mode & T9 Pinyin.
CHAPTER 3
Message
Internet
Organizer
Games
My Phone
Settings
Camera
MENU
Page 16
MESSAGE MESSAGE
Write your message using a
maximum of 456 Latin characters.
While you type, the remaining free
space is stated by a counter in the
top right corner.
1
1
Press [ ] to select “Write new SMS”.
2
2
Input a message,
press [ ] and you will see
the preview of message.
4
4
Choose Send only or Save &send.
Press [ ].
5
5
Press [ ] to confirm it.
3
3
Press [ ] again, enter a
phone number then,
press [ ].
To include a picture or a sound in your SMS, select Attach on left
softkey. The picture & sound Import manager opens.
Select Animation or Melody and scroll to select the desired itemPress [ ]. The item is inserted in the text. Press [ ] to back
the edit screen.
That using more than 153 characters will require an
extra SMS message to be sent, more than 306 will
require three messages some languages may have
characters that will result in up to seven messages.
Press to select “Option”.
Group send : To send a message to
a group.
Phonebook : To lookup a number
from phonebook.
WRITE NEW SMS
31
Page 17
MESSAGE
MESSAGE
To postpone reading of a new SMS,
press Later.
The message is stored and the icon
will appear in the start screen.
To read a SMS received earlier,
go to the Messages menu:
-In the SMS menu, scroll to SMS Inbox.
indicates a read message,
while an unread message.
-Select the desired message and
press [ ] to read.
To edit a sent or Save Only message:
- Scroll to Outbox. Select a message.
indicates a save only message,
indicates a sent and save message.
Press [ ] to select one of the
following options.
Press [ ] to select one of the following options.
1
1
Press
1
1
Press
(Open the Message.)
Press to select
“Option”.
-Forward : Forwards a
message to another.
-Reply : Reply a message.
-Delete : Deletes a
message.
-Forward : Forwards a
message to another.
-Reply : Reply a message.
-Call: Places a call to a
sender.
-Delete : Deletes a
message.
-Read : Reads a message.
-Forward : Forwards a
message to another.
-Edit : Edits a message.
-Send : Sends a message.
-Delete : Deletes a
message.
-Read : Reads a message.
1
1
Press
Page 18
MESSAGE
MESSAGE
Write a text template and, press [ ]
to save it. You can enable the use of the
template in the ‘Selections’ menu in
‘SMS settings’.
To set sms features.
SMS SETTINGS
1
1
Press [ ] to select
“Format”.
1
1
Press [ ] to select
“S.C number”.
2
2
Select one of the
available formats and
press [ ] to save it.
2
2
Enter your operator
Service Center
number.
Delete messages regularly to avoid
unnecessary usage of memory.
Text format is default.
Press
Press
FORMAT
SERVICE CENTRE NUMBER
You are to select one from four alternative
data formats if made available by network
service provider.
3534
Page 19
MESSAGE MESSAGE
1
1
Press [ ] to select
“SMS Bearer”.
1
1
Press [ ] to select “Selections”.
2
2
Select GSM or GPRS connection
and press [ ] to save it .
2
2
Move to one of the available options
and press [ ] to enable or disable
each option.
Your network subscription must include
GPRS services for you to use this.
SMS Class 0 .
Incoming class 0 messages will not be
stored, but only shown in the display.
New messages will thus overwrite
previous.
Verify send .
Initiates confirmation request before
sending.
Use template .
Input mode starts with template text.
Reply path .
Allows a recipient to use a sender’s
service center.
Page 20
MESSAGE MESSAGE
WRITE NEW MMS
1
1
Press [ ] to select “Write new MMS”.
To
Enter a receiver’s phone number.
- If you want to select a number in Phonebook when
you enter it, press the to select “PB Look up”.
- If you want to send the message to several persons,
insert “,” between the telephone numbers.
Maximum allowable number of persons is 4.
Cc, Bcc
Enter a phone number or E-mail address.
- If you want to select a number in Phonebook when
you enter it, press the to select “PB Look up”.
- If you want to send the message to several persons,
insert “,” between the telephone numbers.
Maximum allowable number of persons is 4.
Subject
Enter a message title.
Message
Enter a message.
-Press to select “Option”.
Slide time : 2/3/5/8/10seconds
Add sound : Select the data folder that you want and
select a sound from within it. the sound will play when the
message is opened or played.
Add text : Enter any text that you want to have in the
message.
Add image : Select the data folder that you want and
select an image frome within it.
Message Option
Select a message options.
If you are upgrading your phone, and your
previous phone did not support Multi Media
Messaging, to use Multi Media Messaging
you must insert your new SIM Card.
2
2
Prepare a message and press the [ ]
to select Send, Save, and Delete.
39
Page 21
MESSAGE MESSAGE
1
1
Press [ ] to select
“MMS Outbox”.
1
1
Press [ ] to select
“MMS Drafts”.
1
1
Press [ ] to select “MMS Sent”.
Press to select “Option”.
View
Forward
Reply
Press to select “Option”.
Send
Delete All
Delete
View
Press to select “Option”.
Send
Delete All
Delete
View
Page 22
MESSAGE
MMS SETTINGS
Press
To set MMS features.
1
1
Press [ ] to select
“User”.
USER
1
1
Press [ ] to select
“MMSC”.
MMSC
2
2
You are to set the
user and press [ ]
to save it.
Page 23
MESSAGE MESSAGE
CB
READ CB
1
1
Press [ ] to select “Read CB”.
Messages will be stored in the memory, but new messages will
overwrite old ones received on the same channel.
To read the last messages stored, enter the Messages menu
and select CB message and select read cb, then select the
channel you want to read.
Cell Broadcast (CB) is a network provided service. Check with your operator about the
details. When you receive a CB, it will appear automatically in the display.
Press
45
FOLDER MANAGER
Press
This function manages the
downloaded images.
1
1
Press [ ] to select
“Network”.
NETWORK
2
2
Select one from the
network list and
press [ ] to
save it.
(For details of network see
page 53~54.)
Page 24
MESSAGE MESSAGE
CB SETTINGS
1
1
Press [ ] to select
“CB settings”.
CB ENABLED CHANNELS LANGUAGE
1
1
Press [ ] to select
“CB enabled”.
1
1
Press [ ] to select
“Channels”.
1
1
Press [ ] to select
“Language”.
2
2
Move to the
desired language
using the [ ],
and then press
the [ ].
3
3
Press [ ] to
save it.
2
2
You are to view existing
channels and add a new
channel.
To add, edit or delete,
press[ ]
2
2
To enable CB, mark up
the checkbox with [ ].
German, English, Italian,
French, Spanish, Dutch,
Swedish, Danish,
Portuguese, Finnish,
Norwegian, Greek,Turkish,
Chinese
47
Page 25
INTERNET INTERNET
The phone has a WAP browser, which enables you
to access mobile internet services.
You can access any WAP homepage by entering the relevant URL in the editor. The input must
start with the text string http:// to access the page. Accept the input with OK. Up to 50 URL’s can
be stored and later accessed from the Bookmarks menu, using the commands:
The display shows
“Connecting to server – Requesting data”
Press
When connection is established, the
“Home” URL will be displayed.
Follow on-screen instructions to browse the
homepage or enter another homepage via
the Options softkey [ ] menu.
Select. Opens the list of WAP bookmarks.
Edit. Edits the list of WAP-sites.
Add. Opens an editor to add a homepage to
Bookmarks.
Delete. Opens the list of WAP-sites. Delete a
homepage from bookmarks and press [ ].
49
• Some WAP pages may be password protected and prompt
you to enter a user name and password. However, on many
WAP sites you can enter as a guest, but you may not be
eligible to browse the entire site.
• Some network operators enables you to receive and read
your E-mail via WAP. In most cases this service requires you
to give the operator your Internet account details and
password.
The operator will then retrieve your mail and send it to you as
a WAP page. Contact your operator for details.
Page 26
Press
Press
Press
~
1
1
2
2
Press [ ] to enable or disable it.
Press [ ] and select one of the
following options.
1
1
Select one of the following items and
press [ ].
1. Allow PUSH :
2. SL settings
Always ask.
WAP-site will open upon your confirmation.
Always open.
WAP-site will open automatically.
Open when WAP.
WAP-site will open if you are in a WAP session.
If you get a “Wap settings incomplete”
message, your phone is not set up for WAP.
You will need set-up information from your
network (marked with in this manual).
Check the sales package or contact your
network operator.
With the information at hand:
51
INTERNET INTERNET
Page 27
HOMEPAGE
1
1
Press [ ] to select “Homepage”.
CSD GPRS
1
1
Press [ ] to select “CSD”.
In each item, you are to enter data
or select an option.
1
1
Press [ ] to select “GPRS”.
in each item, you are to enter data.
-Enter a url and press [ ] to save it.
Homepage (e.g.:http://wap.aol.com)
User name
Password
Dial-up number
IP address
Data type
(Analog / ISDN)
Data speed
(9600 / 14400)
Idle Timeout
(1minute / 2 / 3 / 4 / 5 )
User name
Password
APN (Access Point Name)
IP address (The IP Address is a 12
digit code. When typing it, enter 0 for
“blank” spaces.)
53
INTERNET INTERNET
Page 28
CONNECT MODE
1
1
Press [ ] to select
“Connect Mode”.
2
2
Select temporary or continuously.
Press [ ] to save it.
SECURITY
1
1
Press [ ] to select
“Security”.
Make it up this to enable the
use of encrypted transmission which some URLs may
require.
SHOW GRAPHICS
1
1
Press [ ] to select
“Show Graphic”.
Make it up to include graphic
elements in the display.
RENAME
1
1
Press [ ] to
select “Rename”.
2
2
Edit a name of the
gateway.
Repeat the setup procedure for the
remaining four gateways to create
alternative “Homes”.
55
INTERNET INTERNET
Page 29
ORGANIZER
Press
Press
To provide quick access to your favorite web sites,
information is stored in the phones cache memory.
It is recommended that you empty your cache
memory regularly to avoid congestion.
The Organizer is a practical tool that will help you to keep track of your
appointments and alert you of meetings, celebrations, events etc.
To set and view appointments.
DAY VIEW
1
1
Press [ ] to
select “Day View”.
2
2
Use [ ] and [ ]
to select a schedule
and press [ ] to
view it.
In Day view, you can check
appointments for the day.
You can scroll through the entries
and use [ ] to view an
appointment.
Press [ ] to add an
appointment and edit or delete it.
Press to select “Option”.
Month : To move to ‘Month vview’.
New : To add an appointment.
you are to select one of
the following categories.
(Meeting/ Birthday / Memo)
Delete : To delete a selected
appointment.
View : To display a selected
appointment.
57
INTERNET
Page 30
ORGANIZER ORGANIZER
1
1
Press [ ] to select “New”.
- A calendar is displayed with
appointments. the date with
an appointment is shown in
green color, while a selected
date is in violete.
- The wallpaper for calendar
changes as a new season is
selected.
In ‘New’ you can enter a new appointment.
Define it as a Meeting, Birthday or a Memo.
Select one and enter the relevant
information in the text editor.
Use [ ] to scroll through the entry fields:
Press to select “Option”.
Day view : To move to ‘Day view’
New : To add a new appointment.
Press to select “Option”.
New : To add an appointment.
you are to select one of
the following categories
(Meeting/ Birthday / Memo).
Delete : To delete a selected
appointment
View : To display a selected
appointment.
59
Subject
To enter a title for an
appointment.
Start and End date,
Start and End time.
To set a date and a time to start
or end an appointment
Reminder
To set a reminder to give you
an alert to appointment.
Page 31
ORGANIZER
ORGANIZER
TASKS
3
3
Press [ ] to confirm it.
1. All : Delete all appointments.
2. Week Old : Delete the appointments that is a week old.
3. Month Old : Delete the appointments that is a month old.
The Tasks list is an electronic notepad
that will help you to remember things
to do. The list is accessed in the
Organizer folder.
To put down
things to
remember.
NEW
Press
1
1
If no tasks are entered in the list,
the screen will display “No entries”.
61
1
1
Press [ ] to select “Options”.
2
2
Select a “New” item and
press [ ] to create
a new task.
3
3
Move to each field to
enter data.
The Tasks list is an electronic notepad
that will help you to remember things
to do. The list is accessed in the
Organizer folder.
1. Subject : Enter a title for a task.
2. Due Date : Enter a due date for
a task.
3. Reminder : Mark it up and you are
prompted to enter its
date and time.
4. Reminder Date
5. Reminder Time
If one or more tasks are entered, you
can choose among the following
options: Delete all, Delete, New
You can enter up to 10 different tasks, each
with a maximum 20 characters, and set an
alarm to remind you.
Page 32
ORGANIZER
CALCULATOR
Press
To use the calculator.
Enter a figure and press a +, -, *, / as a assigned in
navigation keys.
Enter another figure, then press [ ].
The result will be show on the bottom line.
Example :
Enter 200 and press [ ].
Enter 25 then press [ ].
The result 225 will be show in
bottom line.
If you want to continue the
calculation, do not select =,
but press [ ] then repeat
the above procedure.
to finish the calculation,
select [ ].
63
Press [ ] to clear a digit or press
and hold [ ] to clear all inputs.
ORGANIZER
Press
Press [ ] to enter
a time for an alarm.
2
2
Press [ ] to
select “Audio”.
3
3
press [ ] to mark up
‘Alarm on’ to enable the alarm.
Page 33
MAXFUN
MAXFUN
You can download Java
applications such as Java
games from the internet,
and run these applications
in your phone. You can
also remove these applicati ons if you don’t need
these applications anymore.
Before you can start to download JAVA
applications, you have to adjust related
Internet setting.
For example,
Meunà2InternetàWAP ProfilesàGateway
1à homepage sets as
http://www.midlet.org/wap
(Example)
Menuà2InternetàWAP ProfilesàGateway
1à GPRSàAPN sets as internet(example)
Exit: Exit
Query system: check free space of system
storage
Query midlet: check name, version, vendor
and description of midlet.
Delete: Delete midlet in MidletSuiteList
OTA download: Download midlet
(Java application).
1. To download Java application from the internet, go to Menuà4FunboxàJavaà
MenuàOTA download.
Download URL sets as http://210.59.231.229:8080/midpman.jad(example)
The default URL will show up on the display. Press MenuàDownload to see the
application information, and press “Yes” to confirm download and install the midlet.
After the midlet was downloaded, the internet connection would be terminated.
2. The midlet will be installed to
JavaàMidletSuiteList, and you can press twice to run the midlet.
Or you can press to quit JAVA.
Java application = midlet
When the default URL shows on the display, you can enter a new URL
to replace it and connect to the new site.
After you open a midlet, use the matching soft keys to execute the
commands shown at the bottom of the main display.
JAVA SETTINGS
MENU OF MIDLETSUITELIST
DOWNLOAD JAVA APPLICATIONS
Page 34
How many laps will you complete
on the racing track, avoiding oil
slicks, obstacles and aggressive
competitors? Choose between
three different types of cars, each
with its own advantage and race like
your life depended on it.
: INCREASE SPEED
: DECREASE SPEED
: LEFT
: RIGHT
: SPECIAL
: PAUSE
: RESUME
: VOLUM UP/DOWN
MAXFUN MAXFUN
PushMan is a PacMan-style maze
game. Guide your little Buddy
through the maze and avoid the
ghost, the fluffy monsters and the
worm. Pick up the apples to gain
points.
: UP
: LEFT
: RIGHT
: DOWN
: PAUSE
: VOLUM UP/DOWN
PUSH MANCRAZY RACE
Press
6766
Page 35
MAXFUN
1
1
Select on or off and
press [ ] to save it.
VIBRATE
Press
MYPHONE
AUDIO
Press
INCOMING CALL
1
1
Press [ ] to select “Incoming Call”.
Alert Tune - Select one among
10bells, 30melodies and some
downloaded melodies.
Alert Type - Select one of the
available options .
(1.Tone only/2.Tone+Vib/3.Tone
after Vib/4.Vibration Only)
Volume - Volume can be
controlled in 7 levels through
[ ] and [ ]
69
Page 36
MYPHONE
1
1
Press [ ] to select
“Keypad Type”.
2
2
Select one of the available keypad
tone type and press [ ] to
save it.
Alert Tune - 10 different SMS alert tunes.
Alert Type - Select one of the available options.
(1.Tone only / 2. Tone +Vib / 3.Vibration Only)
Volume - volume can be controlled in 7
levels through [ ] and [ ].
MYPHONE
INFO TONES
1
1
Press [ ] to select “Info Tones”.
2
2
Select On or Off and press [ ]
to save it.
CONNECT TONE
1
1
Press [ ] to select
“Connect Tone”.
2
2
Select On or Off to set call
connection tone.
Press [ ] to save it.
71
Page 37
MYPHONE
2
2
Press the [ ] or [ ], then the
Idle screen is changed.
1
1
Select the desired Wallpaper using
the [ ][ ] key.
MYPHONE
GREETING
Press
You can enter a greeting,
set an animation for startup or shutdown and set a
greeting time.
TEXT
1
1
Press [ ] to select “Text Edit”.
2
2
Enter a greeting of your own and
press [ ] to save it.
73
Page 38
GREETING TONE
1
1
Press [ ] to select
“Greeting Tone”.
2
2
On or Off to set a greeting tone
when the phone is turned on.
MYPHONE
MYPHONE
CALLER GROUPS
Press
You can create Caller
Groups from the contacts
in your phone book to
identify a caller by sound
alone.
1
1
Use [ ] to moved to a caller group.
2
2
Press [ ] to select it.
75
Page 39
SMS
1
1
Press [ ] to select “SMS”.
2
2
Select one of the available alerts
and press [ ] to save it.
You can designate a type of alert for a group.
MYPHONE
MYPHONE
LCD & LED
Press
Your phone has a backlight LCD display with full
graphic capability.
You can set Contrast,
backlight time.
TUNE
1
1
Press [ ] to select
“Contrast”.
CONTRAST
1
1
BACKLIGHT TIME
1
1
Press [ ] to select
“Backlight time”.
2
2
Use [ ] and [ ]
to select a contrast
level.
2
2
Select one of the following backlight time and
press [ ] to save it.
You can adjust the
display contrast.
You can adjust how long the
Backlight stays on.
(20/40/60 seconds)
77
Page 40
SETTINGS
TIME & DATE
Press
The Settings menu is used to set basic parameters for the phone
such as language, time & date, data transfer, security, network and
call settings.
SET TIME / DATE
1
1
Press [ ] to select
“Set time / Date”.
SUMMER TIME
1
1
Press [ ] to select
“Summer Time”.
2
2
You are to set the
present time & date.
2
2
Mark up ‘Summer time’
through [ ] to
apply daylight saving
time.
1. Present Time
2. Present Date
Box If you wish to apply
daylight saving time
79
MYPHONE
Page 41
SETTINGS
DATE FORMAT
1
1
Press [ ] to select
“Date Format”.”.
2
2
Select one of the date formats
and press [ ] to save it.
SETTINGS
LANGUAGE
Press
1
1
Use [ ] to select a language.
2
2
Select one of the available languages and press
[ ] to save it.
The display will change to the selected language.
81
Page 42
SETTINGS
DATA CABLE GPRS
- Bit rate : (300 / 1200~ / 115200)
- Reset : You are to reset it.
1. Attach on
2. Accept calls : You are to
mark this up
to enable it.
1
1
Press [ ] to select
“Data Cable”.
1
1
Press [ ] to select
“GPRS”.
2
2
Set each parameter and
press [ ] to save it.
2
2
Set each parameter and
press [ ] to save it.
SETTINGS
SECURITY
Press
1
1
Press [ ] to select “Enable PIN 1”.
2
2
Mark it up to enable pin code 1 and
press [ ] to save it.
ENABLE PIN 1
83
Page 43
SETTINGS
3
3
Confirm it when prompted.
Press [ ].
That if you enter an incorrect PIN code three
times in succession, your SIM card will lock and
you must enter the PUK code to unlock. PIN
and PUK codes are either supplied with your
phone or must be obtained from your network
provider or place of purchase.
SETTINGS
CHANGE PIN 2
1
1
Press [ ] to select
“Change PIN 2”.
2
2
Enter your old pin code
followed by the new code.
3
3
Confirm it when prompted.
Press [ ].
That if you enter an incorrect PIN code three
times in succession, your SIM card will lock and
you must enter the PUK code to unlock. PIN
and PUK codes are either supplied with your
phone or must be obtained from your network
provider or place of purchase.
85
Page 44
SETTINGS
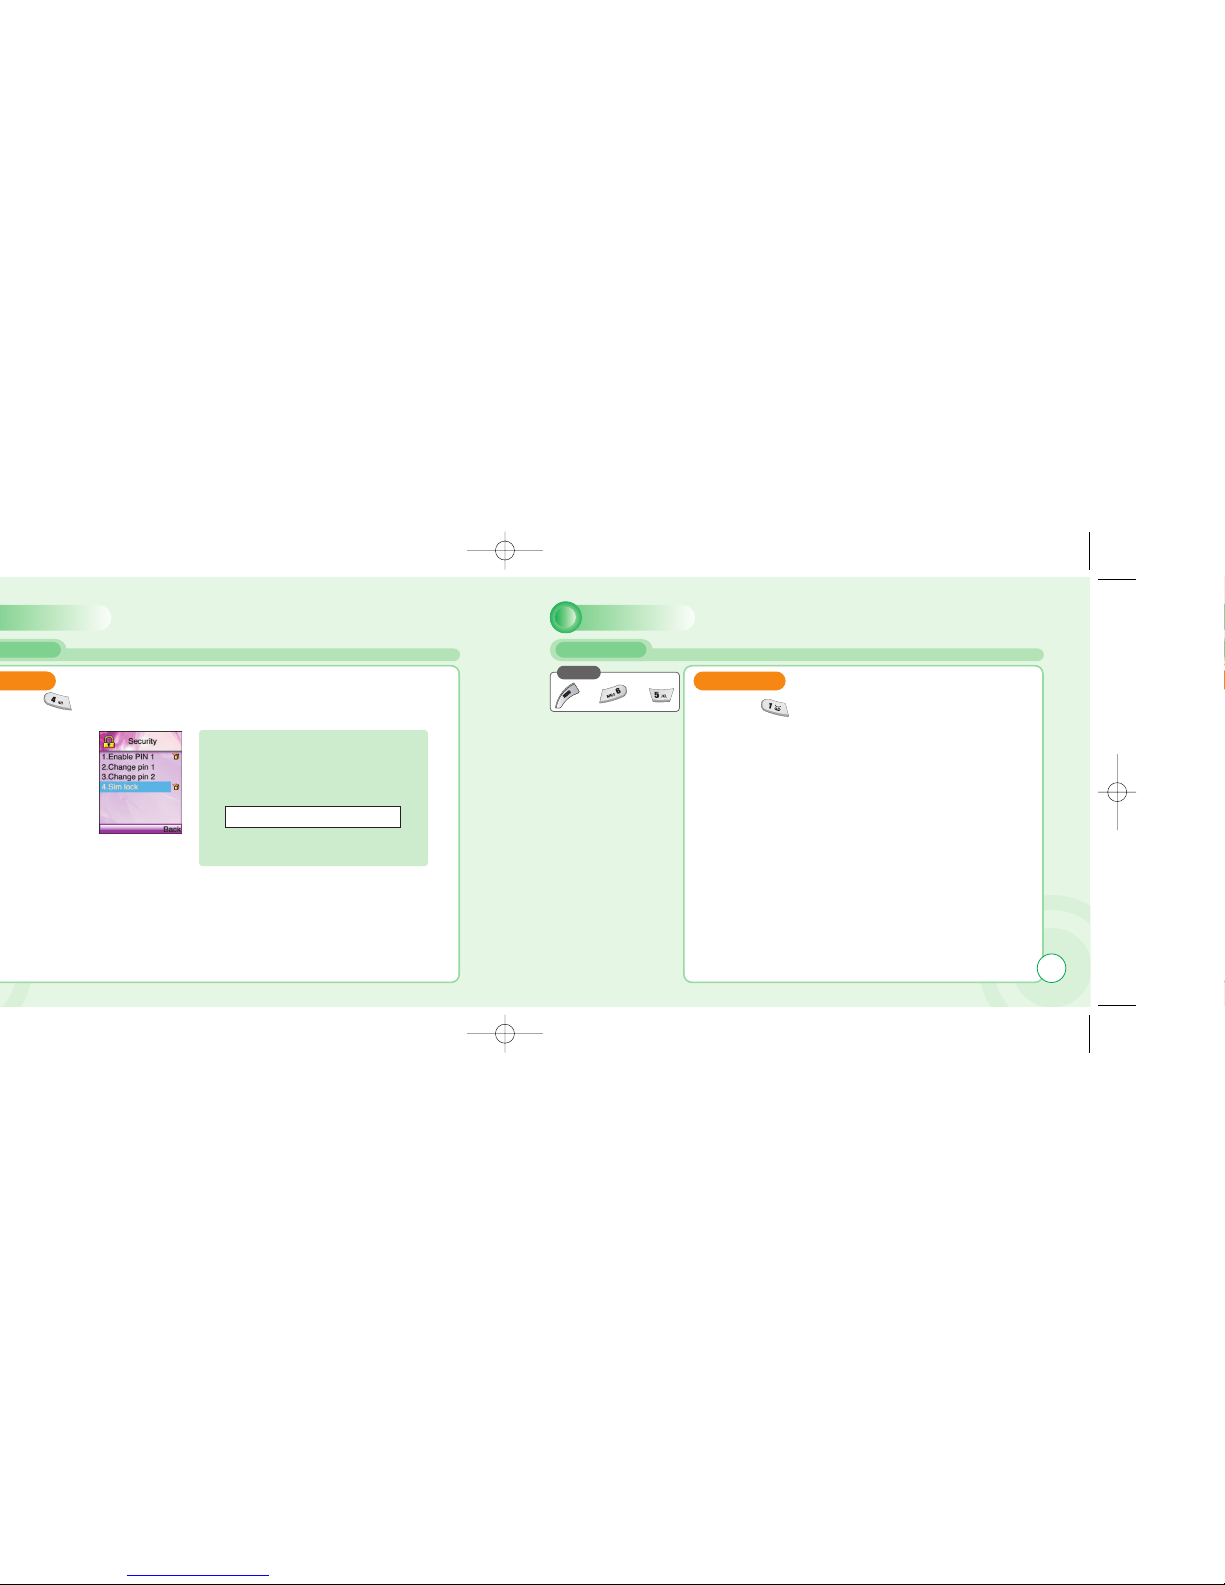
As a unique identification, your phone is furnished with a code number known as IMEI.
You must retain this number in case you
need to block your account, e.i. if your phone
is lost or stolen. We recommend that you
write it down here:
The IMEI number is printed on the label
under the battery.
SETTINGS
NETWORK
Press
1
1
Press [ ] to select “Select network”.
2
2
Select automatic or manual.
SELECTION
87
Page 45
SETTINGS
SETTINGS
ADD NETWORK
1
1
Press [ ] to select
“Add network”.
To add a new network, start by selecting an
empty network entry from the Add network
menu. Press OK. A text editor will appear.
Enter the name(input english) of the network followed by the Mobile Country Code
(MCC) and the Mobile Network Code
(MNC). This information is supplied by your
network operator.
BAND
1
1
Press [ ] to select
“Band”.
8988
Page 46
SETTINGS
1
1
Press [ ] to select “Call forward”.
Unconditional:
To forward all incoming calls to a specified
number.
All unanswered:
To forward all calls that you do not answer
within a specified period of time.
No reply:
To forward calls those are not replied.
Not reachable:
To forward calls when you are out of
network range.
Busy:
To forward calls when your phone is busy.
Status all:
To summarize the status of call forward
options.
Cancel all:
To cancel all call forward settings
A specific number can be designated for
each option, and you can activate, view or
cancel the present status. Follow the onscreen instructions.
SETTINGS
1
1
Press [ ] to select “Call waiting”.
CALL WAITING
1
1
Press [ ] to select
“Optional func.”.
OPTIONAL FUNC.
This function notifies you of another call during a telephone conversation. Enter the menu to Activate or
Cancel Call waiting or to see the Status. If Call waiting is
active, and you are called during a conversation, you will
hear a faint ringing tone in the background. To answer the
new caller without losing contact with the original party:
-Enter Options roll-up menu.
Select Switch calls.
- Conduct the conversation with the new party and select
Switch calls to return to the first caller. Select Join calls to
conduct a three-party conversation.
This menu contains various
settings to facilitate daily use.
91
Page 47
SETTINGS
3
3
Press [ ] to select
“Shortcut dial”.
4
4
Press [ ] to select
“Open folder”.
Redial .
Activates automatically
redialing of your last unsuccessful call. The number will
be redialed after 5 seconds
(1 time), after 1 minute (3
times) and after 3 minutes
(10 times). If this sequence
is completed without connection established, the
number must be manually
dialed for a new attempt.
To manually abort the redial
sequence, press [ ]. To
manually redial last number
called, press [ ] twice in
a row.
Shortcut dial.
If you activate
Shortcut dial, you
can dial phone
numbers from the
Shortcut list by
pressing just one
or two digits.
Open folder.
Set the phone to
answer a call with
any key, (except),
e.g. the earpiece
volume control on
the side, to answer
your calls.
SETTINGS
1
1
Press [ ] to select “Call barring”.
CALL BARRING
You can lock the telephone to
reject incoming calls or bar
outgoing calls, domestic or
international. Call barring is a
password protected network
service, and details should be
acquired from your network.
1.Cancel all - To cancel all call barring settings.
2.Outgoing calls - To cancel all call barring
features of outgoing calls, or
decide what type of outgoing
calls is to be barred.
(1.cancel all / 2.all calls / 3.all
internat. / 4.except to home)
3.Incoming calls - To cancel all call barring
features of incoming calls or
decide what type of incoming
calls is to be barred.
(1.Cancel all / 2.All incoming
/ 3.When abroad)
4.Password - To set a password.
93
Page 48
SETTINGS SETTINGS
You can keep track of your calling expenses by setting the
“Billing” feature. Scroll to Billing.
Press [ ]. Enter the submenus:
Total calls - To view the total amount of time and units used.
Last call - To view the duration of the last call.
Set max units - To set a maximum of units available for a call.
Units left - To view the number of units left on your account.
Price/unit - To enter a network price for the units.
Currency - Displayed if supported by your network.
1
1
Press [ ] to select “DTMF Tone”.
DTMF TONE
Enabling DTMF tones allows you to remote
control various telephone connected devices,
e.g. listen to your home telephone answering
machine, or charge your SIM.
Activates key lock after 30 sec. of idleness.
Page 49
SETTINGS
Return all settings to factory defaults.
the power goes off automatically.
if you want to delete photo image can use
to camera menu.
The default password is the “1234”.
CAMERA
PREVIEW
Press
To move directly to message menu, press [ ] in idle mode.
1
1
Press [ ] to select
“Preview”.
3
3
Press [ ] to select
new or save.
2
2
Press [ ] to take a photo.
: Normal or reverse picture.
: Contrast.
97
Page 50
CAMERA
1
1
Press [ ] to select
“My Photos”.
2
2
Press [ ] to display
the following items.
Edit name : To name a picture.
Send wallpaper : To set for idle mode.
Delete all : To delete all.
Delete : To delete one.
View : To view a picture.
CAMERA
MEMORY STATUS
Press
1
1
Press [ ] to select “Memory Status”.
Displays the used and free memory
available in the respective camera.
99
Page 51

CHAPTER 4
Smart Look up
Look Up
New
PB Settings
Voice Mail no.
PHONEBOOK
MEMO
Page 52
PHONEBOOK
Press
LOOK UP
1
1
Press [ ] to select
“SIM: Look up”.
2
2
Scroll to find the desired contact
and press [ ] or [ ].
LOOK UP CALL
When “Use SIM”is selected.
Press [ ]and you will see
the following items displayed.
NEW
USE PHONE
DELETE
EDIT
SEARCH
VIEW
CALL
1
1
Press [ ] to select
“Look up”.
1
1
Press [ ] and you are
prompted to call.
2
2
Scroll to find the desired
number and press [ ].
2
2
Scroll to find the desired contact
and press [ ] or [ ].
When “Use Phone”is selected.
Press [ ]and you will see
the following items displayed.
NEW
USE SIM
SORTING
DELETE
EDIT
SEARCH
VIEW
CALL
The window will display contact
name and phone numbers.
103
Page 53
PHONEBOOK
When “Use SIM”is selected. When “Use Phone”is selected.
1
1
Move to each field and press [ ] to enter its
information accordingly.
1
1
Move to each field and press [ ] to enter its information accordingly.
2
2
Press [ ] to save it after entering information.
2
2
Press [ ] to save it after entering information.
- A text editor appears.
- Enter a name and press [ ].
Scroll [ ].
- Enter a phone number and press [ ].
(home / mobile / work) and press [ ].
Scroll [ ].
If you have chosen Phone as your phonebook,
up to three numbers can be entered along with
address information for each contact.
All the above data can be entered.
1.First name 2.Last name 3.Home number
4.Mobile number 5.Work number
6.Calling group 7.Street 8.Zip code 9.City
10.State 11.Country 12.E-mail
If a different SIM card is inserted in the phone, you
will be alerted of the option to copy data from this.
You may also copy data to SIM cards, thus
enabling you to share contact information with
friends and colleagues. Copy features are located
in the PB Settings submenu. (Optional)
105
Page 54
PHONEBOOK
Make calls using only one or two
keys. Define a key combination (2-
21) for your most accessed contacts.
To include or remove a contact in the
shortcut dial list, select a position
and:
-Select New or Delete in the
Options softkey menu.
-Choose the appropriate
contact from the phone book.
Press [ ].
- any previous contact on the
selected position will be
overwritten.
1
1
Press [ ] to select “Shortcut Dial”.
SHORTCUT DIAL FIXED LIST
1
1
Press [ ] to select
“Fixed List”.
Use this to create a list of
allowed numbers. When
Active is ticked, the user
can only access the listed
numbers. Requires PIN 2
(see p. 85).
BARRED LIST
1
1
Press [ ] to select
“Barred List”.
Use this to create a list of
barred numbers
(if supported by network).
If activated, the user can not
access barred numbers.
Requires PIN 2.
OWN NUMBER
1
1
Press [ ] to select
“Own Number”.
Store your own number for
future reference. Some SIM
cards will install your phone
number automatically. If
yours is not, simply enter it in
the editor and press [ ].
If you select SIM as your Phonebook, you will
not be able to use Contacts database features
(three phone numbers, address information),
but still allowed to use caller groups or shortcut
dial.
107
Page 55
PHONEBOOK
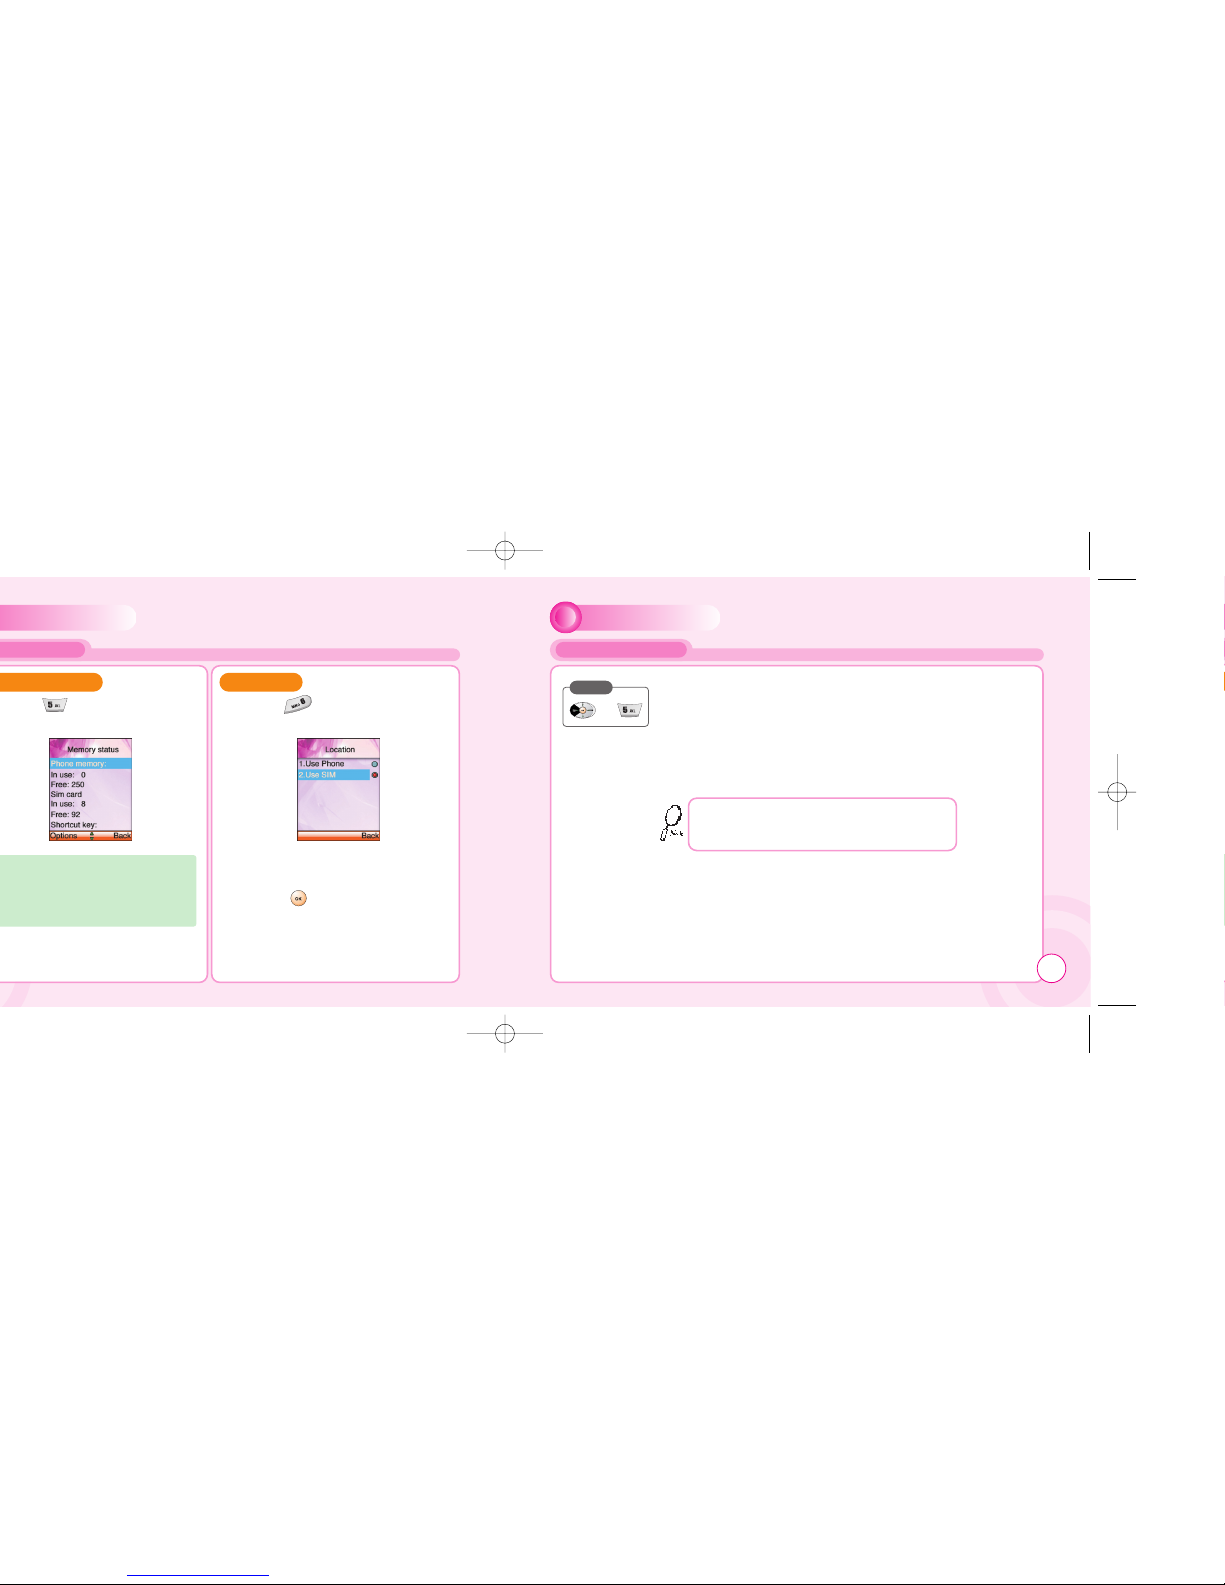
1
1
Press [ ] to select “Location”.
LOCATION
2
2
Select one of the location and
press [ ] to save it.
PHONEBOOK
VOICE MAIL NO.
1
1
Enter a Voice mail number.
- The options softkey allows you to do the
following items.(Lookup / Back / Save)
Press
Service numbers.
This is a network service and the menu will only appear if
your network operator supports this service. The menu may
contain various services, depending on the network.
109
Page 56

CHAPTER 5
Menu summary
Cellular phone in brief
Abbreviations and acronyms
Questions and answers
Technical data
MISCELLANEOUS
MEMO
Page 57
MENU SUMMURY
Write new SMS
SMS inbox
SMS outbox
Delete
Delete inbox
Delete outbox
Delete all
SMS Template
Memory status
SMS Settings
Format
SC number
Val idity
SMS bearer
Selections
SMS class 0
Verify send
Use template
Reply path
MMS
Write new MMS
MMS Inbox
MMS Outbox
MMS Drafts
MMS Sent
Delete
MMS Settings
Folder manager
CB
Read CB
CB Settings
CB enabled
Channels
Languages
Internet
Home
Bookmarks
Select
Edit
Add
Delete
Push inbox
Push settings
Allow push
SL. Settings
MENU SUMMURY
WAP Profiles
Gateway 1~4
Default
Homepage
CSD
UserName
Password
Dial-up number
IP Address
Data Type
Data speed
Idle timeout
GPRS
User name
Password
APN
IP address
Bearer
Connect Mode
Security
Show graphics
Rename
Empty cache
Organizer
Calendar
Day view
Month view
New
Meeting
Birthday
Memo
Delete
All
Week old
Month old
Tasks
Alarm
Time
Sound
Alarm on
Calculator
Games
JAVA
Games
Myphone
Audio
Incoming call
113
Page 58
MENU SUMMURY
Alert tune
Alert type
Volume
SMS Attention
Alert tune
Alert type
Volume
Keypad Type
Natural Tone
DTMF
Mute
Info Tones
On
Off
Connect Tone
On
Off
Text edit
Selections
Greeting tone
Caller groups
Private
Business
Friends
Family
Others
Light & LCD
Contrast
Backlight time
Settings
Time & Date
Set time/Date
Summer Time
Time zone
Date format
Language
Data
Data cable
Bitrate
Reset
GPRS
Attach on
Accept calls
MENU SUMMURY
Security
PIN Code 1
Change PIN 1
Change PIN 2
Network
Select Network
Automatic
Manual
Preferred net
Add network
Call settings
Call Forward
Unconditional
Activate
Cancel
Status
All Unanswered
Activate
Cancel
Status
No Reply
Activate
Cancel
Status
Not Reachable
Activate
Cancel
Status
Busy
Activate
Cancel
Status
Status All
Cancel All
Call waiting
Activate
Cancel
Status
Optional func.
Redial
Shortcut Dial
Open folder
115
Page 59
MENU SUMMURY MISCELLANEOUS
Call Barring
Cancel All
Outgoing Calls
Cancel All
All Calls
All Internat.
Except to Home
Incoming Calls
Cancel All
All Incoming calls
when abroad
Password
Billing
Total calls
Last call
Set max units
Units left
Price/Unit
Currency
DTMF Tone
Camera
Photo shot
Motion shot
Shot
view
Photo manager
Photo list
Photo name list
Photo Settings
Lock setting
Password
Memory status
Phone Book
Look Up
New
PB Settings
Shortcut dial
Fixed list
Barred list
Own Number
Copy
Memory status
Voice Mail no
Your cellular phone is essentially a highly sophisticated radio, basically no different from any other
two-way radio system. The ingenuity of the cellular system lies in the splitting of the broadcasting
environment into a multitude of relatively small cells with low-power transmitters.
This “Cellular approach” to radio communication allows for extensive frequency reuse so that
millions of people can use their mobile phones simultaneously although the number of frequencies
are limited. The broadcasting cells are commonly illustrated as hexagons, typically 10 square miles
in area with the base station in the center. This arrangement allows for non-adjacent cells to use
the same frequencies without risk of interference.
Your cellular phone is in constant contact with the nearest base station. As you move from cell to
cell, e.g. while driving in your car, the base station you are approaching takes over when you are
within reach. This happens within split seconds without your noticing it.
All you experience is a stable and clear connection.
However, not all network operators provide the same coverage in all areas. Hence, if you travel
near the limit of your network’s coverage, you may experience difficulties in maintaining the
connection. The same may hap pen if the radio signal is blocked by obstacles such as high trees,
hills or buildings, or if you are inside a heavily reinforced concrete building.
CELLULAR PHONE IN BRIEF
117
Page 60
MISCELLANEOUS
MISCELLANEOUS
What is CSD? A wireless service protocol used for WAP. CSD stands for Circuit Switched Data
and will enable continuous connection and payment by the amount of data transferred.
What is SIM? Subscriber Identity Module or SIM is the little gold-plated plastic card that you get
from your network operator and which holds the unique data the network needs to identify your
phone.
What is PIN and what is PUK? Access to use a cell phone is most often protected by a code
known as “PIN” - Personal Identification Number. Your SIM card comes with a default PIN that you
can change to any code you prefer. See p. 80 for details. If you forget your code, or by mistake
enter a faulty code three times in a row, the SIM card will lock. To unlock, you must enter the
Personal Unblocking Key or “PUK” code that came with your SIM card.
What is IMEI? IMEI stands for International Mobile Equipment Identifier and is an identification
system that can recognize every mobile phone by a specific number. If a phone is stolen, the IMEI
system is capable of blocking it on all network operators that support the system.
What are MCC and MNC? Mobile Country Code is a code that identifies the country in which the
subscriber lives. Mobile Network Code identifies the network operator.
What is DTMF? Dual Tone Multi Frequency or DTMF is a paging and remote control protocol that
allows you to control certain functions via your phone, e.g. listening to your answering machine.
ABBREVIATIONS AND ACRONYMS
119
Page 61
MISCELLANEOUS
MISCELLANEOUS
Q:My phone does not switch on when I press the key ?
A:The keypress has been too short or the phone has shut down because the battery power
level is too low to make calls. Recharge the battery fully.
Q:Stand-by time seems too short ?
A:You have made excessive use of the games or the Organizer or display light has been on
continouslu due to unintentional key activation. Apply Keypad lock in left softkey menu.
Q:My phone displays: ‘PLEASE INSERT SIM’?
A:You must insert the SIM before you can use the phone. If it is already installed, remove and
clean the blank area with a dry cloth, then reinsert.
Q:My phone displays: ‘INVALID SIM’?
A:The phone is SIM-locked and will not accept the inserted SIM. Insert the correct SIM or
contact your dealer.
Q:My phone displays: “EMERGENCY CALLS ONLY”?
A:Your SIM card is not properly installed or configured, or you are out of network range.
Q:My phone displays: “NO NETWORK” ?
A:You are outside network range or there is no clear path to the transmitter.
If you are inside a building, try moving towards a window.
QUESTIONS AND ANSWERS
121
Page 62
MISCELLANEOUS
MISCELLANEOUS
Q:Can I use my phone inside a car?
A:oad safety comes first. Always keep your eyes on the road if you are driving. You can install a
“Hands free” set (see. p. 8) if you need to drive and talk at the same time.
Always comply with local legislation.
If your car is equipped with airbags, check safety precautions with your car dealer.
See also “Warnings” .
Q:How do I clean my phone if it becomes soiled?
A:See “Cell phone care” on p. 128.
Q:Are cellular phones dangerous to my health?
A:No unambiguous scientific evidence exists at this point of time. We recommend that you keep
abreast with the advice given by your domestic health authorities. See also “Warnings” .
Q:My phone has been lost or stolen. What do I do?
A:Contact your network operator immediately to close your account and prevent misuse.
Report your phone stolen to local police.
Q:How do I reset my phone to factory defaults?
A:Enter the Settings menu and scroll to “Reset all”.R
QUESTIONS AND ANSWERS
123
Page 63

MISCELLANEOUS
Extend-180
60min
10g cube
Personalizing features
Greeting
Wallpaper
40 Polyphonic ring tones
5 Caller groups
Organizing features
Calendar
Tasks
Alarm
Calculator
Leisure
2 games
Accessories
Contact local retailer
CHAPTER 6
Safety Information for Wireless Handheld Phones
Cell Phone Care
Driving Safety
Electronic Devices
Other Safety Guidelines
Cautions
Warning
FCC RF exposure
SAFETY
Page 64
SAFETY
SAFETY
The design of your phone complies with the FCC guidelines (and those standards).
˙
;
American National Standards Institute;
National Council on Radiation protection and measurements; International Commission
on Nonionizing Radiation Protection.
ANTENNA CARE
Use only the supplied or an approved replacement antenna. Unauthorized antennas,
modifications, or attachments could damage the phone and may violate FCC regulations.
SAFETY INFORMATION FOR WIRELESS HANDHELD PHONES
127
Page 65
SAFETY
SAFETY
- Never try to open the battery as it contains substances that might be harmful if swallowed or
allowed to contact unprotected skin.
- Never short-circuit the battery,as it may overheat and course a fire.Keep away from jewelry and
other metal objects.
- Never dispose of the battery by burning it.It could explode and release harmful substances into
the environment.
- Never dispose of the battery with your regular household waste.Take it to a hazardous material
collection point.
The charger.Use only the charger supplied with the phone.Newer pull charger cord to release it
from mains,pull the charge itself.
Cleaning & storing.Your phone should always be handled with care,protected from dirt,dust and
damp.To avoid scratches,never place the phone face down.
If cleaning is necessary,switch the phone off and wipe carefully with a a soft,slightly damp (not
wet)cloth. Allow the phone to dry completely before switching it on.Never use solvents for cleaning.
If you wont use your phone for some time,fully charge the battery and store the phone in a dry
place away from direct sunlight.The phone should be switched off during storage.
Point store member:
-Never disassemble the phone or battery.
-Never expose the phone to heat or strong sunlight.
-Never expose the phone to moisture or liquids of any kind.
-Do not paint the phone or otherwise block keypad,microphone or earpiece function,i.e.with
stickers
-The battery has its optimum performance in an ambient temperature of +5 °C to +50 °C
CELL PHONE CARE
Page 66
SAFETY
SAFETY
Most modern electronic equipment is shielded from RF energy. However, certain electronic equipment may not be shielded against the RF signals from your wireless phone.
Pacemakers
The Health Industry Manufacturers Association recommends that a minimum separation of six (6”)
inches be maintained between a handheld wireless phone and a pacemaker to avoid potential
interference with the pacemaker. These recommendations are consistent with the independent
research by and recommendations of Wireless Technology Research.
If you have a pacemaker:
l
ALWAYS keep the phone more than six inches from your pacemaker when the phone is
turned on.
l
Do not carry the phone in a breast pocket.
l
Use the ear opposite the pacemaker to minimize the potential for interference.
l
If you have any reason to suspect that interference is taking place, turn your phone OFF
immediately.
Hearing Aids
Some digital wireless phones may interfere with some hearing aids. In the event of such interference, you may want to consult your service provider (or call the customer service line to discuss
alternatives).
ELECTRONIC DEVICES
Page 67
SAFETY
SAFETY
Aircraft
FCC Regulations prohibit using your phone while in the air. Switch OFF your phone before
boarding an aircraft.
Blasting Areas
To avoid interfering with blasting operations, turn your phone OFF when in a “blasting area” or in
areas posted: “Turn off two-way radio.” Obey all signs and instructions.
Potentially Explosive Atmospheres
Turn your phone OFF when in any area with a potentially explosive atmosphere and obey all signs
and instructions. Sparks in such areas could cause an explosion or fire resulting in bodily injury
or even death.
Areas with a potentially explosive atmosphere are often, but not always, clearly marked. They
include fueling areas such as gas stations; below deck on boats; fuel or chemical transfer or
storage facilities; vehicles using liquefied petroleum gas (such as propane or butane); areas where
the air contains chemicals or articles, such as grain, dust, or metal powders; and any other area
where you would normally be advised to turn off your vehicle’s engine.
OTHER SAFETY GUIDELINES
Page 68
SAFETY
SAFETY
The following offenses are punishable by fine, imprisonment, or both:
l
Using obscene, indecent, or profane language.
l
Using the unit to give off false distress calls.
l
Wiretapping or otherwise intercepting a telephone call, unless that person has first obtained the
consent of the parties participating in the call.
l
Making anonymous calls to annoy, harass, or molest other people.
l
Charging to an account without authorization to avoid payment for service.
l
Refusing to yield a party line when informed that it is needed for an emergency call
(It is also unlawful to take over a party line by stating falsely that it is needed for an emergency).
WARNING
Page 69
SAFETY
SAFETY
Body-worn Operation
This device was tested for typical body-worn operation with the back of the phone kept 0.5 inches
(1.27cm) from the body. To comply with FCC RF exposure requirements, a minimum separation
distance of 0.5 inchs (1.27cm) must be maintained between the user’s body and the back of the
phone, including the antenna, whether extended or retracted. All belt-clips, holsters and similar
accessories used by this device must not contain any metallic components. Body-worn accessories that do not meet these requirements may not comply with FCC RF exposure limits and
should be avoided.
Vehicle Mounted External Antenna(optional, if available)
A minimum separation distance of 7.9 inches (20cm) must be maintained between the
user/bystander and the vehicle mounted external antenna to satisfy FCC RF exposure
requirements.
Note: For more information about RF exposure, please visit the FCC website at www.fcc.gov
FCC RF EXPOSURE
WARNING! Read this Information before using your phone
137
 Loading...