

Page 1

Entry
1
Table of contents
Subject: Page:
Phonebook
Look-up and add contacts 37
Phonebook settings 39
Organizer
Calendar 43
Tasks 45
Alarm 45
Calculator 46
PC-Synchronization (Optional) 47
MaxFun
Games (1-3) 51
My Phone
Personalizing sounds 53
MelodyMaker 55
Graphics 57
Caller Groups 58
LED 58
Subject: Page:
Entry
Read me first Cover
Legal statement Cover
Table of contents 1
Welcome 3
Getting started
What’s in the package 5
Setting language, time & date 6
Get acquainted 13
Messaging
T9 editor 21
SMS/EMS 23
Cell Broadcast 27
E-mail (Optional) 28
WAP
WAP Home & Bookmarks 31
WAP settings 33
02207155_1.2 11/18/02 3:35 PM Side 1
Page 2

Entry
2
Table of contents
Subject: Page:
Settings
Language 8
Time & date 9
PIN code (Security) 9
Data 59
Network 60
Call forward & waiting 61
Call barring 63
Billing 64
Miscellaneous
Cellular phones in brief 65
Abbreviations & acronyms 68
Cell phone care 69
Questions & Answers (FAQ) 73
Technical data 76
EU Certificate of compliance 77
Index 79
02207155_1.2 11/18/02 3:35 PM Side 2
Page 3
Entry
3
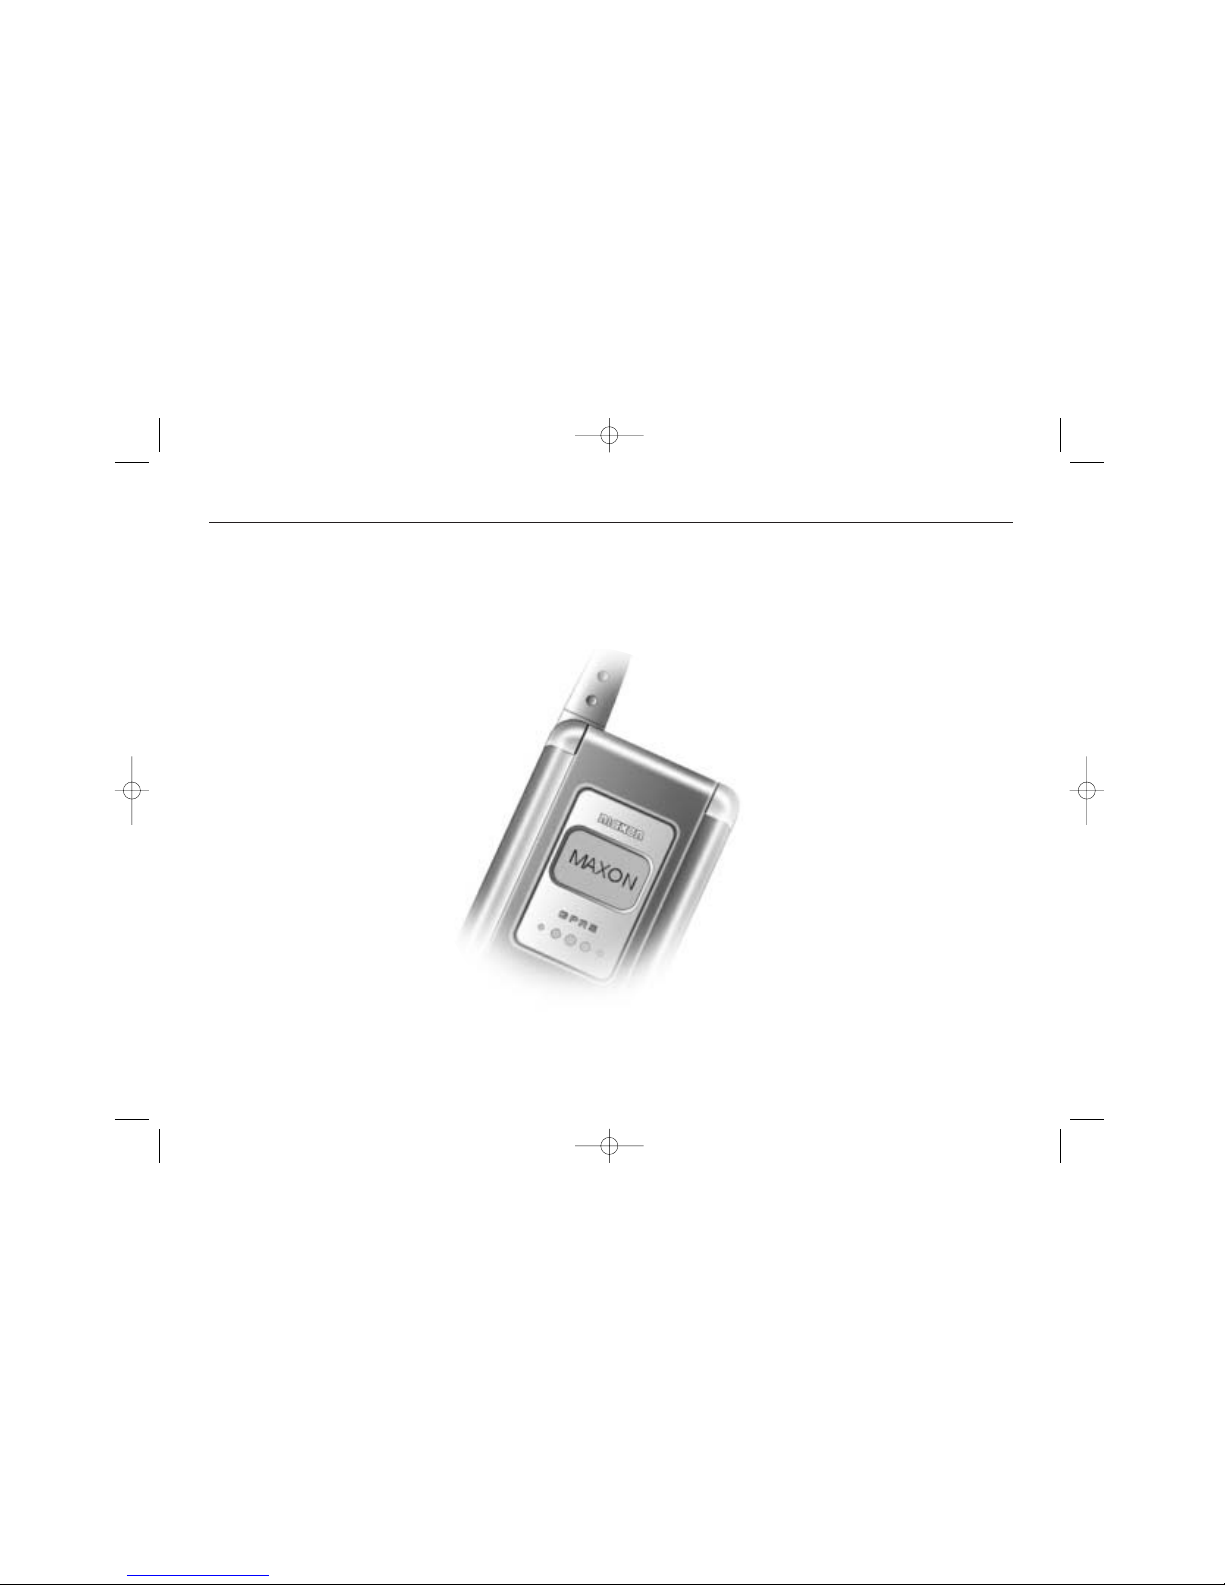
Welcome
Uplink to the Mobile Internis facilitated
with WAP 1.2 and a fast GPRS data connection.
Size has always been a Maxon
focuspoint, and the 7930-series
have very modest exterior
dimensions and will fit into
any shirt pocket or purse.
50 different ring signals,
SMS alert signals, wallpapers along with renameable
profiles and caller groups
facilitates a high degree of
personalization.
You have acquired a phone and
a communications companion
that will enable you to stay tuned
wherever you choose to go.
Thank you for choosing a cel-
lular phone from Maxon Telecom, Koreas
second-largest IT industrial complex
and a manufacturer with more
that two decades of experience within the electronic
communications industry.
Your new communications device represents
the cutting edge technology of the 21
st
century, featuring 64k
brilliant color display,
enhanced messaging
service (EMS), polyphonic ring tones. PC-synchronisation and stunning
games along with extensive
Organizer and Phonebook properties.
02207155_1.2 11/18/02 3:35 PM Side 3
Page 4

Entry
4
About this user guide
This user guide is written for the Maxon
MX7930/31-series cellular handsets and
for these models only.
The layout of the user guide follows the
same order as the phone menu system.
Please note that optional functions may
not be shared by all models. The text is
printed in grey color if optional.
The user guide is accompanied by a Mini
Guide describing the most commonly
used functions.
Symbols used in the text:
> Indicates a user action
< indicates system response
- indicates a listing
Grey text indicates optional functions
indicates direction of joy-
stick presses
OK indicates a downwards joystick press
Indicates a network ressource
Queries regarding the user guide or
phone handling can be addressed to:
Maxon Technical Marketing
User guide order no.: 02207155
Mini Guide order no.: 02207159
02207155_1.2 11/18/02 3:35 PM Side 4
Page 5

Get started
5
What’s in the package
When you open your MX7930/31 sales
package you should find the phone
itself, the battery, the charger, the
MaxSoft CD (Optional), the Mini Guide
and this user guide. Depending of your
place of purchase, various accessories
may also be included. Contact your
retailer if any of the above is missing.
The battery
Your phone comes with a high-performance rechargeable battery. The battery
must be fully charged before you use
your phone. Failure to do so may impair
the service life of the battery. Use only
the charger supplied with the phone.
To install the battery, align the pins at
the bottom with the guides in the cover
and click in place. To remove the battery, pull the button on the back of the
phone upwards and lift off. The battery
Important:
Carefully read the “Read me first”
statement at the inside of the cover as
it contains vital information concerning
your security, the security of others
and your legal rights.
Open retail box
photo (MTHQ)
02207155_1.2 11/18/02 3:35 PM Side 5
Page 6

Get started
6
Battery installation and charging
must be installed on the phone prior to
charging.
To charge the battery:
> Connect the charger to the plug at
the base of the phone with the “arrow”
symbol on the plug pointing towards the
display.
> Connect charger to mains
< an animation indicates charging in
progress. When the animation stops,
charging is completed
>Press release tabs on side of charger
plug and remove plug.
> Remove charger from mains by pulling
the charger itself (do not pull cord).
Important:
Be sure to charge the battery for four
hours prior to using it the first time.
For longest service life, prefér full
chargings to frequent small chargings
when possible.
02207155_1.2 11/18/02 3:35 PM Side 6
Page 7
Get started
7
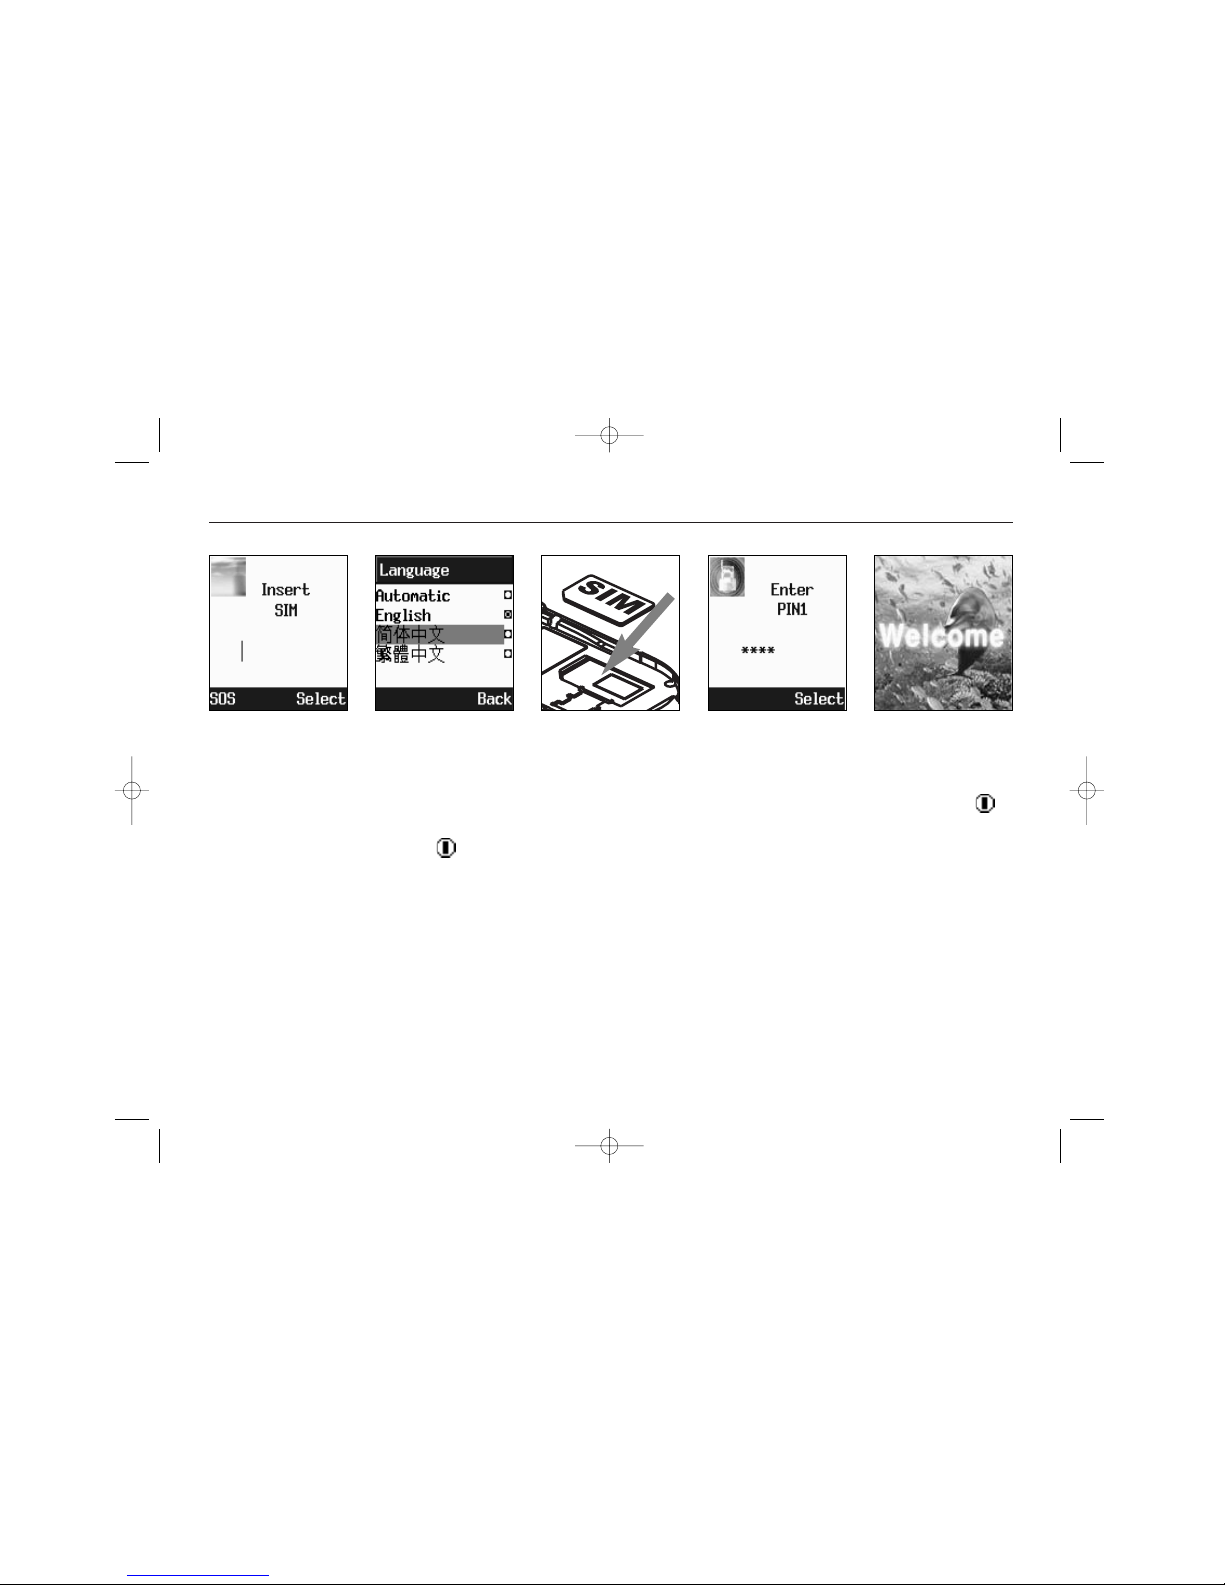
Installing SIM card
To connect to your network operator
your phone must have a SIM card
installed. The SIM card slot is located
under the battery.
> Switch off the phone and remove
charger if connected. Release the battery and remove it to access the SIM
cradle.
> Install the SIM card, gold-plated side
down and with the cut corner of the
card matching the slot profile. Never
use force. Avoid touching the gold-plated side of the SIM.
> Secure the card with the lock and
reinstall the battery.
>Turn on the phone by pressing the
key for a few seconds.
< a tune is heard and the display
becomes active. You are prompted to
enter the PIN code.
NOTE THAT UP TO THIS POINT, PRESSING SELECT
ON THE RIGHT SOFTKEY WILL DISPLAY A LIST OF
AVAILABLE PHONE LANGUAGES.
> Enter the network-supplied PIN code.
Press the OK key to accept.
02207155_1.2 11/18/02 3:35 PM Side 7
Page 8
Get started
8
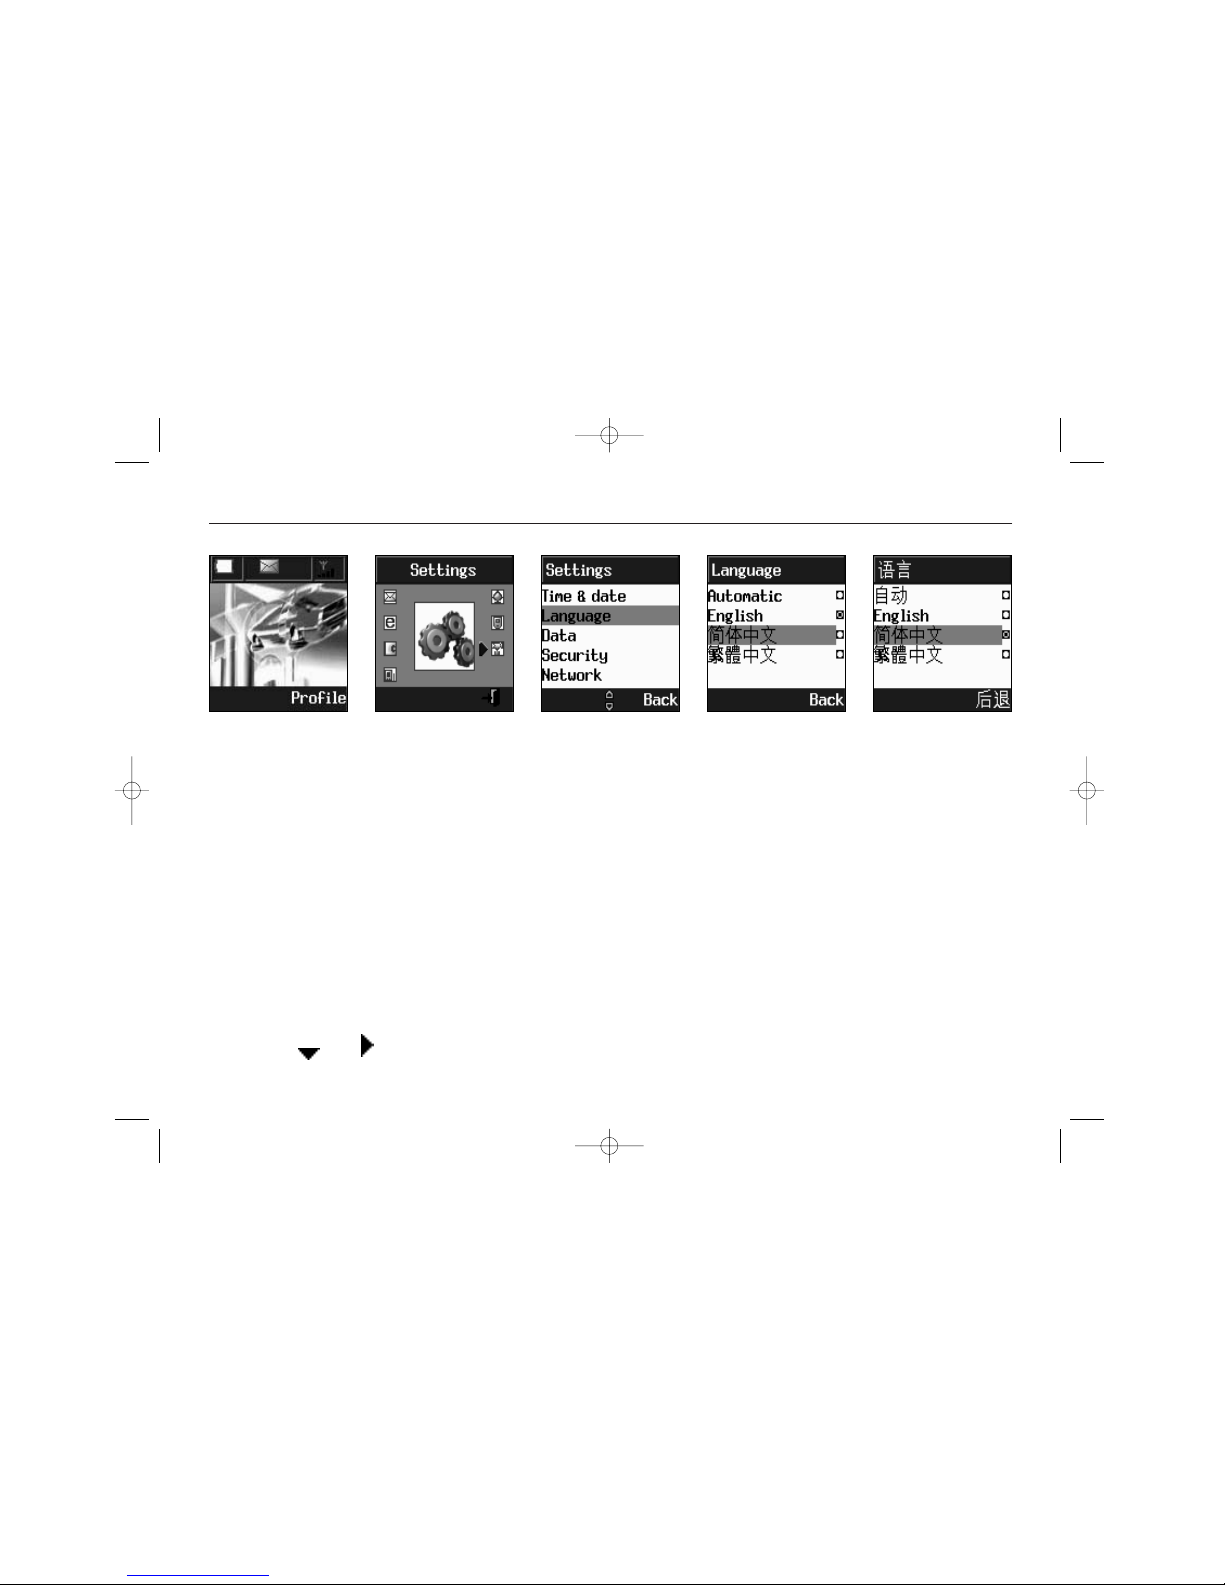
Set language
Settings menu. Press OK.
NOTE THAT IF YOU DID NOT SELECT LANGUAGE
BEFORE YOU ENTERED THE PIN CODE, OR IF YOU
WANT TO CHANGE THE LANGUAGE:
> Scroll to the Language submenu.
Press OK.
< a list of languages appears.
> Scroll, and select language with OK.
Exit with Back.
< the display will change to the
selected language
< your phone will search for the network. When connection is established,
the the network name is displayed. You
are now able to make and receive calls
NOTE THAT ENTERING AN INCORRECT PIN CODE
THREE TIMES IN SUCCESSION WILL LOCK THE SIM
CARD AND YOU MUST ENTER THE PUK CODE TO
UNLOCK (SEE P. 9)
To set up language, time & date and to
change the default PIN code:
- Enter the menu by pressing the Menu
key. Use or to step to the
02207155_1.2 11/18/02 3:35 PM Side 8
Page 9
Get started
9
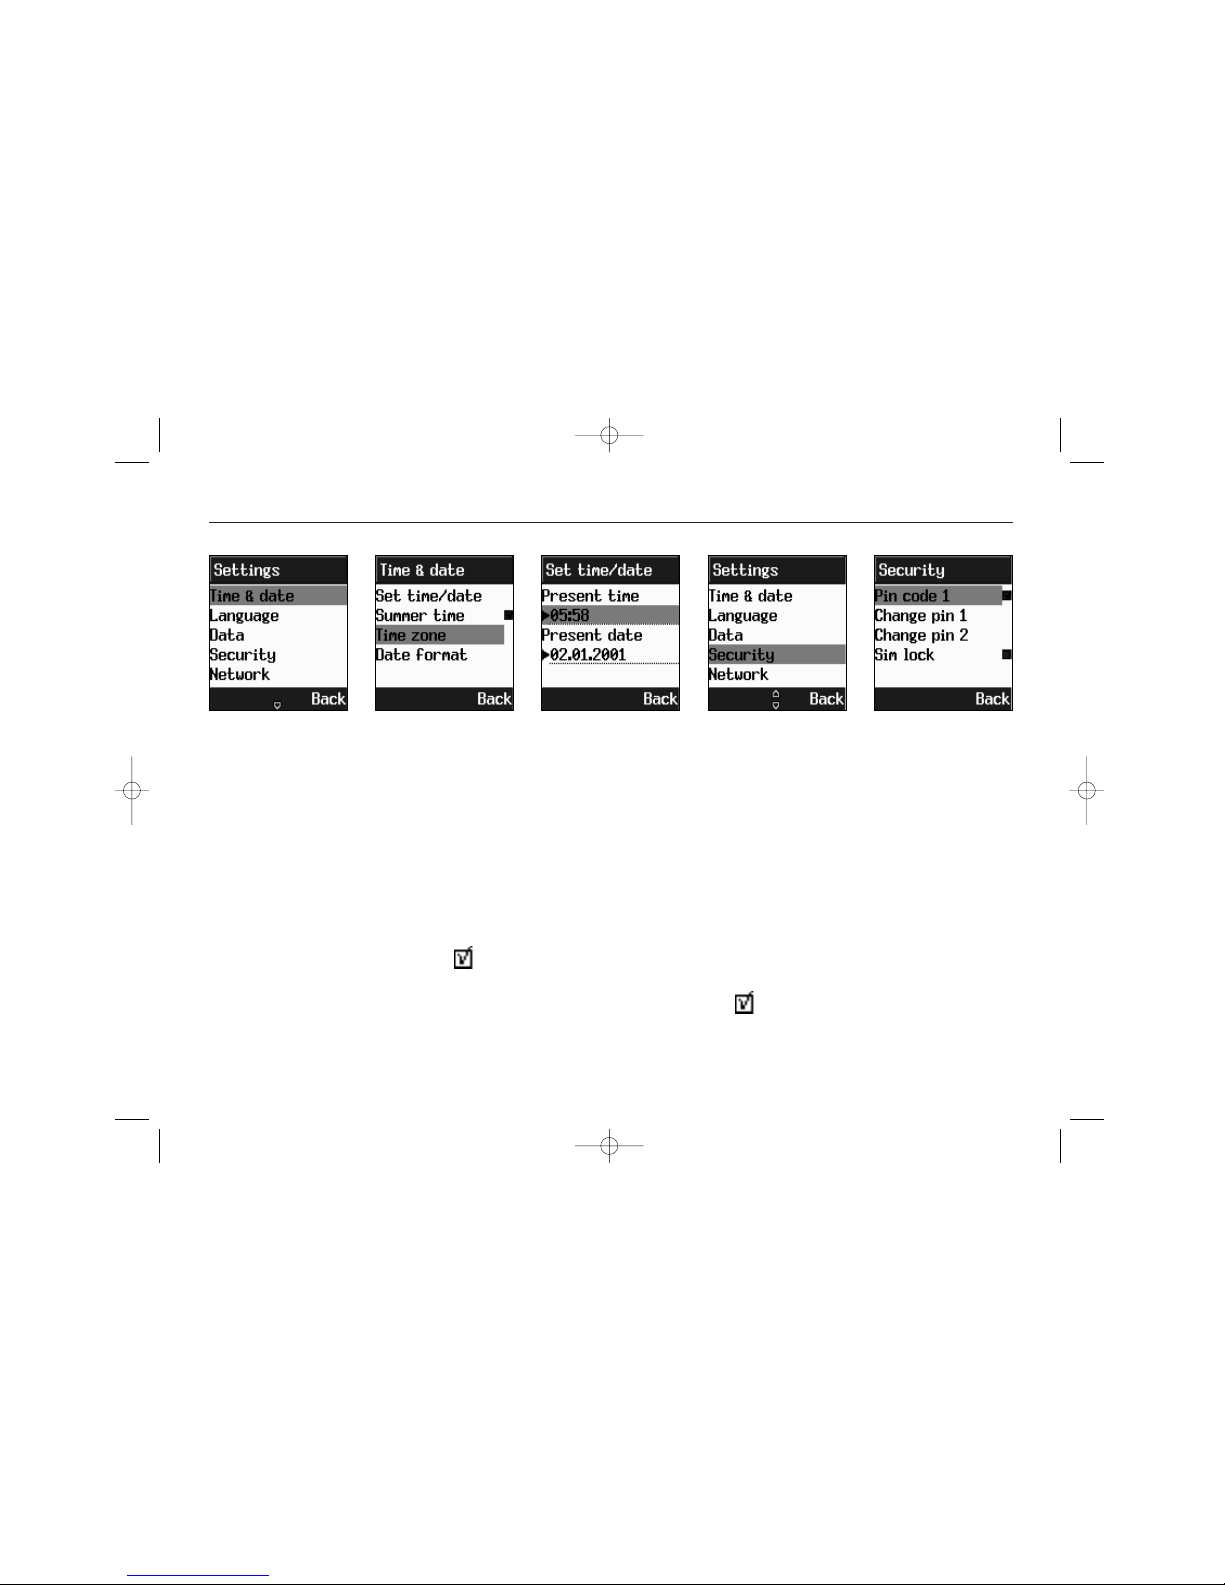
Set time & date, change PIN
> Enter the time. Press OK. Enter the
date. Press OK
> Step Back to the Settings menu and:
> Scroll to highlight the Security sub-
menu. Press OK.The options are:
PIN code 1 Switch PIN on/off
Change PIN 1 Alter your primary PIN
Change PIN 2 Alter your secondary
PIN
SIM lock Only the designated SIM
can be used
> Step Back to the Settings menu and:
> Scroll to highlight the Time & date
submenu. Press OK
< the time & date submenu opens
> Scroll to Time zone to select your
present location and proceed to Date
format to change this if so desired
>Tick the Summer time box If you
wish to apply daylight saving time
> Scroll to Set time/date. Press OK
< the time & date editor opens
02207155_1.2 11/18/02 3:35 PM Side 9
Page 10
Get started
10
The IMEI number
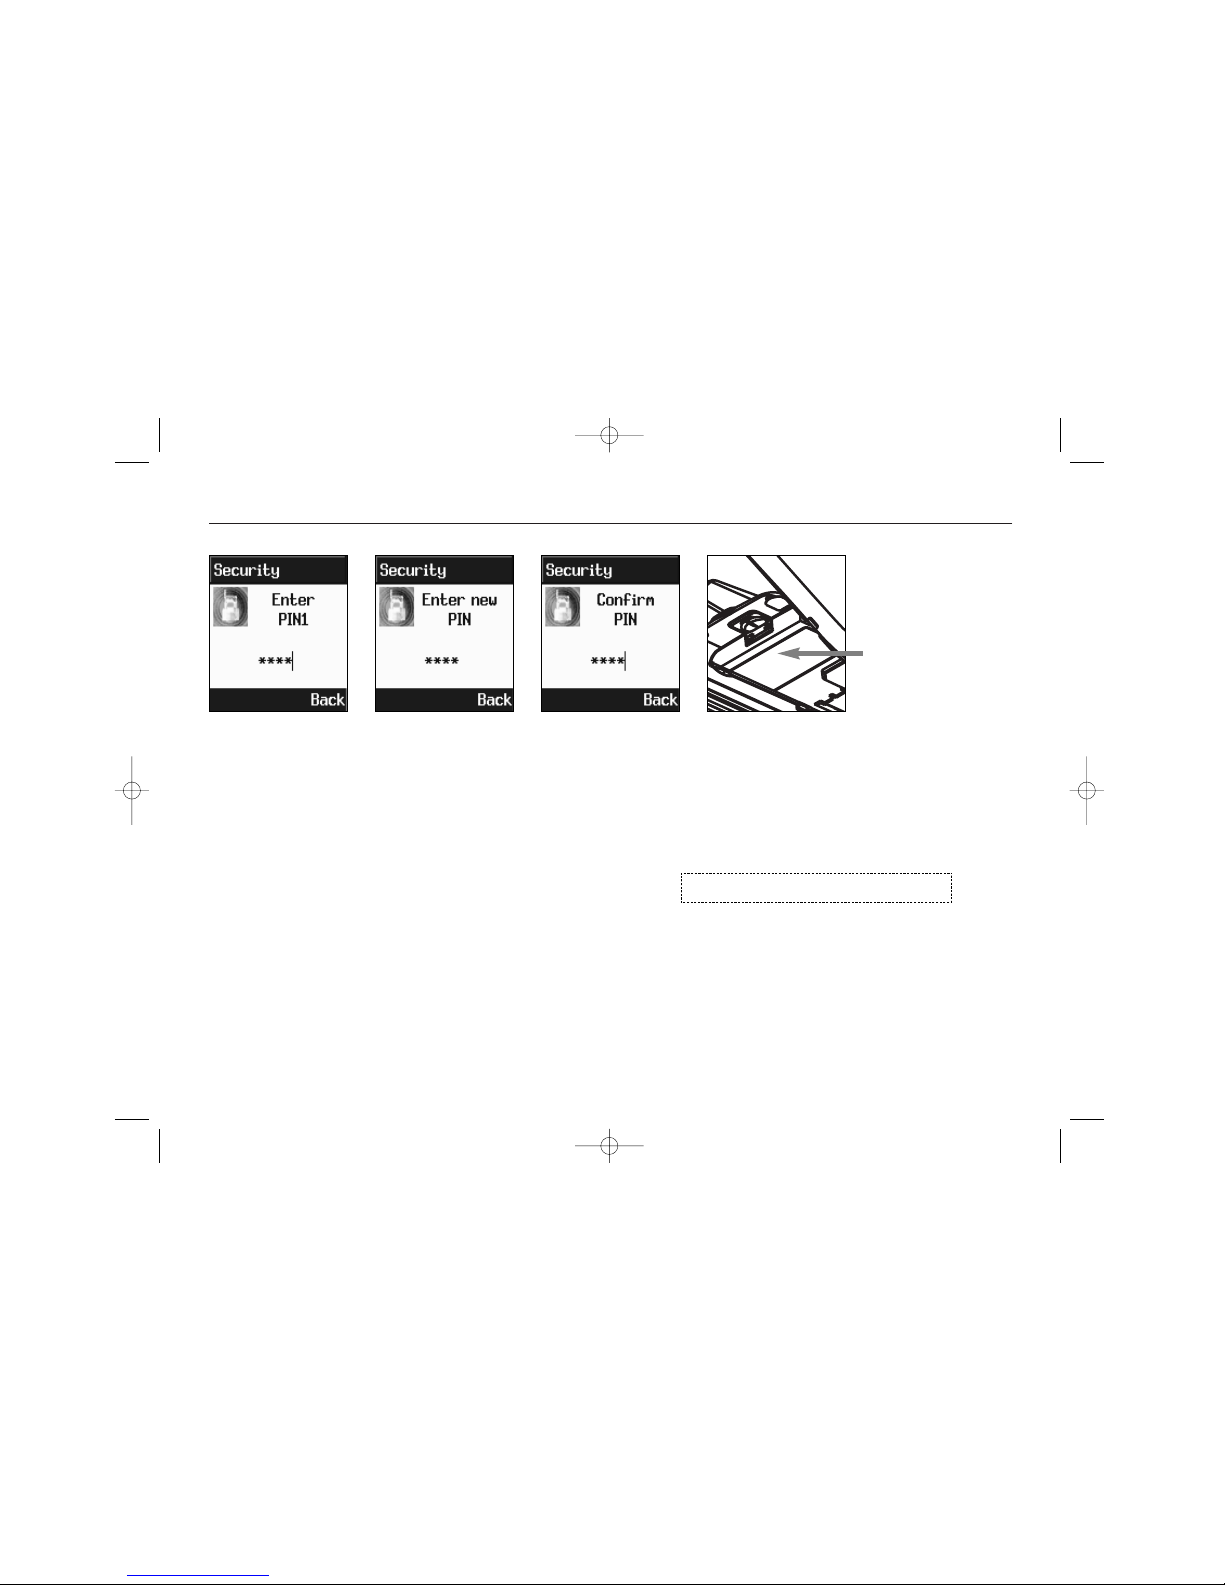
> Scroll to Change PIN1 and press OK.
Enter your old PIN code followed by the
new code. Confirm it when prompted.
Press OK.
> Exit with right softkey.
NOTE THAT IF YOU ENTER AN INCORRECT PIN
CODE THREE TIMES IN SUCCESSION, YOUR SIM
CARD WILL LOCK AND YOU MUST ENTER THE PUK
CODE TO UNLOCK. PIN AND PUK CODES ARE
EITHER SUPPLIED WITH YOUR PHONE OR MUST BE
OBTAINED FROM YOUR NETWORK PROVIDER OR
PLACE OF PURCHASE.
As a unique identification, your phone is
furnished with a code number known as
IMEI. You must retain this number in
case you need to block your account,
e.i. if your phone is lost or stolen. We
reccomend that you write it down here:
The IMEI number is printed on the label
under the battery.
IMEI No.
02207155_1.2 11/18/02 3:35 PM Side 10
Page 11
Get started
11
Answer or reject a call
>Press the Reject / End softkey
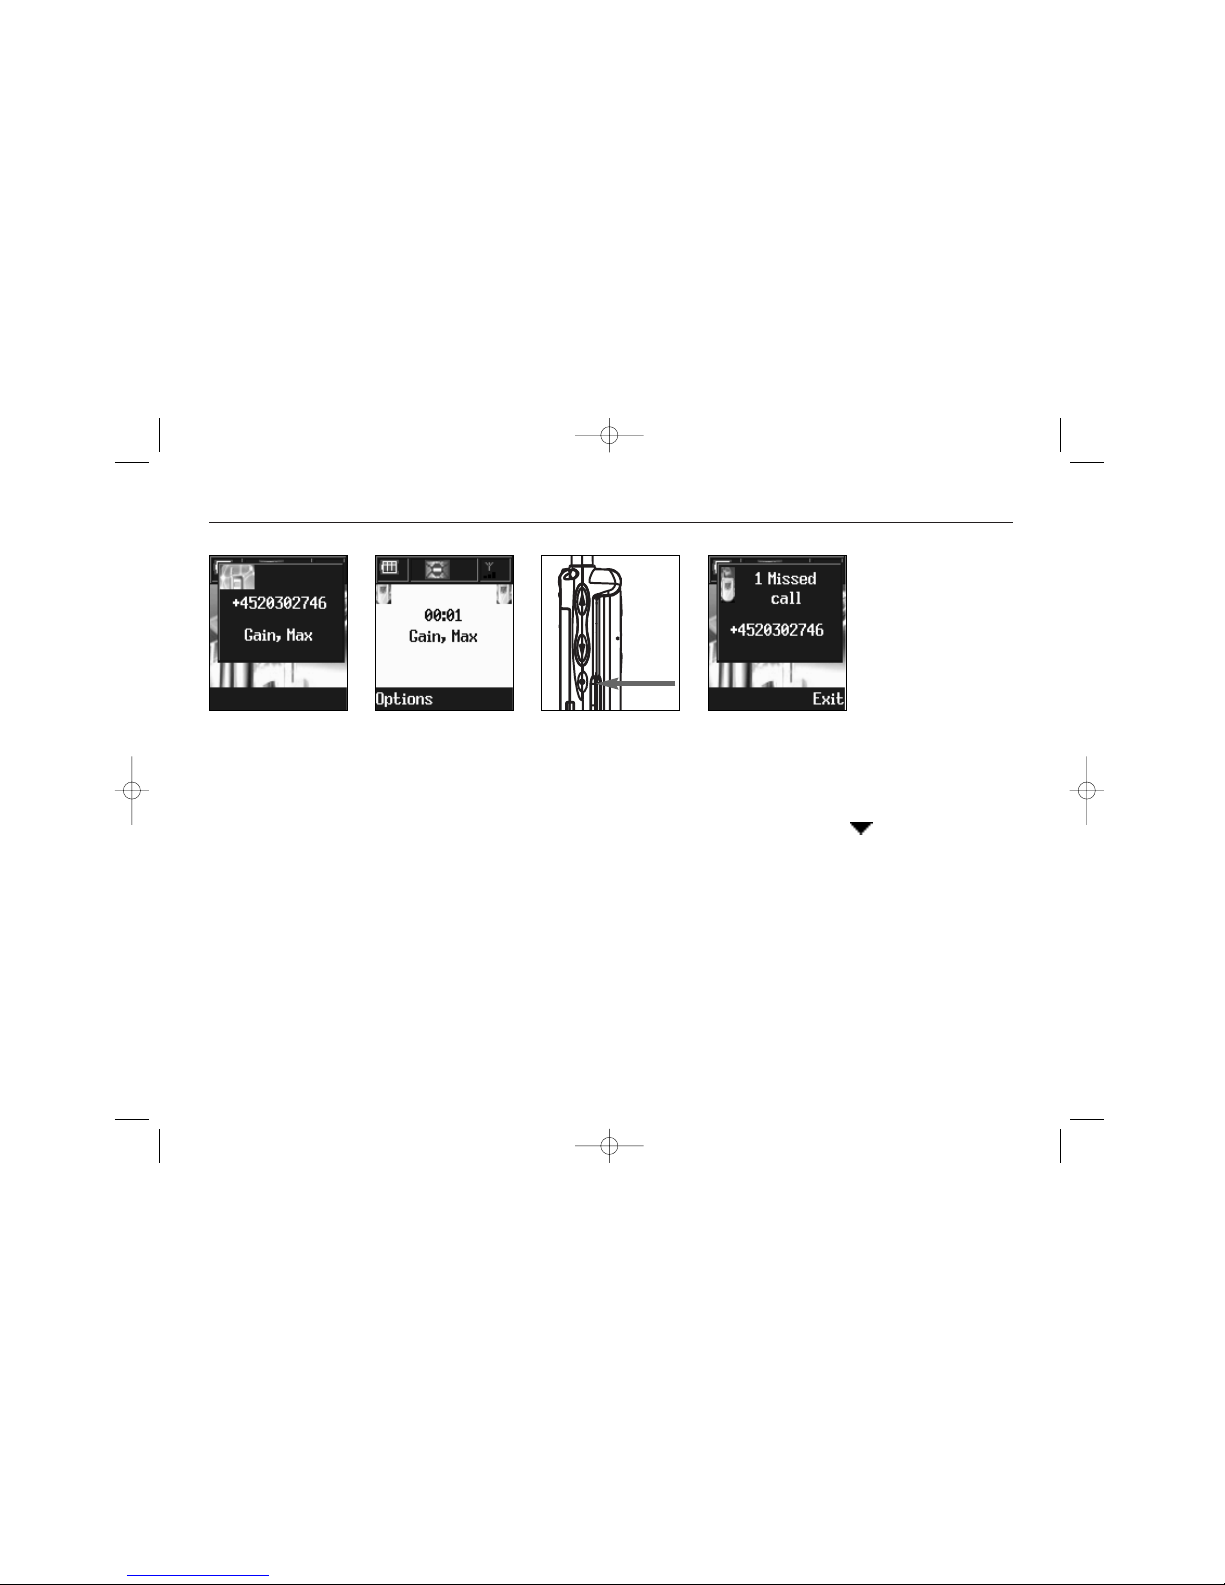
If you miss a call, the calling number
will be stored in the Dial list. To
retrieve a number, use to open the
list, scroll to the appropriate number
and press OK
To mute the phone, press the Mute key
below the volume keys on the side
To make a national call, simply enter
the desired number and press the Call
softkey. A calling or busy tone will
sound. To end the call, press End
When called, your phone will play the
selected tone or melody and/or vibrate
and flash LED as selected. The display
will show the calling number or, if the
caller is listed in your phone book, the
name will be displayed.
To answer the call, simply open your
phone and:
>Press the Answer softkey
< connection is established
To reject or terminate a call:
MUTE
02207155_1.2 11/18/02 3:35 PM Side 11
Page 12
Get started
12
International calls, call to an extension, emergency call
> Enter the main phone number.
>Press the * key until - appears.
> Enter the extension number. Press OK.
< the call will automatically be rout-
ed to the extension
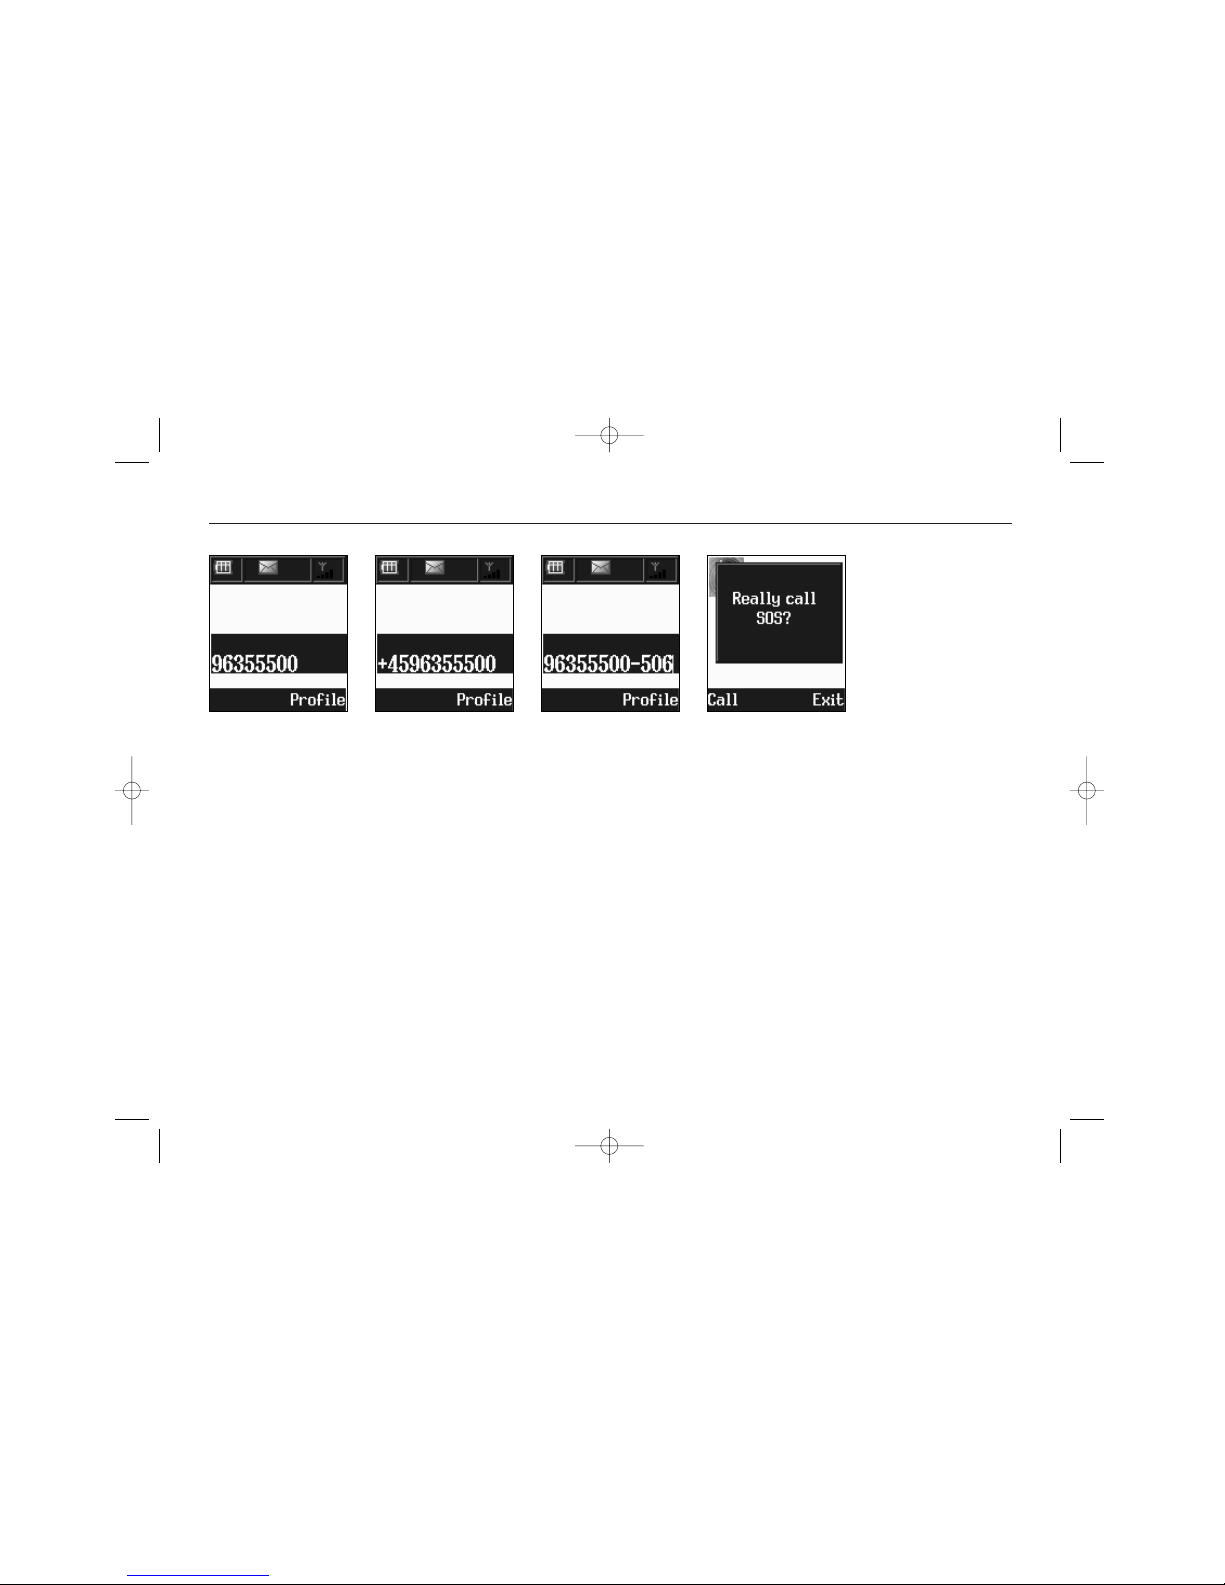
You will be able to make emergency
calls at all times, even without a SIM
card installed. You will be prompted to
confirm your call (to avoid unintentional
calling)
Some countries (e.g. USA) uses area
codes. In this case you must enter the
area code before the telephone number
(no space between)
To make an international call, press the
* key until + is displayed. Then enter
the appropriate country code, area code
if necessary and finally the telephone
number, all in succession (no spaces)
To make a call to an extension line you
may sometimes have to go through an
automated switchboard. To do so:
02207155_1.2 11/18/02 3:35 PM Side 12
Page 13
Get started
13
Get acquainted
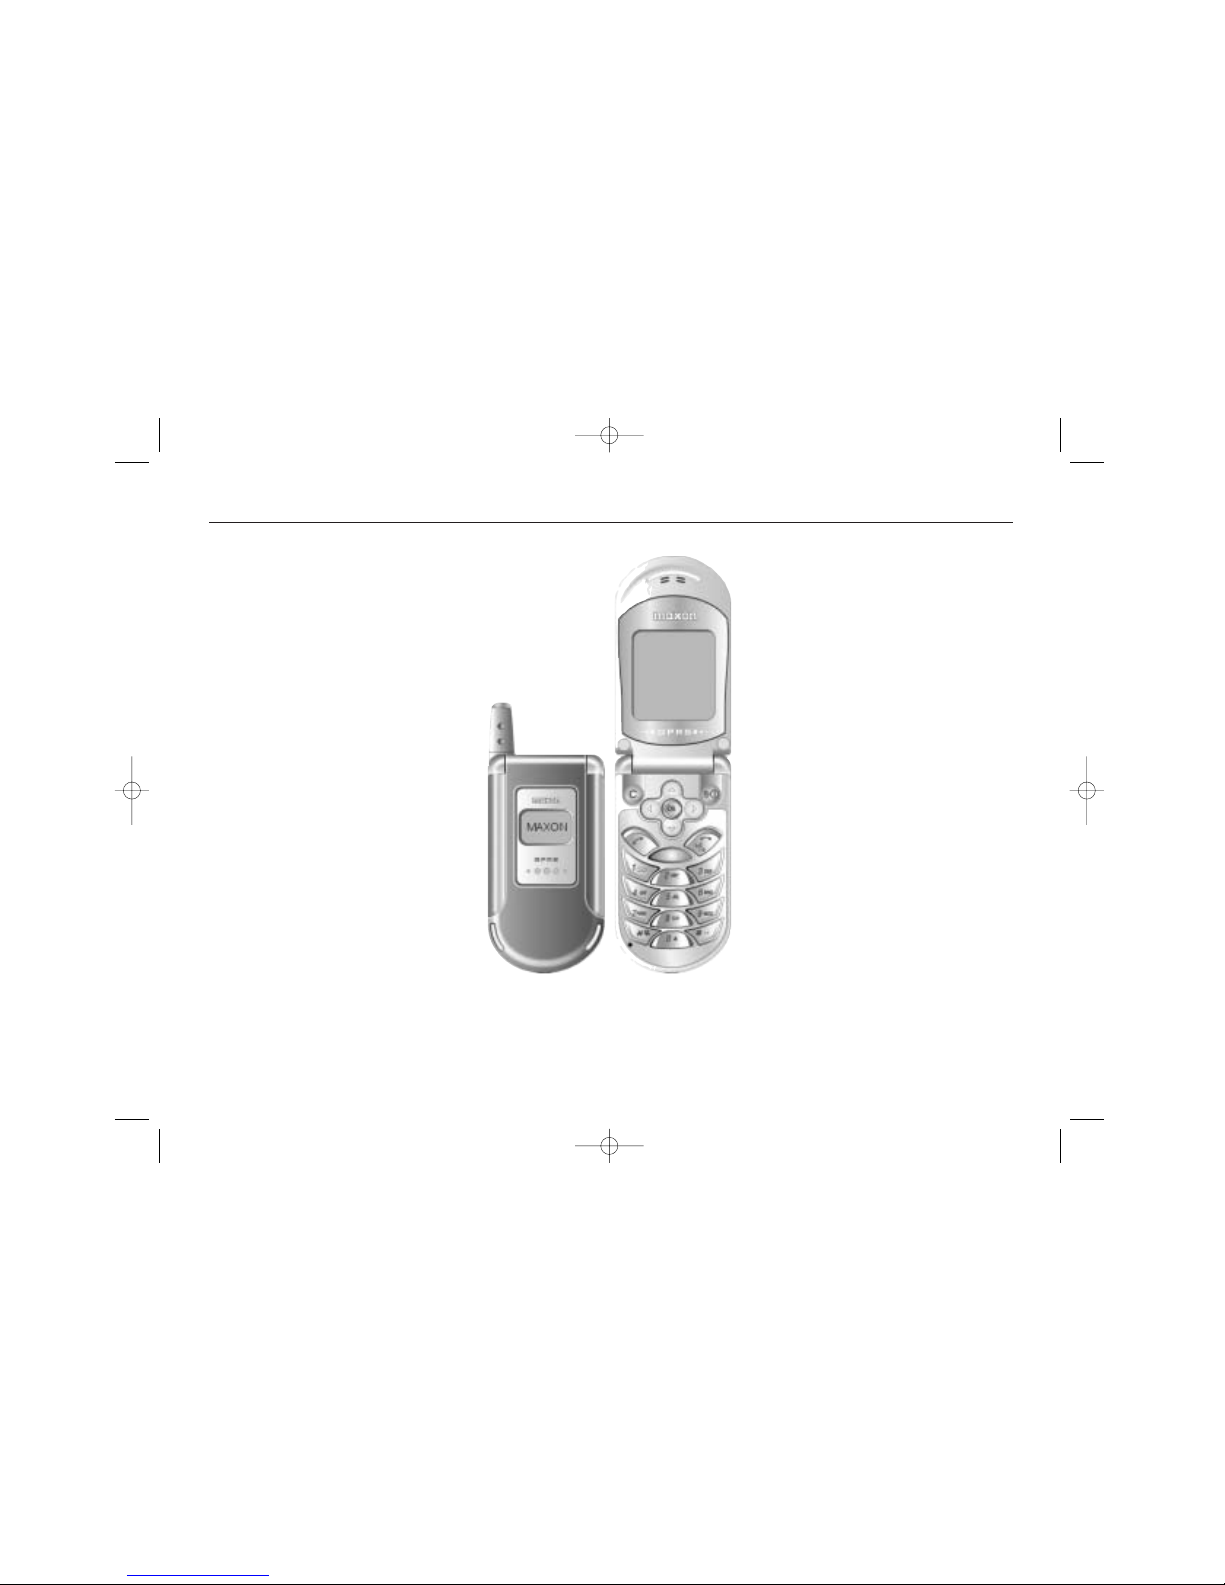
The keypad. The backlit
keypad has 7 dedicated keys
and 12 alphanumeric keys,
allowing for number and
text entries
WAP key. Pressing right
arrow key will access the
Mobile Internet
Menu key. Left arrow key
opens the menu
Answer key. Answer a
phone call
Reject key. Reject a call,
terminate a call. Turn
phone On/Off
Volume keys. On side of
casing
Mute key. On side of casing
below volume keys (long key press)
Long key press. In the start screen, a
The MX7930/31 is equipped with illuminated dual displays. Main display is a
128 by 128 pixel 64K colour display
with full graphic capabilities
In the start screen, the following information may be
displayed:
-Top area: Battery status,
Call forwarding or Call barring set, SMS-alert, Mute (if
selected), Signal strength
- Middle area: Wallpaper
- Bottom area: Softkey
commands
The sub display is 80 by 50
pixel with orange backlight.
The display shows:
- Battery status, time, signal strength
and network name
02207155_1.2 11/18/02 3:35 PM Side 13
Page 14

Get started
14
Keypad function
press will open the Symbols pop-up.
Toggles between * + - / and = in standby
mode
Hash key (#). Toggle between: # . , ; :
“ ‘ ? and ! in stand by. Controls . (peri-
od) in text editors
Keypad tone. May be switched on/off in
the Profiles menu
DTMF tones. The keypad allows for the
use of DTMF tones, enabling you to
access certain public services and to
remote control various devices, e.g. an
answering machine
Volume control. On the side of the
phone
Earphones with microphone may be
plugged in, opposite to the antenna
long key press on the keys 2 to 9 will
initiate a call to the connected shortcut
number, provided that this is activated
Caps on/off & digits. In text editors
repeated pressing on the * key will
cause the cursor to toggle between
upper and lower case. A long key press
on the keys 1-9 will produce the digit
Symbols. Punctuation and symbols are
selected in the options menu during
text editing, but can also be found on
the # key (in ABC mode)
Delete. Delete with the right softkey
(Command: Clear)
Space. Space with the 1-key key
Star key (*). Switch between upper and
lower case letters in text editors. A long
02207155_1.2 11/18/02 3:35 PM Side 14
Page 15

Get started
15
Navigating
press will enter the main Menu, whereas
an up key press has no function in
standby. A long press on OK will activate
Voice dial (Optional)
In main menu mode
-Pressing the arrow keys will step
through menus and OK will enter the
selected menu
Once you have entered a menu, you can
scroll up and down to highlight submenu
items with the action bar. All menus are
in a continuous loop, meaning that
when you reach the end, the menu will
start over again
-Pressing will move the action bar
upwards
-Pressing will move the action bar
downwards
base, automatically disconnecting the
earpiece. A switch on the microphone
enables you to accept and end a call
Data and charger socket (bottom of
casing). Use only original Maxon cables
and accessories
Navigating. The arrow keys and the OK
key functions much like arrows and
Enter on your PC, whereas two softkeys
control shortcut commands. The softkeys are placed left and right to the
arrow keys and softkey commands are
displayed in the lover corners of the display. If no commands are displayed, the
softkeys are not active
In standby mode
-A down key press will open the
Dial list. Left key press will access
Phone Book Look Up and right key
02207155_1.2 11/18/02 3:35 PM Side 15
Page 16
Get started
16
Navigating, cont.
Left key press:
- Phone book menu
Menu key press:
- SIM Toolkit (if supported)
- Service Numbers (if supported)
- Messages (SMS/EMS, E-mail & CB)
- Mobile Internet (WAP)
- Phone Book (incl. Voice dial)
- Organizer (Calendar, Tasks, Calc.)
- Games (3 Games)
- MyPhone (Audio & Visual settings,
MelodyMaker, picture & sound)
- Settings (Time, Language, Data,
Security, Network and Call settings)
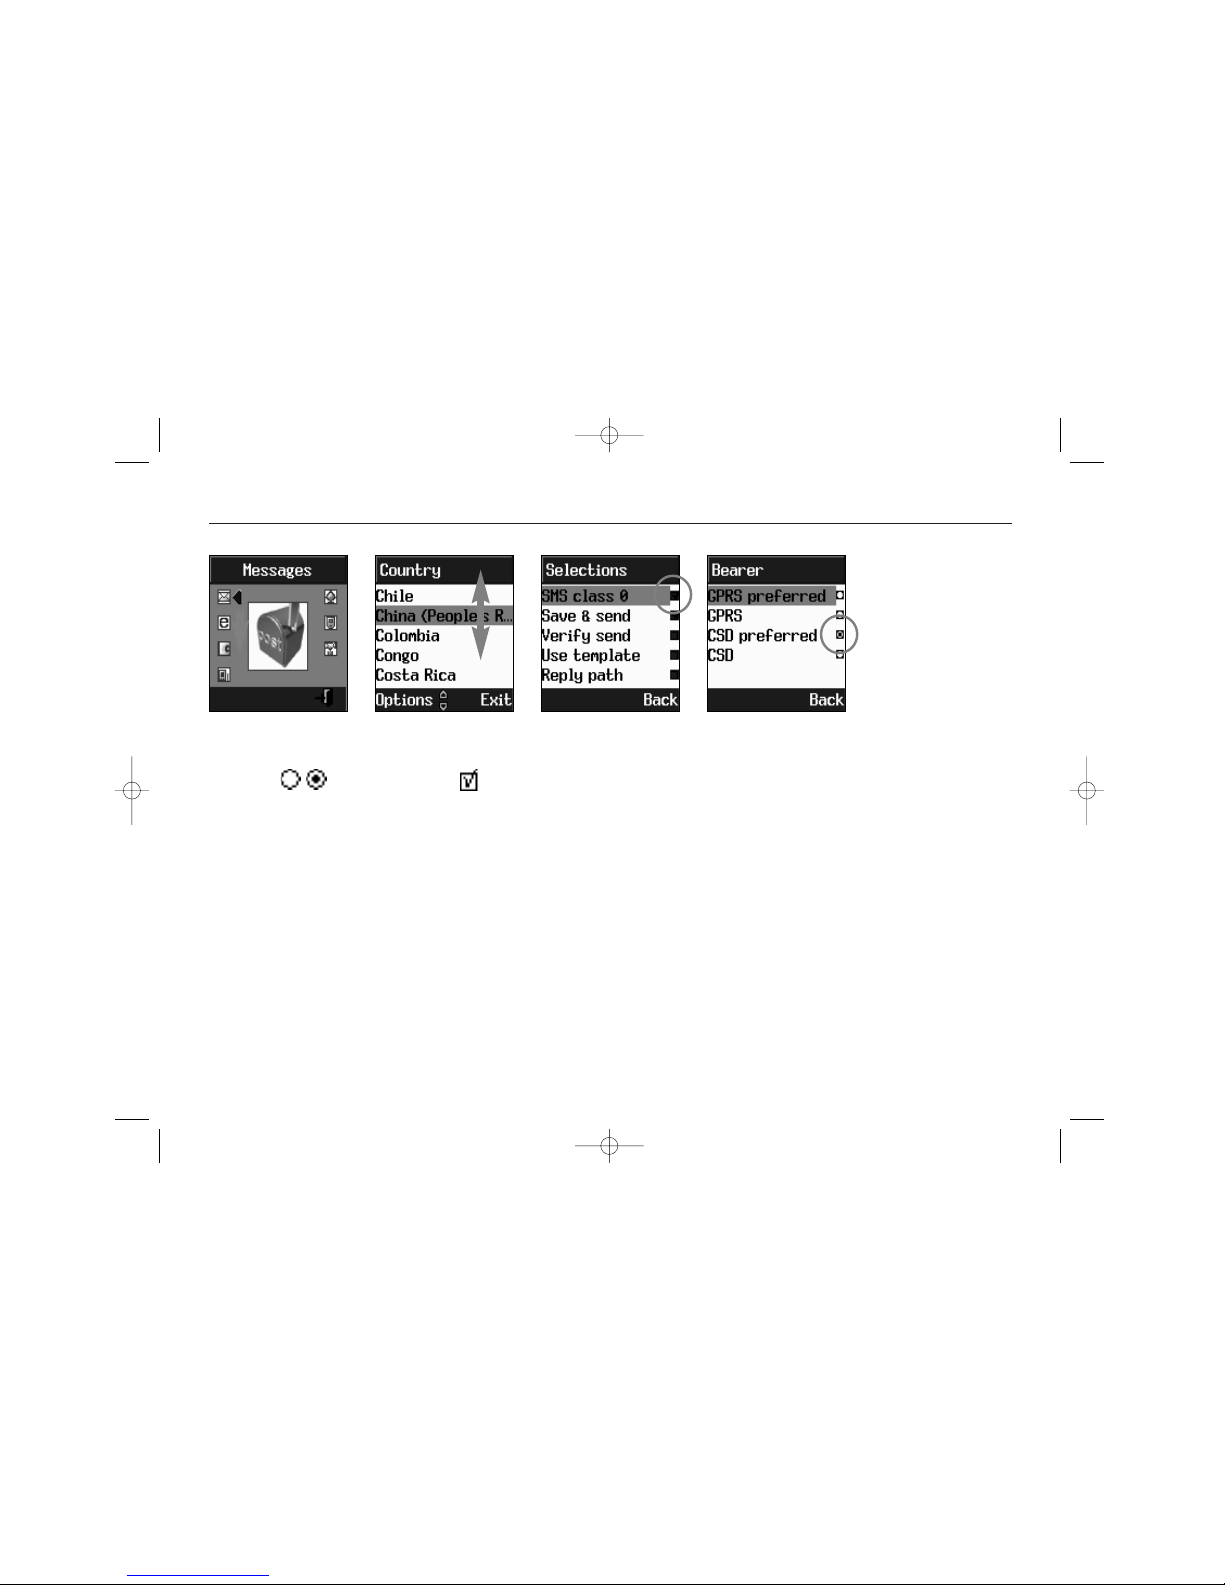
-Pressing OK will enter the highlighted
submenu, make a selection in a radiobutton list or tick a checkbox.
From the start screen, following menus
can be accessed:
Up key press:
- Phone Book Look Up
Down key press:
- Dial list
Right key press:
- WAP (Mobile Internet) menu
02207155_1.2 11/18/02 3:35 PM Side 16
Page 17

Get started
17
Softkeys
function of the softkeys will change as
you navigate through the menus. If no
commands are displayed, softkeys are
not applicable
In the start screen, right softkey control
the Profiles menu, letting you select
one of five profiles suit the situation
you are in. All profiles can be renamed
Inside menus, the left softkey is generally used to select and the right key to
clear, backspace or end
When the left softkey controls Save, the
command line will remain blank until all
the required information is entered. In
text editors, the right softkey command
will change when text input is initiated
The right softkey also controls on/off
(long key press)
In submenu mode
In some submenus you can go one step
or deeper into the menu. Highlight the
desired item and press OK. Pressing the
right softkey with the command Back
takes you up one level
Left and right arrow keys will increase/
decrease values in settings menus (e.g.
volume)
All options in settings as well as in feature menus can be accessed via the
arrow keys, but you may also use the
softkeys as shortcuts to many features
Softkeys. Your phone has two softkeys
that allow you to access most features
via roll-up menus. When one or both
softkeys are applicable, the relevant
softkey commands will appear in the
display. Commands and subsequent
02207155_1.2 11/18/02 3:35 PM Side 17
Page 18
Get started
18
Display items
OK or Select. When all requested information is entered, store with Save
Text editor. Appears when you write
SMS messages. You can choose to accept
the text entry or exit the editor at any
time, using the softkeys
Pop-up windows. Pop-up windows will
appear as a question, information, an
event reminder, or an alert to inform
you of problems
Checkboxes & radio buttons. When setting up or using your phone, you may
Scroll arrows. If the text is too large to
fit in the window, scroll arrows will
appear to show there is more text outside the window
One-line editors. When you wish to
enter information, e.g. in the phone
book or calendar, a list will appear from
which you, line by line, can access the
editor. The editor will start in T9 mode
Longpress on # key will enter ABC mode
Scroll through the list and enter the
necessary information. Make selections
in checkbox and radio button lists with
02207155_1.2 11/18/02 3:35 PM Side 18
Page 19

Get started
19
Voice mail, voice dial
Voice dial (Optional). Enables you to
access selected contacts from your
phone book simply by speaking the contacts name into the microphone. The
phone will dial the contact automatically according to the settings selected. To
use and setup Voice dial, see p. 41
Scratch pad. During a call you may wish
to take down a telephone number.
Simply enter the number during the call
and it will be stored in the Dial list
Dial list. To access the dial list, simply
press in the start screen. A list of
the last calls is displayed by phone number (In: > Out: <). Select Details in the
softkey menu to view date & time of
the call. If the caller is listed in your
phone book, the name is shown instead
of the number.
enable or disable functions by ticking
one or more checkboxes or selecting
from an array of options activated by
radio buttons . In the latter case,
only one option can be active at a time.
Icons. Many functions in your phone are
accompanied by illustrative icons. Some
of these will be animated, e.g. to indicate that the phone is working, or to
illustrate a new event such as a incoming SMS
Features not accessed from the menu:
Voice mail is your network-based
answering machine. A new voice mail
will be indicated by a symbol in the
start screen, You may play recorded
messages by selecting Voice mail in the
start screen Options key or you may
simply apply a long key press on the “1”
key
02207155_1.2 11/18/02 3:35 PM Side 19
Page 20

Get started
20
Scratch pad, dial list, conference call
If OK is pressed while a phone number
or name is highlighted, that number will
be called
Conference call. You can conduct
multi-party conversation on your phone.
During a call, select Hold on left softkey
and call another party. You can include
the first-called party in the conversation by selecting Join in the options
menu. All parties can now converse. To
include more parties, start by putting
each connected participant on hold
while you call the next. Then select
Join all from the Options menu to open
the conference. As many as five people
can be online at the same time
To release a participant from a conference call, select Release in the Options
menu. To dismiss all in a multi-party
conversation, select Release all
02207155_1.2 11/18/02 3:35 PM Side 20
Page 21
Messaging
21
T9, the predictive text editor
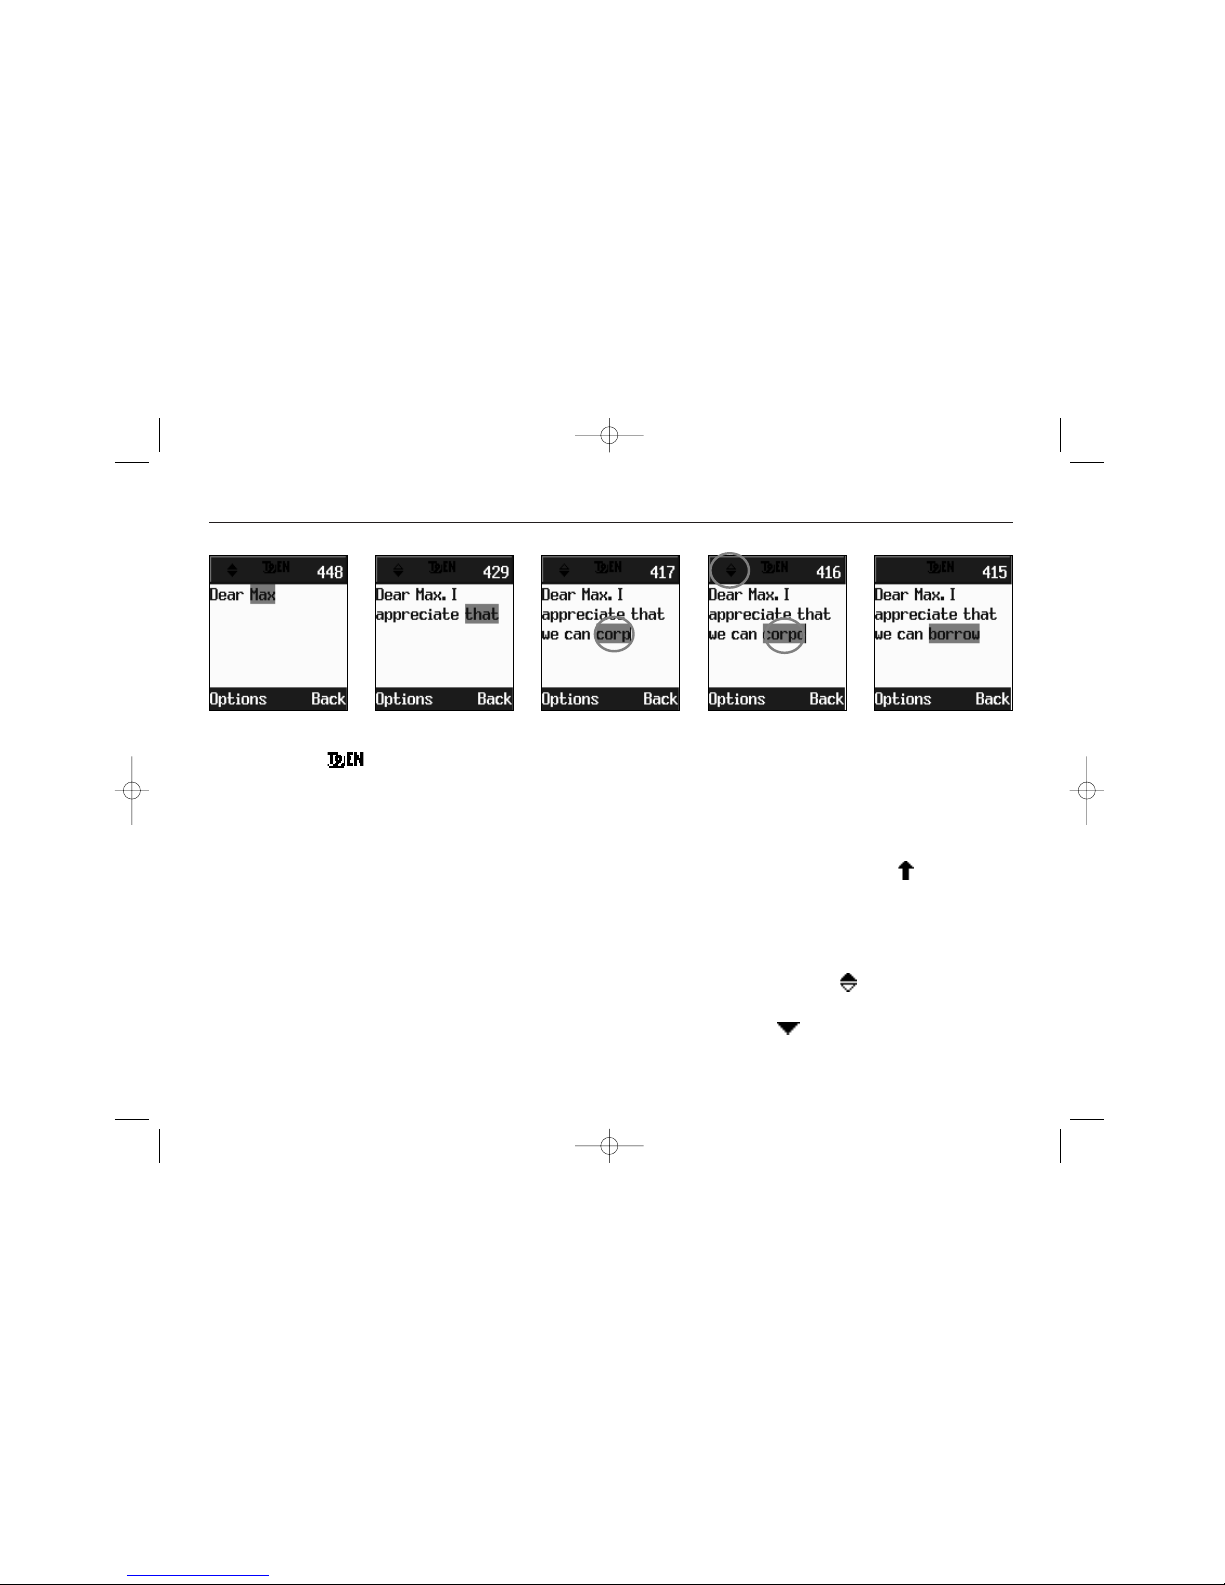
you are entering will change as you type
and you should not try to make corrections in the word before you have finished typing it.
For capital letters press the *-key prior
to typing the letter. An icon will
appear in the top line.
In most cases the text editor will find
the desired word. If there are two or
more options, an icon appears in the
top line and a list of possible words is
available when is pressed. Scroll
to find the word you want. Press OK.
Entering text into your phone is made
easy by the predictive text editor
and dictionary with learning capability.
By suggesting, while you type, the most
common words, or words you frequently
use, T9 will allow you to write quickly.
When using T9, select the key that has
the letter you want to type. e.g. if you
want to type an “a”, press the 2-key. If
you want to type an “r”, press the 7key. Only press each key once even
though the character you want may be
number two or three on the specific
key. You will experience that the word
02207155_1.2 11/18/02 3:35 PM Side 21
Page 22
Messaging
22
T9, the predictive text editor
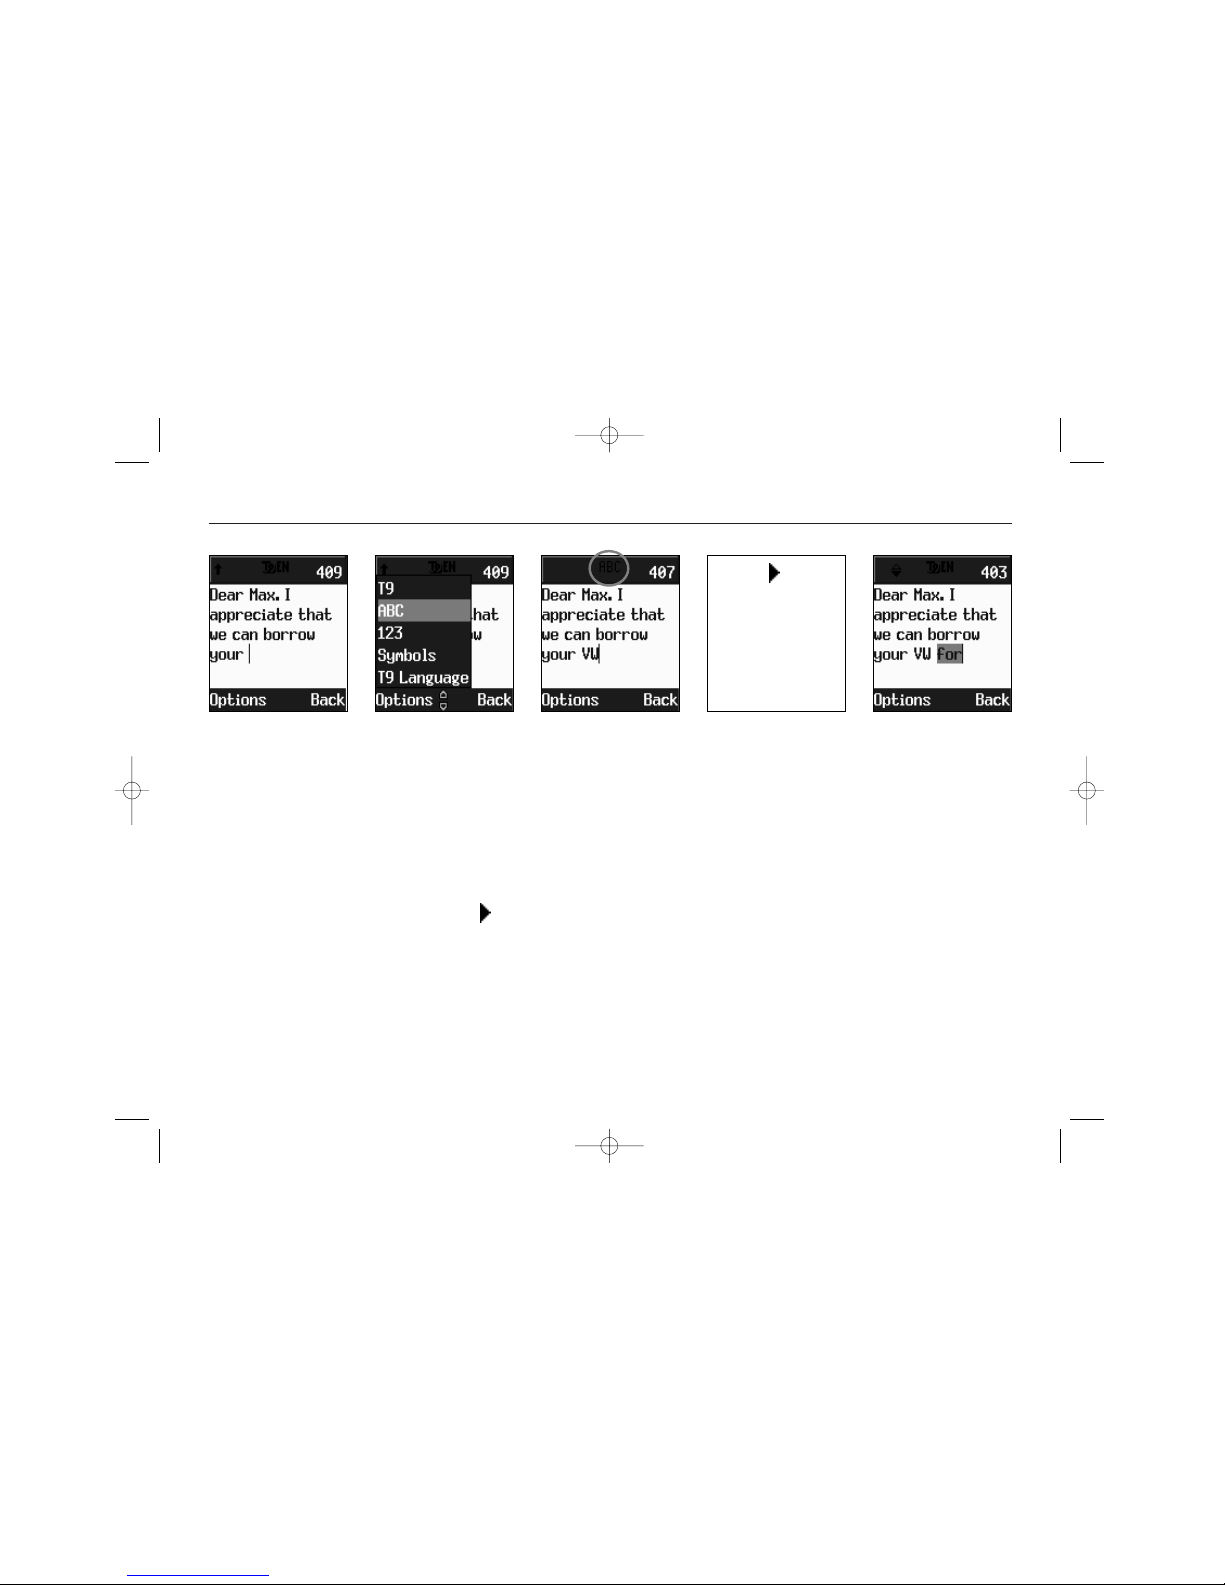
Should T9 fail to recognize the word,
such as personal names or unusual
words or should you wish simply not to
apply T9, you can select ABC in the
Options menu or by a long press on the
# key.
To teach T9 a new word, switch to ABC
mode. Type the word. Press to store
the word in the memory. Return to T9.
Up to 400 personal words can be stored.
If this limit is exceeded, rarely used
words will be deleted first.
Editor modes, T9, ABC or 123, and sym-
bols such as @ can be selected in the
Options menu, or you can long press *
key for symbols, 0-key to switch to 123
mode and #-key to select ABC mode.
The T9 predictive text editor may
require a little getting used to, but
once you master it, you will find it is a
powerful and useful tool. In average you
will save up to 60% time using T9.
Press to
store the
word in the
memory.
Return to T9.
02207155_1.2 11/18/02 3:35 PM Side 22
Page 23
Messaging
23
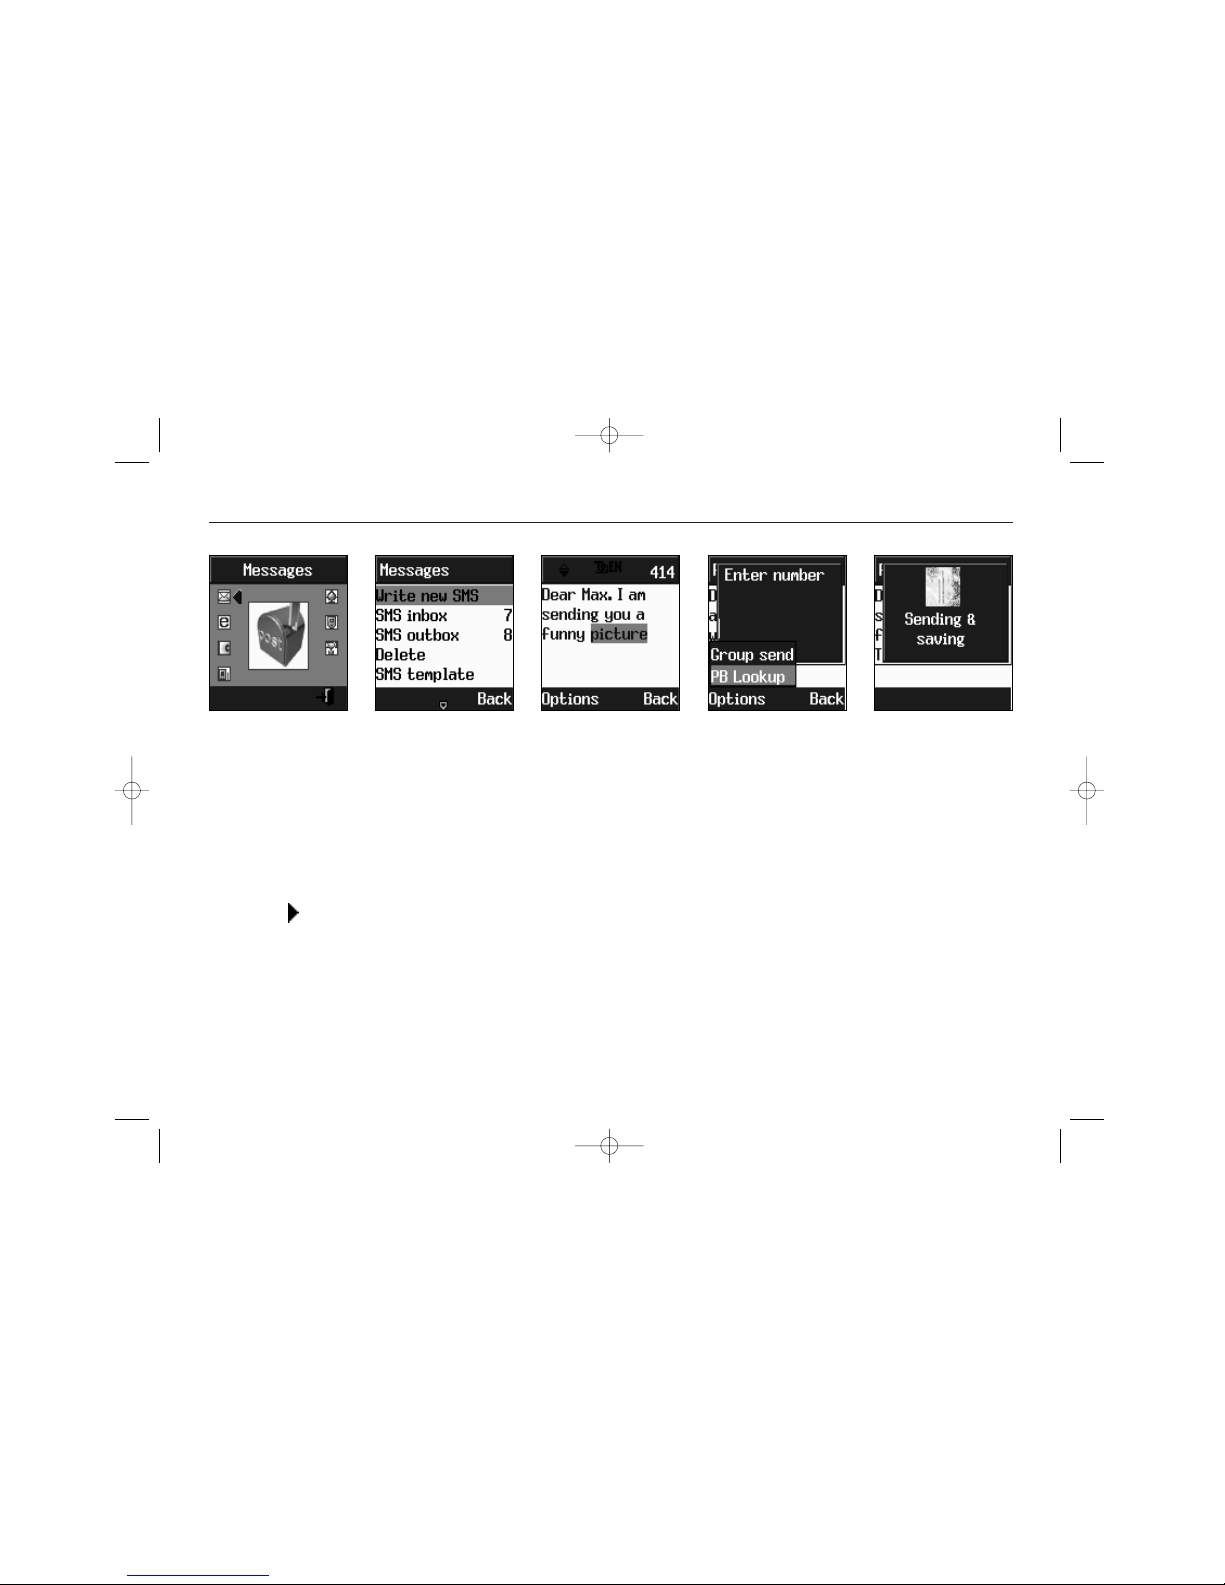
Send SMS and EMS
NOTE THAT USING MORE THAN 153 CHARACTERS
WILL REQUIRE AN EXTRA SMS MESSAGE TO BE
SENT, MORE THAN 306 WILL REQUIRE THREE MESSAGES. SOME LANGUAGES MAY HAVE CHARACTERS
THAT WILL RESULT IN UP TO SEVEN MESSAGES.
While you type, the remaining free
space is stated by a counter in the top
right corner. Number of messages is
indicated within the envelope icon.
> When typing is finished, press OK.
>Type the recipients phone number.
Press OK. Confirm sending with Yes.
< the message will be sent.
SMS is fun with Maxon. You can send
long messages (up to 456 characters),
and personalize them with pictures and
sounds (EMS). You can store pictures and
sounds, you recieve from others, in your
library and use them as ring tones and
wallpapers.
>Press to open the menu overview.
Step to the Messages menu. Press OK.
The Write new SMS submenu is the first
choice. Press OK to enter the editor.
>Write your message using a maximum
of 456 Latin characters.
02207155_1.2 11/18/02 3:35 PM Side 23
Page 24
Messaging
24
Read messages
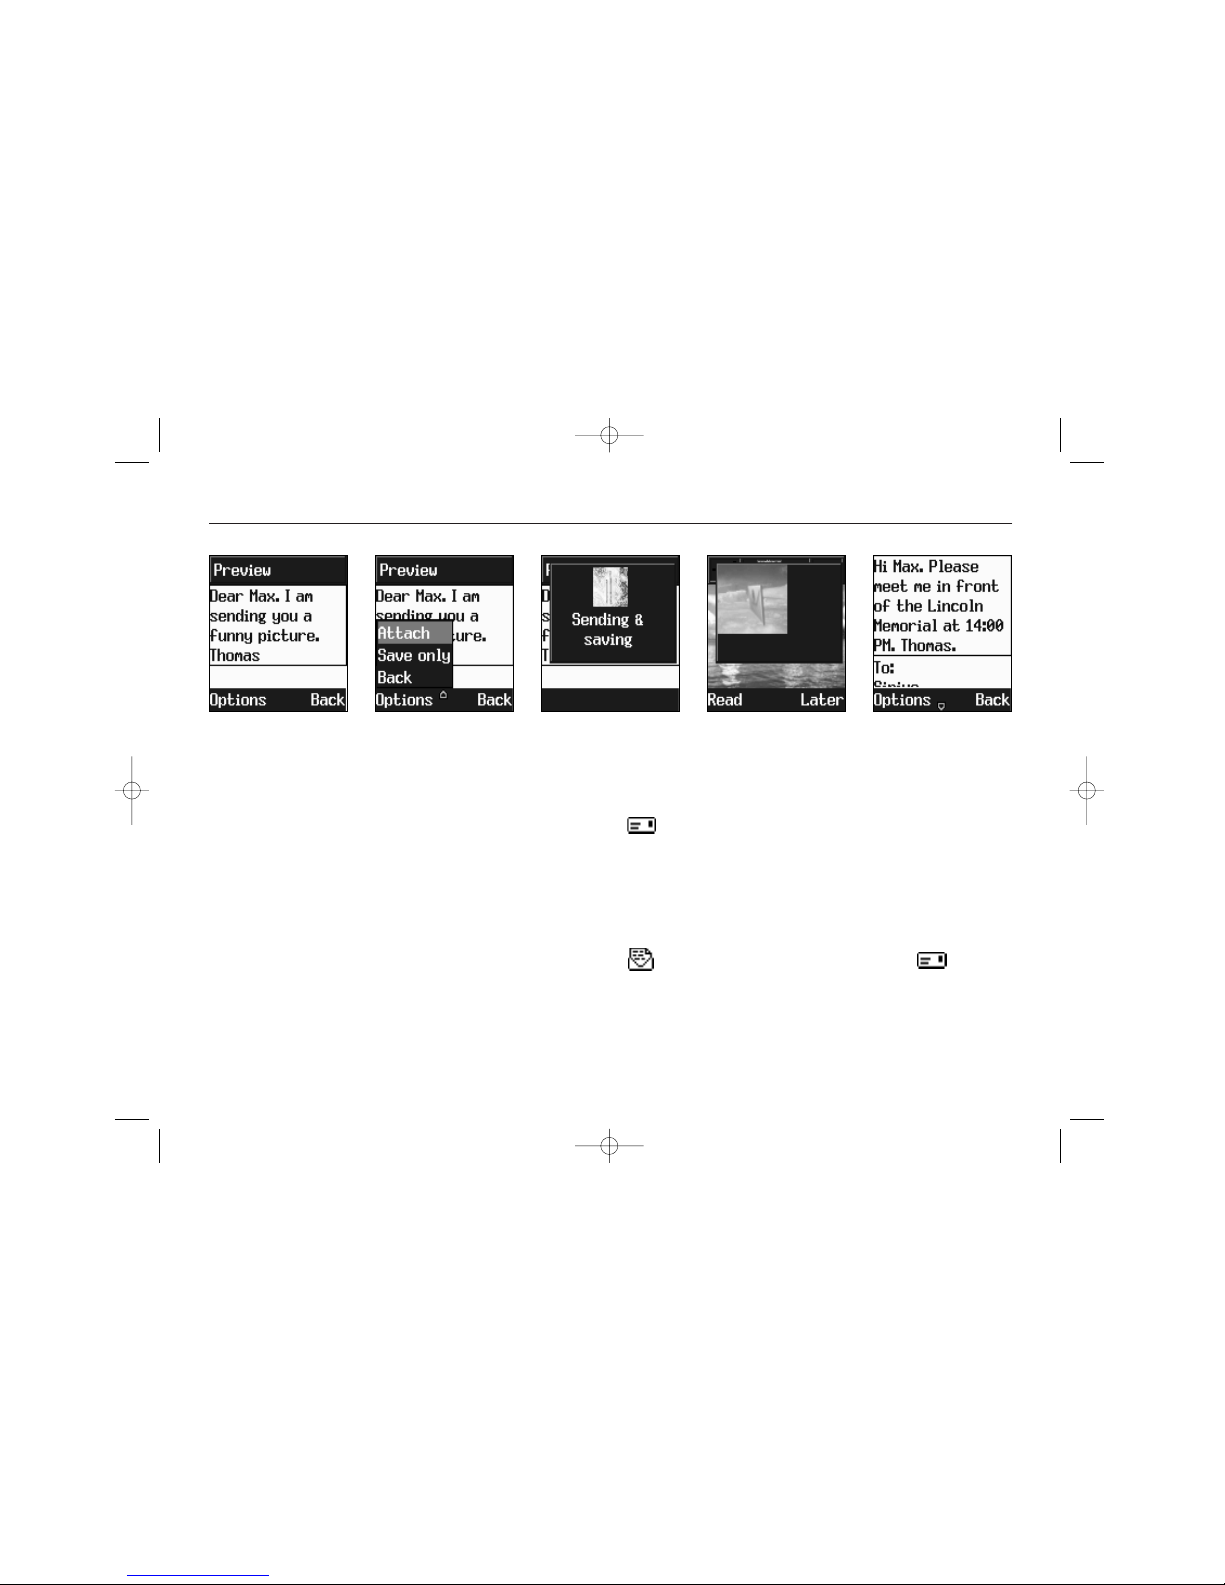
To include a picture or a sound with
your SMS, select Insert on left softkey.
The picture & sound Import manager
opens. Select Animation or Melody and
scroll to select the desired item- Press
OK. The item is inserted in the text.
Press OK again to send the SMS.
An incoming message alert will be
shown in the start screen (and with a
tone or vibration if so selected). Press
Read to open the message. If you want
to store an attached picture or sound in
your library, scroll through the message
with to highlight the attachment. Select
Store on left softkey.
To postpone reading of a new SMS, press
Later. The message is stored and the
icon will appear in the start screen.
To read an SMS received earlier, go to
the Messages menu:
> In the SMS menu scroll to SMS Inbox.
indicates a read message, an
unread message.
> Select the desired message and press
OK to read.
02207155_1.2 11/18/02 3:35 PM Side 24
Page 25
Messaging
25
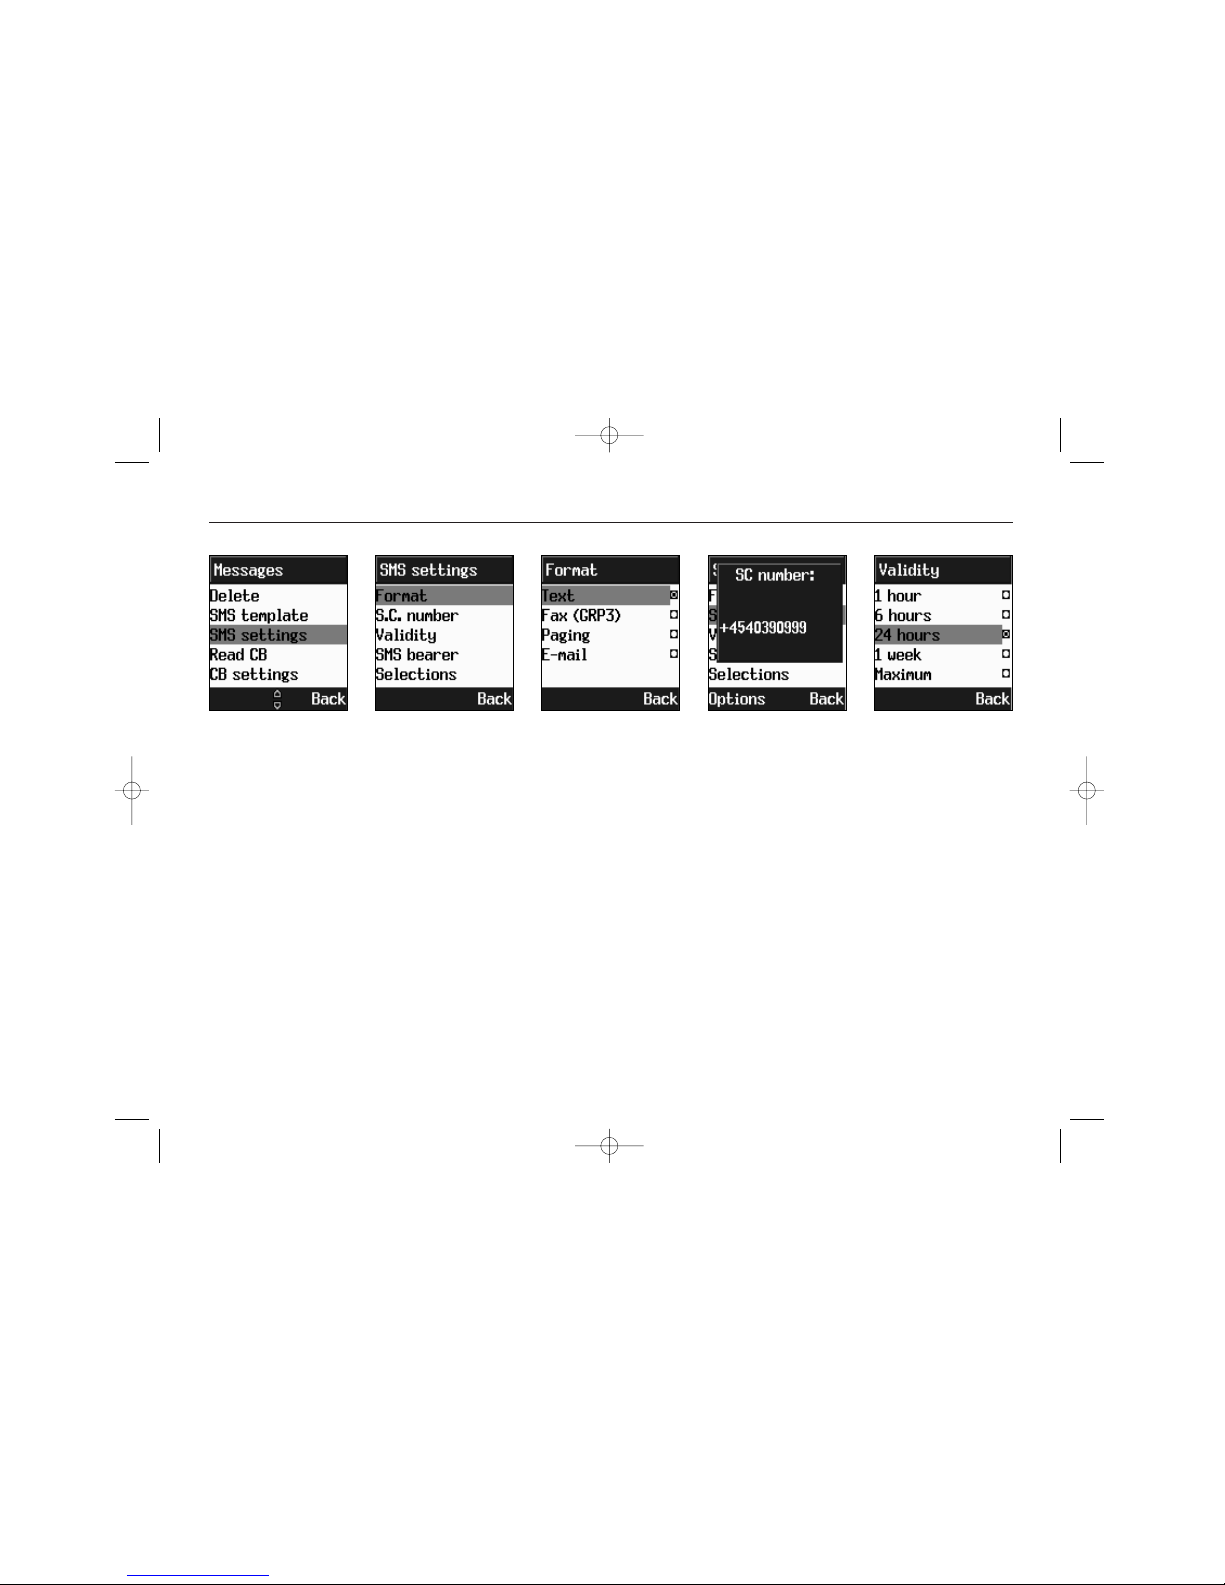
Set up SMS options
Messages menu and scroll to SMS settings. Press OK to open the settings sub-
menu, comprising the following options:
Format. Lets you select from four alter-
native data formats, if supported by
your network. Text format is default.
S.C. number. Enter your operator
Service Center number.
Validity. Specify the period a sent message will be hosted by the network.
Four options.
To edit a sent or Save Only message:
> Scroll to Outbox. Select message.
Select Edit on left softkey.
< the message opens.
To create a template, scroll to SMS template and write the text. Save. You can
enable the use of the template in the
Selections menu in SMS settings.
Delete old messages regularly to avoid
memory congestion. Scroll to Delete,
and select Inbox, Outbox or Delete all.
To set up up SMS options, enter the
02207155_1.2 11/18/02 3:35 PM Side 25
Page 26
Messaging
26
Set up SMS options
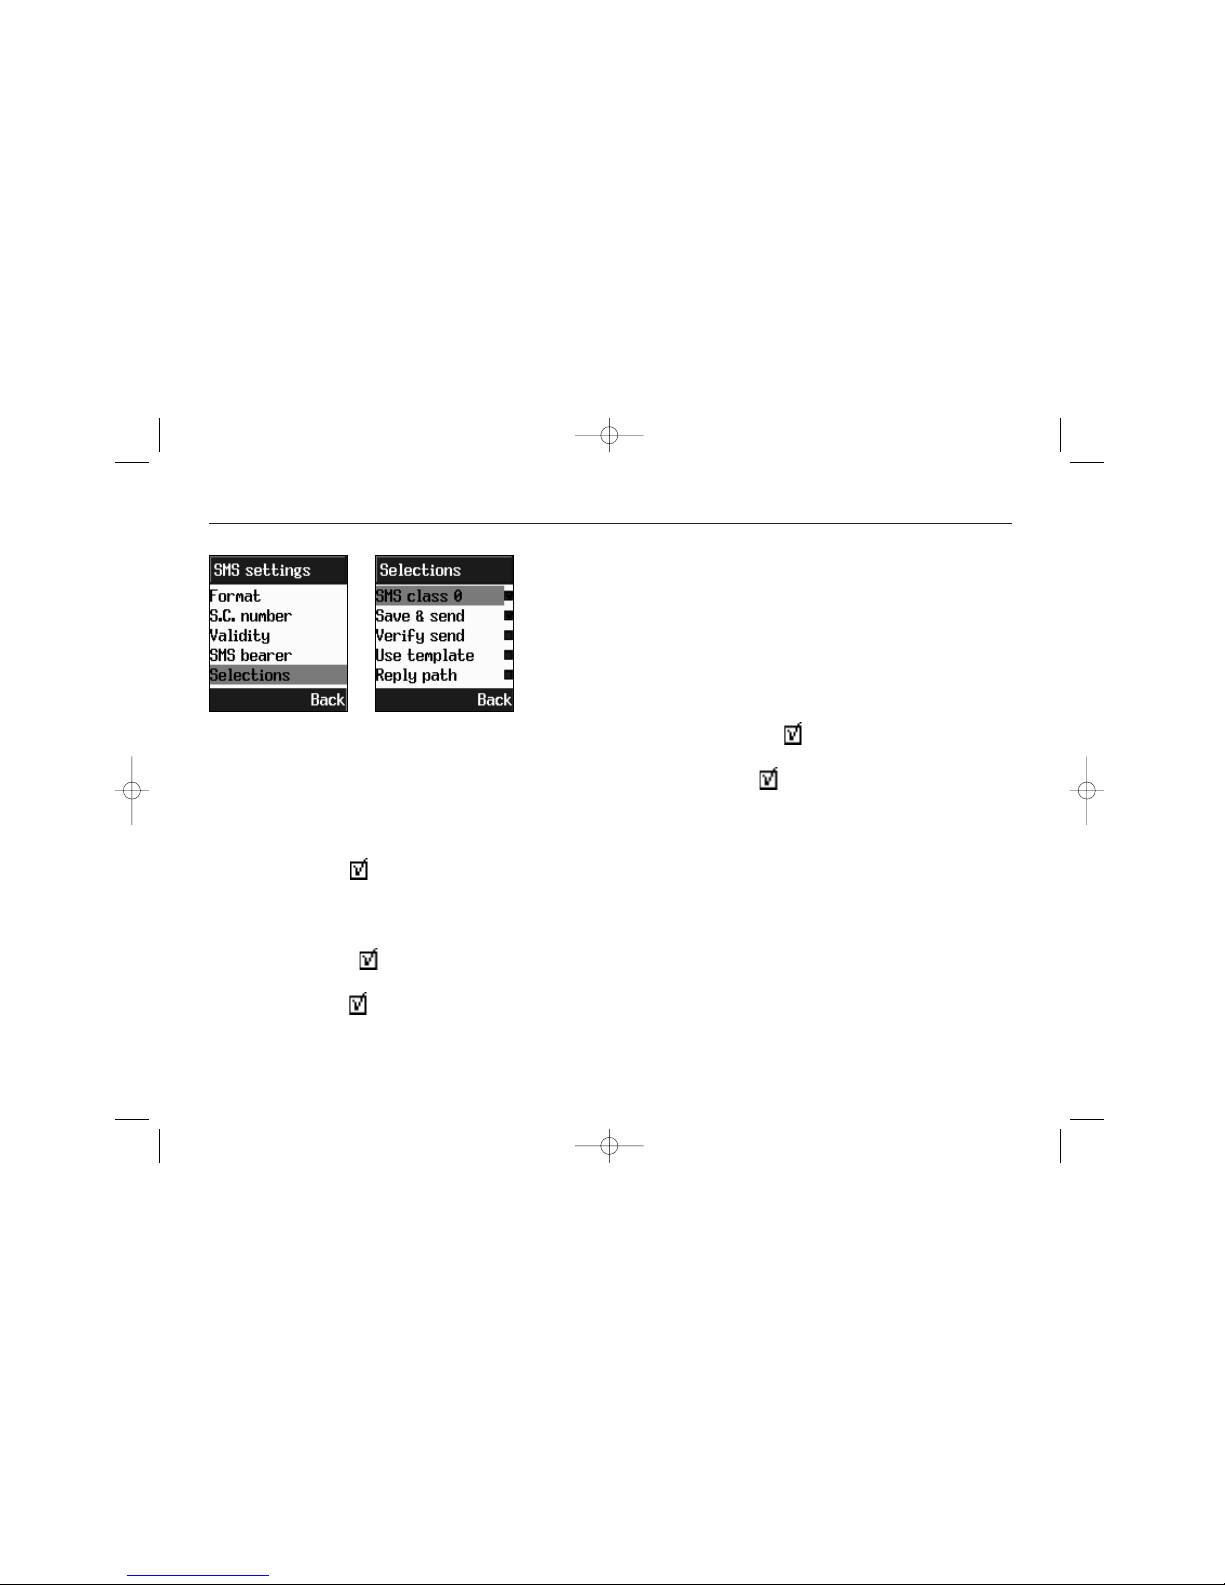
SMS bearer. Select GSM or GPRS connection. Your network subscription must
include GPRS services for you to use
this.
Selections. Select among (Tick):
SMS Class 0 . Incoming class 0 mes-
sages will not be stored, but shown in
display only. New messages will thus
overwrite previous.
Save & Send . Saves message in
SIM memory.
Verify send . Initiates confirmation
request before sending.
Use template . T9 editor default
starts with template text.
Reply path . Will let the recipient
use senders service center.
02207155_1.2 11/18/02 3:35 PM Side 26
Page 27
Messaging
27
Cell Broadcast (CB)
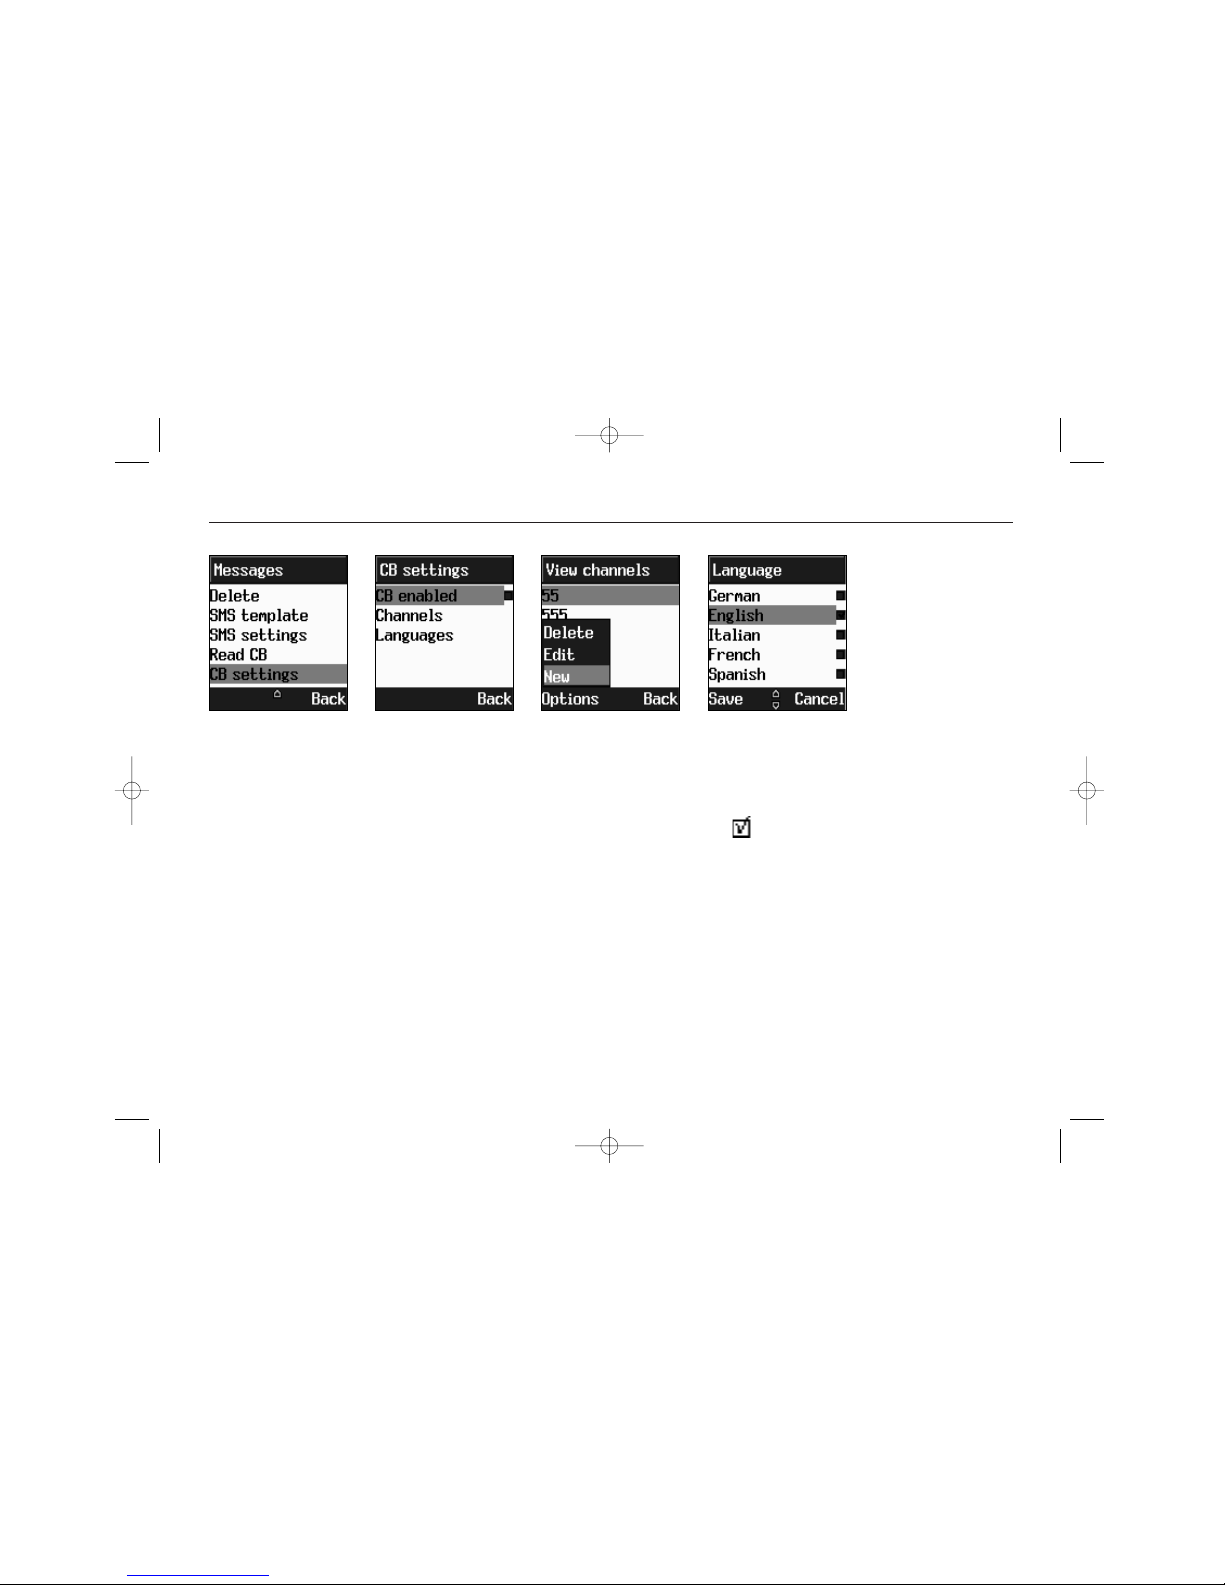
To set up CB, enter the Messages menu
and scroll to CB settings. Enter OK to
open. You can select:
CB Enable . Tick to open for Cell
Broadcast reception.
Channels. View existing channels, add a
New channel or use Rename to customize channel names..
Language. Scroll a list of languages.
Select with OK. Save with left softkey.
Cell Broadcast (CB) is a network provided service. Check with your operator
about the details. When you receive a
CB, it will appear automatically in the
display.
Messages are stored in the memory, but
new messages will overwrite old ones
received on the same channel. To read
the last messages stored, enter the
Messages menu and select Read CB,
then select the channel you want to
read.
02207155_1.2 11/18/02 3:35 PM Side 27
Page 28
Messaging
28
Send and receive E-mails (Optional)
NOTE. BEFORE YOU CAN USE THE E-MAIL CLIENT,
YOU WILL HAVE TO SET UP THE PARAMETERS.
> Open Messages menu
> Scroll to E-mail. Press OK
- Enter Email settings to set up:
Account settings
User name. Your account ID
Password. Your network password
From name. Your E-mail address
POP3 server. Server name
SMPT server. Server name
Connection. Setup network
GPRS
APN. Unique network location
User ID. Your account ID
Password. Network password
GSM
Phone number. Dial-up number
User ID. Your account ID
Password. Network password
Carrier. Select network transmission
GSM
GPRS
E-mail client
02207155_1.2 11/18/02 3:35 PM Side 28
Page 29

Messaging
29
> Scroll through the list. Select E-mail
to read. Press OK
< the selected email is downloaded
for reading
NOTE. SENDING & RECEIVING E-MAILS MAY TAKE
SOME TIME, ESPECIALLY LARGE MAILS. ONLY ONE
EMAIL IS DOWNLOADED AT A TIME.
DOWNLOADED EMAILS WILL NOT BE DELETED
FROM THE SERVER.
IT WILL NOT BE POSSIBLE TO DOWNLOAD
ATTACHMENTS.
LONG E-MAILS WILL BE TRUNCATED TO 700 CHARACTERS.
Conclude each step with Save. You are
now ready to send and receive E-mails
> Scroll to Send & receive and press OK.
< your phone will connect you to your
mail account, download incoming
emails from the server and send emails
from your Outbox
To read E-mails:
> Scroll to Inbox. Press OK
< a list of the 20 newest emails is
presented by Subject
Write & send E-mail
02207155_1.2 11/18/02 3:35 PM Side 29
Page 30

Messaging
30
To create a new E-mail:
> Scroll to Write email and press OK.
< the editor opens, prompting you to
enter E-mail addresses (To:, c.c:) and
Subject, prior to writing the mail
With this information keyed in, proceed
to Contents to write your message
> Save your message on left softkey
> Go to Send and Recieve and press OK
to send your message
NOTE. WHEN YOU HAVE WRITTEN YOUR MESSAGE, YOU CAN CHOOSE TO SAVE IT TO OUTBOX
OR AS A DRAFT. THE LATTER WILL BE STORED IN
THE MEMORY AND WILL NOT BE SENT THE NEXT
TIME YOU SELECT SEND & RECEIVE. TO SEND A
MESSAGE, IT MUST BE SAVED TO OUTBOX.
Read E-mail
02207155_1.2 11/18/02 3:35 PM Side 30
Page 31
WAP - Mobile Internet
31
Home, Bookmarks
be the homepage of your network operator and as no other WAP-sites are
bookmarked yet, also your only option.
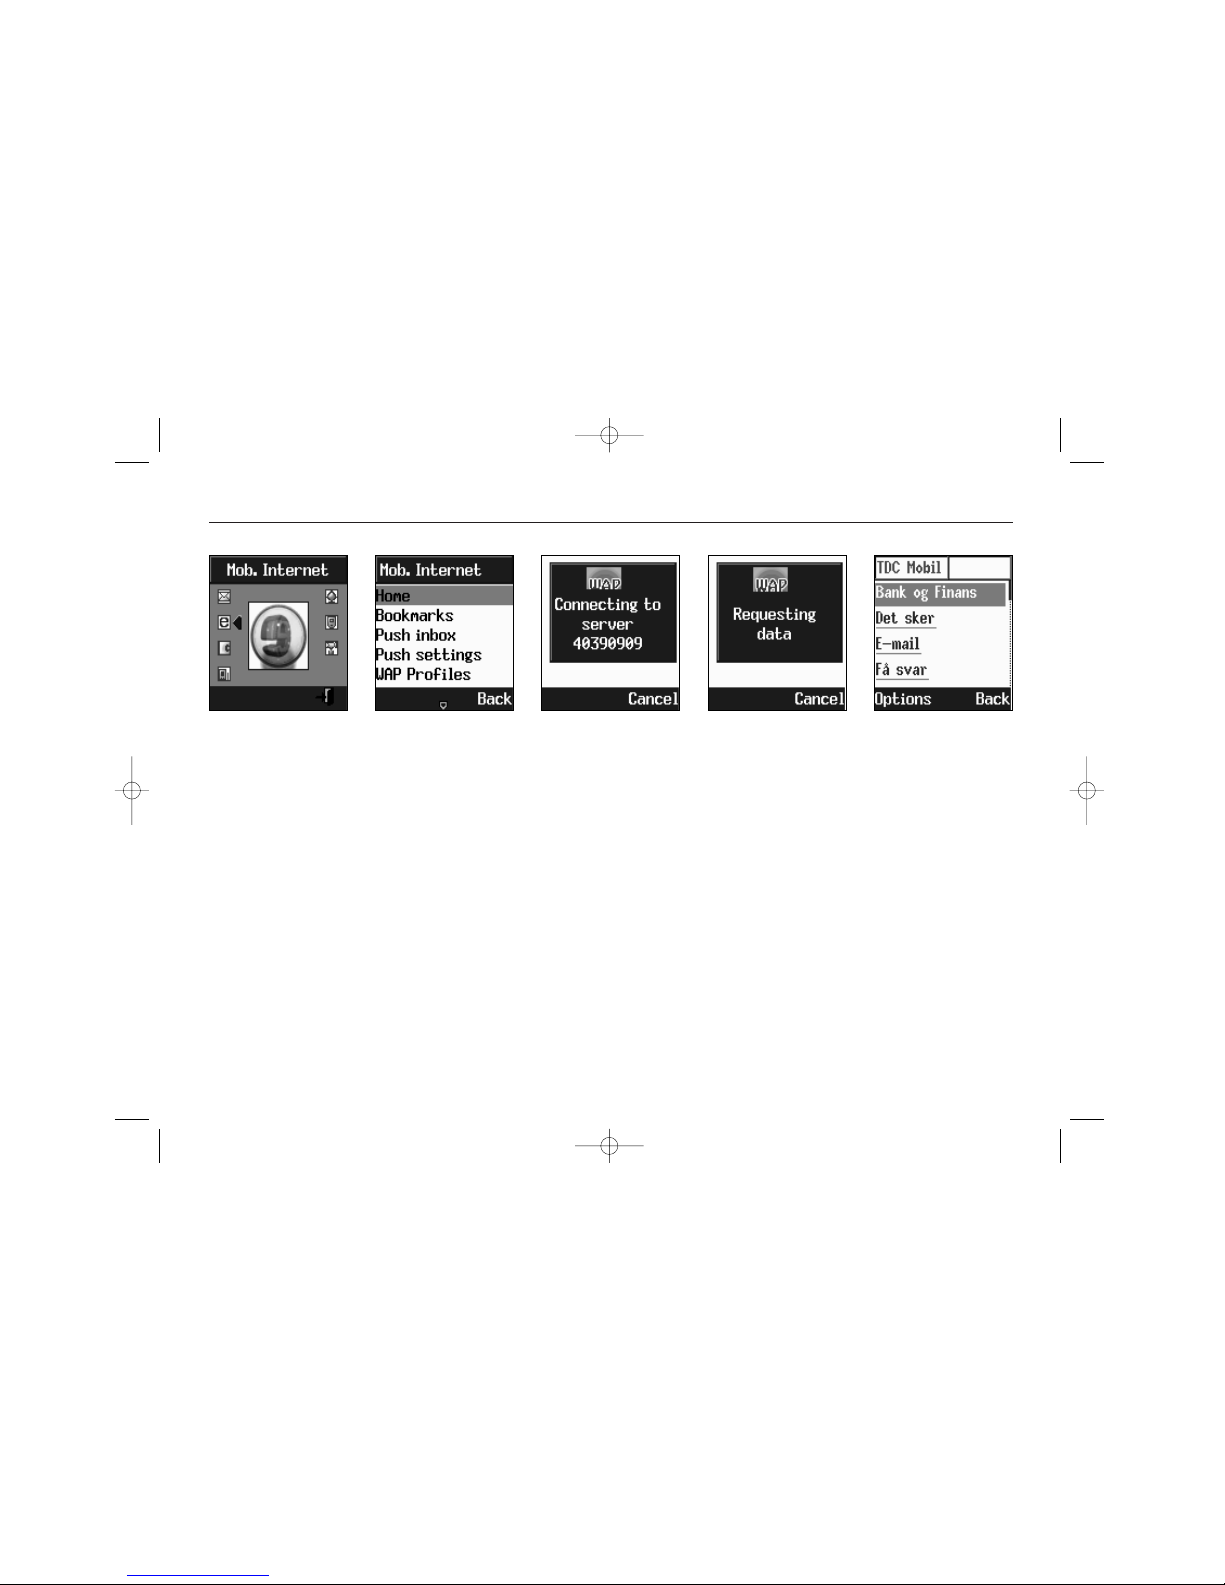
>Press OK to open Home.
< the display shows “Connecting to
server – Requesting data”
When connection is established, the
“Home” URL will be displayed. Follow
on-screen instructions to browse the
homepage or enter another homepage
via the Options softkey menu.
You can access any WAP homepage by
WAP is a technology that enables you
to access the Mobile Internet via your
phone. Depending on your place of purchase, and provided that your network
operator supports WAP, your phone is
most likely set up with the necessary
information. If so, to access the Mobile
Internet for the first time, simply:
>Press right arrow key or press Menu
to open the menu overview. Step to the
Mobile Internet menu. Press OK.
The first two submenus will be Home
and Bookmarks. Home will most likely
02207155_1.2 11/18/02 3:35 PM Side 31
Page 32
WAP - Mobile Internet
32
Passwords, E-mail on WAP
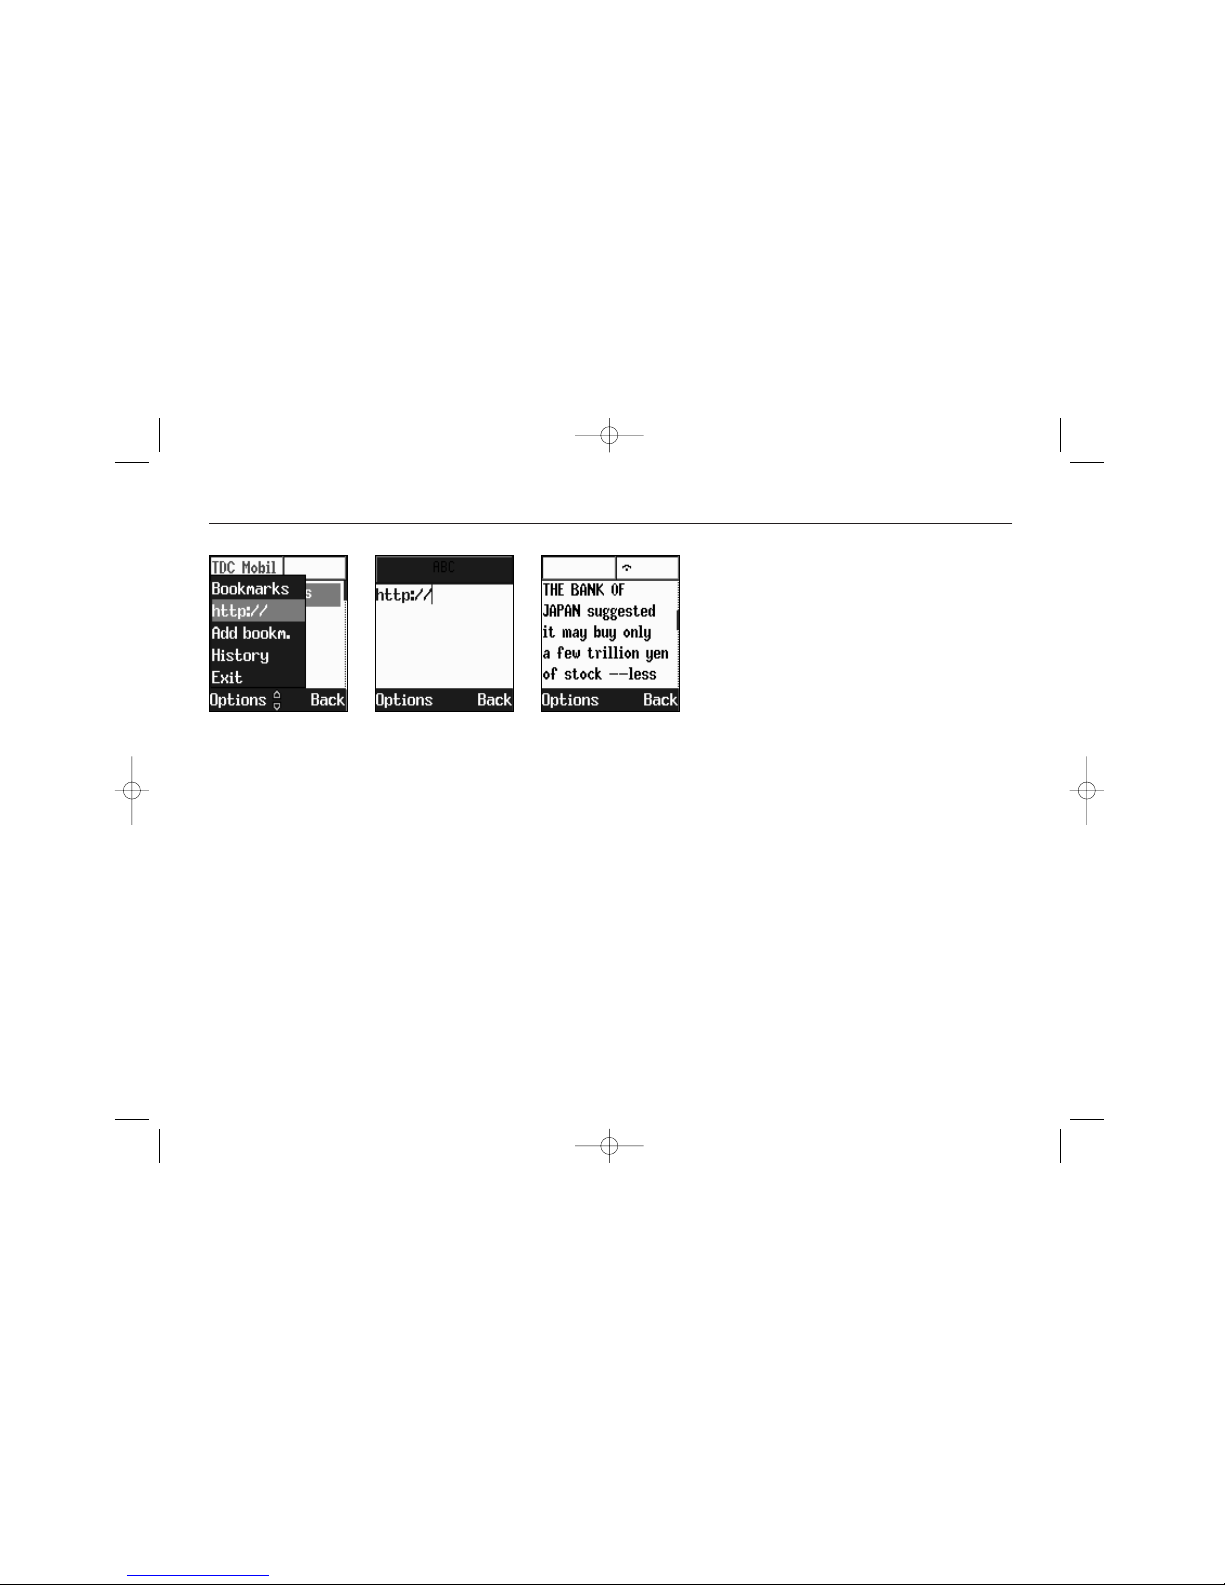
entering the relevant URL in the editor.
The input must start with the text string
http:// to access the page. Accept the
input with OK. Up to 50 URL’s can be
stored and later accessed from the
Bookmarks menu, using the commands:
Select. Opens the list of WAP book-
marks.
Edit. Edits the list of WAP-sites.
Add. Opens an editor allowing you to
add a homepage to Bookmarks.
Delete. Opens the list of WAP-sites.
Delete by highlighting and press OK.
Some WAP pages may be password pro-
tected and prompt you to enter a user
name and password. However, on many
WAP sites you can enter as a guest, but
you may not be eligible to browse the
entire site.
Some network operators enables you to
receive and read your E-mail via WAP. In
most cases this service requires you to
give the operator your Internet account
details and password. The operator will
then retrieve your mail and send it to
you as a WAP page. Contact your operator for details.
02207155_1.2 11/18/02 3:35 PM Side 32
Page 33
WAP - Mobile Internet
33
Push, Set up WAP
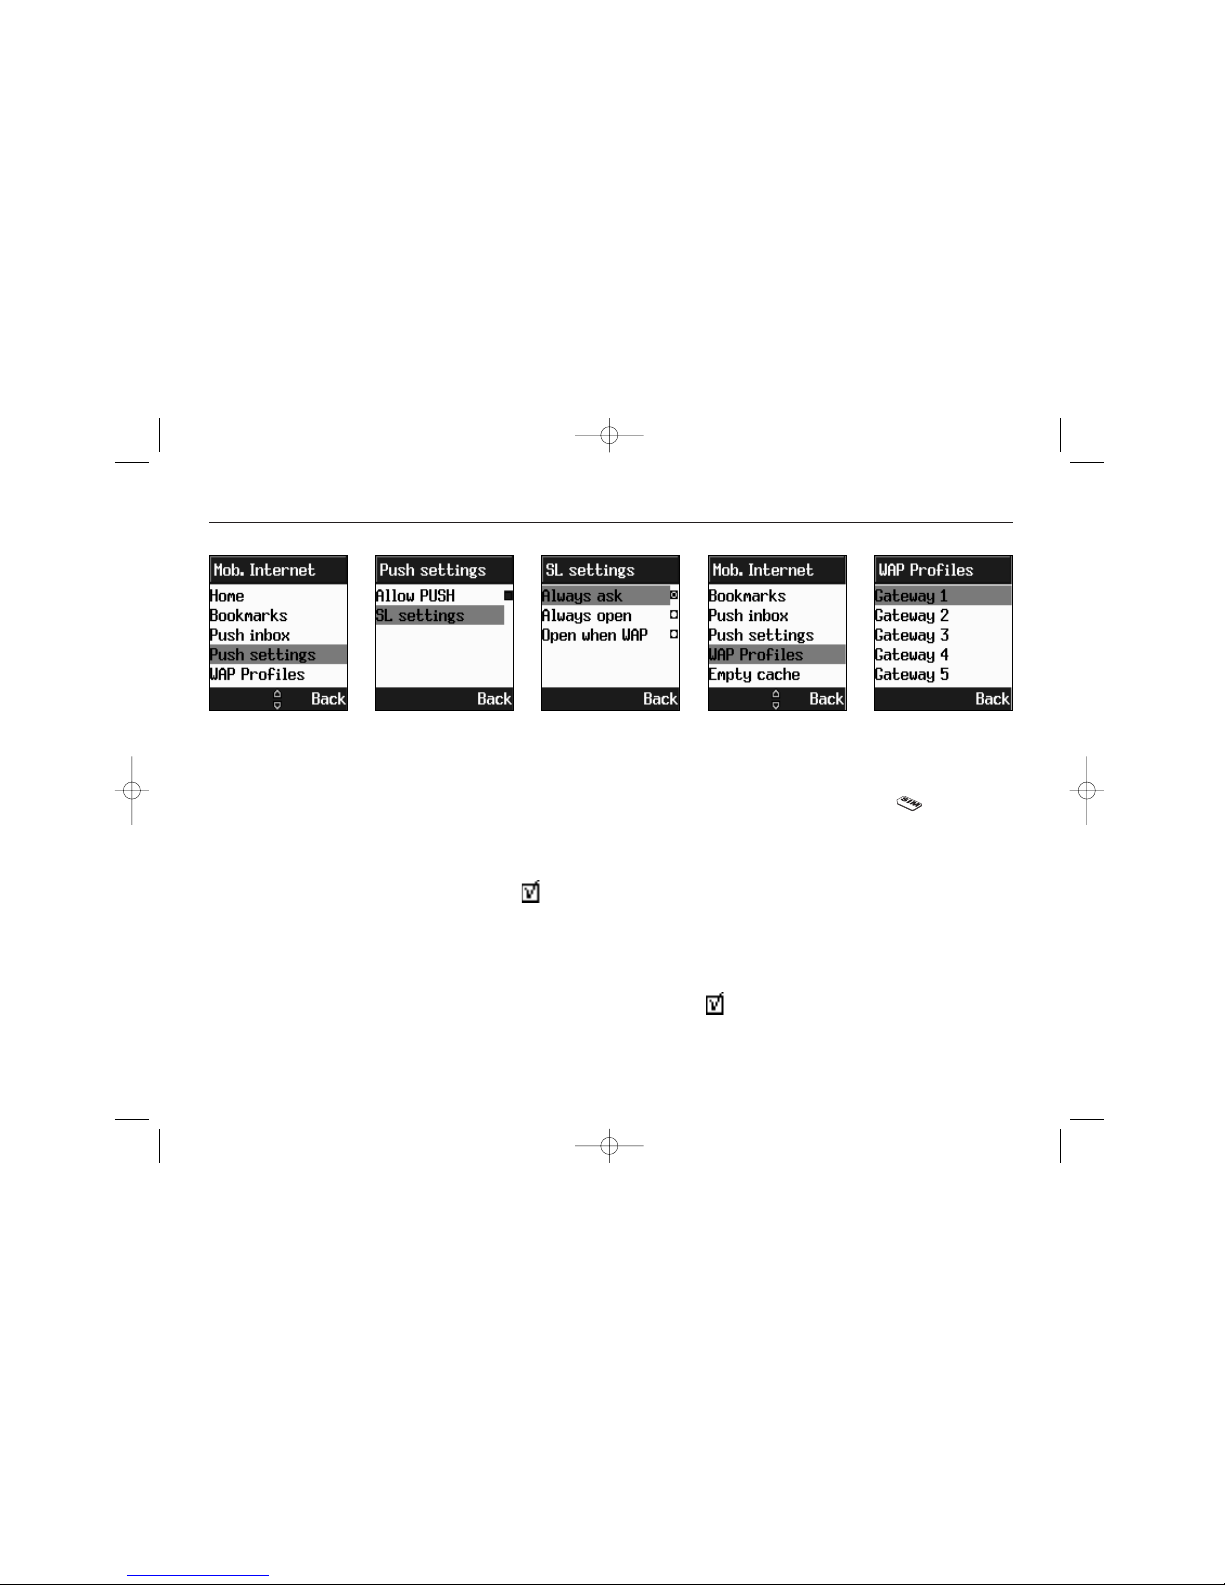
If you get a “Wap settings incomplete”
message, your phone is not set up for
WAP. You will need set-up information
from your network (marked
in this
guide)
. Check the sales package or contact your network operator. With the
information at hand:
> Go to the WAP menu. Scroll to WAP
Profiles. Press OK.
> Select Gateway 1. Press OK. Tick
Default to make this your Home. You
can configure five different gateways,
but only one at a time can be “Home”.
If your network operator supports Push
technology, you can recieve messages
from WAP service providers. The messages will be announced by a pop-up
alert and stored in the Push Inbox. To
personalize Push, go to:
Push settings, tick Enable push and
open Push access to select:
Always ask. WAP-site will open upon
your confirmation.
Always open. WAP-site will open
automatically.
Open when WAP. WAP-site will open
if you are in a WAP session.
02207155_1.2 11/18/02 3:35 PM Side 33
Page 34
WAP - Mobile Internet
34
Set up Wap, cont.
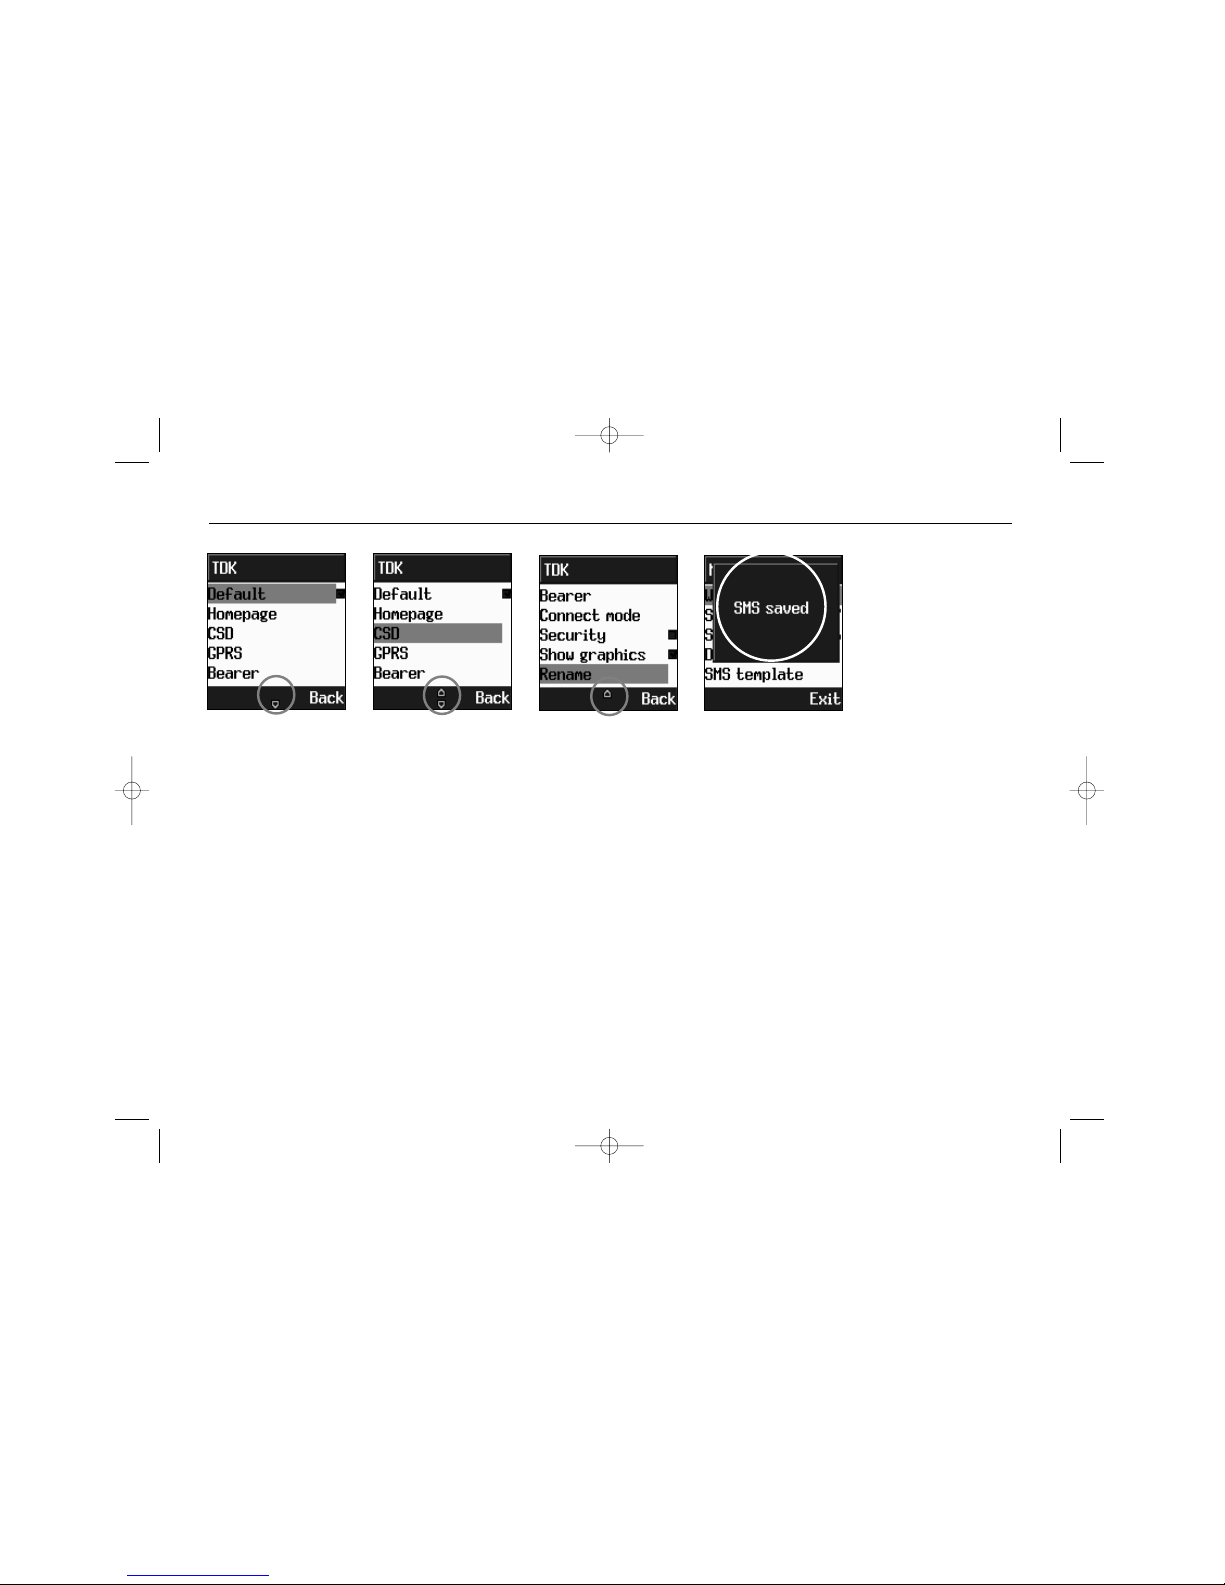
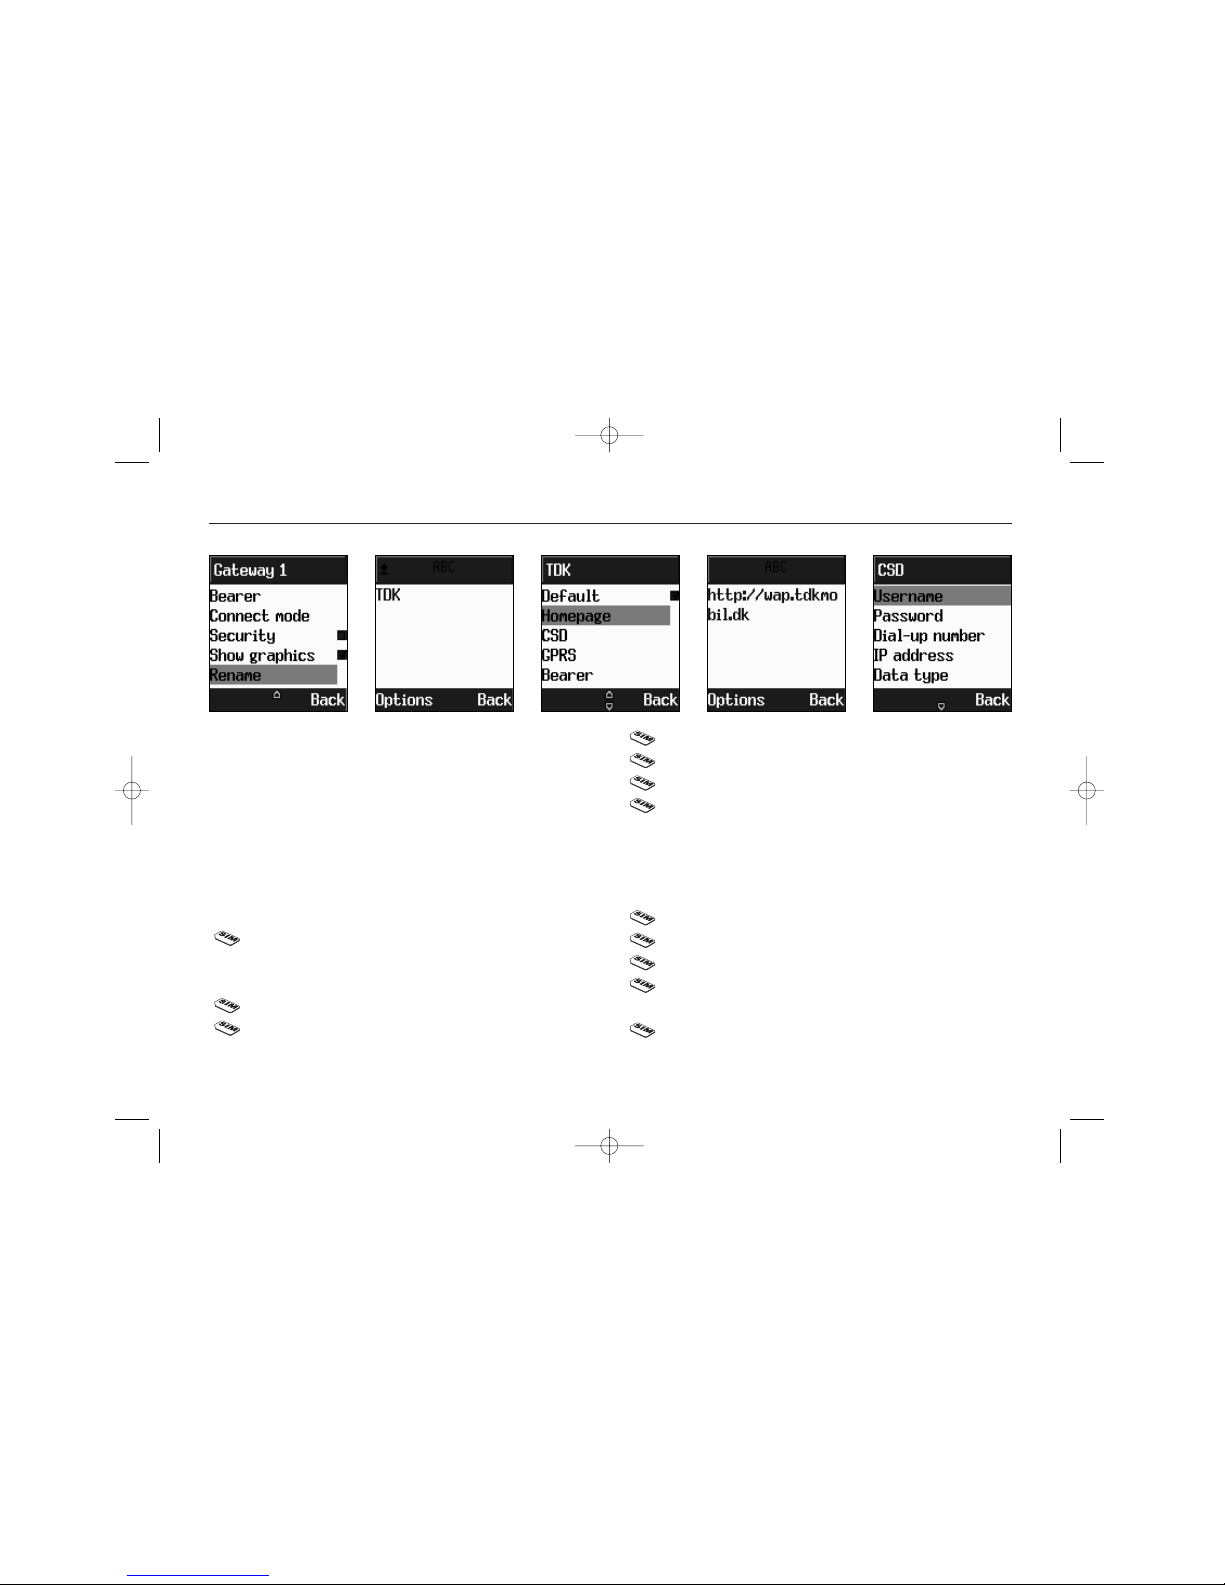
> Scroll to Rename tp personalize the
selected gateway. Press OK. Enter new
name. Save.
> Select the menu points in the profile
one by one and enter the requested
information. Confirm each choice with
OK and proceed to next point:
Homepage (e.g.: http://wap.aol.com)
CSD
User name
Password
Dial-up number
IP address
Data type (Analog /ISDN)
Data speed (9600 / 14400)
Idle timeout (is the time you want
the phone to keep an idle connection)
GPRS.
User name
Password
APN (Access Point Name)
IP address
Bearer. Select GPRS or CSD.
02207155_1.2 11/18/02 3:35 PM Side 34
Page 35
WAP - Mobile Internet
35
Set up WAP cont.
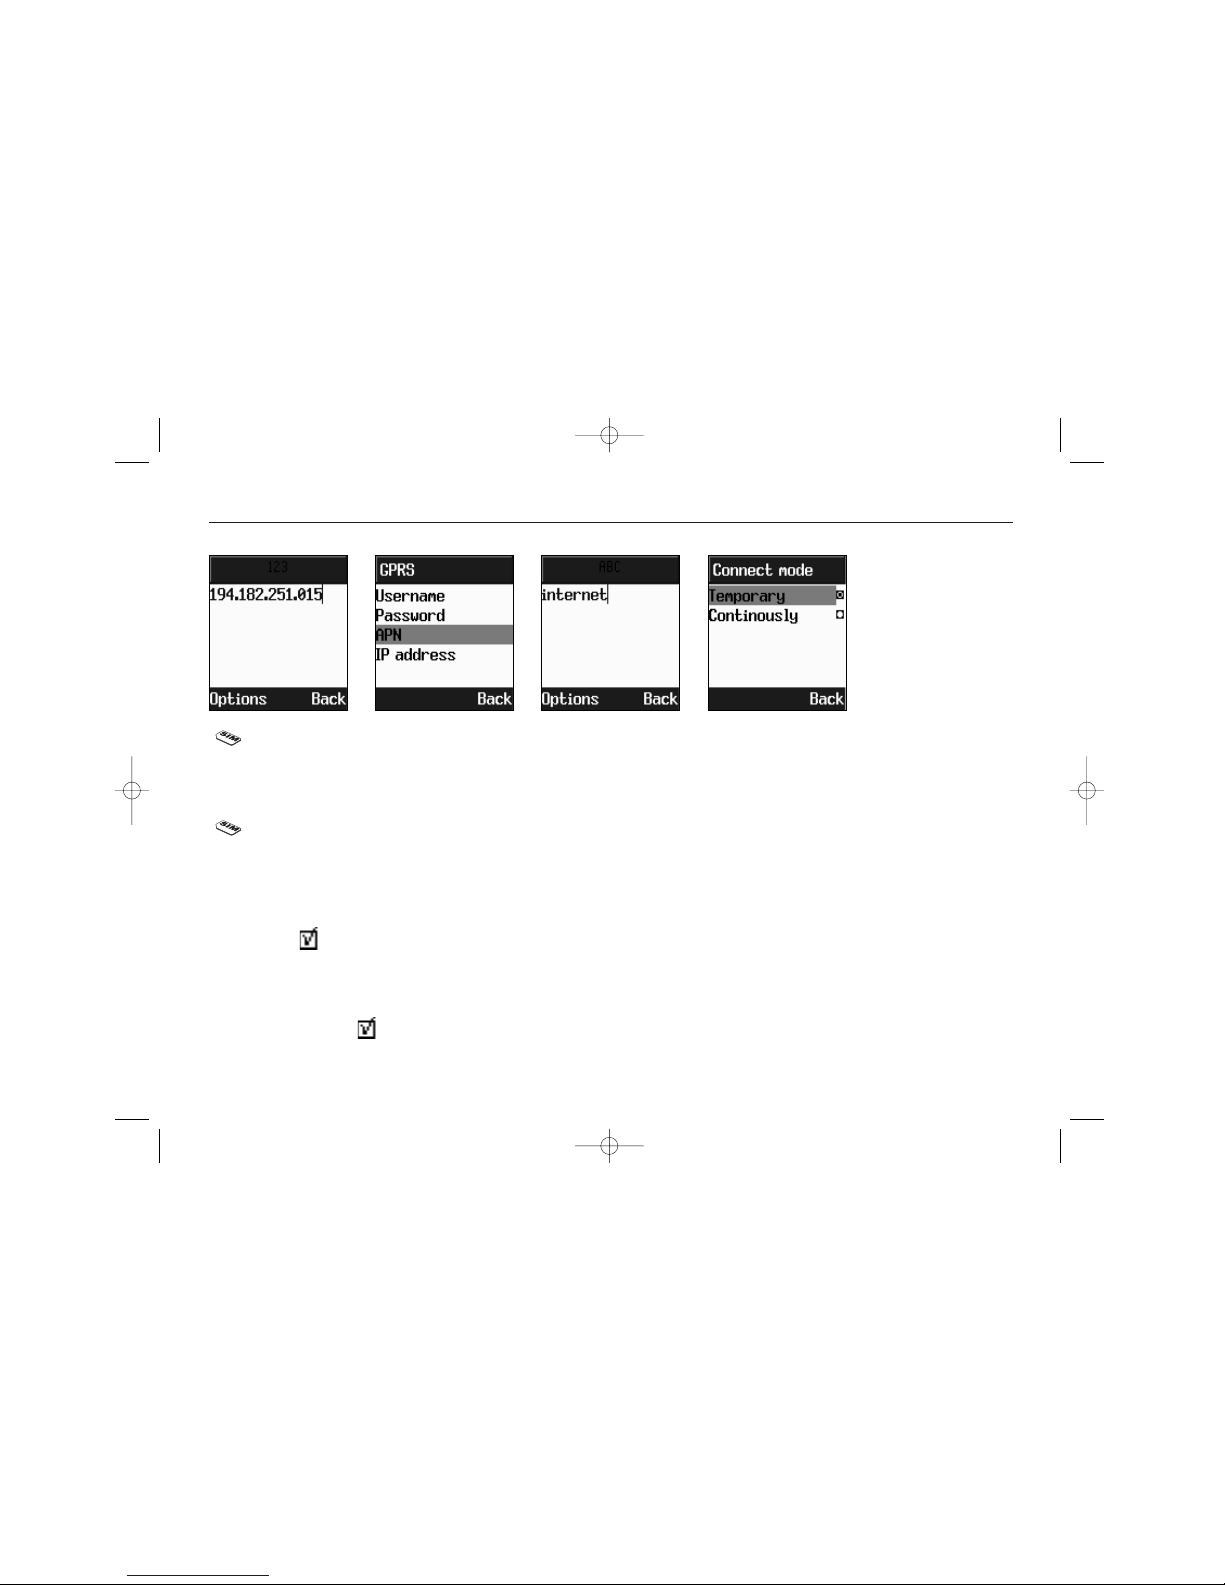
Rename. Select a name for the gateway, if not already done.
Repeat the setup procedure for the
remaining four gateways to create alternative “Homes”.
Empty cache. To provide quick access
to your favorite web sites, information
is stored in the phones cache memory.
It is recommended that you empty your
cache memory regularly to avoid congestion.
IP Address. The IP Address is a 12
digit code. When typing it, enter 0 for
“blank” spaces.
Connect mode. Determines your
connection. If no specifications are stated by your network, both Temporary
and Continuously are applicable.
Security . Tick this to enable the use
of encrypted transmission which some
URLs may require.
Show graphics . Tick this to include
graphic elements in the display.
02207155_1.2 11/18/02 3:35 PM Side 35
Page 36

WAP - Mobile Internet
36
02207155_1.2 11/18/02 3:35 PM Side 36
Page 37
Phonebook
37
Look up contacts
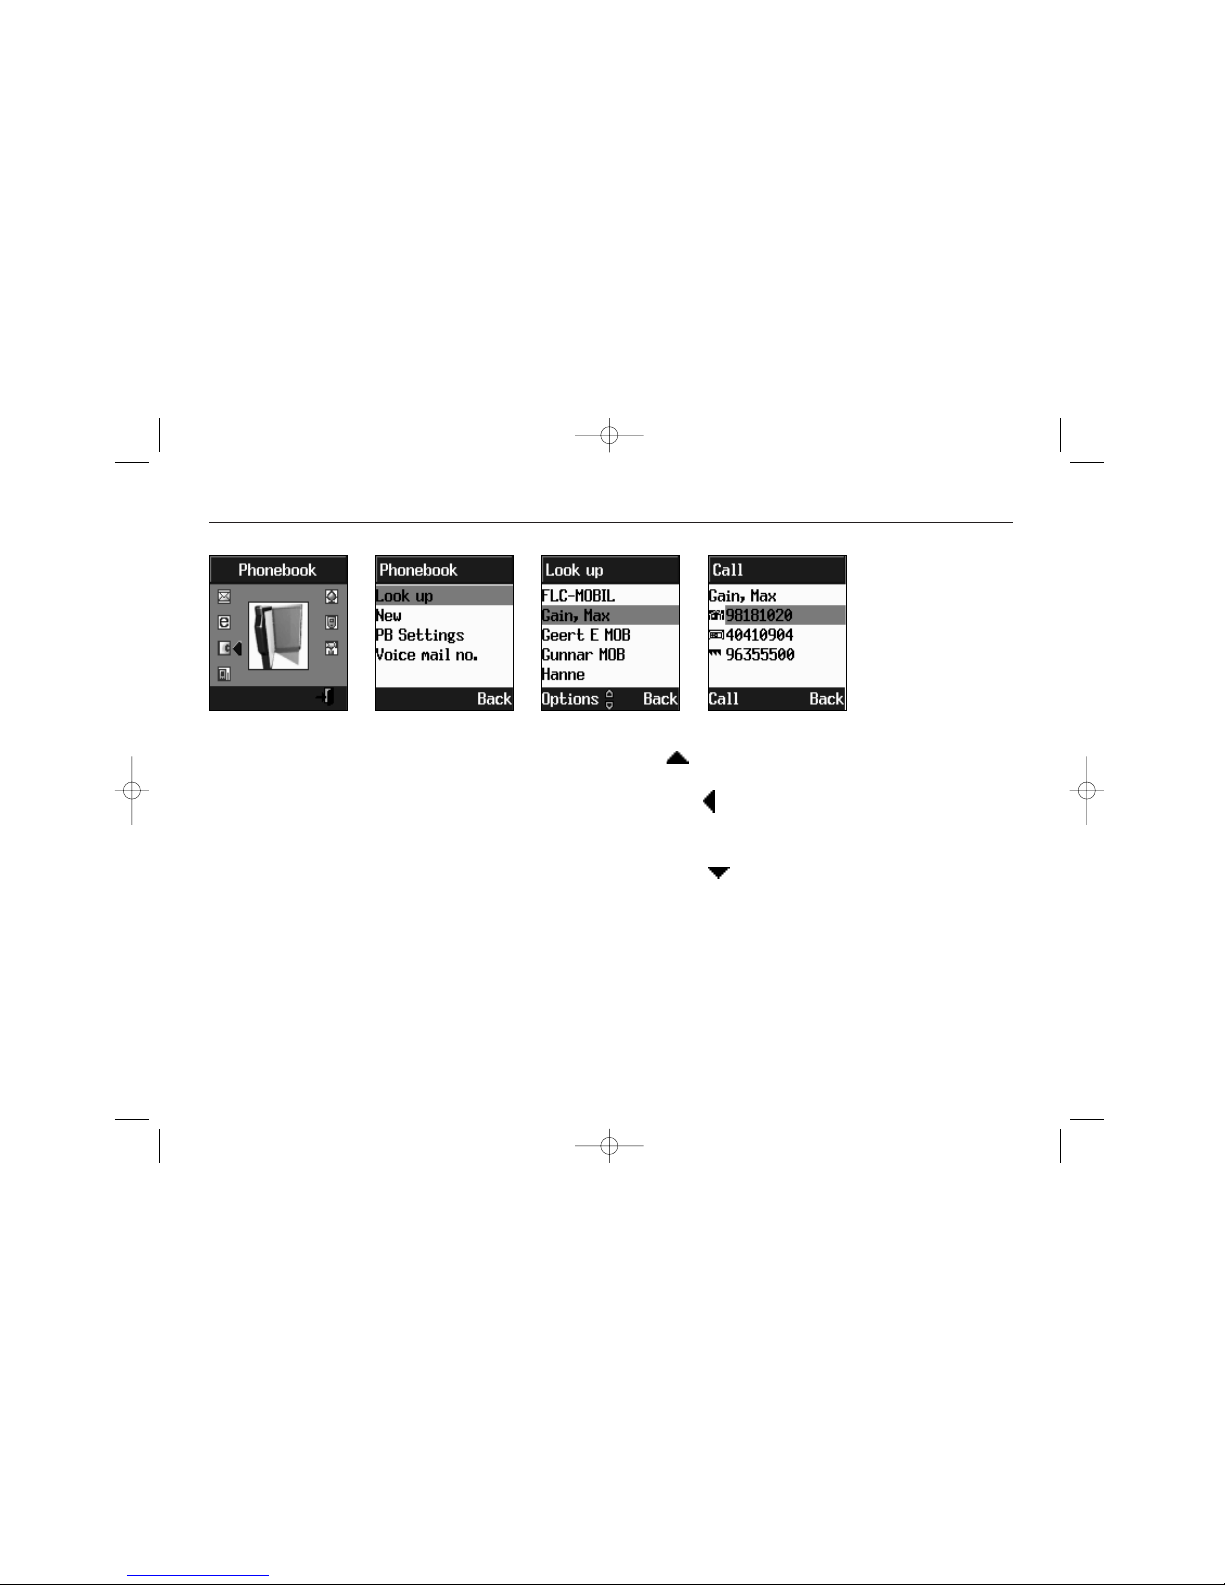
To look up an existing contact, simply
use as a shortcut, or:
>Press to enter the Phonebook
menu.
> Scroll to Look up and press OK.
< contacts are listed by surname.
> Scroll to find the desired contact and
press OK
< the window will display contact
name and telephone numbers available
> Scroll to find the number. Press Call
Your can use either the SIM card or the
built-in Contacts database as your
Phonebook. The database can store up
to 250 contacts, with three phone numbers per contact along with the contact’s complete postal address and
email address. Number of contacts on
the SIM card depends on your network
Active Phonebook is chosen on left softkey during Look Up. SIM card is default.
You can copy names and phone numbers
from/to a SIM card but not address
information (Optional)
02207155_1.2 11/18/02 3:35 PM Side 37
Page 38
Phonebook
38
Add new contacts
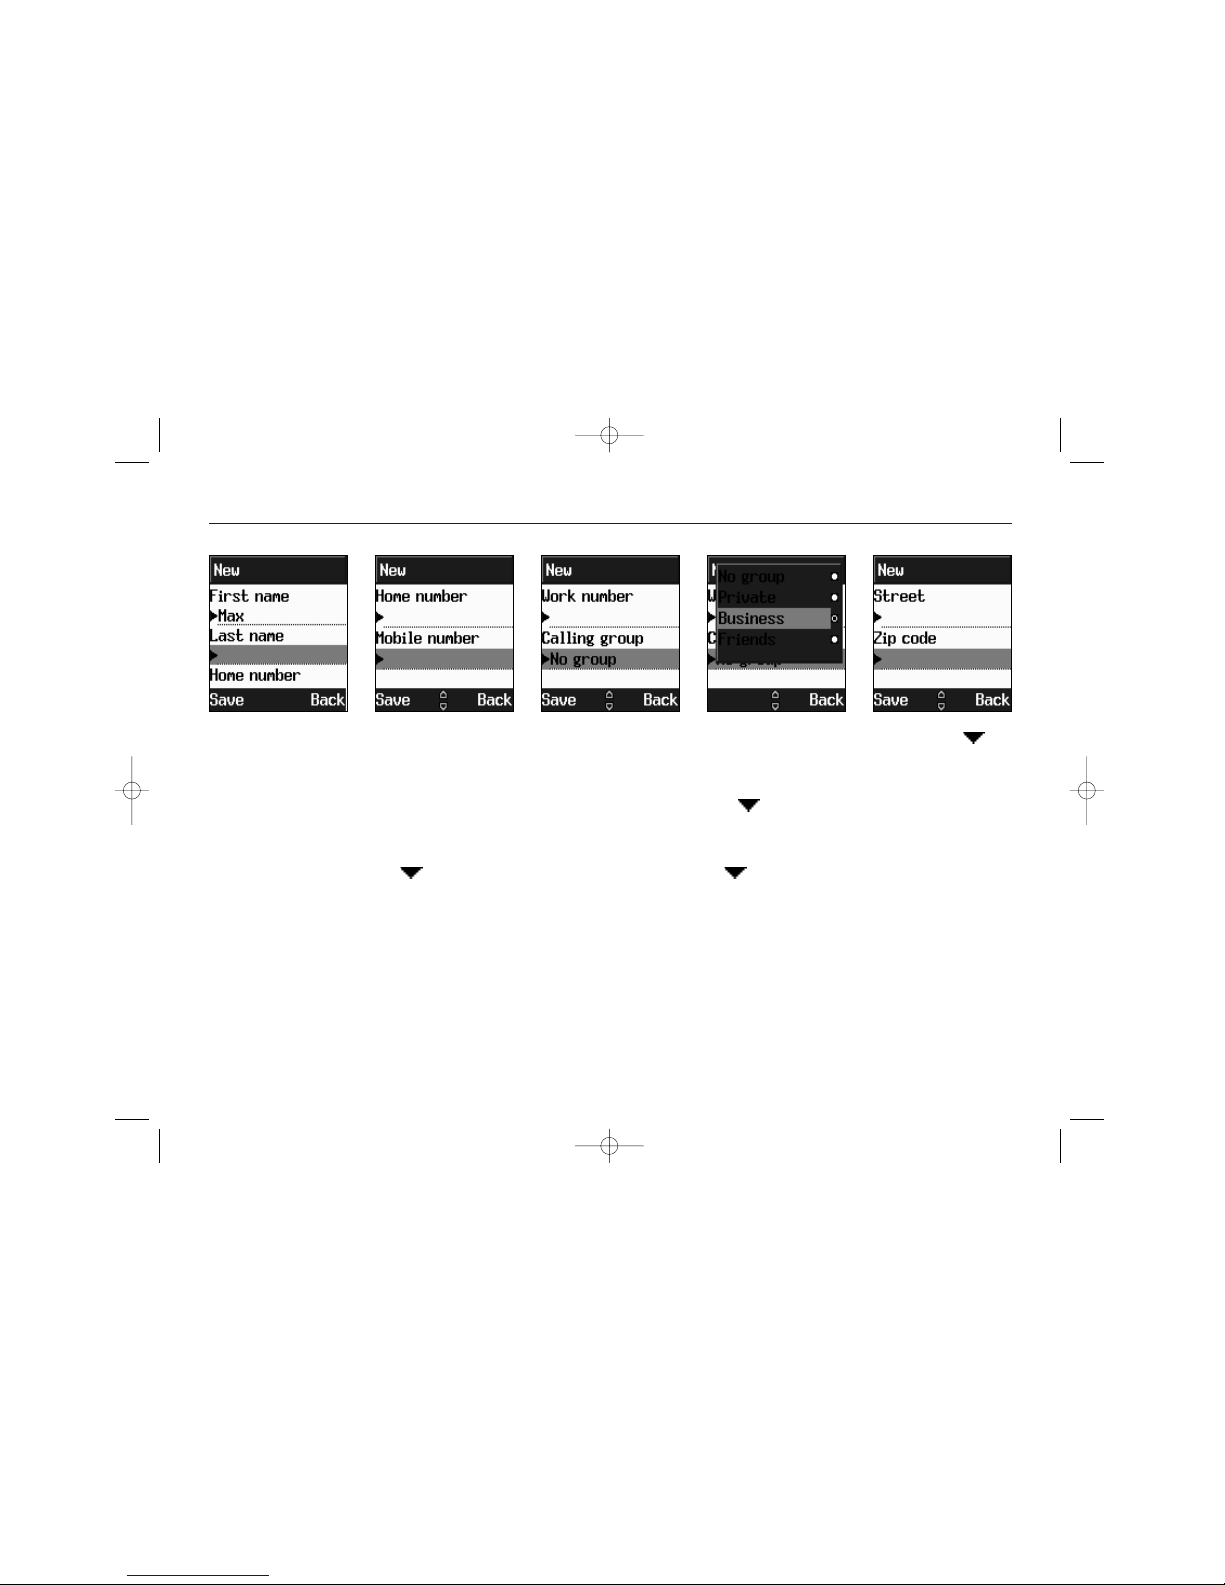
To add a contact to the SIM phonebook:
> Scroll to New. Press OK
< a text editor appears
> Enter the first and last name of the
new contact. Scroll
> Enter telephone number. Save
NOTE: IF YOU HAVE CHOSEN INT AS YOUR
PHONEBOOK, UP TO THREE NUMBERS CAN BE
ENTERED ALONG WITH ADDRESS INFORMATION
FOR EACH CONTACT.
> Enter addotional numbers. Scroll
> Specify caller group for the new con-
tact. Scroll
> Enter address, postal code and coun-
try. Scroll
> Enter email address. (You will find @
in the left softkey menu)
When you have entered the information
you wish (name and one phone number
minimum), press the Save softkey. The
phone returns to Phonebook menu
02207155_1.2 11/18/02 3:35 PM Side 38
Page 39
Phonebook
39
Settings, shortcut dial
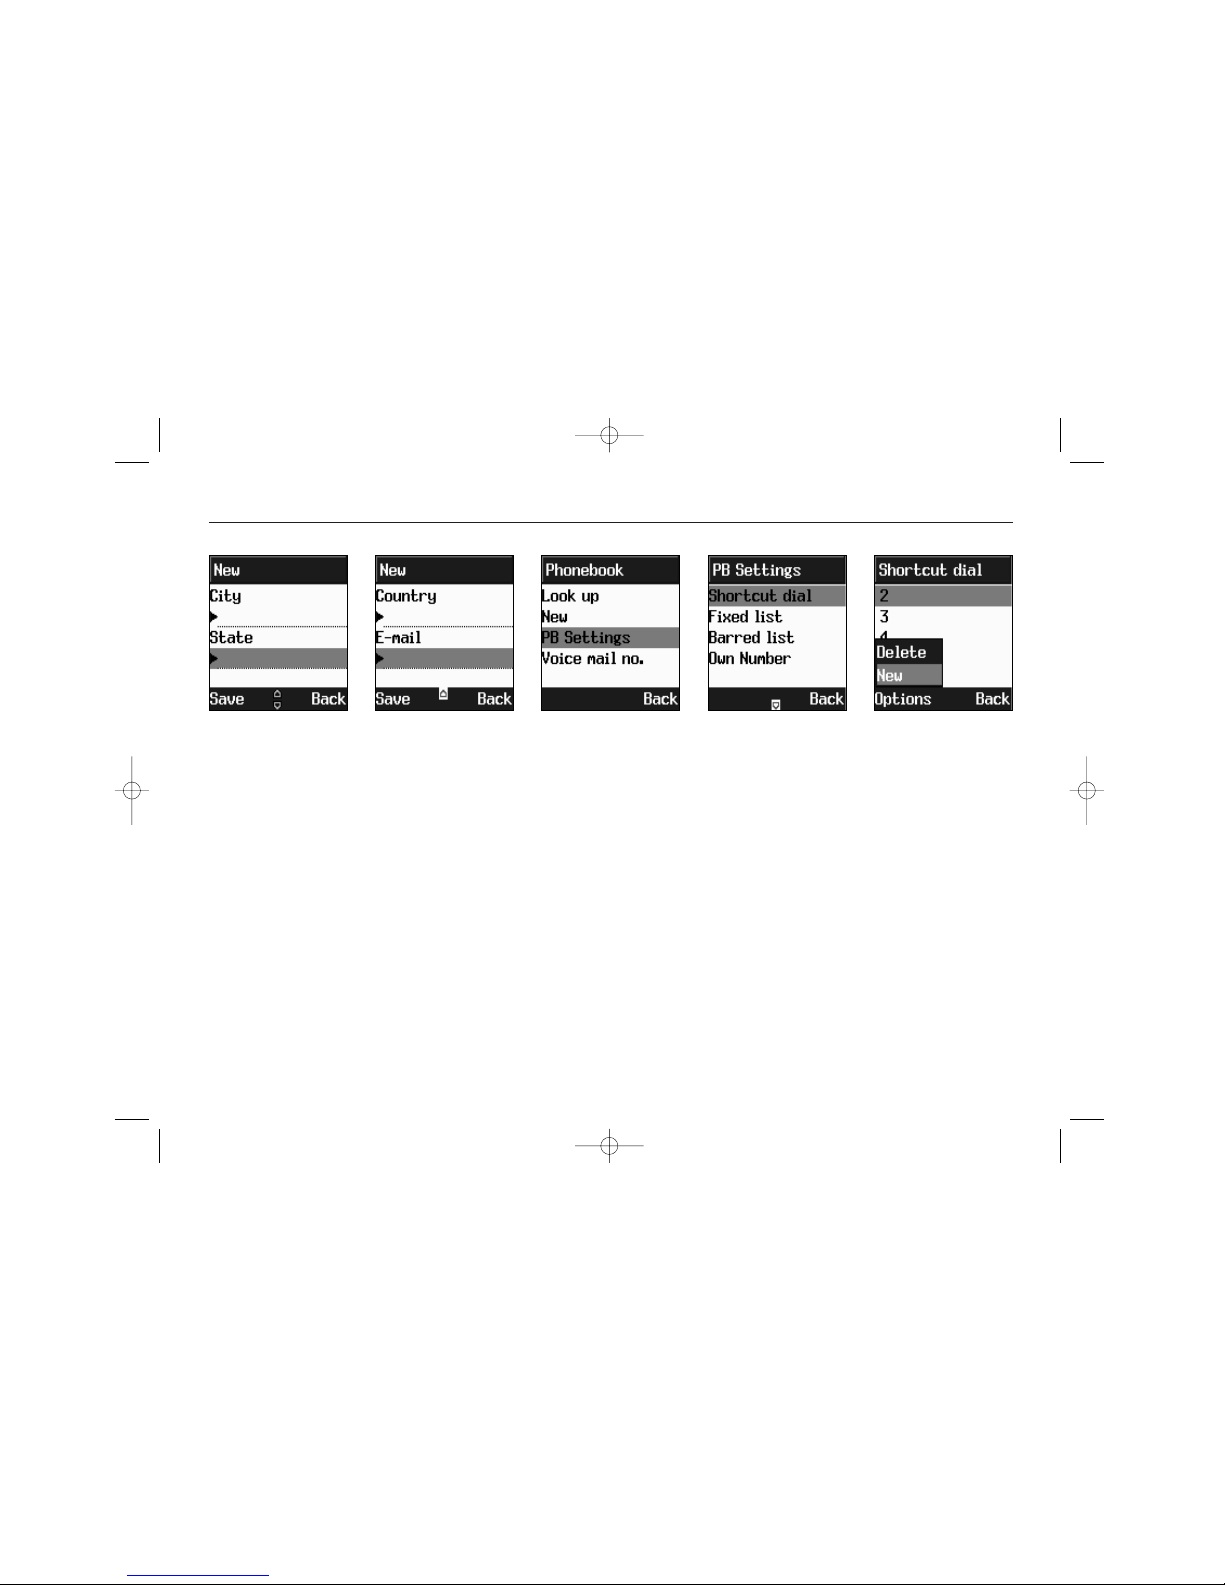
To alter settings in the Phonebook:
> Enter Phonebook menu. Scroll to PB
Settings and press OK. Choose among:
Shortcut dial. Make calls using only one
or two keys. Define a key combination
(2-21) for your most accessed contacts.
To include or remove a contact in the
shortcut dial list, select a position and:
> Select New or Delete in the Options
softkey menu.
> Choose the appropriate contact from
Contact name and numbers(s) will be
stored in the memory
Synchronizing (Optional). The
Phonebook can be synchronized with MS
Outlook on your PC. See p. 47 for
details
Copy (Optional). If a different SIM card
is inserted in the phone, you will have
the option to copy data from this. You
may also copy data to SIM cards, thus
you can share contact information with
friends and colleagues. Copy features
are found in the PB Settings submenu
02207155_1.2 11/18/02 3:35 PM Side 39
Page 40
Phonebook
40
Fixed list, barred list, own number, export
the phone book. Press OK.
< any previous contact on the select-
ed position will be overwritten.
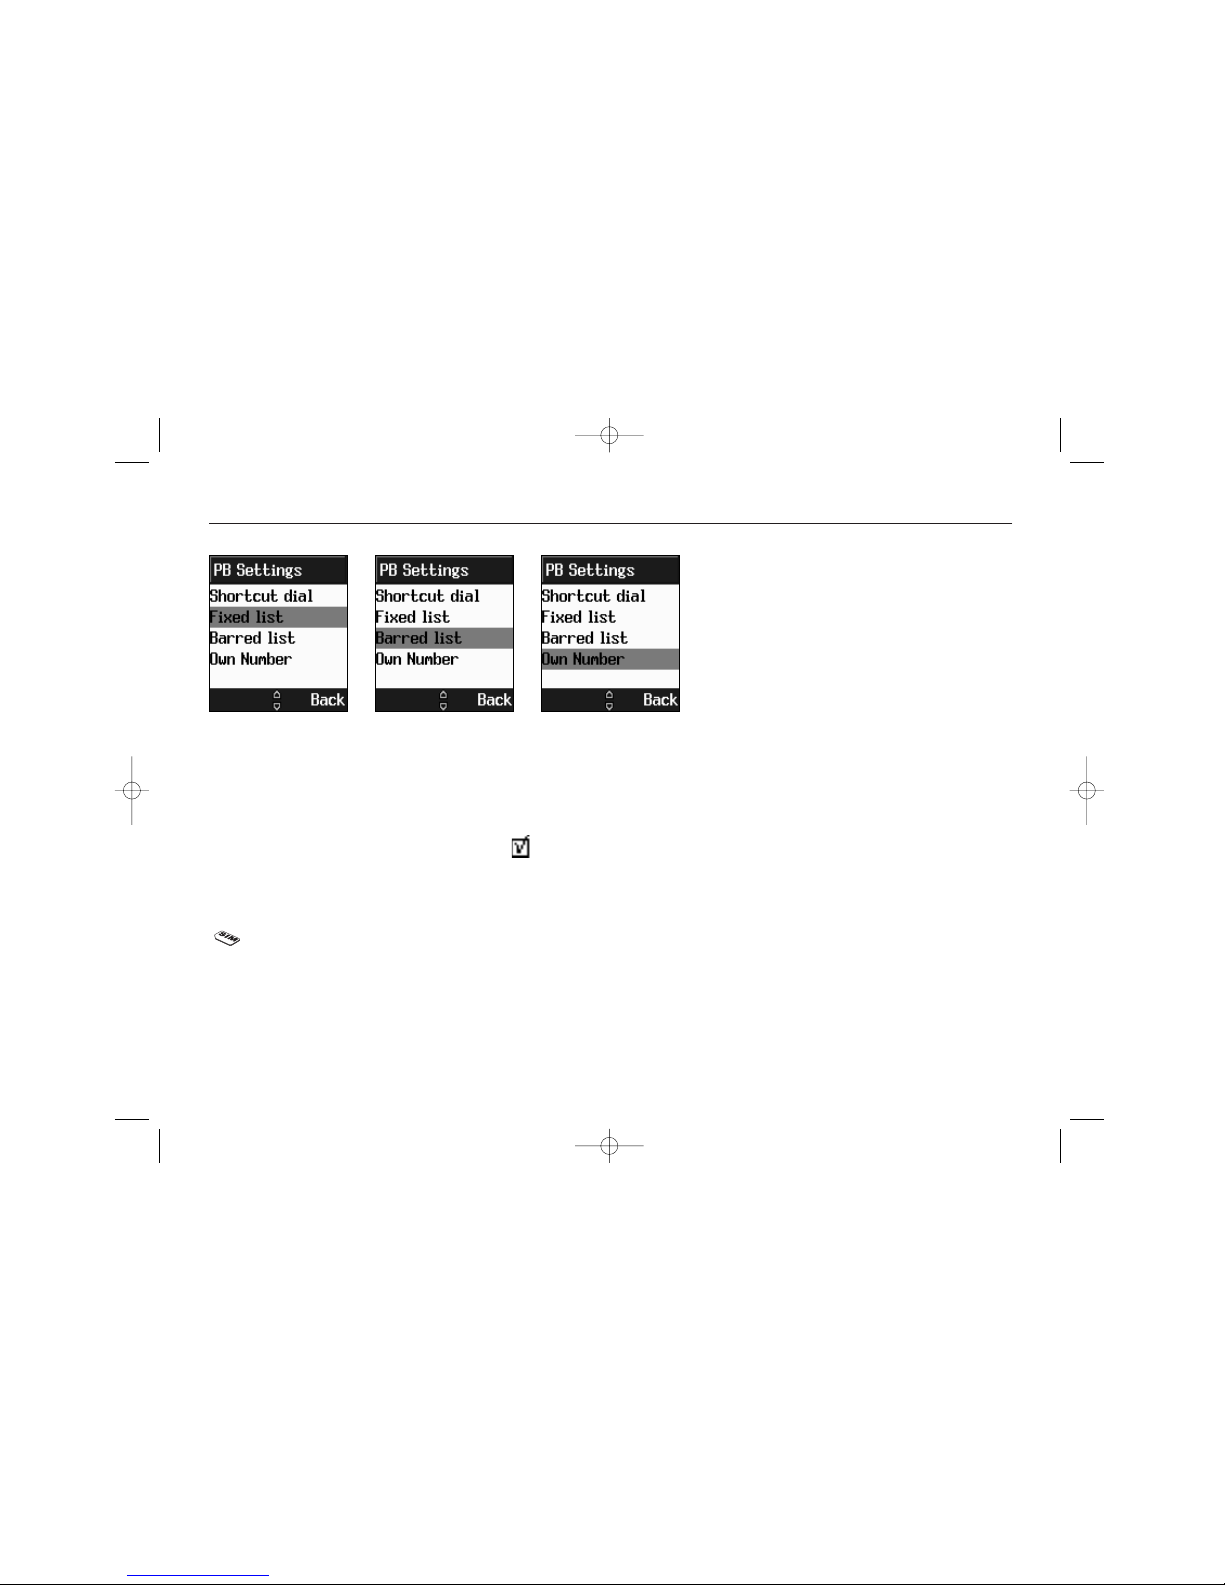
Fixed list. Use this to create a list of
allowed numbers. When Active is
ticked, the user can only access the listed numbers. Requires PIN 2 (see p. 9).
Barred list. Use this to create a list
of barred numbers (if supported by network). If activated, the user can not
access barred numbers. Requires PIN 2.
Own number. Store your own number
for future reference. Some SIM cards
will install your phone number automatically. If yours is not, simply enter it in
the editor and press OK.
Copy (Optional). Copy names and phone
numbers to and from the SIM card. You
can copy single contacts or all the contents. Selection is done via left softkey.
Be aware that contacts will be copied
from Contacts one time for each phone
number recorded. Thus, if a contact has
3 numbers attached, he will occupy 3
slots on the SIM card.
02207155_1.2 11/18/02 3:35 PM Side 40
Page 41
Phonebook
41
Import, memory status, voice dialing
Voice dialing (Optional) will enable you
to access selected contacts from your
phone book by speaking the contacts
name into the microphone.
To setup, enter Voice dialling in the
Phonebook menu and:
>Tick Enable , to activate.
> Enter Name list to select contacts for
voice dial. Left softkey controls the
options New, Edit, Delete, Play and
Voice change.
When copying from SIM, you will not be
alerted if the contact is already in
Contacts and the entry will not be overwritten. We recommend that you check
for double-entries and delete the surplus entries.
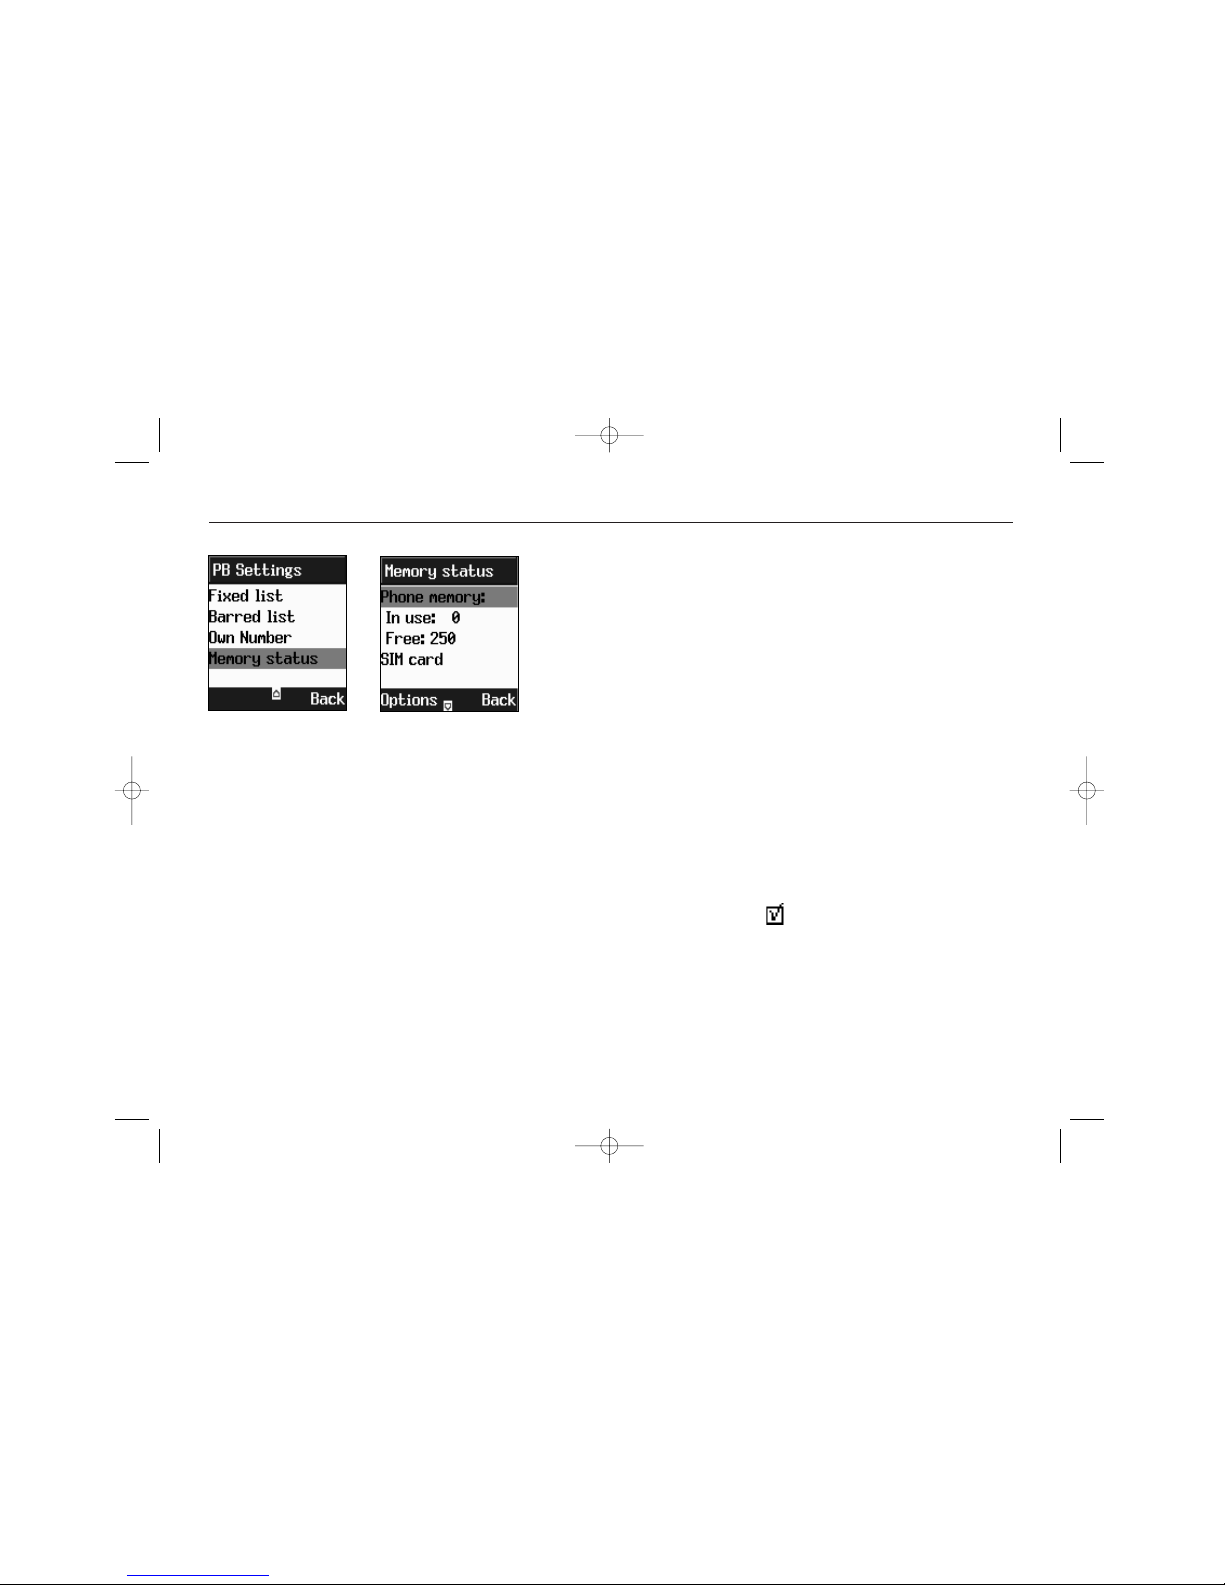
Memory status. Displays the used and
free memory available in the respective
phonebooks. Reset Phone memory or
SIM memory on left softkey. Be advised
that this will erase all entries in the
Phonebook that is reset.
02207155_1.2 11/18/02 3:35 PM Side 41
Page 42

Phonebook
42
Voice dial set-up, Service numbers
> Select New to open the phone book.
Add or delete names from the phone
book. When a new number is selected,
you will be prompted to speak the number for the phone to memorize. Be sure
to do this in a quiet environment. A
maximum of 20 numbers can be stored
in the voice dial memory.
Service numbers. This is a network
service and the menu will only appear if
your network operator supports this
service. The menu may contain various
services, depending on the network.
02207155_1.2 11/18/02 3:35 PM Side 42
Page 43
Organizer
43
Calendar
Synchronize (Optional)
- to copy data to / from your PC
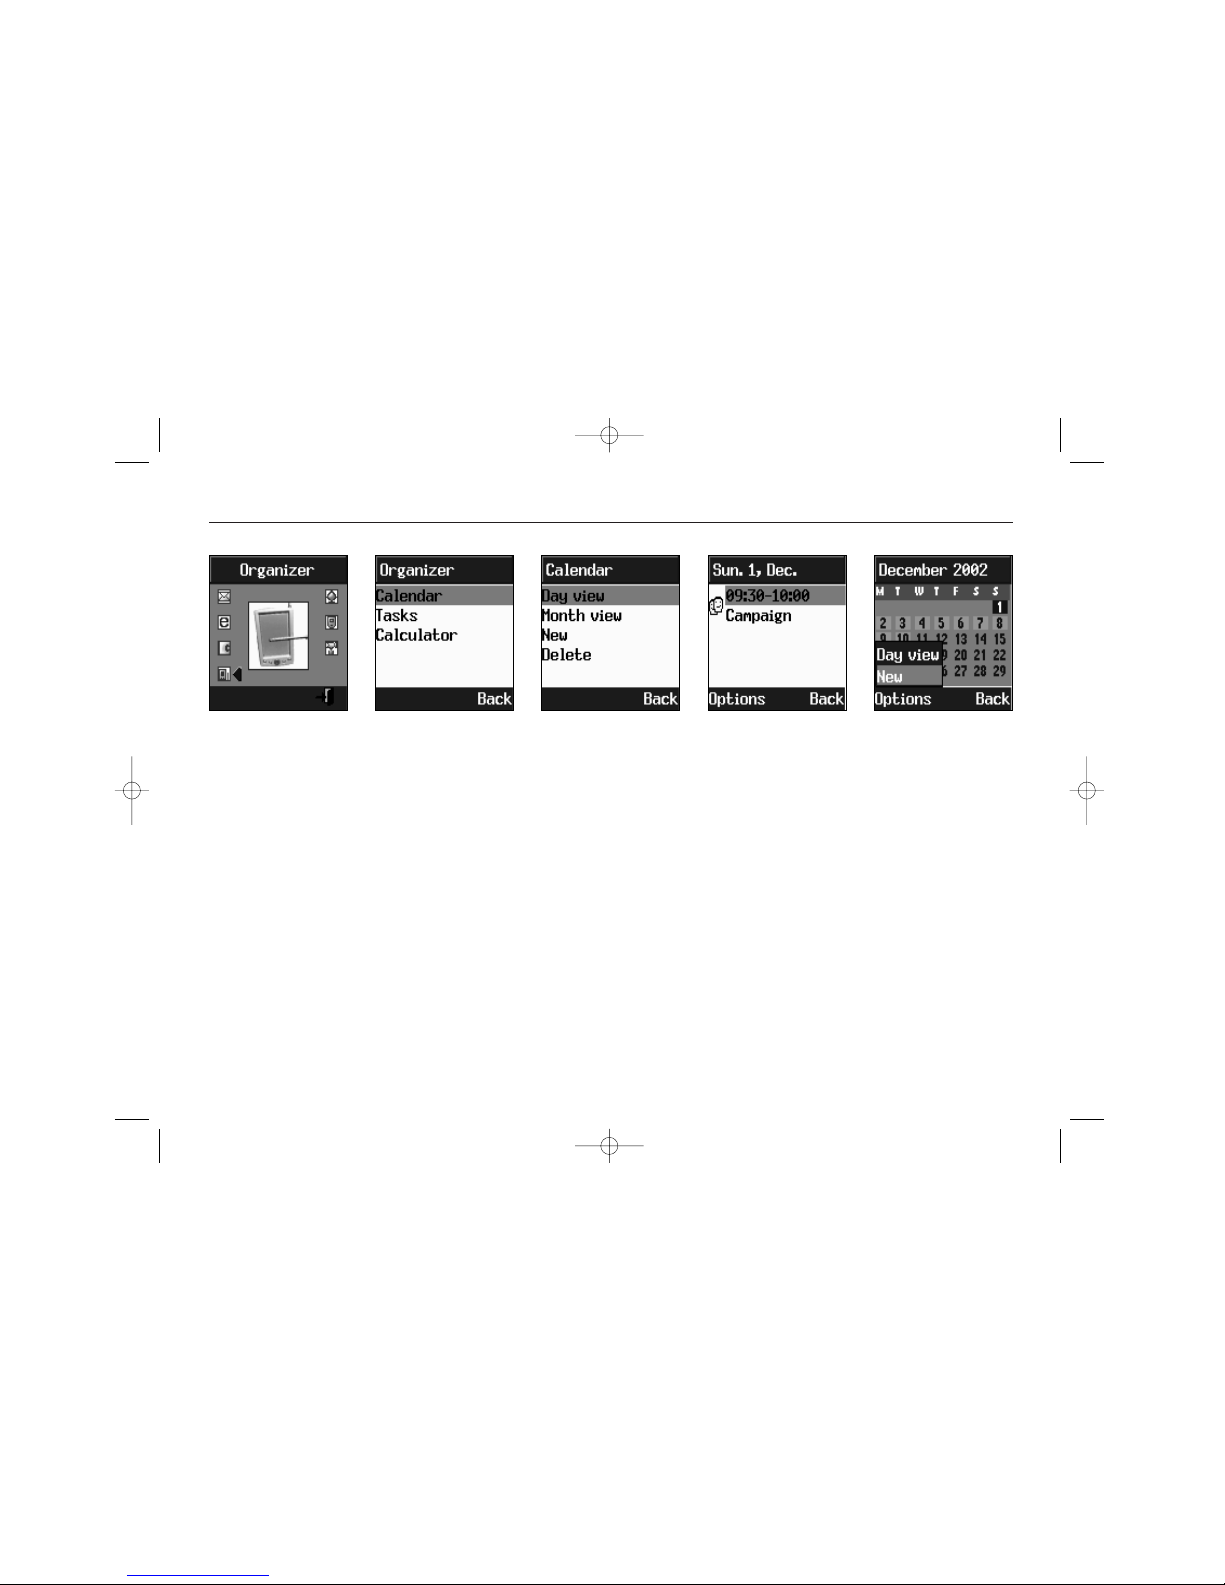
> Scroll to Calendar. Press OK.
In Day view, you can check your
appointments for the day. You can scroll
through the entries and use OK to view
an appointment. Delete or add an
appointment on left softkey, or go to
Month view.
Month view will give you the full picture. Dates with appointments are
underlined. You can toggle through the
The Organizer is a practical tool that
will help you to keep track of your
appointments and alert you of meetings, celebrations, events etc.
> Step to Organizer. Press OK. Select:
Calendar
- to make and view appointments
Tasklist
- to take down tasks to remember
Alarm
- to set up an alarm call
Calculator
- to make simple calculations
02207155_1.2 11/18/02 3:35 PM Side 43
Page 44
Organizer
44
Enter new appointment
days of a month with the arrow keys
and select a date with the OK key to
enter day view on that particular date
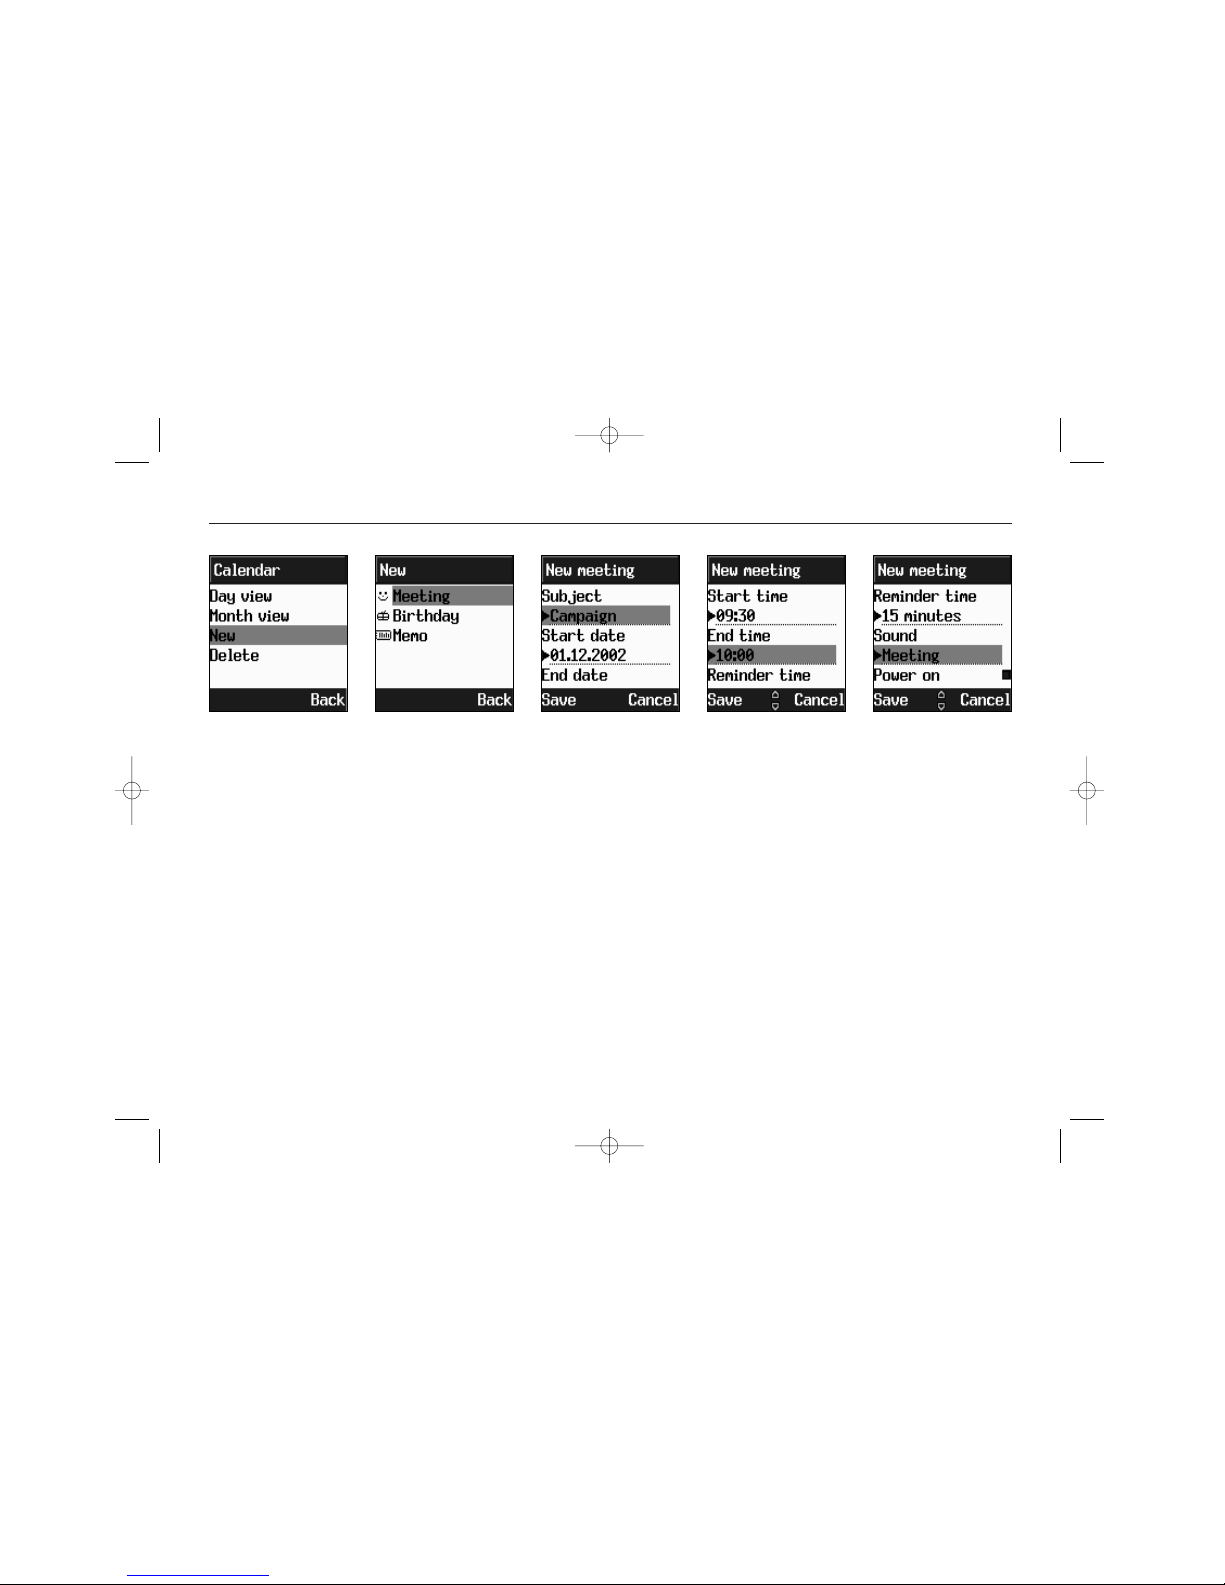
In New you can enter a new appointment. You will be prompted to define it
as a Meeting, a Birthday, or a Memo.
Select one and enter the relevant information in the text editor. Use the arrow
keys to scroll through the entry fields:
Subject
- what is the event about
Start and End date, Start and End time
- set up parameters for the event
Reminder
- get an audio reminder of the event
Sound.
- select the sound you wish to apply.
Press Save to return to Calendar menu
or Cancel to leave the text editor.
Delete. Clear up your calendar by
deleting all entries or select those who
are a week or a month old.
Synchronizing (Optional). The Calendar
can be synchronized with MS Outlook on
your PC. See p. 47 for details
02207155_1.2 11/18/02 3:35 PM Side 44
Page 45
Organizer
45
Tasks list
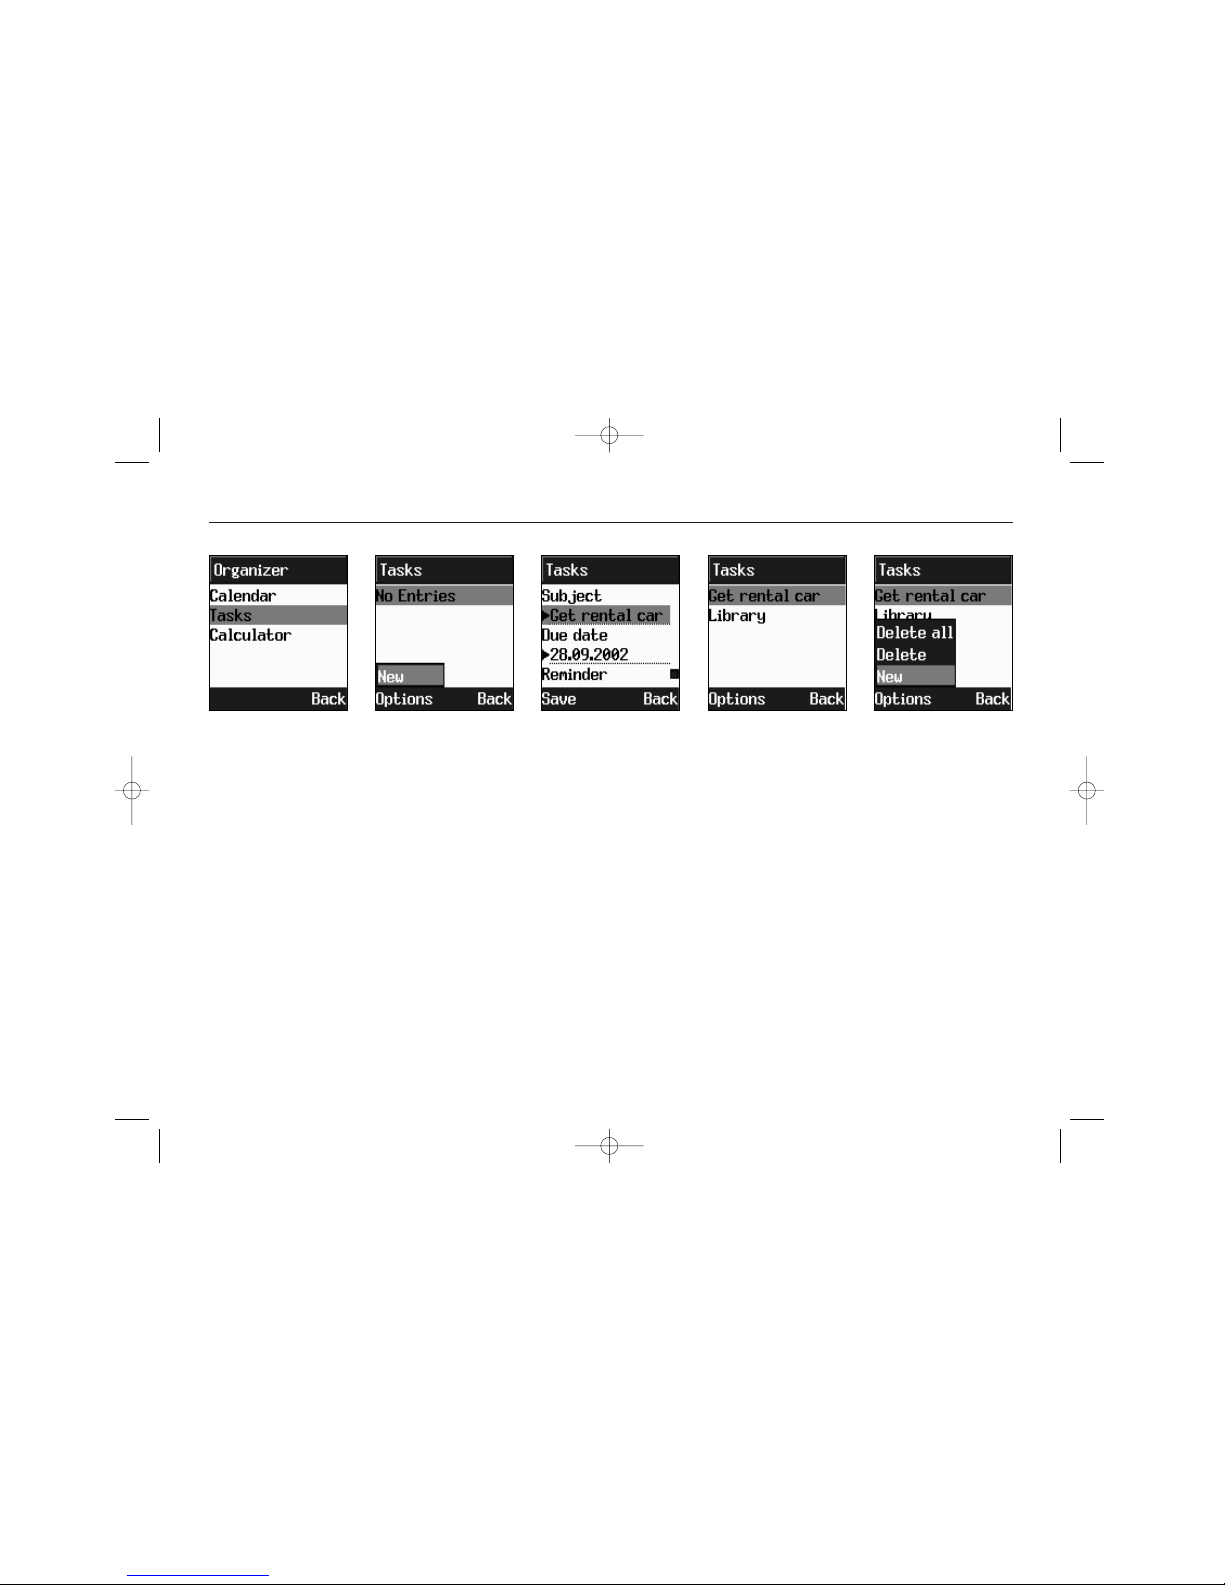
You can enter up to 10 different tasks,
each with a maximum of 24 characters,
and set the alarm to remind you
Synchronizing (Optional). The Tasks list
can be synchronized with MS Outlook on
your PC. See p. 47 for details
Alarm. To set a wake-up call, enter
Alarm and:
> Enter Time to set the desired wakeup time
>Tick Enable to activate the alarm
The Tasks list is an notepad that will
help you to remember things to do.
> Step to the Organizer menu. Press OK.
Scroll to Tasks submenu Press OK.
If no tasks are entered in the list, the
screen will display “No entries”.
> Select New on left softkey
< an editor opens
If one or more task are entered, you
can choose Edit, View list or Delete
entries from the list
02207155_1.2 11/18/02 3:35 PM Side 45
Page 46
Organizer
46
Calculator
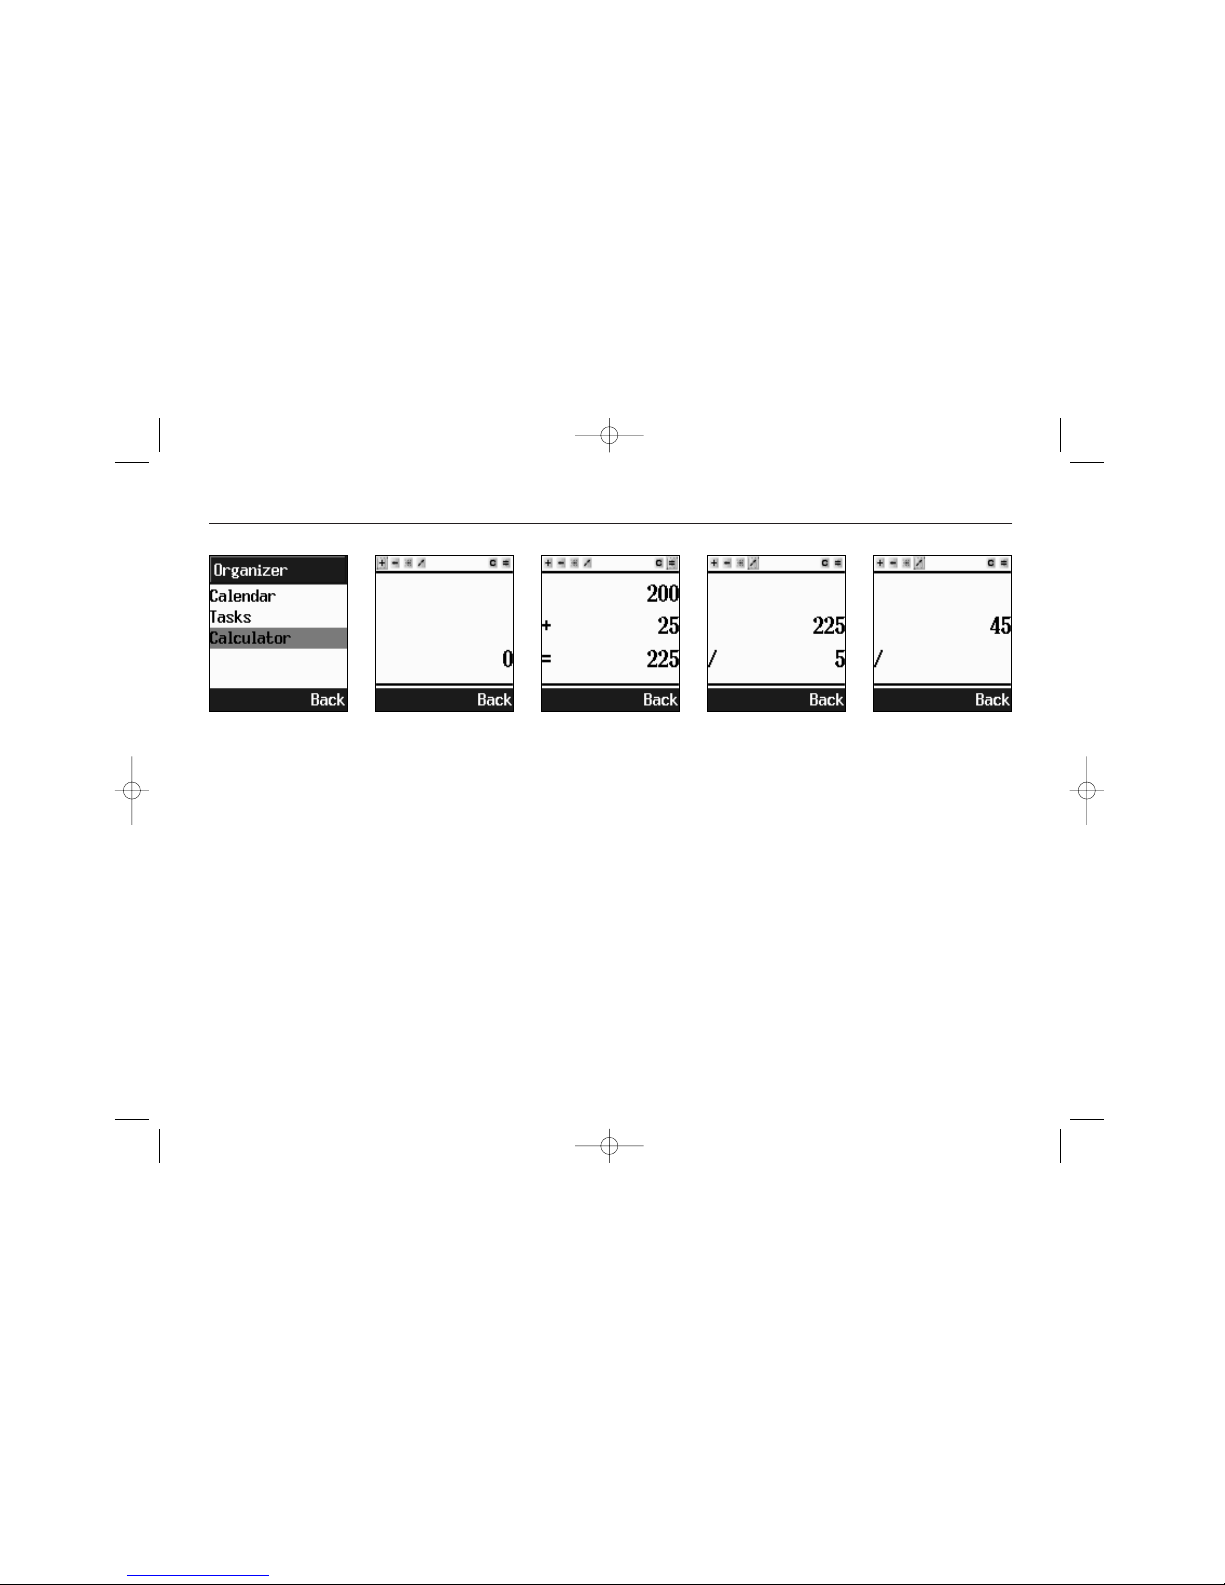
To use the calculator, enter the
Organizer menu and select Calculator
submenu. Press OK.
> Enter the first figure and select mode
(+ - * or /. Press OK. Enter the second
figure, select = and press OK. The result
is displayed on the bottom line.
Example:
> Enter 200. Select + . Press OK. Enter
25. Select =. Press OK. The display
shows: 225
If you want to continue the calculation
after the addition in the example, do
not select =, but press OK while in +
mode to reach 225 as an intermediate
result. If you want e.g. to divide the
above result by 5, then use the arrow
keys to sidestep to /. Press OK. Enter 5
and select =. Press OK. The display
shows the final result: 45. Only use =
when you want to finish a calculation.
Use right softkey to clear single digits. A
long key press will clear all and return
the command prompt to Back.
02207155_1.2 11/18/02 3:35 PM Side 46
Page 47

Organizer
47
Set up synchronization
In the Organizer menu, scroll to
Synchronize. Press OK. Scroll to
Settings. Press OK.
> Enter Desktop to set up:
User ID. Select a user name
Password. Select a password
NOTE: USER ID AND PASSWORD MUST BE IDENTI-
CAL IN PHONE AND SYNC_ML SETTINGS.
> Enter Sync. Type to select:
Two-way. Phone and MS Outlook
are synchronized by comparison.
Slow. Information is synchronized
Using Synchronization (Optional)
The PC-sync feature enables you to synchronize the calendar, phonebook and
tasks list in your phone with your
Microsoft Outlook desktop organizer
NOTE: BEFORE YOU ATTEMPT TO SYNCHRONIZE,
YOU WILL HAVE TO INSTALL THE SERIAL CABLE IN
YOUR PC (CONNECT CABLE IN COM 1. TURN
YOUR PC OFF BEFORE CONNECTING) AND INSTALL
THE SYNC_ML SOFTWARE. PLEASE REFER TO THE
INSTRUCTIONS ON THE CD. WE STRONGLY RECOMMEND THAT YOU BACK UP YOUR MS OUTLOOK
FILES BEFORE SYNCHRONIZING.
02207155_1.2 11/18/02 3:35 PM Side 47
Page 48
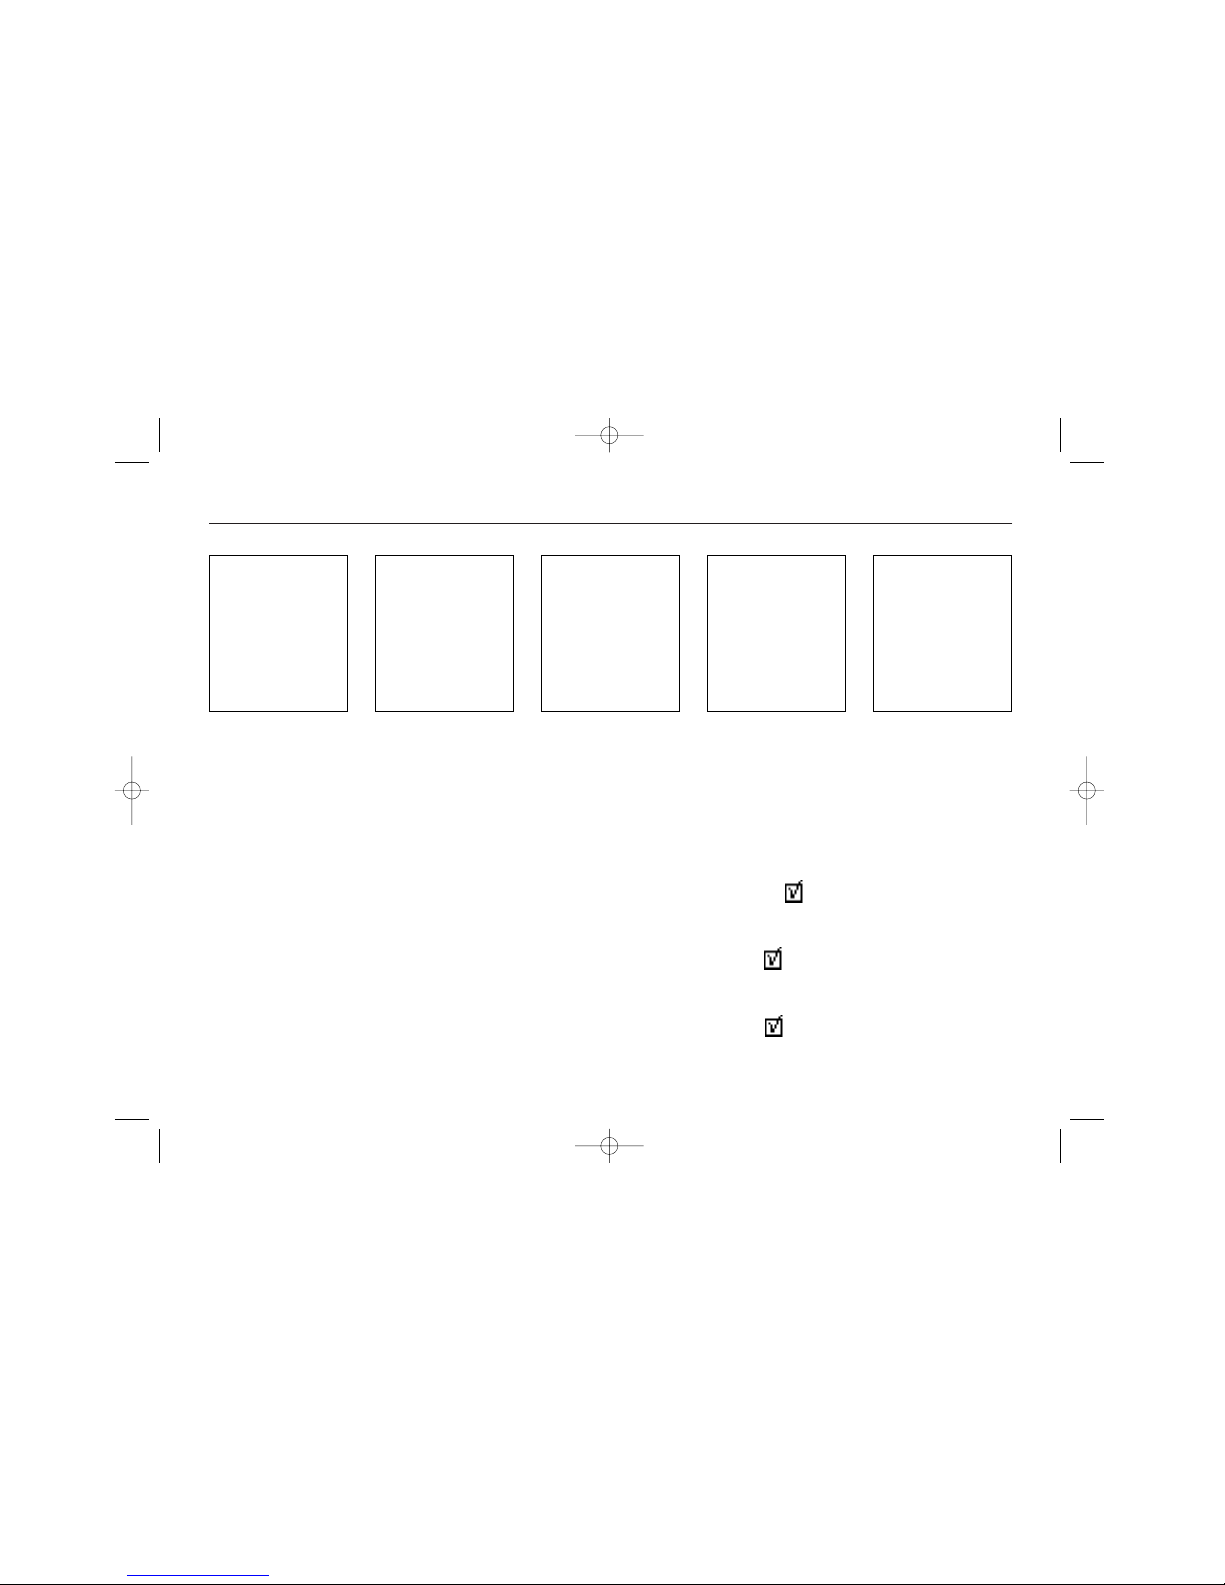
Organizer
48
Set up synchronization
by replacing all data. Double entries
may thus occur.
> Enter Solving to select how mismatches are handled:
Not resolved. To merge client
(phone) and server (Outlook) information
Client win. To have phone information overwrite Outlook
Server win. To have Outlook information overwrite phone
> Enter Authen. Type to select:
Basic. Basic security level.
MD5. Enhanced security level
(check with your systems responsible)
> Select items to be synchronized:
Phonebook To synchronize your
contacts (name, phone numbers and
address information)
Calendar To synchronize up to
100 appointments (recurring events are
not supported)
Tasks list To synchronize jobs to
be done and things to remember
02207155_1.2 11/18/02 3:35 PM Side 48
Page 49

Organizer
49
Set up synchronization
If you get the message “Synchronization
failed”, your phone may not be properly
set up. Scroll to Settings and repeat the
above steps. Pay special attention to
the user ID and password. These must
be the same in the phone and in the PCSync. program.
Please recognize these synchronization limitations:
- The phone will handle a maximum of
100 entries in your Calendar
- Recurring events are not supported in
Calendar or Tasks list
When settings have been completed,
and the software installed on your PC,
you will be able to synchronize the
information in your phone with that of
your MS Outlook. To do so:
> Open MS Outlook on your PC and copy
the contacts to be synchronized to the
PHONE_SYNC folder in Contacts
> Start the Sync_ML program
> Select Start to start synchronization
with your MS Outlook
< a pop-up box displays “Connecting”
02207155_1.2 11/18/02 3:35 PM Side 49
Page 50

Organizer
50
Limitations to synchronization
- Contacts are limited to the 250 entries
in your phone database
- Contacts to be synchronized must be
copied to the PHONE_SYNC folder in
your Outlook. Read the instructions on
the CD for details
02207155_1.2 11/18/02 3:35 PM Side 50
Page 51
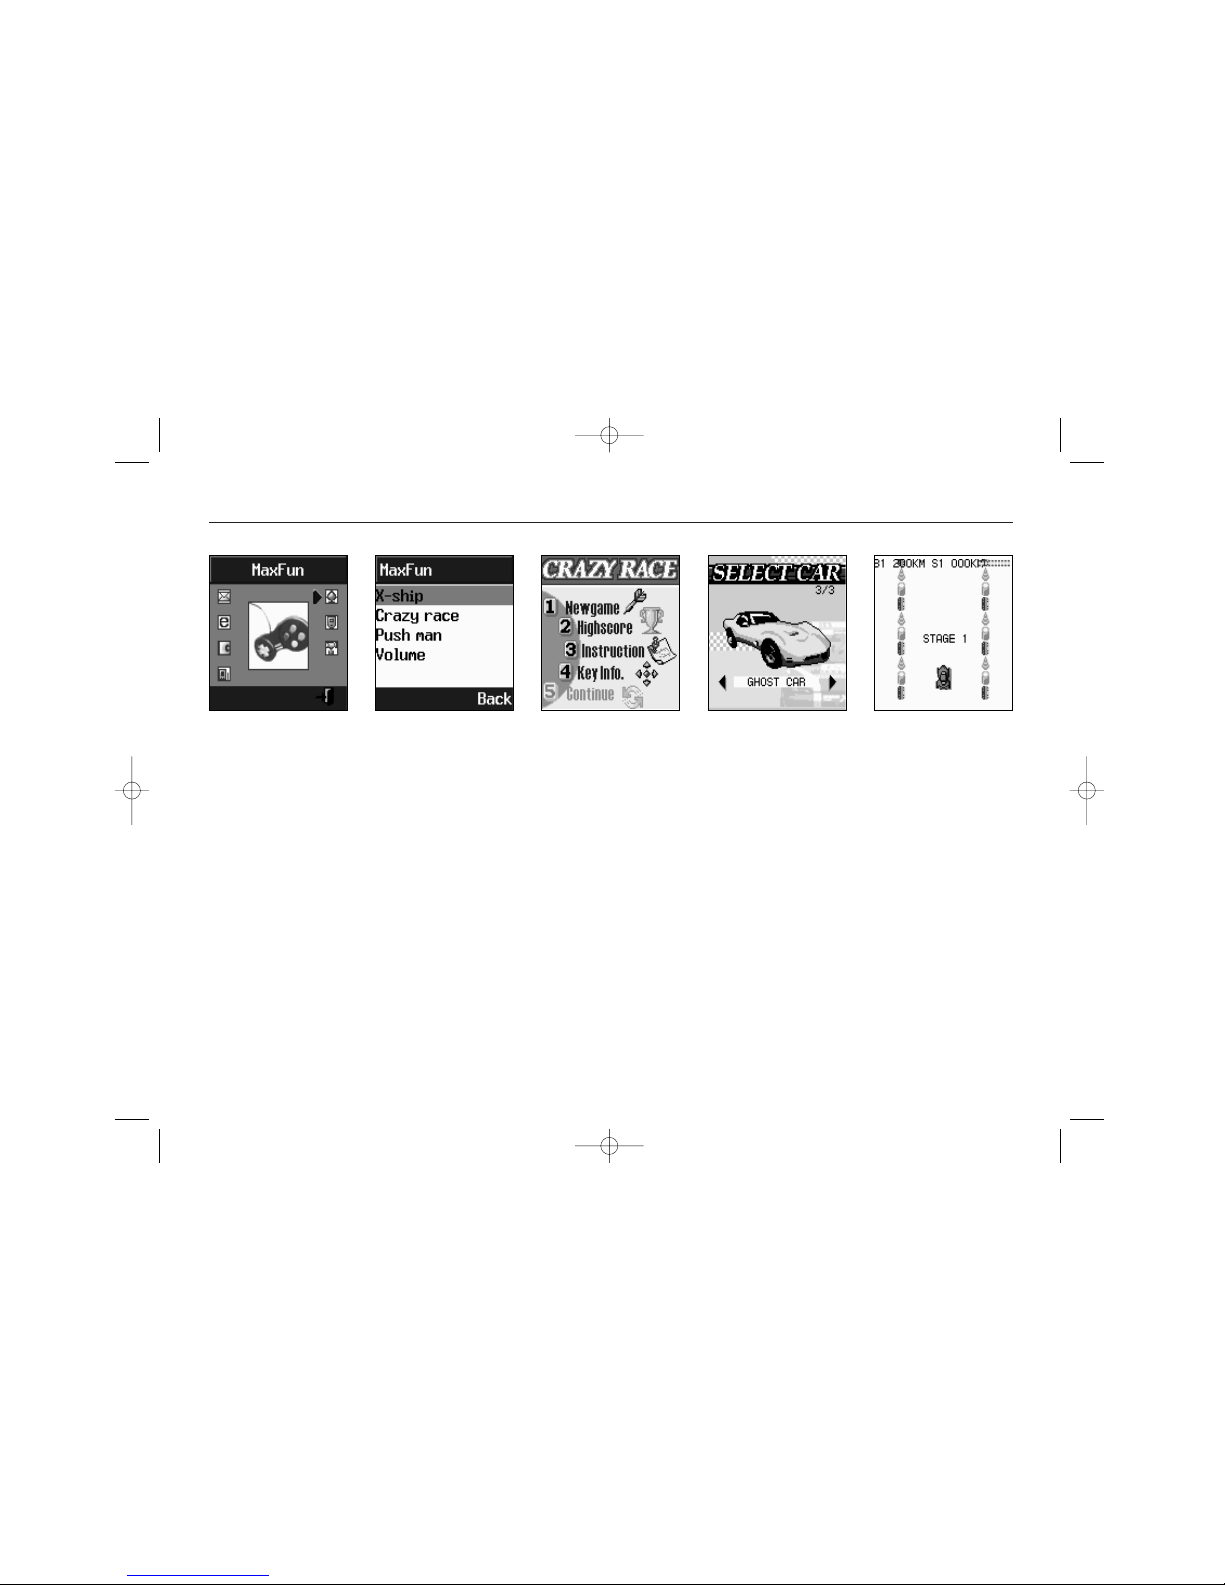
MaxFun
51
Crazy Race
Crazy Race. How many laps will you
complete on the racing track, avoiding
oil slicks, obstacles and aggressive competitors? Choose between three different types of cars, each with its own
advantage and race like your life
depended on it.
To play Crazy Race, increase/decrease
speed with “2” and “8” keys, steer with
“1” to “9” keys.
The MX7930 comprises three amusing
and challenging color action games. All
games feature on-screen instructions on
the “3” key and key info on the “4” key.
Games are started with the “2” key.
Volume control is in the main menu.
In all three games, best performance
will place you on the high-score list.
Thus you can compete with your friends
for the honor and glory and enjoy maximum fun.
Whenever you need a break, step to
MaxFun and Press OK. Select among:
02207155_1.2 11/18/02 3:35 PM Side 51
Page 52
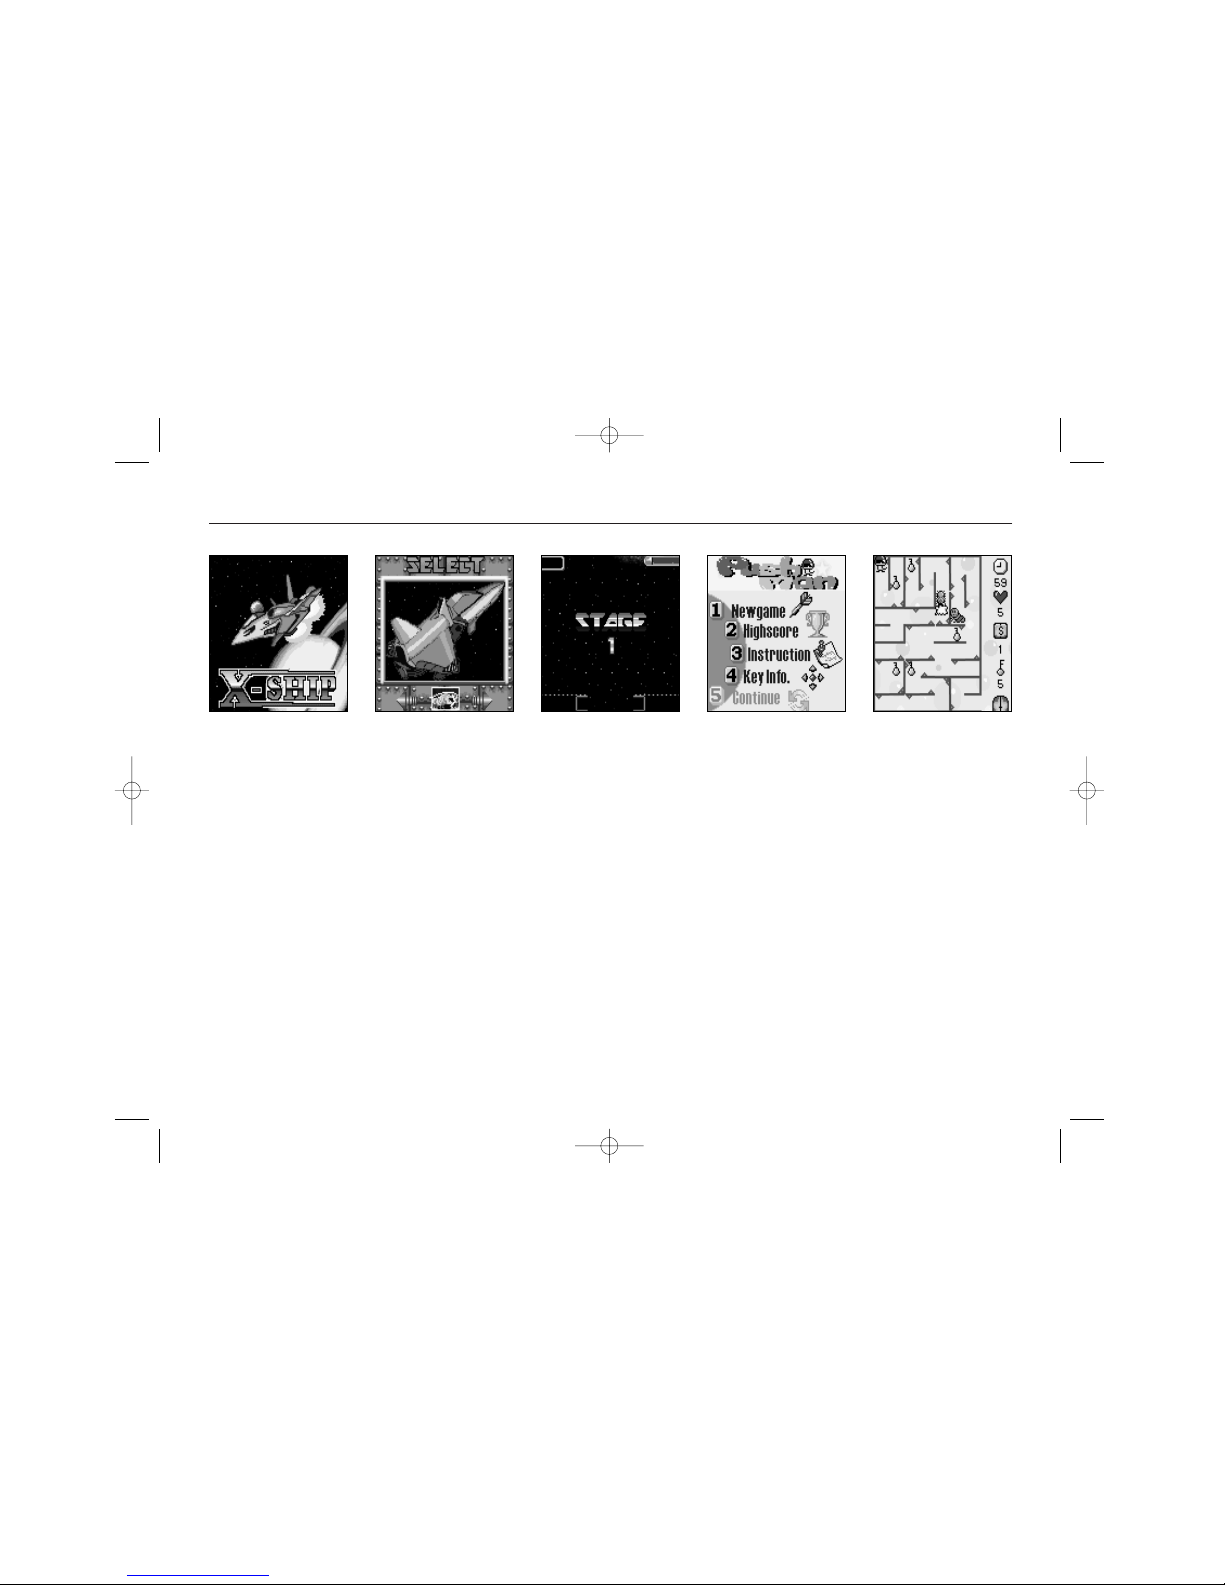
MaxFun
52
X-Ship, PushMan
X-Ship is a classic arcade “shoot’m up”
game. You are in control of a space
fighter and must destroy approaching
enemies with your laser cannon before
they shoot you. If surrounded by enemies, you can blast your way out with a
nuclear explosion.
To play X-Ship, accelerate with “2” key,
slow down with “8” key. Go left and
right with ”4” and “6” keys, shoot with
“0” and release your nuclear device
with the “5” key.
PushMan is a PacMan-style maze game.
Guide your little Buddy through the
maze and avoid the ghost, the fluffy
monsters and the worm. Pick up the
apples to gain points.
To play PushMan, move your player with
“1”, “4”, “5” and “7” keys. Your survival will depend heavily on your reaction time and tactics.
02207155_1.2 11/18/02 3:35 PM Side 52
Page 53
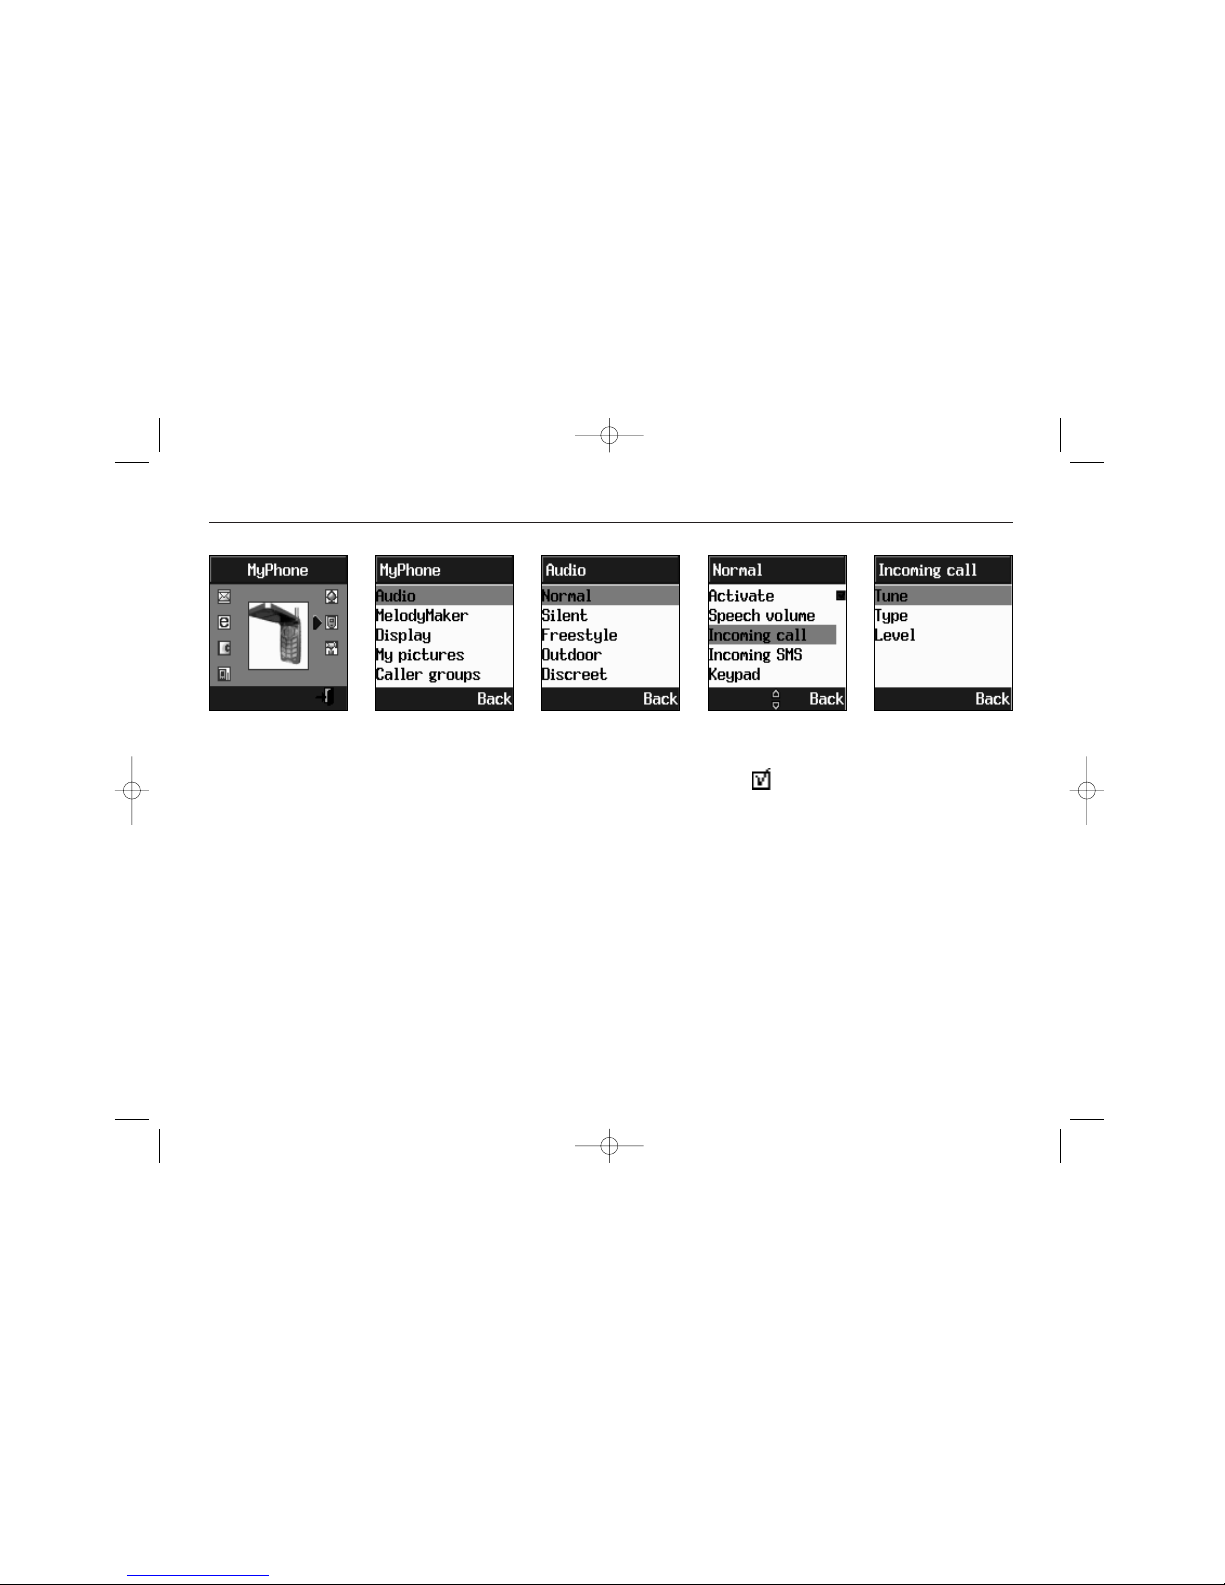
MyPhone
53
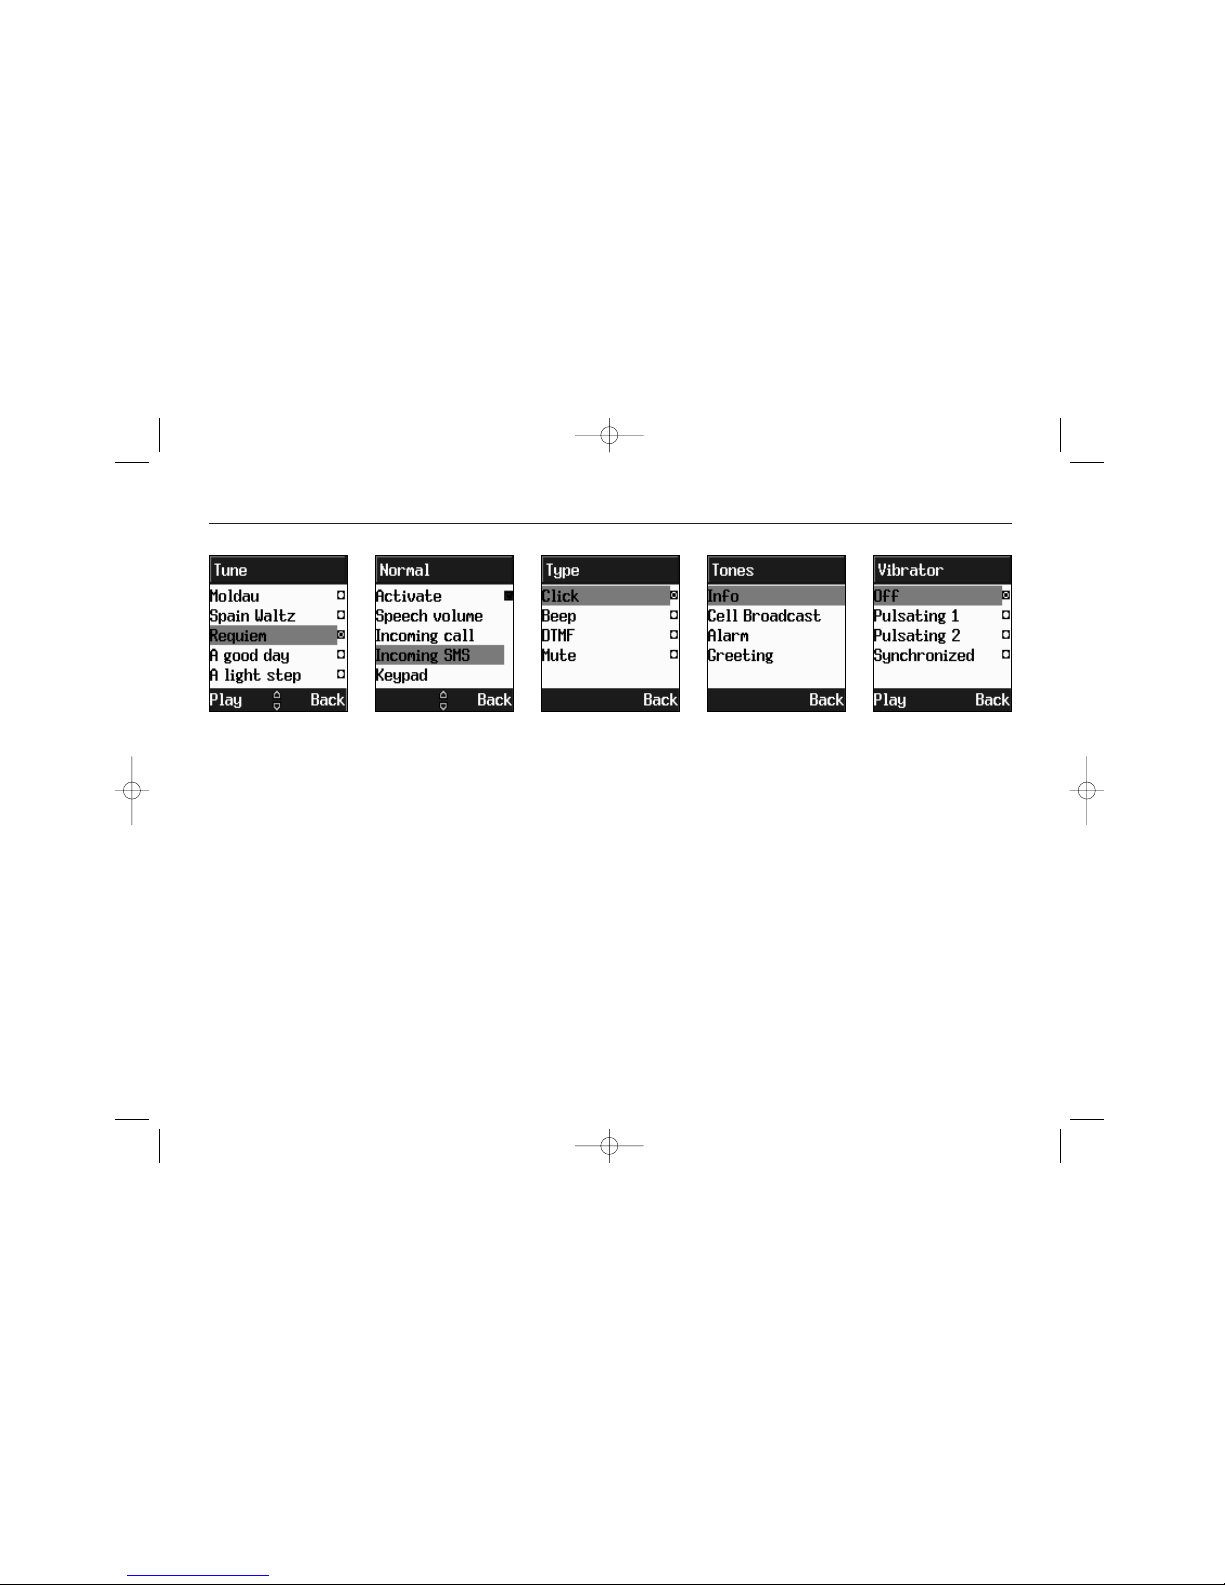
Set speech volume & ring tones
> Scroll to the profile you want to edit
and press OK. Enable the profile by ticking Activate and subsequently alter
one or more of the following settings:
Speech volume - adjustable in seven
levels.
Incoming call
Tune - access to 49 different ring sig-
nals + up to five composed.
Type - choose between Normal, Once
and Rising.
Level - sound adjustable in 7 levels.
The default settings in your phone as
regards the sounds and displays are easily changed, allowing you to personalize
audio and visual signatures to meet your
individual preferences. The phone has
five profiles that can be set up individually to suit different situations and
renamed.
>Press Menu and step to the My Phone
menu. Press OK.
> Select Audio. Press OK. The profiles
Silent, Discreet, Normal, Outdoor and
Freestyle are listed.
02207155_1.2 11/18/02 3:35 PM Side 53
Page 54
MyPhone
54
Set SMS tones, keypad sound, vibrator
Incoming SMS
Tune - access to 10 different SMS
alert tunes + up to five composed.
Level - sound adjustable in seven
levels.
Keypad
Tune - select Click, Beep, DTMF or
Mute.
Level - keystroke sound adjustable in
two levels.
Tones - adjustable i three levels for
the functions:
Info
Cell Broadcast
Alarm
Greeting
VibraLight - vibration & LED adjusting:
Off
Light only
Vibra & Light
Vibra-in-tune (Synchronized)
Rename - open editor to rename the
active profile.
Reset Profile - returns active profile to
factory defaults.
02207155_1.2 11/18/02 3:35 PM Side 54
Page 55
MyPhone
55
Compose own tones
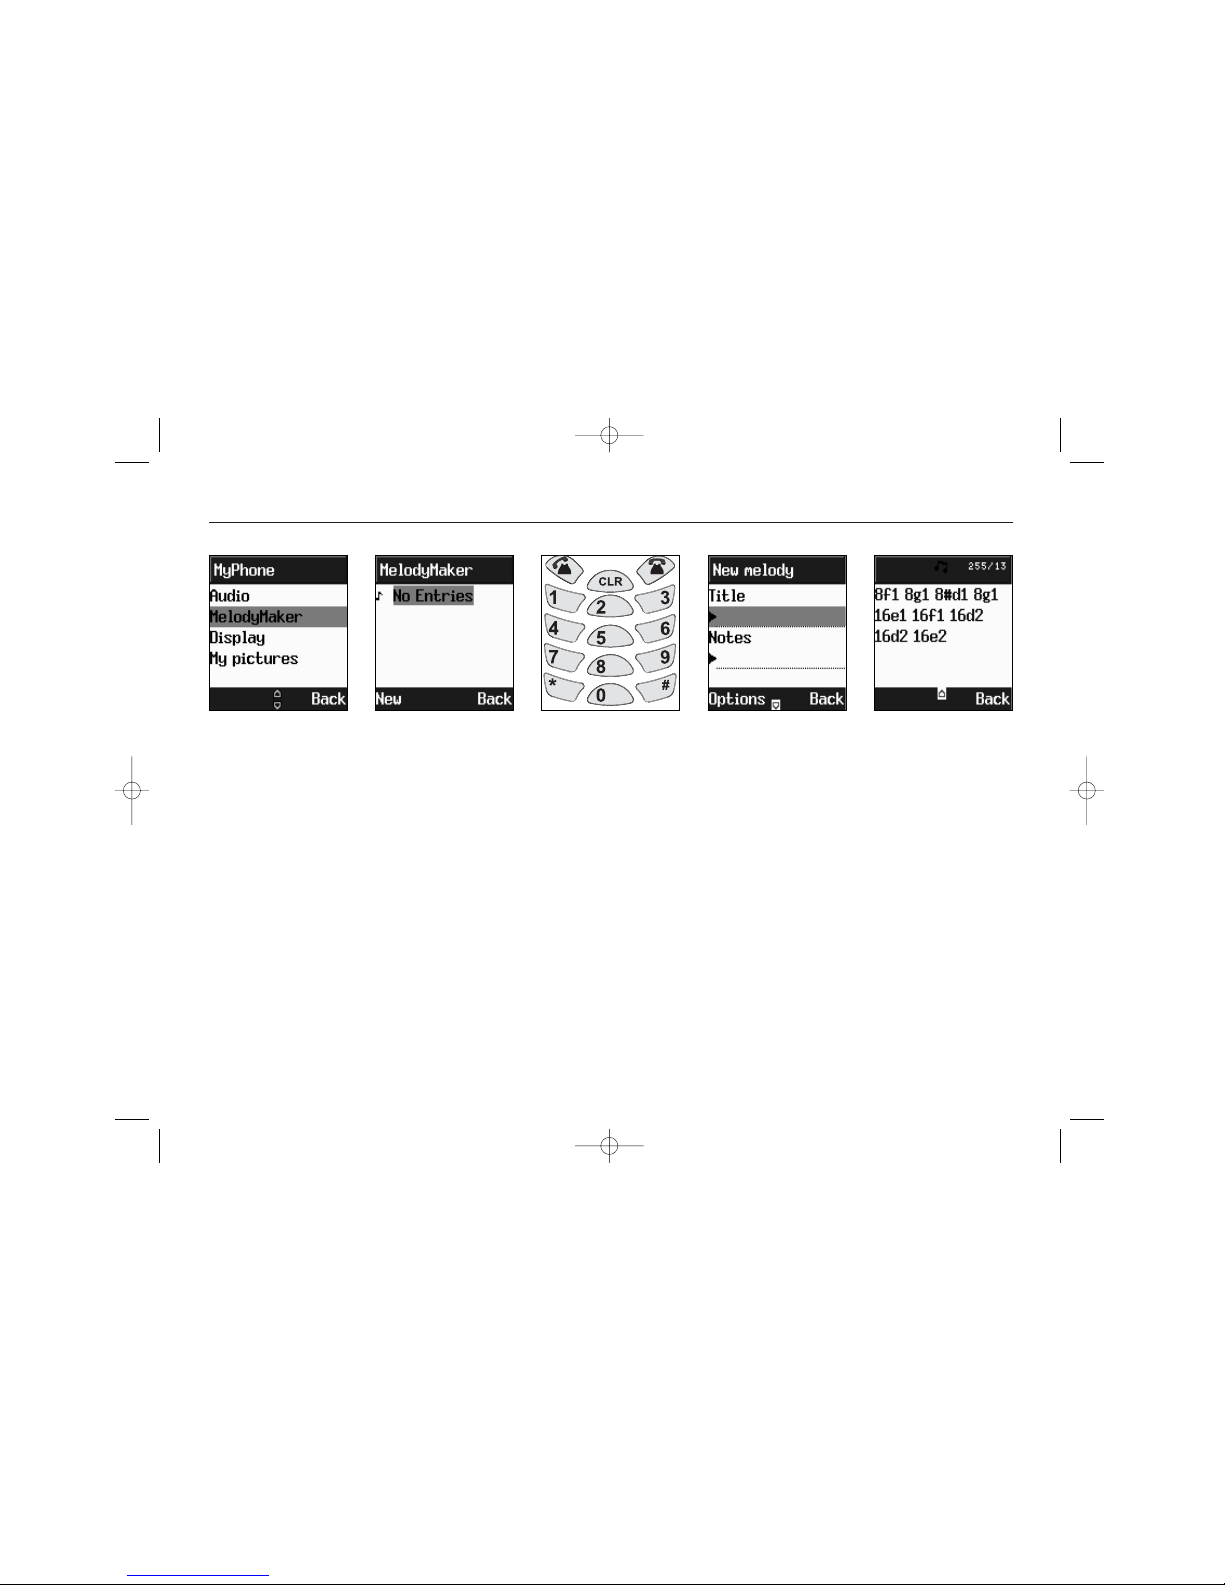
> Enter notes (Keys 1 to 7 represent the
notes C, D, E, F, G, A, B) and:
> Alter the sound, applying one or more
of the following effects:
Duration: 8-key shortens and 9-key
lengthens a note by 1/4 (e.g. 4D)
Long key press: Enhance the duration
by an additional 50 %.
Octave: Star-key raises a new note one
octave (e.g. D1)
Pitch: Hash-key raises the note one
semitone (e.g. #D)
Pause:
0-key
inserts a pause of same
length as the previous note
To create tunes of your own with the
built-in composer to use as ring tones or
for amusement only, enter the My
melodies menu and select:
MelodyMaker
If no melodies are composer, a pop-up
box will alert you.
> Select New on the left softkey.
< the edit window opens.
> Enter the Name of the tune, select
Ring Tone or SMS Tone and press Notes
to open the composer editor.
02207155_1.2 11/18/02 3:35 PM Side 55
Page 56
MyPhone
56
Compose own tones, cont.
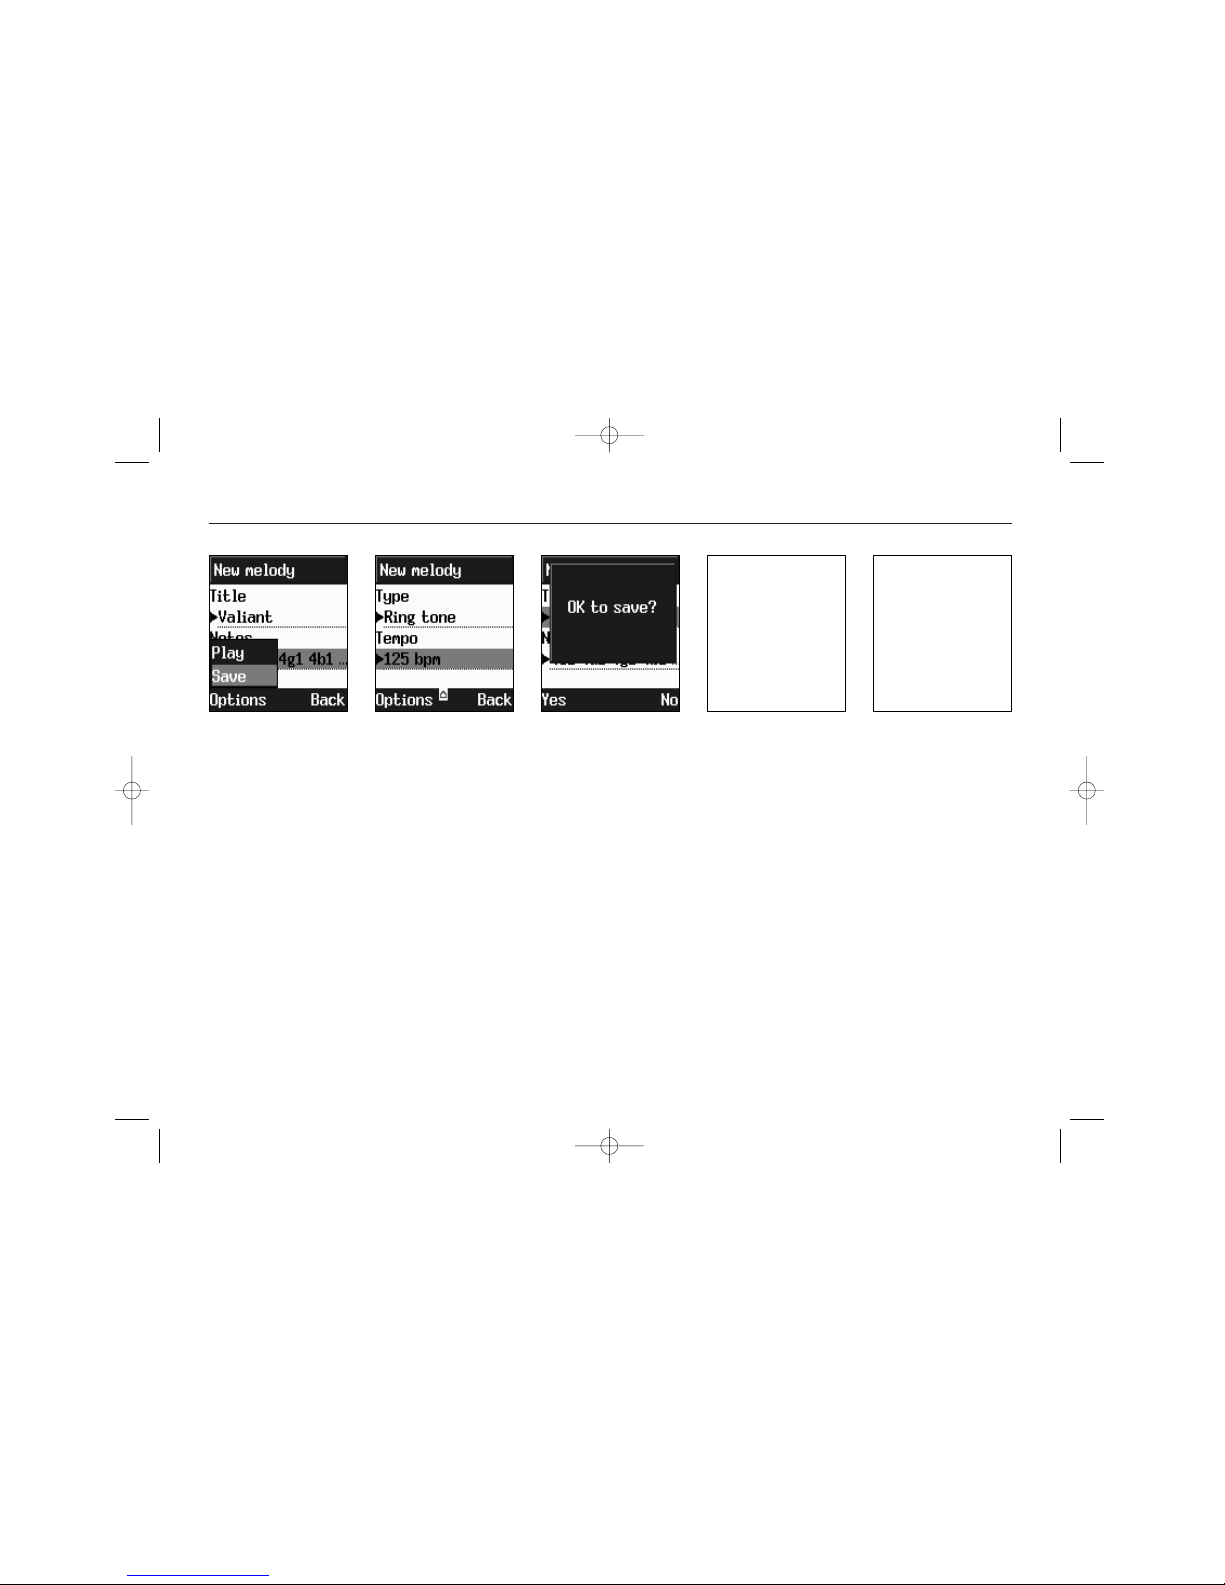
>Press OK to return to edit window
> Select Tempo to set the speed
> Select Style for playback mode (Optional)
> Use left softkey to listen to the result
by selecting Play and subsequently to
Save or Cancel the composed tune.
< saved tunes will be listed in the
composer and added to ring tone or SMS
tone library as selected
You can find pre-composed melodies,
e.g. on the Internet. These are most
often described as a sequence of key
presses to be entered. Note that digits
in brackets () indicates a long key press.
Practice the following example and see
what you get.
1 8 # 1 # 1 8 # 4 9 9 9 # 1 # * 7 8 8 * * 6
8 # 5 9 # 4 9 9 # * 1 8 # 7 8 * * 6 8 # 5 9
# 4 9 9 # * 1 8 # 7 8 * * 6 8 # 7 9 5 9 9 #
1 8 8 # 1 # 1 8 # 4 9 9 9 # 1 # * 7 8 8 * *
6 8 # 5 9 # 4 9 9 # * 1 8 # 7 8 * * 6 8 # 5
9 # 4 9 9 # * 1 8 # 7 8 * * 6 8 # 7 9 5 9 9
# 1 8 # 1 8 8 # 2 9 9 9 # 1 8 8 # * 7 * * 6
# 5 # 4 # 4 8 # 5 9 # 6 8 # 5 9 9 #
02207155_1.2 11/18/02 3:35 PM Side 56
Page 57
MyPhone
57
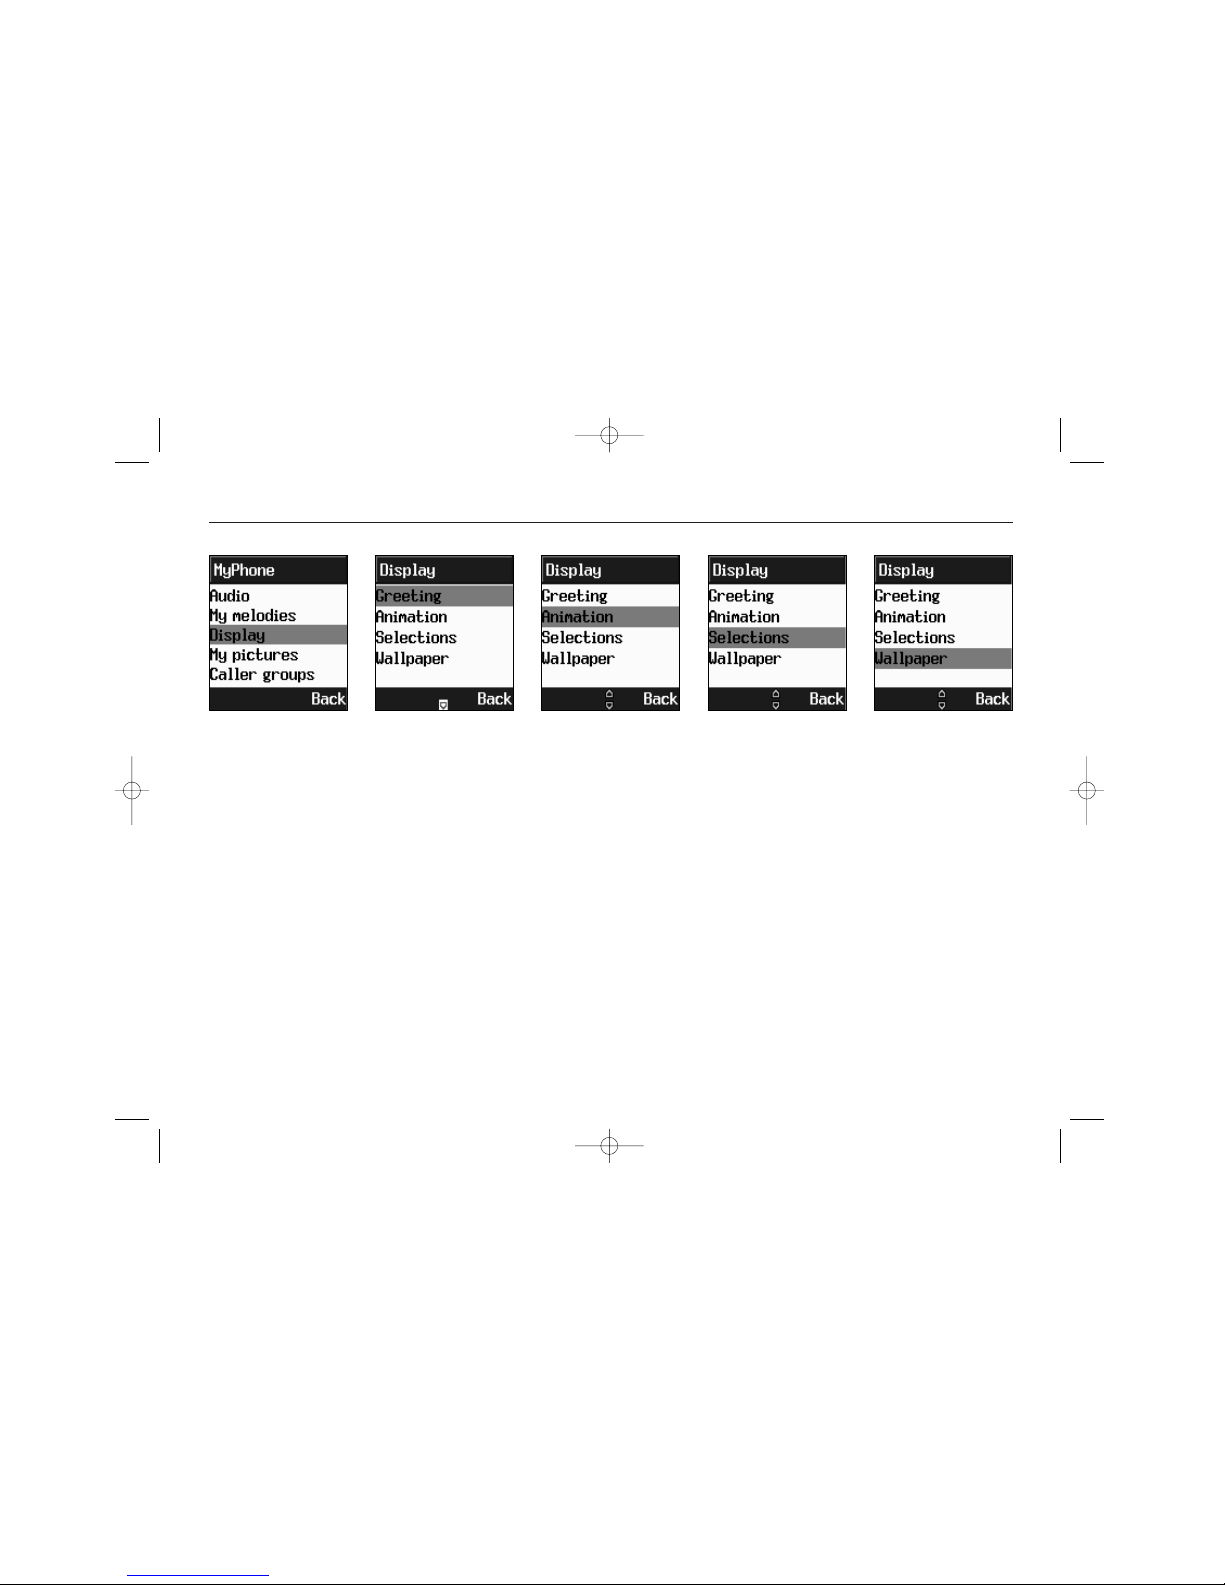
Set greeting
> Step to Display. Press OK. Scroll to
access the following options:
Greeting. Enter to write a greeting of
your own
Animation. Enter to write a greeting
of your own
Selections. To choose between
Greeting, Animation or None
Wallpaper. Select image you want as
display background
Set Tempo to 94
Up to five tunes (255 notes each) can be
stored in the memory, as ring tones or
SMS alerts. A pop-up box will alert you
if the library is full
Melody list
The melody list contains EMS melodies
you can attach to messages.
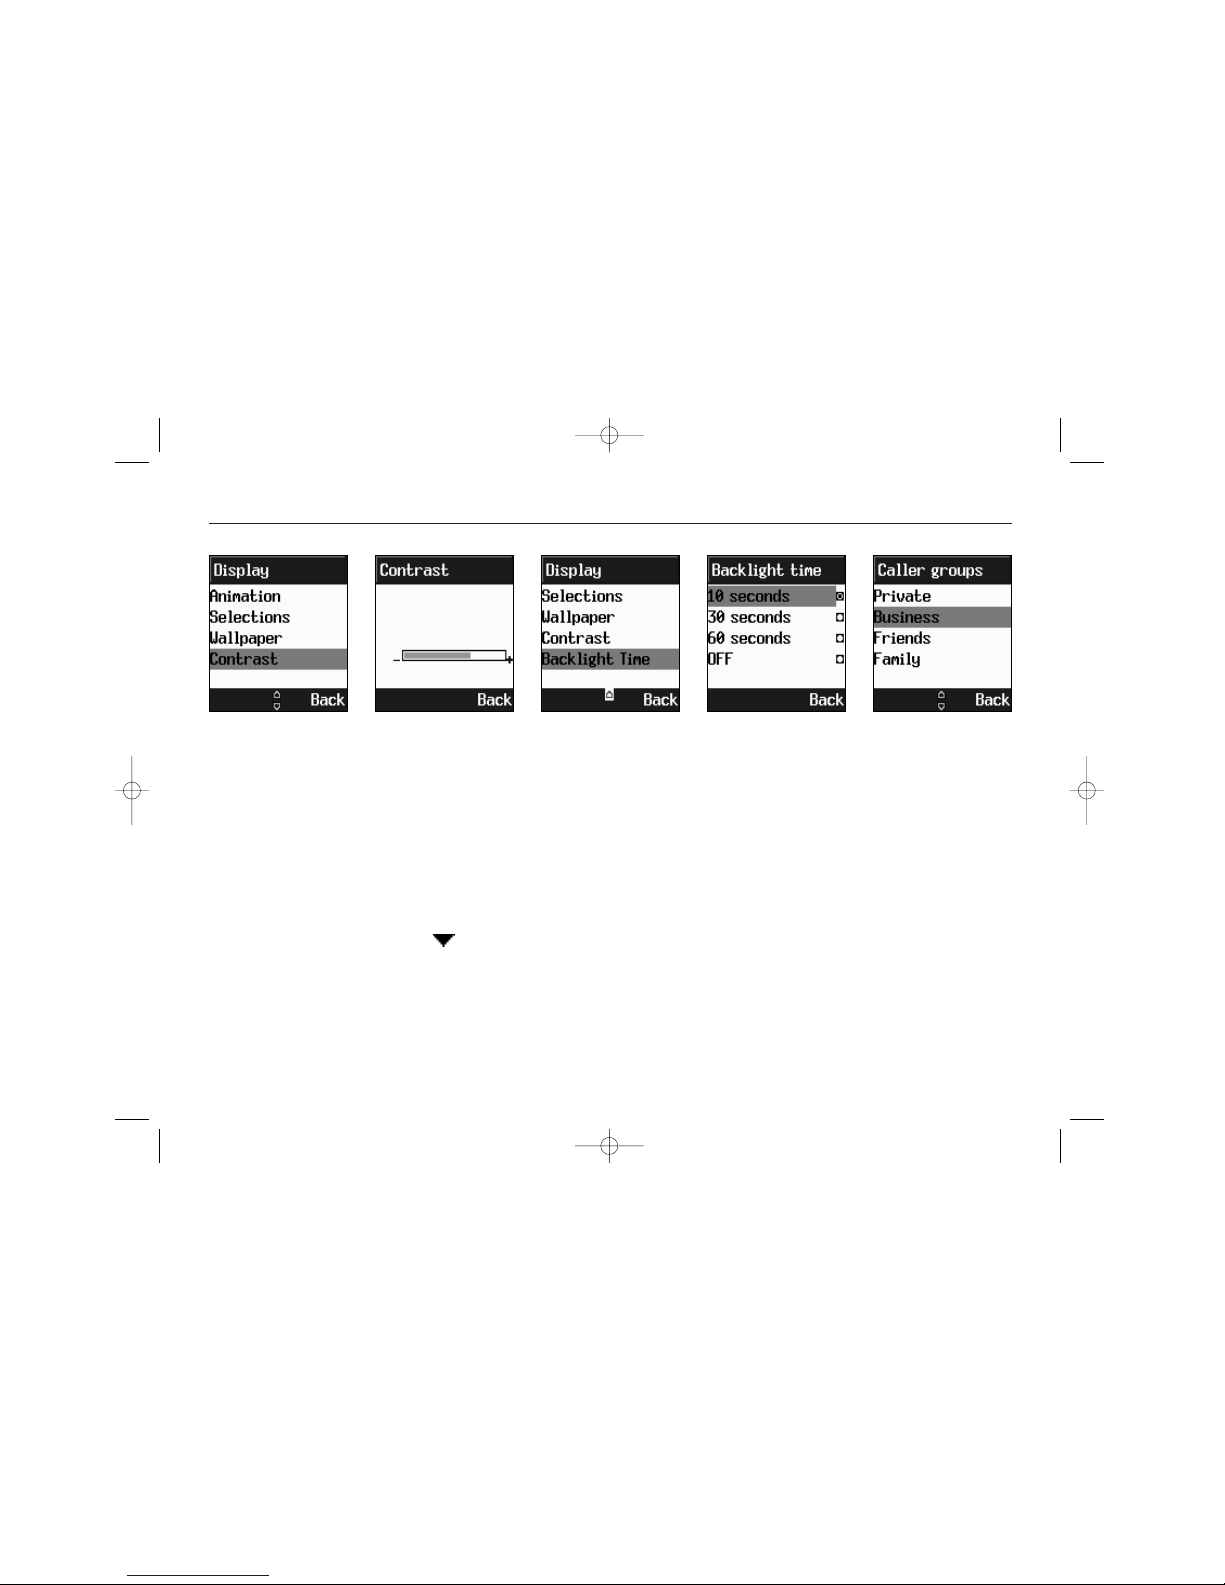
Visual settings. Your phone has a backlit LCD display with full graphic capability. You can setup greeting, wallpaper
and screensaver. To alter settings:
02207155_1.2 11/18/02 3:35 PM Side 57
Page 58
MyPhone
58
Set wallpaper, backlight, caller groups
Contrast. To adjust the display contrast
Backlight time. To adjust how long the
backlight stays on (Off - 60 sec.)
You can create Caller Groups from the
contacts in your phone book to identify
a caller by sound alone.
Enter the menu. Scroll to Caller
groups. Press OK. Select a group from
the five default options: Private,
Business, Friends, Family or Others.
Select:
Tune - to personalize ring tones for
the group.
SMS - to personalize SMS alert signal
for the group.
Rename – to alter the group name
02207155_1.2 11/18/02 3:35 PM Side 58
Page 59
Settings
59
Set data
GPRS
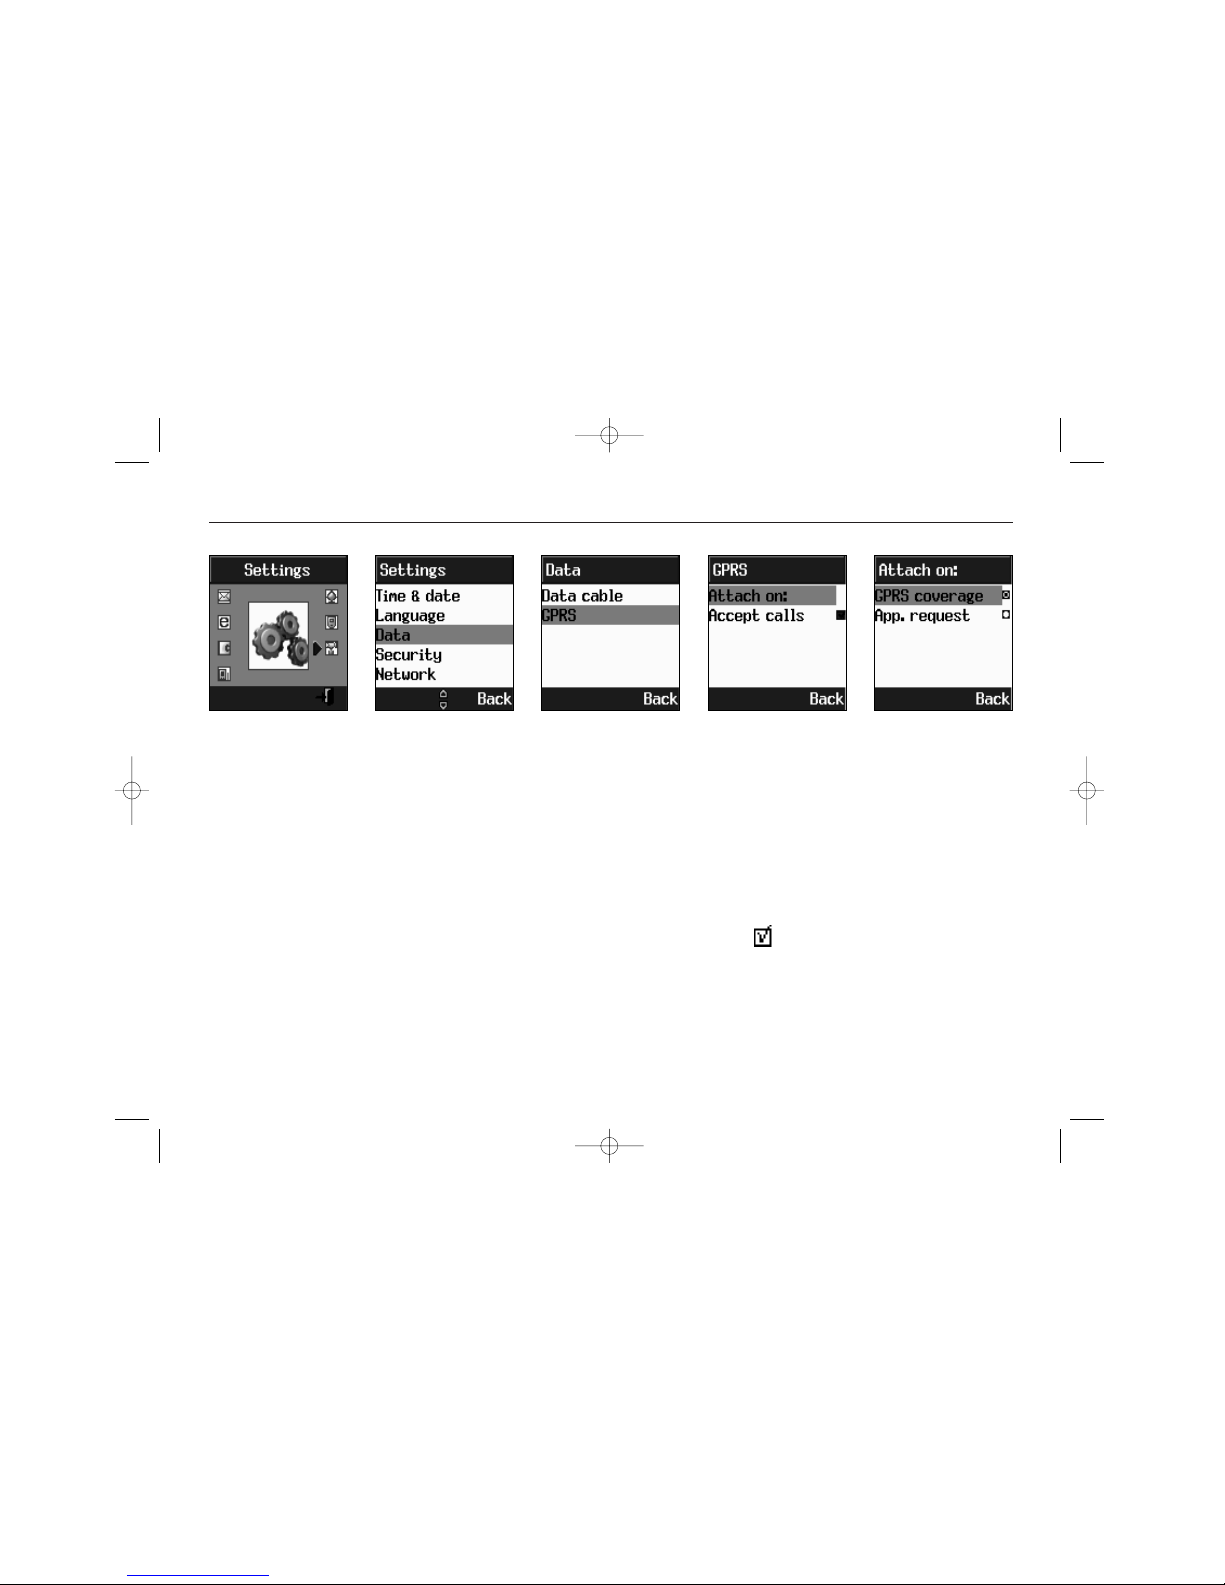
Attach on:
- GPRS coverage. Connecting via
GPRS whenever network is within reach
- App. request. The phone will connect to network only when requested
(e.g.: when you send an SMS, WAP the
Mobile Internet and transfer Data).
Accept calls Regular calls will be
carried through during GPRS sessions.
Select network
Automatic
Manual
The Settings menu is used for basics
such as language, time & date, data,
security, network and call settings
Step to the Settings menu. Press OK and
choose from the following options:
(For Time & Date and Language set-up
menus, see p. 8 for details)
Data. Set up parameters for data transmission from your laptop or PC
Data cable
Bit rate
Reset
02207155_1.2 11/18/02 3:35 PM Side 59
Page 60
Settings
60
Set network
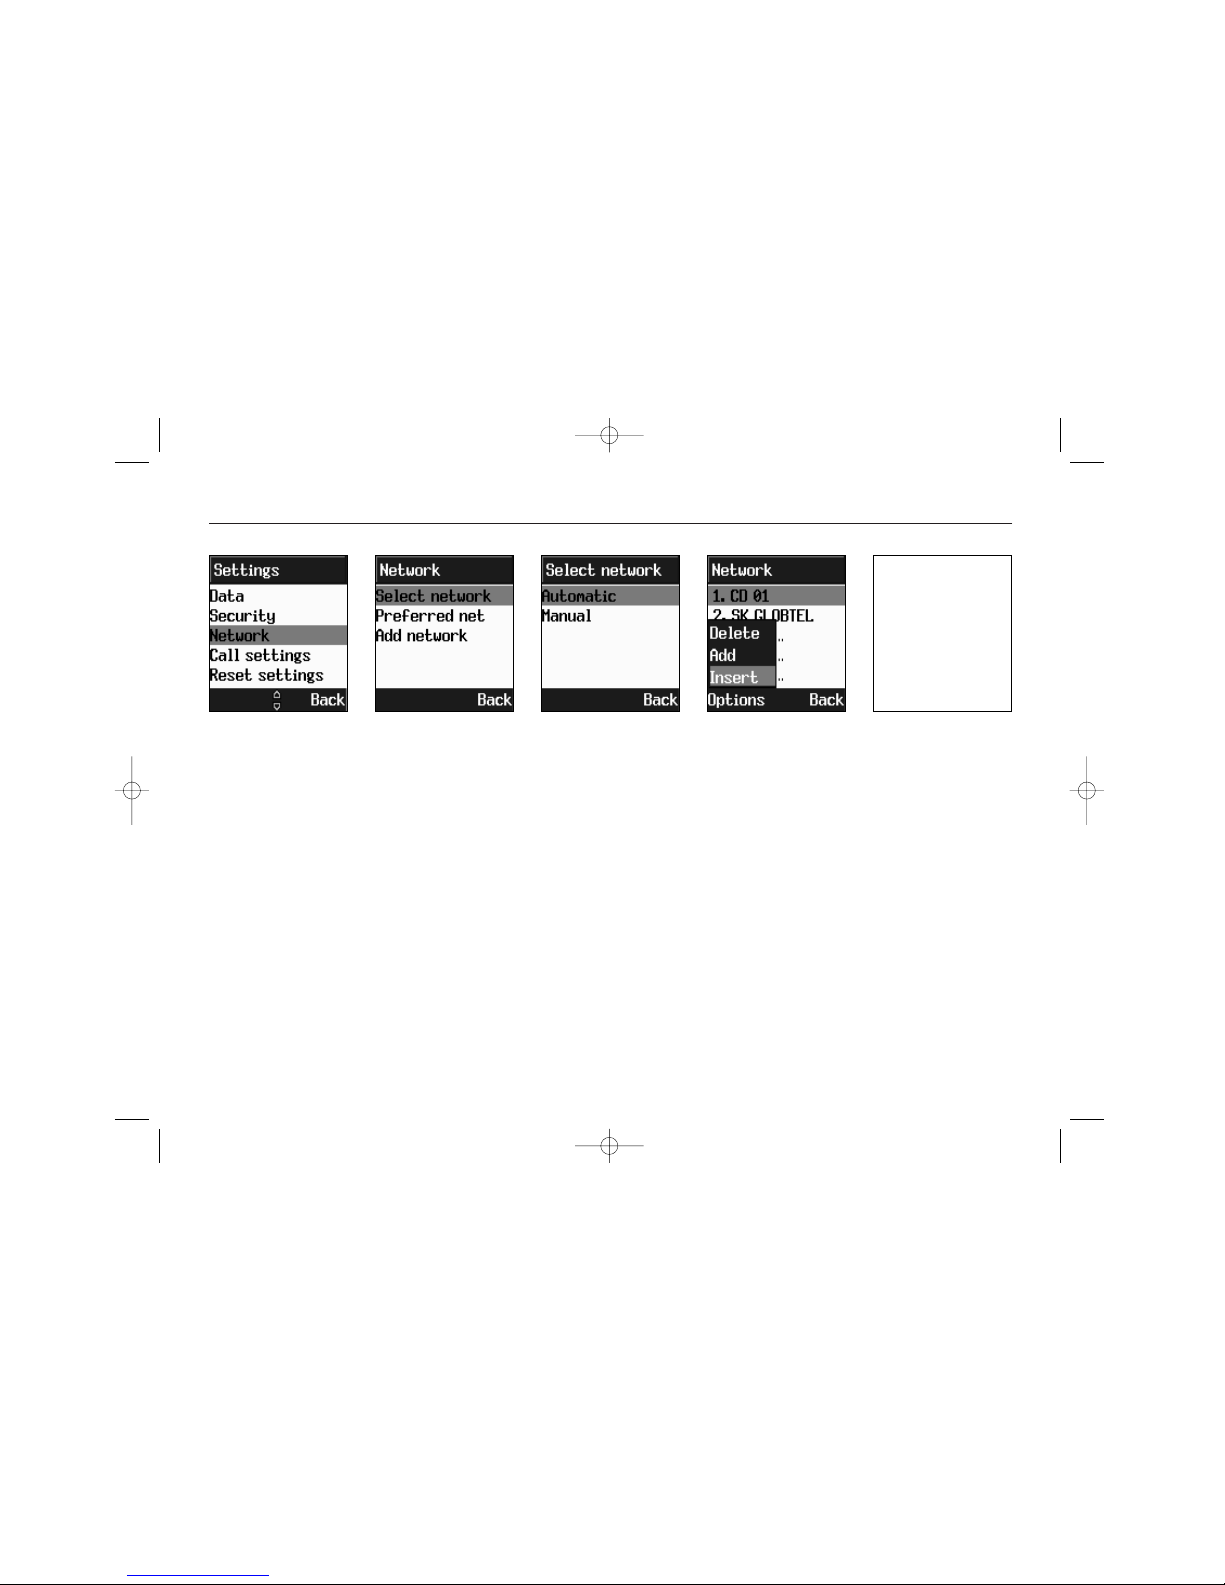
Preferred net. The phone will search
this list from the top. Left softkey
options roll-up enables you to Add or
Insert a new network. If you use Add,
the new network will be added to the
end of the list (having the lowest priority). Insert will insert the network in the
list where the cursor is placed.
Add network. To add a new network,
start by selecting an empty network
entry from the Add network menu. Press
OK. A text editor will appear. Enter the
name of the network followed by the
Mobile Country Code (MCC) and the
Mobile Network Code (MNC). This information is supplied by your network
operator.
Common calling options are described
on page 11-12. However, more advanced
calling features are available, accessible
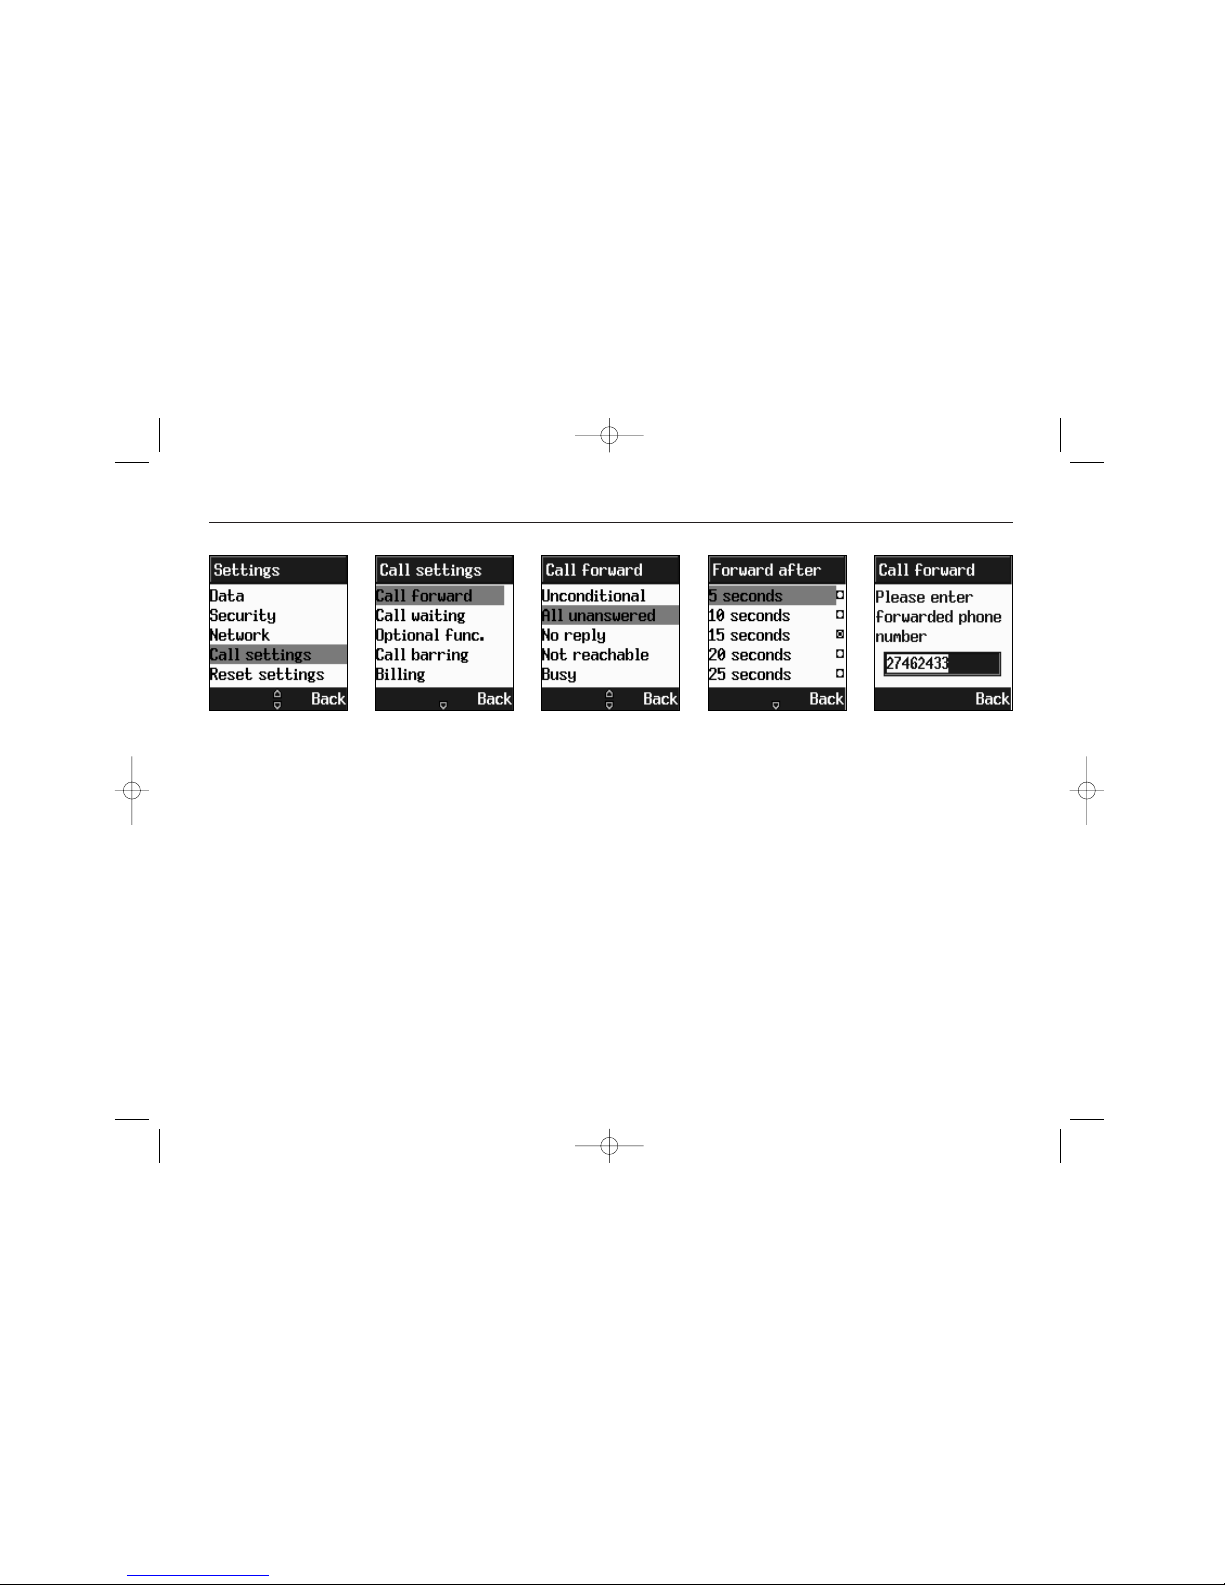
from the Call settings menu:
Call forward
- Unconditional. To forward all
incoming calls to a specified number.
- All unanswered. To forward all calls
that you do not answer within a specified period of time.
02207155_1.2 11/18/02 3:35 PM Side 60
Page 61
Settings
61
Set call forward, call waiting
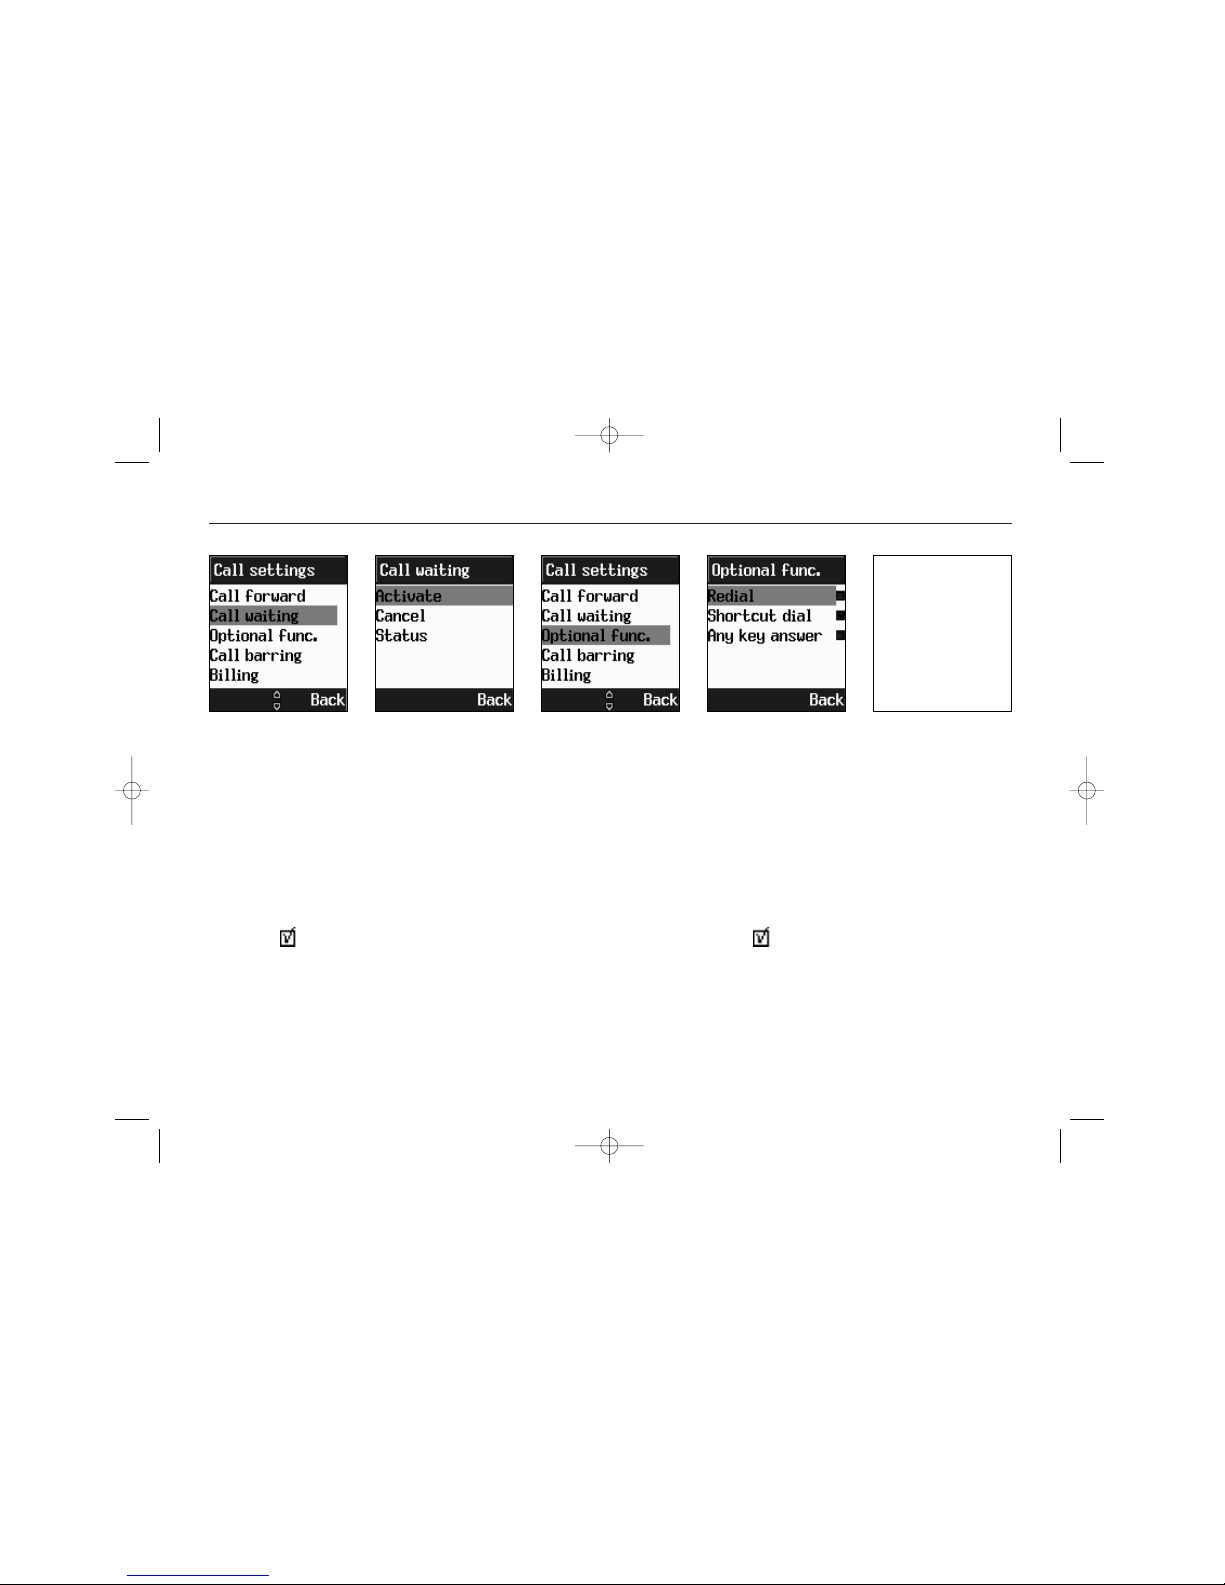
Call waiting
This function notifies you of another
call during a telephone conversation.
Enter the menu to Activate or Cancel
Call waiting or to see the Status. If Call
waiting is active, and you are called
during a conversation, you will hear a
faint ringing tone in the background. To
answer the new caller without losing
contact with the original party:
> Enter Options roll-up menu. Select
Switch calls.
> Conduct the conversation with the
- No reply. To forward calls that are
not replied.
- Not reachable. To forward calls
when you are out of network range.
- Busy. To forward calls when your
phone is busy.
- Status all. To summarize the status
of call forward options.
- Cancel all. To cancel all call forward
settings
A specific number can be designated for
each option, and you can activate, view
or cancel the present status. Follow the
on-screen instructions.
02207155_1.2 11/18/02 3:35 PM Side 61
Page 62
Settings
62
Multi-party calls, optional functions
connection is established, the number
must be manually dialed for a new
attempt.
To manually abort the redial sequence,
press End. To manually redial last number called, press OK two times in succession.
Shortcut dial . If you activate
Shortcut dial, you can dial phone numbers from the Shortcut list by pressing
just one or two digits.
new party and select Switch calls to
return to the first caller. Select Join
calls to conduct a three-party conversation. See Conference call on p. 20 for
details.
Optional func. This menu contains various settings to facilitate daily use.
Redial . Activates automatically redialing of your last unsuccessful call. The
number will be redialed after 5 seconds
(1 time), after 1 minute (3 times) and
after 3 minutes (10 times). If this
sequence is completed in full without
02207155_1.2 11/18/02 3:35 PM Side 62
Page 63
Settings
63
Shortcut dial, any-key-answer, call barring
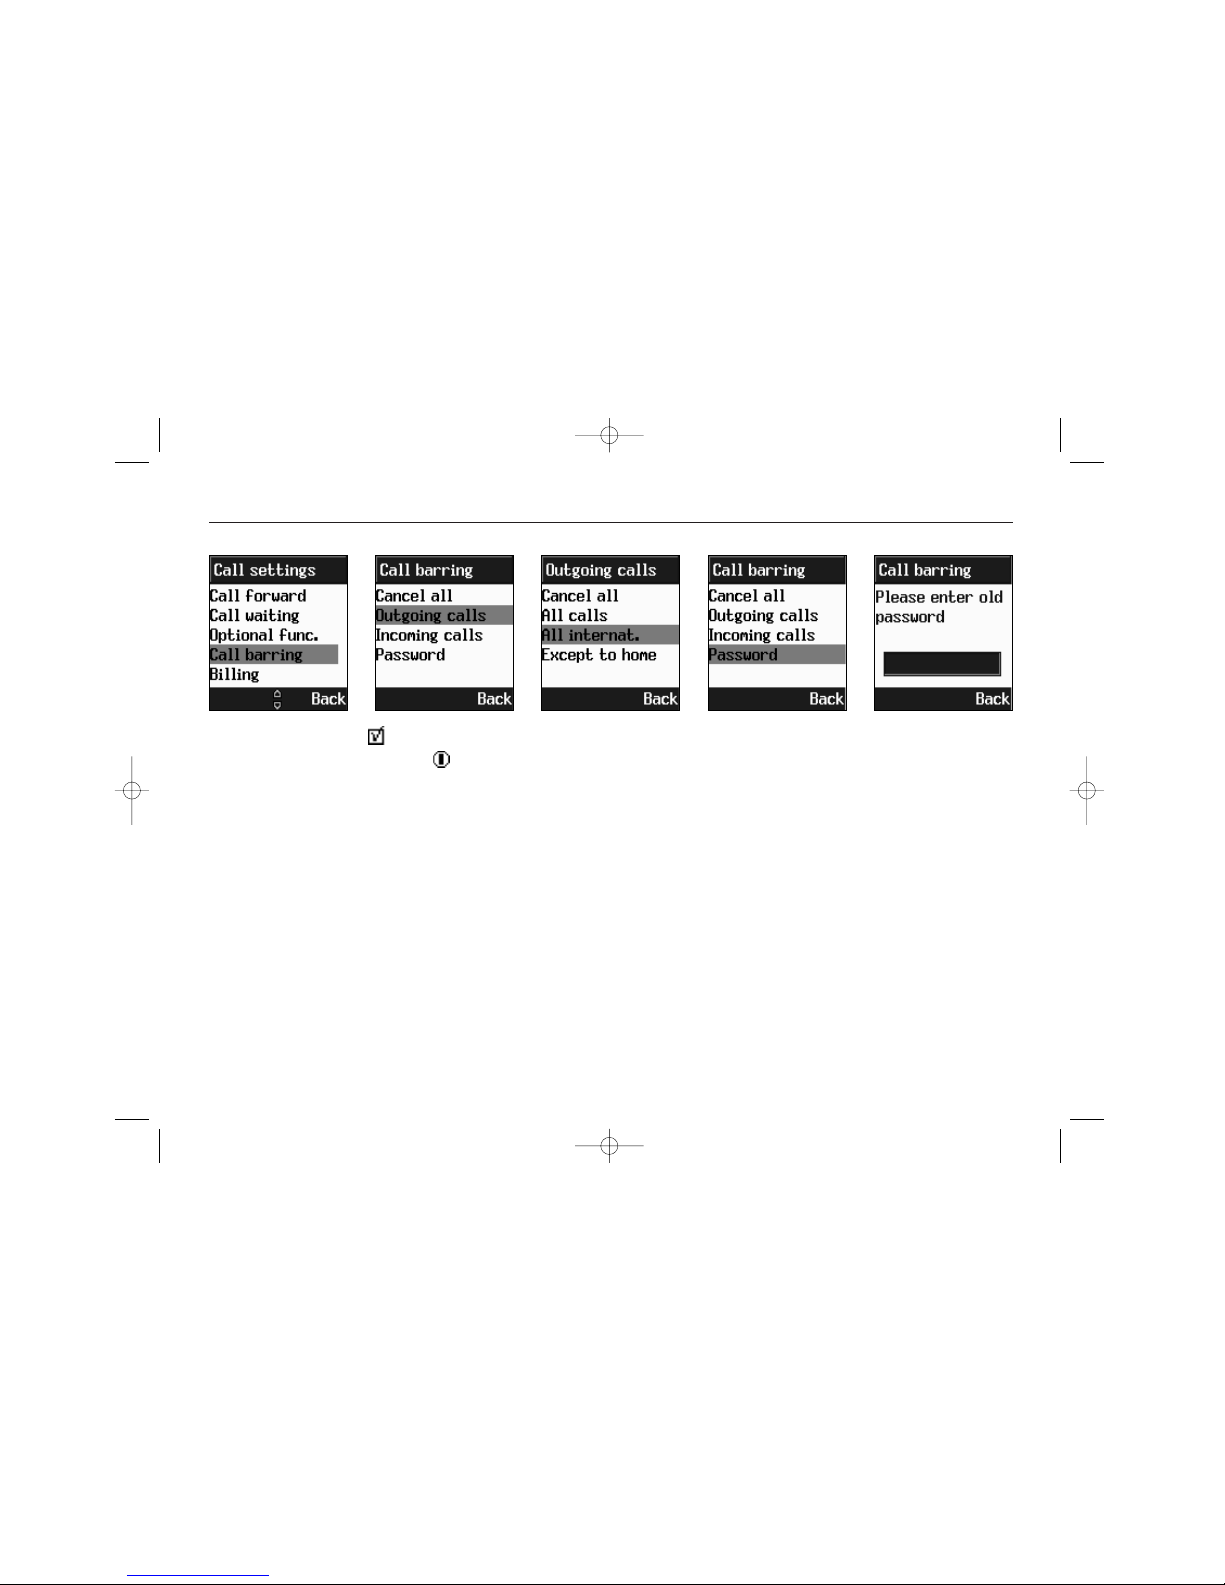
Incoming calls
All calls
When abroad
Password
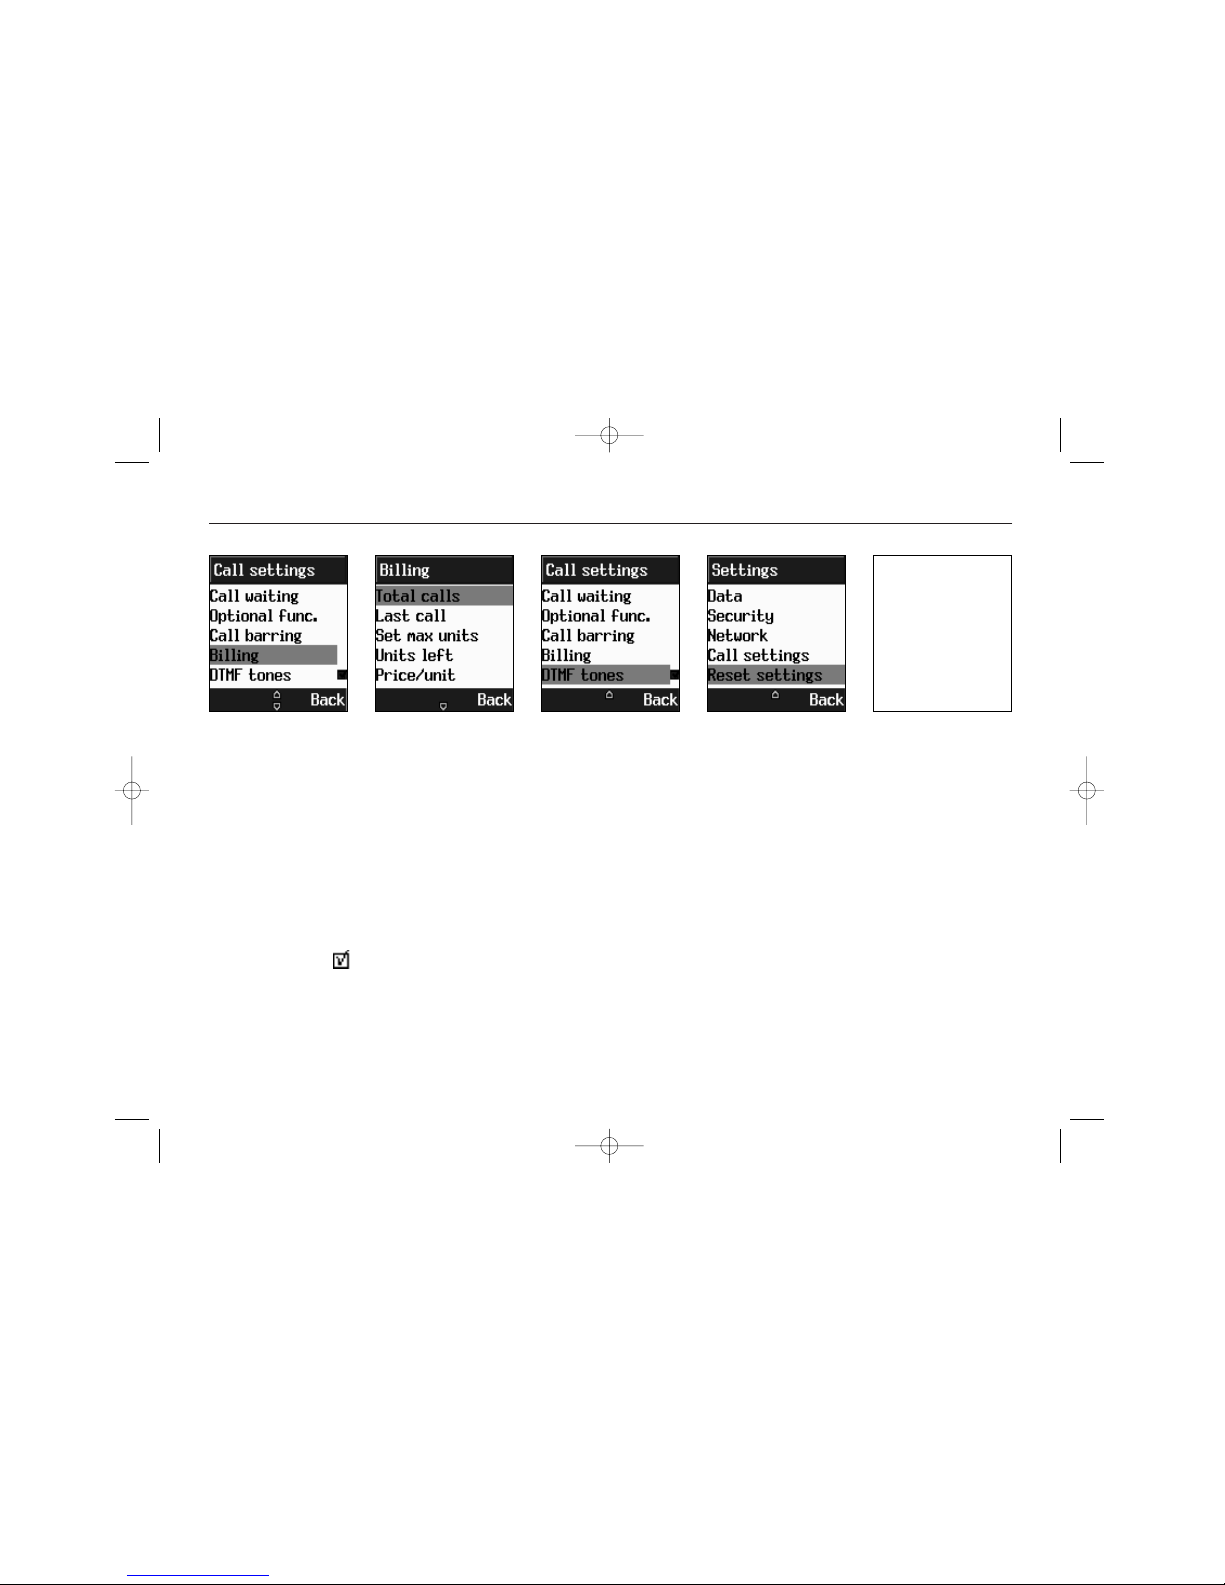
Billing
You can keep track of your calling
expenses:
> Scroll to Billing. Press OK. Enter the
submenus:
Total calls - to view the total amount
of time and units used.
Last call - to view the duration of the
Any key answer . Set-up your phone
to use any key (except ), to answer
your calls.
Call barring. You can lock the phone to
reject incoming calls or bar outgoing
calls. Call barring is a network service.
Acquire details from your network.
Following is supported:
Cancel all
Outgoing calls
All calls
All international
Except to home
02207155_1.2 11/18/02 3:35 PM Side 63
Page 64
Settings
64
Billing, reset settings
selected in MyPhone menu.
Reset settings. Return all settings to
factory defaults.
last call.
Set max units - to setup a maximum
of units available for a call.
Units left - to view the number of
units left on your account.
Price/unit - to enter a network price
for the units.
Currency code - displayed if support-
ed by your network.
DTMF tones . Enabling DTMF tones
allows you to remote control various
telephone connected devices, e.g. to
listen to your home telephone answering machine. DTMF for keypad tones is
02207155_1.2 11/18/02 3:35 PM Side 64
Page 65

Miscellaneous
65
Cellular phones in brief
cells to use the same frequencies without risk of interference.
Your cellular phone is in constant con-
tact with the nearest base station.
As you move from cell to cell,
e.g. while driving in your car,
the base station you are
approaching takes over
when you are within
reach. This happens within
split seconds without your
noticing it. All you experi-
ence is a stable and clear
connection.
However, not all network opera-
tors provide the same coverage in
all areas. Hence, if you travel near the
limit of your network’s coverage, you
may experience difficulties in maintaining the connection. The same may hap-
Your cellular phone is essentially a highly sophisticated radio, basically no different from any other two-way radio
system. The ingenuity of the cellular
system lies in the splitting of the
broadcasting environment into a
multitude of relatively small
cells with low-power transmitters.
This “cellular approach” to
radio communication allows
for extensive frequency
reuse so that millions of
people can use their mobile
phones simultaneously
although the number of frequencies are limited. The broadcasting
cells are commonly illustrated as hexagons, typically 10 square miles in area
with the base station in the center. This
arrangement allows for non-adjacent
02207155_1.2 11/18/02 3:35 PM Side 65
Page 66

Miscellaneous
66
Abbreviations and acronyms
pen if the radio signal is blocked by
obstacles such as high trees, hills or
buildings, or if you are inside a heavily
reinforced concrete building.
To remedy the situation move closer to
the nearest mast if possible or seek
higher ground. If you are inside a building, try moving towards a window.
What is roaming? Roaming is the technique that allows subscribers to move
from one cell to another or from one
network to another without affecting
the call.
What is digital? Early cellular phones
relied on analogue systems. Analogue
radio systems transmit the voice signal
in its original form, whereas digital
technology transforms the microphone
signal into number sequences (digits)
and transmit these. When received, the
digital signal is decoded so that you can
hear the sender’s voice. Digital signals
do not degrade in quality as long as the
data is received, and they can be compressed to take up less memory.
What is Dual Band? A dual band cell
phone has the capability to automatically switch between frequencies and can
thus operate on two or more frequency
bands, e.g. 900 Mhz and 1800 Mhz.
What is GSM? Global System for Mobile
communications is the most widespread
standard for digital communication in
Europe, Australia and in large parts of
Asia and Africa. GSM uses frequencies in
the 900 and 1800 Mhz bands.
What is APN? APN stands for Access
Point Name and is basically an URL
02207155_1.2 11/18/02 3:35 PM Side 66
Page 67

Miscellaneous
67
Abbreviations and acronyms
What is PIN and what is PUK? Access to
use a cellphone is most often protected
by a code known as “PIN” - Personal
Identification Number. Your SIM card
comes with a default PIN that you can
change to any code you prefer. See p. 9
for details. If you forget your code, or
by mistake enter a faulty code three
times in a row, the SIM card will lock.
To unlock, you must enter the Personal
Unblocking Key or “PUK” code that
came with your SIM card.
What is IMEI? IMEI stands for
International Mobile Equipment
Identifier and is an identification system
that can recognize every mobile phone
by a specific number. If a phone is
stolen, the IMEI system is capable of
blocking it on all network operators that
support the system.
address on the Mobile Internet.
What is GPRS? General Packet Radio
System is a service protocol built on
GSM technology. GPRS allows several
mobile phone users to share the same
connection. Charges may thus be based
on the amount of transferred data
rather than on airtime.
What is CSD? A wireless service protocol
used for WAP. CSD stands for Circuit
Switched Data and will enable continuous connection and payment by the
amount of data transferred.
What is SIM? Subscriber Identity Module
or SIM is the little gold-plated plastic
card that you get from your network
operator and which holds the unique
data the network needs to identify your
phone.
02207155_1.2 11/18/02 3:35 PM Side 67
Page 68

Miscellaneous
68
Abbreviations and acronyms
What are MCC and MNC? Mobile Country
Code is a code that identifies the country in which the subscriber lives. Mobile
Network Code identifies the network
operator.
What is DTMF? Dual Tone Multi
Frequency or DTMF is a paging and
remote control protocol that allows you
to control certain functions via your
phone, e.g. listening to your answering
machine.
What is Cell Broadcast? Cell Broadcast
is a service from your network provider.
With CB, you will be alerted when
entering a “cheap zone” or you can
obtain traffic information, weather
reports and other important information
sent to you as text messages. Some
providers also offer sports results, news
bulletins or even commercials. If offer-
ing CB services, your network will forward a list of services and the relevant
channels to enter.
What is WAP? Wireless Application
Protocol or WAP is a standard that
allows you to access parts of the
Internet, known as “Mobile Internet” via
your cell phone. Using WAP will open
many services to you, i.e. news and
weather forecasts, ordering services and
goods, accessing databases and more.
What is an URL? Uniform Resource
Locator or URL is an address system
used on the Internet. All WAP homepages have a unique address, allowing
browsers to distinguish one from the
other. An URL always start with the text
string: http://wap followed by the
address.
02207155_1.2 11/18/02 3:35 PM Side 68
Page 69

Miscellaneous
69
Cell phone care
ment may lead to condensation inside
the phone, resulting in corrosion and
possible damage.
If you pack your cell phone in your suitcase during travel, beware not to damage it. Cramming a suitcase may crack
the LCD display. Remember to switch off
your phone during air travel.
Like with all other radio devices, touching the built-in antenna area during
telephone conversation may impair the
quality and lead to shorter stand-by
time due to increased power consumption.
The battery. Your phone is equipped
with a high-performance Li-Ion battery.
Optional battery types may be available, check with your local retailer.
Observe the maintenance guidelines and
Your phone is a state-of-the-art electronic device that will serve you well
for many years provided it gets a minimum of attention and care from you.
You should never attempt to open the
phone casing. There are no user-serviceable parts inside, and you might damage
sensitive electronic circuits and components. Unauthorized disassembly will
void the warranty.
You should never leave your phone in
the window of your car or otherwise
expose it to strong sunlight or excessive
heat for a prolonged period of time as
this may damage it.
You should never handle your phone
with wet hands or expose it to moisture
or liquids of any kind. Continuous
changes from a cold to a warm environ-
02207155_1.2 11/18/02 3:35 PM Side 69
Page 70

Miscellaneous
70
Cell phone care
your battery should give you a long
service life.
- at the beginning of the battery’s life,
fully charge and discharge (let it go
flat) three times.
- avoid repeated short charging. It is
preferable to let the battery go flat and
then recharge it completely.
- avoid charging in strong heat or
extreme cold. Ambient room temperature is preferable.
- never try to open the battery as it
contains substances that might be harmful if swallowed or allowed to contact
unprotected skin.
- never short-circuit the battery, as it
may overheat and course a fire. Keep
away from jewelry and other metal
objects.
- never dispose of the battery by burning it. It could explode and release
harmful substances into the environment.
- never dispose of the battery with your
regular household waste. Take it to a
hazardous material collection point.
The charger. Use only the charger supplied with the phone. Newer pull charger cord to release it from mains, pull
the charge itself.
Cleaning & storing. Your phone should
always be handled with care, protected
from dirt, dust and damp. To avoid
scratches, never place the phone face
down.
02207155_1.2 11/18/02 3:35 PM Side 70
Page 71

Miscellaneous
71
Cell phone care
- Do not paint the phone or otherwise
block keypad, microphone or earpiece
function, i.e. with stickers
- The battery has its optimum performance in an ambient temperature of + 5
°C to + 50 °C
Maintenance hints.
A carrier case will protect your phone
and is both convenient and smart.
A belt clip makes an excellent “parking space” for your phone, reducing the
risk of mislaying it.
Using a headset allows you to keep
your phone dry while talking outdoors
on a rainy day.
If cleaning is necessary, switch the
phone off and wipe carefully with a a
soft, slightly damp (not wet) cloth.
Allow the phone to dry completely
before switching it on. Never use solvents for cleaning.
If you wont use your phone for some
time, fully charge the battery and store
the phone in a dry place away from
direct sunlight. The phone should be
switched off during storage.
Points to remember:
- Never disassemble the phone or battery.
- Never expose the phone to heat or
strong sunlight.
- Never expose the phone to moisture
or liquids of any kind.
02207155_1.2 11/18/02 3:35 PM Side 71
Page 72

Miscellaneous
72
02207155_1.2 11/18/02 3:35 PM Side 72
Page 73

Miscellaneous
73
Questions and Answers
A: The phone is SIM-locked and will not
accept the inserted SIM. Insert the correct SIM or contact your dealer.
Q: My phone displays: “EMERGENCY
CALLS ONLY”?
A: Your SIM card is not properly
installed or configured, or you are out
of network range.
Q: My phone displays: “NO NETWORK” ?
A: You are outside network range or
there is no clear path to the transmitter. If you are inside a building, try
moving towards a window.
Q: Some calls are not processed. What
is wrong?
A: A call bar has been set to restrict
phone usage. Check call barring and
cancel as necessary.
Q: My phone does not switch on when I
press the key ?
A: The keypress has been too short or
the phone has shut down because the
battery power level is too low to make
calls. Recharge the battery fully.
Q: Stand-by time seems too short ?
A: You have made excessive use of the
games or the Organizer or display light
has been on continouslu due to unintentional key activation. Apply Keypad lock
in left softkey menu.
Q: My phone displays: ‘PLEASE INSERT
SIM’?
A: You must insert the SIM before you
can use the phone. If it is already
installed, remove and clean the blank
area with a dry cloth, then reinsert.
Q: My phone displays: ‘INVALID SIM’?
02207155_1.2 11/18/02 3:35 PM Side 73
Page 74

Miscellaneous
74
Qurstions & Answers
Q: Someone else is receiving my calls.
What is wrong?
A: The phone has been set to forward
your calls to another number. Cancel
call forwarding as necessary.
Q: Can I send and receive emails and
surf the Mobile Internet on my phone?
A: Yes. Your phone has WAP capability,
which means that you can access the
Mobile Internet from your phone. For
sending and receiving emails, please
contact your network operator.
Q: Can I use my phone for transferring
data from a PC?
A: Yes. Your phone has a fax and data
modem. Apply a data/fax cable
Q: Can I download new ring tones and
graphics to my phone?
A: We are working on that. In the meantime, you can compose your own ring
tones using the “MelodyMaker”.
Q: What is T9?
A: T9 text input is a predictive text editor that allows you to type using just
one click per letter, thus saving time
when writing SMS, text entries, etc.
Q: What type of networks are supported?
A: Check the technical specifications on
p. 76.
Q: What does dual-band, GSM, CDMA
and all the other telecom argot mean?
A: See “How do cellular phones work”
on p. 65.
Q: Can I use my phone inside a car?
A: Road safety comes first. Always keep
02207155_1.2 11/18/02 3:35 PM Side 74
Page 75

Miscellaneous
75
Questions & Answers
Q: My phone has been lost or stolen.
What do I do?
A: Contact your network operator
immediately to close your account and
prevent misuse. Report your phone
stolen to local police.
Q: How do I reset my phone to factory
defaults.
A: Enter the Settings menu and scroll to
“Reset all”.
your eyes on the road if you are driving. You can install a “Hands free” set
if you need to drive and talk at the
same time. Always comply with local
legistation.
If your car is equipped with airbags,
check safety precautions with your car
dealer. See also “Warnings” (Cover).
Q: How do I clean my phone if it
becomes soiled?
A: See “Cell phone care” on p. 69.
Q: Are cellular phones dangerous to my
health?
A: No unambiguous scientific evidence
exists at this point of time. We recommend that you keep abreast with the
advice given by your domestic health
authorities. See also “Warnings”
(Cover).
02207155_1.2 11/18/02 3:35 PM Side 75
Page 76

Miscellaneous
76
Technical data
Physical properties
Size:
Weight:
Display:
Performance
GSM: 900/1800/EGSM
GPRS: Class 8
Standby:
Talk time:
Charging time:
Radiation (SAR):
Communication features
Long SMS (459 latin chr.)
EMS (sound & picture attachment)
Call wait & call hold
Conference call (up to 5 participants)
Call forwarding & call barring
Billing (AoC)
WAP
E-mail client (Optional)
Personalizing features
Greeting
Wallpaper
Screen saver (Iptional)
Flashing LED
49 polyphonic ring tones
Melody composer
7 renameable profiles
5 renameable caller groups
Organizing features
Calendar
Tasks list
Calculator
Unit converter (Optional)
Leisure
3 games
Accessories
Contact local retailer
02207155_1.2 11/18/02 3:35 PM Side 76
Page 77

Miscellaneous
77
Certificate of approval
02207155_1.2 11/18/02 3:35 PM Side 77
Page 78

Miscellaneous
78
02207155_1.2 11/18/02 3:35 PM Side 78
Page 79

Miscellaneous
79
Index
Call forwarding 61
Call, answer a 11
Call, emergency 12
Call, incoming 11
Call, missed 11
Call, optional functions 62
Call, redirected 12
Call waiting 61
Caller group, include in 38
Car safety Cover
Cell Broadcast 27
Charger Cover, 6
Cleaning & storing 70
Clock, set 9
Conference call 20
Contact, look up 37
Contact, new 38
Country Codes 12
DPage
Default, reset to 64
Dial-up number, WAP 34
APage
Advice of Charge 64
Aircraft, caution in Cover
Alarm (Reminder) 46
Alert, SMS 24
Any key answer 63
Appointment, new 46
Audio (Sound) settings 53
BPage
Backlight, display 58
Battery, charge 6
Battery, recycling 70
Billing 64
Bookmarks, WAP 32
CPage
Cache, WAP 35
Calculator 48
Calendar 45
Call, make a 11
Call barring 63
02207155_1.2 11/18/02 3:35 PM Side 79
Page 80

Miscellaneous
80
Disclaimer Cover
Display 13
Driving, caution Cover
EPage
E-mail 28
Emergency call 12
Entertainment (MaxFun) 51
Environment Cover
FPage
FAQ (Q&A’s) 73
GPage
Games 51
GPRS 59
Greeting 57
HPage
Hands-free set Cover
Hazards, avoid Cover
Hearing aides, caution Cover
High-risk activities Cover
Home, WAP 31
IPage
IMEI number xx
Inbox, PUSH (WAP) 33
Inbox, SMS 24
Incoming call 11
Int. calling prefixes 12
KPage
Keypad 13
LPage
Language 8
LED 58
Lost your phone Cover
MPage
Melody composer 55
02207155_1.2 11/18/02 3:35 PM Side 80
Page 81

Miscellaneous
81
Reset to default 64
Ring tones 53
SPage
Safety Cover
Scratch pad 20
Security Cover
Service numbers 43
Silent (Mute) 13
SIM 7
SMS 23
Softkeys 17
Speech volume 13
Stand-by time 76
TPage
T9 text editor 21
Talk time 76
Technical data 76
Time, set 8
NPage
Network 60
OPage
One key dialling 39, 63
Organizer 45
Outbox, SMS 25
PPage
Pacemaker, caution Cover
Password (PIN) 9
Password, WAP 32
PC-sync 49
Phonebook 37
PIN, enter, change 9
QPage
Questions & Answers 73
RPage
Read SMS 24
Redial call 62
02207155_1.2 11/18/02 3:35 PM Side 81
Page 82

Miscellaneous
82
UPage
Unlock SIM 9
VPage
Validity, SMS 25
Vibrator 54
Voice dialling 41
Voice mail 19
Volume, earpiece 13
WPage
WAP, home 31
WAP, sites 32
WAP, profiles 33
WAP, set connection 34
Warnings Cover
Warranty Cover
Welcome 3
02207155_1.2 11/18/02 3:35 PM Side 82
 Loading...