

Page 1

49-HX
HANDS-FREE
COMMUNICATOR
Owner’s Manual
English / Spanish / French
Page 2

TABLE OF CONTENTS
Specifications 1
Product Description 2
Package Contents 3
Performance Features 4
Controls and Functions 5
Operating Instructions 8
Using the Intercom Mode 10
Helmet Installation Instructions 11
Installing the Remote P-T-T 13
Warranty Service Instructions 14
Warranty Statement 15
Optional/Replacement Accessories 17
Other Maxon Products 17
Page 3

TABLA DE CONTENIDO
Especificaciones 18
Descripción del Producto 19
Contenido del Paquete 20
Características de Funcionamiento 21
Controles y Funciones 5
Instrucciones de Operación 22
Utilización del Modo Intercom 25
Instrucciones de Instalación
en un Casco 26
Instalación del P-T-T
(Presione para Hablar) Remoto 28
Instrucciones para el Servicio
de Garantía 29
Garantía 30
Accesorios Opcionales
y de Repuesto 32
Otros Productos de Maxon 32
Page 4

TABLE DES MATIÈRES
Fiche Technique 33
Description du Produit 34
Contenu 35
Caractéristiques 36
Commandes et Fonctions 5
Mode d’Emploi 37
Utilisation du mode Intercom 39
Installation sur un Casque
Protecteur 40
Installation de la Touche
d'Émission à Distance 42
Instructions pour Réparations 43
Déclaration de Garantie 44
Accessoires Optionnels/de
Remplacement 46
Autres Produits Maxon 46
Page 5

49-HX SPECIFICATIONS
GENERAL
Channels: 5
Frequency range: A: 49.830 MHz,
B: 49.845 MHz,
C: 49.860 MHz,
D: 49.875 MHz
E: 49.890 MHz
Power source: 3 AA alkaline or ni-cad
batteries
Dimensions: W x H x D 5-1/2" x 3" x 1"
Weight: 6.5 oz.
RECEIVER
Receiving system: FM Dual conversion
superheterodyne
Intermediate frequency: 1st IF: 10.7 MHz,
2nd IF: 455 kHz
TRANSMITTER
Transmitting system: Manual push-to-talk or
VOX
RF Output power: 10,000 µV/M @ 3
meters (FCC maximum)
Modulation: FM (Frequency
Modulation)
Specifications subject to change without notice.
1
Page 6

PRODUCT DESCRIPTION
Maxon’s 49-HX hands-free communicator is a
compact, 5-channel portable two-way transceiver
with a built-in intercom function. The radio has
a uniquely designed headset that can be quickly
and easily mounted onto a variety of open and
closed-faced helmets, or worn as a standard
headset. Communications between the 49-HX
and other 49 MHz models is possible - provided
each is equipped with the same channel/
frequency.
Maxon’s 49-HX provides you the choice of handsfree automatic transmitting or manual push-to-talk
operation. With the use of an optional 49-HXH
passenger headset, two-way intercom communications can occur between driver and passenger.
The 49-HX provides hundreds of uses - in
recreational (motorcycling, biking, boating,
camping, hunting), and business situations (warehousing, building maintenance, inventory control,
security, etc.).
Please take a few minutes to become familiar
with the features and operating instructions of your
Maxon 49-HX hands-free communicator.
2
Page 7

PACKAGE CONTENTS
The Maxon 49-HX comes complete with belt clip,
helmet adaptable headset with adjustable boom
mic and whip antenna, hook and loop fastening
material and Owner’s Manual. NOTE: Three
AA alkaline or ni-cad batteries are required for
operation - batteries are not included.
3
Page 8

PERFORMANCE FEATURES
• Five channel operation
• Approx. 1/4 mile range
• Helmet adaptable headset with boom
microphone and whip antenna
• Powered by 3 AA alkaline or ni-cad
batteries (not included)
• Choice of voice operated (VOX) or
push-to-talk (P-T-T) operation
• Thumbwheel on/off-volume control
• VOX Sensitivity control
• Battery low LED
• Jack for in-unit charging of ni-cad
batteries, remote P-T-T and optional
passenger headset
4
Page 9

CONTROLS AND FUNCTIONS
CONTROLES Y FUNCIONES
COMMANDES ET FONCTIONS
A. Power on/off -volume control - Turns power on/off and
adjusts volume level • Control de encendido/apagado y
volumen - Enciende/apaga y ajusta el nivel de volumen
• Interrupteur et commande du volume - Allume/éteint
l’appareil et permet de régler le volume
B. Battery low LED - Lights to indicate when battery power
is low • Indicador LED de baterías con carga baja - Se
enciende para indicar cuando la carga de las baterías está en
un nivel bajo • Voyant de niveau faible de la pile - S’allume
lorsque le niveau de la pile est faible
C. Push-to-talk button - Push and hold to transmit (talk);
release to receive (listen) • Botón "presione para hablar" Manténgalo oprimido para transmitir (hablar); suéltelo para
recibir (escuchar) • Touche d’émission - Gardez enfoncée pour
émettre (parler); relâchez pour recevoir (écouter)
D. Belt clip • Sujetador para el cinturón • Pince pour
ceinture
E. Jack for remote P-T-T switch • Enchufe para el
interruptor remoto (P-T-T) (Presione para Hablar) • Prise
pour touche d’émission à distance
F. Jack for intercom passenger headset • Enchufe para el
conjunto de audífonos /micrófono de intercomunicación del
pasajero • Prise pour casque du passager
G. Fully adjustable and helmet adaptable headset
• Conjunto de audífonos/micrófono completamente ajustable
y adaptable a un casco • Casque de communication
entièrement réglable compatible avec un casque protecteur
5
Page 10
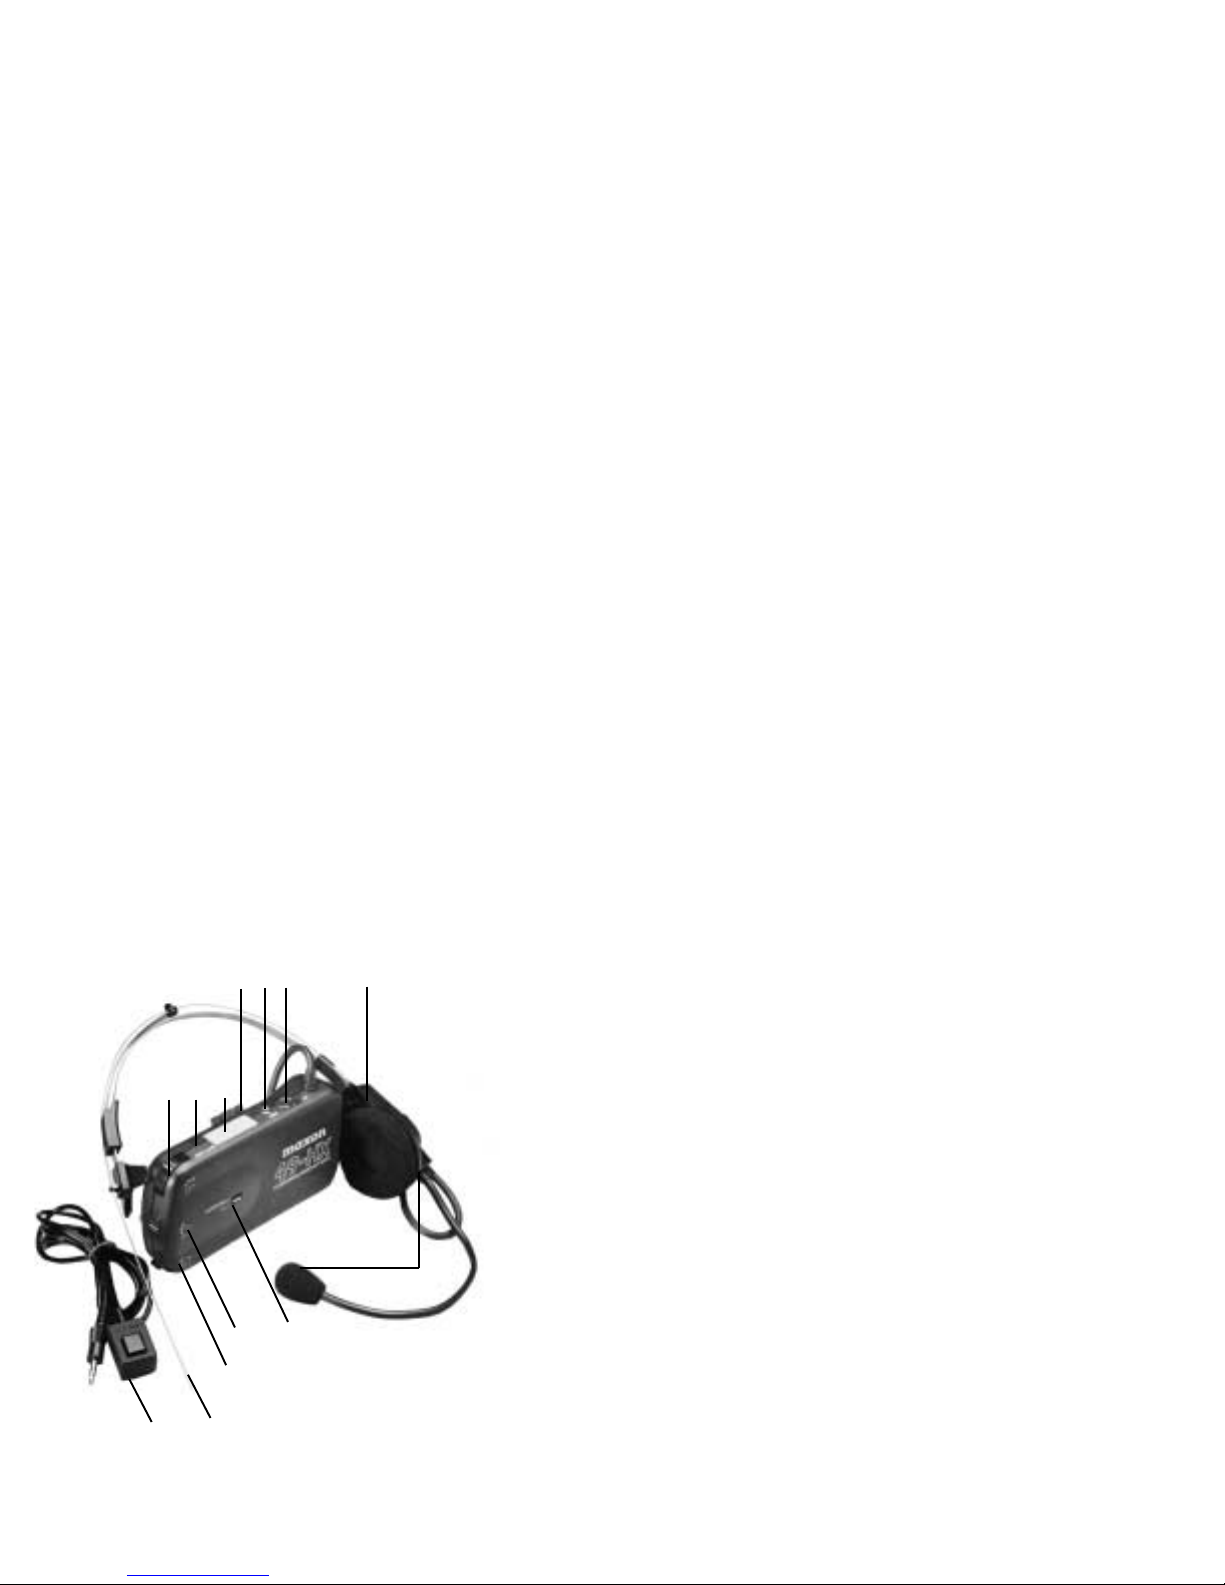
D E F G
A B C
H
J I
K
M L
6
Page 11

H. Adjustable microphone with windscreen • Micrófono
ajustable con pantalla contra el viento • Microphone
réglable avec boule antivent
I. Intercom/ TX mode selector - Selects either unit to unit
communications or intercom communciations between main
headset and passenger headset • Selector de modo Intercom/
TX - Selecciona la unidad a la función de comunicaciones de
la unidad o a la de comunicaciones intercom entre el conjunto
de audífonos/micrófono principal y el del pasajero
• Sélecteur mode Intercom/TX - Réglez ce sélecteur à TX
pour communiquer avec d’autres appareils ou à Intercom pour
communiquer avec le passager seulement
J. VOX/P-T-T Control dial - Thumbwheel selects mode
of operation (voice or manual push-to-talk) and controls
microphone sensitivity during voice activated transmissions
• Disco de control VOX/ P-T-T - Con una ruedecilla para
mover con el pulgar se selecciona el modo de operación
(activado por voz o manual - presione para hablar) y se
controla la sensibilidad del micrófono durante transmisiones
activadas por la voz • Sélecteur activation par la voix/
activation manuelle - Utilisez la molette pour choisir le mode
d’activation et la sensibilité du microphone (activation par la
voix)
K. Channel selector switch • Interruptor selector de canales
• Sélecteur de canaux
L. Whip antenna - Receives and transmits radio signals
• Antena flexible - Recibe y transmite señales de radio
• Antenne fouet - reçoit et émet les signaux radio
M. Remote P-T-T - Used to activate the P-T-T button without
reaching for the main unit switch • Interruptor remoto P-T-T
(Presione Para Hablar) - Utilizado para activar el botón P-T-T
sin tener que alcanzer el botón de la unidad principal
• Cadran d'émission à distance - Est utilisé pour activer la
touche d’émission sans avoir l’appareil à portée de la main
7
Page 12

Charging jack - Used to charge ni-cad batteries inside the
unit - requires Maxon DV-7510 AC/DC wall charger (not
shown) • Enchfe para cargar - Utilizado para cargar las
baterías de níquel-cadmio dentro de la unidad - requiere un
cargador de Maxon DV-7510 AC/DC de pared (no se
muestra) • Prise de chargement - est utilisée pour charger
les piles dans l'appareil - requiert le chargeur au mur c.a./c.c.
Maxon DV-7510 (non montré)
OPERATING INSTRUCTIONS
1) Remove the battery compartment door
by pulling the door tab towards you. Install three
fresh AA batteries, noting the polarity diagram
embossed in the battery compartment. For
continuous, heavy-duty use, alkaline batteries
are recommended.
NOTE: Rechargeable ni-cad batteries can
be used in the 49-HX. To recharge them while
installed in the unit, Maxon’s DV-7510 optional
AC/DC wall charger must be used. Average
charging time is 12-16 hours.
CAUTION: Do not attempt to recharge alkaline
or carbon zinc batteries - this could result in an
explosion, or other damage to the unit.
8
Page 13

2) Using the belt clip, affix the unit to your
belt or another convenient location. Put the
headset on, extend the antenna and adjust
to a comfortable fit. Keep the microphone element within 1" of your mouth.
NOTE: If you choose to adapt the 49-HX headset
for helmet use, refer to the helmet installation
instructions in this manual.
3) Turn the power on and adjust the volume to a
desired listening level.
4) Select the desired channel using the channel
selector switch.
5) If you want to communicate radio to radio, set
the intercom/TX switch to TX. If you choose to
utilize the Maxon 49-HXH passenger headset
(sold separately), plug in the passenger headset
and set the intercom/TX switch to the intercom
position.
6) Position the VOX/P-T-T thumbwheel control
to either the VOX position (for hands-free, voice
activated transmissions) or the P-T-T position (for
manual push-to-talk transmissions). When using
the VOX mode, adjust the sensitivity setting to
suit your surroundings and needs. While looking
at the
9
Page 14

front of the unit, move the thumbwheel clockwise
for a high setting, or counter-clockwise to a low
setting. A low setting requires you to speak more
loudly to activate the transmitter and should be
used when background noise levels are high. A
higher setting allows you to speak in a softer
voice and should be used when lower background
noise is present.
NOTE: Very high noise levels may cause the unit
to transmit continuously in the VOX mode. When
very high background noise levels are present, the
P-T-T mode may be the only method to avoid this
problem.
The Maxon 49-HX will not receive a transmission
while you are transmitting. Wait until an incoming
message is completed before transmitting.
If the unit appears to malfunction, or has constant
static present, try replacing the batteries, even if
the “BATT LOW” LED has not illuminated.
USING THE INTERCOM MODE
1) When using the unit’s intercom, follow steps
1 ~ 3 in the operating instructions.
10
Page 15

2) Set the intercom/TX switch to the intercom
position.
3) Plug in the optional Maxon 49-HXH passenger headset (sold separately) into the headset jack
on the top of the unit.
4) Position the VOX/P-T-T thumbwheel control
as directed in operating instructions.
NOTE: The 49-HXH passenger headset will
only communicate with the main unit headset.
However it can monitor all other unit to unit
conversations, but will not transmit. (FCC Regulations).
HELMET INSTALLATION
INSTRUCTIONS
Both the headband and earpiece of the 49-HX
headset can be detached from the antenna/boom
microphone assembly. Hook-and-loop fastening
material is included with your 49-HX to enable
attaching the antenna/boom microphone assembly
to the exterior of the helmet and for attaching the
earpiece to the interior.
11
Page 16
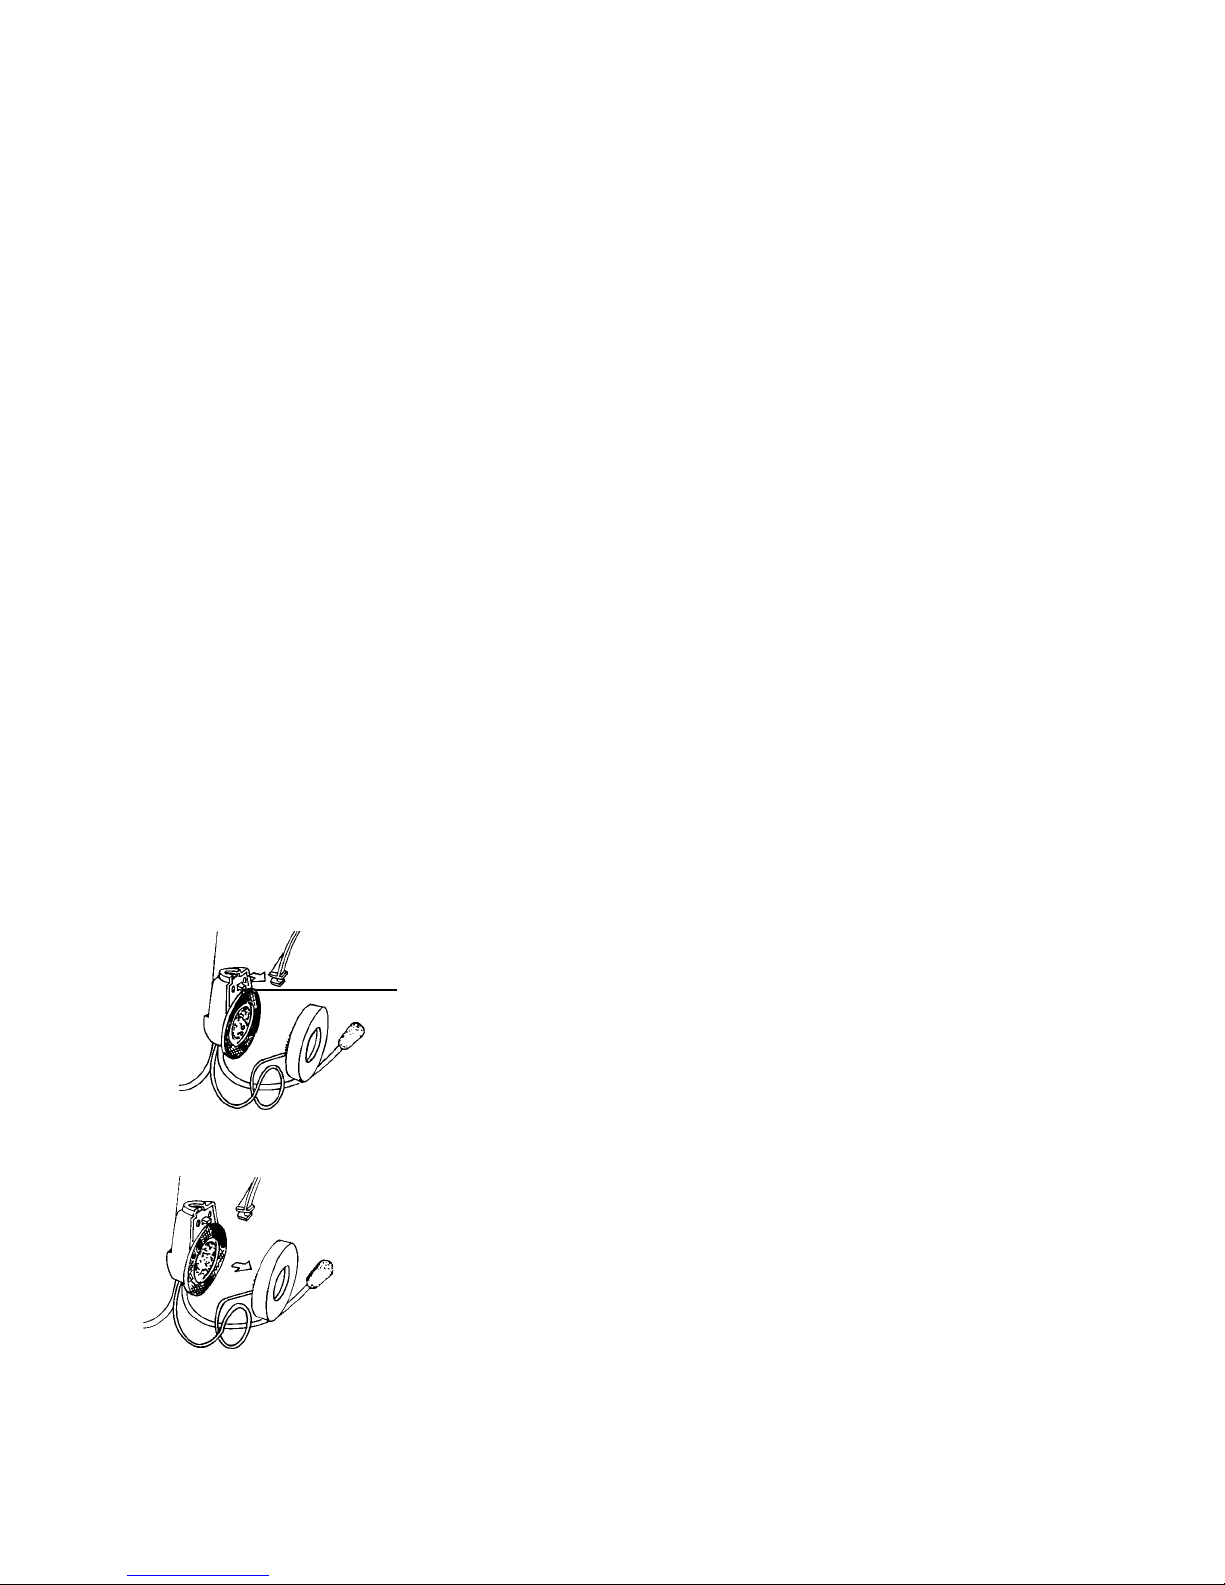
To remove the headband: Release the whip
antenna from the retaining hook. Hold down
the headband release tab (A) and gently slide the
headband out of the antenna/earpiece housing
assembly. (Figure 1)
(A)
To remove the earpiece: Gently pull the earpiece
away from the antenna housing assembly.
(Figure 2).
Peel the adhesive backing from the 2"x 4" piece
of hook-and-loop fastening material. Apply the
material to the outside surface of the helmet,
positioning it to allow the antenna to be in a
vertical position and the boom microphone to
be about 1" from your mouth when wearing
the helmet.
12
Page 17

Mount the earpiece inside the helmet, positioning
it so that it will be next to your ear when wearing
the helmet. A 2" x 2" piece of hook-and-loop
fastening material is supplied for this mounting.
NOTE: Some helmets have recesses for inserting
an earpiece, or have pads which can be removed
to provide space to mount the earpiece.
INSTALLING THE REMOTE P-T-T
The radio’s remote push-to-talk button has been
designed to fit the handlebar of a motorcycle,
bicycle, snowmobile, etc. A mounting strap with
hook-and-loop fastening material has been
provided with your 49-HX.
To use the remote P-T-T: Plug into the REM
jack on your transceiver and set the VOX/P-T-T
control dial to the P-T-T position (counterclockwise, as far as it will go).
13
Page 18

WARRANTY SERVICE INSTRUCTIONS
1) Refer to the Operating Instructions section of
this Owner’s Manual for adjustments that
may be applicable to correct your problem.
2) If the above mentioned procedure does not
correct the problem you are experiencing with
your unit, return the unit (with proof of purchase)
to the place of purchase, or call Maxon’s
Customer Service Department for assistance.
Maxon America, Inc.
Customer Service Department
10828 NW Air World Drive
Kansas City, Missouri 64153
816/891-1093, ext. 499
14
Page 19

LIMITED WARRANTY STATEMENT
The Consumer Products Division of Maxon America,
Inc. (hereinafter referred to as “Maxon”), warrants
that its Products and their included accessories will be
free from defects in workmanship or materials under
normal use for a period of ninety (90) days from date
of purchase by the original end user, provided that the
buyer has complied with the requirements stated
herein.
If the Product fails to function under normal use
because of manufacturing defect(s) or workmanship
during the ninety (90) day period following the date
of purchase, it will be replaced or repaired at Maxon’s
option at no charge when returned to the place of
purchase. The defective unit must be accompanied
by proof of the date of purchase in the form of a sales
receipt.
Maxon’s sole obligation hereunder shall be to repair or
replace the Product covered in this Warranty. Replacement, at Maxon’s option, may include a similar or
higher-featured product. Repair may include the
replacement of parts or boards with functionally
equivalent reconditioned or new parts or boards.
Replaced parts, accessories, batteries or boards are
warranted for the balance of the original time period. All
replaced parts, accessories, batteries or boards become
the property of Maxon America, Inc.
15
Page 20

Maxon shall have no obligation to make repairs or to
cause replacement required through normal wear and
tear or necessitated in whole or in part by catastrophe,
fault or negligence of the user, improper or unauthorized alterations or repairs to the Product, use of the
Product in a manner for which it was not designed, or
by causes external to the Product. This warranty is void
if the serial number is altered, defaced or removed.
The purchaser shall provide for removal of the defective
Product and installation of its replacement.
THE EXPRESS WARRANTIES CONTAINED HEREIN ARE
IN LIEU OF ALL OTHER WARRANTIES, EITHER
EXPRESSED OR IMPLIED, OR STATUTORY, INCLUDING, WITHOUT LIMITATION, ANY WARRANTY OF
MERCHANTABILITY OR FITNESS FOR A PARTICULAR
PURPOSE.
FOR ANY PRODUCT THAT DOES NOT COMPLY
WITH THE WARRANTY SPECIFIED, THE SOLE
REMEDY WILL BE REPAIR OR REPLACEMENT. IN NO
EVENT WILL MAXON AMERICA, INC. BE LIABLE TO
THE BUYER FOR ANY DAMAGES, INCLUDING ANY
SPECIAL, INCIDENTAL, INDIRECT OR CONSEQUENTIAL DAMAGES, OR THE LOSS OF USE OF, OR THE
INABILITY TO USE THE PRODUCT.
This warranty is void for sales and deliveries outside of
the U.S.A.
16
Page 21

OPTIONAL / REPLACEMENT
MAXON ACCESSORIES
DV-7510 In-unit ni-cad battery charger
49-HXH Optional intercom passenger
headset
Rely on Maxon for quality, value-priced
consumer electronics!
HCB-40WX Handheld CB radio features
40 CB channels and 10
weather channels
GMRS-210+3 Two-way UHF radio offers
10 channel operation, hi/low
power switch
MCB-30 Compact 40 channel
mobile CB radio features
LED channel display
17
Page 22

49-HX ESPECIFICACIONES
GENERALES
Canales: 5
Intervalo de Frecuencia: A: 49.830 MHz,
B: 49.845 MHz,
C: 49.860 MHz
D: 49.875 MHz
E: 49.890 MHz
Fuente de Potencia: 3 Baterías AA alcalinas o
de níquel-cadmio
Dimensiones: 139.7 x 76.2 x 25.4 mm
Ancho x Alto x Profundidad
Peso: 184.28 gm
RECEPTOR
Sistema Receptor: Doble conversión
superheterodina de FM
Frecuencia Intermedia: Primera: 16 MHz,
Segunda: 455 kHz
TRANSMISOR
Sistema Transmisor: Modo "Presione para
hablar" manual o
sistema VOX
Potencia de Salida RF: 10,000 µV/M a 3 metros
(Máximo permitido por
la FCC)
Modulación: FM (Modulación de
Las especificaciones están sujetas a cambios sin previo aviso.
Frecuencia)
18
Page 23

DESCRIPCION DEL PRODUCTO
El comunicador "manos libres" 49-HX de Maxon,
es un radio transmisor - receptor de 5 canales,
bidireccional, portátil y compacto, con una función
de intercomunicación incorporada.
El radio tiene un conjunto de audífonos/micrófono
de diseño único que puede ser rápida
y fácilmente montado en una variedad de cascos
de cara cerrada y abierta, o se puede usar
como un conjunto de audífonos estándar. Las
comunicaciones entre el 49-HX y otros modelos
de 49 MHz es posible siempre que cada uno esté
equipado con el mismo canal y frecuencia
El Maxon 49-HX le da a usted la elección
de transmisión automática "manos libres" o la
operación manual - "presione para hablar". Con
la utilización del conjunto opcional de audífonos/
micrófono para pasajeros 49-HXH, es posible la
intercomunicación entre el conductor y el
pasajero.
19
Page 24

El 49-HX tiene cientos de usos, como recreativos
(viaje en motocicleta o bicicleta, navegación,
acampada, caza patinaje), y de negocios
(almacenes de depósito, mantenimiento de
edificios, control de inventarios, seguridad, etc.)
Por favor, dedique unos minutos a familiarizarse
con las características e instrucciones de operación
de su comunicador "manos libres"
49-HX de Maxon.
CONTENIDO DEL PAQUETE
El 49-HX de Maxon viene completo con el
sujetador para el cinturón, audífonos adaptables
a los cascos y con micrófono con jirafa ajustable
y antena flexible, material de sujeción de gancho
y lazo, y el manual del propietario. NOTA: Tres
baterías AA alcalinas o de níquel-cadmio se
requieren para el funcionamiento - las baterías no
están incluidas.
20
Page 25

CARACTERISTICAS
DE FUNCIONAMIENTO
•Operación de cinco (5) canales
•Alcance aproximado de 1/4 de milla
•Conjunto adaptable a un casco, de
audífonos/micrófono, con jirafa ajustable
y antena flexible
•Potencia suministrada por tres baterías
AA alcalinas o de niquel-cadmio (no
están incluidas)
•Opciones de mando mediante la voz
(VOX) o - presione para hablar - (P-T-T,
del inglés "push-to-talk")
•Ruedecilla para mover con el pulgar
que controla el encendido/apagado y el
volumen
•Control de sensibilidad VOX
•Indicador LED de baterías con carga baja
•Enchufes para cargar las baterías de
níquel-cadmio dentro de la unidad,
para el interruptor P-T-T remoto y para el
conjunto opcional de audífonos/ micrófono
para el pasajero
21
Page 26

INSTRUCCIONES DE OPERACION
1) Para extrarer la tapa del compartimiento de las
baterías hale la lengüeta de la tapa hacia
usted. Instale tres baterías AA nuevas, siga el
diagrama que indica la polaridad grabado en el
compartimiento para baterías. Para uso continuo y
trabajo pesado, se recomiendan baterías alcalinas.
NOTA: Las baterías recargables de níquel-cadmio
pueden utilizarse en el 49-HX. Para recargarlas
mientras estén instaladas en la unidad, se debe
utilizar el cargador de pared opcional de AC/DC
DV-7510 de Maxon. El tiempo promedio para
recargar las baterías es de 12-16 horas.
PRECAUCION: No trate de recargar baterías
alcalinas o de carbono zinc - podría resultar en una
explosión u otros daños a la unidad.
2) Utilizando el sujetador para el cinturón,
sujete la unidad a su cinturón o cualquier otro
lugar conveniente: colóquese los audífonos,
extienda la antena y ajuste hasta que le sea
cómodo. Mantenga el micrófono a una distancia
de 1" de su boca.
22
Page 27

NOTA: Si usted elige adaptar al conjunto de
audífonos/micrófonos 49-HX para usario dentro
de un casco, consulte las instrucciones en este
manual para su instalación en un casco.
3) Encienda y ajuste el volumen al nivel
deseado para escuchar.
4) Para seleccionar el canal deseado, utilice el
interruptor de selección de canales.
5) Si usted quiere comunicarse de radio a radio,
ajuste el interruptor intercom/TX a la posción TX.
Si usted elige utilizar el conjunto de audífonos/
micrófono Maxon 49-HXH para pasajeros (que se
vende separadamente), enchufe el conjunto de
audífonos/micrófono del pasajero y ajuste el
interruptor intercom/TX a la posición intercom.
6) Mueva el control de la ruedecilla VOX/P-T-T,
ya sea a la posición VOX (para transmisiones
"manos libres", activadas por la voz) o a la
posición P-T-T (para la transmisión manual presione para hablar). Cuando utilice el modo
VOX, ajuste la sensibilidad según sus alrededores
y necesidades. Para un ajuste alto, mire el frente
de la unidad y mueva la ruedecilla para mover con
el pulgar en el sentido de las agujas del reloj, o
en sentido contrario a las agujas del reloj
23
Page 28

para un ajuste bajo. Un ajuste bajo exige que
usted hable más alto para activar el transmisor y
debe utilizarse sólo cuando hay niveles altos de
ruido de fondo. Un ajuste más alto le permite a
usted hablar más bajo y debe utilizarse cuando el
nivel de ruido de fondo es más bajo.
NOTA: Los niveles de ruido muy altos pueden
causar que la unidad transmita continuamente en
el modo VOX. Cuando hay niveles de ruido muy
altos, el modo P-T-T (Presione Para Hablar) puede
ser el único método de evitar este problema.
El 49-HX de Maxon no recibirá transmisiones
mientras usted esté transmitiendo. Espere hasta
que el mensaje entrante termine antes de
transmitir.
Si la unidad parece no estar funcionando bien,
o si hay estática constantemente, pruebe
reemplazar las baterías, aunque la indicación
"BATT LOW" no se haya encendido en el LED.
24
Page 29

UTLIZACION DEL MODO INTERCOM
1) Cuando use el modo intercom de la unidad,
siga las instrucciones de operación en los pasos 1 a
3 del manual del propietario.
2) Ajuste el interruptor intercom/TX a la posición
intercom.
3) Enchufe el conjunto de audífonos /micrófono
opcional 49-HXH del pasajero (que se vende
separadamente), en el enchufe del conjunto
audífonos/micrófono en la parte superior de la
unidad.
4) Coloque el control de ruedecilla para mover
con el pulgar VOX/P-T-T como se instruye en las
instrucciones de operación.
NOTA: El conjunto de audífonos/micrófono
49-HXH del pasajero sólo se comunica con el
conjunto de audífonos/micrófono de la unidad
principal. No obstante, sí puede monitorear todas
las otras coversaciones entre diferentes unidades,
aunque no será capaz de trasmitir (Reglamentos de
la FCC).
25
Page 30

INSTRUCCIONES DE INSTALACION
EN UN CASCO
Tanto la banda para la cabeza como los auriculares
del conjunto de audífonos/micrófono 49-HX pueden
separarse del conjunto del micrófono con jirafa y de
la antena. Se incluye material de sujeción de
gancho y lazo con su equipo 49-HX para poder
asegurar el conjunto de la antena y el micrófono con
jirafa al exterior del casco y para asegurar los
auriculares al interior.
Para quitar la banda para la cabeza: Suelte la
antena flexible del gancho de retención. Mantenga
oprimida la lengüeta de liberación de la banda
para la cabeza (A) y suavemente deslice y saque
la banda del conjunto de antena/auriculares.
(Ilustración 1).
(A)
26
Page 31

Para quitar los auriculares: Suavemente saque
los auriculares del conjunto de la antena.
(Ilustración 2).
Pele el respaldo adhesivo de la pieza 2" x 4" de
sujeción de gancho y lazo. Aplique el material a
la superficie exterior del casco; colóquelo de
manera que la antena quede en posición vertical y
el micrófono con jirafa quede aproximadamente a
una (1) pulgada de su boca cuando tenga puesto el
casco.
Para montar los auriculares dentro del casco
colóquelos de modo que esté junto a su oído
cuando tenga puesto el casco. Se suministra un
pedazo 2" x 2" de material de sujeción de gancho
y lazo para este montaje. NOTA: Algunos cascos
tienen espacio para insertar los auriculares, o
tienen piezas acolchadas que se pueden sacar para
instalar los auriculares.
27
Page 32

INSTALACION DEL P-T-T
(Presione Para Hablar) REMOTO
El botón del P-T-T remoto del radio ha sido
diseñado para ajustarse al manubrio de una
motocicleta, bicicleta, moto de nieve, etc. El
49-HX viene provisto de una correa de montaje
con material de sujeción de gancho y lazo.
Para usar el interruptor del P-T-T remoto: Enchufe
en el macho del interruptor remoto (REM) en su
radio transmisor-receptor y ajuste el botón de
control VOX/P-T-T a la posición P-T-T (tan lejos
como pueda en dirección opuesta a las agujas del
reloj).
28
Page 33

INSTRUCCIONES PARA EL
DE SERVICIO DE GARANTIA
1) Refiérase a la sección de Instrucciones de
Operación de este Manual del Propietario para
ajustes que pueden aplicarse para corregir su
problema.
2) Si el procedimiento mencionado arriba
no corrige el problema que usted está experimentando con su unidad, devuelva la unidad
(con el comprobante de compra) al lugar donde
la compró, o llame al Departamento de Servicios
al Cliente de Maxon para solicitar ayuda.
Maxon America, Inc.
Customer Service Department
10828 NW Air World Drive
Kansas City, Missouri 64153
816/891-1093, ext. 499
29
Page 34

CONTRATO DE GARANTIA LIMITADA
La División de Productos para el Consumidor de Maxon
America, Inc. (de aquí en adelante referido como
"Maxon"), garantiza que sus Productos y los accesorios
incluidos estarán libres de defectos de mano de obra o
materiales bajo un uso normal por un período de
noventa (90) días a partir de la fecha de compra por el
usuario original, siempre y cuando el comprador haya
cumplido con los requerimientos aquí declarados.
Si el producto no funciona bajo un uso normal, a causa
de defecto(s) de manufactura o mano de obra durante el
período de noventa (90) días siguientes a la fecha de
compra, será reemplazado o reparado, a elección de
Maxon, sin costo alguno cuando se devuelva al lugar de
compra. La unidad defectuosa debe estar acompañada
del comprobante de la fecha de compra en forma de un
recibo de venta.
Conforme a la presente, la única obligación de
Maxon será la de reparar o reemplazar el producto
cubierto bajo esta garantía. El reemplazo, a opción
de Maxon, puede incluir un producto similar o de
mejores características. La reparación puede incluir el
reemplazo de partes o tableros por sus equivalentes
funcionales reacondicionados, o nuevos. Las partes,
accesorios, baterías o tableros reemplazados, estarán
garantizados por el resto del período de tiempo original.
Todas las partes, accesorios, baterías o tableros
reemplazados pasan a ser propiedad de Maxon
America, Inc.
30
Page 35

Maxon no estará en la obligación de hacer reparaciones
o de hacer reemplazos requeridos por el desgaste
natural, ni por la reparación parcial o total debida
a una catástrofe, a la falta o negligencia del usuario,
a reparaciones o alteraciones inapropiadas o no
autorizadas hechas al Producto, al uso del Producto en
una manera para la cual no está diseñado, o por causas
externas al Producto. Esta garantía es nula si se altera,
borra, o remueve el número de serie.
El comprador deberá hacerse responsable de la
remoción del Producto defectuoso e instalación de su
repuesto.
LAS GARANTIAS EXPRESAS AQUI CONTENIDAS
SUSTITUYEN TODAS LA OTRAS GARANTÍAS, YA
SEAN EXPRESAS, O IMPLICITAS, O ESTATUTARIAS,
INCLUYENDO, SIN LIMITACION, CUALQUIER
GARANTIA DE BUENA CALIDAD O IDONEIDAD
PARA UN PROPOSITO PARTICULAR.
PARA CUALQUIER PRODUCTO QUE NO CUMPLA
CON LA GARANTIA ESPECIFICADA, EL UNICO
REMEDIO SERA LA REPARACION O REEMPLAZO.
EN NINGUN CASO MAXON AMERICA, INC. SERA
RESPONSABLE POR CUALESQUIERA DAÑOS,
INCLUYENDO DAÑOS INCIDENTALES, INDIRECTOS
O EMERGENTES O POR LA PERDIDA DEL USO DE,
O LA INCAPACIDAD PARA USAR EL PRODUCTO.
Esta garantía es nula para ventas y envíos fuera de
Estados Unidos.
31
los
Page 36

ACCESORIOS OPCIONALES Y
DE REPUESTO DE MAXON
DV-7510 Cargador de Maxon de baterías
níquel-cadmio, para cargar
dentro de la unidad.
49-HXH Conjunto opcional de audífonos/
micrófonos para el pasajero.
¡Confíe en Maxon para recibir productos
electrónicos para el consumidor de
calidad y económicos!
HCB-40WX El radio portátil de mano tiene 40
canales de CB (banda ciudadana)
y 10 canales meteorológicos.
GMRS-210+3 Radio transmisor de UHF
bidireccional que ofrece 10
canales de operación, interruptor
de alta y baja potencia.
MCB-30 Radio de banda ciudadana de
40 canales, compacto móvil,
con visualizador de canales
tipo LED (diodo emisor de luz).
32
Page 37

FICHE TECHNIQUE DU 49-HX
GÉNÉRALITÉS
Canaux: 5
Plage de fréquence: A: 49.830 MHz,
B: 49.845 MHz,
C: 49.860 MHz
D: 49.875 MHz
E: 49.890 MHz
Source d’alimentation: 3 piles AA alcalines ou
au Ni-Cd
Dimensions: 139.7 x 76.2 x 25.4 mm
larg. x haut. x prof.
Poids: 184.28 gm
RÉCEPTEUR
Sysètme de réception: Superhétérodyne FM à
double conversion
Fréquence intermédiaire:1re fréq. int.: 16 MHz;
2e fréq. int.: 455 kHz
ÉMETTEUR
Système d’émission: Commande par la voix
ou manuelle
Puissance de sortie RF: 10,000m µV/m @ 3 m
(maximum établi par
la FCC)
Modulation: FM (modulation de
fréquence)
Les détails techniques sont sujets à changements sans préavis.
33
Page 38

DESCRIPTION DU PRODUIT
L’émetteur-récepteur mains libres 49-HX de Maxon
est un appareil portatif et compact à cinq canaux
doté d'une fonction d’intercom. Il comporte un
casque de communication exclusif qui peut aller
sur un grand nombre de casques protectecteurs
ordinaires ou intégraux ou être porté comme un
casque de communication normal. Avec le 49-HX,
il est possible de communiquer avec d'autres
appareils fonctionnant à 49 MHz s'ils sont tous
les deux réglés à la même fréquence.
Le 49-HX de Maxon vous permet de choisir
entre l’activation automatique (mains libres) ou
manuelle. À l'aide du casque pour passager
49-HXH (offert en option), le conducteur et son
passager peuvent communiquer sans problème.
Vous pouvez utiliser le 49-HX dans n’importe
quelle circonstance - dans les loisirs (en motocyclette, en vélo, en bateau, en camping ou à
la chasse) ou au travail (mise de matériel en
entrepôt, entretien d’un bâtiment, inventaire,
sécurité, etc.).
Nous vous prions de prendre ces quelques minutes
pour vous mettre au courant des fonctions de
l’émetteur-récepteur 49-HX et lire son mode
d’emploi.
34
Page 39

CONTENU
Le 49-HX comprend une attache pour ceinture,
un casque de communication, compatible avec un
casque protecteur, doté d'un micro téléscopique
réglable et d’une antenne fouet, des fermetures
à boucles et crochets ainsi qu'un manuel du
propriétaire. REMARQUE: Trois piles AA alcalines
ou au nickel-cadmium sont nécessaires. Elles ne
sont pas comprises.
35
Page 40

CARACTÉRISTIQUES
•Cinq canaux
•Portée d’environ 400 m (1/4 mi)
•Casque de communication, compatible
avec un casque protecteur, muni d'un
microphone télescopique et d’une antenne
fouet
•Alimentation: 3 piles alcalines ou au Ni-Cd
(non incluses)
•Activation automatique (par la voix) ou
manuelle (touche "émission")
•Interrupteur et commande de volume à
molette
•Commande de sensibilité (activation par la
voix)
•Voyant indicateur de niveau faible de la
pile
•Prises pour la recharge des piles dans
l’appareil, la touche d’émission à distance
et le casque du passager
36
Page 41

MODE D’EMPLOI
1) Retirez la porte du compartiment à pile
en la tirant vers vous. Insérez trois piles AA
neuves en respectant la polarité indiquée dans
le compartiment à pile. Des piles alcalines sont
recommandées dans le cas d’une utilisation
continue et intense.
REMARQUE: Il est possible d’utiliser les piles
rechargeables au Ni-Cd avec le 49-HX. Pour les
recharger pendant qu’elles se trouvent dans
l’appareil, utilisez le chargeur au mur c.a./c.c.
DV-7510 Maxon, offert en option. Le temps de
charge moyen est de 12 à 16 heures.
MISE EN GARDE: N’essayez pas de recharger des
piles alcalines ou au carbone-zinc. Elles pourraient
exploser ou endommager l’appareil.
2) À l’aide de la pince pour ceinture, fixez
l’appareil à l’endroit désiré. Mettez et ajustez
le casque, puis étirez l’antenne. Gardez
le microphone à moins de 1 po de votre bouche.
REMARQUE: Si l’utilisation du casque de communication avec un casque protecteur est anticipée,
consultez la section installation sur un casque
protecteur du présent manuel.
37
Page 42

3) Allumez l’appareil et réglez le volume au
niveau désiré.
4) Choisissez le canal à l’aide du sélecteur de
canaux.
5) Si vous désirez communiquer d’appareil à un
autre appareil, réglez le sélecteur Intercom/TX
à TX. Si vous décidez d’utiliser le casque pour,
passager Maxon 49-HXH (offert en option),
branchez ce dernier à votre appareil et réglez le
sélecteur à Intercom.
6) Réglez la molette VOX/P-T-T à la position
VOX (pour l’activation par la voix) ou P-T-T (pour
l’activation manuelle). Lorsque vous utilisez le
mode mains libres (VOX), réglez la sensibilité du
microphone en fonction de l’environnement et de
vos besoins. Orientez l’appareil vers vous et
tournez la molette dans le sens horaire pour
augmenter la sensibilité, ou dans le sens antihoraire pour une sensibilité plus faible. Lorsque la
sensibilité est faible, il vous faut parler plus fort
pour activer l’émetteur; ce réglage convient aux
endroits où le bruit de fond est élevé. Une
sensibilité élevée, préférable dans les endroits où
le bruit de fond est fabile, vous permettra de parler
à voix plus basse.
38
Page 43

REMARQUE: Si le bruit de fond est très élevé, il
est possible que l’appareil émette continuellement.
Si tel est le cas, le mode d’émission à distance peut
être le seul moyen de régler ce problème.
L’émetteur-récepteur 49-HX Maxon ne peut
recevoir de signaux lorsqu’il émet, et vice-versa.
Attendez que le signal que vous recevez soit
terminé avant d’émettre.
Si l’appareil semble mal fonctionner, ou s’il émet
toujours des parasites (statique), remplacez les
piles, même si le voyant BATT LOW n’est pas
allumé.
UTILISATION DU MODE INTERCOM
1) Lorsque vous utilisez l’intercom, suivez les
étapes 1 à 3 du mode d’emploi.
2) Réglez le sélecteur Intercom/TX à la position
intercom.
3) Branchez le casque de passager Maxon
49-HXH (offert en option) dans la prise située sur le
dessus de l’appareil.
4) Placez la molette VOX/P-T-T à la position
désirée (voir mode d’emploi).
39
Page 44

REMARQUE: Le casque de passager 49-HXH ne
communiquera qu’avec l’appareil principal. Il
peut écouter les autres conversations d’appareil à
appareil, mais ne peut émettre. (Règlements de la
FCC).
INSTALLATION SUR UN CASQUE
PROTECTEUR
Sur le casque du 49-HX, il est possible de détacher
le ruban serre-tête et l’écouteur du montage
antenne/microphone. Des fermetures à boucles et
crochets sont incluses avec le 49-HX afin de vous
permettre de fixer l’antenne et le microphone à
l’extérieur du casque et l’écouteur à l’intérieur.
Pour retirer le ruban serre-tête: Décrochez
l’antenne fouet du crochet de retenue. Tout en
gardant la patte de relâchement du ruban serre-tête
(A) enfoncée, retirez ce dernier du montage
antenne/écouteur en le faisant glisser. (Figure 1).
(A)
40
Page 45

Pour retirer l’écouteur: Retirez-le délicatement du
montage de l’antenne. (Figure 2)
Retirez la pellicule adhésive à l’endos de la
fermeture à boucles et crochets de 2 po x 4 po.
Placez le fermeture sur la surface extérieure du
casque de façon à ce que l’antenne puisse être
placée verticalement et que le microphone soit à
environ 1 po de votre bouche lorsque vous portez
le casque protecteur.
Placez l’écouteur à l’intérieur du casque de façon
à ce qu’il soit à côté de votre oreille lorsque vous
portez le casque. Une fermeture à boucles et
crochets de 2 po de côté est fournie à cet effet.
REMARQUE: Certains casques sont pourvus de
cavités ou d’un rembourrage amovible vous
permettant d’insérer un écouteur.
41
Page 46

INSTALLATION DE LA TOUCHE
D'ÉMISSION À DISTANCE
La touche d’émission à distance de l’appareil a
été conçue pour aller sur le guidon d’un vélo,
d’une motocyclette, d’une motoneige, etc. Une
courroie de montage avec fermeture à boucles et
crochets est incluse avec le 49-HX.
Pour utiliser la touche d’émission à distance:
Branchez-vous à la prise REM de votre appareil et
réglez la molette VOX/P-T-T à P-T-T (faites-la
tourner au maximum dans le sens anti-horaire).
42
Page 47

INSTRUCTIONS POUR RÉPARATIONS
1) Consultez la section Mode d’emploi du
présent manuel pour connaître les réglages qui
pourraient corriger votre problème.
2) Si ces réglages ne corrigent pas le problème,
retournez l’appareil (avec une preuve d’achat) au
détaillant, ou appelez le Département du
service à la clientèle de Maxon.
Maxon America, Inc.
Customer Service Department
10828 NW Air World Drive
Kansas City, Missouri 64153
816/891-1093, ext. 499
43
Page 48

DÉCLARATION DE GARANTIE LIMITÉE
La Division des produits de Maxon America, Inc.
(ci-après dénommée «Maxon») garantit que ses produits
et accessoires inclus seront exempts de défauts de
matériau ou de fabrication pour les quatre-vingt-dix
(90) jours suivant la date d’achat initial. Les conditions
d’utilisation doivent être normales, et l’acheteur doit
avoir rempli les exigences mentionnées dans les
présentes.
Tout produit utilisé dans des conditions normales qui
serait défectueux, par suite d’un défaut de matériau
ou de fabrication, dans les quatre-vingt-dix (90) jours
suivant la date d’achat initial et qui est rapporté à
l’endroit d’achat sera, à la discrétion de Maxon,
remplacé ou réparé sans frais. L’appareil défectueux doit
être accompagné d’une preuve d’achat, c.-à-d.
le coupon de caisse.
L’unique obligation de Maxon est de réparer ou de
remplacer l’appareil défectueux. S’il y a remplacement,
Maxon, à sa discrétion, rendra à l’acheteur un modèle
similaire ou supérieur au modèle défectueux. Si
l’appareil est réparé, des pièces ou des cartes neuves ou
réusinées pourront être utilisées. Les pièces, accessories
ou cartes utilisés dans la réparation sont garantis pour la
période résiduelle de la garantie d’origine et deviennent
la propriété de Maxon America, Inc.
Maxon n’est pas tenue d’effectuer tout remplacement ou
réparation rendu nécessaire par l’usure normale ou, en
44
Page 49

tout ou en partie, par une cause naturelle, la faute ou la
négligence de l’utilisateur, des réparations ou altérations
inadéquates ou non autorisées du produit, l’utilisation
du produit dans un contexte pour lequel il n’était pas
conçu ou par des causes extérieures au produit. De
plus, la présente garantie est nulle si le numéro de série
a été altéré, enlevé ou s’il est illisible.
Il incombe à l’utilisateur de retirer l’appareil défectueux
de son installation et de poser l’appareil de
remplacement.
LA GARANTIE EXPLICITE ÉNONCÉE DANS LES
PRÉSENTES REMPLACE TOUTE AUTRE GARANTIE
EXPRESSE, IMPLICITE OU STATUTAIRE; CELA
COMPORTE, MAIS NON EXCLUSIVEMENT,
TOUTE GARANTIE IMPLICITE D’APTITUDE À LA
COMMERCIALISATION OU D’APTITUDE
PARTICULIÈRE.
L’ACHETEUR CONVIENT QUE SON SEUL RECOURS
POUR UN APPAREIL QUI NE RESPECTE PAS LA
GARANTIE SPÉCIFIÉE EST SON REMPLACEMENT OU
SA RÉPARATION. MAXON AMERICA NE PEUT EN
AUCUN CAS ÊTRE TENUE RESPONSABLE DE TOUT
DOMMAGE, INCLUANT TOUTE PERTE D’ARGENT,
TOUT DOMMAGE ACCIDENTEL, INDIRECT OU
ACCESSOIRE AINSI QUE LA PERTE DU PRODUIT OU
L’INCAPACITÉ DE L’UTILISER.
La présente garantie ne s’applique pas aux ventes et
livraisons effectuées à l’extérieur des États-Unis.
45
Page 50

ACCESSOIRES OPTIONNELS/
DE REMPLACEMENT MAXON
DV-7510 Chargeur de pile au Ni-Cd à
l’intérieur de l’appareil.
49-HXH Casque de communication pour
passager (offert en option).
Vous pouvez compter sur Maxon pour
des produits électroniques de qualité
avec un bon rapport qualité-prix!
HCB-40WX Poste SRG portatif à 40
canaux et 10 canaux météo.
GMRS-210+3 Radio UHF à deux voies, 10
canaux et un sélecteur haute/
basse puissance.
MCB-30 Poste mobile SRG compact à
40 canaux et affichage du
canal à diode
46
Page 51

Thank you for choosing Maxon !
¡Gracias por escoger a Maxon!
Merci d’avoir choisi Maxon!
For more information, contact:
Para obtener más información,
comuníquese con:
Pour de plus amples informations:
Maxon America, Inc.
Consumer Products Division
10828 NW Air World Drive
Kansas City, Missouri 64153
Phone: 1-800-922-9083, ext. 399
Fax: 816/891-8815
Printed in Thailand U.S. P/N: 680-090-0015
Impreso en Tailandia P/N: 93658BA
Imprimé en Thaïlande
 Loading...