

Page 1

Portable Standalone
Alarm System
User Manual
Printed in China
2016 V 1.0
Page 2
Description
Specifications
The multi-functional indoor standable sys tem is in sleek,
modern-looking design with mirror touch key pad.
It offers affordable safety sol ution, no mont hly costs.
Low-power FHSS technology mak es sure the stab ility of
the communication which means ideal range, mo re secure
and anti-interference, less chance of missi ng something
important. It can be operated as po rtable stand alone alarm
system or a control panel based acc essory. It ale rts you,
your neighbors and deter intruders which is sui table for
student's dorm room,rental room, the young pr ofessional 's
apartment or the family looking f or a simple solu tion to
secure doors, windows and more.
Features
※ Visual LED backlight gently ale rts you for armi ng/
disarming status
※ Quick arming, disarming, stay a rming the syst em
※ Human touch voice prompt creat an interactive v oice
response and reduce the onfusio n.
※ The emergency panic SOS button- one click to sen d out help
messages
※ Delivers 90dB sound in the event of a n intrusion
※ Siren volume & alarming time prog ramable
※ The strong wireless range up to 100 m lets keep conn ected.
※ 1000mA backup battery protect s you for 12 hours a fter a
power outage.
※ 40pcs accessories and 10 remote c ontroller ca n be expandabl e
to form a full various protection
※ Fast and easy adjustment-free i nstallatio n with no cablin g work
Power Supply: DC 5V
Battery Back-up: 3.7V/1000m A
Static Current: <16mA
Max Alarm Current: <500mA
Wireless Receiving Distance: 100m (in open ar ea)
Max Siren Volume: 90dB
Operating Temperature: -25℃~5 5℃
Operating Humidity: ≤ 95% (non-condensing )
Housing Material: ABS
Siren Measurement: Φ 90m m*25 mm
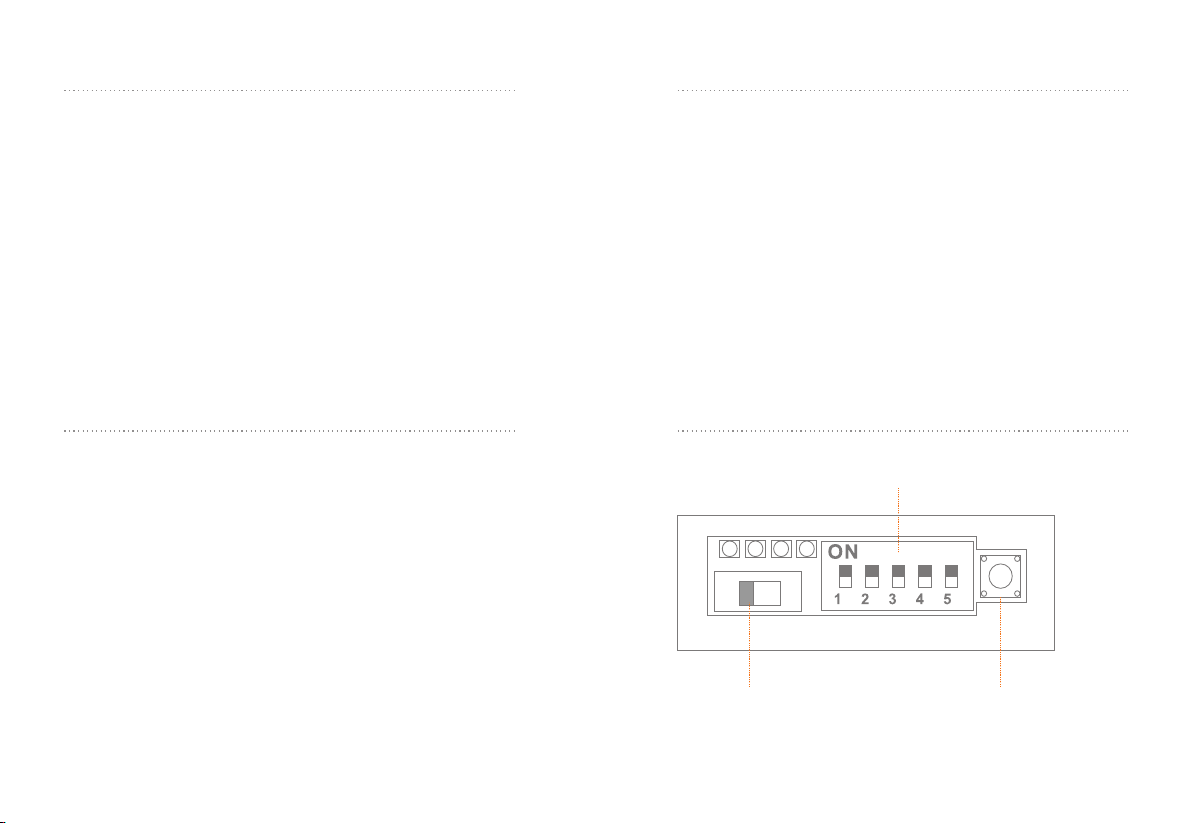
Diagram of PCB Board
Arm/Di sarm Prompt Ju mper Setup
On/off S witch
Enroll B utton
Page 3
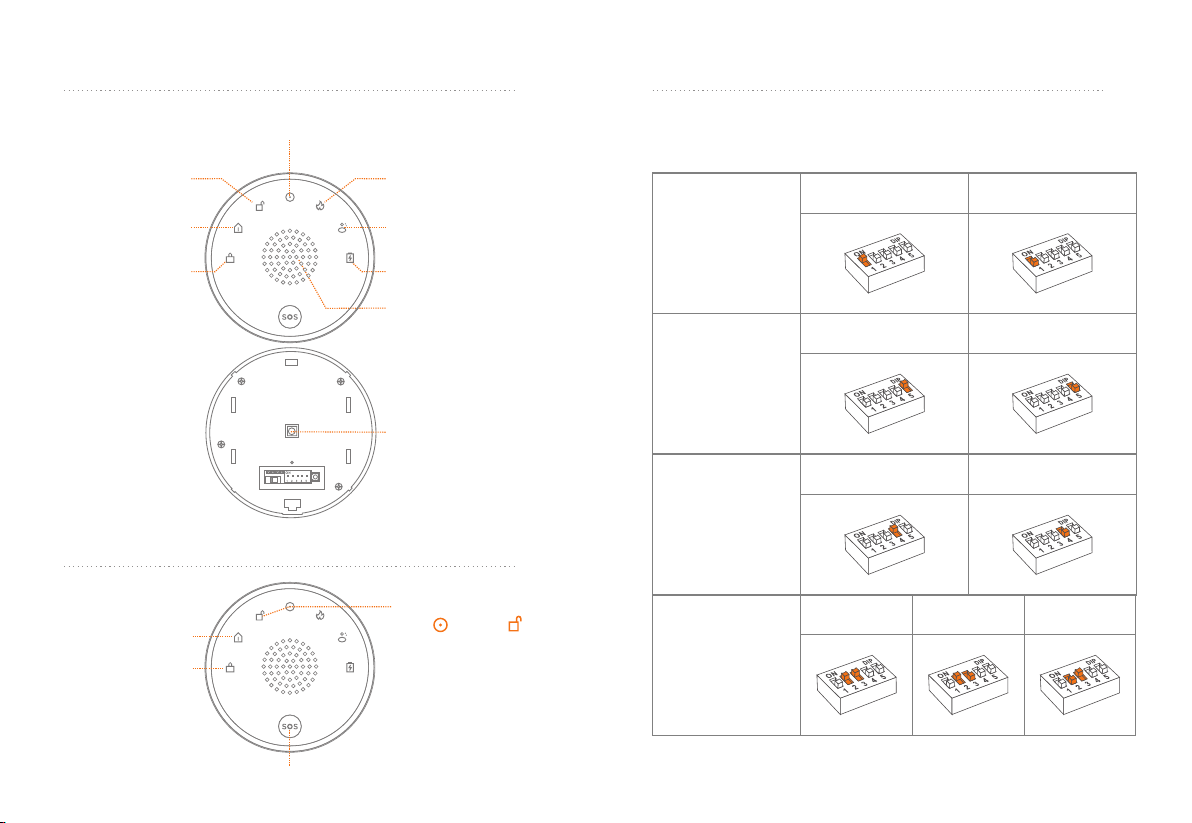
LED Indication
Jumper Setup
Normal Z one Alarm /
System D isarmed
System A rmed
in Stay Mo de
System A rmed
Button Operation
Stay Arm
Arm
Standb y Breathing
24 Hour
Zone Ala rm
SOS
Power Su pply
Siren
Blackl ight
Gre en: Sys tem arm ed.
Blu e: Syst em disa rmed.
Red : Syste m in alar ming mo de.
Disarm
(Pr ess 3 tim es+ )
User can setup tur n on/ off backlight LED, turn on/off siren
alarming, sire n ala rming duration, and siren volume.
Bac kligh t
LED S etup
(1)
Tur n on/of f
Ala rming P rompt
(5)
Sir en Volu me
(4)
Ala rming S iren
Dur ation
(2, 3)
On( As defa ult)
On( As defa ult)
Hig h Volum e
(As d efaul t)
30 Se c
(As d efaul t)
2 Min
Off
Off
Low V olume
5 Min
Emerge ncy Call
Page 4
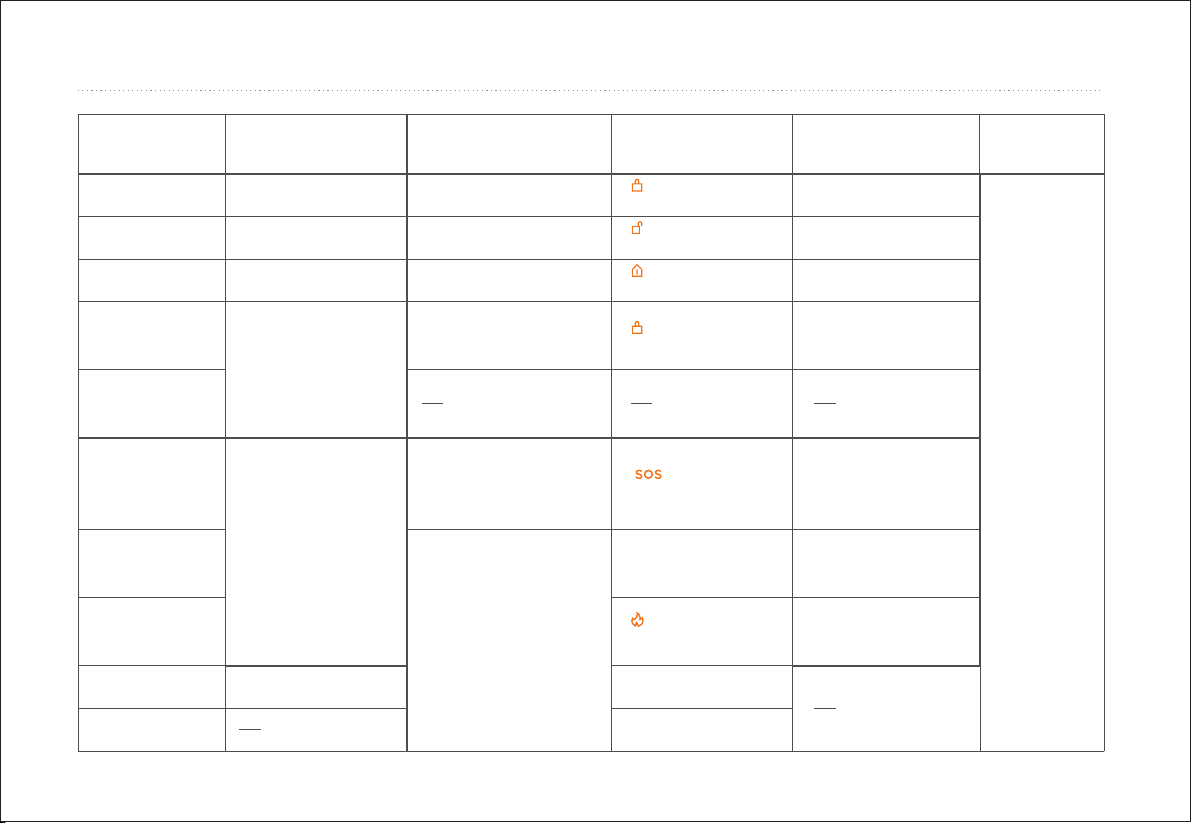
Siren Working Status
Status
Arm
Dis arm
Sta y Arm
Exi t Delay
Ent ry Dela y
Eme rgenc y Call
Nor mal Zon e
24 Ho ur Zone
Det ector T amper
Ala rm
Det ector L ow
Bat tery
Sound
Bee ps once (Low ba ttery
bee ps 5 time s)
Bee ps Twic e (Low
bat tery be eps 5 tim es)
Bee ps once (Low ba ttery
bee ps 5 time s)
It be eps onc e every
sec ond. Th e sound
wil l incre ase in te mpo
for t he last 1 0 secon ds
for t he"hu rr y up"
not ifica tion. O ne beep
wil l be hear d after t he
tim e is up.
(Al armin g durat ion is
set up by jum per) Th e
sir en stop s alarm ing
whe n syste m disar med.
Ala rming t ime:3 0 sec
Backlight
Gre en LED li ght up
for 6 0 sec
Blu e LED lig ht up
for 6 0 sec
Gre en LED li ght up
for 6 0 sec
Gre en LED fl ashin g
end ed with a l ong bee p.
Red L ED flas hing
(Al armin g durat ion is
set up by jum per)L ED
wil l stop fl ashin g once
sys tem dis armed .
Red L ED flas hing
It wi ll stop o nce sys tem
is di armed .
Status Indicator
ind icato r
nor mally o n
ind icato r
nor mally o n
ind icato r
nor mally o n
ind icato r
nor mally o n
ind icato r
nor mally o n
Nor mal zon e indic ator
nor mally o n
ind icato r
nor mally o n
Zon e indic ator fl ashes
qui ckly
Zon e indic ator fl ashes
slo wly
Voice Prompt
Sys tem arm ed in
awa y mode
Sys tem dis armed
Sys tem arm ed in
sta y mode
Sys tem arm ed in
awa y mode
Eme rgenc y Call
Zon e alarm
Zon e2 alar m
...
24 Ho ur zone a larm
Remark
Not e: Ther e is
no pr ompt to ne
whe n syste m is
mut e armed o r
dis armed b y the
rem ote con trol.
The s iren al so
mut ed once t he
con trol pa nel
set up to sil ent
ala rm type w hile
ala rming .
Page 5

Control Panel Based Siren-Network Mode
Connect Expandable Accessories to the Siren
In network mode, the siren is a control panel based system which
should be connected to the wireless alarm panel. The visual LED
backlight gently alerts you for arming/disarming status of the
alarm system. When alarm panel is alarming, it will hoot loudly
and the red LED flashes. User can quickly arm/disarm/stay arm
control panel system by pressing the touch buttons.
Connect Siren to the Alarm Panel
Press the Enroll Button of control panel, system beeps once and
the LED lights up in red. System enters enrolling status. Then
press the enroll button of Tutti. System beeps once, the LED light
flashes once, the enrollment is successful. If system beeps twice
and the LED light flashes once, the accessories have been enrolled
before. If three beeps are heard and LED light flashes once, the
storage is full. Press the enrolling button again to exit. System will
exit automatically after 20 seconds
Note!
1.Please do not trigger any other accessories during connecting with alarm panel.
2. As long as control panel been connected with siren, other accessories
no need to connect again.
Standalone Alarm System-Standalone Mode
As standalone mode, all accesso ries be should e nrolled to
the siren. Any detector triggered will activa te the siren
immediately.
Press enroll button of siren, the enroll backli ght purple LED
light up, siren enters enrollin g state, then tr igger the
accessory ( for example: press arm button of remo te control,
depart the transmitter and magn et of door senso r etc.),
the connection is successful after enroll LED l ight flashes o nce.
Press the enrolling button again to exit.
System will exit automaticall y after 20 secon ds.
Not e:
1. If a ccess ory in de lay zon e, sire n will al arm aft er 30 sec d elay.
2. Co nnect o utdoo r siren t o the ind oor sir en: Pre ss enro ll butt on of
out door si ren, ou tdoor s iren en ters en rolli ng stat e, pres s emerg ency
but ton of re mote co ntrol (Its re mote al ready c onnec t to indo or sire n
bef ore), t he conn ectio n is succ essfu l after e nroll b utton f lashe s once.
Clear All Enrolled Accessories
Press and hold the enroll button un til one
beep is heard, all accessories wi ll be cleared.
Test the distance between siren and control panel
In order to make sure the position of s iren is well con nected
with control panel, please test communicati on distance
before install.
Supervision for Door Sensor
If the door is open, when you arm the system, Tutti wil l beep in 3
times to remind user to close the door. User can forc e to arm the
system by pressing the "Arm" butt on again withi n 5 seconds.
Page 6
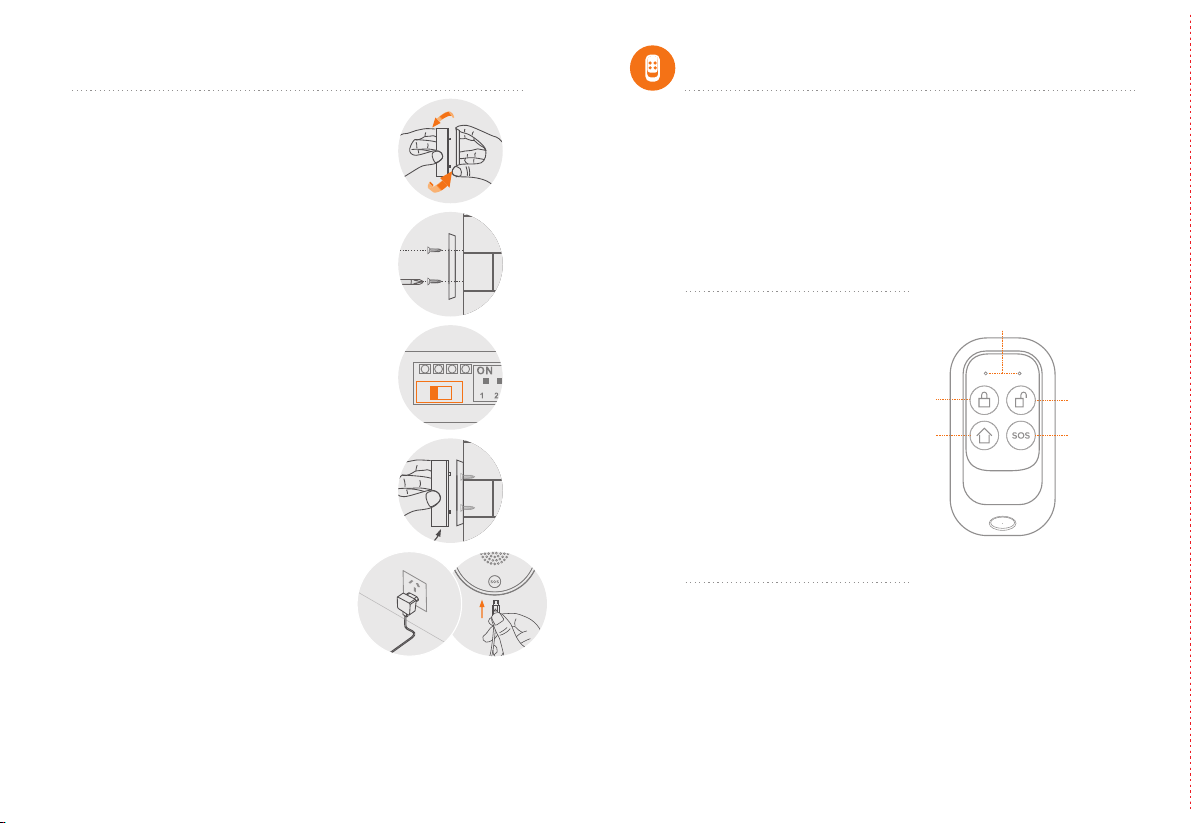
Installation Steps
Wireless Remote Control
1. Loosen the back cover in
counterclockwise rotation.
2. To nail the screws in to the wall,
please make sure the position of si ren.
3. Turn on power switch.
4. To put cover in right side,
then fix it with clockwise rotation.
5. Finally connect the power supply.
Tip s:
1. Do n ot heat o r drop th e Strob e Siren i n case of t he dama ge of the
com ponen t insid e.
2. In c ase of th e unexc eptio nal cas e, the St robe Si ren sho uld be te sted
reg ularl y, so tha t it can be f ixed at o nce.
Thecompact and elegant remote control is easy to carry. It is designed
to fit on a key chain, a purse, a pocket or to be hidden in the car sun visor.
This remote control act as multi-purposekeyforarming, disarming,
armingstay, andemergencycall.
LED Indication:
Arm
LED Indicator
Disarm
Emergency Call
LED Flashes:
Transmitting the signal
to control panel.
Low LED Light:
Low battery,
please replace the
battery immediately.
Stay Arm
(Home Mode)
Specifications:
Power Supply: DC 3V(2pcs CR2016 button cell batteries)
Transmitting Frequency: ≤25mA
Transmitting Distance: ≤80m (in open area)
Housing Material: ABS plastic
Working Temperature: -10°C-55°C
Humidity: Up to 80% (non-condensing)
Dimension(L/W/H): 35x70x12 mm
Page 7
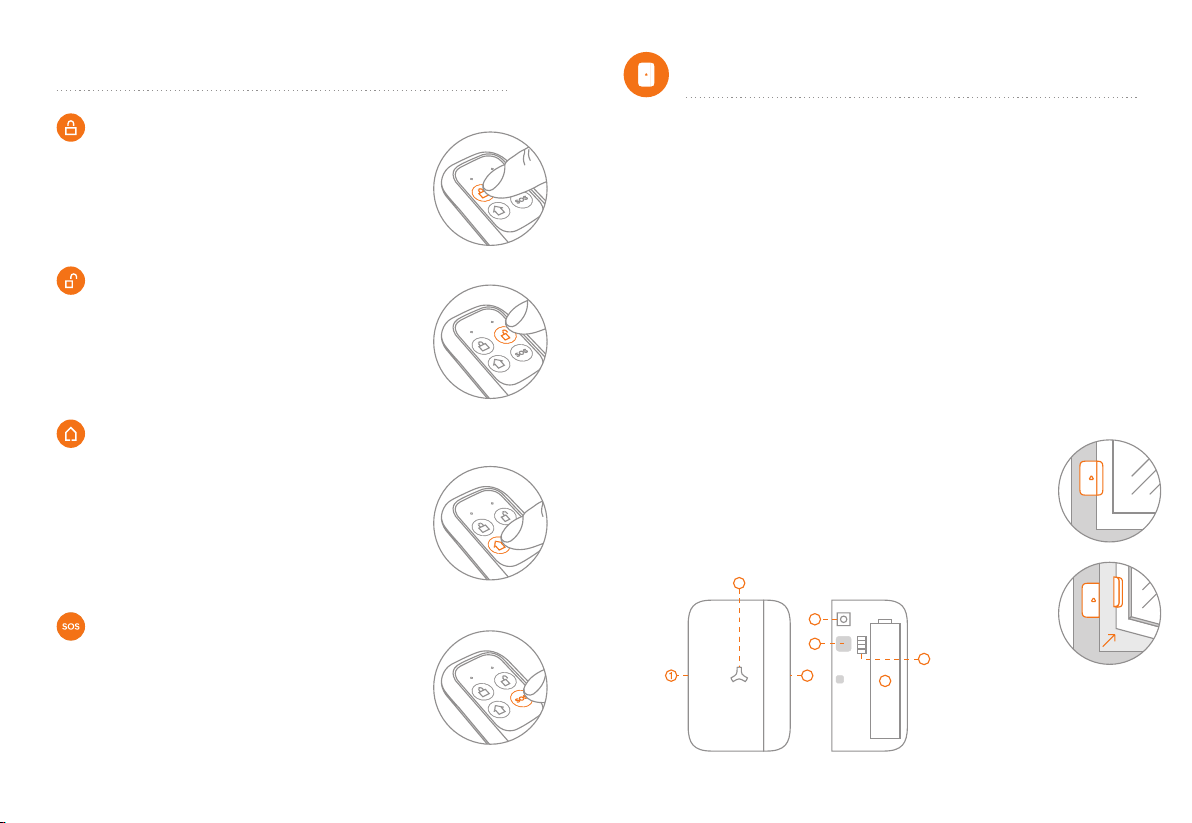
Button Manual
Wireless Door/Window sensor
Arm
Press the button to arm the system before leaving arm
your home, arming LED (left)flashesonce,any detectors (in
Normal Zone) triggered will activate the system to alarm
immediately. The system simultaneously calls the preset
phone numbers.
Disarm
Press button before entering your home,disarming disarm
LED (left)flashes once. Then you are able to move freely in
your home without triggering the alarm. In the event of
alarm, you can press this button to disarm the system and
silence the siren.
Stay Arm (Home Mode)
Press the button, arming LED (left ) flashes once, the siren stay
beeps once, system is in stay arm mode. The accessories in
home mode are disarmed, this allows the user to move
freely at home, while the rest of the system is fully armed,
the accessories in normal zones will activate an immediate
alarm when
triggered.
Emergency Call
Once there's an emergency situation, no matter what
state the alarm system is in, press b once for help, SOS utton
both LED flashes once, the system immediately goes into
an alarm condition and notify your family.
Connect Door Sensor to Control Panel:
The new-bought door sensors should be enrolled to the control panel
before use.
For specified operation, please refer to the manual of alarm system.
Specifications:
Power Supply: DC1.5V/AA battery
Standby Current: ≤20uA
Alarm Current: ≤28mA
Wireless Transmit Distance: ≤80 m (in Open Area)
Temperature/Humidity: -10°C-55°C/≤80% (Non-condensing)
Dimensions (L x W x H): 48 x 71 x 18mm
Features:
The Door/Window Sensor can be installed on doors,
windows and any other objects that open and close.
The sensor transmits signal to control panel when the
magnet mounted near the sensor is moved away.
to move the sensor will result in an alarm activation.
The tamper protection ensures that sabotage attempts
2
7
6
3
1.Transmitter
2.LED Indicator
5
3.Magnet
4
4.Battery Compartment
5.Zone Jumper
6.Buzzer
7.Tamper Switch
Page 8
Tamper Alarm: Once intruder attempts to move the sensor, built-in buzzer
beeps. The control panel will send tamper alarm message to user at the
first time.
Zone Jumper: Please follow manual of alarm system for zone setup.
The door sensor is set in normal zone1 as default.
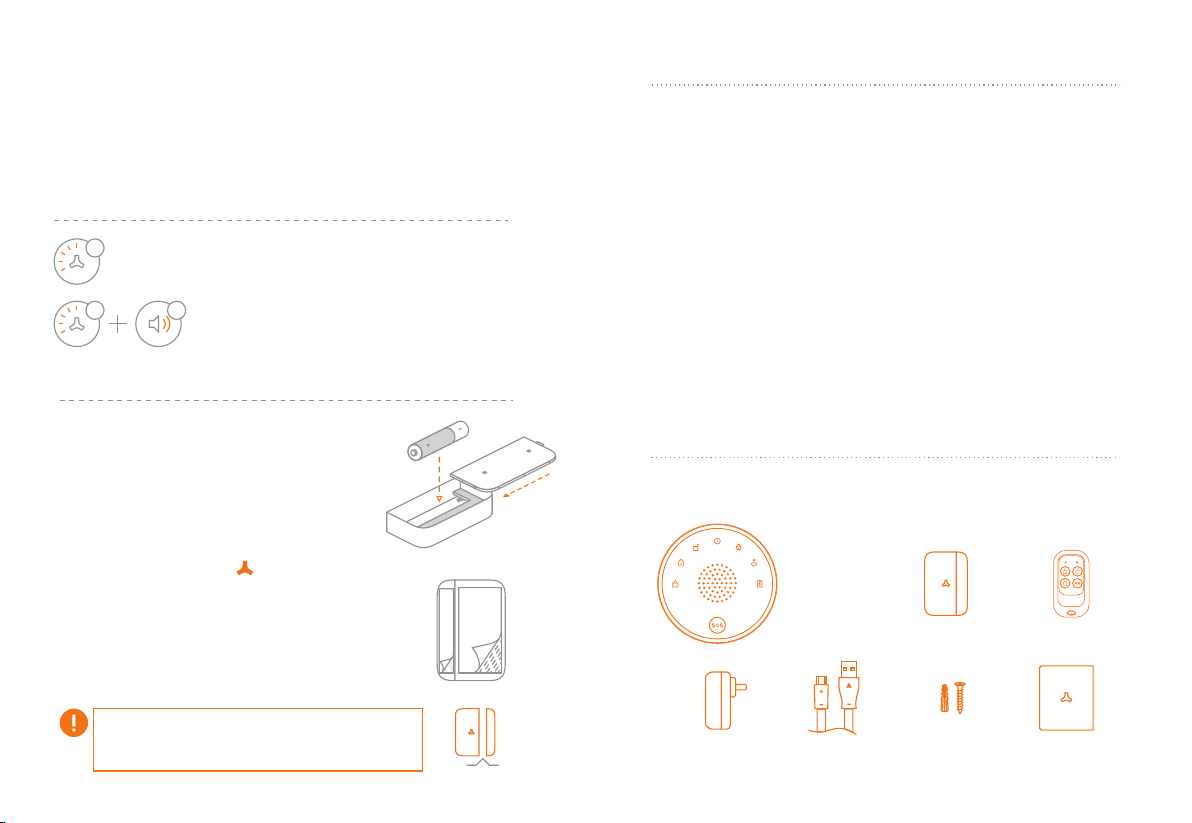
Working Status:
1
LED flashes once:
Door or window is opened, and the transmitter
sends signal to the control panel.
LED flashes 5 times, and buzzer beeps 5 times:
55
Tamper alarm, low battery indication.
If it's in low battery state, please replace it immediately.
Installation:
Warning
1. It s hould b e insta lled in door in c ase of be ing not iced an d destr oyed.
2. It s hould b e insta lled ab ove 0.5 m from th e groun d to avoi d shiel ding.
3. Pl ease av oid tri ggeri ng SOS un der non -emer gency c ircum stanc e in case
of di sturb ing nei ghbor s.
4. Pl ease do n ot plac e the con trol panel near to the high-frequency hig h power el ectrical applianc es like fax, microw ave ove n etc.
5. Af ter ins talla tion, p lease t est pro ducts ’ real tr ansmi tting a nd rece iving
dis tance s to avoi d loss ca used by f alse al arm.
6. Pl ease re gular ly chec k produ cts to ke ep the m work no rmall y.
7. Pl ease ke ep it aw ay from h umid, h igh-t emper ature p lace an d metal .
8. In stall ed in flam mable a nd expl osive p laces i s prohi bited .
9. Do n’t dis moun t or refit p roduc ts by you rself t o avoid m alfun ction a nd
acc ident .
10. R emote c ontro l and doo r senso r are con taine d for sta ndard k it.
If yo u purch ase one u nit of Tutti, no addt ional a ccess ories a re cont ained .
Or yo u can pur chase r emote c ontro l and doo r senso r separ ately .
1. Open the case and install the battery properly.
2. Sensor can be installed on door or window that
open and close. Make sure the installed position
have been already cleaned.
3. Remove the paper strip of the double-sided
tape on the back of transmitter and magnet.
Carefully mount the transmitter on the
door frame and the magnet on the door.
4. Keep LED Indication light at the right direction.
Make sure the magnet is on the right of the transmitter.
5. Place the transmitter in the desired location,
mount the magnet no more than 1cm away from the
transmitter.
6. Avoid mounting sensors in areas with a large quantity
of metal and electric wiring.
The door sensor is set in Normal Zone 1 as default.
It will cause on immediate alarm if the magnet depart
from the transmitter more than 2cm in arming state.
<1cm
Items supplied in kits
Ple ase rem ove all s uppli ed cont ents fr om pack aging a s below .
If th ere' re a nythi ng miss ing, pl ease re turn to y our pla ce of pur chase .
Control Panel
Power
Adapter
USB
Cable
Door/Window Sensor
& Screws
Remote Control
User ManualPlastic Plugs
 Loading...