

Page 1
1
MLP-3500
User Manual
Page 2

TABLE OF CONTENTS
2
1. SAFETY PRECAUTIONS 3
2. PACKAGE CONTENTS 4
3. DESCRIPTION OF THE PLAYER 5
3.1. How to use the player ................................................................................. 5
3.2. Charging the player ................................................................................. 6
4. DESCRIPTION OF THE MAIN FUNCTIONS 7
4.1. Free to air channels, DVB-T ................................................................................. 7
4.1.1. Detailed function description ................................................................................. 7
4.1.2. Telescopic antenna connection guide .......................................................................... 7
4.1.3. External antenna installation guide .............................................................................. 8
4.2. FM radio ................................................................................. 9
4.3. Video player ............................................................................... 10
4.4. Audio player ................................................................................11
4.5. Image viewer ............................................................................... 12
4.6. Text viewer ............................................................................... 13
4.7. Settings ............................................................................... 13
5. CONNECTING THE PLAYER TO YOUR PC 14
5.1. File upload/ download ............................................................................... 14
5.2. Photo & text file display ............................................................................... 14
5.3. Audio & video file playback ............................................................................... 14
5.4. Disconnecting the player from your PC......................................................................... 14
5.5. Format the player ............................................................................... 15
5.6. Firmware upgrade ............................................................................... 15
6. VIDEO CONVERTER PROGRAM 17
6.1. PC system requirements: ............................................................................... 17
6.1.1. Available Format ............................................................................... 17
6.1.2. Necessary Codec to be installed ............................................................................... 17
6.2. Video converter program installation ............................................................................. 17
6.3. Video Converter guide ............................................................................... 18
7. TROUBLE SHOOTING 21
8. SPECIFICATIONS 22
Page 3
1. SAFETY PRECAUTIONS
3
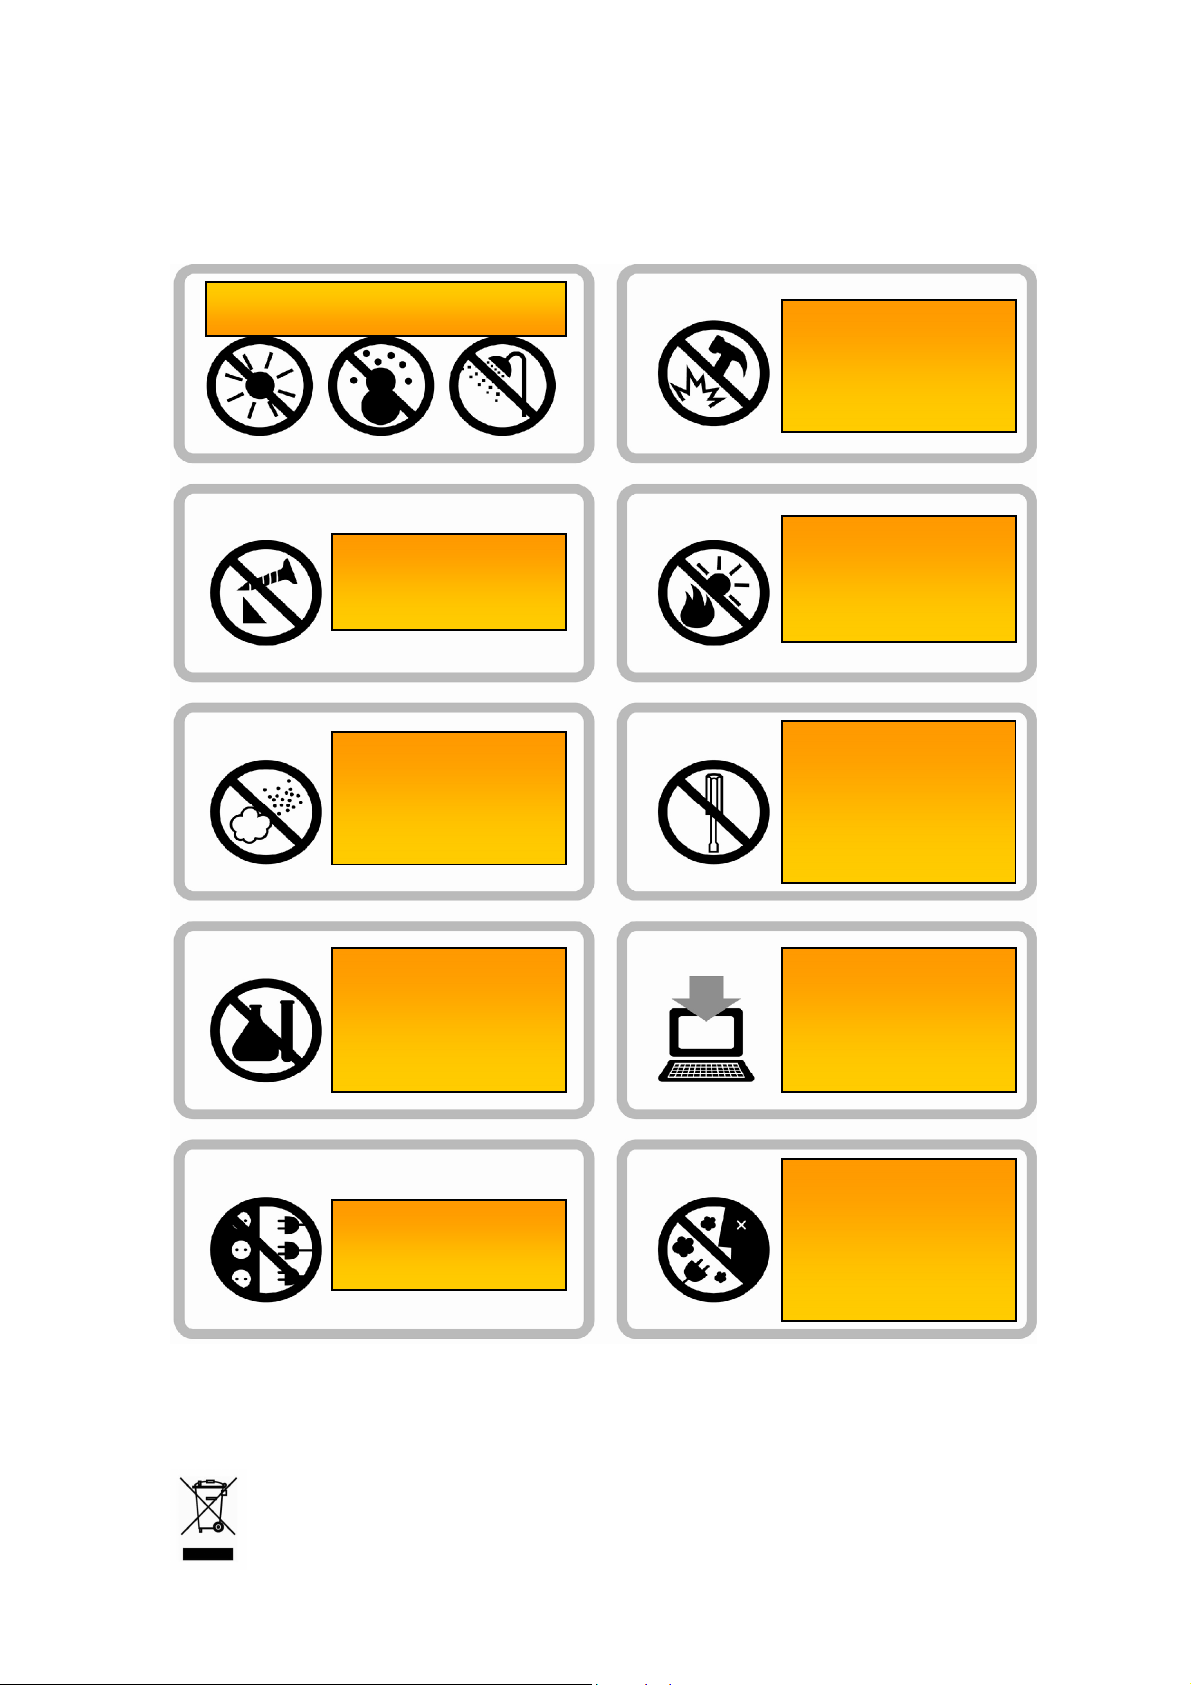
Avoid high/ low temperature and water.
Do not attempt to modify
the product.
Do not place the product
under high moisture or
dust level.
Do not drop or shake.
Prevent heavy shocks on
the product.
Avoid direct sunlight, and
high temperature from
heating device.
Never attempt to
disassemble, repair or
rebuild by yourself.
Contact your retailer.
Do not use thinner,
alcohol, or benzene when
cleaning the product.
Avoid using multi surge
outlet.
Make sure to backup and
store all important data
under your responsibility.
Stop immediately using
the player if you smell
smoke from the player or
power supply.
Do not wear earphones while driving an automobile, bicycle, or motorcycle.
Listening to music at high volume level for extended periods of time may result in damaging your
hearing.
WEEE (Waste Electrical and Electronic Equipment Directive): If at any time in the future
you should need to dispose of this product please note that waste electrical products
should not be disposed of with household waste. Please recycle where facilities exist.
Check with your Local Authority or retailer for recycling advice.
Page 4
2. PACKAGE CONTENTS
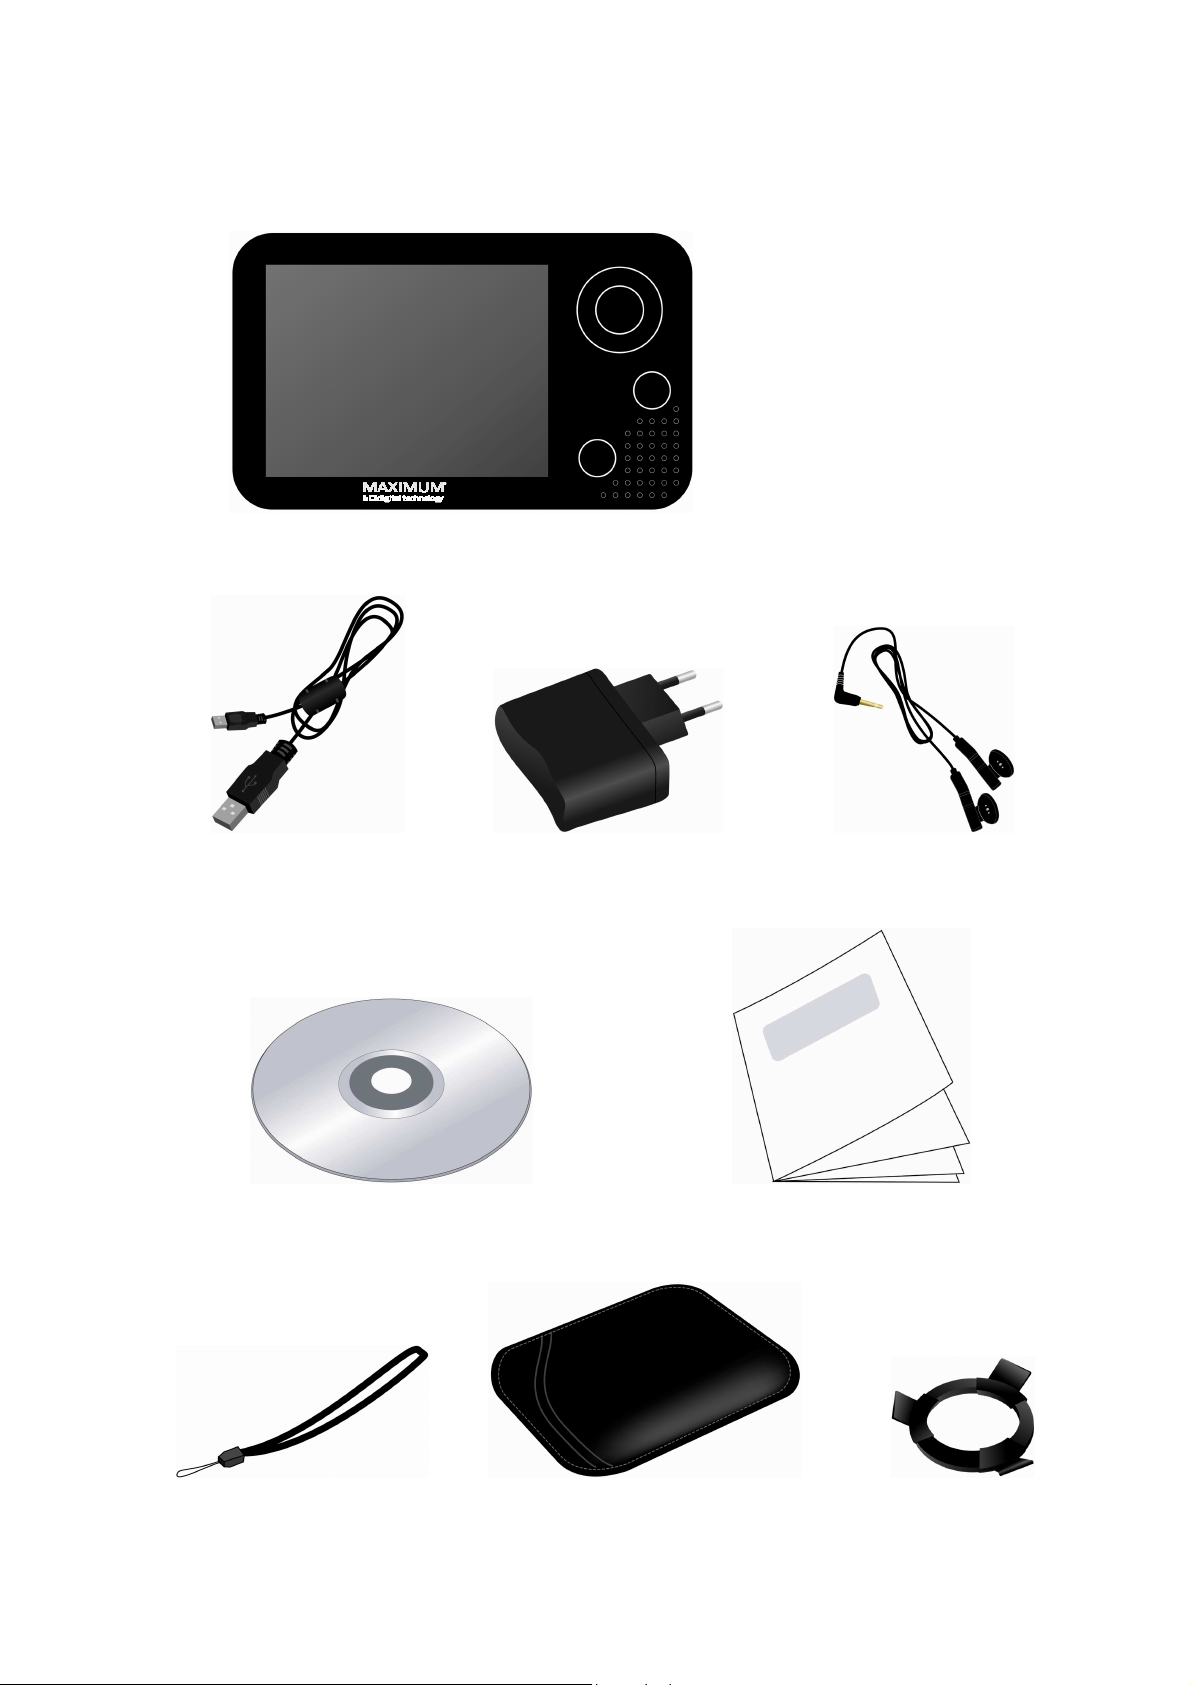
Player
4
USB Cable Power Adaptor Earphones
Installation CD Quick Guide
Hand Strap Soft Pouch Cradle
Page 5
3. DESCRIPTION OF THE PLAYER
5
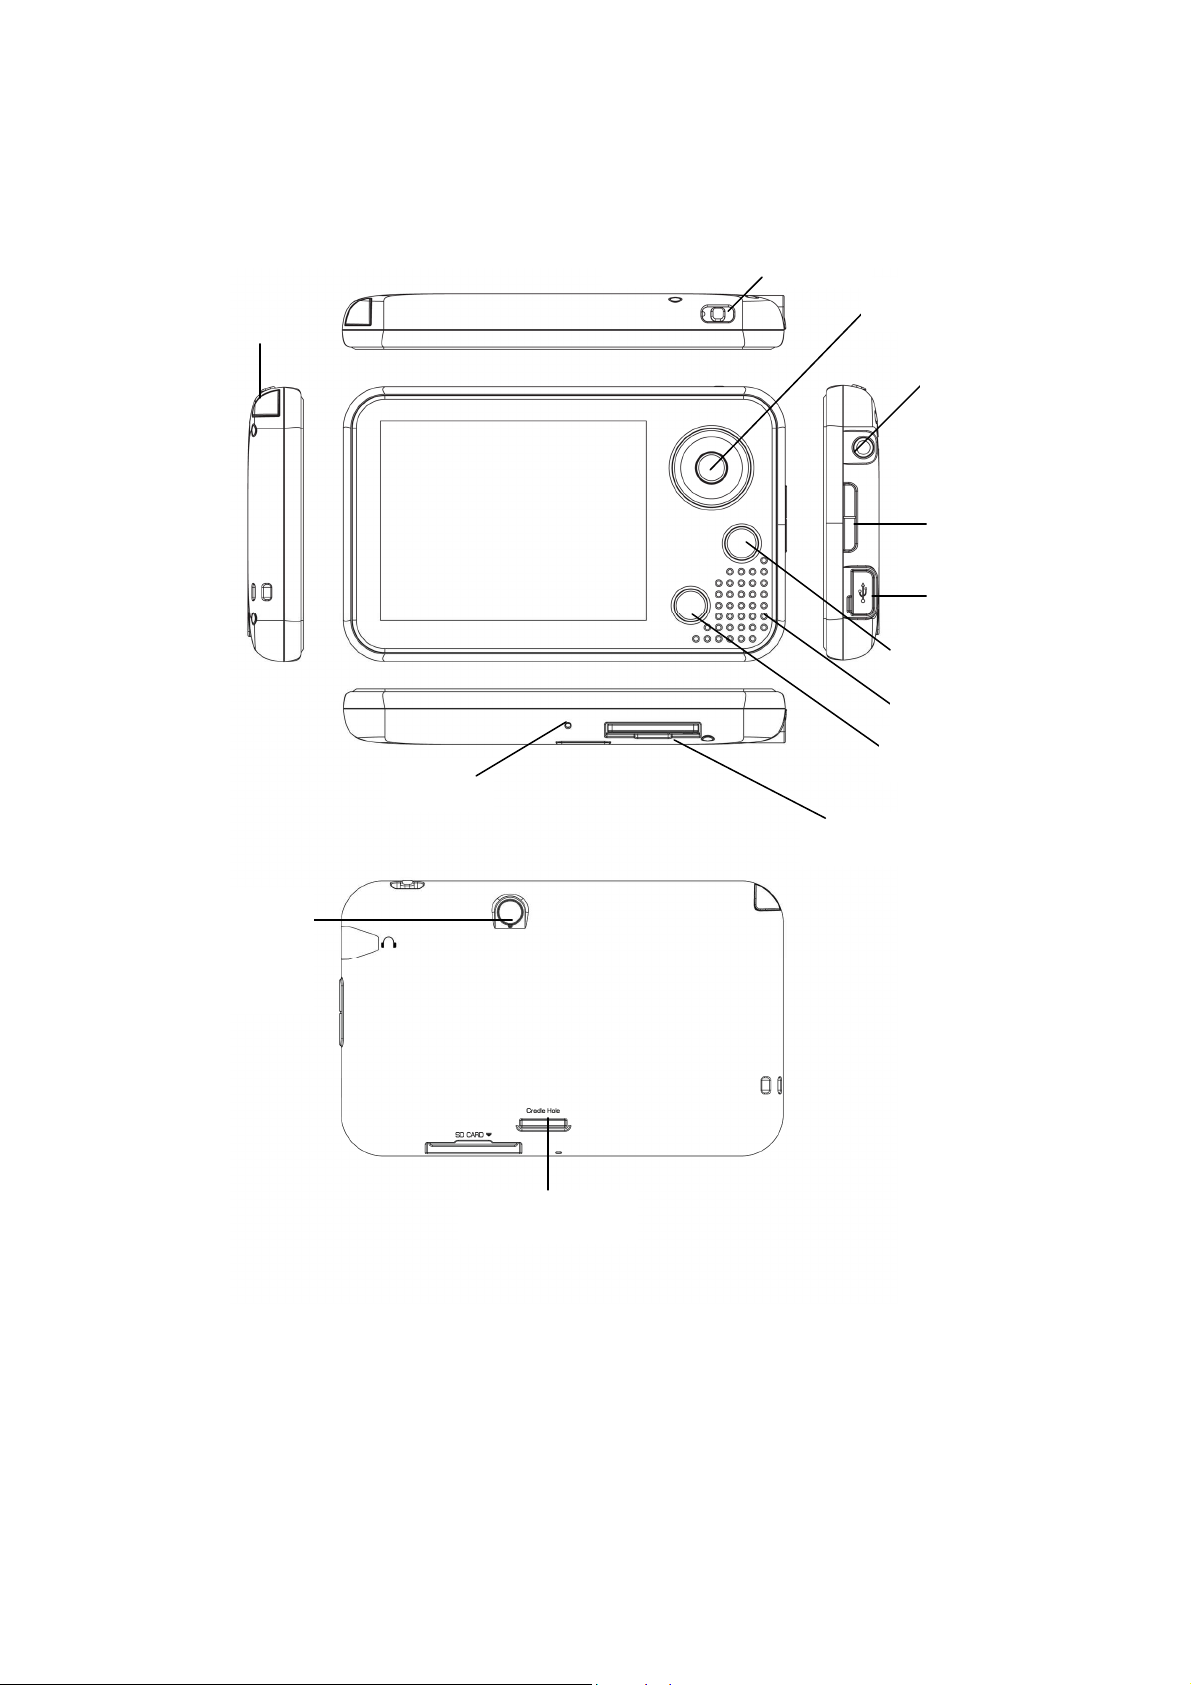
TELESCOPIC
ANTENNA
RESET
POWER/ HOLD SWITCH
NAVI KEY
EARPHONE
JACK
VOLUME
KEY
MINI-USB
PORT
SUB-MENU KEY
SPEAKER
RETURN KEY
SD CARD SLOT
EXTERNAL
ANTENNA
PORT
CRADLE HOLE
3.1.
How to use the player
POWER/ HOLD SWITCH: Push and hold the power switch toward the left (power sign) to
turn on the player. Do the same to turn off the player.
The hold switch prevents the player from turning-off by accident. To activate, push the
power switch all the way to the right (hold key sign).
VOLUME KEY: Volume can be increased or decreased (10 levels) using the volume keys
on the right side of the player.
Page 6

NAVI KEY: To move around the menus (up / down / left / right). The center button is used
to select items.
SUB-MENU KEY: Calls up a sub-menu list within the main menu content.
RETURN KEY: To return to the previous menu.
RESET: In case of your player suddenly freezing, push the reset button with a sharp-
ended instrument like a pin or clip and it will reset the player by force. Then turn on your
player again.
Note: This is different from formatting and no data is deleted during reset.
TELESCOPIC ANTENNA: For better reception, gently pull the telescopic antenna all the
way out towards the left.
EARPHONE JACK: To connect earphones to the player
SD CARD SLOT: For a compatible SD card
MINI USB PORT: To connect to a compatible PC and/ or to charge the battery.
3.2.
Charging the player
6
• To charge the battery via PC, connect the player to the USB port of your PC when the
PC is turned on. The battery will start charging.
• To charge the battery via charger, use the USB cable to connect the unit to the included
charger. The charging lamp will be red and will turn to green when the battery is fully
charged.
Page 7
4. DESCRIPTION OF THE MAIN FUNCTIONS
7
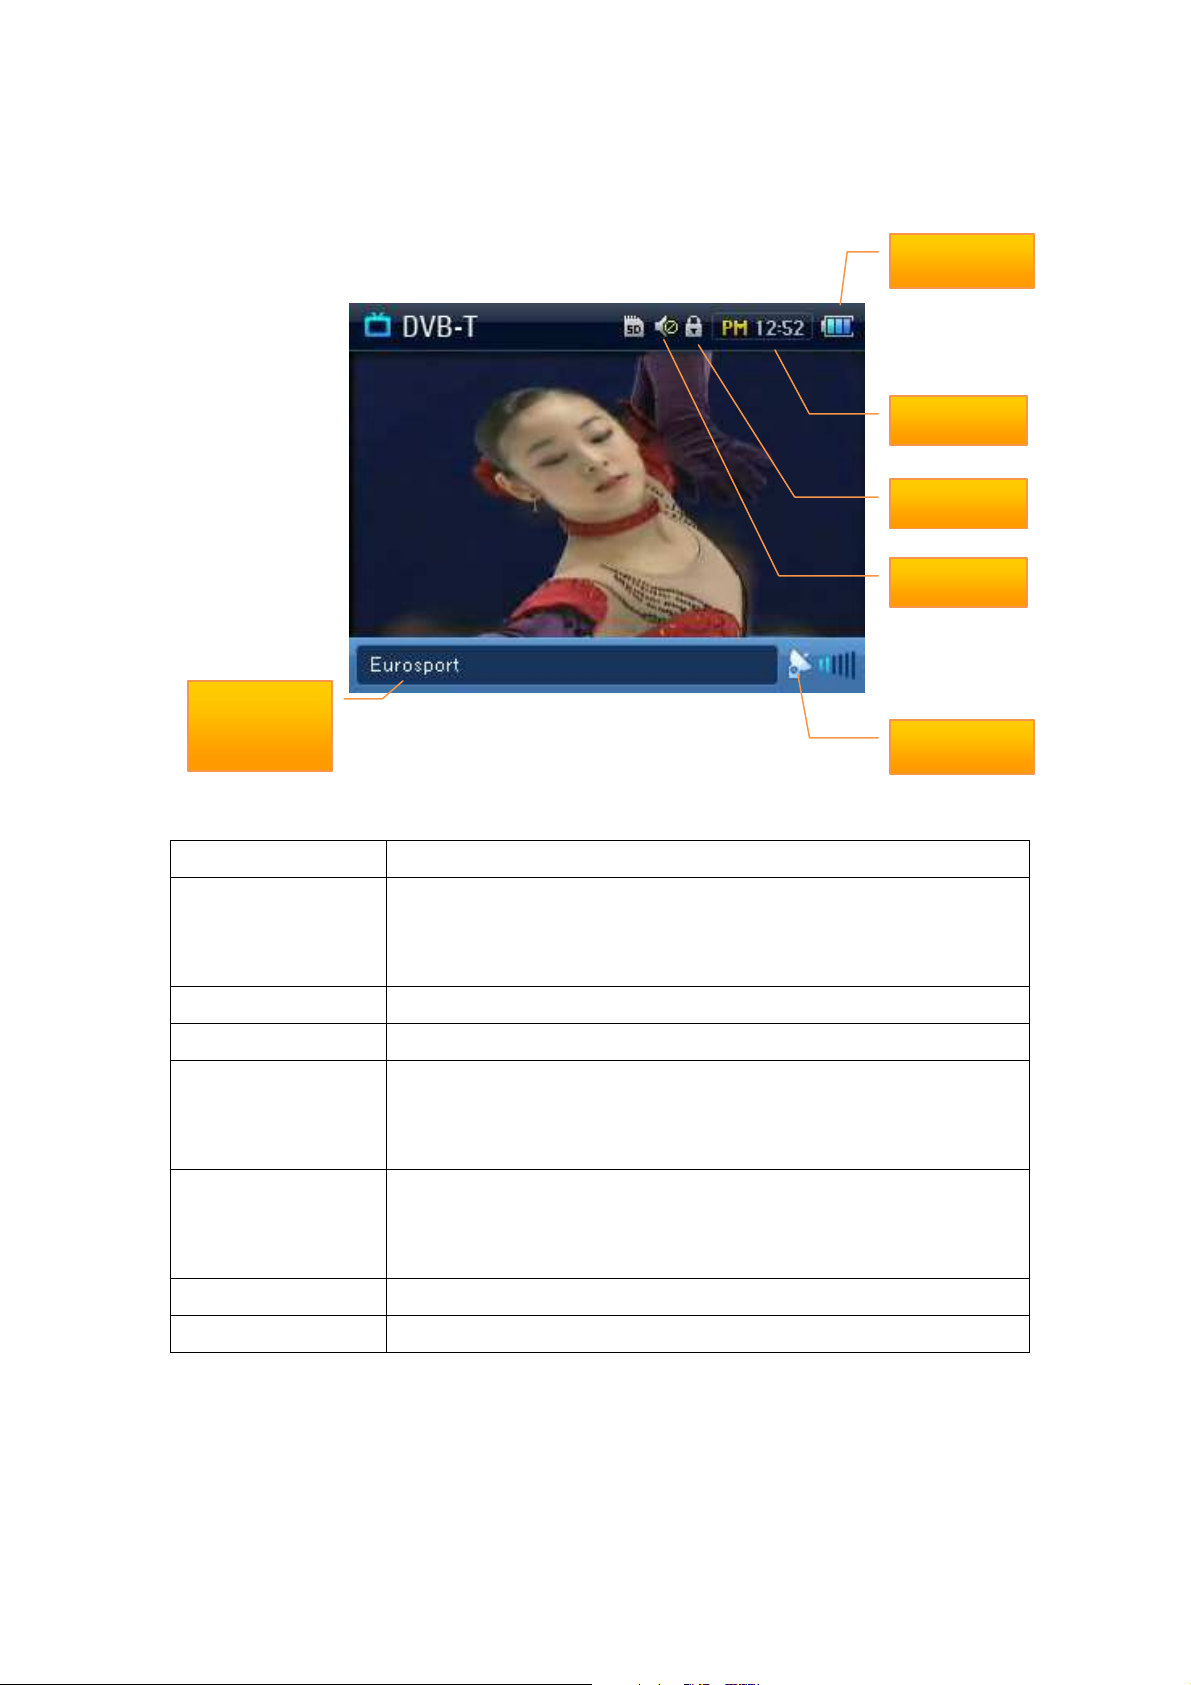
4.1. Free to air channels, DVB-T
Channel
name
4.1.1. Detailed function description
Battery
Clock
Hold
Mute
Reception
Mute
MTS (Multi
Deactivates sound.
You can choose from the LL/ LR/ RR mode
Television Sound
Service)
Full Scan
Manual Scan
Channel List
Scans all available channels.
Scans available channels from the selected frequency.
Displays searched channels. Select a channel to display it full screen.
Navigate in the list with the NAVI key (left or right).
TV and radio channel lists are independant.
EPG
Displays the program list of the current channel (EPG). Navigate in
the list with the NAVI key (left or right). Click on OK button of Navi key
to see detailed information.
Region
LCD Brightness
Selects region to scan channels.
Adjusts LCD Brightness (10 levels).
4.1.2. Telescopic antenna connection guide
If the telescopic antenna is loosen or disconnected from the device, please follow below
steps to reconnect it.
1. Insert the antenna into the antenna hole of the player.
Page 8
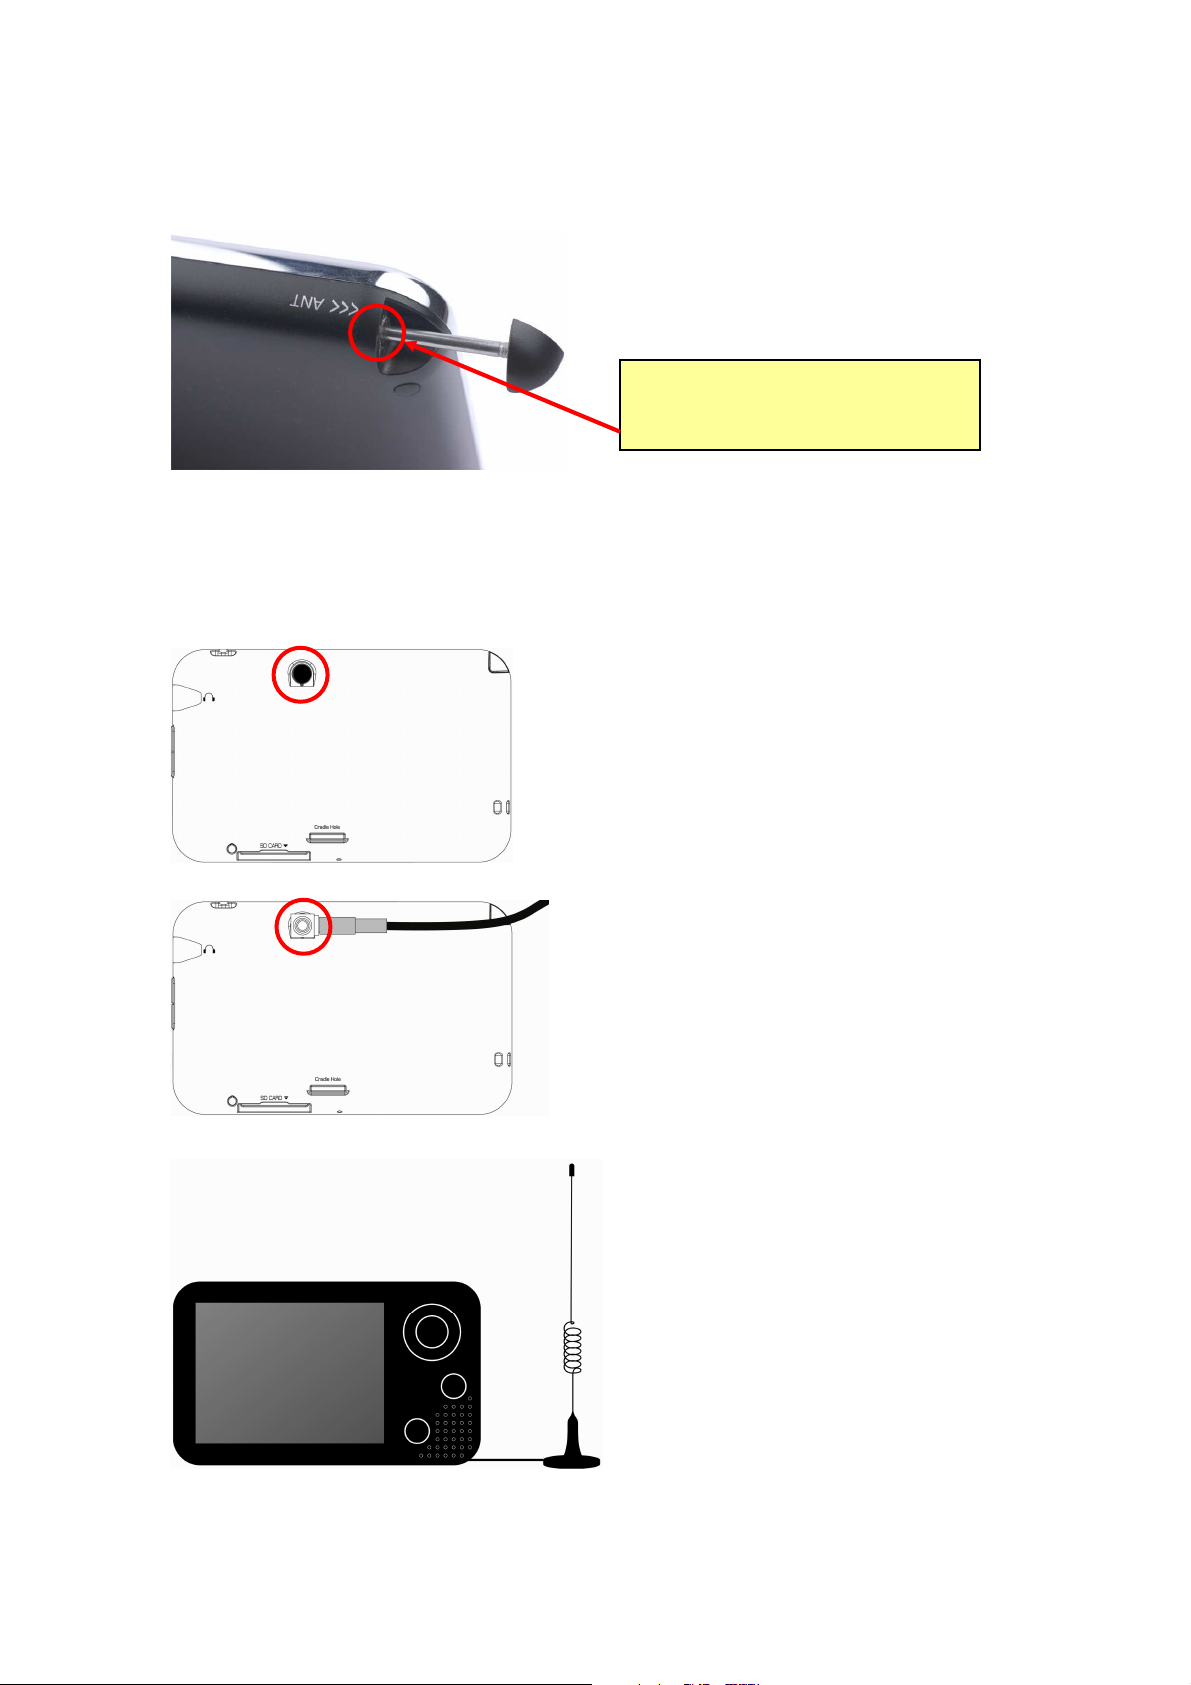
2. Use your finger, and slowly turn the antenna (red circled area) clock-wise until it is
firmly inserted. Be careful to not bend the antenna.
8
Insert the antenna clockwise, all
the way to the end.
4.1.3. External antenna installation guide
Note: the external antenna is not included. Contact your retailer to find a model that fits
your MAXIMUM Media Player.
1. Remove the cover of the external
antenna connector.
2. Connect the antenna cable to the connector.
Make sure that the cable is firmly connected to the
hole.
3. Move the antenna until you get a strong and
stable broadcast signal. For better reception, we
recommend you to fix the antenna on a metallic
surface.
Page 9
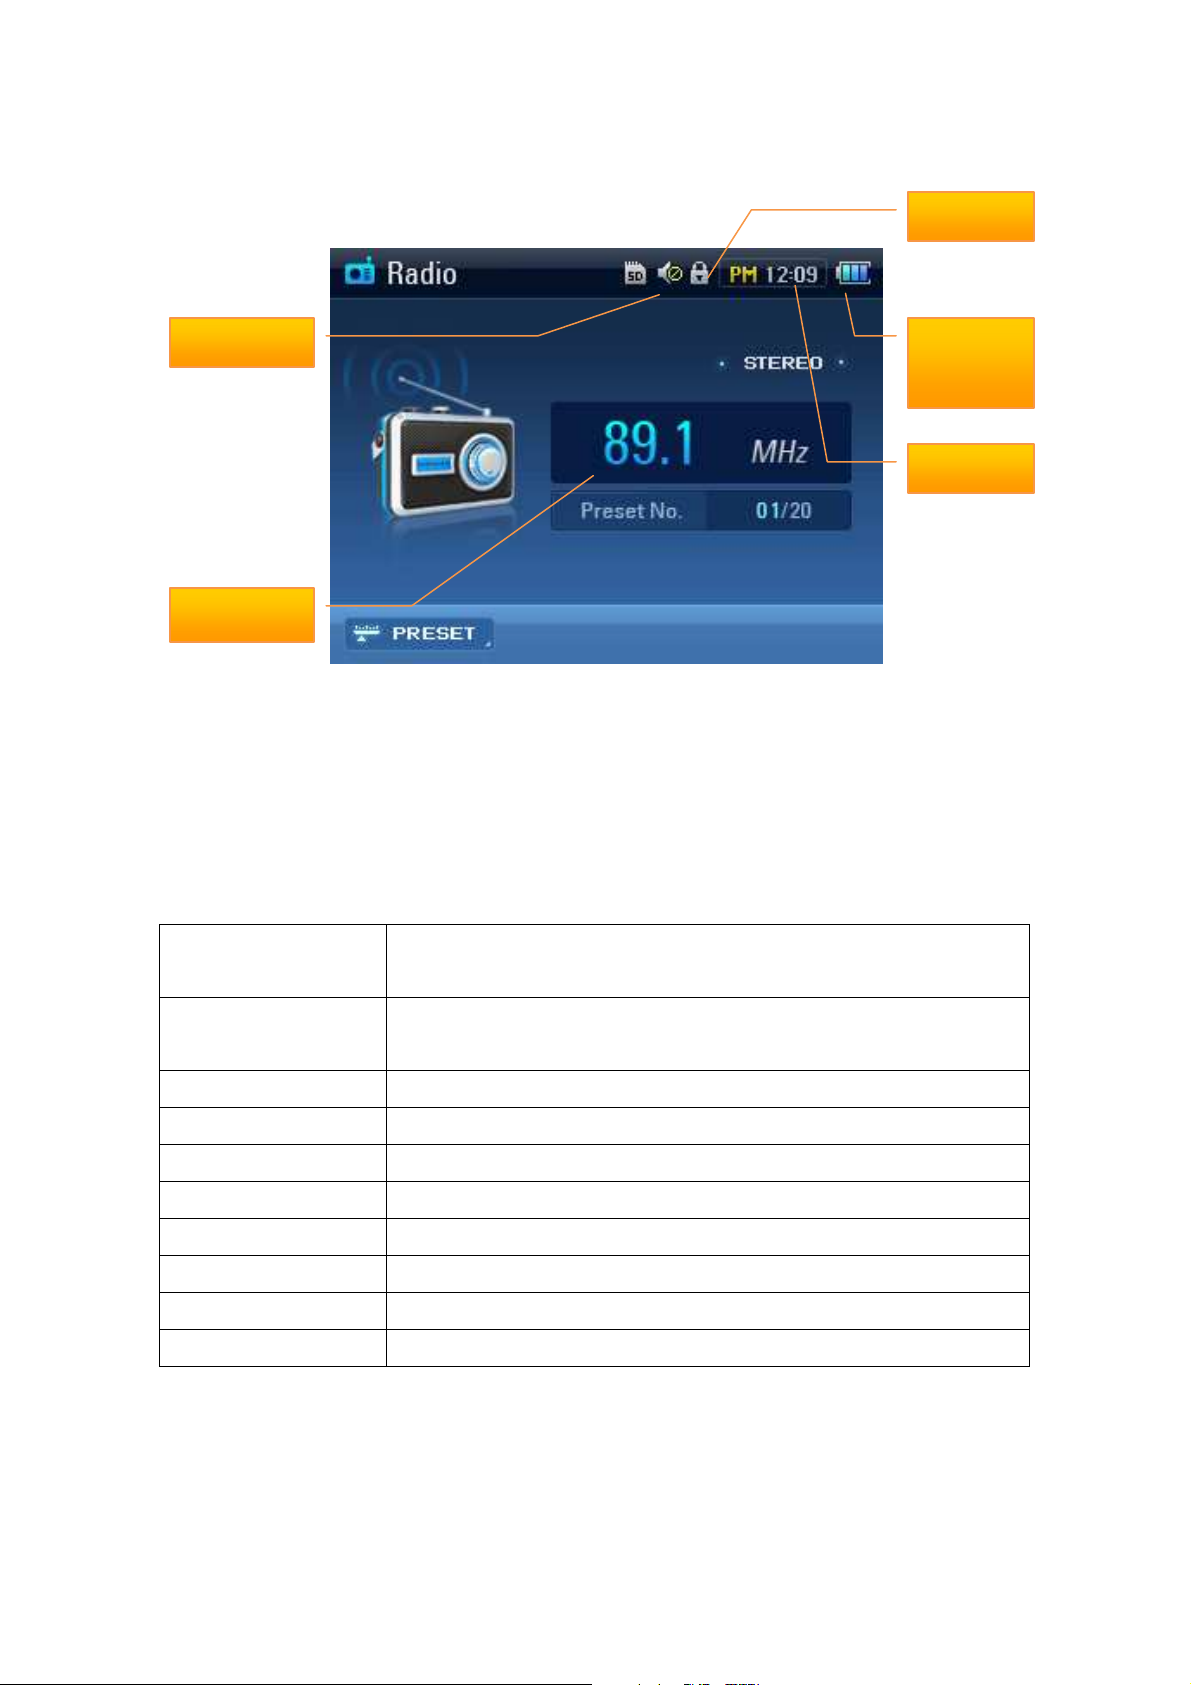
4.2. FM radio
Mute Battery
Channel
9
Hold
level
Clock
Detailed function description
• The earphone cable acts as an FM antenna. You must use the earphones when you listen to the
radio, or search radio channel.
• To change radio frequency, press left or right key.
• To auto scan channels, press and hold on left or right key.
Auto Scan
Record
Sound
LCD Power Save
Storage
Mute
Preset Mode
Delete All
Scans all available channels while deleting previously stored channel
information.
The recording is stored in the MUSIC/FM Folder. You can stop the
recording by pressing the Return key.
Setup Sound mode. (Stereo / Mono)
LCD Off Timer (5s / 10s / 30s / Always)
Selects storage for recordings (Internal Memory / External Memory)
Deactivates sound.
Stores available broadcasting frequencies. (on/off).
Deletes all stored channel information.
Preset CH Delete
Preset CH Save
Deletes current preset channel.
Saves current channel.
Page 10
10
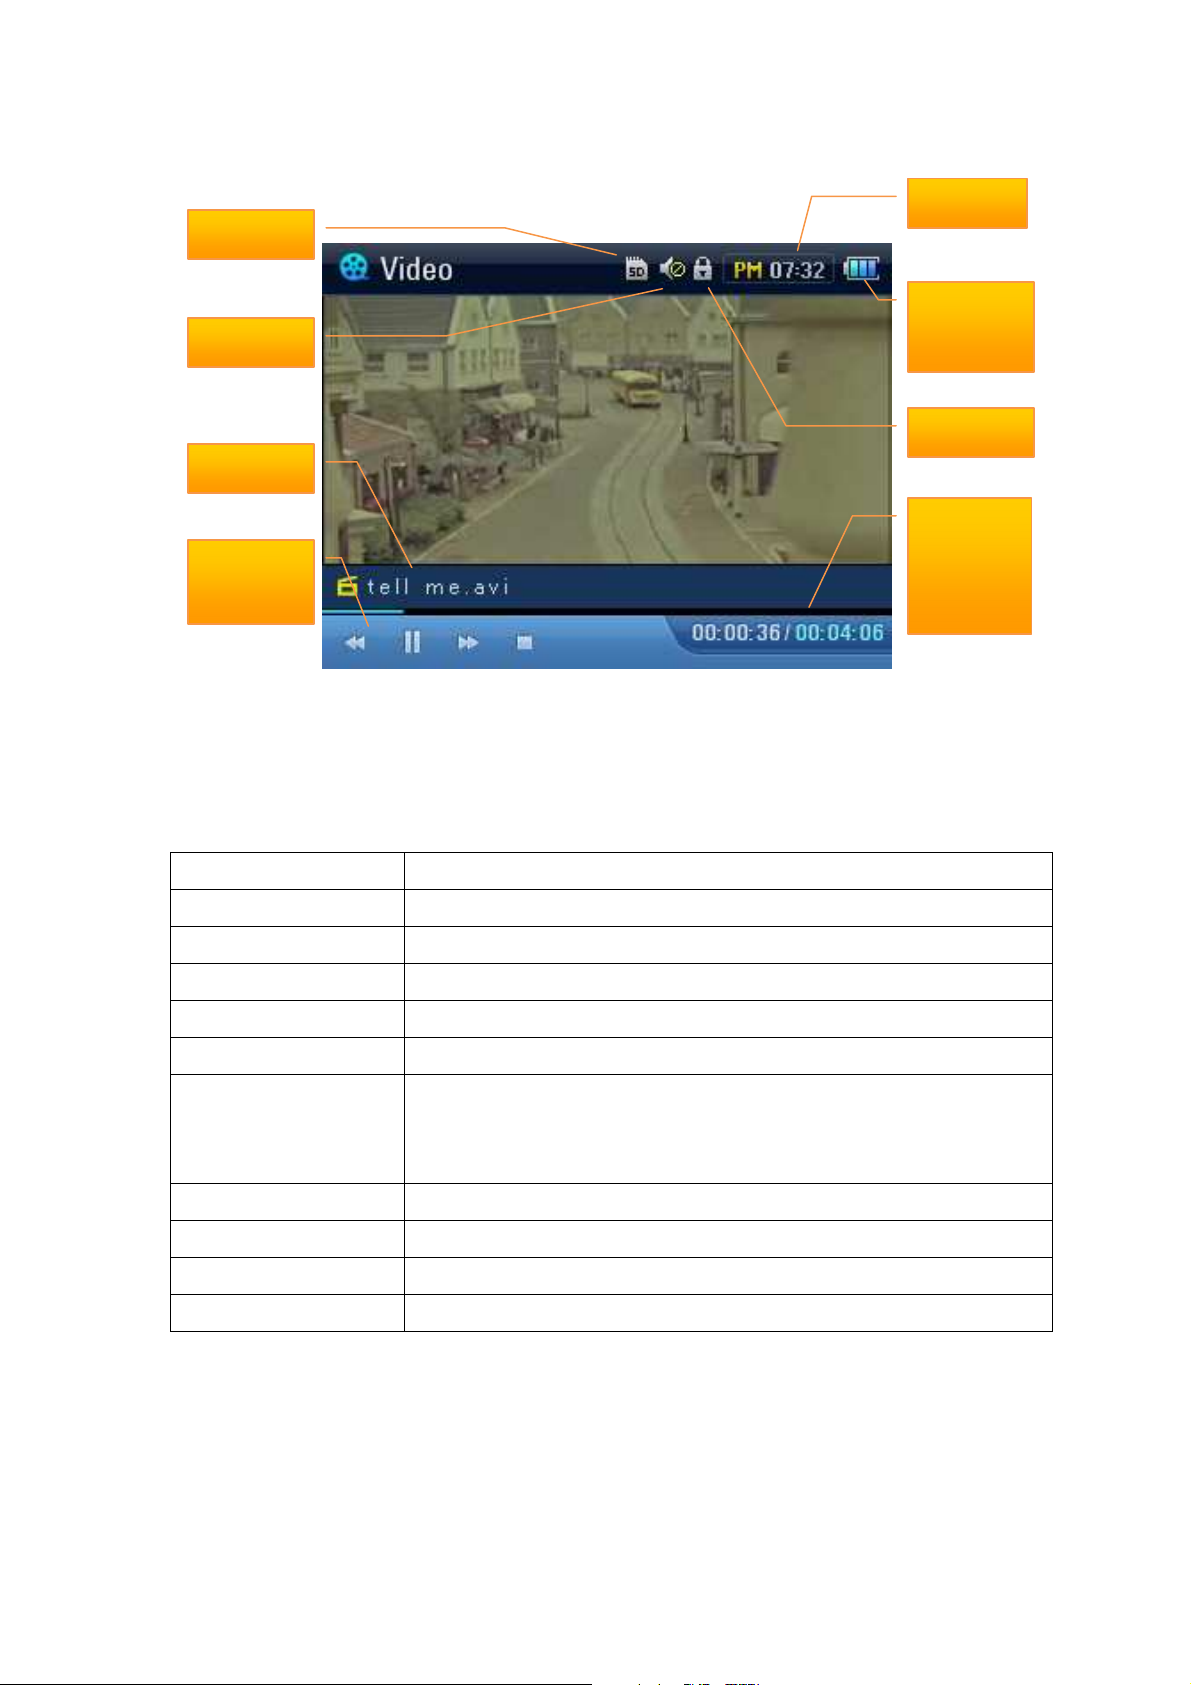
4.3. Video player
Clock
Battery
level
Hold
Elapsed/
total
play time
Progressi
SD Card
Mute
File
ve bar
Detailed function description
When entering the video mode, a bookmark feature will offer you to resume the playback to the
point you left it after previous viewing.
PLAY
STOP
FF
REW
Next Movie
Previous Movie
File Browser
Play / Pause (press OK on Navi key)
Stop (press and hold OK key or press Return key)
Fast Forward (press and hold on right key)
Rewind (press and hold on left key)
Plays next file from the play list (press NAVI key to the right)
Plays previous file from the play list (press NAVI key to the left)
1. You can choose the play mode from All/ Folder/ One Mode
2. Summons the File Browser to create a new “Favorite List”. Add a file
to the favorite list by selecting “Add or Add All”.
Favorite List
LCD Brightness
Mute
Information
Summons favorite list, plays the selected file.
Adjusts LCD Brightness (10 levels).
Deactivates sound.
Displays file information.
Page 11
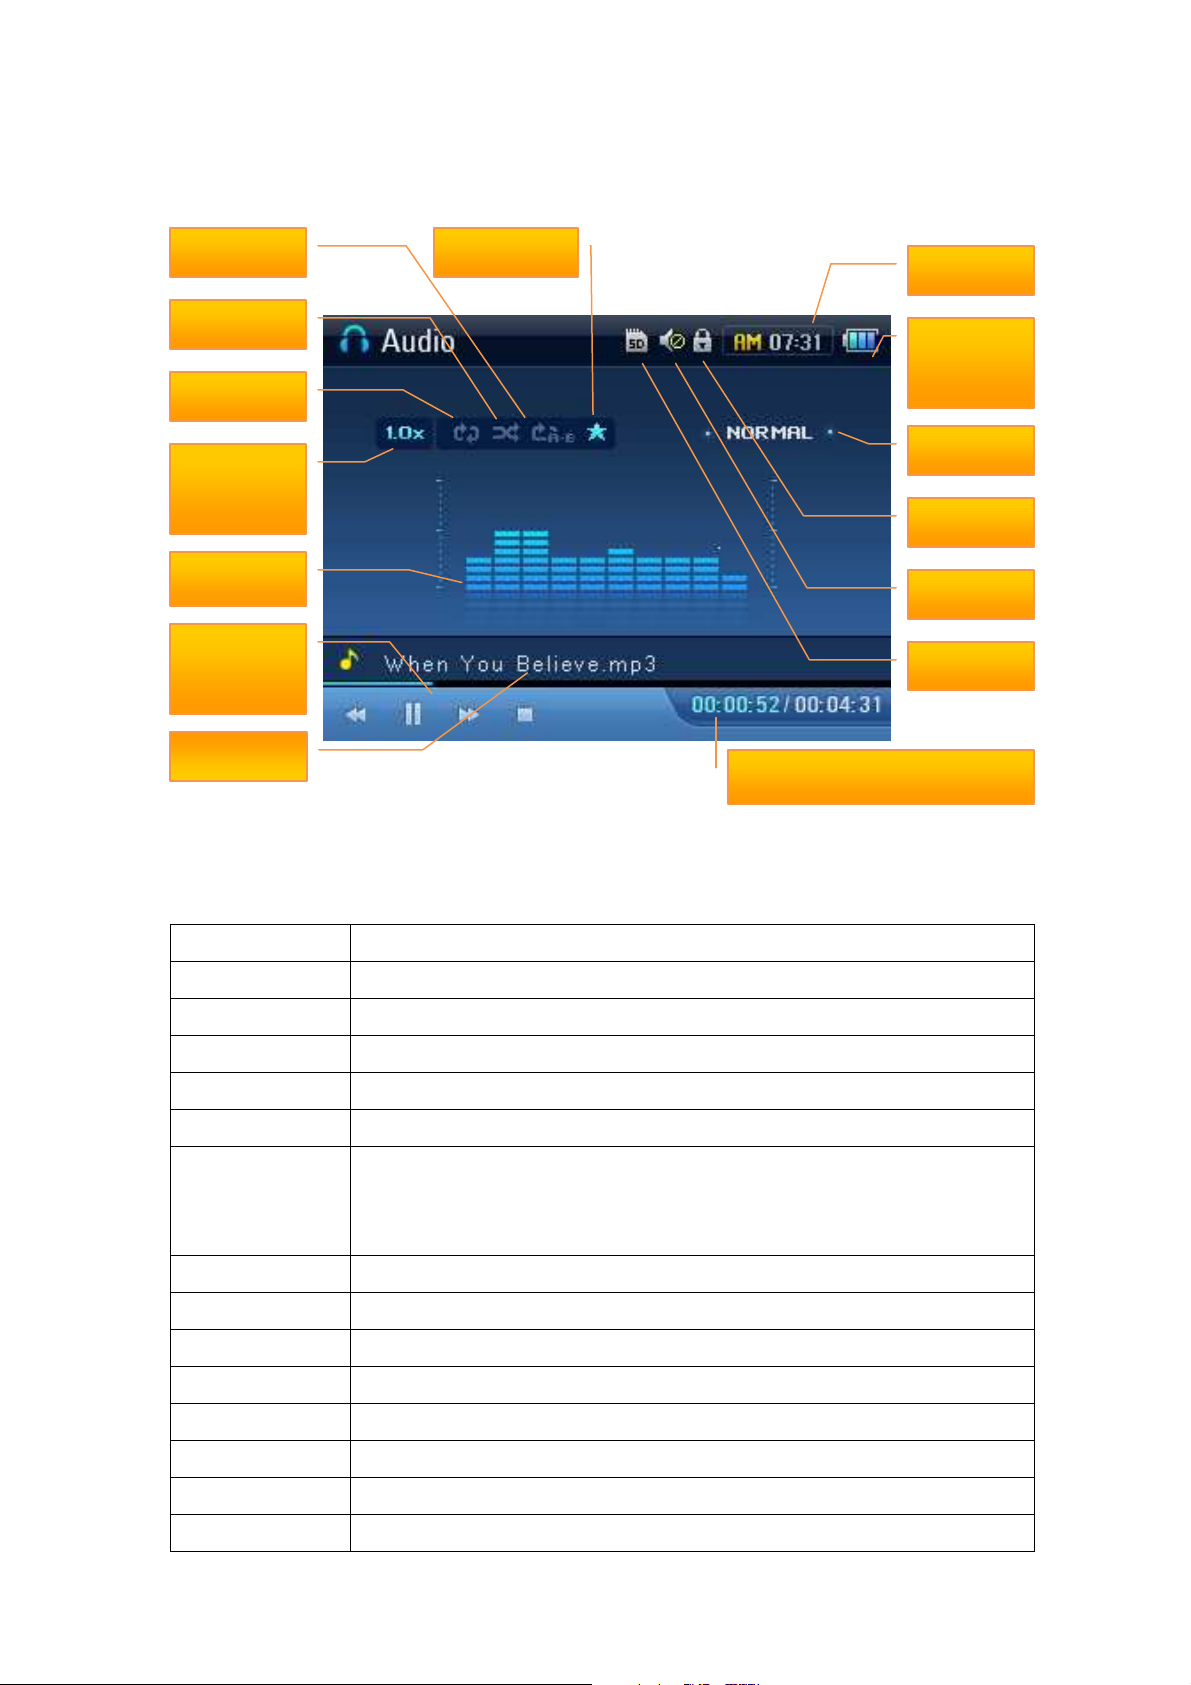
4.4. Audio player
Track
Shuffle
Favorite
11
Clock
Battery
Repeat
Playback
speed
Spectrum
Progressiv
e bar
level
EQ
Hold
Mute
SD Card
File name
Elapsed/ total playback
Detailed function description
When entering the audio mode, a bookmark feature will offer you to resume the playback to the
point you left it after previous playback.
PLAY
Play/ Pause (press central button on Navi key)
STOP
FF
REW
Next Track
Prev. Track
File Browser
Favorite List
Repeat
Shuffle
EQ
LCD power save
Play Speed
A → B
Information
Stop (press and hold OK key or press Return key)
Fast Forward (press and hold on right key)
Rewind (press and hold on left key)
Plays next file from the play list (press NAVI key to the right)
Plays previous file from the play list (press NAVI key to the left)
1. You can choose the play mode from All/ Folder/ One Mode
2. Summons the File Browser to create a new “Favorite List”. Add a file to
the favorite list by selecting “Add or Add All”.
Summons the favorite list, plays the selected file (star on the screen).
Repeat track(None/ One/ All)
Select random playing (on / off)
Equalizer mode (Normal /Rock /Jazz /Classic /Pop)
LCD Off Timer (5s / 10s / 30s / Always)
Setup play speed (0.5x ~ 1.5x)
Repeats the selected section
Displays current file information
Page 12
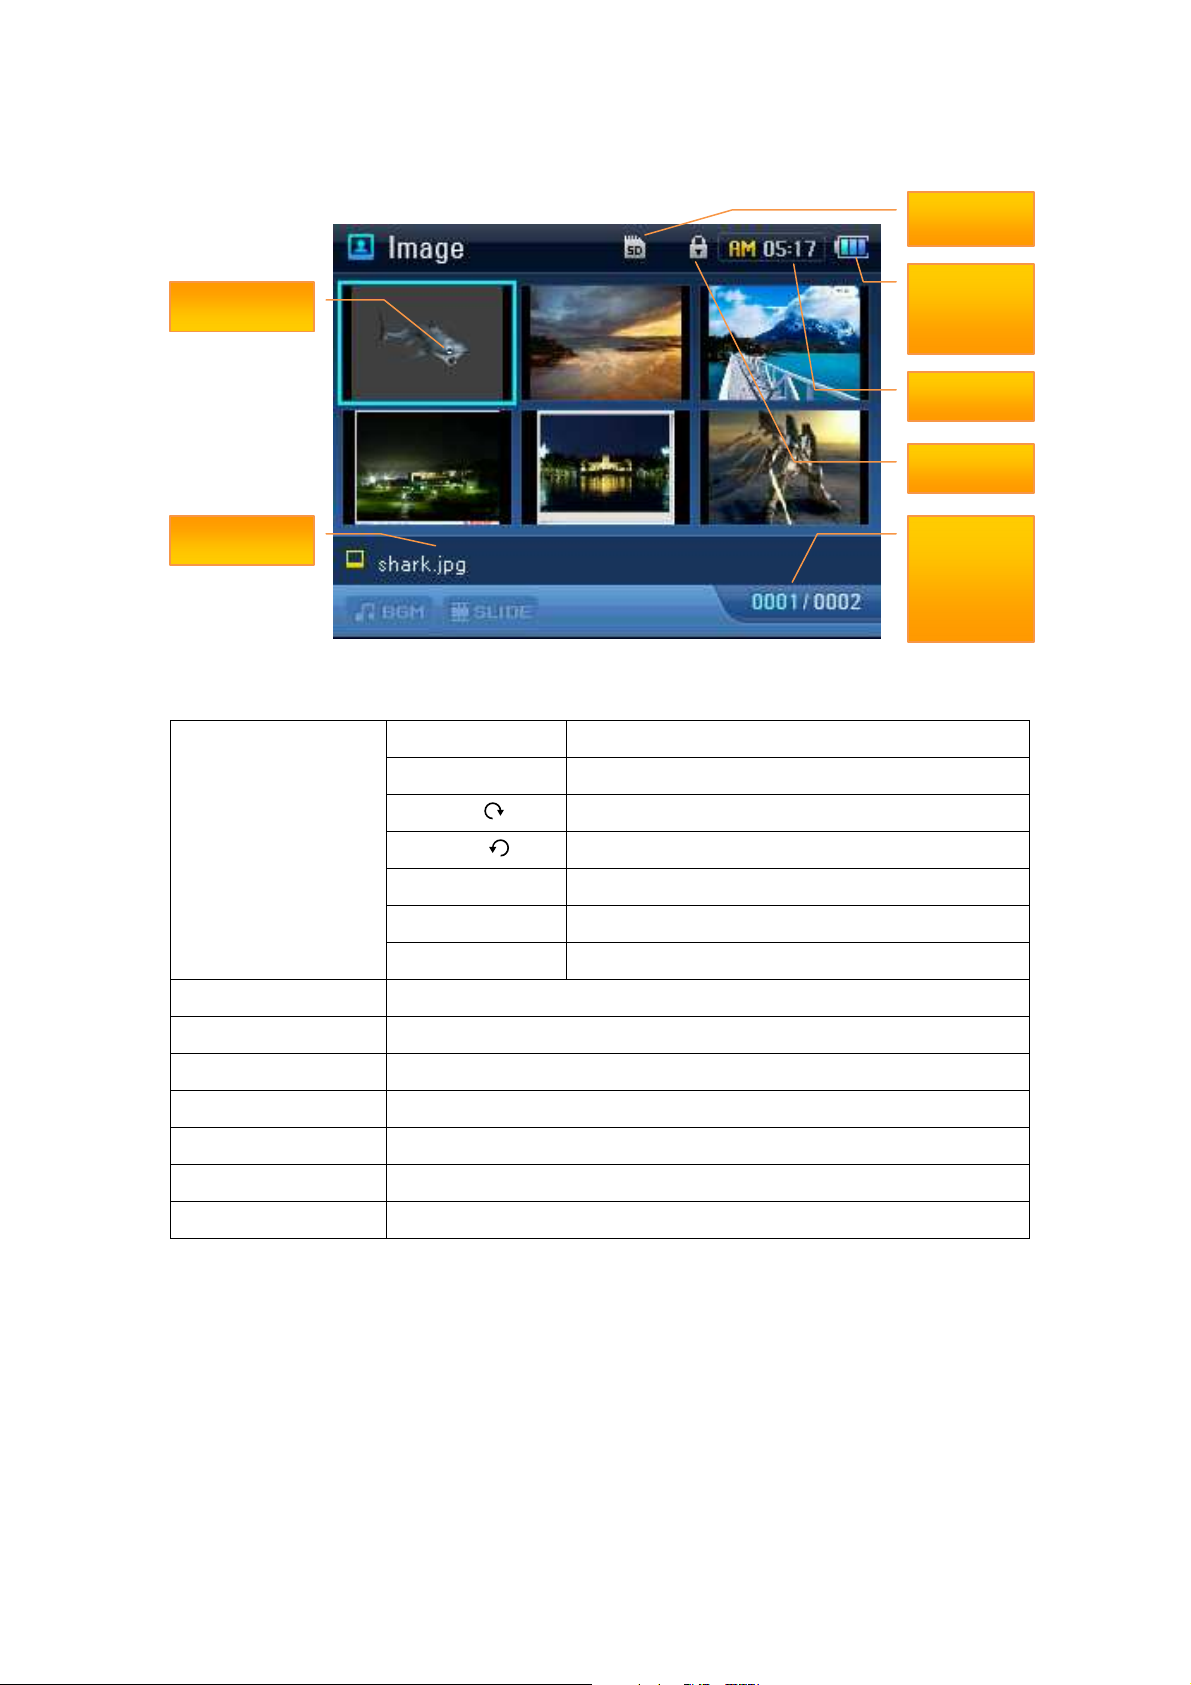
4.5. Image viewer
12
Thumbnail
File Name
Detailed function description
Open
Full Screen Displays a suitable image for the full screen.
Zoom In Displays a twice enlarged image.
SD Card
Battery
level
Clock
Hold
Elapsed/
total
count of
Delete
Delete All
Slide Show
BGM
Slide Show Time
Storage
LCD Brightness
Rotate 90 Displays image rotated 90˚ clockwise.
Rotate 90 Displays image rotated 90˚ counterclockwise.
Slide Show Starts slide show from current image.
Slide Show(Full) Starts slide show in full screen mode.
Information Displays current file information.
Deletes the selected image.
Deletes all images.
Starts slide show from selected image.
Starts current audio favorite list playback on slide show (On / Off).
Time interval for slide show. (2s / 3s).
Choose internal or external memory.
Adjusts LCD Brightness (10 levels).
Page 13
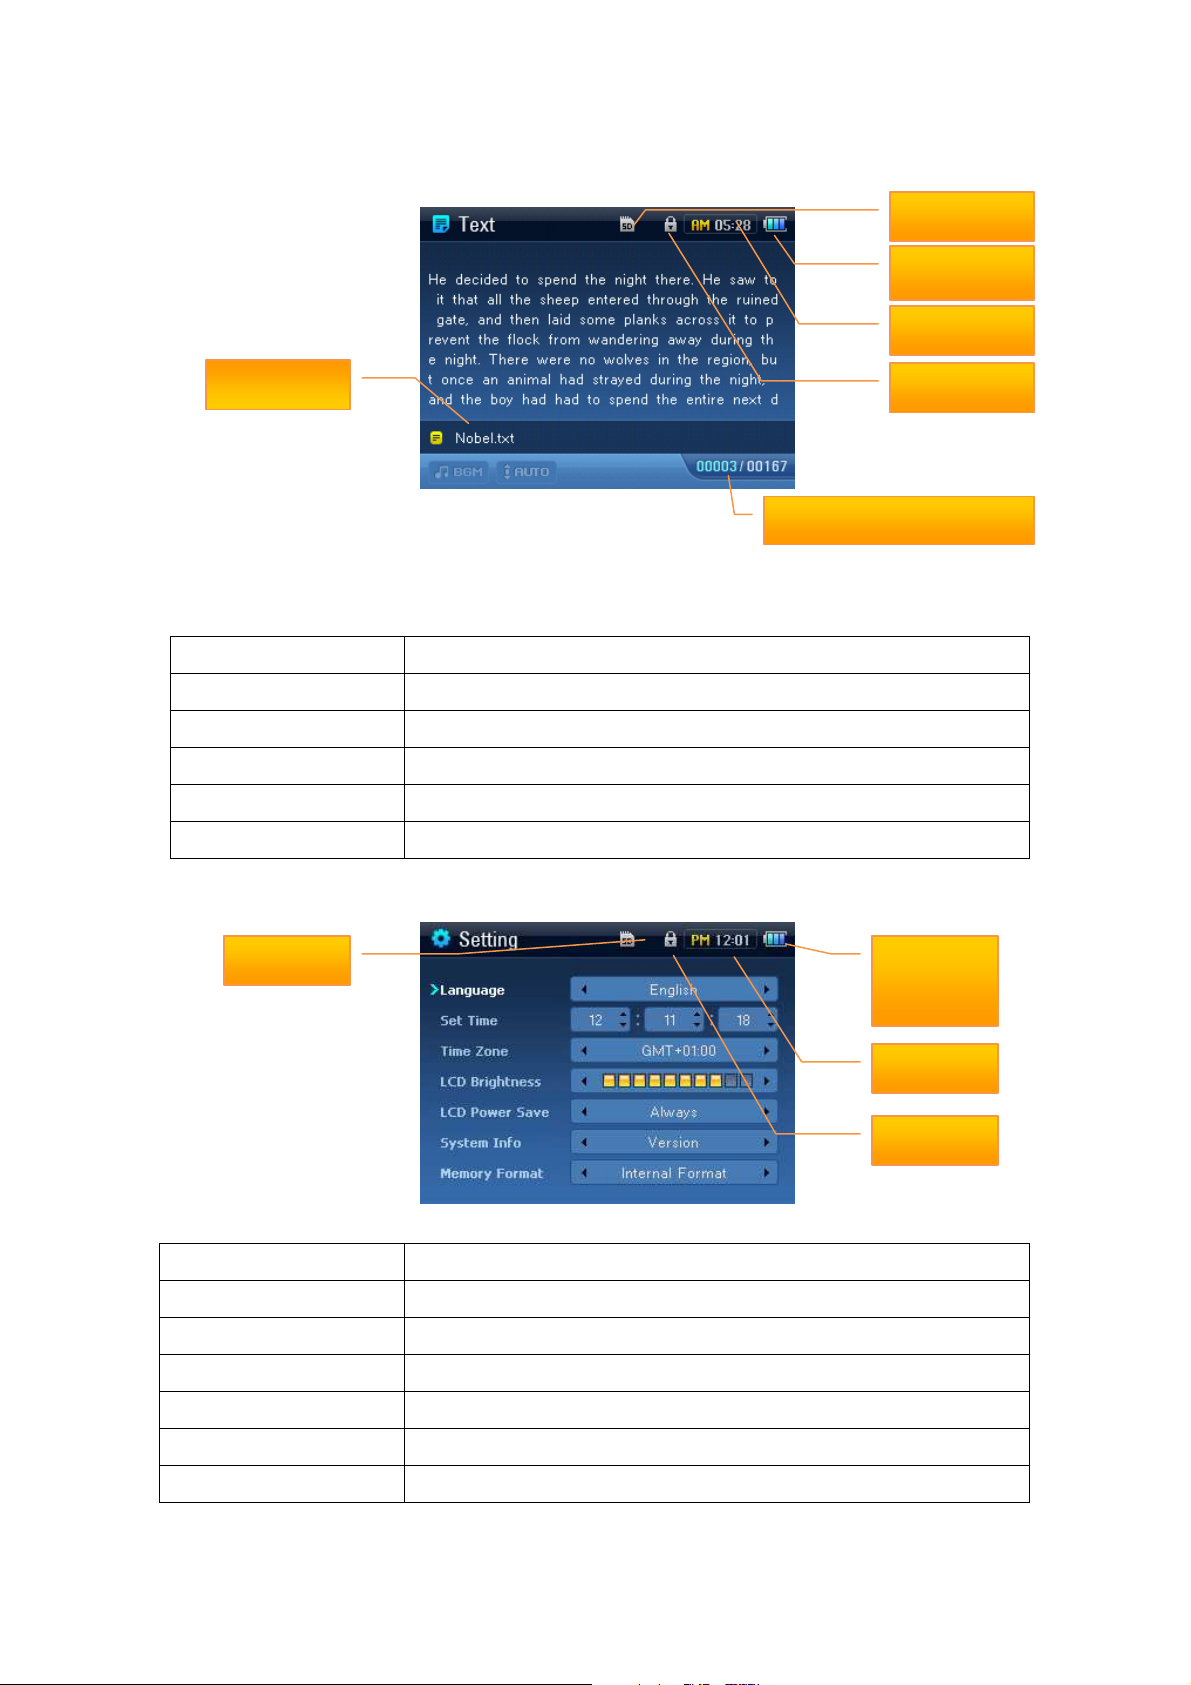
4.6. Text viewer
SD Card
Battery
Clock
13
File Name
Hold
Current/ total count of
Detailed function description
When entering the text viewer mode, a bookmark feature will offer you to resume the playback to
the point you left it after previous viewing.
File Browser
BGM
Auto Scroll
Font color
BG color
LCD Brightness
Opens a text file from the file list.
Select music from the favorite list (On / Off)
Auto Scroll by page unit. (0s – 15s setup)
Changes font Color (15 colors)
Changes background Color (15 colors)
Adjusts LCD Brightness (10 levels).
4.7. Settings
SD Card
Battery
Detail function description
Language
Set Time
Time Zone
LCD Brightness
LCD Power Save
System Information
Memory Format
Select display language.
Use Navi key to set the clock.
Select the Time Zone (GMT).
Adjusts LCD Brightness (10 levels).
LCD Off Timer (5s / 10s / 30s / Always)
Version and memory information.
Internal Format / External Format / Initialize
level
Clock
Hold
Page 14

14
5. CONNECTING THE PLAYER TO YOUR PC
Push and hold the power switch towards the left (power sign) to turn on the player. You
can connect the mini USB port of the player to the USB port of your PC with the help of
the included USB cable. The removable disk will appear on the screen of your PC.
5.1. File upload/ download
a. Open Windows Explorer and select the removable disk newly created.
b. You can just copy/ move files from your PC to the removable disk.
c. You can create a folder for each function (MUSIC/ PHOTO/ VIDEO/ TEXT) of the
removable disk and organize those files.
d. You can delete/ rename any files stored on the removable disk in the same way as you
do it on the PC.
5.2. Photo & text file display
• The image display function supports JPG, BMP and PNG file formats. Copy the files
from your PC to the “IMAGE” folder on your player.
• The text display function supports only TXT file formats. Copy the files from your PC to
the “TEXT” folder on your player.
5.3. Audio & video file playback
• Audio playback function supports MP3, OGG, WMA9 and WAV file formats. Copy the
files from your PC to the “MUSIC” folder on your player.
• Video playback function supports AVI and WAV file formats. Copy the files from your PC
to the “VIDEO” folder on your player. Supports MPEG4 or WMV9 type of Codec only. You
must use the converter software program in order to watch other video formats.
5.4. Disconnecting the player from your PC
a. Before you unplugg the player from the PC, make sure to double click the green arrow
icon on the taskbar on the right bottom of the PC screen (“Safely remove hardware”).
b. When the dialogue box is displayed on the monitor, select the appropriate USB Mass
Storage Device and click on “Stop”.
c. When a new dialogue box appears, confirm by clicking “OK”. An info box will let you
know whether it is safe to remove the device.
▬ CAUTION
Fatal error may occur on the PC or the player if you remove the player without
completing above procedure to disconnect the device.
Page 15
5.5. Format the player
a. Open Window Explorer and right-click on the removable disk.
b. Select the format menu with the left button of the mouse.
▬
CAUTION
Format function will delete all files stored in the player. Make sure to backup all
important data before formatting the removable disk.
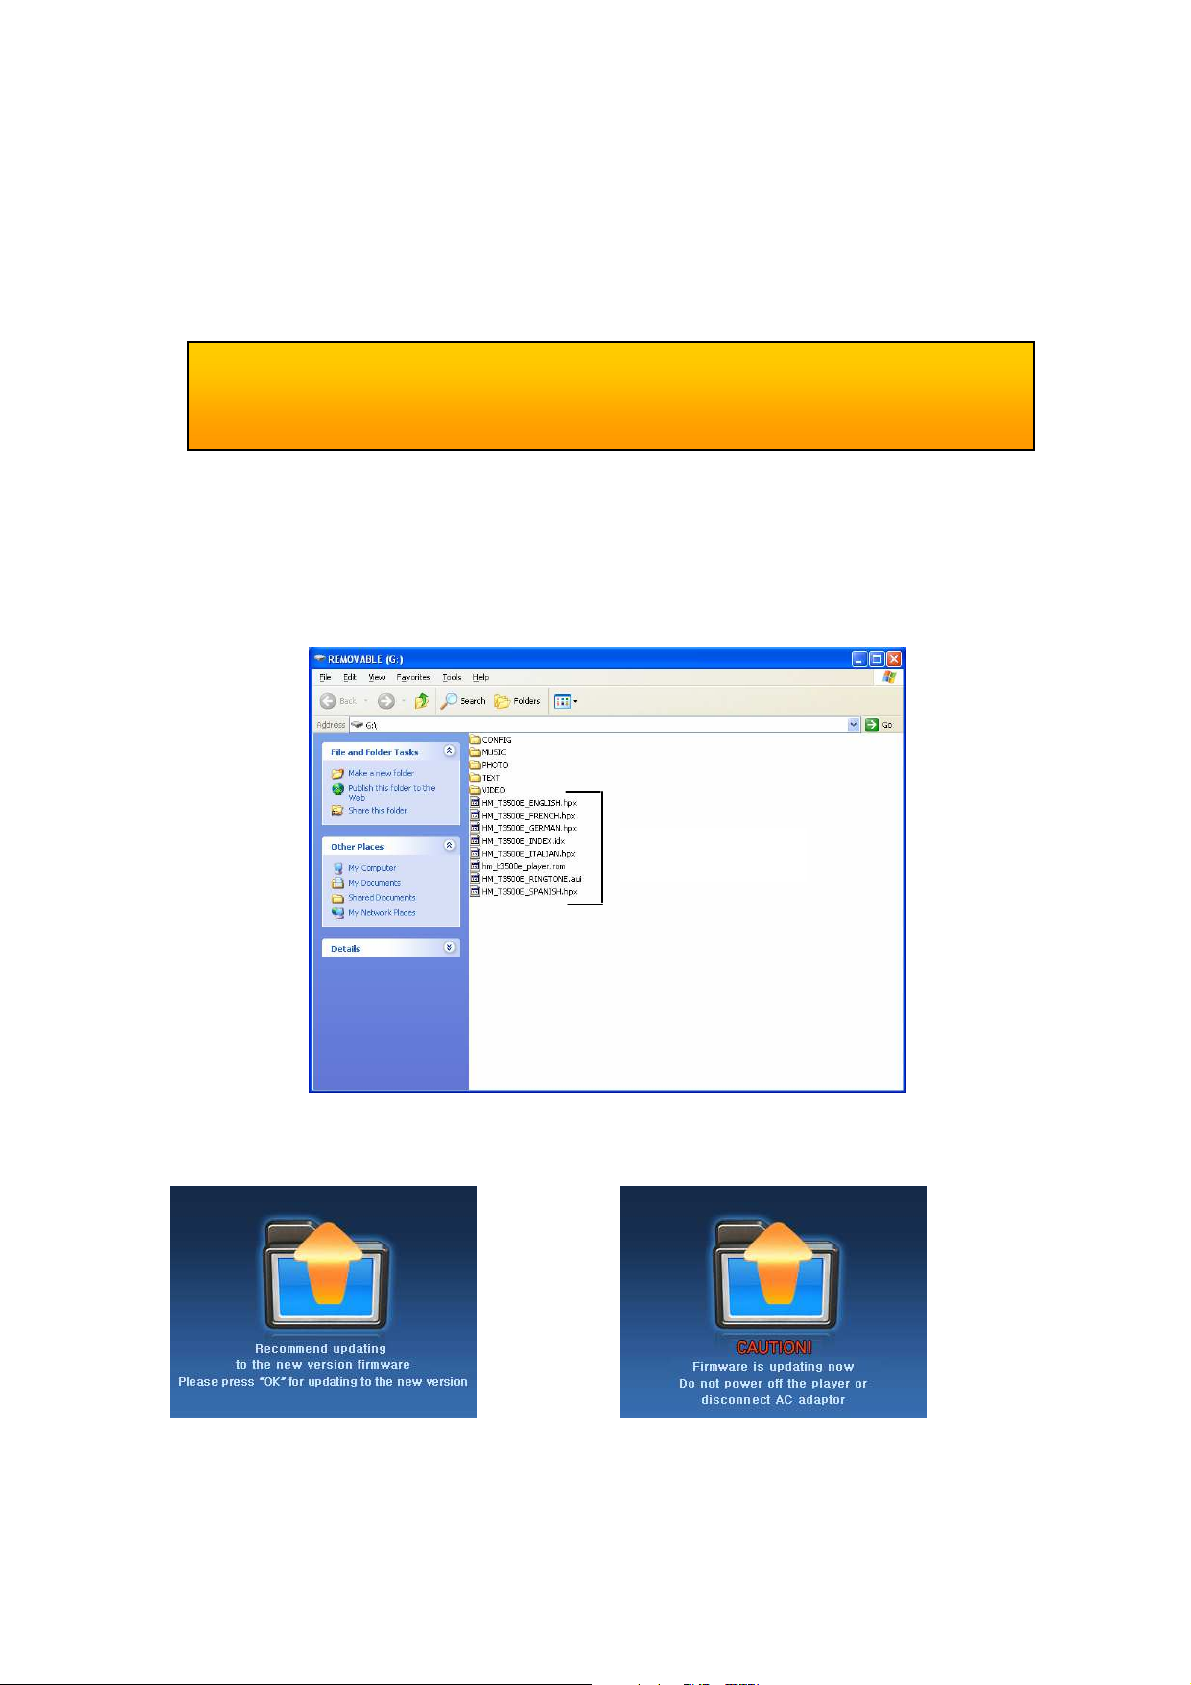
5.6. Firmware upgrade
1. Turn on the player and connect it to the USB port of the computer. The removable disk
will appear on the screen. Copy the firmware file and the GUI file to the root folder of the
player.
15
Firmware Data
2. Safely remove the removable disk and pull the player off the USB port.
3. Upgrade will begin when you turn on the player again.
1. Press center button on Navi key 2. Firmware updating
Page 16
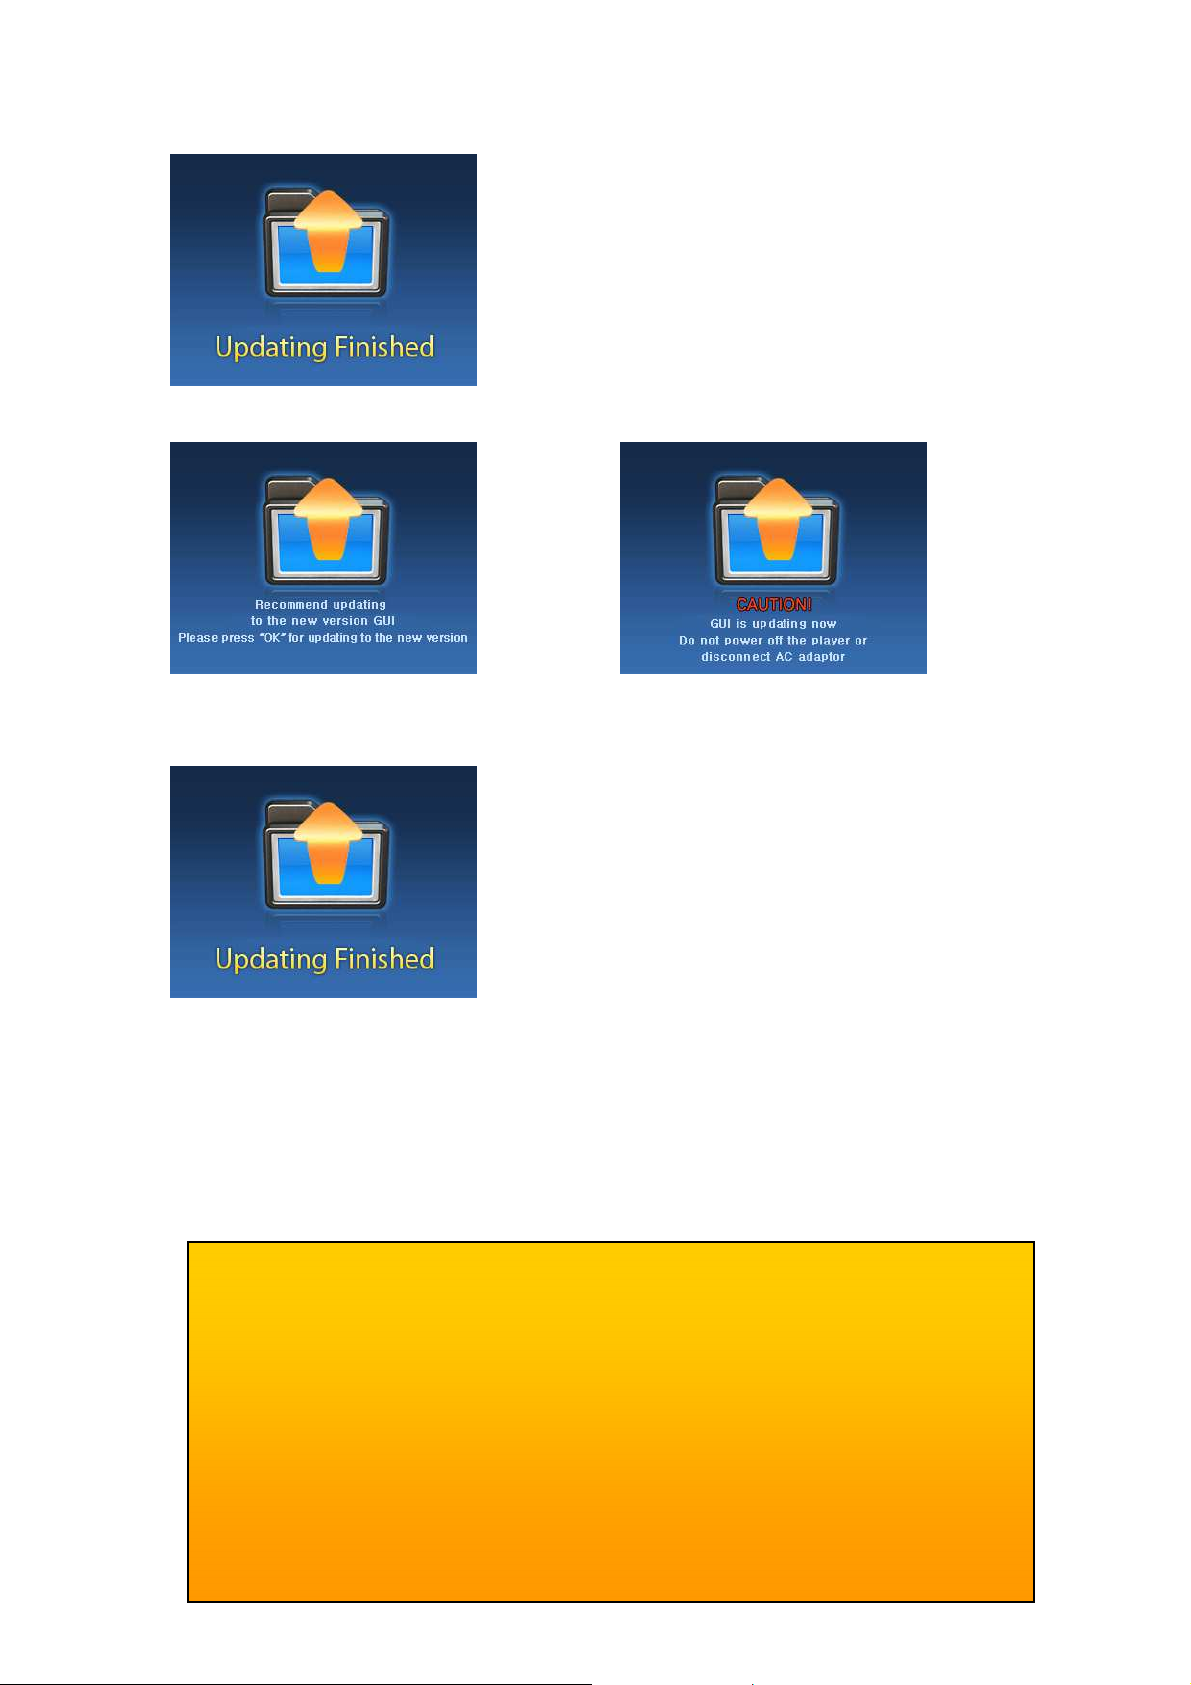
3. Firmware updating completed
16
1. Press the “OK” button 2. GUI Updating…
(In case of updating the GUI)
3. GUI Updating completed.
Note: GUI updating will automatically run if both of Firmware and the GUI updating files
are copied on the root folder of the player.
▬ CAUTION
• Make sure to do a back up storage of your data before upgrading the firmware.
• After completing the firmware upgrading, we recommend you to do an “internal
format” and to “Initialize” the player (go to Menu > Settings > System info).
• Do not turn off the player while updating the firmware. This may cause the player
to malfunction.
• Do not use a firmware meant for another product. This may cause the product to
malfunction.
• Check the current firmware version of your player. Firmware upgrade will be
implemented only for a newer version of the firmware.
Page 17
17
6. VIDEO CONVERTER PROGRAM
The video converter program will compress certain movie files such as AVI, MPEG, WMV
into a special format and make them compatible with the player.
6.1. PC system requirements:
To be able to use the video converter, we recommend Windows OS with below versions:
• CPU: above PENTIUM3
• OS: WINDOW 2000 / XP / VISTA or latest version.
• DIRECTX 9.0 / WMV 9.0 plus must be installed on your PC
• Integrated Codec must be installed on your PC
Note: Only Windows OS is supported, other types of OS are not supported.
6.1.1. Available Format
AVI, MPEG, WMV
Some files in above format may not be compressed by the video converter. The size of
the encoded picture output is 320 x 240.
6.1.2. Necessary Codec to be installed
Both types of codec mentioned below must be installed:
1) Direct X: install 9.0 version or later version.
Visit www.microsoft.com/windows/directx/default.sapx and enter download center menu.
Download Direct X and install it.
2) WMV9: Visit above website and enter download center menu. Download and install
windows media player version 9.0 or later version.
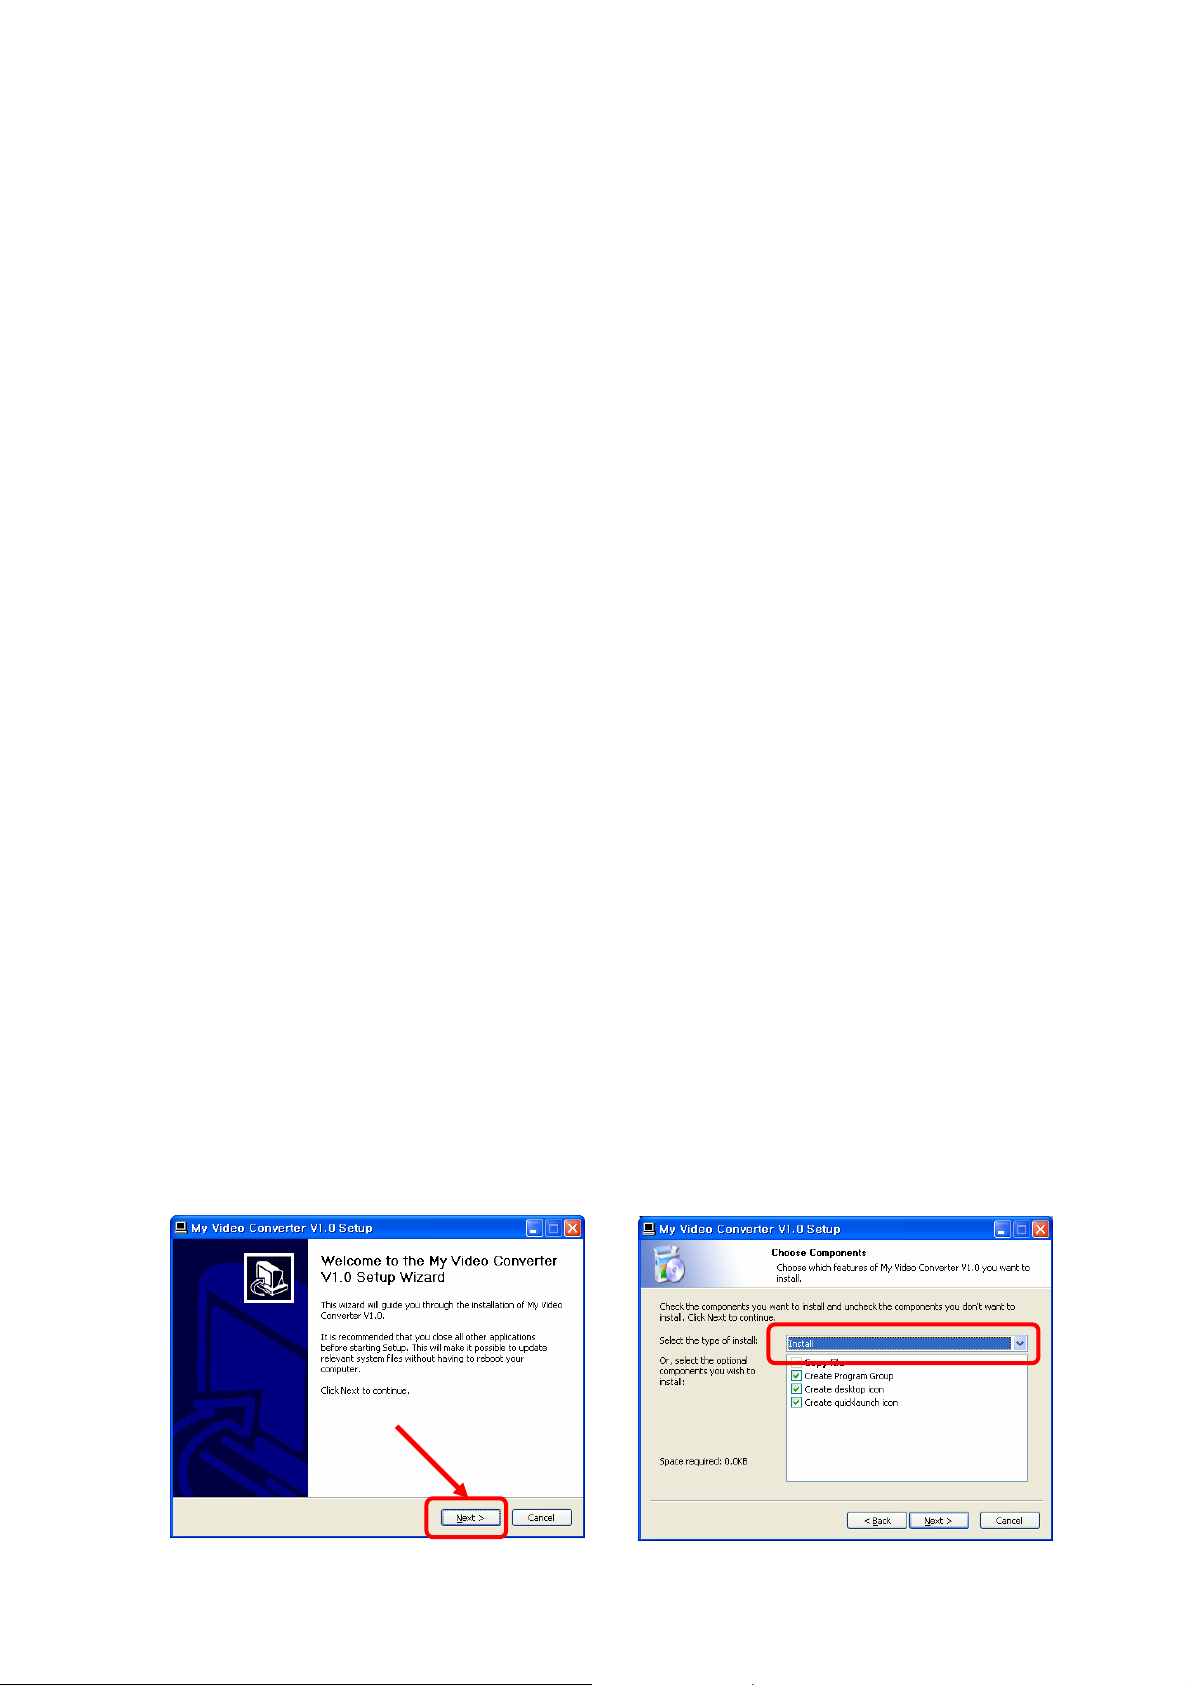
6.2. Video converter program installation
1. Insert the CD and install the program by
double-clicking on the setup file in the
converter folder. Click “Next”.
2. Choose “Install” type and click “Next”.
Page 18
18
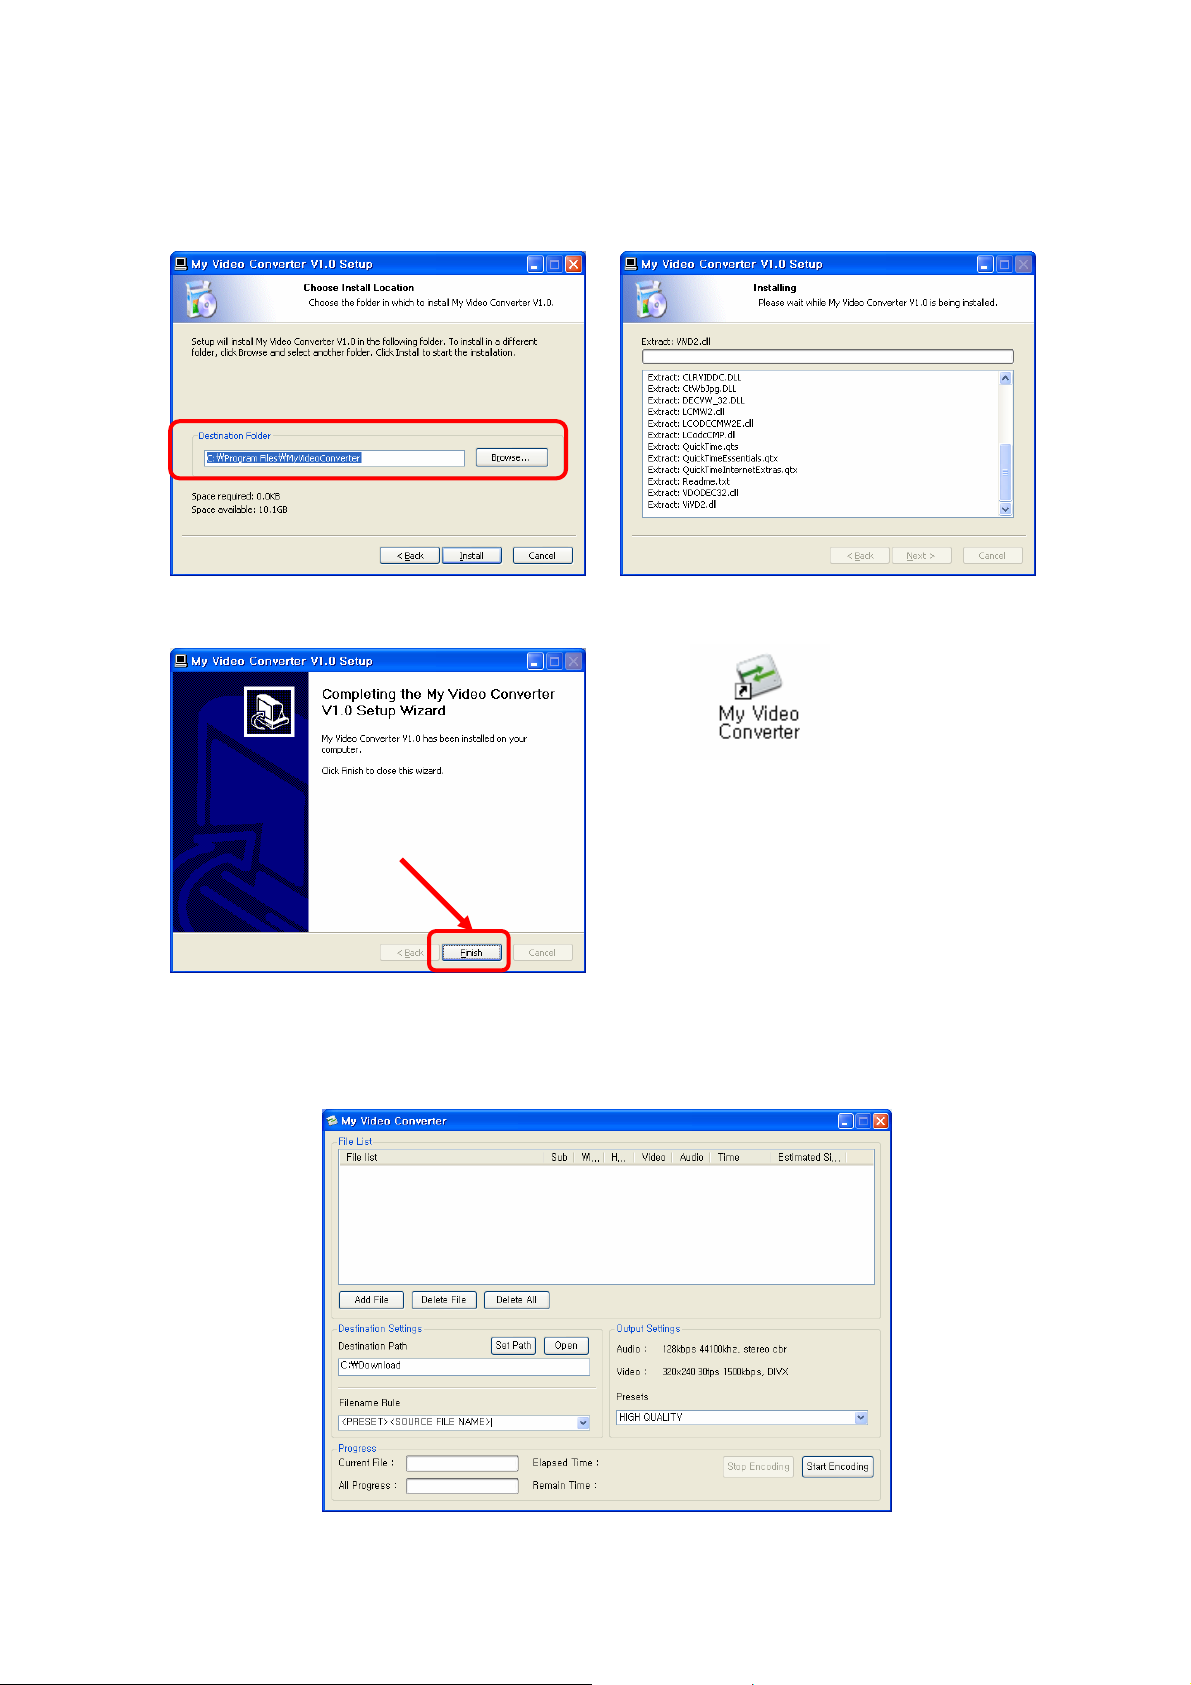
3. Choose where to install the program, and
click “Install”.
4 Installing the program…
5. Complete the installation and click “Finish”. 6. Below icon is created on your PC’s desktop.
6.3. Video Converter guide
1. Run the My Video Converter.exe and below window appear on the screen.
Page 19
19
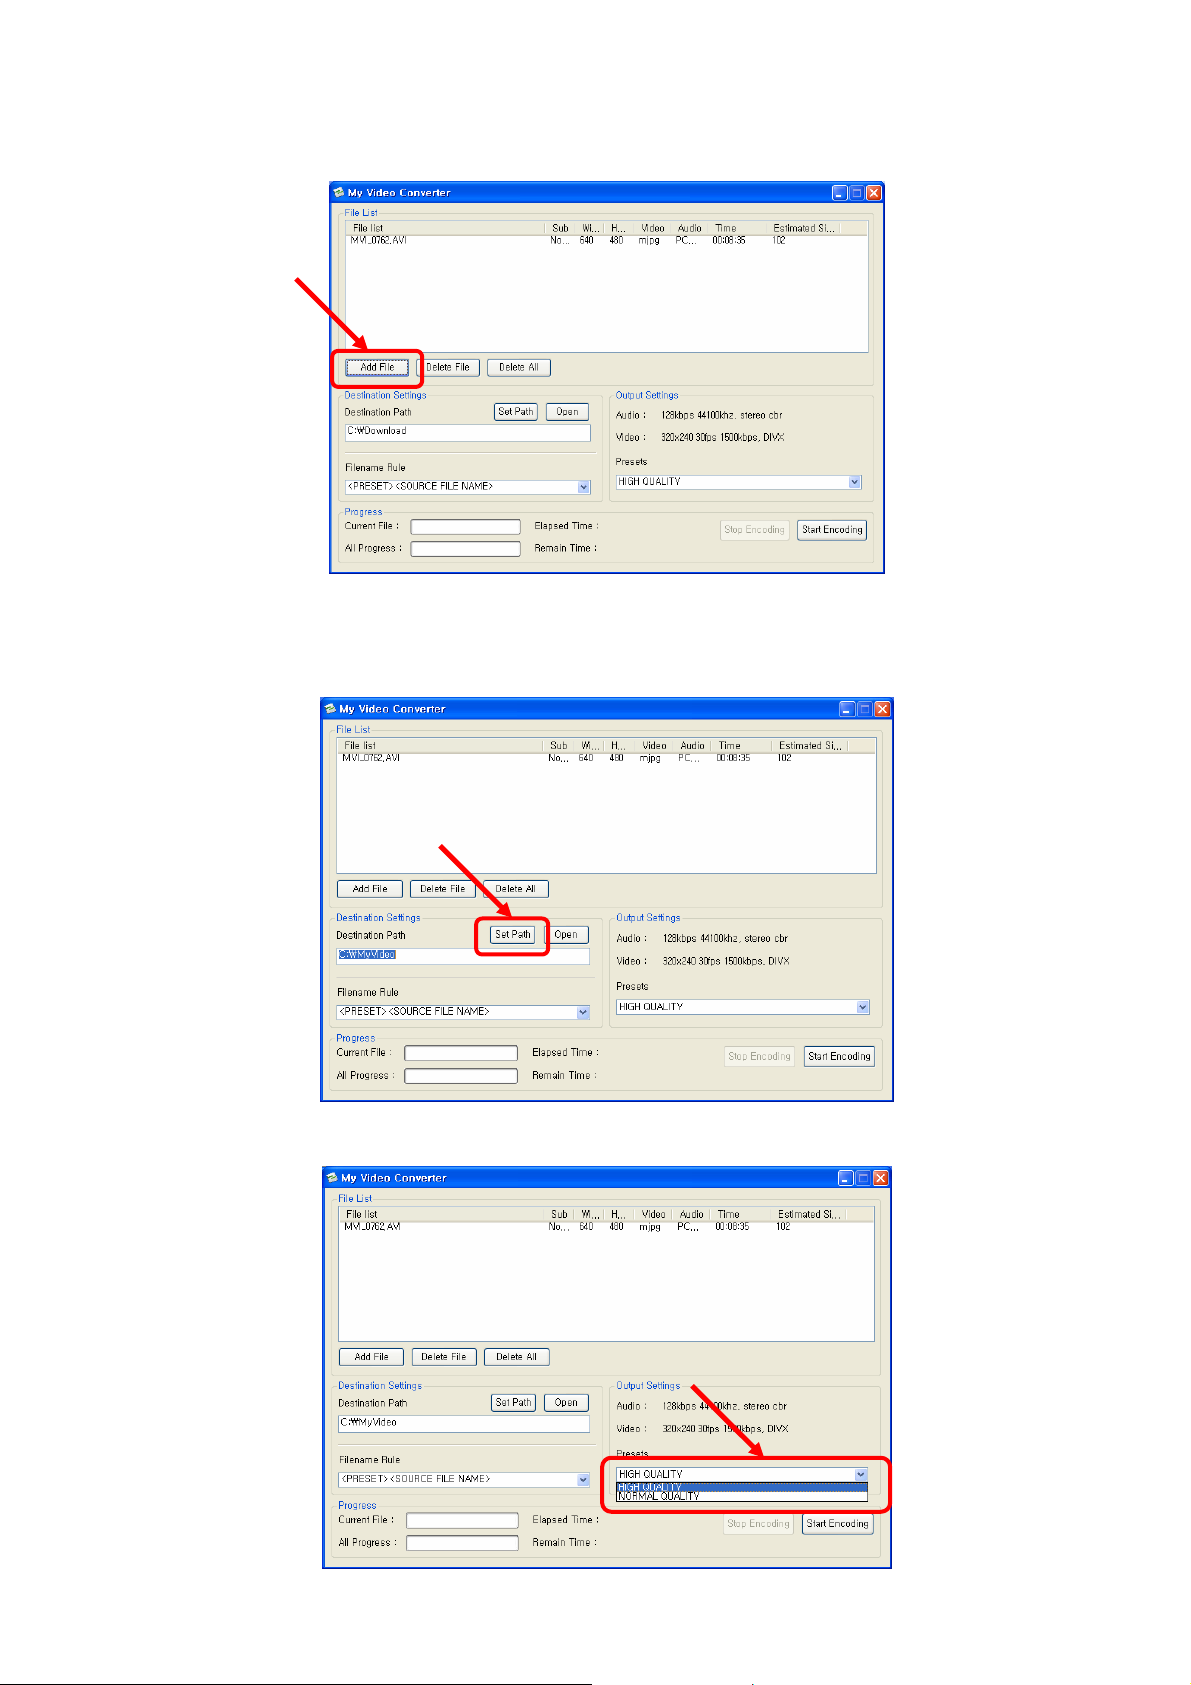
2. You can add the video file you wish to convert to the file list by clicking “Add File”.
3. You can set the path of the file that you wish to convert by clicking the “Set Path” button of the
“Destination Settings”.
4. You can set up the output quality to either high or normal from the “Output Settings”.
Page 20
20
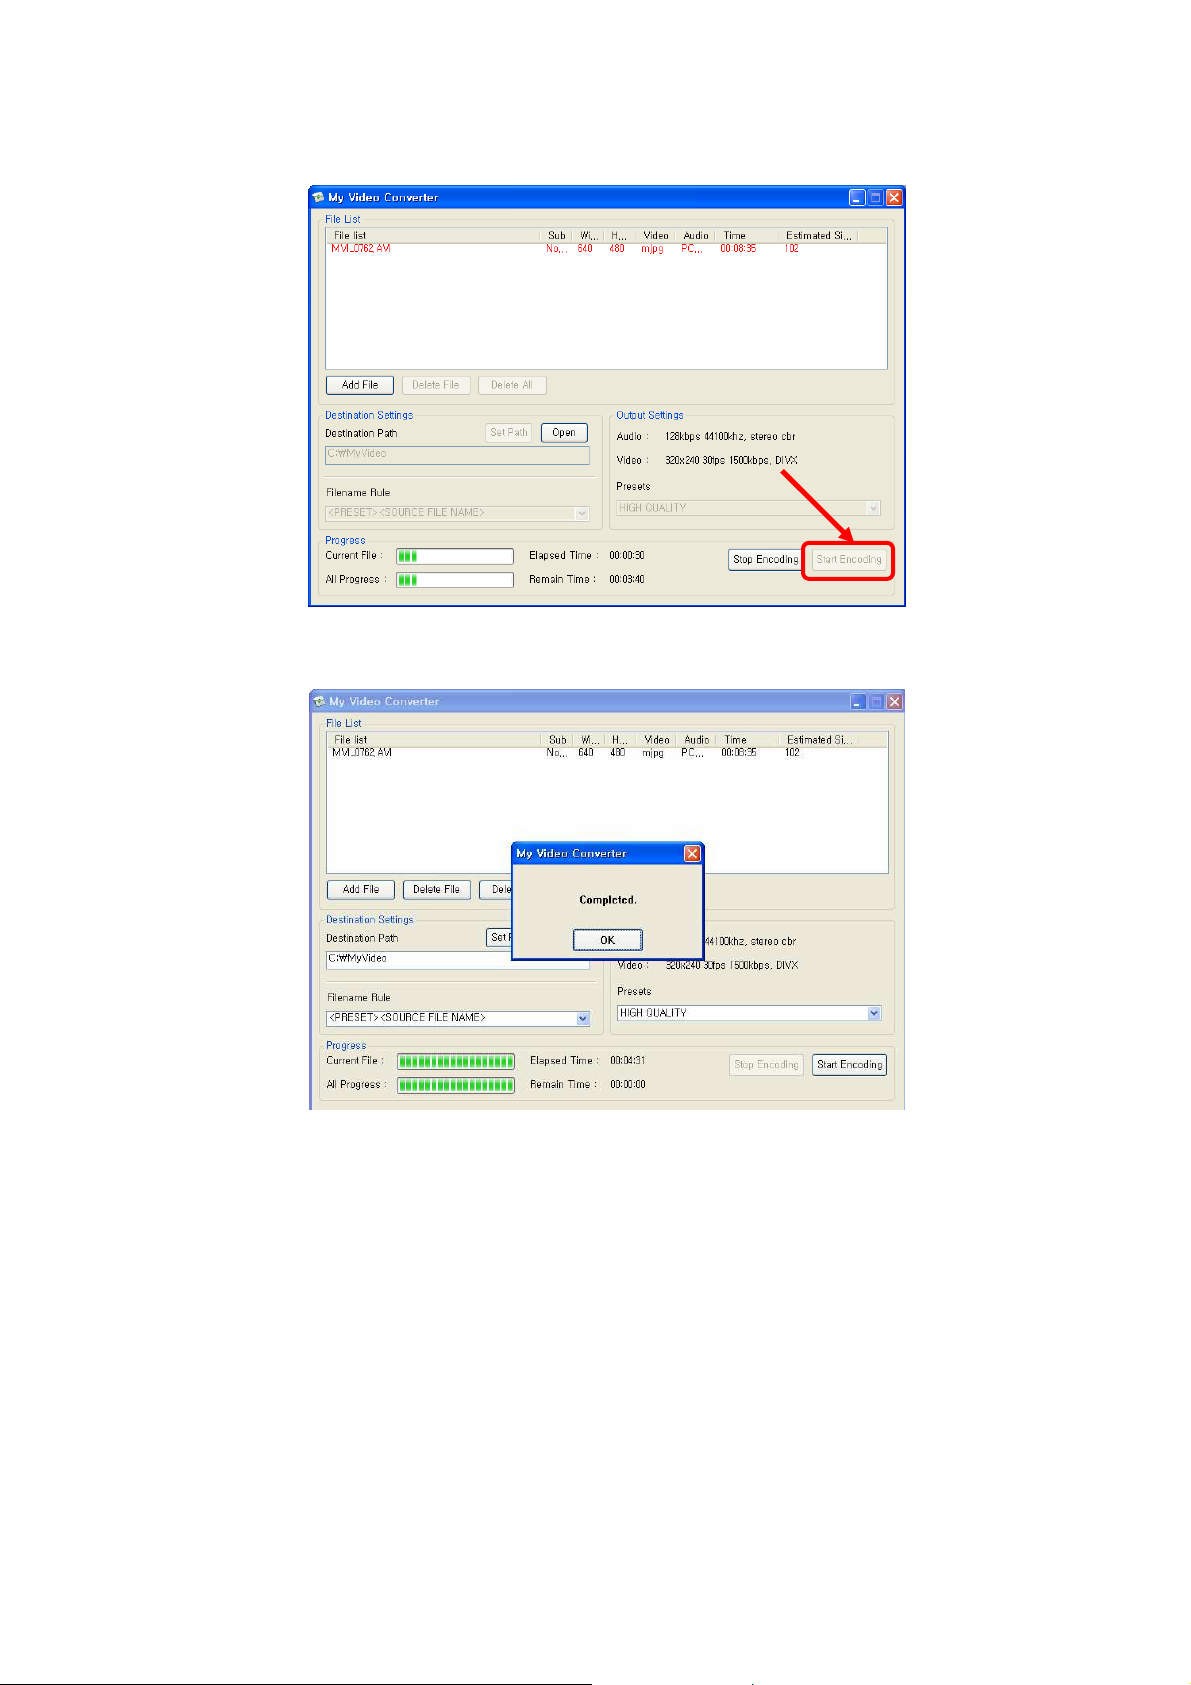
5. Click the “Start Encoding” button on the bottom of the window.
6. “Completed” message box will pop up when the conversion is complete. The converted file will
be created on the destination path.
7. Copy the converted file to your player’s VIDEO folder, and enjoy your favorite movie.
Page 21

21
7. TROUBLE SHOOTING
■ The player cannot be turned on
The player cannot be turned on if the battery is totally uncharged. Recharge the battery via the
computer (USB cable) or via a wall socket (USB cable + power adapter) and try again. Charging
time varies according the battery level before charge. If the player still fails to start up, press the
RESET button and try again.
■ About battery life time and autonomy
Battery is consumption goods; therefore its life time is getting shorter every time it is used. Low
and high temperatures will impede the battery life time. Battery autonomy will vary depending on
the functions you use and on the settings you chose (DVB-T TV viewer, file playback, screen
brightness and volume for instance).
■ Charging does not work
Please check if the charger is correctly connected to the device (red light: charging/ green light:
fully charged). Only the included charger can be used to recharge the device.
■ A control key is not working
Check whether the hold key is locked. If the control key still fails, press the RESET button and try
again.
■ Antenna is loosen from the player
If the Antenna is loosen and disconnected from the player, please refer to the dedicated section of
the manual.
■ The LCD screen is turned off
The screen might be turned off if you set up the “LCD power save” mode. Press on any button and
the screen will turn on. Direct sunlight on the screen may make the screen look black.
■ I get no sound
Check if the player is ON or playing. Check if the volume is set at the lowest level or if mute has
been selected. Check if the Earphone is firmly connected to the device.
■ The device heats up
The device might feel warm during battery charging or function operating, but it will not affect to the
duration or performance of the device.
■ The DVB-T receiver does not work properly
DVB-T reception might be impeded by the weak broadcasting signals going through some
buildings or underground. Move the player until you find a direction with stronger and stable signal.
■ The DVB-T picture is paused or disconnected
This can happen temporarily, when the DVB-T signal is weak and/ or interrupted. Move the player
until you find a direction with stronger and stable signal.
■ I get sound only, no video
Check if you are in the audio/ radio mode.
■ The FM signal is paused or disconnected
This can happen temporarily, when the radio signal is weak and/ or interrupted. The earphone
Page 22
22
cable works as an FM antenna. It must be plugged in to receive FM radio.
■ I cannot play a movie file
Check that the video file is stored on the internal/ external memory. The device supports MPEG4,
WMV9 type of Codec files. Make sure to not use different types of formats or damaged files. In that
case, you can convert your files by using the video converter software on the included CD-Rom.
■ I cannot play a music file
Check that the audio file is stored on the internal/ external memory. The device supports MP3,
WAV, OGG, WMA9 type of Codec files. Make sure to not use different types of formats or damaged
files.
■ I cannot see an image on the image viewer
Check that the image file is stored on the internal/ external memory. The device supports JPG,
BMP, PNG formats. Make sure to not use different types of formats or damaged files.
■ I cannot see a text in the text viewer
Check that the text file is stored on the internal/ external memory.
The device supports ANSI (might not be available in some countries), Unicode type of files. Make
sure to not use different types of formats or damaged files. In that case, sett up the encoding type
of your text as “Unicode” when you store it on your PC. You can also use .txt format.
■ My PC does not recognize the device
Please check if the USB cable is correctly connected.
■ The memory card is not recognized
Check if you use a supported memory card format (SD) and if the memory card has been correctly
inserted. Check whether the memory card is damaged.
8. SPECIFICATIONS
RF Sensitivity
Dimension
LCD
Audio Support
Video Support
Image Support
Radio
≤ -88 dBm (@16QAM,514Mhz)
117 x 73 x 14 mm
3.5” LCD, QVGA (320X240), Color 65K
MP3, WMA9, OGG, WAV
MPEG4, WMV9
JPG, BMP, PNG
87.5Mhz ~ 108Mhz
Audio Output
PC Interface
Memory
Internal Battery
Accessories
Stereo Earphone – 22mW ; Mono Speaker – Max 1.0W
USB 2.0 High Speed Maximum 32 Mbps (Upload: 40 Mbps)
Internal 2GB; External by SD card
Li-Polymer 1600mA
USB cable, earphones, installation CD, USB AC/DC adaptor,
manual, cradle, hand strap, soft pouch
Language
OS
English, German, Swedish, Finnish
Windows 2000, Windows XP, Windows VISTA
Page 23

23
 Loading...