

Page 1
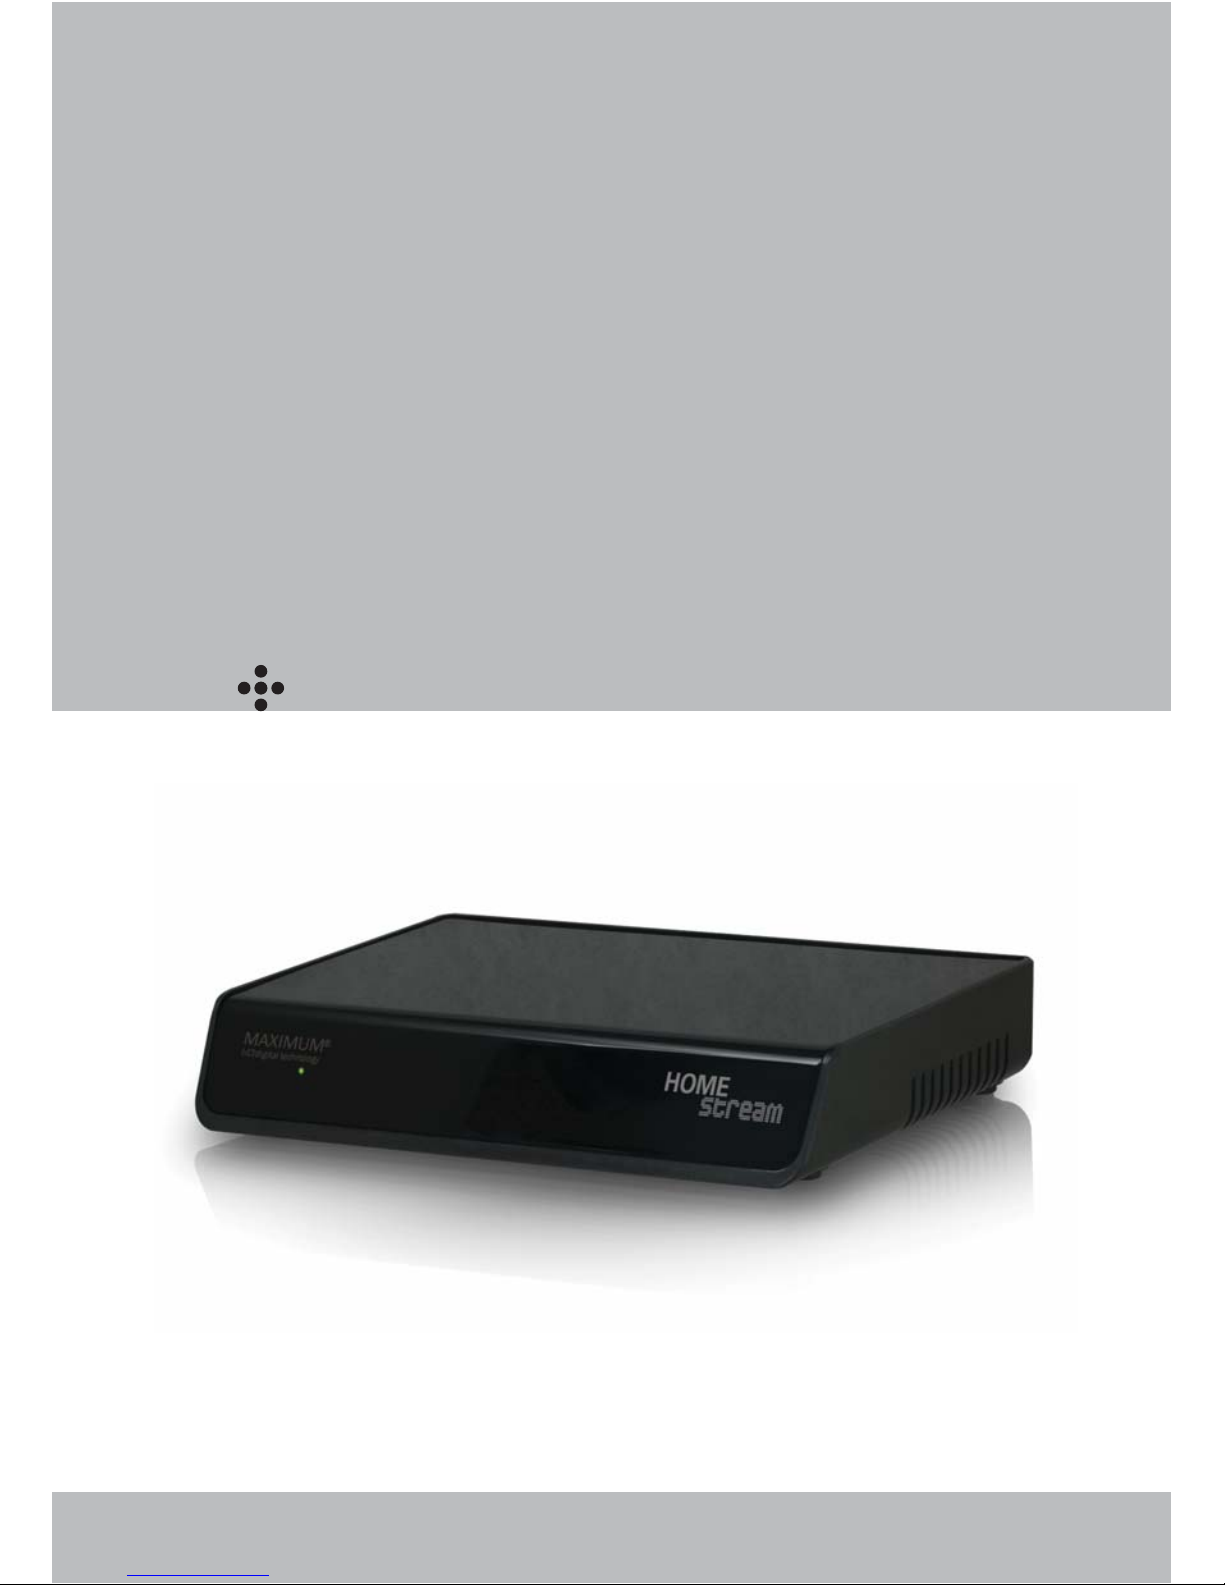
Instruction manual
HomeStream
Page 2

Before using the product
Introduction
Welcome.
HomeStream is a set-top box that allows you to enjoy your own home entertainment contents from a remote location using the internet
Take – Out the home contents
With the HomeStream, your home A/V media content is available to you from
any location with internet access. This feature is known as “ Take-Out “. This
feature allows you to enjoy you’re A/V devices through any PC or labtop just as
you would from your very own home
Home view
In addition to the “ Take-Out “ feature, HomeStream allows you to monitor your
home remotely by connecting a web-camera ( optional accessory ) to your
HomeStream . Using this feature, you may monitor your home using any PC or
labtop connected to the internet
Page 3
Before using the product
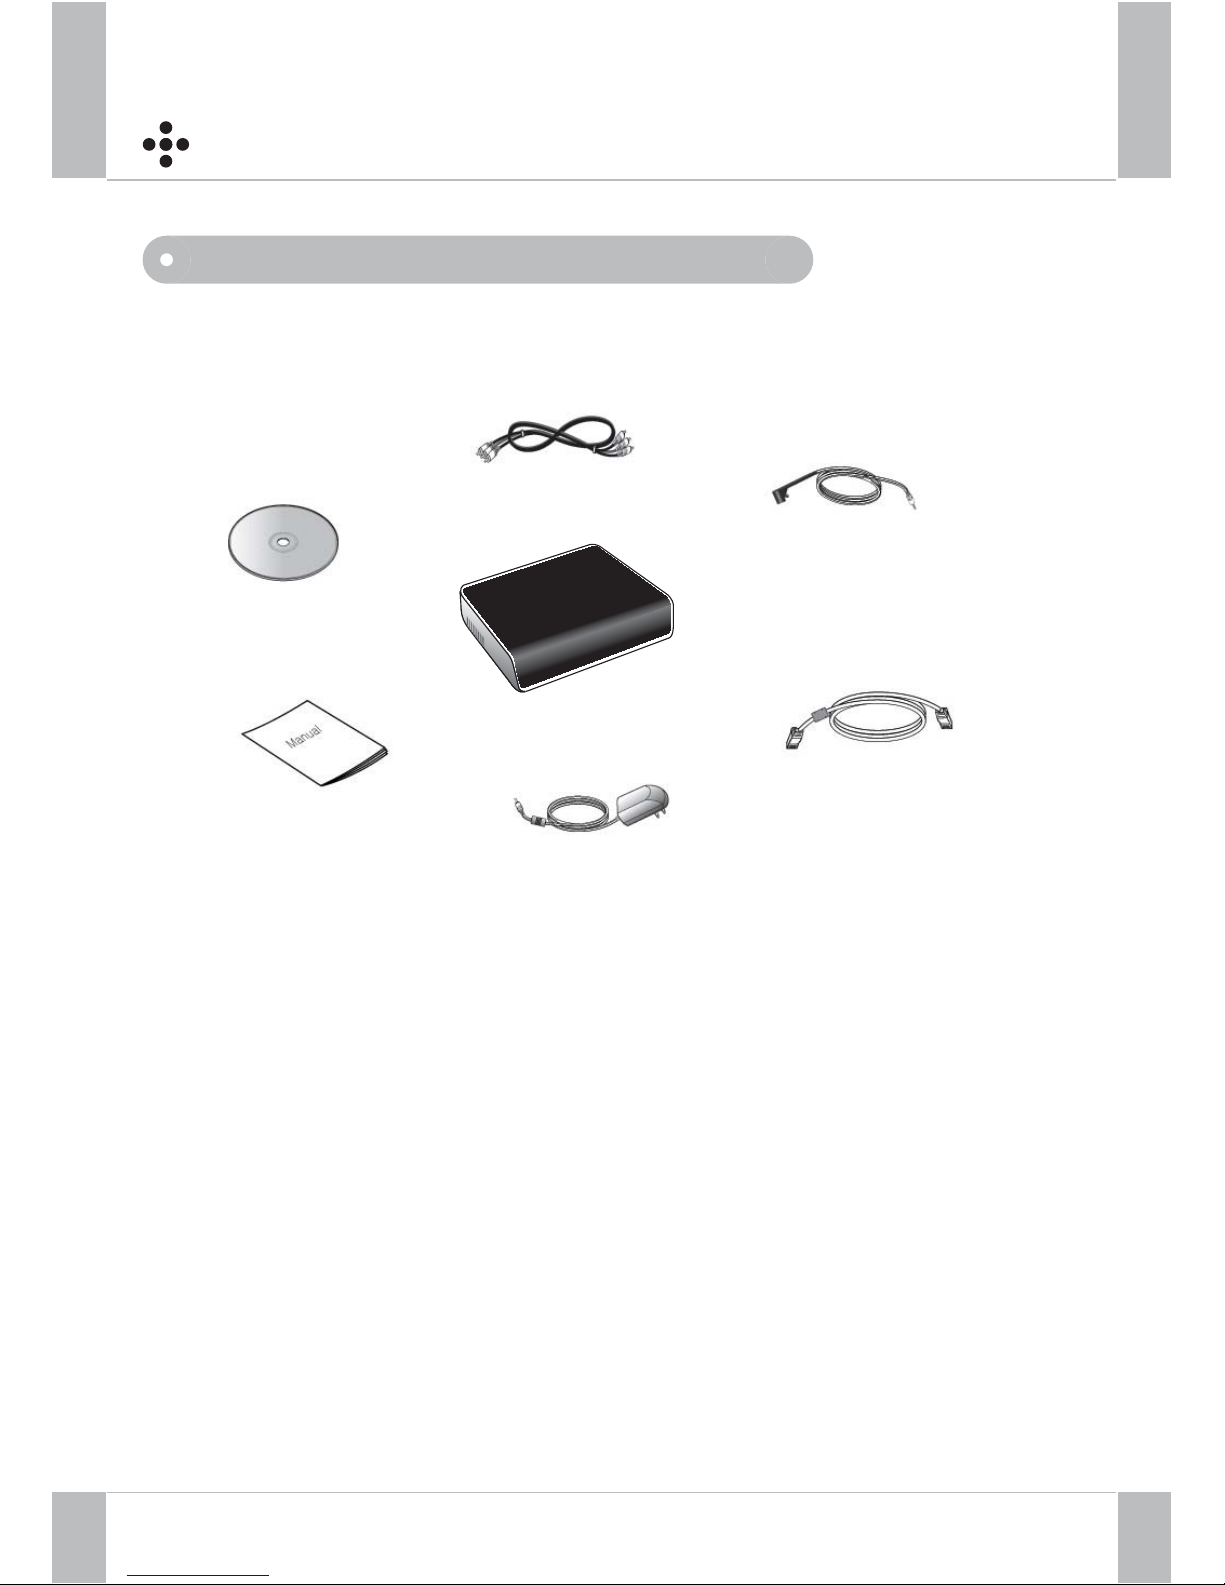
Accessories
Installation CD
A/V Cable
IR Contorl Cable
LAN Cable
DC Adaptor (5V, 2A)
HomeStream
Instruction manual
Page 4
1
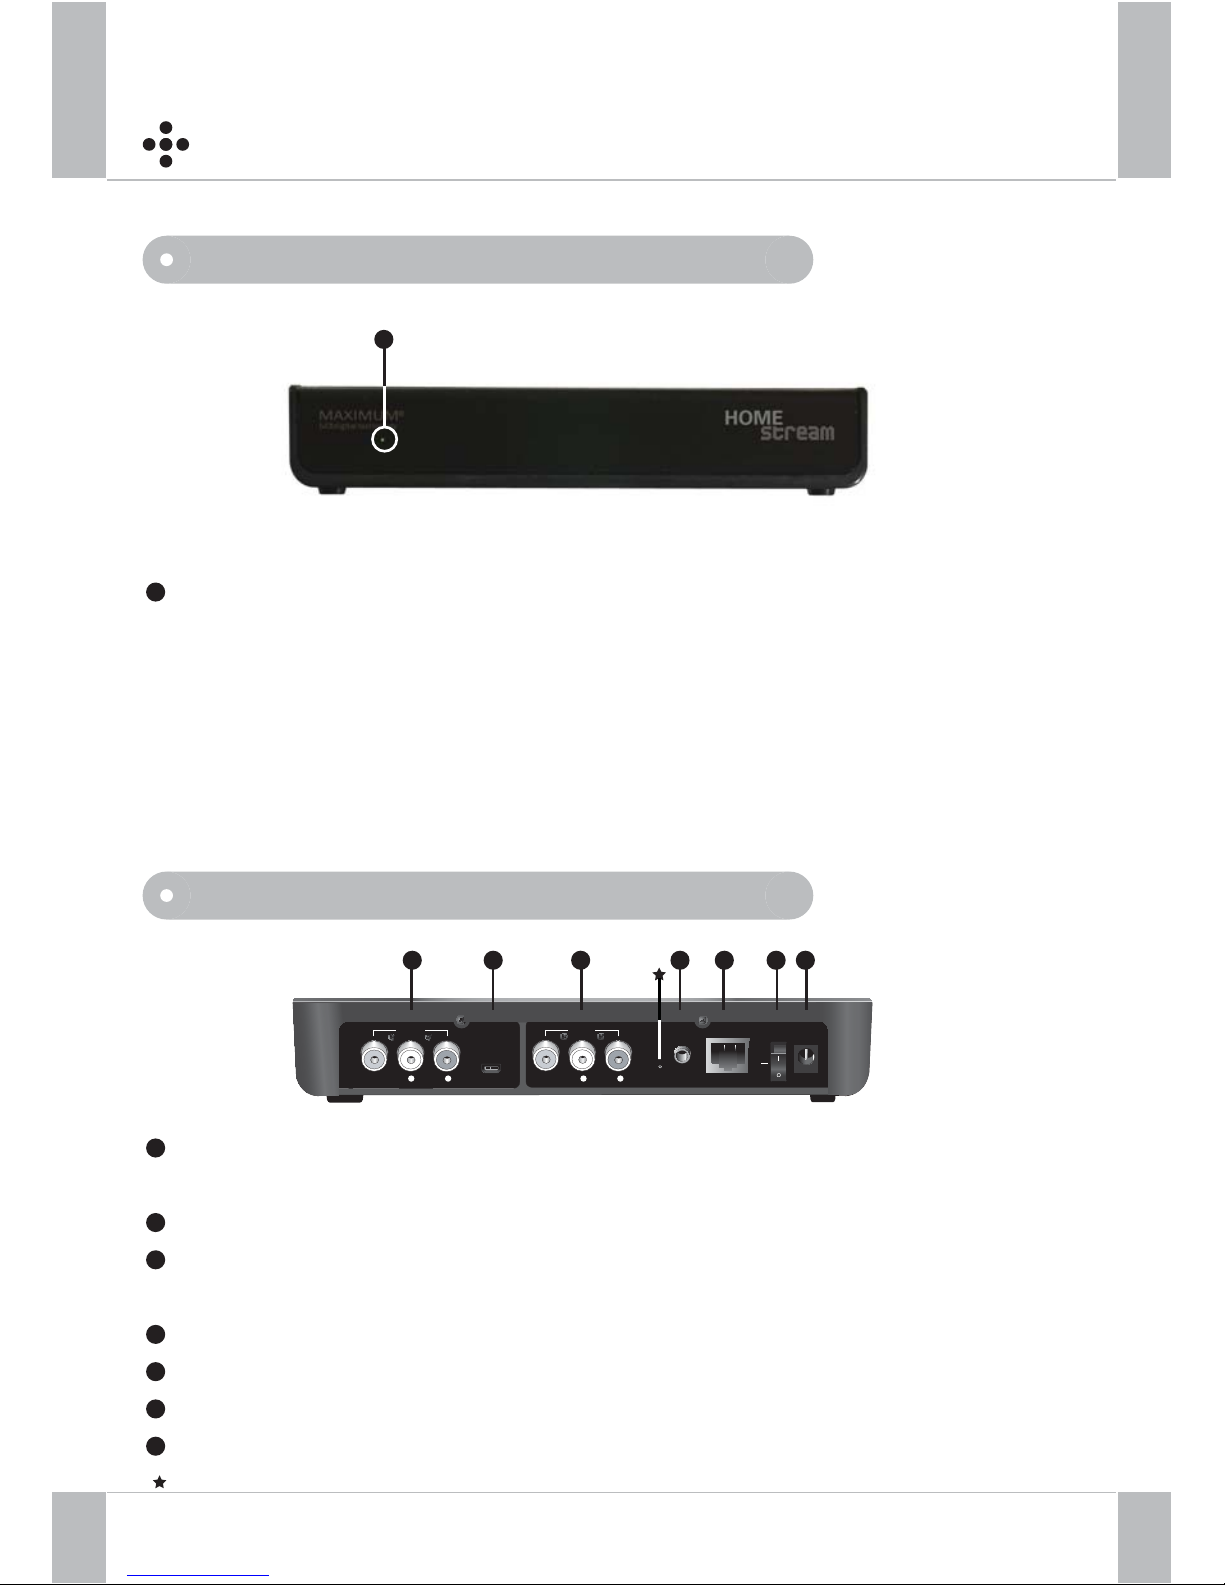
Front and Rear views of the HomeStream
Front
Rear Panel
3
Power Indicator : When the power cord is connected to the outlet and the switch
is turned on,
Green LED in front will blink in order and remain on while active
* Description of LED lighting
1 blink indicates that the system is initializing
2 blinks indicate that the system is checking the connection between the HomeStream and the Router
3 blinks indicate that the system is checking the connection between the HomeStream and the Server
LED will remain on when the system is on standby for connection
A/V Output :Composite video output socket (Yellow) and Stereo audio output
socket (Red/ White) to TV
Camera input : Web camera input port for home view
A/V Input : Composite video input socket (Yellow) and Stereo audio input socket
(Red/ White) from the external A/V devices
IR connector : port for the IR control cable
LAN port : Ethernet port to Router for internet
Power On/Off Switch
Power Supply : Adaptor type. AC 100 - 240V, 50/60Hz ( 5V DC, 2.8A )
Reset
1
1
2
3
4
5
6
7
LAN
EXT.IR
VIDEO
CAMERA
- AUDIO -
A /V IN
DC 5V
POWER
OFF
ON
A /V OUT
L R
VIDEO - AUDIO -
L R
1 3 4 5 6 72
Page 5
LAN
EXT.IR
DC 5V
POWER
OFF
ON
LAN
EXT.IR
VIDEO - AUDIO -
A /V IN
DC 5V
POWER
OFF
ON
L R
Connecting
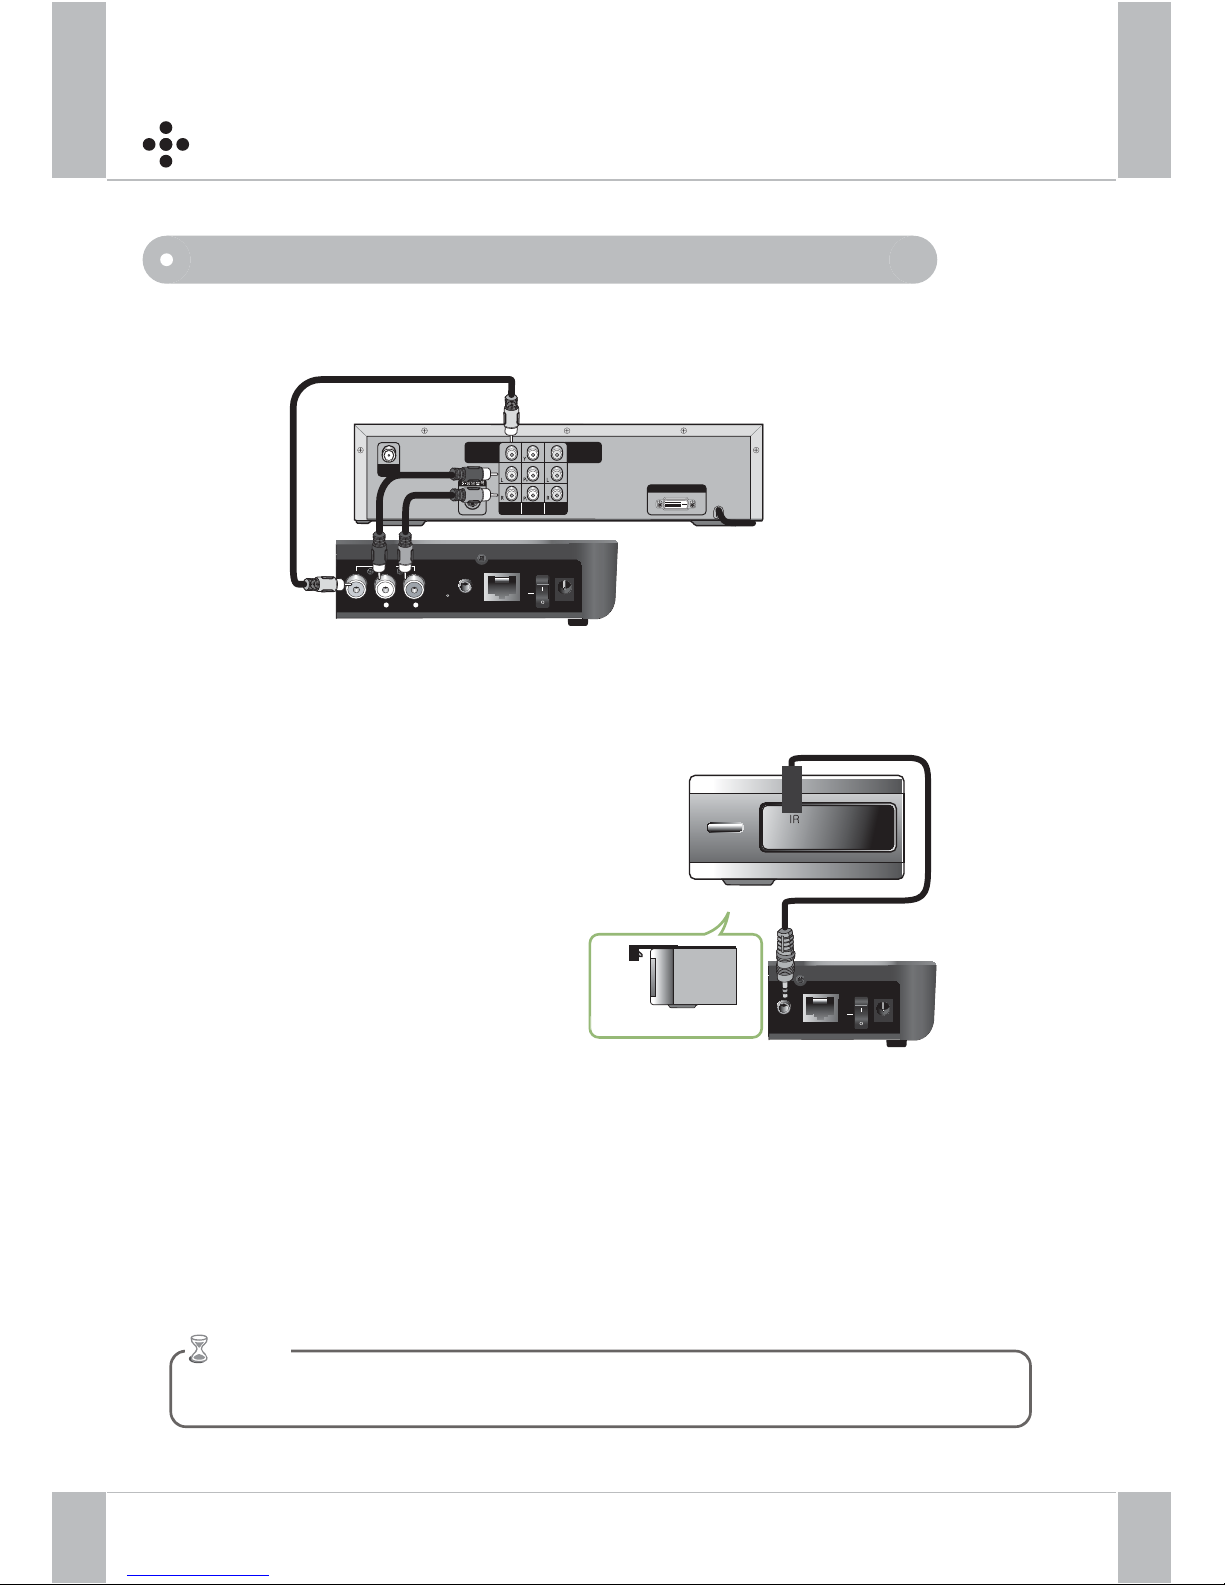
Connecting the remote control IR Cable and A/V Cable
1. Connect A/V out of an external A/V device and A/V input of the HomeStream with
an Audio/Video cable
2. Insert the remote control IR cable into the IR connector on the HomeStream
3. Place the head of remote control IR cable against the IR sensor of the external
A/V device
otice
The remote control IR cable allows you to control your device’s channels and menu remotel
y
Rear panel of External device
S-
ANT IN
VIDEO OUT
AUDIO OUT
AUDIO OUT
COMPONENT
COAXIAL
DVI OUT
IR Blaster Installation
Front panel of the external A/V device
Page 6
LAN
EXT.IR
VIDEO
CAMERA
- AUDIO -
A /V IN
DC 5V
POWER
OFF
ON
A /V OUT
L R
VIDEO - AUDIO -
L R
Connecting
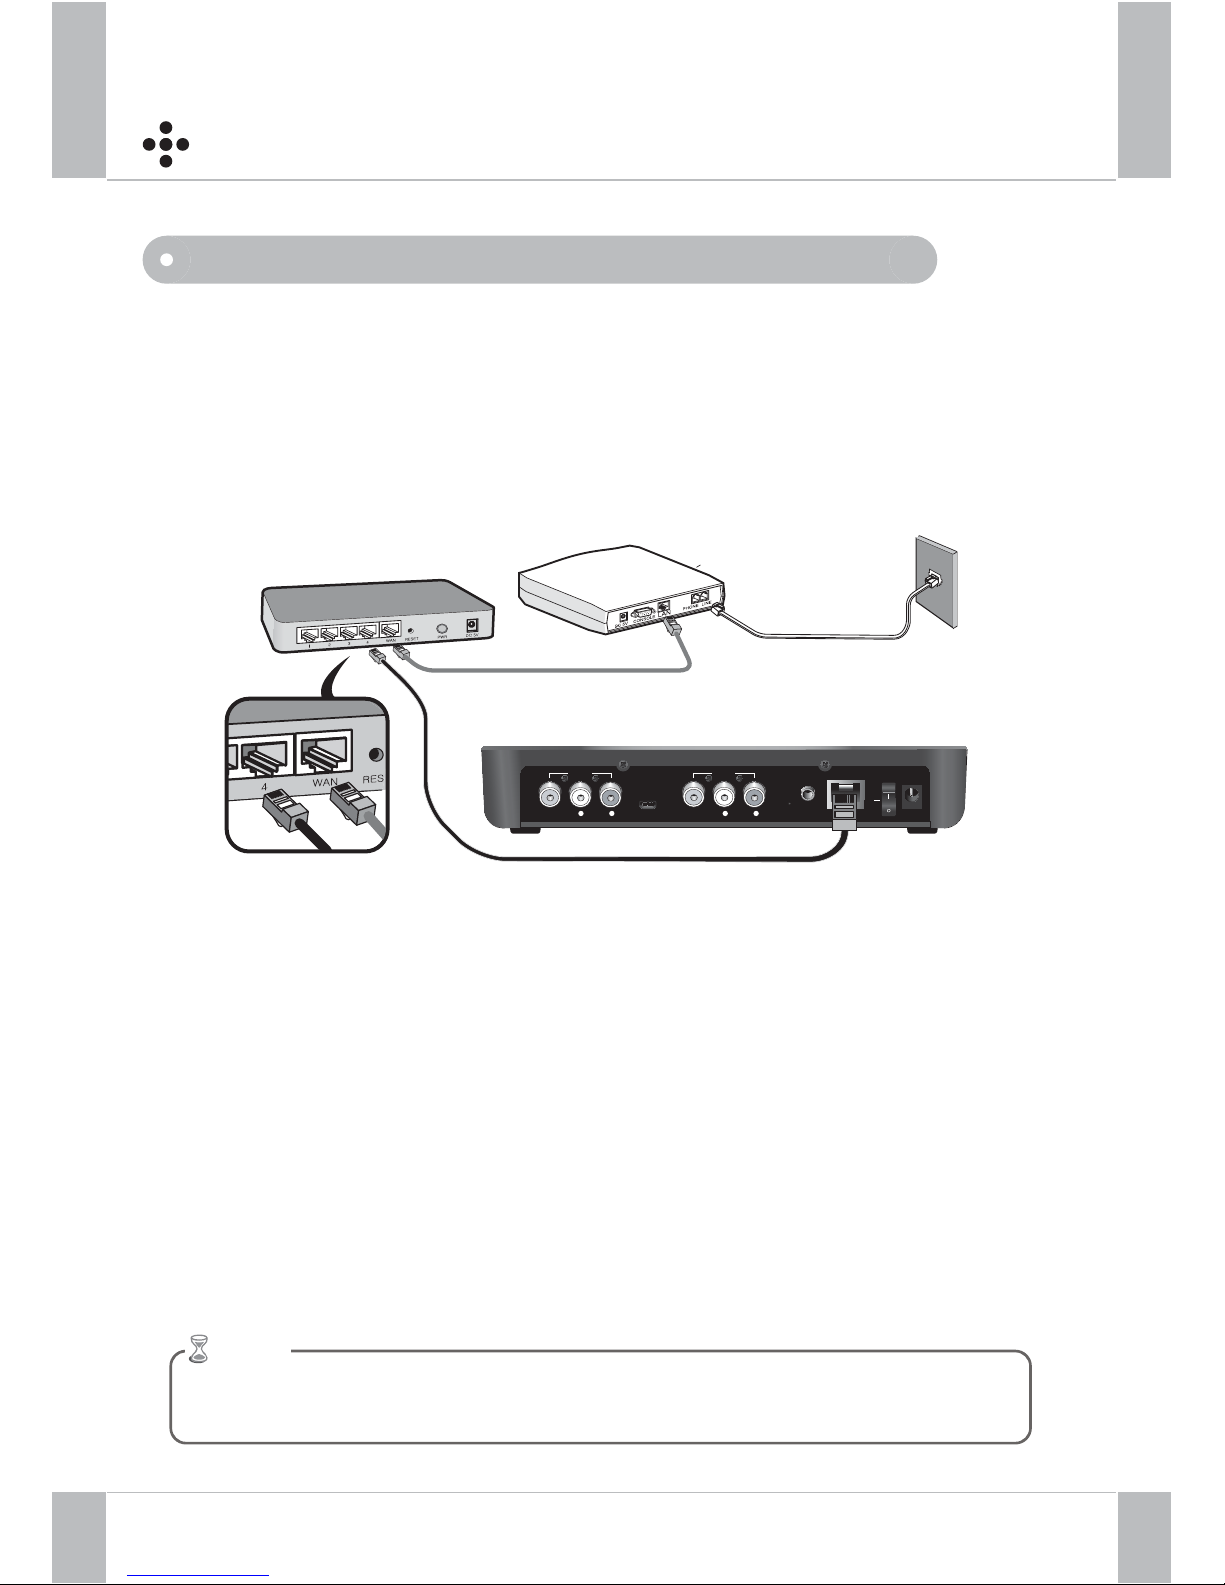
Network Connection of HomeStream
Plug one end of the Ethernet cable into LAN port of the HomeStream and
connect the other end to a port of your Router
HomeStream requires a connection to the Internet in order to provide the
services such as Take- Out and Home View
otice
DSL Modem
Router
Page 7
LAN
EXT.IR
VIDEO
CAMERA
- AUDIO -
A /V IN
DC 5V
POWER
OFF
ON
A /V OUT
L R
VIDEO - AUDIO -
L R
Connecting
Powering-up the HomeStream
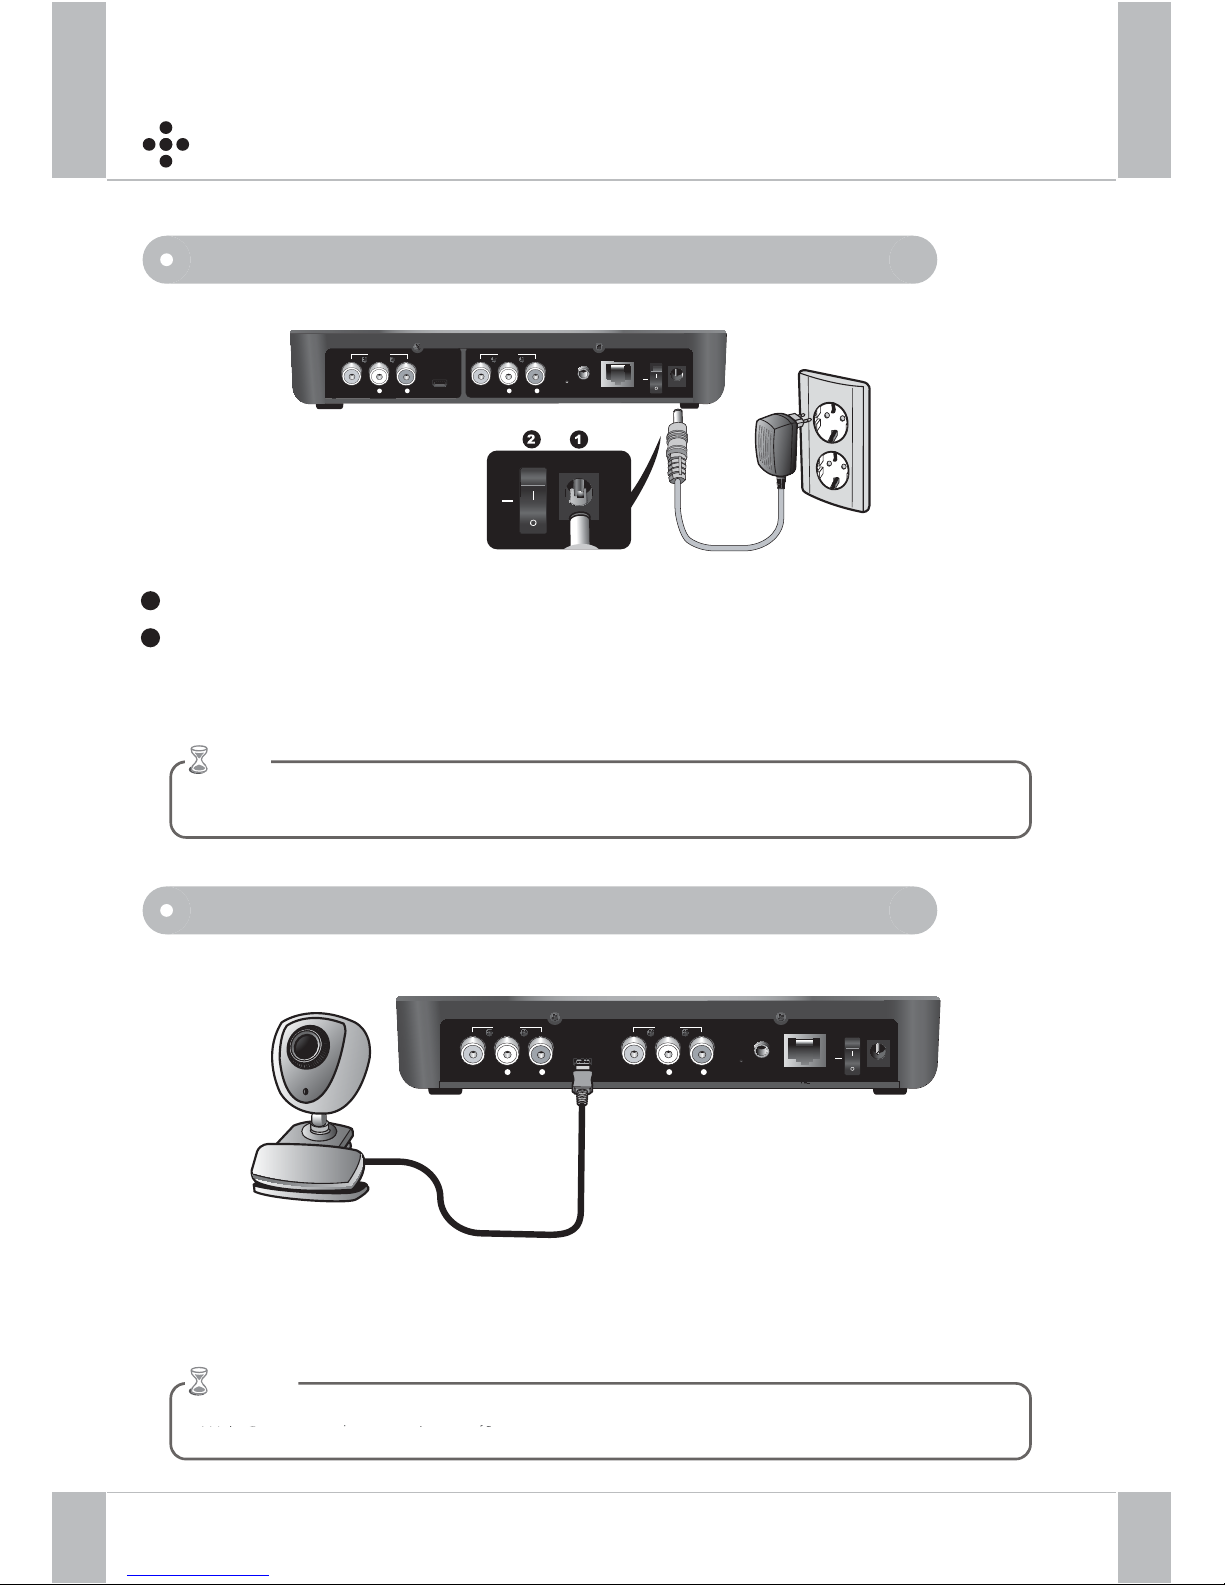
Connecting Web Cam
Plug Web Cam into the camera port of the HomeStream. You may adjust the
definition of the camera by turning the frame of the camera lens
Connect the power adaptor into the HomeStream and plug it into an electrical outlet.
Turn ON the power switch at the rear panel of the HomeStream. Then the LED light
should turn on and blink a few times while checking the connection with the router.
ip :
If the LED light does not turn on after powering up, check the HomeStream connection to the
outer
i
ce
py
py
1
2
LAN
EXT.IR
VIDEO
CAMERA
-AUDIO -
A /V IN
DC 5V
POWER
OFF
ON
A /V OUT
L R
VIDEO -AUDIO -
L R
DC 5V
POWER
OFF
ON
Page 8
Connecting
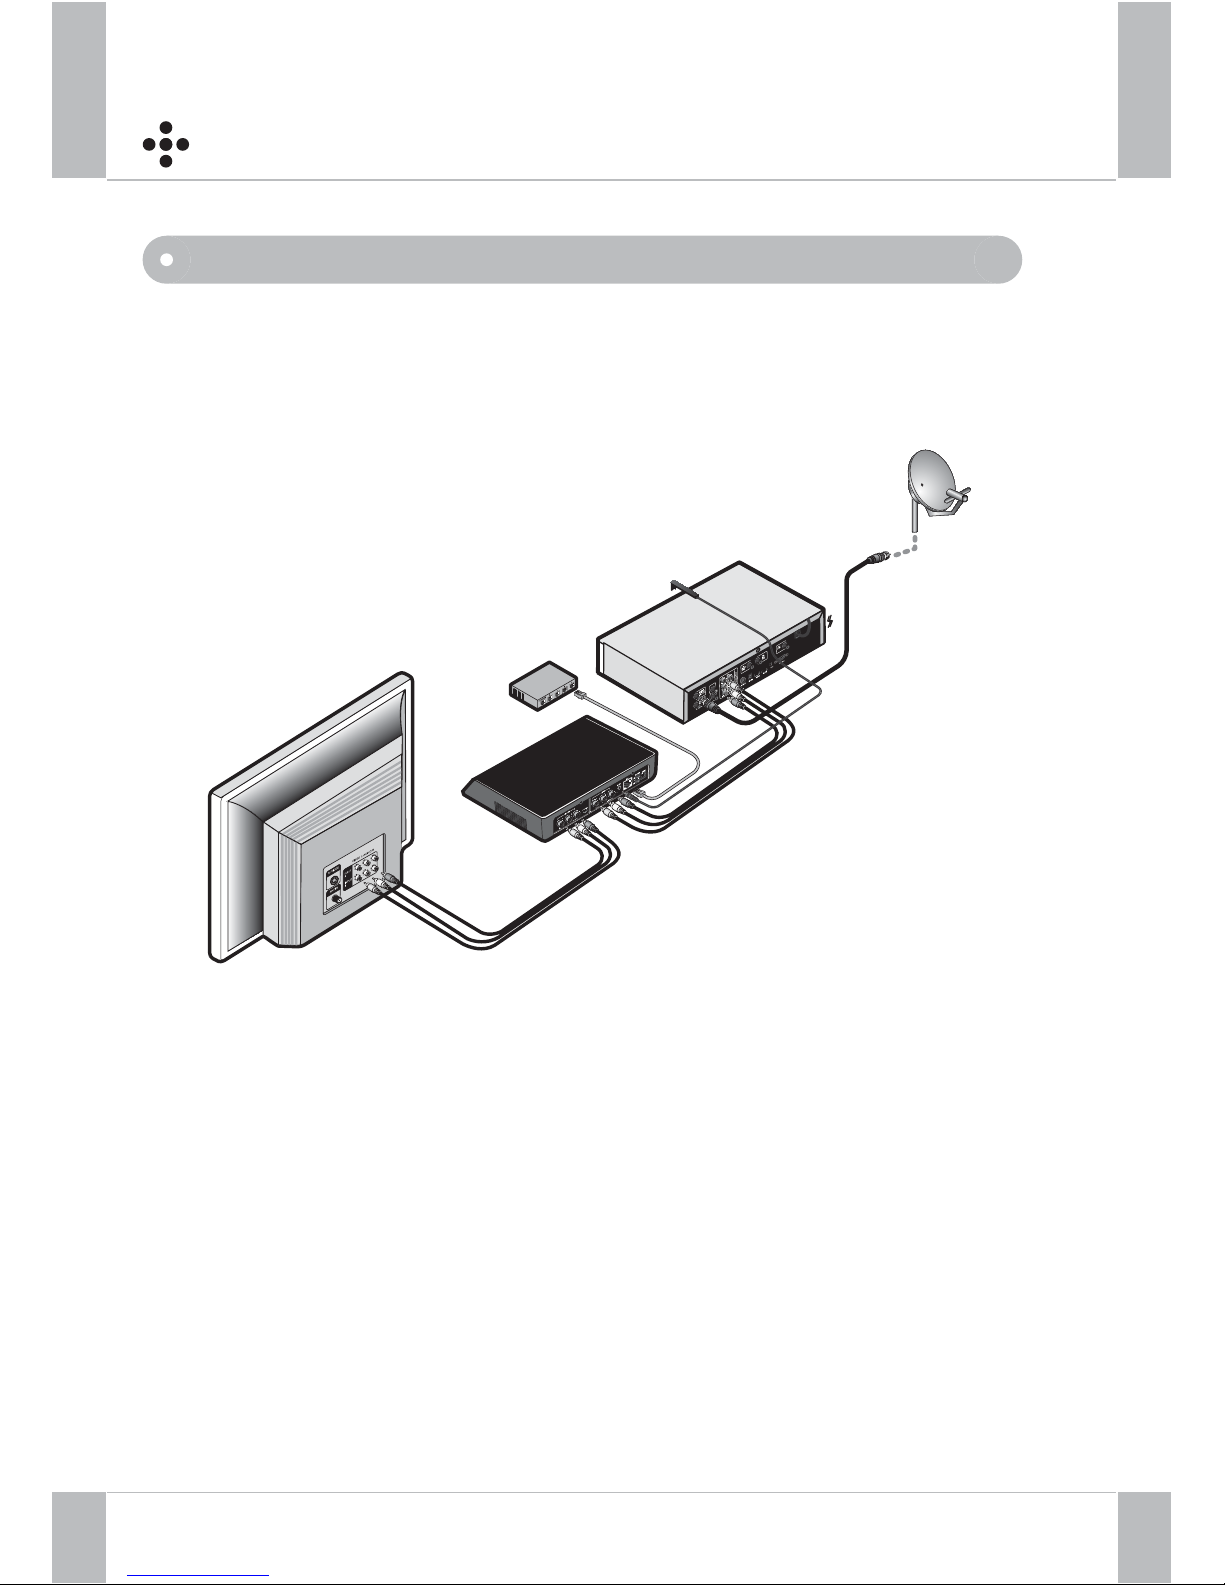
A connection diagram of all the connection of the HomeStream
Connect the TV, External device, router and the HomeStream as shown in the
below picture
TV
Router
Eksterne AV-enhed
HomeStream
Page 9

HomeStream Player
Introduction
HomeStream Player is the PC software that allows the HomeStream user to view
the media contents of an external device connected to the HomeStream via the
internet
Main features of HomeStream
(1) Take Out TV
With HomeStream Player installed, any remote PC or labtop may be used to
access live channel and media services of the external device
(2) Home View ( optional feature )
The user can monitor their home through video streaming from Web Cam
connected to the HomeStream
Minimum System and Network Requirements
Windows 2000 / Windows XP / Windows Vista operating systems
Pentium 4 over 1GHz processor speed
256MB or above memory
100MB or above free hard disk space
Sound card ( 16-bit )
Graphics Card ( 24-bit color )
Cable or DSL modem
256 Kbps upstream network speed
Home network router ( UPnP compatibility highly recommended )
Page 10
Installation
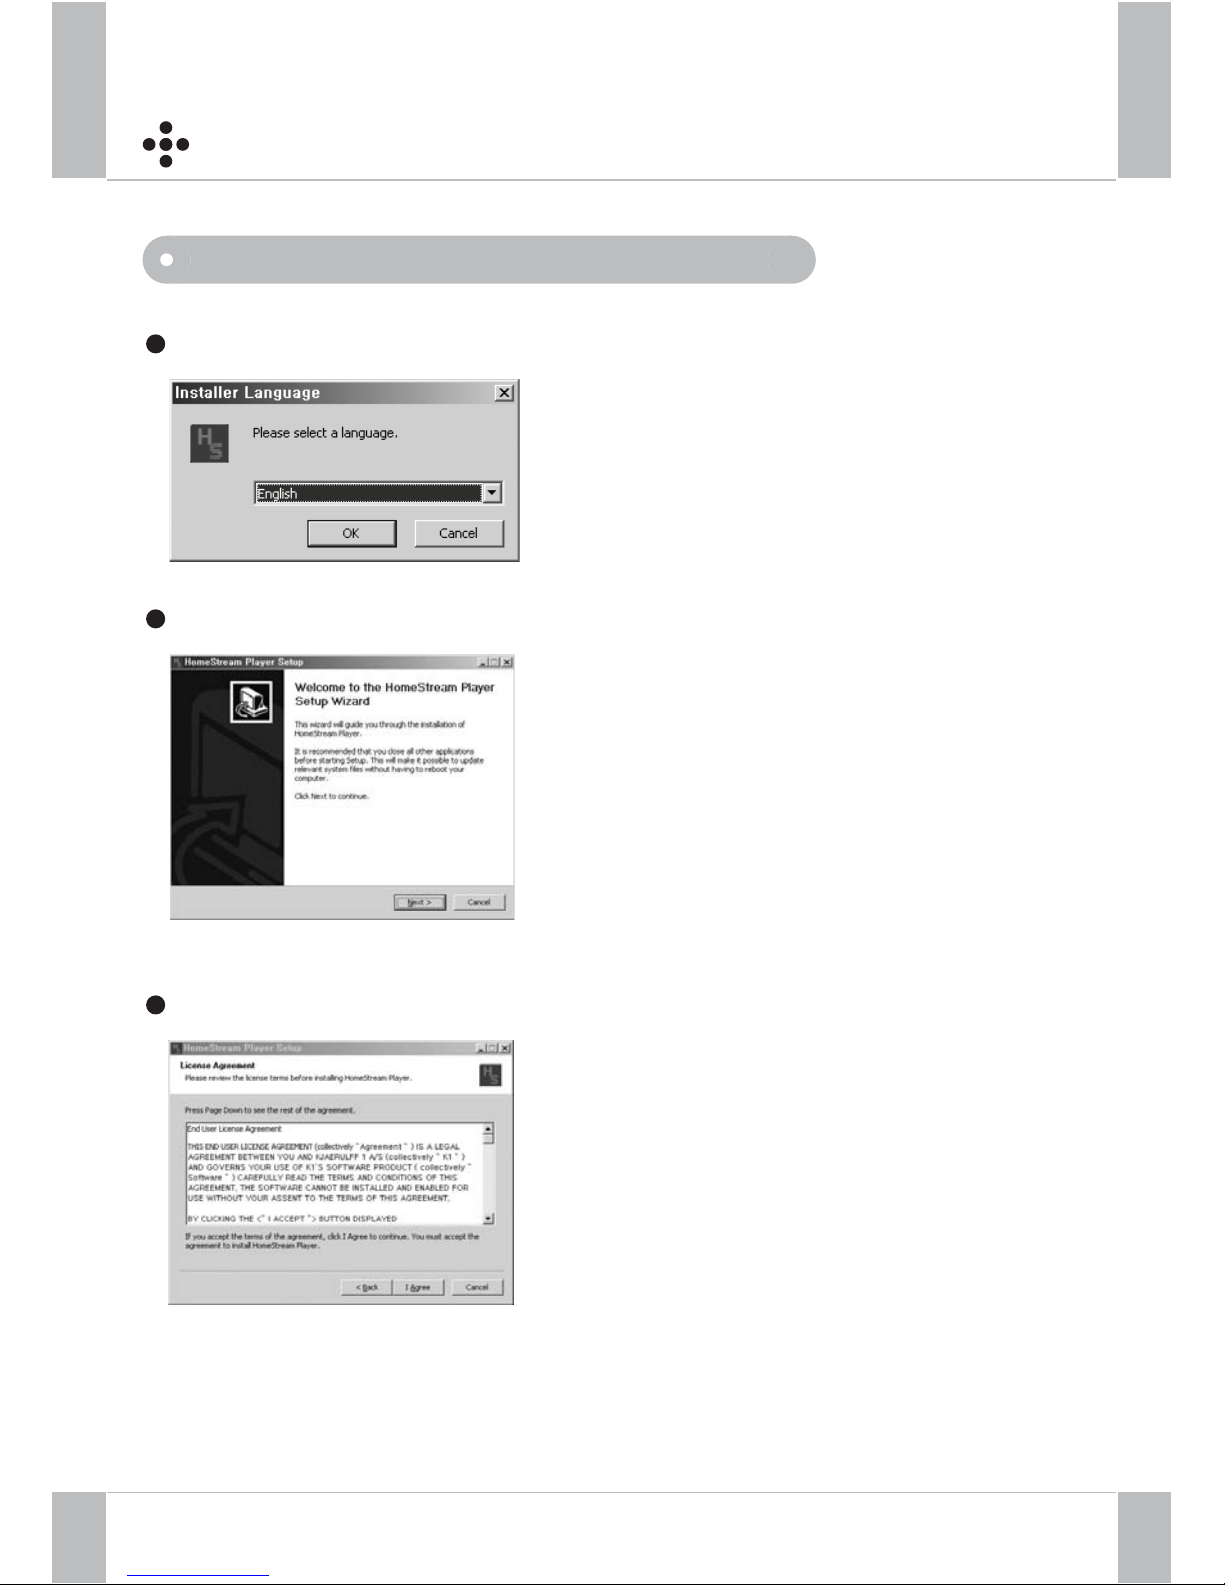
HomeStream Installation
Select your language preference and
click “ OK “.
Language selection
1
Click “ Next “ to continue
Starting Setup
2
Read over the End user License Agreement and click “ I agree “ to continue
License Agreement
3
Page 11
Installation
1
0
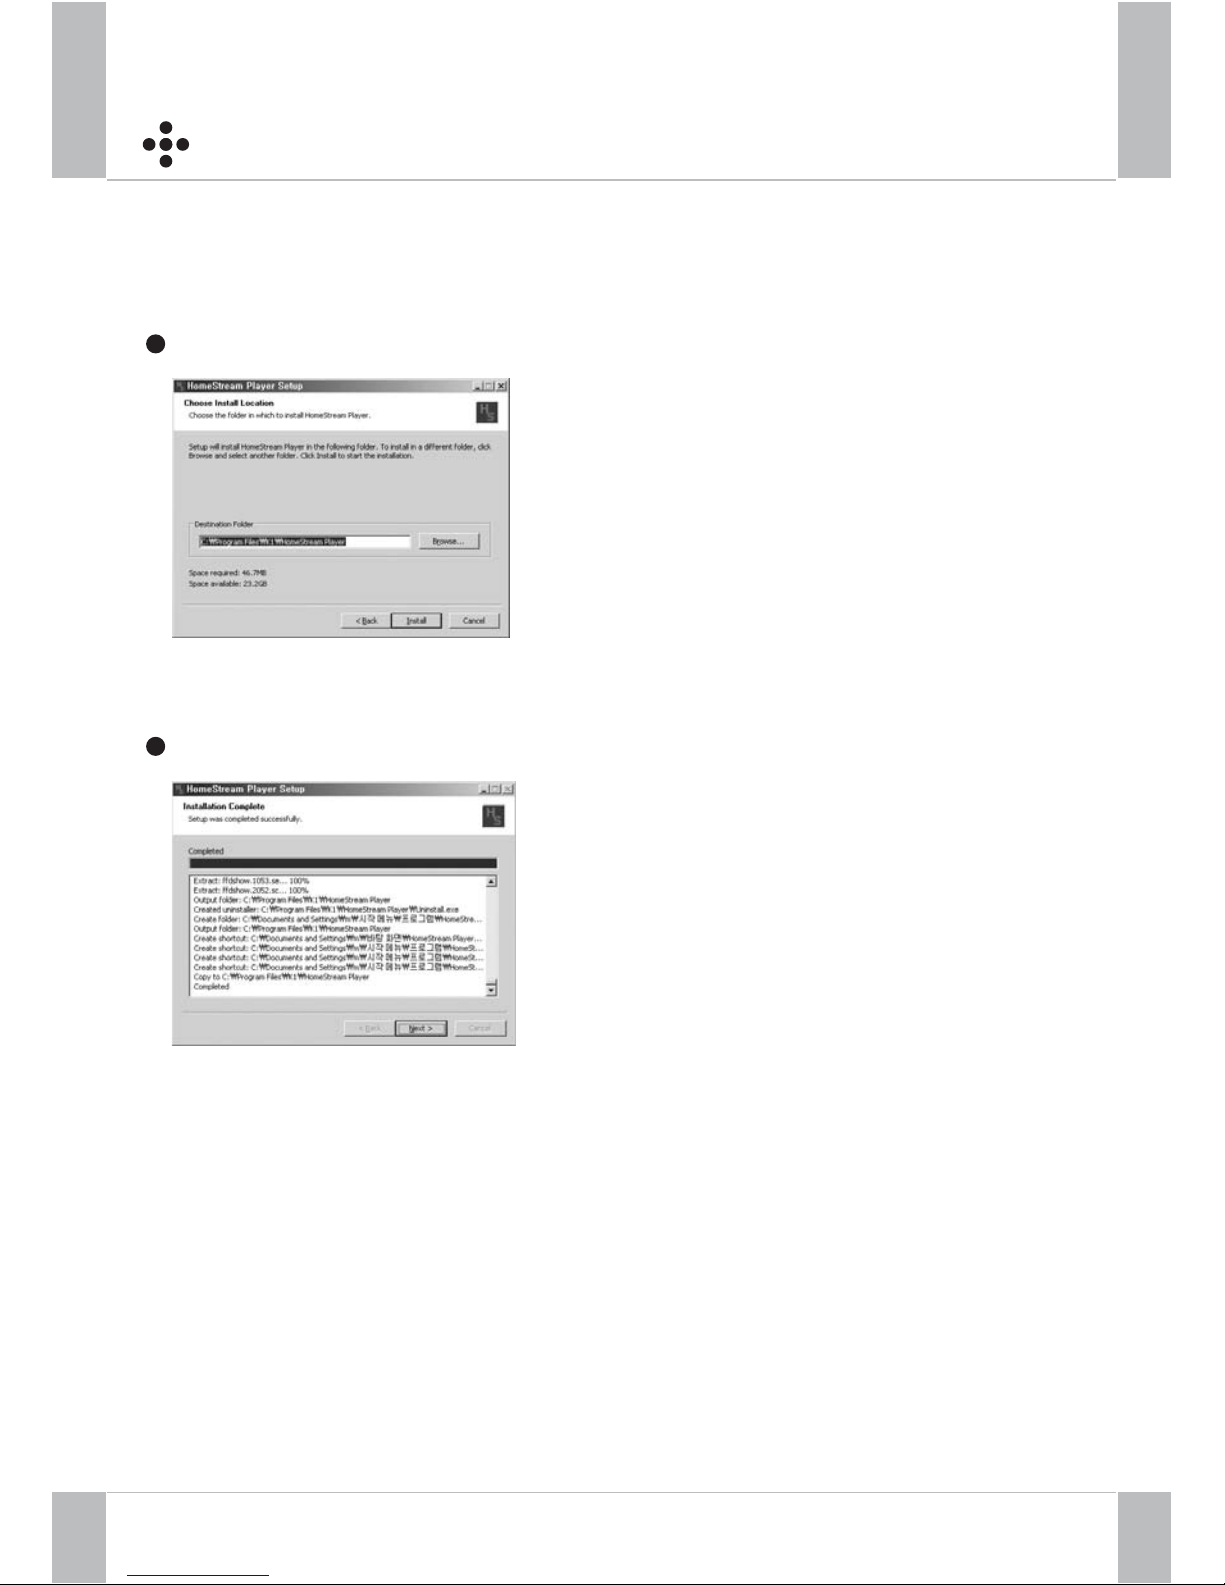
Select the destination folder and click “
Install “ to continue
Installation Location selection
4
Click “ Next “ to activate the Setup Wizard
Installation processing
5
Page 12
Installation
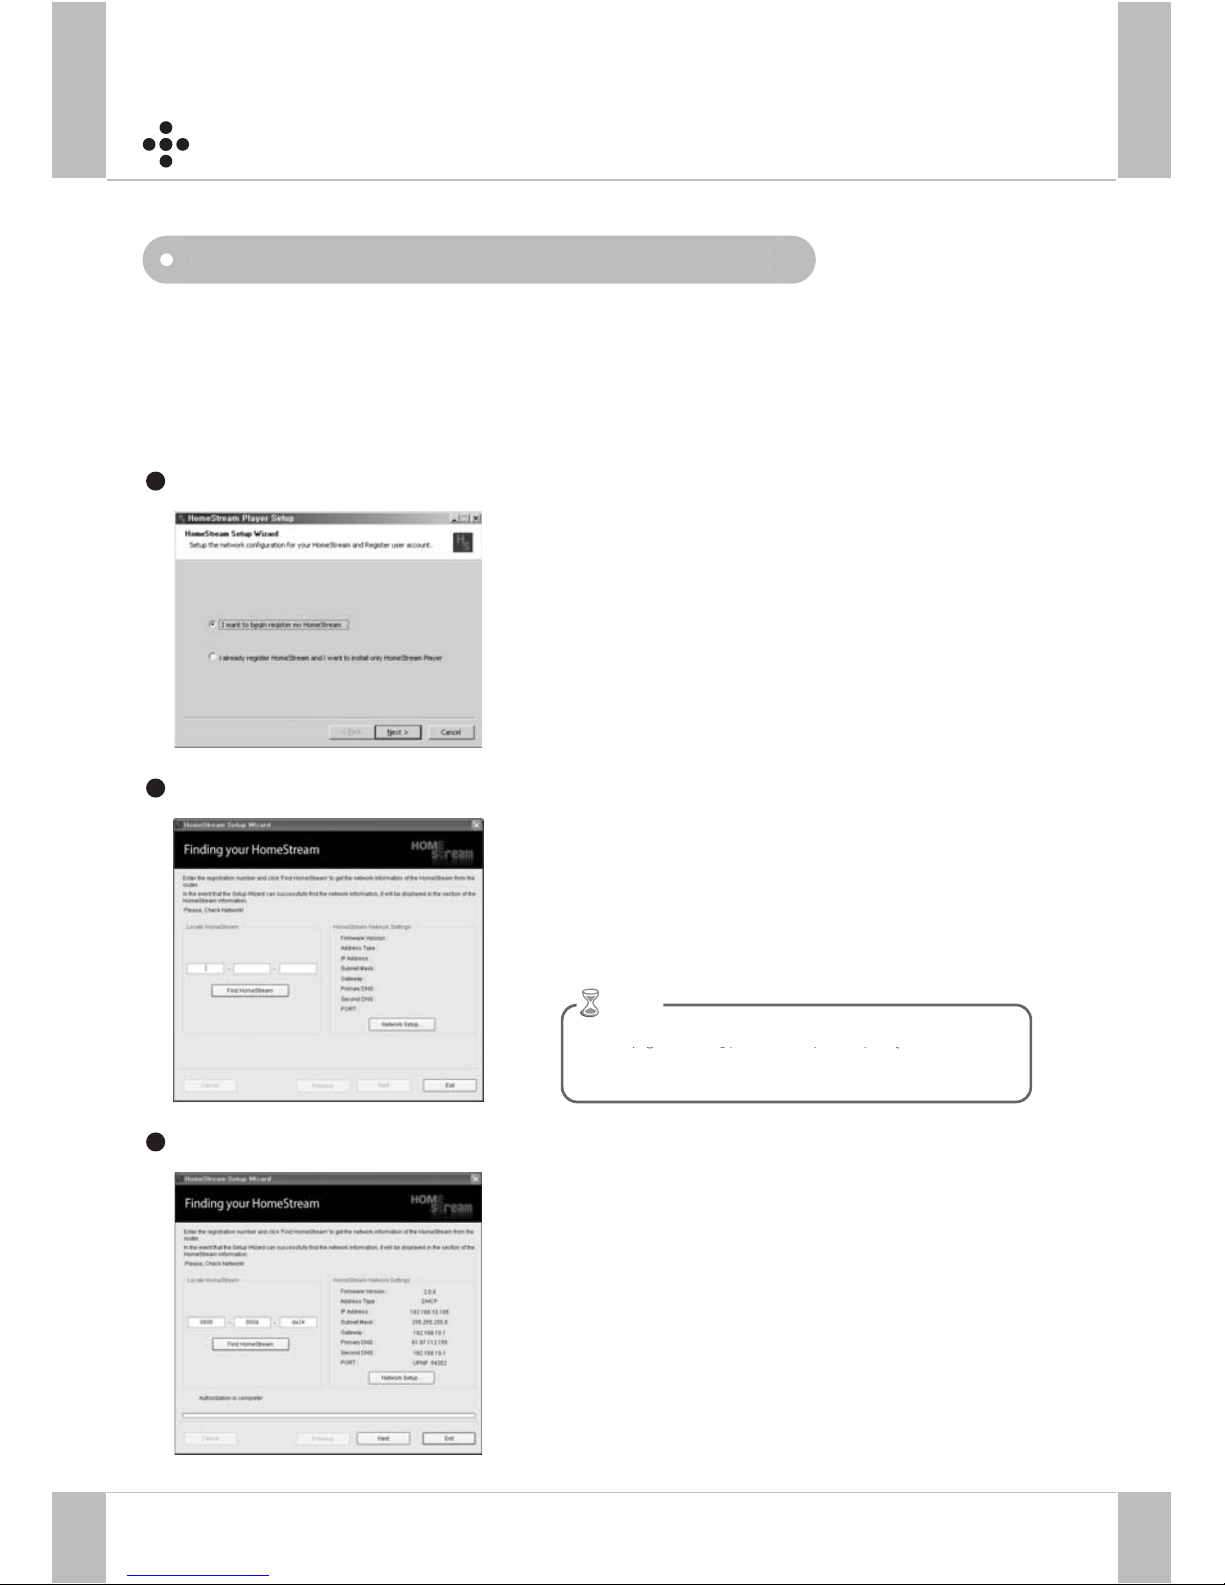
HomeStream Setup Wizard
Click “ I want to begin register my
“ in the radio button and click “ Next “ to
continue
Setup Wizard is a useful program for the user to setup the HomeStream and
change the network information. This program can only be used in the local
network
Starting the Setup Wizard
1
Entered the registration number and click
“ Find HomeStream ” to get the network
information from the router
Entering the registration number
2
Click “ Next “ to continue In the event that
the network information of the HomeStream
is not found, please refer to the Help
Finding the network information
3
Tip
:
The registration number is the 12 digits of
combination of letters and numbers
gg
g
ound on the bottom of your HomeStream
Page 13
Installation
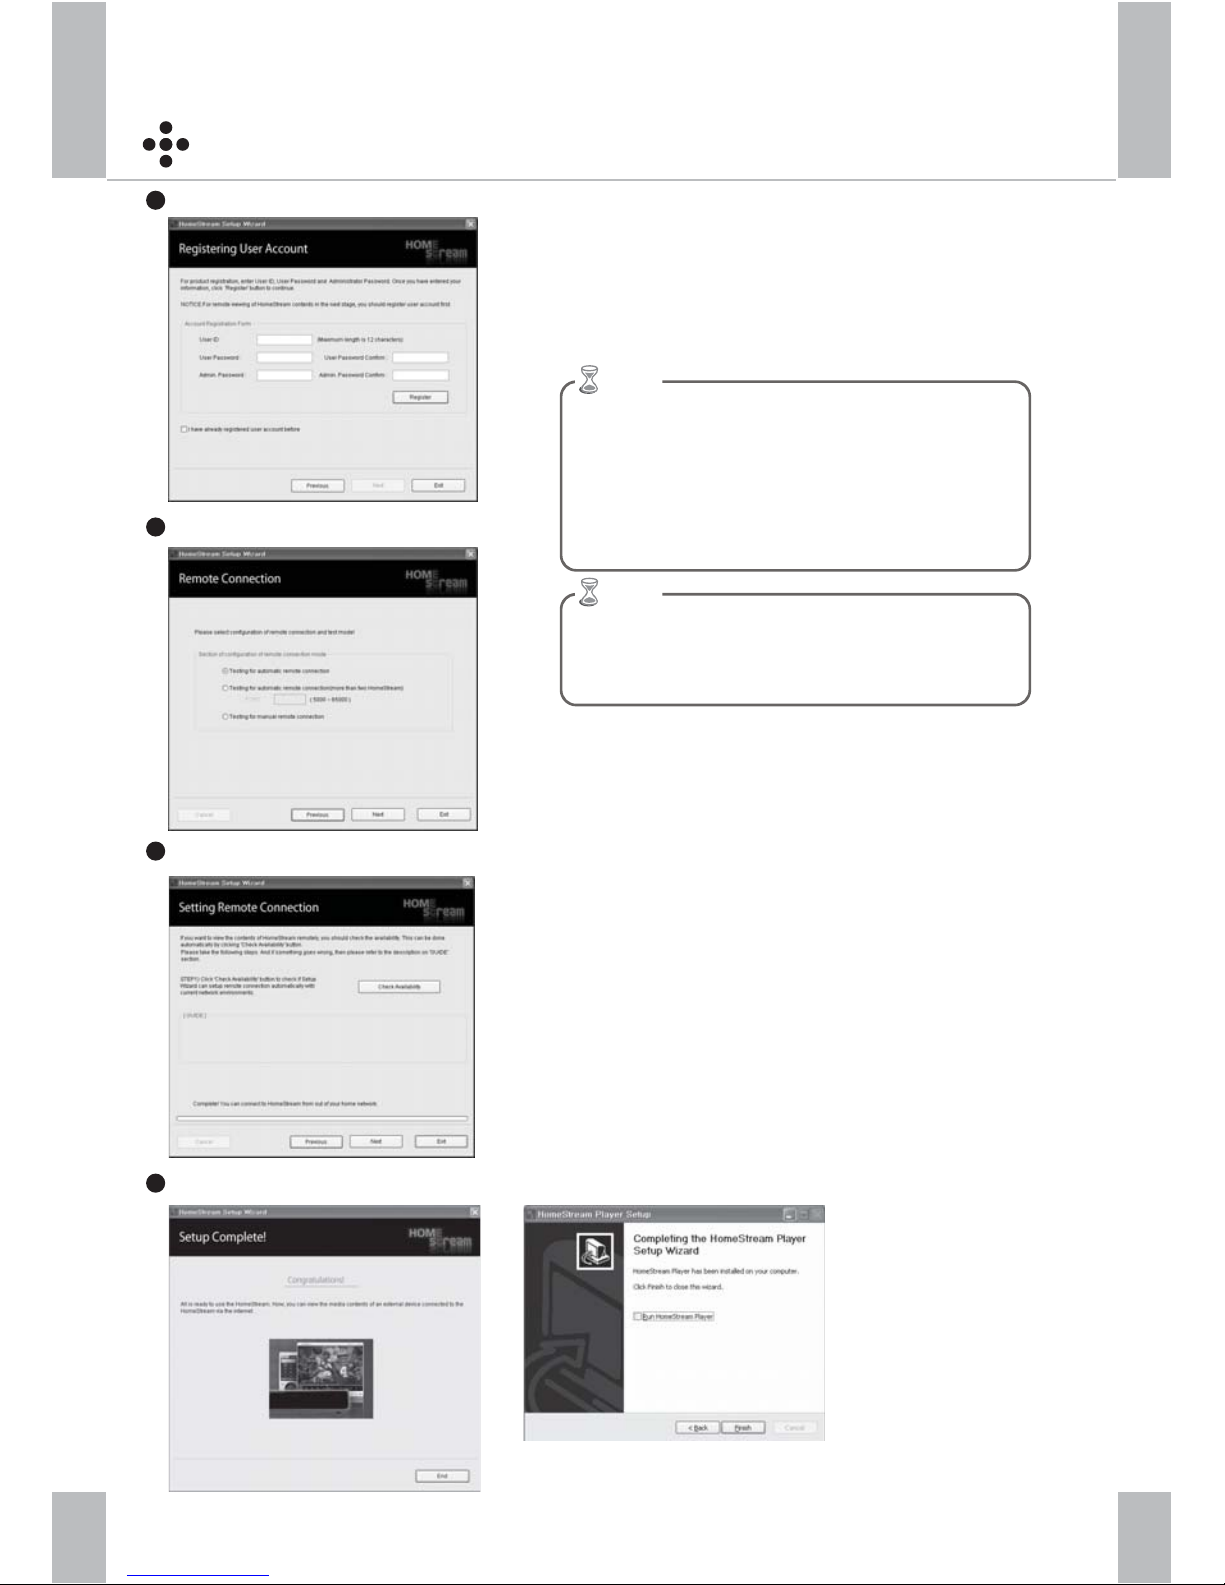
For product registration, enter User ID,
Password and admin Password. Once you
have entered your information, click “
Register “ to continue
Registration
4
setting for remote connection
5
Click ‘ Next ‘ to continue .
Click “ Check if available” to check
the availability for the remote connection.
If the remote connection is available, click
to complete the Setup Wizard.
In the event that the network does not allow
the remote connection, please click the “
Help” button
Checking the remote connection
6
Click “ finish “ to complete
the installation
Click “ End “ to complete the Setup
Wizard
Completion
7
Tip
:
The admin Password will be used when you change the
setting and firmware update via Setup Wizard. In addition,
Admin Password can be used when you want to stop the
streaming to the third person. In the case that
y
ou forget the
Admin Password, you should reset the HomeStream. After
the reset, The HomeStream gets into the factory default, and
y
ou can register with a new user ID, a new password and a
ew admin password
Tip
:
w to reset
ile the HomeStream is working ON, press a reset hole
in the rear panel for 4-5 seconds. Then the HomeStream gets
rebooted.
Page 14
Installation
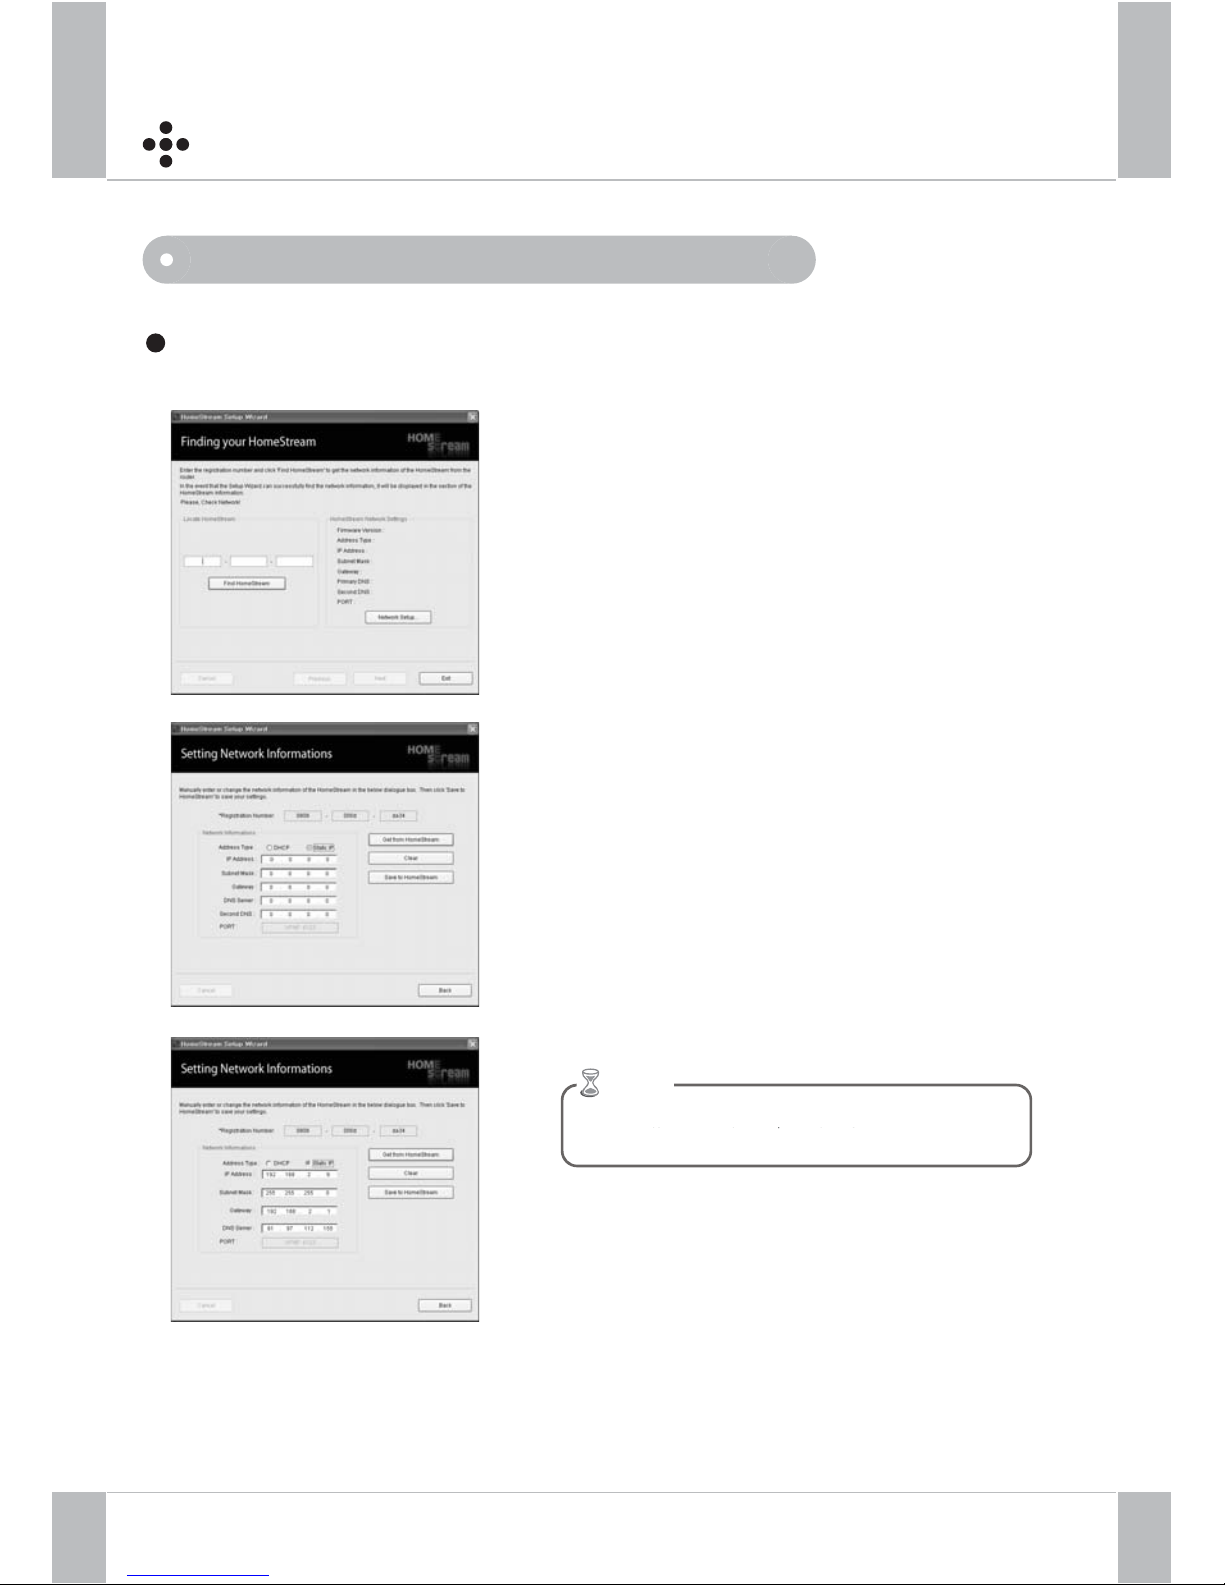
HomeStream Setup Wizard ( More settings )
1
3
Click “ Network Setup “ to invoke the
Network Setup dialogue box
Manual setting of the network information
( In the event that “ Find HomeStream“ is failed )
1
And click “ Save to HomeStream“ to save
your settings
ot
e
manually enter the network information
p
p
Page 15
Installation
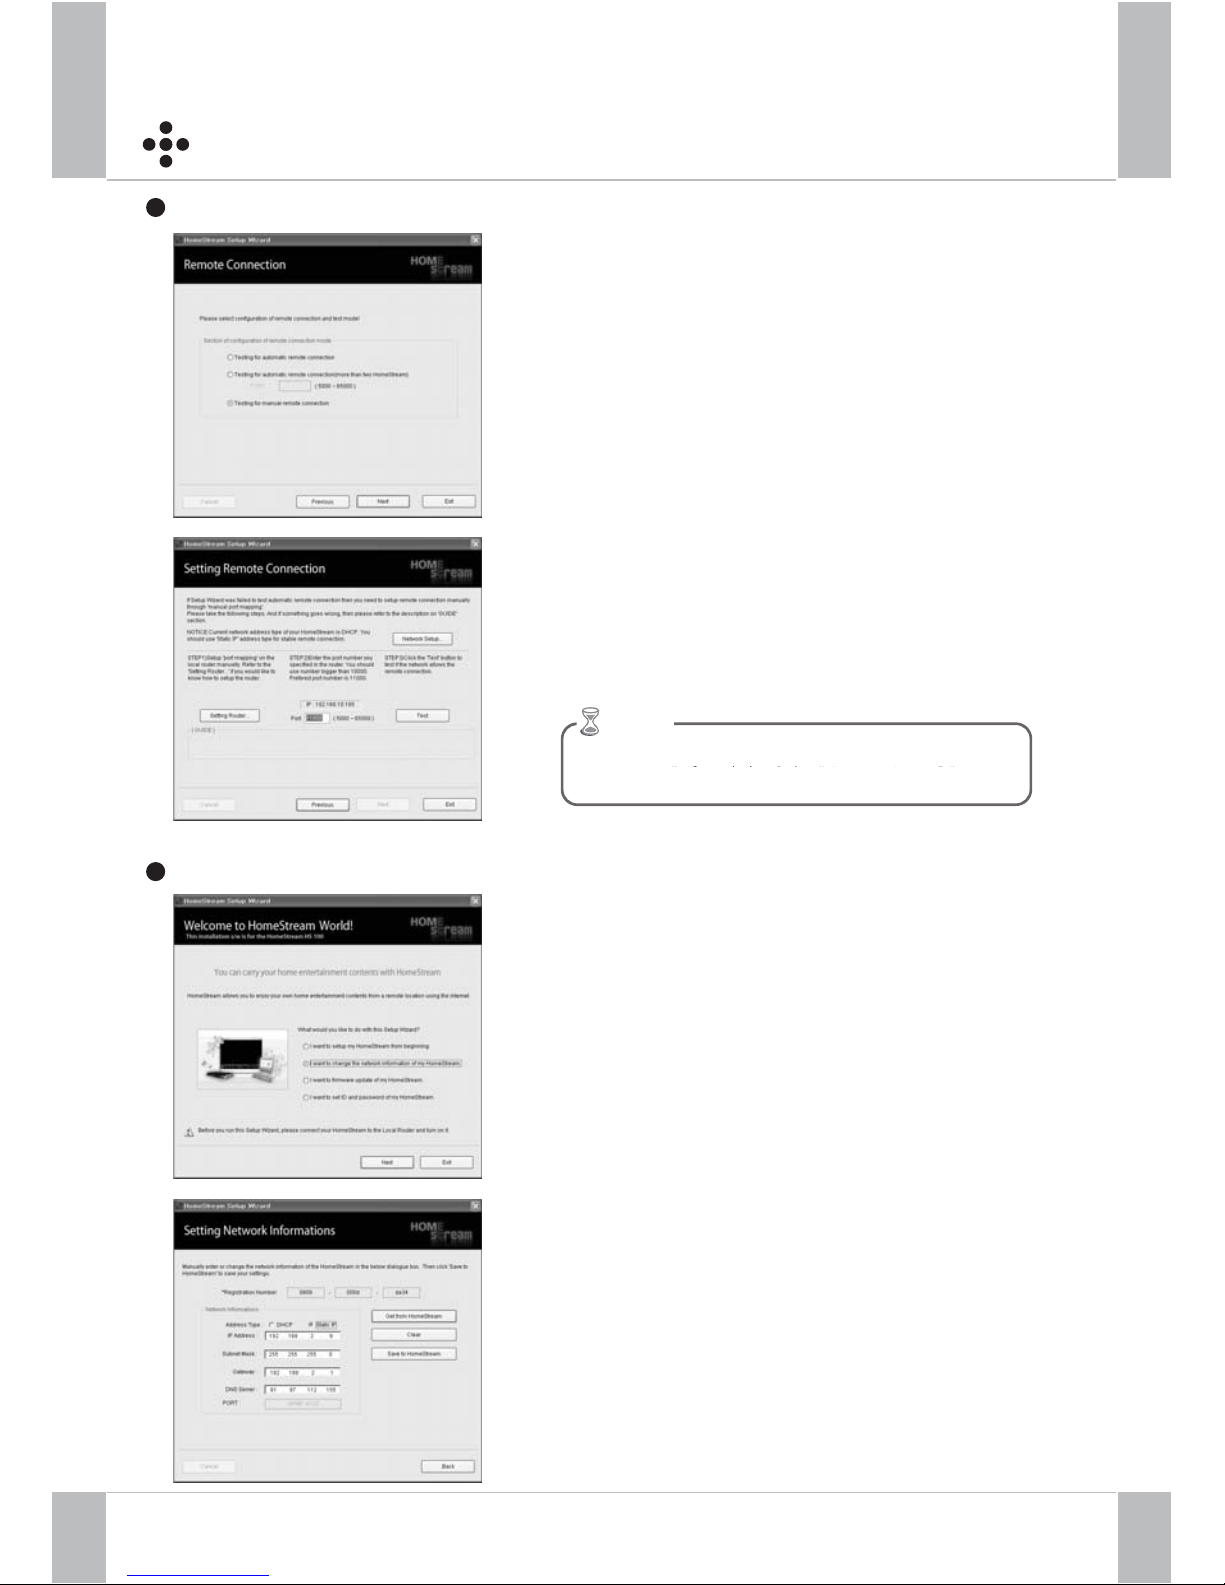
Check the radio button “ Testing for
manual remote connection “ and click the
Next button
Manual setting for remote connection
2
Check “ I want to change the network
information of HomeStream” to invoke
the Network Setup dialogue box
Enter the new Network information that
you would like to change, and click “ Save
to HomeStream“ to save your settings
Change the network information
3
1) Set up ‘ port mapping ‘ on the local router
manually. Refer to the “ Setting Router “ if you
would like to know how to setup the router.
2) Enter the port number you specified in the
router
3) Click the “ Test “ button to check that
the settings are correct. If the remote
connection is successful, click to complete
the Setup Wizard
4) Click “ Next “ to complete the Setup Wizard
N
ote
gg
gg
Page 16
Installation
1
5
4
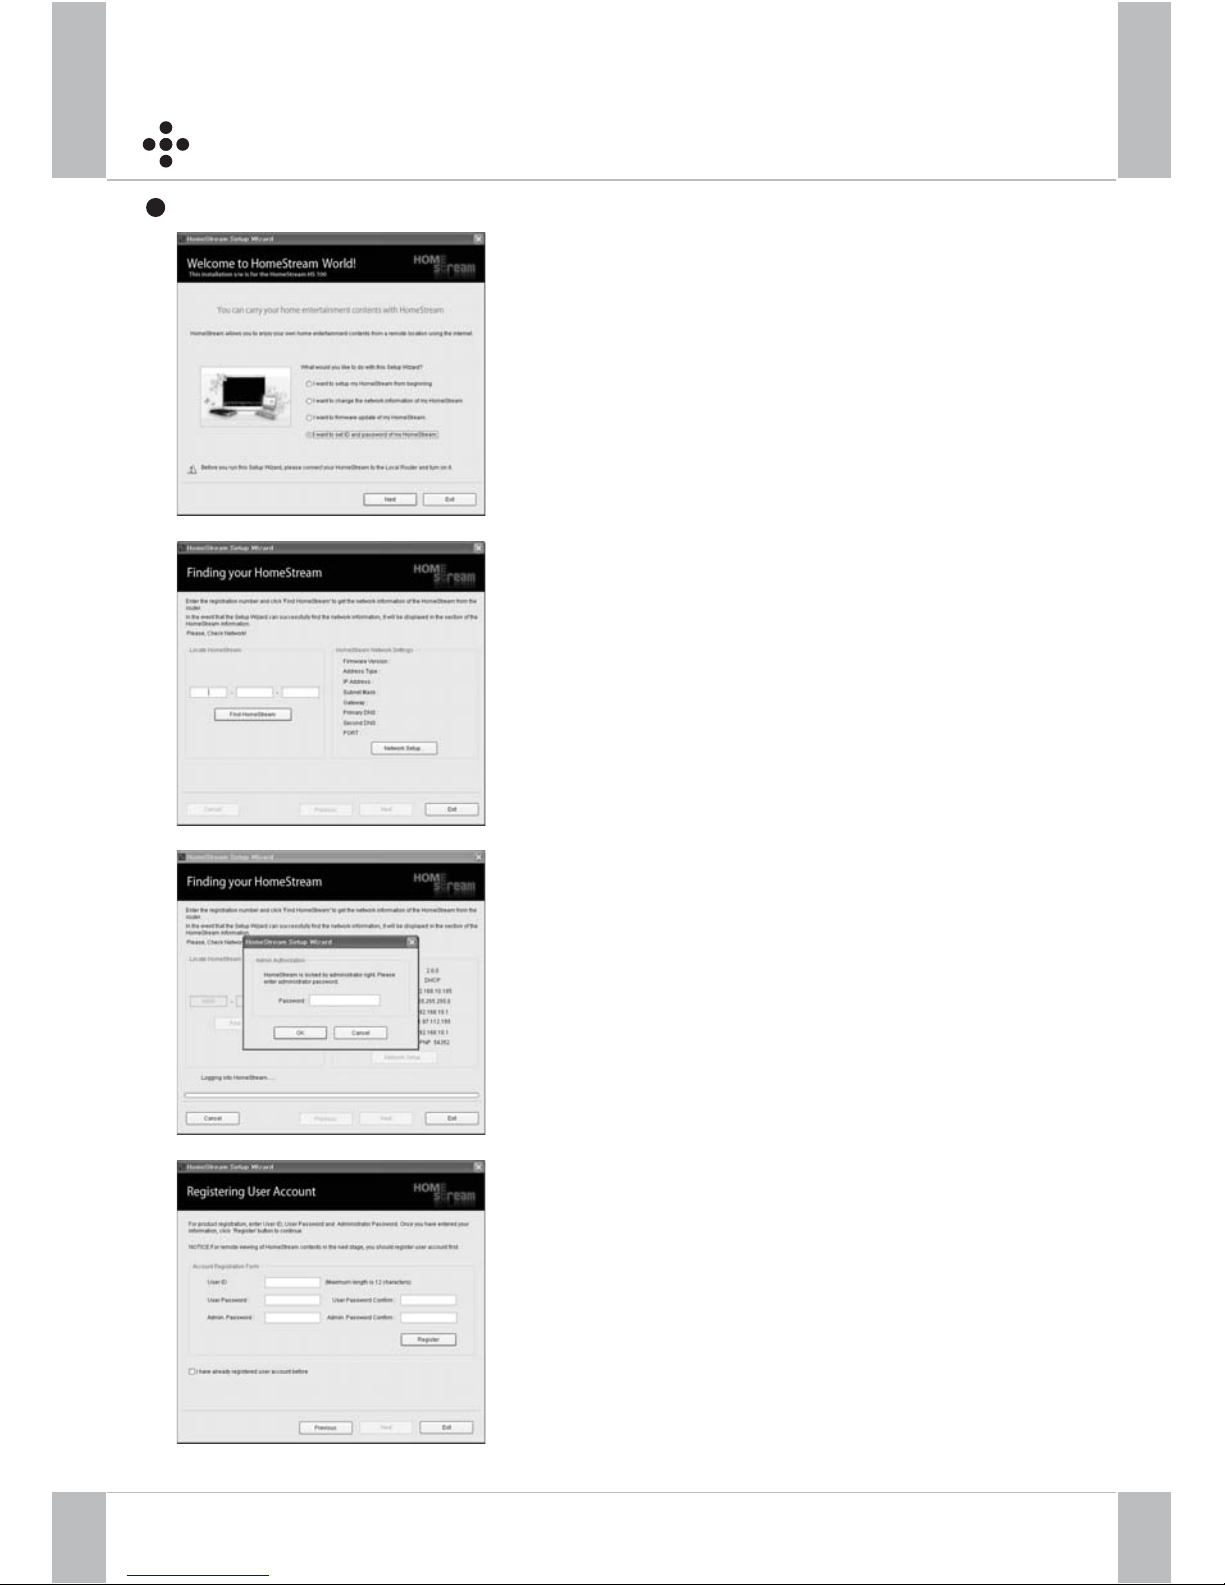
Check the radio button “ I want to set ID
and password of my HomeStream and
click the Next button to continue
Click “ Find HomeStream“ to find the
network setting of HomeStream. Then
click the Next button to continue
Enter the Administrator password to
go to the next step
You can make a new User ID and a new
Password in this step. After entering a
new User ID and a new Password, click
“register “ to complete
Changing the User ID and Password
Page 17
Installation
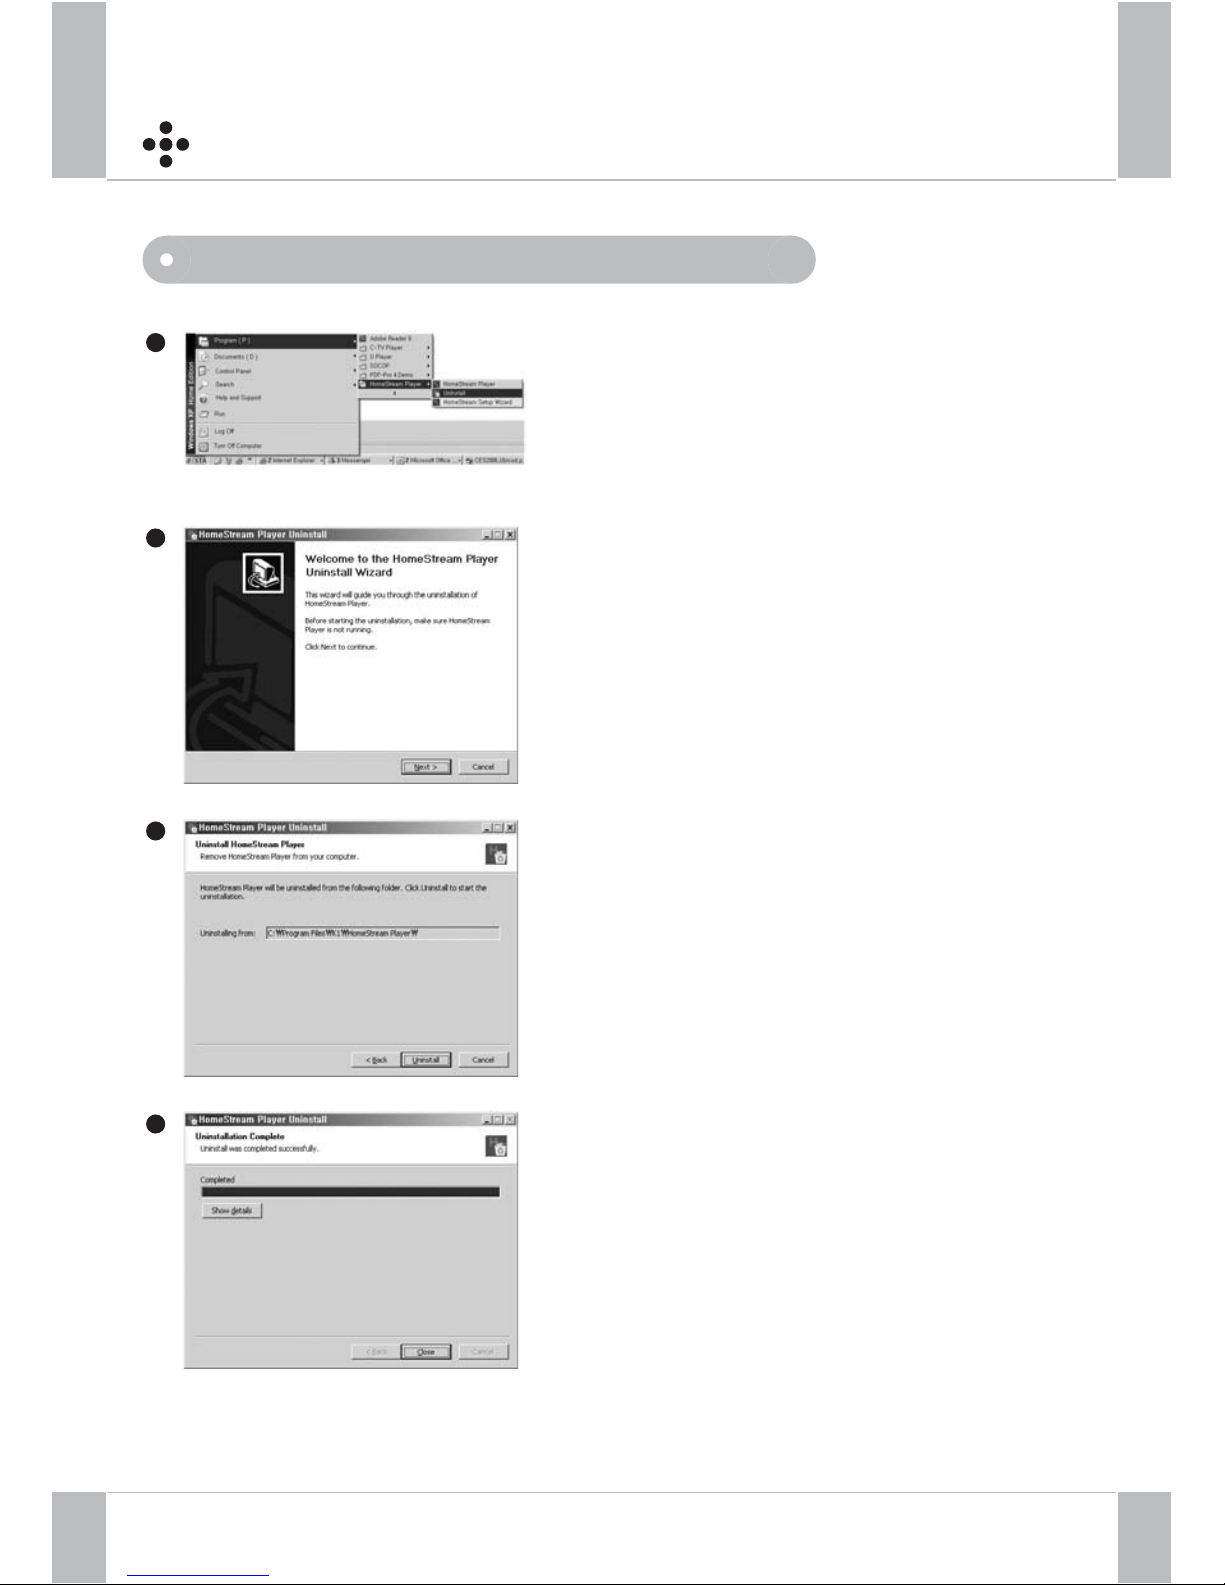
Uninstallation
Click “Start” -> Go to PROGRAM
-> go to HomeStream -> select Uninstall
Click “ Next “ to continue
Click “ Unintall “
Click “ Close “ to complete the uninstallation
1
2
3
4
1
6
Page 18
Installation
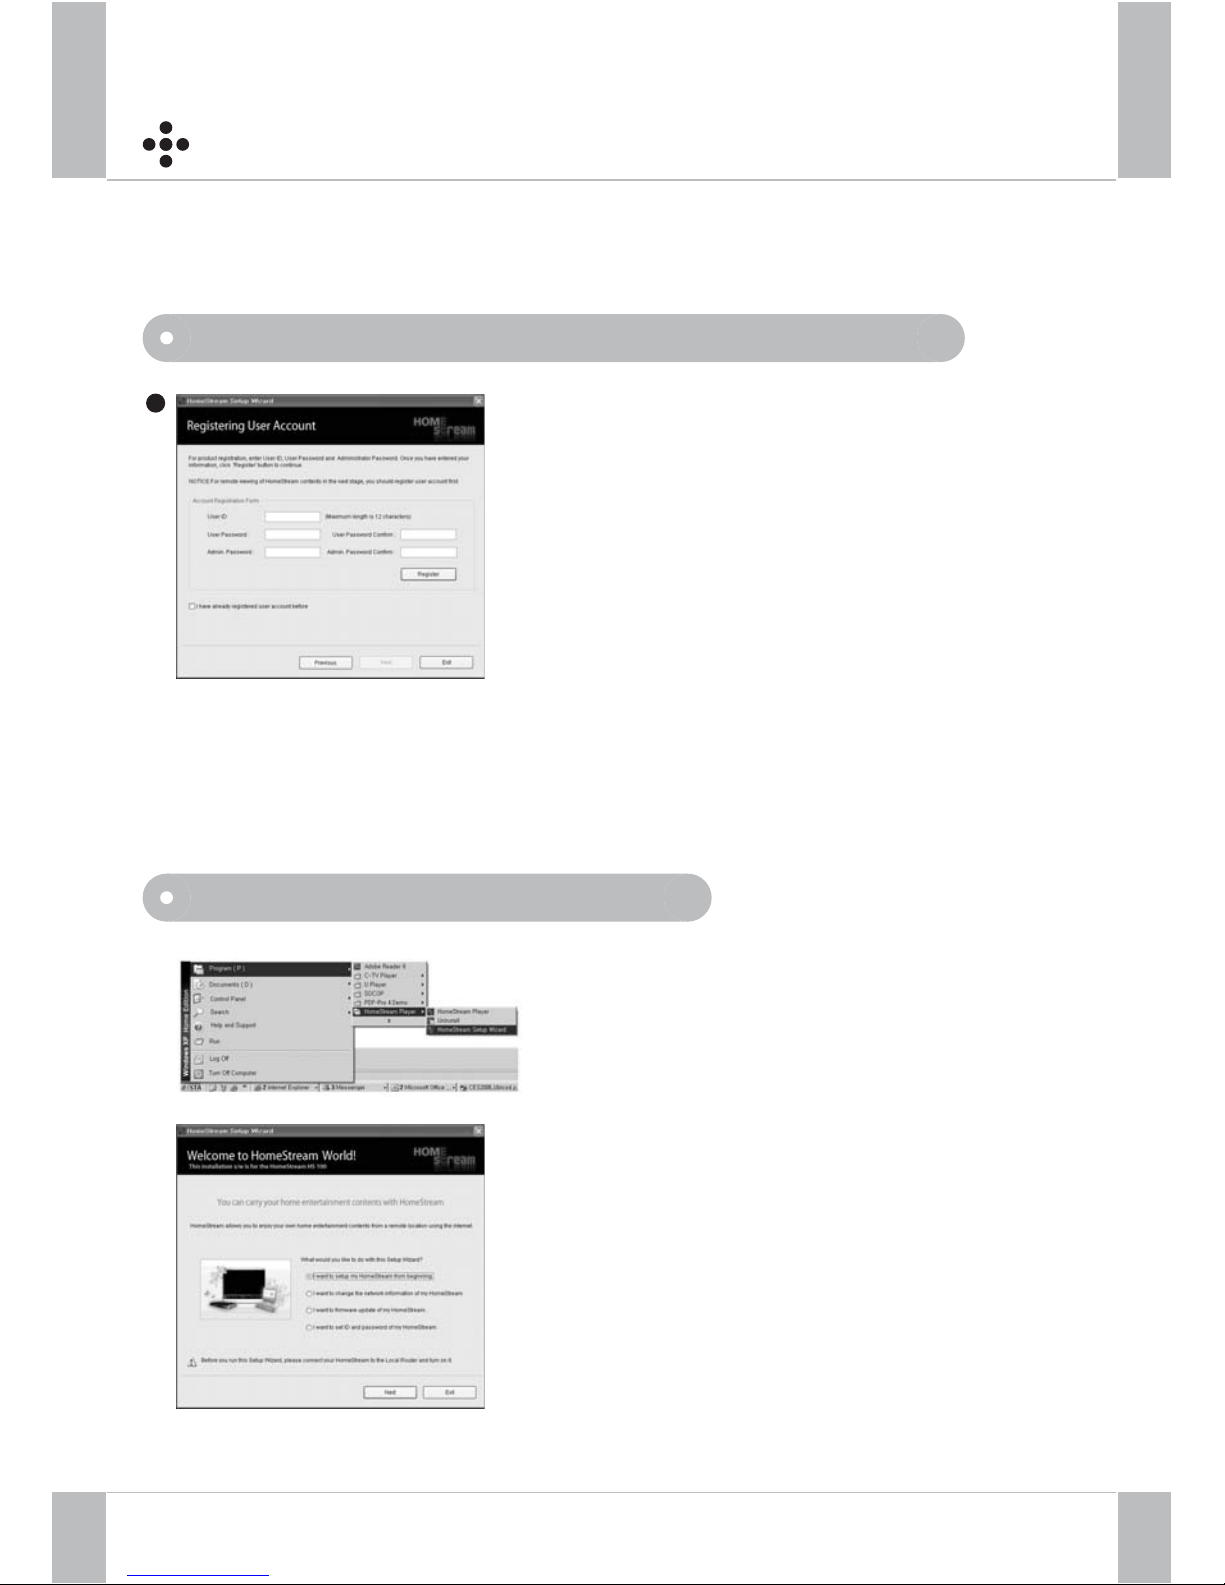
Registration while installing the HomeStream Setup Wizard
Run the Setup Wizard
In order to enjoy the HomeStream services remotely via the internet, it is
required that you register your HomeStream first using the HomeStream Setup
For product registration, enter the following
information and click “ Register “
User ID and Password : choose the User ID
and password you wish to use for access to
your device
Admin Password : used when you change the
setting and firmware update via Setup Wizard.
In addition, Admin Password can be used when
you cut the streaming to the third person.
In the case that you forget the Admin Password,
you should reset the
Click “Start”
-> Go to PROGRAM
-> go to HomeStream
-> select HomeStream Setup Wizard
1
Page 19
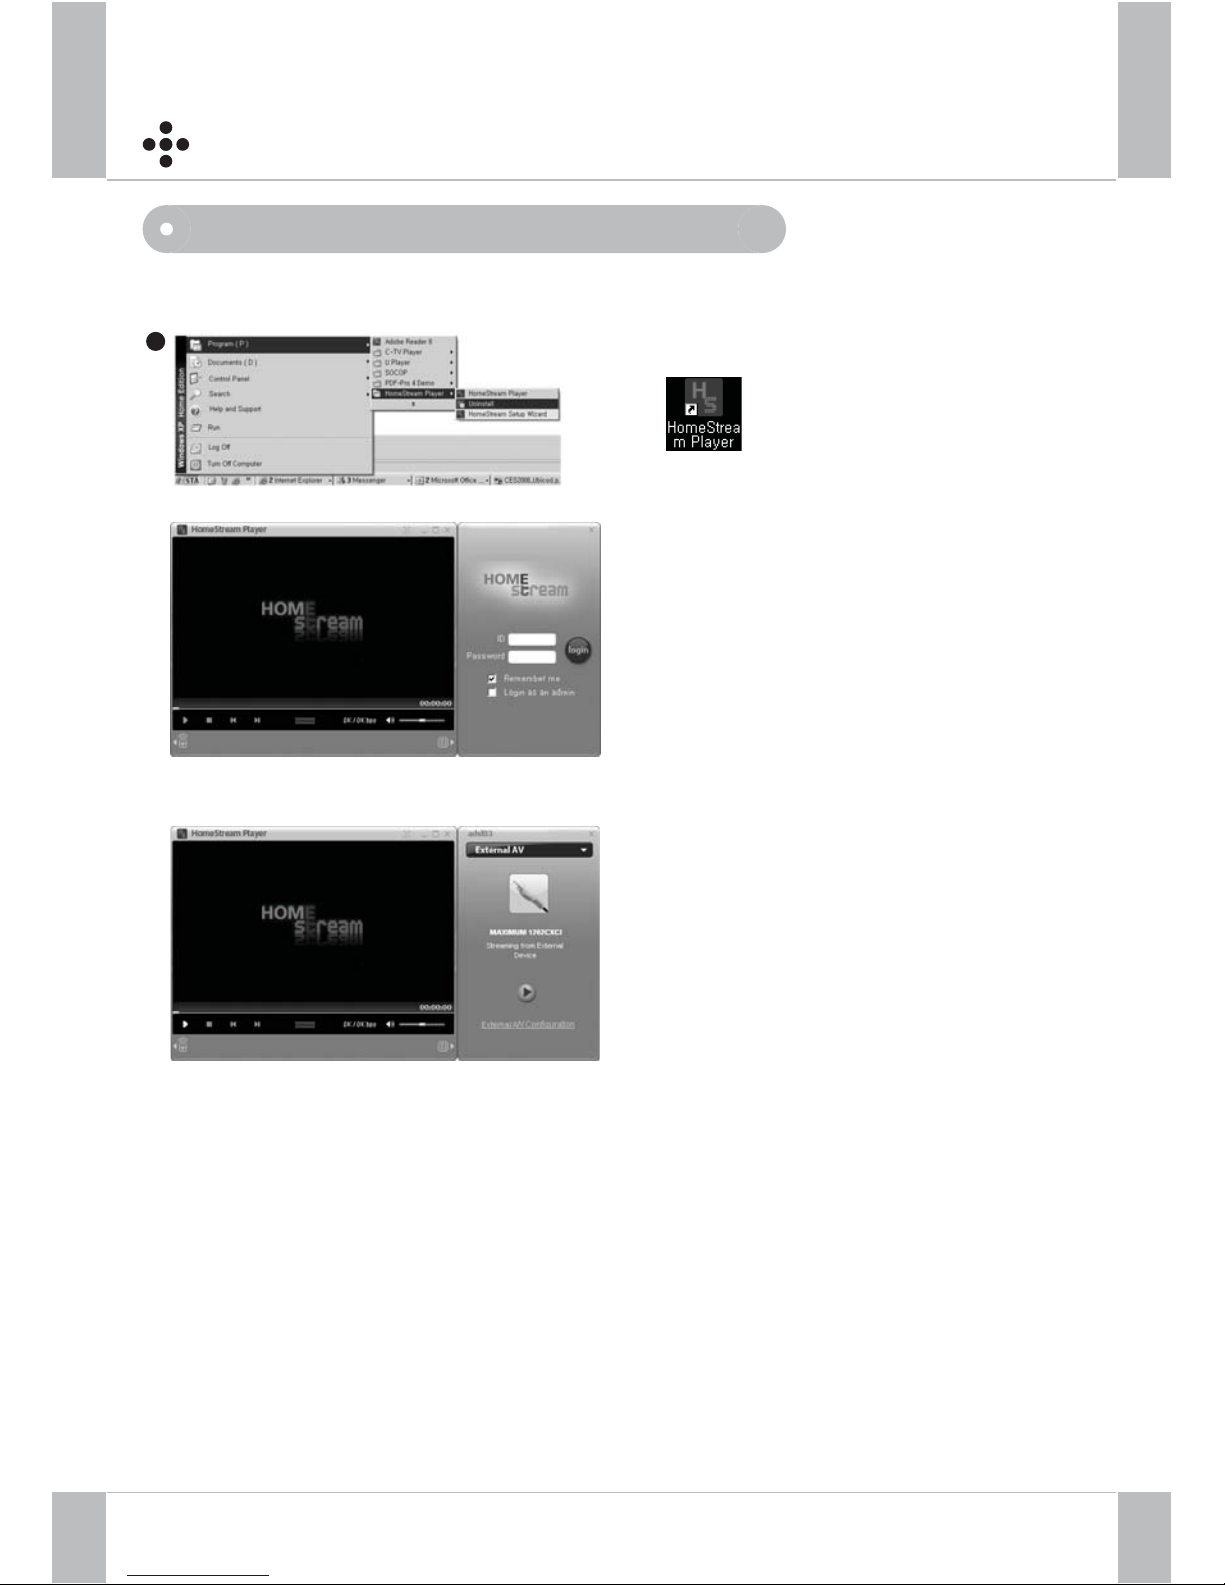
Using the HomeStream Player
HomeStream Player Log - In
To activate the HomeStream Player Log-in window, complete either of the following:
Enter your User ID and Password,
then Click “ Log in“
When Login is successful, the
Log in window changes to
Service window
or
1
1
8
Page 20
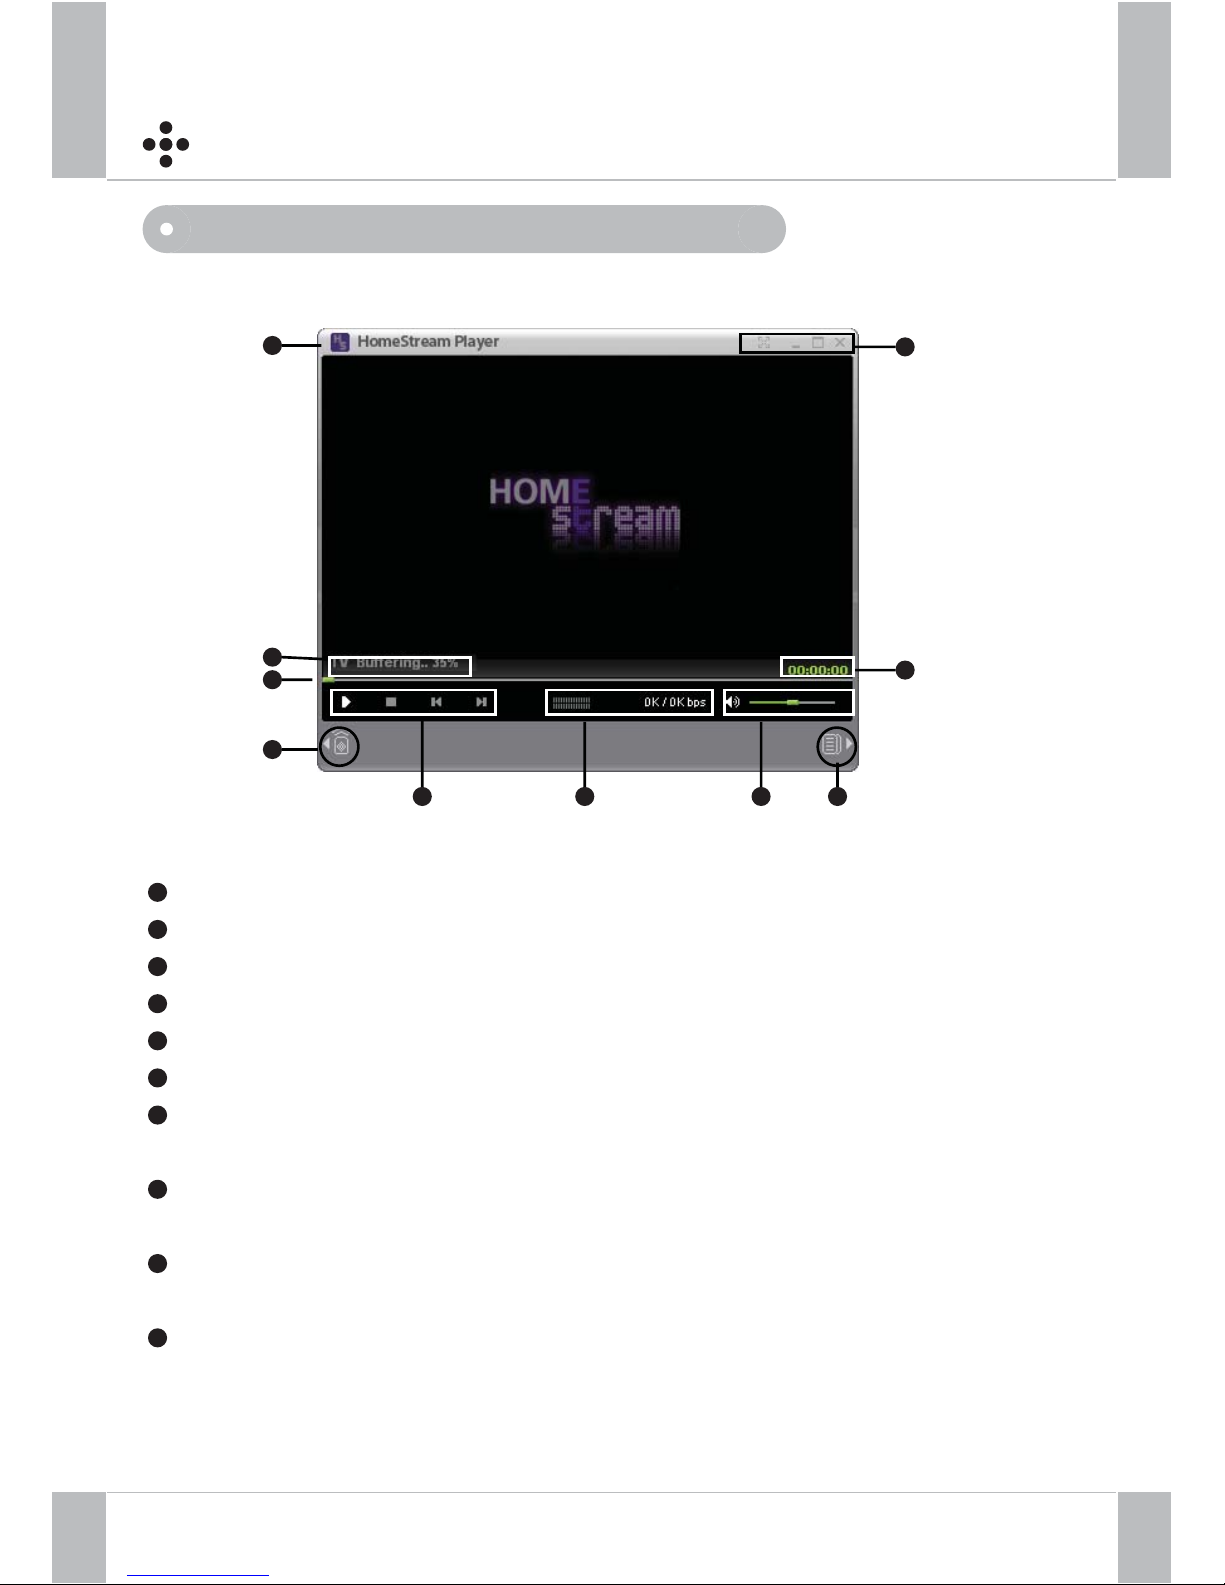
Using the HomeStream Player
Play Window
Menu Button : Use to check and Change the settings
Title bar : Displays the channel number and buffers status
Progressive bar : Displays the process status of the playing media
Remote controller : Activates the PC remote controller
Play / Stop / Next / Previous : Controls the playing file
Network info : Displays the network speed
Volume : Controls the volume ( Mute can be controlled using the PC remote
controller )
HomeStream Service window button : Activates the Log In window or
HomeStream Service window
Running time and total playing time : Displays the run time of the playing file
and total play time
Full screen, Minimize, Maximize, Close button : Controls the screen size and
close the play window
1
1
2
3
4
5 6 7 8
9
10
2
3
4
5
6
7
8
9
10
1
9
Page 21
Using the HomeStream Player
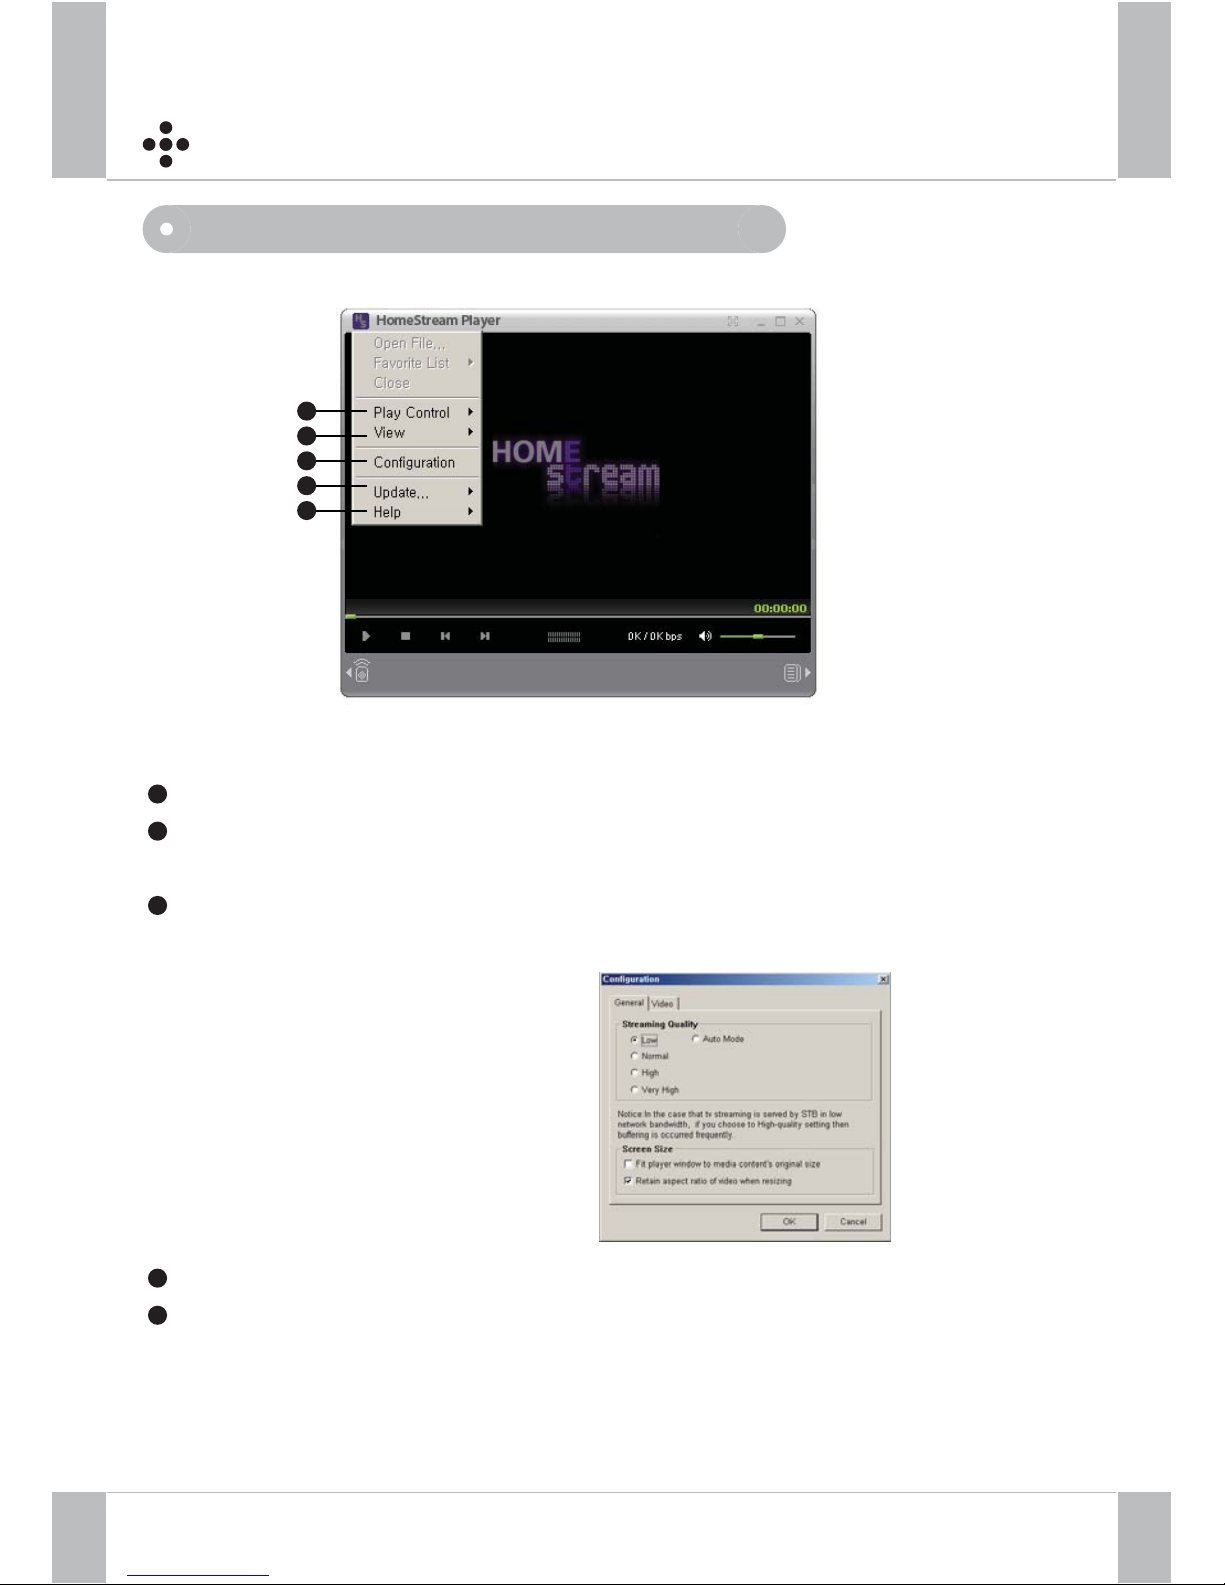
Menu
Play Control :Uses to control the playing media file
View : Changes the screen size into Full screen, Maximized screen and Minimized
screen
Configuration : The user can set the screen quality
as the network speed allows as follows
Low ( 256 Kbps )
Normal ( 350 Kbps )
High ( 650 Kbps )
Very high ( 1.5 M )
Auto mode ( Default )
Update : Check the HomeStream version
Help : Displays the version of the U Player
1
1
2
3
4
5
2
3
4
5
20
Page 22
Using the HomeStream Player
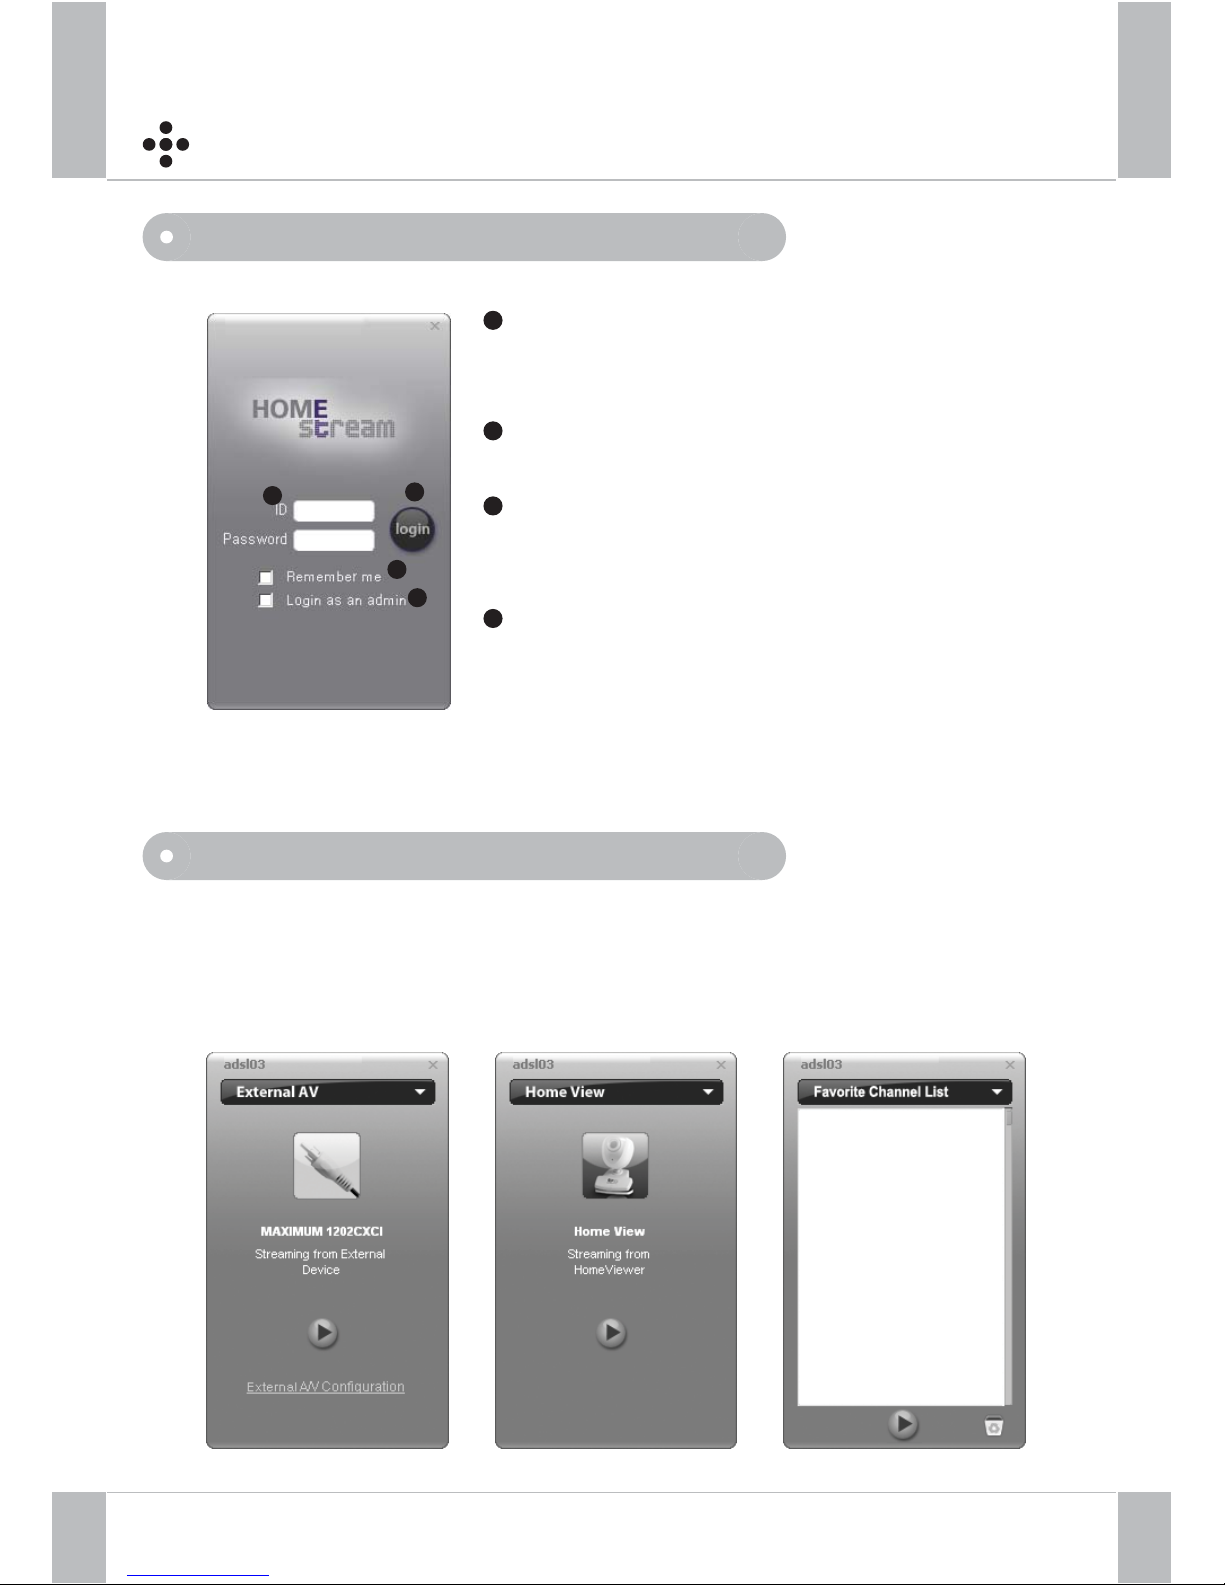
Log - In Window
HomeStream Service Window
ID : Enter the ID you created during registration
Password: Enter the Password you created
during registration
Log in : Click here once you have entered your
login information
Remember me : Check this box if you would like
the HomeStream to remember your login for
future use.
Login as an admin : Check this box and enter
the Administrator password in the Password box.
Then you can login as an administrator and you
can stop the streaming to the third person
Select List box and choose the Service : External AV or Home View
( Optional Accessory ). The user can also view their Favorite Channel List and Log
out using the Service window
1
1
2
2
3
3
4
4
Page 23
Using the HomeStream Player
Service Window
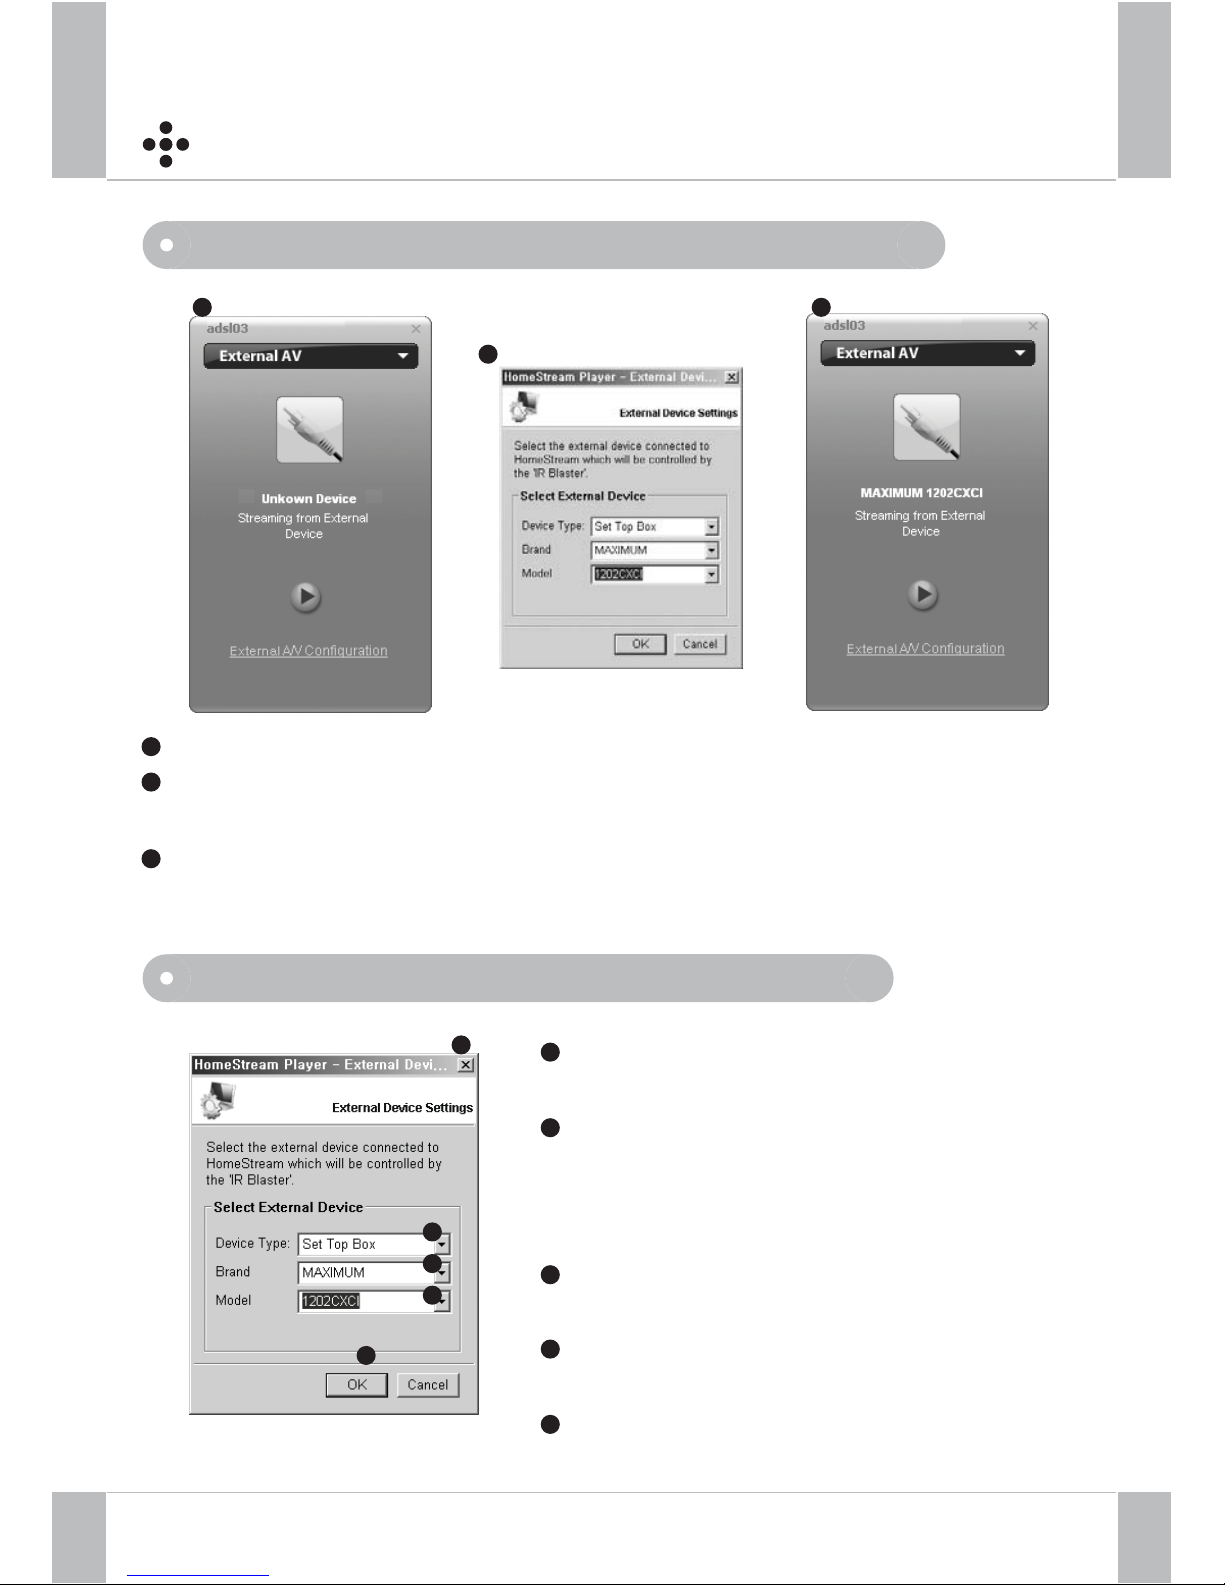
– External AV : Setting the External Device
Service Window - External AV : Setting window
Click External AV configuration
The External Device setting window will be displayed. Choose your External
Device in the List box and click the OK button
Device Mapping will start and the External Device will be displayed.
Device type :
Choose the type of connected
External A/V device in the list box
Brand : Choose the brand name of
connected External A/V device
You can easily find the brand name after
entering the first letter
Model : Choose the model number of the
connected External A/V device
Click the OK button after selecting the
connected External A/V device
Closes the Setting window
1
2
3
1
2
3
4
4
5
5
1
2
1 3
2
3
Page 24
Using the HomeStream Player
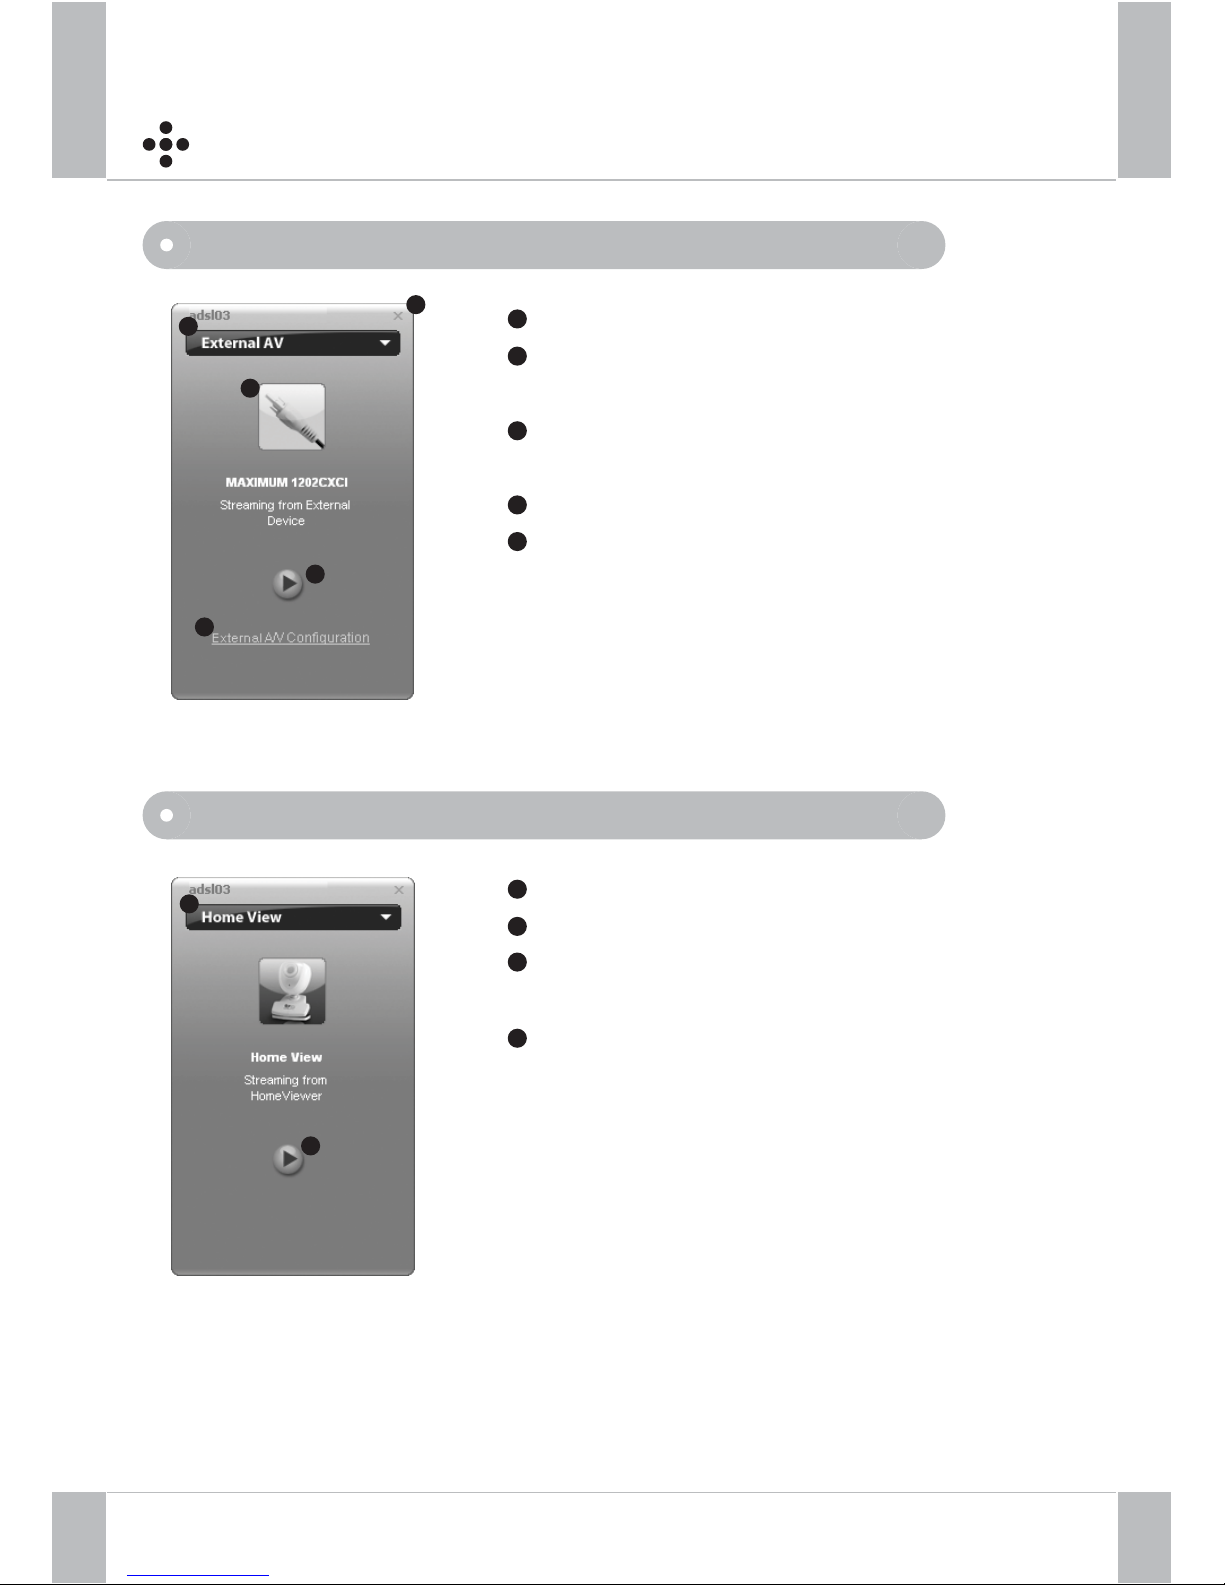
Service Window : External A/V – Setting completed
List Box : Choose External A/V device
Mapped External Device : Displays the
connected External Device
External A/V configuration: Use to configure the
External Device
Play button : play the program of External Device
Closes the HomeStream Service window
23
1
2
3
4
5
1
2
3
4
5
Service Window : Home View
Click the list box and select Home View
Click Play button
The Home view will start streaming in the Play
window
In the event that the HomeStream Cam is not
connected, a “ not available “ message is displayed
1
2
3
4
2
1
Page 25
Using the HomeStream Player
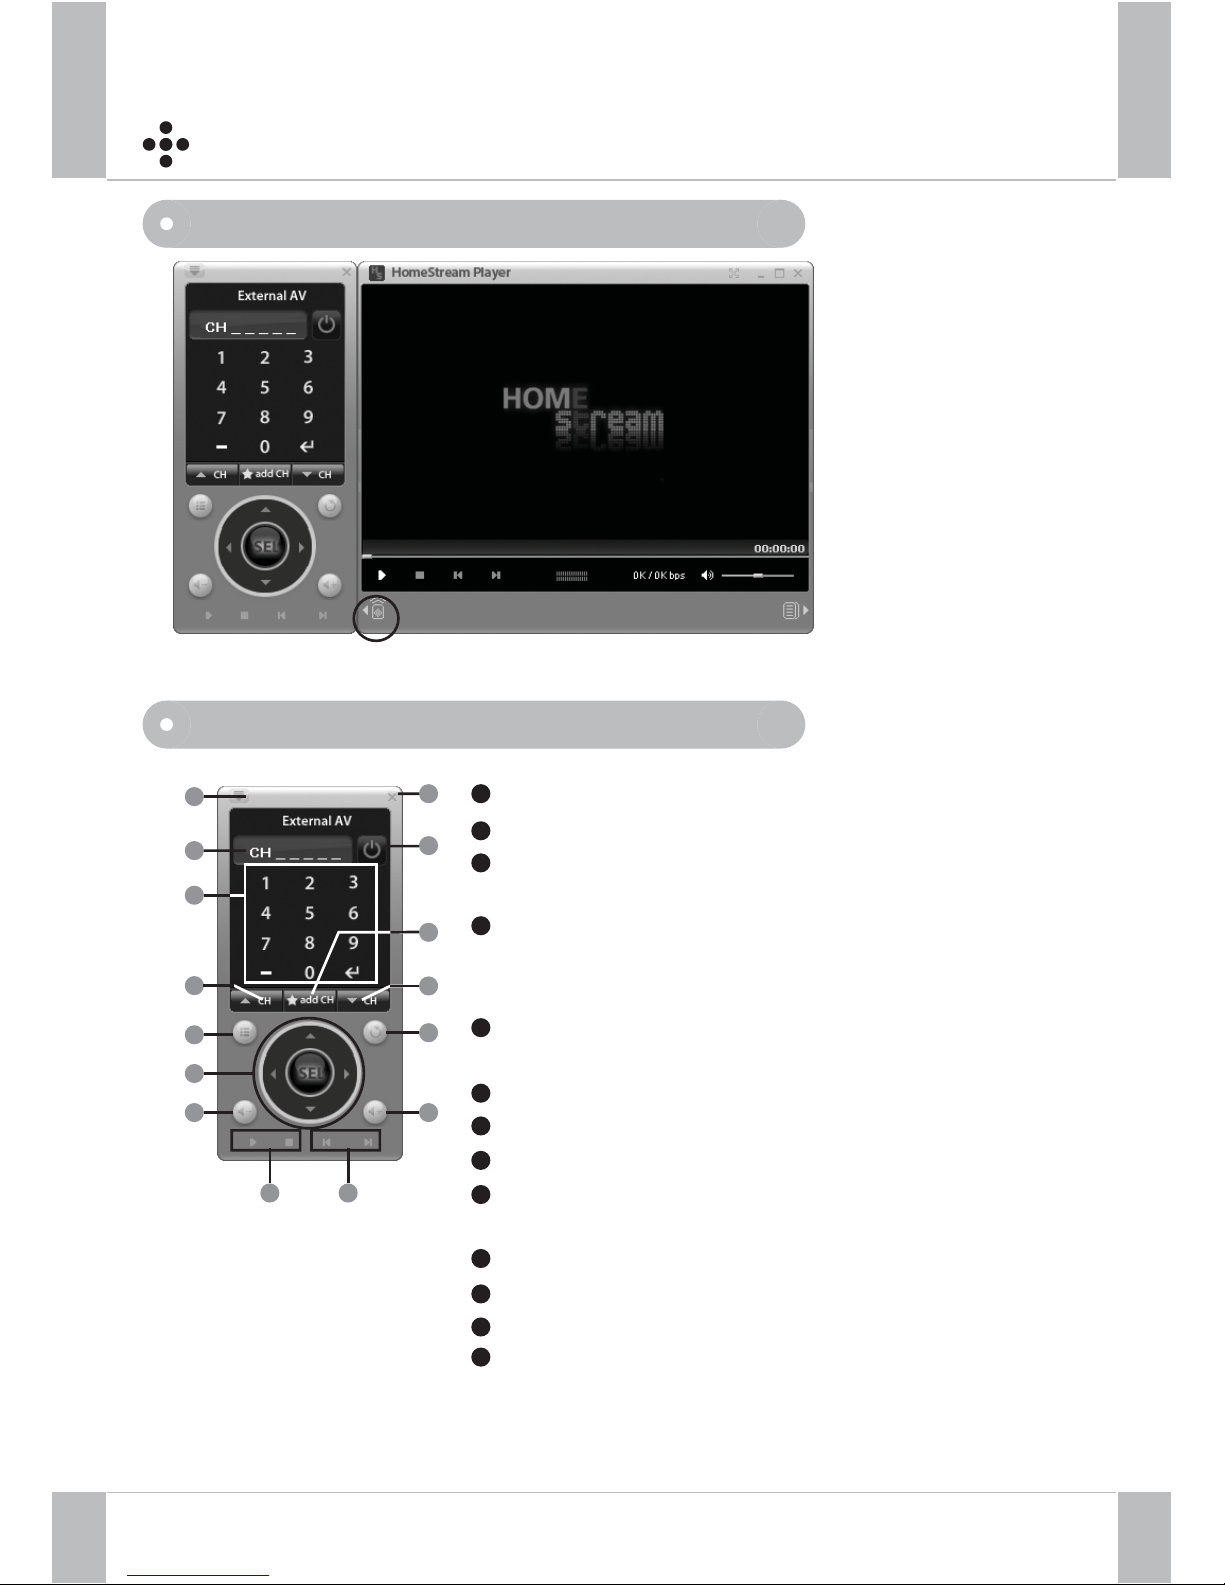
PC Remote Controller
PC Remote Controller description
Click the PC remote controller button to activate the PC remote controller
Power button : Powers on and off the External A/V device
Close : closes the PC remote controller
Channel Info : Displays the current channel number and
the number entered
Keypad : Used to enter the channel number
Enter key : Used after the channel number is inputted
Enter the channel number and click Enter key to change the channel
Add to Favorite List : Enter the channel number and click this key
to add the channel to the Favorite Channel List
Channel up / down : Changes channel number up and down
Menu : Opens the Menu of the External A/V device
Back button : Goes to the previous step
Navigation button : Used to navigate through the Menu of the
External A/V device.
Volume : Controls the volume of the External A/V device
Play and Stop : Plays and stops the channel or A/V stream
Previous / Next channel : Changes to the previous or next channel
Additional key list :Displays the additional keys to control the
external A/V device
12
1
5
8
1010
9
7
6
4
3
1211
2
3
4
5
6
7
8
9
10
11
12
13
13
click
6
Page 26
Using the HomeStream Player
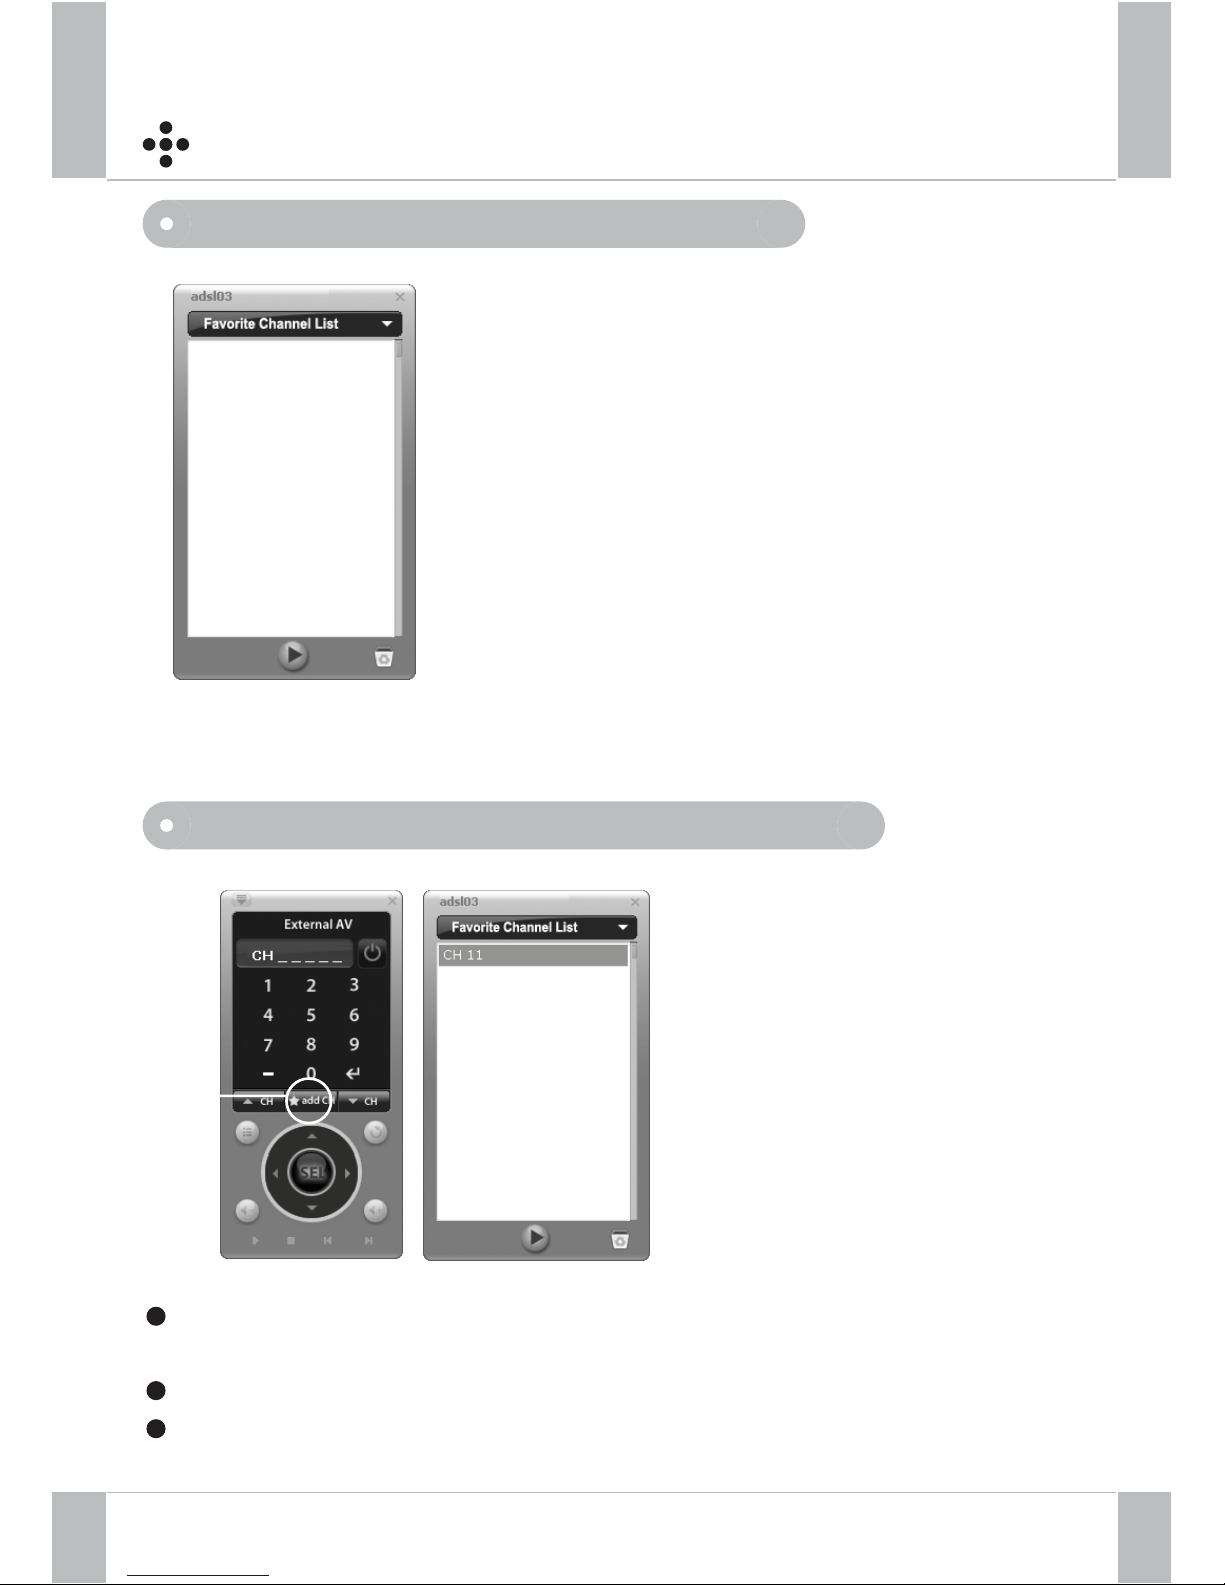
Favorite Channel List
Favorite Channel List : Adding a channel to the list
Enter a channel number using the Numeric keypad
or go to a channel using Navigation keys
Click the “ Add to Favorite list “ button
The channel is then added to the Favorite Channel List
25
1
2
3
click
Page 27
Using the HomeStream Player
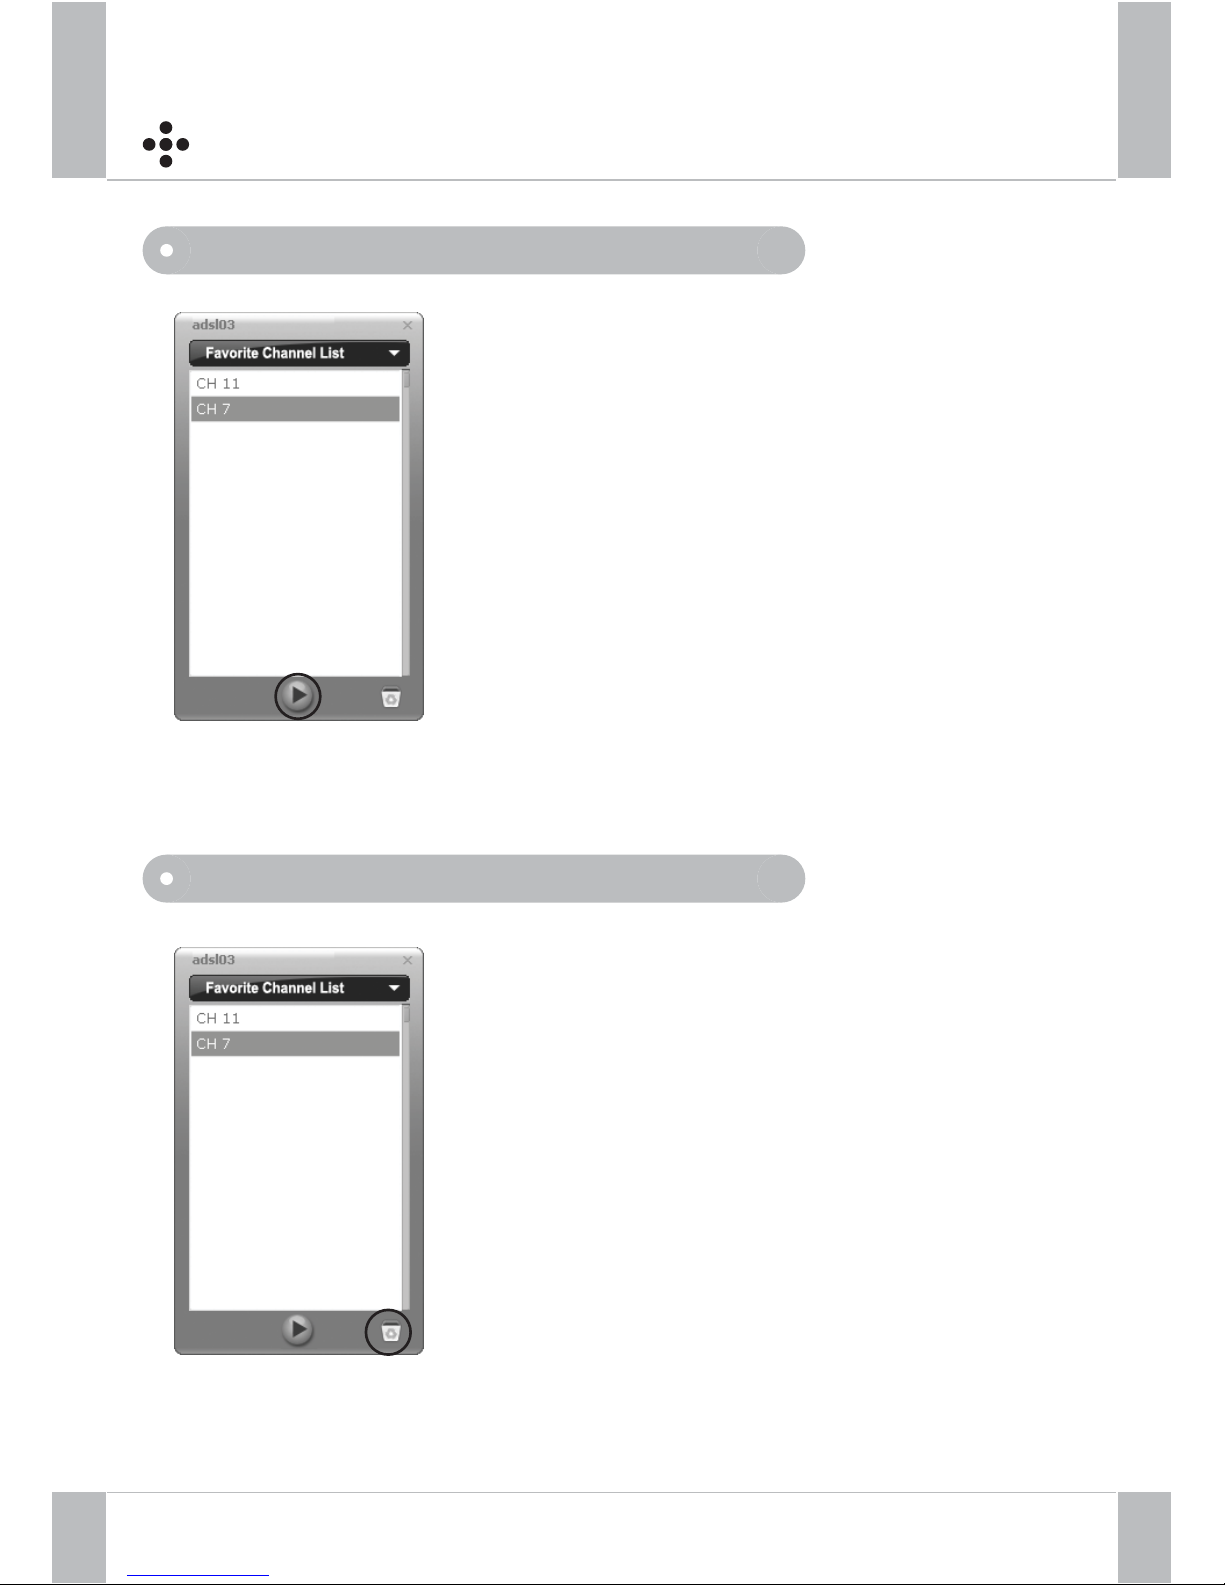
Favorite Channel List : playing a channel
Favorite Channel List : Deleting a channel
Select the desired channel and click the “ Play “
button or double-click the desired channel
Select a channel desired to be deleted from
the list and click the “ Delete “ button
26
Play button
Delete button
Page 28
Using the HomeStream Player
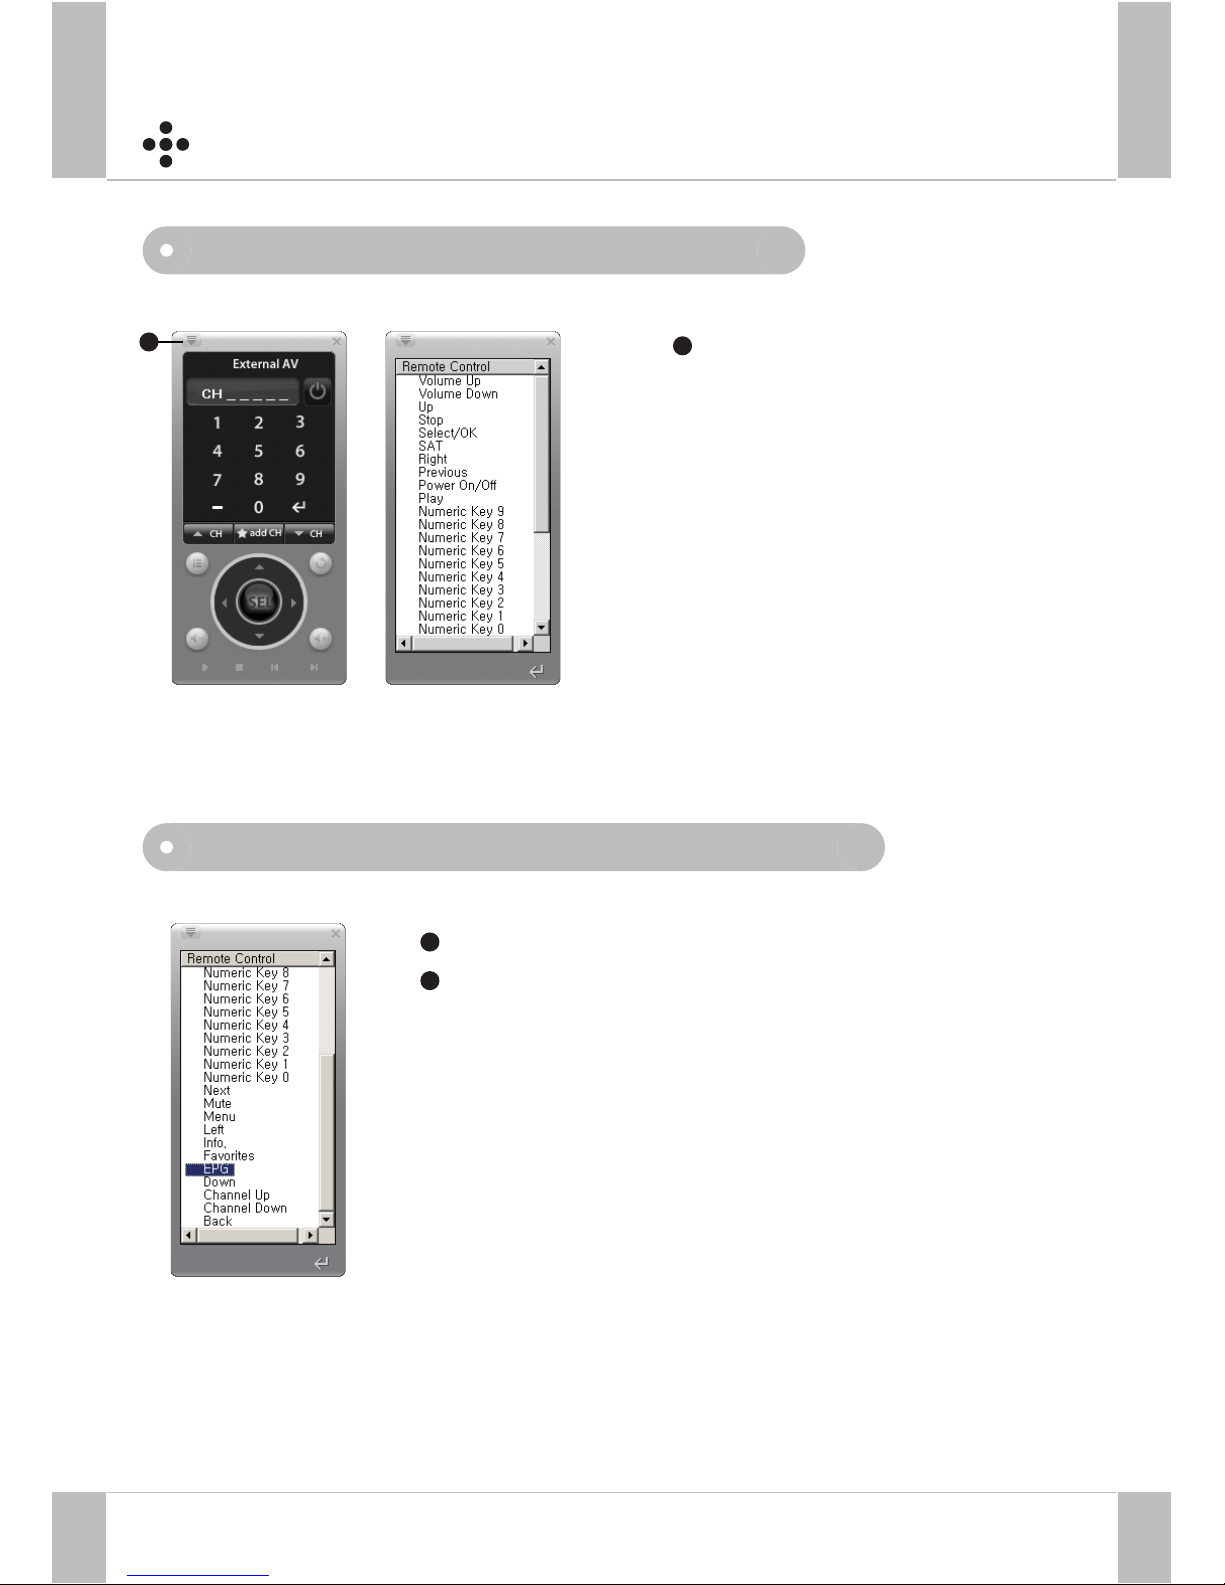
Additional Key List
Click to toggle the PC
remote controller and additional
key list
1
1
1
2
Additional Key List : control an external A/V Device
Select a key which you desire to control
Click the “ Enter “ key
Page 29
Using the HomeStream Player
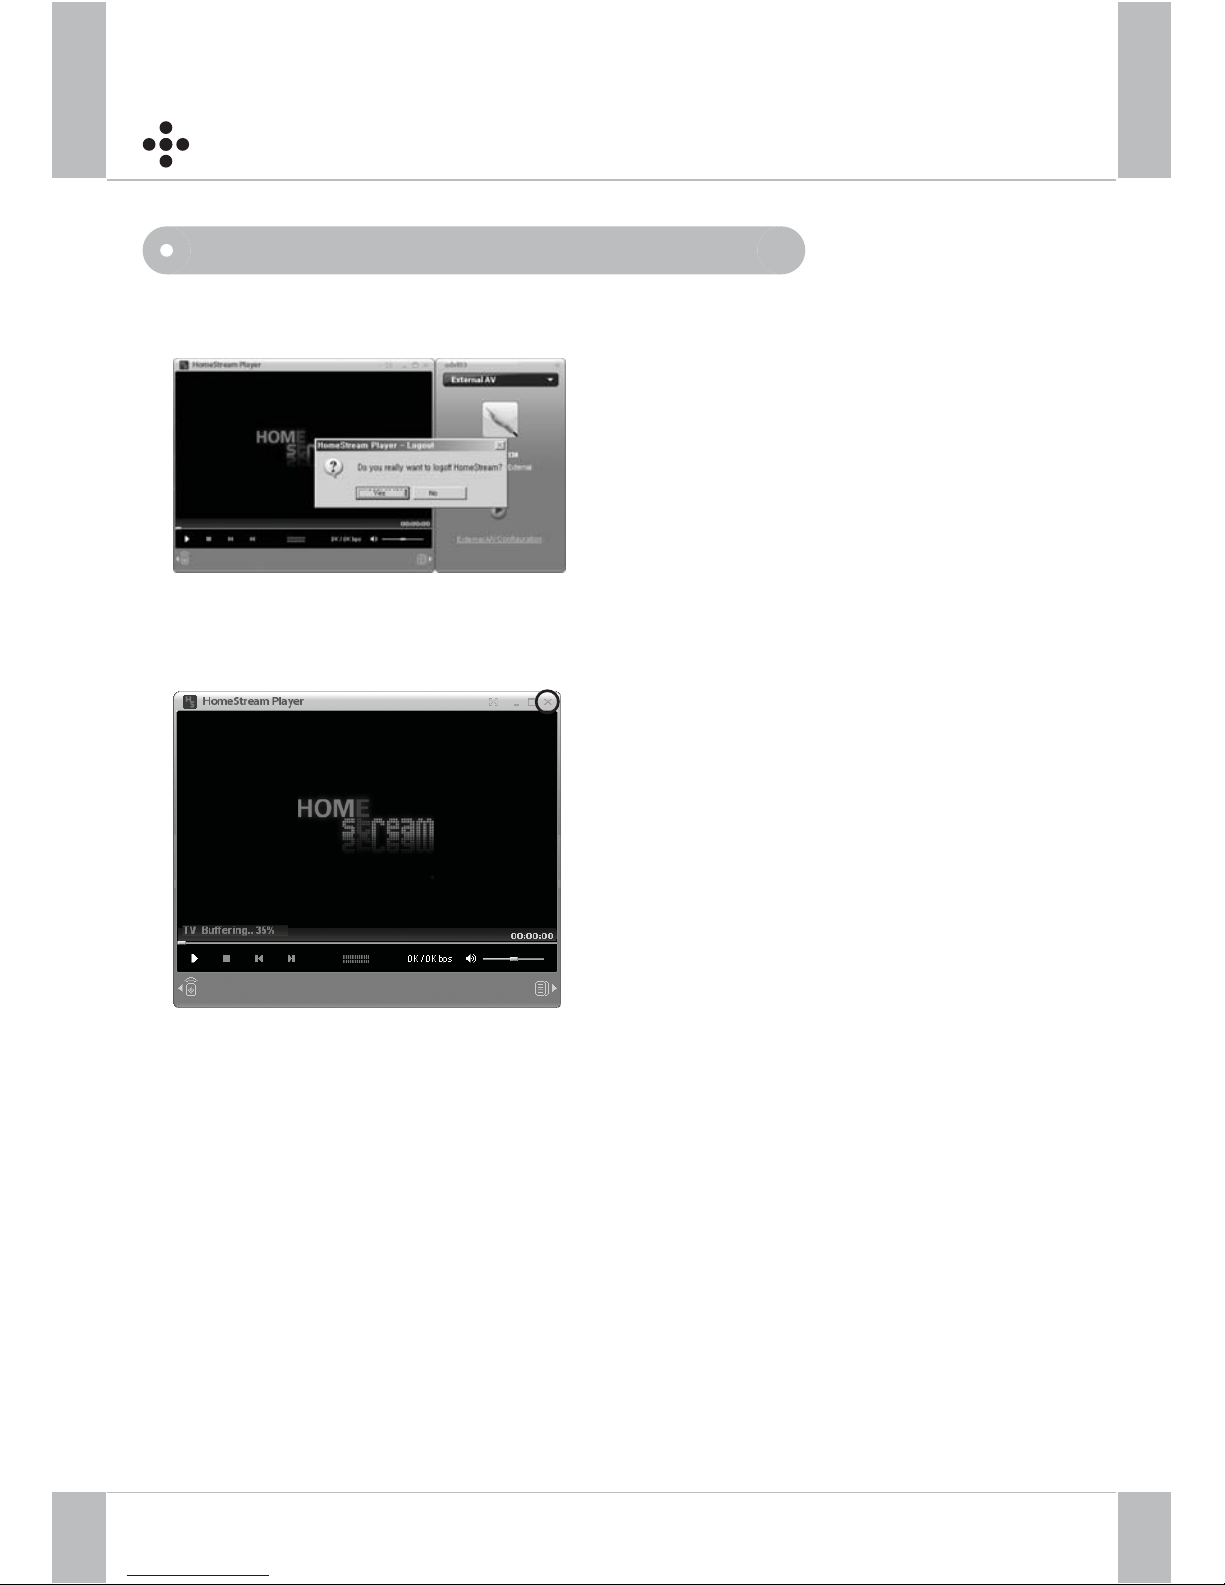
Log Out
Method 1
Select “ log out “ in the list box of
Service window
The confirmation message will be
displayed.
Click “ Yes” to continue logging out of
the HomeStream.
Method 2
Click “ Close” button
28
Close button
Page 30
Firmware Update
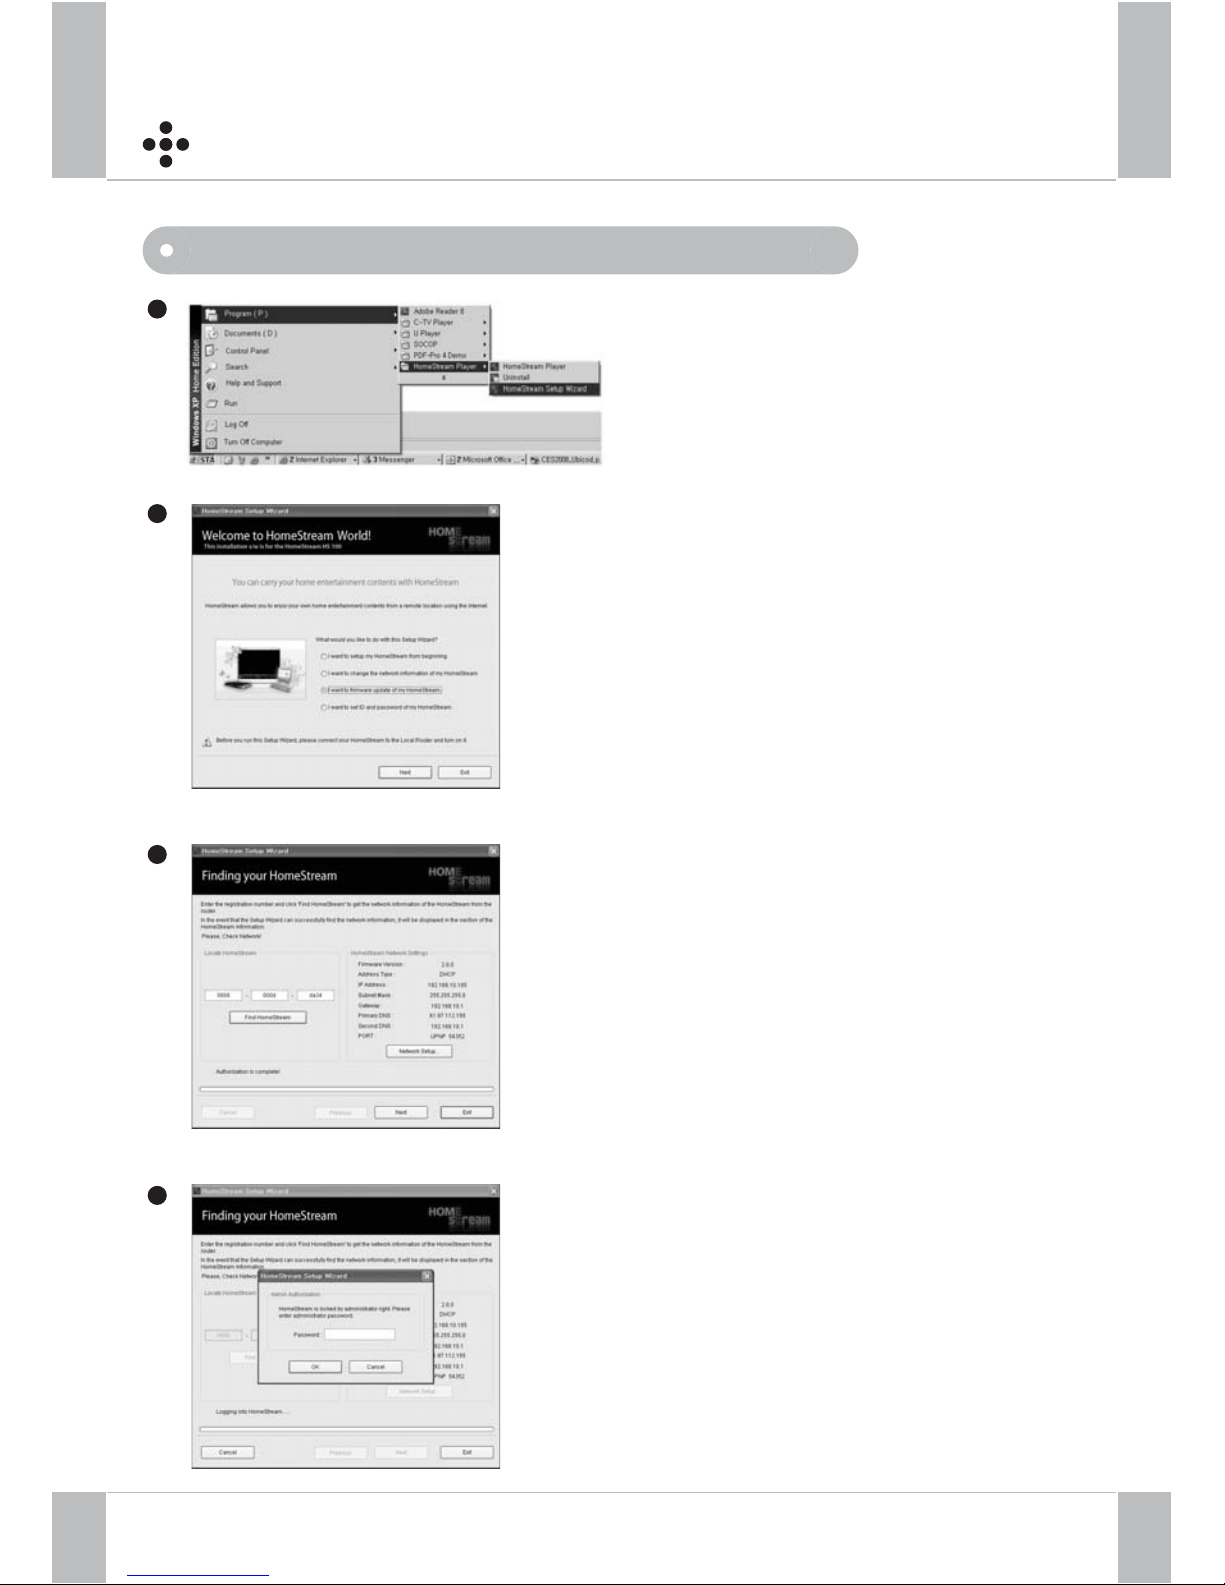
Firmware Update using HomeStream Setup Wizard
Check the radio button “ I want to
Update the firmware of my HomeStream“
and click the Next button to continue
Click “ Find HomeStream” to find the
network setting of HomeStream. Then
click the Next button to continue
Enter the Administrator password to
go to the next step
29
Click
1
2
3
4
Page 31
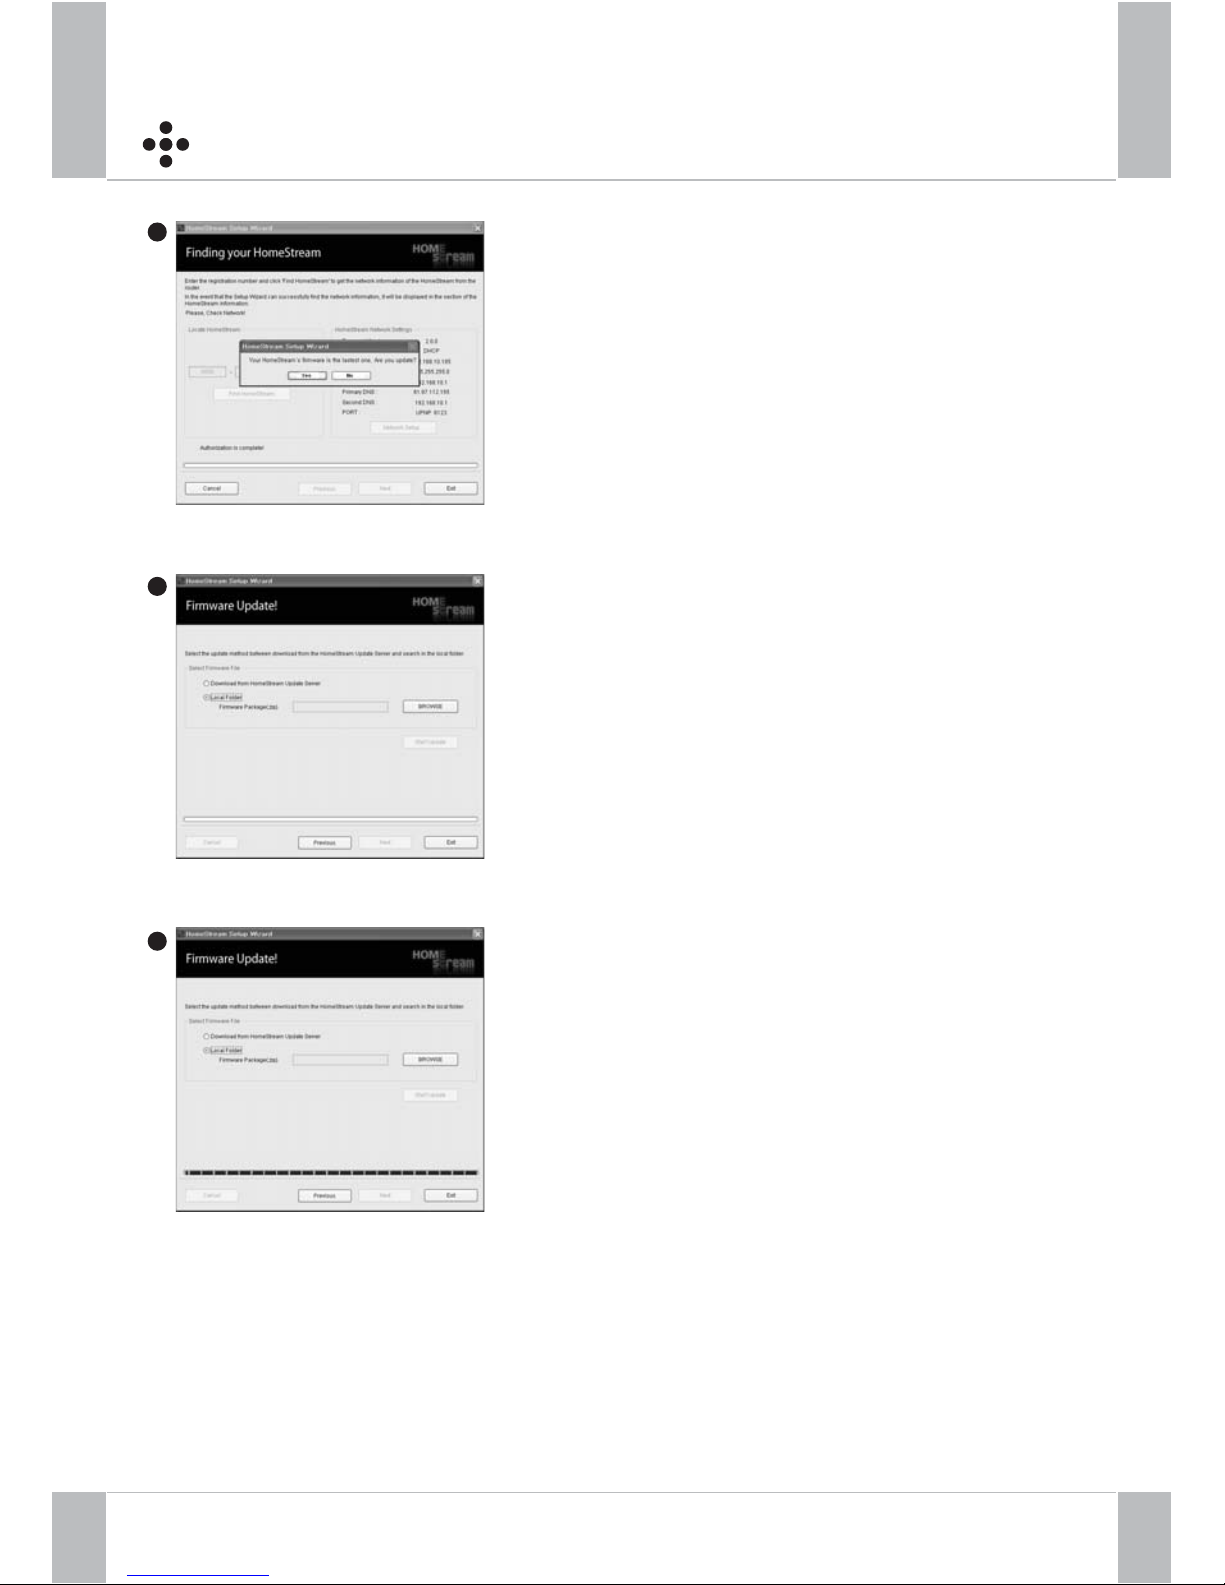
Firmware Update
The information for a new firmware is
displayed. If you want to update the
HomeStream with a new firmware, click “
Yes “
Check the radio button “ Local folder “ and
click “ BROWSE” to search and select the
firmware file.
Then click the Start Update button
Click “ Finish “ to complete the update
4
5
6
Page 32

Troubleshooting
HomeStream
The LED on the HomeStream is blinking quickly
Possible Solution : The HomeStream did not get an IP address from your home router for some
reasons. Try restarting both the HomeStream and your home router.
Disconnect then reconnect the Ethernet cable between HomeStream and your router. Once done,
restart the .
Power Adaptor is heating in use
Note : When you use HomeStream for a long time, product ( Power Adaptor ) can be heated.
It is normal condition, and there is not danger for the safety and a fire
1
2
HomeStream
No Video or Sound in HomeStream
Possible Solution:
- Check the connection between the HomeStream and the external A/V device and check the ports
of Audio/Video cable to match the colors.
- Check that the external A/V device is turned on.
- Some external devices should be reset the video resolution to be played via the U Player. Generally
resolution of the external device should be set into 480i
PC remote controller is not working
Possible Solution
- Check that the head of the remote control IR cable is placed against the IR sensor of the external
A/V device
- Check that the setting of the external device is right
The reaction of PC remote controller is slow
Note : The response time of PC remote controller depends on the network condition, and the
reaction may be delayed as the network speed.
The remote viewing is broken
Possible solution
- Since the remote viewing in the HomeStream is streamed via the internet, the pictures may be
broken as the network speed. An upstream bandwidth of 256 Kbps (Kilobits per second) or more is
recommended.
No use in the company
Note : There may be the firewall in the company, and the data of the HomeStream may be blocked.
Ask a network administrator in your company
he connection of the HomeStream is suddenly cut
Possible Solution: Check the internet security or a personal firewall in your PC.
No login the HomeStream ( There is a message for the invalid of User ID and Password )
Possible Solution : Check the capital and small letters when you enter the User ID and the Password
1
2
3
4
5
6
7
 Loading...