

Page 1
User Guide
DAB Tuner +
Page 2

page 2
Safety Information
Please read all this safety information before use:
Safety Considerations
• Position the cables so that they cannot be walked on or pinched by items placed
on or against them.
• Do not use the unit in humid or damp conditions.
• Do not allow the unit to get wet.
• Do not expose the unit to dripping or splashing.
• Do not place water filled objects such as vases on top of the unit.
• Do not place naked flame sources, such as candles, on top of or near to the unit.
Cleaning
• Unplug the unit before you clean it.
• Do not use liquid or aerosol cleaners.
• Clean your DAB radio with a soft, damp (not wet) cloth.
Ventilation
• The slots and openings on the unit are for ventilation. Do not cover or block them
as it may cause overheating.
• NEVER let children push anything into the holes or slots on the case.
Servicing
• There are no user serviceable parts in the unit.
• Consult your dealer if you are ever in doubt about the installation, operation or
safety of the unit.
Page 3

page 3
Contents
2 Safety Information
4 Location of Controls
5 Getting Started
5 Mains adapter
5 Batteries
5 Audio cable
5 Switch on
5 When you first switch on
5 No stations available
6 Tuning in
6 The tune and scan buttons
6 Tuning to a preset station
6 Assigning a station to a preset button
7 Changing the Station Information Display
7 Scrolling information supplied by the radio station (DLS)
7 Program type
7 Ensemble name
7 Date
7 Channel & frequency
7 Bit-rate & mode
7 Signal error
8 Using the Info Menus
8 Station order
9 Manual tune
9 Dynamic range control (DRC)
10 Clock and alarm settings
10 Set alarm
11 Set alarm on/off
11 Autoset clock
11 Set clock
11 Software version
11 Factory reset
12 Specifications
12 What is Digital Radio?
Page 4
page 4
Location of Controls
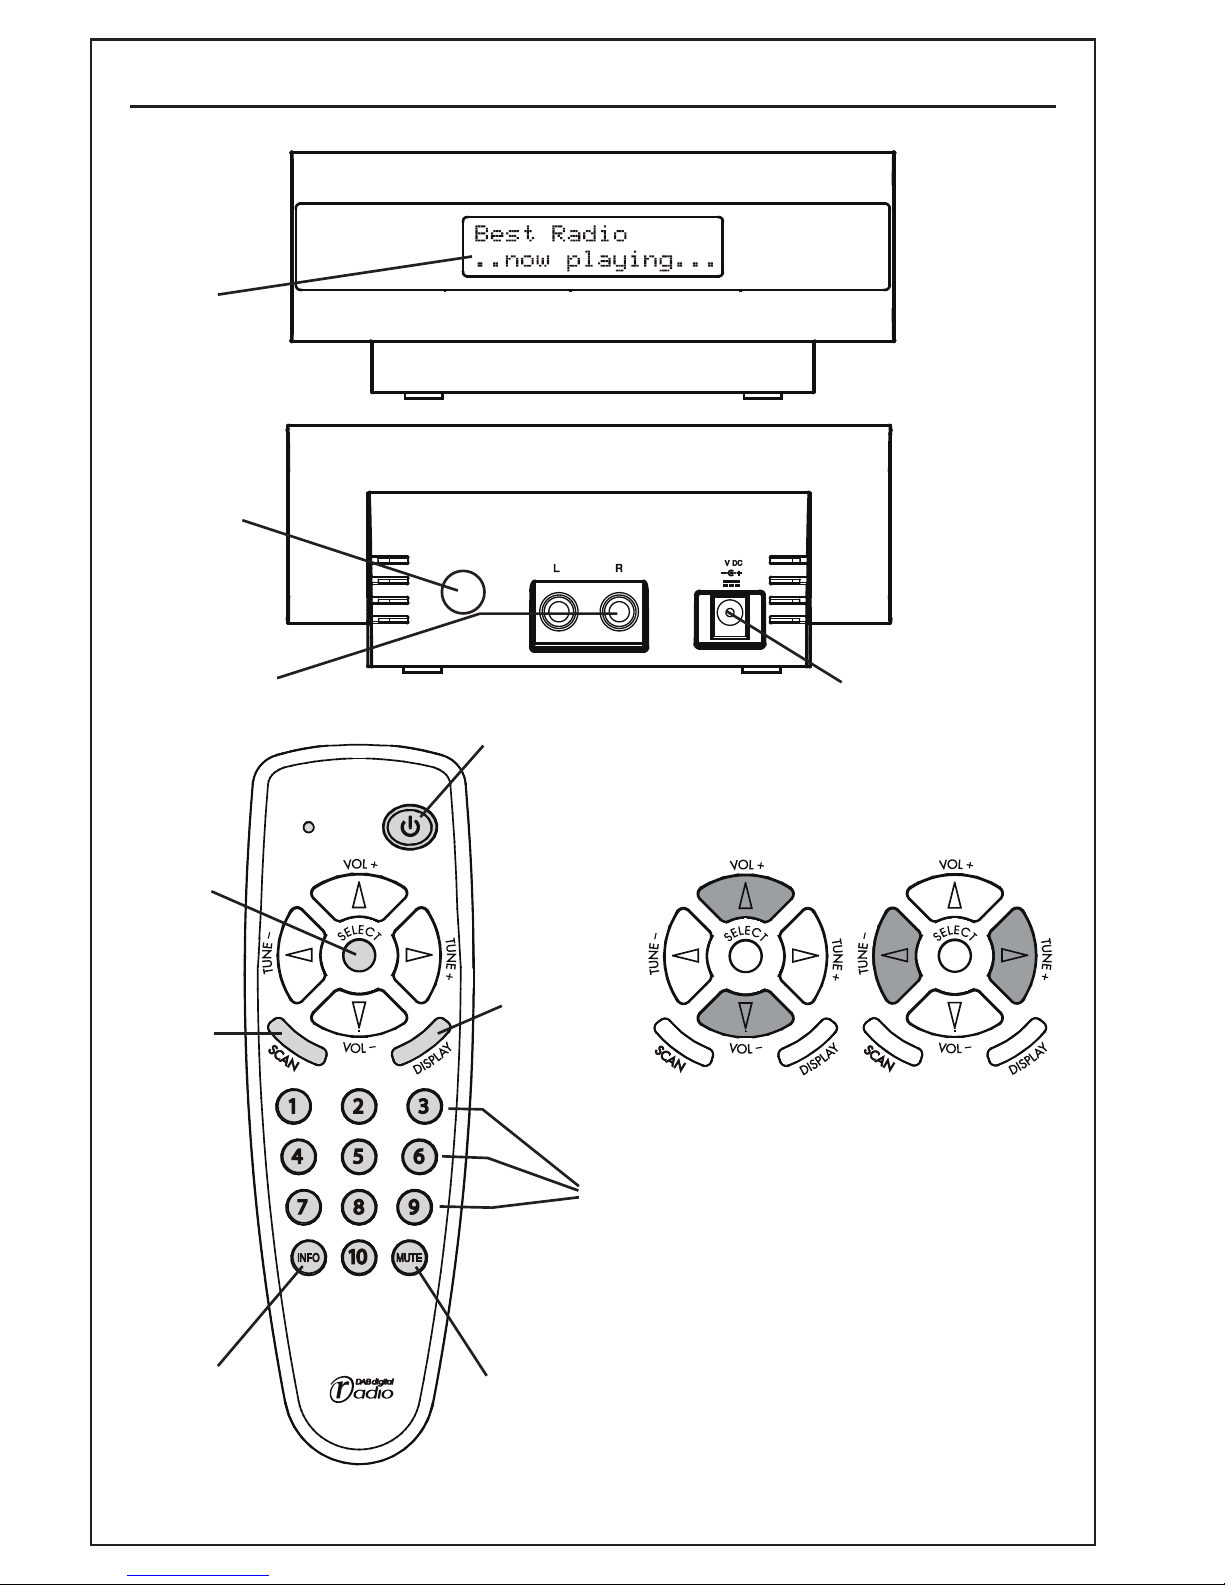
LCD
screen
audio output
connectors
external power
connector
VOLUME
buttons
TUNING
buttons
SELECT
button
SCAN
button
(see
page 6)
INFO
button
(see
page 8)
MUTE
button
(press to turn the sound
off completely)
PRESET
buttons
(see
page 6)
ON / OFF
button
DISPLAY
button
(see
page 7)
antenna
input
Page 5
page 5
Getting Started
Mains adaptor
Your Matsui DAB Radio is powered by a mains adaptor (use only the power adaptor
supplied). Plug the mains adaptor into the mains supply.
The LCD screen will show ‘Clock not set’, until you switch the radio on using the
remote control and tune to a DAB radio station.
Batteries
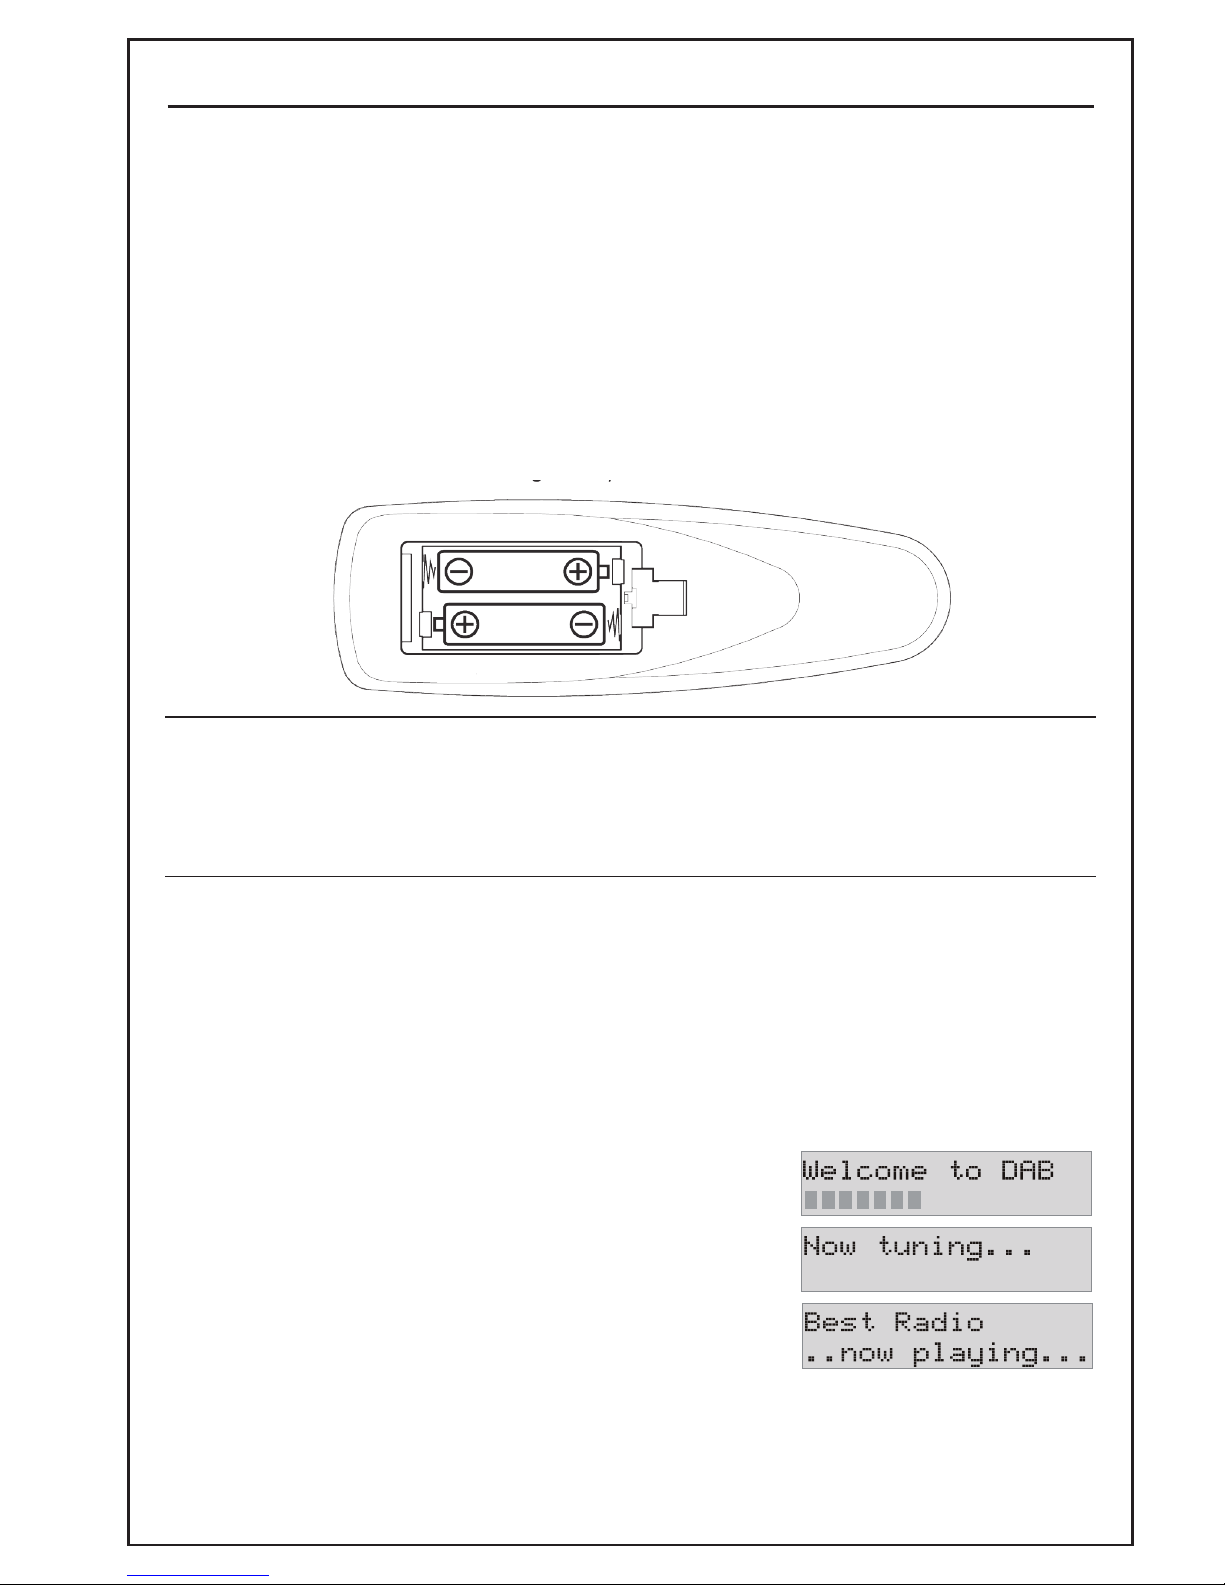
The remote control is powered by batteries. Insert two ‘AAA’ size batteries, taking care
to fit them the right way round, as shown here.
Switch on
To switch the radio on, press the ON/OFF button.
To switch the radio back into standby mode, press the button again.
If the buttons are not used, the radio will switch into standby mode, and the LCD will
go dim.
When you first switch on
The first time you switch on your new radio, it will
automatically scan to find out what UK digital stations
are available.
When all available stations are found, the radio will sort
them alphabetically and tune to the first in the list.
No stations available
If no stations are found, the radio will present a menu that enables you to perform
another scan, or to tune the radio manually. (see page 9)
Audio cable
Use an audio cable to connect your Matsui DAB Radio to a spare input connector on
your audio system.
Page 6
page 6
Tuning in
The tune and scan buttons
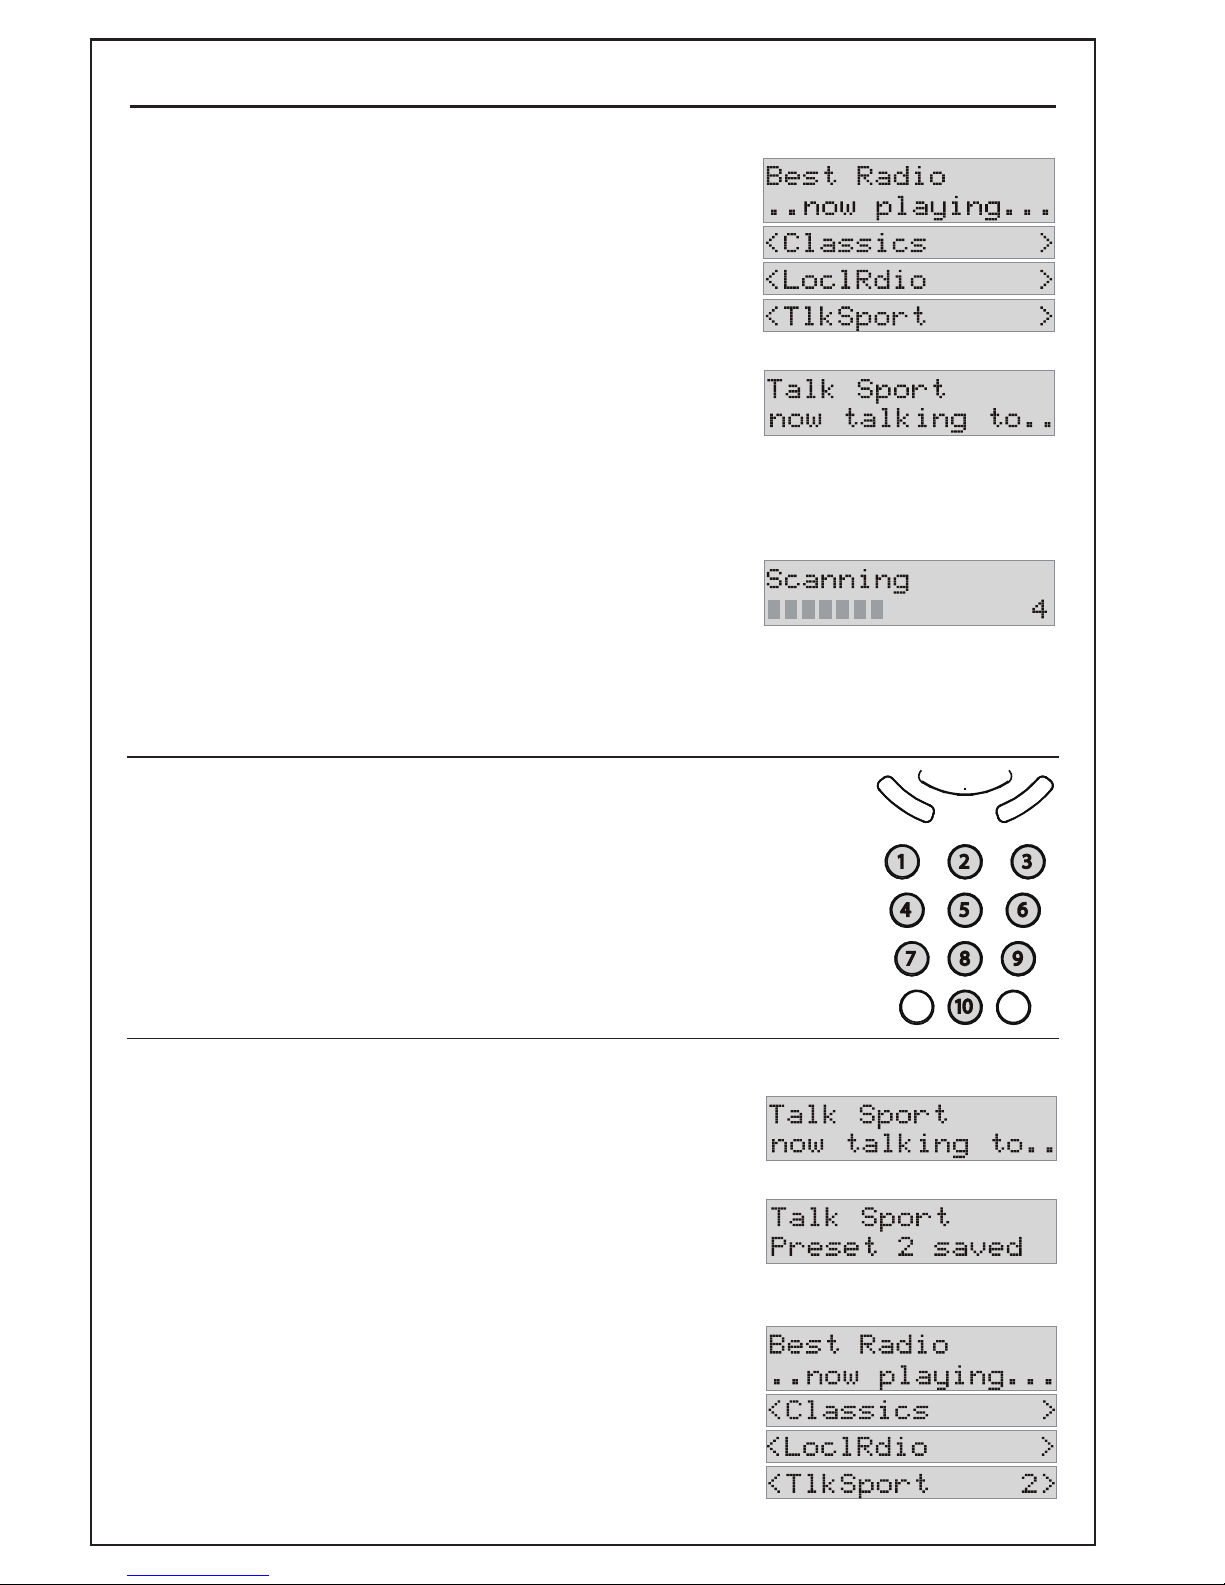
To see what stations are in the station list, press
the TUNE+ or TUNE– buttons to scroll up or down the list.
The station names will appear one at a time on the bottom
line of the display.
When you see the name of the station you want to listen
to, press the SELECT button.
To add new stations to the station list, press the SCAN button – a short press for a local
(UK) Scan, a long press (two seconds) for a full (all band III stations) scan. When all
available stations are found, the radio will add them
to the station list, then retune to the station you were
listening to.
If no stations are found, the radio will present a menu
that enables you to perform another scan, or to tune the radio manually. (see page 9)
Tuning to a preset station
Press the PRESET button for the station you wish to listen to.
Note – The first time you switch your new radio on, or straight after
a Factory Reset (see page 11), there will be no preset stations
saved.
TUNE...
SELECT...
Assigning a station to a preset button
Tune to the station that you want to save.
Press the PRESET button that you wish to use for this
station, and hold it in. Wait until the message “Preset
saved” is displayed, then release the button.
When you are scrolling through the station list, any
preset stations will be marked with their preset number.
Page 7
page 7
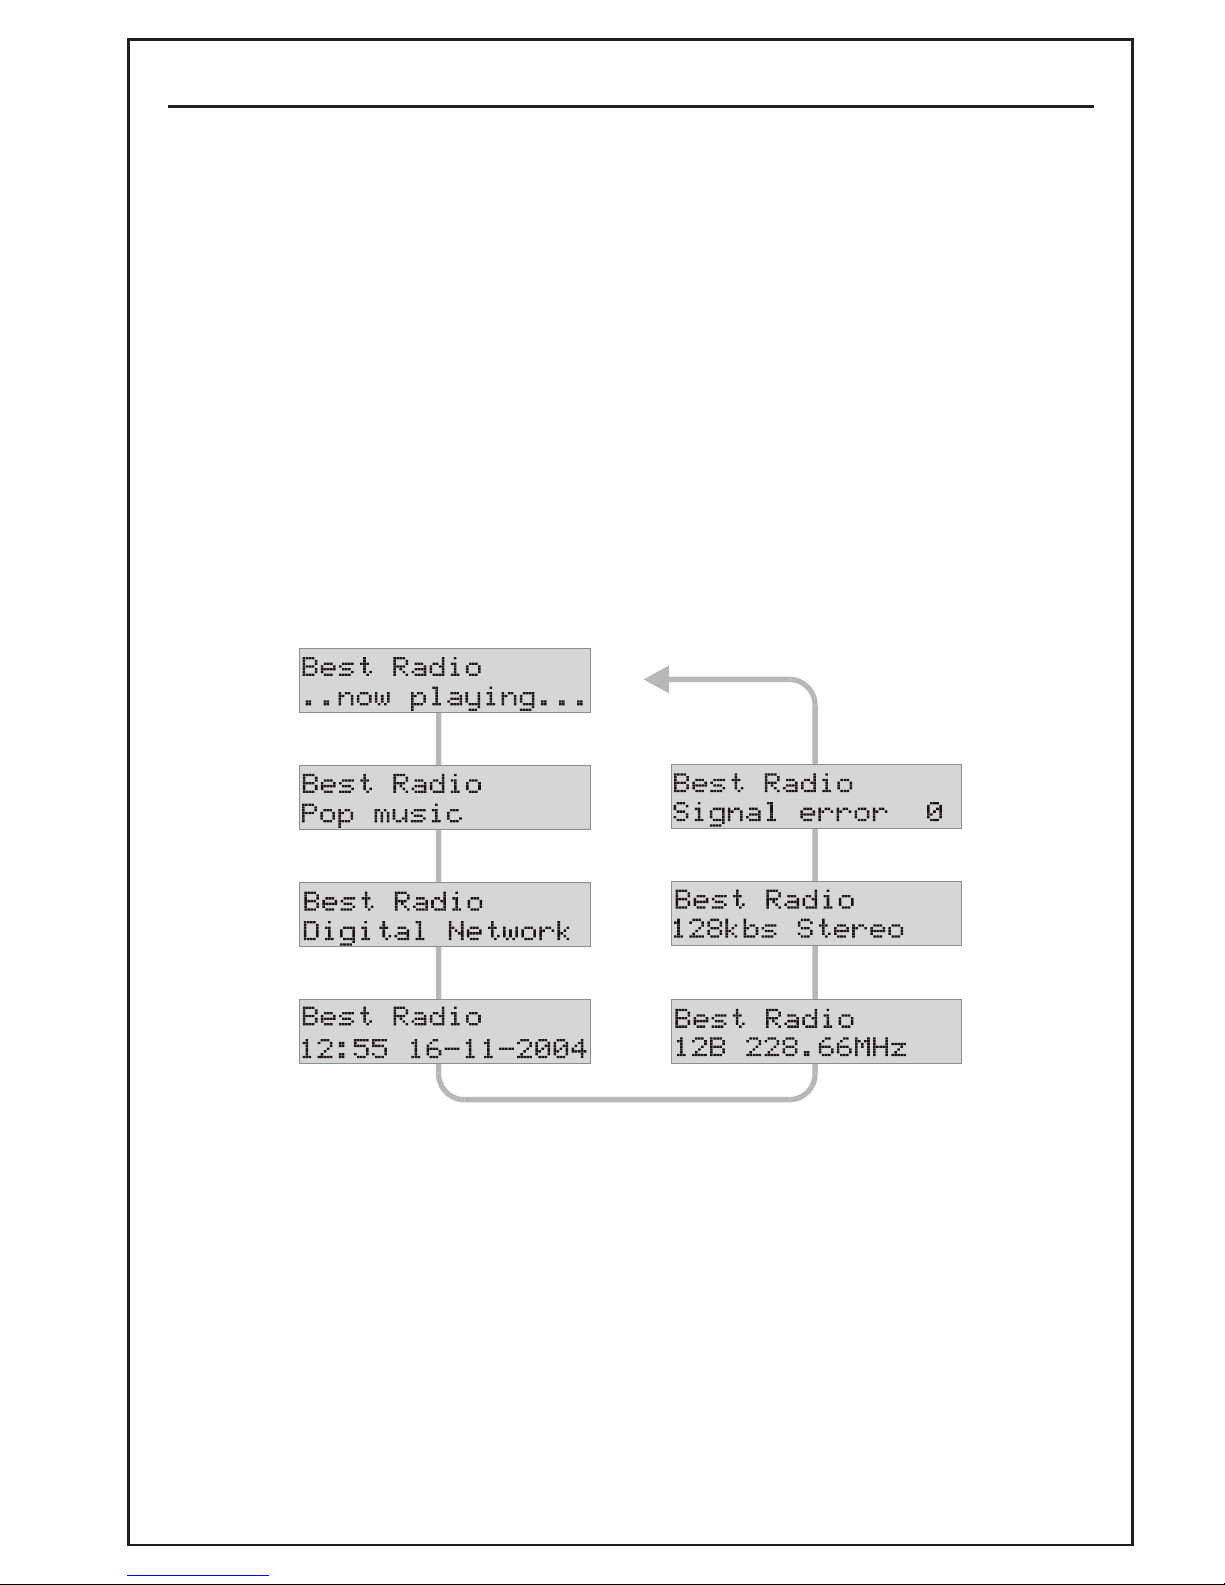
Changing the Station Information Display
The second line of text can display any one of these seven items of information:
Scrolling information supplied by the radio station (DLS)
Program type
Ensemble name
Time & date
Channel & frequency
Bit-rate & mode
Signal error
To change the information displayed, press the DISPLAY button repeatedly.
When the last item Signal error is displayed, the next press of the button will change
back to scrolling information.
•
•
•
•
•
•
•
Page 8
page 8
Using the Info Menus
The Info menus allow you to:
• sort the stations in the station list
• manually tune the radio
• adjust the dynamic range control setting (DRC)
• set the clock and the alarm
• check which version of software is being used in your radio
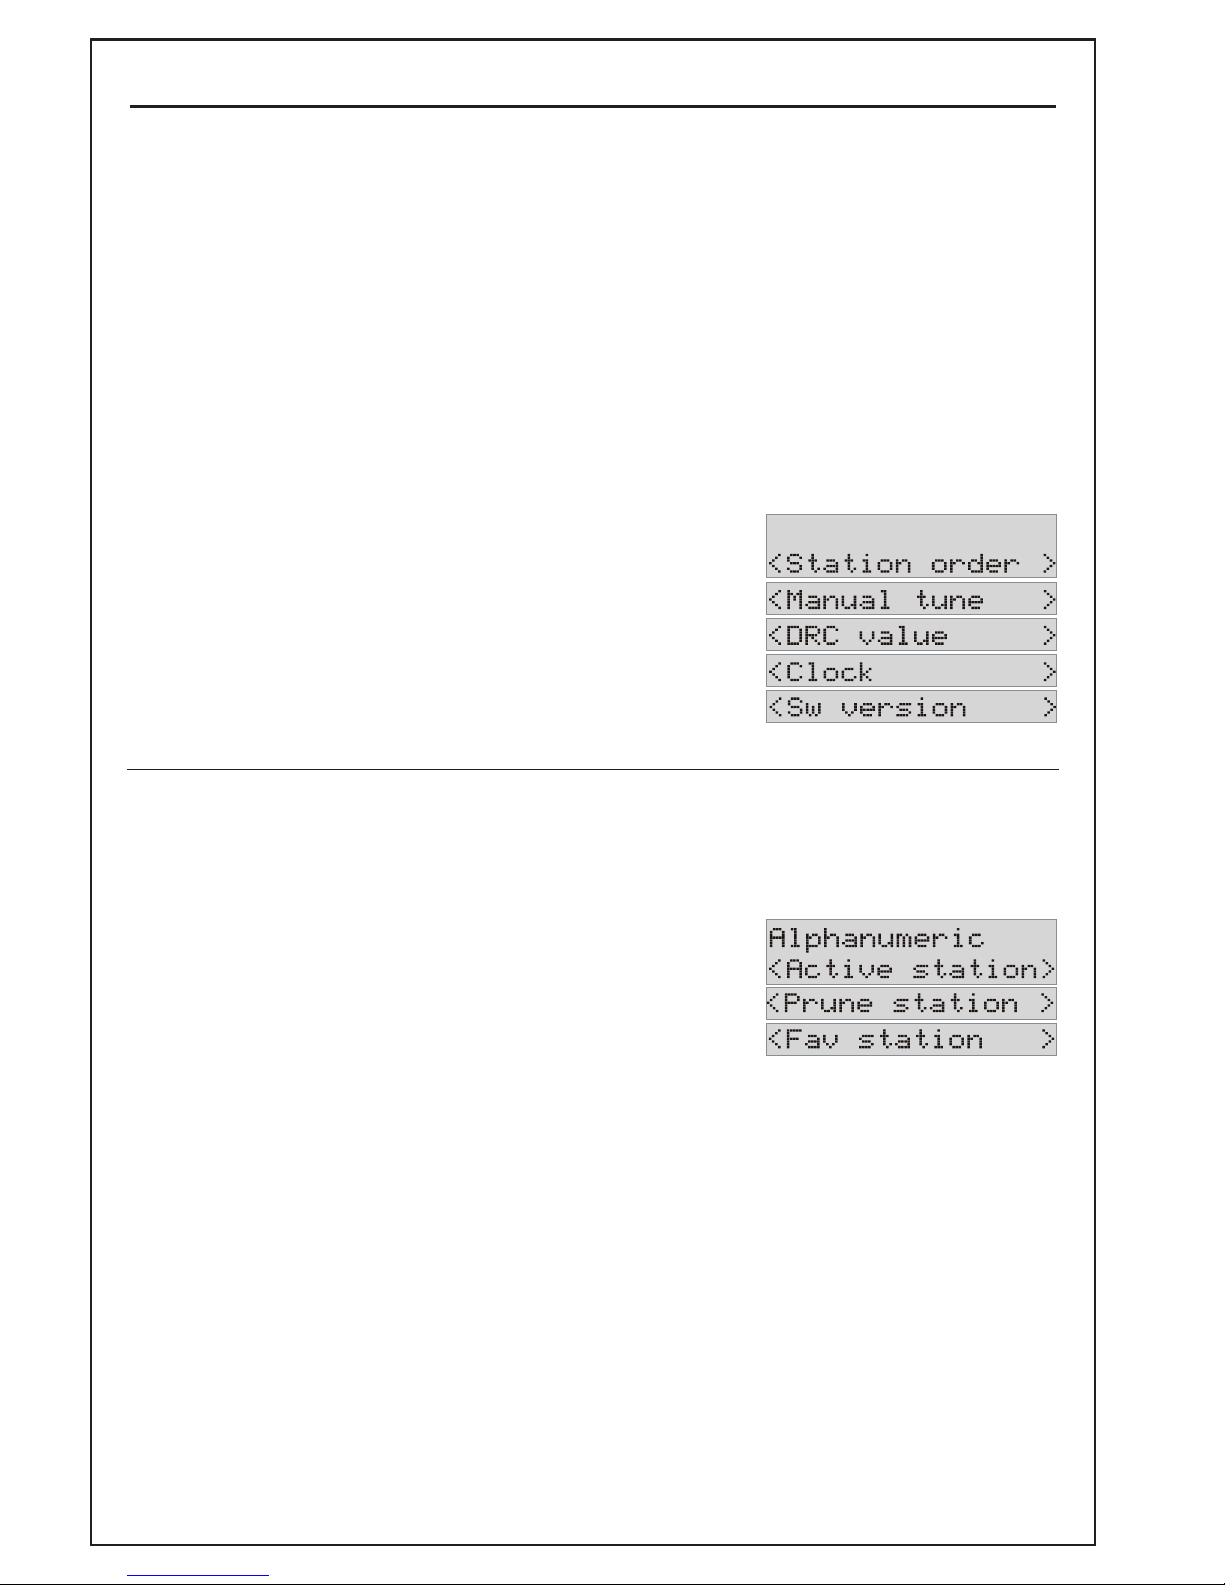
To display the first of the Info menus, press the INFO button.
Press the TUNE+ or TUNE– buttons to scroll up or down the
list until you see the menu you want to use, then press
the SELECT button.
To exit from the Info menus, press the INFO button again,
or simply leave all controls untouched for a few seconds.
The display will return to normal.
Station order
Use the INFO, TUNE and SELECT buttons, as described above, to choose the Station
order menu.
Press the TUNE+ or TUNE– buttons to see the different
ways in which the station list can be sorted.
When you see the sorting order you want to use, press
the the SELECT button:
• Alphanumeric
All stations will be sorted alphabetically.
• Active stations
All those stations which are not currently available will be moved to the bottom of
the station list.
• Prune stations
All those stations which are not currently available will be removed permanently
from the station list.
continued on next page
Page 9
page 9
Station order (continued)
• Favourite stations
Your ten most listened-to stations will be moved to the top of the station list. Next
time you use the menu, you will see an additional item:
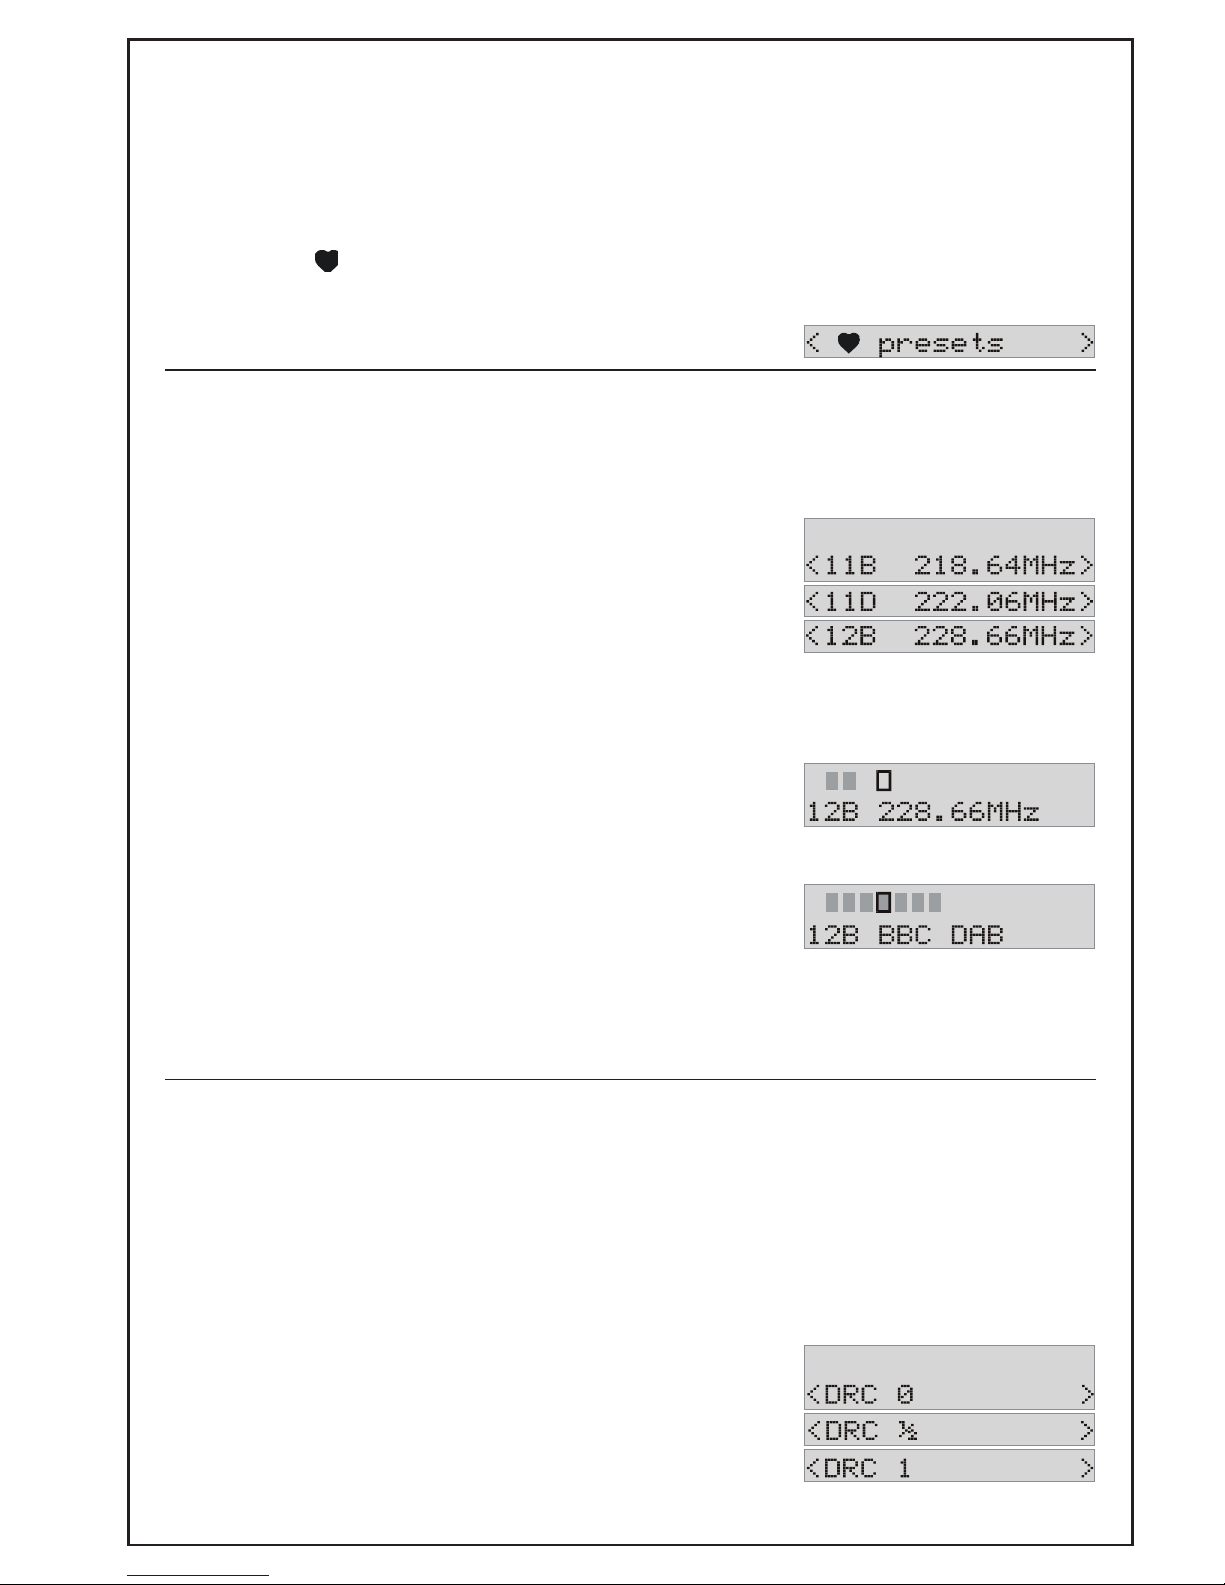
• Favourites ( ) to presets
Your favourite stations will be allocated to the preset buttons, overwriting any you
have set previously.
Manual tune
Use the INFO, TUNE and SELECT buttons, as described at the top of page 8 to choose the
Manual tune menu.
Press the TUNE+ or TUNE– buttons to see the different
channels that are available.
When you see the channel you want to use, press
the SELECT button. The Signal strength meter will be
displayed:
The bar in the middle of the meter shows you the
minimum signal strength needed for good DAB reception.
The grey bars will go up and down, showing you the
changing signal strength as you adjust the aerial and
radio position.
To turn off the Signal strength meter, press the SELECT
button.
Note – You can turn on the Signal strength meter any time, simply by pressing the
SELECT button whilst any DAB radio station is playing.
Signal strength low
Signal strength OK
Dynamic range control (DRC)
Your radio can use DRC to maintain the audio volume at a constant level. A high DRC
value would be useful in a noisy environment such as the car, but a low value would
be better for listening to classical music at home.
Use the INFO, TUNE and SELECT buttons, as described at the top of page 8 to choose the
DRC menu.
Press the TUNE+ or TUNE– buttons to see the different
DRC values that are available.
When you see the value you want to use, press the
SELECT button.
Page 10
page 10
Clock and alarm settings
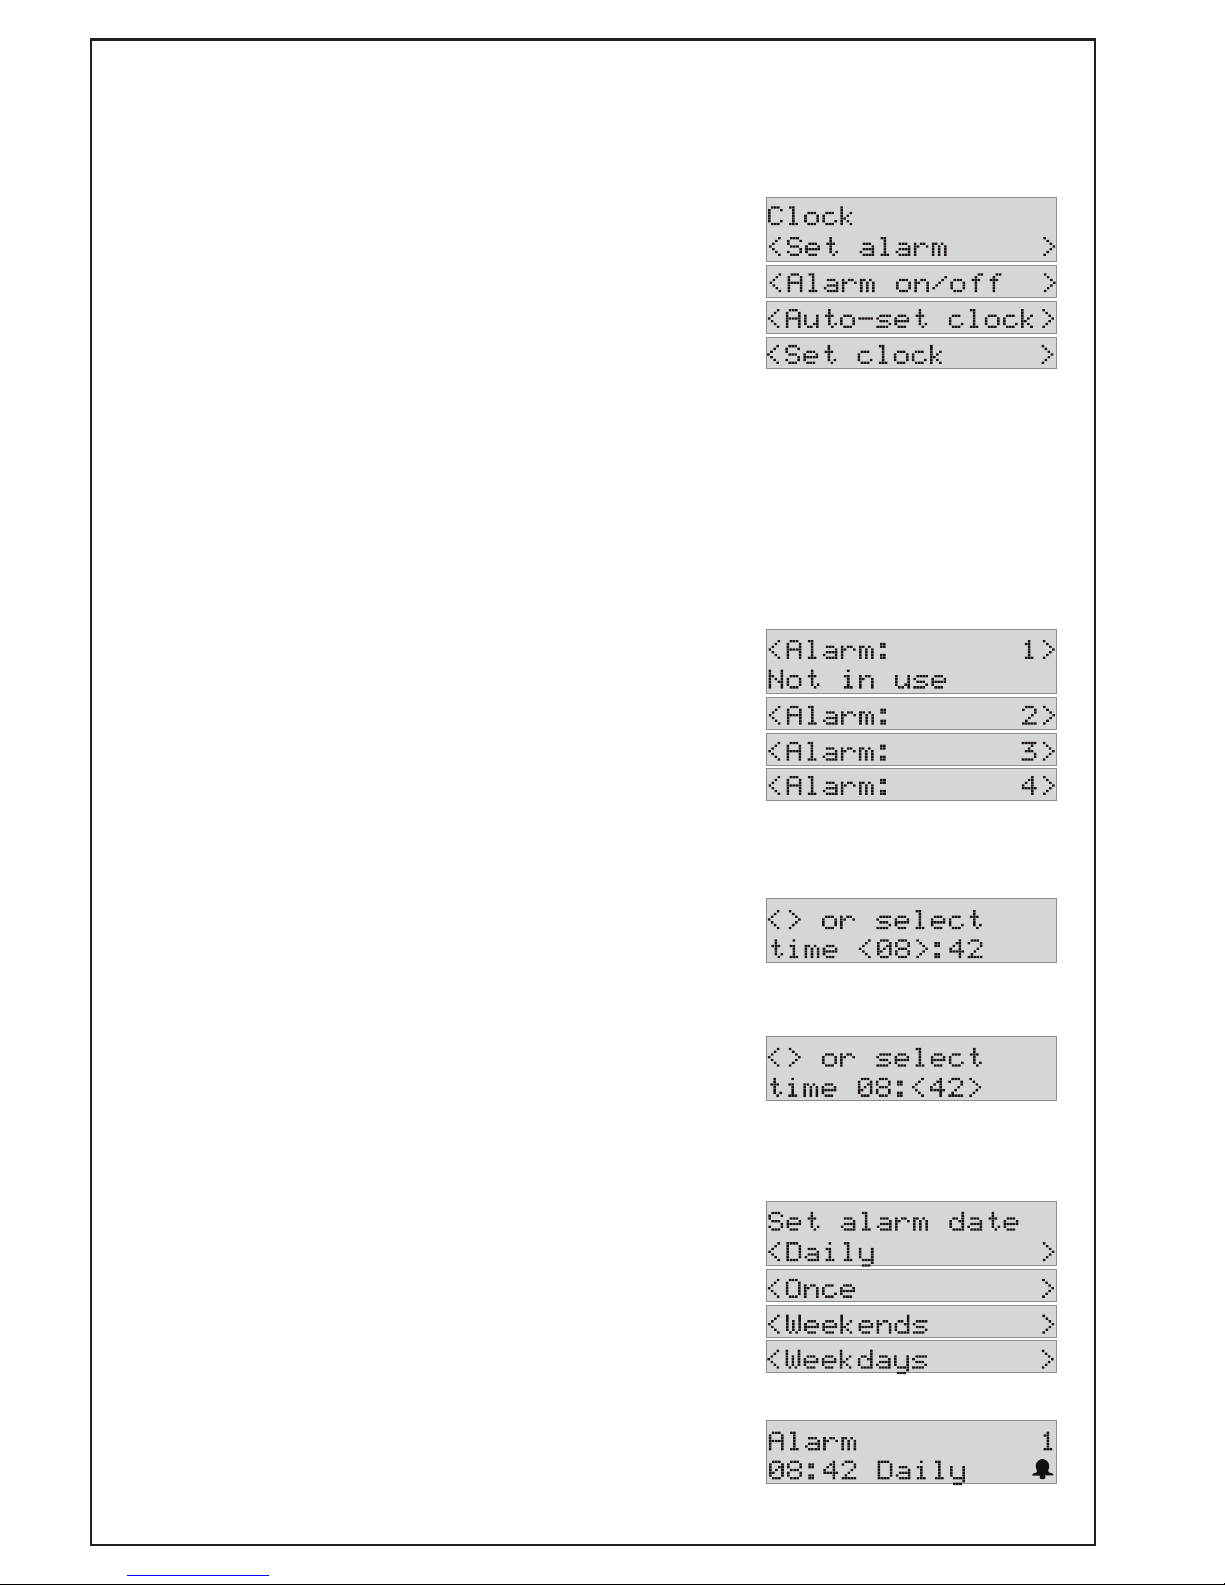
Use the INFO, TUNE and SELECT buttons, as described at the top of page 8, to choose
the Clock and alarm menu.
Press the TUNE+ or TUNE– buttons to see the different
clock and alarm settings.
When you see the setting you want to view or adjust,
press the SELECT button.
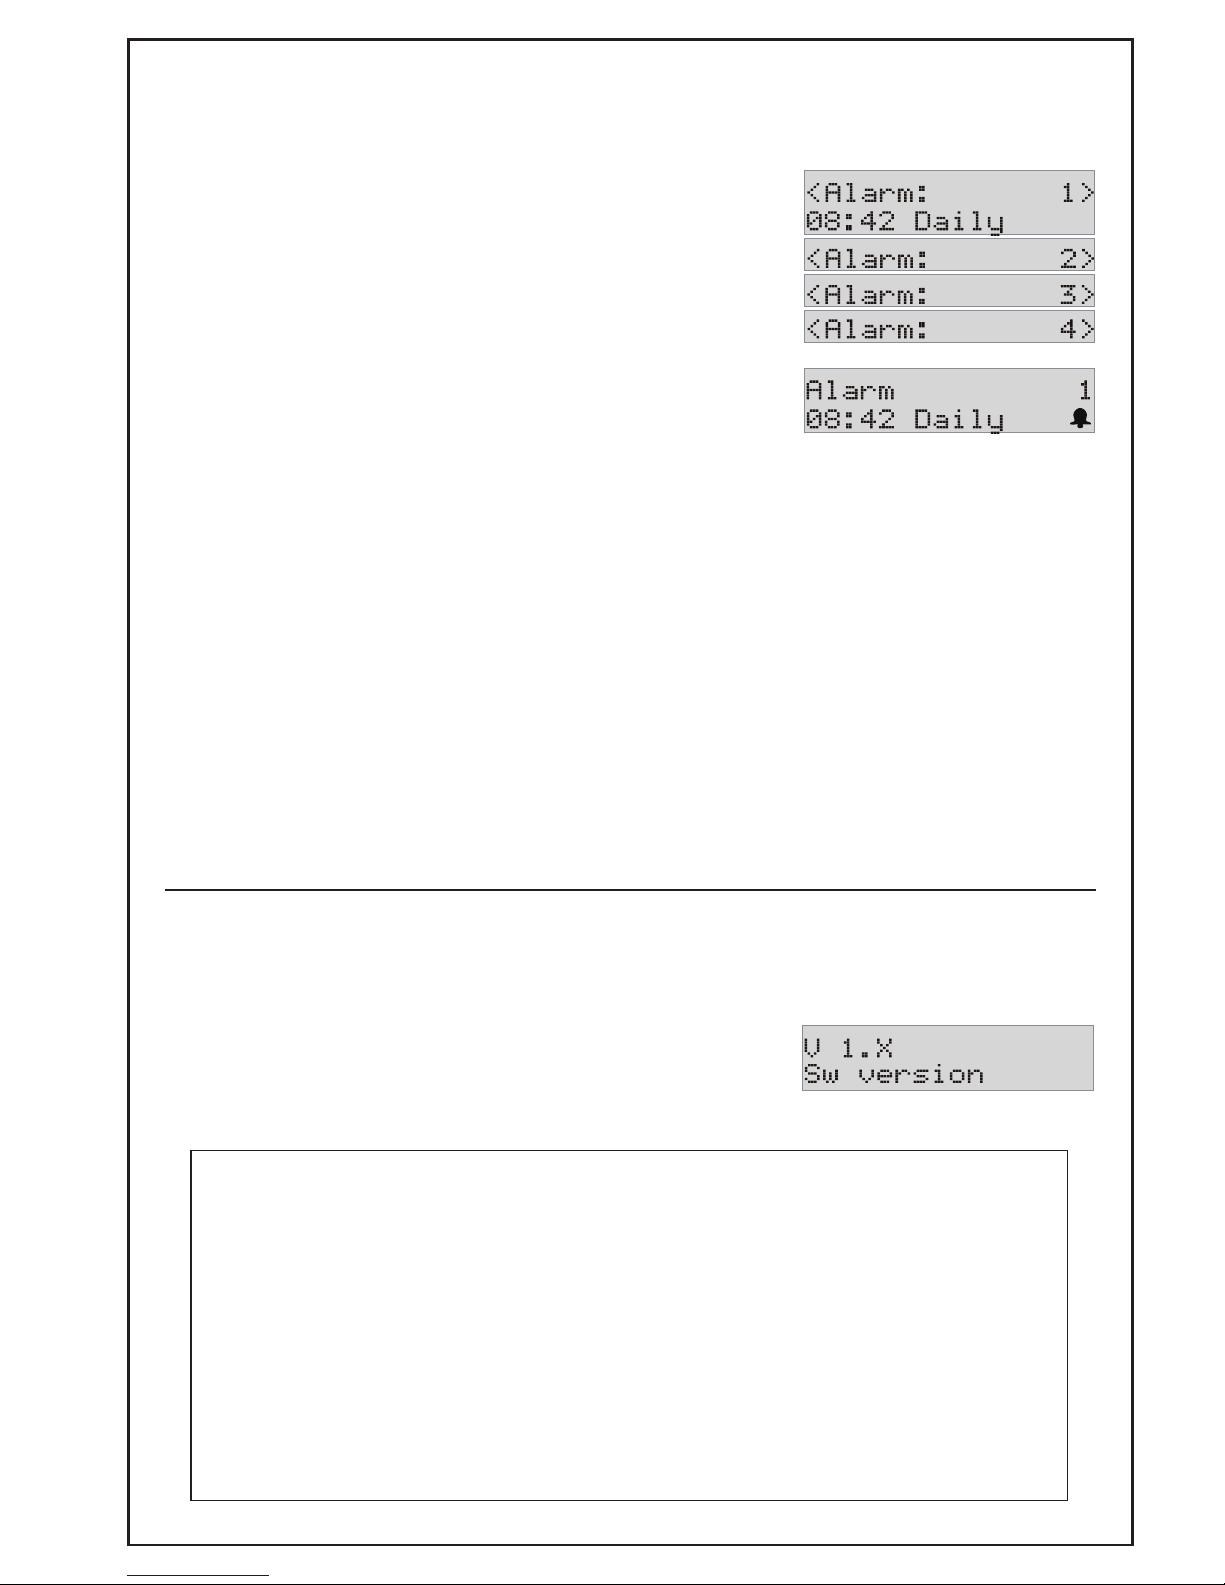
1 From the Clock and alarm menu (top of this page), choose Set alarm.
Press the TUNE+ or TUNE– buttons to see the four alarms.
When you see the alarm you want to view or adjust,
press the SELECT button.
2 The LCD screen will show the alarm time, with the hours highlighted.
Press the TUNE+ or TUNE– buttons to set the hours, then
press the SELECT button.
The the LCD screen will change so that the minutes are
highlighted.Press the TUNE+ or TUNE– buttons to set the
minutes, then press the SELECT button.
3 The LCD screen will show the alarm date setting.
Press the TUNE+ or TUNE– buttons to see the four settings.
When you see the setting you want to use, press the
SELECT button.
4 The LCD screen will confirm the settings you have
made, then return to normal.
Set alarm
Note – You can set up to four separate alarms. Each alarm can be set to repeat: daily,
once, weekends only, or weekdays only.
Page 11
page 11
Software version
Use the INFO, TUNE and SELECT buttons, as described at the top of page 8, to choose
Software Version.
The LCD screen will display the version of software that
has been used in your radio.
Note:
Factory reset
To return the radio to its factory settings, with all stations and presets cleared:
Press the INFO button and hold it in for two seconds.
The LCD screen will display a message asking if you really want to do this. To
confirm, press the SELECT button, and the radio will be returned to its factory
settings.
Set alarm on/off
From the Clock and alarm menu, choose Set alarm on/off.
Press the TUNE+ or TUNE– buttons to see the four alarms.
When you see the alarm you want to turn on or off,
press the SELECT button.
Autoset clock
From the Clock and alarm menu, choose Autoset clock.
• The clock will be set automatically from the time transmitted with the DAB radio
signal.
Set clock
From the Clock and alarm menu, choose Set clock.
The top line of the LCD screen will prompt you to set the hours first.
• Set the hours, minutes, year, month and day, just as described for setting the
alarm on page 10.
Page 12
page 12
Specifications
Audio output connector: Line output level
Frequency band: Band-III VHF
Quick Scan: 11B 218.640MHz to 12D 229.072MHz
Full Scan: 5A 174.920MHz to 13F 239.200MHz
Power supply: 6V 500mA
Accesssories: 1 x Mains adaptor
1 x RC101 remote control (takes 2 x AAA batteries)
Because we continually strive to improve our products, we may change specifications and
designs without prior notice.
Maximum DAB Tuner +
What is Digital Radio?
DAB (Digital Audio Broadcasting) is the next generation of radio.
DAB was developed in Europe by a consortium of broadcasters and manufacturers.
DAB uses digital compression techniques to transform the source material, i.e. music and speech,
into digital computer code before it is transmitted. The computer code consists of electronic ‘ones
and zeros’ called binary digits or bits. The binary code is then multiplexed or grouped together to
create a superior signal, when compared with the older analogue system with the following key
benefits:
• Near CD quality sound.
Because DAB is binary coded, the receiving equipment is only expecting to receive a
series of ones and zeros, so any other interference is ignored, resulting in very high
quality audio.
• Interference free reception.
Analogue systems suffer from an effect called ‘multipath distortion’. This is caused
because radio waves do not behave in an orderly fashion, but bounce and reflect off
buildings and mountains etc. DAB sees this as an advantage and uses the direct and
reflected signals to actually reinforce the end result.
• No need to re-tune.
A single DAB frequency can be used to cover the whole of the UK, so solving many of the
problems experienced with the earlier analogue system.
 Loading...