

Page 1
INSTRUCTION
MANUAL
Model no.
IMPORTANT:
Please read this manual carefully before
using this product, and save it for reference.
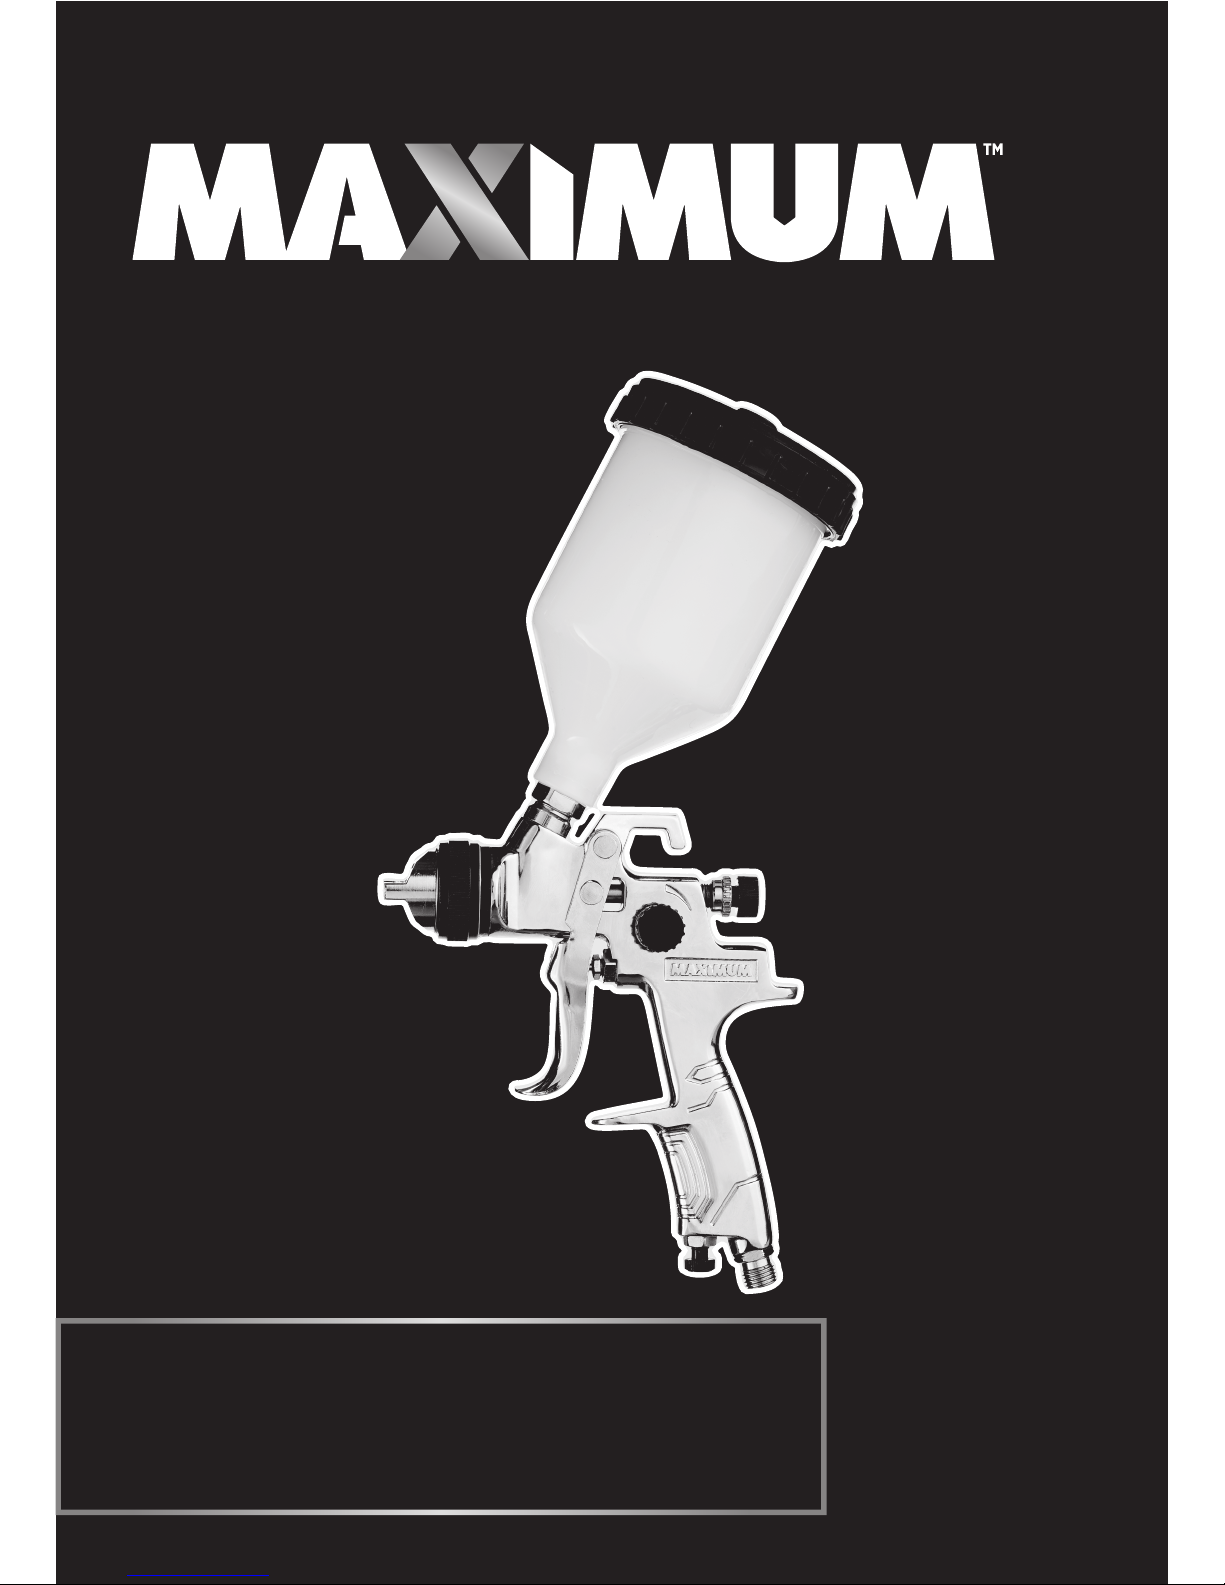
Air-Powered Gravity-Feed HVLP Spray Gun
058-9373-2
Page 2
NOTE:
If any parts are missing or damaged, or if you
have any questions, please call our toll-free helpline
at 1-888-670-6682.
4
5
10
11
12
16
18
20
21
22
TABLE OF CONTENTS
TECHNICAL SPECIFICATIONS
SAFETY GUIDELINES
KEY PARTS DIAGRAM
TECHNICAL INFORMATION
OPERATING INSTRUCTIONS
MAINTENANCE
TROUBLESHOOTING
EXPLODED VIEW
PARTS LIST
WARRANTY
TM
Page 3
54
model no. 058-9373-2 | contact us 1-888-670-6682
NOTE: The word “Note” is used to inform the reader of
something he/she needs to know about the tool.
CFM: Cubic Feet per Minute (the volumetric flow rate of air 50℃
corrected to standardized conditions of temperature and pressure).
NPT: Nominal Pipe Thread
TECHNICAL SPECIFICATIONS
MAXIMUM MATERIAL TEMPERATUER
DANGER!
WARNING!
CAUTION!
PERSONAL SAFETY
Potential hazard that will result in serious
injury or loss of life.
Potential hazard that could result in
serious injury or loss of life.
Potential hazard that may result in
injury or damage to equipment.
FLUID DELIVERY
NOZZLE
AIR HOSE REQUIRED
PAINT VISCOSITY
FINISH QUALITY
CFM REQUIREMENT
AIR INLET
PAINT CAPACITY
MAXIMUM OPERATING PRESSURE
OPERATING PRESSURE
WEIGHT
Gravity
1.4 mm
3/8" (9.5 mm)
Water–based paint
Best
3.4 @ 40 PSI
1/4"-18 NPT
0.6 L
58 PSI (4 bar)
2.0 to 3.5 bar
1 lb 6 oz (0.65 kg)
50 ℃
This manual contains information that relates to PROTECTING PERSONAL
SAFETY and PREVENTING EQUIPMENT PROBLEMS. It is very important
to read this manual carefully and understand it thoroughly before using
the product. The symbols listed below are used to indicate this
information.
These precautions are intended for the personal safety of the user and
others working with the user.
Please take time to read and understand them.
TM
Page 4
76
model no. 058-9373-2 | contact us 1-888-670-6682
NOTE: Carefully read and understand all the instructions in
this manual before using the Gravity-feed Spray Gun. Ensure
that the operator of the tool has read and understood these
instructions.
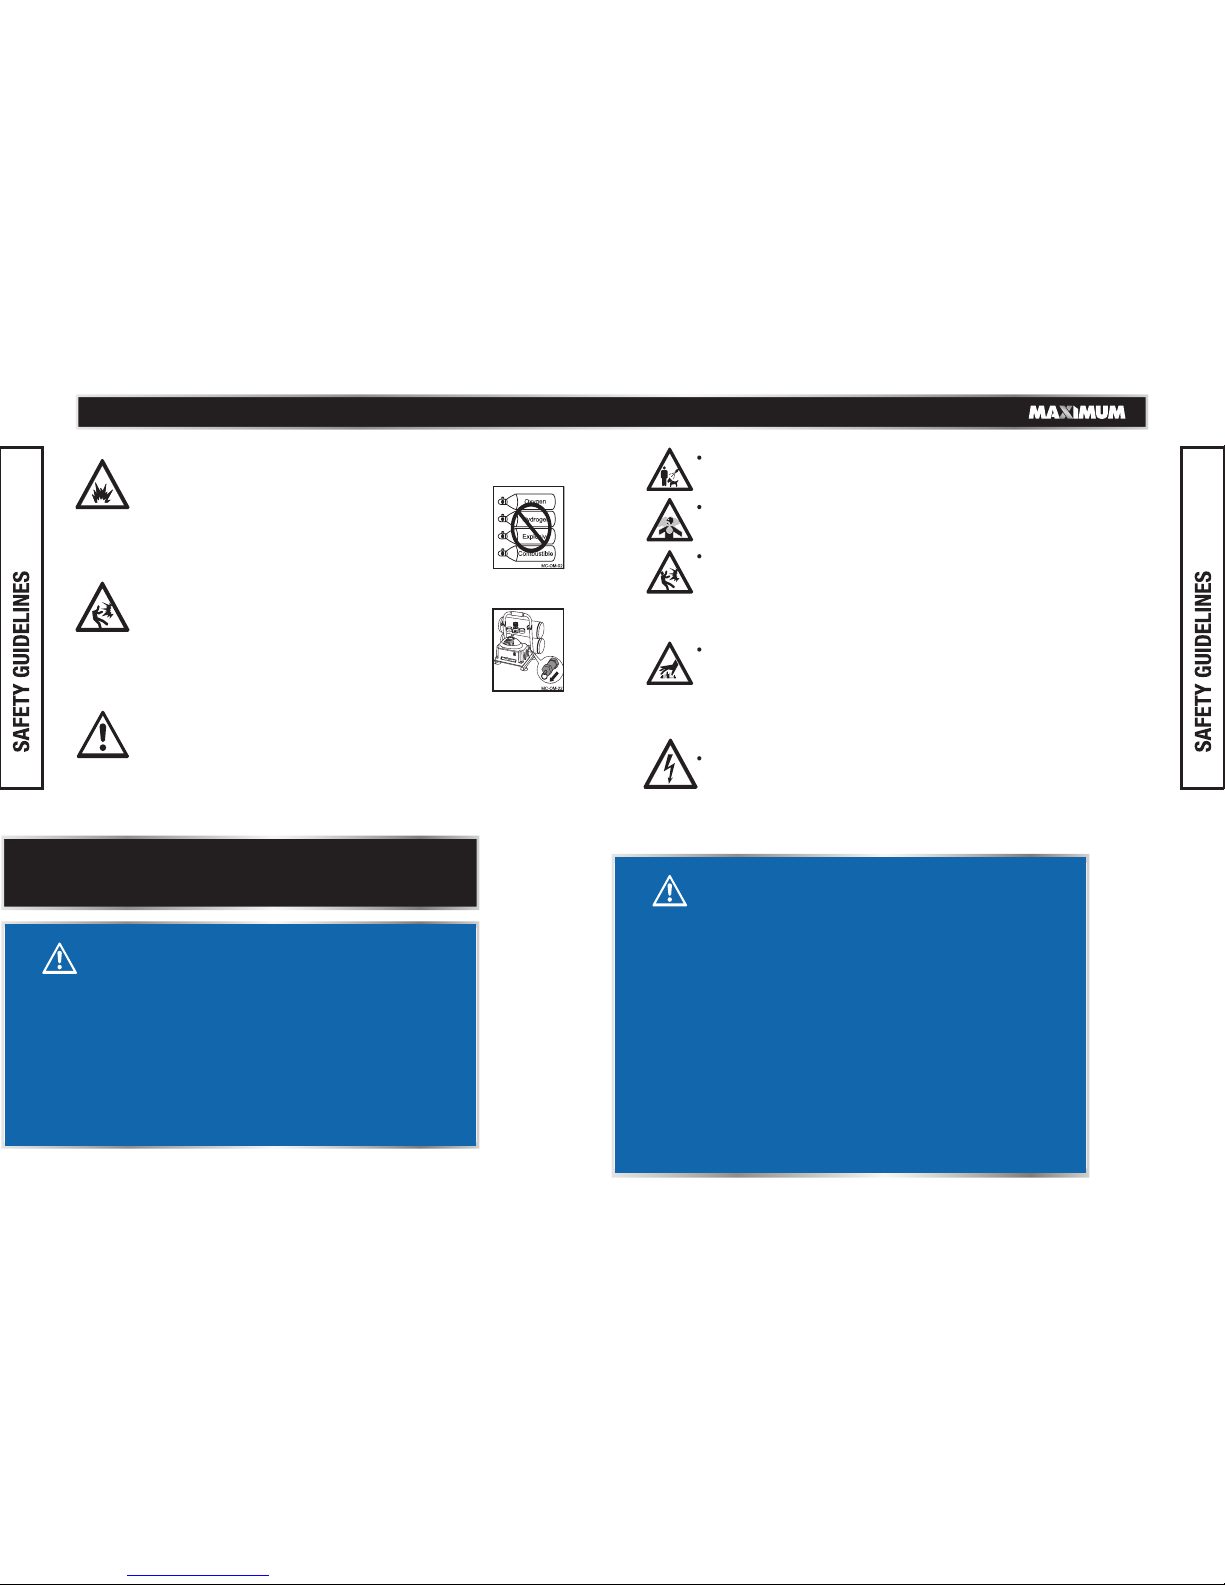
• Do not use oxygen or any other combustible or bottled gas to
power air-powered tools. Failure to observe this warning
can cause explosion and serious personal injury or
death. Use only compressed air to power
air-powered tools. Use a minimum of 25' (7.6 m) of
hose to connect the tool to the compressor. Failure
to comply will result in serious injury or loss of life.
• Risk of bursting. Make sure the regulator is adjusted
so that the compressor outlet pressure is set lower
than the maximum operating pressure of the tool.
Before starting the compressor, pull the ring on the
safety valve to make sure the valve moves freely.
Drain water from tank after each use. Do not weld
or repair tank. Relieve all pressure in the hose
before removing or attaching accessories.
• Do not use this tool in the presence of flammable
liquids or gases. Sparks that are created during use
may ignite gases. Please use the tool in a well ventilated area only and avoid any ignition sources
such as smoking and open flames.
Risk of personal injury. Do not direct compressed air from the
air hose towards the user or other persons.
Risk for breathing. Never directly inhale the air produced by
the compressor. Use the spray gun in a well-ventilated area.
Risk of bursting. Do not adjust the pressure switch or safety
valve for any reason. They have been preset at the factory for
this compressor’s maximum pressure. Tampering with the
pressure switch or the safety valve may cause personal injury
or property damage.
Risk of burns. The pump and the manifold generate high
temperatures. In order to avoid burns or other injuries, do not
touch the pump, the manifold, or the transfer tube while the
compressor is running. Allow the parts to cool down before
handling or servicing. Keep children away from the
compressor at all times.
Risk of electric shock. Do not expose a compressor to rain.
Store it indoors. Disconnect the compressor from the power
source before servicing. Compressor must be grounded. Do
not use grounding adaptors.
WARNING!
Potential hazard that could result in serious injury or
loss of life.
• Do not allow unskilled or untrained individuals to operate
the Gravity-feed Spray Gun.
• Use components recommended by manufacturers: Never
modify the tool for other applications. Use only parts,
nozzles, and accessories with specifications as mentioned
in this manual (see section “ Technical Specifications”).
• Inspect the tool components and attachments before
operation and ensure that they are assembled properly and
are not damaged. Failure to comply could lead to serious
injury or loss of life.
• Locate the compressor in a well-ventilated area for cooling,
at a minimum of 12" (31 cm) away from the nearest wall.
• Protect the air hose and the power cord from damage and
puncture. Inspect them for weak or worn spots every week,
and replace them if necessary.
DANGER!
Potential hazard that will result in serious injury or
loss of life.
• Keep children away from the work area. Do not allow
children to handle power tools.
• Do not point the tool towards yourself or other people,
even when the tool has stopped. Keep hands, feet,
and all other parts of the body clear from work area.
• Never use homogenate hydrocarbon solvent, which
can chemically react with aluminum and zinc parts
and which is not chemically compatible with aluminum
and zinc parts.
TM
Page 5
98
model no. 058-9373-2 | contact us 1-888-670-6682
CAUTION!
Potential hazard that may result in moderate injury or
damage to equipment.
Keep proper footing at all times in order to ensure correct balance.
Do not use a tool that is leaking air, that has missing or damaged parts,
or that requires repairs. Verify that all screws are securely tightened.
For optimal safety and tool performance, inspect the tool daily in order
to ensure free movement of the trigger, safety mechanisms, and
springs.
Ensure proper tool operation before painting. Before painting, inspect
to ensure free movement of the trigger and nozzle.
Check the tightness of screws before operating the tool. Before
operating the tool, make sure all the screws and caps are securely
tightened to prevent leakage.
Keep the work area clean. A cluttered or dirty workbench may lead to
an accident. Floors should be kept clear.
Handling and storage of oil: Use with adequate ventilation. Avoid
contact of oil with eyes, skin, and clothing. Avoid breathing spray or
mist. Store in a tightly closed container in a cool, dry, well-ventilated
area free from incompatible substances.
Do not use the tool near or below freezing temperatures, as doing so
may cause tool failure.
Do not store the tool in a freezing environment to prevent ice
formation on the operating valves of the tool, which may cause tool
failure.
Always wear hearing protection when using the air compressor.
Failure to do so may result in hearing loss.
Do not carry the compressor while it is running.
Do not operate the compressor if it is not in a stable position.
Do not operate the compressor on a rooftop or in elevated
position that could allow the unit to fall or be tipped over.
Always replace a damaged gauge before operating the unit again.
NOTE: Recycle the unwanted materials rather than disposing
them as waste. Sort tools, hoses, and packaging into separate
categories and take them to the local recycling centre or
dispose them in an environmentally safe way.
CAUTION!
Potential hazard that may result in moderate injury or
damage to equipment.
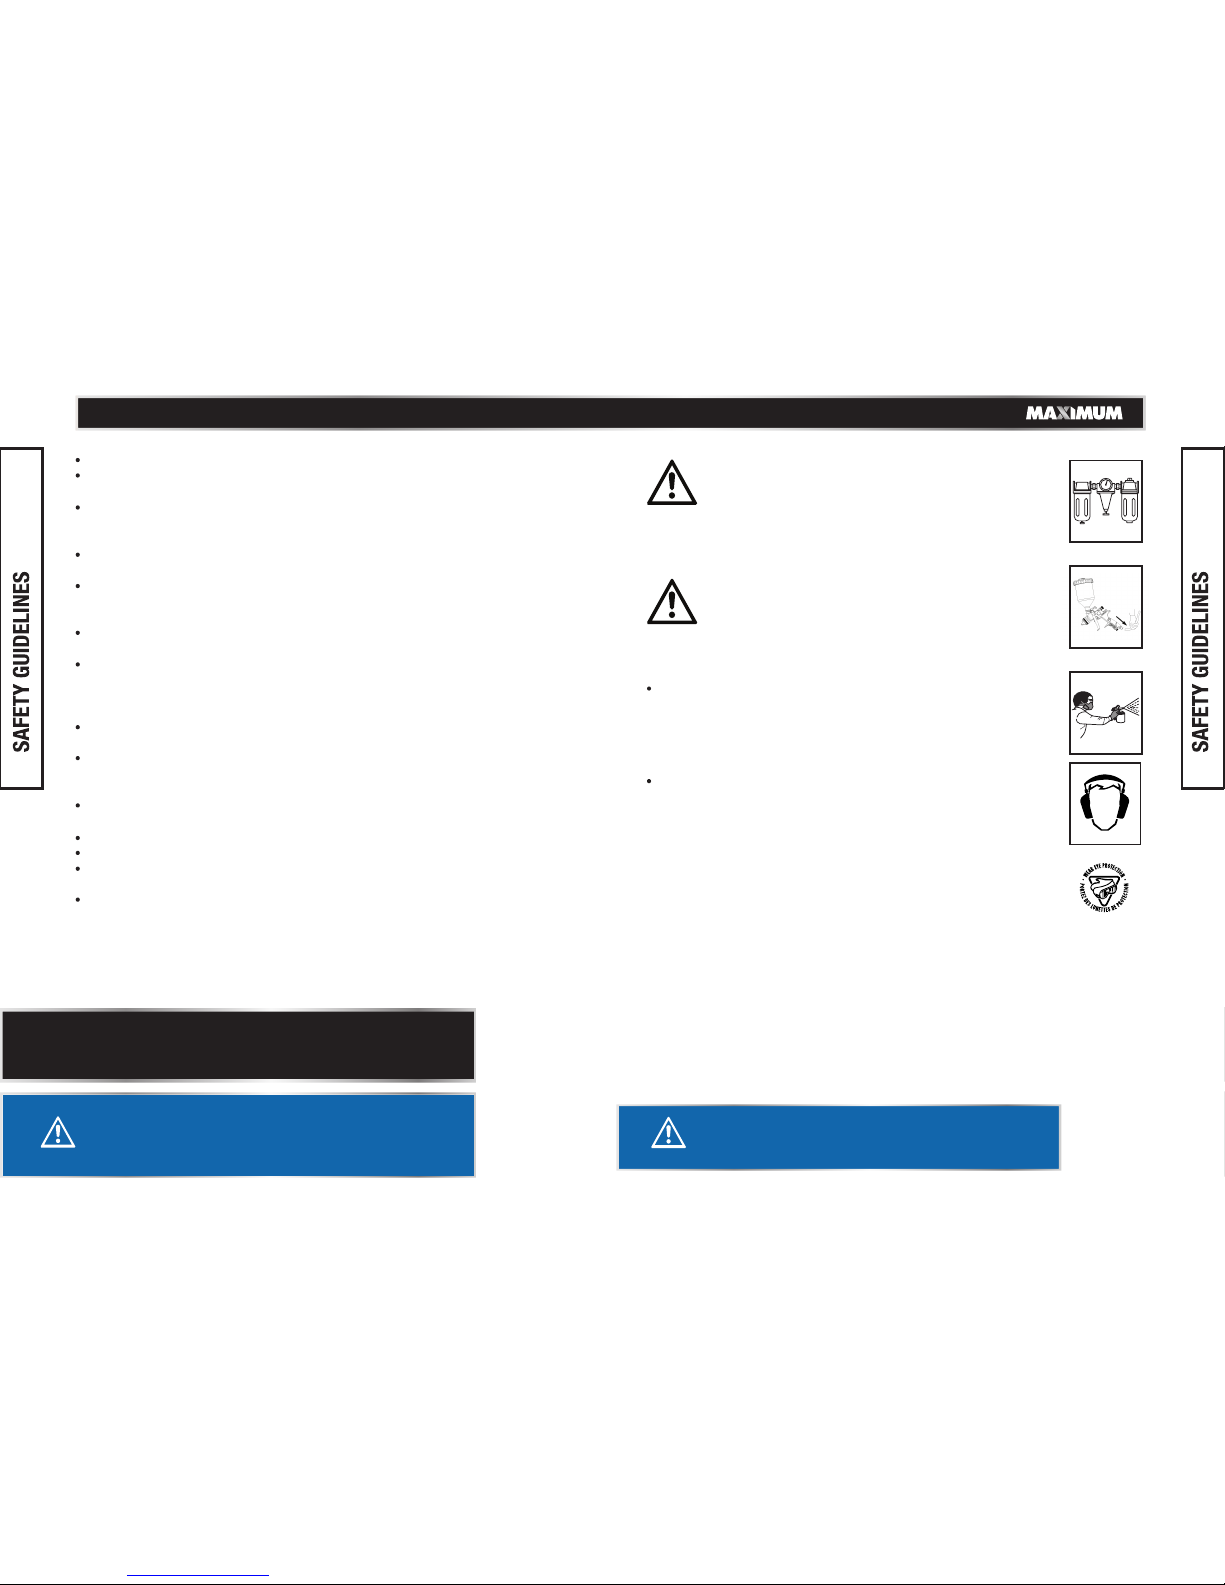
Use safety respirator: Toxic vapours produced by spraying
certain materials can cause serious damage to health.
Always wear safety gloves and a respirator to prevent
hazards caused by inhaling toxic vapour or contact of
solvent and paint with eyes or skin. Failure to comply may
result in injury.
Use safety goggles and ear protection:
Wear safety glasses with side shields when operating the
tool/compressor and verify that others in the work area are
also wearing safety glasses. Safety glasses provide
protection from flying particles from the front and the sides.
Air-powered tools are loud and the sound can cause hearing
damage. Always wear ear protection to help prevent
hearing damage and loss. Failure to comply may result in
injury.
• Use compressed air at regulated pressure: Always
use clean, dry, and compressed air at the regulated
pressure. Do not exceed the maximum operating
pressure of 80 PSI. Failure to comply could lead to
serious injury or loss of life.
• Disconnect the spray gun from the air supply hose
and turn off the compressor before performing any
maintenance, when the tool is not in use, when it is
being handed to another person, and when it is left
unattended. It is recommended to use a ball valve
in the gun to regulate air supply, for emergency
stoppage and to prevent unintended operation.
TM
Page 6
This MAXIMUM® Air-powered Gravity-feed Spray Gun is an HVLP or
high-volume low-pressure sprayer. This tool applies paint with less force,
reducing the bounce of the material from the surface to be painted. It
features a stainless steel needle and nozzle to accommodate a variety of
coatings. The spray gun is capable of forming very large patterns.
1110
model no. 058-9373-2 | contact us 1-888-670-6682
CAUTION!
Potential hazard that may result in injury or damage
to equipment.
• Incomplete or improper cleaning could cause
function failures and a degradation of the tool.
Failure to comply may result in injury or damage
to equipment.
Air Compressor
Size and Power
1 1/2–2 HP 2 1/2–3 HP 3 HP and more
5–6 Gallons
8–11 Gallons
15 Gallons
and more
Light-duty and
intermittent use
Light-duty and
intermittent use
Medium-duty and
intermittent use
Light-duty and
intermittent use
Medium-duty and
intermittent use
Heavy-duty and
continuous use
Light-duty and
intermittent use
Medium-duty and
intermittent use
Heavy-duty and
continuous use
Compatible compressors and air tool
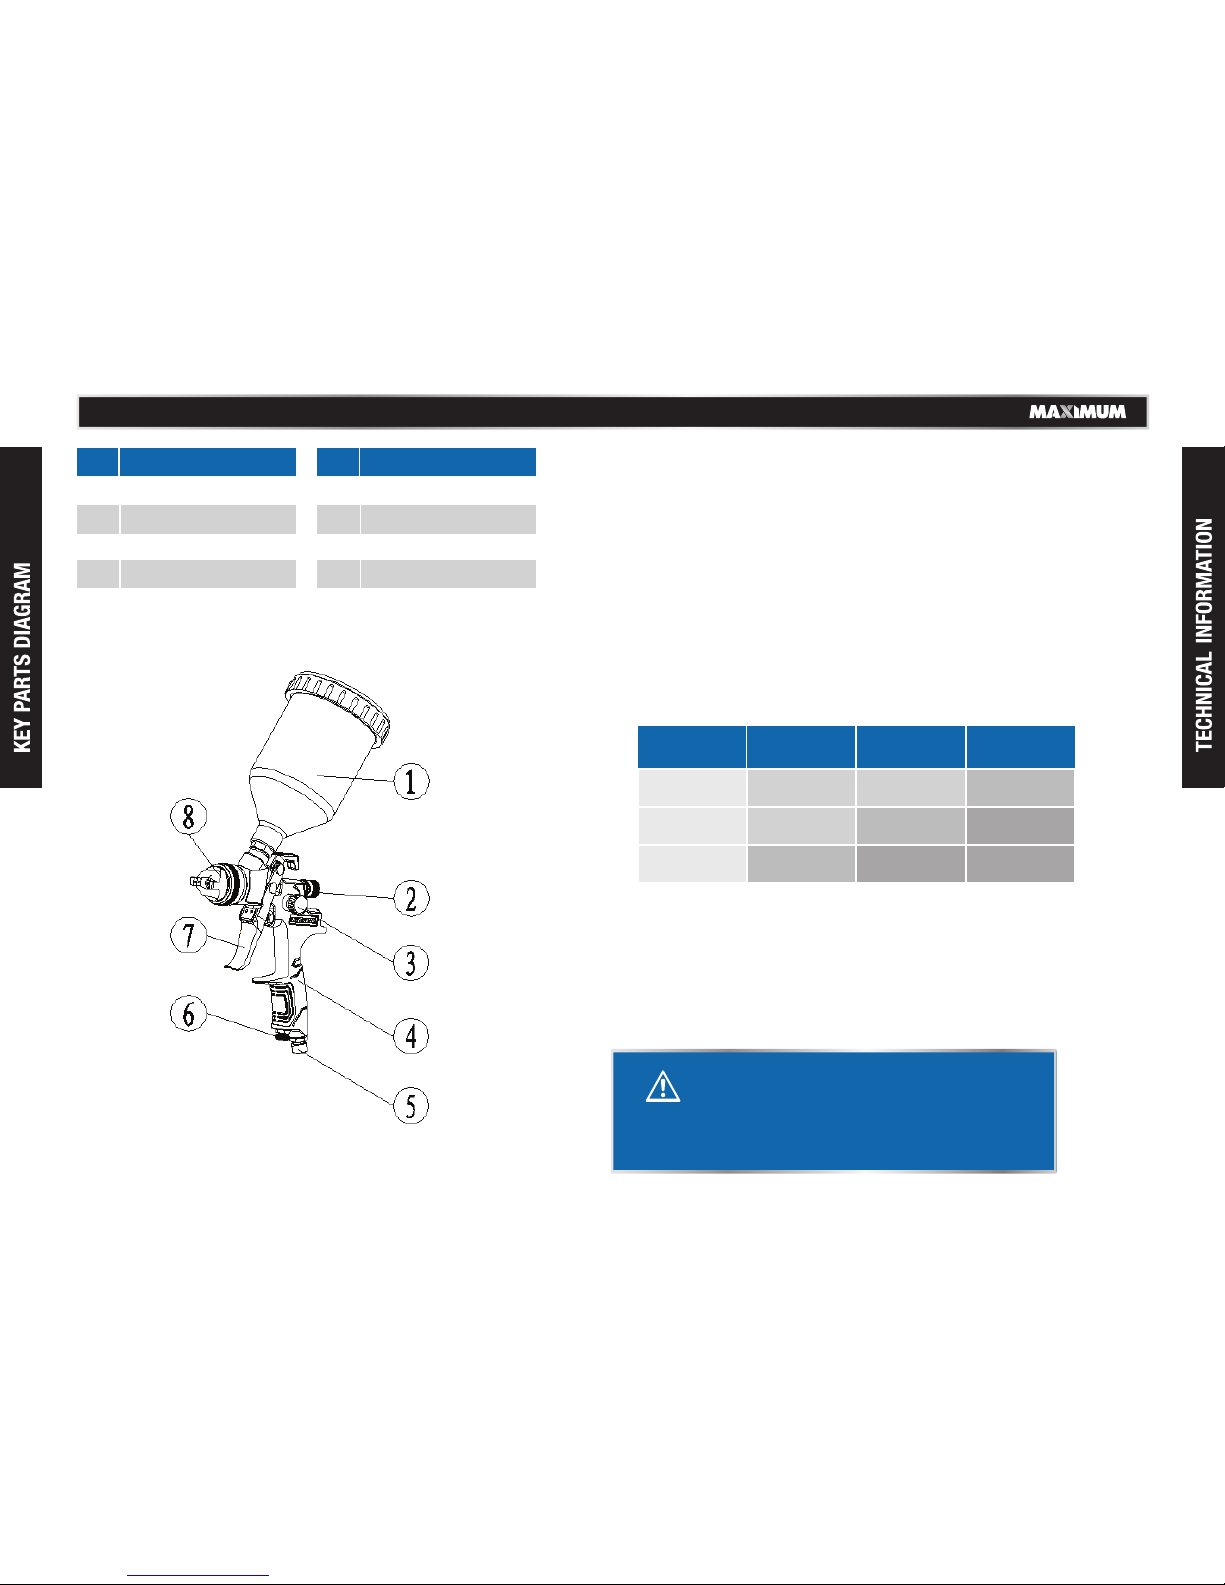
No.
1
2
No.
5
6
7
8
Description Description
Plastic canister
Paint adjusting knob
Pattern adjusting knob
Gun body
3
4
Air inlet plug
Air adjusting knob
Trigger
Air cap nozzle and needle
General use
Be sure to use the proper air compressor with MAXIMUM® air-powered
tools. The compressor should be able to supply a minimal air delivery of
5.1 CFM @ 40 PSI to ensure it can run continuously with the MAXIMUM
®
Air-powered Gravity-feed Spray Gun. Using tools or combinations of tools
that together or separately require more than the air compressor can
deliver will reduce performance and could void the compressor or tool
guarantee/warranty.
GUIDELINES FOR PROPER USE AND OPERATION
• Rotate the paint adjusting knob in a counter-clockwise direction and
open the knob when the gun is not in use. This will reduce spring
tension on the needle fluid tip.
• Clean the Air-powered Gravity-feed Spray Gun thoroughly and slightly
lubricate it, after use and before storage.
Storage
TM
Page 7
1312
model no. 058-9373-2 | contact us 1-888-670-6682
WARNING!
Potential hazard that could result in serious injury or
loss of life.
• Do not exceed the maximum pressure for the Air powered Gravity-feed Spray Gun or any other parts
in the compressor system. Failure to comply could
lead to serious injury or loss of life.
• Never aim or spray at yourself or anybody else as this
could cause serious injury. Failure to comply could
lead to serious injury or loss of life.
• After unpacking the tool, inspect it carefully and check
thoroughly for any damage that may have occurred
during transit. Ensure the tightness of fittings, bolts,
etc., before performing service operation.
Before assembly and preparation
1
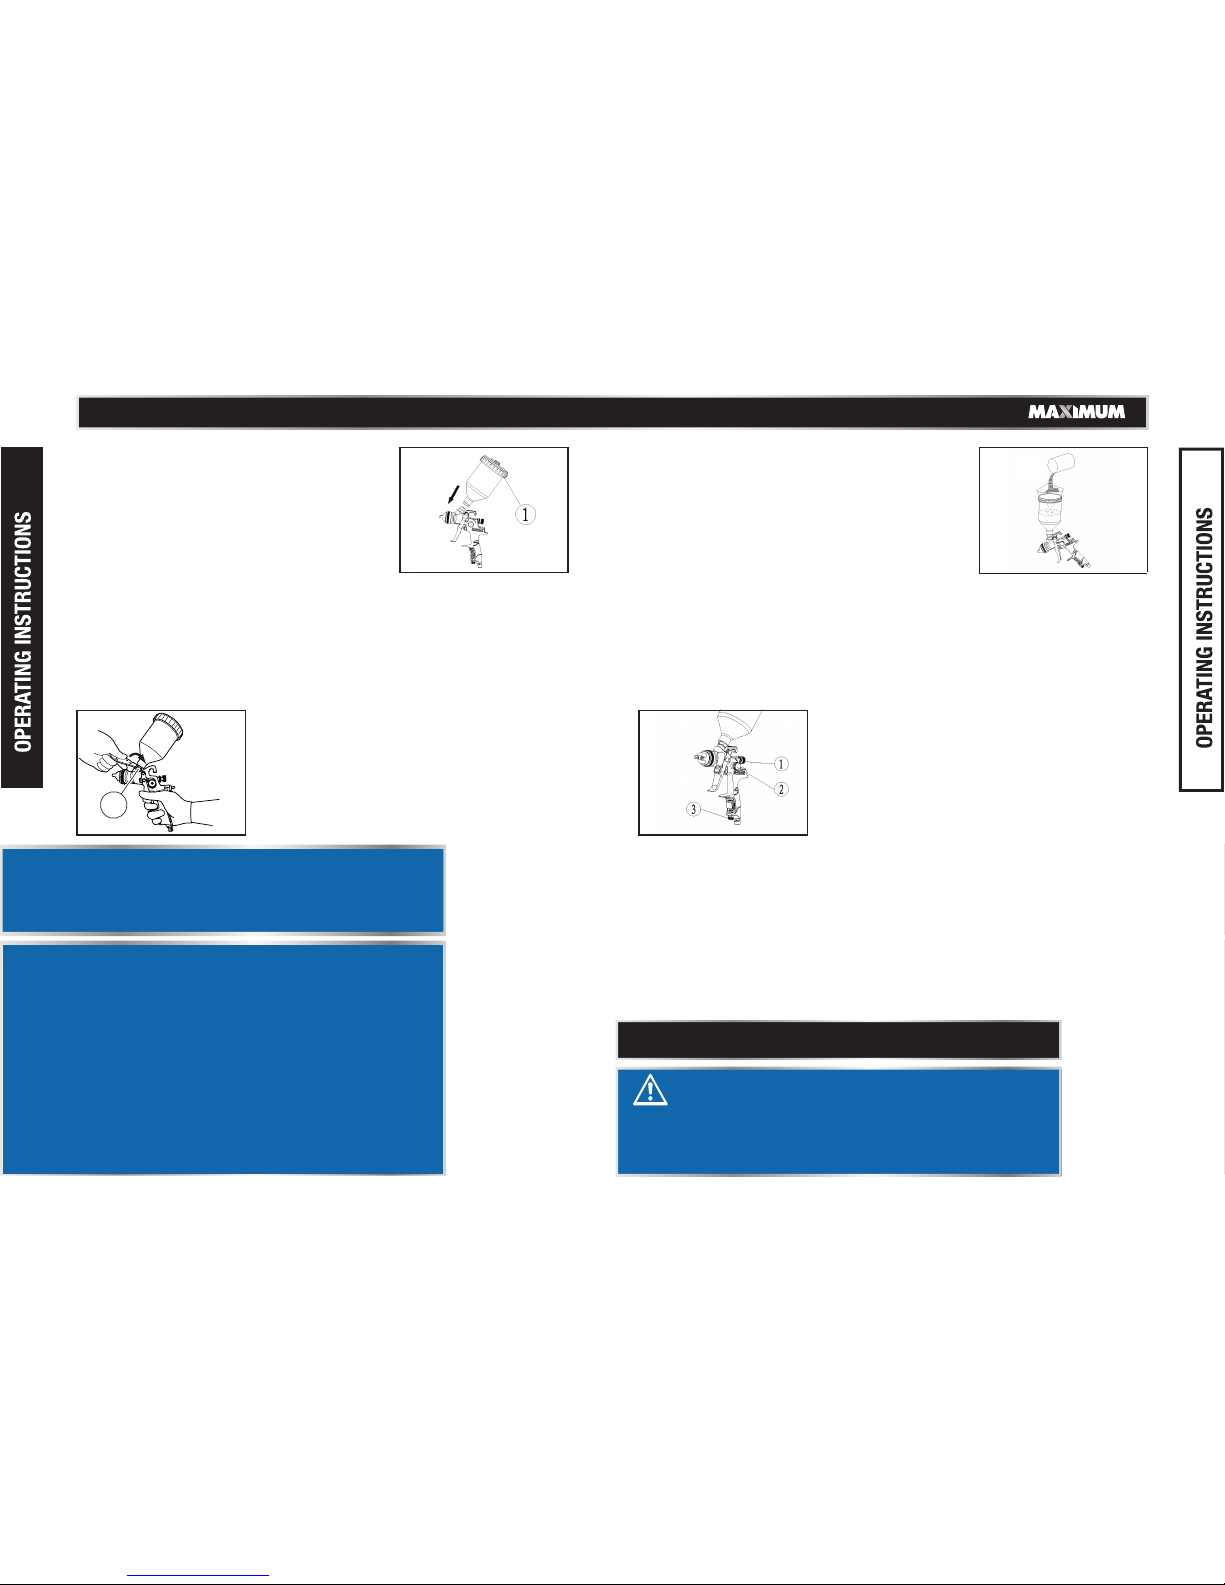
3. Pour paint through a strainer, cheesecloth or
paint strainer to remove any foreign substances
from the paint (Fig. C).
NOTE: Do not tighten the canister too
much by hand, as doing so may break
the plastic canister.
2. Use the wrench provided and tighten the
nut (1) securely to ensure paint does not
leak (Fig. B).
The Gravity-feed Spray Gun has a pattern
adjusting knob (1), a paint adjusting knob (2),
and an air adjusting knob (3) that are used to
obtain the desired pattern, to control the output
volume of paint, and to obtain fine atomization,
respectively (Fig. D).
1. Attach the empty canister (1) to the
spray gun by lining up the threads then
holding the gun stationary and twisting
the canister clockwise until snug (Fig. A)
4. Fill the canister 3/4 with paint.
5. Plug in compressor, turn it on set the pressure
regulator to 40 PSI, attach one end of the air
hose to the compressor and the other end of
the air hose to the spray gun. The spray gun is
now ready for use.
6. After connecting the spray gun to the air supply, ensure the fluid cap,
canister, and air hose are tightly connected to the Air-powered Gravity feed Spray Gun.
7. Use a piece of cardboard or other scrap material as a target for trial
spraying and adjust for desired spray pattern.
8. Test the consistency of the paint by making a few strokes on a cardboard
target. If the stroke appears to be very thick, add a small amount of thinner.
Rotate the paint adjusting knob clockwise to reduce the output volume of
paint and rotate the knob in a counter-clockwise direction to increase the
output volume of paint.
Rotate the air adjusting knob clockwise to reduce the output volume of air
and rotate the knob in a counter-clockwise direction to increase the output
volume of air.
Rotate the pattern adjusting knob in a clockwise direction to form a circular
spray pattern and rotate the knob in a counter-clockwise direction to form an
elliptical spray pattern.
PATTERN ADJUSTMENT
PAINT ADJUSTMENT
AIR VOLUME ADJUSTMENT
Adjustments
Paint filling
• Mixing and thinning of paint should be performed in
accordance with the paint manufacturer’s instructions.
Most materials readily spray if thinning is properly
performed.
Fig. A
Fig. B
Fig. D
Fig. C
• Do not exceed the thinning recommendations of the
paint manufacturer. Failure to comply may result in
moderate injury or damage to equipment.
CAUTION!
Potential hazard that may result in injury or damage to
equipment.
NOTE: Always thin the paint with care.
TM
Page 8
1514
model no. 058-9373-2 | contact us 1-888-670-6682
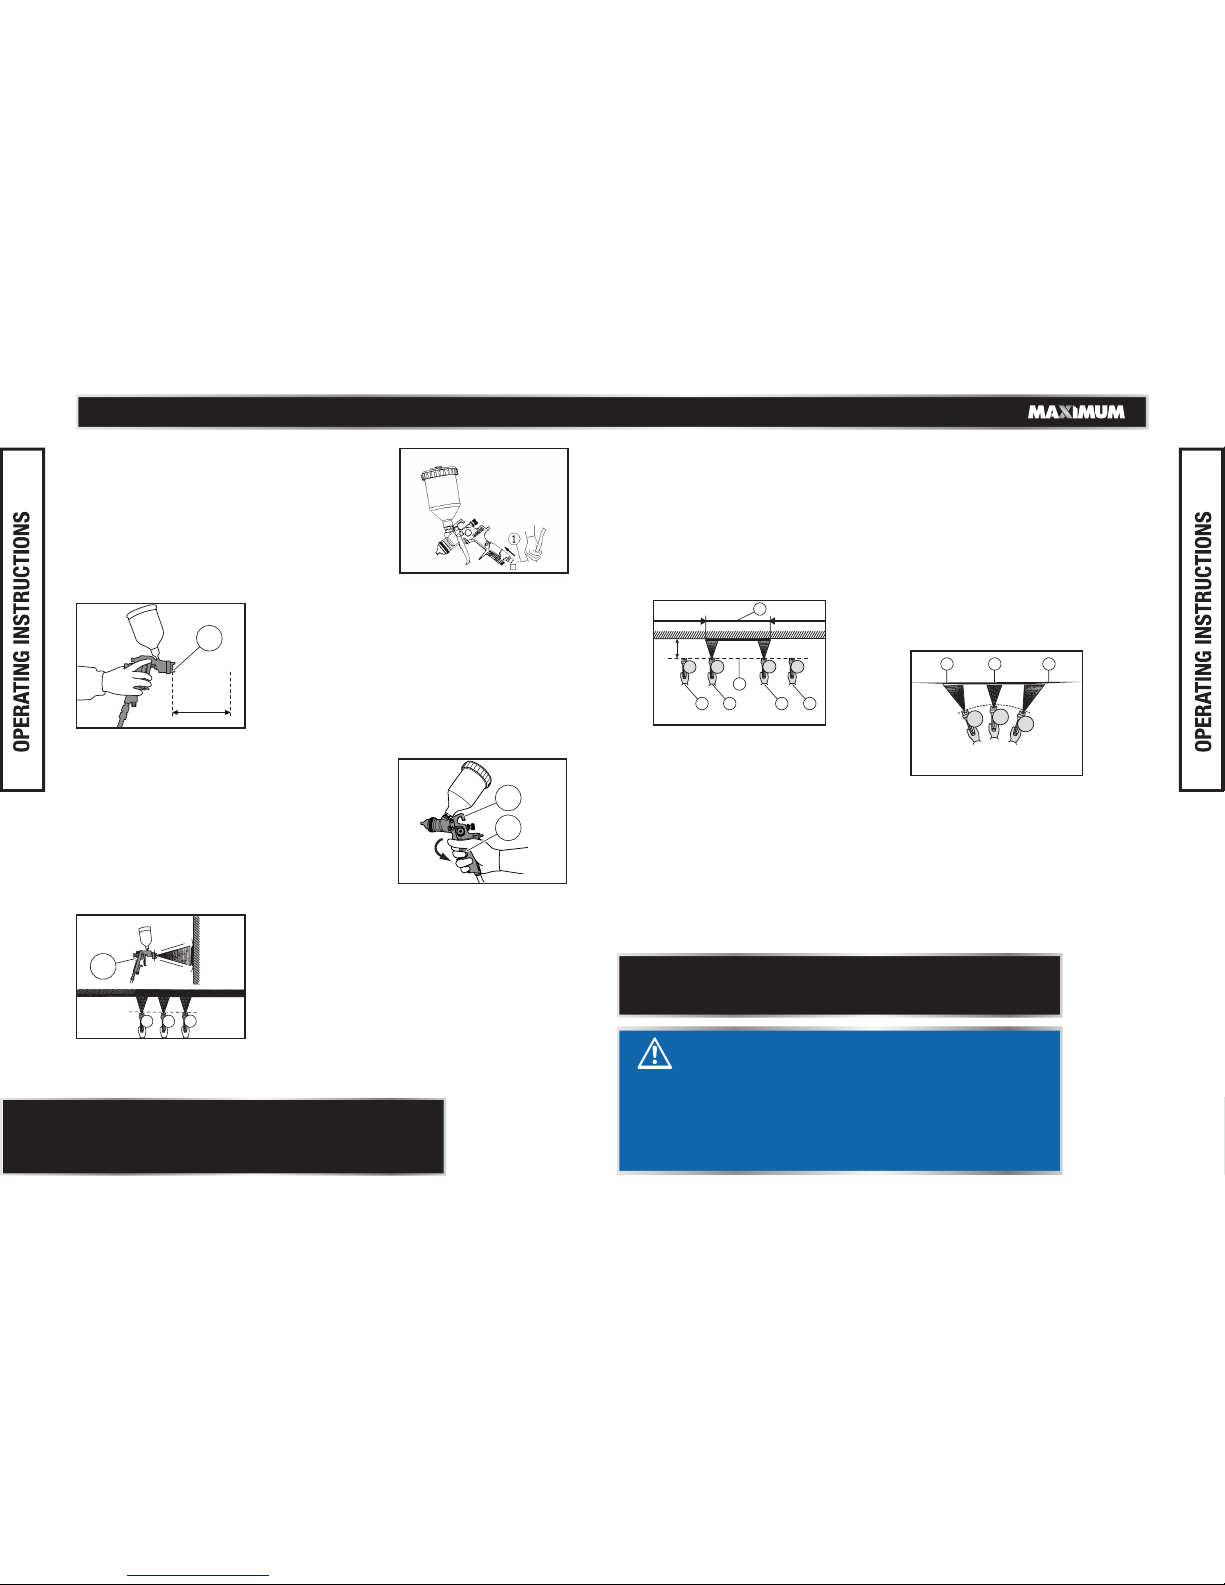
1. Plug in compressor, turn it on, set the
pressure regulator to 40 PSI, attach one
end of the air hose to the compressor
and the other end of the air hose (1) to
the air tool (Fig. E).
OPERATION
3. Squeeze the trigger (1) of the spray gun
(2). Start moving the gun before pressing
the trigger and release the trigger before
stopping the gun movement at the end
of each stroke. This procedure will blend
each stroke with the next without
overlap or unevenness (Fig. G).
1
2
4. Move the gun (1) at a constant pace in a
back and forth parallel direction,
maintaining a uniform distance from the
surface to be painted (Fig. H).
5. Repeat the strokes until a uniform
coating is formed.
1
NOTE: Do some practice sprays to check
and adjust the spray pattern and gun set
up, using a spare surface (scrap piece of
metal).
2. Hold the gun (1) so that the nozzle is
approximately 6" to 12" (15 to 30 cm)
from the work surface, perpendicular
to the spraying area (Fig. F).
6" - 12"
1
NOTE: Use a piece of cardboard as a shield to capture
the loss of s pray paint at the ends of the workpiece to
protect other surfaces from being painted.
NOTE: Two proper and uniform thin coats of paint, rather
than one thick layer, will yield better results and reduce the
chance of runs.
• The speed of the stroke, the distance from the work surface,
and the setting of the paint adjusting knob vary the amount
of paint being applied.
Always move the gun in a
parallel direction.
DON’TS
Do not press the trigger with the gun
at an inclined or angled position.
Do not stop the sprayer movement in
between strokes, as this will cause a
build-up of paint and result in runs.
1. Improper/thin coating region
2. Uniform/thick coating region
1. Uniform coating region
2. Stroke starting position
3. Trigger pressing position
4. Trigger releasing position
5. Stroke stopping position
6. Gun movement path
DO’S
图片
2 3 4 5
6
1
6" - 12"
图片
121
CAUTION!
Potential hazard that may result in moderate injury
or damage to equipment.
• Do not fan the gun while painting. This will cause a
build-up of paint in the c entre of the stroke and an
insufficient coating at the ends. Failure to comply
may result in moderate injury or damage to
equipment.
Fig. E
Fig. F
Fig. G
Fig. H
TM
Page 9
CAUTION!
Potential hazard that may result in injury or
damage to equipment.
• Incomplete cleaning could cause function failures and
a degradation of the tool. Failure to comply may
result in injury or damage to equ ipment.
WARNING!
Potential hazard that could result in serious injury or
loss of life.
• Do not use metal or other objects that could damage
the holes in nozzle and cap.
• Never immerse the spray gun completely in solvent.
• Do not use components or parts that are not
recommended. Failure to comply could lead to serious
injury or loss of life.
General inspection
free movement
Trigger, spring,
safety mechanism
None X
Worn or broken
parts
X X
Replace worn or
broken parts
X
Lubrication See below
Pneumatic
X
MAINTENANCE
REQUIRED
DESCRIPTION
TOOLS OR
MATERIALS
REQUIRED
MAXIMUM SERVICE INTERVAL
Each use or
every 2 hrs
Monthly
As
needed
In-depth inspection
tool oil
• Remove the remaining paint by pouring it into another container.
• Disassemble the Air-powered Gravity-feed Spray Gun. Ensure that
the needle is removed before disassembling the nozzle to avoid
damage to the housing of the nozzle closure.
• Clean all the paint passages, nozzle, and other components using a
brush soaked in cleaning solvent.
• Reassemble the spray gun and spray a small quantity of solvent to
remove any residues in the paint passages.
1716
NOTE: When it is hard to get rid of the stuck paint, wash it
after soaking it in lacquer thinner.
CAUTION!
Potential hazard that may result in injury or
damage to equipment.
• Ensure that the needle is removed before
disassembling the nozzle, to avoid damage to
the nozzle closure housing. Failure to comply may
result in injury or damage to equipment.
Care of spray gun
The spray gun should be cleaned at every use.
The paint remaining inside the gun thickens and
may damage the inner components and
mechanism of the gun.
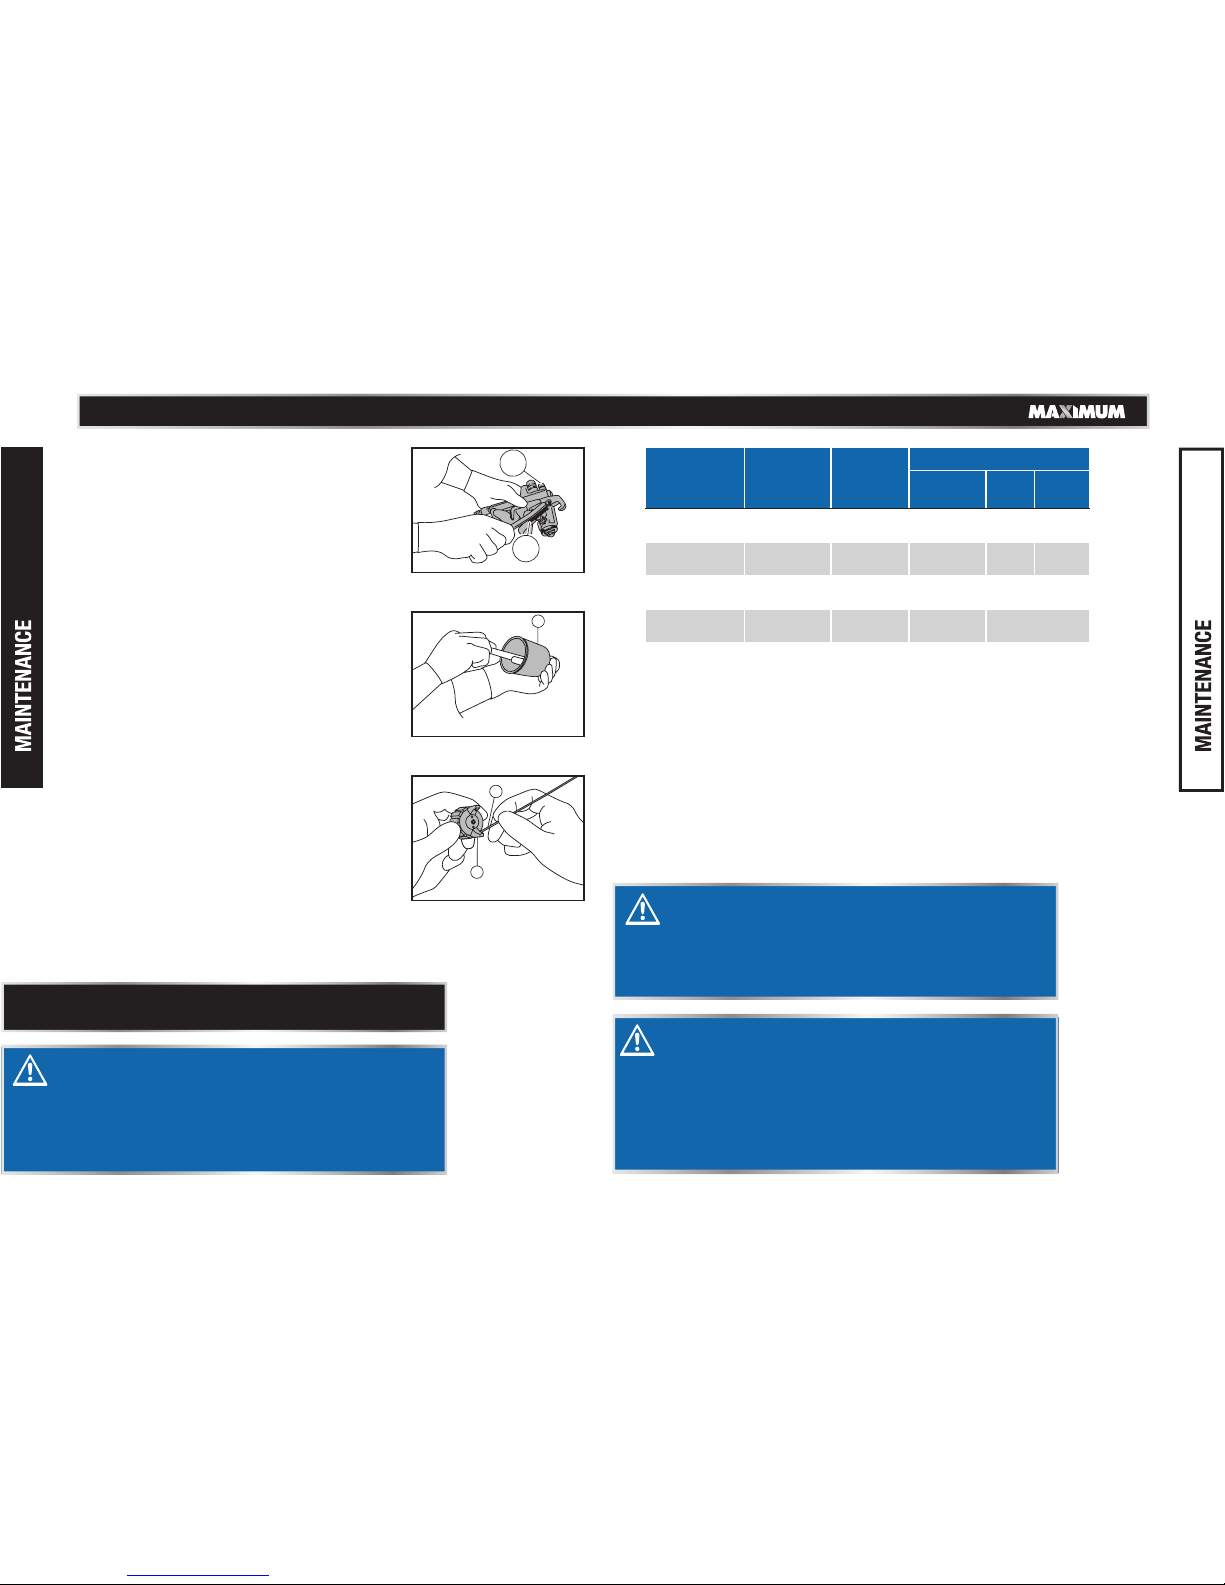
1. Cover the air cap with a cloth and pull the
trigger. The air that is blown out of the paint
nozzle tip enters the paint passage and
cleans the inside of the gun.
2. Discard the paint remaining in the canister and
add some thinner for washing and to blow out
the gun.
3. Clean the inside and outside of the spray gun
(1) with a brush (2) (Fig. I).
4. Clean the inside of the paint canister (1) (Fig. J).
5. Remove and clean the inside and outside of the
air cap with a brush soaked in cleaning solvent.
Note: Wash the air cap (1) carefully without
causing any damage to its air hole as this would
affect the spraying pattern. Never use a steel
wire or wire brush for cleaning. If the air hole is
clogged, clean it using a wooden toothpick (2)
(Fig. K).
1
2
1
1
2
Washing procedure
Fig. I
Fig. J
Fig. K
model no. 058-9373-2 | contact us 1-888-670-6682
TM
Page 10
1918
WARNING!
Potential hazard that could result in serious injury or
loss of life.
• If any of the following symptoms appear while the
tool is in use, turn it off and disconnect it from the
air supply immediately. Failure to heed this warning
could result in serious personal injury.
• Disconnect electrical plug and air supply from the
tool before making any adjustments.
• Repairs must be performed by a qualified service
technician only.
Troubleshooting
The following chart lists common issues and solutions. Please read it
carefully and follow all instructions closely.
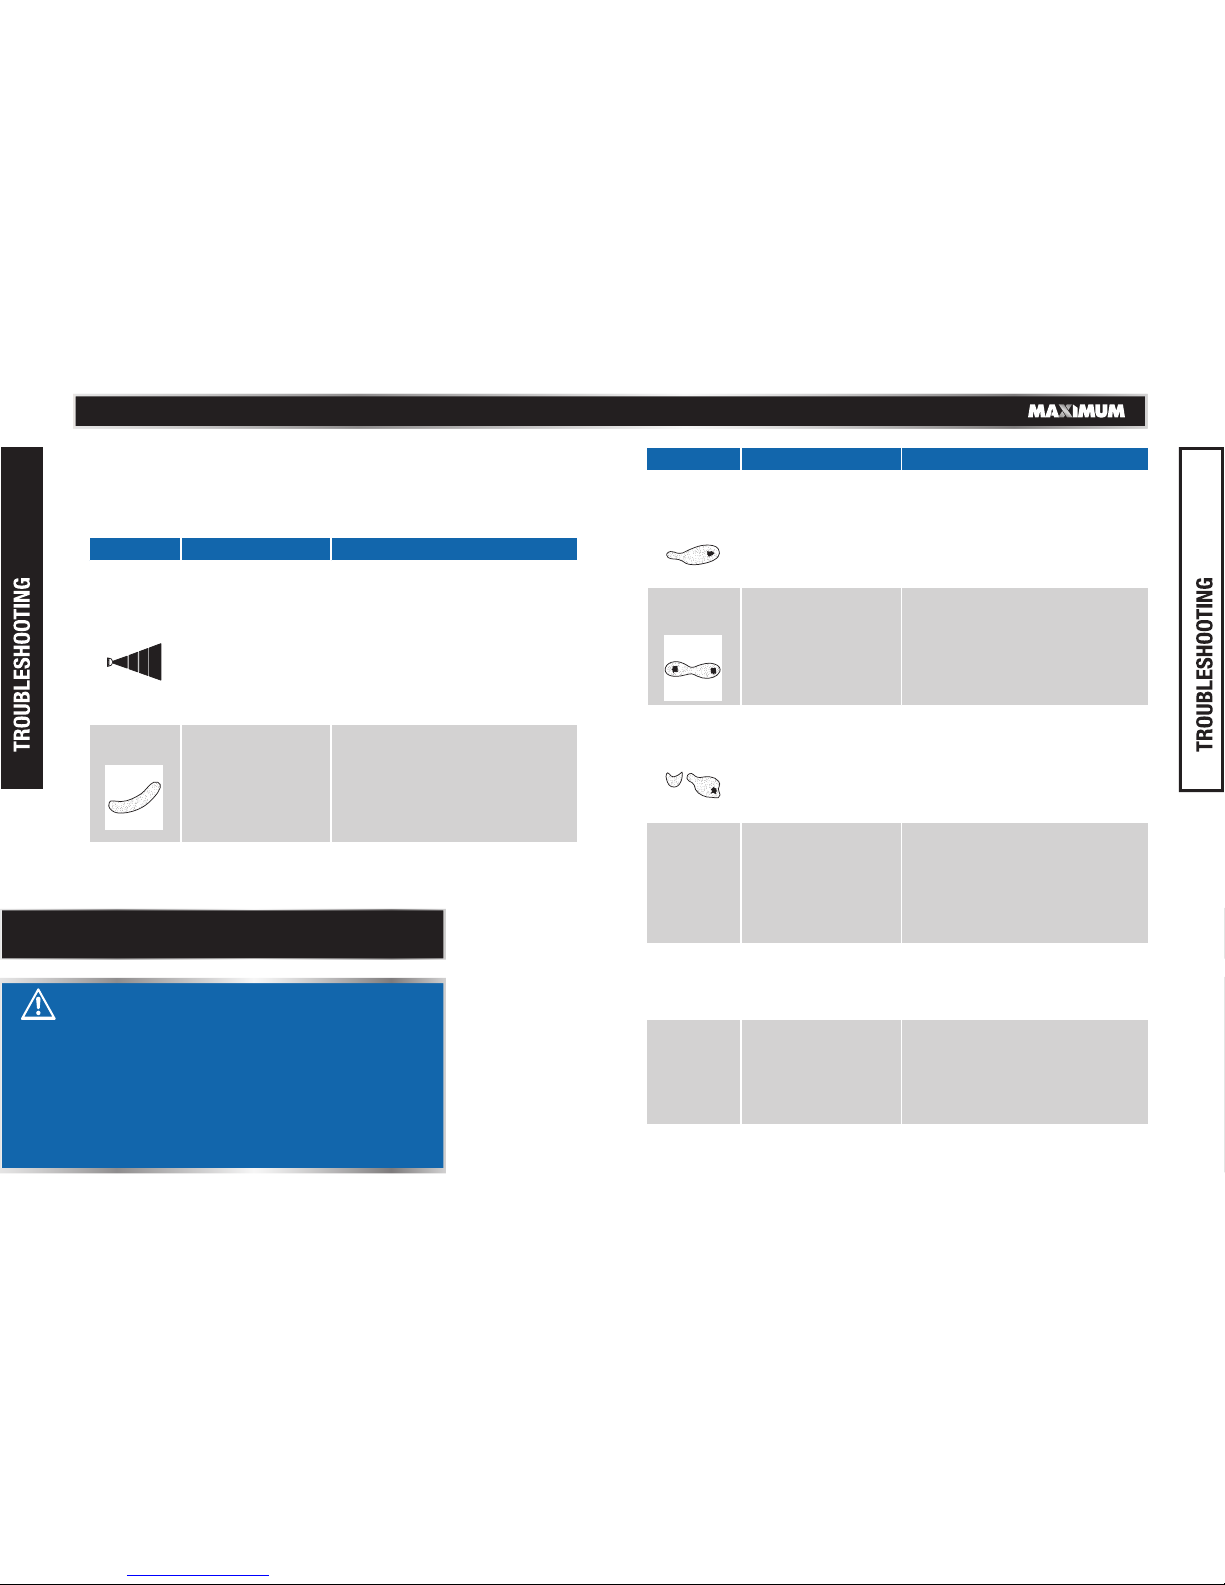
Fluttering or
spitting
1. Paint level is too low.
2. Container is tipped
too far.
3. Fluid inlet
connection is loose.
4. Fluid tip/seat is
loosened or damaged.
5. Fluid needle packing
nut is dry or loose.
6. Air vent is clogged.
PROBLEM POSSIBLE CAUSES SOLUTIONS
1. Add paint inside the container.
2. Hold the container in upright
position.
3. Tighten the fluid connection.
4. Adjust or replace the fluid
tip/seat.
5. Lubricate and/or tighten the nut.
6. Clear the vent hole.
NOTE: For further repair information, please
call 1-888-670-6682.
PROBLEM POSSIBLE CAUSES SOLUTIONS
Centre of
pattern is
too narrow
Paint is too thin or
insufficient
quantity.
Atomization air
pressure is too high.
Regulate paint viscosity.
Reduce air pressure.
Width of
spray pattern
is too narrow
Arc-shaped
pattern
Paint is too thick.
Atomization air
pressure is too low.
Regulate paint viscosity.
Increase air pressure.
Fluid leakage
from packing
nut
1. Packing nut is loose.
2. Packing nut is worn
or dry.
Tighten, but do not restrict the
needle movement.
Replace or lubricate
(non-silicone oil).
Fluid nozzle is worn
or loose.
Paint has built up on
air cap.
1. Tighten or replace fluid nozzle.
2. Remove obstructions from holes,
but don’t use metal objects to
clean it.
Pattern is not
spread
uniformly.
Paint has built up on
air cap.
Fluid nozzle is dirty
or worn.
Clean or replace air cap.
Clean or replace fluid nozzle.
Air leakage
from air cap
when trigger
is not pressed.
Air valve stem is stuck.
Air valve or seat is
contaminated.
Air valve or seat is
worn or damaged.
Air valve spring is
broken.
Valve stem is bent.
Lubricate the air valve stem.
Clean the air valve or seat.
Replace the air valve or seat.
Replace the air valve spring.
Replace the valve stem.
Excessive
overspray
Atomization pressure
is too high.
Work surface is too
far.
Improper stroking
(arcing, gun motion
are too fast).
1. Reduce the air pressure.
2. Adjust to proper distance.
3. Move at moderate pace, parallel
to work surface.
No spray No pressure in gun.
2. Fluid control is not
properly opened.
3. Fluid is too thick or
heavy.
Check air lines.
Open the fluid control.
Thin the fluid or change to
pressure feed system.
1.
2.
1.
2.
1.
2.
1.
2.
1.
2.
1.
2.
1.
2.
model no. 058-9373-2 | contact us 1-888-670-6682
TM
1.
2.
3.
4.
5.
1.
2.
3.
4.
5.
1.
2.
3.
1.
2.
3.
1.
2.
1.
Page 11
model no. 058-9373-2 | contact us 1-888-670-6682
No. Qty No. Qty
Description Description
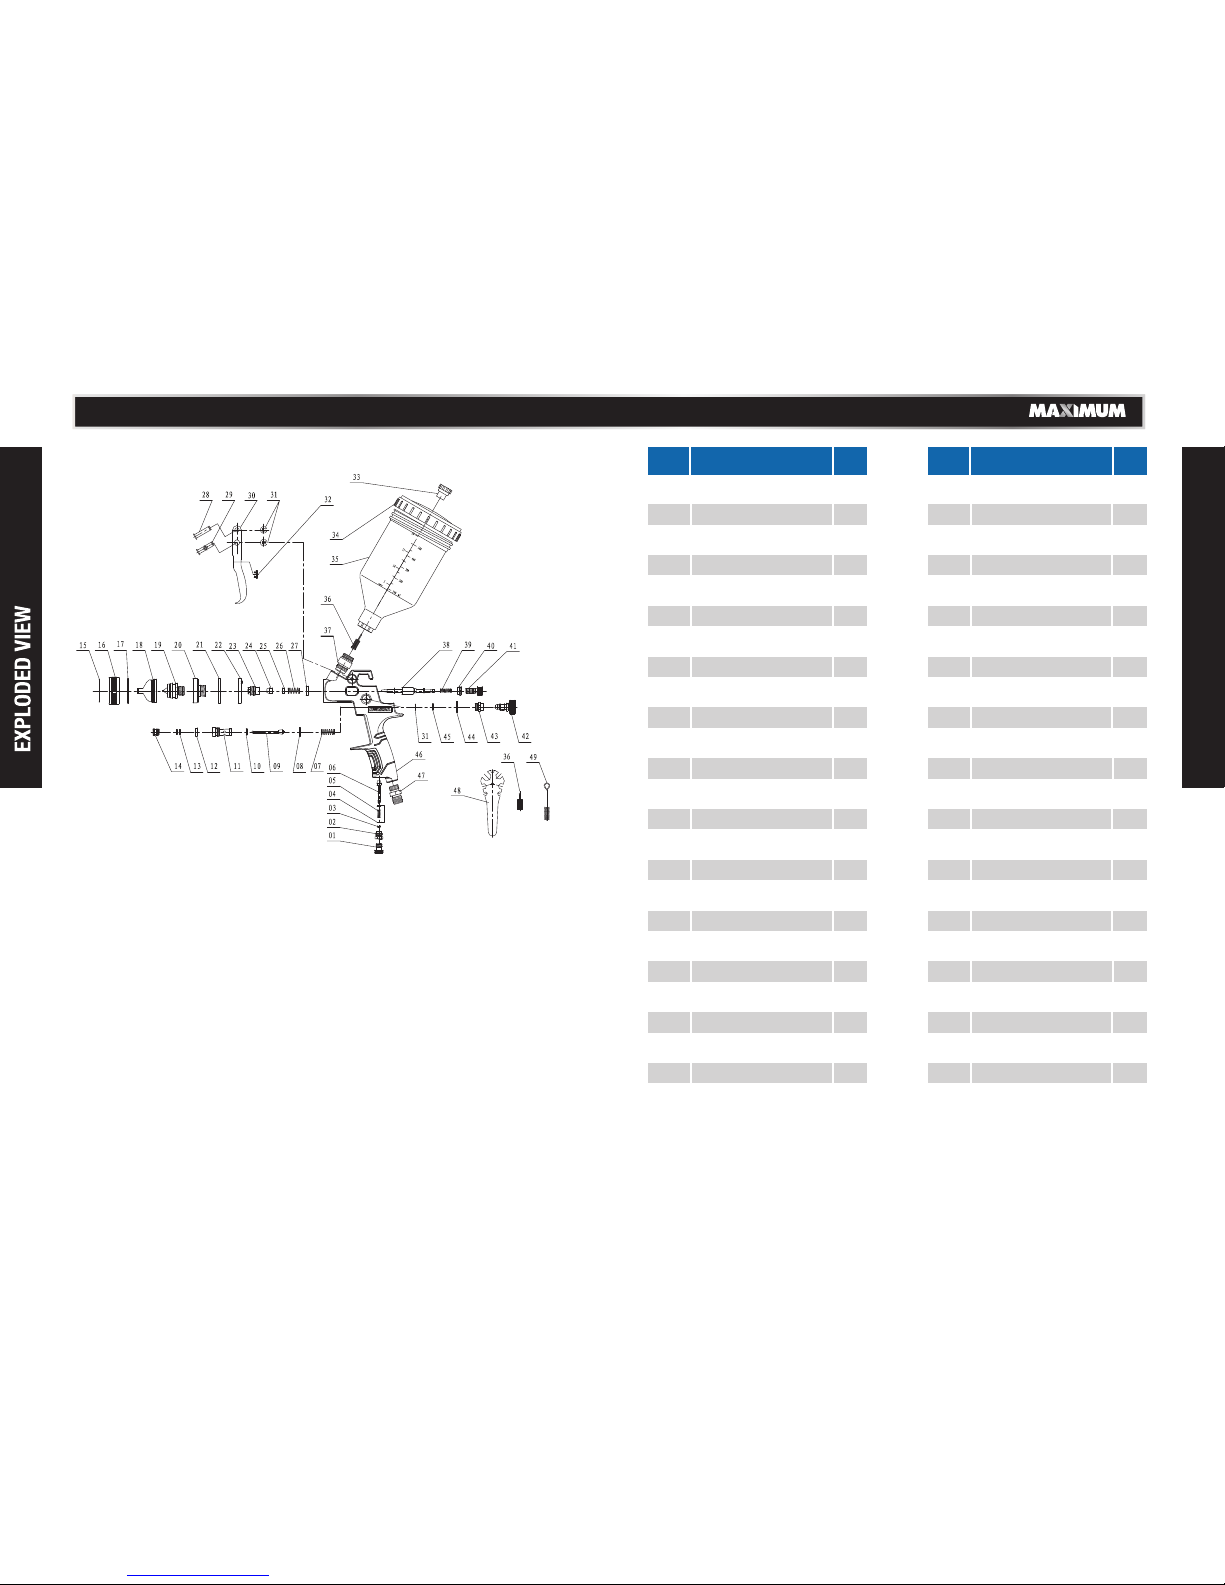
PARTS LIST
2120
1
2
3
4
5
6
7
8
9
10
11
12
13
14
15
16
17
18
19
20
21
22
23
24
25
If any parts are missing or damaged, or if you have any questions, please
call 1-888-670-6682
1
1
1
2
1
1
1
1
1
1
1
1
2
1
1
1
1
1
1
1
1
1
1
1
1
26
27
28
29
30
31
32
33
34
35
36
37
38
39
40
41
42
43
44
45
46
47
48
49
Air adjusting screw
Air adjusting knob
O-ring 2.5 x 2.1
Washer
Air inlet spring
Air inlet valve
Switch spring
Air valve body
Switch knob
O-ring 8.5 x 1.2
Switch seat
Foam washer
Washer
Direction screw
Snap ring
Round nut
Fluid cap washer
Atomizer
Fluid nozzle
Fluid nozzle joint
Washer
Joint washer
Direction screw
Needle sealing washer
Small washer
1
1
1
1
1
3
1
1
1
1
2
1
1
1
1
1
1
1
1
1
1
1
1
1
Compression spring
Big washer
Trigger pin I
Trigger pin II
Trigger
Snap retainer
Trigger washer
Ventilator head
Canister cover
Canister
Filter
Fluid inlet plug
Fluid adjusting needle
Fluid needle spring
Joint
Fluid adjusting knob
Pattern adjusting screw
Pattern adjusting knob
Pattern adjusting screw
O-ring 6 x 2
Gun body
Air inlet plug
Hex wrench
Brush
TM
Page 12
23
22
model no. 058-9373-2 | contact us 1-888-670-6682
TM
This MAXIMUM product is guaranteed for a period of 5 years
from the date of original retail purchase against defects in
workmanship and materials only and is subject to the following
components:
a) Component A: The carrying case is guaranteed for a period of
1-year from the date of original retail purchase against defects in
workmanship and materials.
These warranties are subject to the following conditions and
limitations:
Subject to the conditions and limitations described below, this product,
if returned to us with proof of purchase within the stated warranty
period and if covered under this warranty, will be repaired or replaced
(with the same model, or one of equal value or specification), at the sole
discretion of the Maximum Canada authorised repair centre (“Service
Provider”). We will bear the cost of any repair or replacement and any
costs of labour relating thereto.
A bill of sale verifying the purchase and purchase date must be provided;
Defects in workmanship and material to be assessed and determined by
the Service Provider;
This warranty will not apply to any product or part thereof which is worn
or broken or which has become inoperative due to abuse, misuse,
accidental damage, neglect or lack of proper installation, operation or
maintenance (as outlined in the applicable owner’s manual or operating
instructions);
This warranty does not apply to normal wear and tear or to expendable
parts or accessories (including drill bits and saw blades) that may be
supplied with the product that by their nature have a limited life span
and are expected to become inoperative or unusable after a reasonable
period of use;
This warranty will not apply to routine maintenance and consumable
items such as, but not limited to atomize,needle,nozzle,springs, rubber
o-rings, tune-ups or adjustments;
This warranty excludes the following components that may accompany
your product:
(1) The carrying case, which is only for a period of 1-year from the date of
original retail purchase against defects in workmanship and materials.
(2) Accessories, including drill bits and saw blades, which do not carry a
warranty of any kind.
This warranty will not apply where damage is caused by repairs made or
attempted by others (i.e. persons not authorized by the manufacturer),
and any such unauthorized repairs or attempted repairs shall void this
warranty in its entirety;
FURTHER, THE WARRANTIES SET OUT HEREIN ARE IN LIEU OF ALL OTHER
WARRANTIES OR CONDITIONS, WHETHER EXPRESS, IMPLIED OR
STATUTORY (INCLUDING SUCH AS ARISE UNDER THE SALE OF GOODS
ACT OR THE INTERNATIONAL SALE OF GOODS ACT), ARISING OUT OF A
COURSE OF DEALING OR USAGE OF TRADE OR OTHERWISE, INCLUDING,
SUBJECT TO APPLICABLE LAW, ANY IMPLIED WARRANTIES OR
CONDITIONS OF MERCHANTABILITY, MERCHANTABLE QUALITY, FITNESS
OR ADEQUACY FOR A PARTICULAR PURPOSE OR USE, AND ALL OTHER
SUCH WARRANTIES ARE EXPRESSLY DISCLAIMED BY THE RETAILER
AND MANUFACTURER.
a)
b)
c)
d)
e)
f)
g)
This warranty will not apply to any parts other than original parts,
except to the extent that the retailer or manufacturer or persons
authorized by either of them have repaired or replaced them;
This warranty will not apply to any product that was sold to the original
purchaser as a reconditioned or refurbished product (unless otherwise
specified in writing);
This warranty will not apply to any product or part thereof if any part
from another manufacturer is installed therein or any repairs or
alterations have been made or attempted by unauthorized persons;
This warranty will not apply to normal deterioration of the exterior finish,
such as, but not limited to, scratches, dents, paint chips, or to any
corrosion or discolouring by heat, abrasive and chemical cleaners; and
This warranty will not apply to component parts sold by and identified as
the product of another company, which shall be covered under that
product manufacturer’s warranty, if any;
Any products replaced by the retailer in attempt to fulfill warranty
obligations is subject to the original product warranty conditions and
related time period as initiated by the original date of purchase; if
product is purchased in Quebec, the warranty term will be extended for
a period equal to the time during which the Quebec retailer possesses
the product in attempt to fulfill warranty obligations; replaced product
will not default to new product warranty conditions; and
The retailer and manufacturer’s sole obligation and the purchaser’s sole
remedy under this warranty shall be as set out herein. The warranties
contained herein are not transferable and are given only to the purchaser.
h)
i)
j)
k)
l)
m)
n)
Page 13
25
24
model no. 058-9373-2 | contact us 1-888-670-6682
TM
Additional Limitations
This warranty applies only to the original purchaser and may not be transferred.
This warranty applies for a period of 5 years from the date of original retail
purchase, as indicated on the bill of sale.
Neither the retailer, Maximum Canada, nor the manufacturer shall be liable for
any other expense, loss or damage, including, without limitation, any indirect,
incidental, consequential or exemplarydamages arising in connection with the
sale, use or inability to use this product.
Under no circumstances shall the retailer, Maximum Canada, or manufacturer
be liable to the purchaser for any claim for (a) indirect, special, punitive,
incidental, exemplary, or consequential damages, (b) compensation for loss of
profits, anticipated revenue, savings or goodwill, or other economic loss of the
purchaser, (c) exemplary, aggravated or punitive damages howsoever incurred,
(d) contribution or set-off in respect of any claims against the purchaser, (e)
any damages whatsoever relating to third party products or services or the
purchaser’s materials, or (f) any damages whatsoever relating to interruption,
delays, errors or omissions; in each case under any theory of law or equity,
arising out of or in any way related to this warranty, even if advised of the
possibility thereof. Notwithstanding any provision herein or entitlement of the
purchaser at law, in equity or otherwise, in no event shall the liability of the
retailer or manufacturer under this warranty, whether in contract, tort, product
liability or otherwise, exceed, in the aggregate, the amount paid by the purchaser
to the retailer for the product to which this warranty applies.
*Notice to Consumer
This warranty gives you specific legal rights, and you may have other rights,
which may vary from province to province. The provisions contained in this
warranty are not intended to limit, modify, take away from, disclaim or exclude
any statutory warranties set forth in any applicable provincial or federal
legislation.
In addition to the 5-Year Limited Warranty, this MAXIMUM product is
covered by our:
1-Year Repair Warranty
Maximum Canada will maintain this product and replace critical parts
which have worn beyond reasonable use through normal use of such
product, any time during the first year after purchase.
The following are excluded from this 1-Year Repair Warranty:
a)Missing or damaged parts or components that are a result of abuse
or misuse;
b)Any wear and tear to non-critical parts or accessories that do not
affect the core function of the product.
90-Day Satisfaction Guarantee
If you are not completely satisfied with the performance of your
MAXIMUM product for any reason, you can return it within 90 days
from the date of purchase with proof of purchase for exchange or a
full refund.
Made in China,
Imported by
MAXIMUM Canada Toronto, Canada M4S 2B8
 Loading...