

Page 1
INSTRUCTION
MANUAL
Model no. 058-9342-6
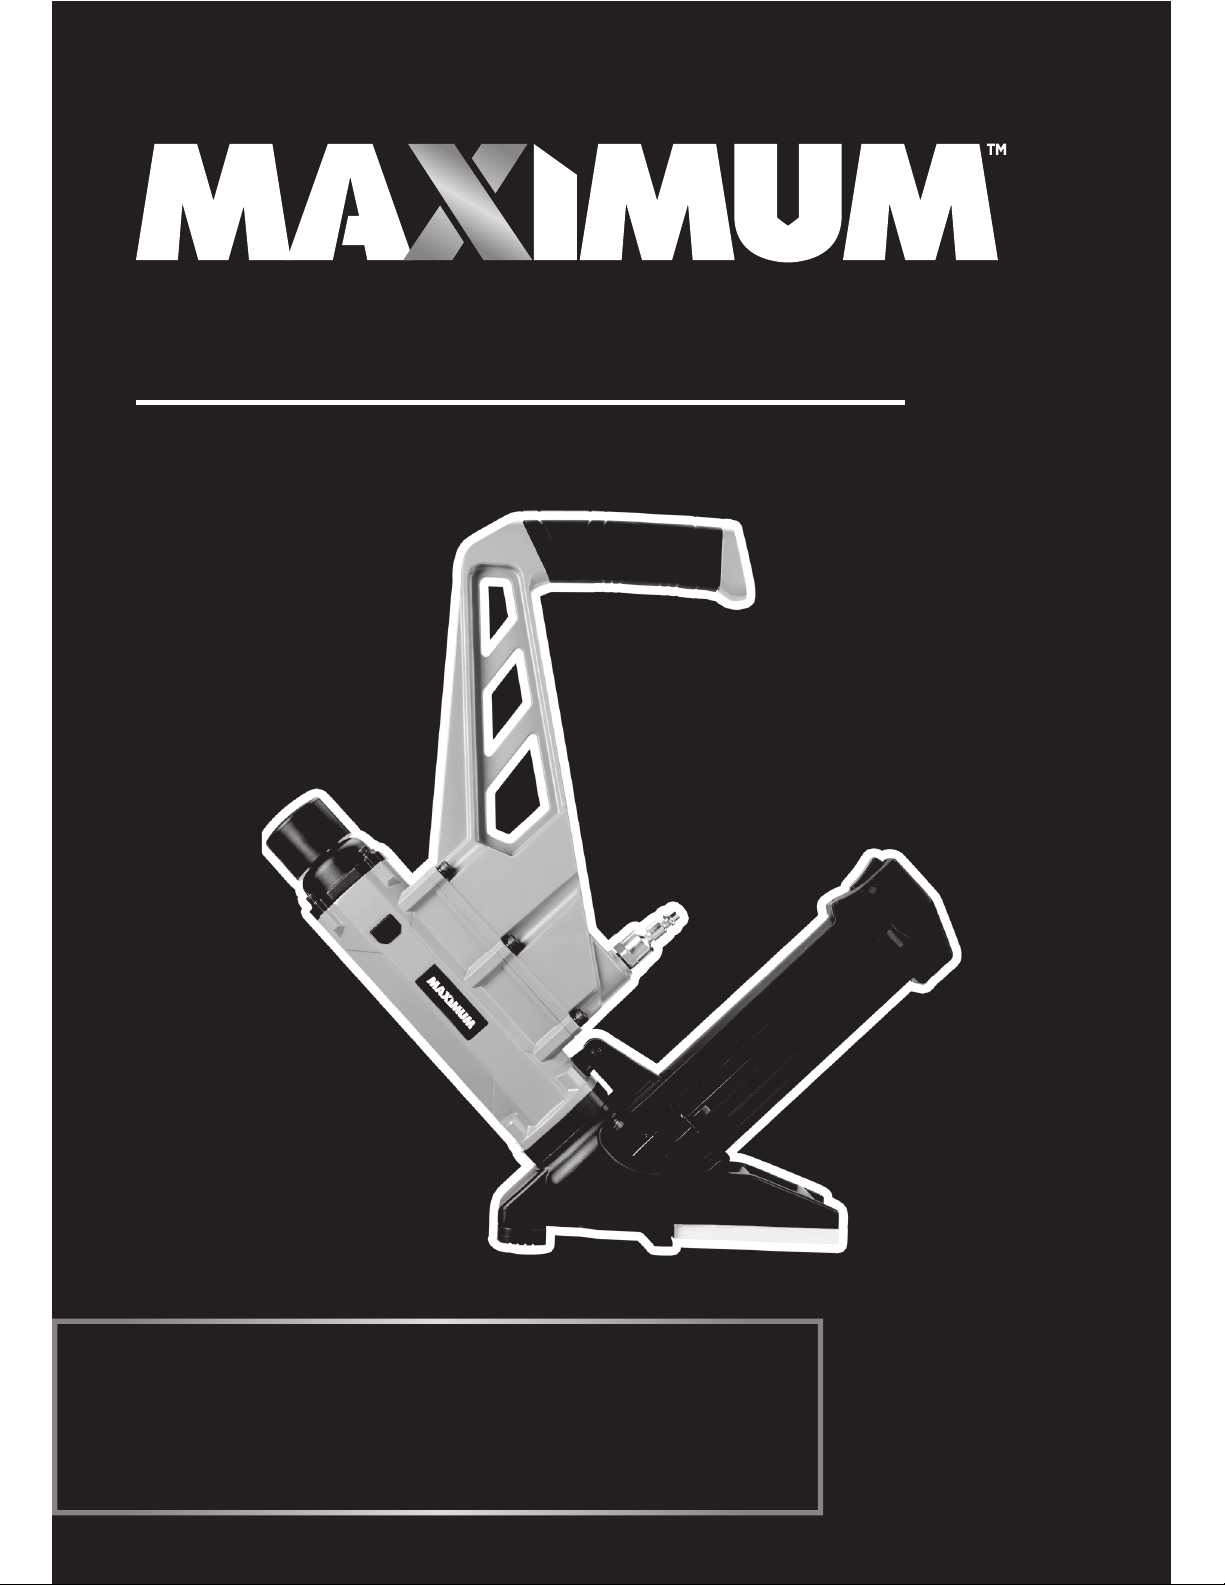
Air-powered Flooring Nailer
IMPORTANT:
Please read this manual carefully before
using this product, and save it for reference.
2-in-1
Page 2
TECHNICAL SPECIFICATIONS
SAFETY GUIDELINES
KEY PARTS DIAGRAM
TECHNICAL INFORMATION
TYPES OF NAILS
OPERATING INSTRUCTIONS
MAINTENANCE
TROUBLESHOOTING
EXPLODED VIEW
PARTS LIST
WARRANTY
4
5
10
11
14
15
19
20
22
23
24
TABLE OF CONTENTS
NOTE:
If any parts are missing or damaged, or if you
have any questions, please call our toll-free helpline at
1-888-670-6682.
SAVE THESE INSTRUCTIONS
This manual contains important safety and operating instructions. Read all instructions and follow
them with use of this product.
TM
Page 3
54
model no. 058-9342-6 | contact us 1-888-670-6682
NOTE: The word “Note” is used to inform readers of
something they need to know about the tool.
CF: Cubic Feet (the volumetric flow rate of air corrected to
standardized conditions of temperature and pressure).
NPT: National Pipe Thread.
TECHNICAL SPECIFICATIONS
This manual contains information that relates to PROTECTING PERSONAL
SAFETY and PREVENTING EQUIPMENT PROBLEMS. It is very important
to read this manual carefully and understand it thoroughly before using
the product. The symbols listed below are used to indicate this
information.
These precautions are intended for the personal safety of the user and
others working with the user.
Please take time to read and understand them.
Make sure you read and understand this manual before using this tool.
Make sure other users read and understand this manual before they use
the tool.
DANGER!
WARNING!
CAUTION!
PERSONAL SAFETY
Potential hazard that will result in serious
injury or death.
Potential hazard that could result in
serious injury or death.
Potential hazard that may result in
injury or damage to equipment.
MAGAZINE CAPACITY
FLOORING CLEATS
STAPLE CROWN
OPERATING PRESSURE
MAXIMUM PRESSURE
AIR CONSUMPTION
AIR INLET
WEIGHT
60 staples; 100 L–cleats
16–gauge L–cleat (1 1/2–2")
1/2" (12.7 mm)
70 to 110 PSI (4.8 to 7.5 bar)
120 PSI (8.3 bar)
0.032 CF/CYCLE @ 90 PSI
1/4" – 18 NPT
10 lb 6 oz (4.7 kg)
STAPLES 15 1/2–gauge flooring staple
(1 1/2–2" with 0.495 widths
TM
SAFETY GUIDELINES
Page 4
76
model no. 058-9342-6 | contact us 1-888-670-6682
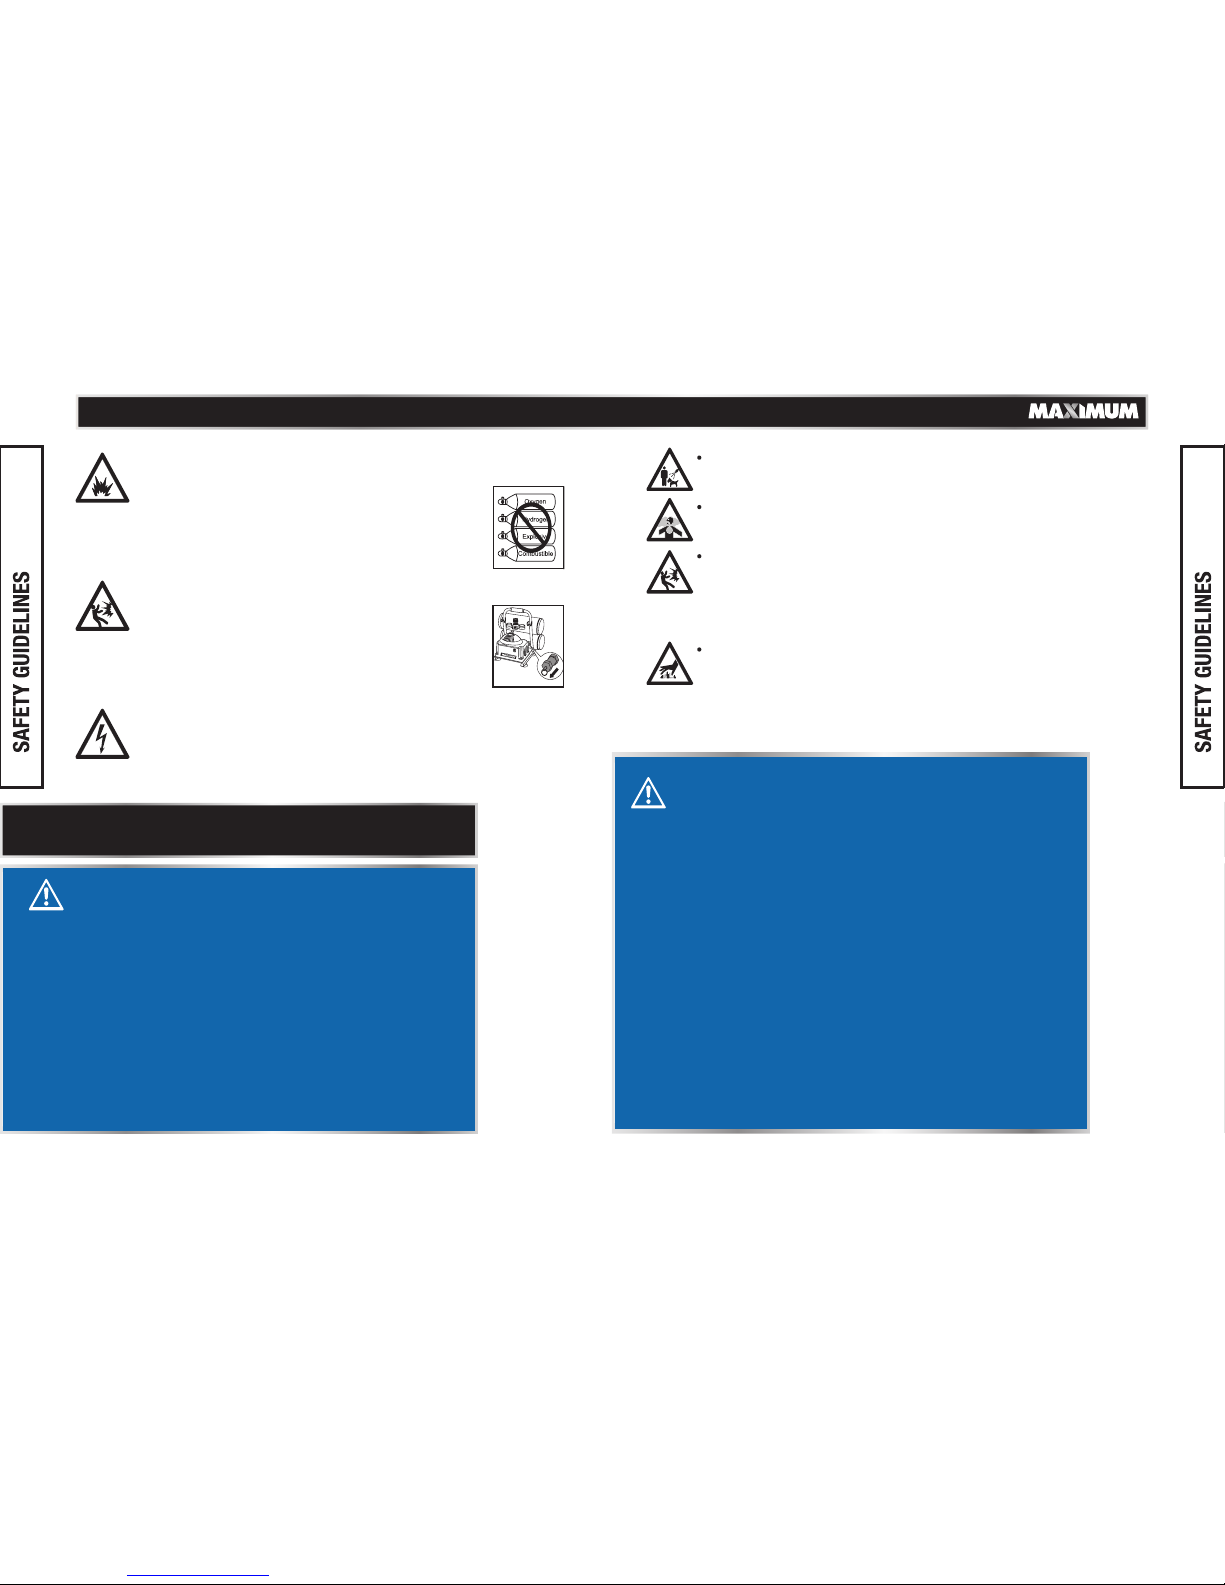
• Do not use oxygen or any other combustible or bottled gas to
power air-powered tools. Failure to observe this warning
can cause explosion and serious personal injury or
death. Use only the compressed air to power the
air-powered tools. Use a minimum of 25’ (7.6 m) of
hose to connect the tool to the compressor. Failure
to comply will result in serious injury or death.
• Risk of bursting. Make sure the regulator is adjusted
so that the compressor outlet pressure is set lower
than the maximum operating pressure of the tool.
Before starting the compressor, pull the ring on the
safety valve to make sure the valve moves freely.
Drain water from tank after each use. Do not weld
nor repair the tank. Relieve all pressure in the hose
before removing or attaching accessories.
• Risk of electric shock. Do not expose a compressor to rain.
Store it indoors. Disconnect the compressor from the power
source before servicing. The compressor must be grounded. Do
not use grounding adaptors.
Risk of personal injury. Do not direct compressed air from the
air hose toward the user or other people or animals.
Risk of inhalation. Never directly inhale the air produced by the
compressor.
Risk of bursting. Do not adjust the pressure switch or safety
valve for any reason. They have been preset at the factory for
this compressor’s maximum pressure. Tampering with the
pressure switch or the safety valve may cause personal injury
or property damage.
Risk of burns. The pump and the manifold generate high
temperatures. In order to avoid burns or other injuries, do not
touch the pump, the manifold or the transfer tube while the
compressor is running. Allow the parts to cool down before
handling or servicing. Keep children and pets away from the
compressor at all times.
NOTE: Carefully read and understand all the instructions in this
manual before using the tool. Ensure that the operator has read
and understood these instructions.
Keep children away from the work area. Do not allow
children to handle power tools.
Keep air hose away from heat, oil, and sharp edges.
Check air hose for wear before each use and ensure
that all connections are proper.
Always ensure that the workpiece is firmly secured
leaving both hands free to control the tool.
Always ensure that the tool has stopped before
putting it down after use, in the interest of safety
and to prevent possible damage to the tool or
personal injury or death.
Keep proper footing at all times in order to ensure
correct balance.
DANGER!
Potential hazard that will result in serious injury or
death.
TM
•
•
•
•
•
WARNING!
Potential hazard that could result in serious injury or
death.
Do not allow unskilled or untrained individuals to operate
the Air-powered 2-in-1 Flooring Nailer.
Do not use the Air-powered 2-in-1 Flooring Nailer for any task
other than that it is designed to perform.
Do not use the Air-powered 2-in-1 Flooring Nailer unless you
have been trained to do so. Only a qualified person should use
the tool.
Locate the compressor in a well-ventilated area for cooling, and
must be a minimum of 12” (30 cm) away from the nearest wall.
Protect the air hose and the power cord from damage and
puncture. Inspect them for weak or worn spots before every
usage, and replace them if necessary.
Always wear eye and hearing protection when using the air
compressor. Failure to do so may result in hearing loss.
Do not carry the compressor while it is running.
Do not operate the compressor if it is not in a stable position.
Do not operate the compressor on a rooftop or in an elevated
position that could allow the unit to fall or be tipped over.
Always replace a damaged gauge before operating the unit.
•
•
•
•
•
•
•
•
•
•
Page 5
98
model no. 058-9342-6 | contact us 1-888-670-6682
CAUTION!
Potential hazard that may result in moderate injury
or damage to equipment.
NOTE: Recycle unwanted materials rather than disposing of
them as waste. Sort the tools, hoses, and package into specific
categories and take them to the local recycling centre or
dispose of them in an environmentally safe way.
CAUTION!
Potential hazard that may result in moderate injury or
damage to equipment.
Disconnect the tool from the air supply and turn off
the compressor before performing any maintenance,
or changing accessories, when the tool is not in use,
when it is being handed to another person, and
when it is left unattended. Failure to comply may
result in injury or damage to equipment.
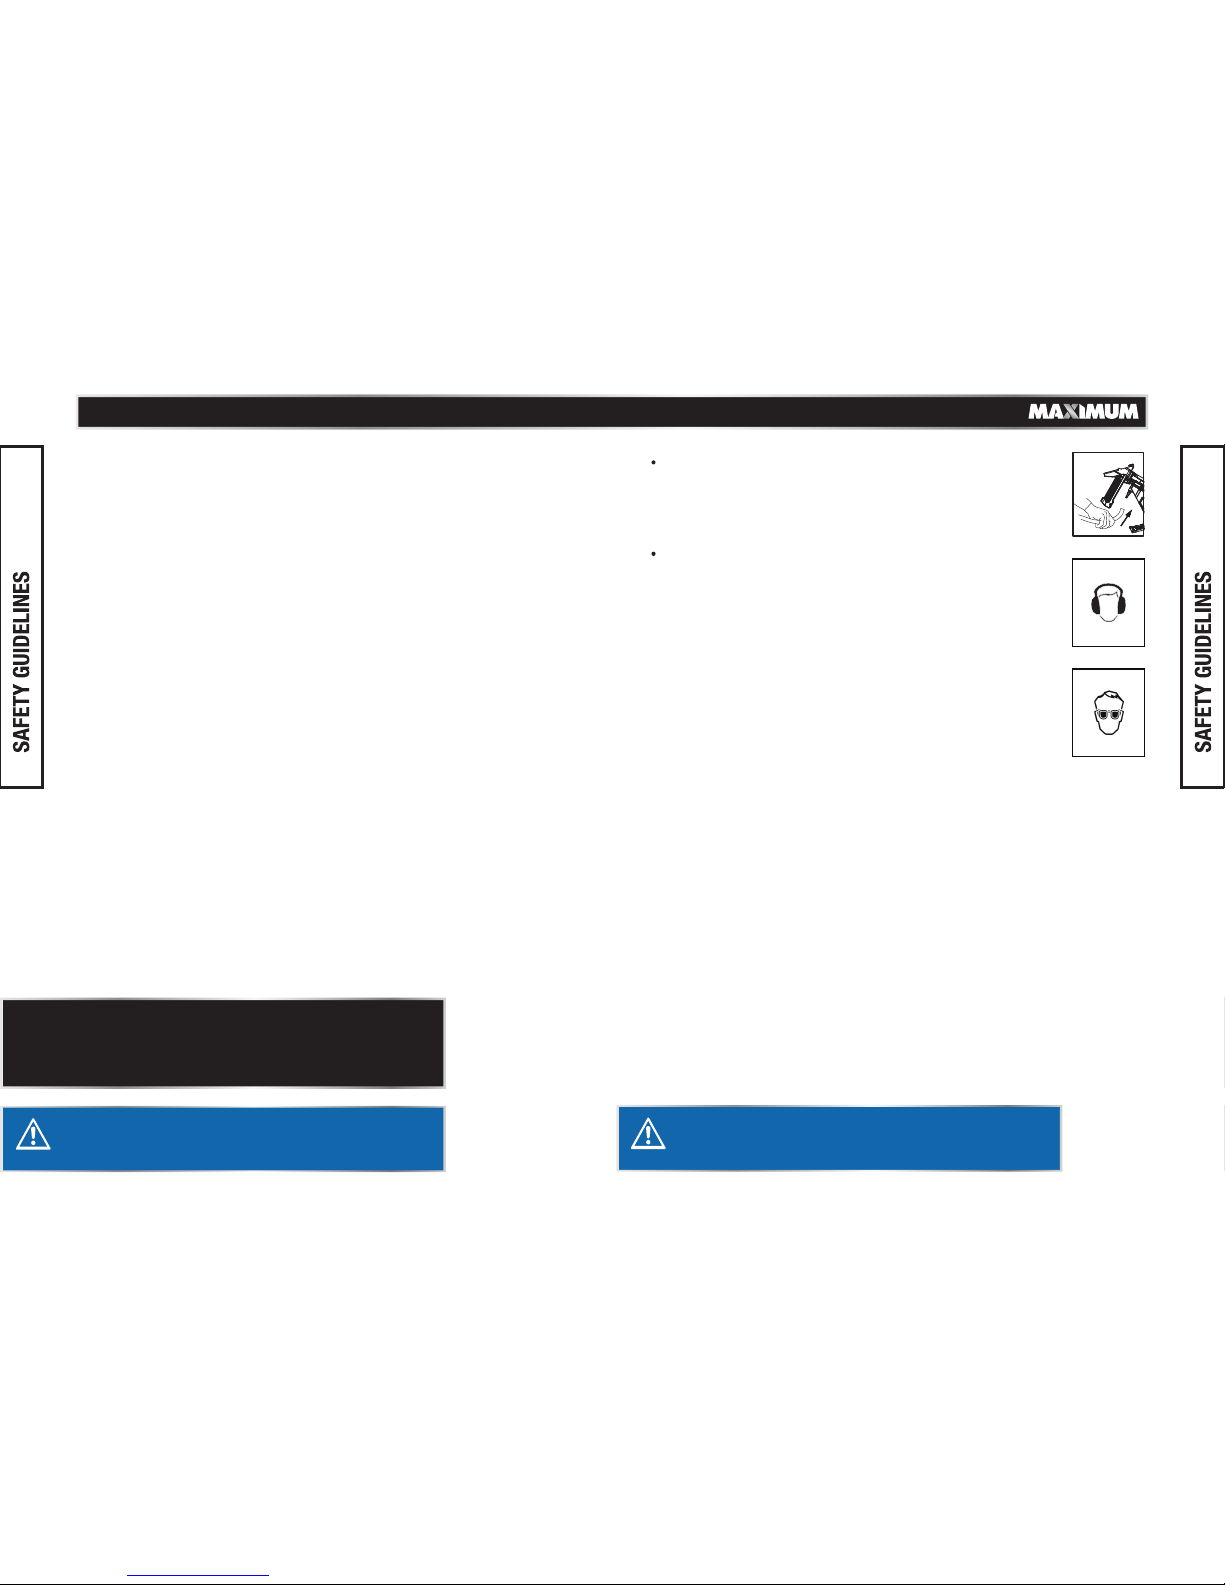
Use safety goggles and ear protection:
Wear safety glasses with side shields when
operating the tool/compressor and verify that
others in the work area are also wearing safety
glasses. Safety glasses must provide protection
from flying particles from the front and the sides.
Air-powered tools are loud and the sound can cause
hearing damage. Always wear ear protection to
prevent hearing damage and loss. Failure to comply
may result in injury.
Do not use while under the influence of alcohol,drugs
or medication.
• Always ensure that the tool has stopped before connecting to the
air supply.
• Do not wear watches, rings, bracelets, or loose hair or clothing when
using any air tool.
• Do not overload the tool. Allow the tool to operate at its optimum
speed for maximum efficiency.
• Do not use a tool that is leaking air, with missing or damaged parts,
or that requires repairs. Verify that all screws are securely tightened.
• For optimal safety and tool performance, inspect the tool before every
usage in order to ensure free movement of the trigger, safety mechanisms,
and springs.
• Always keep your air tool clean and lubricated. Daily lubrication is
essential to avoid internal corrosion and possible failures.
• Ensure the floor is not slippery and wear non-slip shoes. Floors should
be kept clean and clear.
• Always follow all workshop safety rules, regulations, and conditions when
using the Air-powered 2-in-1 Flooring Nailer.
• Carry the tool by the handle only. Do not carry the tool with a finger on
the trigger. Do not carry the tool by the hose, magazine or any other parts.
• Do not store the tool in a freezing environment to prevent ice formation
on the operating valves of the tool, as doing so may cause tool failure.
• Handling and storage of oil: Use with adequate ventilation. Avoid contact
of oil with eyes, skin, and clothing. Avoid breathing spray or mist. Store
in a tightly closed container in a cool, dry, well-ventilated area free from
incompatible substances.
TM
Page 6
1110
model no. 058-9342-6 | contact us 1-888-670-6682
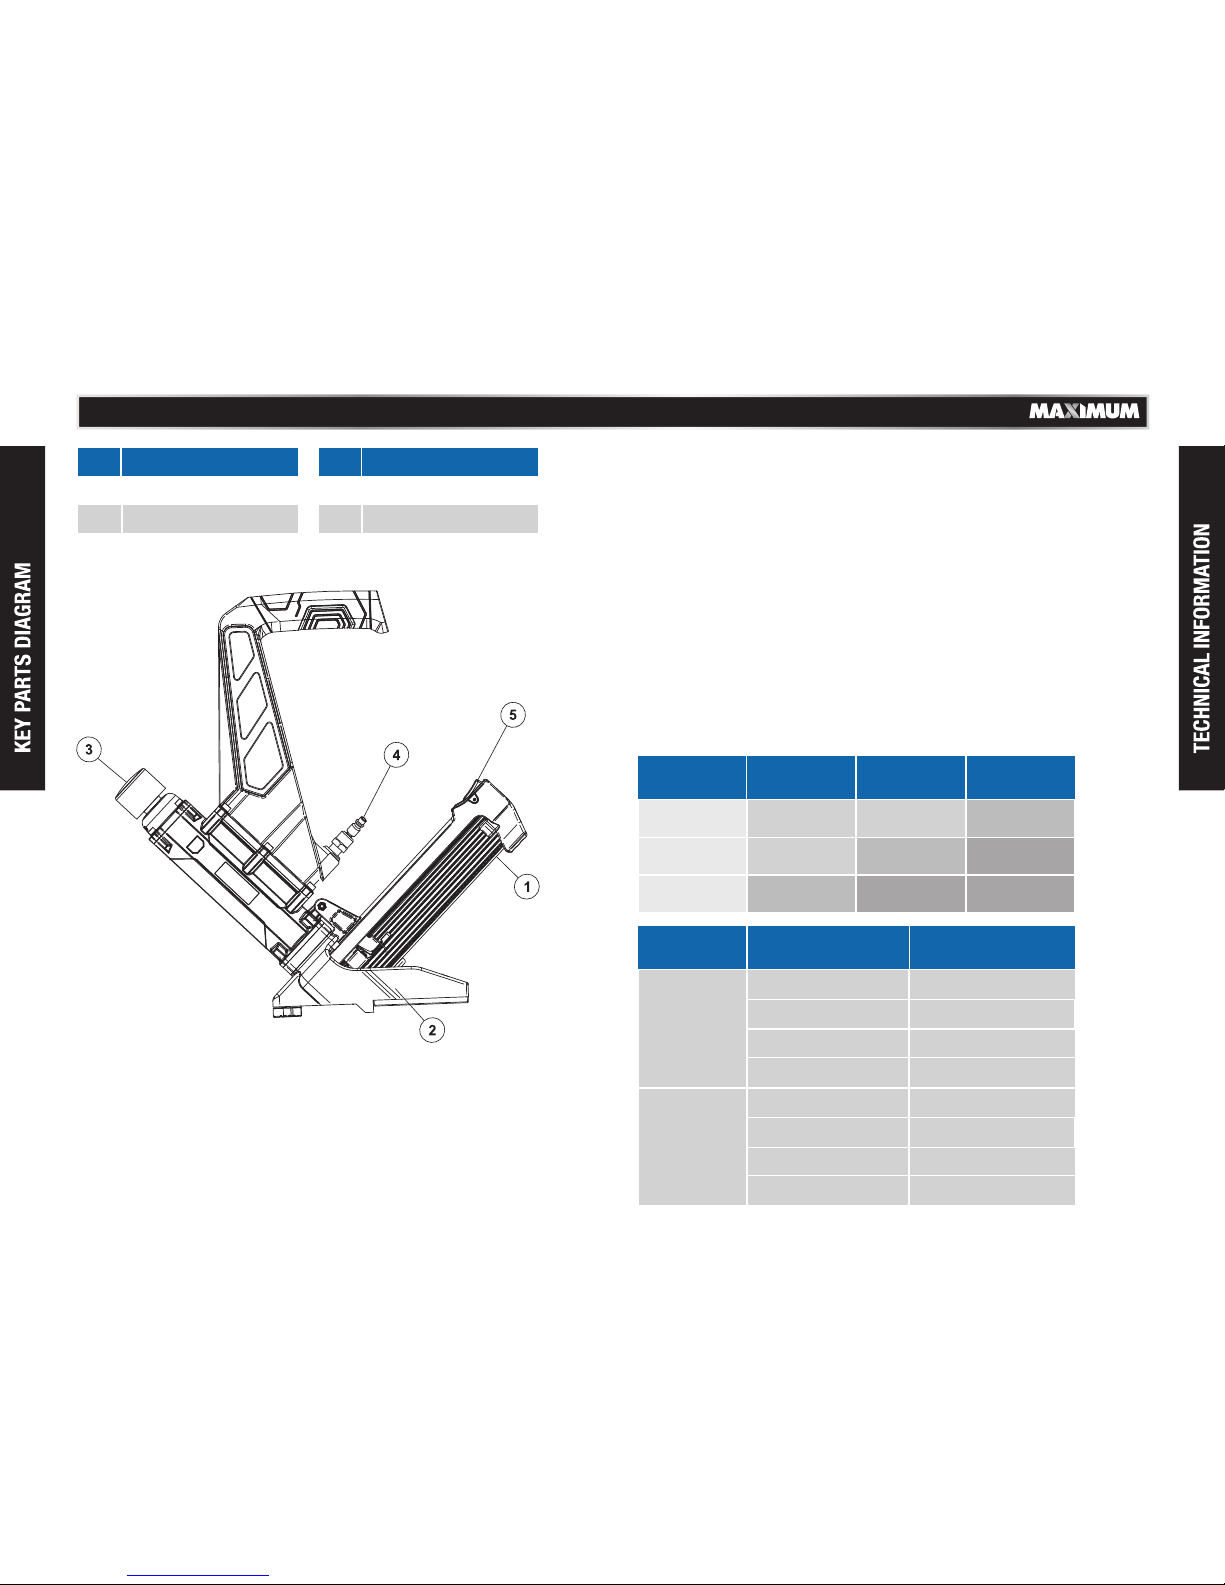
No.
1
2
Magazine
Spacer wheel for depth control
Hammer striking area - whack
3
No.
4
5
Magazine pusher latch
This MAXIMUM® Air-powered 2-in-1 Flooring Nailer drives 15-gauge staples
1 1/2 to 2" (38 to 50 mm) long with a 1/2" (12.7 mm) crown, and "L" shaped
cleats and nails that are between 1 1/2 and 2" (38 and 50 mm) in length. It
features a die-cast aluminum housing and a comfortable handle for optimal
control and comfort, even during extended use. It is well balanced for
stability, and ergonomically designed with a longer handle for ease of
operation. It also features a hardened driver blade for longer life, a
composite base to eliminate stretches and damage to surfaces, and
economical air consumption with low noise. This Air-powered 2-in-1
Flooring Nailer is specifically designed for installing hardwood flooring.
General use
Compatible compressors
GUIDELINES FOR PROPER USE AND OPERATION
Be sure to use a proper air compressor with MAXIMUM® Air-powered tools.
The compressor should be able to supply a minimal air delivery of 6.36
CFM @ 90 PSI to ensure the compressor can run continuously with the
MAXIMUM
®
Air-powered 2-in-1 Flooring Nailer.
Air Compressor
Size and Power
1 1/2–2 HP 2 1/2 HP 3+ HP
4–5 Gallons
6–11 Gallons
15+ Gallons
Light-duty and
intermittent use
Light-duty and
intermittent use
Medium-duty and
intermittent use
Light-duty and
intermittent use
Medium-duty and
intermittent use
Heavy-duty and
continuous use
Light-duty and
intermittent use
Medium-duty and
intermittent use
Heavy-duty and
continuous use
Air inlet plug
Description Description
cap
Wood Density
Nail Size Compressor Air Pressure
>0.6 g/cm
3
<1 1/4" (32 mm) staples
≥1 1/4" (32 mm) staples
<3/2" (38 mm) L nails
≥3/2" (38 mm) L nails
90
120
90
110
≤0.6 g/cm
3
<1 1/4" (32 mm) staples
≥1 1/4" (32 mm) staples
<3/2" (38 mm) L nails
≥3/2" (38 mm) L nails
75
110
75
100
TM
PSI (6.2 bar)
PSI (6.2 bar)
PSI (8.3 bar)
PSI (7.6 bar)
PSI (5.2 bar)
PSI (5.2 bar)
PSI (6.9 bar)
PSI (7.6 bar)
Page 7
1312
model no. 058-9342-6 | contact us 1-888-670-6682
• Do not use the tool if it is not in proper working order.
• Do not use oxygen, CO2 (carbon dioxide) or any other combustible, or
bottled gas to power this tool.
• Do not use this tool in the presence of any flammable liquids or gases.
• Keep hands and other parts of the body away from the firing head during
use.
• Do not point the tool towards the operator or other people.
• Never attempt to clear a jammed fastener while the air hose is connected.
• Do not drive a fastener on top of an existing fastener. Failure to comply
could lead to serious injury or death.
• It is recommended that a filter-regulator-lubricator is used and located
as close to the tool as possible.
• If a filter-regulator-lubricator is not installed, place up to 6 drops of
compressor oil into the NPT inlet plug before each use.
• If a filter-regulator-lubricator is installed, keep the air filter clean. A dirty
filter will reduce the air pressure to the tool, which will cause reduction
in power, efficiency, and general performance.
• For optimal performance, install a quick connector to the tool and a
quick coupler on the hose, if applicable.
• Verify that all of the connections in the air supply system are sealed in
order to prevent air from leaking.
AIR TOOLS
Read this Instruction Manual carefully before using the tool.
• Read and follow all the safety instructions at the beginning of this
manual. Inspect the Air-powered tool prior to each use in order to:
– Ensure that the proper power source is being used.
– Verify that the tool is in proper working order.
– Verify that the air pressure level(s) are properly set on the air
compressor.
WARNING!
Potential hazard that could result in serious injury or
death.
• Keep hands and other parts of the body away from
the tool’s discharge and working areas when
connecting the air supply. Failure to comply could
lead to serious injury or death.
WARNING!
Potential hazard that could result in serious injury or
loss of life.
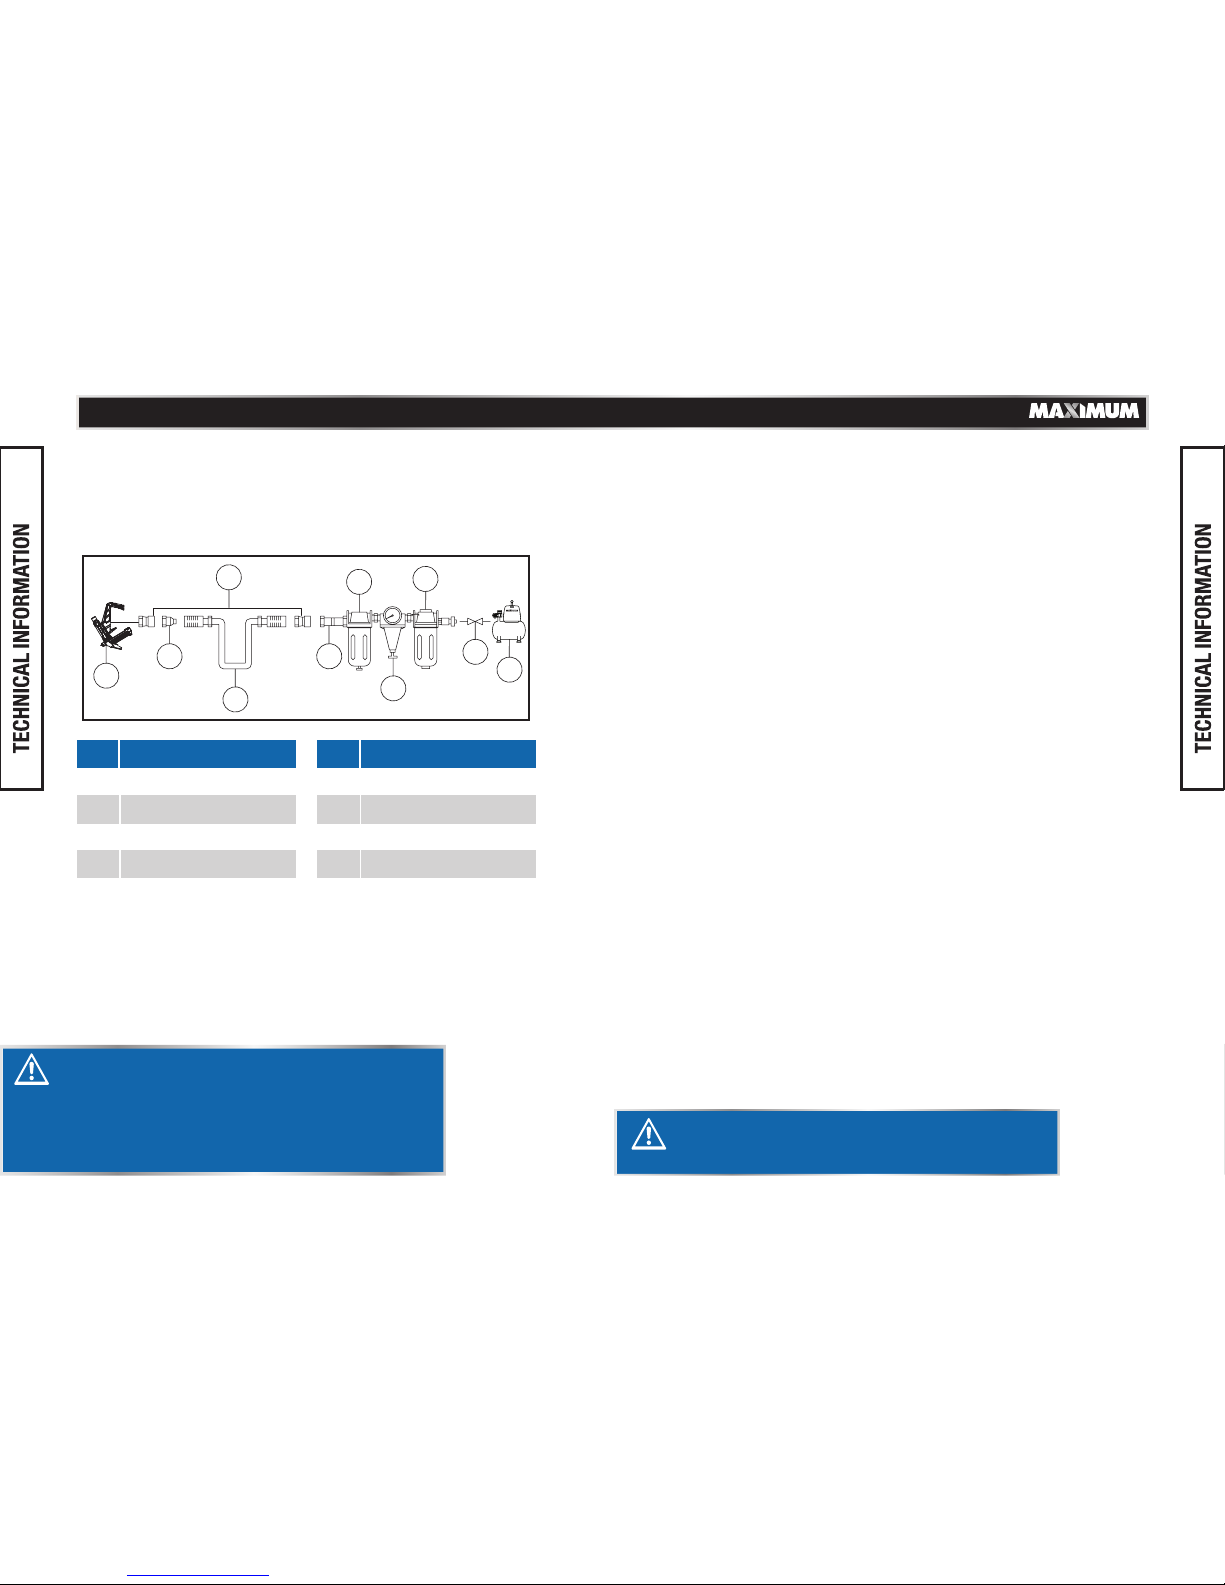
Air system
• Always use clean, dry, regulated, compressed air at 5.5 to 7.5 bar
(80 to 110 PSI).
• Do not exceed the maximum or minimum pressures. Operating the
tool at the wrong pressure (too low or too high) will cause excessive
noise or rapid wear of tool.
MAXIMUM® Air-powered 2-in-1
DescriptionNo. No.
6
7
8
(0–8.5 bar)
Filter
Cut-off valve
Quick connector
Quick coupler
Air hose
Lubricator
Description
1
2
3
4
5
9
Flooring Nailer
Regulator 0–123 PSI
Air compressor
2
5
7
1
3
3
6
8
9
4
TM
Page 8
1 1/2”
(38 mm)
2”
(50 mm)
1514
model no. 058-9342-6 | contact us 1-888-670-6682
• Disconnect the tool from the compressed air source
before loading fasteners.
• Do not point the tool towards the operator or other
people while changing fasteners.
• Do not hold the tool with the trigger depressed while
changing the fasteners. Failure to comply will lead to
serious injury or loss of life.
DANGER!
Potential hazard that will result in serious injury or
loss of life.
NOTE: Icons are colour-coded. Please refer the actual
tool for the specific colour.
WARNING!
Potential hazard that could result in serious injury or
loss of life.
• The use of any other types of fasteners will cause
the tool to jam. Failure to comply could lead to
serious injury or loss of life.
This MAXIMUM® Air-powered 2-in-1 Flooring Nailer accepts the
following size and type of fasteners.
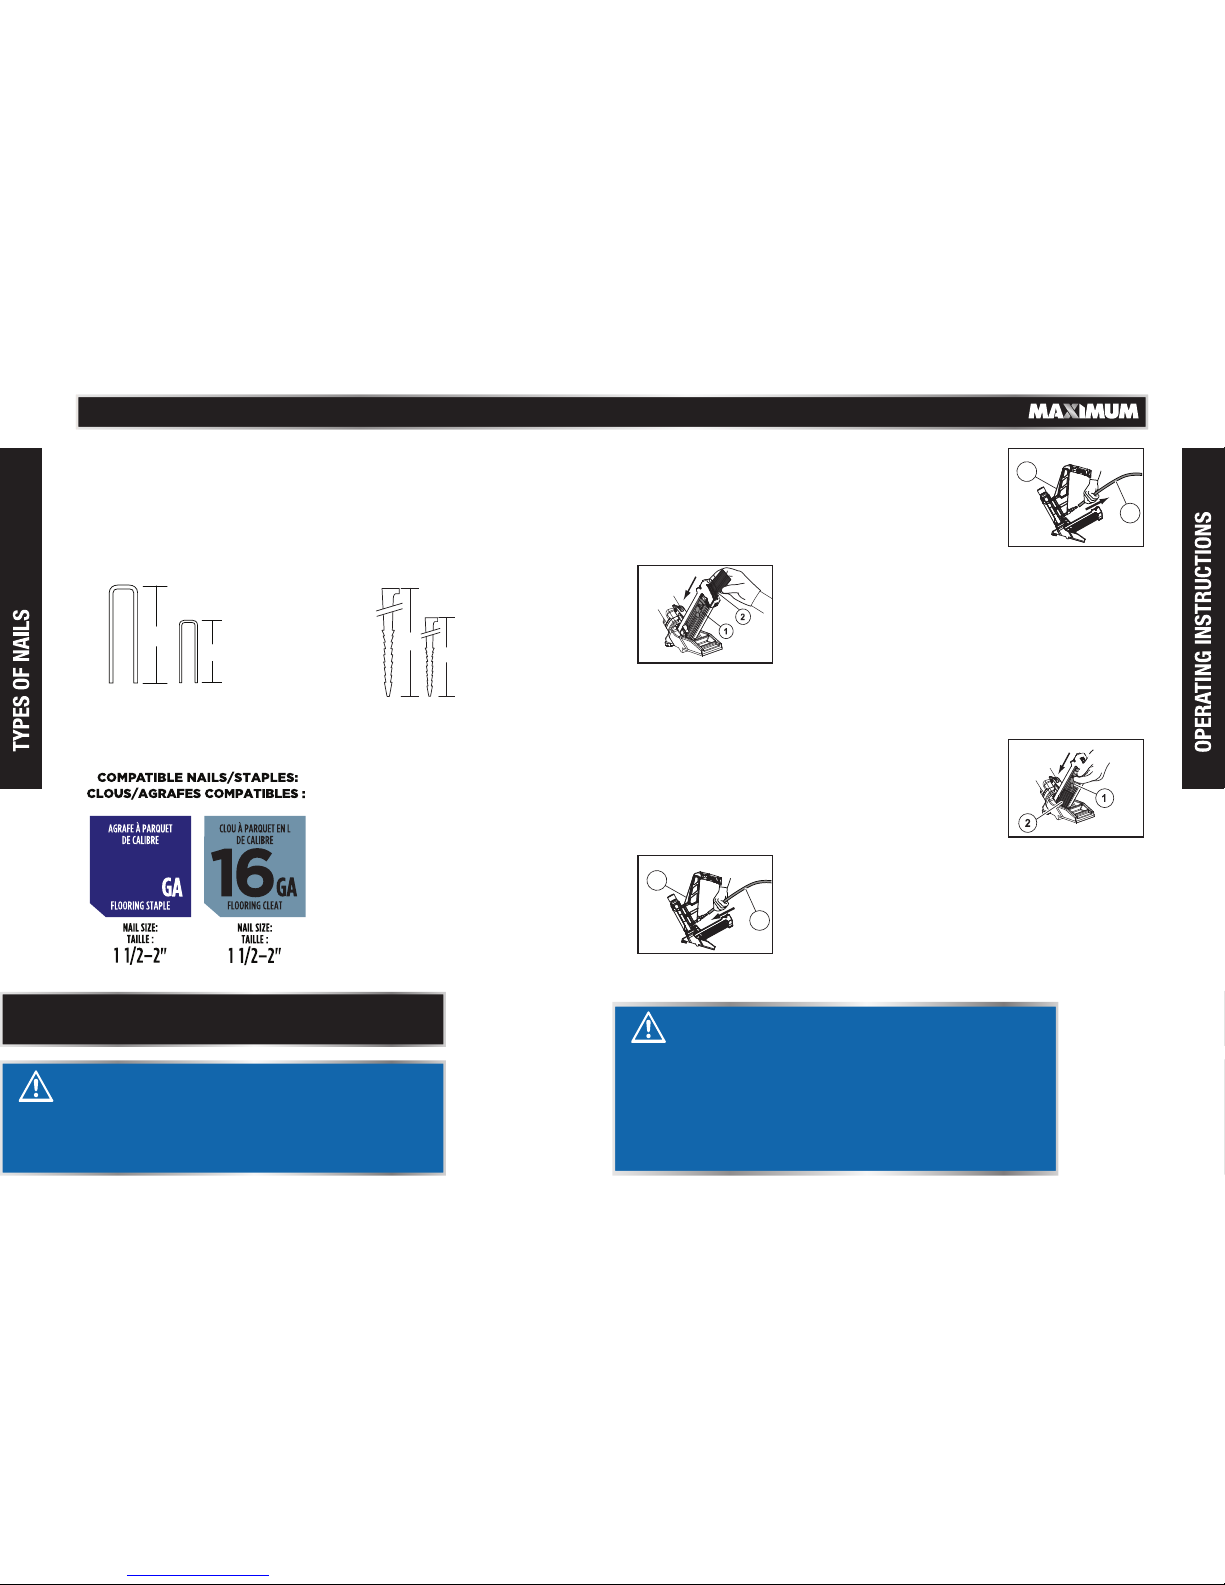
ACCEPTABLE FASTENERS
Flooring staples (15 gauge)
Crown: 1/2" (12.7 mm)
Length: 1 1/2-2" (38-50 mm)
L-Shaped cleats/nails (16 gauge)
Length: 1 1/2-2" (38-50 mm)
NAIL TYPE ICONS
These Icons are used to select the proper nails for this specific nailer.
Fig. A
1
Loading fasteners
1. Disconnect the tool (1) from the air
supply (2) (Fig. A).
2
Fig. C
3. Release the pusher (1), so that it rests
on against the fasteners (2) to close the
magazine, until it comes into contact
with the fasteners and locks into position
(Fig. C).
1
Fig. D
2
4. Plug in compressor, turn it on, set the
pressure regulator to 90 PSI, and attach
one end of the air hose to the compressor
and the other end of the air hose (1) to
the tool (2). Use plumber’s tape to avoid
air leaks (Fig. D).
Fig. B
2. Take hold of the Air-powered 2-in-1
Flooring Nailer firmly with one hand.
Use the other hand to press the pusher
latch (1) on the magazine and slide it
back. Make sure you have the right
nails for your tool (See page 14). Insert
a strip of fasteners (2) into the magazine.
Ensure that the points of the fasteners
are facing down (Fig. B).
2”
(50 mm)
1 1/2”
(38 mm)
TM
15 1/2
Page 9
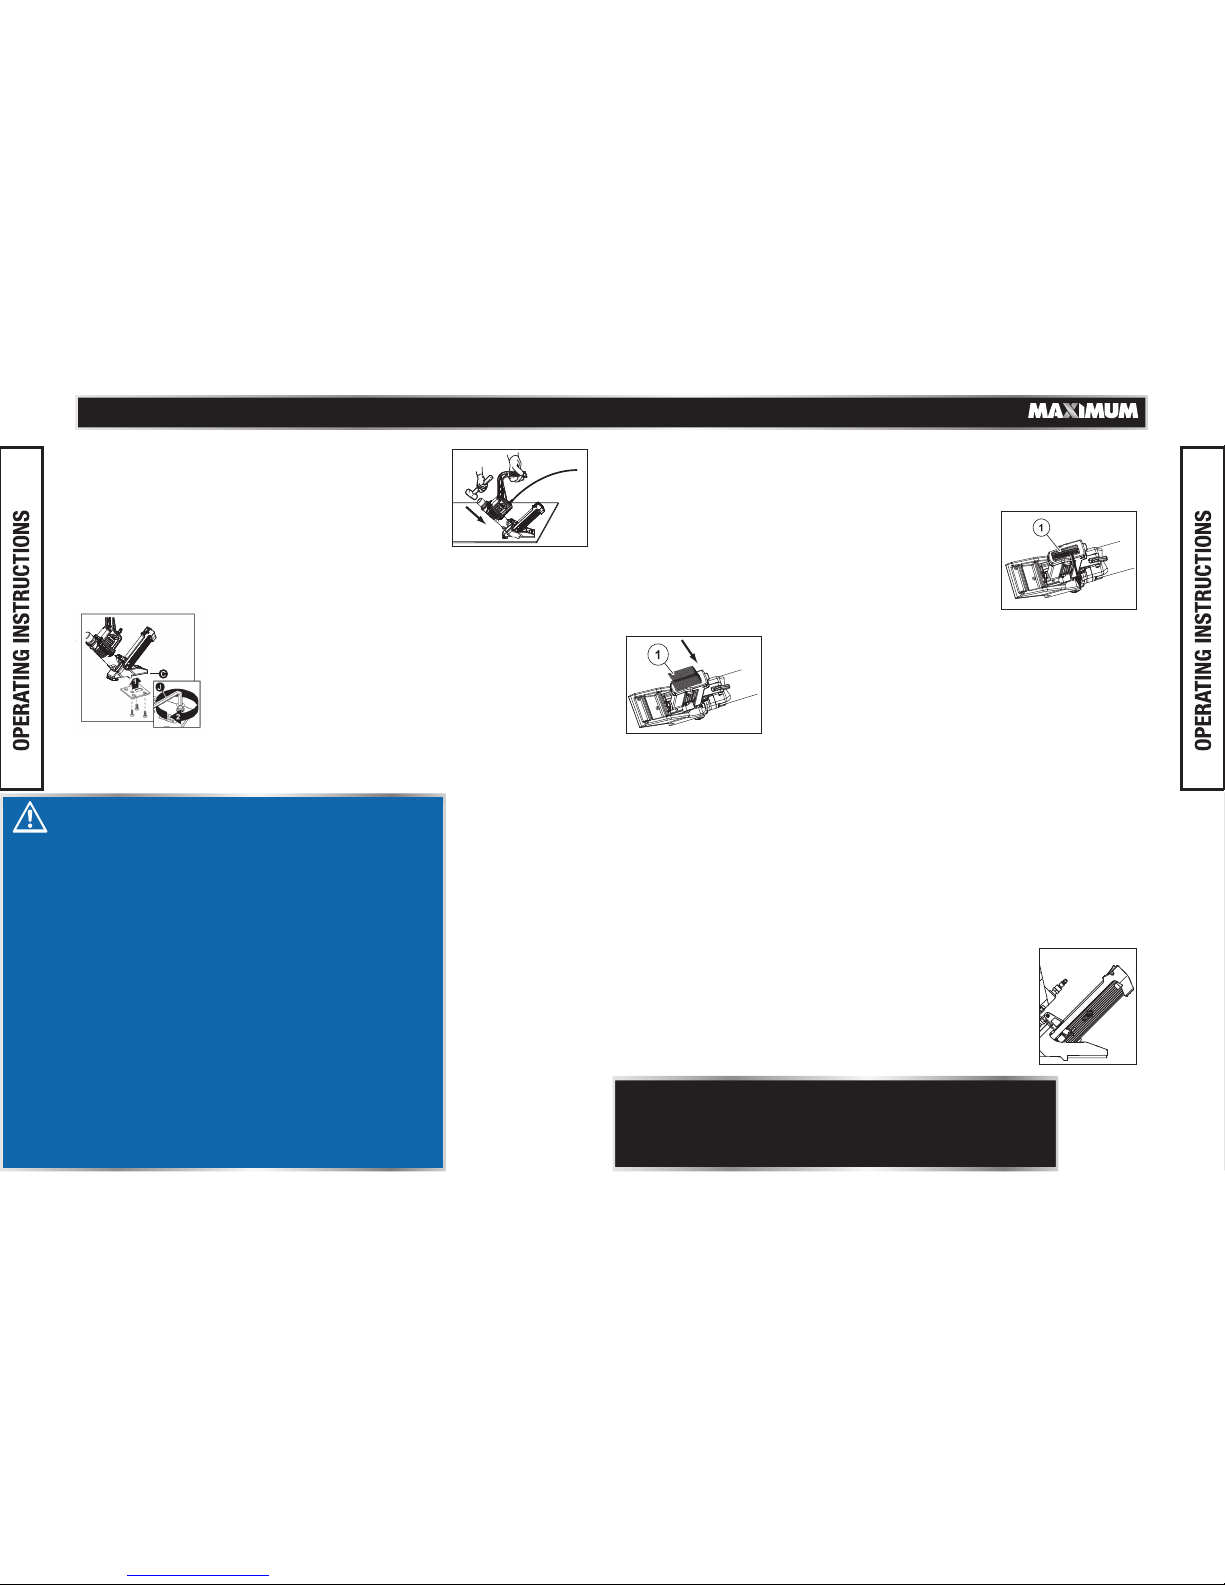
Fig. E
Fig. F
Fig. G
Fig. I
Fig. H
16 17
model no. 058-9342-6 | contact us 1-888-670-6682
NOTE: Test the driving depth using a scrap piece of
wood before working on the workpiece. If the fasteners
are being driven too deep or not deeply enough, adjust
the spacer wheel in order to provide more or less air
pressure, as required.
DANGER!
Potential hazard that will result in serious injury or
loss of life.
• Do not operate the tool if the fasteners are not loaded,
doing so may damage the tool.
• Do not fire fasteners into the air, doing so may cause
injury to the operators or others, apart from damaging
the tool.
• Load the correct type of fasteners only, do not load
different sized fasteners into the magazine, doing so
may cause fasteners to jam. Failure to comply will lead
to serious injury or loss of life.
• The nailer releases one fastener with each hit, so hitting
the whack cap twice will project a second fastener onto
the first one which could cause a potential ricochet
hazard.
• Ensure that the hammer exerts sufficient amount of
force on the nailer. If the force is too low, the fastener
will not be inserted completely onto the flooring. For
nails that are not completely inserted, use a hammer to
pull out the nails or knock the nails in with a nail setter.
Do not attempt to drive a fastener into the same
location twice.
6. Using the hex key (J), hold the nailer upside
down and remove the three screws from the
base plate by turning counter clockwise.
Attach the desired plate (See Fig. F). Ensure
the screw holes on the base plate line up
with the holes at the nailer base (C). Tighten
the screws by turning clockwise (See Fig. F).
Make sure screws do not protrude out of
the base plate.
INSERTION METHODS
The MAXIMUM® Air-powered 2-in-1 Flooring Nailer drives nails and staples,
which are to be inserted using different insertion methods.
5. Hold the handle, and lift the Air-powered
2-in-1 Flooring Nailer into place. Swing
the mallet and strike the top end of the
“whack cap” with the rubber face of the
mallet (Fig. E).
• Disconnect the tool from the air supply line.
• Remove the fasteners that are stored in the tool’s magazine.
• Use pliers or any appropriate tool to remove the jammed
fastener.
• Reload the fasteners into the tool magazine.
• Reconnect the air line to the tool’s air inlet.
• Test fire 3 to 5 fasteners into a piece of scrap wood in order
to ensure proper operation.
1. Pull the pusher latch to the end of the
magazine to lock it (Fig. I).
Clearing a jammed fastener
To clear a jammed fastener:
1. Nails: Insert the nails (1) from the top
area of magazine into the centre slot at
the top of the magazine (Fig. G).
2. Staples: Insert the staples (1) from the
top area of the magazine with one arm
of the staple in the center slot of the
magazine and the other arm along the
left side of the magazine (Fig. H).
TM
Page 10
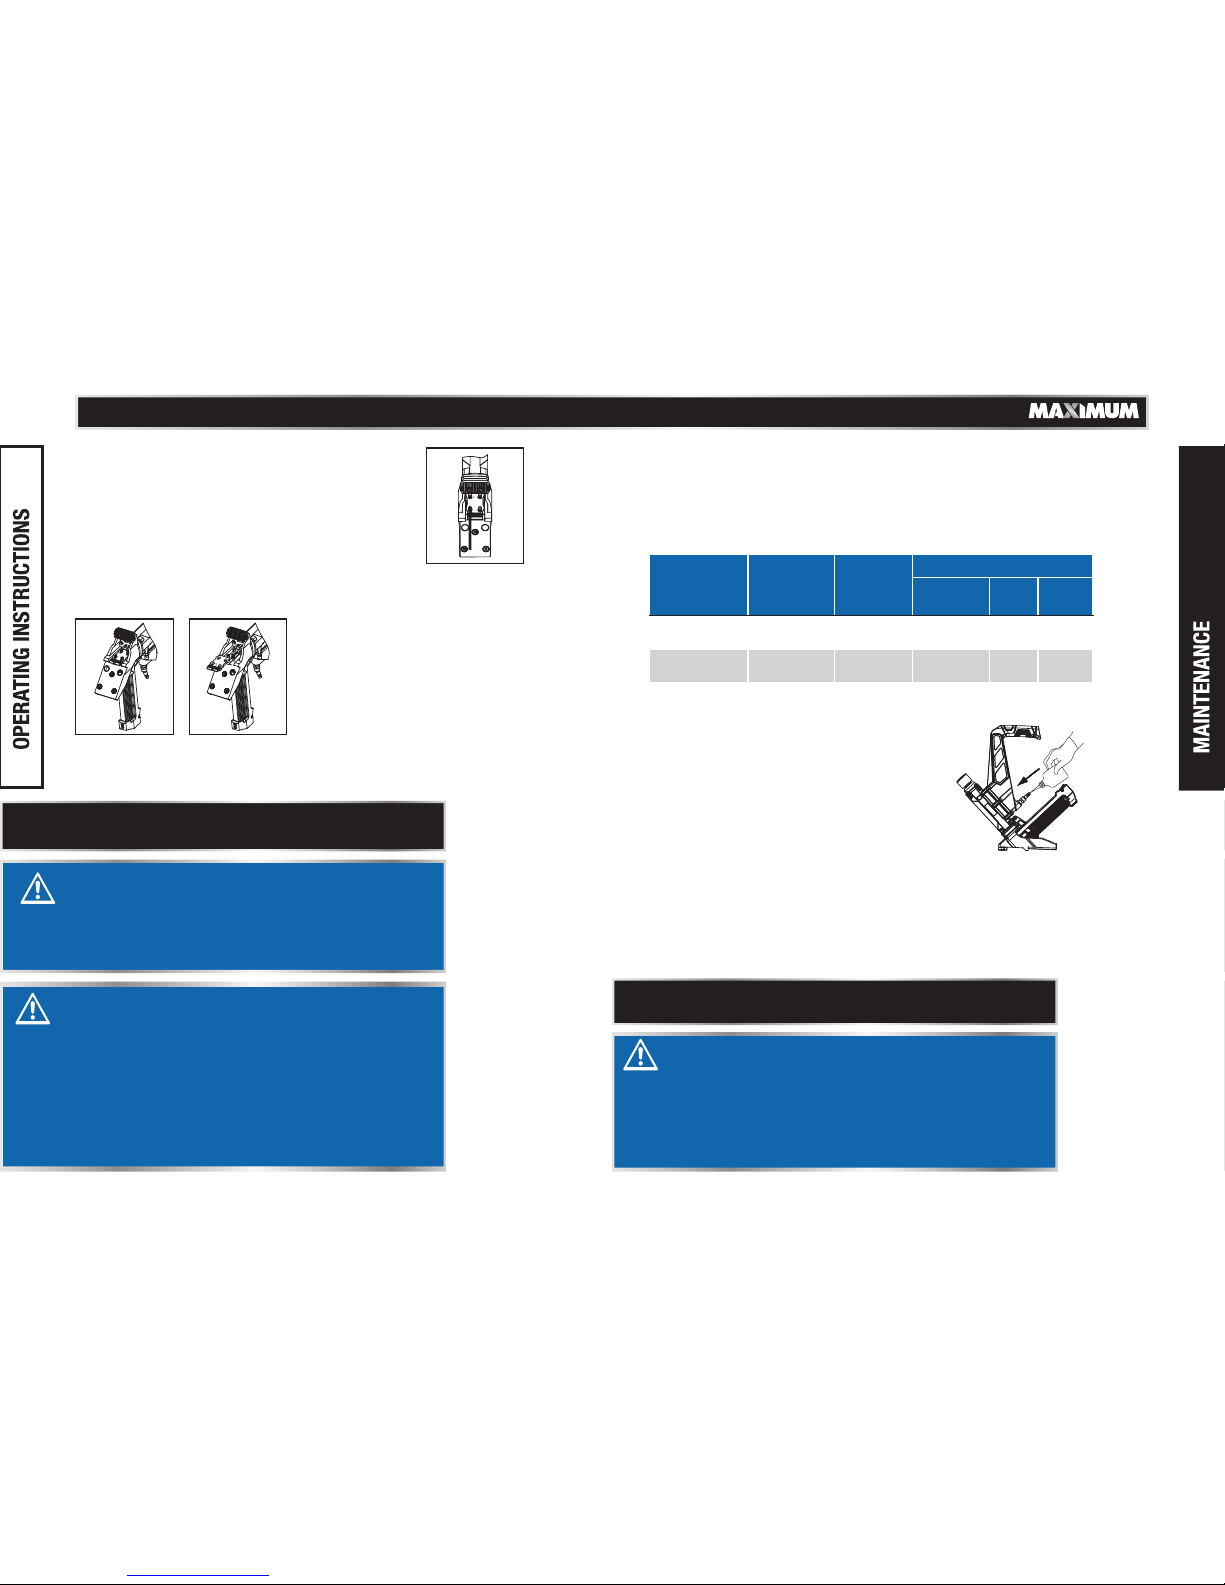
Fig. J
Fig. K Fig. L
18
model no. 058-9342-6 | contact us 1-888-670-6682
19
• Lubrication: If the Air-powered 2-in-1 Flooring
Nailer and the compressor are not equipped
with an in-line lubrication system, place up
to 6 drops of pneumatic tool oil into the air
inlet before each work day or after every 2
hours of continuous use, depending on the
characteristics of the workpiece and type
of fasteners used.
• Air-operated tools must be inspected periodically and worn or broken
parts must be replaced to ensure that the tools are operating safely and
efficiently.
• Inspect and replace worn or damaged O-rings, seals, etc. Tighten all
screws and caps frequently in order to help prevent personal injury.
• Keep the magazine of the tool clean and free of any dirt or abrasive
particles.
NOTE: When temperatures are below freezing, maintain the
tools in a warm condition using any safe, convenient method.
DANGER!
Potential hazard that will result in serious injury or
loss of life.
• Disconnect the tool from the air compressor before
maintenance/service, adjusting, clearing jams, reloading,
and when it is not in use. Repairs must be performed by
a qualified service technician only. Failure to comply will
lead to serious injury or loss of life.
NOTE: If the fasteners continue to jam, please
call 1-888-670-6682.
WARNING!
Potential hazard that could result in serious injury or
loss of life.
• Disconnect the magazine from the tool and remove the
non-jammed fasteners from the tool before clearing a
jammed fastener. The fasteners are under pressure and
failure to comply will cause them to be fired out of the
tool causing serious injury.
• Do not point the tool towards the operator or other
people. Serious personal injury could result if these
instructions are not followed.
CAUTION!
Potential hazard that may result in injury or damage
to equipment.
• Operate the tool with the utmost care when connected
with the air compressor. Failure to comply may result in
moderate injury or damage to equipment.
Storage
Maintenance
If it is necessary to store the tool for an extended period of time, apply a
generous amount of lubrication before storing. The tool should be allowed
to run for approximately 30 seconds after lubricating, in order to ensure
that the lubrication is uniformly distributed throughout the tool.
Worn or broken
parts
X X
Replace worn or
broken parts
X
Lubrication See below
Pneumatic
X
MAINTENANCE
REQUIRED
DESCRIPTION
TOOLS OR
MATERIALS
REQUIRED
MAXIMUM SERVICE INTERVAL
Each use or
every 2 hrs
Monthly
As
needed
In-depth inspection
tool oil
2. Using the hex key, hold the gun upside down
and loosen the four screws from the cover plate
by turning counter clockwise (Fig. J).
3. Pull out and lift up the cover plate.
Remove it to clean the jam (Fig. K&L).
TM
Page 11
2120
model no. 058-9342-6 | contact us 1-888-670-6682
Troubleshooting
The following chart lists common operating system issues and solutions.
Please read it carefully and follow all instructions carefully.
- Disconnect the tool from the air supply before making any
adjustments.
- Repairs and replacement must be performed only by a qualified
service technician or in an authorized service centre.
NOTE: For further repair information, please
call 1-888-670-6682.
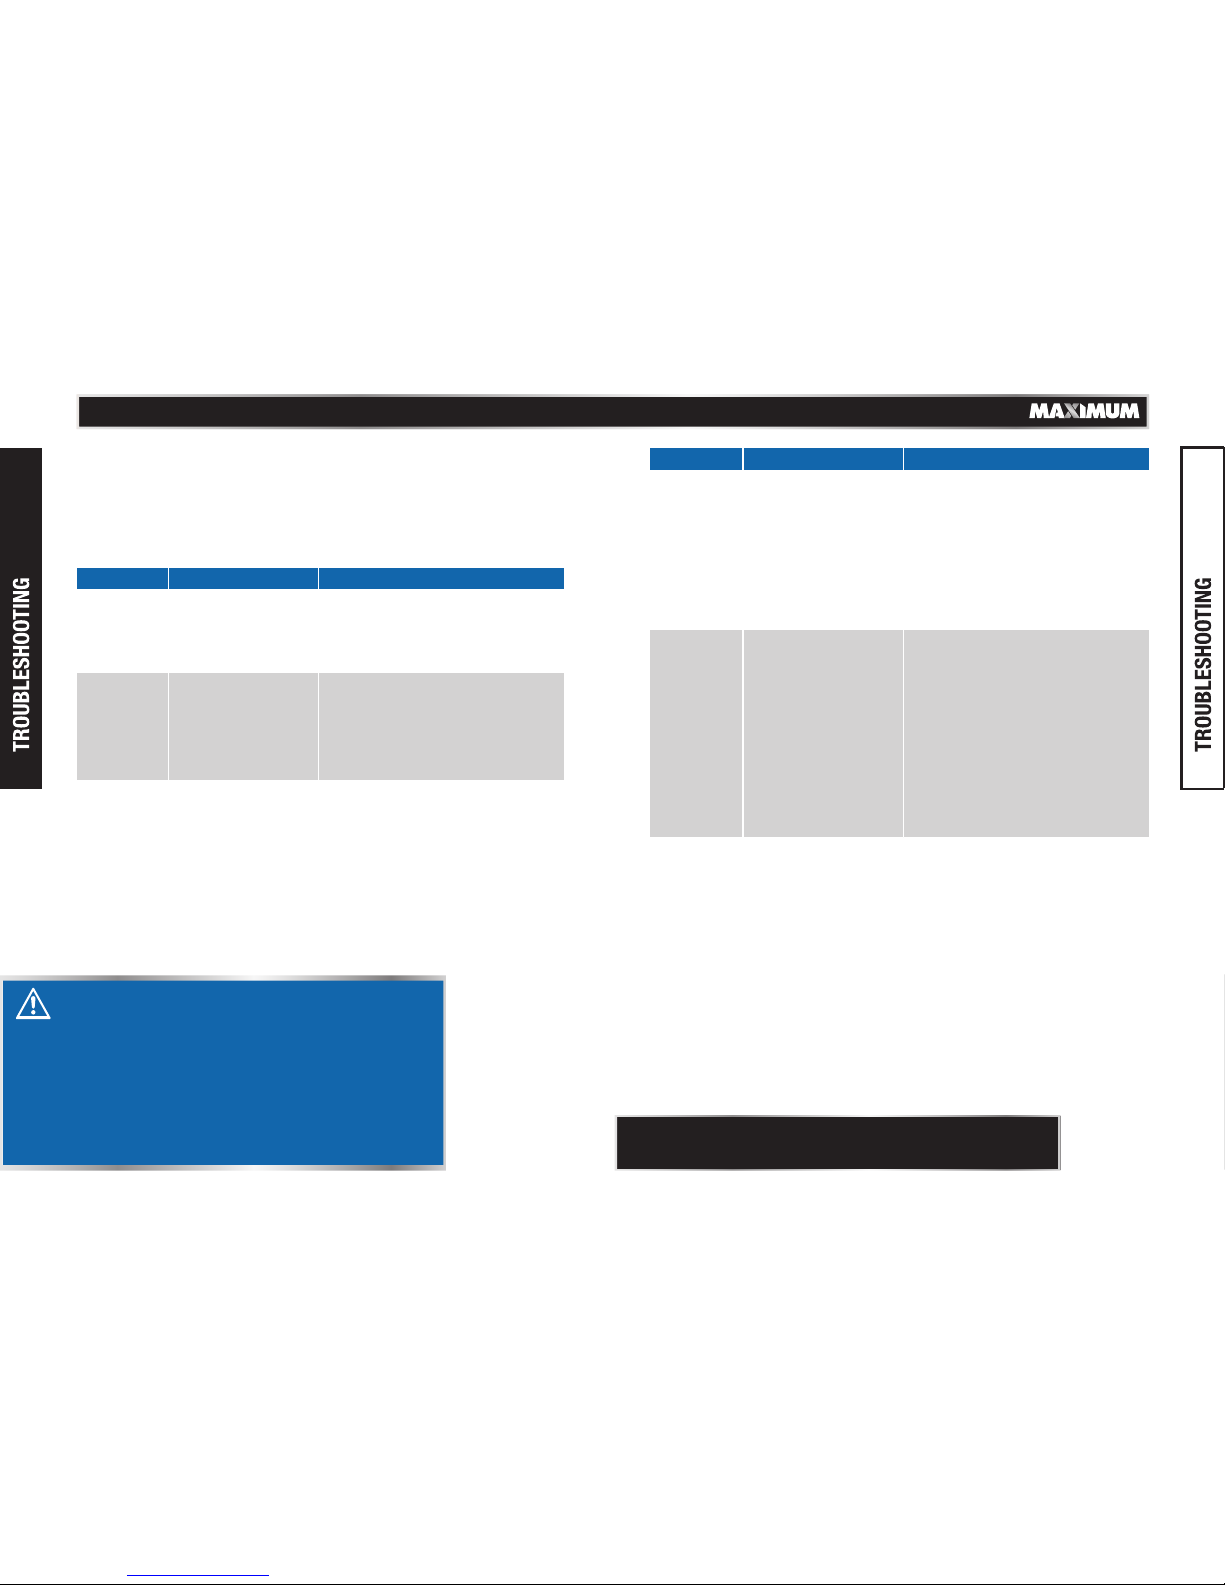
PROBLEM POSSIBLE CAUSES SOLUTIONS
The tool does
not operate
properly - it
does not drive
the fasteners
or operates
sluggishly.
Have the tool serviced by a qualified
service technician.
The tool
skips
fasteners.
The tool jams.
DANGER!
Potential hazard that will result in serious injury or
loss of life.
If any of the following symptoms appear while the tool
is in use, turn it off and disconnect it from the air supply
immediately. Failure to comply will lead to serious
injury or loss of life.
• Disconnect the tool from the air supply before making
any adjustments.
• Repairs must be performed by a qualified service
technician only.
(See section “Clearing a Jammed
fastener”).
Air leakage
near the
bottom of
the tool
PROBLEM POSSIBLE CAUSES SOLUTIONS
Contact a qualified service technician
Air leakage
between the
body and the
cylinder cap
Have the tool serviced by a qualified
service technician.
The fasteners
are being
driven too
deep.
TM
Screws are loose.
The O-rings or the
bumper is/are
damaged.
1.
2.
The screws are loose.
The O-rings or the
seals are worn or
damaged.
1.
2.
The bumper is worn.
The air pressure is
too high.
The depth adjustment
dial is not adjusted
properly.
1.
2.
3.
The air supply is
inadequate.
Lubrication is
inadequate.
The O-rings or seals
are worn or damaged.
The exhaust port in
the cylinder head is
blocked.
1.
2.
3.
4.
Fasteners are
incorrect or damaged.
The driver guide is
damaged or worn.
The magazine screw
is loose.
There is dirt in the
magazine.
1.
2.
3.
4.
The bumper is worn or
the spring is damaged.
There is dirt in the
front plate.
Fasteners cannot
move freely in the
magazine because
of dirt or damage.
The O-ring on the
piston is worn or dry
or there is not enough
lubrication.
The cylinder cover
seal Is leaking.
1.
2.
3.
4.
5.
1. 2.To tighten the screws.
To inspect and replace the O-rings
or seals.
1. 2.Tighten the screws.
Inspect and replace the O-rings or
the seals.
1.
2.
3.
Replace the bumper.
Adjust the air pressure.
Adjust the depth setting by turning
the depth adjustment dial counterclockwise (see section “Adjusting
the Fastener Depth”).
1.
2.
3.
4.
Verify that the air supply is adequate.
Pour up to 6 drops of oil into the air
inlet.
Inspect and replace O-rings or seals.
Replace the damaged internal parts.
1.
2.
3.
4.
Use the proper fasteners.
Inspect and replace the driver.
Tighten the magazine.
Clean the magazine.
1.
2.
3.
4.
5.
Replace the bumper or pusher spring.
Clean the drive channel on the front
plate.
Clean the magazine.
Replace the O-ring.
Replace the sealing washer.
Have the tool serviced by a qualified
service technician.
Have the tool serviced by a qualified
service technician.
Have the tool serviced by a qualified
service technician.
Have the tool serviced by a qualified
service technician.
Page 12
If any parts are missing or damaged, or if you have any questions, please
call 1-888-670-6682.
2322
model no. 058-9342-6 | contact us 1-888-670-6682
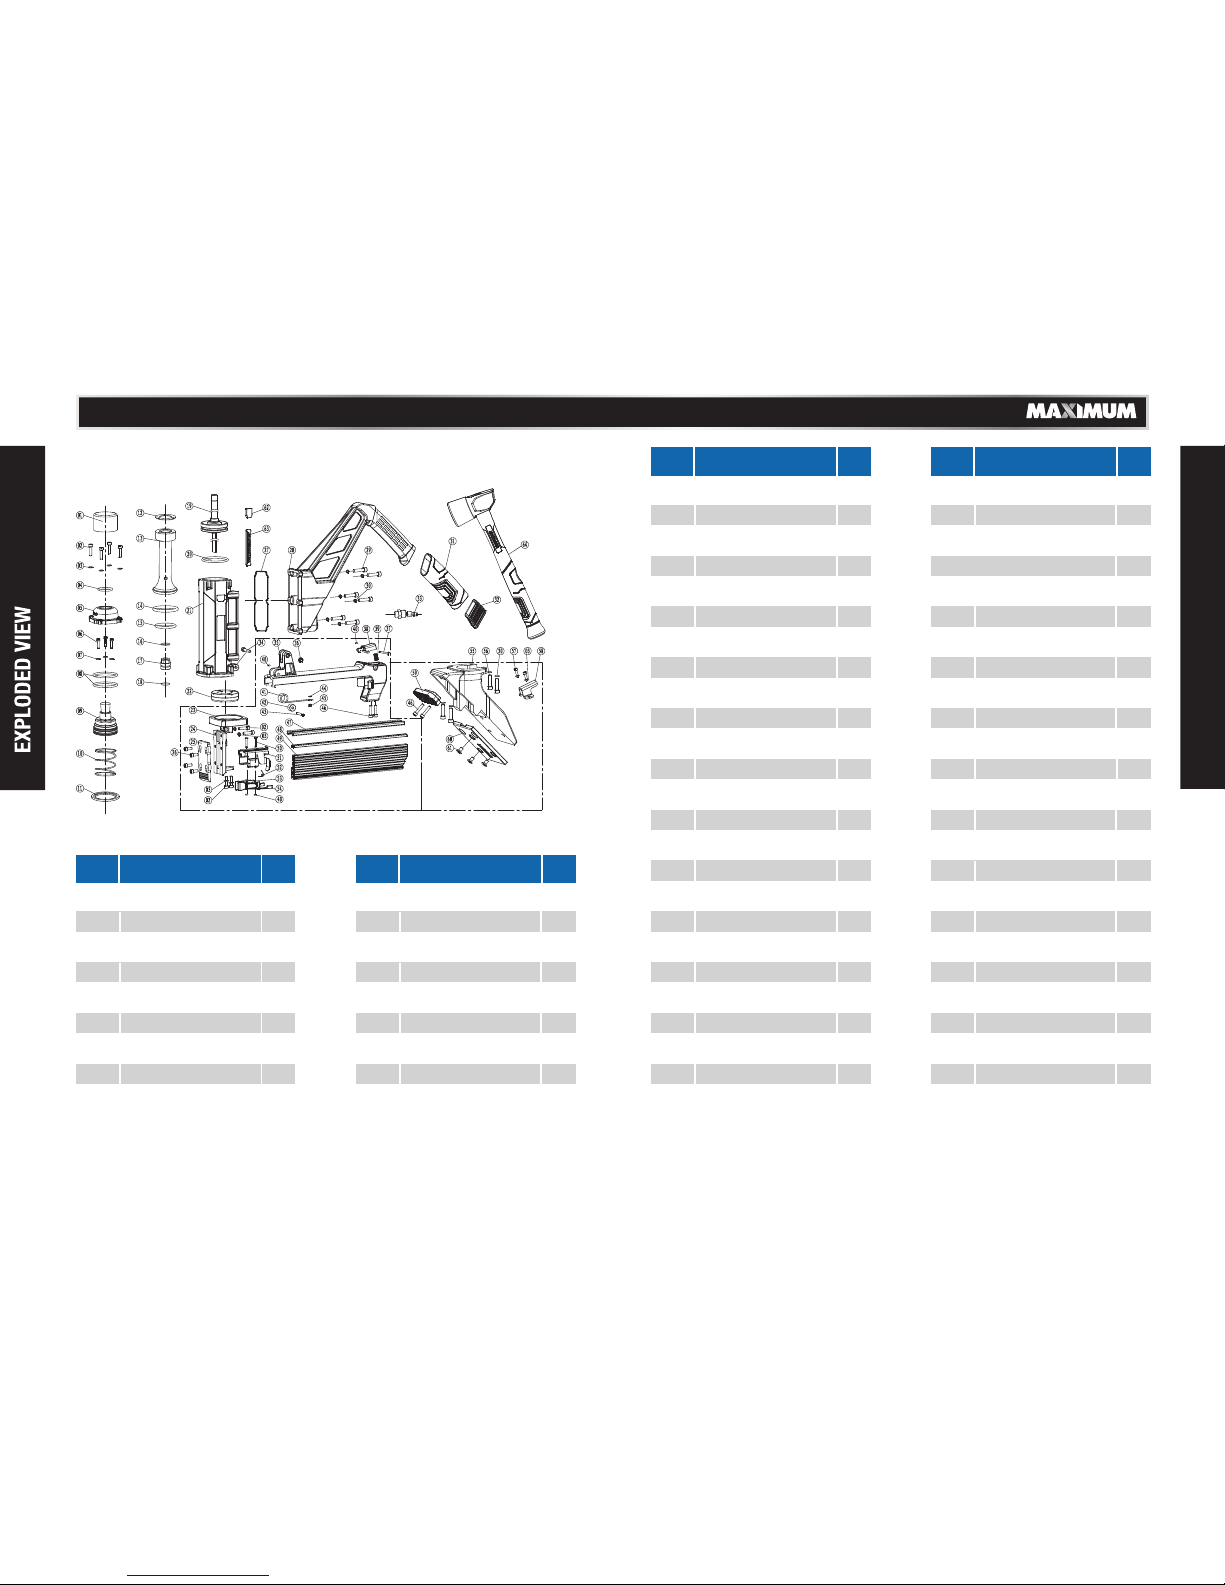
No. Qty.
41
42
43
44
45
46
47
48
49
50
51
52
53
54
55
56
57
58
59
60
61
62
63
64
Spring Ⅱ
Spring core
Pin
Retainer d=3
Spring core pin
Bolt M5x16
Pusher seat shelf
Nail guide slice
Magazine
Pin
Pusher seat
Pusher spring
Right pusher
Left pusher
Base
Bolt M6 x 40
Bolt M5 x 10
Bracket
Stop block
Base plate A
Bolt M6 x 18
Rubber gasket
Logo
Hammer
1
1
1
1
1
6
1
1
1
1
1
2
1
1
1
4
2
1
1
1
3
2
2
1
No. Qty.Description Description
PARTS LIST
17
18
19
20
21
22
23
24
25
26
27
28
29
30
31
32
33
34
35
36
37
38
39
40
Sealing nut
O-ring 12.8 x 1.8
Main piston
O-ring 50 x 3.55
Nailer body
Bumper
Driver guide seat
Driver guide
Cover plate
Bolt M6 x 12
Sealing washer
Handle
Bolt M6 x 25
Washer
Hand grip
Crank plug
360°air inlet plug
Screw M5 x 25
Magazine cover
Self-lock nut
Roll pin
Latch
Compressed spring
O-ring 1.7 x 2
1
1
1
1
1
1
1
1
1
4
1
1
6
10
1
1
1
1
1
1
1
1
1
3
1
8
10
1
1
3
3
2
No. Qty.
9
10
11
12
13
14
15
16
1
2
3
4
5
6
7
8
1
1
1
1
1
1
1
1
No. Qty.Description Description
Whack cap
Screw M5 x 20
Spring washer
O-ring 25 x 3.55
Cylinder cover
Bolt M4 x 16
Spring washer
O-ring 48.7 x 2.65
Piston seat
Spring
Spring washer
Sleeve washer
Piston sleeve
O-ring 32 x 4.5
O-ring 12.4 x 2.5
O-ring 15.6 x 1.8
TM
Page 13
2524
model no. 058-9342-6 | contact us 1-888-670-6682
TM
This MAXIMUM product is guaranteed for a period of 5 years
from the date of original retail purchase against defects in
workmanship and materials only and is subject to the following
components:
a) Component A: The carrying case is guaranteed for a period of
1-year from the date of original retail purchase against defects in
workmanship and materials.
These warranties are subject to the following conditions and
limitations:
Subject to the conditions and limitations described below, this product,
if returned to us with proof of purchase within the stated warranty
period and if covered under this warranty, will be repaired or replaced
(with the same model, or one of equal value or specification), at the sole
discretion of the Maximum Canada authorised repair centre (“Service
Provider”). We will bear the cost of any repair or replacement and any
costs of labour relating thereto.
A bill of sale verifying the purchase and purchase date must be provided;
Defects in workmanship and material to be assessed and determined by
the Service Provider;
This warranty will not apply to any product or part thereof which is worn
or broken or which has become inoperative due to abuse, misuse,
accidental damage, neglect or lack of proper installation, operation or
maintenance (as outlined in the applicable owner’s manual or operating
instructions);
This warranty does not apply to normal wear and tear or to expendable
parts or accessories (including drill bits and saw blades) that may be
supplied with the product that by their nature have a limited life span
and are expected to become inoperative or unusable after a reasonable
period of use;
This warranty will not apply to routine maintenance and consumable
items such as, but not limited to, driver blades, bumpers, pistons, piston
rings, rubber o-rings, tune-ups or adjustments;
This warranty excludes the following components that may accompany
your product:
(1) The carrying case, which is only for a period of 1-year from the date of
original retail purchase against defects in workmanship and materials.
(2) Accessories, including drill bits and saw blades, which do not carry a
warranty of any kind.
This warranty will not apply where damage is caused by repairs made or
attempted by others (i.e. persons not authorized by the manufacturer),
and any such unauthorized repairs or attempted repairs shall void this
warranty in its entirety;
FURTHER, THE WARRANTIES SET OUT HEREIN ARE IN LIEU OF ALL OTHER
WARRANTIES OR CONDITIONS, WHETHER EXPRESS, IMPLIED OR
STATUTORY (INCLUDING SUCH AS ARISE UNDER THE SALE OF GOODS
ACT OR THE INTERNATIONAL SALE OF GOODS ACT), ARISING OUT OF A
COURSE OF DEALING OR USAGE OF TRADE OR OTHERWISE, INCLUDING,
SUBJECT TO APPLICABLE LAW, ANY IMPLIED WARRANTIES OR
CONDITIONS OF MERCHANTABILITY, MERCHANTABLE QUALITY, FITNESS
OR ADEQUACY FOR A PARTICULAR PURPOSE OR USE, AND ALL OTHER
SUCH WARRANTIES ARE EXPRESSLY DISCLAIMED BY THE RETAILER
AND MANUFACTURER.
a)
b)
c)
d)
e)
f)
g)
This warranty will not apply to any parts other than original parts,
except to the extent that the retailer or manufacturer or persons
authorized by either of them have repaired or replaced them;
This warranty will not apply to any product that was sold to the original
purchaser as a reconditioned or refurbished product (unless otherwise
specified in writing);
This warranty will not apply to any product or part thereof if any part
from another manufacturer is installed therein or any repairs or
alterations have been made or attempted by unauthorized persons;
This warranty will not apply to normal deterioration of the exterior finish,
such as, but not limited to, scratches, dents, paint chips, or to any
corrosion or discolouring by heat, abrasive and chemical cleaners; and
This warranty will not apply to component parts sold by and identified as
the product of another company, which shall be covered under that
product manufacturer’s warranty, if any;
Any products replaced by the retailer in attempt to fulfill warranty
obligations is subject to the original product warranty conditions and
related time period as initiated by the original date of purchase; if
product is purchased in Quebec, the warranty term will be extended for
a period equal to the time during which the Quebec retailer possesses
the product in attempt to fulfill warranty obligations; replaced product
will not default to new product warranty conditions; and
The retailer and manufacturer’s sole obligation and the purchaser’s sole
remedy under this warranty shall be as set out herein. The warranties
contained herein are not transferable and are given only to the purchaser.
h)
i)
j)
k)
l)
m)
n)
Page 14
2726
model no. 058-9342-6 | contact us 1-888-670-6682
TM
Additional Limitations
This warranty applies only to the original purchaser and may not be transferred.
This warranty applies for a period of 5 years from the date of original retail
purchase, as indicated on the bill of sale.
Neither the retailer, Maximum Canada, nor the manufacturer shall be liable for
any other expense, loss or damage, including, without limitation, any indirect,
incidental, consequential or exemplarydamages arising in connection with the
sale, use or inability to use this product.
Under no circumstances shall the retailer, Maximum Canada, or manufacturer
be liable to the purchaser for any claim for (a) indirect, special, punitive,
incidental, exemplary, or consequential damages, (b) compensation for loss of
profits, anticipated revenue, savings or goodwill, or other economic loss of the
purchaser, (c) exemplary, aggravated or punitive damages howsoever incurred,
(d) contribution or set-off in respect of any claims against the purchaser, (e)
any damages whatsoever relating to third party products or services or the
purchaser’s materials, or (f) any damages whatsoever relating to interruption,
delays, errors or omissions; in each case under any theory of law or equity,
arising out of or in any way related to this warranty, even if advised of the
possibility thereof. Notwithstanding any provision herein or entitlement of the
purchaser at law, in equity or otherwise, in no event shall the liability of the
retailer or manufacturer under this warranty, whether in contract, tort, product
liability or otherwise, exceed, in the aggregate, the amount paid by the purchaser
to the retailer for the product to which this warranty applies.
*Notice to Consumer
This warranty gives you specific legal rights, and you may have other rights,
which may vary from province to province. The provisions contained in this
warranty are not intended to limit, modify, take away from, disclaim or exclude
any statutory warranties set forth in any applicable provincial or federal
legislation.
In addition to the 5-Year Limited Warranty, this MAXIMUM product is
covered by our:
1-Year Repair Warranty
Maximum Canada will maintain this product and replace critical parts
which have worn beyond reasonable use through normal use of such
product, any time during the first year after purchase.
The following are excluded from this 1-Year Repair Warranty:
a)Missing or damaged parts or components that are a result of abuse
or misuse;
b)Any wear and tear to non-critical parts or accessories that do not
affect the core function of the product.
90-Day Satisfaction Guarantee
If you are not completely satisfied with the performance of your
MAXIMUM product for any reason, you can return it within 90 days
from the date of purchase with proof of purchase for exchange or a
full refund.
Made in China,
Imported by
MAXIMUM Canada Toronto, Canada M4S 2B8
 Loading...