

Page 1
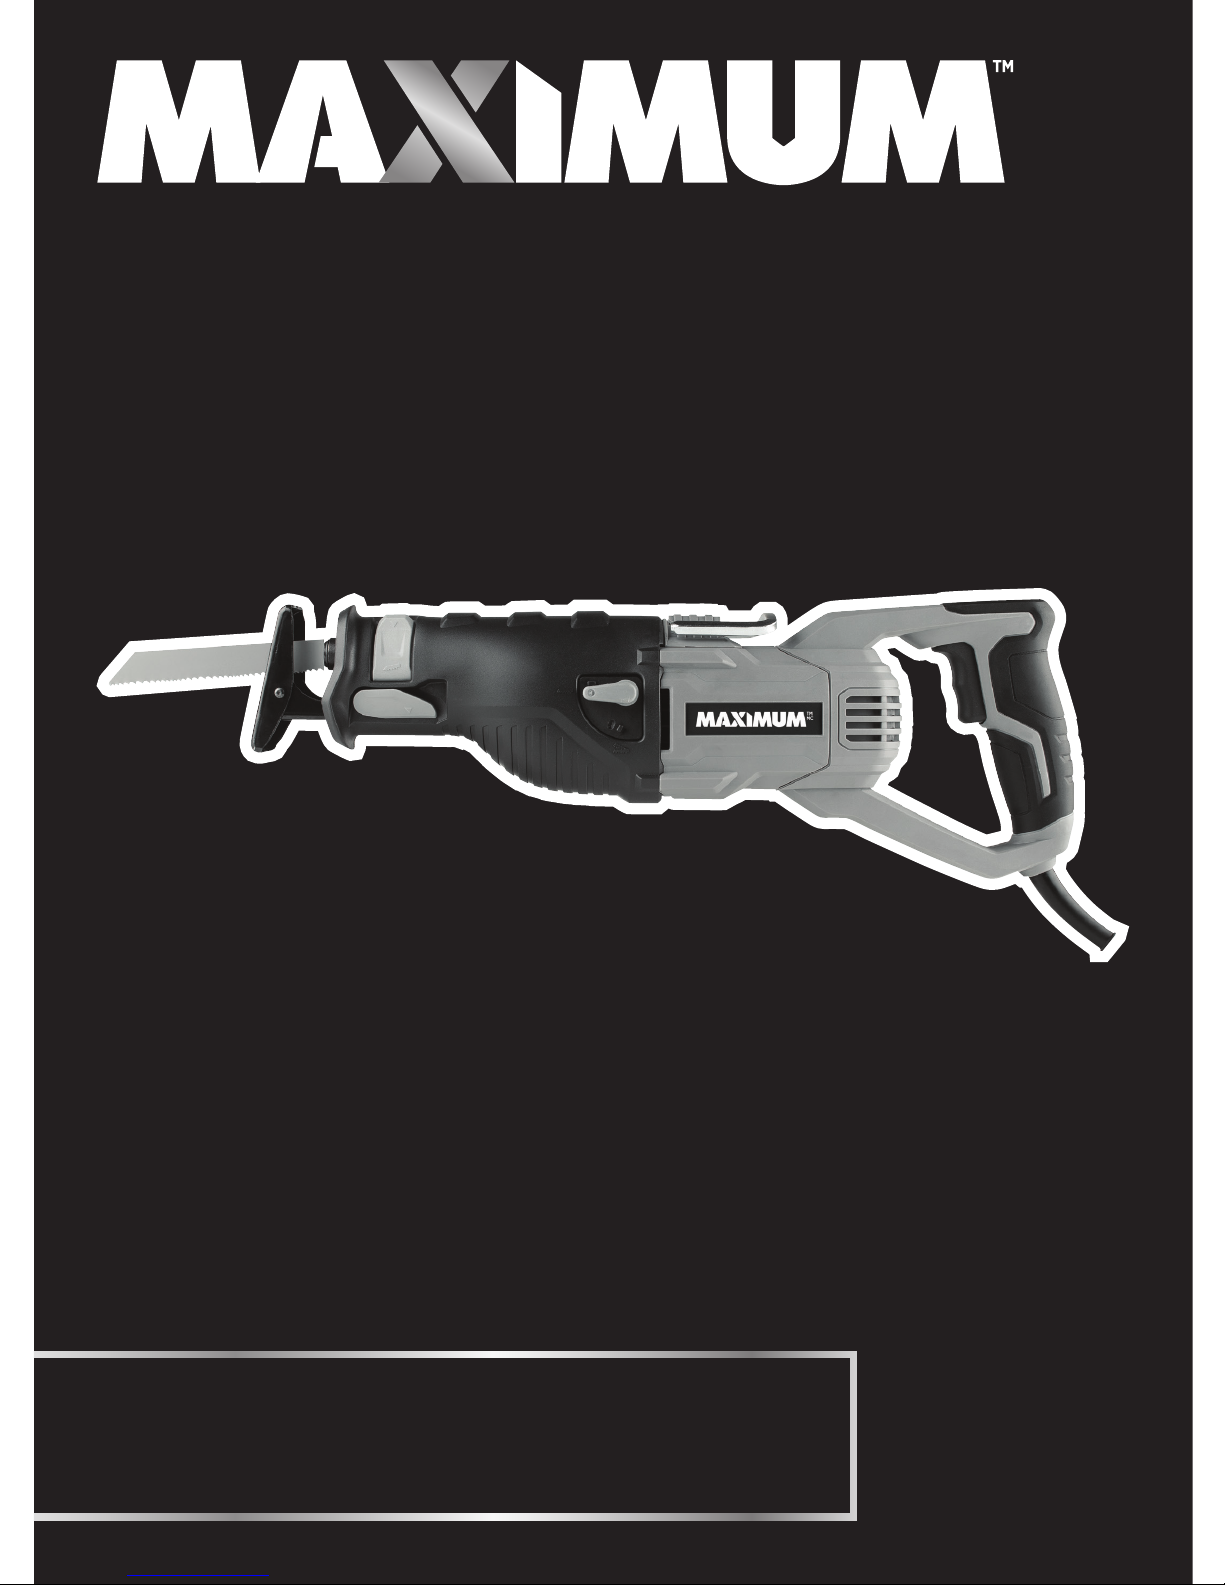
INSTRUCTION
MANUAL
Model No. 054-8286-4
RECIPROCATING SAW
IMPORTANT:
Please read this manual carefully before
using this product, and save it for reference.
Page 2

Page 3
3
TABLE OF CONTENTS
Technical Specifications 4
Safety Guidelines 5
Key Parts Diagram 9
Assembly Instructions 10
Operating Instructions 12
Maintenance 16
Troubleshooting 17
Parts List 18
Warranty 21
NOTE: If any parts are missing or damaged, or if you
have any questions, please call our toll-free helpline at
1-888-670-6682.
SAVE THESE INSTRUCTIONS
• This manual contains important safety and
operating instructions. Read all instructions
and follow them with use of this product.
TABLE OF CONTENTS
Page 4

4
model no. 054-8286-4 | contact us 1-888-670-6682
TECHNICAL SPECIFICATIONS
Motor 120V~, 60 Hz, 11A
Variable speed 0–2800 SPM (no load)
Blade stroke 1 1/8" (2.9 cm)
Power cord 10' (3 m)
Weight 8 lb 3 oz (3.7 kg)
TECHNICAL SPECIFICATIONS
Page 5
5
RULES FOR SAFE OPERATION
KNOW YOUR TOOL
To operate this tool, carefully read this Instruction Manual and all labels affixed
to the reciprocating saw before using it. Keep this manual available for future
reference.
IMPORTANT
This tool should only be serviced by a qualified service technician. For more
information, call the toll free helpline at 1-888-670-6682.
READ ALL INSTRUCTIONS CAREFULLY
SAVE THESE INSTRUCTIONS
GENERAL POWER TOOL SAFETY WARNINGS
WARNING!
Read all safety warnings and instructions. Failure to follow the warnings
and instructions may result in electric shock, fire and/or serious injury.
SAVE ALL WARNINGS AND INSTRUCTIONS FOR FUTURE REFERENCE.
The term “power tool” in the warnings refers to your mains-operated (corded)
power tool or battery-operated (cordless) power tool.
WORK AREA SAFETY
• Keep the work area clean and well lit. Cluttered or dark areas invite accidents.
• Do not operate power tools in explosive atmospheres, such as in the presence
of flammable liquids, gases or dust. Power tools create sparks, which may
ignite the dust or fumes.
• Keep children and bystanders away while operating a power tool. Distractions
can cause you to lose control.
ELECTRICAL SAFETY
• Power tool plugs must match the outlet. Never modify the plug in any way. Do
not use any adapter plugs with earthed (grounded) power tools. Unmodified
plugs and matching outlets will reduce risk of electric shock.
• Avoid body contact with earthed or grounded surfaces, such as pipes,
radiators, ranges and refrigerators. There is an increased risk of electric shock
if your body is earthed or grounded.
• Do not expose power tools to rain or wet conditions. Water entering a power
tool will increase the risk of electric shock.
SAFETY GUIDELINES
Page 6
6
model no. 054-8286-4 | contact us 1-888-670-6682
• Do not abuse the cord. Never use the cord for carrying, pulling or unplugging
the power tool. Keep cord away from heat, oil, sharp edges or moving parts.
Damaged or entangled cords increase the risk of electric shock.
• When operating a power tool outdoors, use an extension cord suitable for
outdoor use. Use of a cord suitable for outdoor use reduces the risk of electric
shock.
• If operating a power tool in a damp location is unavoidable, use a ground-fault
circuit interrupter (GFCI) protected supply. Use of a GFCI reduces the risk of
electric shock.
PERSONAL SAFETY
• Stay alert, watch what you are doing and use common sense when operating a
power tool. Do not use a power tool while you are tired or under the influence
of drugs, alcohol or medication. A moment of inattention while operating
power tools may result in serious personal injury.
• Use personal protective equipment. Always wear eye protection. Protective
equipment such as dust mask, non-skid safety shoes, hard hat, or hearing
protection used for appropriate conditions will reduce personal injuries.
• Prevent unintentional starting. Ensure the switch is in the off-position before
connecting to power source and/or battery pack, picking up or carrying the
tool. Carrying power tools with your finger on the switch or energising power
tools that have the switch on invites accidents.
• Remove any adjusting key or wrench before turning the power tool on. A
wrench or a key left attached to a rotating part of the power tool may result in
personal injury.
• Do not overreach. Keep proper footing and balance at all times. This enables
better control of the power tool in unexpected situations.
• Dress properly. Do not wear loose clothing or jewellery. Keep your hair,
clothing and gloves away from moving parts. Loose clothes, jewellery or long
hair can be caught in moving parts.
• If devices are provided for the connection of dust extraction and collection
facilities, ensure these are connected and properly used. Use of these devices
can reduce dust-related hazards.
POWER TOOL USE AND CARE
• Do not force the power tool. Use the correct power tool for your application.
The correct power tool will do the job better and more safely at the rate for
which it was designed.
• Do not use the power tool if the switch does not turn it on and off. Any power
tool that cannot be controlled with the switch is dangerous and must be
repaired.
SAFETY GUIDELINES
Page 7

7
• Disconnect the plug from the power source and/or the battery pack from the
power tool before making any adjustments, changing accessories, or storing
power tools. Such preventive safety measures reduce the risk of starting the
power tool accidentally.
• Store idle power tools out of the reach of children and do not allow persons
unfamiliar with the power tool or these instructions to operate the power tool.
Power tools are dangerous in the hands of untrained users.
• Maintain power tools. Check for misalignment or binding of moving parts,
breakage of parts and any other condition that may affect the power tool’s
operation. If damaged, have the power tool repaired before use. Many
accidents are caused by poorly maintained power tools.
• Keep cutting tools sharp and clean. Properly maintained cutting tools with
sharp cutting edges are less likely to bind and are easier to control.
• Use the power tool, accessories, tool bits, etc. in accordance with these
instructions, taking into account the working conditions and the work to be
performed. Use of the power tool for operations different from those intended
could result in a hazardous situation.
SERVICE
• Have your power tool serviced by a qualified repair person using only
identical replacement parts. This will ensure that the safety of the power tool
is maintained.
SAFETY GUIDELINES RECIPROCATING SAWS
• Hold the power tool by its insulated gripping surfaces when performing an
operation where the cutting accessory may contact hidden wiring or its own
cord. If a cutting accessory contacts a “live” wire, it may cause the exposed
metal parts of the power tool to become “live” and shock the operator.
• Use clamps or another practical way to support the workpiece and secure it
to a stable platform. Holding the work by hand or against your body leaves it
unstable and may lead to loss of control.
• Do not use dull or damaged blades. A bent blade can break easily or cause
kickback.
• Before starting to cut, turn the tool ON and allow the blade to come to full
speed. The tool can chatter or vibrate if the blade speed is too slow at the
beginning of cut and could kickback.
• Before plugging the tool in, check that the trigger switch is in the OFF
position. Accidental start-up could cause injury.
• Keep hands away from cutting area. Do not reach under the material being cut.
The proximity of the blade to your hand is hidden from your sight.
• Always wear safety goggles or eye protection when using this tool. Use a dust
mask or respirator for applications that generate dust.
SAFETY GUIDELINES
Page 8
8
model no. 054-8286-4 | contact us 1-888-670-6682
• Wear ear protection. Exposure to noise can cause hearing loss.
• When removing the blade from the tool, avoid contact with skin and use
proper protective gloves when grasping the blade or accessory. Accessories
may be hot after prolonged use.
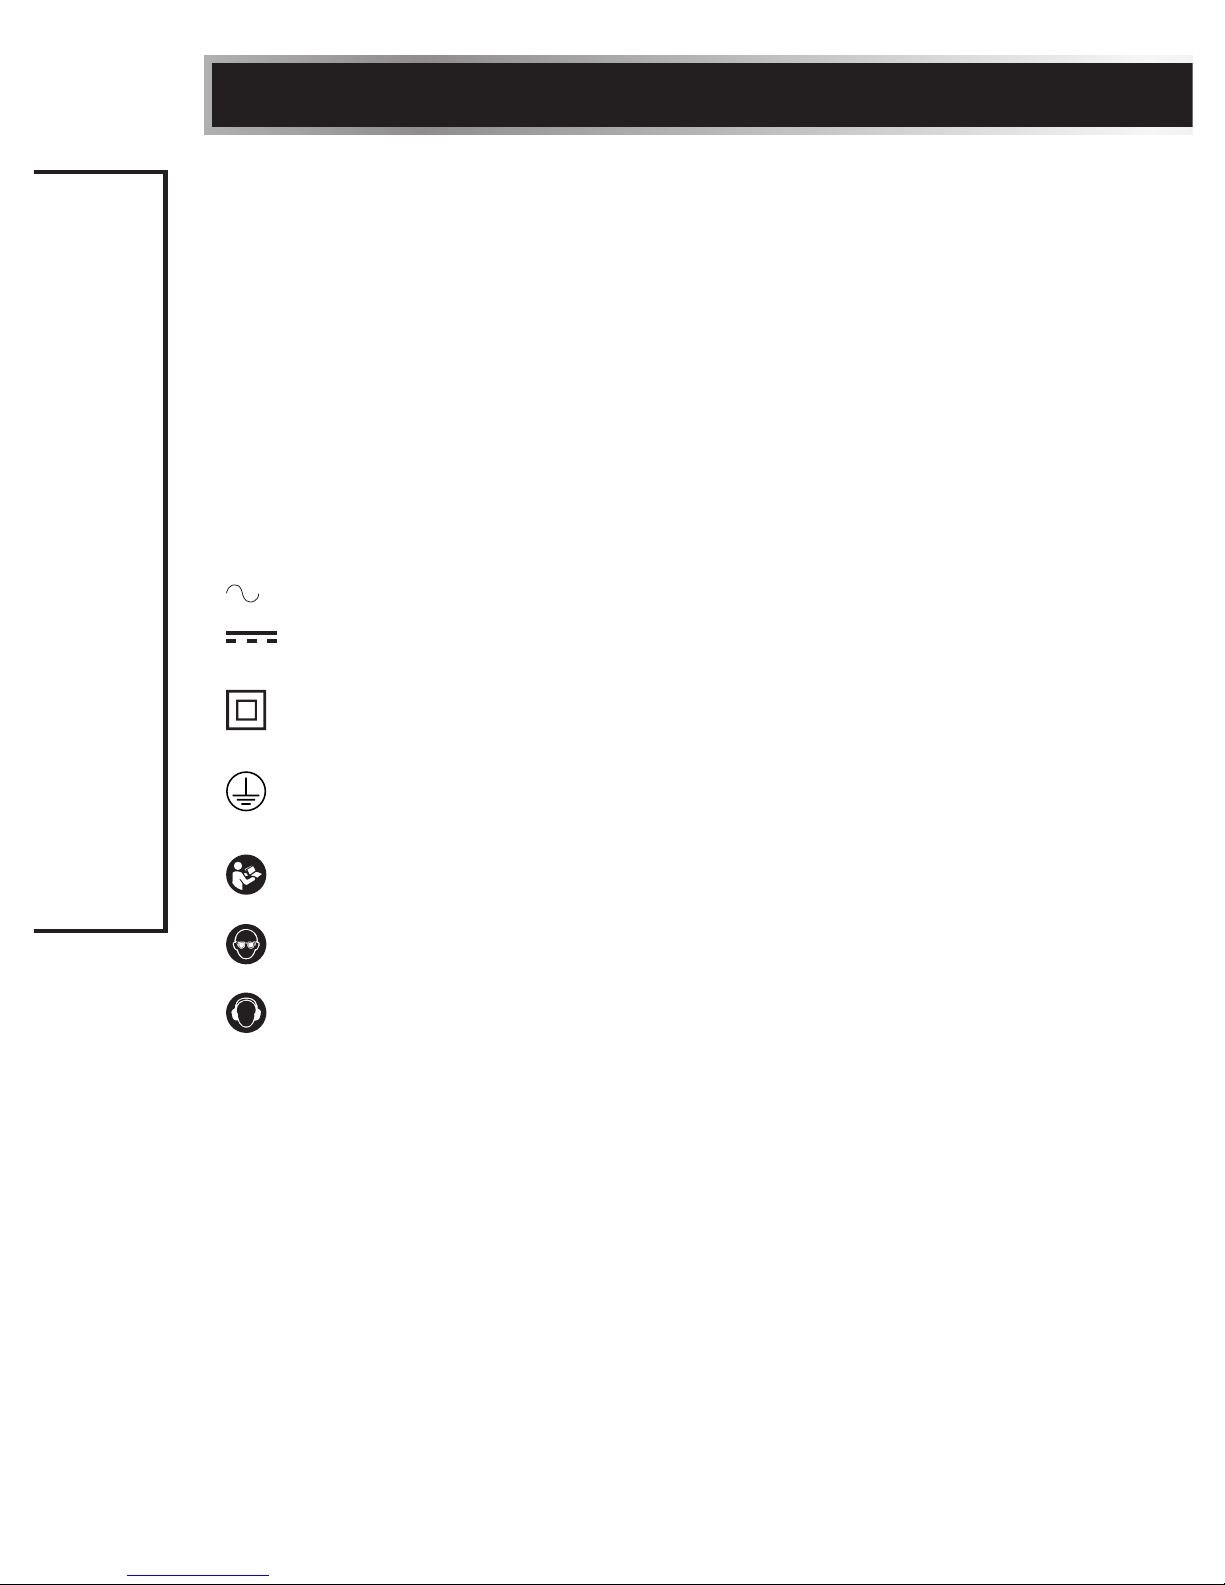
• The label on your tool may include the following symbols. The symbols and
their definitions are as follows:
V ..................... Volts
A ..................... Amperes
Hz ................... Hertz
W .................... Watts
min ................. Minutes
............... Alternating current
............. Direct current
n
0
................... No-load speed
............... Class II Construction
…/min ........... Revolutions or reciprocations per minute
............... Grounding terminal
BPM ............... Beats per minute
.............. WARNING – To reduce the risk of injury, user must read
instruction manual.
.............. WARNING – To reduce the risk of injury always wear eye
protection.
.............. WARNING – To reduce the risk of injury always wear ear
protection.
SAFETY GUIDELINES
Page 9
9
PACKAGE CONTENTS
Reciprocating saw, general cutting blade and instruction manual.
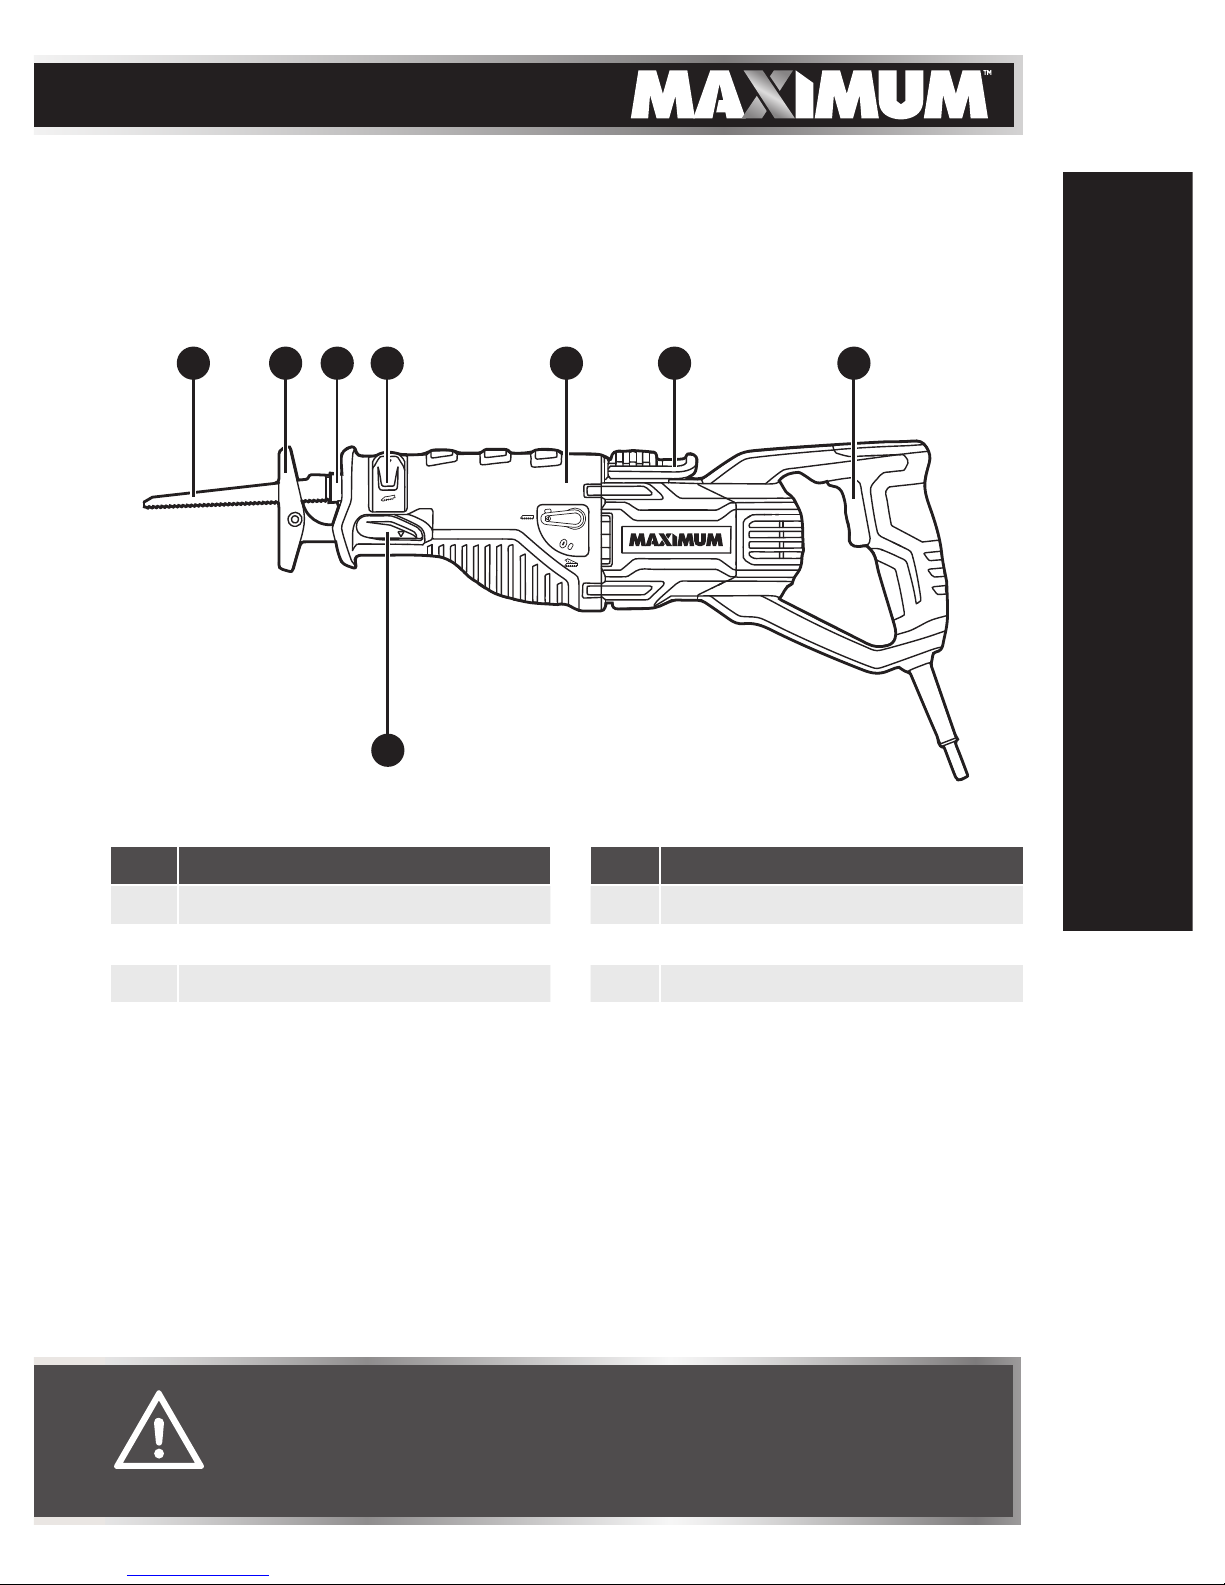
KEY PARTS DIAGRAM
1 2 3 4 6 7 8
5
NO. PART NO. PART
1 Blade 5 Shoe-release lever
2 Pivot shoe 6 Orbital function lever
3 Tool-less blade clamp 7 Utility hook
4 Blade-clamp lever 8 Variable-speed trigger
KEY PARTS DIAGRAM
WARNING!
• Remove the reciprocating saw from the package and examine it
carefully. Do not discard the carton or any packaging material until
all parts have been examined.
Page 10
10
model no. 054-8286-4 | contact us 1-888-670-6682
ASSEMBLY INSTRUCTIONS
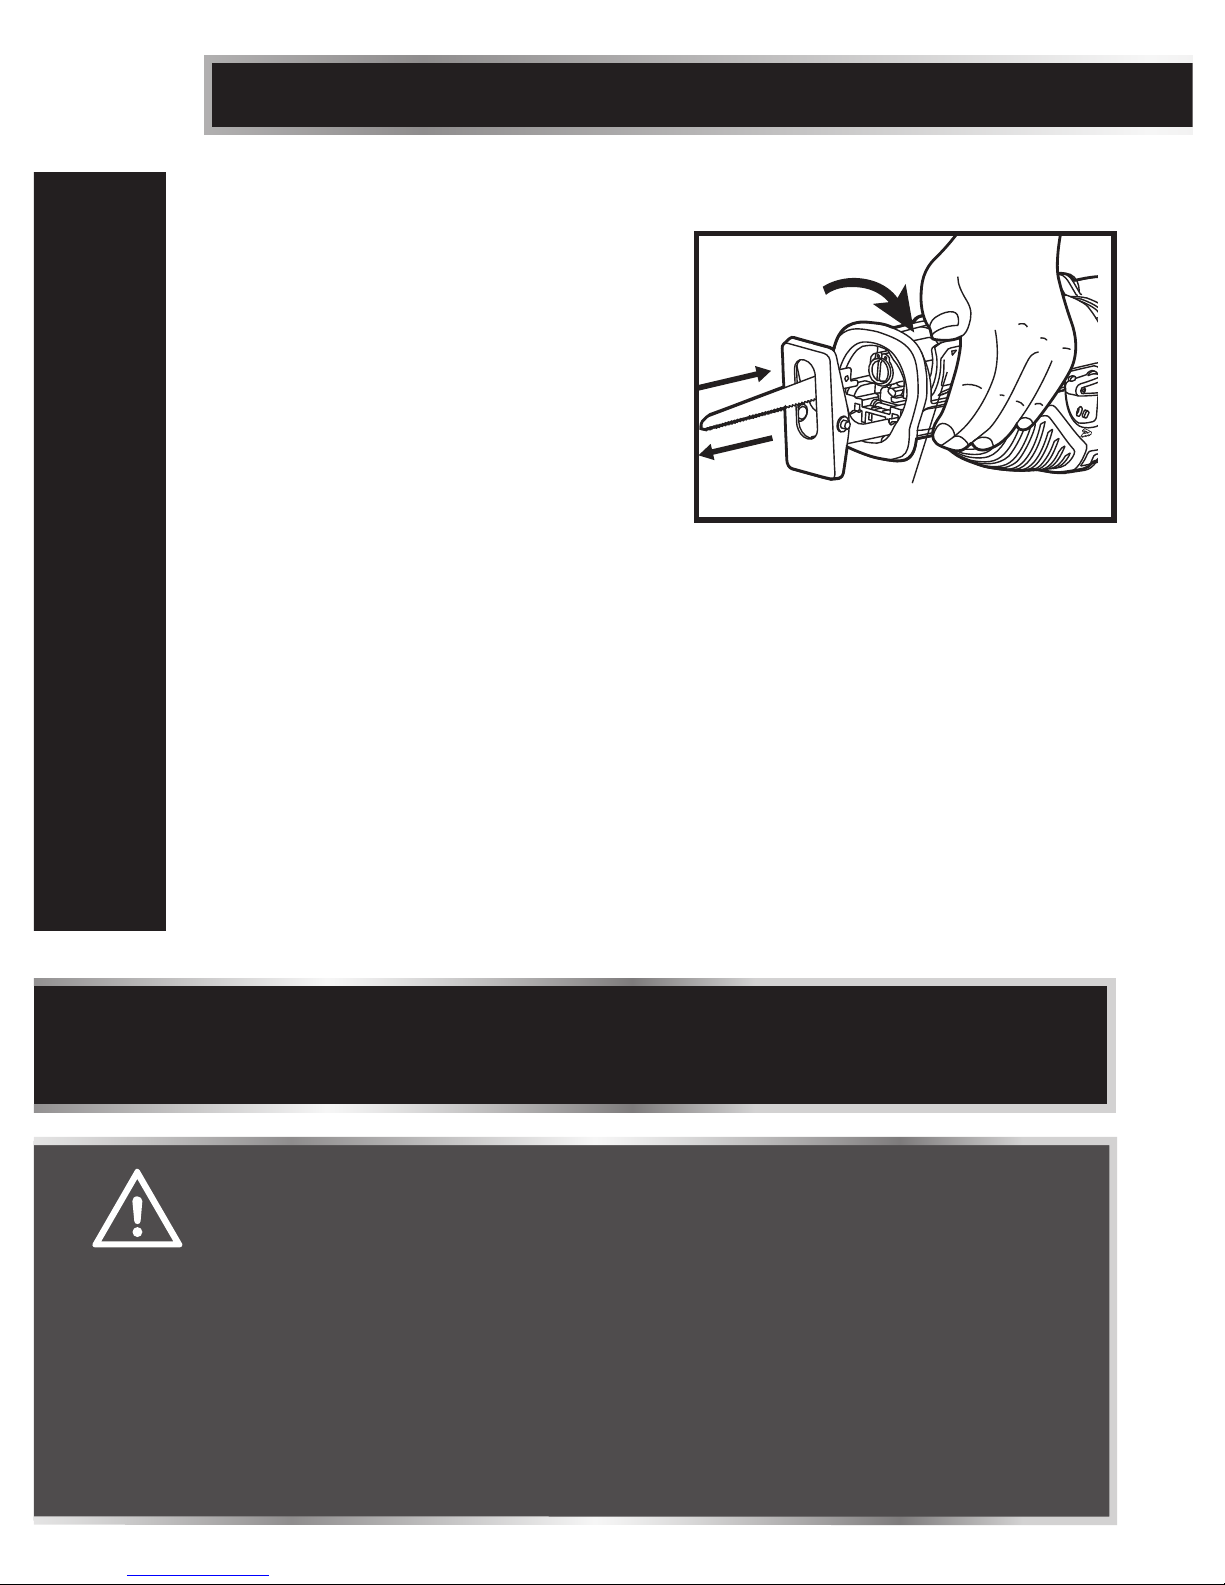
INSTALLING SAW BLADE (g 1)
1. Unplug the saw from the power supply.
2. Pull the blade-clamp lever as far as
it will go to open the tool-less blade
clamp.
3. Insert the blade until it stops, then
release the blade-clamp lever to lock
the blade in position.
4. Use your gloved hand to push in and
pull out on the blade to be sure the
blade is clamped securely.
REMOVING SAW BLADE (g 1)
1. Unplug the saw from the power supply.
2. To remove the blade, pull the blade-clamp lever as far as it will go and, with
your gloved hand, pull the blade out of the blade clamp.
ASSEMBLY INSTRUCTIONS
Blade-clamp lever
g 1
NOTICE: The blade may be installed with the teeth pointing up or down,
according to the needs of the cutting operation. Note that orbital action is
effective only when the saw blade teeth face down.
WARNING!
• Never connect the reciprocating saw to the power source when you are
assembling parts, making adjustments, installing or removing the blade,
cleaning, or when it is not in use. Disconnecting the reciprocating saw will
prevent accidental starting, which could cause serious personal injury.
• Make sure that the front end of the blade extends through the footplate
for the entire stroke length. Do not use specialty blades that are very short
or those with a significant cant. Blade must not contact footplate. A blade
which is too short or tilted could jam inside the foot and snap.
• For all work and when changing the blade, always wear protective gloves.
The sharp edges of the blade will cause personal injury. The blade can be
very hot while working.
Page 11
11
PIVOT SHOE
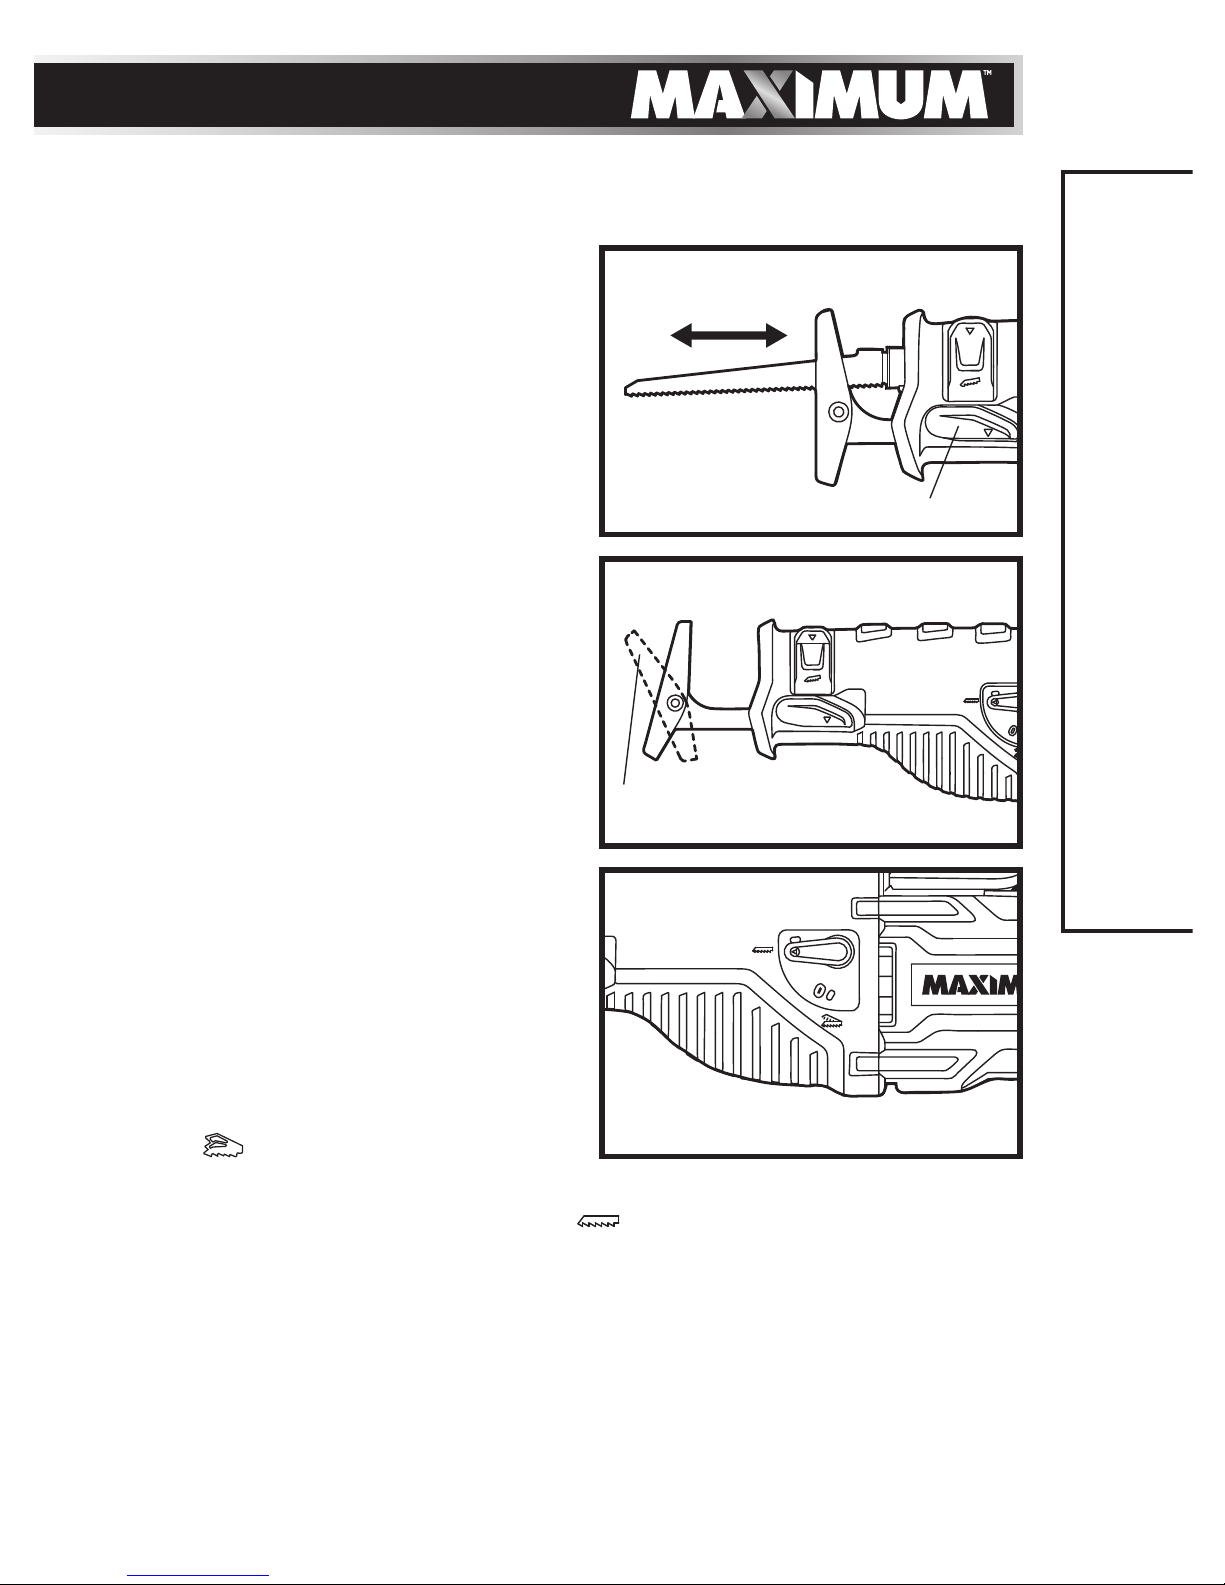
Sliding the shoe in or out (fig 2)
For maximum control and longer blade
life, the base assembly slides in or out to
adjust the effective stroke length.
1. Disconnect the saw from the power
supply.
2. Pull the shoe-release lever (5) and slide
the pivot shoe to the desired position.
3. Release the shoe-release lever in
order to lock the shoe in the desired
position.
Pivoting the shoe (fig 3)
The shoe pivots to provide maximum
control against the surface being cut.
1. Unplug the reciprocating saw from the
power supply.
2. Hold the saw firmly, and then pivot the
shoe to the desired angle.
ORBITAL ACTION (g 4)
This reciprocating saw has the option
of pendulum action to make the blade
swing slightly as it cuts: orbital action.
1. Disconnect the saw from the power
supply.
2. Turn the orbital function lever to
the “
” position for orbital
cutting action.
3. Turn the orbital function lever to the “
” position for straight
cutting action.
Orbital action increases the speed of the cut, but may result in a rougher finish
to the cut in some materials.
Experiment on a piece of scrap material to determine the optimum action
setting.
ASSEMBLY INSTRUCTIONS
g 4
g 3
Pivot shoe
g 2
Shoe-release lever
Out
In
Page 12

12
model no. 054-8286-4 | contact us 1-888-670-6682
OPERATING INSTRUCTIONS
LED WORKLIGHT
The LED worklight, located next to the tool-less blade clamp of this tool, will
illuminate when the saw is turned on. This provides additional light on the
surface of the workpiece for operation in lower-light conditions. The LED
worklight will turn off when the saw is turned off.
UTILITY HOOK
Your tool is equipped with a convenient utility hook for hanging your tool. To
use, simply lift up hook until it snaps into the open position. When not in use,
always lower hook until it snaps into the closed position.
TURNING THE SAW ON AND OFF
To turn the saw ON, squeeze the trigger switch.
To turn the saw OFF, release the trigger switch.
The variable-speed trigger switch delivers higher speed with increased trigger
pressure and lower speed with decreased trigger pressure.
OPERATING INSTRUCTIONS
Page 13
13
GENERAL CUTTING
1. Disconnect the saw from the power supply.
2. Make sure that the workpiece is firmly anchored: clamp the workpiece to keep
it from slipping or moving while cutting.
3. Use the appropriate type and size of blade for the workpiece material and size.
4. Adjust the pivot shoe as necessary to make sure that the blade will extend
beyond the shoe and through the workpiece at all times.
5. Adjust the pivot shoe as necessary to expose unworn blade teeth for longer
blade life.
6. Check for clearance behind the workpiece so that the blade will not contact
another surface.
7. Mark the line of cut clearly.
8. Plug the reciprocating saw into an electrical outlet.
9. Hold the saw firmly with both hands. Make sure to keep your hands on the
insulated gripping areas only.
10. Depress the trigger switch to turn on the tool; allow it to come to the desired
cutting speed before applying the blade to the workpiece.
11. Do not force the tool. Place the shoe firmly on the workpiece while cutting.
Use only enough steady pressure on the blade to keep the saw cutting.
12. Reduce pressure as the blade comes to the end of the cut.
13. When sawing fibreglass, plaster, wallboard, or spackling compound, clean the
motor vents frequently with a vacuum or compressed air. These materials are
highly abrasive and may accelerate the wear on motor bearings and brushes.
OPERATING INSTRUCTIONS
WARNING!
• Always wear safety goggles when cleaning tools using
compressed air.
• Hold the tool only by the plastic handle and the insulated grip
area to help prevent electric shock. When sawing into walls or
floors you may encounter electrical wiring. Sawing into a “live”
wire will cause electric shock.
Page 14
14
model no. 054-8286-4 | contact us 1-888-670-6682
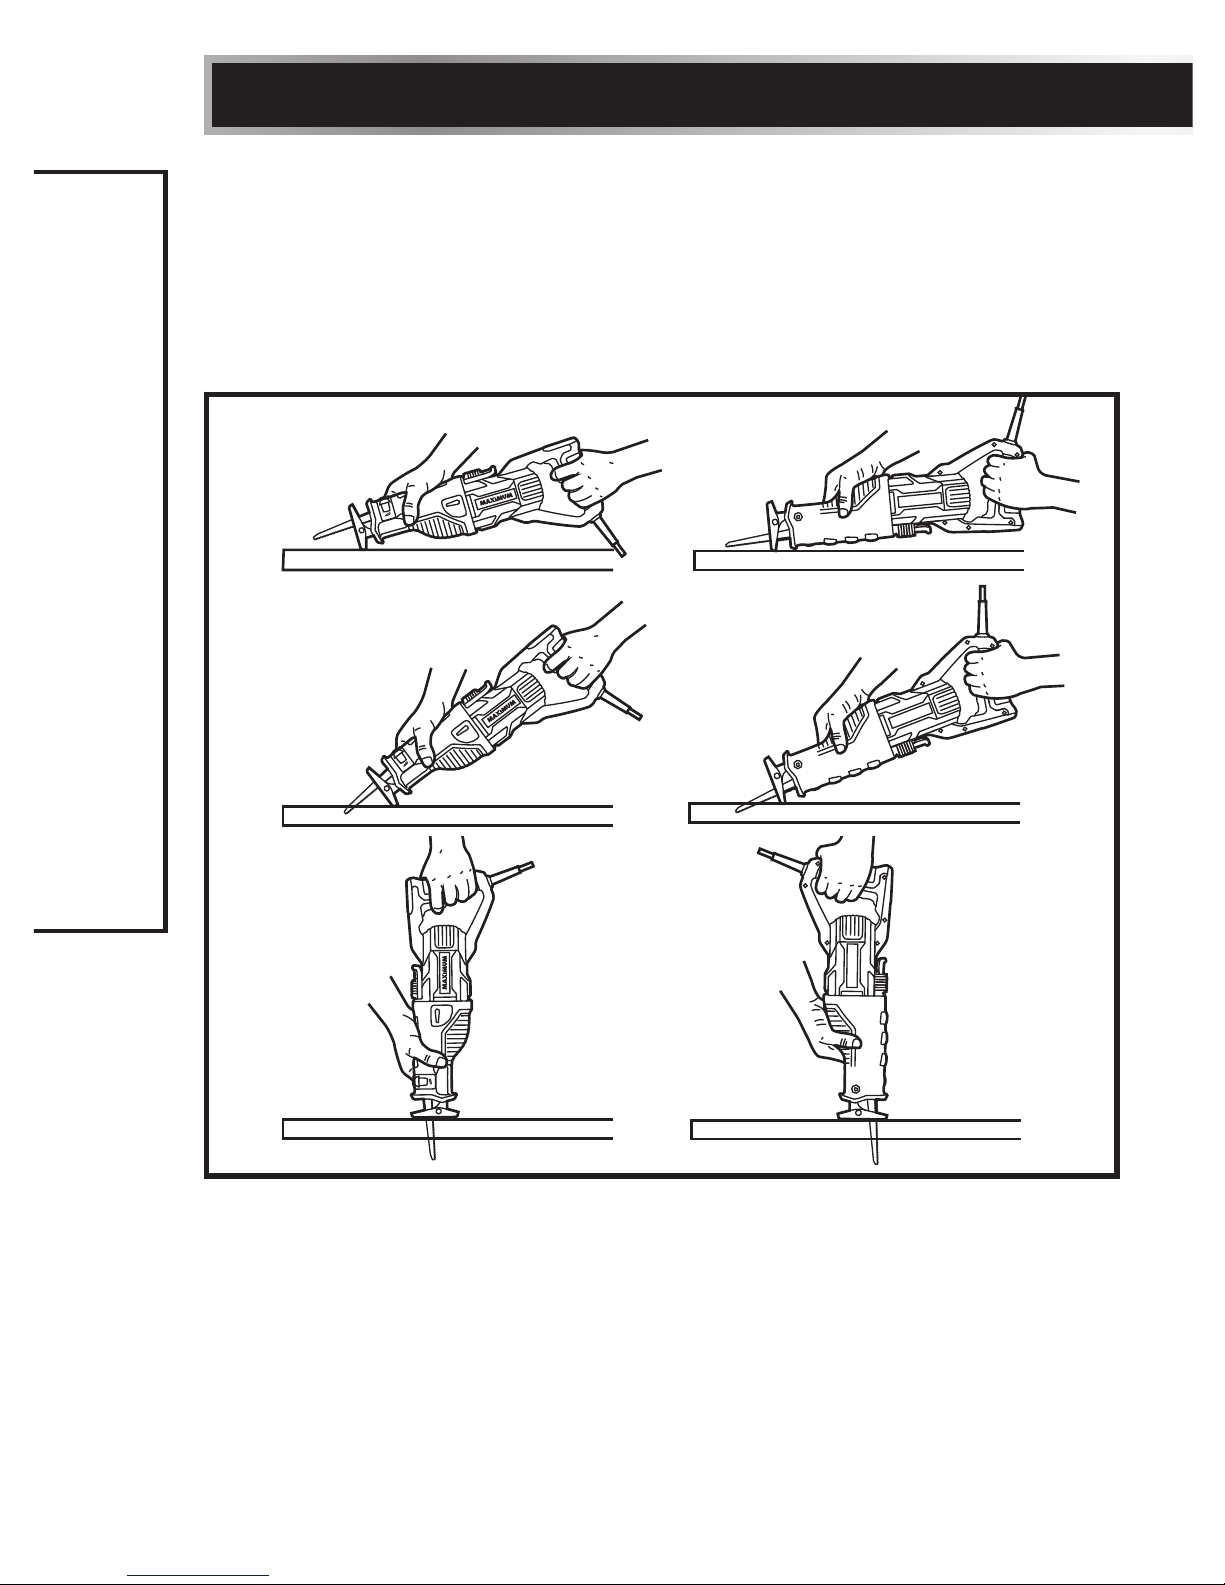
PLUNGE CUTTING (g 5)
Your reciprocating saw is ideal for plunge cutting directly into surfaces that cannot
be cut from an edge, such as walls or floors. Plunge cutting may be done two ways,
depending on how the blade is installed.
Column A shows how to plunge cut with the teeth of the blade facing down.
Column B shows how to plunge cut with the teeth of the blade facing up.
g 5
A B
1. Disconnect the saw from the power supply.
2. Make sure that the workpiece is firmly anchored; clamp the workpiece to keep
it from slipping or moving while cutting.
3. Use the appropriate type and size of blade for the workpiece material and size.
4. Install the blade into the tool.
5. Adjust the pivot shoe as necessary to make sure that the blade will extend
beyond the shoe and through the workpiece at all times.
6. Adjust the pivoting shoe as necessary to expose unworn blade teeth for
longer blade life.
OPERATING INSTRUCTIONS
Page 15
15
7. Check for clearance behind the workpiece so that the blade will not contact
another surface.
8. Plug the reciprocating saw into an electrical outlet.
9. If the blade is inserted with the teeth facing downward, hold the tool as
shown in Column A, resting the edge of the shoe on the workpiece. If the
blade is inserted with the teeth facing upward, hold the tool as shown in
Column B, resting the edge of the shoe on the workpiece.
10. With the blade just above the workpiece, switch on the tool; allow it to come
to the desired speed. Then, using the edge of the shoe as a pivot, lower the
blade into the workpiece.
11. As the blade starts cutting, raise the handle of the tool slowly, until the shoe
rests firmly on the workpiece.
12. After the blade has penetrated through the workpiece, continue sawing along
the marked cutting line.
METAL CUTTING
The saw can be used to cut metals, such as sheet steel, pipe, steel rods,
aluminum, brass, and copper. Be careful not to twist or bend the saw blade.
Do not force the tool.
The use of cutting oil is recommended when cutting soft metals and steel. Cutting
oil will keep the blade cool, increase cutting action, and prolong blade life.
• Never use gasoline as a cutting lubricant, because normal sparking could ignite
the fumes.
• Securely clamp the workpiece in position, and make the cut close to the
clamping point to minimize vibration.
• When cutting conduit pipe or angle iron, clamp the work in a vise, if possible,
and cut close to the vise.
• To cut thin sheet material, “sandwich” the material between pieces of
hardboard or plywood, and clamp the layers together to reduce vibration and
tearing of the material.
OPERATING INSTRUCTIONS
NOTICE: To make plunge cutting easier, use a heavy gauge blade and install
the blade with the teeth facing upward relative to the normal upright operating
position of the saw as shown in Column B.
WARNING!
• Risk of injury, don’t plunge cut in metal.
• Never use the wood-cutting blade for cutting metals. Failure to
do so could result in serious personal injury.
Page 16

16
model no. 054-8286-4 | contact us 1-888-670-6682
MAINTENANCE
BEFORE EACH USE
1. Inspect the reciprocating saw, the on/off switch, the cord and the accessories
for damage.
2. Check for damaged, missing, or worn parts.
3. Check for loose screws, misalignment or binding of moving parts, or any other
condition that may affect the operation.
4. If abnormal vibration or noise occurs, turn the tool off immediately and have
the problem corrected before further use.
5. Unplug the tool from power source before cleaning or performing any
maintenance. Using compressed air may be the most effective cleaning
method. Always wear safety goggles when cleaning tools using compressed air.
LUBRICATION
All of the bearings in this tool are lubricated with a sufficient amount of highgrade lubricant for the life of the unit under normal conditions. Therefore, no
further lubrication is required.
MAINTENANCE
WARNING!
• Do not allow brake fluids, gasoline and petroleum-based products,
penetrating oil, etc. to come into contact with plastic parts. These
substances contain chemicals that can damage, weaken, or destroy plastic.
• When servicing, use only identical replacement parts. The use of any other
parts may create a hazard or cause damage to the product.
• Use only accessories that are recommended for this reciprocating saw
by the manufacturer. Accessories that may be suitable for one tool may
become hazardous when used with another tool.
• If the supply cord is damaged, it must be replaced by a specially prepared
cord available through the service organization.
• To ensure safety and reliability, all repairs should be performed by a
qualified service technician.
Page 17

17
TROUBLESHOOTING
PROBLEM POSSIBLE CAUSES SOLUTIONS
The motor is
overheating.
Cooling vents are
obstructed.
Clean and clear vents.
Do not cover with hand
during operation.
Blade cannot be
removed.
Saw dust in the clamp
slot.
Clean the clamp slot
with a brush.
Cutting is difficult. Saw blade is damaged. Replace the saw blade.
If the problem remains unsolved after performing the checks described above,
call the toll-free helpline at 1-888-670-6682.
TROUBLESHOOTING
Page 18
18
model no. 054-8286-4 | contact us 1-888-670-6682
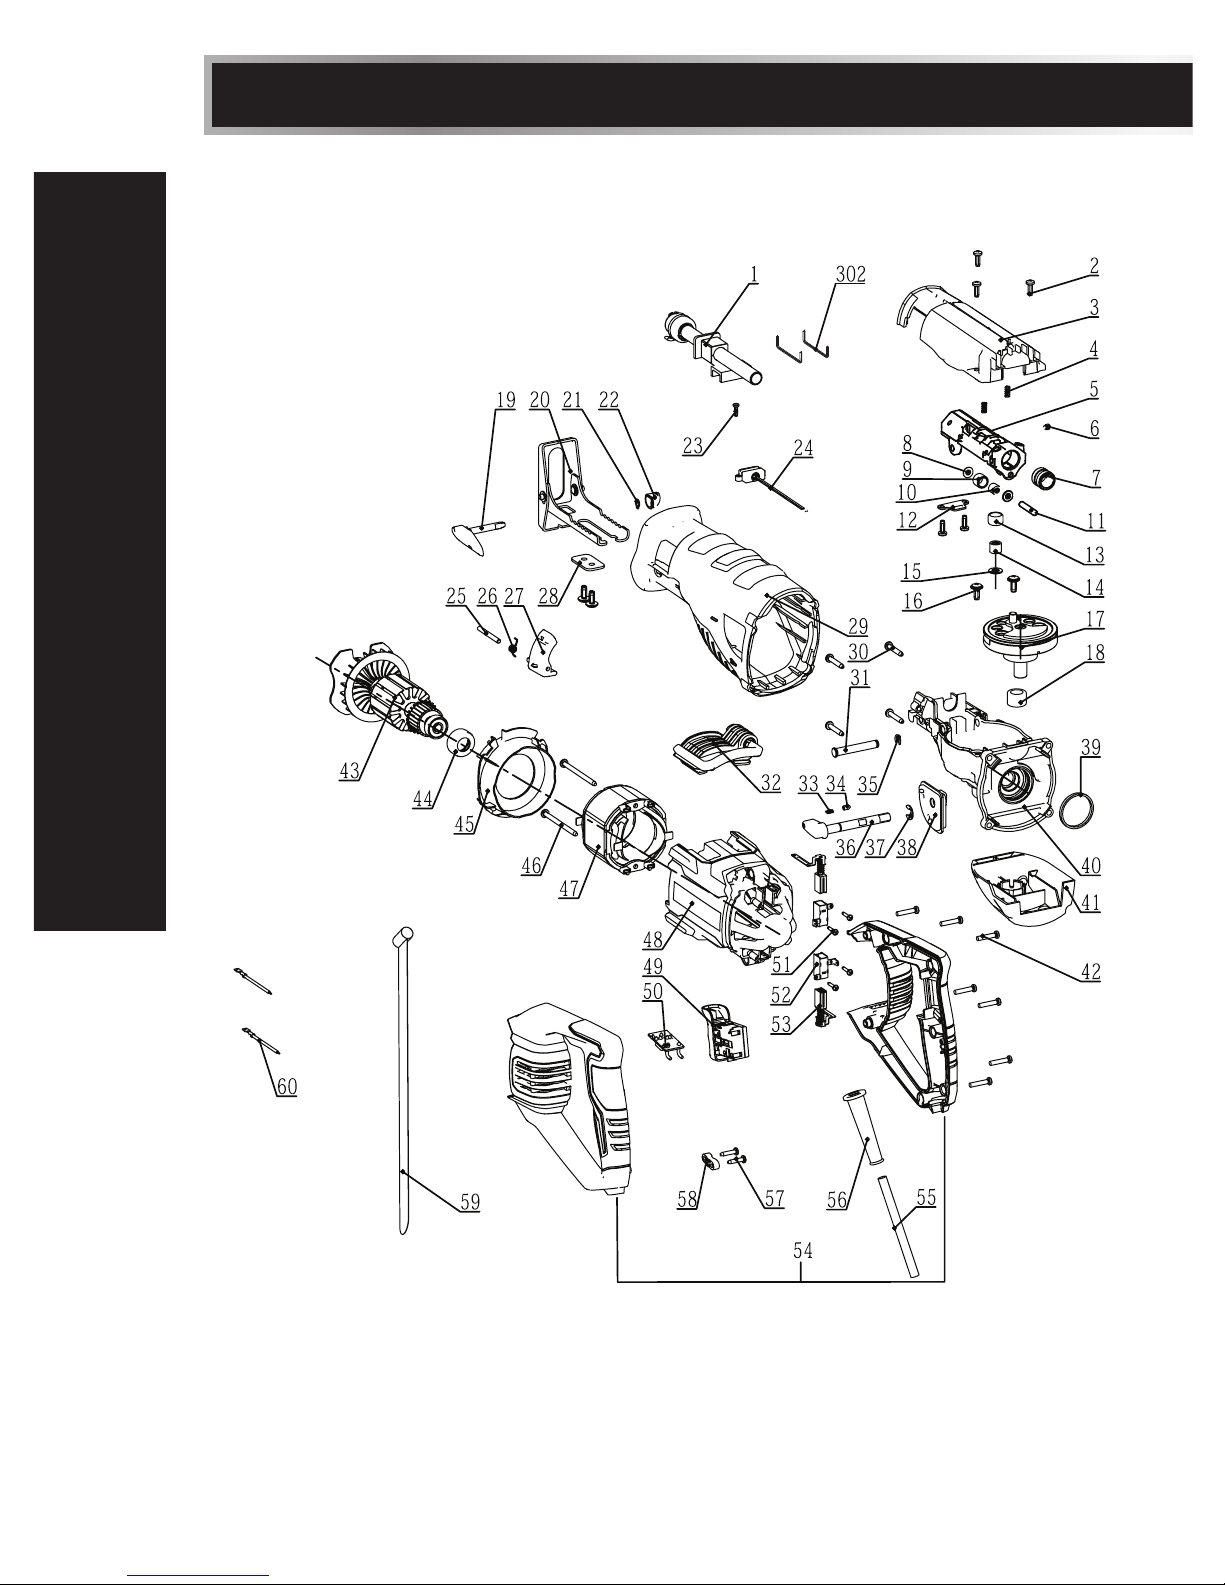
EXPLODED VIEW
PARTS LIST
Page 19
19
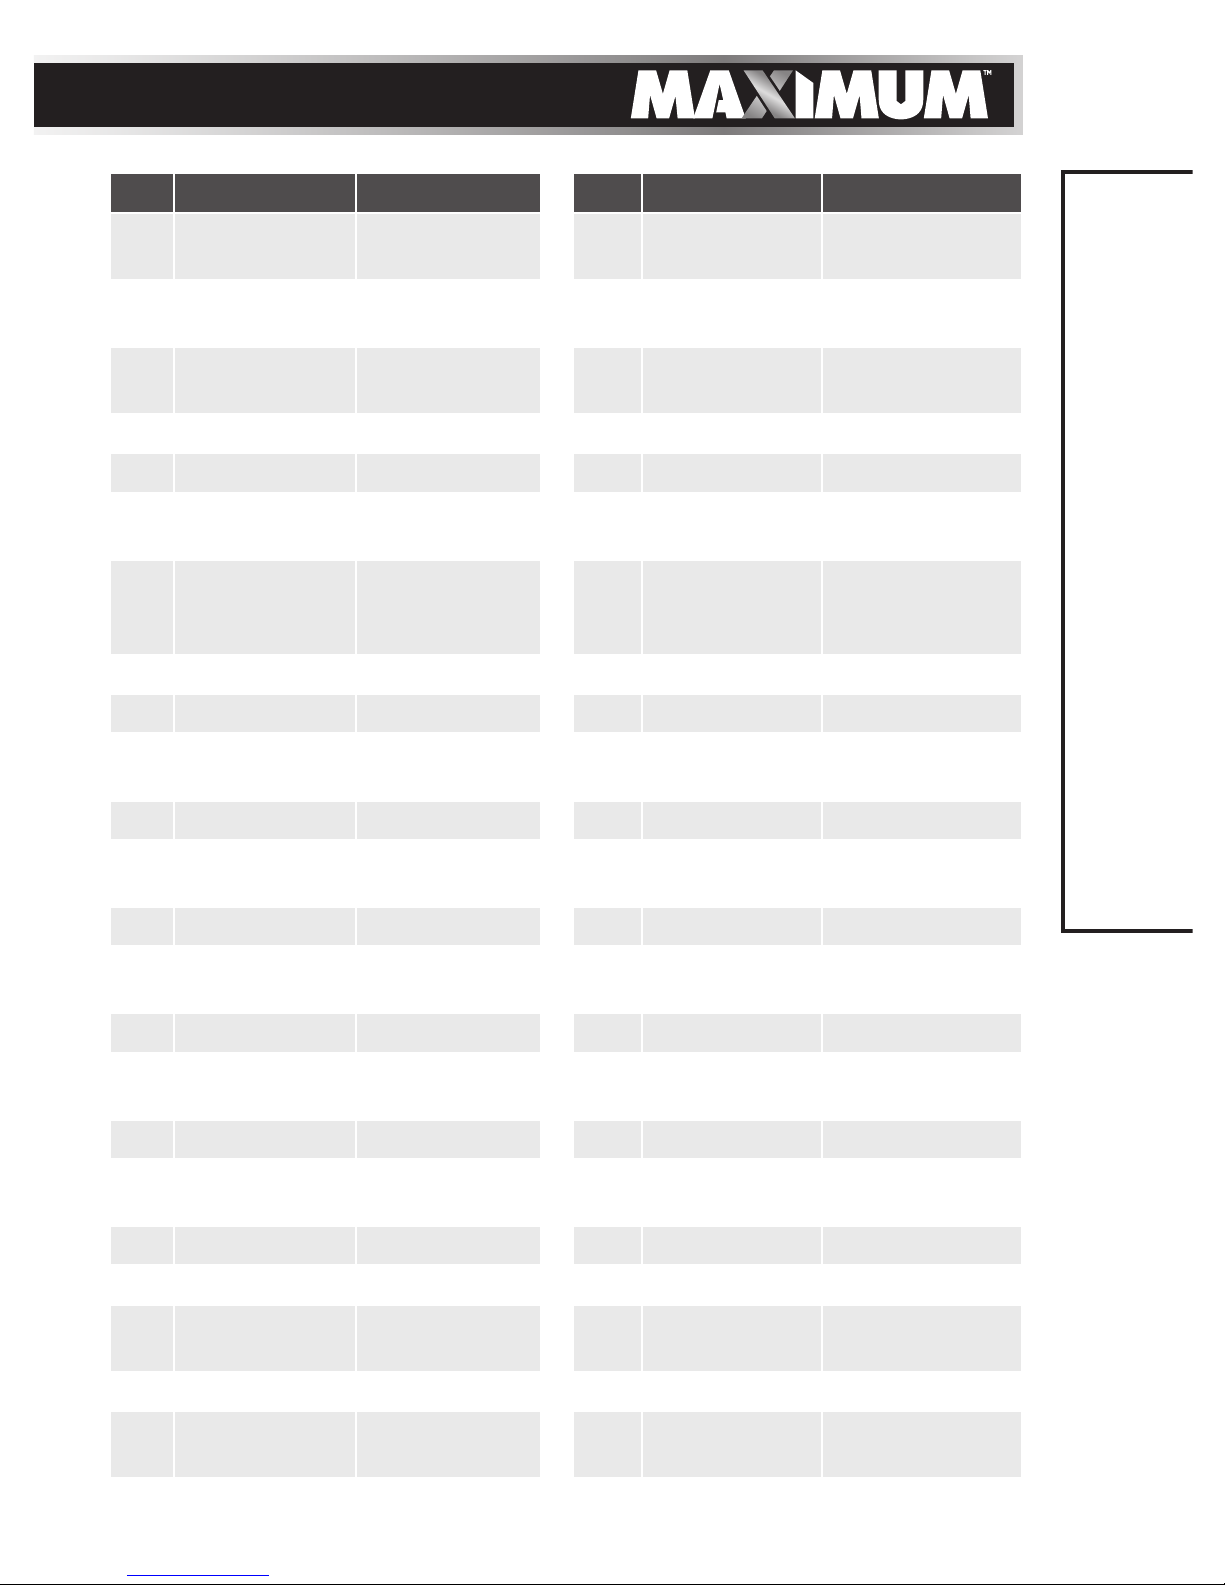
No. Part No. Description No. Part No. Description
1 2823904000 Quick clamp
assembly
25 5670285000 Pin
2 5610030000 Thread
forming screw
26 3660260000 Torsion spring
3 3127789000 Gear case
cover
27 3402195000 Lever
4 3660375000 Spring 28 3704168000 Clamp
5 3420830001 Bevel support 29 3127791000 Front handle
6 5620399000 Hexagon
socket screw
30 5610044000 Tapping screw
7 5700193000 Oil
impregnated
bearing
31 3550284000 Gear pin
8 3700197000 Washer 32 2824332000 Hook assembly
9 3550169000 Crank roller 33 3660050000 Spring b
10 5700022000 Needle
bearing
34 3700191000 Cap
11 5670186000 Pin 35 5660005000 E ring
12 3704273000 Bearing
clamping plate
36 3402668000 Pendulum lever
set
13 3551281000 Crank roller 37 5660029000 E ring
14 5700025000 Needle
bearing
38 3124150000 Limit plate
15 3700352000 Washer 39 3121057000 Rubber ring
16 5620396000 Screw with
washer
40 3421644900 Gear case
17 2822482000 Gear set 41 3127788000 Handle support
18 5700182000 Needle
bearing
42 5610248000 Tapping screw
19 3402708000 Lever 43 2823930000 Rotor set
20 2823896000 Pivot shoe 44 3121027000 Bearing holder
21 5660027000 Circlips for
shaft
45 3127870000 Fan baffle
22 3127830000 Seal cover 46 5610049000 Tapping screw
23 5610099000 Thread
forming screw
47 2740115000 Stator
24 2824042000 LED assembly 48 3127790000 Motor housing
PARTS LIST
Page 20

20
model no. 054-8286-4 | contact us 1-888-670-6682
No. Part No. Description No. Part No. Description
49 4870543000 Trigger switch 56 3121045000 Cord guard
50 4891167000 PCB assembly 57 5610024000 Tapping screw
51 5610008000 Tapping screw 58 3120234000 Cord anchorage
52 2800032000 Brush holder 59 2490136000 Nylon string
53 4960306000 Carbon brush 60 4860288000 Internal wire
assembly
54 2824331000 Handle
assembly
302 3650179000 Clamp Wire
55 4810002000 Power cord
and plug
If the problem remains unsolved after performing the checks described above,
call the toll-free helpline at 1-888-670-6682.
PART LIST
Page 21
21
5-YEAR LIMITED WARRANTY
This MAXIMUM product is guaranteed for a period of 5
years from the date of original retail purchase against
defects in workmanship and materials only and is
subject to the following components:
a) Component A: The carrying case is guaranteed for a
period of 1-year from the date of original retail purchase
against defects in workmanship and materials.
b) Component B: Accessories, including drill bits and
saw blades, do not carry a warranty.
Subject to the conditions and limitations described below,
this product, if returned to us with proof of purchase
within the stated warranty period and if covered under this warranty, will be
repaired or replaced (with the same model, or one of equal value or specification),
at the sole discretion of the Maximum Canada authorised repair centre (“Service
Provider”). We will bear the cost of any repair or replacement and any costs of
labour relating thereto.
These warranties are subject to the following conditions and limitations:*
a) a bill of sale verifying the purchase and purchase date must be provided;
b) defects in workmanship and material to be assessed and determined by the
Service Provider;
c) this warranty will not apply to any product or part thereof which is worn or
broken or which has become inoperative due to abuse, misuse, accidental
damage, neglect or lack of proper installation, operation or maintenance
(as outlined in the applicable owner’s manual or operating instructions);
d) this warranty does not apply to normal wear and tear or to expendable parts
or accessories (including drill bits and saw blades) that may be supplied with
the product that by their nature have a limited life span and are expected to
become inoperative or unusable after a reasonable period of use;
e) this warranty will not apply to routine maintenance and consumable items
such as, but not limited to, fuel, lubricants, vacuum bags, blades, belts,
sandpaper, bits, fluids, rubber o-rings, tune-ups or adjustments;
f) this warranty excludes the following components that may accompany your
product:
(1) the carrying case, which is only for a period of 1-year from the date of
original retail purchase against defects in workmanship and materials.
(2) accessories, including drill bits and saw blades, which do not carry a
warranty of any kind.
g) this warranty will not apply where damage is caused by repairs made or
attempted by others (i.e. persons not authorized by the manufacturer), and
any such unauthorized repairs or attempted repairs shall void this warranty
in its entirety;
WARRANTY
Page 22
22
model no. 054-8286-4 | contact us 1-888-670-6682
h) this warranty will not apply to any parts other than original parts, except to
the extent that the retailer or manufacturer or persons authorized by either
of them have repaired or replaced them;
i) this warranty will not apply to any product that was sold to the original
purchaser as a reconditioned or refurbished product (unless otherwise
specified in writing);
j) this warranty will not apply to any product or part thereof if any part from
another manufacturer is installed therein or any repairs or alterations have
been made or attempted by unauthorized persons;
k) this warranty will not apply to normal deterioration of the exterior finish,
such as, but not limited to, scratches, dents, paint chips, or to any corrosion
or discolouring by heat, abrasive and chemical cleaners; and
l) this warranty will not apply to component parts sold by and identified as
the product of another company, which shall be covered under that product
manufacturer’s warranty, if any;
m) any products replaced by the retailer in attempt to fulfill warranty
obligations is subject to the original product warranty conditions and
related time period as initiated by the original date of purchase; if product
is purchased in Quebec, the warranty term will be extended for a period
equal to the time during which the Quebec retailer possesses the product in
attempt to fulfill warranty obligations; replaced product will not default to
new product warranty conditions; and
n) the retailer and manufacturer’s sole obligation and the purchaser’s sole
remedy under this warranty shall be as set out herein. The warranties
contained herein are not transferable and are given only to the purchaser.
FURTHER, THE WARRANTIES SET OUT HEREIN ARE IN LIEU OF ALL
OTHER WARRANTIES OR CONDITIONS, WHETHER EXPRESS, IMPLIED OR
STATUTORY (INCLUDING SUCH AS ARISE UNDER THE SALE OF GOODS
ACT OR THE INTERNATIONAL SALE OF GOODS ACT), ARISING OUT OF A
COURSE OF DEALING OR USAGE OF TRADE OR OTHERWISE, INCLUDING,
SUBJECT TO APPLICABLE LAW, ANY IMPLIED WARRANTIES OR
CONDITIONS OF MERCHANTABILITY, MERCHANTABLE QUALITY, FITNESS
OR ADEQUACY FOR A PARTICULAR PURPOSE OR USE, AND ALL OTHER
SUCH WARRANTIES ARE EXPRESSLY DISCLAIMED BY THE RETAILER AND
MANUFACTURER.
Additional Limitations
This warranty applies only to the original purchaser and may not be transferred.
This warranty applies for a period of 5 years from the date of original retail
purchase, as indicated on the bill of sale.
Neither the retailer, Maximum Canada, nor the manufacturer shall be liable for
any other expense, loss or damage, including, without limitation, any indirect,
incidental, consequential or exemplary damages arising in connection with the
sale, use or inability to use this product.
WARRANTY
Page 23

23
Under no circumstances shall the retailer, Maximum Canada, or manufacturer
be liable to the purchaser for any claim for (a) indirect, special, punitive,
incidental, exemplary, or consequential damages, (b) compensation for loss of
profits, anticipated revenue, savings or goodwill, or other economic loss of the
purchaser, (c) exemplary, aggravated or punitive damages howsoever incurred,
(d) contribution or set-off in respect of any claims against the purchaser, (e)
any damages whatsoever relating to third party products or services or the
purchaser’s materials, or (f) any damages whatsoever relating to interruption,
delays, errors or omissions; in each case under any theory of law or equity,
arising out of or in any way related to this warranty, even if advised of the
possibility thereof. Notwithstanding any provision herein or entitlement of
the purchaser at law, in equity or otherwise, in no event shall the liability of
the retailer or manufacturer under this warranty, whether in contract, tort,
product liability or otherwise, exceed, in the aggregate, the amount paid by the
purchaser to the retailer for the product to which this warranty applies.
*Notice to Consumer
This warranty gives you specific legal rights, and you may have other rights, which
may vary from province to province. The provisions contained in this warranty are
not intended to limit, modify, take away from, disclaim or exclude any statutory
warranties set forth in any applicable provincial or federal legislation.
In addition to the 5-Year Limited Warranty, this MAXIMUM product is covered by our:
1-Year Repair Warranty
Maximum Canada will maintain this product and replace critical parts which
have worn beyond reasonable use through normal use of such product, any time
during the first year after purchase.
The following are excluded from this 1-Year Repair Warranty:
a) missing or damaged parts or components that are a result of abuse or
misuse;
b) any wear and tear to non-critical parts or accessories that do not affect the
core function of the product.
90-Day Satisfaction Guarantee
If you are not completely satisfied with the performance of your MAXIMUM
product for any reason, you can return it within 90 days from the date of
purchase with proof of purchase for exchange or a full refund.
Made in China
Imported by
MAXIMUM Canada Toronto, Canada M4S 2B8
WARRANTY
Page 24

 Loading...