

Page 1
TM
IMPORTANT:
Please read this manual carefully before using
this product, and save it for reference.
INSTRUCTION
MANUAL
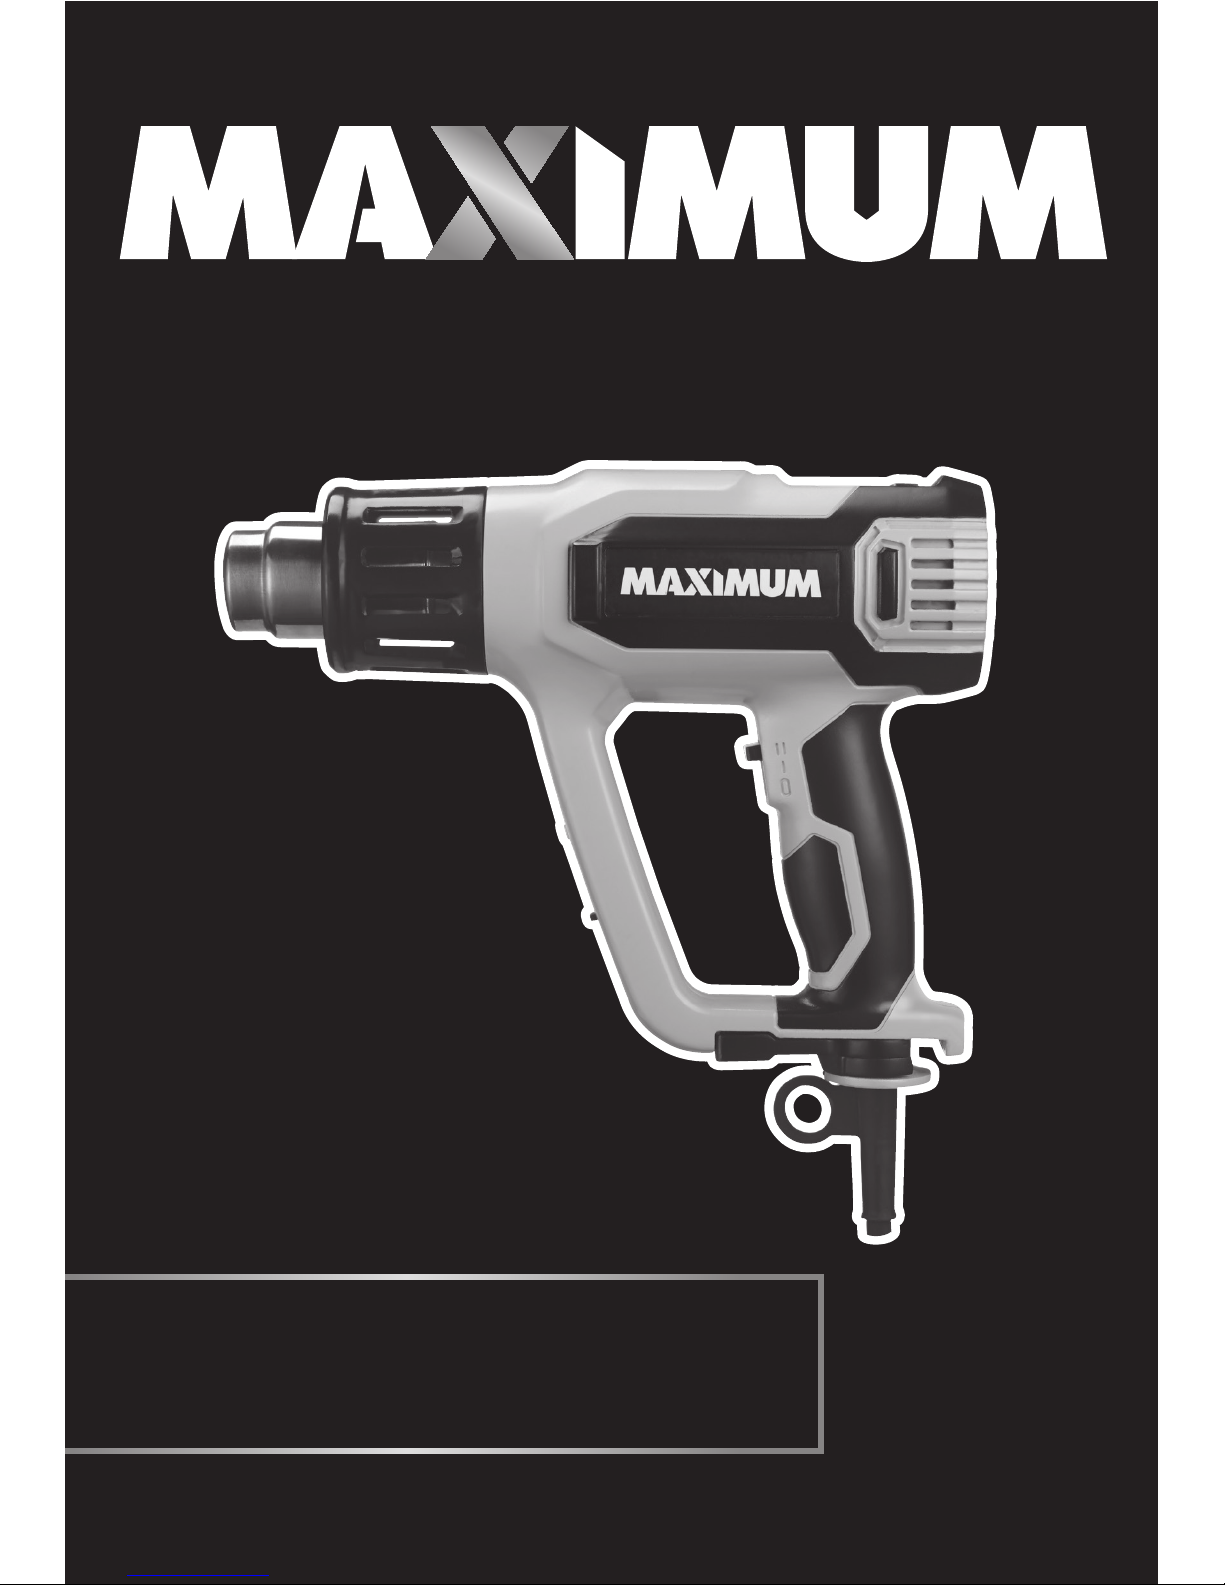
Pro-grade Heat Gun
with LCD
Model No. 054-0403-4
Page 2

Page 3
3
TM
NOTE: If any parts are missing or damaged, or if you have any
questions, please call our toll-free helpline at 1-888-670-6682.
SAVE THESE INSTRUCTIONS
This manual contains important safety and operating instructions.
Read all instructions and follow them with use of this product.
TABLE OF CONTENTS
TECHNICAL SPECIFICATIONS 4
GENERAL SAFETY WARNINGS 5
ADDITIONAL SAFETY RULES FOR YOUR HEAT GUN 7
SYMBOLS 8
KEY PARTS DIAGRAM 9
ACCESSORIES 11
PARTS LIST 12
OPERATING INSTRUCTIONS 14
MAINTENANCE 18
TROUBLESHOOTING 19
WARRANTY 20
TABLE OF CONTENTS
Page 4

4
model no. 054-0403-4 | contact us 1-888-670-6682
TECHNICAL SPECIFICATIONS
TECHNICAL SPECIFICATIONS
VOLTAGE 120 V 60 Hz AC
POWER INPUT 15A
TEMPERATURE/FLOW RATE
I = 120 — 1100°F (50 — 600°C),
8.1 CFM (300 L/min)
II = 120 — 1100°F (50 — 600°C),
13.5 CFM (500 L/min)
PROTECTION CLASS
/II
CORD LENGTH
10’ (3 m)
MACHINE WEIGHT 2 lb 7 oz (1.1 kg)
Page 5

5
TM
GENERAL SAFETY WARNINGS
PERSONS REMOVING PAINT SHOULD FOLLOW THESE
GUIDELINES:
1) Move the workpiece outdoors. If this is not possible, keep the work area well
ventilated. Open the windows and put an exhaust fan in one of them. Be sure
the fan is moving the air from inside to outside.
2) Remove or cover any carpets, rugs, furniture, clothing, cooking utensils and air
ducts.
3) Place drop cloths in the work area to catch any paint chips or peelings. Wear
protective clothing such as extra work shirts, overalls and hats.
WARNING!
Read all safety warnings and instructions. Failure to follow the
warnings and instructions may result in electric shock, fire and/or
serious injury.
Save all warnings and instructions for future reference.
WARNING!
Extreme care should be taken when stripping paint. The peelings,
residue and vapours of paint may contain lead, which is poisonous.
Any pre-1977 paint may contain lead and paint applied to homes prior
to 1950 is likely to contain lead. Once deposited on surfaces, hand to
mouth contact can result in the ingestion of lead. Exposure to even
low levels of lead can cause irreversible brain and nervous system
damage; young and unborn children are particularly vulnerable.
Before beginning any paint removal process you should determine
whether the paint you are removing contains lead. This can be done
by your local health department or by a professional who uses a paint
analyzer to check the lead content of the paint to be removed. LEADBASED PAINT SHOULD ONLY BE REMOVED BY A PROFESSIONAL
AND SHOULD NOT BE REMOVED USING A HEAT GUN.
WARNING! This product may contain lead, phthalate or other
chemicals known to cause cancer, birth defects and other reproductive
harm. Please wash your hands after use.
Hidden areas such as behind walls, ceilings, floors, soffit boards and
other panels may contain flammable materials that could be ignited
by the heat gun when working in these locations. The ignition of these
materials may not be readily apparent and could result in property
damage and injury to persons.
When working in these locations, keep the heat gun moving in a backand-forth motion. Lingering or pausing in one spot could ignite the
panel or the material behind it.
Page 6

6
model no. 054-0403-4 | contact us 1-888-670-6682
4) Work in one room at a time. Furnishings should be removed or placed in the
centre of the room and covered. Work areas should be sealed off from the rest
of the dwelling by sealing doorways with drop cloths.
5) Children, pregnant or potentially pregnant women and nursing mothers should
not be present in the work area until the work is done and all clean up is
complete.
6) Wear a dust respirator mask or a dual filter (dust and fume) respirator
mask which has been approved by the Occupational Safety and Health
Administration (OSHA), the National Institute of Safety and Health (NIOSH),
or the United States Bureau of Mines. These masks and replaceable filters
are readily available at major hardware stores. Be sure the mask fits. Beards
and facial hair may keep masks from sealing properly. Change filters often.
DISPOSABLE PAPER MASKS ARE NOT ADEQUATE.
7) Use caution when operating the heat gun. Keep the heat gun moving as
excessive heat will generate fumes which can be inhaled by the operator.
8) Keep food and drink out of the work area. Wash hands, arms and face and rinse
mouth before eating or drinking. Do not smoke or chew gum or tobacco in the
work area.
9) Clean up all removed paint and dust by wet mopping the floors. Use a wet cloth
to clean all walls, sills and any other surface where paint or dust is clinging.
DO NOT SWEEP, DRY DUST OR VACUUM. Use a high-phosphate detergent or
trisodium phosphate (TSP) to wash and mop areas.
10) At the end of each work session put the paint chips and debris in a double
plastic bag, close it with tape or twist ties and dispose of properly.
11) Remove protective clothing and work shoes in the work area to avoid carrying
dust into the rest of the dwelling. Wash work clothes separately. Wipe shoes off
with a wet rag that is then washed with the work clothes. Wash hair and body
thoroughly with soap and water.
GENERAL SAFETY WARNINGS
Page 7

7
TM
ADDITIONAL SAFETY RULES FOR
YOUR HEAT GUN
ADDITIONAL SAFETY WARNINGS FOR HEAT GUN
1. This appliance has a polarized plug (one blade is wider than the other). To
reduce the risk of electric shock, this plug is intended to fit in a polarized
outlet only one way. If the plug does not fit fully in the outlet, reverse the plug.
If it still does not fit, contact a qualified electrician. Do not modify the plug in
any way.
2. Always allow the heat gun to cool before storing. The hot nozzle can cause
damage.
3. Never attempt to use the heat gun to dry animals, clothing or hair.
4. Don’t leave the heat gun unattended when in use.
5. This product is designed for light domestic use only; it is not designed for
industrial purposes. Even though every care has been taken to make the heat
gun safe, accidents can happen. By following the simple safety guide, you can
avoid serious accidents.
6. Be aware that heat may be conducted to combustible materials that are out of
sight.
7. DOUBLE INSULATION – When servicing, use only identical replacement parts.
8. To reduce the risk of fire or electric shock, do not expose this product to rain or
moisture. Store indoors. Read instruction manual before using.
9. If the supply cord is damaged, it must be replaced by special assembly
available from a service agent.
Page 8
8
model no. 054-0403-4 | contact us 1-888-670-6682
SYMBOLS
SYMBOLS
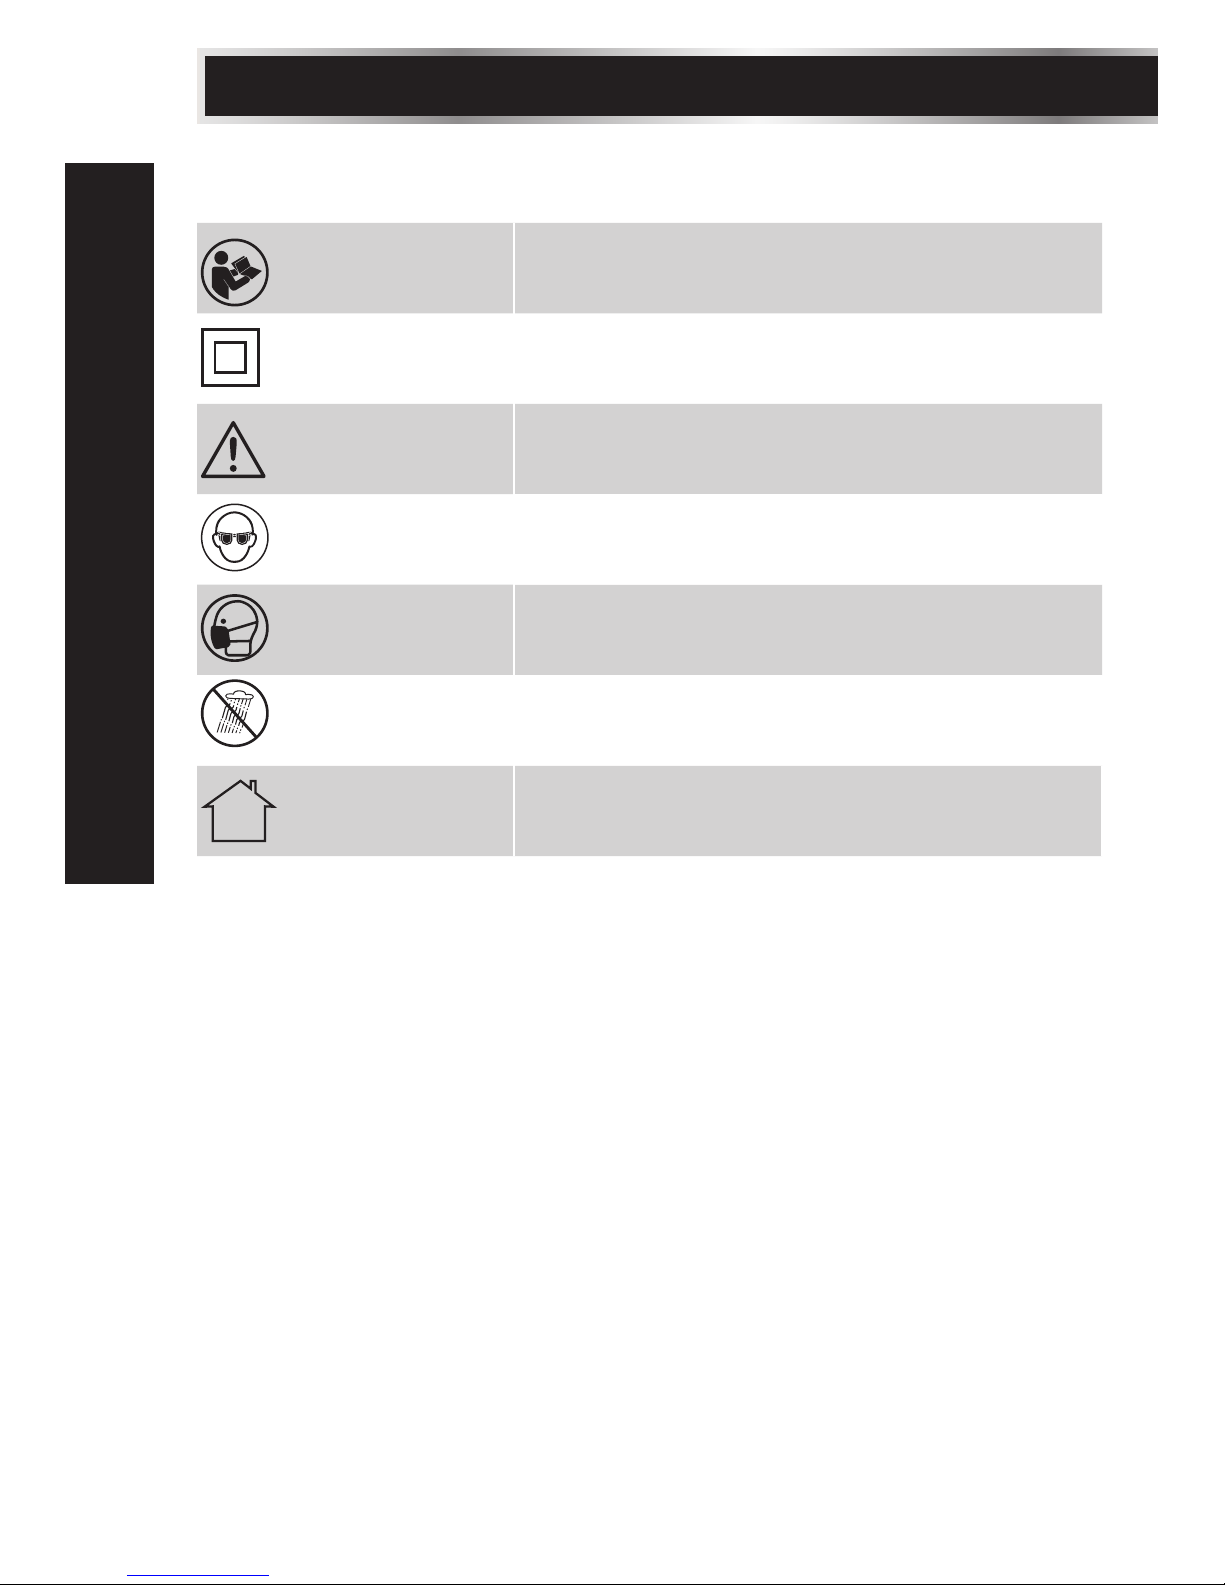
To reduce the risk of injury, user must read
instruction manual
Double insulation
Warning
Wear eye protection
Wear dust mask
Don’t use in the rain
For indoor use only
Page 9
9
TM
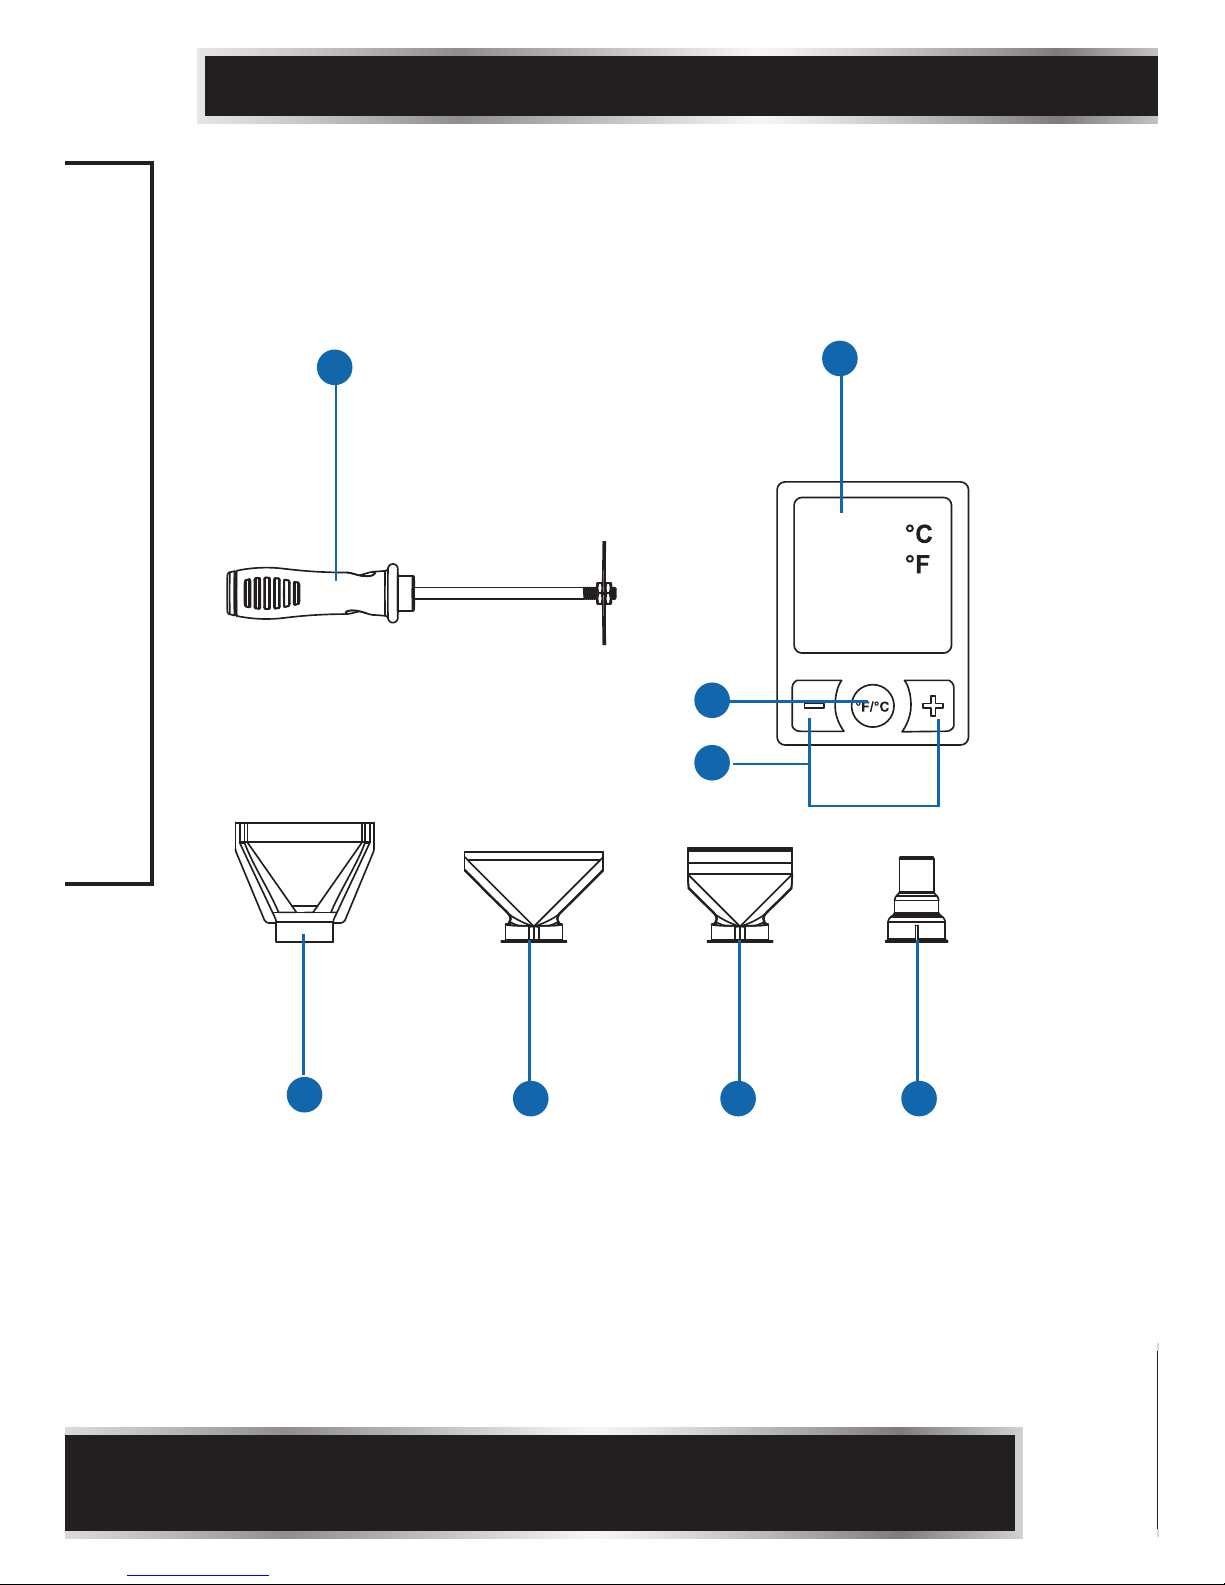
KEY PARTS DIAGRAM
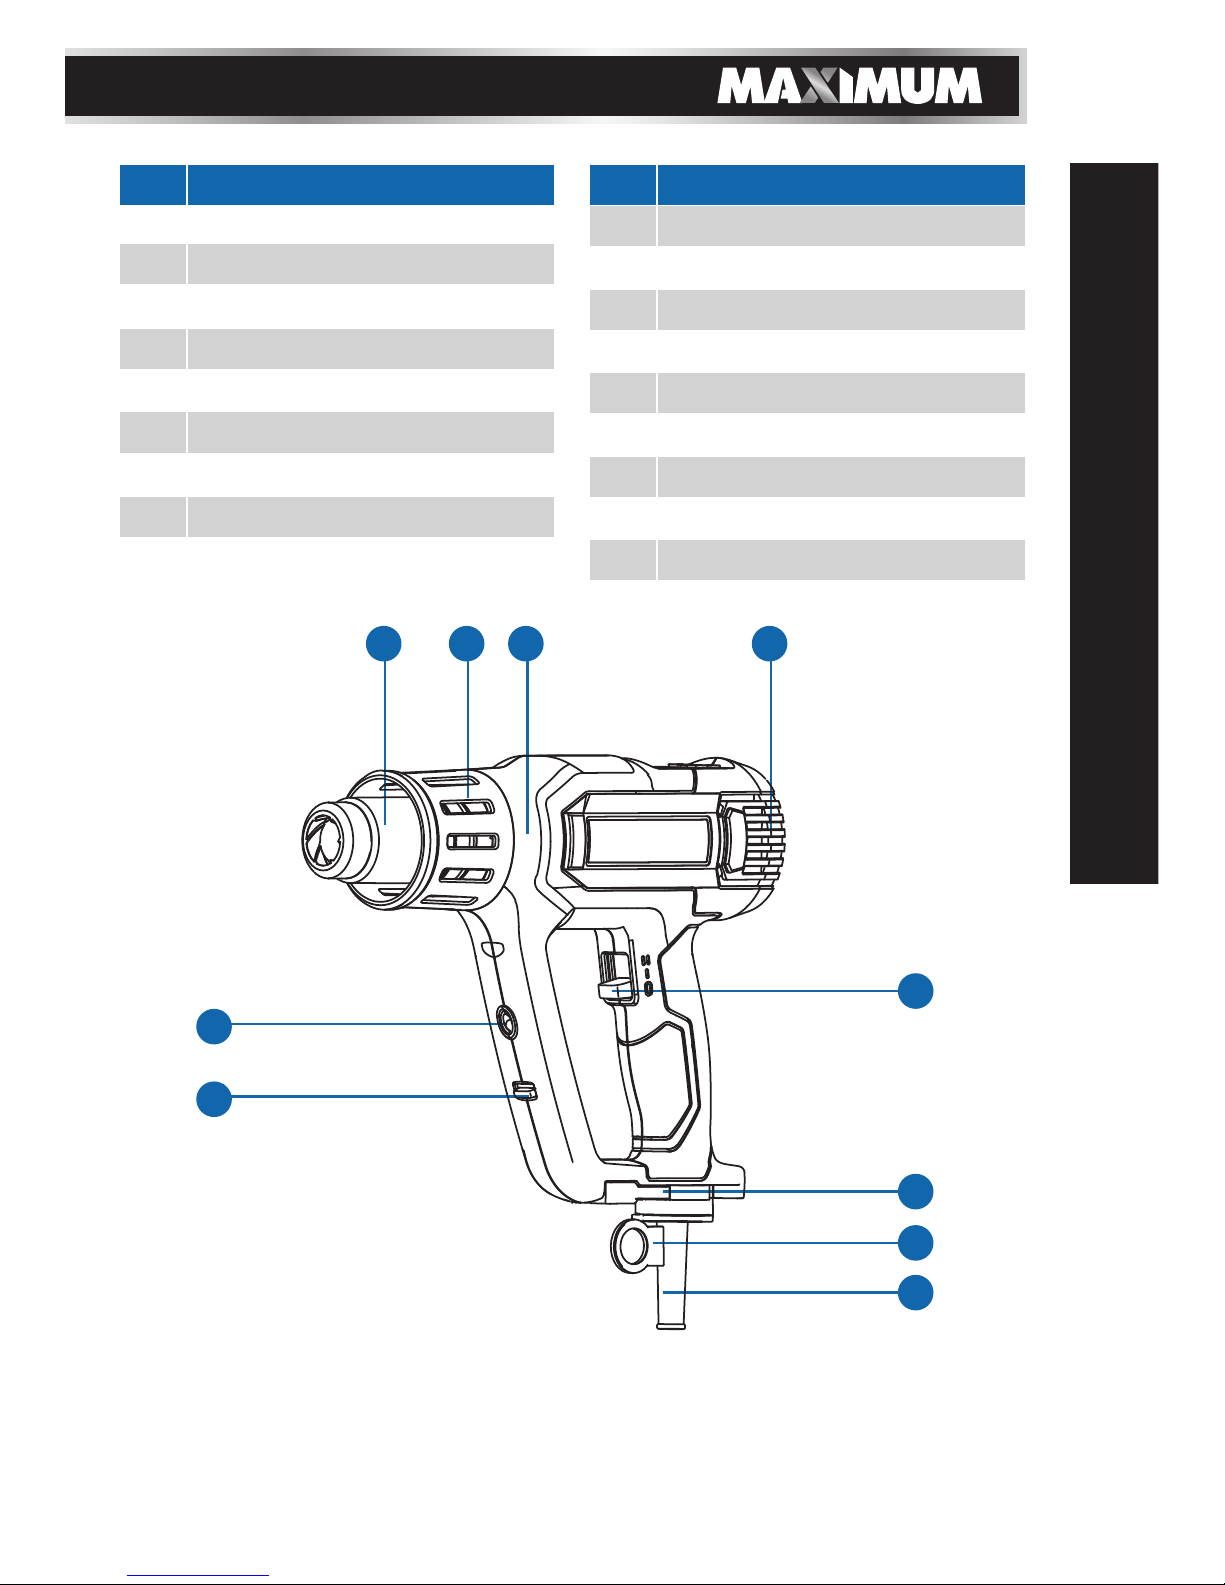
No. Description
1. Wind pipe
2. Heat protection guard
3. Main body
4. Air cooling window
5. On/off switch
6. Stand supporter
7. Hook
8. Power cord
9. LED light switch
No. Description
10. LED light cover
11. LCD cover
12. Temperature control button
13.
°F/°C button
14. Scraper
15. Flat nozzle
16. Glass protection nozzle
17. Hook nozzle
18. Concentration nozzle
5
6
7
8
1 2 3 4
10
9
Page 10
10
model no. 054-0403-4 | contact us 1-888-670-6682
Not all the accessories illustrated or described are included in standard delivery.
KEY PARTS DIAGRAM
14
11
13
15
16 17 18
12
Page 11

11
TM
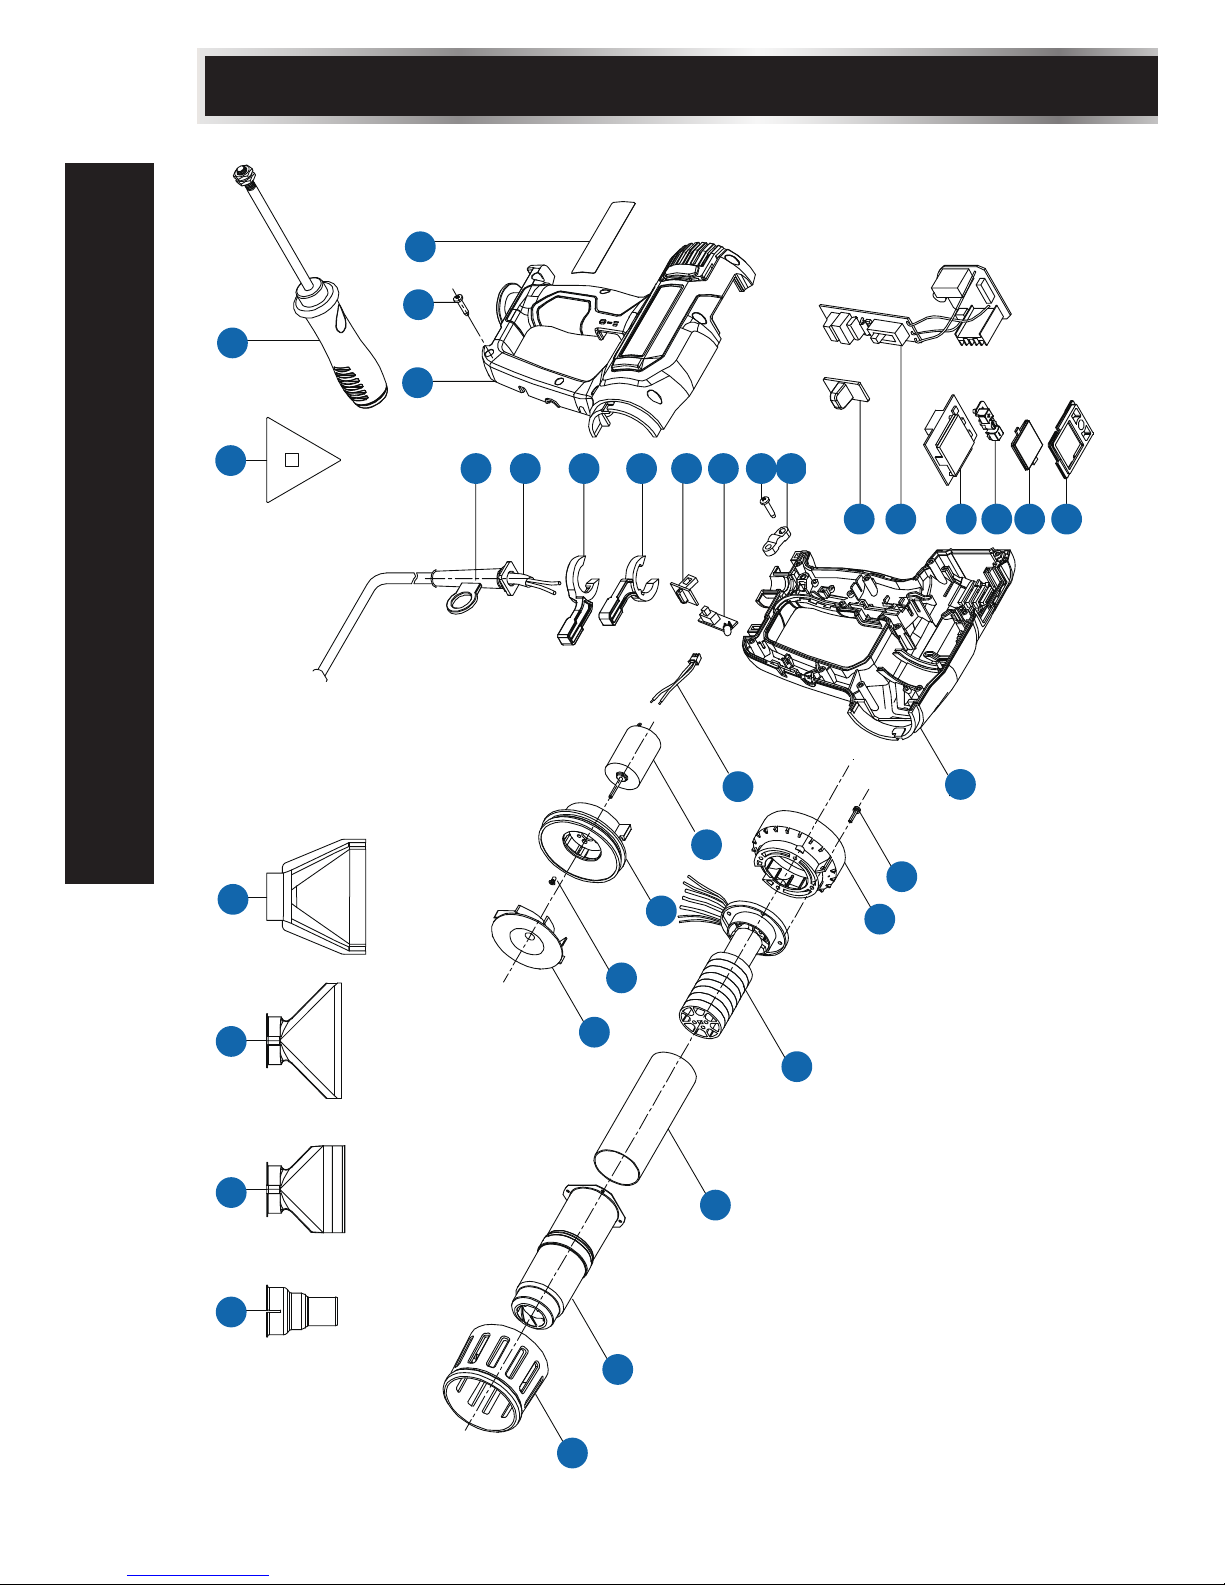
ACCESSORIES
We recommend that you purchase your accessories from the same store that sold
you the tool. Use good-quality accessories marked with a well-known brand name.
Choose the type according to the work you intend to undertake. Refer to the
accessory packaging for further details. Store personnel can assist you and offer
advice.
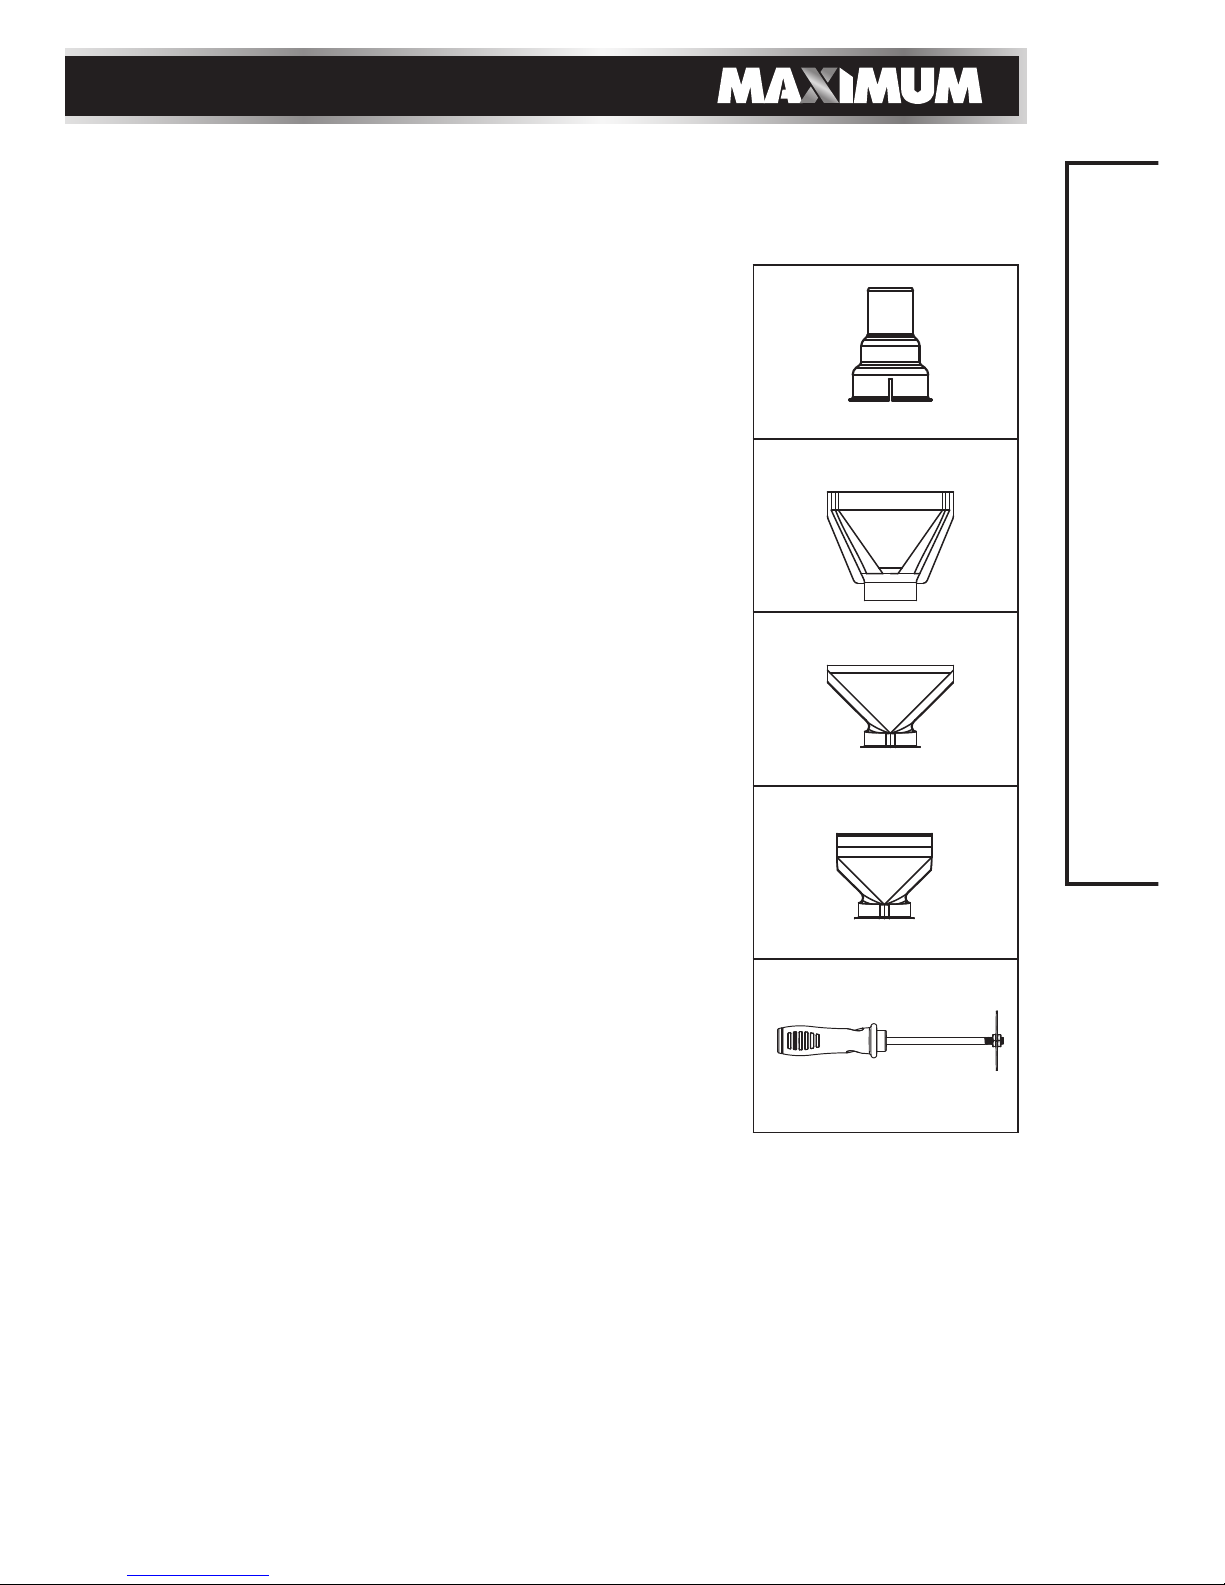
Scraper 1
Glass protection nozzle 1
Flat nozzle 1
Hook nozzle 1
Concentration nozzle 1
ACCESSORIES
Page 12
12
model no. 054-0403-4 | contact us 1-888-670-6682
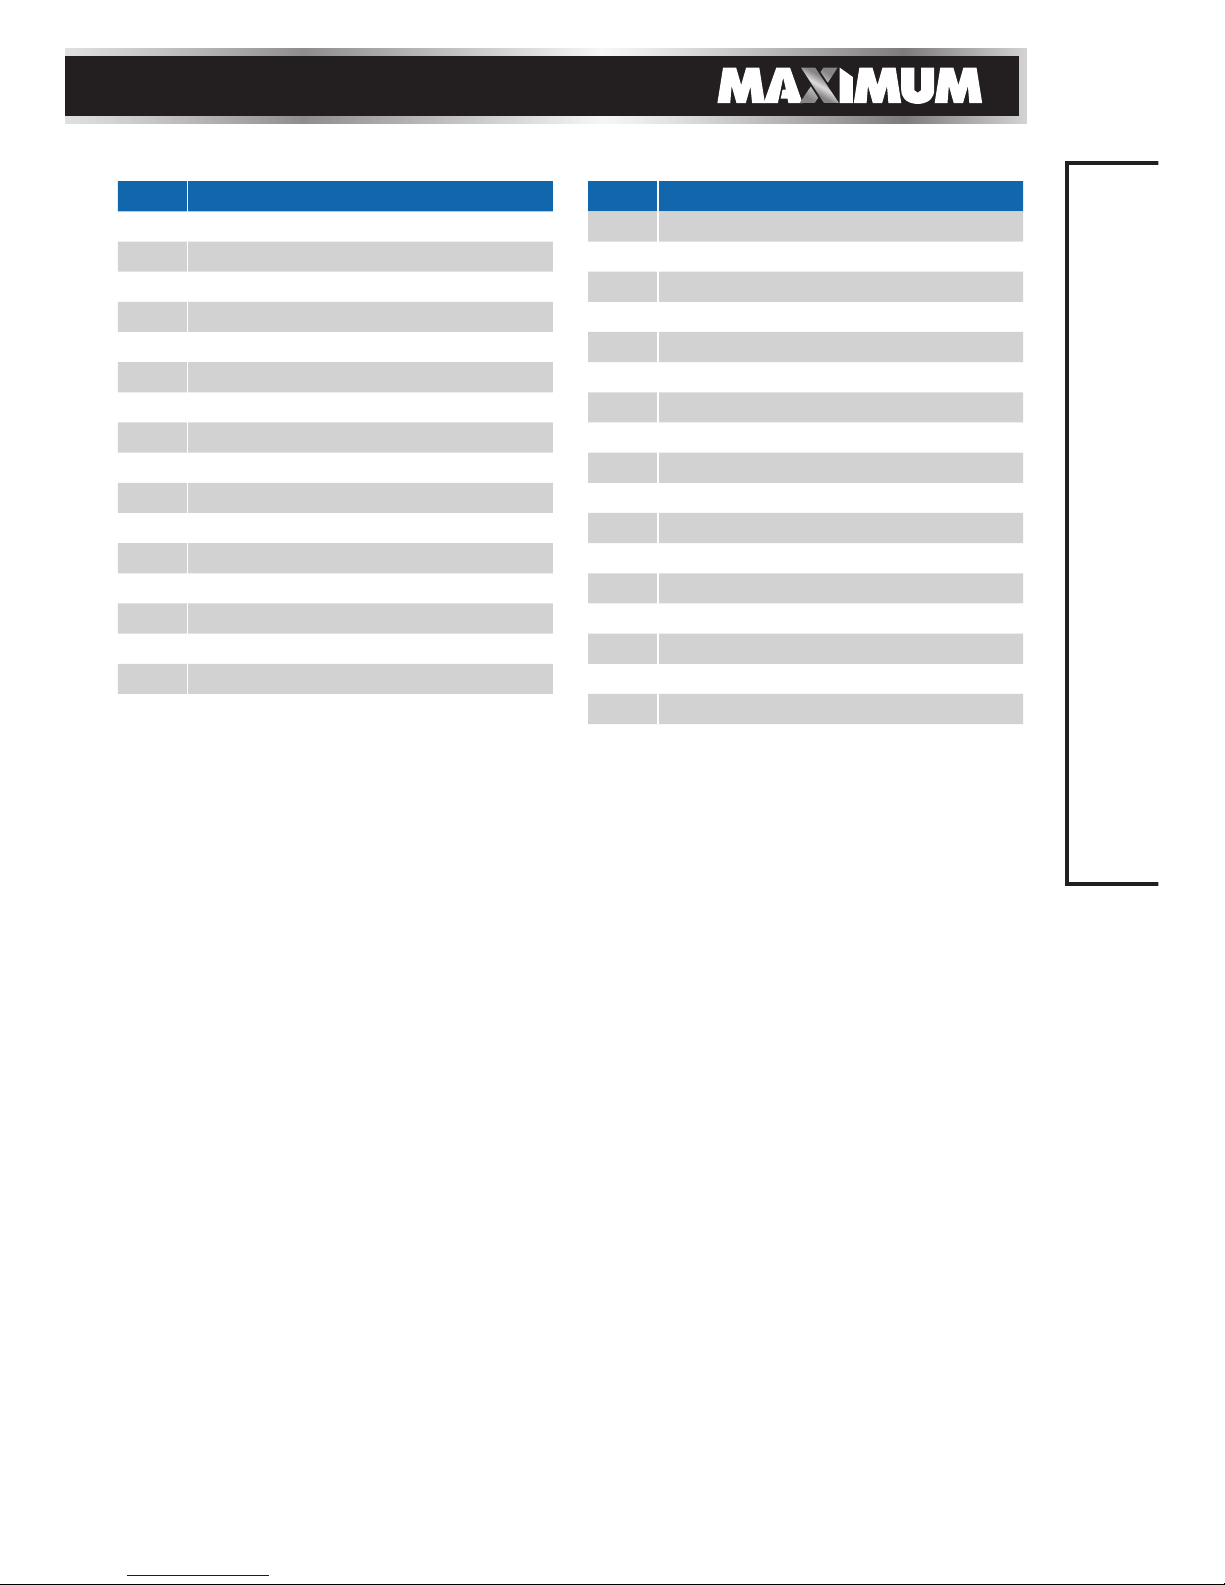
PARTS LIST
23
22
21
20
10
11
12
12
33
32
14
15
16
17
34
13 28 31
18
19
30
29
27
26
25
24
9
8
7
1
2
3
4
5
6
Page 13
13
TM
PARTS LIST
No. Description
1
Heat-proof cover
2
Wind pipe
3
Mica paper
4
Heating element
5
Commutate cover
6
Screw M2.5X12
7 Fan
8 Screw M2.5X5
9 Motor holder
10 Motor
11 Wire
12 Left/right housing
13 Glass protection nozzle
14 Push-button
15 Push-button cover
16 Push-button
17 Window
No. Description
18 PCB
19 Switch button
20 Cable clip
21 Screw ST4x16
22 LED board
23 LED switch
24 Right support foot
25 Left support foot
26 Cable
27 Cable sleeve
28 Hook nozzle
29 Screw ST3x14
30 Rated label 2
31 Concentration nozzle
32 Plastic handle
33 Iron triangle
34 Flat nozzle
Page 14
14
model no. 054-0403-4 | contact us 1-888-670-6682
OPERATING INSTRUCTIONS
BEFORE USING THE TOOL
Before starting the job it is advisable to test the
workpiece for the ideal temperature to use. The
description below gives an indication of the likely
heat settings required but always start with the low
heat setting.
The distance between the nozzle and the workpiece
will vary according to the material being worked on
but this should always be at least 2’’ (5 cm) or more
on any heat setting.
All applications, with the exception of removing paint
from the window frames, can be performed without
using a nozzle; however, for best results nozzles are
recommended.
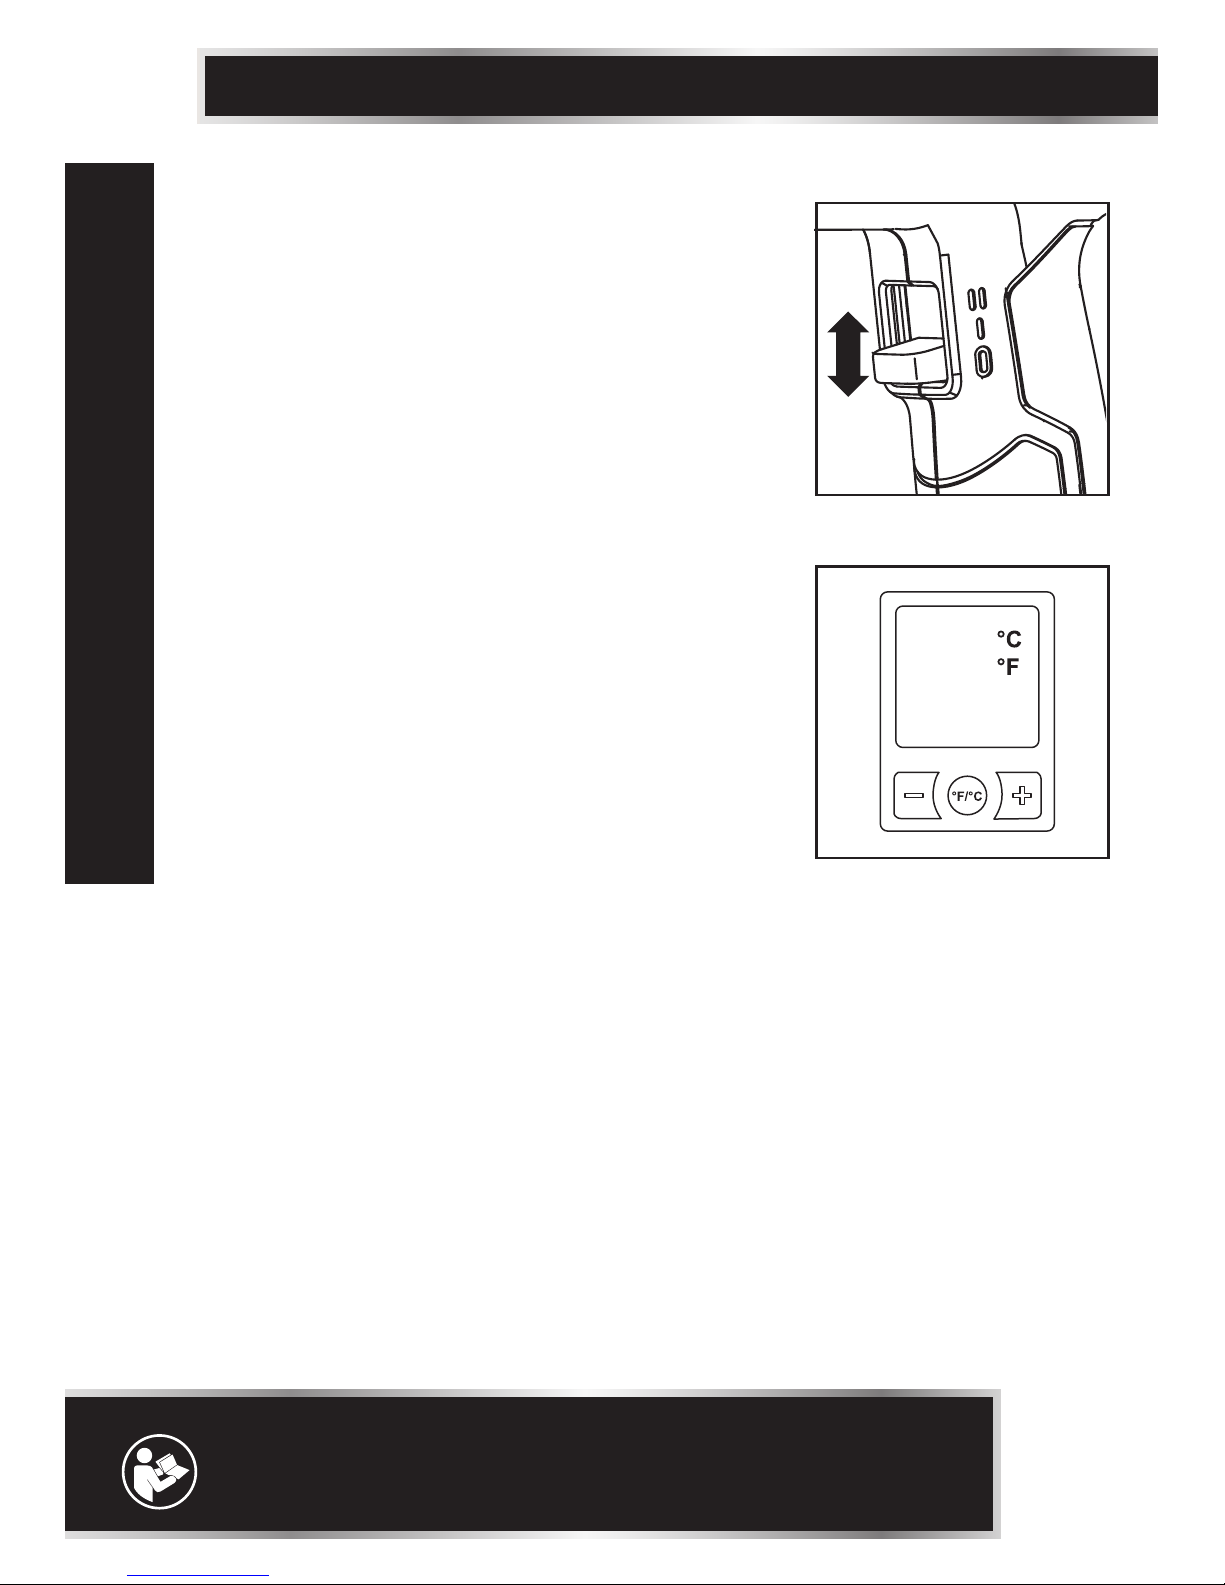
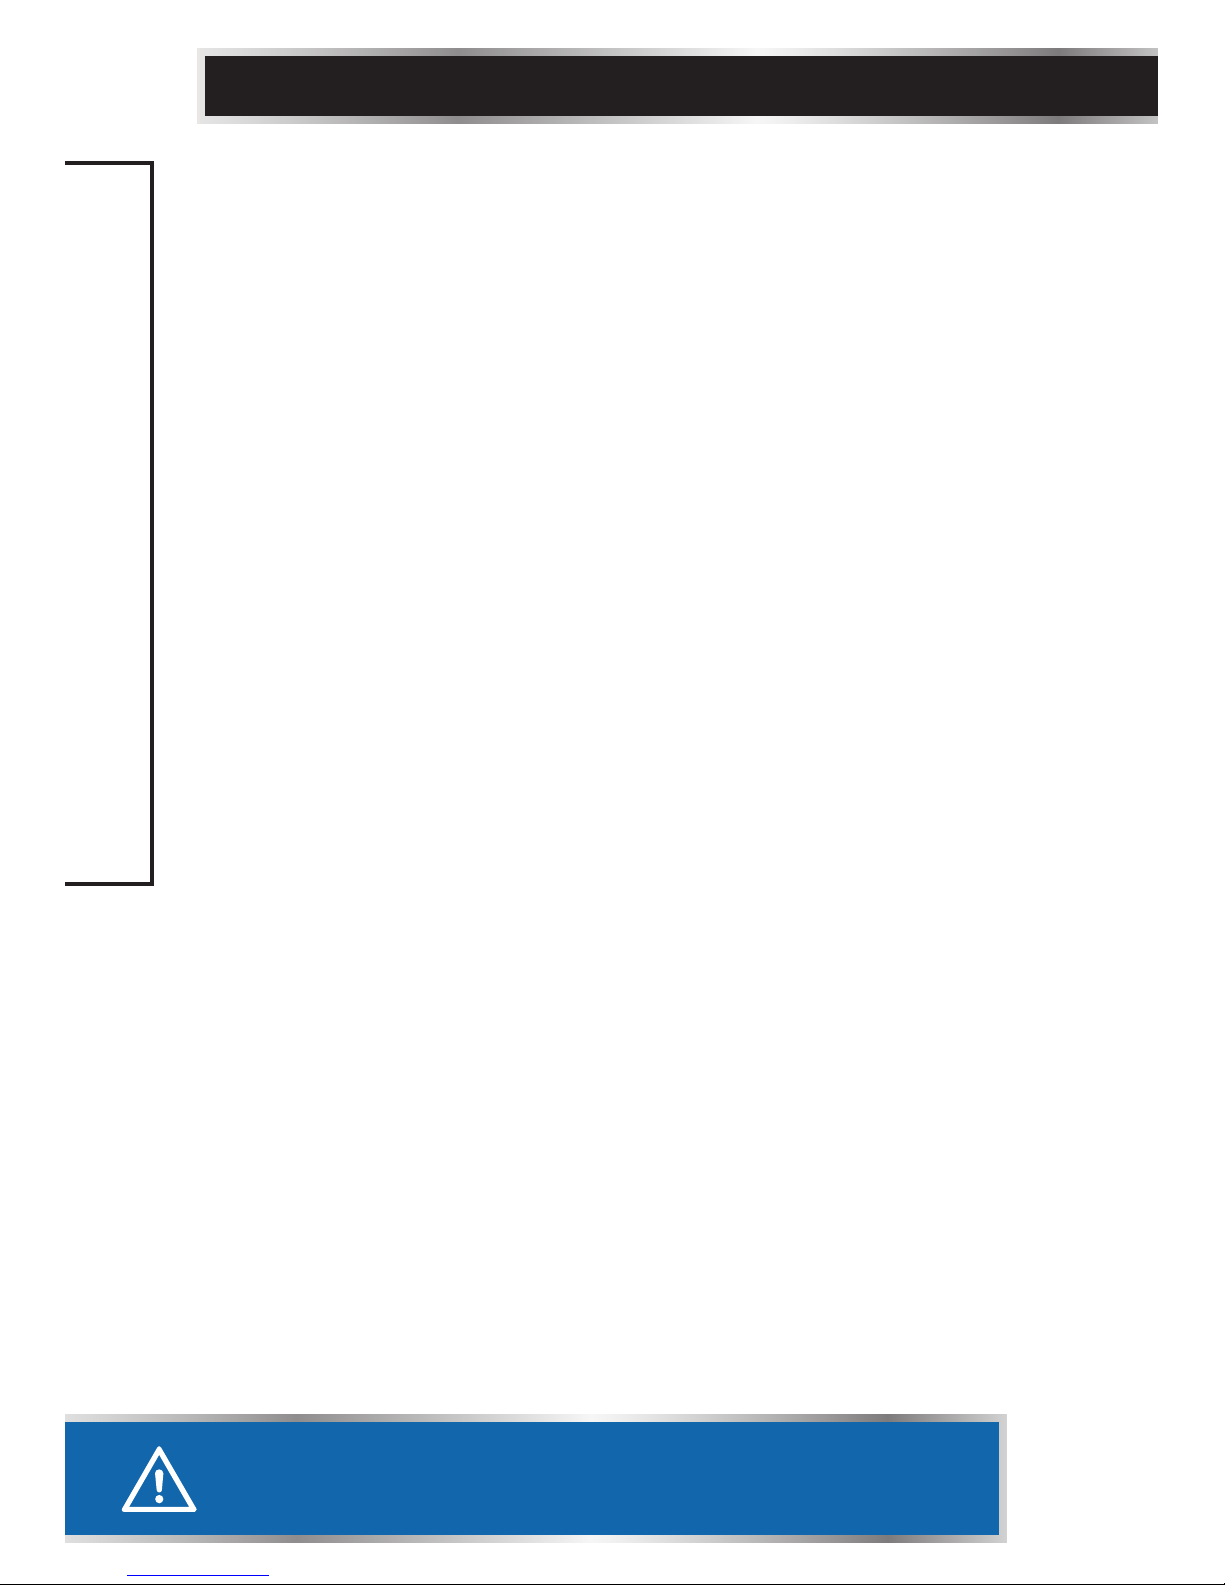
PUTTING INTO OPERATION (See Fig. A)
1. SWITCHING ON/OFF
Switching on:
To put into operation, slide the on/off switch (5) to
position I or II.
Switching off:
To switch off, slide the on/off switch (5) to position 0.
2. SETTING THE AIR FLOW AND TEMPERATURE (See
Fig. B)
The switch (5) can be set to two blower settings.
Suitable airflow and temperature combinations can be
selected according to the applications.
I =120 — 1100°F (50 — 600°C), 8.1 CFM (300 L/min)
II =120 — 1100°F (50 — 600°C), 13.5 CFM (500 L/min)
The air setting I is suitable for bending plastic and
heat-shrinking plastic.
The air setting II is suitable for stripping paint and
defrosting pipes.
Temperature can be adjusted in increments of 20°F
(10°C) from 120°F (50°C) to 1100°F (600°C) by
pressing the temperature control button (12) on the
LCD cover (11).
°F or °C can be selected by pressing °F/ °C .
NOTE: Before using the tool, read the instruction book carefully.
Fig. A
Fig. B
Page 15
15
TM
OPERATING INSTRUCTIONS
3. NOZZLE SELECTION
The kit is supplied with 4 different nozzles which can
be used as follows:
1) Concentration nozzle
This nozzle directs a concentrated heat flow to the
workpiece. It is ideal when removing paint in awkward
corners, crevices, mouldings, beading, architraves or
whenever precise paint removal is required.
2) Flat Nozzle
This nozzle directs a long narrow heat pattern to the
workpiece and is ideal for removing paint or varnish
from large flat surfaces such as skirting boards, doors,
stairs etc. It should be used in conjunction with a flat
scraper. Vinyl tiles can be removed by softening the
tile and adhesive.
3) Glass Protection Nozzle
This nozzle deflects the heat away from glass or other
fragile areas and back onto the workpiece.
4) Hook Nozzle
This nozzle disperses the heat flow evenly around
the whole workpiece. It is ideal for defrosting frozen
pipes, soldering pipe work, bending plastics and heatshrinking electrical parts.
4. SHAVE HOOK
Take the handle from the set, remove the nut from
the end, and fit the triangle blade in place by refitting
and tightening the nut. The triangular shave hook is
ideal for stripping paint from flat wooden surface and
edges.
Remember to clean the blade after use with wire
wool, and lightly oil before storing.
Page 16
16
model no. 054-0403-4 | contact us 1-888-670-6682
OPERATING INSTRUCTIONS
5. REMOVING PAINT
Choose the required nozzle and fit onto the heat outlet. Select the scraper
or shave hook required. Hold the gun with the nozzle approximately 2’’ (5
cm) from the surface of the paintwork and start with the lower heat setting.
Move the heat gun slowly backwards and forwards until the paint blisters
and bubbles. Immediately remove the paint with the scraper or shave hook.
Aim to heat the paint just ahead of the scraper so that you can develop a
continuous action. Do not heat the paint for too long as this will burn the
paint, making it difficult to remove.
Most stickers can also be removed from paintwork by using the heat to
soften the adhesive. Be careful not to direct the heat for too long if you are
trying just to remove the stickers as this will blister the paint.
6. REMOVING PAINT FROM WINDOW FRAMES
Always use the glass protection nozzle. Ensure you have the nozzle facing
the correct way to deflect the heat away from the glass before you switch
on. Rotate the gun or nozzle 90° as you move to horizontal or vertical bead.
Allow nozzle to cool before attempting to turn it. Paint can be removed
from profile surfaces by using a shave hook and/or a soft wire brush.
WARNING: Glass can break easily.
7. DEFROSTING FROZEN PIPES
Choose the hook nozzle and fit over the wind pipe (1). Always heat from one
or other end of the frozen portion, not from the middle.
WARNING: Do not attempt to defrost PVC pipes. Always check that it is a
water pipe and not a gas pipe. Do not heat a gas pipe.
8. SHRINK SEALING ELECTRICAL CABLES
Choose the hook nozzle and fit over the wind pipe (1). Select a heatshrinkable sleeve with a diameter matching that of the workpiece. Evenly
heat the sleeve.
9. BENDING PLASTIC TUBE
Choose the hook nozzle and fit over the wind pipe (1). Turn the gun upside
down and place on its clip stand so that it is resting on a secure bench with
the nozzle pointing upwards.
To avoid buckling or kinking the tube, fill the tube with dry sand and seal at
both ends. Heat the tube evenly by moving from side to side and bend to
required shape.
WARNING!
Protect hands from heat.
Page 17
17
TM
OPERATING INSTRUCTIONS
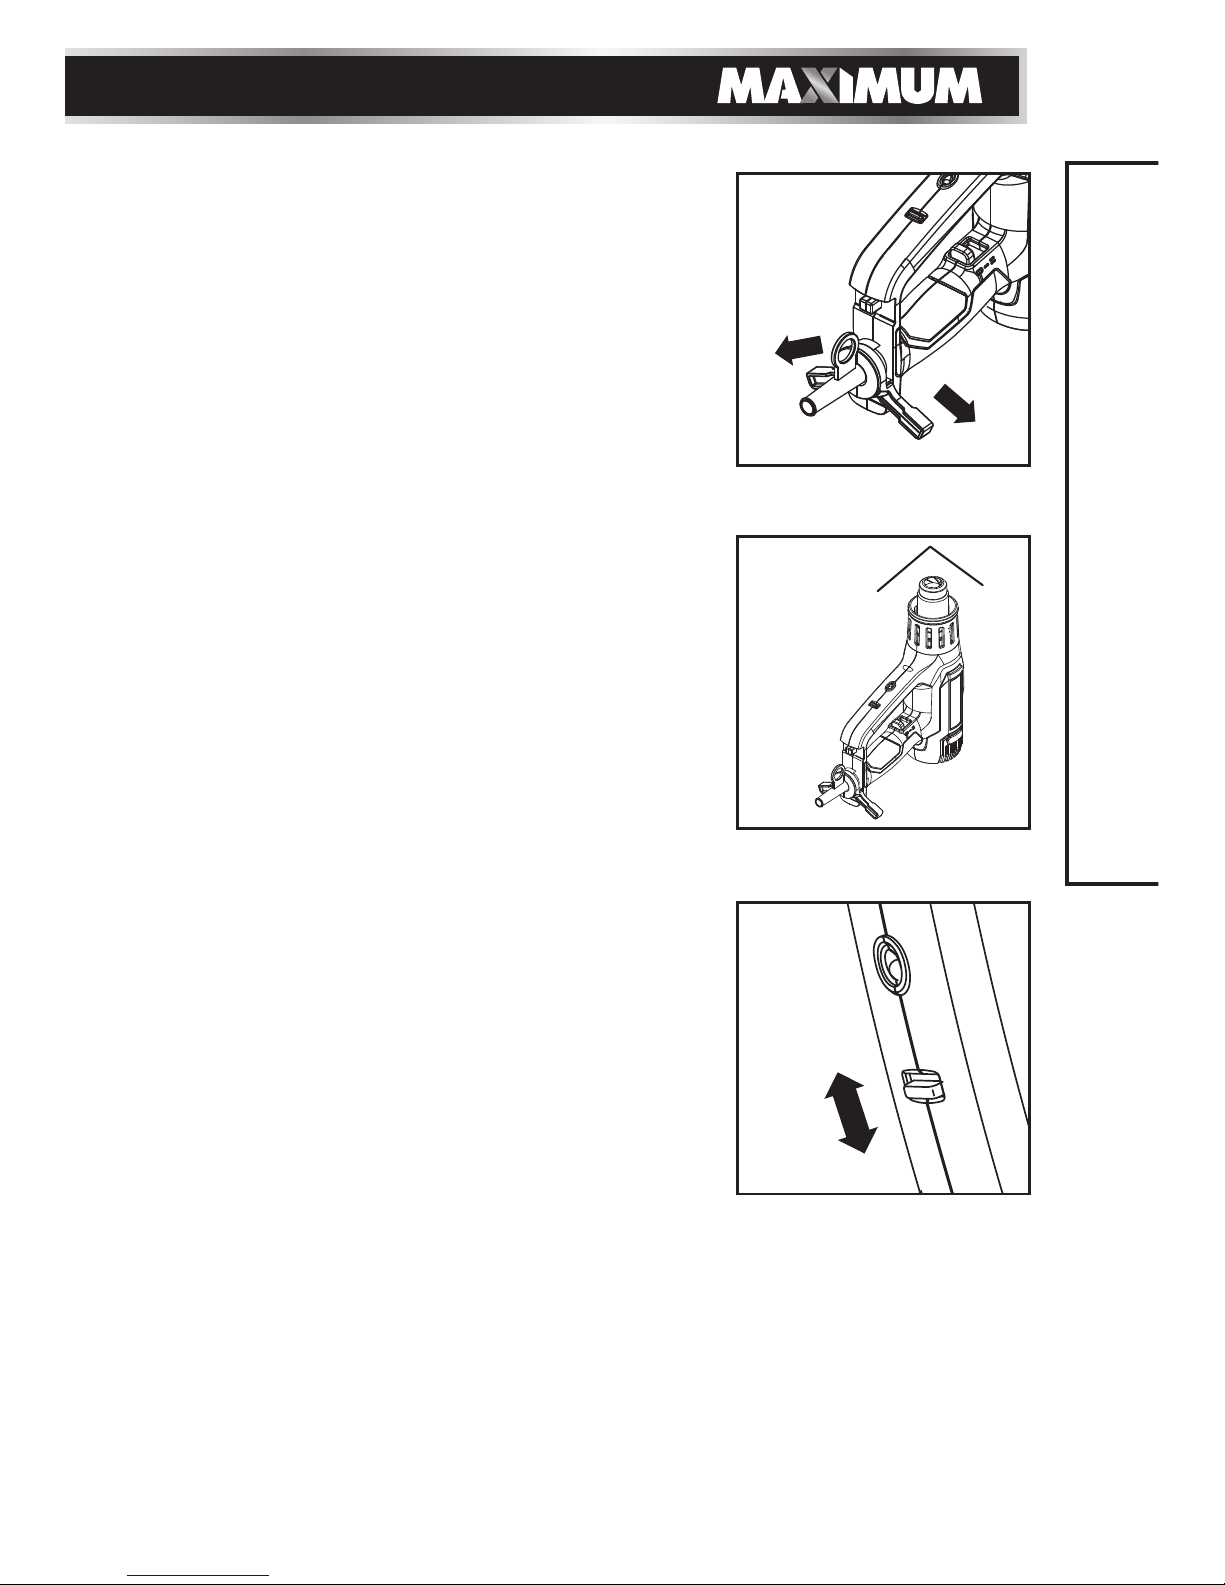
10. STAND SUPPORTER USE (See Figs. C and D)
This gun can be used in stationary mode.
1. Firstly fold down the stand supporter (6).
2. Set the gun onto a level, stable workbench. Be sure that
the tool will not tip over.
3. Secure the power cord (8) to prevent entanglement or
pulling the gun off the workbench.
4. Turn the gun on by selecting the desired air flow.
11. LED LIGHT (See Fig. E)
Switching on:
To switch on, slide the LED light switch (9) up.
Switching off:
To switch off, slide the LED light switch (9) down.
Fig. A
Fig. C
Fig. B
Fig. D
Fig. E
Page 18

18
model no. 054-0403-4 | contact us 1-888-670-6682
MAINTENANCE
MAINTENANCE
Remove the power cord from the socket before carrying out any adjustment,
servicing or maintenance.
There are no user-serviceable parts in your power tool. Never use water or chemical
cleaners to clean your power tool. Wipe clean with a dry cloth. Always store your
power tool in a dry place. Keep the motor ventilation slots clean. Keep all working
controls free of dust. Occasionally you may see sparks through the ventilation slots.
This is normal and will not damage your power tool.
If the power cord is damaged, it must be replaced by the manufacturer, its service
agent or similarly-qualified persons in order to avoid a hazard.
Page 19

19
TM
TROUBLESHOOTING
TROUBLESHOOTING
1. If your heat gun will not operate, check the power at the power outlet.
2. If the outlet of the heat gun is very hot, please rest until cold.
3. If a fault can not be rectified return the tool to an authorized dealer for repair.
Page 20
20
model no. 054-0403-4 | contact us 1-888-670-6682
WARRANTY
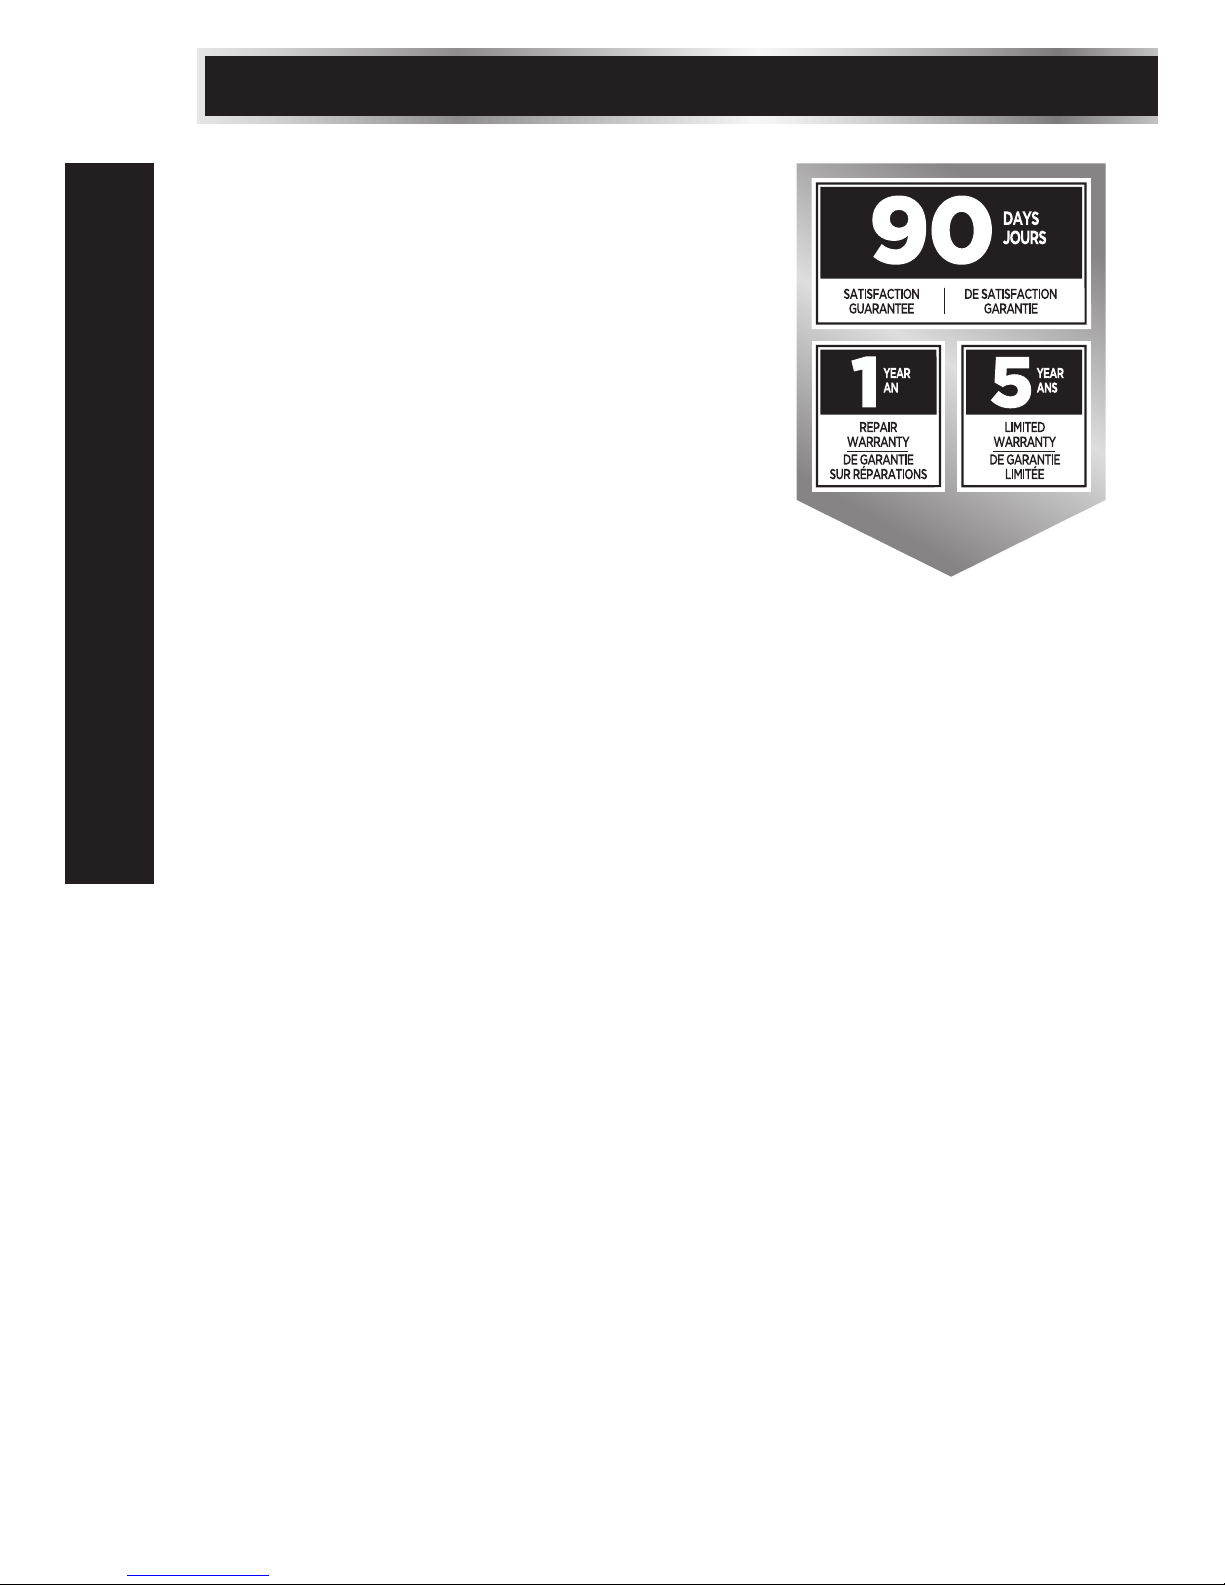
This MAXIMUM product is guaranteed for a period of 5
years from the date of original retail purchase against
defects in workmanship and materials only and is
subject to the following components:
a) Component A: The carrying case is guaranteed for
a period of 1-year from the date of original retail
purchase against defects in workmanship and
materials.
b) Component B: Accessories, including drill bits and
saw blades, do not carry a warranty.
Subject to the conditions and limitations described
below, this product, if returned to us with proof of
purchase within the stated warranty period and if
covered under this warranty, will be repaired or
replaced (with the same model, or one of equal value
or specification), at the sole discretion of the Maximum
Canada authorized repair centre (“Service Provider”). We will bear the cost of any
repair or replacement and any costs of labour relating thereto.
These warranties are subject to the following conditions and limitations:
a) a bill of sale verifying the purchase and purchase date must be provided;
b) defects in workmanship and material to be assessed and determined by the
Service Provider;
c) this warranty will not apply to any product or part thereof which is worn or
broken or which has become inoperative due to abuse, misuse, accidental
damage, neglect or lack of proper installation, operation or maintenance (as
outlined in the applicable owner’s manual or operating instructions);
d) this warranty does not apply to normal wear and tear or to expendable parts
or accessories (including drill bits and saw blades) that may be supplied with
the product that by their nature have a limited life span and are expected to
become inoperative or unusable after a reasonable period of use;
e) this warranty will not apply to routine maintenance and consumable items such
as, but not limited to, fuel, lubricants, vacuum bags, blades, belts, sandpaper,
bits, fluids, rubber O-rings, tune-ups or adjustments;
f) this warranty excludes the following components that may accompany your
product:
(1) The carrying case, which is only for a period of 1-year from the date of
original retail purchase against defects in workmanship and materials.
(2) Accessories, including drill bits and saw blades, which do not carry a
warranty of any kind.
g) this warranty will not apply where damage is caused by repairs made or
attempted by anyone other than the Service Provider (i.e. persons not
authorized by the manufacturer), and any such unauthorized repairs or
attempted repairs shall void this warranty in its entirety;
h) this warranty will not apply to any parts other than original parts, except to the
extent that the retailer or manufacturer or persons authorized by either of them
have repaired or replaced them;
Page 21

21
TM
i) this warranty will not apply to any product that was sold to the original
purchaser as a reconditioned or refurbished product (unless otherwise specified
in writing);
j) this warranty will not apply to any product or part thereof if any part from
another manufacturer is installed therein or any repairs or alterations have been
made or attempted by unauthorized persons;
k) this warranty will not apply to normal deterioration of the exterior finish, such
as, but not limited to, scratches, dents, paint chips, or to any corrosion or
discolouring by heat, abrasive and chemical cleaners;
l) this warranty will not apply to component parts sold by and identified as
the product of another company, which shall be covered under that product
manufacturer’s warranty, if any;
m) any products replaced by the retailer in attempt to fulfill warranty obligations is
subject to the original product warranty conditions and related time period as
initiated by the original date of purchase; if product is purchased in Quebec, the
warranty term will be extended for a period equal to the time during which the
Quebec retailer possesses the product in attempt to fulfill warranty obligations;
replaced product will not default to new product warranty conditions; and
n) The retailer and manufacturer’s sole obligation and the purchaser’s sole remedy
under this warranty shall be as set out herein. The warranties contained herein
are not transferable and are given only to the purchaser. FURTHER, THE
WARRANTIES SET OUT HEREIN ARE IN LIEU OF ALL OTHER WARRANTIES
OR CONDITIONS, WHETHER EXPRESS, IMPLIED OR STATUTORY (INCLUDING
SUCH AS ARISE UNDER THE SALE OF GOODS ACT OR THE INTERNATIONAL
SALE OF GOODS ACT), ARISING OUT OF A COURSE OF DEALING OR USAGE
OF TRADE OR OTHERWISE, INCLUDING, SUBJECT TO APPLICABLE LAW,
ANY IMPLIED WARRANTIES OR CONDITIONS OF MERCHANTABILITY,
MERCHANTABLE QUALITY, FITNESS OR ADEQUACY FOR A PARTICULAR
PURPOSE OR USE, AND ALL OTHER SUCH WARRANTIES ARE EXPRESSLY
DISCLAIMED BY THE RETAILER AND MANUFACTURER.
ADDITIONAL LIMITATIONS
This warranty applies only to the original purchaser and may not be
transferred.
This warranty applies for a period of 5 years from the date of original retail
purchase, as indicated on the bill of sale.
Neither the retailer, Maximum Canada, nor the manufacturer shall be
liable for any other expense, loss or damage, including, without limitation,
any indirect, incidental, consequential or exemplary damages arising in
connection with the sale, use or inability to use this product.
Under no circumstances shall the retailer, Maximum Canada, or manufacturer
be liable to the purchaser for any claim for (a) indirect, special, punitive,
incidental, exemplary, or consequential damages, (b) compensation for loss of
profits, anticipated revenue, savings or goodwill, or other economic loss of the
purchaser, (c) exemplary, aggravated or punitive damages howsoever incurred,
(d) contribution or set-off in respect of any claims against the purchaser, (e) any
damages whatsoever relating to third party products or services or the purchaser’s
WARRANTY
Page 22

22
model no. 054-0403-4 | contact us 1-888-670-6682
WARRANTY
materials, or (f) any damages whatsoever relating to interruption, delays, errors
or omissions; in each case under any theory of law or equity, arising out of or
in any way related to this warranty, even if advised of the possibility thereof.
Notwithstanding any provision herein or entitlement of the purchaser at law, in
equity or otherwise, in no event shall the liability of the retailer or manufacturer
under this warranty, whether in contract, tort, product liability or otherwise, exceed,
in the aggregate, the amount paid by the purchaser to the retailer for the product to
which this warranty applies.
NOTICE TO CONSUMER
This warranty gives you specific legal rights, and you may have other rights, which
may vary from province to province. The provisions contained in this warranty are
not intended to limit, modify, take away from, disclaim or exclude any statutory
warranties set forth in any applicable provincial or federal legislation.
In addition to the 5-Year Limited Warranty, this MAXIMUM product is covered by
our:
1-YEAR REPAIR WARRANTY
Maximum Canada will maintain this product and replace critical parts which have
worn beyond reasonable use through normal use of such product, any time during
the first year after purchase.
The following are excluded from this 1-Year Repair Warranty:
a) Missing or damaged parts or components that are a result of abuse or misuse;
b) Any wear and tear to non-critical parts or accessories that do not affect the
core function of the product.
90-DAY SATISFACTION GUARANTEE
If you are not completely satisfied with the performance of your MAXIMUM product
for any reason, you can return it within 90 days from the date of purchase with
proof of purchase for exchange or a full refund.
Imported by MAXIMUM Canada Toronto, Canada M4S 2B8
Made in China
 Loading...