

Page 1

78M6618 PDU1 Firmware
Quick Start Guide
July 2012
Rev. 0
UG_6618_122
Page 2

Table of Contents
1 Introduction ......................................................................................................................................... 3
1.1 What’s Included with an EVK? ...................................................................................................... 4
1.2 What’s included with an SDK? ...................................................................................................... 5
1.3 Other Development Tools ............................................................................................................. 5
1.3.1 Socketed Flash Programming Board ................................................................................ 5
1.3.2 Compiler and Integrated Development Environment (IDE) ............................................... 6
1.3.3 In-Circuit Emulator (ICE) ................................................................................................... 6
1.3.4 TFP2 Flash Programmer ................................................................................................... 7
2 Getting Started with the EVK ............................................................................................................. 8
2.1 USB Driver Installation .................................................................................................................. 8
2.2 Connecting the Evaluation Board to the PC ................................................................................. 8
2.3 Getting Ready to Measure AC Energy ......................................................................................... 8
2.4 Read Energy Measurement Data ................................................................................................. 8
2.5 Calibration ..................................................................................................................................... 8
3 Getting Started with the SDK ............................................................................................................. 9
3.1 Required Hardware and Software Development Tools ................................................................ 9
3.1.1 Running the PDU1 Application Software .......................................................................... 9
3.1.2 Modifying the Application Code ......................................................................................... 9
3.2 Opening the Project with Keil uVision Tools ................................................................................. 9
3.3 Rebuilding the Application .......................................................................................................... 10
3.3.1 Without the Boot Loader .................................................................................................. 10
3.3.2 With the Boot Loader and CRC ....................................................................................... 10
3.4 Downloading the *.abs File to the Target ................................................................................... 11
4 Getting Started with Flash Programmin g ....................................................................................... 12
4.1 Via the GUI ................................................................................................................................. 12
4.2 Via theTFP2 Flash Programming Tool ....................................................................................... 14
4.3 Via the ADM-51 Emulator ........................................................................................................... 17
5 Contact Information .......................................................................................................................... 19
Revision History ........................................................................................................................................ 19
Page 3

UG_6618_122 78M6618 PDU1 Firmware Quick Start Guide
1 Introduction
The 78M6618 PDU1 Firmware is a turnkey energy measurement solution optimized for use in
single-phase AC Power Distribution Units (PDUs). At the sensor interface, the 78M6618 with PDU1
Firmware provides eight sense inputs for current and two sense inputs for voltage (single-phase). At the
host interface, either a UART or SPI interface can be used to issue configure the device and access the
following measurement data:
• RMS Voltage
• RMS Current (Line1, Line2,..Line8)
• Active Power (Line1, Li ne2 , ..Li ne8)
• Apparent Power (Line1, Line2,..Line8)
• Reactive Power (Line1, Line2,..Line8)
• Power Factor (Line1, Line2,..Line8)
• Energy (Line1, Line2,..Li ne 8)
• Line Frequency
Fully functional demo code can be evaluated in an Evaluation Kit (EVK) and used as is in some
applications. It can also serve as starting base for customization and adaptation to different system buses
with an optional Software Development Kit (SDK).
This document overviews the steps for
• Getting Started with the EVK
• Getting Started with the SDK
• Getting Started with Flash Programming
Rev. 0 3
Page 4
78M6618 PDU1 Firmware Quick Start Guide UG_6618_122
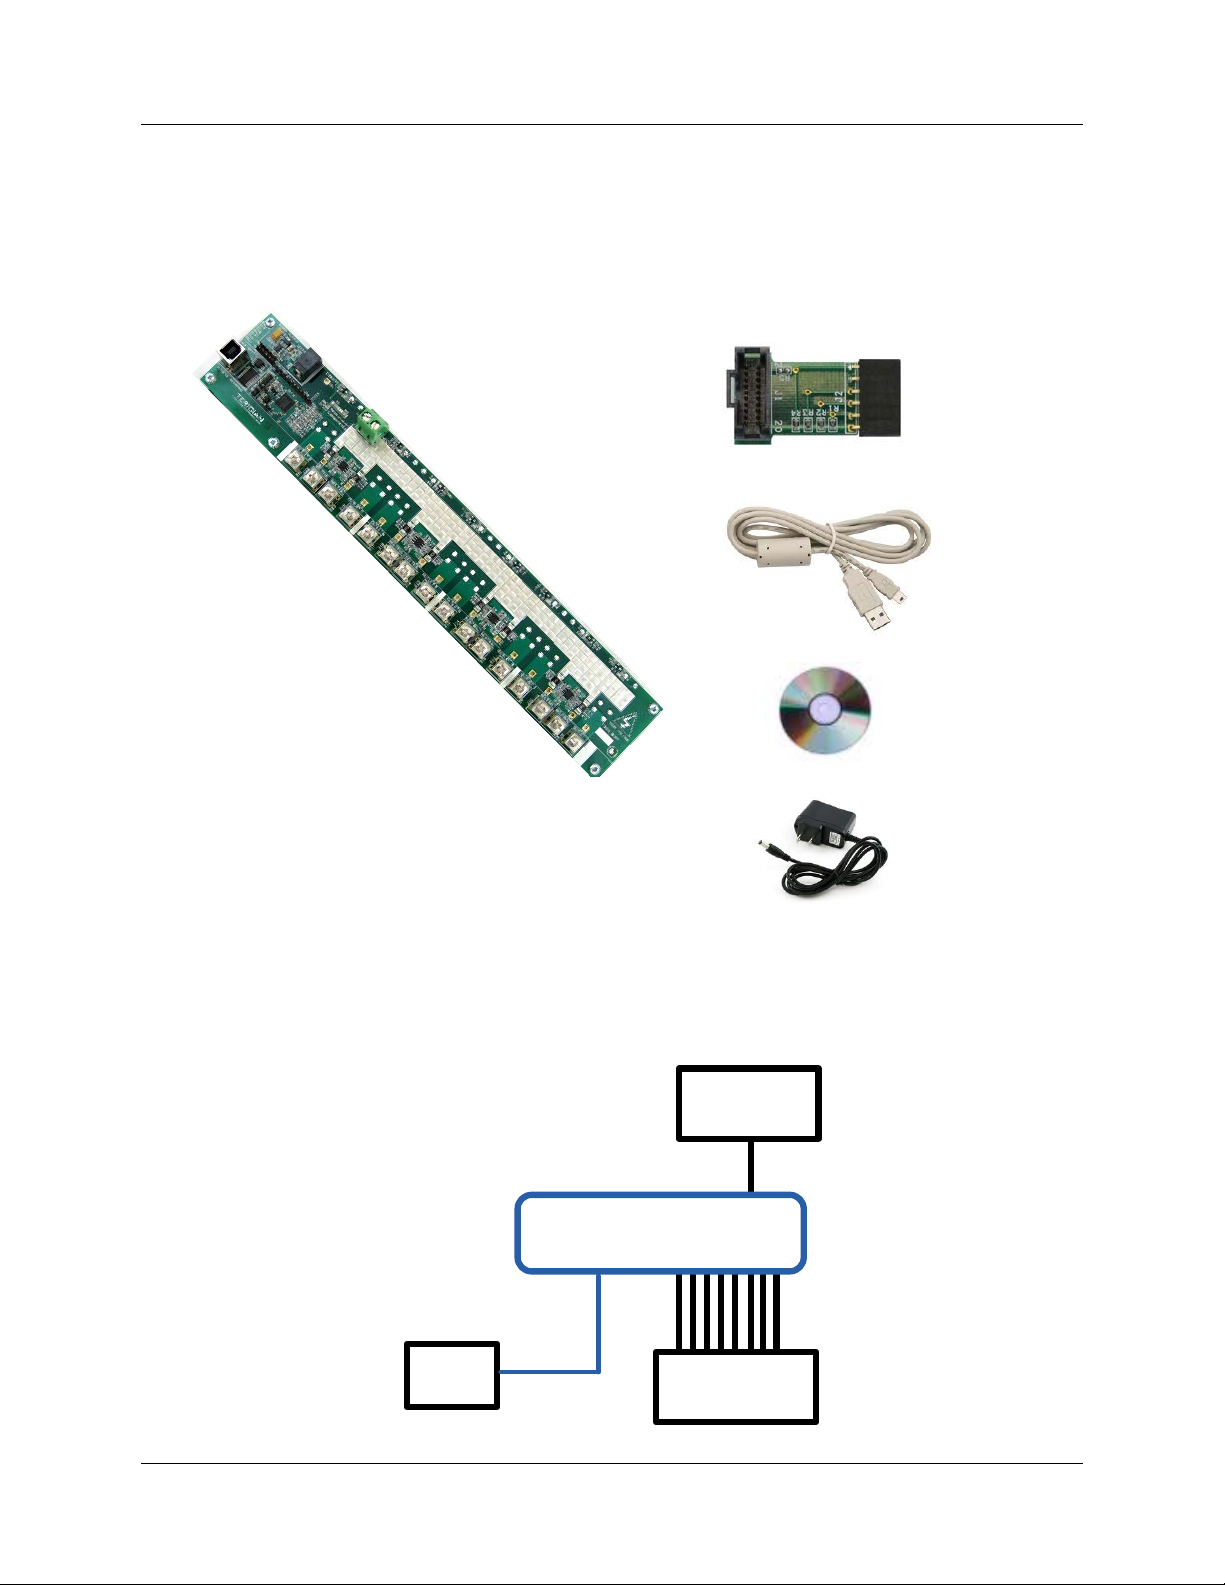
USB
Monitored Loads
(up to 8)
Host PC
2-wire
Single-phase
AC Source
78M6618 PDU1
Eval Kit
1.1 What’s Included with an EVK?
The PDU1 Evaluation Kit (EVK) includes the 78M6618 PDU1 Board ( P/N 78M 66 18-PDU-1)
demonstrating measurement and relay control of eight outlets using shunt resistors. The board
incorporates the 78M6618 power and energy measurement IC, sensors, relays, and an isolated serial
port connection to a Windows PC.
ICE Adaptor
Board
USB Cable
CD with GUI
Software and
Documentation
78M6618 PDU1 Board
12VDC Power
Supply
The 78M6618 on the board is pre-programmed with PDU1 Demo Code and calibrated at the factory. The
energy measurement data and status is read back over the serial UART interface presente d to the PC as
a virtual COM port. The 78M6618 PDU1 Evaluation Kit requires a PC with Microsoft
®
Windows XP or later
with a USB port and a minimum 1024 x 768 video display resolution. An AC source and load complete
the rest of the test setup needed to collect measurements.
4 Rev.0
Page 5
UG_6618_122 78M6618 PDU1 Firmware Quick Start Guide
1.2 What’s included with an SDK?
The SDK contains all the required elements for a variety of usages.
For the user who would like to evaluate the application in their own hardware, pre-built image files are
available. Loading these image files into a 78M6618 will allo w runn ing the app l icati on as prov ide d. A
demonstration PC-based graphical user interface (GUI) is also provided and may be used to send
configuration commands to and read out measurement data from the PDU1 application.
Users who would like to develop their own applications have access to application level source code to
use as a baseline. Energy measurement functions are provided in object code format and with a
documented application programming interface (API). An SDK User Guide describes how to use
development tools to modify the project code. Post processing tools, such as CRC insertion also included
in the SDK package.
The 78M6618 PDU1 SDK includes the following components:
• This Quick Start Guide
• 78M6618 PDU1 SDK 2.0 User Guide
• 78M6618 PDU1 Demo Application User Guide
• 78M6618 Firmware Boot Loader Functional Specification
• 78M6618 Programmer’s Reference Manual
• EMSoC SDK 2.0 Serial Asynchronous Interface Protocol Specification
• EMSoC SDK 2.0 Serial Peripheral Interface (SPI) Protocol Specification
1.3 Other Development Tools
This section describes other items available for purchase through Maxim directly or Maxim’s distributors.
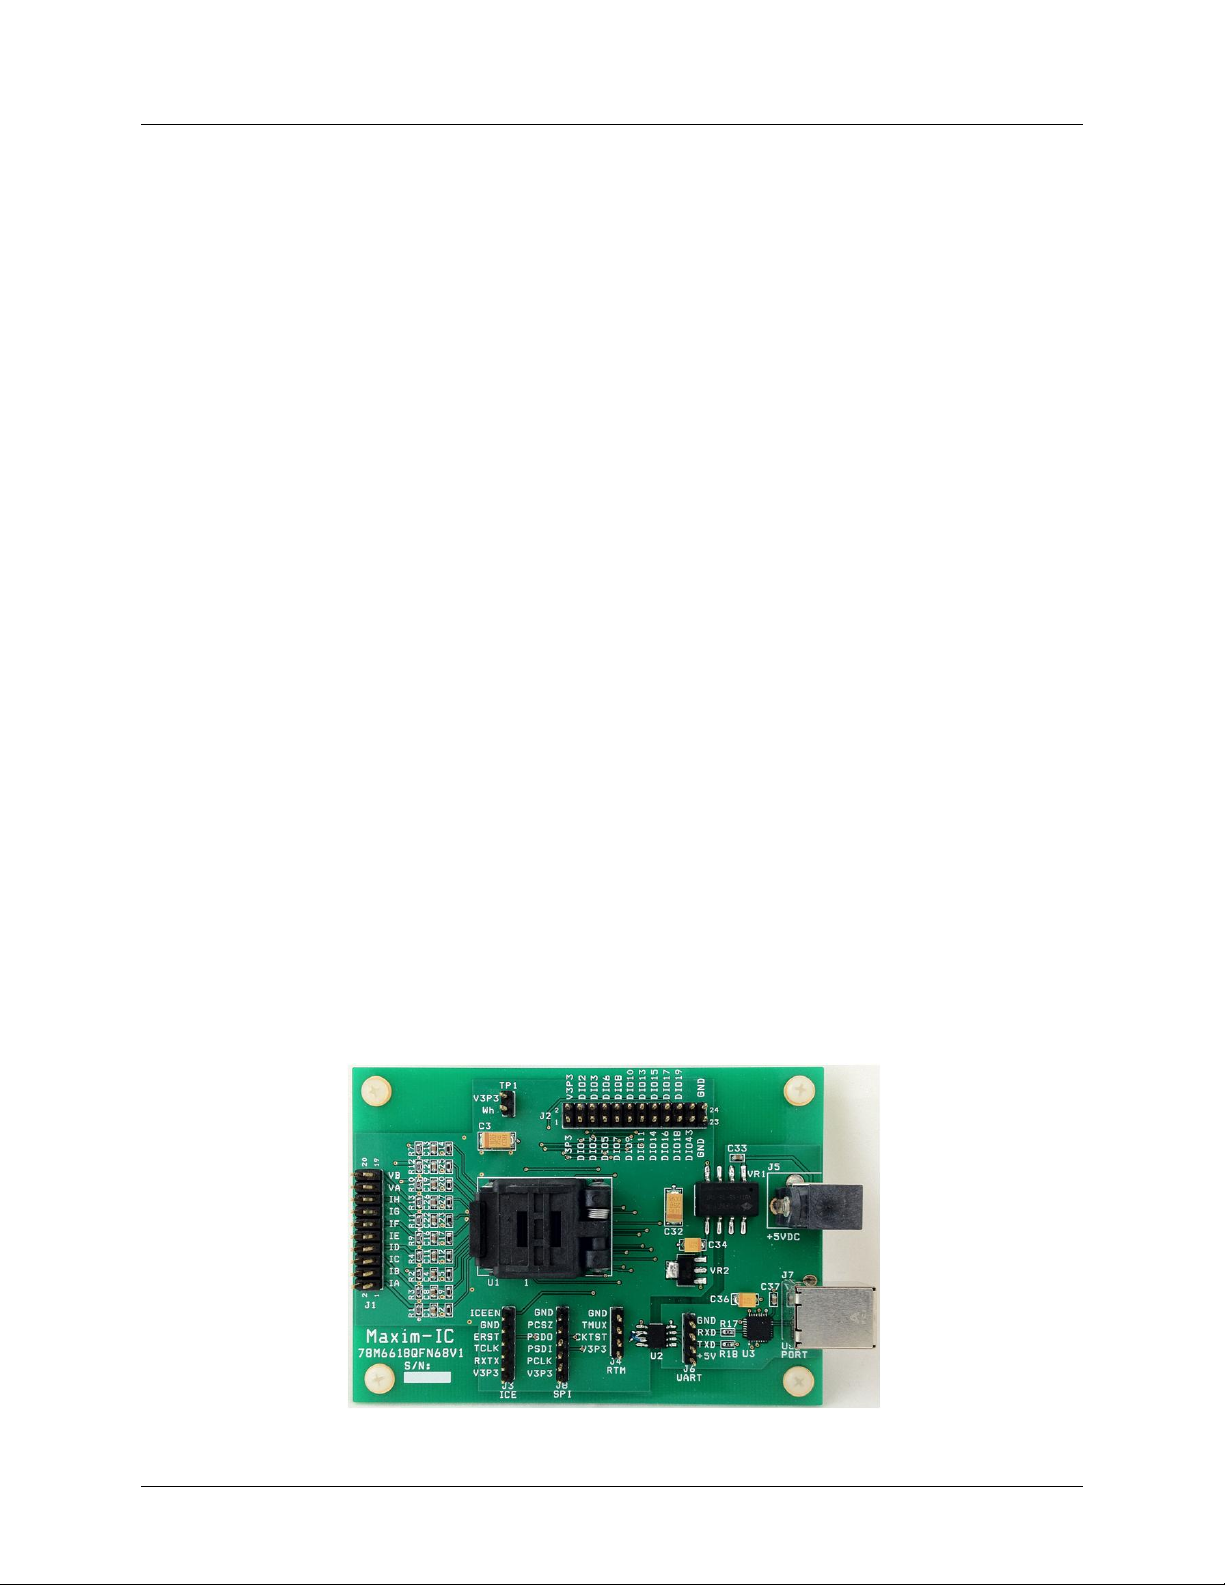
1.3.1 Socketed Flash Programming Board
The 78M6618 Socket Board is a socketed fixture for flash programming 78M6618 devices in small
quantities. It allows for loading program memory into 78M6618 SoCs via either the In-C irc uit Emulator
(ICE) interface, TFP2, or the serial Boot Loader (UART) interface if the device already contains the Boot
Loader in flash. The 78M6618 Socket Board (P/N 78M6618-SOCKET68) includes:
• 78M6618 Socket Board and power supply
• CD with USB Driver, GUI software, and documentation
Rev. 0 5
Page 6

78M6618 PDU1 Firmware Quick Start Guide UG_6618_122
1.3.2 Compiler and Integrated Development Environment (IDE)
Maxim recommends using the PK51 Professional Developer’s Kit b y Keil™ (www.keil.com), containing
the µVision 4 Integrated Development Environment (IDE), complete with 8051 assembler, editor, C
compiler, linker, and locator. The Demo Code shipped with the Demo Kits for Maxim AC Power
Monitoring ICs was written using this tool. Keil offers the best support for the memory model of the 80515
core used in the 78M6618 ICs. It is possible to use alternative compilers, but the code for these is not
supported by Maxim.
While all Demo Code is written using the standard CA51 tool by Keil, significant improvements in memory
usage can be made by using the PK51 “Professional Developer’s Kit” by Keil. The PK51 contains the
LX51 extended linker that can reduce code size using special optimization techniques.
1.3.3 In-Circuit Emulator (ICE)
The Signum Systems ADM-51 (www.signum.com) is compatible with the Keil symbolic output format and
supports the 78M6618. It is useful to perform the following tasks:
• Code emulation with breakpoints, watch windows, etc., with support of source code symbols
• Memory monitoring and manipulation (SFRs, XRAM, I/O RAM)
• Flash erase and code loading into flash memory of the 78M6618
Maxim supplies the ADM-51 to customers at a preferred price (P/N DB6612-ADM51) along with an
isolated USB cable.
6 Rev.0
Page 7

UG_6618_122 78M6618 PDU1 Firmware Quick Start Guide
1.3.4 TFP2 Flash Programmer
The Signum ADM-51 can serve as a programmer for prototyping and small quantities. For programming
production quantities, Maxim offers the TFP2 Flash Programming Module (P/N 80515-FPBM-TFP2),
which is a stand-alone programmer that can be operated manually or in an ATE environment.
The TFP2 offers the following features:
• Stand-alone or PC-controlled programming
• Variable flash memory size (selectable to match target device’s memory size
• LEDs and signal outputs for PASS and FAIL
• Pushbutton and digital control inputs compatible with ATE
• Can erase and re-program ICs overriding the SECURE bit set
For more information, see the Flash Programmer Model TFP2 User’s Manual.
Rev. 0 7
Page 8

78M6618 PDU1 Firmware Quick Start Guide UG_6618_122
2 Getting Started with the EVK
This section describes the necessary steps to get the pre-built application up and running. Note that some
of the steps are only required once when the setup is installed for the first time.
2.1 USB Driver Installation
The Evaluation Kit includes an isolated USB interface for serial communications with a PC. The FTDI
USB controller IC FT232R performs the USB functions. Refer to the 78M6618 PDU1 Evaluation Board
User Manual for information about USB Driver installation.
2.2 Connecting the Evaluation Board to the PC
DO NOT APPLY AC POWER TO THE BOARD YET!
Connect the 78M6618 PDU1 Evaluation Board to a USB port of the PC using the provided USB cable.
The USB controller is powered through this connection. If installed for the first time, the PC will prompt
you to install a USB-COM driver. Refer to the 78M6618 PDU1 Evaluation Board User Manual for more
information.
2.3 Getting Ready to Measure AC Energy
Refer to the included Saf et y Precautions application note and 78M6618 PDU1 Evaluation
Board User Manual for detailed instructions if not already familiar with energy measurement,
and for trouble shooting tips. Otherwise, connect AC source and loads to evaluation board
along with external 12VDC power su ppl y.
2.4 Read Energy Measurement Data
The GUI application is now ready to be used to read energy measurement data and verify that the
hardware and software work properly. Refer to the 78M6618 PDU1 Demo Application User Guide for
more information.
2.5 Calibration
All evaluation kits come pre-calibrated to a precision source.
Note: Calibration requires connection of a reference power supply and a reference load that are more
accurate than the desired calibrated accuracy. For more information, refer to the 78M661x Calibration
Procedure.
8 Rev.0
Page 9

UG_6618_122 78M6618 PDU1 Firmware Quick Start Guide
3 Getting Started with the SDK
3.1 Required Hardware and Software Development Tools
3.1.1 Running the PDU1 Application Software
The PDU1 Demo Application can be used without purchasing software development tools. The prebuilt
image file can be downloaded to the 78M6618 device via one of the following methods:
• The UART interface using the 78M6618 Boot Loader (target 78M6618 device must already have Boot
Loader code resident in the flash memory)
• The ICE interface using TFP2 Flash Programmer tool (sold separately)
• The ICE interface using the ADM-51 Emulator (sold separately by Signum Systems Corporation)
3.1.2 Modifying the Application Code
The project application code can be modified and adapted using the Keil development tool suite for the
8051 processor and the ADM-51 Emulator.
• Keil uVision4, version 9.0 and higher (http://www.keil.com/uvision)
• ADM-51 Emulator (http://www.signum.com/Signum.htm)
3.2 Opening the Project with Keil uVision Tools
The project is loaded into the development tools by opening the 6618_PDU1_APP_BL.uvproj file in the
\Application folder.
The project files are organized in folders, such as metrology, drivers, communication, etc, as can be seen
below.
Rev. 0 9
Page 10

78M6618 PDU1 Firmware Quick Start Guide UG_6618_122
3.3 Rebuilding the Application
The application can be built with or without inclusion of the Boot Loader utility.
3.3.1 Without the Boot Loader
Building the application without the Boot Loader entails that software updates in the end product are
possible only by connecting the TFP2 or ADM-51 tools to the ICE interface port. However, 1 KB of flash
memory is freed when the Boot Loader is not included, which can be used by the application itself.
Select target PDU_NO_BOOT from the drop down list (encircled in the figure above) and press F7 to
build the project. A successful run produces two output files in the \Application\Obj folder. The *.abs file
is most suited to be used by the emulator for debugging. The *.hex file is an image file best suited for
the TFP2 programmer, and contains no debugging information. The *.hex file, as produced by the Keil
compiler, is not suitable for the TFP2 unless the CHKSUM utility is first used to process the file into the
proper format.
3.3.2 With the Boot Loader and CRC
The Boot Loader requires 1 KB of memory and insertion of CRC codes into the image file. Building an
application with the Boot Loader utility allows for subsequent firmware upgrades via the serial interface
(RS-232 or RS-485) connected to the host.
Select target PDU_BOOT from the drop-down list (encircled in the figure above) and press F7 to build the
project. A successful run produces two output files in the \Application\Obj folder. The *.abs file is most
suited to be used by the emulator for debugging. The *.hex file is an image file best suited for the TFP2
programmer, and contains no debugging information. See the Flash Programmer Model TFP2 User’s
Manual on how to use the CHKSUM utili t y.
It should be noted that the *.hex output file needs to be post-processed in order to calculate and insert
the CRC values. The Hex2CRCHex.exe application is included, in the tools folder of the SDK, to perform
the post-compiling CRC insertion into the hex file. The resulting hex file is renamed with ‘CRC’ added in
the name. For example: 6618_PDU_CRC.hex is generated by the Hex2CRCHex.exe tool using input file
6618_PDU.hex. The project settings are such that this tool is invoked by default, as shown here:
10 Rev.0
Page 11

UG_6618_122 78M6618 PDU1 Firmware Quick Start Guide
3.4 Downloading the *.abs File to the Target
The ADM-51 Emulator is used to download the *.abs file to the EVM board. Once downloaded, the
developer can run, stop and debug the application. Familiarity with the ADM-51 debugging tools is
assumed for the purpose of this document.
Rev. 0 11
Page 12

78M6618 PDU1 Firmware Quick Start Guide UG_6618_122
4 Getting Started with Flash Programming
4.1 Via the GUI
If the Firmware includes a Boot Loader, the following steps describe how to use the GUI to upgrade the
Firmware using the Boot Loader:
1. On the SAI Commands tab, click the Invoke Boot Loader Mode button near the lower-left corner.
2. Power cycle the device, or send “Watchdog Reset” command. It will enter the Boot Load mode. This
can be verified by observing the DIO4 pin, which produces 15 ms pulses when the boot loader is in
operation.
12 Rev.0
Page 13

UG_6618_122 78M6618 PDU1 Firmware Quick Start Guide
3. On the BootLoader tab, click the Load New Hex File button and select the hex file for the upgrade.
4. The GUI will show progress during the firmware upgrade. After the firmware upgrade is complete the
new firmware application is running.
Rev. 0 13
Page 14

78M6618 PDU1 Firmware Quick Start Guide UG_6618_122
4.2 Via theTFP2 Flash Programming Tool
Refer to the Flash Programmer Model TFP2 User’s Manual for more detailed instructions if necessary.
1. Connect the TFP2 Programmer to the evaluation board via the ribbon cable and connect the serial
cable to the PC. Make sure the 78M6618 is connected to 3.3V. The memory size switch must be set
to 64 KB for the 78M6618 target device.
2. Start a terminal program. In the example, Hyper Terminal was used. Set the connection to the proper
COM port and set it to 38400, N, 1, XONXOFF. A prompt should appear.
3. Type the “H” command at the > prompt on the terminal and select Transfer –> Send Text File (as
shown below). Do not select Send File. This
CHKSUM.exe utility.
.hex file must have previously been processed with the
14 Rev.0
Page 15

UG_6618_122 78M6618 PDU1 Firmware Quick Start Guide
4. Wait for the hex file to get transferred to TFP2 internal EEPROM. Once complete, a PASS message
should appear as seen below.
Rev. 0 15
Page 16

78M6618 PDU1 Firmware Quick Start Guide UG_6618_122
5. To program the device’s flash using the flash image that was just programmed in the TFP2’s
EEPROM in steps 3 and 4 above, type the “P” command at the > prompt or simply push the Program
button on the TFP2. If the programming is successful, a “PASS” message will be displayed. The
Firmware programming is now complete.
16 Rev.0
Page 17

UG_6618_122 78M6618 PDU1 Firmware Quick Start Guide
4.3 Via the ADM-51 Emulator
Refer to the Signum System ADM-51 Emulator documentation if necessary.
1. Connect the ADM-51 to the PC us ing the isolated USB cable. C onnect the target board to ADM-51
emulator using the ribbon cable and power up the 78M6618 device.
2. Start the Wemu51 program from the connected PC.
3. Stop the CE by writing 0x00 at XRAM address 0x2000 (see the XDATA memory window below).
4. Use File->Load to select the hex file for programming.
Rev. 0 17
Page 18

78M6618 PDU1 Firmware Quick Start Guide UG_6618_122
5. Browse using the Hex File Type, or ABS file type (see Section 3.4).
6. Click OK to start the programming. The progress will be shown in the progress bar.
7. Once progress is 100%, the firmware programming is complete.
18 Rev.0
Page 19

UG_6618_122 78M6618 PDU1 Firmware Quick Start Guide
Number
Date
Changed
5 Contact Information
For more information about the 78M6618 or other Maxim products, contact technical support at
www.maxim-ic.com/support.
Revision History
Revision
Revision
Description
Pages
0 7/12 First publication. –
Maxim cannot assume responsibility for use of any circuitry other than circuitry entirely embodied in a Maxim product. No circuit
patent licenses are implied. Maxim reserves the right to change the circuitry and specifications without notice at any time.
Maxim Integr ated Products, In c. 160 Rio Robles, San Jose, CA 95134 USA 1-408-601-1000
2012 Maxim Integrated Products is a registered trademark of Maxim Integrated Products.
Rev. 0 19
 Loading...