

Page 1

LANGUAGE
EN
ISTRUCTI ON
HERA
AUTOMATIC
U S E M A N U A L
Page 2

Page 3

1
GENERAL CONTENTS
DESCRIPTION OF THE MACHINE .............................................................................................................. PAGE 02
MACHINE OPERATIONS............................................................................................................................PAGE 03
1
a
STEP: TANK FILLING .......................................................................................................................................... PAGE 03
2
a
STEP: LOWER DRUM FILLING ............................................................................................................................ PAGE 03
3
a
STEP: TURNING ON ............................................................................................................................................ PAGE 04
4
a
STEP: HOSE CONNECTION ................................................................................................................................. PAGE 04
5
a
STEP: ACCESSORY STARTING ............................................................................................................................. PAGE 05
ACCESSORIES EQUIPPED WITH MACHINE ............................................................................................... PAGE 06
1 HANDLE WITH HOSE .................................................................................................................................... PAGE 06
2 MULTIFUNCTION BRUSH .............................................................................................................................. PAGE 06
2A FITTING FOR LIQUID SUCTION ..................................................................................................................... PAGE 06
2B FITTING FOR CARPETS .................................................................................................................................. PAGE 06
2C UNIVERSAL FITTING ..................................................................................................................................... PAGE 06
3 WINDOW CLEANER ...................................................................................................................................... PAGE 07
4 150 MM. NOZZLE ......................................................................................................................................... PAGE 07
4A WINDOW CLEANER FITTING ........................................................................................................................ PAGE 07
4B BRISTLE FITTING ........................................................................................................................................... PAGE 07
5 STEAM NOZZLE ADAPTER ........................................................................................................................... PAGE 07
6 EXTENSIONS ................................................................................................................................................. PAGE 07
7 TANK FILLING BOTTLE ................................................................................................................................. PAGE 07
ROUTING MAINTENANCE ........................................................................................................................PAGE 08
OPTIONAL .................................................................................................................................................PAGE 09
SAFETY RULES AND CAUTIONS ...............................................................................................................PAGE 10
TROUBLESHOOTING .................................................................................................................................PAGE 11
AFTER-SALES ASSISTANCE ...................................................................................................................... PAGE 12
SPARE O-RING .......................................................................................................................................... PAGE 13
WARNING: READ THE PRESENT MANUAL BEFORE USING THE APPLIANCE.
INTROdUzIONE
WE THANK YOU FOR CHOOSING THIS PRODUCT MADE IN ITALY.
ELEKTRA IS THE RESULT OF A CAREFUL SEARCH CARRIED OUT BY PEOPLE KEEN ON CLEAN AND INNOVATION AND
IT REPRESENTS THE NEWEST PRODUCT AMONG THE NEW-GENERATION MULTIFUNCTION DEVICES.
ELEKTRA CARRIES OUT THE FUNCTIONS OF 5 DIFFERENT HOUSEHOLD APPLIANCES: IT SUCKS, WASHES, DRIES,
SANITIZES AND IRONS. IT IS A SPECIAL, POWERFUL AND ECOLOGICAL MACHINE, IT DOESN’T NEED FILTERS OR
BAGS TO BE REPLACED PERIODICALLY AND EXPLOITS THE NATURAL PROPERTIES OF WATER TO ENSURE MAXIMUM
HYGIENE AND CLEANLINESS.
THANKS TO ITS SMALL OVERALL DIMENSION IT CAN BE HANDLED EASILY AND KEPT ANYWHERE.
WE RECOMMEND READING CAREFULLY THIS MANUAL TO DISCOVER ALL ELEKTRA FEATURES AND POTENTIALITIES.
MOREOVER, WE RECOMMEND STRICTLY FOLLOWING THE ADVISES AND CAUTIONS FOR A CORRECT USE IN ORDER
TO ENSURE VERY GOOD RESULTS AND SAFETY.
Page 4

12
10
11
5
1
2
3
4
6
7
8
9
2
DESCRIPTION OF THE MACHINE
Parte Anteriore
1. Opening to insert the hoses
2. Control panel
3. Steam adjusting knob
4. Water tank plug
5. Upper cover
6. Handle
7. Lower drum
8. Closing hook
9. Wheels
Parte posteriore
10. Filter cover
11. Feeding cable
12. Cable reel
Page 5

FIG.6
FIG.5
FIG.1
FIG.2
FIG.4
FIG.3
3
FIG.6
FIG.5
FIG.1
FIG.2
FIG.4
FIG.3
MACHINE OPERATION
1ST STEP: LOWER DRUM FILLING
• Unhook the closing devices (fig.1);
• Lift the upper cover (fig.2);
• Fill the lower drum with about 2 litres of clean water (fig.3)
• Reposition the cover by paying attention to the drum level
indicator. It must be is in the front part (fig.4)
IMPORTANT:
to avoid motor damages during the
suction check that the liquid contained in the drum
does not exceed the level indicated on the drum
itself
(MAX) (fig.4) otherwise we recommend
emptying the drum.
2ND STEP: WATER TANK FILLING
• Remove the plug (fig.5);
• Fill the tank with water by using the suitable bottle supplied
(fig.6) and by respecting the maximum capacity of the tank
(any excessive water will be automatically discharged in the
lower drum).
• Put the plug again.
NOTE: USE ONLY THE BOTTLE SUPPLIED AND AVOID USING ANY
OTHER OBJECT SUCH AS GLASSES AND FUNNELS TO FILL THE
TANK. IT MAY BE OVERFILLED. DO NOT USE DISTILLED WATER.
WARNING: Fill the lower drum only with water.
Do not use fragrances-essential oils different
from the ones approved by the Manufacturer.
They may damage the drum.
Empty and wash the drum after each use.
To clean the drum, use natural soap and rinse
with abundant water.
Page 6
A
d
e
C
f
B
44
FIG. 7
FIG. 8
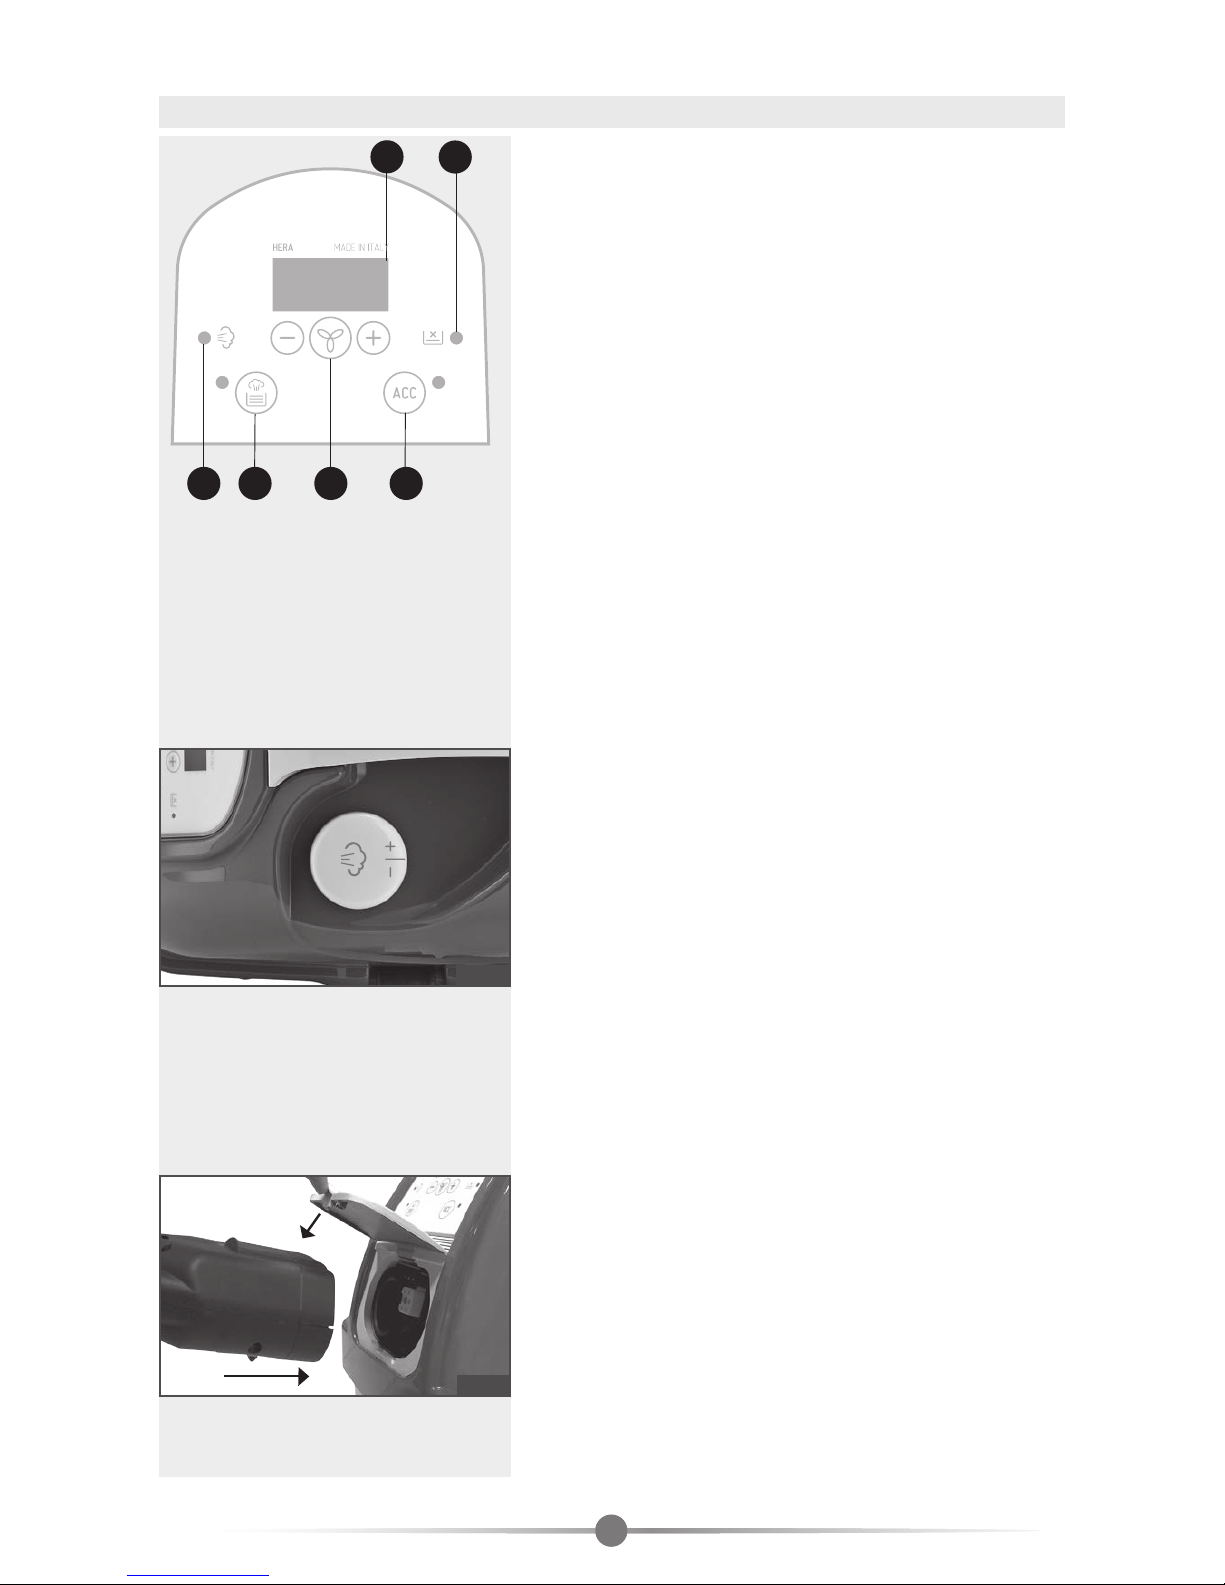
3TH STEP: TURNING ON
• Connect the supply cable to a 220V plug provided with
earth. Three red lights appear on display “e”.
• For the vacuum cleaner function: press push button “B” and
ad just the power by means of keys +/-.
• For the steam function: press push button “A”, after
about 5 minutes pilot light “d” lights up and the
device reaches the optimum working temperature and
pressure. The steam must be adjusted by means of the
knob (fig.7
) according to the surface to be treated.
The temperature remains displayed on the display. Once the
other functions are selected, the display shows them about
5 seconds.
NOTES: when pilot light “f” signalling that the water is finished
is on, the flashing writing “H2o” appears on the display and in
the meantime the steam delivery is stopped. In this case fill the
tank with water. (step 2).
• For the iron / carpet cleaner function: press push button
“C”, the corresponding pilot light lights up and the writing
“ACC” appears on the display.
4TH STEP: HOSE CONNECTION
• To connect the hose, move upwards the door covering the
plug (fig.8), insert the plug and close the door by making
sure the pawl is into its proper seat.
LIST OF THE PANELS FUNCTIONS
A. Push button to turn the boiler on
B. Push button to start and adjust the
motor (+/-)
C. Push button to start the iron / carpet cleaner
d. Pilot light signalling the steam is ready
e. Display
f. Pilot light signalling the water is finished
Page 7
55
FIG. 9
FIG.11
FIG.10
FIG.12
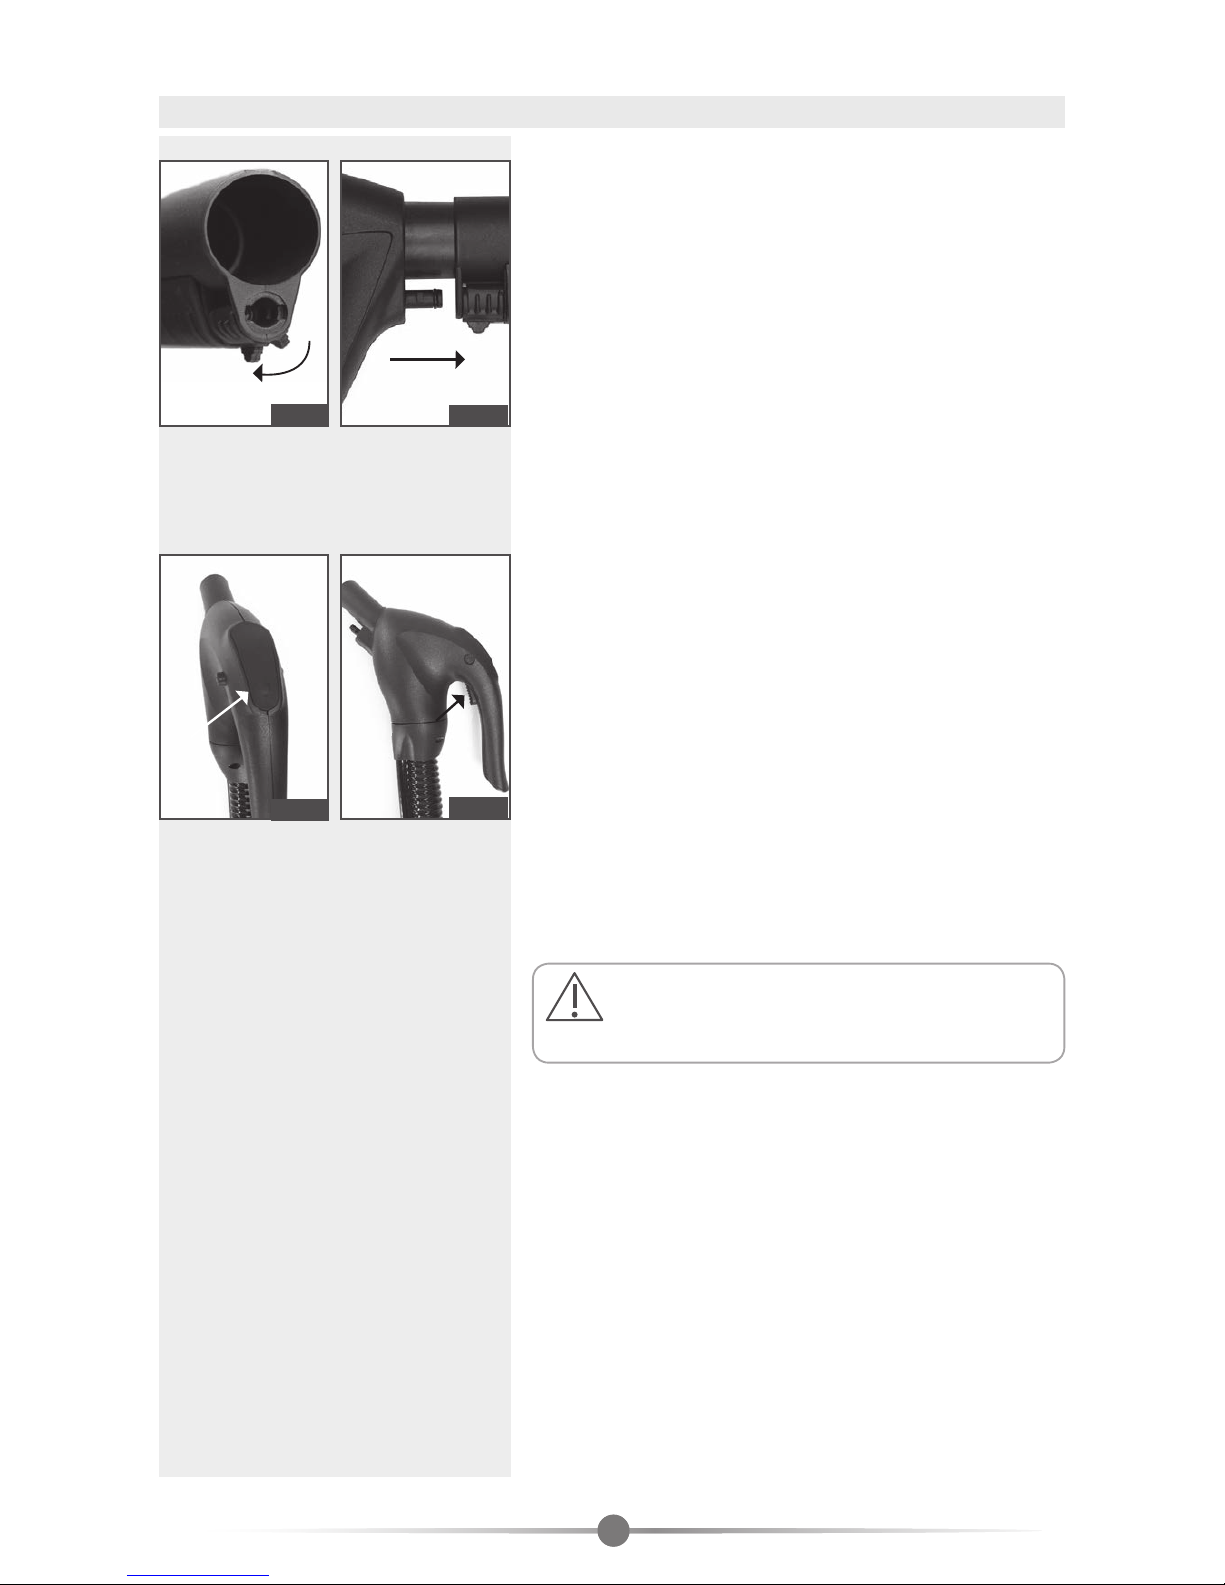
5TH STEP: ACCESSORY STARTING
• All the accessories carry out the double function of suction
and steam. They fit in directly on the handle or on the
extensions.
• Move the ring nut to open position and keep it open (fig.9).
• Fit in the extension hose or the accessory (fig.10).
• Move the ring nut to close position. Release the spring wheel
for the hose extension.
• Press the button located on the start handle once and then
once again to stop suction (fig.11).
• To regulate the suction motor power, keep the button
pressed down during use (fig.11); every 4 seconds the power
will increase until it reaches maximum power (lev. 5) and
then it will restart from the minimum power (lev. 3). Once it
has reached the desired power, take pressure off the button;
the chosen power will be memorised.
• Keep the button under the handle pressed for steam and
then take pressure off it to stop (fig.12).
WARNING: DO NOT USE STEAM ON ELECTRIC
FIXTURES WHICH ARE ON OR ENERGIZED!
Page 8
2B
2
C
2A
2
d
A
B
e
C
1
open open
close close
66
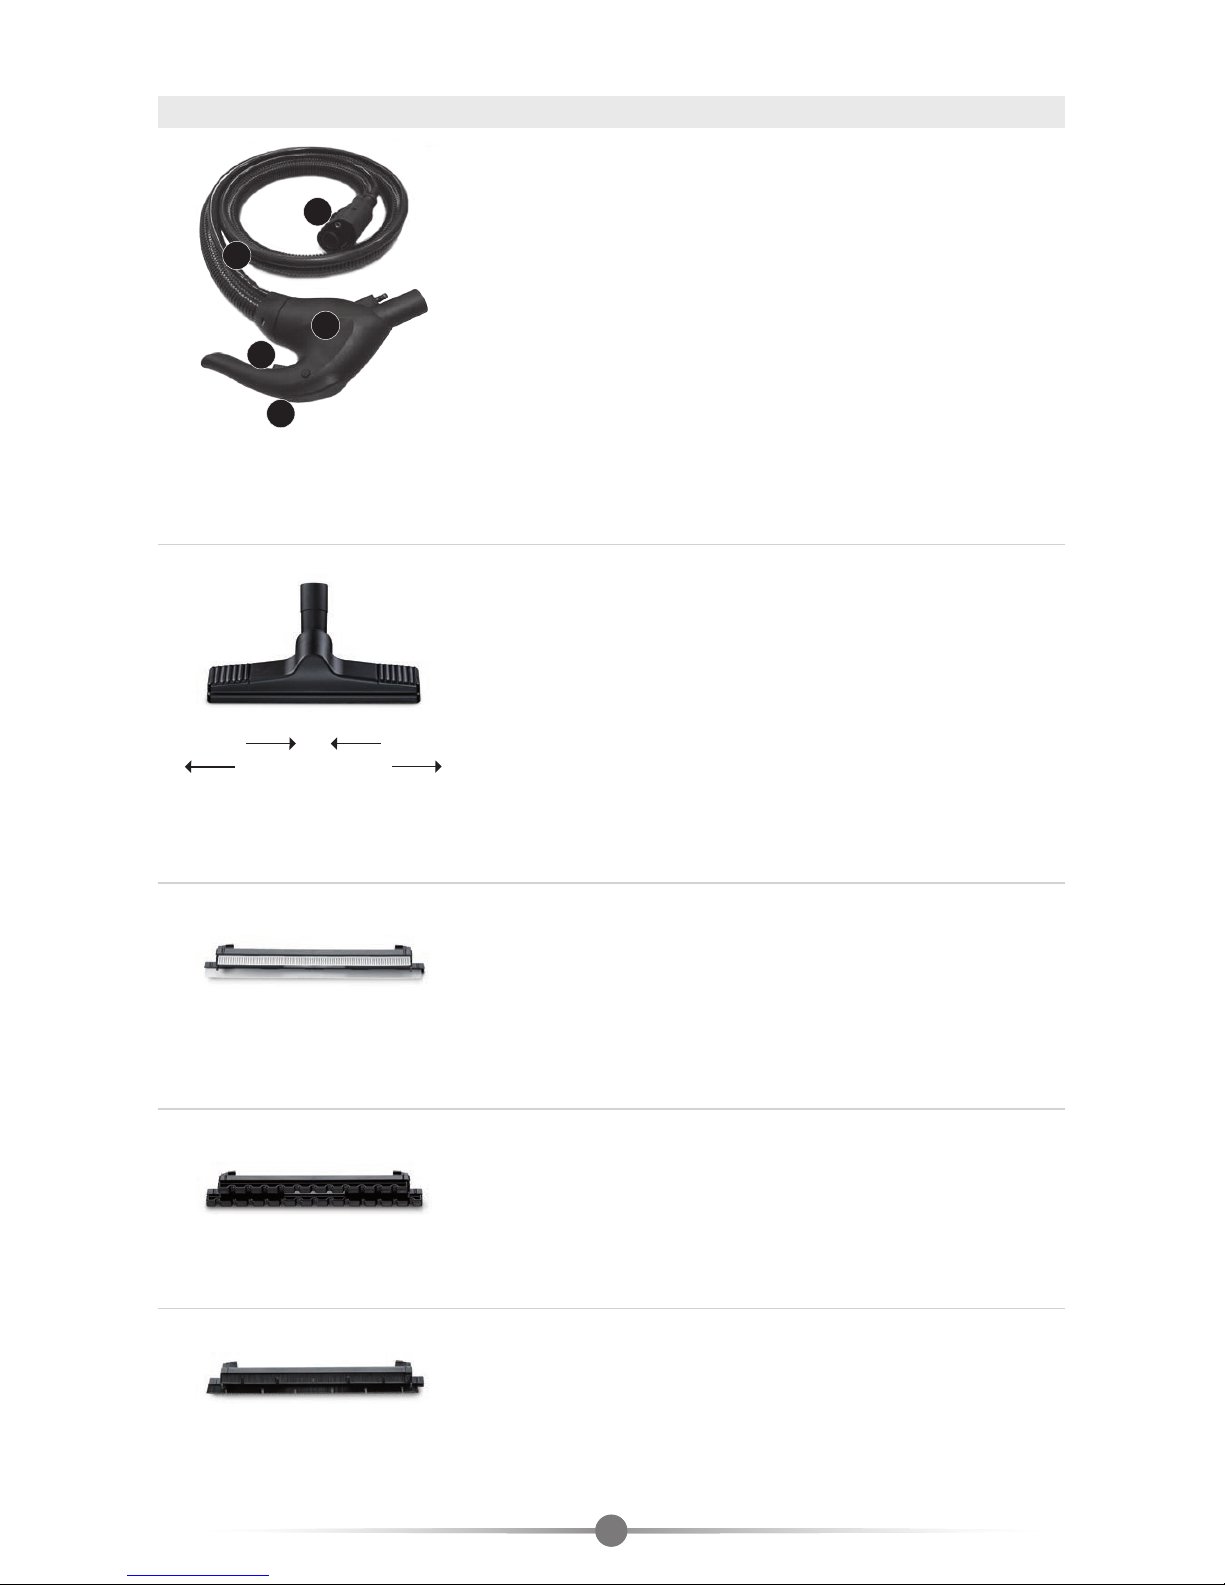
ACCESSORIES SUPPLIED WITH THE MACHINE
1. HANDLE WITH HOSE
A. Plug.
B. Hose.
C. Handle.
d. Steam push button.
e. Suction push button.
MAINTENANCE OF THE HOSE
After every use we recommend rinsing the hose by sucking one/
two litres of water from a basin to prevent the dirt from settling
on the internal walls. Then, hook it, so that it can get dry.
2. MULTIFUNCTION BRUSH
It is equipped by an articulation which allows it to turn 360°. This
brush can clean areas difficult to be reached (under the furniture
and the beds, on high cupboards, etc.) and various kind of floor,
carpets, etc.
To use the desired fitting on the brush, just insert it and by
keeping it pressed, move the orange sliders inwards (fig. 2). To
remove the fitting, move the sliders outwards.
2A. FITTING FOR LIQUID SUCTION
It is fitted to clean floors, plastic coatings, marble, etc..
Steam the surface to be cleaned and then suck; the result is a
perfectly clean and dry surface.
2B. FITTING FOR CARPETS
The rounded shape allows sliding and cleaning carpets and fitted
carpets more easily.
2C. UNIVERSAL FITTING
It can be used as vacuum cleaner on floors, tiles, plastic coatings.
Page 9

6
5
5B
5A
5C
7
3
4A
4
4B
7
3. WINDOW CLEANER
The window cleaner is particularly suitable for the cleaning of
windows and mirrors.
For the use refer to point 4A.
NOTE: in winter the windows must be previously warmed by using
the accessory at a distance of 10/15 cm. before starting cleaning.
4. 150 MM. NOZZLE
It is a brush on which the following fittings can be assembled:
4A. WINDOW CLEANER FITTING
Ideal to clean “English” windows. For a correct use we
recommend warming the accessory by keeping the steam push
button pressed for some seconds and steaming in the air. Then
proceed with the cleaning.
It is possible to steam and suck at the same time or separately.
We recommend using the window cleaner from the top to the
bottom by keeping it well pushed on the window.
4B. BRISTLE FITTING
It can be used to clean sofas, armchairs, seats, etc.
For a correct use steam and suck by keeping pressed the brush
against the surface so that the dirt can be easily removed.
5. ADAPTER FOR THE STEAM LANCE
5A. Bristle brush diameter 30 mm
5B. 80 mm nozzle
5C. Lance
Particularly recommended to clean shower boxes, grills, fly
screens and the spaces between the tiles etc. Ideal also for the
defrosting of freezers or refrigerators.
6. EXTENSIONS
Essential to clean floors, washable walls or high windows. They
can be used combined with any other accessory.
7. BOTTLE TO FILL THE TANK
IMPORTANT: adjust the pressure of the steam
according to the type of surface. Pay attention to
the more delicate surfaces.
Page 10

C
B
A
NO!
NO!OK
C
A
B
D
8
COMPONENTS OF FILTER AND SEPARATOR
A. Molecular separator.
B. Knurled screw.
C. Filter.
D. Motor support.
ROUTINE MAINTENANCE
MOTOR SUPPORT (D)
It is located under the upper cover. For the cleaning at first we
recommend disconnecting the device. Use only a wet cloth. Do not
use direct water jets (i.e.: shower, tap, etc.).
THE MACHINE CAN BE TIPPED TO ONE SIDE ONLY FOR
THIS FUNCTION (DO NOT OVERTURN THE MACHINE
FOR ANY REASON!)
FILTER AND SEPARATOR
Once the filter is removed, you can see the “molecular separator”
(A). Both the filter and the separator must be washed separately
with water. To remove them, contact an authorised service centre.
NOTE FOR THE TECHNICIAN AT THE SERVICE CENTRE:
To remove filter (C) remove the safety screw by turning it until it
comes away. To remove separator (a) unscrew knurled screw (B) and
remove from the housing. Be careful on re-inserting it as it has a set
housing. Screw the knurled screw clockwise without tightening it
too much. Do not use the machine if the plastic filter is not inserted
or if it is without the “molecular separator”.
SPONGE FILTER
The filter cover (A) is located in the rear part of the machine and can
be removed by sliding it upwards.
Once the filter cover has been removed, you can reach the silencer
filter (B) which is located in the motor air outlet (C). We recommend
cleaning it periodically by washing it with water.
A. Filter cover
B. Silencer filter
C. Air outlet
Page 11
1
4
5
3
2
7
6
9
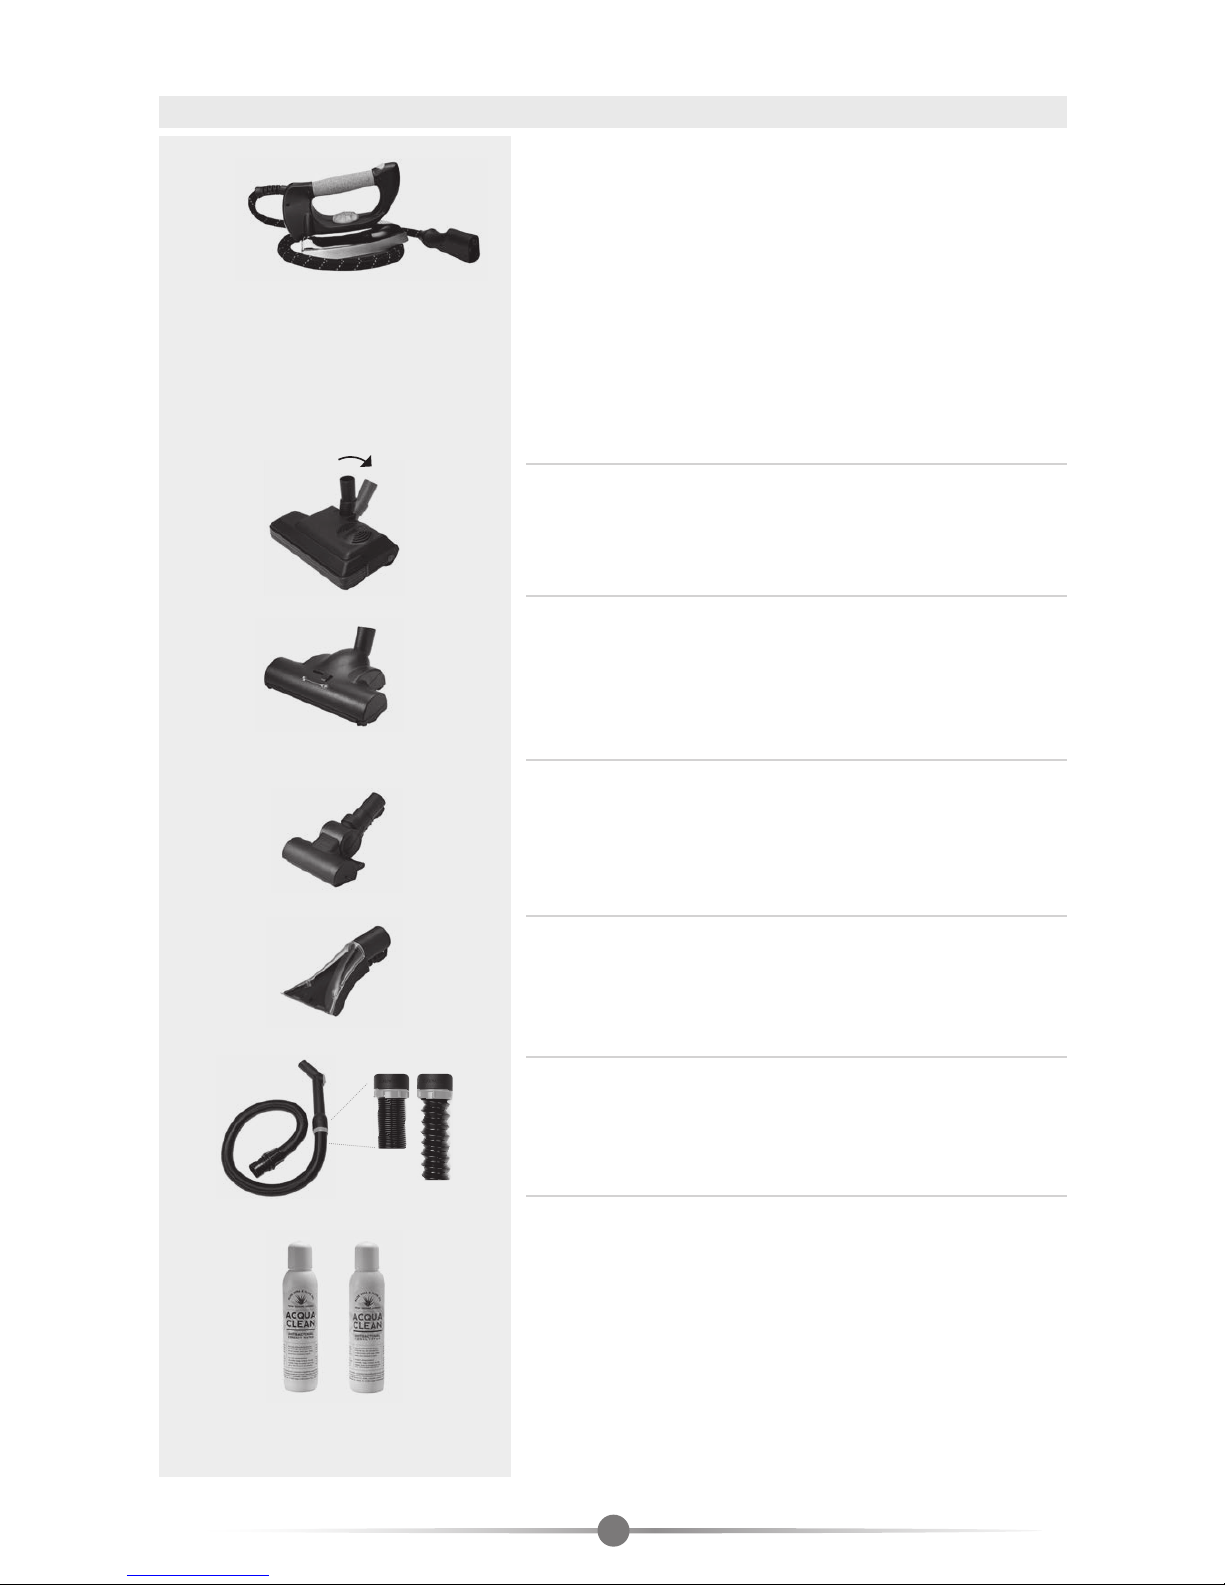
OPTIONAL:
1. IRON
• Open the door located in the front part of the machine.Insert
the iron pin into the plug of the device
.
• Close the door making sure the pin has entered into the special
housing.
• Adjust the thermostat on the desired position according to the
fabrics
.
• Turn on the push button (ACC) of the control panel
.
• Wait for a few seconds, till the iron is warm.
• By pressing the push button on the handle of the iron the steam
is delivered
; adjust pressure depending on the fabric.
• To remove the pin from the unit, at first open the door and
then pull out the plug.
2. ELECTRIC CARPET CLEANER
Very good to suck thoroughly carpets, fitted carpets, mattresses etc.
3. TURBO CARPET CLEANER
Very good to suck thoroughly carpets, fitted carpets, mattresses etc.
without using any electricity.
4. VAPORIZING TURBO BRUSH
To wash, brush and steam dry rugs, carpets, upholstery etc.
5. TRANSPARENT NOZZLE
To wash rugs, carpets, upholstered ...
6. EXTENDABLE HOSE
Suction hose for dust/liquids that can extend from 1 metre to 6
metres.
7. ACQUA CLEAN
ANTIBACTERIAL EFFICACY TESTED AT 99,999%. Thanks to natural
active principles with an effective “antiseptic and sanitizing” action,
it prevents bacteria from forming removing bad smell caused by
water impurities.
When it is diffused in the air during the machine use, it “cleans” the
air effectively removing bad smell in the house as smoke, kitchen
smell, dust, etc. Put some drops (at leat 1 cap) together with water
in the lower drum of the machine.
Page 12

1010
SAFETY RULES ANd CAUTIONS
• Do not use the machine without the lower drum (7).
• Do not fill the boiler tank with detergent or disinfecting products (use only water).
• Do not turn the device upside down (the solenoid valve may get clogged).
• Do not suck flammable materials, explosives, concrete, ash, gypsum or any other material which might
create a dangerous mixture.
• If substances such as: wine, alcohol, ammonia, detergents or corrosive products are sucked, the lower
drum might be damaged. We recommend empting and rinsing it well.
• Make sure the surfaces and the parts to be cleaned can withstand the steam (at the beginning we
recommend using the steam on small surfaces).
• Do not use steam on velvet, satin and leather.
• Before connecting your device, check that the voltage corresponds to the one written on the technical
plate (220/240V).
Do not use the appliance near people not wearing safety clothings.
WARNING: high power jets can be dangerous if used improperly. Never direct the jet towards people, animals,
electrically powered appliances or towards the appliance itself.
• Never direct the jet towards yourself or other people for cleaning clothes and shoes.
• Use this device only for the functions it is conceived for.
• Disconnect the power supply before carring out the maintenance operations.
• To disconnect the device, pull only the plug, ever the cable.
• Be careful the supply cable does not touch hot surfaces.
• Never use the device if the feeding cable or its other important parts are damaged for example, safety
devices, high pressure flexible tubes, handle with controls.
• To avoid any risks of being electrocuted, do not disassemble it.
• Avoid connecting more powerful household appliances to the same electric circuit.
• If an extension cable is needed, make sure it is provided with earth; the plug and the socket must be
watertight.
• If the supply cord is damaged, it must be replaced by the manufacturer, its service agent or similarly
qualified persons in order to avoid a hazard.
WARNING: unsuitable extension cables can be dangerous.
• Use an outlet provided with earth.
• Do not plunge the device into the water and do not use it in case of rain or snow.
• Do not sprinkle or wash the appliance.
• This appliance can be used by persons with reduced physical, sensory or mental capabilities or lack
ofexperience and knowledge if they ahve been given supervision or instruction concerning use of the
appliance in a safe way and under stand the hazards involved. Children shall not play with the appliance.
• Do not let the connected device be unguarded.
• Remember to disconnect the device before any cleaning or maintenance operation and at the end of
every use.
• Let the device cool down before putting it back.
• Empty and rinse the lower drum after any use.
• For any repair, take the device to an authorised technical service.
• To ensure the safety of the appliance, use original spare parts supplied or approved by the manufacturer
only.
WARNING: hoses, accessories and connections are important for the safety of the appliance; use parts
recommended by the manufacturer only.
Any intervention carried out by non-authorised make the warranty forfeit.
The manufacturer is not to be held responsible for any failure due to incorrect use and maintenance.
Page 13

1111
TROUBLESHOOTING
Sometimes problems arise from causes which can be easily removed by carrying out simple checks.
PR OB L EM CA US E SO LU T IO N
Insufficient suction
· The plastic filter of the
separator is dirty or clogged
· Power is too low
· The hose is clogged
· The lower drum is full
· Clean the filter
· Increase power
· Disconnect the hose and remove dirt
· Empty the drum and restore the
minimum level with clean water
The motor is noisy The lower drum is full
Empty the drum and restore the
minimum level with clean water
When the boiler is ready, steam
does not come out
Adjustment is low Increase the output power
When the boiler is ready, steam
does not come out and the display
shows the message H2o
Water has finished in the tank
Fill the tank by means of the proper bottle
The extension hoses or the accessories loosen easily
The fastening ring nut is not in its
correct position
Fix the fastening ring nut in its
proper position
The extension hoses or the accessories are not coupled easily
· Gaskets are not lubricated
· Gaskets are damaged
· The fastening ring nut is not in its
correct position
· Lubricate gaskets by using teflon
grease or hand cream
· Replace gaskets with
those supplied
· Put the fastening ring nut in
open position
Light water/steam escape from the
couplings (of: accessories, extension
hoses, hose)
Gaskets are damaged
Replace gaskets with those
supplied. Lubricate gaskets by
using teflon grease or hand cream
The controls on the hose handle do
not respond
The plug unit of the hose has not
been connected properly
Connect the plug unit until the
door is properly closed
The hose loosens from the machine
The plug unit of the hose has not
been connected properly
Connect the plug unit until the
door is properly closed
The iron does not get hot
· The iron function has not been
selected from the panel
· The iron temperature is too low
· The plug unit of the iron has not
been connected properly
· Enable the function (the display
will show the ACC message)
· Increase the iron temperature
· Connect the plug unit until the
door is properly closed
The iron drips out water instead of
steam
· The iron temperature is too low
· The user has not waited for the
correct heating time of the iron
· Increase the iron temperature
· Wait for some minutes
If, after carrying out these checks, the appliance does not work, please contact the Technical Assistance Service.
Page 14

1212
For any malfunction, please contact your dealer or the Technical Service.
Never repair your device on your own. The regulations at the basis of its manufacture might break and consequently the
warranty might forfeit. The warranty forfeits also when any intervention is carried out by non-authorised staff.
CONDITIONS
The device sold is guaranteed according to the Law for possible manufacture failures. During this period, the faulty
components are replaced free, if the failure is not caused by collisions, falls, fires, short circuits or by an improper use. The
non-working device or the faulty parts are to be sent carriage free to our Company or to the authorised Technical Service.
We send the repaired components back carriage paid to the purchaser address.
INFORMATION FOR THE USERS ON THE DISPOSAL OF OUTDATED ELECTRIC AND ELECTRONIC DEvICES (FOR
PRIvATE FAMILY UNIT)
This symbol on the products and/or on the documents means that the electric and electronic products used
are not to be dispose of with generic household waste. For a correct treatment, reutilization and recycling
take these products to the collecting points, where they are accepted free. Alternatively, in some Countries
the products could be given back to the local dealer when purchasing another equivalent product. A
correct disposal of this product will allow saving precious resources and avoid possible negative effects on
the human health and on the environment. For further details, contact the local authority or the nearest
collecting point. In case of wrong disposal, penalties may be applied according to the Local Law. For the
Companies of the European Union: if you wish to dispose of electric and electronic devices, contact the dealer or the
supplier for further details.Information about disposal in Countries not belonging to the European Union. This symbol is
valid only in the European Union. If the device should be dispose of, contact the local authority or the dealer and ask for
information about a correct disposal.
WARRANTY AND TECHNICAL SERvICE
TECHNICAL SHEET
• Dimension (cm.) 37 x 30 x 41h
• Voltage 220-240 Volt 50-60 Hz.
• Pressure 600 kPa
• Resistance 1900 Watt
• Turbine engine 1200 Watt
• Sound Level Lpa 81,8 dBA - LWa 100,12 dBA
• Operation temperature: +5°C / +30°C
• Stainless steel boiler
• Electric supply cable 6 m
• Steam ready time 5 minutes
• Basin capacity 5,5 l. max
• Unlimited boiler endurance
SAFETY
• Device stopping the circuit at tank and boiler level
• Thermostat
• Thermofuse
• Pressure switch
• Safety valve 8 bar
• Low voltage contol
• Appliance complying with the low tension directive
2006/95/CE
• Product norms EN 60335-1, EN 60335-2-2, EN 60335-2-54
• Protection degree IP24
WARNING:
DANGER OF BURNS
Page 15
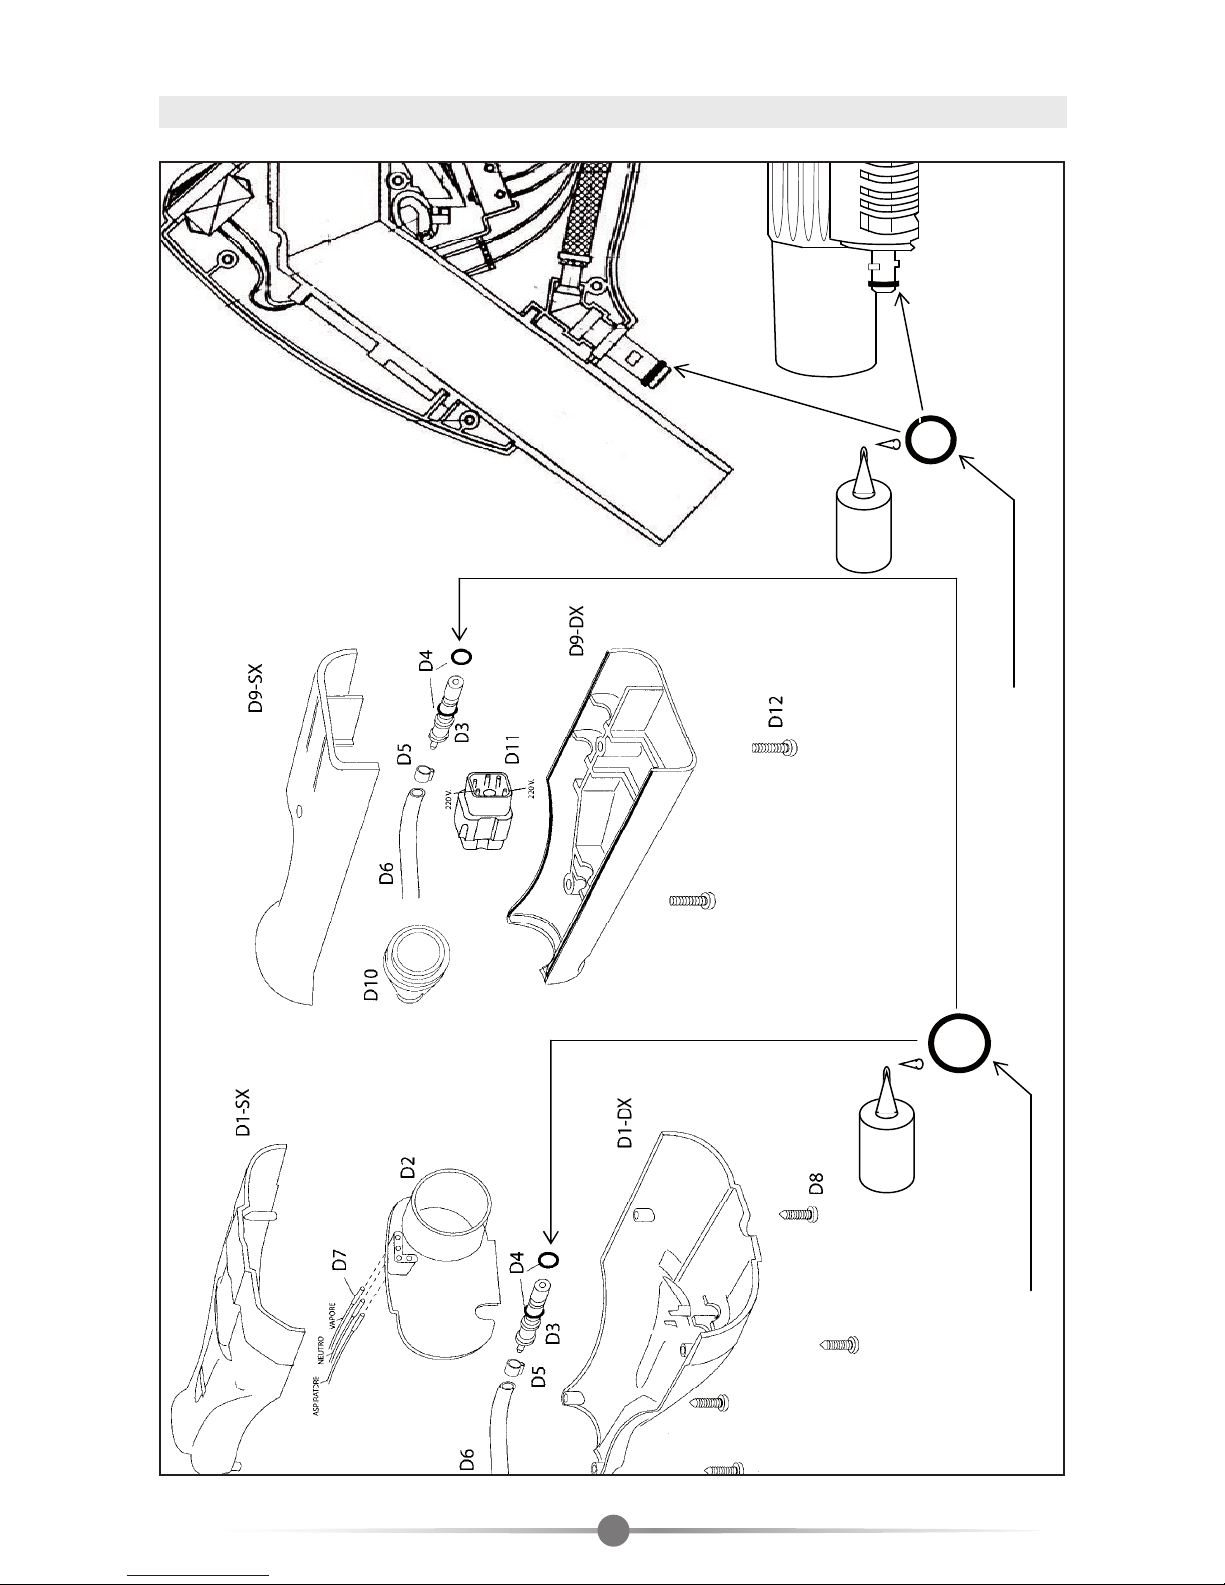
O-RING VITON
(20/31)
O-RING VITON (20/21)
GREASE
GREASE
i
16
11
13
SPARE O-RING
11
Page 16

 Loading...