

MAX2163
ISDB-T 1-Segment Tuner
________________________________________________________________
Maxim Integrated Products
1
19-3104; Rev 2; 10/09
For pricing, delivery, and ordering information, please contact Maxim Direct at 1-888-629-4642,
or visit Maxim’s website at www.maxim-ic.com.
EVALUATION KIT
AVAILABLE
General Description
The MAX2163 low-IF tuner IC is designed for use in
1-segment ISDB-T applications. The MAX2163 directly
converts UHF band signals to a low-IF using a broadband I/Q downconverter. The operating frequency
range covers the UHF band from 470MHz to 806MHz.
The MAX2163 includes LNAs, RF variable gain amplifiers, I and Q downconverting mixers, a baseband variable gain amplifier, and a low-IF filter. The MAX2163’s
variable gain amplifiers provide in excess of 100dB of
control range.
The MAX2163 also includes fully monolithic VCOs as
well as a complete frequency synthesizer including an
on-chip crystal oscillator and output buffer. The device
operates with a crystal from 32MHz to 36MHz.
The MAX2163 features a 2-wire I2C-compatible serialcontrol interface. A low-power standby mode is available that shuts down the signal path leaving the control
interface and register circuits active. Additionally, an
external pin can shut down the entire device.
The MAX2163 is specified for operation in the extended
-40°C to +85°C temperature range and is available
in a 5mm x 5mm x 0.8mm, 28-pin thin QFN, lead-free
plastic package with exposed paddle (EP).
Applications
Cell Phone Mobile TV
Personal Digital Assistants (PDAs)
Game Consoles
Portable TV Devices
Portable Audio Devices
Automotive
Home Audio
Features
o Frequency Range
UHF: 470MHz to 806MHz (UHFIN)
o Low Noise Figure: 3.2dB (typ)
o High Dynamic Range: -99dBm to 0dBm
o Optional UHF Tracking Filter
o Integrated VCO and Frequency Synthesizer
o Low LO Phase Noise: -87dBc/Hz at 10kHz
o Integrated Variable BW Low-IF Filters
o Greater Than 40dB Image Rejection
o Single +2.4V to +3.47V Supply
o Low Power: 80mW (typ) at +2.5V
o 2-Wire I
2
C Serial-Control Interface
o Low-Power Shutdown and Standby Modes
Pin Configuration/
Functional Diagram
Typical Application Circuit appears at end of data sheet.
Ordering Information
PART TEMP RANGE
PINPACKAGE
MAX2163ETI+ -40°C to +85°C 28 TQFN-EP*
MAX2163ETI/V+ -40°C to +85°C 28 TQFN-EP*
+
Denotes a lead(Pb)-free/RoHS-compliant package.
*
EP = Exposed pad.
/
V denotes an automotive qualified part.
TQFN
Actual Size (5mm x 5mm x 0.8mm)
TOP VIEW
STBY
SHDN
LEXTU
CCVCO
V
LDO
VTUNE
28 27 26 25 24 23 22
+
1
2
3
TANK
LEXTU
GNDSYN
FREQUENCY
SYNTHESIZER
DIV
CPOUT
CCSYN
V
DIV2
XTALOUT
21
20
19
XTAL
MUX
V
CCDIG
PWRDET
PWRDET
N.C.
V
CCLNA
V
UHFIN
N.C.
CCRF
4
MAX2163
5
6
7
8 9 10 11 12 13 14
N.C.
N.C.
GC1
SDA
18
17
SCL
AND CONTROL
INTERFACE LOGIC
16
PWRDET
IFOUT
15
CCIF
GC2
V
CCBIAS
V
MAX2163
ISDB-T 1-Segment Tuner
2 _______________________________________________________________________________________
ABSOLUTE MAXIMUM RATINGS
DC ELECTRICAL CHARACTERISTICS
(MAX2163 Evaluation Kit, VCC= +2.4V to +3.47V, V
GC1
= V
GC2
= 0.3V (maximum gain), no RF input signal at UHFIN. IFOUT is open cir-
cuited and the VCO is active with f
LO
= 557.714MHz, default register settings, TA= -40°C to +85°C, unless otherwise noted. Typical val-
ues are at V
CC
= +2.5V, TA=+25°C, unless otherwise noted.) (Note 1)
Stresses beyond those listed under “Absolute Maximum Ratings” may cause permanent damage to the device. These are stress ratings only, and functional
operation of the device at these or any other conditions beyond those indicated in the operational sections of the specifications is not implied. Exposure to
absolute maximum rating conditions for extended periods may affect device reliability.
All V
CC_
Pins to GND.............................................-0.3V to +3.6V
UHFIN to GND.......................................................-0.3V to +0.9V
IFOUT to GND ............................................-0.3V to (V
CC
+ 0.3V)
GC1, GC2, VTUNE, XTALOUT,
XTAL to GND..........................................-0.3V to (V
CC
+ 0.3V)
CPOUT, XTLOUT, PWRDET to GND ..........-0.3V to (V
CC
+ 0.3V)
SDA, SCL, SHDN, STBY to GND...............-0.3V to (V
CC
+ 0.3V)
MUX, LEXTU, LDO to GND ........................-0.3V to (V
CC
+ 0.3V)
Maximum RF Input Signal UHFIN...................................+10dBm
Short-Circuit Duration IFOUT, CPOUT, XTALOUT,
PWRDET, SDA, MUX ..........................................................10s
Continuous Power Dissipation (T
A
= +70°C)
28-Pin Thin QFN (derate 34.5mW/°C above +70°C)....2758mW
Operating Temperature Range ...........................-40°C to +85°C
Junction Temperature......................................................+150°C
Storage Temperature Range .............................-65°C to +150°C
Lead Temperature (soldering, 10s) .................................+300°C
CAUTION! ESD SENSITIVE DEVICE
SUPPLY VOLTAGE AND SUPPLY CURRENT
Supply Voltage 2.4 2.5 3.47 V
Supply Current Normal Mode 30.4 40 mA
Supply Current High-Linearity Mode RFVGA = 1; MXR = 1 35 44 mA
Supply Current HW or SW Standby Mode 1.1 2.0 mA
Supply Current Shutdown Mode 1 20 µA
ANALOG GAIN-CONTROL INPUTS (GC1, GC2)
Voltage Range Max imum gain = 0.3V 0.3 2.1 V
Input Bias Current -15 +15 µA
POWER DETECTOR OUTPUT BUFFER (PWRDET)
Output Voltage Range Load impedance = 2 k ||10pF 0.3 2.1 V
Output Impedance 25
VCO TUNING VOLTAGE INPUT (VTUNE)
Voltage Range 0.35 2.05 V
DIGITAL CONTROLS (SHDN, STBY)
Input Logic-Level High
Input Logic-Level Low
2-WIRE S ERIAL I2C DIGITAL INPUTS (SCL, SDA)
Cloc k Frequenc y 400 kH z
Input Logic-Level High
Input Logic-Level Low
PARAMETER CONDITIONS MIN TYP MAX UNITS
0.7 x
V
CC
0.7 x
V
CC
V
0.3 x
V
CC
V
0.3 x
V
CC
V
V
MAX2163
ISDB-T 1-Segment Tuner
_______________________________________________________________________________________ 3
DC ELECTRICAL CHARACTERISTICS (continued)
(MAX2163 Evaluation Kit, VCC= +2.4V to +3.47V, V
GC1
= V
GC2
= 0.3V (maximum gain), no RF input signal at UHFIN. IFOUT is open cir-
cuited and the VCO is active with f
LO
= 557.714MHz, default register settings, TA= -40°C to +85°C, unless otherwise noted. Typical val-
ues are at V
CC
= +2.5V, TA=+25°C, unless otherwise noted.) (Note 1)
AC ELECTRICAL CHARACTERISTICS
(MAX2163 Evaluation Kit, VCC= +2.4V to +3.47V, fRF= 557.143MHz, fLO= 557.714MHz, fIF= 571kHz, f
XTAL
= 36MHz, V
GC1
= V
GC2
=
0.3V (maximum gain), default register settings, RF input signals as specified, IF output load as specified, T
A
= -40°C to +85°C, unless
otherwise noted. Typical values are at V
CC
= +2.5V, TA= +25°C, SHDN = VCC, STBY = GND, unless otherwise noted.) (Note 1)
2-WIRE S ERIAL I2C DIGITAL OUTPUT (SDA)
Output Logic-Level Low 0.4 V
MUX DIGITAL OUTPUT
Output Logic-Level Low
Output Logic-Level High
PARAMETER CONDITIONS MIN TYP MAX UNITS
0.7 x
V
CC
V
0.3 x
V
CC
V
MAIN SIGNAL PATH PERFORMANCE
Receive Input Frequency Range UHFIN (Note 2) 470 806 MHz
Maximum Voltage Gain
Minimum Voltage Gain
RF Gain Control Range (GC1) 40 52 dB
Analog IF Gain Control Range (GC2) 60 76 dB
In-Band IM3 (Note 3) -40 dBc
Out-of-Band IIP3 (Note 4) 30 dBm
Input P
Image Rejection TA = +25°C, +85°C 40 49 dB
Noise Figure TA = +25°C, 470MHz < fRF < 806MH z 3.2 5.3 dB
OPTIONAL UHF TRACKING FILTER
Center Frequency 640 MHz
Nominal 3dB Bandwidth LEXTU = 18nH, Q
WIDEBAND RF OVERLOAD DETECTOR
Typical RF Attack Point Relative to RFAGC attack point +28 dB
In-band CW tone, V
1dB
PARAMETER CONDITIONS MIN TYP MAX UNITS
= V
-100dBm CW tone, V
V
= 0.225V
IFOUT
0dBm CW tone, V
V
= 0.1V
IFOUT
P-P
GC1
P-P
MIN
GC1
= V
= V
GC1
= 35 320 MHz
= 0.3V
GC2
= 2.1V
GC2
= 2.1V 0 dBm
GC2
96 dB
-2 dB
MAX2163
ISDB-T 1-Segment Tuner
4 _______________________________________________________________________________________
AC ELECTRICAL CHARACTERISTICS (continued)
(MAX2163 Evaluation Kit, VCC= +2.4V to +3.47V, fRF= 557.143MHz, fLO= 557.714MHz, fIF= 571kHz, f
XTAL
= 36MHz, V
GC1
= V
GC2
=
0.3V (maximum gain), default register settings, RF input signals as specified, IF output load as specified, T
A
= -40°C to +85°C, unless
otherwise noted. Typical values are at V
CC
= +2.5V, TA= +25°C, SHDN = VCC, STBY = GND, unless otherwise noted.) (Note 1)
IF POWER DETECTOR
Minimum Attack Point -66 dBm
Maximum Attack Point -52 dBm
Detector Accuracy 1.5 dB
3dB Frequency Response
LOW-IF FILTER RES PONSE
Center Frequency 571 kHz
1-Segment Mode Frequency Re spon se
LOW-IF OUTPUT CHARACTERISTICS
Nominal Output-Voltage Swing R
Output Impedance Single-ended, real 31
FREQUENCY SYNTHESIZER
N-Divider Frequenc y Range 90 804 MHz
N-Divider Range 256 4095 —
Reference Divider Frequenc y Range 32 36 MHz
Reference Di vider Range (R) 112 280 —
Phase Detector Comparison Frequency 1/7 2/7 MHz
PLL Referred Phase Noise Floor f
Spurio us Product s f
Charge-Pump Output Current
VOLTAGE-CONTROLLED OSCILLATOR AND LO GEN
Guaranteed VCO Frequency Range 1890 3216 MHz
Guaranteed LO Frequency Range 472.5 804.0 MHz
LO Phase Noise
PARAMETER CONDITIONS MIN TYP MAX UNITS
PDBW[1:0]=00 43
PDBW[1:0]=01 26
PDBW[1:0]=10 17
PDBW[1:0]=11 13
±219kHz offset from center frequency -2.8 +2.8
1MHz offset from center frequency -80
= 10k||10pF 225 mV
LOAD
= 2/7MH z -153 dBc/Hz
COMP
spurious -70 dBc
COMP
CP bit s = 00 1.0 1.5 2.0
CP bit s = 01 1.4 2.0 2.6
CP bit s = 10 1.8 2.5 3.3
CP bit s = 11 2.1 3.0 3.9
f
= 1kHz -82
OFFSET
f
= 10kHz -87
OFFSET
f
= 100kHz -108
OFFSET
f
= 1MHz -128
OFFSET
> 10MHz -140
f
OFFSET
MHz
dB
P-P
mA
dBc/Hz
MAX2163
ISDB-T 1-Segment Tuner
_______________________________________________________________________________________ 5
AC ELECTRICAL CHARACTERISTICS (continued)
(MAX2163 Evaluation Kit, VCC= +2.4V to +3.47V, fRF= 557.143MHz, fLO= 557.714MHz, fIF= 571kHz, f
XTAL
= 36MHz, V
GC1
= V
GC2
=
0.3V (maximum gain), default register settings, RF input signals as specified, IF output load as specified, T
A
= -40°C to +85°C, unless
otherwise noted. Typical values are at V
CC
= +2.5V, TA= +25°C, SHDN = VCC, STBY = GND, unless otherwise noted.) (Note 1)
Note 1: Min and max values are production tested at TA= +85°C. Min and max limits at TA= -40°C and +25°C are guaranteed by
design and characterization.
Note 2: IFOUT output voltage level met over this range.
Note 3: In-band IM3 is measured with two tones at f
LO
- 450kHz and fLO- 550kHz. The RFAGC is engaged and set for the default
attack point of -58dBm. IFL[1:0] = 01, RFVGA = MXR = 1. V
GC2
is adjusted to maintain 225mV
P-P
at IF
OUT
. Input power levels
(tone 1 plus tone 2) up to -10dBm and > 30dBc for levels from -10dBm to 0dBm.
Note 4: V
GC1
is set for maximum attenuation (2.1V) and V
GC2
is adjusted to maintain 225mV
P-P
at I
FOUT
for an equivalent 0dBm
input desired level. Closed loop, attack point at -58dBm, f
RF
= 767.143MHz, fLO= 767.714MHz, f
RF1
= fRF+ 4.25MHz,
f
RF2
= fRF+ 8MHz, -10dBm/tone. RFGR = 1, RFVGA = 1, and MXR = 1.
CRYSTAL OSCILLATOR INPUT (XTAL)
Frequency Range 32 36 MHz
Input Capacitance Crystal load capacitance 8 pF
Input Overdrive Leve l AC-coupled sine wave input 0.5 1.5 V
Input Negative Resistance f
REFERENCE OSCILLATOR BUFFER OUTPUT (XTALOUT)
Output Frequency Range 16 18 MHz
Output Voltage Swing ZL = 4k||10pF 0.5 1.0 V
Output Buffer Divide Range 2 2 —
Output Duty C ycle 45 55 %
Output Turn-On Time XTAL amp litude > 0.5V
PARAMETER CONDITIONS MIN TYP MAX UNITS
= 36MHz 575
XTAL
4 ms
P-P
P-P
P-P
MAX2163
ISDB-T 1-Segment Tuner
6 _______________________________________________________________________________________
Typical Operating Characteristics
(MAX2163 Evaluation Kit, VCC= +2.5V, default register settings, V
GC1
= V
CG2
= 0.3V, V
IFOUT
= 225mV
P-P
, fLO= 557.714MHz,
T
A
= +25°C, unless otherwise noted.)
NORMAL MODE SUPPLY CURRENT
33.0
vs. SUPPLY VOLTAGE
32.5
32.0
31.5
31.0
30.5
30.0
SUPPLY CURRENT (mA)
29.5
29.0
28.5
TA = +85°C
TA = -40°C
2.4 2.82.72.6 3.02.9 3.1 3.33.22.5
SUPPLY VOLTAGE (V)
MAX2163 toc01
TA = +25°C
UHF VOLTAGE GAIN vs. FREQUENCY
110
108
106
104
UHF VOLTAGE GAIN (dB)
102
100
470 670570520 820720 770620
FREQUENCY (MHz)
MAX2163 toc02
RELATIVE UHF GAIN RANGE vs. V
10
0
-10
-20
-30
-40
-50
RELATIVE VHF GC1 GAIN RANGE (dB)
-60
-70
0.30 1.100.700.50 2.101.30 1.50 1.901.700.90
V
GC1
(V)
GC1
MAX2163 toc03
RELATIVE IF GAIN RANGE vs. GC2
0
-10
-20
-30
-40
-50
-60
-70
RELATIVE IF GAIN RANGE (dB)
-80
-90
-100
0.30 0.90 1.50 2.100.60 1.20 1.80
V
(V)
GC2
3.00
2.50
2.00
(V)
1.50
TUNE
V
1.00
0.50
0
410 530 650610 770490 730 650 770730450 570
UHF V
vs. LO FREQUENCY
TUNE
VCO 0, SB0-15
VCO 1, SB0-15
LO FREQUENCY (MHz)
VCO 2, SB0-15
MAX2163 toc04
MAX2163 toc06
UHF NOISE FIGURE vs. FREQUENCY
5.0
TA = +85°C
4.5
4.0
3.5
3.0
2.5
2.0
1.5
UHF NOISE FIGURE (dB)
1.0
0.5
TA = -40°C
0
460 810660 710560510 760610
FREQUENCY (MHz)
TA = +25°C
UHF LO-TO-RFIN LEAKAGE vs. FREQUENCY
-101
-103
-105
-107
-109
-111
LO-TO-RFIN LEAKAGE (dBm)
-113
-115
460 510 610 710 810560 660 760
FREQUENCY (MHz)
MAX2163 toc05
MAX2163 toc07
MAX2163
ISDB-T 1-Segment Tuner
_______________________________________________________________________________________
7
Typical Operating Characteristics (continued)
(MAX2163 Evaluation Kit, VCC= +2.5V, default register settings, V
GC1
= V
CG2
= 0.3V, V
IFOUT
= 225mV
P-P
, fLO= 557.714MHz,
T
A
= +25°C, unless otherwise noted.)
1-SEGMENT BASEBAND FILTER
FREQUENCY RESPONSE
10
0
-10
-20
-30
-40
NORMALIZED GAIN (dB)
-50
-60
-70
0 2000500 1000 1250 1750250 1500750
-50
-60
-70
-80
-90
-100
-110
PHASE NOISE (dBc/Hz)
-120
-130
-140
-150
MAX2163 toc08
NORMALIZED GAIN (dB)
FREQUENCY (kHz)
PHASE NOISE vs. OFFSET FREQUENCY
UHF
1 10 100 1000
OFFSET FREQUENCY (kHz)
1-SEGMENT BASEBAND FILTER
FREQUENCY RESPONSE
10
8
6
4
2
0
2
-4
-6
-8
-10
0 1250500 1000250 750
FREQUENCY (kHz)
MAX2163 toc11
MAX2163 to09
1-SEGMENT GROUP DELAY VARIATION
vs. BASEBAND FREQUENCY
4.0
3.5
3.0
2.5
2.0
1.5
1.0
GROUP DELAY VARIATION (µs)
0.5
0
-0.5
0 1200800400 1000600200
FREQUENCY (kHz)
UHF INPUT RETURN LOSS
vs. RF FREQUENCY
470MHz
810MHz
UHF
INPUT
RETURN
LOSS
MAX2163 toc10
MAX2163 toc12
-5.50E+02
-6.00E+02
-6.50E+02
-7.00E+02
INPUT IMPEDANCE, REAL COMPONENT (Ω)
-7.50E+02
XTAL PORT INPUT IMPEDANCE
vs. XTAL FREQUENCY
32 353433 36
XTAL FREQUENCY (MHz)
MAX2163 toc13
UHF LO PHASE NOISE AT 10kHz OFFSET
vs. CHANNEL FREQUENCY
-78
-80
-82
-84
-86
-88
-90
UHF PHASE NOISE AT 10kHz OFFSET (dBc/Hz)
-92
450 600 750500 650 800550 700 850
CHANNEL FREQUENCY (MHz)
MAX2163 toc14

MAX2163
ISDB-T 1-Segment Tuner
8 _______________________________________________________________________________________
Pin Description
PIN NAME DESCRIPTION
1 STBY
2 SHDN Device Shutdown. Connect to logic-low to place the device in shutdown mode.
3 LEXTU Optional UHF Tracking Filter Inductor. Connect an 18nH inductor from this pin to ground.
4, 8, 9, 10 N.C. No Connection. Connect to the PCB ground plane.
5V
6V
7 UHFIN UHF 50Ω RF Input. Incorporates an internal DC-blocking capacitor.
11 GC1
12 V
13 GC2 IF Gain Control Input. High-impedance analog input.
14 V
15 IFOUT Low-IF Output. Requires a DC-blocking capacitor.
16 PWRDET
17 SCL 2-Wire Serial-Clock Interface. Requires a pullup resistor to V
18 SDA 2-Wire Serial-Data Interface. Requires a pullup resistor to V
CCLNA
CCRF
CCIF
CCBIAS
Device Standby. Connect to logic-high to place the device in standby mode. Connect to logic-low for
normal operation. This pin is logically ORed to the STBY bit.
DC Power Supply for LNA. Connect to a +2.5V low-noise supply. Bypass to GND with a 0.1µF capacitor
placed as close as possible to the pin. Do not share capacitor ground vias with other ground
connections.
DC Power Supply for RF Circuits. Connect to a +2.5V low-noise supply. Bypass to GND with a 0.1µF
capacitor placed as close as possible to the pin. Do not share capacitor ground vias with other ground
connections.
RF Gain Control Input. In closed-loop RFAGC mode (PDBM[1:0] = 11), connecting a capacitor from
GC1 to ground sets the AGC response time. In open-loop RFAGC mode (PDBM[1:0] = 10), GC1 is a
high-impedance analog input that controls the RFAGC.
DC Power Supply for IF Circuits. Connect to a +2.5V low-noise supply. Bypass to GND with a 0.1µF
capacitor placed as close as possible to the pin. Do not share capacitor ground vias with other ground
connections.
DC Power Supply for Bias Circuits. Connect to a +2.5V low-noise supply. Bypass to GND with a 0.1µF
capacitor placed as close as possible to the pin. Do not share capacitor ground vias with other ground
connections.
Low-Impedance Power Detector Output Buffer. Bits PDBM[1:0] control the function of this output pin.
See Table 6.
CCDIG
CCDIG
.
.

MAX2163
ISDB-T 1-Segment Tuner
_______________________________________________________________________________________ 9
Pin Description (continued)
PIN NAME DESCRIPTION
DC Power Supply for Digital Logic Circuits. Connect to a +2.5V low-noise supply. Bypass to GND with a
19 V
20 MUX Device TEST. See Table 14 for details.
21 XTAL Base Contact of Internal Colpitts Oscillator. See the Typical Application Circuit for details.
22 XTALOUT Crystal Oscillator Buffer Output. A DC-blocking capacitor must be used when driving external circuitry.
23 V
24 CPOUT
25 GNDSYN
26 VTUNE
27 LDO
28 V
CCDIG
CCSYN
CCVCO
0.1µF capacitor placed as close as possible to the pin. Do not share capacitor ground vias with other
ground connections.
DC Power Supply for Synthesizer Circuits. Connect to a +2.5V low-noise supply. Bypass to GND with a
0.1µF capacitor placed as close as possible to the pin. Do not share capacitor ground vias with other
ground connections.
Charge-Pump Output. Connect this output to the PLL loop filter input with the shortest connection
possible.
Synthesizer Ground. Connect to the PCB ground plane. Do not share ground vias with other ground
connections.
High-Impedance VCO Tune Input. Connect the PLL loop filter output directly to this pin with as short as
possible of a connection.
Internal LDO Bypass. Bypass to GND with a 470nF capacitor placed as close as possible to the pin. Do
not share capacitor ground vias with other ground connections.
DC Power Supply for VCO Circuits. Connect to a +2.5V low-noise supply. Bypass to GND with a 0.1µF
capacitor placed as close as possible to the pin. Do not share capacitor ground vias with other ground
connections.
—EP
Exposed Paddle. Solder evenly to the board’s ground plane for proper RF performance and enhanced
thermal dissipation. Not intended as an electrical connection point.

MAX2163
ISDB-T 1-Segment Tuner
10 ______________________________________________________________________________________
Detailed Description
Register Descriptions
The MAX2163 includes 16 programmable registers and
2 read-only registers. Note: All programmable registers
must be written no earlier than 100µs after device powerup or recovery from a brownout event (i.e., when V
CC
drops below 1V). Follow up by rewriting the registers
needed for channel/frequency programming (i.e., registers 00–08) or simply rewrite all registers. The default values listed in Tables 1–15 are provided for informational
purposes only. The user must write all required register
values, including “factory use only” values.
Table 1. I2C and 4-Wire Register Configuration
REGISTER
NUMBER
00 IF Filter
01 VAS
02 VCO
03
04 MODE
05
06
07
08
09 STATUS
0A
0B–11
REGISTER
NAME
PDET/
RF-FILT
R-Di vider
MSB
R-Di vider
LSB/CP
N-Di v id er
MSB
N-Di v id er
LSB/LIN
VAS
STATUS
Factor y
Use Only
READ/
WRITE
Read/
Write
Read/
Write
Read/
Write
Read/
Write
Read/
Write
Read/
Write
Read/
Write
Read/
Write
Read/
Write
Read
Only
Read
Only
Read/
Write
REGISTER
ADDRESS
0x00 TUN2 TUN1 TUN0 FLTS IFL1 IFL0 PDBW1 PDBW0
0x01 1 VASS VAS CPS ADL ADE LTC1 LTC0
0x02 0 VCO1 VCO0 VSB3 VSB2 VSB1 VSB0 VCOB
0x03 PDBM1 PDBM0 PDET2 PDET1 PDET0 RFLT2 RFLT1 RFLT0
0x04 RFVB RFFB HSLS 0 0 0 0 0
0x05 R8 R7 R6 R5 R4 R3 R2 R1
0x06 CP1 CP0 0 DRFD RFDA1 RFDA0 1 R0
0x07 N11 N10 N9 N8 N7 N6 N5 N4
0x08 N3 N2 N1 N0 0 MIX RFVGA STBY
0X09 X X ADC2 ADC1 ADC0 VCP1 VCP0 PWR
0x0A VVCO1 VVCO0 VVSB3 VVSB2 VVSB1 VVSB0 VASA VASE
0x0B–
0x11
D7 D6 D5 D4 D3 D2 D1 D0
0 0 0 0 0 0 0 0
MSB
DATA BYTE

MAX2163
ISDB-T 1-Segment Tuner
______________________________________________________________________________________ 11
I2C Read/Write Addresses
The MAX2163 I2C read/write addresses are C1/C0.
See Table 2 for details.
Table 2. MAX2163 I2C Write Addresses
Table 3. IF Filter Register
DEVICE
ADDRESS
C0 WRITE 1 1 0 0 0 0 0 0
C1 READ 1 1 0 0 0 0 0 1
ADDRESS
TYPE
D7 D6 D5 D4 D3 D2 D1 D0
BIT NAME
TUN[2:0] 7, 6, 5 011
FLTS 4 0
IFL[1:0] 3, 2 01
PDBW[1:0] 1, 0 11
BIT LOCATION
(0 = LSB)
DEFAULT FUNCTION
Sets the IF f ilter center frequency. This fi lter ’s center frequency is trimmed at the
factory, but can be manually adjusted by setting the FLTS bit and programming
the TUN[2:0] bits as follows:
000 - 0.75 x f
001 - 0.84 x f
010 - 0.92 x f
011 - f
100 - 1.08 x f
101 - 1.16 x f
110 - 1.25 x f
111 - 1.33 x f
Select s which registers set low-IF bandpass fi lter center frequenc y and
bandwidth.
0 = Selects internal factory set register.
1 = Select s manual trim register TUN[2:0] (Not factory tested).
Set the bias current for the low-IF circuits to provide for fine linearity adjustments.
Program to 01 upon power-up.
Sets the IF power detector bandwidth.
00 = 43MH z bandwidth.
01 = 26MH z bandwidth.
10 = 17MH z bandwidth.
11 = 13MH z bandwidth.
(571kH z)
IF
(Not factory tested.)
IF
(Not factory tested.)
IF
(Not factory tested.)
IF
(Not factory tested.)
IF
(Not factory tested.)
IF
(Not factory tested.)
IF
(Not factory tested.)
IF
MAX2163
ISDB-T 1-Segment Tuner
12 ______________________________________________________________________________________
Table 4. VAS Register
Table 5. VCO Register
BIT NAME
X 7 1 Factory use only. Must be programmed to 1 upon power-up.
VASS 6 0
BIT LOCATION
VAS 5 1
CPS 4 1
ADL 3 0
(0 = LSB)
DEFAULT FUNCTION
Controls the VCO autoselect (VAS) start conditions function.
0 = VAS starts from the current VCO/VCOSB loaded in the VCO[1:0]
and VSB[3:0] registers.
1 = VAS starts from the currently used VCO and VCOSB.
Controls the VCO autoselect (VAS) function.
0 = Disables the VCO autoselect function and allows manual VCO selection
through the VCO[1:0] and VSB[3:0] bits.
1 = Enables the on-chip VCO autoselect state machine.
Sets the charge-pump current selection mode between automatic and manual.
0 = Charge-pump current is set manually through the CP[1:0] bit s.
1 = Charge-pump current is automat icall y selected. Also requires ADE, ADL,
and VAS bits to be programmed to 1.
Enables or disables the VCO tuning vo ltage ADC latch.
0 = Disables the ADC latch.
1 = Latches the ADC value.
ADE 2 0
LTC[1:0] 1, 0 11
BIT NAME
X 7 0 Factory use only. Must be programmed to 0 upon power-up.
VCO[1:0] 6, 5 01
BIT LOCATION
(0 = LSB)
DEFAULT FUNCTION
Enables or disables VCO tuning voltage ADC.
0 = Disables ADC read.
1 = Enables ADC read.
Sets the VCO autoselect wait time.
00 = 14336/f
01 = 24576/f
10 = 34816/f
11 = 45056/f
Controls which VCO band is activated when using manual VCO programming
mode. This also serves as the starting point for VCO autoselect mode when
VASS = 0.
00 = Select VCO-0.
01 = Select VCO-1.
10 = Select VCO-2.
11 = Not used.
XTAL
XTAL
XTAL
XTAL
.
.
.
.

MAX2163
ISDB-T 1-Segment Tuner
______________________________________________________________________________________ 13
Table 5. VCO Register (continued)
Table 6. PDET/RF-FILT Register
BIT NAME
VSB[3:0] 4, 3, 2, 1 0100
VCOB 0 1
BIT LOCATION
(0 = LSB)
DEFAULT FUNCTION
BIT NAME
PDBM[1:0] 7, 6 00
PDET[2:0] 5, 4, 3 100
BIT LOCATION
(0 = LSB)
DEFAULT FUNCTION
Select a particu lar sub-band for each of the on-chip VCOs. Together with the
VCO[1:0] bits a manual selection of a VCO band and a sub-band can be made.
Thi s a lso serves as the starting point for the VCO auto select mode when VASS =
0.
0000 = Select sub-band 0.
0001 = Select sub-band 1.
…
1111 = Select sub-band 15.
Sets the VCO bias mode.
0 = Normal mode.
1 = Low-power mode.
Power detector and buffer mode.
00 = P ow er d etector i s enab l ed , P W RD E T b uffer i s off. O n- chi p cl osed - l oop RFAGC .
01 = Power detector is enabled, PWRDET buffer is on with detector RMS voltage
output at PWRDET pin (RFAGC is open loop with RF gain controlled by voltage
applied to GC1).
10 = Unused.
11 = Power detector is enabled; PWRDET buffer is on with the GC1 voltage
output at PWRDET pin (on-chip closed loop RFAGC).
Sets the AGC attack point.
000 = -66dBm.
001 = -64dBm.
010 = -62dBm.
011 = -60dBm.
100 = -58dBm.
101 = -56dBm.
110 = -54dBm.
111 = -52dBm.
RFLT[2:0] 2, 1, 0 011
Sets the center frequency of the UHF tracking filter when used.
000 = Minimum frequency (see Table 17).
-----------111 = Maximum frequency (see Table 17).

MAX2163
ISDB-T 1-Segment Tuner
14 ______________________________________________________________________________________
Table 9. R-Divider LSB/CP Register
Note: When changing R-divider value, both registers R-Divider MSB and R-Divider LSB must be loaded as they are double buffered.
Table 7. MODE Register
Table 8. R-Divider MSB Register
Note: When changing R-divider value, both registers R-Divider MSB and R-Divider LSB must be loaded as they are double buffered.
BIT NAME
RFVB 7 0
BIT LOCATION
(0 = LSB)
DEFAULT FUNCTION
Bypass 3rd-stage RFVGA.
0 = Enables 3rd-stage RFVGA.
1 = Disables the 3rd-stage RFVGA.
RFFB 6 0
HSLS 5 0
X 4, 3, 2, 1, 0 0 Factory u se only. Must be programmed to 0 upon power-up.
Bypass integrated RF fi lter.
0 = Enables optional RF filter.
1 = Disables optional RF filter.
Selects between high-side and low-side LO injection.
1 = Low-side injection.
0 = High-side injection.
BIT NAME
R[8:1]
BIT LOCATION
(0 = LSB)
7, 6, 5, 4, 3, 2,
1, 0
DEFAULT FUNCTION
00111111
Sets the PLL reference divider (R) number. Default R divide value is 126
decimal. R can range from 16 to 511 decimal.
BIT NAME
CP[1:0] 7, 6 00
X 5 0 Factory u se only. Must be programmed to 0 upon power-up.
DRFD 4 1
BIT LOCATION
(0 = LSB)
DEFAULT FUNCTION
Sets the charge-pump current.
00 = 1.5mA.
01 = 2mA.
10 = 2.5mA.
11 = 3mA.
Disable RF Detector
0 = Enables the wideband RF overload detector.
1 = Disables the wideband RF overload detector.
Sets the RF overload detector attack point ( subtract 6dB to each if PDIQ = 0).
00 = +37dB relativ e to IF attack point setting.
RFDA[1:0] 3, 2 11
X 1 1 Factory u se only. Must be programmed to 1 upon power-up.
R0 0 0 LSB of reference divider number
01 = +34dB relativ e to IF attack point setting.
10 = +31dB relativ e to IF attack point setting.
11* = +28dB relative to IF attack point setting.
*Only 11 is factory te sted.

MAX2163
ISDB-T 1-Segment Tuner
______________________________________________________________________________________ 15
Table 10. N-Divider MSB Register
Table 11. N-Divider LSB/LIN Register
Note: When changing N-divider value, both registers N-Divider MSB and N-Divider LSB must be loaded as they are double buffered.
Note: When changing N-divider value, both registers N-Divider MSB and N-Divider LSB must be loaded as they are double buffered.
BIT NAME
N[11:4]
BIT LOCATION
(0 = LSB)
7, 6, 5, 4, 3, 2,
1, 0
DEFAULT FUNCTION
01111010
Sets the most significant bits of the PLL integer divide number (N). Default
integer divider va lue is N = 1952 decimal. N can range from 1314 to 2687.
BIT NAME
N[3:0] 7, 6, 5, 4 0000
X 3 0 Factory u se only. Must be programmed to 0 upon power-up.
MIX 2 0
RFVGA 1 0
BIT LOCATION
(0 = LSB)
DEFAULT FUNCTION
Sets the least significant bits of the PLL integer divide number (N). Default
integer divider va lue is N = 1952 decimal. N can range from 1314 to 2687.
Sets linearity mode of mixers.
0 = Selects normal mode for mixer.
1 = Selects high linearity mode for mixer.
Sets l inearity mode of 3rd-stage RFVGA.
0 = Selects normal mode for 3rd-stage RFVGA.
1 = Selects high linearity mode for 3rd-stage RFVGA.
Selects standby mode when STBY pin is logic-low.
STBY 0 0
0 = Normal operation.
1 = Disable s the signa l path and frequency s ynthesizer lea ving onl y the serial
bus, crystal oscillator, and XTALOUT buffer active.
MAX2163
ISDB-T 1-Segment Tuner
16 ______________________________________________________________________________________
Table 14. Factory Use Only Registers (0B, 0C, 0D, 0E, 0F, 10 and 11)
Table 12. STATUS Register (Read Only)
Table 13. VAS STATUS Register (Read Only)
BIT NAME
X 7, 6 1,1 Unused
ADC[2:0] 5, 4, 3 — Indicates the 3-bit ADC conversion of the VCO tuning voltage (VTUNE).
VCP[1:0] 2, 1 — Reflects the charge-pump current setting, when CPS = 1.
PWR 0 1
BIT LOCATION
(0 = LSB)
BIT NAME
VVCO[1:0] 7, 6 —
VVSB[3:0] 5, 4, 3, 2 —
VASA 1 —
BIT LOCATION
(0 = LSB)
DEFAULT FUNCTION
Logic-high ind icates power has been cycled. STATUS register read operation
resets PWR to 0.
DEFAULT FUNCTION
Indicates which VCO has been selected by the VCO autoselect state machine. See
Table 5 for VCO[1:0] definition.
Indicates which sub-band of a particular VCO has been selected by either the VCO
autoselect state machine. See Table 5 for VSB[2:0] definition.
Indicates whether VCO autoselection was successful.
0 = Indicates the autoselect function is disabled or unsuccessful VCO selection.
1 = Indicates successful VCO autoselection.
Status indicator for the VCO autoselect function.
VASE 0 —
0 = Indicates the VCO autoselect function is active.
1 = Indicates the VCO autoselect function is inactive.
BIT NAME
X
BIT LOCATION
(0 = LSB)
7, 6, 5, 4, 3,
2, 1, 0
DEFAULT FUNCTION
00000000 Factory u se only. Must be programmed to 0 upon power-up.

MAX2163
ISDB-T 1-Segment Tuner
______________________________________________________________________________________ 17
Pin and Bit Truth Tables
The MAX2163 STBY can be controlled by either a hardware pin or a register bit. The truth table for each is
described in Table 15.
For software control of the STBY mode, connect the
STBY pin to ground.
Normal and High-Linearity Mode
Definitions
Table 16 defines the register setup for normal and highlinearity modes.
2-Wire Serial Interface
The MAX2163 features a 2-wire I2C-compatible serial
interface consisting of a serial-data line (SDA) and a
serial-clock line (SCL). SDA and SCL facilitate bidirectional communication between the MAX2163 and the
master at clock frequencies up to 400kHz. The master
device initiates a data transfer on the bus and generates
the SCL signal to permit data transfer. The MAX2163
functions as an I2C slave device that transfers and
receives data to and from the master. Pull SDA and SCL
high with external pullup resistors of 1kΩ or greater referenced to MAX2163 V
CCDIG
for proper I2C operation.
One bit transfers during each SCL clock cycle. A minimum of nine clock cycles is required to transfer a byte
into or out of the MAX2163 (8 bits and an ACK/NACK).
The data on SDA must remain stable during the high
period of the SCL clock pulse. Changes in SDA while
SCL is high and stable are considered control signals
(see the
START and STOP Conditions
section). Both
SDA and SCL remain high when the bus is not busy.
START and STOP Conditions
The master initiates a transmission with a START condition (S), which is a high-to-low transition on SDA while
SCL is high. The master terminates a transmission with
a STOP condition (P), which is a low-to-high transition
on SDA while SCL is high.
Acknowledge and
Not-Acknowledge Conditions
Data transfers are framed with an acknowledge bit
(ACK) or a not-acknowledge bit (NACK). Both the master and the MAX2163 (slave) generate acknowledge
bits. To generate an acknowledge, the receiving device
must pull SDA low before the rising edge of the
acknowledge-related clock pulse (ninth pulse) and
keep it low during the high period of the clock pulse.
To generate a not-acknowledge condition, the receiver
allows SDA to be pulled high before the rising edge of
the acknowledge-related clock pulse, and leaves SDA
high during the high period of the clock pulse.
Monitoring the acknowledge bits allows for detection of
unsuccessful data transfers. An unsuccessful data
transfer happens if a receiving device is busy or if a
system fault has occurred. In the event of an unsuccessful data transfer, the bus master must reattempt
communication at a later time.
STBY PIN STBY BIT DEVICE STATE
VCC 0 Device in standby mode
VCC 1 Device in standby mode
GND 0 Device in normal mode
GND 1 Device in standby mode
Table 15. Standby Bit Truth Table
BIT
NORMAL
MODE
HIGH LINEARITY MODE
RFVGA 0 1
MIX 0 1
Table 16. Register Setup for Normal and
High-Linearity Modes
MAX2163
ISDB-T 1-Segment Tuner
18 ______________________________________________________________________________________
Slave Address
The MAX2163 has a 7-bit I2C slave address that must
be sent to the device following a START condition to initiate communication. The slave address is internally
programmed to C0 or C2 for WRITE and C1 or C3 for
READ. See Table 2.
The MAX2163 continuously awaits a START condition
followed by its slave address. When the device recognizes its slave address, it acknowledges by pulling the
SDA line low for one clock period; it is ready to accept
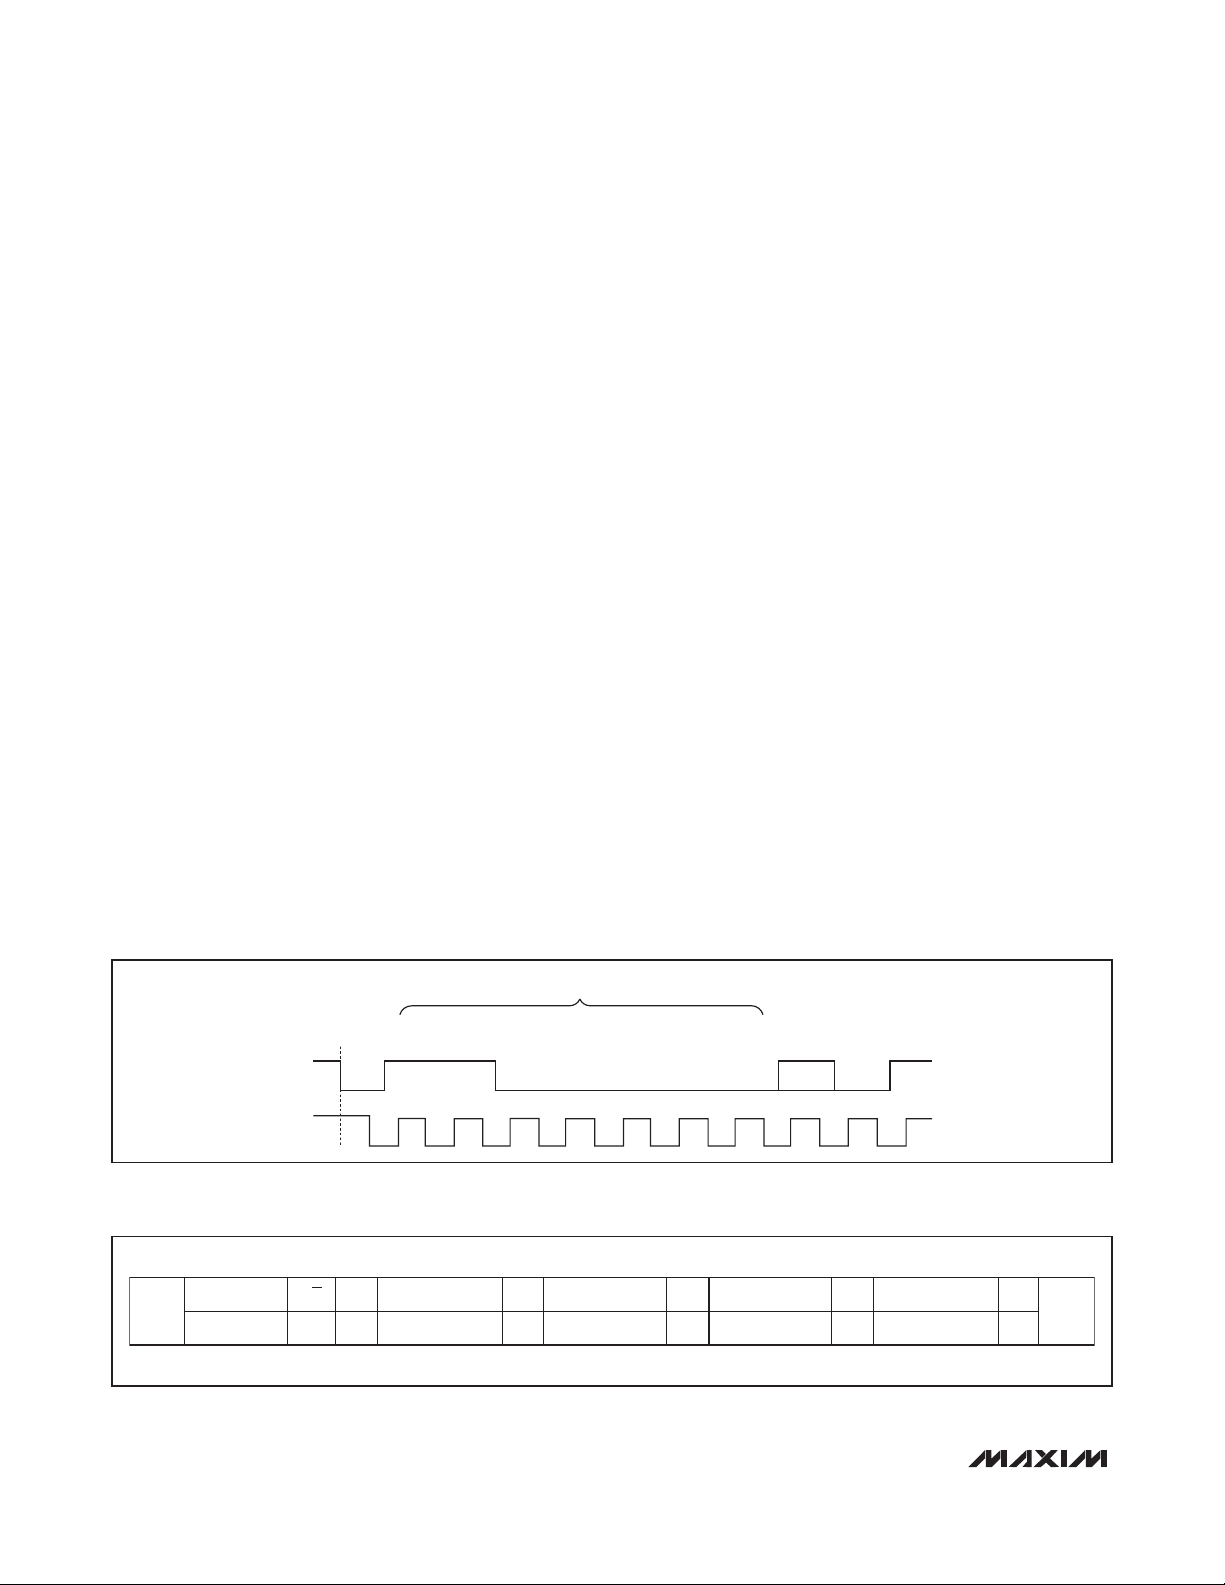
or send data depending on the R/W bit (Figure 1).
Write Cycle
When addressed with a write command, the MAX2163
allows the master to write to a single register or to multiple successive registers.
A write cycle begins with the bus master issuing a
START condition followed by the 7 slave address bits
and a write bit (R/W = 0). The MAX2163 issues an ACK
if the slave address byte is successfully received. The
bus master must then send the address of the first register it wishes to write to (see Table 1 for register
addresses). The slave acknowledges the address, and
the master can then write one byte to the register at the
specified address. Data is written beginning with the
most significant bit (MSB). The MAX2163 again issues
an ACK if the data is successfully written to the register.
The master can continue to write data to the successive
internal registers with the MAX2163 acknowledging
each successful transfer, or the master can terminate
transmission by issuing a STOP condition. The write
cycle does not terminate until the master issues a STOP
condition.
Figure 2 illustrates an example in which registers 0
through 2 are written with 0x0E, 0x08, and 0xE1,
respectively.
Read Cycle
When addressed with a read command, the MAX2163
allows the master to read back a single register or multiple successive registers.
A read cycle begins with the bus master issuing a
START condition followed by the 7 slave address bits
and a write bit (R/W = 0). The MAX2163 issues an ACK if
the slave address byte is successfully received. The bus
master must then send the address of the first register it
wishes to read (see Table 1 for register addresses). The
slave acknowledges the address. Then a START condition is issued by the master, followed by the 7 slave
address bits and a read bit (R/W = 1). The MAX2163
issues an ACK if the slave address byte is successfully
received. The MAX2163 starts sending data MSB first
with each SCL clock cycle. At the 9th clock cycle, the
master can issue an ACK and continue to read successive registers, or the master can terminate the transmission by issuing a NACK. The read cycle does not
terminate until the master issues a STOP condition.
Figure 3 illustrates an example in which registers 0
through 2 are read back.
Figure 1. MAX2163 Slave Address Byte
Figure 2. Write Register 0 through 2 with 0x0E, 0x08, and 0xE1, respectively.
SLAVE ADDRESS
3
SDR
SCL
WRITE 0B/CE
ADDRESS
1
10001
123456789
WRITE REGISTER
ADDRESS
0x001100000 0 — — — — —
WRITE DATA TO
REGISTER 0x00
0x0E 0x0E 0xE1
ACKACKACKR/W ACK ACK
0 RIVAL ACK
WRITE DATA TO
REGISTER 0x01
WRITE DATA TO
REGISTER 0x02
STOPSTART

MAX2163
ISDB-T 1-Segment Tuner
______________________________________________________________________________________ 19
Applications Information
RF Input (UHFIN)
The MAX2163 UHFIN input is internally matched to
50Ω.
RF Gain Control (GC1)
The MAX2163 features multistage RF variable gain
amplifiers controlled by pin GC1 that provide in excess
of 54dB typical of RF gain control range. The voltage
control range is 0.3V at maximum gain to 2.1V at minimum gain. The RF gain control can be configured for
open-loop control or for closed-loop RF automatic gain
control (AGC) when combined with the on-chip IF power
detector. To set the response time of the AGC, connect a
capacitor from GC1 to ground. See the
Closed-Loop RF
Gain Control
section for more information.
Optional RF Tracking Filter
The MAX2163 features an optional RF tracking filter at
the output of the 3rd-stage RFVGA. This filter is controlled by the RFLT bits as shown in the MODE register.
See Table 7. To enable the filter, set RFFB bit to 0; to
disable filter, set RFFB bit to 1. See Table 17 for proper
center frequency settings. In the event that the RF tracking filter is not used, do not install the 18nH inductor.
RF Overload Detector
The MAX2163 includes an RF overload detector. The
RF overload detector circuit is enabled or disabled with
the DRFD bit as shown in Table 10 (R-Divider LSB/CP
register).
IF Gain Control (GC2)
The MAX2163 features an IF variable gain amplifier that
provides in excess of 65dB of IF gain control range.
The voltage control VGC2 range is 0.3V at maximum
gain to 2.1V at minimum gain. The IF VGA is controlled
by the channel decoder.
IF Power Detector
The MAX2163 features a true RMS IF power detector at
the mixer output with adjustable bandwidth. The power
detector circuit is enabled or disabled with the
PDBM[1:0] bits in the PDET/RF-FILT register (Table 6).
The attack point can be set through the PDET[2:0] bits
in the PDET/RF-FILT register (see Table 6 for a summary of attack-point settings).
The PWRDET pin can be configured to provide a lowimpedance buffered and scaled version of either the
GC1 voltage when using the on-chip closed loop AGC,
or the IF power detectors RMS voltage for use in off-chip
closed loop AGC schemes. The output voltage at this pin
ranges from 0.3V to 2.1V, with 2.1V indicating the maximum RF input power. This output allows the baseband
processor to monitor the received RF power level.
When using the on-chip closed-loop AGC function
(PDBM = 11), the PWRDET buffer provides a lowimpedance buffered version of the GC1 voltage. This output can be monitored by the demodulator LSI to determine
the state of the RF front-end and subsequently used to
control other circuits (external LNA) or various demodulator functions. The PWRDET output can also be disabled
for reduced overall power consumption (PDBM = 00).
For use in off-chip closed-loop AGC schemes, the
PWRDET buffer output can be configured to provide a
low-impedance scaled version of the IF power detectors RMS voltage (PDBM = 10). In this mode, an external voltage is applied to the GC1 pin to close the loop.
S
Figure 3. Receive Data from Read Registers
Table 17. RFLT[2:0] Center Frequency
Settings
DEVICE
T
ADDRESS
A
R
T
R/W R/W
REGISTER
A
ADDRESS
C
K
00000000
S
A
C
K
ADDRESS
A
R
11000001100000 0 1 xxxxxxxx xxxxxxxx xxxxxxxx
T
DEVICE
T
REG 00
A
DATA
C
K
REG 01
A
DATA
C
K
REG 02
A
DATA
C
K
S
N
T
A
O
C
P
K
RFLT UHF (MHz)
000 470 –488
001 488 –512
010 512 –542
011 542 –572
100 572 –608
101 608 –656
110 656 –710
111 710 –806

Closed-Loop RF Gain Control
The MAX2163 can provide either open-loop RF gain
control by the GC1 pin or closed-loop RF automatic
gain control (AGC) by the on-chip power detector.
Automatic RF gain control is enabled by setting the
PDBM[1:0] bits to 00 as shown in the PDET/RF-FILT
register (Table 6). Setting the PDBM[1:0] bits to 10
allows open-loop RF gain control by the GC1 pin.
When the RF AGC loop is disabled, RF gain is controlled by an external voltage that is applied to the GC1
pin. The GC1 pin’s input voltage range is 0.3V to 2.1V
with 0.3V providing the maximum RF gain.
When the RF AGC loop is enabled, the IF power detector output is internally connected to the GC1 input and
the RF gain is controlled by the power detector’s output
voltage. An external capacitor connected from the GC1
pin to ground sets the AGC loop response time. The
loop response time is calculated as follows:
t
SETTLING
= 41.7 x R x C
EXT
where:
R = 1kΩ
C
EXT
= External capacitor from GC1 to ground in
farads.
The attack point (referred to as the RF input) of the AGC
loop can be programmed from -66dBm to -52dBm and
is controlled by the PDET[2:0] bits in the PDET/RF-FILT
register (Table 6).
High-Side and Low-Side LO Injection
The MAX2163 allows selection between high-side and
low-side LO injection through the HSLS bit in the MODE
register (Table 7). To select low-side injection, set HSLS
to 1; to select high-side injection, set HSLS to 0.
IF Filter
The nominal IF filter center frequency and bandwidth
are 571kHz and 860kHz, respectively.
The center frequency of the IF bandpass filter is tuned
at the factory; however, the factory-set trim can be
bypassed and the center frequency can be adjusted
through the FLTS and TUN[2:0] bits in the IF Filter register (Table 3). Set the FLTS bit to 0 to select the filter’s
center frequency to the factory-set tuning. Set the FLTS
bit to 1 to allow the filter’s center frequency to be
adjusted with the TUN[2:0] bits (Table 3).
VCO Autoselect (VAS)
The MAX2163 includes three VCOs with each VCO having 16 sub-bands. The appropriate VCO and VCO subband for the desired local oscillator frequency can be
manually selected by programming the VCO[1:0] and
VSB[3:0] bits in the VCO register. The selected VCO and
sub-band is reported in the VAS STATUS register (read
only) (Table 13).
Alternatively, the MAX2163 can be set to autonomously
choose a VCO and VCO sub-band. Automatic VCO
selection is enabled by setting the VAS bit in the VAS
register (Table 4) and is initiated once the N-divider LSB
register word is loaded. In the event that the R-divider
is changed, both the R-Divider MSB and R-Divider
LSB registers must be reprogrammed. Also, if the
R-Divider or the N-Divider MSB is changed, the
N-Divider LSB register must also be reprogrammed to
initiate the VCO autoselect function. The VCO and
VCO sub-band that are programmed in the VCO[1:0] and
VSB[3:0] bits serve as the starting point for the automatic
VCO selection process when VASS = 0. When VASS = 1,
the current VCO and VCO sub-bands serve as the starting point for the automatic VCO selection process.
During the selection process, the VASE bit in the VAS
STATUS register is cleared to indicate the autoselection
function is active. Upon successful completion, bits VASE
and VASA are set and the VCO and sub-band selected
are reported in the VAS STATUS register (Table 13). If the
search is unsuccessful, VASA is cleared and VASE is set.
This indicates that searching has ended, but no VCO has
been found, and occurs when trying to tune to a frequency outside the VCO’s specified frequency range.
Charge-Pump Select (CPS)
The MAX2163 allows for manual selection of the
charge-pump current (CPS = 0) or automatic selection
(CPS = 1). When in manual mode, the charge-pump
current is programmed by bits CP[1:0] in the R-Divider
LSB register (Table 9). In automatic selection mode, the
charge-pump current is automatically set based on
VTUNE voltage and current VCO sub-band. ADE, ADL,
and VAS bits must be programmed to 1. The selected
charge-pump current is reported in Table 18 .
MAX2163
ISDB-T 1-Segment Tuner
20 ______________________________________________________________________________________
Table 18. Charge-Pump Current Setting
When CPS = 1
VSB[3] ADC[2] CP (mA)
0 0 2
0 1 3
1 0 1.5
1 1 2.5

MAX2163
ISDB-T 1-Segment Tuner
______________________________________________________________________________________ 21
3-Bit Analog-to-Digital Converter
The MAX2163 includes a 3-bit ADC. Its input is connected to the VCO tune pin (VTUNE). This ADC can be
used for checking the lock status of the VCOs.
Table 19 summarizes the phase-locked loop (PLL) lock
status based on ADC[2:0] values. The VCO autoselect
routine only selects a VCO in the VAS locked range.
This allows room for a VCO to drift over temperature
and remain in a valid locked range.
When VCO autoselect is disabled, the ADC must first be
enabled by setting the ADE bit in the VAS register. The
ADC reading is latched by a subsequent programming
of the ADC latch bit (ADL = 1). The ADC value is reported
in the STATUS register (Table 12).
Loop-Time Constant Selection
The loop-time constant (LTC) function sets the wait time
for an ADC read when in VCO autoselect mode. This
wait time determines how long the VCO autoselect circuit waits for the PLL to settle before determining if
VCO selection was successful. The loop time constant
is selectable by the LTC[1:0] bits in the VAS register
(Table 4).
XTALOUT Buffer
The reference buffer/divider is provided for driving
external devices. The internal frequency divider is fixed
at 2, and the buffer can provide a minimum 500mV
P-P
signal swing into a load of 4kΩ||10pF with a guaranteed
duty cycle of 45% to 55%. Upon power-up or coming
out of shutdown, the XTALOUT buffer is held in shutdown for an additional 3ms (typ) by an internal timer
circuit. This allows the crystal oscillator sufficient time to
start up properly, without unwanted parasitic feedback
from the output buffer.
Layout Considerations
The MAX2163 Evaluation Kit serves as a guide for PCB
layout. Keep RF signal lines as short as possible to minimize losses and radiation. Use controlled impedance on
all high-frequency traces. Use abundant ground vias
between RF traces to minimize undesired coupling.
Bypass each V
CC_
pin to ground with a 0.1µF capacitor
placed as close as possible to the pin.
When using the optional UHF tracking filter, keep the
external inductor as close to the IC as possible and allow
it to connect back to the top side ground as close as
possible to the IC.
To ensure proper crystal oscillator startup, place the
crystal near the MAX2163 XTAL pin (pin 21). The crystal ground should have a clear, short return back to the
MAX2163 ground paddle near XTAL. Minimize the parasitic capacitance between the board traces of XTAL
(pin 21) and XTALOUT (pin 22). Refer to the MAX2163
Evaluation Kit data sheet for a recommended board
layout.
In addition, the ground returns for the VCO, VTUNE,
and charge pump require special layout consideration
(see the
Typical Application Circuit
). The LDO capacitor (C66) and VCCVCO bypass capacitor (C17)
grounds should be routed back to the MAX2163
ground paddle near pin 28. The loop filter ground connections of C27, C28, and C30 should be connected
together before tapping down to the overall ground
plane with a clear path back to pin 25 (GNDSYN).
When using the TQFN packaged device, the exposed
paddle must be soldered evenly to the board’s ground
plane for proper operation. Use abundant vias beneath
the exposed paddle for maximum heat dissipation.
Table 19. PLL and Lock Status
ADC[2:0] PLL LOCK STATUS
000 Out of lock
001 Loc ked
010 Loc ked
011 Not used
100 Not used
101 Loc ked
110 Loc ked
111 Unlocked

MAX2163
ISDB-T 1-Segment Tuner
22 ______________________________________________________________________________________
Chip Information
PROCESS: BiCMOS
Typical Application Circuit
Package Information
For the latest package outline information and land patterns, go
to www.maxim-ic.com/packages
.
PACKAGE TYPE PACKAGE CODE DOCUMENT NO.
28 TQFN-EP T2855-8
21-0140
R22
UHFIN
C30
V
CC
C17
V
CC
V
CC
V
CC
C66
28 27 26 25 24 23 22
+
1
2
3
4
5
6
7
TANK
MAX2163
8 9 10 11 12 13 14
R20
C27
LEXTU
PWRDET
PWRDET
C28
FREQUENCY
SYNTHESIZER
DIV
V
CC
C19
V
CC
DIV2
INTERFACE LOGIC
AND CONTROL
V
CC
XTALOUT
21
20
V
19
18
17
16
15
CC
SDA
SCL
PWRDET
IFOUT
GC2

MAX2163
ISDB-T 1-Segment Tuner
Maxim cannot assume responsibility for use of any circuitry other than circuitry entirely embodied in a Maxim product. No circuit patent licenses are
implied. Maxim reserves the right to change the circuitry and specifications without notice at any time.
Maxim Integrated Products, 120 San Gabriel Drive, Sunnyvale, CA 94086 408-737-7600 ____________________
23
© 2009 Maxim Integrated Products Maxim is a registered trademark of Maxim Integrated Products, Inc.
Revision History
REVISION
NUMBER
0 7/08 Initial release
1 4/09 Updated to add 28-pin MAX2163ETI to data sheet
2 10/09
REVISION
DATE
DESCRIPTION
Added note instructing to program all regi sters; corrected register tab les
and li sted all factory use only registers
PAGES
CHANGED
—
All
10, 12, 14,
15, 16
 Loading...