

Page 1
19-6062; Rev 0; 10/11
MAX1454 Evaluation System
Evaluates: MAX1454
General Description
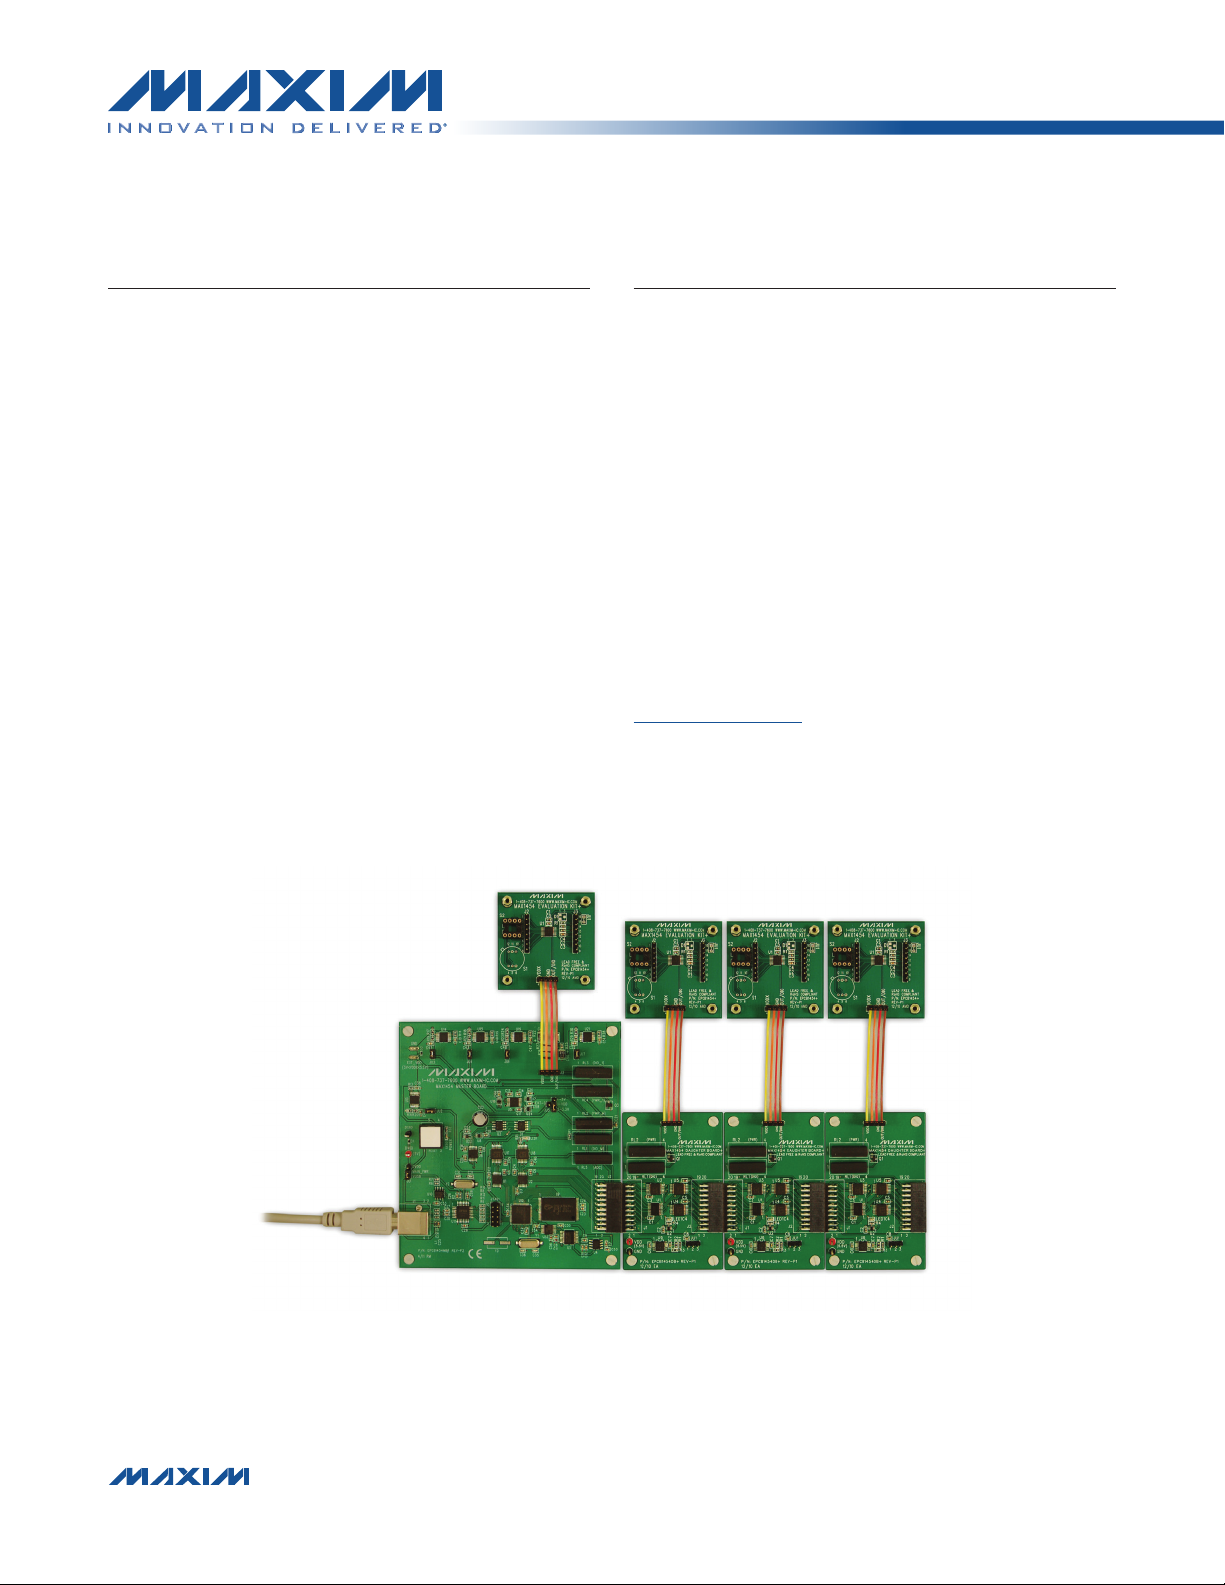
The MAX1454 evaluation system (EV system) includes
one MAX1454 master board and one MAX1454 evaluation kit (EV board). The MAX1454 daughter board
system (DB system) includes one MAX1454 daughter
board and one MAX1454 EV board. The EV system,
when combined with the DB system, provides a proven
design to evaluate up to 15 MAX1454 precision sensor signal conditioners. The EV system also includes
Windows XPM-, Windows VistaM-, and WindowsM 7-compatible software that provides a simple graphical user
interface (GUI) for exercising the features of the IC. The
master board includes interface circuitry to communicate between the IC and the host computer, circuitry to
address each of the 15 devices in a fully loaded system,
and circuitry to connect to the EV board in position 1.
The EV board comes installed with a MAX1454AUE/V+ in
a 16-pin TSSOP package. The daughter board includes
circuitry and relays to connect to the EV board. Each
position in the system, with the exception of position 1,
requires a daughter board and an EV board. Therefore,
to evaluate 15 MAX1454 devices, one EV system and
14 DB systems are required. Figure 1 shows a partially
expanded system, for four positions.
Features
S USB Powered
S Evaluates Up to 15 MAX1454 Devices
S Daughter Board and EV Board Powered by the
Master Board
S Sensor Socket on the EV Board
S On-Board ADC to Read the OUT Voltage of the
MAX1454
S Windows XP-, Windows Vista-, and Windows
7-Compatible Software
S User-Friendly Graphical User Interface (GUI)
S Proven PCB Layout
S Fully Assembled and Tested
Ordering Information appears at end of data sheet.
MAX1454 EV BOARD
POSITION 1
MAX1454 MASTER BOARD
Figure 1. MAX1454 EV System (4-Position System, Expandable to 15 Positions)
Windows, Windows XP, and Windows Vista are registered
trademarks of Microsoft Corp.
MAX1454
EV BOARD
POSITION 2
MAX1454
DAUGHTER
BOARD
MAX1454
EV BOARD
POSITION 3
MAX1454
DAUGHTER
BOARD
MAX1454
EV BOARD
POSITION 4
MAX1454
DAUGHTER
BOARD
_________________________________________________________________ Maxim Integrated Products 1
For pricing, delivery, and ordering information, please contact Maxim Direct at 1-888-629-4642,
or visit Maxim’s website at www.maxim-ic.com.
Page 2
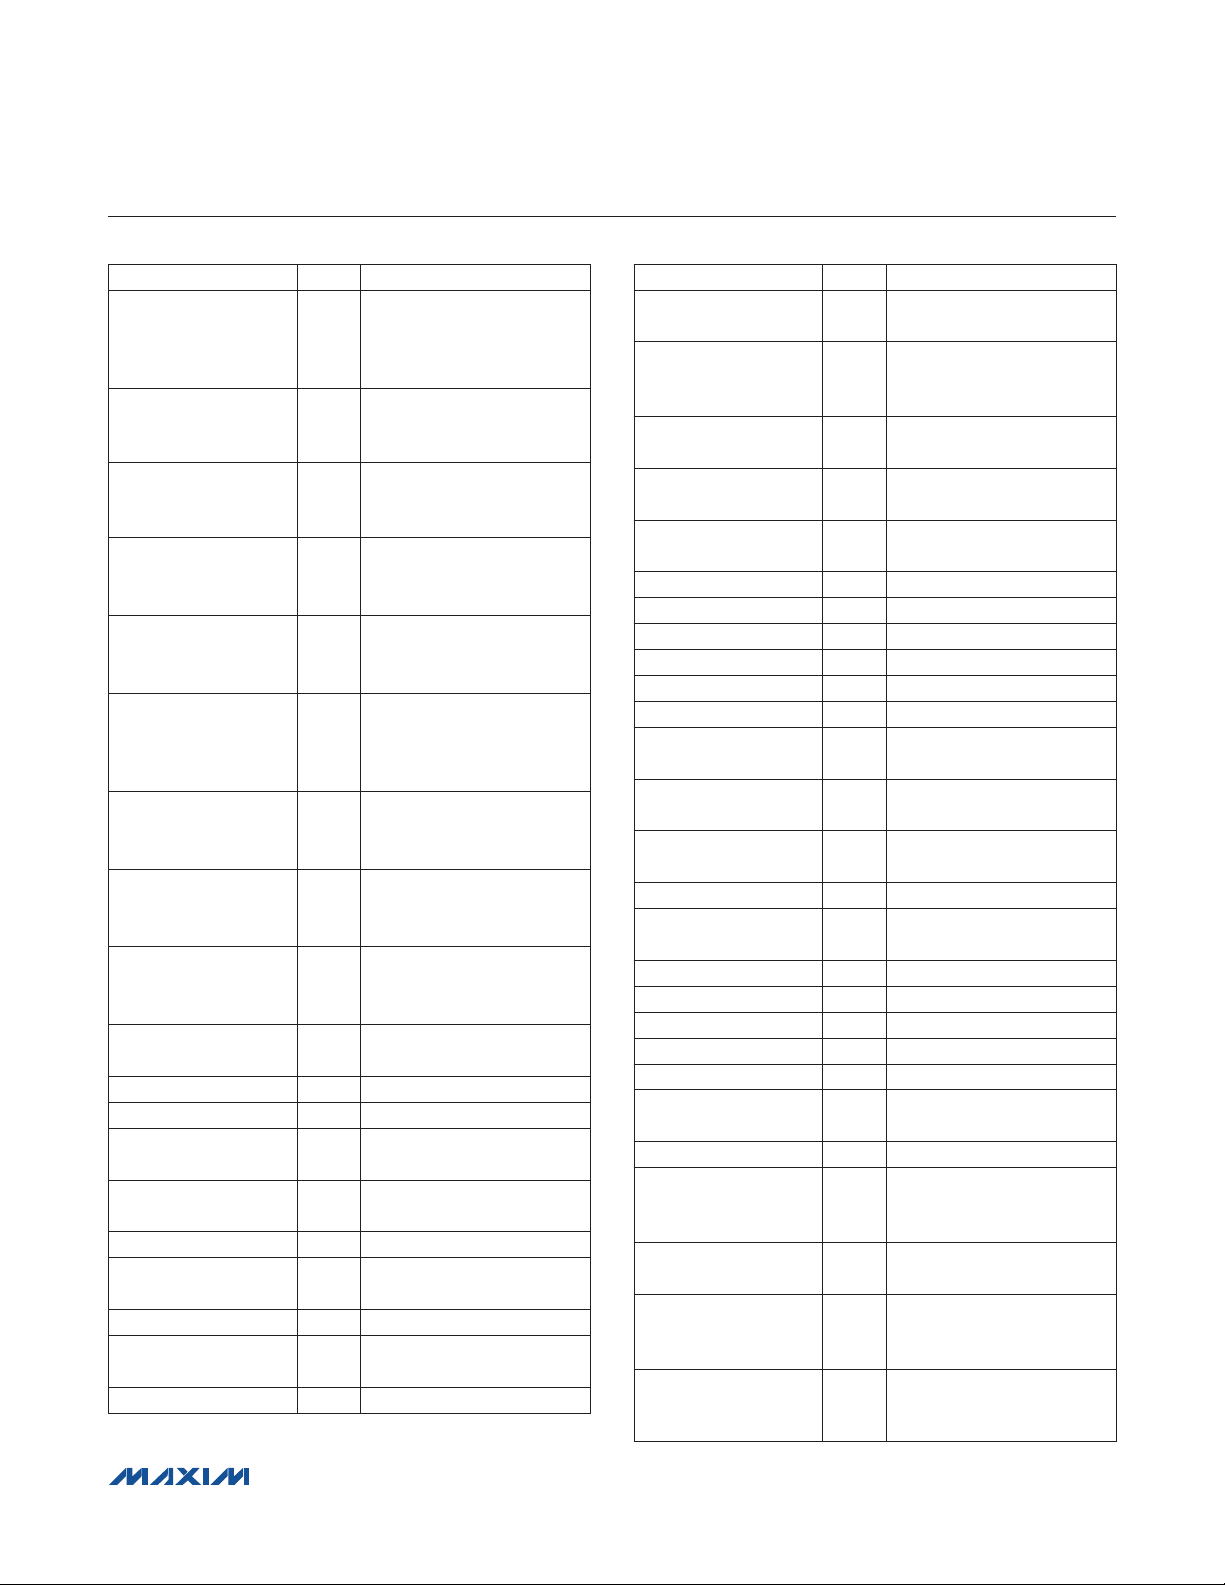
DESIGNATION QTY DESCRIPTION
C1–C4, C13–C16,
C19, C20, C21, C24,
C41–C44, C48, C52,
C54, C55, C58
C5, C6, C11, C17,
C18, C45, C46,
C56, C57
C7, C8,C9, C12,
C23, C25–C29, C33,
C34, C37, C53
C10, C38, C39, C40,
C47, C51
C22 1
C30 1
C31, C32 2
C35, C36 2
C49, C50 2
D1, D2 2
DGND 1 Black test point
DVDD 1 Red test point
J1 1
J2 1
J3 1 Single-row, 4-pin header
JTAG1 1
JU1 1 3-pin header
JU2, JU3, JU4,
JU6, JU7
JU5 1 4-pin header
10FF Q20%, 6.3V X5R
21
ceramic capacitors (0603)
Murata GRM188R60J106M
1FF 10%, 16V X5R
9
ceramic capacitors (0603)
Murata GRM188R61C105K
0.1FF Q10%, 16V X7R
14
ceramic capacitors (0603)
TDK C1608X7R1C104K
4.7FF Q10%, 6.3V X5R
6
ceramic capacitors (0603)
Murata GRM188R60J475K
220FF, 10V electrolytic
capacitor
Panasonic ECE-A1AKA221
0.033FF Q10%, 16V X5R
ceramic capacitor (0603)
Taiyo Yuden
EMK107BJ333KA
22pF Q5%, 50V C0G
ceramic capacitors (0603)
Murata GRM1885C1H220J
10pF Q5%, 50V C0G
ceramic capacitors (0603)
Murata GRM1885C1H100J
47FF Q20%, 6.3V
capacitors (B1)
SANYO 6TPC47MB
20V, 500mA Schottky
diodes (SOD882)
USB type-B right-angle
PC-mount receptacle
2 x 10 right-angle female
connector
Dual-row, 10-pin (2 x 5)
JTAG header
5 2-pin headers
MAX1454 Evaluation System
Evaluates: MAX1454
Component Lists
MAX1454 Master Board
DESIGNATION QTY DESCRIPTION
L1 1
L2 1
LED1, LED2 2
Q1, Q2 2
Q3 1
R1 1
R2 1
R3, R4 2
R5 1
R6 1
R7 1
R8–R12 0
R13, R14, R15,
R22, R28
R16–R19, R24,
R27, R30
R20 1
R23 1
R21, R29 2
R25 1
R26 1
R31, R32 2
R33 1
RESET 1
RL1–RL5 5 Ultra-reed relays
U1, U2, U5 3
U3 1
U4 1
U6, U22 2
Ferrite bead (0603)
TDK MMZ1608R301A
22FH, 0.11I, 300mA
inductor
Coilcraft DS1608C-223ML
Red LEDs (0603)
Panasonic LNJ208R8ARA
Power MOSFETs (8 SO)
Fairchild FDS8958B
60V, 200mA n-channel
MOSFET (3 SOT23)
390kI Q5% resistor (0603)
470I Q5% resistor (0603)
27I Q5% resistors (0603)
1.5kI Q5% resistor (0603)
2.2kI Q5% resistor (0603)
10kI Q5% resistor (0603)
Not installed, resistors—
short (PC trace) (0603)
100kI Q5% resistors
5
(0603)
7
10kI Q1% resistors (0603)
14kI Q1% resistor (0603)
16.5kI Q1% resistor
(0603)
30kI Q1% resistors (0603)
1MI Q5% resistor (0603)
34kI Q1% resistor (0603)
1kI Q5% resistors (0603)
510I Q5% resistor (0603)
Normally closed
pushbutton
Level translators
(14 TSSOP)
Maxim MAX3379EEUD+
16-bit ADC (20 SSOP)
Maxim MAX1134BCAP+
2.048V voltage reference
(8 SO)
Maxim MAX6126AASA21+
Level translators
(14 TSSOP)
Maxim MAX3390EEUD+
_________________________________________________________________ Maxim Integrated Products 2
Page 3
DESIGNATION QTY DESCRIPTION
U7, U8, U16, U24 4 Logic inverters (SOT363)
U9 1 SRAM (48 TSOP)
U11 1
U10 1
U12 1
U13, U14, U15,
U19, U21
U17, U18 2
U20 1
U23 1 Logic buffer (5 SC70)
USB-to-UART converter
(32 TQFP)
93C46-type 3-wire
EEPROM (8 SO)
Microcontroller
(68 QFN-EP)
Maxim MAXQ2000-RAX+
LDOs (16 TSSOP-EP)
5
Maxim MAX1793EUE50+
4-bit comparators
(16 SSOP)
Step-up regulator
(8 FMAXM)
Maxim MAX1795EUA+
MAX1454 Evaluation System
Evaluates: MAX1454
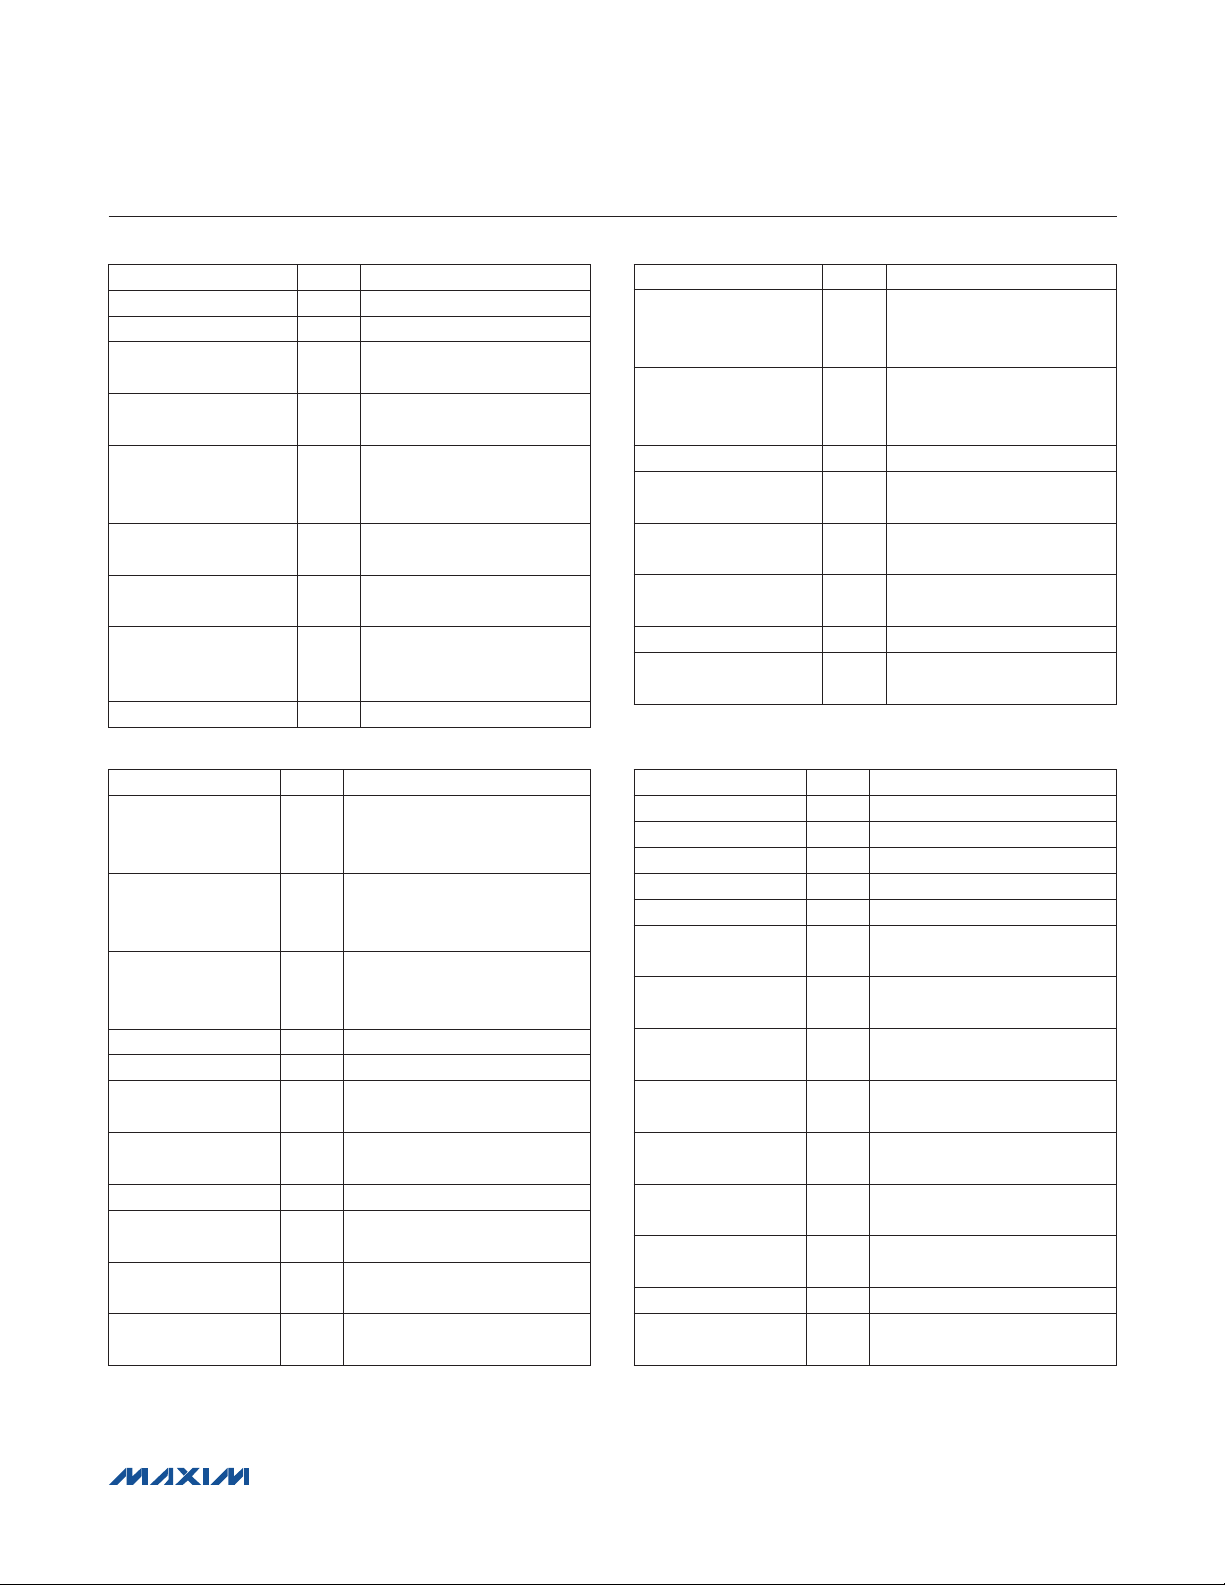
Component Lists (continued)
MAX1454 Master Board (continued)
DESIGNATION QTY DESCRIPTION
20MHz crystal
Y1 1
Y2 1
Y3 0 Not installed, crystal
— 4
— 4
— 1
— 7 Shunts
— 1
Hong Kong X’tals
SSM20000N1HK188F0-0
6MHz crystal
Hong Kong X’tals
SSL60000N1HK188F0-0
0.250in x 0.625in 4-40
round nylon spacers
4-40 x 0.375in nylon
machine screws
USB high-speed A-to-B
cables 5ft (1.5m)
PCB: MAX1454 MASTER
BOARD
DESIGNATION QTY DESCRIPTION
1FF Q10%, 16V X7R ceramic
C1, C3, C4, C5 4
C2, C7, C8 3
C6 1
DVDD 1 Red test point
GND 1 Black test point
J1 1
J2 1
J3 1 Single-row 4-pin header
JU1 1
LED1 1
Q1 1
capacitors (0603)
Murata GRM188R71C105K
10FF Q20%, 6.3V X5R
ceramic capacitors (0603)
Murata GRM188R60J106M
4.7FF Q10%, 6.3V X5R
ceramic capacitor (0603)
Murata GRM188R60J475K
2 x 10 right-angle male
header
2 x 10 right-angle female
receptacle
3-pin header
Sullins PEC36SAAN
Red LED (0603)
Panasonic LNJ208R8ARA
60V, 200mA n-channel
MOSFET (3 SOT23)
MAX1454 Daughter Board
DESIGNATION QTY DESCRIPTION
R1 1
R2 1
R3 1
R4 1
RL1, RL2 2 Ultra-reed relays
U1 1
U2 1
U3 1
U4, U5 2
U6 1
— 4
— 4
— 1 Shunts
— 1
100kI Q5% resistor (0603)
30kI Q1% resistor (0603)
10kI Q1% resistor (0603)
1kI Q5% resistor (0603)
Logic buffer (20 TSSOP)
Fairchild 74VHCT244AMTCX
Logic inverter (6 SC70)
NXP Semi 74LVC2G04GW
4-bit adder (16 SSOP)
NXP Semi 74HC283
4-bit comparators (16 SSOP)
NXP Semi 74HCT85DB
LDO (16 TSSOP-EP)
Maxim MAX1793EUE18+
0.250in x 0.625in, 4-40
round nylon spacers
4-40 x 0.375in nylon
machine screws
PCB: MAX1454 DAUGHTER
BOARD
µMAX is a registered trademark of Maxim Integrated Products,
Inc.
_________________________________________________________________ Maxim Integrated Products 3
Page 4
DESIGNATION QTY DESCRIPTION
1FF Q10%, 16V X7R
C1 1
C2 0
C3 1
C4, C5 2
D1 0 Not installed, Schottky diode
J1 1 Single-row 4-pin header
J2, J3 2 Single-row 8-pin headers
JU1 0
ceramic capacitor (0603)
TDK C1608X7R1C105K
Not installed, ceramic
capacitor (0603)
0.01FF Q10%, 16V X7R
ceramic capacitor (0603)
Murata GRM188R71C103K
0.1FF Q10%, 50V X7R
ceramic capacitors (0603)
TDK C1608X7R1H104K
Not installed, 2-pin
header—Short (PC trace)
MAX1454 Evaluation System
Evaluates: MAX1454
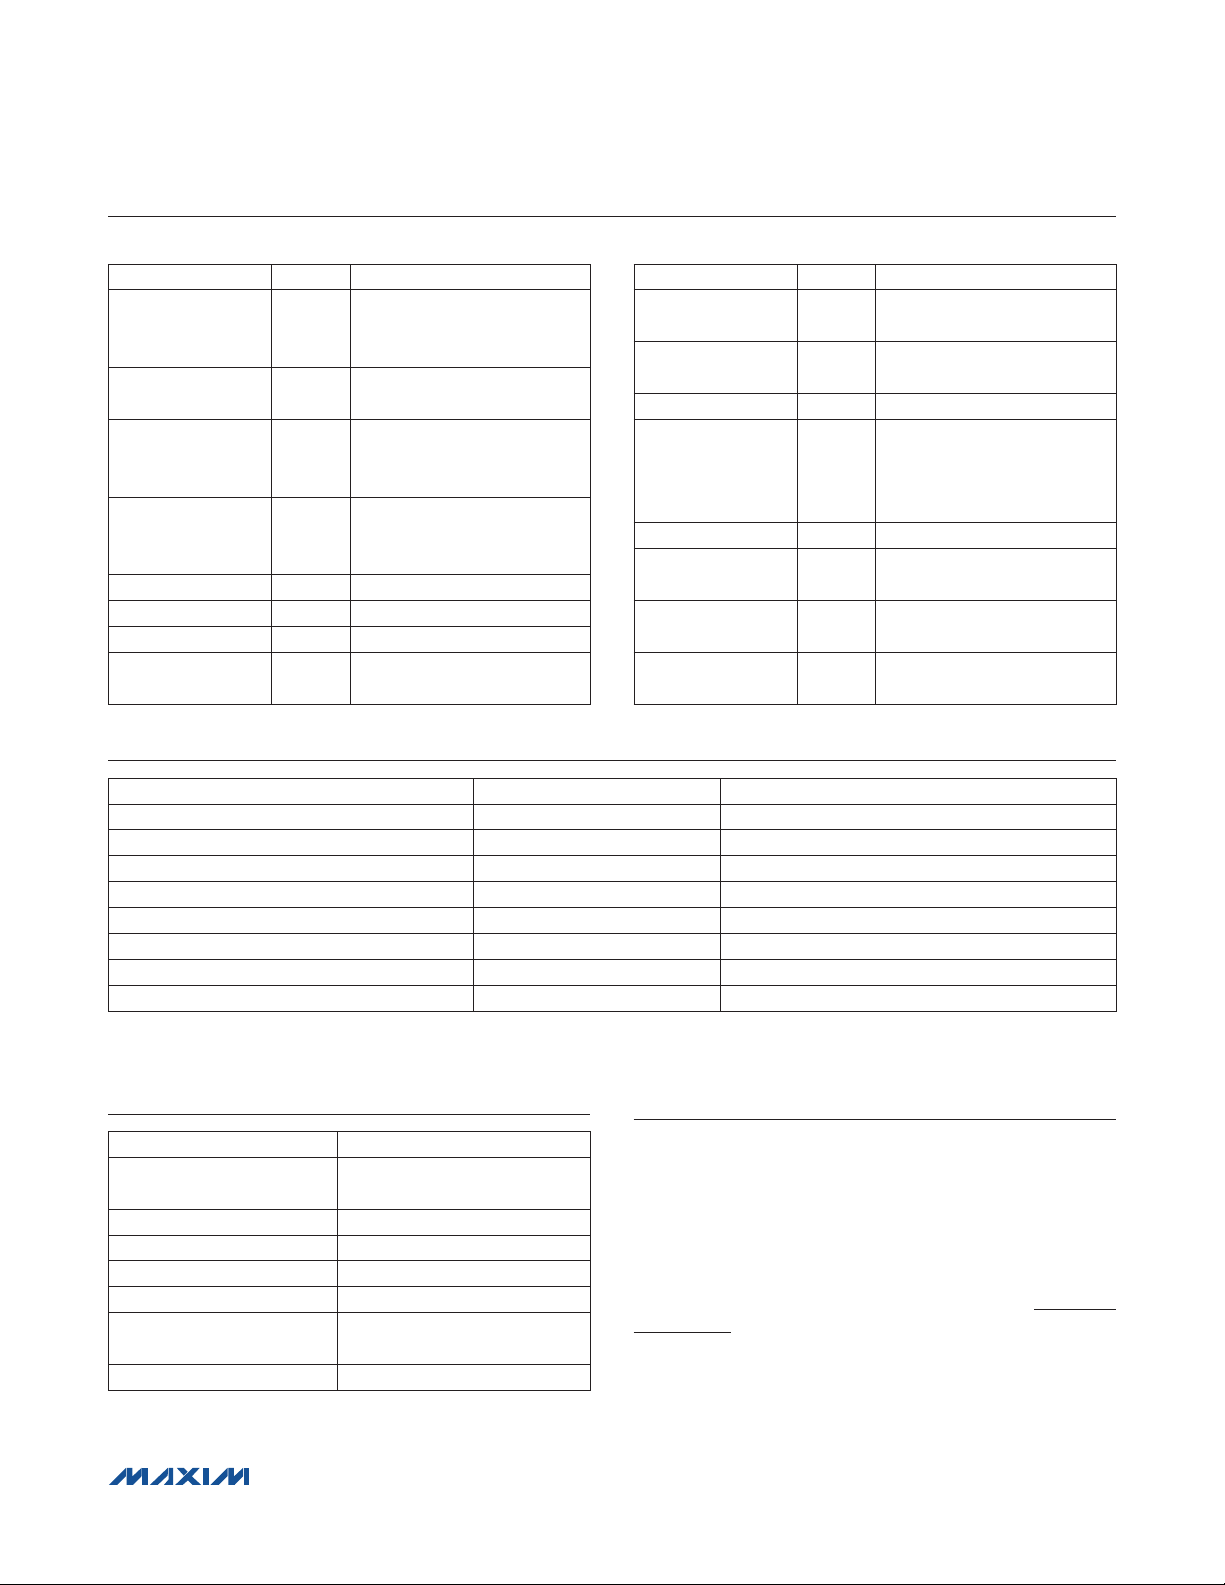
Component Lists (continued)
MAX1454 EV Board
DESIGNATION QTY DESCRIPTION
R1 0
S1 0
S2 1 8-pin DIL header
U1 1
— 1 3ft cable (4 pin)
— 4
— 4
— 1
Not installed, resistor—short
(PC trace) (0603)
Not installed, pressure
sensor
Precision sensor signal
conditioner with overvoltage
protection (16 TSSOP)
Maxim MAX1454AUE/V+
0.250in x 0.625in, 4-40
Aluminum spacers
4-40 x 0.375in steel jack
screws
PCB: MAX1454
EVALUATION KIT
Component Suppliers
SUPPLIER PHONE WEBSITE
Coilcraft, Inc. 847-639-6400 www.coicraft.com
Fairchild Semiconductor 888-522-5372 www.fairchildsemi.com
Hong Kong X’tals Ltd. 852-35112388 www.hongkongcrystal.com
Murata Electronics North America, Inc. 770-436-1300 www.murata-northamerica.com
Panasonic Corp. 800-344-2112 www.panasonic.com
SANYO Electric Co., Ltd. 619-661-6835 www.sanyo.com
Taiyo Yuden 800-348-2496 www.t-yuden.com
TDK Corp. 847-803-6100 www.component.tdk.com
Note: Indicate that you are using the MAX1454 when contacting these component suppliers.
MAX1454 EV System Files
FILE DESCRIPTION
INSTALL.EXE
MAX1454.EXE Application program
MAX1454_DLL.dll MAX1454 DLL library file
CMODCOMM.dll CMODCOMM library file
CDM20600.EXE Installs the USB device driver
UNINSTALL.EXE
USB_Driver_Help_200.PDF USB driver installation help file
Installs the EV system files on
your computer
Uninstalls the EV system
software
• MAX1454EVsystem(USBcableincluded)
• WindowsXP,WindowsVista,orWindows7PCwitha
spare USB port
Note: In the following sections, software-related items
are identified by bolding. Text in bold refers to items
directly from the EV system software. Text in bold and
underlined refers to items from the Windows operating
system.
Required Equipment
Quick Start
_________________________________________________________________ Maxim Integrated Products 4
Page 5

MAX1454 Evaluation System
Evaluates: MAX1454
Procedure
The EV system is fully assembled and tested. Follow the
steps below to verify board operation:
1) Visit www.maxim-ic.com/evkitsoftware to download
the latest version of the EV system software, 1454Rxx.
ZIP. Save the EV system software to a temporary
folder and uncompress the ZIP file.
2) Install the EV system software and USB driver
on your computer by running the INSTALL.EXE
program inside the temporary folder. The program
files are copied to your PC and icons are created
in the Windows Start | Programs | Maxim EVKIT
Software | MAX1454 menu. During software installation, some versions of Windows may show a warning message indicating that this software is from an
unknown publisher. This is not an error condition and
it is safe to proceed with installation. Administrator
privileges are required to install the USB device driver
on Windows.
3) Verify that all jumpers (JU1–JU7) are in their default
positions, as shown in Table 1.
4) Connect the J3 connector of the master board to the J1
connector of the EV board with the provided flex cable.
5) Connect the USB cable from the PC to the master
board. A Windows message appears when connecting the master board to the PC for the first time.
Each version of Windows has a slightly different message. If you see a Windows message stating ready
to use, then proceed to the next step. Otherwise,
open the USB_Driver_Help_200.PDF document in the
Windows Start | Programs | Maxim EVKIT Software
| MAX1454 menu to verify that the USB driver was
installed successfully.
6) Start the EV system software by opening its icon in
the Start | Programs | Maxim EVKIT Software |
MAX1454 menu. The EV system software main window appears, as shown in Figure 2.
7) The EV system software automatically detects the
MAX1454, and a is displayed under Device #1.
8) In the Output MUX group box (Figure 2), select VDD
from the Signal drop-down list.
9) Press the Read Output button and verify that the
returned value that appears next to the button is
approximately 2.5V.
Table 1. Master Board Jumper Settings (JU1–JU7)
JUMPER SHUNT POSITION DESCRIPTION
JU1
JU2
JU3
JU4
JU5
JU6
JU7
*Default position.
1-2* EV system powered by the USB.
2-3 Connect an external 5V supply to the DVDD and DGND connector.
1-2* The on-board LDO (U13) provides 3V output to the EV system.
Open Disconnects the output of the on-board LDO (U13).
1-2* The on-board LDO (U14) provides 2.5V output to the EV system.
Open Disconnects the output of the on-board LDO (U14).
1-2* The on-board LDO (U15) provides 5V output to the EV system.
Open Disconnects the output of the on-board LDO (U15).
1-2 Selects 3.3V to connect to the VDDX of the active device.
1-3 Selects EXT_VDD to connect to the VDDX of the active device.
1-4* Selects 5V to connect to the VDDX of the active device.
1-2* The 3.3V output of the on-board LDO (U19) connects to pin 2 of jumper JU5.
Open Disconnects the output of the on-board LDO (U19).
1-2* The 5V output of the on-board LDO (U21) connects to pin 1 of jumper JU5.
2-3 Disconnects the output of the on-board LDO (U21).
Table 2. Daughter Board Jumper Settings (JU1)
JUMPER SHUNT POSITION DESCRIPTION
JU1
*Default position.
1-2* Daughter board powered by master board
2-3 Connect an external 5.5V supply to the DVDD and GND connector
_________________________________________________________________ Maxim Integrated Products 5
Page 6
MAX1454 Evaluation System
Evaluates: MAX1454
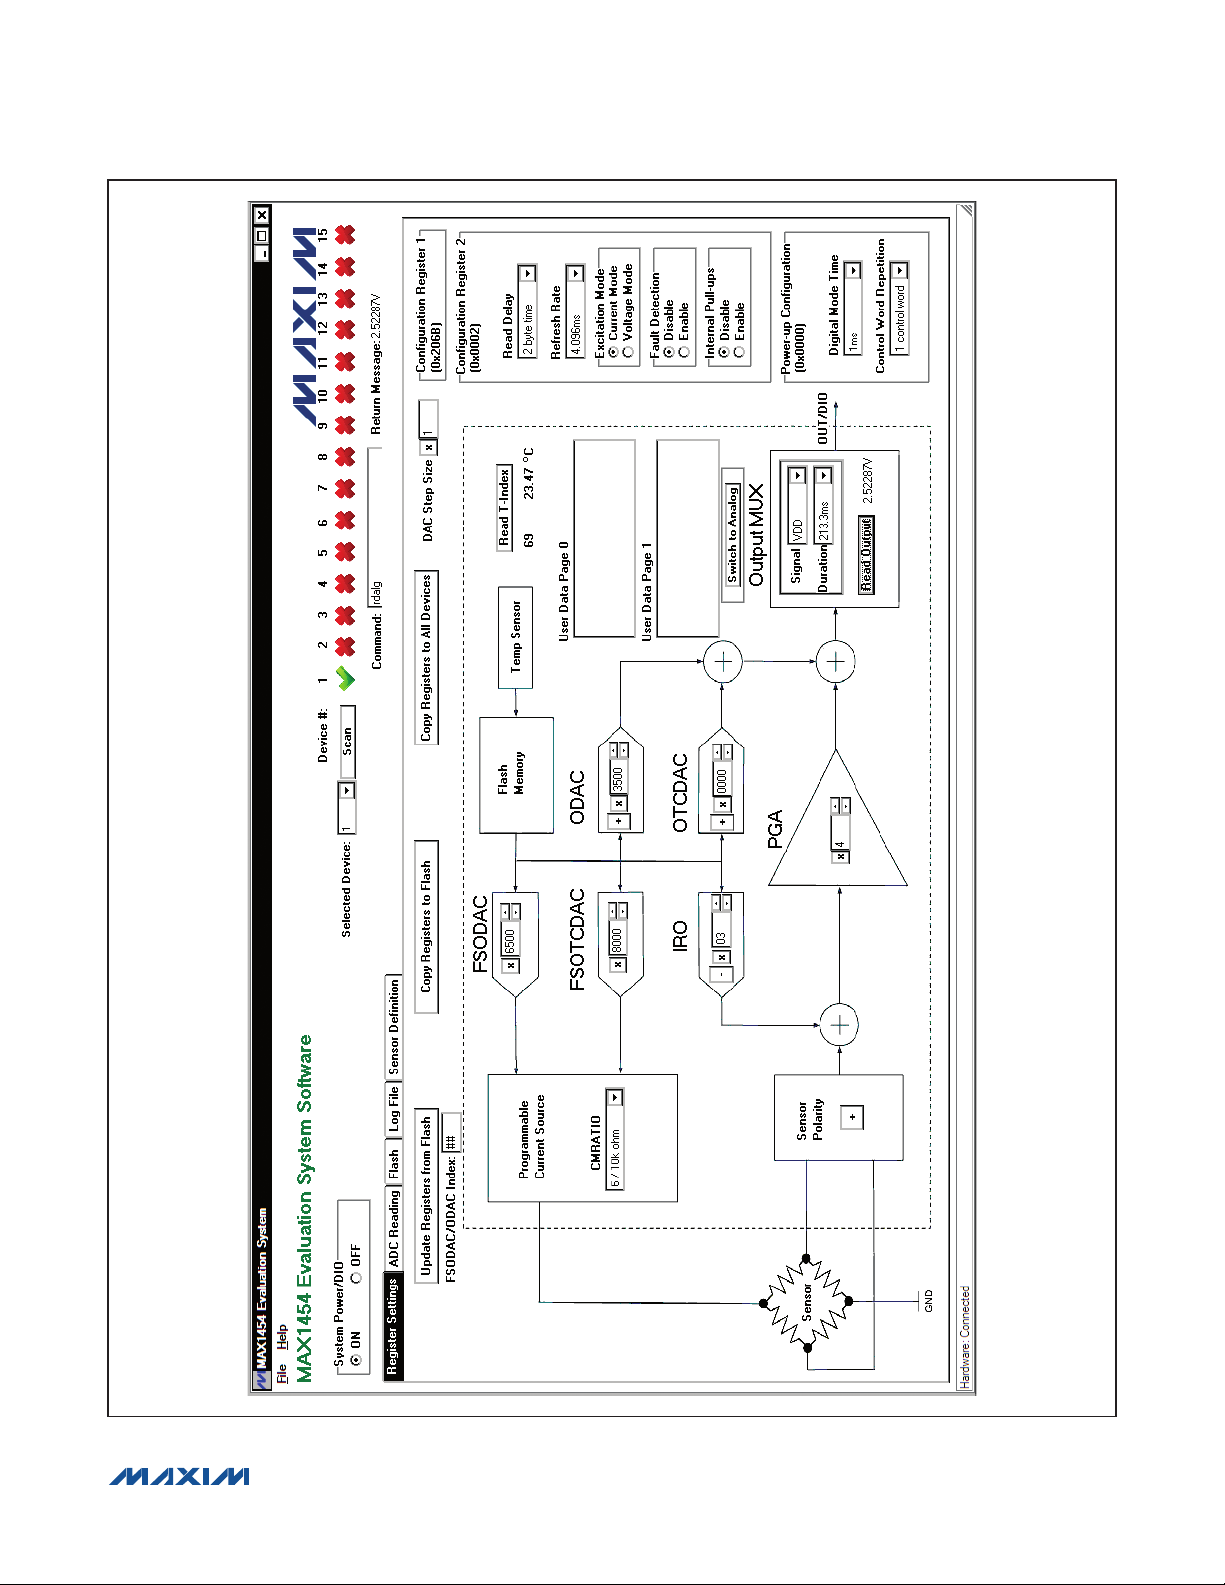
Figure 2. MAX1454 EV System Software Main Window (Register Settings Tab)
_________________________________________________________________ Maxim Integrated Products 6
Page 7
MAX1454 Evaluation System
Detailed Description of Software
The MAX1454 EV system software (Figure 2) has all the
functions to configure the MAX1454. When the software
starts up, it scans the system and determines the number
and position of operational MAX1454 present in the system. The first operational MAX1454 device is selected,
powered up, and initialized to communicate in digital
mode.
Evaluates: MAX1454
VALUE OF THE DAC REGISTER
SIGN BIT
SWITCH B/T DECIMAL
AND HEX
INCREMENT/DECREMENT
BUTTON
Scan
If the number or the positions of the operational devices
on the system is changed, press the Scan button. After
the Scan button is pressed, the EV system checks
every position of the system (1 through 15) and identifies all positions with operating devices. If the device is
present, the software displays a . Otherwise, the
software displays a . The value in the Selected Device
drop-down list identifies the active device-under-test
(DUT).
System Power/DIO
To power off the system, press the OFF radio button in
the System Power/DIO group box. Press the ON radio
button to power up the system and the previously selected MAX1454 device. The selected device is initialized to
communicate in digital mode.
Command
The Command edit box can be used to enter and
execute any of the commands listed in the Interpreter
Definition section. The Return Message is shown at the
right of the Command edit box.
Register Settings Tab
After the software starts up and is connected to an active
device selected in the Selected Device drop-down list,
the default register values on the Register Settings tab
sheet (Figure 2) are written in the active MAX1454 registers. Through the software, all parameters with a white
window area can be edited by the user. The parameters
can be edited by typing a new value in the edit box,
selecting from a drop-down list, or by pressing a button.
The revised value is automatically written to the corresponding MAX1454 register. All entries can be in hexadecimal or decimal format, except the FSODAC/ODAC
Index, which must be in decimal format.
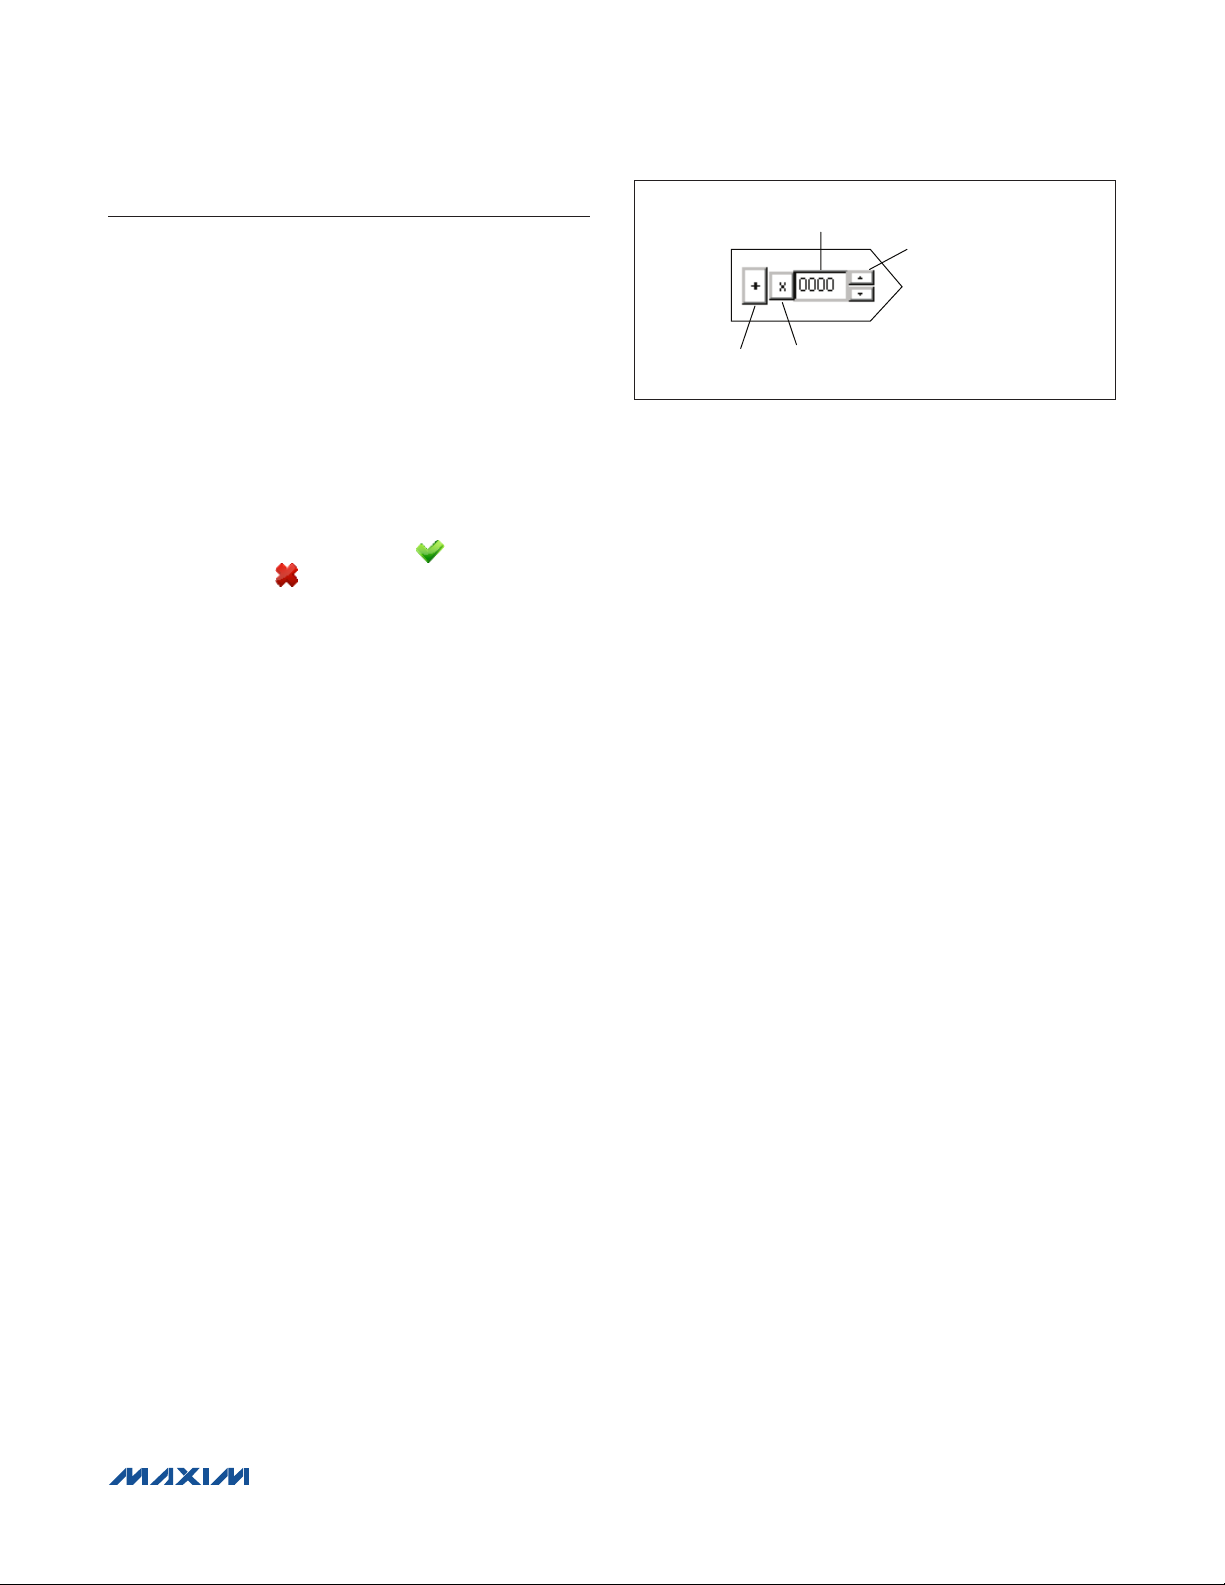
FSODAC, FSOTCDAC, ODAC, and OTCDAC
Values in each one of the FSODAC, FSOTCDAC,
ODAC, and OTCDAC registers can be changed by its
corresponding block, as explained in Figure 3. The sign
bit does not apply to FSODAC and FSOTCDAC. The
Configuration Register 1 register (CONFIG1) value is
updated automatically as the ODAC and OTCDAC sign
Figure 3. Register Controls
bits are changed. Values for these parameters can be
selected to be in decimal or hexadecimal format. Refer to
the MAX1454 IC data sheet for acceptable values.
IRO and PGA
The IRO and PGA control block set values of IRO (including IRO sign) and PGA values. Configuration Register
1 (CONFIG1) value is updated automatically as these
parameters are updated. Values for these parameters
can be selected to be in decimal or hexadecimal format. Refer to the MAX1454 IC data sheet for acceptable
values.
Sensor Polarity
This button corresponds to the PGA Sign bit in the
Configuration Register 1 (CONFIG1). To invert the
polarity of the input signal, press to switch to negative.
The Configuration Register 1 (CONFIG1) value is
updated automatically as the PGA sign bit is changed.
Functional Buttons
The Update Registers from Flash button updates all
DAC and configuration registers from the flash memory
of the active DUT. FSODAC and ODAC are updated
from the lookup tables’ locations pointed to by the
FSODAC/ODAC index.
The Copy Registers to Flash button copies the register values shown on the GUI to the flash memory of the
active DUT. All 176 locations of the FSODAC lookup
table in the flash memory are filled with the value in the
FSODAC register shown on the GUI. All 176 locations of
the ODAC lookup table in the flash memory are filled with
the value in the ODAC register shown on the GUI.
The Copy Registers to All Devices button does the
same as the Copy Registers to Flash, except that action
is performed on all operational DUTs in the system.
The Read T-Index button reads the internal temperature
ADC and displays the return value in decimal format. The
T-Index value is applied to the temperature conversion
formula given in the MAX1454 IC data sheet and the
resulting value (in NC) is displayed.
_________________________________________________________________ Maxim Integrated Products 7
Page 8

MAX1454 Evaluation System
Evaluates: MAX1454
Programmable Current Source
The CMRATIO drop-down list in the Programmable
Current Source box selects the desired current-
mirror ratio for sensor excitation. It corresponds to the
CMRATIO bits in the Configuration Register 1. Refer to
the MAX1454 IC data sheet for details.
Output MUX
Select the IC output signal from the Signal drop-down
list within the Output MUX group box. Refer to Table 19
(ALOC definition) in the MAX1454 IC data sheet for more
information about the available signals.
Select the duration for which the selected Signal remains
available on the OUT/DIO pin from the Duration dropdown list. A readout device (e.g., voltmeter) is required
to read the output.
Press the Read Output button to execute the read analog command that outputs the selected Signal onto the
OUT/DIO pin.
Switch to Analog
Press the Switch to Analog button to put the active DUT
into fixed analog mode. In this mode, the device does not
respond to commands. Press the Scan button to return to
the digital programming mode.
User Data
The general-purpose user data is diplayed in the User
Data Page 0 and User Data Page 1 memo boxes.
Configuration Register 1 (CONFIG1)
The Configuration Register 1 group box displays the
current value of the CONFIG1 register.
Configuration Register 2 (CONFIG2)
Items in this group box correspond to parameters in the
CONFIG2 register. Refer to the MAX1454 IC data sheet
for the definition of each parameter.
Power-Up Configuration (PWRUPCFG)
Items in this group box correspond to parameters in
the PWRUPCFG register. Refer to the MAX1454 IC data
sheet for the definition of each parameter.
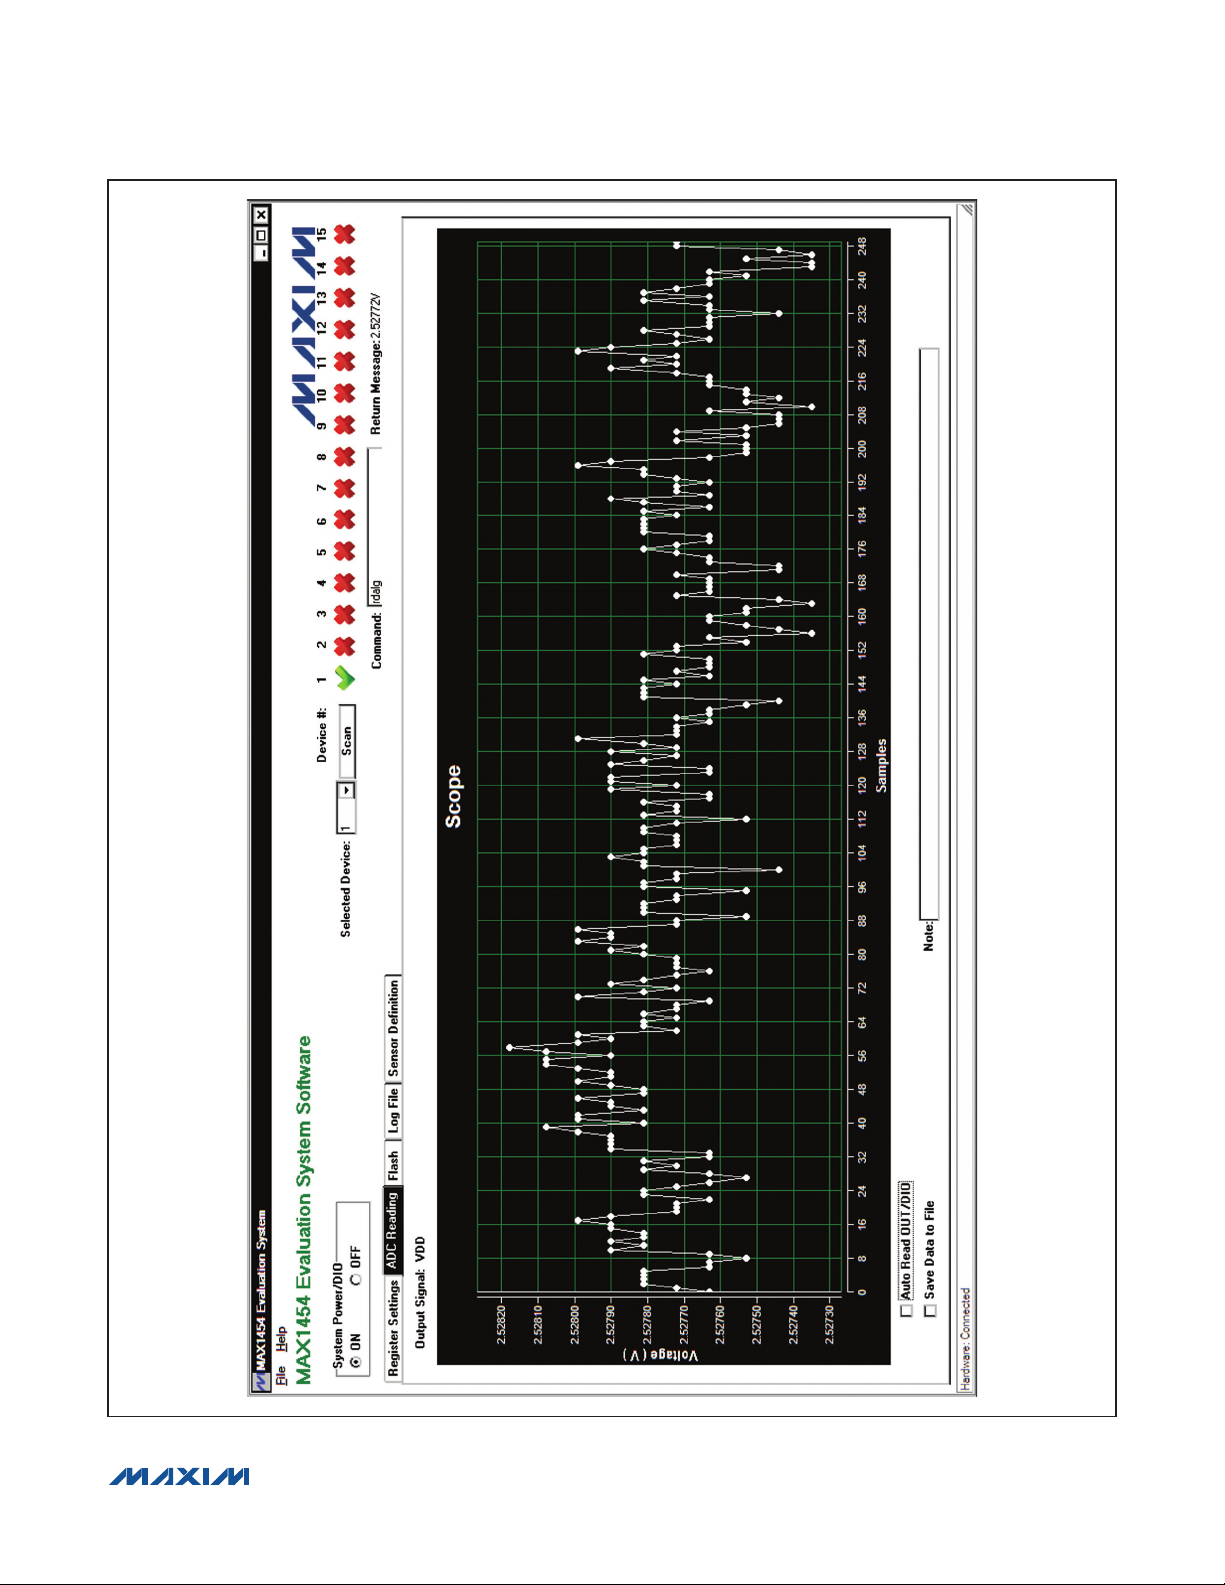
ADC Reading Tab
The master board has an on-board 16-bit ADC device
(MAX1134) to read the voltage of the OUT/DIO signal of
the MAX1454. The ADC Reading tab sheet (Figure 4)
has a Scope to display the output of the ADC. When the
IC is operating in analog mode, check the Auto Read
OUT/DIO checkbox to start the ADC conversion. The
Scope receives new ADC values approximately every
300ms. If the IC is operating in digital mode, when the
Auto Read OUT/DIO checkbox is checked the software
triggers the Read Output button approximately every
300ms on the Register Settings tab sheet and displays
the ADC return values on the Scope. The Scope displays the last 250 readings. Check the Save Data to
File checkbox to start saving the ADC data along with
the message in the Note edit box to a file. The user is
prompted for a file name.
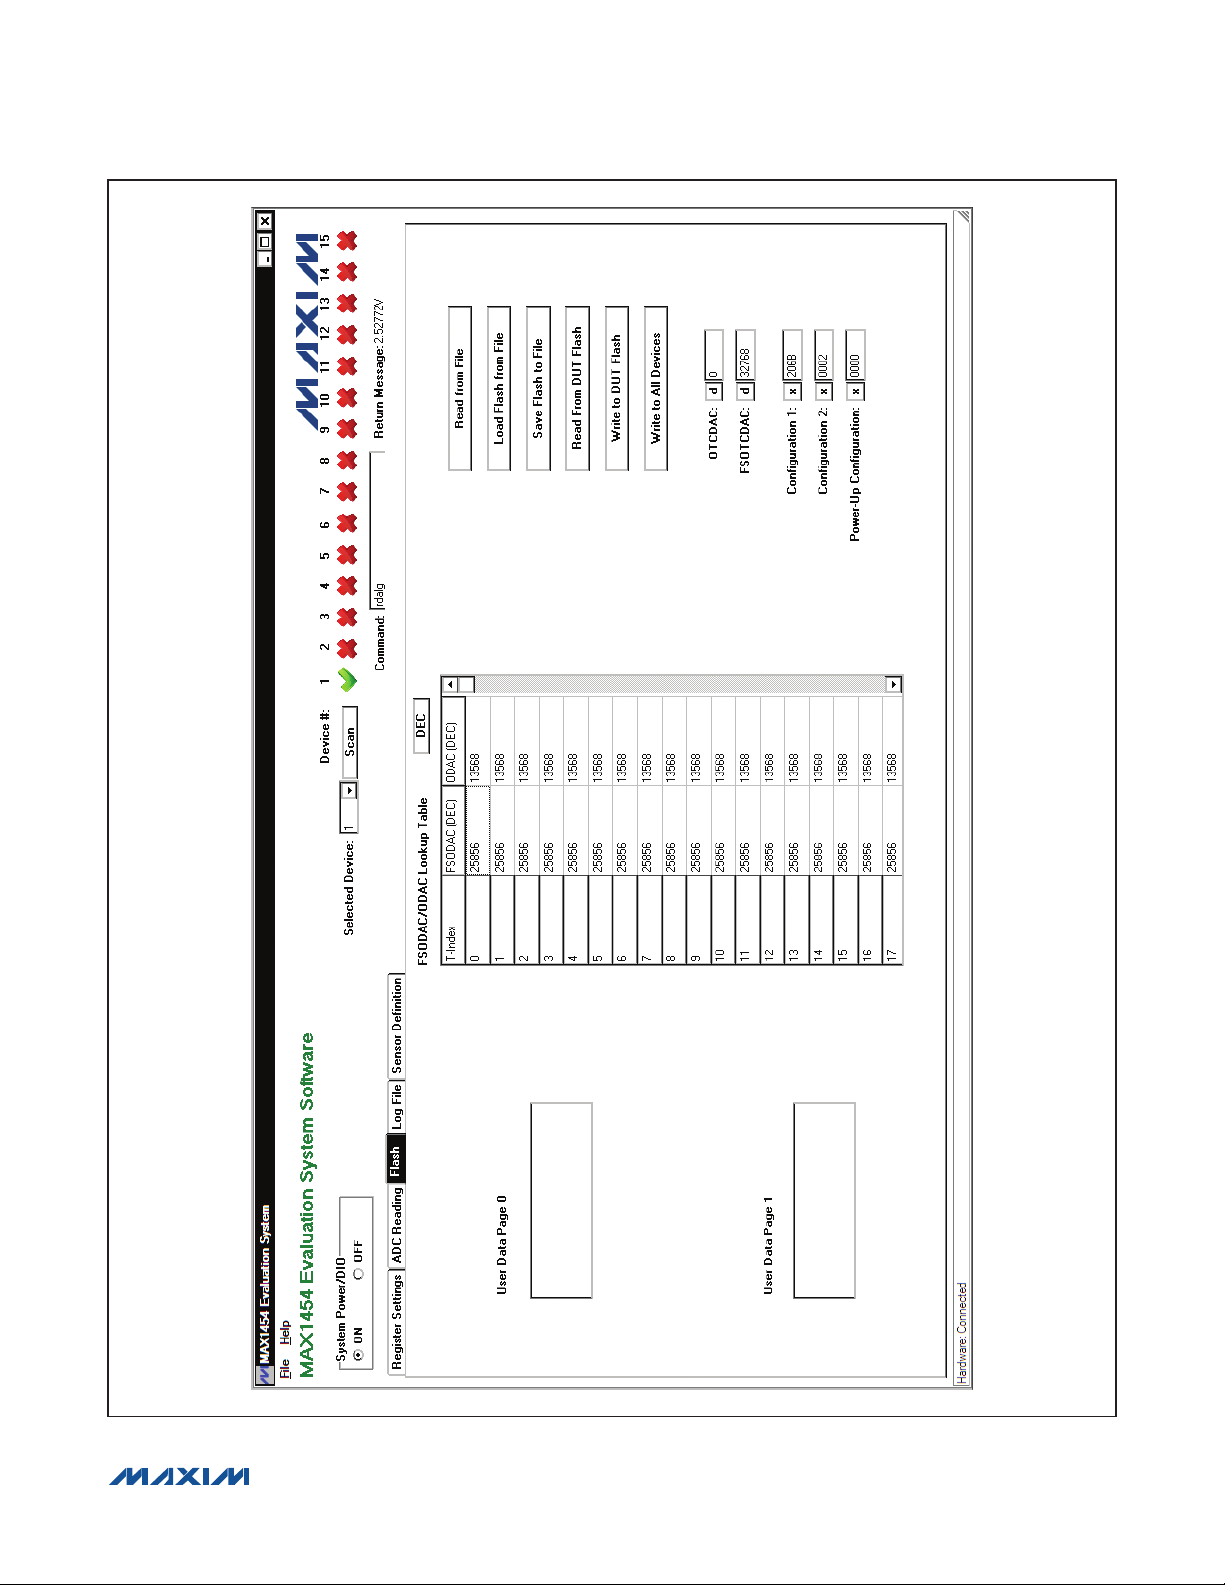
Flash Tab
The Flash tab sheet (Figure 5) is used to read or modify
the contents of the internal flash memory of the active IC.
To read the flash memory, press the Read from DUT
Flash button. The contents of the FSODAC and ODAC
lookup tables are shown in the FSODAC/ODAC Lookup
Table. The user can use the DEC button to switch the
values in the FSODAC/ODAC Lookup Table between
hexadecimal format and decimal format. The CONFIG1,
CONFIG2, PWRUPCFG, OTCDAC, and the FSOTCDAC
flash memory values are shown in the corresponding
edit boxes at the right. The general-purpose user data is
displayed in the User Data Page 0 and User Data Page
1 memo boxes.
Press the Save Flash to File button to save the contents
of the flash to a file. The user is prompted for a file name.
There are two ways to modify the contents of the flash
memory:
1) Manually change the contents on this tab sheet and
press the Write to DUT Flash button to write the contents to the active device. The Write to All Devices
button does the same thing except that it writes to all
devices on the EV system.
2) Press the Load Flash from File button to copy the
contents of a file to the flash memory of the active
device. The user is prompted for a file name.
Press the Read from File button to update the contents
of the Flash tab sheet from a file. The user is prompted
for a file name.
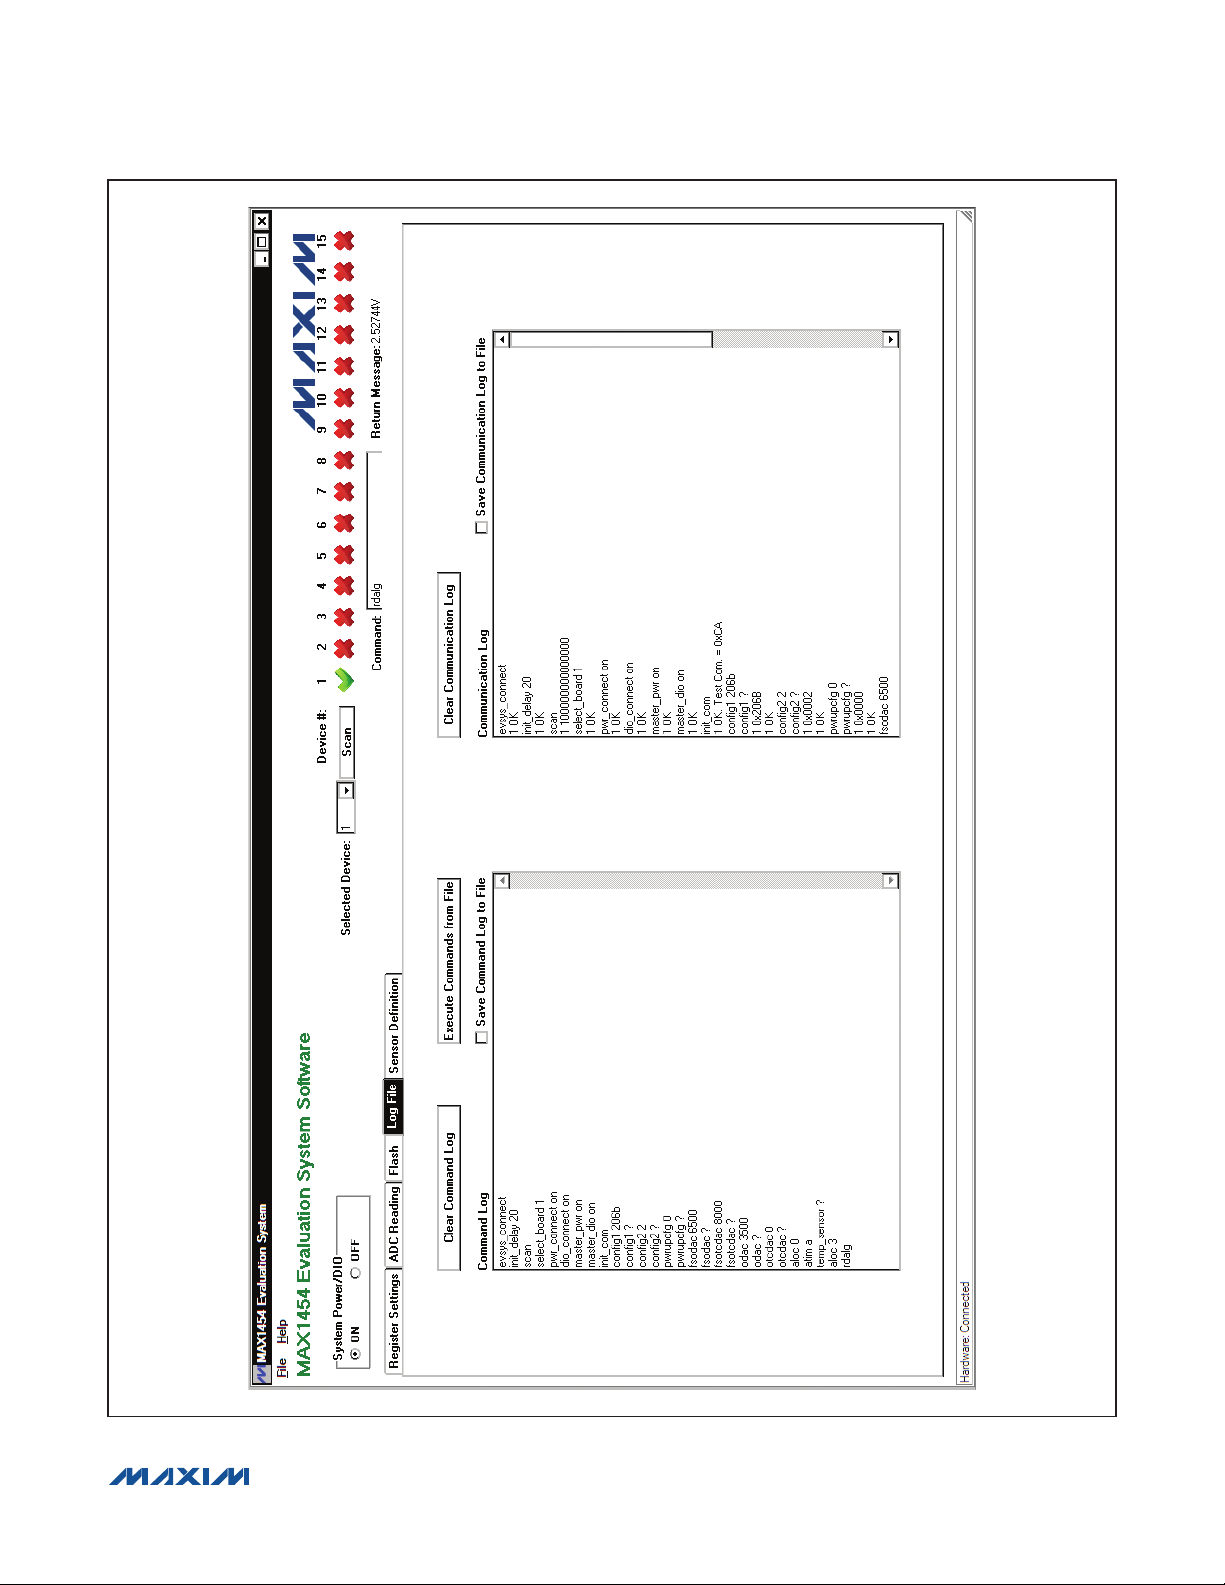
Log File Tab
In the Log File tab sheet (Figure 6), the Command
Log memo box logs the interpreter commands (see the
Interpreter Definition section) that were executed. When
the user checks the Save Command Log to File checkbox, the software begins to record the commands to a file
specified by the user until the Save Command Log to
File checkbox is unchecked. To execute the commands
from a file, press the Execute Commands from File but-
ton. To clear the Command Log memo box, press the
Clear Command Log button.
The Communication Log memo box is very similar to
the Command Log memo box. The difference is that the
Communication Log logs both the executed interpreter
commands and the return messages from the EV system.
Check the Save Communication Log to File checkbox
to start saving the commands and return messages
to a file. Press the Clear Communication Log button
to clear the Communication Log. Uncheck the Save
Communication Log to File checkbox to stop saving
the commands and return messages to a file.
_________________________________________________________________ Maxim Integrated Products 8
Page 9
MAX1454 Evaluation System
Evaluates: MAX1454
Figure 4. MAX1454 EV System Software Main Window (ADC Reading Tab)
_________________________________________________________________ Maxim Integrated Products 9
Page 10
MAX1454 Evaluation System
Evaluates: MAX1454
Figure 5. MAX1454 EV System Software Main Window (Flash Tab)
________________________________________________________________ Maxim Integrated Products 10
Page 11
MAX1454 Evaluation System
Evaluates: MAX1454
Figure 6. MAX1454 EV System Software Main Window (Log File Tab)
________________________________________________________________ Maxim Integrated Products 11
Page 12

MAX1454 Evaluation System
Evaluates: MAX1454
Figure 7. MAX1454 EV System Software Main Window (Sensor Definition Tab)
________________________________________________________________ Maxim Integrated Products 12
Page 13

MAX1454 Evaluation System
Evaluates: MAX1454
Sensor Definition Tab
On the Sensor Definition tab sheet (Figure 7), fill out
the required information in the Sensor Information and
Application Information group boxes, then press the
Calculate button. The software calculates the appro-
priate FSODAC, ODAC, FSOTCDAC, IRO, PGA, and
CMRATIO values based on the given information. The
calculated values are intended to bring the MAX1454
in the linear range and produce an output around the
specified offset and span. The calculated values should
be appropriate as starting values for the compensation
process. In some instances, it may be required to adjust
the PGA and/or DAC value. Sensor definition equations
are listed in Table 3.
Table 3. Sensor Definition Equations
PARAMETER EQUATION
In Voltage Excitation Mode:
VBDR
VDDX
× × + × × + × ×
× × ×
2 CMRATIO RBDR VDDX
4 9
FSODAC
FSODAC 65535
In Current Excitation Mode:
FSODAC
If the calculated FSODAC is negative, set FSODAC = 0.
If the calculated FSODAC is greater than 65535, set FSODAC = 65535.
CMRATIO: See CMRATIO equation
FSOTCDAC: See FSOTCDAC equation
VBDR (V) is the Target Bridge Excitation voltage specified by user
RBDR (I) is the sensor Bridge Resistance specified by user
VDDX (V) is the External Supply Voltage specified by user
= ×
CMRATIO (FSOTCDAC VBDR 3.5 10 ) RBDR 3.9321 10 VBDR
=
FSOTCDAC
In Voltage Excitation Mode:
FSOTCDAC 0=
In Current Excitation Mode:
TCi TCR 393210 Ri
− ×
FSOTCDAC 1
If TCS and/or TCR is not specified, set FSOTCDAC = 0
If the calculated FSOTCDAC is negative, set FSOTCDAC = 0.
If the calculated FSOTCDAC is greater than 65535, set FSOTCDAC = 65535.
TCi = 600 ppm/NC
Ri = 10kI
CMRATIO: See CMRATIO equation
RBDR (I) is the sensor Bridge Resistance specified by user
TCR (ppm/NC) and TCS (ppm/NC ) are sensor’s temperature coefficient of the sensor Bridge Resistance and
Sensitivity, respectively, specified by user
= − ×
TCS CMRATIO RBDR
×
________________________________________________________________ Maxim Integrated Products 13
Page 14

MAX1454 Evaluation System
Virodac 0.744 IRO_Index VDDX
input_offset sensor_offset VBDR
desired_offset (input_offset Virodac) PGA_gain
ODAC 65535 65535
VDDX VDDX 1000
VBDR
OTCDAC
VDDX
= × ×
= ×
+ ×
= × × ×
×
− ×
input_offset sensor_offset VBDR
input_offset
IRO% 100
VDDX 1000
IRO%
IRO_index ( 1) ROUND
0.0744
= ×
= ×
×
= − ×
1000
gain Desired_Span
Sensitivity VBDR
PGA_Index Select index of first valuelarger thangain from Table 7 in MAX1454 IC data sheet
= ×
×
=
Table 3. Sensor Definition Equations (continued)
PARAMETER EQUATION
ODAC
If the calculated ODAC is negative, set ODAC = 0.
If the calculated ODAC is greater than 65535, set ODAC = 65535.
IRO_index: See IRO Index equation
VDDX (V) is External Supply Voltage specified by user
Sensor_Offset (mV/V) is sensor offset specified by user
Desired_Offset (V) is the target calibrated offset specified by user
OTCDAC is value of OTCDAC specified by user
VBDR (V) is the Target Bridge Excitation voltage specified by user
PGA_gain (V/V) is calculated signal path gain
Evaluates: MAX1454
IRO Index
PGA Index
CMRATIO
If the calculated |IRO_index| is greater than 15, set |IRO_index| to 15.
VDDX (V) is External Supply Voltage specified by user
Sensor_Offset (mV/V) is sensor offset specified by user
VBDR (V) is the Target Bridge Excitation voltage specified by user
ROUND() function rounds the input value to the nearest integer
Desired_Span (V) is the target calibrated output span, specified by user
Sensitivity (mV/V) is the sensor sensitivity, specified by user
Select CMRATIO from below, based on the value of RBDR
CMRATIO Range
6 RBDR R 8k
12 4k P RBDR < 8k
18 2.7k P RBDR < 4k
30 RBDR < 2.7k
RBDR (I) is the sensor Bridge Resistance specified by user
________________________________________________________________ Maxim Integrated Products 14
Page 15

MAX1454 Evaluation System
Evaluates: MAX1454
Detailed Description of Hardware
The MAX1454 EV system includes one MAX1454
master board and one MAX1454 EV board. The EV
system provides a proven design to evaluate up to 15
MAX1454 precision sensor signal conditioners. The EV
system also includes Windows XP-, Windows Vista-,
and Windows 7-compatible software that provide a
simple graphical user interface (GUI) for exercising the
features of the IC. The master board includes interface
circuitry to communicate between the IC and the host
computer, circuitry to address each of the 15 devices in
a fully loaded system, and circuitry to connect to the EV
board in position 1. The EV board comes installed with
a MAX1454AUE/V+ in a 16-pin TSSOP package. The
daughter board includes circuitry and relays to connect
to the EV board. Each position in the system, with the
exception of position 1, requires a daughter board and
an EV board. Figure 1 shows how the EV system and DB
system should be connected.
Connections
To connect the EV board to the master board, connect
the J3 connector on the master board to the J1 connector
on the EV board with the flex cable. Similarly, to connect
the EV board to the daughter board, connect the J3 connector on the daughter board to the J1 connector on the
EV board with the flex cable.
Carefully connect the master board and the daughter
board by aligning the 20-pin right-angle header (J1) on
the daughter board with the 20-pin right-angle connector
(J2) on the master board. Gently press them together.
If more daughter boards need to be cascaded to the
EV system, connect the 20-pin connector (J2) on the
last daughter board with the 20-pin connector (J1) on
the additional daughter board. Use the USB AB cable to
connect the EV system to the computer.
Power Supply
By default, the master board and the EV board are USB
powered. To use an external power supply for the digital
circuits, connect a 5V supply to the DVDD and DGND
terminals, and place the shunt on jumper JU1 on the
master board in the 2-3 position. The digital circuitry of
the daughter board is powered by the master board.
To use an external power supply for a daughter board,
connect a 5.5V supply to the DVDD and GND terminals,
and place the shunt on jumper JU1 on the daughter
board in the 2-3 position.
To use an external power supply for the MAX1454 (on the
EV board), apply power to the EXT_VDD and GND terminals on the master board and place the shunt on jumper
JU5 in the 1-3 position. The power-supply voltage should
be set between 3V and 5.5V.
Power LED
The master board has a power indicator. When the
master board is powered up, LED2 (next to the RESET
switch) lights up.
Active Device LED
Only one MAX1454 device can be powered and in communication with the controller at a time. The active device
is selected in the EV system software, and the corresponding selected device LED1 on the master board or
daughter board lights up.
Sensors
The EV board has an on-board S2 socket and an S1
footprint for the user to install the sensor.
Interpreter Definition
The interpreter is a DLL function that the user can import
to his software to communicate with the EV system
Function Definition
// cmd = Command string
// msg = Return message string
extern “C” int __stdcall __declspec(dllexport) interpreter
(char *cmd, char *msg);
Table 4. Interpreter Return Values
FUNCTION RETURN VALUE DESCRIPTION
0 Board-connection error
1 Command executed successfully
2 Syntax error
3 Communication error
________________________________________________________________ Maxim Integrated Products 15
Page 16

Table 5. EV System-Related Commands
MAX1454 Evaluation System
Evaluates: MAX1454
COMMAND
(char *cmd)
evsys_connect “OK”/“Failed” Connect to the EV system evsys_connect
evsys_disconnect “OK”/“Failed” Disconnect from the EV system evsys_disconnect
select_board board# “OK”/“Failed”
pwr_connect on/off “OK”/“Failed”
dio_connect on/off “OK”/“Failed”
master_pwr on/off “OK”/“Failed”
master_dio on/off “OK”/“Failed”
RETURN MESSAGE
(char *msg)
DESCRIPTION EXAMPLE
Selects the active board
board# (in decimal)
board# 1 = master board
board# 2 = first cascaded daughter board
etc.
Turn on/off the power relay on the selected
active board
Turn on/off the DIO relay on the selected active
board
Turn on/off the master power relay on the
master board
Turn on/off the master DIO relay on the master
board
select_board 15
pwr_connect on
dio_connect on
master_pwr on
master_dio on
Table 6. Read/Write Commands
COMMAND
(char *cmd)
flash_read_byte addr value/“Failed”
flash_write_byte addr value “OK”/“Failed”
flash_read_page page_num 512-byte data/“Failed” Read a page of data from flash flash_read_page 1
flash_write_page page_num
512_byte_data
flash_page_erase page_
num
flash_erase “OK”/“Failed” Erase the whole flash flash_erase
RETURN MESSAGE
(char *msg)
Read a byte from flash at address addr
(11-bit hex)
Write 1 byte of data (value) to the flash at
address addr (11-bit hex)
“OK”/“Failed”
“OK”/“Failed” Erase a page on the flash flash_page_erase 1
Write 512 bytes of data to the flash on
page page_num
DESCRIPTION EXAMPLE
flash_read_byte 3ff
flash_write_byte 016a ff
flash_wrt_page 1
0123456789abcdef...
________________________________________________________________ Maxim Integrated Products 16
Page 17

MAX1454 Evaluation System
Table 7. Register Read/Write Commands
Evaluates: MAX1454
COMMAND
(char *cmd)
config1 value “OK”/“Failed” Write 16-bit hex (value) to the CONFIG1 register config1 abcd
config1 ? value/“Failed” Read CONFIG1 register config1 ?
pga value “OK”/“Failed”
pga ? value/“Failed” Read PGA[4:0] value from the CONFIG1 register pga ?
pga_sign value “OK”/“Failed”
pga_sign ? value/“Failed” Read PGA Sign value from the CONFIG1 register pga_sign ?
iro_sign value “OK”/“Failed”
iro_sign ? value/“Failed” Read IRO Sign value from the CONFIG1 register iro_sign ?
iro value “OK”/“Failed”
iro ? value/“Failed” Read IRO[3:0] value from the CONFIG1 register iro ?
cmratio value “OK”/“Failed”
cmratio ? value/“Failed” Read CMRATIO[1:0] value from the CONFIG1 register cmratio ?
odac_sign value “OK”/“Failed”
odac_sign ? value/“Failed” Read ODAC Sign value from the CONFIG1 register odac_sign ?
otcdac_sign value “OK”/“Failed”
otcdac_sign ? value/“Failed” Read OTCDAC Sign value from the CONFIG1 register otcdac_sign ?
RETURN MESSAGE
(char *msg)
DESCRIPTION EXAMPLE
Write 5-bit hex (value) to the PGA[4:0] bit field of the
CONFIG1 register
Write 1-bit hex (value) to the PGA Sign bit field of the
CONFIG1 register
Write 1-bit hex (value) to the IRO Sign bit field of the
CONFIG1 register
Write 4-bit hex (value) to the IRO[3:0] bit field of the
CONFIG1 register
Write 2-bit hex (value) to the CMRATIO[1:0] bit field of the
CONFIG1 register
Write 1-bit hex (value) to the ODAC Sign bit field of the
CONFIG1 register
Write 1-bit hex (value) to the OTCDAC Sign bit field of the
CONFIG1 register
pga 1a
pga_sign 0
iro_sign 0
iro a
cmratio a
odac_sign 0
otcdac_sign 0
config2 value “OK”/“Failed” Write 16-bit hex (value) to the CONFIG2 register config2 abcd
config2 ? value/“Failed” Read CONFIG2 register config2 ?
enfdet value “OK”/“Failed”
enfdet ? value/“Failed” Read ENFDET value from the CONFIG2 register enfdet ?
refrate value “OK”/“Failed”
refrate ? value/“Failed” Read REFRATE[1:0] value from the CONFIG2 register refrate ?
enpullup value “OK”/“Failed”
enpullup ? value/“Failed” Read ENPULLUP value from the CONFIG2 register enpullup ?
readdly value “OK”/“Failed”
readdly ? value/“Failed” Read READDLY[1:0] value from the CONFIG2 register readdly ?
excimode value “OK”/“Failed”
excimode ? value/“Failed” Read EXCIMODE value from the CONFIG2 register excimode ?
odac value “OK”/“Failed” Write 16-bit hex (value) to the ODAC register odac 0
odac ? value/“Failed” Read ODAC register odac ?
otcdac value “OK”/“Failed” Write 16-bit hex (value) to the OTCDAC register otcdac abcd
otcdac ? value/“Failed” Read OTCDAC register otcdac ?
________________________________________________________________ Maxim Integrated Products 17
Write 1-bit hex (value) to the ENFDET bit field of the
CONFIG2 register
Write 2-bit hex (value) to the REFRATE[1:0] bit field of the
CONFIG2 register
Write 1-bit hex (value) to the ENPULLUP bit field of the
CONFIG2 register
Write 2-bit hex (value) to the READDLY[1:0] bit field of the
CONFIG2 register
Write 1-bit hex (value) to the EXCIMODE bit field of the
CONFIG2 register
enfdet 0
refrate 2
enpullup 0
readdly 2
excimode 0
Page 18

MAX1454 Evaluation System
Table 7. Register Read/Write Commands (continued)
Evaluates: MAX1454
COMMAND
(char *cmd)
fsodac value “OK”/“Failed” Write 16-bit hex (value) to the FSODAC register fsodac 0
fsodac ? value/“Failed” Read FSODAC register fsodac ?
fsotcdac value “OK”/“Failed” Write 16-bit hex (value) to the FSOTCDAC register fsotcdac abcd
fsotcdac ? value/“Failed” Read FSOTCDAC register fsotcdac ?
pwrupcfg value “OK”/“Failed” Write 16-bit hex (value) to the PWRUPCFG register pwrupcfg abcd
pwrupcfg ? value/“Failed” Read PWRUPCFG register pwrupcfg ?
digmodetime value “OK”/“Failed”
digmodetime ? value/“Failed”
ctrlrep value “OK”/“Failed”
ctrlrep ? value/“Failed” Read CTRLREP[2:0] value from the PWRUPCFG register ctrlrep ?
RETURN MESSAGE
(char *msg)
DESCRIPTION EXAMPLE
Write 4-bit hex (value) to the DIGMODETIME[3:0] bit field
of the PWRUPCFG register
Read DIGMODETIME[3:0] value from the PWRUPCFG
register
Write 3-bit hex (value) to the CTRLREP[2:0] bit field of the
PWRUPCFG register
digmodetime a
digmodetime ?
ctrlrep 7
Table 8. Additional Commands
COMMAND
(char *cmd)
init_com “OK”/“Failed” Power cycle and initialize communication init_com
init_delay 8bit_value “OK”/“Failed”
init_delay ? value/“Failed” Read initial delay parameter init_delay ?
read_test_com_reg “CA”/“Failed”
rdalg
swtoana “OK”/“Failed” Switch to fixed analog mode swtoana
read_adc
relearn_baud “OK”/“Failed” relearn the baud rate relearn_baud
temp_sensor ? value/“Failed” Read temperature sensor register temp_sensor ?
aloc value “OK”/“Failed” Write 5-bit hex (value) to the ALOC register aloc 15
aloc ? value/“Failed” Read ALOC register aloc ?
atim value “OK”/“Failed” Write 4-bit hex (value) to the ATIM register atim f
atim ? value/“Failed” Read ATIM register atim ?
scan a string of 1/0/“Failed”
dll_version ?
maxq_version ?
RETURN MESSAGE
(char *msg)
OUT/DIO Voltage +
“V”/“Failed”
OUT/DIO Voltage +
“V”/“Failed”
“DLL version =”
#.##/“Failed”
“MAXQ version =”
#.##/“Failed”
DESCRIPTION EXAMPLE
Insert delay between closing the power relay and sending
the initial byte to the device.
Delay = 0.5ms+8bit_value x 0.1ms
Read the test communication register. It should return
CAhex
Output the multiplexed analog signal onto OUT/DIO. The
on-board ADC automatically reads the voltage on the
OUT/DIO pin and returns the data to the PC.
On-board ADC conversion read_adc
Send test communication command to all 15 devices.
Return a character string of 1/0 that indicates which
devices are functioning.
e.g., “101111111111111”
this means the 2nd device doesn’t respond to the test
communication command
Return the DLL version dll_version ?
Return the MAXQ FW version maxq_version ?
init_delay 20
read_test_com_reg
rdalg
scan
________________________________________________________________ Maxim Integrated Products 18
Page 19

MAX1454 Evaluation System
Evaluates: MAX1454
Figure 8a. MAX1454 Master Board Schematic (Sheet 1 of 6)
________________________________________________________________ Maxim Integrated Products 19
Page 20

MAX1454 Evaluation System
Evaluates: MAX1454
Figure 8b. MAX1454 Master Board Schematic (Sheet 2 of 6)
________________________________________________________________ Maxim Integrated Products 20
Page 21

MAX1454 Evaluation System
Evaluates: MAX1454
Figure 8c. MAX1454 Master Board Schematic (Sheet 3 of 6)
________________________________________________________________ Maxim Integrated Products 21
Page 22

MAX1454 Evaluation System
Evaluates: MAX1454
Figure 8d. MAX1454 Master Board Schematic (Sheet 4 of 6)
________________________________________________________________ Maxim Integrated Products 22
Page 23

MAX1454 Evaluation System
Evaluates: MAX1454
Figure 8e. MAX1454 Master Board Schematic (Sheet 5 of 6)
________________________________________________________________ Maxim Integrated Products 23
Page 24

MAX1454 Evaluation System
Evaluates: MAX1454
Figure 8f. MAX1454 Master Board Schematic (Sheet 6 of 6)
________________________________________________________________ Maxim Integrated Products 24
Page 25

MAX1454 Evaluation System
Evaluates: MAX1454
Figure 9a. MAX1454 Daughter Board Schematic (Sheet 1 of 2)
________________________________________________________________ Maxim Integrated Products 25
Page 26

MAX1454 Evaluation System
Evaluates: MAX1454
Figure 9b. MAX1454 Daughter Board Schematic (Sheet 2 of 2)
________________________________________________________________ Maxim Integrated Products 26
Page 27

MAX1454 Evaluation System
Evaluates: MAX1454
Figure 10. MAX1454 EV Kit Schematic
________________________________________________________________ Maxim Integrated Products 27
Page 28

MAX1454 Evaluation System
Evaluates: MAX1454
Figure 11. MAX1454 Master Board Component Placement Guide—Component Side
________________________________________________________________ Maxim Integrated Products 28
1.0’’
Page 29

MAX1454 Evaluation System
Evaluates: MAX1454
Figure 12. MAX1454 Master Board Component Placement Guide—Bottom Side
________________________________________________________________ Maxim Integrated Products 29
1.0’’
Page 30

MAX1454 Evaluation System
Evaluates: MAX1454
Figure 13. MAX1454 Master Board PCB Layout—Component Side
________________________________________________________________ Maxim Integrated Products 30
1.0’’
Page 31

MAX1454 Evaluation System
Evaluates: MAX1454
Figure 14. MAX1454 Master Board PCB Layout—Bottom Side
________________________________________________________________ Maxim Integrated Products 31
1.0’’
Page 32

MAX1454 Evaluation System
Evaluates: MAX1454
1.0’’
Figure 15. MAX1454 Daughter Board Component Placement
Guide—Component Side
1.0’’
Figure 16. MAX1454 Daughter Board PCB Layout—
Component Side
1.0’’
Figure 17. MAX1454 Daughter Board PCB Layout—Bottom
Side
________________________________________________________________ Maxim Integrated Products 32
Page 33

MAX1454 Evaluation System
Evaluates: MAX1454
1.0’’
Figure 18. MAX1454 EV Kit Component Placement Guide—
Component Side
1.0’’
Figure 20. MAX1454 EV Kit Component Placement Guide—
Bottom Side
1.0’’ 1.0’’
Figure 19. MAX1454 EV Kit PCB Layout—Component Side
________________________________________________________________ Maxim Integrated Products 33
Figure 21. MAX1454 EV Kit PCB Layout—Bottom Side
Page 34

PART TYPE INCLUDES
MAX1454EVSYS#
MAX1454DBSYS#
#Denotes RoHS compliant.
MAX1454 Evaluation System
Ordering Information
EV
System
DB
System
MAX1454 Master Board,
MAX1454 EV Board
MAX1454 Daughter
Board,
MAX1454 EV Board
Evaluates: MAX1454
________________________________________________________________ Maxim Integrated Products 34
Page 35

MAX1454 Evaluation System
Evaluates: MAX1454
Revision History
REVISION
NUMBER
0 10/11 Initial release —
REVISION
DATE
DESCRIPTION
PAGES
CHANGED
Maxim cannot assume responsibility for use of any circuitry other than circuitry entirely embodied in a Maxim product. No circuit patent licenses are implied.
Maxim reserves the right to change the circuitry and specifications without notice at any time.
Maxim Integrated Products, 120 San Gabriel Drive, Sunnyvale, CA 94086 408-737-7600 35
©
2011 Maxim Integrated Products Maxim is a registered trademark of Maxim Integrated Products, Inc.
 Loading...