

Page 1
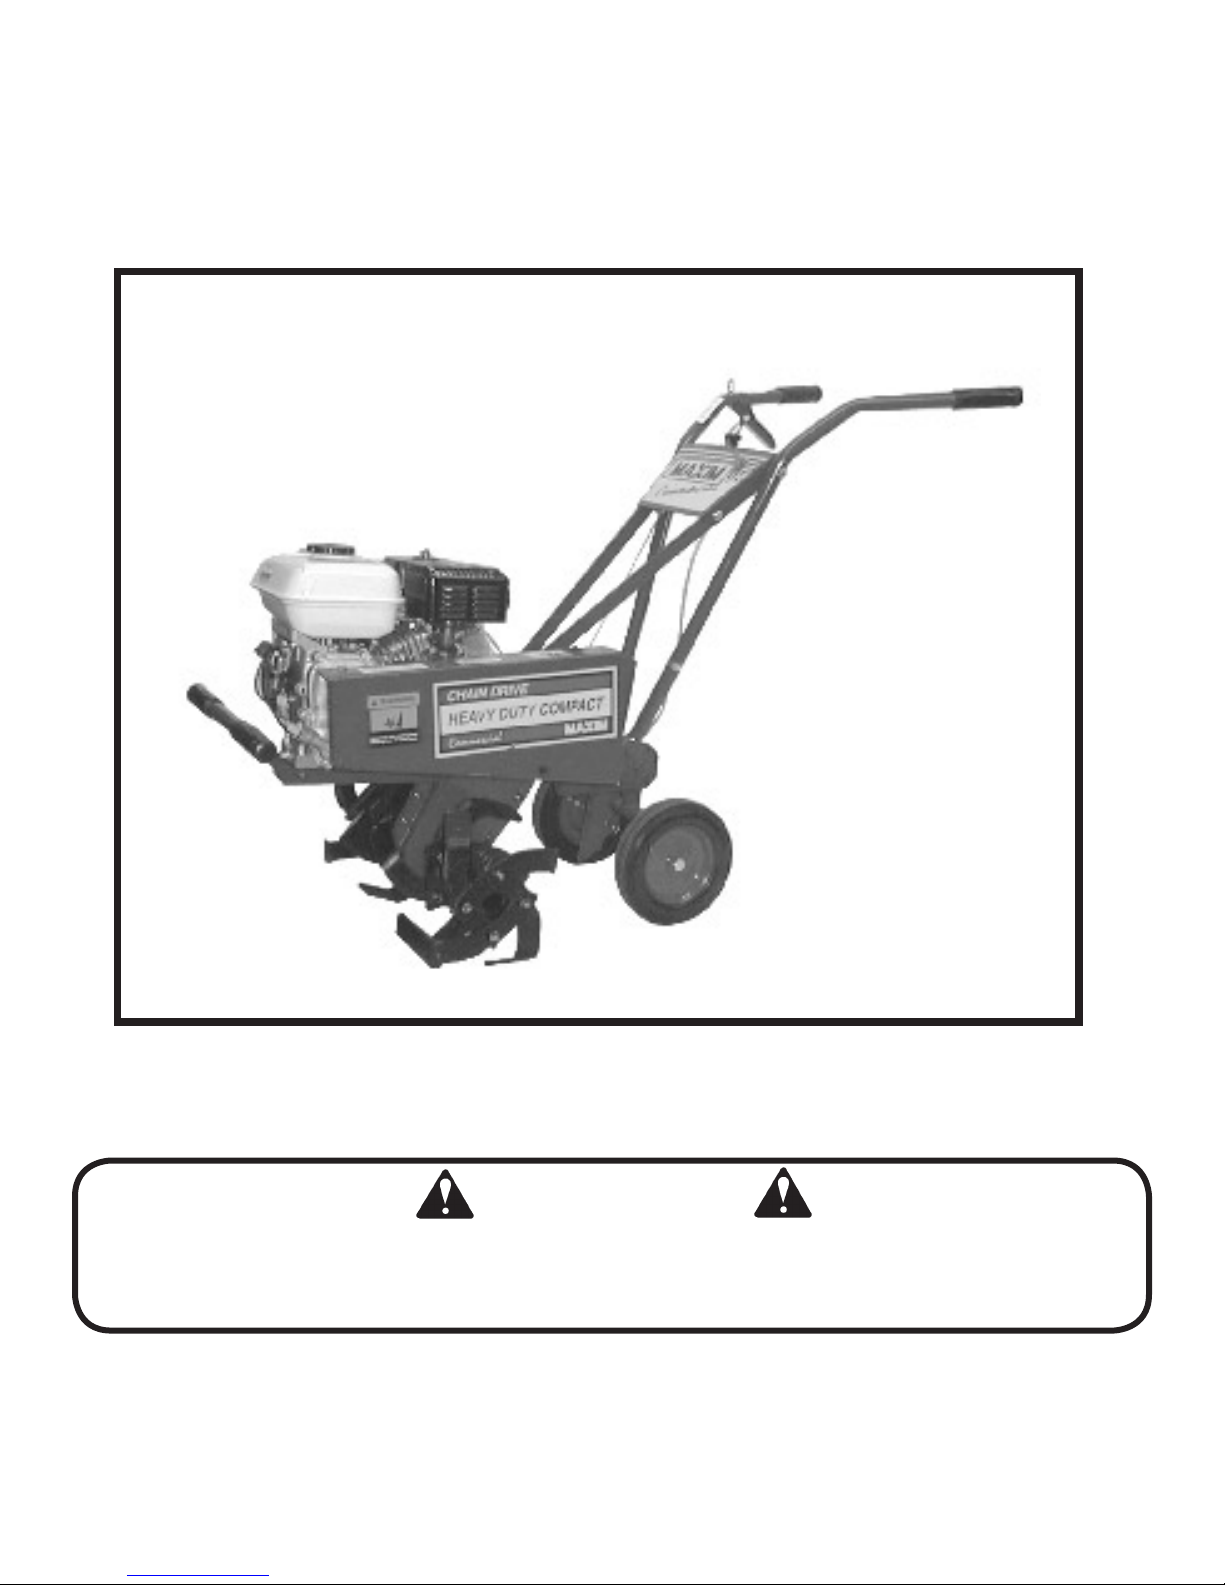
Maxim Chain Drive Tiller
Operator’s Manual and Parts List
Model RM4H
M30B • RM30B • RM4H
WARNING
If incorrectly used this machine can cause severe injury. Those who use and maintain the
machine should be trained in its proper use, warned of its dangers, and should read the
entire manual before attempting to set up, operate, adjust or service the machine.
READ THIS MANUAL.
RETAIN IT FOR FUTURE REFERENCE.
Page 2

2
SAFE PRACTICES FOR GARDEN TILLERS
TRAINING
Regard your tiller as a piece of power equipment and teach
this respect to all who operate it.
Read the owner’s manual carefully. Be thoroughly familiar
with the controls and proper use of the equipment. Know
how to stop the unit and disengage the controls quickly.
Never allow children to operate equipment. Never allow
adults to operate equipment without proper instruction.
Keep the area of operation clear of all persons, especially
small children.
Exercise caution to avoid slipping and falling.
PREPARATION
Check the tiller to make certain it is in good operating condition.
Check tines to be sure they are free of any obstruction.
Check engine crankcase oil level.
Unless there is very good articial light operate during day-
light hours only.
Do not operate power tools in wet soil, which clogs the
cutter and increases the danger of your slipping and falling
and possibly coming into contact with the tines.
Thoroughly inspect the area where the equipment is to be
used and remove all large stones, boards, wires, and other
foreign objects.
Do not operate machine when barefoot or wearing open
sandals. Wear strong work-type footwear which will
improve footing and provide optimum protection. Provide
leg protection by means of long, heavy denim trousers and
brogues.
Check that clutch is disengaged before starting engine.
Handle fuel with care; it is highly ammable.
• Use approved fuel container.
• Never add fuel to a running engine or hot engine.
• Fill fuel tank outdoors with extreme care. Never ll fuel
tank while smoking.
• Replace gasoline cap securely and wipe up spilled fuel.
Never attempt to make any adjustments while engine is
running except carburetor mixture as instructed in the engine owner’s guide.
Allow engine sufcient warm-up period before tilling.
OPERATION
Give complete and undivided attention to the job at hand.
Familiarize yourself with the controls. Be sure you know
how to stop your machine quickly. Do not start engine until
you set machine on ground to be tilled.
Hold the handle with your left hand while pulling the starter
rope with your right. Be sure the machine will not tip or roll
during the starting operation.
Stay clear of the front of self-propelled machine during
and after starting. Do not put hands or feet near rotating
tines or belt when machine is operating. Once machine is
started stand behind it with hands on handles at all times.
Keep in step with machine. Do not lag behind or let it pull
you so you will not be in full command of the machine.
Control the direction of the machine by hand pressure on
the handle, not by foot pressure on the machine housing.
Stay alert for hidden hazards.
When operating over uneven terrain and slopes, use
extreme care and make sure of solid and rm footing at all
times.
Exercise special care when operating around objects to
prevent the tines from striking them and never deliberately
operate over any object.
After striking a foreign object, stop the engine, remove wire
from spark plug, thoroughly inspect the tiller for any damage and repair the damage before restarting and operating
the tiller.
If the unit should start to vibrate abnormally, stop the
engine and check immediately for the cause. Vibration is
generally a warning of trouble.
Stop operation when another person approaches.
Stop the engine whenever you leave the operating position
before making any repairs, adjustment, or inspections.
Stop the engine whenever leaving the tiller unattended.
When cleaning, repairing, or inspecting make certain tines
and all moving parts have stopped. Disconnect spark plug
wire and keep wire away from plug to prevent accidental
starting.
Do not run engine indoors.
Exercise extreme caution when changing direction on
slopes. Do not attempt to till steep slopes.
Never operate tiller without guards, plates, or other safety
protective devices in place.
Never operate tiller near glass enclosure, automobiles,
window wells, drop-offs, or bystanders. Keep children and
pets away.
Do not over load machine capacity by attempting to till
ground at too fast a rate.
Use care when backing.
Never allow anyone in front of unit. Disengage clutch,
when someone approaches, when transporting or when not
in use.
Use only attachments and accessories approved by manufacturer of tiller.
Never operate tiller without good visibility or light. Always
be sure of your footing and keep a rm hold on the handles
and walk, never run.
MAINTENANCE AND STORAGE
Follow the recommendations for maintenance described in
this manual and engine literature.
Have a competent service man make a thorough inspection
of the tiller before the season begins.
Check shear bolts and engine mounting bolts at frequent
intervals for proper tightness to be sure equipment is in
safe working condition. Check that the engine stop circuit
is intact.
Never adjust the machine or change attachments until the
engine has been turned off and the spark plug wire discon-
Page 3

Continued from page 2
nected. It is possible that the engine could start while making an adjustment or repair.
If carburetor adjustment is necessary, stand to one side
and keep feet and hands in the clear while making adjustments.
Keep engine free from accumulations of grass, leaves, or
excessive grease. An accumulation of these combustible
materials may result in a re.
Store gasoline in a safe container. Store the container in
a cool, dry place, not in the house or near heating appliances.
Never store machine with fuel in the fuel tank inside a building where open ame or sparks are present. Allow engine
to cool before storing in any enclosure.
Keep the machine and fuel container in locked storage to
prevent children from playing and tampering with them.
Maximum operating results and safety can only be expected if the machine is maintained and operated correctly.
Always refer to operator’s manual for important details if
tiller is to be stored for extended period.
IMPORTANT: THIS UNIT IS EQUIPPED WITH AN INTERNAL COMBUSTION ENGINE, AND SHOULD
NOT BE USED ON OR NEAR ANY UNIMPROVED FOREST-COVERED, BRUSH COVERED OR GRASS
COVERED LAND UNLESS THE ENGINE’S EXHAUST SYSTEM IS EQUIPPED WITH A SPARK ARRESTER MEETING APPLICABLE LOCAL LAWS (IF ANY). IF A SPARK ARRESTER IS USED, IF SHOULD BE
MAINTAINED IN EFFECTIVE WORKING ORDER BY THE OPERATOR.
IN THE STATE OF CALIFORNIA A SPARK ARRESTER IS REQUIRED BY LAW (SECTION 4442 OF
THE CALIFORNIA PUBLIC RESOURCES CODE). OTHER STATES MAY HAVE SIMILAR LAWS. FEDERAL LAWS APPLY ON FEDERAL LANDS. SEE YOUR AUTHORIZED SERVICE CENTER FOR A
SPARK ARRESTER.
3
WARNING
The engine exhaust from this product contains chemicals know to the State of
California to cause cancer, birth defects, or other reproductive harm.
Specications
Engine: Briggs & Stratton 4 cycle
3HP #92202 Type 1264
Air Cleaner: Replaceable Paper Element
Fuel Tank: 3 Quarts
Throttle: One Handle Panel
Transmission: Roller chain and sprocket,
sealed and running in oil.
Tines: 11” Bolo, self sharpening, non wininding,
forged steel
Tine Speed: Approximately 150 RPM maximum
Tilling Width: 14” to 23” standard
Tilling Depth: Up to 8”
Handle: 14 gauge seamless tubular steel with
braces
Clutch: Hand controlled belt tightener
Frame: All steel, welded and braced
Wheels: 7 x 1.75
Approximate Shipping Weight:.
3hp -- 85 lbs.
Safe Practices for Garden Tillers 2-3
Specications 3
Set-Up Instructions 4-5
General Information 5
Operation 6
Adjustments 7
Maintenance 7
Parts Lists 8-11
Warranty 12
Contents
Page 4
4
SET UP INSTRUCTIONS
UNPACKING
Do not attempt to lift the tiller from the carton.
After opening the top, cut all four corners and lay
the sides at on the oor or working space. Take
out all unassembled parts, bag of parts, and protective packing. Be careful not to kink the control
cables.
DEFINITION OF DIRECTIONS
As used throughout this manual, the following
denitions apply: “Right” and “Left” refer to the
operator’s right and left when standing behind the
machine in the normal operating position. “Forward” and “Rearward” likewise to directions from
the viewpoint of the operator.
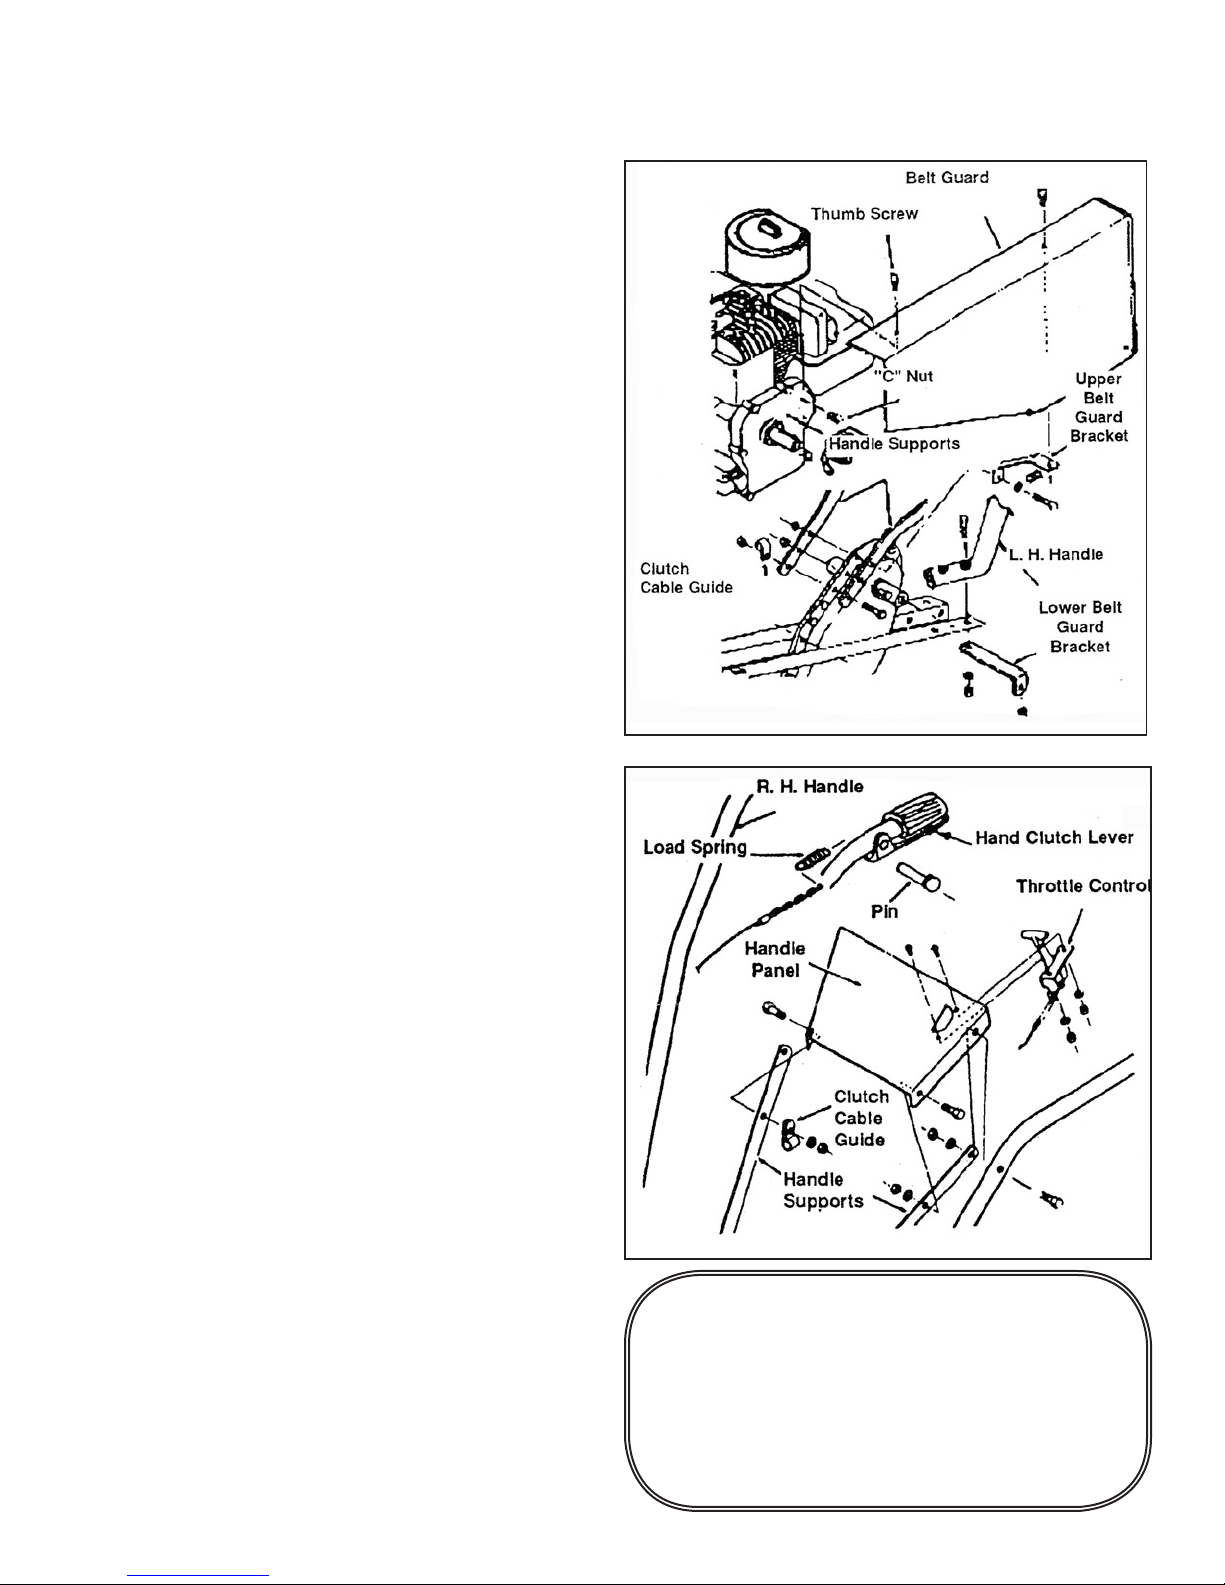
ASSEMBLY OF HANDLE BARS (Figures 2 & 3)
1. Attach the lower end of the handle bars to the
rear of the chassis using four bolts, lock washers, and nuts supplied. Assemble nuts but do not
tighten. Note that the lower belt cover bracket
goes under the chassis on the left rear handle
bar bolt.
Figure 2
2. Assemble the handle bar support brackets to
the transmission. Note the location of the clutch
cable guide. Assemble nuts but do not tighten.
3. Assemble the Handle Panel to the handle bars
and supports. Note the location of the clutch
cable guide.
4. Tighten all bolts and nuts.
5. Assemble the throttle control to the underside
of the panel. Secure the cable to the left handle
bar with the clip supplied.
6. Assemble the clutch spring to the clutch lever on the handle bar. Crimp lightly so it cannot
come off.
7. Route the loop in the end of the clutch cable
down through the two cable guides and attach it
level on the idler arm weldment. Attach the chain
on the other end to the spring on the clutch lever.
Select a loop that will stretch the spring slightly
when the clutch lever is pulled against the handle
bar.
8. With the throttle control in the “OFF” position
and the clutch lever released, pull the engine
starter rope several times to be sure that the tines
do not turn.
Figure 3
IMPORTANT
ENGINE IS SHIPPED FROM
FACTORY WITHOUT OIL. DO
NOT START ENGINE WITHOUT
ADDING OIL.
Page 5

SET UP INSTRUCTIONS CONTINUED
TINE ASSEMBLY (Figure 4)
Assemble the inner tine assemblies to the transmission. Secure with clevis and hair pins. The
short end of the tube goes next to the transmission. Be sure the cutting edge of the blade faces
the direction of rotation. Assemble the out tines
to the inner tine tubes and secure with hair pins
and clevis pins.
FINAL SETUP (Figure 5)
1. Remove the oil ll plug from the engine. With
the unit sitting level, ll the crankcase with oil.
See the engine instruction manual for type and
further directions (Figure 5).
2. Fill the gas tank with clean, fresh, regular
grade gasoline. Do not mix oil and gas.
5
Figure 4
Figure 5
3. When cranking the unit, be sure no one is
standing in front or near the unit. Check for
proper operation of the clutch lever (see page 7).
GENERAL INFORMATION
The Maxim Chain Drive is the most versatile power unit ever developed for the home gardener and
does a soil preparation job second to none, so a few minutes spent in studying the following instructions will pay many dividends.
The tiller will dig deeper and move forward slower by pushing down on the handles, and it will go
ahead faster but at a shallower depth by raising up on the handles. The speed of the rotors is controlled by the use of the throttle.
To control the depth of tilling, the tiller must be operated with both the proper throttle speed and correct up and down hand pressure on the handles. Raising up means going forward. This action
releases the grip of the drag stake in the soil, allowing the tiller to progress ahead. Pushing down
means slowing down or even standing still. This directs the drag stake into the soil, thus holding the
tiller back. Adjust throttle for desired speed of rotors.
When a person is rst learning the proper use of the tiller, it is not unlikely that he will encounter an
uneven or “buckling” action in the operation of this machine. A little practice will accustom the operator on how to overcome this. Never push on the machine if it has dug itself into a depth of six or more
inches in order to get it to move forward. This is accomplished by slightly raising up on the handles
and tilting the machine slowly from on side to the other.
Your tiller has been carefully designed in both workmanship and material. However, by the very nature of its operation, common sense and caution must be employed at all times. Read carefully and
abide by the safety suggestions stated in this operators guide.
Page 6

6
OPERATION
DANGER
For safe operation, the tine drive must disengage immediately when clutch
lever is released. If it does not, adjust belt and cable tension as described in
“ADJUSTMENT” section of this manual.
Never leave the tiller unattended with the engine running because children
might be attracted to a running tiller and could be injured if struck by the rotating tines.
OPERATION OF CHAIN DRIVE TILLER
1. When ground is hard (especially during spring and fall
plowing), place wheels in up position by removing the clevis
pin from the wheel clevis, and repositioning the wheel
frame bar. Replace the clevis pin and the pin clip (Figure
6). For weeding or cultivating, wheels may be left down if
you prefer.
2. Adjust the drag stake for comfortable operation. This
is done by removing the pin clip from the drag stake clevis
pin, removing the clevis pin, and sliding the drag stake up
or down. The drag stake should be set so that when it is
rmly in the ground, and your hands are on the tiller handle,
your arms hang comfortably with the elbows slightly bent.
3. Move the throttle control to center position. Start the engine and allow it to warm up, then set the throttle at about
half speed. After you have become familiar with the tiller,
you may want to run the engine a little faster.
4. Press down rmly on the handles, and then squeeze the
clutch lever. The tines will begin to turn, but the tiller should
not move forward. If it does, don’t pull backwards -- merely
press down harder on the handles. When you nd the right
amount of downward pressure so that the tines are digging
and the tiller is not moving forward, release the pressure
slightly. As you release it you’ll notice the tiller beginning to
move forward.
OPERATING TIPS
To acquire the knack of letting the tiller do the work without
effort on the part of the operator, we offer the following suggestions:
1. Adjust drag stake so the handles are at such a height
that your arms hang straight down to contact them. Rear
wheels should be in up position for deep tillage or ease of
turning in conned areas.
2. Operate the tiller at about three fourths (3/4) throttle.
3. Don’t hurry the job -- proceed at a slow walk -- give the
Figure 6
machine time to do its job.
4. Concentrate on keeping your arms relaxed (There is a
natural tendency for any beginner to tense up.). Operating
the tiller actually takes very little effort. Let the tiller do the
work.
5. When tilling on sloping ground, turn the front of the
machine uphill to sufciently counteract the tendency to run
downhill.
6. For best results, operate at reduced throttle settings
when ground is extremely hard or rough.
7. When cultivating, raise drag stake until the handles are
the proper height as described in Item 1 or set rear wheels
in position. Proceed at a slow walk, watching the rotor as it
tills along the row.
8. Tighten all nuts and bolts periodically.
TILLING PATTERN
Whenever possible till the soil in the direction in which the
planting or rows will run. If the soil is extremely hard and
dry, it may be advisable to till across the plot on the rst
digging and then obtain the depth you want by tilling in the
direction the planting will be done.
IMPORTANT!
KEEP HANDS CLEAR OF BELT AND
TINES WHILE ENGINE IS RUNNING.
TRANSPORT
To transport tiller from garden to storage area, lift the
handles until the drag stake is above ground level, set
the engine throttle at slow speed and walk the tiller on the
tines.
Page 7

ADJUSTMENTS and MAINTENANCE
CLUTCH ADJUSTMENT (Figure 7)
Proper clutch adjustment is very important. Minor adjustment, if needed, can be made by using the links on the
clutch cable chain only. However, the friction type clutch
may need further adjustments as the “V” belt stretches. Adjust as follows:
1. Remove belt guard.
2. Loosen 4 engine mount bolts. Slide engine forward or
backwards as required.
3. Unhook clutch cable from load spring.
4. Push upward on idler pulley to take all slack from the
drive belt. Distance between the inside of belt at the idler
pulley should be between 2 7/8 and 3 1/8 of an inch.
5. Retighten engine mounting bolts.
6. Remove all the slack from clutch cable and hook spring
in proper chain link.
7. Check your adjustment by starting the tiller and holding the tines off the ground. If the tines turn without any
hand pressure on the clutch lever, the adjustment is too
tight. Unhook the clutch load and hook into next chain link
to lengthen clutch cable. If the cable spring on the clutch
handle doesn’t stretch when you hold the clutch handle all
the way in, the adjustment is too loose. Unhook spring end
from chain and hook next link to shorten clutch cable.
7
Figure 7
CHECK TRANSMISSION OIL
Check transmission oil by removing oil level check plug
(See Figure 8). If you cannot see oil from the check plug.
Ret plug and add 90 weight gear oil from the oil ll plug.
Do not overll. This will cause leakage. Recheck level. Oil
should just ooze from Oil level check plug.
Figure 8
CLEAN COOLING SYSTEM (Figure 9)
Grass or chaff may clog cooling system after prolonged
service. Continued operation with a clogged cooling system causes severe overheating and possible engine damage. Remove blower housing and clean regularly.
Figure 9
BELT REPLACEMENT
The drive belt is located on the left side of the machine. To replace a worn or slipping belt proceed as follows:
1. Remove belt guard.
2. Make sure clutch lever is in disengaged position.
3. Start at the top of 10” pulley and begin removing belt in clockwise direction (facing tiller from left side). If tension on
belt is too great the idler pulley may be pulled downward to relieve pressure on belt.
4. Once belt is off 10” pulley, remove it from smaller pulley.
5. Replace belt by reversing sequence of steps above.
6. Replace belt guard, “C” nuts, and thumb screws.
To avoid possible serious bodily injury, when performing any adjustments other than carburetor
adjustment on engine, remove the spark plug wire and place the wire away from the plug to prevent
accidental starting.
DANGER
Page 8

8
Tiller Assembly
Illustration 1
Page 9

REF. # PART # QTY DESCRIPTION
1 1 Engine
2 359773 1 Belt Guard
359780 1 Belt Guard (RM25H only)
3 408883 3 1/4” x 1/2” self-tap screw
4 130731 1 Cross Brace (B&S Engine)
130682 1 Cross Brace (Honda and Robin)
5 359766 1 Bracket, Belt Guard
359776 1 Bracket, Belt Guard (Honda)
6 359766 1 Bracket, Idler Assembly
7 271686 1 Pulley, Crankshaft
271685 1 Pulley, Crankshaft (RM25H)
8 359778 1 Key, Pulley MTG
9 272241 1 Belt, V Drive
10 162029 1 Cable & Chain Assembly
11 162026 1 Throttle Control ( B & S Engine)
12 359774 1 Support RH
13 359775 1 Support LH
14 130699 1 Handle LH
15 130698 1 Handle Assembly RH
16 359327 1 Spring
17 313786 4 Grip
18 130709 2 Wheel (M30B only)
130726 2 Wheel, Heavy Duty
19 359770 1 Wheel Yoke
20 336662 1 Pulley, 6”
21 130350 1 Transmission
22 359769 1 Drag Stake
23 460312 5 Hair Pin
24 359768 5 Clevis Pin
25 359265 1 Rear Support
26 130828 1 Tine Assembly, RH Outer
27 130830 1 Tine Assembly, RH Inner
28 443106 7 Hex Nut, 5/16” NC5
29 400194 4 Screw, 5/16” x 1/2” NC5
30 359764 1 Bracket, Lower Belt Guard
31 359765 1 Bracket, Upper Belt Guard
32 162091 1 Tine Shield RH (RM30B)
33 162092 1 Tine Shield LH (RM30B)
34 463017 1 #K9N Woodruff Key 3/16” x 3/4”
35 130829 1 Tine Assembly LH Inner
36 130827 1 Tine Assembly LH Outer
37 359854 1 Lift Handle
38 130822 2 Tube W L D T - Outside
39 130823 2 Tube W L D T - Inside
40 444721 16 Nut .375 - 16 Lock
41 400260 16 Bolt .375 - 16 x 1.00
9
Parts Reference
Illustration 1
Page 10

10
Tine Assembly
Illustration 2
Ref. Part QTY Description
23 460312 5 Hairpin
24 359768 5 Clevis Pin
26 130828 1 Tine Assembly, RH Outer
27 130830 1 Tine Assembly, RH Inner
35 130829 1 Tine Assembly, LH Outer
36 130827 1 Tine Assembly, LH Inner
38 130822 2 Tube WLDT - Outside
39 130823 2 Tube WLBT - Inside
40 444721 16 Nut .375 - 16 Lock
41 400260 16 Bolt .375 - 16 x 1.00
Transmission Assembly --Illustration 3
Ref Part QTY Description
1 359792 1 R/H Case Side
2 359791 1 L/H Case Side
3 359312 1 Oil Fill Plug
4 359310 1 Expansion Plug
5 359795 2 Bushing Input
6 400104 17 Capscrew, 1/4 x 1/2 NC5
7 445768 17 1/4” Hex Nut, Whizlock
8 359294 1 Oil Seal Input
9 455049 a/r Shim Washer 1” x .625 x .0625
9-A 455062 a/r Shim Washer 1” x 41/64 x .0312
10 140108 1 Bushing Powder - 5/8”
11 463017 1 Key - Woodruff
12 359781 1 Input Shaft Assembly
13 359786 1 Cluster Sprocket
Ref Part QTY Description
14 359787 2 Bearing Idler
15 359783 1 Chain Upper #35 x 50L (Mini)
16 359784 1 Chain Lower #40 x 40L (Mini)
17 359788 1 Spacer, Bearing Race (Bushing)
18 359800 1 Gasket, Chain Case
19 359782 1 Output Shaft Assembly
20 359799 1 Spacer, Output Shaft
21 359320 1 Washer, 2” x1-1/16” x .085
22 359796 1 Bearing, Output (Mini)
23 359829 2 Oil Seal Output (Mini)
24 359828 2 Dust Cover
25 408883 1 Screw, 1/4” x 1/2 Hex Washer
26 359336 1 Washer, Rubber Seal
27 455065 a/r Shim Washer 1/2” x 1.03” x
.0312
Page 11

11
Page 12

12
Limited Warranty
Maxim Manufacturing Corporation, through its dealers will repair or replace any part, or parts of
the M30B or RM30B or handles that are defective in material or workmanship or both. Trans-
portation charges on parts submitted for repair or replacement under this Warranty must
be borne by the purchaser. The original sales receipt must be submitted as proof of purchase
date. The sales receipt will be returned. Maxim Manufacturing Corporation assumes no liability
for labor charges made in performance of this warranty.
The Warranty Periods are as follows:
A. Frame for 1 year
B. Handles for 1 year
C. Transmissions for 1 year
The Throttle Cable, Tires, Fasteners, and belt are not warranted because during normal service
they are subject to wear.
The Warranty on the Frame is Void if:
A. Frame is broken or bent due to abuse.
B. Wheels are bent or broken due to impact.
C. Altering of engine or its components has occurred.
All warranties are voided if the Tiller has been altered, used under abnormal conditions,
or subject to abuse, misuse, neglect, improper maintenance, or rented.
The Engine is warranted by the engine manufacturer, not by Maxim Manufacturing Corporation.
See Engine Owner’s Manual for information regarding engine warranty.
Should you experience problems with your tiller take it back to your authorized Maxim
dealer or distributor to make warranty claims.
Maxim Manufacturing is not liable for any damage claim or liability claim, personal or
otherwise, resulting from the operation of this tiller in any way.
Maxim Manufacturing Corporation • Sebastopol, MS 39359 • (601) 625-7471 • 359779 • 2/2003
 Loading...