

Page 1

Electric
Crepe Maker
Model CM5
Owner’s Manual & Recipe Guide
Page 2

Page 3
Polarized Plug
This appliance has a polarized plug (one blade is wider than the
other). As a safety feature, this plug is intended to fit into a polarized
outlet only one way. If the plug does not fit fully in the outlet, reverse
the plug. If it still does not fit, contact a qualified electrician. Do not
attempt to modify the plug in any way.
Short Cord Instructions
A short power-supply cord is provided to reduce the risk resulting
from becoming entangled in or tripping over a longer cord.
Longer extension cords are available and may be used if care is
exercised in their use.
If an extension cord is used, (1) the marked electrical rating of the
extension cord should be at least as great as the electrical rating of
the appliance, and (2) the longer cord should be arranged so that it
will not drape over the counter top or table top where it can be
pulled on by children or tripped over unintentionally.
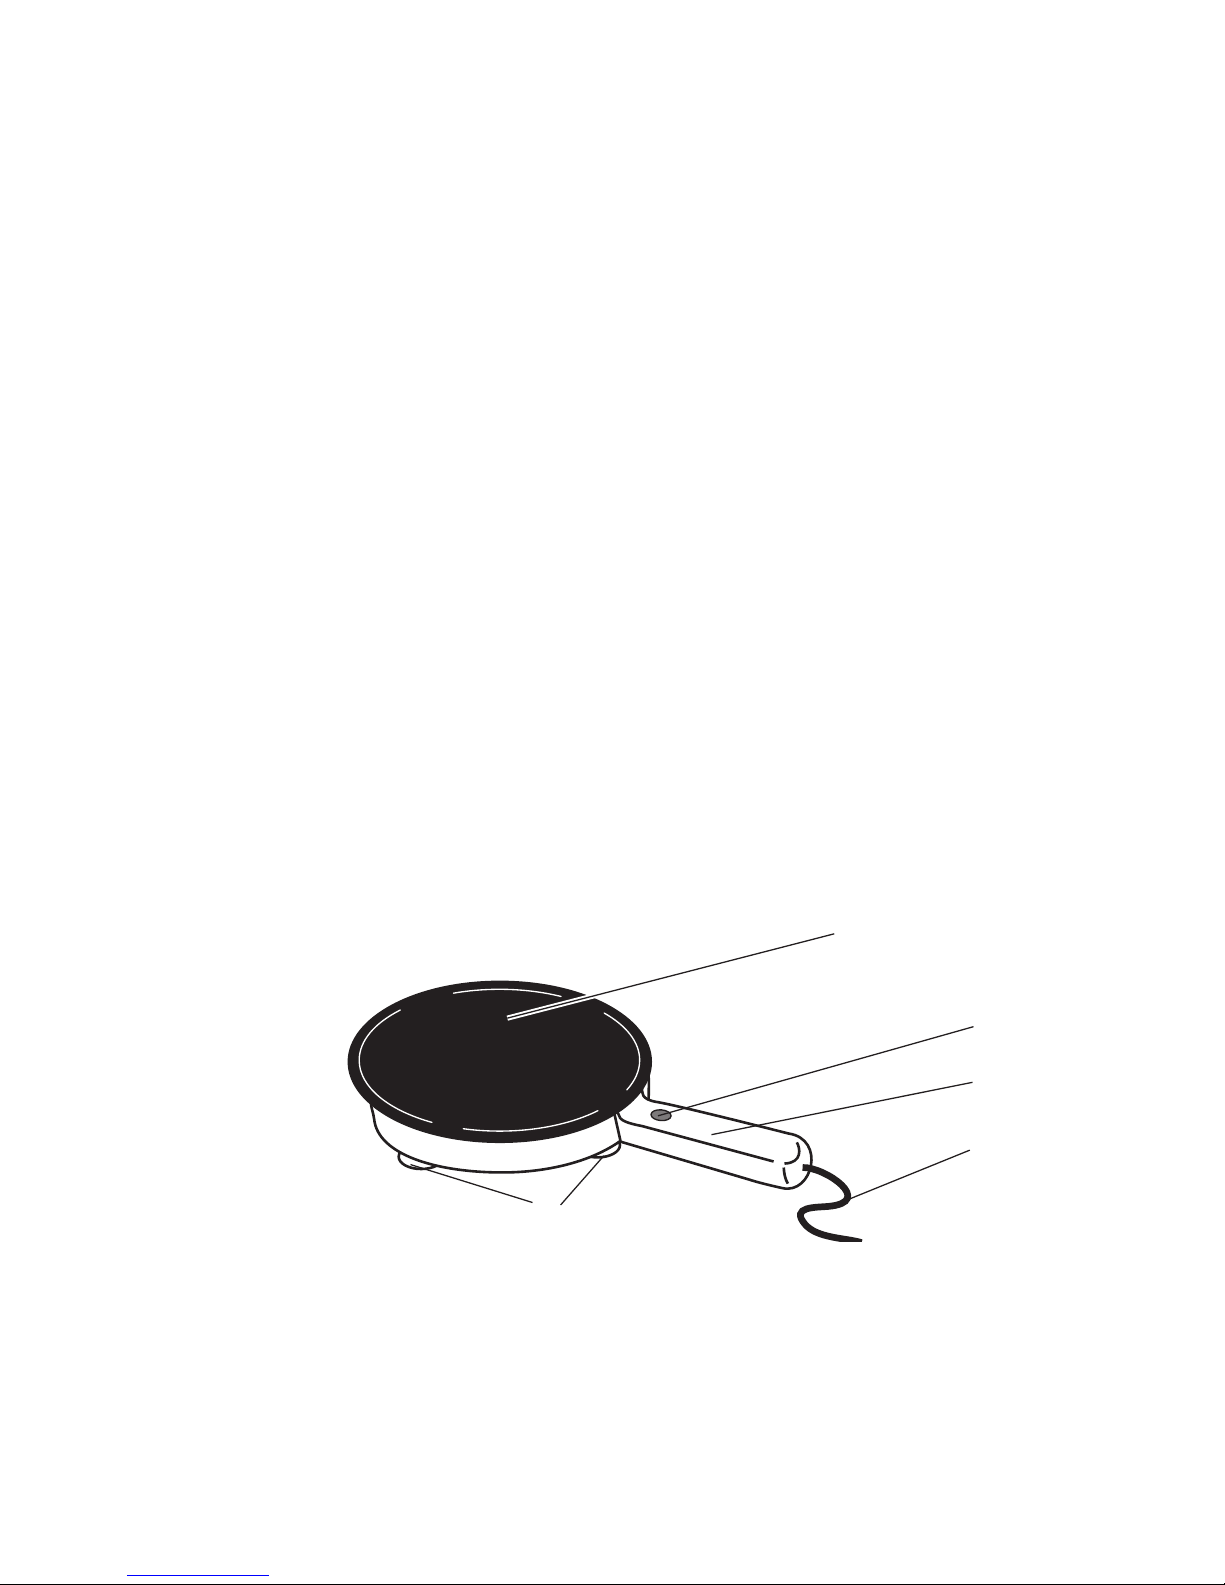
Getting to Know Your CM5
Crepe Maker
2
1. Non-Stick Cooking Surface
2. Ready Light
3. Handle
4. Electric Power Cord
5. Legs
1.
2.
3.
4.
5.
Page 4

Page 5
Non-Stick Cooking Surface
The non-stick cooking surface is not covered by the product
warranty. Care must be taken not to scratch or damage the finish
with sharp utensils, scouring pads or abrasive cleaners. The surface
will provide years of non-stick performance with proper cleaning
and care taken during use and storage. Please save the carton for
future storage of your Crepe Maker.
Instructions For Use
1. Before using this Crepe Maker for the first time, "condition" the
non-stick surface by wiping the top with a paper towel soaked in
cooking oil, butter or shortening.
2. Prepare one of the batter recipes an hour or more ahead.
Plan to use up all of the batter (14-16 crepes), since any of the
crepes you don't use will keep several days in the refrigerator or
a month in the freezer.
3. Pour the batter into a shallow dish or pie pan, either glass, metal
or foil, slightly larger than the Crepe Maker. Plug the cord into a
120V AC outlet. Preheat the Crepe Maker until the Ready Light
illuminates (after about 3 minutes). This indicates that your
Crepe Maker is ready to be dipped into the batter.
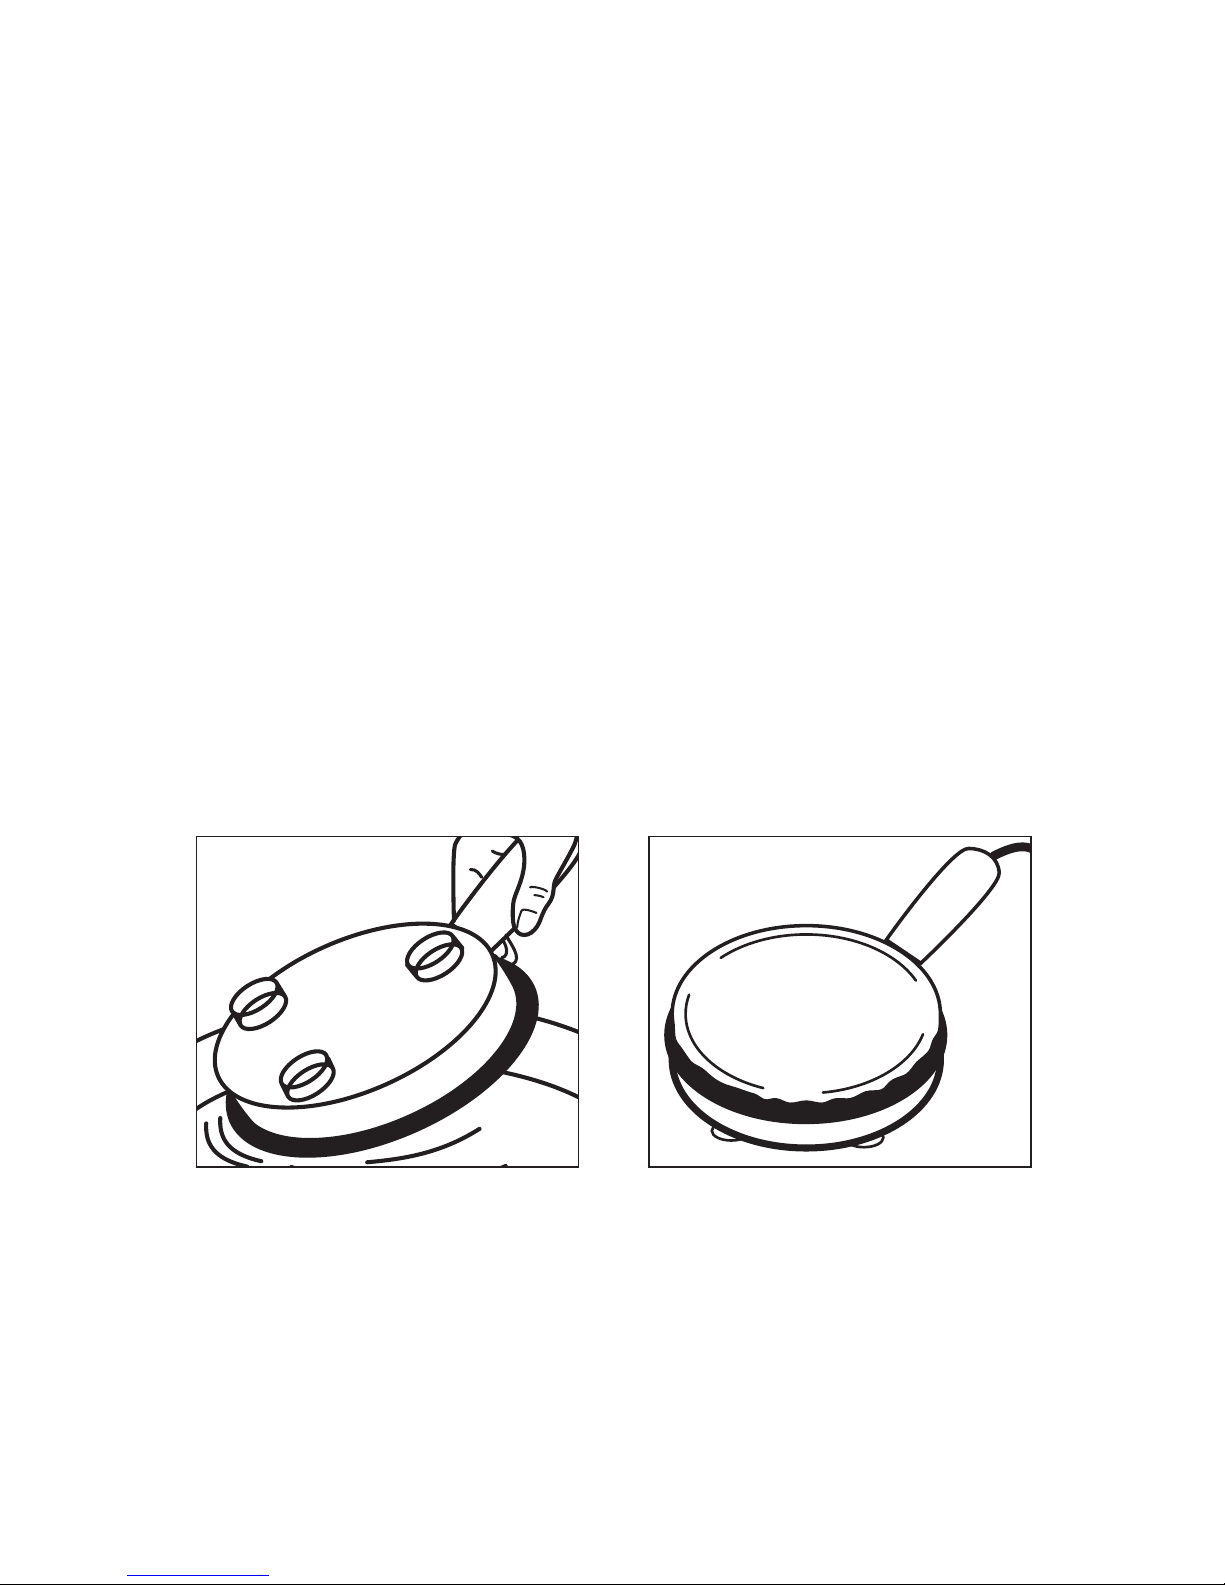
4. When the Light is ON, turn the Crepe Maker over and dip into
batter at a slight angle, then flat, to quickly coat the surface,
almost to the edge. (See Figure 1.)
5. Remove from batter and set on Legs. The Light will go OFF.
Dipping and removing should take no more than 3 seconds. The
Crepe is done when the Ready Light goes ON or when slight
browning appears at the edges and it has almost stopped
steaming (about 45 seconds). (See Figure 2.)
4
Figure 1
Figure 2
Page 6

Page 7

Serving and Hints
Serving
Starting with a pile of flat crepes, you can use them in a number of
ways, depending on whether you want a simple sauced or a fancy
filled crepe. They can be served cold, warm, or hot, baked, broiled,
or crisp-fried in oil. Here are some ideas on handling crepes. See
recipes for ways to use various shapes.
Quartered. . . Crepes are folded into quarters when served plain (or
spread with thin filing) and served in sauce, or used "hot off the
Pan" for dipping in an appetizer dip.
Rolled. . . Fill with a few spoonfuls of an entrée or dessert mixture
and quickly bake or broil, fill with cold mousse, ice cream, or
whipped cream.
6
Page 8

Page 9

Recipes
Basic Batter
We suggest you start with the batter recipes given here — they all
“dip, cook, and release” well on your Crepe Maker. They fold or roll
well, and keep for weeks in the freezer, days in the refrigerator.
Batter can be used immediately. However, an hour or two standing
time will produce slightly more tender crepes. Or, refrigerate batter
up to three days for use as needed.
1 cup all-purpose flour
2 eggs
1/2 cup milk
1/2 cup water
1/4 teaspoon salt
2 Tablespoons butter or margarine, melted
Place ingredients in blender container in the order given. Blend 30
seconds, stop and stir down sides. Blend 30-60 seconds until
smooth. Or, mix in bowl with wire whisk or mixer, first combining
flour and eggs, adding liquid gradually. Beat until smooth; add other
ingredients. Makes about 16 crepes.
NOTE: Measure flour and liquid carefully, since consistency of
batter is important. (It should be about the consistency of thick,
heavy cream.) Spoon flour into 1 cup measure and level off with
straight edge of knife or spatula.
815
Page 10

Page 11

10
Cream Cheese "et cetera"
1 batch crepes (about 16)
1 8 oz. package cream cheese
Seasonings: Use anything that goes well with cream cheese, such as
sliced olives, bacon bits, anchovy filet or paste, dash of
Worcestershire sauce, jam, horseradish, relish, etc.
Oil
Cut chilled cream cheese into approximately 16 1/2 oz. slices. Place
one in the center of each crepe (brown side up). Top with one of the
seasonings. Fold crepes into tight envelopes and place seam side
down on a plate. Heat 1/4" oil in skillet over medium heat until hot but
not smoking. Fry crepe envelopes a few at a time, seam side down,
then turn. Watch carefully as they will brown and crisp quickly. Drain
on paper towel and serve hot.
NOTE: A fun do-it-yourself hor d'oeuvres.
Blinis
1 batch buckwheat crepes, warm (about 16)
1 4 oz. jar red caviar
1/2 pint sour cream
3 hard cooked eggs, chopped finely
1 large onion, chopped finely
Use freshly made crepes, or warm those from freezer or refrigerator in
low oven. Combine caviar and sour cream and place in serving bowl.
Place eggs and onion in serving bowls. Let guests spoon a little of
each onto a crepe, fold and eat from the hand.
Blintzes
1 batch crepes (about 16)
2 cups small-curd cottage cheese
1 egg, beaten well
1 tablespoon sugar
1 teaspoon grated lemon rind
Combine cheese, egg, sugar and rind. Place spoonful of mixture in the
center of each crepe, brown side up. Fold crepe sides over filling to
make a tight envelope. Place on plate seam side down. Heat 1/4" oil
in skillet over medium heat until hot but not smoking. Fry a few
blintzes, seam side down, then turn. Watch carefully as they will brown
and crisp quickly. Drain on paper towel and serve hot. If desired, top
with sour cream, applesauce, fresh fruit or confectioner's sugar.
Page 12

Page 13

Pork or Chicken Eggrolls
1 batch crepes (about 16)
2 cups finely diced cooked pork or chicken
1 1 lb. can meatless or chicken chow mein
1 tablespoon soy sauce
2 tablespoons oil
Prepared mustard, hot or mild
In a bowl, combine pork or chicken, chow mein and soy sauce.
Spoon one to two heaping tablespoons across the center of each
crepe, brown side in. Fold crepes over filling and place seam side
down on plate. Heat oil in skillet over medium heat until hot but not
smoking. Fry eggrolls a few at a time, seam side down, then turn.
Watch carefully as they will brown and crisp quickly. Drain on paper
towel and serve hot with mustard or Chinese sauce. Good with hot
rice and a salad of shredded cucumbers and carrots.
Chinese Sauce
In a small saucepan, combine 1 tablespoon cornstarch with
1 tablespoon water. Add 1 cup chicken broth, 1 tablespoon soy
sauce, 1 tablespoon dry sherry, 1/2 teaspoon sugar, salt and
pepper to taste. Simmer until thickened, stirring constantly.
Page 14

Page 15

14
Beef Stroganoff Crepes
1 batch crepes (about 16)
1/4 cup butter or margarine
1/2 cup minced onions
1 lb. ground beef (or 2 cups finely chopped cooked roast beef)
2 tablespoons all-purpose flour
2 teaspoons salt
1/4 teaspoon pepper
1/4 teaspoon paprika
1 10-1/2 oz. can condensed cream of mushroom soup
1 cup sour cream
Preheat oven to 350ºF. In skillet over medium heat, melt butter until
hot. Add onions and fry until golden. Add meat and next four
ingredients. Fry, stirring, until meat is brown. Add undiluted soup,
simmer 10 minutes, stirring occasionally. Remove from heat and stir
in cream. Place 1-2 heaping tablespoons of mixture across center
of each crepe, brown side out. Roll and place seam side down in
buttered 13" x 9" casserole dish. Brush or drizzle with melted
butter. Bake 15-20 minutes until hot. Serve with additional sour
cream, chopped parsley or chives.
Fresh Mushroom Crepes
1 batch crepes (about 16)
1 lb. fresh mushrooms
1/4 cup butter
1/2 teaspoon salt
1/4 teaspoon pepper
1/2 teaspoon seasoned salt
2 packets beef bouillon
4 tablespoons dry white wine
1 cup dairy sour cream
2 tablespoons minced chives
Slice mushrooms and sauté in skillet in butter about 4 minutes. Add
salt, pepper, seasoned salt, bouillon and wine. Cook over medium
heat several minutes. Stir in sour cream and chives. Heat, but do
not boil. Spoon about 3 tablespoons mushrooms and sauce into
center of crepe, browned side out and fold over. Arrange on plate
and spoon remaining sauce over crepes.
Page 16

Page 17

16
Seafood Crepes with Shrimp Sauce
8-10 crepes
2 tablespoons butter or margarine
1/2 cup thinly sliced green onions or scallions
3/4 cup thinly sliced celery
1 cup flaked Dungeness or king crabmeat (about 6 ounces)
1 cup cooked tiny shrimp (about 6 ounces)
1/2 cup mayonnaise
2 tablespoons diced pimento
1 teaspoon curry powder
1 teaspoon lemon juice
Sauce
1 10 oz. can condensed cream of shrimp soup
1 teaspoon lemon juice
1/2 can milk or half-and-half
Preheat oven to 350ºF. In small skillet, sauté onions and celery in
butter until tender-crisp. Combine remaining ingredients in bowl;
add celery and onion mixture. Place 1-2 heaping tablespoons of
filling across center of each crepe, brown side out, and roll. Place in
buttered 9" x 11" baking dish; cover with aluminum foil. Bake 15-20
minutes or until hot. Serve with hot sauce.
To make sauce, combine ingredients in saucepan and heat,
stirring until smooth and hot.
Page 18

Page 19

18
Lasagna Casserole
1 batch crepes (about 16)
1 qt. homemade sauce or 2 14 oz. jars Italian-style tomato sauce
1 lb. ground beef (optional)
1 15 oz. container ricotta cheese
8-12 oz. mozzarella cheese, thinly sliced
1/2 cup grated parmesan cheese
Preheat oven to 350ºF. In large skillet, brown beef (optional) until
crumbly. Pour off excess fat and add meat to tomato sauce. Bring
to boil. Remove from heat. In a 13" x 9" baking pan, spread 1 cup
sauce. Top with 5-6 crepes, overlapping as necessary. Spread with
1/2 of the ricotta, 1/3 of the cheese slices, 1/3 of the grated
parmesan and 1 cup sauce. Repeat. Top with remaining crepes,
sauce, mozzarella and parmesan. Bake for 30 minutes or until
bubbling hot. Let stand 10 minutes before serving, then cut
into squares.
Crepes Manicotti
1 batch crepes (about 16)
1-1/2 cups (15 oz.) ricotta cheese
1/2 lb. mozzarella cheese, diced in 1/2 inch cubes
1/2 teaspoon salt
1/8 teaspoon pepper
2 eggs
1/4 cup grated parmesan cheese
2 tablespoons butter or margarine
1 teaspoon oregano (optional)
1 14 oz. jar Italian-style tomato sauce or homemade sauce
Preheat oven to 350ºF. Mix all ingredients except tomato sauce.
Place heaping tablespoon of mixture down center of each crepe
(brown side out). Roll to cover filling and place each, seam side
down, in 13" x 9" casserole. Line crepes in pan and spoon sauce
over the centers of each crepe. Top with additional parmesan
cheese, if desired. Bake at 350ºF. for 25-30 minutes or until hot and
bubbling. Serve two or three crepes per portion.
Page 20

Page 21

20
Sour Cream and Strawberries
1 batch crepes (about 16)
1 pint (2 cups) dairy sour cream
3 tablespoons sugar
2 tablespoons orange liqueur (Cointreau or Grand Marnier), optional
2 cups sweetened sliced strawberries
2 tablespoons butter or margarine
Confectioners sugar
Combine sour cream, sugar and orange liqueur, if desired. Spread
crepes with an equal amount of sour cream mixture and a few
sliced berries, roll up. Arrange rolls in shallow casserole, cover and
store in refrigerator until serving time. To heat, melt butter or
margarine in crepes suzette or blazer pan of chafing dish over direct
high flame. Heat crepe rolls, turning carefully to heat evenly. Add
remaining strawberries and heat. Sprinkle with confectioner's sugar.
Blueberry Crepes
1 batch crepes (about 16)
2 cups vanilla pudding from package mix (or favorite recipe) chilled
1 cup heavy cream, whipped
1/4 teaspoon nutmeg
Sauce
1/2 cup sugar
1 tablespoon cornstarch
1/4 cup water
1/4 cup light corn syrup
2 teaspoons lemon juice
2 cups blueberries, fresh or frozen
Combine filling ingredients; place 2-3 heaping tablespoons of
mixture across center of each crepe, brown side out, and roll. Place
on serving plate. Top with sauce and, if desired, a spoonful of sour
cream or additional whipped cream.
To make sauce, combine sugar and cornstarch in saucepan, mix.
Stir in water, corn syrup and lemon juice until smooth. Stir in
blueberries. Cook, stirring constantly, until sauce comes to a boil
and is thickened. Refrigerate until cool.
Page 22

Page 23

Gateau Mocha
1 batch crepes (about 16)
1 5-1/2 ounce package vanilla instant pudding (6-serving size)
1 cup heavy cream
2 tablespoons confectioners' sugar
2 tablespoons cocoa
1 tablespoon instant coffee powder
Prepare instant pudding as package directs, let stand until firm.
Combine remaining ingredients and beat at high speed until cream
is stiff, refrigerate. Place a crepe on a serving plate and spread
evenly with a thin layer of pudding, using a spatula. (Do not stir
pudding.) Place another crepe on top and spread. Repeat until all
crepes are used. Frost stack of filled crepes (top and sides) with
whipped cream frosting. Chill until served.
Cut into 2" wedges with sharp knife. Do not keep more than
12 hours as pudding may liquefy.
Variations: Substitute chocolate or lemon instant pudding
and plain sweetened whipped cream. Top with toasted
slivered almonds.
Fruit and Yogurt
Crepes
Yogurt, plain or vanilla
Fruit jam, syrup, preserves or sundae topping
For an quick dessert, thin any kind of fruit jam or preserves slightly
with water or orange juice (use syrup or topping without thinning).
Heat and stir for a minute or two in saucepan. Place several
spoonfuls of yogurt on a crepe (brown side out); roll up. Spoon hot
sauce over crepes.
Page 24

 Loading...