

Page 1

CONVERTIBLE
CAR SEAT
Suitable for newborn up to 4 years approx.
Images and designs
may vary.
Conver tible Car S eat I Maxi-Cosi
1
I
Page 2
CONVERTIBLE CAR SEAT
Dear Customer,
Congratulations on the purchase of your
brand new Maxi-Cosi car seat, we hope you
and your little one will have plenty of hours of
fun together!
Our car seats are so good, we’ve put them under a Lifetime Warranty - so you
can enjoy them for years to come. Don’t forget to register within three months
after purchase.
In the event of a car accident, your Maxi-Cosi child restraint may have unseen
damage from crash forces. The Maxi-Cosi Accident Exchange Ser vice oers new
for old Maxi-Cosi child restraint replacement in the event of a serious accident
(where a police report is required), giving you peace of mind knowing your child
is correctly protected.
Conver tible Car S eat
2
I
Need assistance?
Call our Customer Service Centre:
1300 809 526
Monday to Friday
(
8:30am-5:00pm AEST)
or send an email:
customerservice@dorel.com.au
Maxi-Cosi
I
Lifetime
warranty
Page 3
Don’t forget to please register your
product warranty by visiting :
warranty.dorelaustralia.com.au
Always keep the
original tax receipt
for your product.
Conver tible Car S eat I Maxi-Cosi
3
I
Page 4

We Carry The Future
Life is one big adventure, and becoming a parent is the biggest adventure
of all.
And we would know. Because we’re parents too.
It’s a road full of milestones, moments and unforgettable journeys - starting
with the rst trip home from the hospital. We understand how important it
is for new parents to feel supported right from the start. That’s where MaxiCosi comes in.
We’re there from day one... and for every day that follows. We care about
giving parents child mobility solutions they can trust - car seats and
strollers that are safe, smart and easy to use. With Maxi-Cosi, parents
know their children are in the best hands possible. So they can focus on
the other things that matter, like living in the moment and seeing the joy
and wonder of life in a whole new way. That’s what being a parent is really
about.
We get it, and we care.
We always have.
It was thirty years ago that we launched Europe’s rst baby car seat
and since then, we’ve carried over 50 million babies home from the
hospital.
We were pioneers then, and we’re pioneers now. That’s why we’ll never
stop improving, designing, and perfecting the way new families move
around the world - wherever life’s adventures may take them.
Conver tible Car S eat
4
I
Maxi-Cosi
I
Page 5
Conver tible Car S eat I Maxi-Cosi
5
I
Page 6

Read and follow all of the installation instructions for
maximum protection. If you have any questions regarding
the installation or use of this child restraint in Australia
or New Zealand, please contact our customer service
numbers provided. An alternative option is to also contact
any registered child tting station authorised by your local
transport authority.
• To be used only in a rearward-facing position until the infant’s
shoulders either reach the lower shoulder height marker
(approximately 12 months of age) or reach the middle height
marker (approximately 2 to 3 years of age). Then to be used in a
forward-facing position until the child’s shoulders reach the upper
shoulder height marker (approximately 4 years of age).
• Continue to use this child restraint until the child reaches this limit.
• Do not use forward facing until child’s shoulders are above the
lower shoulder height marker.
• Infants are at risk of serious injury if they face forward too early.
• Children are at risk of serious injury if they move to booster seats
too early.
• Children who have outgrown this restraint are safest in a larger
child restraint with an in-built harness or a booster seat until their
shoulders reach the upper shoulder height marker of the restraint.
GENERAL
• Use the restraint exactly as shown in the instructions.
• Supervision of children is needed because they may be able to
undo the buckles.
• DO NOT LEAVE CHILDREN UNATTENDED IN THE CAR.
• Do not alter or modify this restraint.
• Repairs must only be done by the manufacturers or agent.
Conver tible Car S eat
6
I
Maxi-Cosi
I
Page 7

• Do not allow the restraint to come into contact with polishes, oils,
bleach and other chemicals.
• Destroy the restraint if it has been in a severe crash, even if no
damage is visible
• DO NOT USE THIS RESTRAINT WITHOUT THE COVER.
• To ensure infant’s back is evenly supported, do not put more than
one nappy on the baby and make sure the nappy is not thickly
folded at the back.
• DO NOT USE A REAR- FACING CHILD RESTRAINT WHERE AN
AIRBAG IS FITTED IN FRONT OF THE SEATING POSITION.
Conver tible Car S eat I Maxi-Cosi
7
I
Page 8

• Fit the restraint rmly to the car seat.
• Fit the harness rmly to the child.
• A loose restraint or harness is dangerous.
• Do not harness an infant wrapped in a blanket or swaddled. Any
blanket or wrap must only be placed over the harness and infant.
• Seatbelt extenders are not recommended to be used if the
seatbelt is not long enough to secure the child restraint. If
seatbelts are too short then advice should be sought from a
child restraint tter and their recommendation be considered
before using a seatbelt extender.
• Always secure the loose end of the top tether strap. Do not use
the child restraint where this strap may fall into a split in the seat
back or o the side of the seat.
• Always secure the loose end of the top tether strap to prevent it
hanging out of the car or being accessible by the child.
• ALWAYS ATTACH HOOK AND REMOVE SLACK.
• THIS RESTRAINT IS NOT SUITABLE FOR USE WHERE THE
TOP TETHER STRAP MAY FALL INTO A SPLIT IN THE SEAT
BACK OR OFF THE SIDE OF THE SEAT.
• THIS RESTRAINT MUST BE ATTACHED TO A CHILD
RESTRAINT UPPER ANCHORAGE POINT IN THE CAR. REFER
TO CAR OWNER’S HANDBOOK FOR LOCATION OF UPPER
ANCHORAGE POINTS. REFER TO A CHILD RESTRAINT
FITTING STATION IF NO UPPER ANCHORAGE POINTS ARE IN
THE MOTOR CAR.
• Always check the measurements between the front of the seat
back of the rear seat and all front seats in the car in which the
child restraint is intended to be used, to ensure that the space
is sucient.
Conver tible Car S eat
8
I
Maxi-Cosi
I
Page 9
• Care and attention be given to ventilation and shading of the
occupant.
• TO BE USED WITH A LAP-SASH/LAP-ONLY SEATBELT OR
ISOFIX LOW ANCHORAGES IN THE FRONT/BACK OF MOST
CARS WITH FORWARD FACING SEATS.
• The use of child restraints in the front seat may be restricted for
children of specic ages by local legislation. Please check with your
local legislation regarding any restriction for child restraint. If a car
has two or more rows of seats, children under four must not travel in
the front seat. If all seats, other than the front seats, are being used
by children under seven years, children aged between four and six
years (inclusive) may travel in the front seat, provided they use an
approved child restraint or booster seat.
• Use of aftermarket accessories (i.e. items not provided in the box
with the child restraint), can reduce the safety provided by child
restraint and may cause injury or death. For approved aftermarket
accessories please refer to page 36.
• Please contact Dorel Australia Customer Service with any questions
or concerns.
Conver tible Car S eat I Maxi-Cosi
9
I
Page 10

TABLE OF CONTENTS
Welcome -----------------------------------------------2
Registration ---------------------------------------------3
Introduction --------------------------------------------4
WARNINGS-------------------------------------------6
What’s in the Box? -----------------------------------12
Components -----------------------------------------13
Suitability Guide -------------------------------------15
VISUAL GUIDE
REARWARD FACING
Rearward Facing ----------------------------------- 18
Removing Inserts ------------------------------------19
Recline Adjustment ---------------------------------20
Harness and Headrest Adjustment --------------21
Rearward Facing Using Seatbelt -----------------22
Rearward Facing Using ISOGO ------------------24
Conver tible Car S eat
10
I
Maxi-Cosi
I
FORWARD FACING
Forward Facing --------------------------------------26
Removing Inserts ------------------------------------27
Harness and Headrest Adjustment --------------28
Recline Adjustment ----------------------------------29
Forward Facing Using Seatbelt ------------------30
Forward Facing Using ISOGO -------------------31
DETAILED GUIDE
VEHICLE INFORMATION
Correct Rearward-Facing Vehicle Position ------34
Correct Forward-Facing Vehicle Position -------35
Location of Top Tether Anchorage Point --------36
Connecting the Top Tether --------------------------37
Page 11
Anchorage Fitting Installation ---------------------38
Seat Angle --------------------------------------------42
OPERATION AND ADJUSTMENTS
Shoulder Height Markers --------------------------44
Fastening the Bucke Assembly ------------------ 46
Removing Inserts -----------------------------------47
Conguring the Harness Straps for Correct Child
Fitment------------------------------------------------48
Adjusting Headrest and Harness Height -------- 49
Correct Harness Use Guide ----------------------50
Recline Adjustment ---------------------------------51
Checklist Before Installation ----------------------- 52
To Adjust the Top Tether Strap -------------------- 53
Rearward-Facing Installation Using Seatbelt --- 54
Rearward-Facing Installation Using ISOGO ---- 56
Forward-Facing Installation Using Seatbelt ----- 60
Forward-Facing Installation Using ISOGO ------ 62
CARE AND MAINTENANCE
Care and Maintenance - Buckle ------------------66
Care and Maintenance - Seat Fabrics -----------68
To Remove Fabric Accessories -----------------69
To Remove The Body Fabrics --------------------70
Caring for the Seat Fabrics -----------------------71
THE NEXT SEAT FOR YOUR CHILD
GUARANTEE
NOTES
Conver tible Car S eat I Maxi-Cosi
11
I
Page 12

What’s in the Box?
Conver tible Car S eat
12
I
Instruction
Manual
Maxi-Cosi
I
CHECK THAT THIS CHILD RESTRAINT
WILL FIT IN YOUR CAR
ISOFIX COMPATIBLE
Swing Tag
What’s included:
1 Car seat
1 Instruction Manual
1 Swing Tag
Page 13

Components
A
B
C
D
E
F
K
I
G
H
L
J
N
M
O
A. Air protect cell (x2)
B. Chinrest(2xiftted)
C. HeadrestAdjuster
D. InfantHeadrestInsert
E. Belt mates (x2)
F. InfantBodyInsert
G. 6-point harness
H. Buckle
L
I. Harnessreleaselever(underap)
J. Harness tightening strap
K. Built-inreboundbar
L. ISOGO storage compartment
(underfabrics)
M. Seat Recline Lever
N. Base
O. ShoulderHeightMarkers(x3)
Conver tible Car S eat I Maxi-Cosi
13
I
Page 14

Components
Q
P
R
S
V
T
W
U
Y
Z
X
X
ReclineIndicatorlabel
FORWARD-FACING
Z
BELT PAT H
REARWARD-FACING
Y
BELT PAT H
Conver tible Car S eat
14
I
P.ChinSupportHandle(if tted)
Q. Top Tether Strap
R.Toptetherstrapadjuster
S. Top Tether Hook
T. Anchor Bolt Kit
U. Storage Pocket
(instruction manual & excess
tether strap webbing)
Maxi-Cosi
I
V. G-Cell (2x)
W. ISOGO Belt Path
X.ReclineIndicator
Y. RearwardFacingBeltPath
Z. For wardFacingBeltPath
Page 15
Rearward
Facing
Forward
Facing
Suitability Guide
Rearward Facing:
0 - 30 months old
see page 18 for visual guide
see page 54 for detailed guide
Between Modes:
12 - 30 months old
Choosing the best mode for your child
see page 16
Forward Facing:
12 months to 4 years old
see page 26 for visual guide
see page 60 for detailed guide
Conver tible Car S eat I Maxi-Cosi
15
I
Page 16
Suitability Guide
Considerations for Rearward or Forward Facing:
• Extended rearward facing is the safest option for your
child, providing them with additional head, neck and
back support for long drives, whilst also removing more
force and trauma from the child in the unfortunate event
of an accident.
• Forward facing requires less depth in the car, allowing
the front passenger seat to sit further back.
• Forward facing can be more convenient for child removal
and tment.
• Rearward facing offers a superior recline angle than
forward facing, allowing for greater head and neck
support if the child falls asleep.
• Both modes can use either a belt or ISOGO installation.
Conver tible Car S eat
16
I
What do we recommend?
Maxi-Cosi recommends that children remain rearward
facing for as long as possible because it is the safest
option for them. If you have concerns or questions
about extended rearward facing give our Customer
Experience Team a call on 1300 809 526.
Rearward Facing :
Visual guide see page 18
Detailed guide see page 54
NOTE: If the baby’s neck muscles are unable to support their head,
then the child should remain rearward facing.
Maxi-Cosi
I
Forward Facing :
Visual guide see page 26
Detailed guide see page 60
Page 17

Visual Guide
Conver tible Car S eat I Maxi-Cosi
17
I
Page 18

Car installation - Rearward Facing
0 - 6 months
Conver tible Car S eat
18
I
Maxi-Cosi
I
6 months - 30 months
Page 19

Car installation - Rearward Facing
How to remove inserts:
Pull
Pull
Lift
Pull
NOTE: Body or headrest inserts can be used together or in isolation.
When rearward facing.
Conver tible Car S eat I Maxi-Cosi
19
I
Page 20
Car installation - Rearward Facing
Recline adjustment:
Swing
Lift
Conver tible Car S eat
20
I
Lift
NOTE: Only use recline position 4 for rearward facing mode.
Maxi-Cosi
I
Page 21
Car installation - Rearward Facing
Harness and headrest adjustment:
Pull
Lift
Pull
Press
Lift
If tted lift
NOTE: Position child in seat and adjust headrest and harness to be
level with shoulders or slightly above but not below.
Conver tible Car S eat I Maxi-Cosi
21
I
Page 22

Car installation - Rearward Facing Using Seatbelt
Conver tible Car S eat
22
I
Maxi-Cosi
I
Click
Push out
slack
Push
Page 23

Car installation - Rearward Facing Using Seatbelt
Attach top tether
TIP: Position adjuster facing
outwards.
Tighten till slack is removed
Conver tible Car S eat I Maxi-Cosi
23
I
Page 24

Car installation - Rearward Facing Using ISOGO
Conver tible Car S eat
24
I
ISO Storage under the trim
Maxi-Cosi
I
Push
Page 25

Car installation - Rearward Facing Using ISOGO
Click
Both Sides
Push
Pull
TIP: Always check for GREEN
at eye level.
Attach top tether
Pull
TIP: Position adjuster facing
outwards.
Tighten till slack is removed
Conver tible Car S eat I Maxi-Cosi
25
I
Page 26

Car installation - Forward Facing using Seatbelt
12 months - 4 years
Conver tible Car S eat
26
I
Maxi-Cosi
I
Page 27

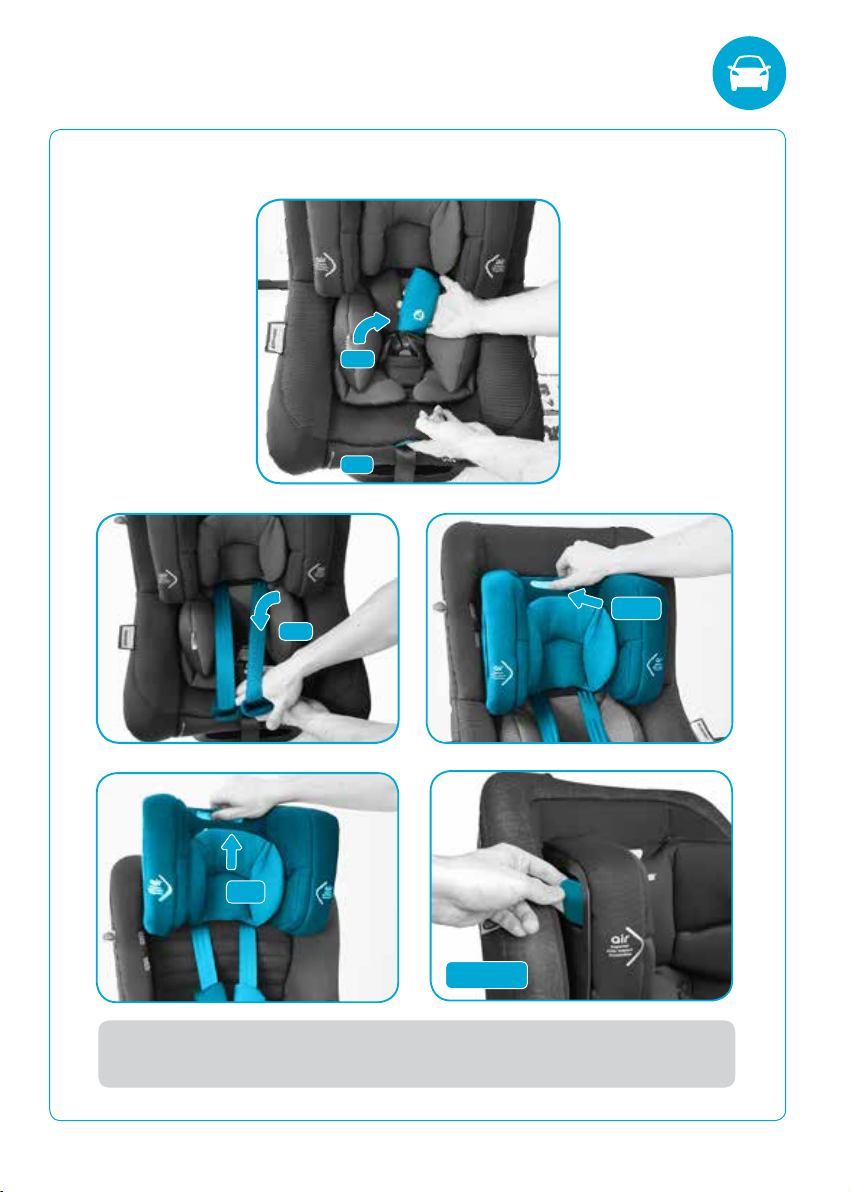
Car installation - Forward Facing using Seatbelt
How to remove inserts:
Pull
Lift
Pull
Pull
NOTE: Body and headrest inserts are not to be used for forward facing.
Conver tible Car S eat I Maxi-Cosi
27
I
Page 28

Car installation - Forward Facing using Seatbelt
Harness and headrest adjustment
Pull
Lift
Conver tible Car S eat
28
I
Pull
Lift
If tted lift
Press
NOTE: Body and headrest inserts are not to be used for forward facing.
Maxi-Cosi
I
Page 29

Car installation - Forward Facing using Seatbelt
Forward position
Squeeze Squeeze
Pull up
NOTE: Recline position 1, 2 or 3 can be used forward-facing but never
use position 4.
Conver tible Car S eat I Maxi-Cosi
29
I
Page 30

Car installation - Forward Facing using Seatbelt
Pull out
Sash
slack
Conver tible Car S eat
30
I
Click
Attach top tether
Maxi-Cosi
I
Lap
Push
Tighten till slack is removed.
Page 31

Car installation - Forward Facing using ISOGO
ISO Storage:
Under the trim
Conver tible Car S eat I Maxi-Cosi
31
I
Page 32

Car installation - Forward Facing using ISOGO
Push
Click
Both Sides
Pull
TIP: Always check for GREEN at
eye level.
Conver tible Car S eat
32
I
Attach top tether
Maxi-Cosi
I
Pull
Tighten till slack is removed.
Page 33

Detailed Section
Conver tible Car S eat I Maxi-Cosi
33
I
Page 34

Vehicle Information
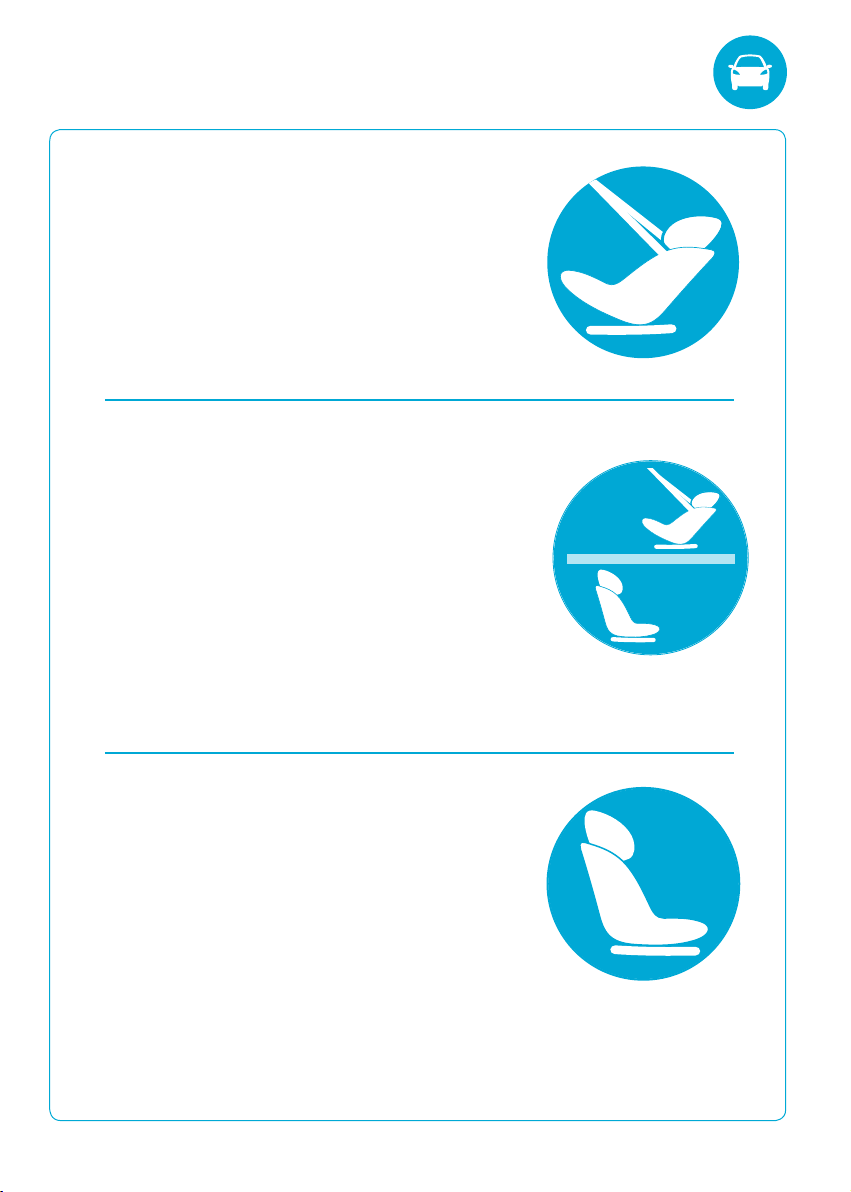
Correct Rearward-Facing Vehicle Position
Some seating positions in your vehicle may NOT be safe for this safety
seat. Some vehicles do not have any seating positions that can be
used safely with the seat.
If you are not sure where to place the infant seat in your vehicle, consult
your vehicle’s owner’s handbook.
Vehicle Seat Location Requirements
Children are safer when properly restrained in rear vehicle seating
positions. Whenever possible, secure the infant seat in the centre
position of the seat directly behind the front seats.
CORRECT
USE
IMPROPER PLACEMENT OF THE SAFETY SEAT INCREASES
THE RISK OF SERIOUS INJURY OR DEATH.
CORRECT
USE
510mm
540mm
Conver tible Car S eat
34
I
Maxi-Cosi
I
Page 35

Vehicle Information
Correct Forward-Facing Vehicle Position
CORRECT
USE
CORRECT
USE
INCORRECT
USE
x
Conver tible Car S eat I Maxi-Cosi
35
I
Page 36

Vehicle Information
Location of Top Tether Anchorage Point
Anchorage Points
NOTE:
• The anchor point can be found in dierent locations in dierent
car. The illustration above shows possible locations of anchor
points. Sometimes it is on the parcel shelf in sedans, and on
the oor area in station wagons, vans and hatchbacks. Make
sure that you do not confuse the luggage hook in the back of a
station wagon with anchor points. Refer to your owner’s manual.
Conver tible Car S eat
36
I
• An extension strap may be needed for vehicles without a xed
parcel shelf. Extension straps and extra ttings are available
from various stores.
Extension straps 300mm
ref no. 014398
Anchor bolt kit ref no. 014400 Locking clip ref no. 014401
Maxi-Cosi
I
Extension straps 600mm
ref no. 014399
Page 37

INCOR-
The clip must not
lie flat on the
anchorage fitting.
INCORRECT
INCOR-
INCORRECT
INCOR-
The clip must not
lie flat on the
anchorage fitting.
INCORRECT
INCOR-
The clip must not
lie flat on the
anchorage fitting.
INCORRECT
Vehicle Information
Connecting the Top Tether
Child restraints must be used correctly to provide proper protection
for your child. The anchorage system on child restraint must be
used in the correct way.
CORRECT
Make sure there is no slack in the top tether strap and the
attachment clip is upright in the anchorage tting.
INCORRECT
The clip must not lie at on the anchorage tting.
Figure 1
INSTALLATION
Anchorages in vertical panel at rear of
vehicle
Correct
Make sure there
is no slack in the
topstrapandthe
attachment
clip is upright in
the anchorage
tting.
Incorrect
The clip must
notlieaton
the anchorage
tting.
x
Figure 2
INSTALLATION
Floormountedanchorages
Correct
Make sure there
is no slack in the
topstrapandthe
attachment
clip is upright in
the anchorage
tting.
Incorrect
The clip must
notlieaton
the anchorage
tting.
x
Conver tible Car S eat I Maxi-Cosi
37
I
Page 38

Vehicle Information
Anchorage Fitting Installation
FOR CARS FITTED WITH A CHILD RESTRAINT UPPER
ANCHORAGE POINT
Locate the upper anchorage point behind the rear seating position
(consult the car owner’s handbook for the location of the upper
anchorage point).
Remove the thread plug from the parcel
shelf/oor/roof and install the attachment
bolt as shown in Figure 1.
Attachment bolt
Lock washer
Conver tible Car S eat
38
I
Anchor tting
Spacer(s) (if required)
Vehicle trim
Vehicle metal structure
1
CAUTION: DO NOT OVERTIGHTEN THE ATTACHMENT BOLT.
OVERTIGHTENING MAY FRACTURE OR BREAK BOLT.
MAXIMUM TORQUE IS 20 Nm.
Maxi-Cosi
I
Page 39

Vehicle Information
FOR CARS NOT FITTED WITH A CHILD RESTRAINT
UPPER ANCHORAGE POINT
FOR SEDANS ONLY:
Drill a 9mm diameter hole in the parcel shelf on the
centre-line of the seating position as shown in Figure 2.
200mm
min.
Centre
line of
seating
position
2
Conver tible Car S eat I Maxi-Cosi
39
I
Page 40

Vehicle Information
Install the anchor bolt as shown in Figure 3. It is recommended that
this installation be carried out by a child restraint tting station or
licenced motor mechanic.
Attachment bolt
Anchor tting
Spacer(s) (if required)
Conver tible Car S eat
40
I
3
Maxi-Cosi
I
Vehicle trim
Vehicle metal structure
Reinforcing washer
Lock washer
Nut
Page 41

For vehicles other than sedans
In Australia, consult your nearest child restraint tting station or
trac authority for vehicle inspection to nd the best, correct
position for the placement of the upper anchorage point, and for the
correct attachment bolt length and use of spacers. In New Zealand,
consult the agent for the vehicle.
CHILD RESTRAINTS MUST NOT BE ATTACHED TO UNSOUND
METAL OR TO WOOD OR SYNTHETIC STRUCTURES. WHEN
DRILLING THE 9mm HOLE DO NOT DRILL THROUGH FUEL
LINES, FUEL TANKS, ELECTRICAL WIRING, OR RADIO
SPEAKERS. WEBBING STRAPS MUST BE PROTECTED FROM
SHARP CORNERS AND EDGES.
THE ANCHOR FITTING MUST BE USED ONLY AS DESCRIBED
ABOVE. IT MUST NOT BE HOOKED ONTO ANY OTHER
OBJECT.
Conver tible Car S eat I Maxi-Cosi
41
I
Page 42

Vehicle Information
Seat Angle
Position seat ensuring that the angle is
no greater than 40˚ from horizontal plane.
Conver tible Car S eat
42
I
Maxi-Cosi
I
40˚
Page 43

Vehicle Information
• DO NOT install convertible child restraints excessively
reclined, ensure the angle is no greater than 40°.
• DO NOT adjust harness or tether strap hardware such that it
sits too close to the occupant.
• Ensure that correct seatbelt path is used and that the
restraint is installed in the correct direction for rearward
facing application refer to page 34.
• DO NOT wrap baby in a blanket or swaddled as infant can be
ejected and killed in an accident.
• Ensure the harness ts the baby rmly.
• Ensure that any blanket or other covering may only be placed
over the harness after the harness is adjusted rmly.
• The infant’s legs are not be bound or wrapped together and
the arms are not bound or wrapped together.
Conver tible Car S eat I Maxi-Cosi
43
I
Page 44

SHOULDERS MUST BE
BELOW THIS LINE
SHOULDERS MUST BE
ABOVE THIS LINE
3
1
2
2010-2013
SHOULDERS MUST BE
BELOW THIS LINE
SHOULDERS MUST BE
ABOVE THIS LINE
MUST BE REAR FACING WHEN
SHOULDERS BELOW THIS LINE
SHOULDERS BELOW THIS LINE WHEN
HEADREST AT HIGHEST POSITION
SHOULDERS ABOVE THIS LINE WHEN
HEADREST AT LOWEST POSITION
NO BOOSTER USE IF SHOULDERS
BELOW THIS LINE
3
4
1
2
5
6
7
2010-2013
SHOULDERS MUST BE
BELOW THIS LINE
SHOULDERS MUST BE
ABOVE THIS LINE
3
1
2
2010-2013
SHOULDERS MUST BE
BELOW THIS LINE
SHOULDERS MUST BE
ABOVE THIS LINE
MUST BE REAR FACING WHEN
SHOULDERS BELOW THIS LINE
3
4
1
2
2010-2013
Shoulder Height Markers
Marker C
SHOULDERS BELOW THIS LINE WHEN
HEADREST AT HIGHEST POSITION
Marker B
Marker A
MUST BE FORWARD FACING WHEN
SHOULDERS ABOVE THIS LINE
MUST BE REAR FACING WHEN
SHOULDERS BELOW THIS LINE
NOTE: You can turn the
Conver tible Car S eat
44
I
restraint from rearward-facing
to forward-facing anytime
once your child’s shoulders
reach the lower height marker.
LOWER HEIGHT MARKER A
MUST BE REAR FACING WHEN
SHOULDERS BELOW THIS LINE
MIDDLE HEIGHT MARKER B
MUST BE FORWARD FACING WHEN
SHOULDERS ABOVE THIS LINE
Maxi-Cosi
I
REARWARD FACING
For newborn use up to approx
12 months old or when the
child’s shoulders reach the
shoulder height marker at
which point you can continue
to use rearward-facing until the
middle height marker, or turn
the car seat forward-facing.
REARWARD FACING
For toddler use up to approx
30 months old or when the
child’s shoulders reach the
shoulder height marker at
which point you must turn
the seat forward-facing.
Page 45

Shoulder Height Marker
UPPER HEIGHT MARKER C
FORWARD FACING
For toddler use up to approx
SHOULDERS BELOW THIS LINE WHEN
HEADREST AT HIGHEST POSITION
4 years old or when the
child’s shoulders reach the
shoulder height marker at
which point you must move
to the next car seat.
• Continue to use this child restraint until the child reaches
this limit.
• Do not use forward facing until child’s shoulders are above
the lower shoulder height marker.
• Infants are at risk of serious injury if they face forward
too early.
• Children are at risk of serious injury if they move to booster
seats too early.
• Children who have outgrown this restraint are safest in a
larger child restraint with an in-built harness or a booster seat
until their shoulders reach the upper shoulder height marker
of the restraint.
• The child restraint is unsuitable for the occupant when the
shoulders are above the upper marker. The child needs to
be moved into the next form of child restraint (booster seat)
when they reach the top shoulder height marker.
NOTE :
• If the baby’s neck muscles are unable to support their
head, then the child should remain rear facing.
Conver tible Car S eat I Maxi-Cosi
45
I
Page 46

Fastening the Buckle Assembly
1. To release, press the red button,
the buckle unfastening
2. Insert one buckle tongue as
shown in image.
You will not hear a click.
3. Insert the second buckle tongue
as shown.
Now listen for a “click!”.
Click
Conver tible Car S eat
46
I
4. Remember to always pull up on
the harness straps to make sure
buckle is locked tightly.
DO NOT LEAVE CHILDREN UNATTENDED IN THE CAR.
Maxi-Cosi
I
Page 47

Pull
Pull
Configuring car seat fitment
REMOVING THE INFANT
BODY INSERT:
Loosen the harness, undo the
buckle and pull the insert out an
through the shoulder straps.
Pull
NOTE: Body and headrest inserts are not to be used for foward facing.
NOTE: Inserts are only recommended for the rst 6 months
approximately when rearward facing.
Conver tible Car S eat I Maxi-Cosi
47
I
Page 48

Configuring car seat fitment
REMOVING THE INFANT
HEADREST INSERT:
Slot the shoulder straps behind
the headrest back support
panel and then unclip the inserts
press stud, locared behind the
headrest.
Conver tible Car S eat
48
I
CONFIGURING THE
HARNESS STRAPS FOR
CORRECT CHILD FITMENT
1. Pull-up the harness release
lever at the front of the seat
and pull the shoulder straps
Pull
to loosen.
2. Press red button to release
Push
buckle assembly for ease of
child tment. Pull the harness
straps over the sides of the
car seat.
NOTE: Body or headrest inserts can be used together or in isolation ,
when rearward facing.
Maxi-Cosi
I
Page 49

Configuring car seat fitment
ADJUSTING HEADREST AND
HARNESS HEIGHT
3. Estimate harness he ight ba sed
on recommendations on
ADJUST
HEIGHT
page 50.
4. Press adjuster to release
headrest mechanism, pull or
push simultaneously to adjust
headrest up or down.
5. Release adjuster when desired
height is reached, ensuring the
headrest is locked in position.
Adjust chin support (if tted).
6. Place child in the seat.
7. Fasten buckle assembly, listen
for ‘click’.
8. Pull adjuster strap to tighten.
9. Re-adjust harness and headrest
until desired height is reached.
CHIN SUPPORT
Lift
1. Lift-up the lever at the side of
the headrest, to activate
chin support (if tted).
Do it for both sides.
You MUST make these adjustments with your child before you
install the child restraint in the vehicle. Please adjust harness
according to the infant’s shoulder height prior to installation.
Conver tible Car S eat I Maxi-Cosi
49
I
Page 50

Preparing Harness for Child Fitment
IMPORTANT: ALWAYS ENSURE THAT THE HARNESS ADJUSTER
IS FREE FROM ANY OBSTRUCTIONS TO AVOID HARNESS STRAPS
LOOSENING.
REARWARD-FACING
(Newborn to approximately 30 months)
The shoulder straps must
be in the slots which are
nearest to the child’s
shoulders, but not lower
than the child’s shoulders.
Shoulder
strap
Conver tible Car S eat
50
I
FORWARD-FACING
(12 months to 4 years)
The shoulder straps must
Strap can
be next slot
above
Child
shoulders
Strap cannot
be more than
25mm below
NOTE: Moving the headrest will automatically adjust the
harness height.
Maxi-Cosi
I
be in the slots which are
nearest to the child’s
shoulders, but not more
than 25 mm below the
child’s shoulders.
Page 51

Recline adjustment
The seat is tted with 3
forward-facing recline
positions. The 4th and
most reclined position
is for rearward-facing
use ON LY.
1. Place hand under seat
and squeeze the grey
recline handle.
2. Whilst squeezing, tilt
the seat back gently
to recline.
3. Release the handle
when desired mode is
reached.
NOTE: Never use Position 4 for forward-facing.
• Always adjust the height of the shoulder straps as the child
grows.
• Failure to fasten and tighten the harness system correctly
can result in serious injury or death.
Conver tible Car S eat I Maxi-Cosi
51
I
Page 52

Car installation - Rearward Facing
Checklist before installation:
Rearward Facing
Check that your child’s upper shoulders are NOT
above the middle height marker and if they are,
convert to forward facing.
Harness height is level or above shoulder
but not below.
Rearward facing recline setting 4 is selected.
Forward Facing
Check that your child’s upper shoulders are NOT
below the minumum height marker and if they are,
convert to rearward facing.
Refer to page 44, 50 and 51.
Check that your child’s upper shoulders are NOT
above the upper height marker and if they are,
convert into a seat for children above 4 years of age.
Refer to page 74.
Conver tible Car S eat
52
I
Infant body and headrest inserts have been
removed.
Harness height is level or in the slot closest
to child’s shoulder height.
Forward facing recline setting 1, 2 or 3 is selected.
Maxi-Cosi
I
Page 53

To Adjust the Top Tether Strap
TO LOOSEN
Pull
Push
button
TO TIGHTEN
Push
button
TO LOOSEN:
Press on the adjuster button with thumb and pull on the strap
between the adjuster and the seat.
TO TIGHTEN:
Pull on the extra length of tether strap.
Pull
NOTE: Store the excess webbing in the pocket provided on the
top tether assembly.
CAUTION: CHILDREN CAN BE INJURED OR RESTRAINTS
AND TOP TETHER STRAP DAMAGED BY UNSECURED
CARGO IN A COLLISION. SECURE OR REMOVE HAZARDOUS
CARGO BEFORE USING THIS CHILD RESTRAINT.
Always secure the loose end of the top tether strap to prevent
it hanging out of the car or being accessible by the child.
When not in use, fold hanging tether strap and place in storage
pocket provided.
Conver tible Car S eat I Maxi-Cosi
53
I
Page 54

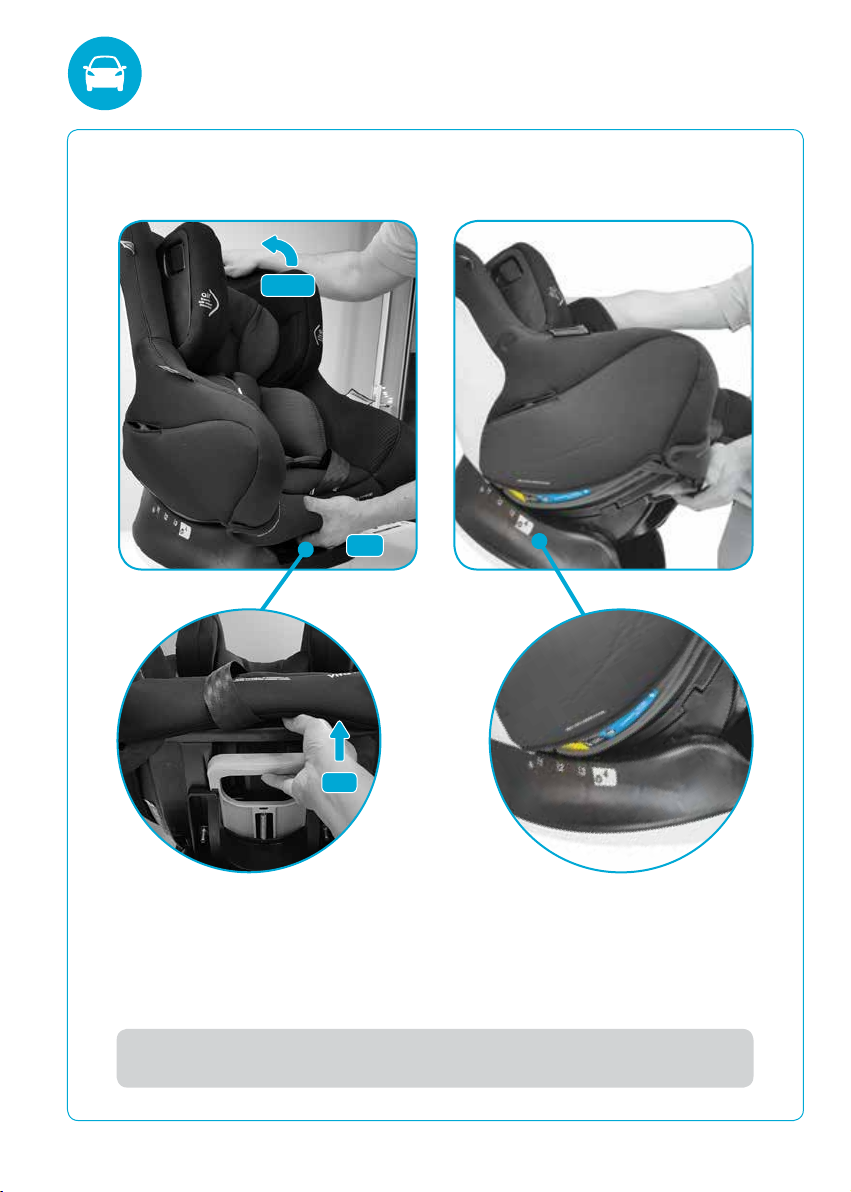
Rearward-Facing Installation Using Seatbelt
1. Ensure ISOGO
latches are secured
and stored in their
slots under the
car seat fabrics
2. Set seat to position 4
(full recline) for
rearward-facing.
3. Loosen full length of the
top tether.
4. Place restraint facing
rearwards on back
seat of vehicle in line
with a top tether strap
anchorage point.
Storage
under fabric
Conver tible Car S eat
54
I
5. Thread the vehicle seat
belt through the BLUE
belt path at the bottom
of the restraint and fasten
buckle.
Ensure vehicle, seat belt
is in-front of harness
waist straps.
Maxi-Cosi
I
Click
Page 55

Rearward-Facing Installation Using Seatbelt
6. Press the child restraint
rmly down into the
vehicle seat and remove
belt slack. (Figure a)
7. Attach the top tether
strap to the anchorage
point. (Figure b)
TIP: Position adjuster facing
outwards.
8. Ensure there are no twists
and turns in the top-tether
belt path (Figure d). Only
one turn is permitted at
the adjuster, allowing it
to be positioned outwards
(Figure c).
Push out
slack
a
Attach top tether
b
Push
Belt Path
Turn
c
Tighten till slack is removed
d
NOTE: There is an option to install seat using seat belt with
accessory locking clip. Please see instructions provided
with locking clip for installation.
Conver tible Car S eat I Maxi-Cosi
55
I
Page 56

Rearward-Facing Installation Using ISOGO
1. Set seat to position 4
(full recline) for
rearward-facing.
2. Remove ISOGO
latches from storage
slots under car seat
fabrics.
Storage
under fabric
Conver tible Car S eat
56
I
3. Place restraint facing
rearwards on back
seat of vehicle in line
with a top tether strap
anchorage point.
Maxi-Cosi
I
Page 57

Rearward-Facing Installation Using ISOGO
4. Locate low anchorage
points. You can nd this
by looking for the
ISOFIX logo located
on the vehicle seat.
5. Attach the lower
connector on both sides.
Listen for a “click!”
Click both
sides
Push
TIP : You can move the car seat out of the way to locate and
attach the connectors, then place back into position before
tightening.
Conver tible Car S eat I Maxi-Cosi
57
I
Page 58

Rearward-Facing Installation Using ISOGO
6. Firmly push child
restraint down into
the vehicle seat
whilst pulling on
the ISOGO straps.
7. Alternate removing
the slack from side
to side until you get
a rm tment and
achieve a majority
GREEN indication.
Push
Pull
Conver tible Car S eat
58
I
TIP: Always check for GREEN at eye level.
Pull loose end parallel to the
belt strap.
CHECK FOR GREEN ONCE
CHILD IS SEATED AS THIS
CAN CREATE ADDITIONAL
SLACK IN SEAT. REMOVE
EXCESS SLACK AS NEEDED.
Maxi-Cosi
I
Pull
Page 59

Rearward-Facing Installation Using ISOGO
8. Attach the top tether
strap to the top anchorage
point in the vehicle.
TIP: Position adjuster facing
outwards.
9. Ensure there are no twists
and turns in the top-tether
belt path (Figure d). Only one
turn is permitted at the adjuster,
allowing it to be positioned
outwards (Figure c).
Turn
c
Attach top tether
Belt Path
Tighten till slack is removed
d
IMPORTANT
Do not attach the lower attachment connectors of
two separate child restraints to the same ISOFIX low
anchorages in your car.
Always attach the top tether strap to the child restraint
upper anchorage in your car. Refer to your owner’s
manual.
Child restraint lower attachment connectors and the ISOFIX
low anchorages in your car are designed to withstand only
those loads imposed by a correctly tted child restraint.
Conver tible Car S eat I Maxi-Cosi
59
I
Page 60

Forward-Facing Installation Using Seatbelt
1. Ensure ISOGO latches
are secured and stored
in their slots under the
car seat fabrics.
2. Select the desired
recline angle (1, 2 or 3).
NOTE: Never use
position 4 for
foward-facing.
3. Place restraint on back
seat of vehicle in line
with a top tether strap
anchorage point.
Click
Sash
Storage
under fabric
Conver tible Car S eat
60
I
4. Thread the vehicle seat
belt through the back
of the seat through the
YELLOW forward-facing
belt path.
Ensure vehicle seat belt
is behind harness waist
straps.
Maxi-Cosi
I
Lap
Page 61

Forward-Facing Installation Using Seatbelt
5. Place one hand on
seat and rmly press
the child restraint
down into the vehicle
seat and pull on
seatbelt to remove
slack.
6. Attach the top tether
strap to the anchorage
point. Adjust until all
the slack is removed.
Ensure Base of seat is
not lifted.
Attach top tether
Pull out
slack
Push
NOTE: If the car seatbelt is not long enough to secure the child
restraint, DO NOT USE SEAT BELT EXTENDERS.
NOTE: There is an option to install seat using seat belt with
accessory locking clip. Please see instructions provided
with locking clip for installation.
Conver tible Car S eat I Maxi-Cosi
61
I
Page 62

Forward-Facing Installation Using ISOGO
1. Remove ISOGO
latches from storage
slots under car seat
fabrics.
2. Select the desired
recline angle (1, 2 or 3).
NOTE: Never use position 4
for foward-facing.
3. Place restraint on back
seat of vehicle in line
with a top tether strap
anchorage point.
Storage
under fabric
Conver tible Car S eat
62
I
Maxi-Cosi
I
Page 63

Forward-Facing Installation Using ISOGO
4. Locate low anchorage
points. You can nd this
by looking for the ISOFIX
logo located on the
vehicle seat.
5. Attach the lower
connector on both
sides. Listen for a
“click!”
Click both
sides
Push
TIP : You can move the car seat out of the way to locate and
attach the connectors, then place back into position before
tightening.
Conver tible Car S eat I Maxi-Cosi
63
I
Page 64

Forward-Facing Installation Using ISOGO
6. Firmly push child restraint
down into the vehicle seat
whilst pulling on the
ISOGO straps.
7. Alternate removing the
slack from side to side
until you get a rm
tment and achieve
a majority GREEN
indication.
Push
Pull
Conver tible Car S eat
64
I
TIP: Always check for GREEN at eye level.
Pull loose end parallel to the
belt strap.
CHECK FOR GREEN ONCE
CHILD IS SEATED AS THIS
CAN CREATE ADDITIONAL
SLACK IN SEAT. REMOVE
EXCESS SLACK AS NEEDED.
Maxi-Cosi
I
Pull
Page 65

Forward-Facing Installation Using ISOGO
8. Attach the top tether
strap to the top
Attach top tether
anchorage point in
the vehicle.
9. Ensure there are
no twists in the belt,
and adjust until all
slack is removed
from top tether.
IMPORTANT
Do not attach the lower attachment connectors of
two separate child restraints to the same ISOFIX low
anchorages in your car.
Always attach the top tether strap to the child restraint
upper anchorage in your car. Refer to your owner’s
manual.
Child restraint lower attachment connectors and the ISOFIX
low anchorages in your car are designed to withstand only
those loads imposed by a correctly tted child restraint.
Conver tible Car S eat I Maxi-Cosi
65
I
Page 66

Care and Maintenance - Buckle
When caring for your restraint’s buckle,
follow the manufacturer’s instructions
at all times. Before removal, ensure you
have carefully noted the way which the
various parts are attached to the seat so
as to facilitate reassembly.
1
Your child car seat is equipped with
a buckle designed to give your child
maximum protection during proper use
(Figure 1). When working properly, your
buckle should always fasten with an
audible ‘CLICK’.
1a
1b
1c
1d
If sticky liquids (such as baby food, fruit
juice, etc.) get into the buckle it may
become sluggish and you will not hear a
‘CLICK’.
REMOVING BUCKLE:
1. Set seat in position 4 (full recline)
(Figure 1a).
2. Lay seat on its back to access crotch
adjustment (Figure 1b).
3. Using a at object (such as a at-
head
screw-driver, not included) gently lift
one
end of the Metal Plate to loosen
(Figure 1c), repeat on the other side.
4. Push the metal plates through the top
opening to release crotch buckle for
cleaning (Figure 1d).
Conver tible Car S eat
66
I
Maxi-Cosi
I
Page 67

2
Repeat until
it click
2a
Care and Maintenance - Buckle
CLEANING BUCKLE:
• Place the buckle unit under running
water (40 degrees Celsius),
(Figure 2). Let the water ow
through the mouth of the buckle
for one minute.
• Simultaneously latch and unlatch
the tongues into the buckle several
times until a strong audible click is
heard (Figure 2a).
• If you still cannot hear a strong
audible click after latching the
buckle several times. Repeat steps
above.
• DO NOT oil any part of the buckle.
• Allow buckle to completely dry.
REFITTING BUCKLE:
• Ret crotch buckle ensuring RED
button is facing out (Figure 2b).
2b
• Place the two metal plates back
through openings.
• Pull up on each side of the crotch
straps rmly to snap the metal
plates back into place (Figure 2c).
2c
• If the buckle does not return to original working order,
contact Dorel Australia Customer Service on 1300 809 526.
• If you are a New Zealand customer, please contact IGC
Dorel New Zealand Customer Service on 0800 628 000.
Conver tible Car S eat I Maxi-Cosi
67
I
Page 68

Care and Maintenance - Seat Fabrics
WASHING INSTRUCTIONS
Conver tible Car S eat
68
I
Lukewarm setting
– delicate cycle
All other surfaces
should be cleaned with
a mild soap and water
Tumble dry
10-15 minutes
on low heat
Never clean with bleach
or spirit-type cleaners
Do not dry clean
VERY IMPORTANT:
Only replace the cover with a manufacturer’s supplied
replacement cover with identical shoulder height markers or
a replacement cover meeting AS/NZS 8005.
Maxi-Cosi
I
Page 69

Care and Maintenance - Seat Fabrics
TO REMOVE FABRIC ACCESSORIES:
1. Remove the belt mates by unclipping
the press-studs. See image a.
2. Remove the inserts as per
page 47-48
a
b
c
Top
Velcro
d
Lower
Velcro
REMOVING THE HEADREST
FABRICS:
3. First, adjust the headrest into the
highest position. You may need to
loosen the harness rst.
4. Undo the two press studs on the top
and then the other two on the
bottom of the headrest.
See image b and c.
5. If chin support is tted, carefully
remove the Velcro tments between
the lower Air Protect cell and the
bottom Velcro strip before nishing
on the top strip. See image d.
6. Once the press studs and the Velcro
strips (if tted) are released, pull the
headrest fabrics away from the seat
gently and the other tucked areas
should gradually release. Please
gently release stuck or tricky areas
as they occur during this process.
CAUTION: Negligent care when removing the Velcro
attachment, could result in the accidental removal of the
Air Protect cell.
Conver tible Car S eat I Maxi-Cosi
69
I
Page 70

Care and Maintenance - Seat Fabrics
TO REMOVE THE BODY FABRICS
7. First, adjust the headrest into the lowest position.
8. Undo all of the press stud xing points starting from the front of
the seat and working your way back. The locations are mirrored
and outlined below:
Underneath each side of the
built-in rebound bar.
See image e.
Inside the seat, midway up
the back support and to the
upper section of the seat
e
There are
2 press studs
behind the
headrest
behind the headrest.
Conver tible Car S eat
70
I
f
g
Outside and at the rear of the seat, midway up the back support,
beside the G-CELL and at the upper most part of the back panel,
near the top tether slot positions (underneath the rear fabric panel).
See image h and i.
h
Maxi-Cosi
I
i
Page 71

k
Care and Maintenance - Seat Fabrics
9. Pull the ISO-FIX latches
out from their storage and
feed them back through
the fabric slots on either
side of the seat so the
strap is internal of the
j
fabrics.
See image j, k and l.
10. Pull the internal parts of
the fabrics back support,
forward so the harness
straps are behind the fabrics.
See image m.
Unclip the Anti-twist
Harness Preventers by
releasing the press-studs
around the harness waist
straps.
See image n.
l
m n
Conver tible Car S eat I Maxi-Cosi
71
I
Page 72

Care and Maintenance - Seat Fabrics
11. Begin untucking the fabrics out from behind the security of
the G-CELL covers, gradually and carefully making your way
around each of the panels until the fabrics are completely
free of the covers. See image p and q.
o
CAUTION: The G-CELL cover is rigid and tight to better
secure safety components and oer a tailored look.
Failure to take enough care when releasing the fabrics
from around this cover could result in pilling or damage
to your seat cover.
p
12. Pull the back fabric
panel up and through the
top tether strap so that it
is released and in front
of the strap.
q
Conver tible Car S eat
72
I
Maxi-Cosi
I
Page 73

Care and Maintenance - Seat Fabrics
13. Pull the fabric covers out
and around the built in
rebound bar at the front
of the seat.
r
14. After completing these
steps and inspecting the
fabric covers for any
other points of attachment,
gently lift and pull the fabrics
away from the seat. Please
gently release stuck or tricky
s
areas as they occur during
this process.
To replace the fabrics for Vita:
Follow the removal process in reverse order by rst placing the
body fabric covers over the seat with the headrest in the lowest
position, using only a few general loose points of attachment to
make sure it is spread over correctly. Once conrmed, proceed
with attaching each point as outlined above.
TIP: Use the back side of a tea-spoon when tucking the
fabrics in behind the G-CELL cover, to ensure a perfect t.
Conver tible Car S eat I Maxi-Cosi
73
I
Page 74

The Next Seat for your Child
Option 1:
HARNESSED FORWARD-FACING CAR SEAT
To be used only in a forward-facing position
by a child whose shoulders are above the
lower shoulder height marker (approximately
6 months of age) until the child’s shoulders
reach the upper shoulder height marker
(approximately 8 years of age).
Option 2:
BOOSTER SEAT
To be used with a lap-sash seatbelt by a child
whose shoulders are above the lower shoulder
height marker (approximately 4 years of age)
until the child’s shoulders reach the upper
shoulder height marker (approximately 6 to
8 years of age). Can also be used with child
harness that is approved for use with this
booster seat.
Conver tible Car S eat
74
I
Maxi-Cosi
I
Option 3:
LARGER BOOSTER SEAT
To be used with a lap-sash seatbelt by a child
whose shoulders are above the lower shoulder
height marker (approximately 4 years of age)
until the child’s shoulders reach the upper
shoulder height marker (approximately 8 to
10 years of age). Can also be used with child
harness that is approved for use with this
booster seat.
For more information,
visit maxi-cosi.com.au
Page 75

Guarantee
Dorel Australia Pty Ltd warrants your new product to be free from defects in materials
and workmanship for 10 years on the seat & 3 years on the trim, from the date of
purchase, provided that the product is used in accordance with accompanying
recommendations or instructions where provided. The benet of this warranty is in
addition to your rights under the Australian consumer law and to other rights and
remedies of the consumer under a law in relation to the goods or services to which
the warranty relates.
Dorel Australia Pty Ltd will provide you with your choice of a refund, repair or
exchange (where possible) for this product if it becomes defective within the warranty
period. Dorel Australia Pty Ltd will bear the reasonable expense of claiming the
warranty. This warranty will no longer apply where the defect is a result of alteration,
accident, misuse, abuse or neglect.
Please retain your receipt as proof of purchase or register your product with us within
3 months from point of purchase via our website www.maxi-cosi.com.au. If you
are having diculties with your product contact our Customer Service Team on ph:
1300 809 526 or alternatively, via our website at www.dorel.com.au. Warranty claims
and claims for expense incurred in returning this product can be addressed to our
Customer Service Team at 655-685 Somerville Road, West Sunshine, Vic, 3020.
Hours: 8:30 am to 5:00 pm, Monday to Friday.
For New Zealand please contact Customer Service Centre, 14 Sir William Avenue,
East Tamaki, Auckland, 2013. Auckland: (09) 274 1040 NZ wide: 0800 628 000
(toll free). Hours: 8:00am - 4:00pm, Monday to Friday.
Our goods come with guarantees that cannot be excluded under the Australian
consumer law. You are entitled to a replacement or refund for a major failure and
compensation for any other reasonably foreseeable loss or damage. You are also
entitled to have the goods repaired or replaced if the goods fail to be of acceptable
quality and the failure does not amount to a major failure.
Australian
Standard
AS/NZS 1754 Lic 1491
SAI Global
Conver tible Car S eat I Maxi-Cosi
75
I
Page 76

Notes
Conver tible Car S eat
76
I
Maxi-Cosi
I
Page 77

Notes
Conver tible Car S eat I Maxi-Cosi
77
I
Page 78

Notes
Conver tible Car S eat
78
I
Maxi-Cosi
I
Page 79

Notes
Conver tible Car S eat I Maxi-Cosi
79
I
Page 80

Dear Customer,
Don’t forget to register your product
within 3 months of purchase for
the Lifetime Warranty oer
*
.
Please visit to register now.
www.maxi-cosi.com.au
Suitable for models:
• DAU - 13 - A
• DAU - 13 - B
© 2019 Dorel Australia, Pty Ltd. All Rights Reserved.
#019729 _B 05/2019
* Terms and conditions apply.
Pleas e visit our web site to find out mo re.
Conver tible Car S eat
80
I
Maxi-Cosi
I
 Loading...