

Page 1
LITHUANIA
(
)
AS Greifto
Pärnu mnt. 139c
11317 Tallinn
Tel. (6) 56 33 06
Fax (6) 56 33 11
E-mail greifto@datanet.ee
LUXEMBOURG
Dorel Benelux
Brussels Int. Trade Mart
Postbus/B.P. 301
Aquarelle 366
1000 Brussel/Bruxelles
Tel. 0800 1 17 40
Fax +31 492 578 122
MALAYSIA
Planete Enfants Sdn. Bhd
No. 23, Jalan SS 26/15
Taman Mayang Jaya
47301 Petaling Jaya
Selangor, Malaysia
Tel. 603-78035523
Fax 603-78035323
E-mail julia.lim.my@gmail.com
MALTA
Rausi Company Limited
J.P.R. Buildings
Ta Zwejt Street
San Gwann Industrial Estate
San Gwann SGN 09
Tel. +356 21 44 56 54
Fax +356 21 44 56 57
E-mail rausi.info@rausi.com.mt
MAURITIUS
Meem Trading
38 Sir S. Ramgoolam Street
Port Louis
Mauritius
Tel. 2302403632
Fax 2302411589
E-mail meem@intnet.mu
MÉXICO
D’bebé SA de CV
Girardón # 84
Colonia Alfosno XIII, Mixcoac.
México D.F. 01420
Tel. (52)(55) 15-00-23-23
Fax (52)(55) 55-98-51-08
E-mail dbebe@dbebe.com.mx
NEDERLAND
Dorel Netherlands
P.O. Box 6071
5700 ET Helmond
Tel. 088 - 123 24 42
NEW ZEALAND
IGC Dorel Pty Ltd
655-685 Somerville Road
Sunshine West, VIC 3020 Australia
Tel. +61(3) 8311 5300
Fax +61(3) 8311 5390
E-mail sales@igcdorel.com.au
NORWAY
BabyWorld DA (sales agent)
Teglverksveien 25b
N - 3057 Solbergelva
Tel. 32 23 00 54 / 957 39 068
Fax 32 23 03 12
E-mail info@baby-world.no
NORWAY
Dorel Netherlands
P.O. Box 6071
5700 ET Helmond
The Netherlands
OSTERREICH
Dorel Germany
Vertrieb Österreich
Augustinusstraße 9c
D-50226 Frechen-Königsdorf
Deutschland
Tel. +49 2234 / 96 43 0
Fax +49 2234 / 96 43 33
PANAMA
BEST BRANDS COMMERCIAL
C. Cial Bal Harbour
Galerias, Oficina 101
Paitilla
Panama, Panama
Tel. (507) 300-2884,
Tel. 1-(305)433-2269
Fax (507) 300-2885
POLAND
Poltrade Waletko
Spolka Jawna
41-500 Chorzow
Ul. Legnicka 84/86
Tel. (032) 346 00 81
Fax (032) 346 00 82
www.maxicosi.pl
biuro@poltradewaletko.pl
www.poltradewaletko.pl
PORTUGAL
Dorel Portugal LDA
Parque Industrial Da Gandara Rua
Pedro Dias, 25
4480-614 Rio Mau- Vila Do Conde
Tel. 252 248 530
Fax 252 248 531
E-mail maxi-cosi@dorel-pt.com
ROMANIA
SC Miniblu SRL.
Calea Rahovei, 266-268, corp 60
Etaj 1; Axele A Si B, Stalpii 15-16
Bir. 104-114;Secotr 5, Bucuresti
Tel. +40 21 404 14 00
Fax +40 21 404 14 01
E-mail office@miniblu.ro
RUSSIA
Carber Poriferra
107392 Moskva, Russia
1aå Pugahevskaå u ., 17
1st Pugachevskaya str. 17
RUS-107392 Moscow
Tel. +8(499) 161 25 91
Fax +8(499) 161 26 48
E-mail maxi-cosi@carber.ru
SINGAPORE
B.I.D. Trading PTE Ltd.
69, Kaki Bukit Ave 1
Shun Li Industrial Park
Singapore 417947
Tel. +65 68441188
Fax + 65 68441189
E-mail
sales@babyhyperstore.com
SLOVAKIA
LIBFIN SK s.r.o
Šoltésovej 12
811 08 Bratislava
Tel. +421 250 219 140
Fax +421 250 219 240
Email info@libfin.sk
www.libfin.sk
SLOVENIA
Baby Center d.o.o.
Letališka c. 3c
Ljubljana
Tel. 00386 01 546 64 30
Fax 00386 01 546 64 31
E-mail uprava@baby-center.si
SOUTH AFRICA
Anchor International
12 Kimberlite Road, Theta Ext.5
Booysens Reserve,
Johannesburg, 2091
P.O.Box 546, Crown Mines,
Johannesburg, 2025
Tel. (011) 835 - 2520
Fax (011) 835 - 3718
E-mail anc.int@mweb.co.za
SOUTH KOREA
YKBnC Co., Ltd.
5F Kins Tower, Intellige 1,
25-1, Jeongja-dong, Bundang-gu,
Seongnam-si, Gyeonggi-do, Korea
Tel: (82) 31 712 8707
Fax: (82) 31 712 8767
www.sbaby.co.kr
SWEDEN
Amvina
Box 7295
187 14 Täby
Sweden
Tel. +46 (0)8 732 88 50
Fax +46 (0)8 732 88 51
E-mail info@amvina.se
www.amvina.se
SWEDEN
Dorel Netherlands
P.O. Box 6071
5700 ET Helmond
The Netherlands
SWITZERLAND
Dorel Juvenile Switzerland SA
Chemin de la Colice 4
1023 Crissier
Tel. 0041 (0) 21 661 28 40
Fax 0041 (0) 21 661 28 45
E-mail info.suisse@ch-dorel.com
TAIWAN
Topping Prosperity Inc.
6F, No.49, Lane 76,
Ruey-Guang Road,
Ney-Hwu District, Taipei, Taiwan
Tel. 02-87924158
Fax 02-87911586
E-mail
topping2@ms21.hinet.net
THAILAND
Diethelm
Sukhumvit Road 2535
Bangchak
Prakanong
10250 Bangkok
Tel. 662 332 6060-89
Fax 662 332 6127
anuchida.i@dksh.com
TURKEY
Grup LTD.
Kayisdagi Cad. No:7
Küçükbakkalköy-ISTANBUL
Tel. 0216 573 62 00 (pbx)
Faks 0216 573 62 09
E-mail destek@grupbaby.com.tr
www.grupbaby.com.tr
UKRAINE
Europroduct
4th floor, 53b
Arnautskaya St
65012 Odessa
Tel 00 380 482 227 338
Fax 00 380 482 345 812
E-mail europroduct@te.net.ua
UKRAINE
Amigo Toys
bul. Shevchenko 29
Donetsk 83017
Tel. 00380-62-3353478
Fax 00380-62-3859974
E-mail info@amigotoys.com.ua
UNITED ARAB EMIRATES
DutchKid FZ Co
P.O.Box 333741
Dubai, United Arab Emirates
Tel. +971 4 3232500
Fax +971 4 3232900
UNITED KINGDOM
Dorel U.K.
Hertsmere House
Shenley Road
Borehamwood, Hertfordshire
WD6 1TE
www.maxi-cosi.com
UNITED STATES
Dorel Juvenile Group, Inc.,
2525 State St., Columbus,
IN47201-7494
Tel. (800) 951-4113
..0528952
Axiss
EN Instructions for use/Warranty
FR Mode d’emploi/Garantie
DE Gebrauchsanweisung/Garantie
NL Gebruiksaanwijzing/Garantie
ES Instrucciones de uso/Garantia
IT Istruzioni per l’uso/Garanzia
EN 7-16
FR 17-26
DE 27-36
NL 37-46
ES 47-56
IT 57-66
EN Product registration for optimum service
To maximize the guarantee, you can register your Maxi-Cosi Axiss at www.maxi-cosi.com.
You will need the product number to register. This can be found on the sticker attached to the bottom of the frame.
FR Enregistrement de produit pour un service optimal
Pour maximiser votre garantie, vous pouvez enregistrer votre Maxi-Cosi Axiss sur www.maxi-cosi.com.
Pour ce faire, vous avez besoin du numéro de produit. Ce dernier figure sur l’autocollant au bas du châssis.
DE Produktregistrierung für optimalen Service
Um sich Ihren Garantieanspruch in vollem Umfang zu sichern, können Sie Ihren Maxi-Cosi Axiss auf der Website
www.maxi-cosi.com registrieren. Dafür benötigen Sie die Seriennummer des Produkts. Sie finden die Seriennummer
auf dem Sticker an der Unterseite des Fahrgestells.
NL Productregistratie voor optimale service
Om de garantie te maximaliseren kunt u uw Maxi-Cosi Axiss registreren op www.maxi-cosi.com.
Hiervoor heeft u het productnummer nodig. Dit kunt u vinden op de sticker aan de onderzijde van het frame.
ES Registro de producto para un servicio óptimo
Para maximizar la garantía, puede registrar su Maxi-Cosi Axiss a través de www.maxi-cosi.com.
Necesitará indicar el número de producto. Podrá encontrarlo en la pegatina situada en la parte inferior del bastidor.
IT Registrazione del prodotto, per un’assistenza ottimale
Per ottenere il massimo della garanzia, potete registrare il vostro Maxi-Cosi Axiss sul sito www.maxi-cosi.com.
A tal scopo, vi occorre il numero del prodotto, che è riportato sull’adesivo situato sul lato inferiore del telaio.
GR. 1
9 - 18 Kg
www.maxi-cosi.comwww.maxi-cosi.com
Page 2
OK
NO
1
OK
NO
NO
CLICK!
OK
NO
NO
OK
NO
1
8
a
CLICK!
OK
b
1
8
a
b
2
9
a
OK
b
3
a
b
10
4
b
a
11
5
CLICK!
a
b
c
a
b
a
c
14 19 25
a
b
15
PUSH
b
a
b
31
20
26
a
b
2
21
1
16
a
b
PUSH
a
27
c
b
32
x 2
33
22
28
a
b
17
PUSH
34
23
CLICK!
CLICK!
12
c
b
OK
NO
18
13
24
a
b
29
a
30
35
36
a
b
6
a
b
CLICK!
c
7
ARGENTINA
Bebehaus S.A.
Guatemala 4831 Ciudad Autónoma de Buenos Aires
C1425BUO
Tel. + 54 (11) 4776-6954
Fax + 54 (911) 6265 0665 /
+ 54 (911) 5050 2339
E-mail info@bebehaus.com.ar
www.bebehaus.com.ar
AUSTRALIA
IGC Dorel PTY Ltd
655-685 Somerville Road
Sunshine West, VIC3020
Tel. +61 (3) 8311 5300
Fax +61 (3) 8311 5390
E-mail sales@igcdorel.com.au
AZERBEDJAN
Breshna
Passage 24
2511 AD The Hague
The Netherlands
Tel. +31 (0) 703465534
Fax +31 (0) 703628924
BELGIE/BELGIQUE
Dorel Benelux
Brussels Int. Trade Mart
Postbus/B.P. 301
Aquarelle 366
1000 Brussel/Bruxelles
Tel. 0800 1 17 40
Fax +31 492 578 122
www.maxi-cosi.com
BRASIL
BBtrends Im&Exp Ltda
Al. Gabriel Monteiro da Silva,
235 – Jardins
São Paulo – SP – Brasil
Cep: 01.441-000
Tel. +55 11 3377 9200
BULGARIA
Nedelchev & Nedelchev Ltd.
compl. “Gotze Delchev”
Ul. Silivria 16
Sofia 1404
Tel. 02-958 26 29
Fax 02-958 26 51
E-mail info@nn-bg.com
www.nn-bg.com
CANADA
Dorel
Dorel Distribution
873 Hodge
St. Laurent
QCH4N 2B1
CESKÁ REPUBLIKA
Libn s.r.o.
LegionŠřů 72
276 01 MělnŪk
Tel. +420 315 621 961
Fax +420 315 628 330
E-mail: info@libn.cz
www.libn.cz
CHILE
Mundo petit
Av. Nueva Costanera 3986,
Interior, Vitacura
Santiago, Chile
Tel. +56 (2) 415 9103 / 415 9864
Tel. +56 (8) 294 9628
Fax +56 (2) 356 4749
http:///www.mundopetit.com
COLOMBIA
Cangurus Mom´s and babies
Cra. 7 A No. 121 - 33
Bogotá - Colombia
Tel. +57 1 6127257
Fax +57 1 6127257
E-mail info@cangurus.com.co
CROATIA
Media Commerce d.o.o.
CMP Savica Šanci
Majstorska 5
10000 Zagreb
Tel. 00385 1 2406-500
Tel. 00385 1 2406-501
Fax 00385 1 2406-499
E-mail
media-commerce@zg.htnet.hr
www.media-commerce.com.hr
CROATIA
Magma
Att. Valentina Gulam
Cabdin BB
10 450 Jastrebarsko
CURAÇAO
Mom & Co.
Promenade Shopping Center C3
Tel. 00 5999 7360 755
Fax 00 5999 7360 744
E-mail info@momandco.com
CYPRUS
Xenofon Demetriades and Son Ltd
Digeni Akrita 39H,
1070 Nicosia, Cyprus.
Tel. 00357 99620137
Fax 00357 22750463
E-mail gkzorpas@cytanet.com.cy
www.demetriades.com.cy
DANMARK
Babysam A.m.b.A.
Egelund A 27-29
6200 Aabenraa
Tel. 74 63 25 10
Fax 74 63 25 11
E-mail babysam@babysam.dk
DEUTSCHLAND
Dorel Germany
Augustinusstraße 9c
50226 Frechen-Königsdorf
Tel. 0049 (0) 2234 / 96 43 0
Fax 0049 (0) 2234 / 96 43 33
ESPAÑA
Dorel Hispania S.A.
Edifici del Llac Center
C/ Pare Rodés, 26 - Torre A 4ª Planta
08208 Sabadell (Barcelona)
Tel. 937 243 710
Fax 937 243 711
ESTONIA
AS Greifto
Pärnu mnt. 139C
11317 Tallinn
Tel. (6) 56 33 06
Fax (6) 56 33 11
E-mail greifto@datanet.ee
FINLAND
Lastentarvike
Sarkatie 3
1720 Vantaa
Tel. +358 985205526
Fax +358 985205426
FRANCE
Dorel France
Z.l. / 9 bd du Poitou - BP 905
49309 CHOLET CEDEX
Tel. 00-33-2-41-49-23-23
Fax 00-33-2-41-56-17-13
GREECE
Dionic SA
95 Aristotelous Str
13671 Axarnes
Athens
Tel. +3 210 2419582
Fax +3 210 2404290
E-mail info@unikid.gr
GUATEMALA
Websolutions, S.A. 20
calle 24-60 Zona 10
Ofibodega No. 9
Guatemala City 01010
Tel. 502 2369-4726
Tel. 502 5200-0867
HONG KONG
Chup Shing Trading Co.Ltd.
Block A, 7/F, Unit J
25-31 Kwai Fung Crescent
Marvel Industrial Building
Kwai Chung N.T.
Tel. (852) 24 22 21 01
Fax (852) 24 89 10 92
HUNGARY
Recontra Kft.
Badacsonyi u. 24
1113 Budapest
Tel. (01) 209 26 32/209 26 33
Fax (01) 209 26 34
E-mail recontra@recontra.hu
ICELAND
Fífa ehf.
Husgagnahollin
Bildshofda 20
IS-110 Reykjavik
Tel. +354-5522522
E-mail fifa@fifa.is
INDONESIA
PT. Sumber Aneka Karya Abadi
JL. Batu Ceper No. 2 B-C-E
Jakarta 10120
Tel. +62-21-3854444
Fax +62-21-3442617
E-mail sakaindonesia@gmail.com
IRAN
Nowrouz Nia
Mirdamad Ave.-Valiasr Ave.
Eskan-shopping Center
No. 13 Eskan - Maxi Cosi
IRAN - 19 696 Tehran
Tel. + 982188787378
Fax + 982188775702
E-mail maxicosinia@yahoo.com
IRELAND
Dorel Ireland Ltd
All n one Ltd
42 Western Parkway
Business Park
Lower ballymount Road
Dublin 12
Ireland
Tel. 353-(1)4294055
Fax 353-(1)4294010
ISRAEL
Shesek Ltd.
28B Halechi Street
Bnei Brak 51200
Israel
Tel. 972 3 5775 133
Fax 972 3 5775 136
E-mail einat_a@shilav.com
ITALIA
Dorel Italia
Via Verdi, 14
24060 Telgate (Bergamo)
P.I. IT 02304040161
Tel. 035 44 21 035
Fax 035 44 21 048
E-mail info@it-dorel.com
JAPAN
GMP International Co.Ltd.
1-19-4, Yoyogi-Park Bldg.
Tomigaya, Shibuya-Ku
Tokyo, 151-0063
KENIA
P.O. Box 45221-00100,
Nairobi Kenya
Viking house, ground floor,
Waiyaki way
Tel: +254716627009 or
+254722761092
info@coochycoo.co.ke
www.coochycoo.co.ke
LATVIA
AS Greifto
Pärnu mnt. 139C
11317 Tallinn
Tel. (6) 56 33 06
Fax (6) 56 33 11
E-mail greifto@datanet.ee
LEBANON
Gebran Geahchan & Sons
Azar Building
Horch Tabet
P.O.Box 55134
Sin El Fil
Tel. 961 1 482369
Fax 961 1 486997
Page 3

DEAR PARENTS
Congratulations on your purchase of the Maxi-Cosi Axiss.
During the development of the Maxi-Cosi Axiss, we paid
special attention to safety, ease of use, comfort and design.
As a result of this, this product fulfils the most stringent
safety requirements.
Studies have shown that a large percentage of child car seats
are not used correctly. It is therefore important that you take
the time to read these instructions through carefully. The
optimum safety of your child is only guaranteed if the
Maxi-Cosi Axiss is used correctly.
Continuous research by our product development and
marketing departments, both by intensive cooperation
with test institutes and in consultation with consumers and
customers, ensures that we remain at the forefront in the
area of child safety in the car. If you have any questions or
remarks concerning the use of the Maxi-Cosi Axiss, we will
be happy to hear from you.
Dorel (address and telephone number on the back of this
instruction manual)
1 IMPORTANT: READ FIRST!
WARNING
- Read this instruction manual carefully and
retain it as a reference by keeping it in the
storage compartment at the rear of the car
seat. If these instructions are not followed, the
safety of a child may be severely endangered.
- Only use original accessories and parts
that have been approved by the manufacturer.
Do not make any modifications to the product.
Contact your supplier or importer if you have
any complaints or problems.
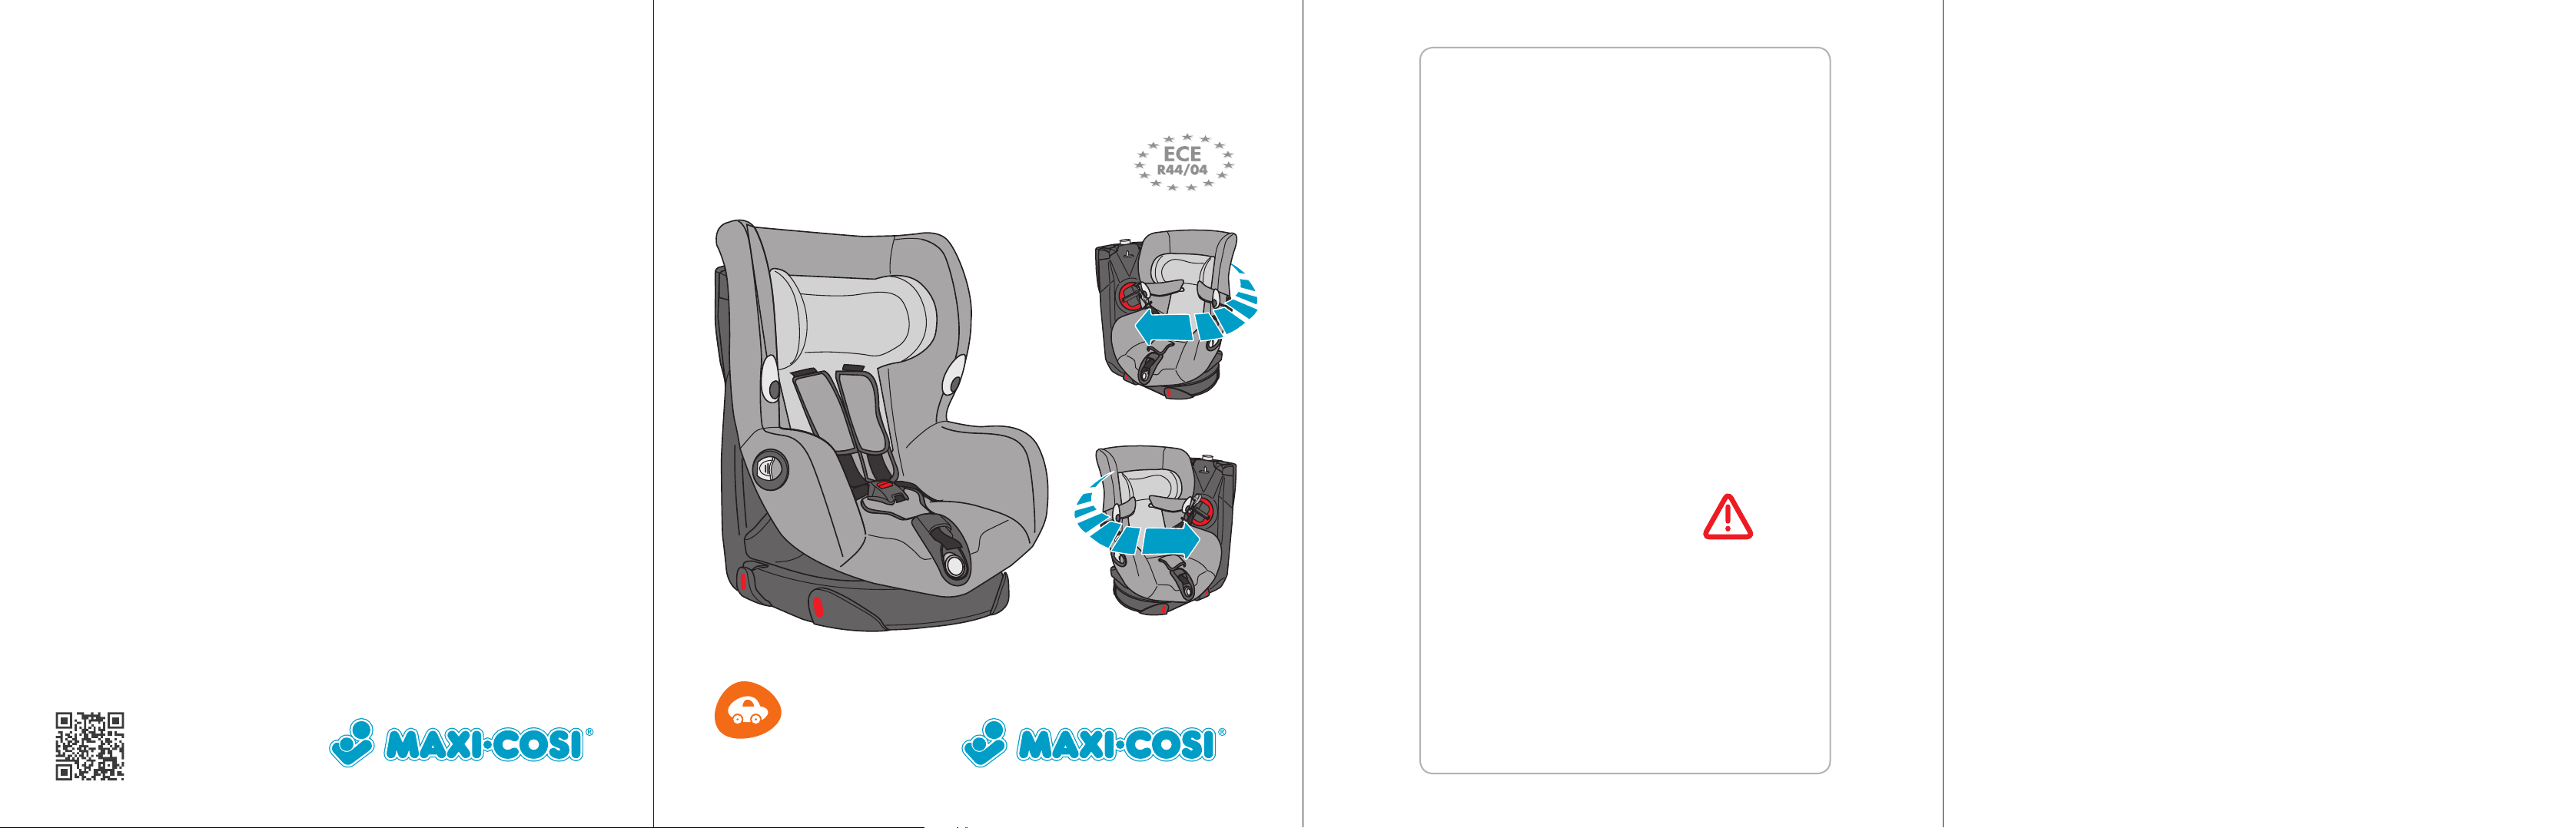
Maxi-Cosi Axiss approved according to ECE R44/04
Group Child’s Body Age
Weight
Group 1 (9 - 18 kg) 9 months -
approx 3.5 years
English
CONTENTS
1 IMPORTANT: READ FIRST!
2 PRODUCT DESCRIPTION
3 INSTALLATION AND REMOVAL OF THE MAXI-COSI
AXISS
4 REMOVING THE MAXI-COSI AXISS FROM THE CAR
5 ADJUSTING THE HEIGHT OF THE SHOULDER BELTS
6 PLACING THE CHILD INTO THE CAR SEAT
7 REMOVING THE CHILD FROM THE CAR SEAT
8 ADJUSTING THE SITTING AND SLEEPING POSITION
9 MAINTENANCE AND REMOVING THE FABRIC COVER
10 WARRANTY
11 QUESTIONS
Disclaimer:
The utmost care was exercised in designing and compiling this
instruction manual. We cannot, however, offer any guarantees
with regard to the completeness and correctness of the
information contained herein.
- The shoulder belt should be adjusted to the
height of your child (see page 12).
- To place your child into the Maxi-Cosi Axiss
correctly, you should carefully follow the
instructions on page 12.
7
Page 4
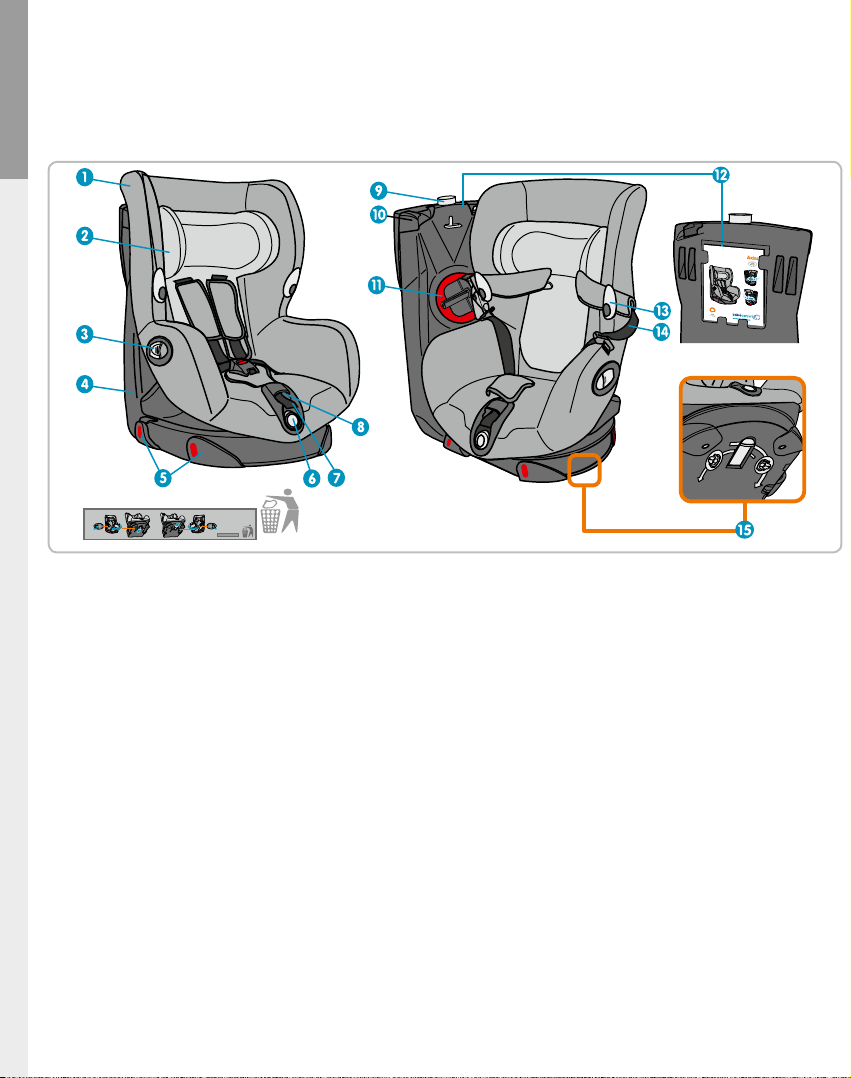
2 PRODUCT DESCRIPTION
English
1. Fabric Cover
2. Adjustable headrest
3. Handle for rotating the
seat shell
4. Car seat support (base)
5. Belt guides for the lap
part of the seat belt
6. Control button for
adjusting the sitting and
sleeping position
7. Fastening strap for the
seat belt system
8. Control button for the
shoulder straps
9. Red/green indicator for
locking the seat shell
8
10. Belt guide for the
shoulder strap
11. Seat belt tensioner (for
fastening the shoulder
part of the belt)
12. Storage compartment for
instruction manual
13. Belt hook
14. Shoulder belt of harness
15. Button for adjusting
direction of rotation of
seat shell (left or right)
Special features
For ease of use, the Maxi-Cosi Axiss comes with the following
features:
• The seat shell can be rotated to the right or to the left
depending on where the car door is, to make placing the
child easier.
• A seat belt tensioner so that the seat belt is secured extra
tightly.
Page 5
3 INSTALLATION AND REMOVAL OF
THE MAXI-COSI AXISS
Installation with 3-point belt
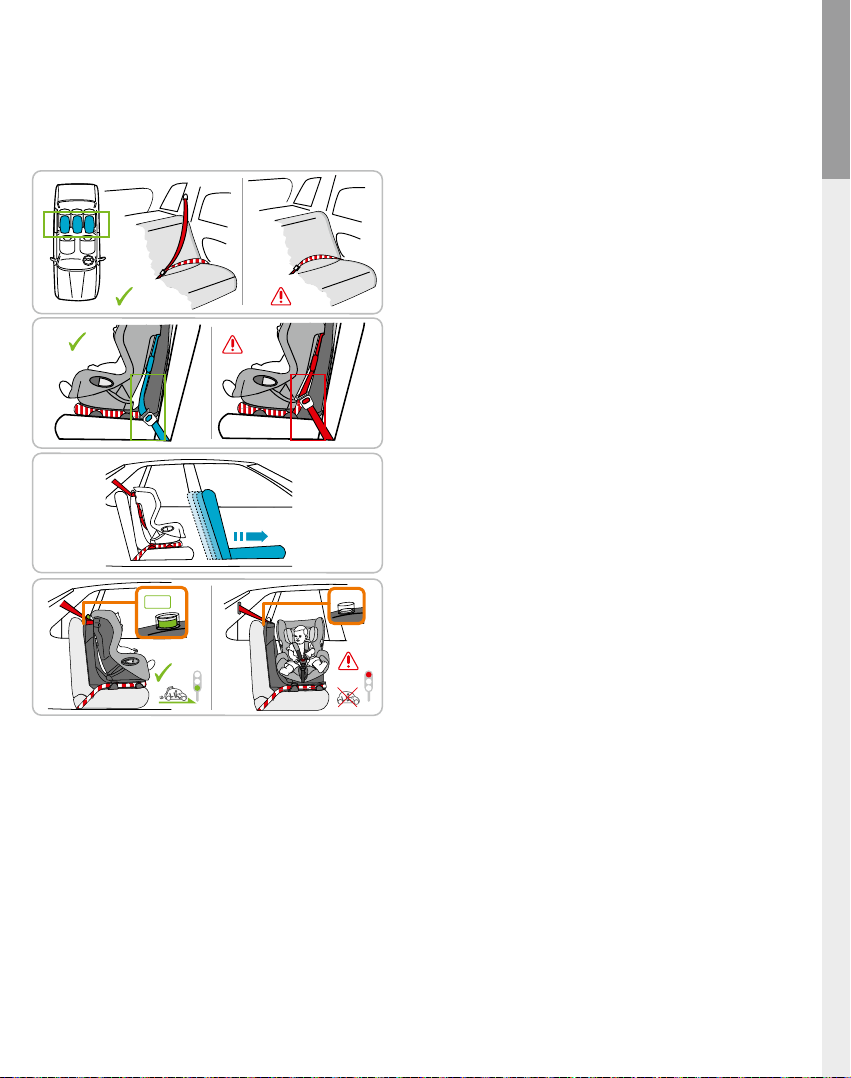
(follow red colour marks on product).
A. Installation
- CAUTION: Lock fold-down rear seats before installing
- CAUTION: In some cases, the seat belts are positioned
The Maxi-Cosi Axiss should preferably be installed on a
rear seat. If this is not possible, it can be installed on the
passenger seat providing this does not contravene local laws
in the country where the car seat is used.
the Maxi-Cosi Axiss.
too far forward. This will make proper installation
impossible. Try a different seat in this case.
English
OK
OK
CLICK!
OK
Only use the Maxi-Cosi Axiss on a front-facing seat when
the device is used in combination with an adult safety-belt
to be used by means of the following wording: Only suitable
for use in the listed vehicles fitted with lap/3 point/static/with
retractor safety-belts, approved to ECE Regulation No. 16 or
other equivalent standards. (Strike out what does not apply.)
Correct fitting of the car seat belt is essential for the safety
of your child. The seat belt must be attached in the correct
sequence along the red marks on the Maxi-Cosi Axiss. For
further instructions, look on the sticker on the side of the
Maxi-Cosi Axiss. Never fit the seat belt in a way
other than that described.
Remove the headrest of the seat where the Maxi-Cosi Axiss
is to be used in the car if it is in the way. Do not forget to put
the headrest back when the seat is used again.
NO
NO
NO
When installing the car seat behind the passenger seat,
position the passenger seat backrest upright and as far
forward as possible so that the child cannot knock it.
IMPORTANT: Always lock the Maxi-Cosi Axiss in a
forwards facing position before driving away.
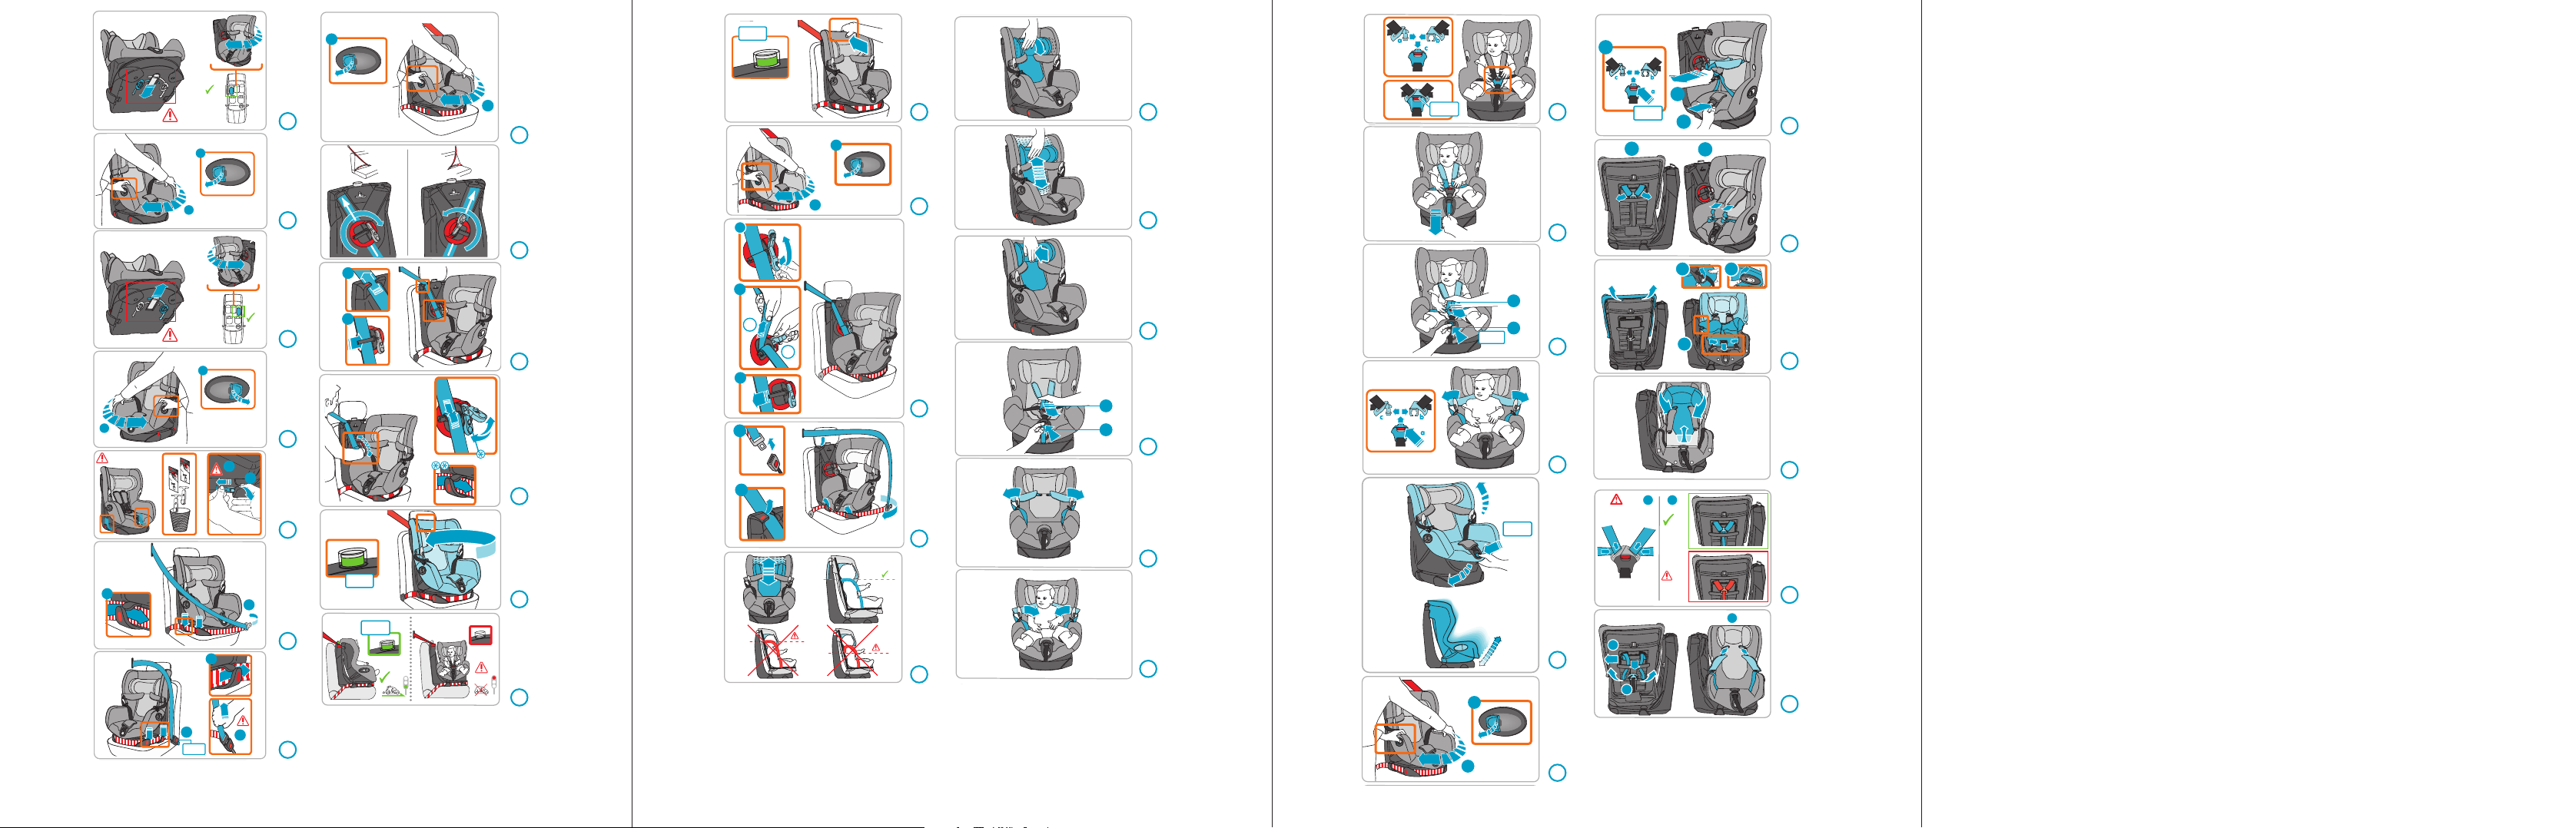
(Fig. 1 - 4)
Rotating the car seat
The direction of rotation of the Maxi-Cosi Axiss should
always be adjusted to the direction of the nearest car
door.
The button for adjusting the direction of rotation is located on
the underside of the Maxi-Cosi Axiss.
To rotate the seat right.
1. Slide the button towards the back if you want the seat
shell to rotate RIGHT.
To rotate the seat left.
1. Slide the button forwards if you want the seat shell to
rotate LEFT.
2. Open the lever and with one hand hold the lever out
whilst rotating the seat shell with the other to reach the
desired position.
9
Page 6

(Fig. 5 - 12)
INSTALLING THE CAR SEAT INTO THE CAR: « IN THE
English
DIRECTION OF TRAVEL »
IMPORTANT: Before you begin using the Maxi-Cosi Axiss,
you should ensure that the spaces have been removed from
the seatbelt guides. These form part of the packaging and
should be removed.
Installing the car seat into the car: « in the direction of
travel ».
1. Place the lap section of the seatbelt behind the two seat
belt guides (a) on the car door side and then around the
underside of the car seat (b).
2. Then place the lap section of the seat belt on the other
side, behind the two belt guides (a). Fasten the seat belt
(b) and tighten it. IMPORTANT: Ensure that the lap
section of the seat belt is tight and passes through the 4
belt guides around the base . The seat belt should not be
twisted.
3. Rotate the seat part towards you by opening the lever
(a). Keep the handle open and rotate the seat shell
towards you with your other hand (b). IMPORTANT:
the button under the base should be adjusted to the
desired direction of rotation beforehand (see page 9).
4. Rotate the seat belt tensioner as far as it will go (see
diagram).
OK OK
NO NO
OK
NO
10
Page 7

5. (a) Place the shoulder section of the seat belt in the belt
guide on the upper side of the base.
(b) Fasten the shoulder belt into the slot of the seatbelt
tensioner spindle. IMPORTANT: Ensure that the lap
section of the seat belt is tight. There should be NO slack
in the lap section of the belt (this can be checked by
gently pulling the lap section of the belt).
6. Move the handle on the seat belt tensioner backwards
and forwards a few times until the belt is fully
tightened (do not push the button on the tensioner).
IMPORTANT: if the belt is tight, the handle
should be closed again. (*see diagram).
7. Rotate the seat shell to face the direction of travel. The
green indicator will be visible on the upper side of the
base. The green indicator shows that the seat shell is
safely locked into position in the direction of travel.
IMPORTANT: even when travelling with the car seat
unoccupied, it should always be locked into position in
the direction of travel.
Check that the car seat is installed correctly
(according to the diagrams). Proper threading of the
seat belt is essential to ensure the safety of your child. To
fasten the car seat into the car, the seat belt should pass
along the red markings on the Maxi-Cosi Axiss. You should
also refer to the instruction sticker on the side of the MaxiCosi Axiss. Never fit the seat belt in a way other than that
described! Any other way of installing this seat is unsafe.
IMPORTANT: when you have finished installing your
Maxi-Cosi Axiss, check the following points and correct
your installation if necessary:
(Fig. 13- 14)
The car seat is not stable
• Raise the headrest to a higher position. The headrest
should NOT come into contact with the Maxi-Cosi Axiss.
• Whenever possible and whenever necessary, adjust
the angle of the backseat’s backrest so that it is in full
contact with the base of the car seat.
The seat shell is difficult to rotate and/or locking the
seat shell into position in the direction of travel (green
indicator) is difficult.
Check the installation:
• The seat belt must pass through all belt guides.
• The lap section of the belt must TIGHTLY pass through
the belt guides, with no slack.
• The seat belt should not affect the seat part of the car
seat.
• The seat belt has possibly been fastened too tight.
• The position of the backrest and back seat could be the
cause of the problem – adjust the angle between the seat
and the backrest.
• If possible, adjust the backrest so that it is completely in
contact with the base of the car seat.
• Check that nothing is impeding or obstructing the car
seat.
If you are still unable to rectify the problem, we
suggest you contact the retailer from which you have
purchased the car seat.
English
IMPORTANT: When the child is seated in the Maxi-Cosi
Axiss, the seat shell should be locked into position facing the
direction of travel. Only then should the car be driven.
IMPORTANT:
- Ensure that the seat belt is not twisted.
- Ensure that the seat belt is fastened properly.
IMPORTANT: in some cars it may be necessary to push the
upper side of the seat shell downwards to lock the shell in
place (green indicator).
11
Page 8

4 REMOVING THE MAXI-COSI AXISS
English
FROM THE CAR
(Fig. 15 - 17)
1. Simultaneously open the handle (a) and rotate the seat
shell (b) towards you.
2. (a) Push the button inwards (1) whilst simultaneously
rotating the handle of the belt guide downwards. Keep the
button pushed in (1) and pull the belt (2) to unwind it from
the guide. Remove the belt from the spindle (c).
IMPORTANT: the belt can only be released if the handle
is rotated fully downwards.
3. Release the seat belt buckle (a), and remove the seat belt
from the upper belt guide (b) and the lower belt guides on
the car seat’s base.
IMPORTANT: Even when the car seat is not occupied
by a child, it should still be secured into the car according
to the instructions. Car seats that are incorrectly secured
can pose a danger to fellow passengers. In the event of
collision, an insecure car seat can pose danger to life.
5 ADJUSTING THE HEIGHT OF THE
SHOULDER BELTS
The belt system should be adjusted according
to the height of the child.
* The shoulder belts of the harness should be adjusted so that
they are level with the child’s shoulders (see diagram).
(Fig. 18 - 21)
1. Tilt the headrest forwards.
2. Adjust the headrest upwards or downwards depending
on the child’s body length.
3. When the headrest is in the desired position, press it back
to lock it into position.
3. Place the child into the car seat, then remove the belts
from the hooks.
4. Slide the buckle sections (a) + (b) together and place
them into the buckle until you hear a clear “click” sound.
5. Pull on the adjustable belt and then pull the whole belt
system tight.
- Note:
- Note:
Do not leave more than one finger’s width of
space between the child and the belt system.
The belts should be pulled extremely tight. Slack
of just one finger’s width will make it virtually impossible
for the child to free his/her arms from underneath the
shoulder belts.
7 REMOVING THE CHILD FROM THE
CAR SEAT
(Fig. 27 - 28)
1. Push the adjuster button (a) and simultaneously pull the
shoulder belts (b) to loosen the belt system (make sure
to pull the belts and not the belt pads).
2. Push the red button on the buckle and open the belt
system. Fix the shoulder belts to the hooks.
8 ADJUSTING THE SITTING AND
SLEEPING POSITION
(Fig. 29)
Adjusting the car seat
The Maxi-Cosi Axiss can be adjusted to 8 different
positions from sitting to semi-reclining
- Push the button on the front of the seat shell and
simultaneously adjust the position of the seat backwards
or forwards to the desired sitting/reclining position.
Release the button to lock the seat shell into the desired
position.
6 PLACING THE CHILD INTO THE CAR
SEAT
(Fig. 22 - 26)
1. Push the adjuster button (a) and simultaneously pull the
shoulder belts (b) to loosen the belt system (make sure
to pull the belts and not the belt pads).
2. To make placing the child into the car seat easier, use the
handy belt hooks on the sides of the car seat (a). Before
placing the child into the seat, fix the shoulder belts to
the hooks.
12
Page 9

9 MAINTENANCE AND REMOVING
THE FABRIC COVER
Maintenance
Fabric cover:
• Refer to the washing label before cleaning the fabric
cover (the washing label is stitched to the cover). The
washing label displays the following information.
Washing instructions
Cleaning the cover:
• Wash the cover and belt pads by hand (maximum of
30°C). Do not use a drier. Also see the care instructions
on the cover.
Tip: It is wise to buy an extra cover when purchasing the
Maxi-Cosi Axiss so that you can continue to use it even when
the cover is being washed and dried.
Plastic base and seat shell:
- CAUTION: Perform these actions only while the Maxi-
Cosi Axiss is outside of the car. Clean all plastic parts of
the base using a cloth, soap and lukewarm water. Do not
use any aggressive cleaning agents.
- CAUTION: Never use lubricants – not even for the
moving parts of the Maxi-Cosi Axiss.
(Fig. 30- 36)
Removing the fabric cover from the seat shell:
Tip: Prior to removing the fabric cover from the seat shell, we
suggest you carefully study how it is attached so that you
can correctly re-attach it to the car seat later on.
1. Rotate the Maxi-Cosi Axiss seat.
2. Open the belt buckle by pushing the red button, open the
buckle (a), then push on the adjustable button (b) and
simultaneously pull both shoulder belts forwards (pull the
belts, NOT the belt pads).
3. Remove the shoulder belts from the belt yoke at the rear
of the car seat, then pull the shoulder belts from the shell
and the belt pads through the front of the car seat.
4. Loosen the elastic bands from the fabric cover (a). Lift
the fabric cover over parts (b) + (c) on the seat shell
(see diagram). Lift the belt components (d) through the
opening on the seat, then carefully and slowly remove
the cover.
5. Lift the elastic bands over the top of the headrest (see
diagram). Guide the belt pads through the opening of
the headrest cover, then remove the cover. Make sure to
remove the support plate from the cover before washing.
IMPORTANT: do NOT remove other parts from the car
seat, such as the EPS/polystyrene or other foam material
from underneath the fabric cover. These materials are
necessary for the safety of the Maxi-Cosi Axiss.
* When re-attaching the cover, it is very important that the
harness belts are not twisted. These should pass through
the belt buckle flat (see diagram). The harness belts
should be placed underneath the cross beams on the rear
of the car seat. Before placing the child back into the car
seat, you should check that the belt system is working
correctly. If you have any doubt you should contact the
retailer of the car seat.
Only for removing the headrest cover
Release the iron rod from the rear of the car seat (b) and
remove it. The straps on the belt pads are then released.
Remove the belt pads from the car seat through the front. The
fabric cover from the headrest can now be removed.
Belt buckle functioning and cleaning:
The proper functioning of the belt buckle is very important
for the safety of the child. The most common reason for the
buckle not functioning properly is because it is dirty (from
dust, grime, food particles, etc.). Ensure that the belt buckle is
clean by removing dirt with a vacuum cleaner. The following
is a list of possible causes of function failure and possible
solutions.
A. Failure of the belt buckle:
• When opening the belt buckle, the buckle sections are
released slowly.
• The belt buckle can only be opened with considerable
force.
• It is difficult to click the buckle sections into the buckle
(too much resistance).
• The buckle will no longer close, the buckle sections will
not go together.
• There is no “click” sound when closing the buckle.
B. Solving any problems:
• Check the buckle for any dirt and if necessary clean
by knocking the dirt out, rinsing, blasting with air or
vacuuming.
• CAUTION: Never use lubricants!
If you are unable to close the belt buckle or if you are unsure
whether you have solved the problem correctly, contact your
retailer or importer immediately (see back of instruction
manual). Under these conditions, do not use the Maxi-Cosi
Axiss.
English
13
Page 10

NOTICE: This is a “Universal” child restraint. It is approved
to Regulation No. 44, 04 series of amendments, for general
English
use in vehicles and it will fit most, but not all, car seats.
A correct fit is likely if the vehicle manufacturer has declared
in the vehicle handbook that the vehicle is capable of
accepting a “Universal” child restraint for this age group.
This child restraint has been classified as “Universal” under
more stringent conditions than those which applied to earlier
designs which do not carry this notice. If in doubt, consult
either the child restraint manufacturer or the retailer.
IMPORTANT: The Maxi-Cosi Axiss is a universal car seat
for use with a 3-Point belt:
• Model approved according to ECE R44/04.
• For group 1 (children from 9 to 18kg) the car seat should
always be used facing the direction of travel, preferably
on the back seat of the car.
• The car seat should always be positioned facing the
direction of travel. The car seat must not be positioned
with the back to the direction of travel.
• The manufacturer can only be held liable where
compliance with the regulations is concerned (R44). This
excludes carelessness when driving, and not respecting
the Highway Code.
• After placing your child into the car seat, you should
check that the seat belt is fastened correctly (the full
3-point seat belt) Tighten the 3-point seat belt by pulling
it with force. Make sure the belts are not twisted.
General instructions
Always pay attention to the following…
• Always use the seat, even on short trips, as this is when
most accidents occur.
• Only use the Maxi-Cosi Axiss in a car and not at home.
Car seats are not designed for home use.
• The Maxi-Cosi Axiss may be used in the front seat and in
the back seat, including where there is an airbag fitted.
However, we recommend installing it on the back seat.
If this is not possible, ensure that the front seat is as far
back as possible if an airbag is provided. Refer to your
car’s handbook as increasingly, airbags can easily be
deactivated.
• The seat must always be secured with the seat belt,
even when not in use. A loose seat could injure other
passengers in an emergency stop.
• Make sure that the Maxi-Cosi Axiss is not jammed or
wedged by heavy luggage, adjustable seats or closing
doors. Folding rear seats should always be locked down
securely.
• Never use the Maxi-Cosi Axiss without the fabric cover.
Do not replace the cover with any cover other than the
original as the cover forms part of the total safety of the
seat.
• Always cover the Maxi-Cosi Axiss when the car is parked
in full sun as plastic and metal parts may become
extremely hot, this can cause burns and may discolour
the cover unnecessarily.
• To avoid damage to the fabric, do not remove the logos,
etc. from the cover.
• Make sure that there is no baggage or other loose
objects (for example on the parcel shelf) in the car. In
an emergency stop or crash these become dangerous
projectiles!
• When making long journeys, make sure to take frequent
breaks in order to give your child some room to move.
• Never leave your child alone in the car.
• Keep the user instructions for future reference in the
appropriate place at the back of the Maxi-Cosi Axiss.
• Never use second-hand products as you can never be sure
what may have happened to these in the past. The safety
of the seat can only be guaranteed by the manufacturer if
it is used by its first owner.
• The user should not make any modifications to the car
seat or the belts. This includes the labels or warnings, etc.
that form part of the seat. These should not be removed
under any circumstances!
• Always replace the Maxi-Cosi Axiss after an accident, as
the seat may become unsafe due to damage that is not
immediately apparent.
• The manufacturer is aware that car seats may cause
impressions in car upholstery or car seat belts. These
cannot be avoided, since the safety standards demand
powerful and firm fastening methods. The manufacturer
cannot be held liable for any damage that occurs as a
result of these.
And of course …
• Always set a good example and wear your own seat belt!
Waste separation
To ensure optimum and safe use of car safety seats, they
should not be used for longer than 5 to 6 years after the date
of purchase. Ageing of the plastic, for instance under the
influence of sunlight (UV), may quite unnoticeably reduce the
qualities of the product.
Once the child has grown out of the seat, we advise you to
stop using the car seat and to dispose of it accordingly.
On account of our concern for the environment, we request
the user of the Maxi-Cosi Axiss to separate the waste
accordingly, both from the beginning of the product’s life
(packaging) and the end of the product’s life (product
components).
Keep plastic wrapping material out of reach of your child in
order to avoid the risk of suffocation.
14
Page 11

10 WARRANTY
Our 24 months warranty reflects our confidence in the high
quality of our design, engineering, production and product
performance. We confirm that this product was manufactured
in accordance with the current European safety requirements
and quality standards which are applicable to this product,
and that this product is free from defects on materials and
workmanship at the time of purchase.
Our 24 months warranty covers all manufacturing defects in
materials and workmanship when used in normal conditions
and in accordance with our user manual. To request repairs
or spare parts under warranty for defects in materials and
workmanship you must present your proof of purchase, made
within the 24 months preceding the service request.
Our 24 months warranty does not cover damage caused by
normal wear and tear, accidents, abusive use, negligence or
the consequence of failing to comply with the user manual.
Examples of normal wear and tear include wheels and fabric
worn down by regular use and the natural breakdown of
colors and materials over extended period of time and use.
What to do in case of defects:
Should problems or defects arise, your first point of contact
is your [Brand] dealer or retailer. Our 24 months Warranty
is recognized by them (1). You must present your proof of
purchase, made within the 24 months preceding the service
request. It is easiest if you get your service request preapproved by [brand] Service. In principle, we pay for shipment
and for return freight connected to service requests under
the warranty. Damage not covered by our warranty or on
products outside of warranty can be handled at a reasonable
fee.
11 QUESTIONS
If you have any questions, please contact your supplier or
importer (see the back of the instruction manual). Make sure
you have the following information to hand:
• The serial number at the bottom of the orange/white ECE
sticker (at the back of the Maxi-Cosi Axiss).
• The make, type and construction of the car and the seat
on which the Maxi-Cosi Axiss is used.
• The age (height) and weight of your child.
English
This Warranty is in compliance with to European Directive
99/44/EG of 25 May 1999.
(1) Products purchased from retailers or dealers that remove
or change labels or identification numbers are considered
unauthorized. Products purchased from unauthorized retailers
are also considered unauthorized. No warranty applies to
these products since the authenticity of these products cannot
be ascertained.
15
Page 12

NOTES / NOTIZEN / NOTITIES / NOTAS / NOTÍCIAS
Français
16
Page 13
CHERS PARENTS
Merci d’avoir acheté le siège-auto Axiss de Maxi-Cosi.
Sécurité, facilité d’utilisation, confort et esthétique ont été
la priorité lors la conception du siège Axiss de Maxi-Cosi. Ce
siège-auto répond aux normes les plus strictes.
Des études ont montré que les sièges-auto sont souvent mal
utilisés. Nous vous recommandons donc de lire attentivement
ce mode d’emploi. La sécurité maximale de votre enfant ne
peut être garantie que si ce produit est correctement utilisé.
Les études permanentes menées par nos services de
développement de produits et marketing, en étroite
collaboration avec les instituts de test ainsi que les
consommateurs et nos clients, nous permettent d’anticiper
les évolutions en matière de sécurité des enfants en voiture.
N’hésitez pas à nous contacter si vous avez des questions ou
des remarques concernant l’utilisation du Maxi-Cosi Axiss.
Dorel (adresse et numéros de téléphone au dos du mode
d’emploi)
TABLE DES MATIÈRES
1 IMPORTANT : À LIRE IMPÉRATIVE MENT !
2 DESCRIPTION DU PRODUIT
3 INSTALLER ET ENLEVER LE MAXI-COSI AXISS
4 ENLEVER LE MAXI-COSI AXISS DU VÉHICULE
5 RÉGLER LA HAUTEUR DES BRETELLES DU HARNAIS
6 INSTALLER L’ENFANT DANS LE SIÈGE-AUTO
7 ENLEVER L’ENFANT DU SIÈGE-AUTO
8 RÉGLER LE SIÈGE-AUTO EN POSITION ASSISE/
ALLONGÉE
9 ENTRETIEN DU SIÈGE ET NETTOYAGE DE LA
HOUSSE
10 GARANTIE
11 QUESTIONS
1 IMPORTANT : À LIRE
IMPÉRATIVE MENT !
AVERTISSEMENT
- Veuillez lire attentivement le présent mode
d’emploi et le conserver précieusement dans le
compartiment de rangement prévu à cet effet
au dos du siège-auto. Ne pas se conformer au
mode d’emploi risque de mettre gravement en
danger la sécurité de l’enfant.
- N’utilisez que des accessoires et des pièces
d’origine agréés par le fabricant. Ne modifiez
pas le produit. En cas de réclamation ou de
problème, prenez contact avec votre fournisseur
ou votre importateur.
Maxi-Cosi Axiss certification CEE R 44/04
Groupe Poids de Age
de l’enfant l’enfant
Groupe 1 (9 - 18 kg) De 9 mois à 3,5
ans environ
- Les bretelles du harnais se règlent en fonction
de la taille de votre enfant (voir page 22).
- Nous vous prions de suivre les
recommandations énoncées en page 22
du présent mode d’emploi afin d’installer
correctement votre enfant dans le
Maxi-Cosi Axiss.
Français
Avis de non-responsabilité :
Ce mode d’emploi a été conçu et rédigé avec le plus grand soin.
Nous ne pouvons néanmoins donner aucune garantie quant à
son exhaustivité et la justesse des informations y figurant.
17
Page 14

2 DESCRIPTION DU PRODUIT
Français
1. Housse de siège
2. Appuie-tête réglable
3. Levier de rotation de la
coque du siège
4. Socle du siège-auto
(base)
5. Guides-sangles pour la
sangle abdominale de la
ceinture de sécurité
6. Bouton de réglage
en position assise et
allongée
7. Sangle de serrage du
harnais
8. Bouton de réglage des
bretelles du harnais
18
9. Indicateur rouge/vert du
verrouillage de la coque
du siège.
10. Guides-sangles pour la
sangle pectorale de la
ceinture de sécurité
11. Tendeur de ceinture de
sécurité (tension de la
sangle pectorale).
12. Compartiment de
rangement du mode
d’emploi.
13. Crochet pour harnais
14. Bretelles du harnais
15. Bouton de réglage du
sens de rotation de la
coque du siège (gauche
ou droite)
Caractéristiques spécifiques
Le siège-auto Maxi-Cosi Axiss présente des particularités
visant à accroître la facilité d’utilisation du Maxi-Cosi Axiss :
• La coque du siège peut être tournée vers la droite ou la
gauche afin de faire face à la portière du véhicule et ainsi
faciliter l’installation de l’enfant dans le siège-auto.
• Le tendeur de ceinture garantit une tension
supplémentaire de la ceinture de sécurité.
Page 15

3 INSTALLER ET ENLEVER LE
MAXI-COSI AXISS
Installation avec ceinture à 3 points
suivre les marques rouges sur le produit).
OK
OK
NO
NO
l’appui-tête lorsque ce siège est à nouveau utilisé par un
passager.
A. Installation
- ATTENTION : si elle est rabattable, verrouillez la
banquette arrière avant d’installer le Maxi-Cosi Axiss.
- ATTENTION : les ceintures de sécurité de certains
sièges sont placées trop en avant pour permettre une
bonne installation. Essayez dans ce cas de l’installer à
une autre place.
Installez le Maxi-Cosi Axiss de préférence sur la banquette
arrière, ou sur le siège passager si cette première option
n’est pas possible, à condition que cela soit conforme à la
législation en vigueur dans le pays où le siège-auto est utilisé.
Pour installer le siège-auto derrière le siège passager, veuillez
avancer le siège passager au maximum et redresser le dossier
afin d’éviter tout choc avec l’enfant.
IMPORTANT : Toujours verrouiller le Maxi-Cosi Axiss en
position « face à la route » avant de prendre le volant.
(Ill. 1 - 4)
Faire tourner le siège-auto
Le sens de rotation du siège-auto Axiss doit toujours
être réglé en direction de la portière la plus proche.
Un commutateur situé sous le siège-auto Axiss permet de
régler le sens de rotation.
Français
CLICK!
OK
Utilisez le Maxi-Cosi Axiss uniquement sur un siège orienté
vers l’avant, équipé d’une ceinture de sécurité à enrouleur à
3 points de fixation homologuée selon la norme CEE R16 ou
une norme équivalente.
Pour la sécurité de votre enfant, il est essentiel que la ceinture
de sécurité de la voiture soit correctement placée. La ceinture
de sécurité doit être placée sur le Maxi-Cosi Axiss selon les
marques rouges dans l’ordre indiqué, voir l’étiquette sur le
côté du Maxi-Cosi Axiss. Ne faites jamais passer la
ceinture d’une autre manière que celle indiquée.
S’il gêne, enlevez l’appui-tête du siège sur lequel est installé
le Maxi-Cosi Axiss dans la voiture. N’oubliez pas de replacer
NO
Pour faire tourner le siège vers la droite.
1. Faites coulisser le commutateur vers l’arrière pour faire
tourner la coque du siège vers la DROITE.
Pour faire tourner le siège vers la gauche.
1. Faites coulisser le commutateur vers l’avant pour faire
tourner la coque du siège vers la GAUCHE.
2. Tirez la poignée, gardez-la en place d’une main puis
placez la coque du siège dans la position souhaitée avec
l’autre main.
19
Page 16

(Ill. 5 - 12)
INSTALLER LE SIÈGE-AUTO DANS LA VOITURE :
« FACE À LA ROUTE »
IMPORTANT : Vérifiez que les cales ont été enlevées des
guides-sangles avant d’utiliser le Maxi-Cosi Axiss. Ces cales
font partie de l’emballage et doivent être éliminées.
Installer le siège-auto dans la voiture : « face à la
route ».
1. Faites passer la sangle abdominale de la ceinture de
sécurité derrière les deux guides-sangles (a), sur le côté
de la portière puis autour du socle du siège-auto (b).
Français
2. Placez ensuite la sangle abdominale de la ceinture de
sécurité de l’autre côté, derrière les guides-sangles
(a). Bouclez la ceinture de sécurité (b). IMPORTANT
: vérifiez que la sangle abdominale de la ceinture
de sécurité est suffisamment serrée et qu’elle passe
correctement à travers les 4 guides-sangles. La ceinture
de sécurité ne doit jamais être torsadée.
3. Tournez l’assise du siège-auto vers vous en tirant sur
la poignée (a). Gardez la poignée en place puis tournez
la coque du siège vers vous avec l’autre main (b).
IMPORTANT : réglez le sens de rotation au préalable à
l’aide du commutateur situé sous le socle (voir page 19).
4. Tournez entièrement le tendeur de ceinture (voir schéma).
OK OK
NO NO
OK
NO
20
Page 17

5. (a) Placez la sangle pectorale de la ceinture de sécurité
dans le guide-sangle situé en haut du socle.
(b) Insérez la sangle pectorale dans la rainure du tendeur
de ceinture. IMPORTANT : Vérifiez que la sangle
abdominale de la ceinture de sécurité soit correctement
serrée et ne présente AUCUN jeu (en tirant doucement
sur la sangle).
6. Actionnez plusieurs fois la poignée du tendeur de ceinture
jusqu’à ce que la ceinture soit correctement serrée
(n’appuyez pas sur le bouton du tendeur de
ceinture).
IMPORTANT : rabattez la poignée une fois
que la ceinture est correctement serrée. (*voir
schéma).
7. Placez la coque du siège face à la route. L’indicateur vert
apparaît au sommet du socle. L’indicateur vert indique
que la coque du siège est verrouillée dans la position «
face à la route ». IMPORTANT : même si le siège-auto
est vide, la position « face à la route » doit toujours être
verrouillée lorsque vous conduisez votre véhicule.
Vérifiez que le siège-auto est correctement installé
(conforme au schéma).
de sécurité soit correctement positionnée afin de garantir
la sécurité de votre enfant. Pour fixer le siège-auto dans la
voiture, la ceinture de sécurité doit suivre les marquages
rouges que porte le Maxi-Cosi Axiss. Consultez les instructions
qui se trouvent sur l’autocollant situé sur le côté du MaxiCosi Axiss. Ne faites jamais passer la ceinture d’une autre
manière. Toute autre méthode d’installation ne peut pas être
considérée comme sûre.
IMPORTANT : après l’installation de votre Maxi-Cosi
Axiss, veuillez vérifier et corriger les points suivants :
Il est primordial que la ceinture
(Ill. 13 - 14)
Le siège-auto n’est pas stable
• Relevez l’appuie-tête du siège sur lequel est installé le
Maxi-Cosi Axiss. L’appuie-tête ne doit EN AUCUN CAS
entrer en contact avec le siège-auto.
• Si possible et si nécessaire, réglez l’angle d’inclinaison
du dossier de la banquette arrière afin qu’il suive
parfaitement la forme du socle de votre siège-auto.
La coque du siège du siège-auto est difficile à tourner
et/ou la position « face à la route » (indicateur vert) est
difficile à verrouiller.
Vérifier l’installation :
• La ceinture de sécurité doit passer à travers tous les
guides-sangles.
• La sangle abdominale doit être SERRÉE (absence de jeu)
et passer à travers tous les guides-sangles.
• La ceinture de sécurité ne doit pas entrer en contact avec
l’assise pivotante du siège-auto.
• La ceinture de sécurité est peut-être trop serrée.
• La position* du dossier/de la banquette arrière pose peutêtre problème (*l’angle entre l’assise et le dossier).
• Si possible, réglez le dossier de la banquette arrière afin
que le siège-auto soit entièrement en contact avec le
dossier de la banquette.
• Vérifiez qu’aucun objet ne gêne le fonctionnement du
siège-auto.
Si le problème persiste, nous vous recommandons de
prendre contact avec le revendeur du siège-auto.
Français
IMPORTANT : Quand votre enfant se trouve dans le MaxiCosi Axiss, la coque du siège doit être verrouillée en position
« face à la route » avant de prendre le volant.
IMPORTANT :
- Vérifiez que la ceinture de sécurité n’est pas torsadée.
- Vérifiez que la ceinture de sécurité est correctement
bouclée.
IMPORTANT : sur certaines voitures, il est parfois
nécessaire d’appuyer légèrement sur la coque du siège afin de
la verrouiller plus facilement (indicateur vert).
21
Page 18

4 ENLEVER LE MAXI-COSI AXISS DU
VÉHICULE
(Ill. 15 - 17)
1. Tirez la poignée (a) tout en tournant la coque du siège (b)
vers vous.
2. (a) Appuyez sur le bouton (1) tout en tirant la poignée
du tendeur de ceinture vers le bas, maintenez le bouton
enfoncé (1) puis tirez sur la ceinture (2) afin de la
dérouler. Oter la ceinture de la rainure du tendeur (c).
IMPORTANT : la ceinture ne peut être enlevée que si la
Français
poignée du tendeur est entièrement dévissée.
3. Ouvrez la boucle de la ceinture (a) puis ôtez la ceinture du
guide-sangle supérieur (b) et des guides-sangles inférieurs
du socle de siège-auto.
IMPORTANT : même inoccupé, le siège-auto Axiss doit
être fixé conformément aux instructions. Un siège-auto qui
n’est pas correctement fixé peut se révéler dangereux pour
les passagers du véhicule. En cas de collision, un siègeauto mal fixé peut mettre en péril la vie des passagers.
5 RÉGLER LA HAUTEUR DES
BRETELLES DU HARNAIS
Le système de harnais doit être réglé en
fonction de la taille de votre enfant.
* Les bretelles du harnais doivent être réglées en fonction de
la hauteur d’épaule de votre enfant (voir schéma).
(Ill. 18 - 21)
1. Inclinez l’appuie-tête vers l’avant.
2. Levez ou baissez l’appuie-tête selon la hauteur d’épaule
de votre enfant.
3. Poussez l’appuie-tête vers l’arrière pour verrouiller le
siège-auto dans la position souhaitée.
6 INSTALLER L’ENFANT DANS LE SIÈGE-
AUTO
(Ill. 22 - 26)
1. Appuyez sur le bouton de réglage (a) tout en tirant sur les
bretelles (b) afin de déserrer le système de harnais (tirez
sur le harnais, non sur les protège-harnais).
2. Utilisez les crochets pour harnais situés de chaque côté
du siège-auto (a) afin de faciliter l’installation de l’enfant.
Faites passer les bretelles derrière les crochets avant
d’installer l’enfant dans le siège-auto.
3. Installez l’enfant dans le siège-auto, replacez les bretelles
en position normale.
4. Assemblez les 2 éléments de verrouillage (a) + (b) puis
insérez-les dans la boucle jusqu’à ce que vous entendiez
un « clic ».
5. Tirez la sangle de réglage afin de serrer le système de
harnais.
- Attention :
de harnais ne doit pas être supérieur à l’épaisseur d’un
doigt.
- Attention :
serrées. Avec un jeu équivalent à l’épaisseur d’un doigt
entre le harnais et les épaules, il est quasiment impossible
que l’enfant parvienne à libérer ses bras.
L’espace entre votre enfant et le système
Les bretelles du harnais doivent être très
7 ENLEVER L’ENFANT DU
SIÈGE-AUTO
(Ill. 27 - 28)
1. Appuyez sur le bouton de réglage (a) tout en tirant sur les
bretelles (b) afin de déserrer le système de harnais (tirez
sur le harnais, non sur les protège-harnais).
2. Appuyez sur le bouton rouge de la boucle puis ouvrez le
système de harnais. Faites passer les bretelles derrières les
crochets pour harnais.
8 RÉGLER LE SIÈGE-AUTO EN
POSITION ASSISE/ALLONGÉE
(Ill. 29)
Régler le siège-auto
Le Maxi-Cosi Axiss offre 8 positions, de la position
assise à la position semi-allongée
- Appuyez sur le bouton situé sur l’avant de la coque du
siège tout en poussant ou en tirant l’assise afin de placer
le siège-auto dans la position souhaitée. Relâchez le
bouton pour verrouiller la coque du siège dans la position
choisie.
22
Page 19

9 ENTRETIEN DU SIÈGE ET
NETTOYAGE DE LA HOUSSE
Entretien
Housse :
• Veuillez lire les instructions de lavage indiquées sur
l’étiquette avant de nettoyer la housse (l’étiquette de
lavage est cousue sur la housse). L’étiquette contient les
instructions suivantes.
Conseils de lavage
• Nettoyez la housse et les protège-bretelles à la main
(maximum 30˚C). Ne jamais les faire sécher dans un
séchoir. Voir les instructions de lavage sur la housse.
Conseil : achetez une housse supplémentaire lors de l’achat
du Maxi-Cosi Axiss, de façon à pouvoir l’utiliser quand vous
lavez la housse d’origine.
Coque du siège et coque en plastique :
- ATTENTION : Le Maxi-Cosi Axiss doit être sorti de la
voiture. Nettoyez les parties en plastique du siège-auto
avec un chiffon, à l’eau tiède savonneuse. N’utilisez
jamais de produits abrasifs.
- ATTENTION : N’utilisez jamais de lubrifiants, même
sur les éléments mobiles du Maxi-Cosi Axiss.
(Ill. 30 - 36)
Enlever la housse de la coque du siège :
Conseil : Avant d’enlever la housse de la coque du siège,
nous vous recommandons d’examiner attentivement
l’installation afin de pouvoir remettre correctement
en place la housse sur le siège-auto.
ouvertures de la housse de l’appuie-tête puis retirez la
housse. Enlever la plaque de renfort avant de laver la
housse.
IMPORTANT : N’enlevez SOUS AUCUN PRÉTEXTE
d’autres éléments du siège-auto, comme le polystyrène,
l’EPS ou tout autre matériau se trouvant sous la housse.
Ces matériaux jouent un rôle essentiel dans la sécurité
que procure le siège Maxi-Cosi Axiss.
* Avant de remettre la housse en place, vérifiez que les
bretelles de harnais ne sont pas torsadées. Elles doivent
se présenter à plat dans la boucle (voir schéma). Les
bretelles doivent passer sous la barre transversale située
dans le dos du siège-auto. Avant d’installer votre enfant
dans le siège-auto, nous vous recommandons de tester
le harnais. Si vous avez le moindre doute, n’hésitez pas à
prendre contact avec le revendeur du siège-auto.
ENLEVER UNIQUEMENT LA HOUSSE DE
L’APPUIE-TÊTE
Desserrez la barre en fer qui se trouve à l’arrière du siège-auto
(b), puis enlevez-la. Les protège-harnais sont désormais libres.
Otez les protège-harnais. Vous pouvez enlever la housse de
l’appuie-tête.
Fonctionnement et nettoyage de la boucle du harnais :
Le bon fonctionnement de la boucle du harnais et du système
de harnais dans son ensemble est essentiel pour la sécurité
de l’enfant. Un mauvais fonctionnement est en général dû à
des impuretés (poussière, saleté, restes de nourriture, etc.).
Nettoyez régulièrement la boucle du harnais en éliminant les
impuretés à l’aide d’un aspirateur par exemple.
Quelques problèmes de fonctionnement et leurs solutions sont
indiqués dans la liste ci-dessous.
Français
1. Faites tourner l’assise du Maxi-Cosi Axiss.
2. Appuyez sur le bouton rouge pour ouvrir la boucle du
harnais, ouvrez la boucle (a), appuyez ensuite sur le
bouton de réglage (b) tout en tirant sur les deux bretelles
(tirez sur le harnais, NON sur les protège-harnais).
3. Enlevez les bretelles de la boucle de regroupement des
sangles située à l’arrière du siège-auto. Placez-vous
devant le siège-auto puis tirez sur les bretelles afin de les
ôter de la coque et des protège-bretelles.
4. Desserrez les élastiques de la housse (a). Faites passer la
housse au-dessus des éléments (b) + (c) de la coque du
siège (voir schéma). Faites passer les éléments du harnais
(d) dans les ouvertures du siège puis ôtez la housse avec
précaution.
5. Faites passer les élastiques au-dessus de l’appuie-tête
(voir schéma). Faites passer les protège-harnais dans les
A. Problèmes au niveau de la boucle du harnais :
• Lors de l’ouverture de la boucle du harnais, les éléments
de verrouillage sont éjectés avec un certain retard.
• La boucle du harnais ne s’ouvre qu’en exerçant une force
excessive.
• Les éléments de verrouillage ne s’enclenchent pas
facilement dans la boucle du harnais (beaucoup de
résistance).
• La boucle ne se ferme plus, les éléments sont chaque fois
éjectés.
• Lors de la fermeture de la boucle du harnais, aucun
« clic » n’est clairement audible.
B. Solutions aux problèmes éventuels au niveau de la
boucle du harnais :
• Vérifiez que la boucle ne contient pas d’impuretés,
nettoyez-la si nécessaire en la secouant, en la rinçant, en
soufflant dessus ou encore en utilisant un aspirateur.
23
Page 20

• ATTENTION : N’employez jamais de lubrifiants !
Si vous n’arrivez pas à fermer correctement la boucle ou si
vous avez des doutes sur son bon fonctionnement, contactez
immédiatement votre fournisseur ou l’importateur (voir liste
d’adresses au dos du mode d’emploi). N’utilisez jamais le
Maxi-Cosi Axiss dans ce cas.
IMPORTANT : Le Maxi-Cosi Axiss est un siège-auto
universel destiné à être utilisé avec une ceinture à trois
points de fixation :
• Modèle conforme à la norme ECE R44/04.
• Pour transporter les enfants du groupe 1 (de 9 à 18 kg),
Français
le siège-auto doit toujours être installé « face à la route »
; de préférence sur la banquette arrière.
• Le siège-auto doit toujours être installé « face à la route
». Ce siège-auto ne doit en aucun cas être installé « dos
à la route ».
• Le fabricant peut être uniquement tenu responsable des
problèmes ayant trait à la réglementation (R44). Cette
disposition exclut les manœuvres imprudentes et le nonrespect du code de la route.
• Une fois votre enfant installé dans le siège-auto, veuillez
vérifier le serrage de la ceinture de sécurité (la ceinture
de sécurité pour adultes à 3 points de fixation). Serrez
fermement la ceinture à 3 points en tirant dessus. Vérifiez
que la ceinture n’est pas torsadée.
Instructions générales
A se rappeler en toutes circonstances…
• Utilisez toujours le siège-auto, même pour les petits
trajets car c’est sur les courtes distances que se
produisent la plupart des accidents.
• Utilisez le Maxi-Cosi Axiss uniquement en voiture, non
dans la maison. Le siège-auto n’est pas conçu pour être
utilisé à la maison.
• Le Maxi-Cosi Axiss peut être utilisé sur le siège avant
comme sur la banquette arrière. Même en présence d’un
airbag. Nous vous conseillons néanmoins d’installer le
siège-auto sur la banquette arrière. Si cela n’est pas
possible, veuillez reculer le siège passager au maximum
si votre véhicule est équipé d’un airbag. Nous vous
conseillons également de consulter le manuel d’utilisation
de votre voiture car il est possible de désactiver l’airbag
très simplement dans bon nombre de véhicules.
• Le siège-auto doit toujours être fixé avec la ceinture de
sécurité, même lorsqu’il n’est pas utilisé. Un siège-auto
non fixé peut blesser d’autres passagers lors d’un coup de
frein brutal.
• Assurez-vous que le Maxi-Cosi Axiss n’est pas coincé ou
surchargé par des bagages lourds, le réglage des sièges
ou la fermeture des portières. Le dossier rabattable des
banquettes arrière doit toujours être verrouillé.
• N’utilisez jamais le Maxi-Cosi Axiss sans housse. Ne
remplacez pas la housse d’origine par une housse d’une
autre marque, car elle fait partie intégrante de la sécurité
assurée par le siège-auto.
• Protégez toujours le Maxi-Cosi Axiss lorsque votre voiture
est garée en plein soleil, les parties synthétiques risquant
de devenir très chaudes et de provoquer des brûlures ;
par ailleurs, la housse risque de se décolorer inutilement.
• N’enlevez pas les logos, etc. de la housse, afin d’éviter
tout dommage.
• Assurez-vous qu’il n’y a pas de bagages ou autre objets
non attachés (sur la plage arrière par exemple) dans la
voiture, qui risquent de se transformer en projectiles
dangereux en cas d’arrêt brusque ou de collision !
• Au cours de longs trajets, faites régulièrement des
pauses pour accorder à votre enfant un peu de liberté de
mouvement.
• Ne laissez jamais l’enfant seul dans la voiture.
• Conservez le mode d’emploi dans le compartiment prévu
à cet effet au dos du Maxi-Cosi Axiss.
• N’utilisez jamais de produits d’occasion. Vous ne savez
jamais ce à quoi ils ont servi. La sécurité du siège-auto ne
peut être garantie par le fabricant que lorsqu’il est utilisé
par son premier propriétaire.
• Aucune modification ne doit être apportée au siègeauto ou au harnais par l’utilisateur. Les étiquettes,
avertissements, etc. apposés sur le siège-auto ne doivent
en aucun cas être enlevés.
• Après un accident, remplacez toujours le Maxi-Cosi
Axiss. Le siège risque de ne plus être sûr en raison de
dommages non apparents.
• Le fabricant est conscient du fait que les sièges-auto
risquent de laisser des marques sur le revêtement de
la voiture ou les ceintures de sécurité. Les normes de
sécurité prescrites et la force avec laquelle ils doivent
être fixés ne permettent pas de l’éviter. Le fabricant ne
peut pas être tenu responsable des dommages éventuels
provoqués par le siège-auto.
Et bien entendu...
• Donnez le bon exemple et attachez toujours votre propre
ceinture de sécurité !
Tri des déchets
Pour un usage optimal et en toute sécurité des sièges-auto,
ils ne devraient pas être utilisés plus longtemps que 5 à 6
ans. Le vieillissement des matières synthétiques, notamment
sous l’effet des rayons solaires (UV), peut entraîner une
détérioration imperceptible des propriétés du produit.
Lorsque l’enfant est trop grand pour s’asseoir dans le siègeauto, nous recommandons de ne plus l’utiliser et de s’en
débarrasser.
24
Page 21

Désireux de préserver l’environnement, nous demandons au
consommateur de bien vouloir trier les déchets lors de l’achat
(emballage) et de l’élimination (éléments du produit) du MaxiCosi Axiss.
Gardez le matériel d’emballage en plastique hors de la portée
des enfants pour éviter les risques d’étouffement.
10 GARANTIE
Notre garantie de 24 mois reflète notre confiance dans la
qualité supérieure de notre conception, ingénierie, production
et la performance du produit. Nous garantissons que ce
produit a été fabriqué conformément aux exigences de sécurité
et normes de qualité actuelles européennes applicables à ce
produit, et que ce produit est, au moment de l’achat, exempt
de défaut de matériau et de fabrication.
Notre garantie de 24 mois couvre tous les défauts de matériau
et de fabrication pour une utilisation dans des conditions
normales et conformément à la notice. Pour demander des
réparations ou des pièces de rechange sous garantie pour des
défauts de matériau et de fabrication, vous devez présenter
la preuve d’un achat effectué dans les 24 mois précédant la
demande de service.
Notre garantie de 24 mois ne couvre pas les dommages causés
par l’usure normale, les accidents, l’utilisation abusive, la
négligence ou les conséquences d’un non-respect de la notice.
Des exemples d’usure normale comprennent des roues et
des tissus usés par l’utilisation régulière et la décomposition
naturelle de couleurs et des matériaux au fil du temps et par
une utilisation prolongée.
d’identifications sont considérés comme non autorisés. Aucune
garantie ne s’applique à ces produits puisque l’authenticité de
ces produits ne peut pas être vérifiée.
11 QUESTIONS
En cas de questions, n’hésitez pas à contacter votre
fournisseur ou importateur (voir au dos du mode d’emploi).
Assurez-vous d’avoir les données suivantes à portée de main :
• Numéro de série figurant sous l’étiquette orange de
certification CEE (à l’arrière du Maxi-Cosi Axiss).
• Marque, modèle et année de fabrication de la voiture et
siège sur lequel le Maxi-Cosi Axiss est utilisé.
• L’âge (taille) et le poids de votre enfant.
Français
Que faire en cas de défauts :
Si des problèmes ou des défauts surviennent, le meilleur
choix pour un service rapide est de consulter votre revendeur.
Notre garantie de 24 mois est reconnue par eux (1). Vous
devez présenter la preuve d’un achat effectué dans les 24
mois précédant la demande de service. Cela est plus facile si
vous obtenez l’approbation au préalable de votre demande de
service par le Service Bébé Confort. En principe, nous payons
le transport et le fret de retour pour des demandes de service
sous garantie. Les dommages qui ne sont pas couverts par
notre garantie peuvent être traités à un tarif raisonnable.
Cette Garantie est conforme à la Directive européenne 99/44/
EG du 25 mai 1999.
(1) Les produits achetés auprès de détaillants ou de revendeurs
qui ôtent ou changent les étiquettes ou les numéros
25
Page 22

NOTES / NOTIZEN / NOTITIES / NOTAS / NOTÍCIAS
Deutsch
26
Page 23

VEREHRTE ELTERN!
Wir beglückwünschen Sie zum Kauf des Maxi-Cosi Axiss.
Bei der Entwicklung des Maxi-Cosi Axiss standen Sicherheit,
Bedienungsfreundlichkeit, Komfort und Design stets im
Vordergrund. Daher erfüllt dieses Produkt die strengsten
Sicherheitsanforderungen.
Eine Untersuchung ergab, dass viele Kindersitze nicht
richtig benutzt werden. Nehmen Sie sich daher Zeit, diese
Gebrauchsanweisung sorgfältig zu lesen. Die optimale
Sicherheit Ihres Kindes ist ausschließlich bei richtiger
Benutzung gewährleistet.
1 WICHTIG: BITTE ZUERST LESEN!
WARNUNG
- Lesen Sie diese Gebrauchsanweisung sorgfältig
und bewahren Sie sie als Nachschlagewerk in
dem dafür vorgesehenen Fach an der Rückseite
des Kinderautositzes auf. Die Sicherheit
Ihres Kindes ist ausschließlich bei Einhaltung
der Vorschriften der Gebrauchsanweisung
gewährleistet.
Langzeituntersuchungen unserer Abteilungen Produktentwicklung und Marketing sowie eine intensive
Zusammenarbeit mit Prüfinstituten und die Beratung von
Verbrauchern und Kunden führen dazu, dass wir auf dem
Gebiet der Kindersicherheit tonangebend sind. Fragen oder
Bemerkungen bezüglich der Benutzung des Maxi-Cosi Axiss
beantworten wir Ihnen jederzeit gerne.
Dorel (Für Adressen- und Telefonangaben, siehe die Rückseite
der Gebrauchsanweisung)
INHALTSANGABE
1 WICHTIG: BITTE ZUERST LESEN!
2 PRODUKTBESCHREIBUNG
3 BEFESTIGEN UND HERAUSNEHMEN DES MAXI-COSI
AXISS
4 MAXI-COSI AXISS AUS DEM AUTO NEHMEN
5 HÖHENVERSTELLUNG DER SCHULTERGURTE
6 DAS KIND IN DEN KINDERAUTOSITZ SETZEN
7 DAS KIND AUS DEM KINDERAUTOSITZ NEHMEN
8 DEN KINDERAUTOSITZ IN DIE SITZ-/
SCHLAFPOSITION VERSTELLEN
9 PFLEGE UND BEZUG ABNEHMEN
10 GARANTIE
11 FRAGEN
- Benutzen Sie ausschließlich vom Hersteller
zugelassene Originalzubehörteile und
Ersatzteile. Nehmen Sie keine Änderungen an
dem Produkt vor. Sollten Sie Reklamationen
oder Probleme haben, kontaktieren Sie bitte
Ihren Lieferanten oder Importeur.
Maxi-Cosi Axiss zulassung nach ECE R 44/04
Gruppe Körpergewicht Alter
Kind
Gruppe 1 (9 - 18 kg) Monate –
ca. 3,5 Jahre
- Der Schultergurt muss auf die Länge Ihres
Kindes eingestellt werden (siehe Seite 32).
- Um Ihr Kind richtig in den Maxi-Cosi Axiss
zu setzen, befolgen Sie bitte genau die
Anweisungen auf Seite 32.
Deutsch
Haftungsausschluss:
Diese Gebrauchsanweisung wurde mit größter Sorgfalt
entworfen und erstellt. Wir übernehmen jedoch keine Gewähr
in Bezug auf die Vollständigkeit und Richtigkeit der in der
Gebrauchs anweisung genannten Informationen.
27
Page 24

2 PRODUKTBESCHREIBUNG
Deutsch
1. Bezug
2. Verstellbare Kopfstütze
3. Hebel zum Drehen der
Sitzschale
4. Gestell Kinderautositz
(Basis)
5. Gurtführungen für das
Beckenteil des Autogurts
6. Bedienknopf Sitz- und
Schlafposition
7. Spannband für
Gurtsystem
8. Bedienknopf
Schultergurte
9. Rot/Grün-Anzeige
für Verriegelung der
Sitzschale
28
10. Gurtführung für
das Schulterteil des
Autogurts
11. Autogurt Spanner
(Spannen Schulterteil
des Autogurts)
12. Fach für die
Gebrauchsanweisung
13. Gurthaken
14. Schultergurte des
Gurtsystems
15. Knopf für Auswahl
Drehrichtung Sitzschale
(links oder rechts)
Besondere eigenschaften
Für eine optimale Bedienungsfreundlichkeit ist der Maxi Cosi
Axiss mit den folgenden Spezialeigenschaften ausgestattet:
• Die Sitzschale kann sowohl nach links oder rechts in
Richtung der Autotür gedreht werden, so dass das Kind
bequem in den Sitz gesetzt werden kann.
• Ein Gurtspanner für ein sehr festes Spannen des
Autogurts.
Page 25

3 BEFESTIGEN UND HERAUSNEHMEN
DES MAXI-COSI AXISS
Befestigung mit Dreipunkt-Sicherheitsgurt
(Folgen Sie der roten Markierung am Produkt).
Entfernen Sie die Kopfstütze vom Sitz, auf dem der MaxiCosi Axiss im Auto benutzt wird, falls diese im Weg steht.
Vergessen Sie nicht, die Kopfstütze wieder anzubringen,
wenn der Sitz erneut ohne den Maxi Cosi Axiss in Gebrauch
genommen wird.
A. Befestigen
- BEACHTEN SIE: Verriegeln Sie umklappbare Rücksitze,
- BEACHTEN SIE: Bei einigen Rücksitzen sind die
NO
NO
Befestigen Sie den Maxi-Cosi Axiss am besten auf dem
Rücksitz oder, sollte dies nicht möglich sein, auf dem
Beifahrersitz, vorausgesetzt die nationalen Vorschriften des
Landes, in dem der Kinderautositz benutzt wird, lassen dies
zu.
Bei einer Befestigung hinter dem Beifahrersitz sollte die
Rückenlehne aufrecht und so weit wie möglich nach vorne
gestellt werden, so dass das Kind sich nicht daran stoßen
kann.
WICHTIG: Verriegeln Sie den Maxi-Cosi Axiss immer in
Vorwärtsposition, bevor Sie losfahren.
OK
OK
(Abb. 1 - 4)
CLICK!
OK
Benutzen Sie den Maxi-Cosi Axiss ausschließlich auf einem
nach vorne gerichteten Sitz, der mit einem automatischen
Dreipunkt-Sicherheitsgurt ausgestattet ist, vorausgesetzt,
dieser wurde nach der ECE R16 oder einer gleichwertigen
Norm zugelassen.
Der richtige Verlauf des Autogurts ist von größter Wichtigkeit
für die Sicherheit Ihres Kindes. Der Autogurt muss entlang der
roten Markierungen an den Maxi-Cosi Axiss montiert werden.
Siehe diesbezüglich auch den Sticker an der Seite des MaxiCosi Axiss. Wählen Sie niemals einen anderen als
den vorgeschriebenen Gurtverlauf.
NO
Den kinderautositz drehen
Die Drehrichtung des Axiss muss immer in Richtung der
in der Nähe liegenden Autotür eingestellt werden.
An der Unterseite des Axiss befindet sich der Auswahlknopf
für die Einstellung der Drehrichtung.
Den Sitz nach rechts drehen.
1. Schieben Sie den Auswahlknopf nach hinten, wenn Sie
Den Sitz nach links drehen.
1. Schieben Sie den Auswahlknopf nach vorne, wenn Sie die
2. Öffnen Sie den Hebel, halten Sie den Hebel mit einer
bevor Sie den Maxi-Cosi Axiss befestigen.
Autogurte so weit oben angebracht, dass eine richtige
Befestigung nicht möglich ist. Nehmen Sie in diesem Fall
einen anderen Kindersitz.
Deutsch
die Sitzschale nach RECHTS drehen möchten.
Sitzschale nach LINKS drehen möchten.
Hand ausgezogen, drehen Sie die Sitzschale des
Kinderautositzes mit der anderen Hand in die gewünschte
Position.
29
Page 26

(Abb. 5 - 12)
BEFESTIGUNG IM AUTO: « IN FAHRTRICHTUNG »
WICHTIG: Bevor Sie den Maxi-Cosi Axiss in Gebrauch
nehmen, müssen Sie prüfen, ob die Stützen nicht mehr in
den Gurtführungen stecken. Diese Stützen gehören zur
Verpackung und müssen entfernt werden.
Den Kinderautositz in das Auto montieren:
« IN FAHRTRICHTUNG ».
1. Befestigen Sie das Beckenteil des Autogurts hinter
die zwei Gurtführungen (a), an der Seite der Autotür
und führen Sie es anschließend um das Gestell des
Kinderautositzes herum (b).
Deutsch
2. Befestigen Sie das Beckenteil anschließend auch an
der anderen Seite hinter den zwei Gurtführungen (a).
Schließen Sie den Autogurt (b) und ziehen Sie den Gurt an.
WICHTIG: Prüfen Sie, ob das Beckenteil des Autogurts
fest gespannt ist und hinten um die 4 Gurtführungen rund
um das Gestell läuft. Der Autogurt darf an keiner Stelle
verdreht sein.
3. Drehen Sie das Sitzteil zu sich hin, indem Sie den Hebel
öffnen (a). Halten Sie den Hebel geöffnet und drehen Sie
die Sitzschale mit der anderen Hand (b) auf sich zu.
WICHTIG: Der Auswahlknopf unter dem Gestell muss
zuvor entsprechend Ihrer gewählten Drehrichtung (siehe
Seite 29) eingestellt werden.
OK OK
NO NO
OK
NO
30
Page 27

4. Drehen Sie den Gurtspanner ganz bis zum Ende an (siehe
Zeichnung).
5. ((a) Legen Sie das Schulterteil des Autogurts in die
Gurtführung am oberen Rand des Gestells (Sockels).
(b) Schieben Sie den Schultergurt in die Rille der
Gurtspanner-Achse. WICHTIG: Prüfen Sie, ob das
Beckenteil des Autogurts fest gespannt ist. Das
Beckengurtteil darf KEINEN Spielraum haben (Prüfen Sie
dies, indem Sie vorsichtig an dem Beckenteil ziehen).
6. Bewegen Sie den Hebel des Gurtspanners einige Male
hin und her, bis der Gurt fest gespannt ist (Drücken
Sie nicht auf den Knopf des Gurtspanners).
WICHTIG: Wenn der Gurt gespannt ist, muss
der Hebel heruntergeklappt sein. (*siehe
Zeichnung).
7. Drehen Sie die Sitzschale in Fahrtrichtung. Die grüne
Kontrollanzeige am oberen Rand des Gestells leuchtet
auf. Die grüne Kontrollanzeige zeigt an, dass die
Sitzschale fest in der Position “in Fahrtrichtung”
verriegelt ist.
WICHTIG: Auch während der Fahrt mit einem nicht
besetzten Kinderautositz muss der Kinderautositz immer
in der Position “in Fahrtrichtung” verriegelt werden.
Prüfen Sie die richtige Befestigung des Kinderautositzes
(entsprechend der Zeichnungen).
Ihres Kindes ist der richtige Verlauf des Autogurts sehr
wichtig. Für die Befestigung des Kinderautositzes muss der
Autogurt entlang der roten Markierungen am Maxi-Cosi Axiss
laufen. Beachten Sie auch die Anweisung auf dem Sticker
an der Seite des Maxi-Cosi Axiss. Wenden Sie nie einen
anderen als den vorgeschriebenen Gurtverlauf an. Jede andere
Befestigungsweise bietet keine Sicherheit.
Für die Sicherheit
(Abb. 13 - 14)
Der Kinderautositz ist nicht stabil montiert
• Stellen Sie die Kopfstütze Ihres Autos in eine höhere
Position. Die Kopfstütze darf NIE mit dem Maxi-Cosi Axiss
in Berührung kommen.
• Sollte es möglich und erforderlich sein, stellen Sie den
Winkel der Rückenlehne des Rücksitzes so ein, dass sie
das Gestell des Kinderautositzes vollständig berührt.
Die Sitzschale des Kinderautositzes lässt sich nur
schwer drehen und/oder die Verriegelung der
Sitzschale in der Position « in Fahrtrichtung » (grüne
Anzeige) rastet nur schwer ein.
Prüfen Sie die Befestigung:
• Der Autogurt muss durch alle Gurtführungen laufen.
• Der Beckengurt muss STRAFF (ohne Spielraum) durch die
Gurtführungen laufen.
• Der Autogurt darf das drehbare Sitzteil des
Kinderautositzes nicht berühren.
• Der Autogurt ist möglicherweise nicht fest gespannt.
• Die Position* der Rückenlehne/Rücksitz verursacht
ein Problem (*der Winkel zwischen dem Sitz und der
Rückenlehne).
• Verstellen Sie, falls möglich, die Rückenlehne des
Rücksitzes, so dass das Gestell/der Sockel des
Kinderautositzes den Rücksitz vollständig berührt.
• Prüfen Sie, ob kein Gegenstand die Betriebsweise des
Kinderautositzes behindert.
Wenn sich das Problem nicht beheben lässt, empfehlen
wir Ihnen, sich mit dem Verkäufer des Kinderautositzes
in Verbindung zu setzen.
Deutsch
WICHTIG: Prüfen Sie nach der Befestigung Ihres
Maxi-Cosi Axiss die folgenden Punkte und
korrigieren Sie diese gegebenenfalls:
WICHTIG: Nachdem Sie das Kind in den Maxi-Cosi Axiss
gesetzt haben, muss die Sitzschale in die Position “in
Fahrtrichtung” verriegelt werden. Erst dann dürfen Sie
losfahren.
WICHTIG:
- Prüfen Sie, ob der Autogurt an keiner Stelle verdreht ist.
- Prüfen Sie, ob der Autogurt fest geschlossen ist.
WICHTIG: Um die Sitzschale leichter verriegeln zu können
(grüne Kontrollanzeige), ist es bei einigen Fahrzeugen
erforderlich, die obere Seite der Sitzschale etwas nach unten
zu drücken.
31
Page 28

4 MAXI-COSI AXISS AUS DEM AUTO
NEHMEN
(Abb. 15 - 17)
1. Öffnen Sie den Hebel (a) und drehen Sie gleichzeitig die
Sitzschale (b) auf sich zu.
2. (a) Drücken Sie auf den Knopf (1) und drehen Sie
gleichzeitig den Hebel des Gurtspanners nach unten.
Halten Sie den Knopf eingedrückt (1) und ziehen Sie an
dem Gurt (2), um den Gurt aufzurollen. Nehmen Sie den
Gurt aus der Rille der Achse (c).
WICHTIG: Es ist nicht möglich, den Gurt zu lösen,
wenn der Hebel des Gurtspanners nicht ganz nach unten
gedreht wurde.
3. Öffnen Sie das Autogurtschloss (a) und ziehen Sie den
Autogurt aus der obersten Gurtführung (b) und aus
den untersten Gurtführungen des Gestells/Sockels des
Kinderautositzes.
WICHTIG: Auch wenn kein Kind in dem Kinderautositz
sitzt, muss der Kinderautositz Axiss entsprechend der
Vorschriften im Auto befestigt werden. Ein nicht
Deutsch
ordnungsgemäß befestigter Kinderautositz kann eine
Gefahr für die Mitfahrer bilden. Bei einem Zusammenstoß
kann ein nicht befestigter Kinderautositz ein
lebensgefährliches Projektil sein.
5 HÖHENVERSTELLUNG DER
SCHULTERGURTE
Das Gurtsystem muss auf die Körpergröße des
Kindes eingestellt werden.
* Die Schultergurte des Gurtsystems müssen auf die
Schulterhöhe des Kindes eingestellt werden (siehe
Zeichnung).
(Abb. 18 - 21)
1. Neigen Sie die Kopfstütze nach vorne.
2. Bewegen Sie die Kopfstütze je nach Körpergröße des
Kindes nach oben oder nach unten.
3. Drücken Sie die Kopfstütze zurück, um sie in der
gewünschten Position zu verriegeln.
6 DAS KIND IN DEN
KINDERAUTOSITZ SETZEN
(Abb. 22 - 26)
1. Drücken Sie auf den Verstellknopf (a) und ziehen Sie
gleichzeitig an den Schultergurten (b), um das Gurtsystem
zu lockern (Ziehen Sie an den Gurten, nie an den
Gurtpolstern).
2. Um das Kind bequemer in den Kinderautositz setzen
zu können, benutzen Sie die praktischen Gurthaken
an den Seiten des Kinderautositzes (a). Hängen Sie die
Schultergurte hinter die Haken, bevor Sie das Kind in den
Kinderautositz setzen.
3. Setzen Sie das Kind in den Kinderautositz. Nehmen Sie
die Gurte vom Haken.
4. Schieben Sie die 2 Schlossteile (a) + (b) ineinander und
schieben Sie diese in das Schloss bis ein deutliches
“Klicken” zu hören ist.
5. Ziehen Sie an dem Verstellgurt des Gurtsystems und
ziehen Sie das Gurtsystem fest an.
- Achtung:
Kind und Gurtsystem nicht mehr als eine Fingerbreite
beträgt.
- Achtung:
gespannt werden; bei einem Spielraum von nur einer
Fingerbreite wird das Kind seine Arme unmöglich unter
den Schultergurten herausziehen können.
Achten Sie darauf, dass der Raum zwischen
Achtung: Die Gurte müssen sehr fest
7 DAS KIND AUS DEM
KINDERAUTOSITZ NEHMEN
(Abb. 27 - 28)
1. Drücken Sie auf den Verstellknopf (a) und ziehen Sie
gleichzeitig an den Schultergurten (b), um das Gurtsystem
zu lockern (Ziehen Sie an den Gurten, nie an den
Gurtpolstern).
2. Drücken Sie auf den roten Knopf des Schlosses und
öffnen Sie das Gurtsystem. Hängen Sie die Schultergurte
über die Gurthaken.
8 DEN KINDERAUTOSITZ IN DIE
SITZ-/SCHLAFPOSITION VERSTELLEN
(Abb. 29)
Den Kinderautositz verstellen
Der Maxi-Cosi Axiss lässt sich in 8 Positionen – von der
Sitz- bis zur halben Liegeposition - verstellen.
- Drücken Sie auf den Knopf an der Vorderseite der
Sitzschale und bewegen Sie gleichzeitig den Sitz
nach vorne oder nach hinten in die gewünschte Sitz-/
Liegeposition. Lassen Sie den Knopf los, um die
Sitzschale in der gewünschten Position zu verriegeln.
32
Page 29

9 PFLEGE UND BEZUG ABNEHMEN
Pflegehinweise
Bezug:
• Lesen Sie das Waschetikett, bevor Sie den Bezug reinigen
(Das Waschetikett ist auf den Bezug genäht). Auf dem
Waschetikett finden Sie die folgenden, bekannten
Pflegesymbole.
Waschvorschriften
Reinigen bekleding:
• Waschen Sie den Bezug und die Schulterpolster mit der
Hand (bei höchstens 30˚C). Nicht im Wäschetrockner
trocknen. Siehe auch die Waschanleitung am Bezug.
Tpp: Es empfiehlt sich, beim Kauf des Maxi-Cosi Axiss
gleichzeitig einen zweiten Bezug zu kaufen, so dass Sie den
Maxi-Cosi Axiss immer benutzen können, auch wenn Sie
einen Bezug waschen und trocknen.
Kunststoffgestell und Sitzschale:
- BEACHTEN SIE: Nehmen Sie den Maxi-Cosi Axiss
für die Reinigung aus dem Auto. Reinigen Sie die
Kunststoffteile des Kinderautositzes mit einem Tuch
mit lauwarmen Wasser und Seife. Verwenden Sie keine
aggressiven Reinigungsmittel.
- BEACHTEN SIE: Benutzen Sie nie Schmiermittel, auch
nicht für die beweglichen Teile des Maxi-Cosi Axiss.
(Abb. 30 - 36)
Den bezug von der sitzschale abnehmen:
Tipp: Bevor Sie den Bezug von der Sitzschale abnehmen,
empfehlen wir Ihnen, sich genau anzusehen, wie der
Bezug befestigt ist, so dass Sie den Bezug nach der
Reinigung wieder auf die ursprüngliche Art und
Weise im Kinderautositz befestigen können.
1. Drehen Sie den Sitz des Maxi-Cosi Axiss.
2. Öffnen Sie das Gurtschloss, indem Sie auf den roten
Knopf drücken (a), drücken Sie danach auf den
Verstellknopf (b) und ziehen Sie gleichzeitig beide
Schultergurte nach vorne (Ziehen Sie an den Gurten,
NICHT an den Gurtpolstern).
3. Nehmen Sie die Schultergurte vom Haken an der
Rückseite des Kinderautositzes. Ziehen Sie die
Schultergurte anschließend über die Vorderseite des
Kinderautositzes aus der Schale und den Gurtpolstern.
4. Lösen Sie die elastischen Bänder des Bezugs (a). Ziehen
Sie den Bezug über die Teile (b) + (c) der Sitzschale
(siehe Zeichnung). Ziehen Sie die Gurtteile (d) durch
die Öffnungen des Sitzes und nehmen Sie den Bezug
vorsichtig und langsam ab.
5. Ziehen Sie die elastischen Bänder über die obere Seite der
Kopfstütze (siehe Zeichnung). Führen Sie die Gurtpolster
durch die Öffnungen des Kopfstützenbezugs und nehmen
Sie den Bezug ab. Nehmen Sie vor dem Waschen die
Verstärkungsplatte aus dem Bezug. WICHTIG: Entfernen
Sie NIE andere Teile des Kinderautositzes, wie das EPS/
Polystyren oder sonstiges Schaummaterial, das sich
unter dem Bezug befindet. Diese Materialien sind für die
Sicherheit des Maxi-Cosi Axiss sehr wichtig.
* Achten Sie beim erneuten Befestigen des Bezugs darauf,
dass die Hosenträgergurte nicht verdreht sind. Die
Gurte müssen flach durch das Gurtschloss laufen (siehe
Zeichnung). Die Hosenträgergurte müssen unter den
Querbalken an der Rückseite des Kinderautositzes befestigt
werden. Bevor Sie das Kind wieder in den Kinderautositz
setzen, müssen Sie die Gurtfunktion testen. Im Zweifelsfall
setzen Sie sich bitte mit dem Verkäufer des Kinderautositzes
in Verbindung.
Ausschliesslich für das abnehmen des bezugs
von der kopfstütze
Lösen Sie die Eisenstäbchen an der Rückseite des
Kinderautositzes (b) und nehmen Sie das Eisenstäbchen
heraus. Die Schlaufen der Gurtpolster sind nun gelöst.
Nehmen Sie die Gurtpolster über die Vorderseite des
Kinderautositzes ab. Sie können jetzt den Bezug der
Kopfstütze abnehmen.
Betriebsweise und Reinigung des Gurtschlosses:
Die richtige Betriebsweise des Gurtschlosses und des
Gurtverstellsystems tragen erheblich zur Sicherheit des
Kindes bei. Ein Nichtfunktionieren des Gurtschlosses ist in
den meisten Fällen auf Verunreinigungen (Staub, Schmutz,
Essensreste usw.) zurückzuführen. Achten Sie darauf, dass das
Gurtschloss immer sauber ist. Saugen Sie es z.B. mit einem
Staubsauger aus.
In nachstehender Liste finden Sie einige möglicherweise
auftretende Betriebsstörungen mit zugehörigen
Problemlösungen.
A. Störungen am Gurtschloss:
• Die Schlossteile werden beim Öffnen des Gurtschlosses
verzögert gelöst.
• Das Gurtschloss lässt sich nur mit großem Kraftaufwand
öffnen.
• Das Festklicken der Schlossteile in das Gurtschloss verläuft
nicht reibungslos (großer Widerstand).
• Das Schloss lässt sich nicht mehr schließen. Die Schlossteile
werden wieder ausgeworfen.
• Beim Schließen des Gurtschlosses ist kein deutliches
“Klicken“ zu hören.
33
Deutsch
Page 30

B. Behebung eventueller Störungen des Gurtschlosses:
• Kontrollieren Sie das Schloss auf Verunreinigung und
reinigen Sie es, falls erforderlich, indem Sie es ausklopfen,
ausspülen oder mit einem Staubsauger aussaugen.
• BEACHTEN SIE: Benutzen Sie nie Schmiermittel.
Wenn es nicht gelingt, dass Gurtschloss richtig zu schließen,
oder Sie nicht sicher sind, ob die Betriebsstörung behoben
ist, wenden Sie sich bitte unmittelbar an Ihren Fachhändler
oder Importeur (siehe Rückseite der Gebrauchsanweisung).
Benutzen Sie den Maxi-Cosi Axiss dann auf keinen Fall mehr.
WICHTIG: Der Maxi-Cosi Axiss ist ein universeller
kinderautositz für die verwendung mit einem
dreipunkt-sicherheitsgurt:
• Zugelassenes Modell nach ECE R44/04.
• Für Gruppe 1 (Kind von 9 bis 18 kg) muss der
Kinderautositz immer “in Fahrtrichtung” befestigt
werden; am besten auf dem Rücksitz des Autos.
• Der Kinderautositz muss immer in der Position “in
Fahrtrichtung” montiert werden. Dieser Kinderautositz
darf nie in der Position “gegen Fahrtrichtung” montiert
werden.
• Der Hersteller übernimmt ausschließlich dann eine
Deutsch
Haftung, wenn die Vorschriften (R44) eingehalten werden.
Diese gesetzlichen Vorschriften schließen Unvorsichtigkeit
und die Nichtbeachtung der Verkehrsregeln aus.
• Nachdem Sie Ihr Kind in den Kinderautositz gesetzt
haben, müssen Sie die Spannung des Autogurts (den
vollwertigen Dreipunkt-Sicherheitsgurt) kontrollieren.
Spannen Sie den Dreipunkt-Sicherheitsgurt, indem
Sie kräftig daran ziehen. Prüfen Sie, ob der Gurt nicht
verdreht ist.
Allgemeine anweisungen
Beachten Sie immer Folgendes…
•
Benutzen Sie den Kinderautositz immer, auch bei kurzen
Fahrten, denn gerade dann ereignen sich die meisten Unfälle.
• Benutzen Sie den Maxi-Cosi Axiss nur im Auto und
nicht im Haus. Der Kinderautositz wurde nicht für die
Benutzung im Haus entworfen.
• Der Maxi-Cosi Axiss darf sowohl auf dem Beifahrersitz
als auch auf dem Rücksitz benutzt werden. Auch wenn
ein Airbag vorhanden ist. Wir empfehlen Ihnen jedoch,
den Kinderautositz auf dem Rücksitz zu montieren. Sollte
dies nicht möglich sein, achten Sie auf jeden Fall darauf,
dass der Beifahrer in die hinterste Position gestellt wurde.
Lesen Sie auch die Bedienungsanleitung des Fahrzeugs;
bei immer mehr Fahrzeugen lässt sich der Airbag einfach
ausschalten.
• Der Kinderautositz muss immer mit dem Autogurt
befestigt sein, auch wenn er nicht benutzt wird.
Bereits bei einer Notbremsung kann ein nicht
befestigter Kindersitz andere Mitfahrer gefährden und
gegebenenfalls verletzen.
34
• Achten Sie darauf, dass der Maxi-Cosi Axiss nicht durch
schweres Gepäck, verstellbare Sitze oder schließende
Türen eingeklemmt oder belastet wird. Umklappbare
Rückenlehnen von Rücksitzen müssen immer richtig
verriegelt sein.
• Benutzen Sie den Maxi-Cosi Axiss nie ohne Bezug. Der
Bezug darf nur durch einen Originalbezug ersetzt werden,
da er zur Sicherheit des Kinderautositzes beiträgt.
• Decken Sie den Maxi-Cosi Axiss immer ab, wenn Sie das
Auto in der prallen Sonne parken, da Kunststoff- und
Metallteile sehr heiß werden können und der Bezug
unnötig verblassen könnte.
• Entfernen Sie Logos, Warnhinweise usw. am Bezug nicht,
um den Bezug nicht zu beschädigen.
• Achten Sie darauf, dass kein Gepäck oder lose
Gegenstände (beispielsweise auf der Hutablage) im Auto
liegen. Diese Gegenstände bilden bei einer Notbremsung
oder bei einem Zusammenprall gefährliche Projektile.
• Legen Sie bei längeren Fahrten regelmäßig eine Pause
ein, damit Ihr Kind Bewegungsfreiheit bekommt.
• Lassen Sie Ihr Kind nie unbeaufsichtigt im Auto zurück.
• Bewahren Sie die Gebrauchsanweisung für die zukünftige
Benutzung in dem dafür vorgesehenen Fach an der
Rückseite des Maxi-Cosi Axiss auf.
• Wir raten Ihnen dringend von der Benutzung gebrauchter
Produkte ab, da Sie niemals wissen können, was bisher
damit geschah. Die Sicherheit des Kinderautositzes
wird nur dann vom Hersteller garantiert, wenn er vom
Erstbesitzer benutzt wird.
• Der Benutzer ist nicht berechtigt, sowohl am Kinderautositz
als auch an den Gurten Änderungen vorzunehmen. Logos
oder Warnhinweise usw., die zum Kinderautositz gehören,
dürfen auf keinen Fall entfernt werden.
• Ersetzen Sie den Maxi-Cosi Axiss nach einem Unfall
immer. Die Sicherheit des Kinderautositzes kann durch
eine mit bloßem Auge nicht sichtbare Beschädigung
gefährdet sein.
• Dem Hersteller ist bekannt, dass Kinderautositze
Abdrücke im Autositzbezug oder an Autogurten
verursachen können. Aufgrund der vorgeschriebenen
Sicherheitsnormen und der für die Befestigung
erforderlichen Kraft lassen sich diese Abdrücke jedoch
nicht vermeiden. Der Hersteller übernimmt keine Haftung
für eventuelle, dadurch auftretende Schäden.
Und selbstverständlich…
• Seien Sie selbst ein gutes Beispiel und legen Sie immer
Ihren Sicherheitsgurt an.
Abfalltrennung
Für eine optimale und sichere Benutzung von Kinderautositzen
sollten diese nicht länger als 5 bis 6 Jahre nach Kaufdatum
benutzt werden.
Page 31

Durch den langsamen Verschleiß des Kunststoffs, beispielsweise durch Sonneneinstrahlung (UV), können sich die
Eigenschaften des Produkts geringfügig verschlechtern. Für
den Fall, dass das Kind zu groß für den Sitz geworden ist,
empfehlen wir, den Kinderautositz nicht länger zu benutzen
und ihn zu entsorgen.
Aus Umweltschutzgründen bitten wir den Benutzer zu Beginn
(Verpackung) und zu Ende (Produkteile) der Lebensdauer
des Maxi-Cosi Axiss den anfallenden Abfall zu trennen.
Bewahren Sie Verpackungsmaterial aus Plastik außer
Reichweite Ihres Kindes auf, um Erstickungsgefahr zu
verhindern.
im Rahmen der Garantie. Schäden, die von der Garantie
ausgeschlossen sind, können gegen eine angemessene
Gebühr behoben werden.
Diese Garantie entspricht der Europäischen Richtlinie 99/44/
EG vom 25. Mai 1999.
(1) Produkte, bei denen die Etiketten oder
Identifikationsnummern entfernt oder geändert wurden,
gelten als nicht zugelassen. Für diese Produkte wird keine
Garantie gewährt, da die Echtheit dieser Produkte nicht
feststellbar ist.
10 GARANTIE
Unsere 24-Monats-Garantie zeigt, wie groß unser
Vertrauen in die hohe Qualität unserer Design-, Technik-,
Produktions- und Produktleistung ist. Wir garantieren,
dass dieses Produkt gemäß den aktuellen europäischen
Sicherheitsanforderungen und Qualitätsstandards hergestellt
wurde, die auf dieses Produkt Anwendung finden und dass
dieses Produkt zum Zeitpunkt des Kaufes frei von Materialund Verarbeitungsmängeln ist.
Unsere 24-Monats-Garantie erstreckt sich auf Material- und
Verarbeitungsmängel bei Verwendung unter normalen
Bedingungen und gemäß unserem Benutzerhandbuch.
Zur Anforderung von Reparaturen oder Ersatzteilen
im Rahmen der Garantie aufgrund von Material- und
Verarbeitungsmängeln ist der Nachweis zu erbringen, dass der
Kauf innerhalb von 24 Monate vor dieser Service-Anforderung
erfolgt ist.
Unsere 24-Monats-Garantie erstreckt sich nicht auf Schäden
aufgrund von normalem Verschleiß, Unfällen, missbräuchlicher
Verwendung, Fahrlässigkeit oder der Nichtbefolgung des
Benutzerhandbuches. Beispiele für normalen Verschleiß sind
die Abnutzung von Rädern und Gewebe durch regelmäßige
Nutzung und die natürliche Farb- und Materialabschwächung
über einen längeren Zeitraum und eine längere
Nutzungsdauer.
Was im Falle von Mängeln zu tun ist:
Falls Probleme oder Mängel auftreten, sollten Sie sich für
schnellen Service am besten an Ihren [Marke] Händler
wenden. Unsere 24-Monats-Garantie wird dort anerkannt
(1). Dazu ist ein Nachweis zu erbringen, dass der Kauf
innerhalb von 24 Monaten vor der Service-Anforderung
erfolgt ist. Am einfachsten ist es, Ihre Service-Anforderung
vorab vom [Marke] Kundenservice genehmigen zu lassen.
Wir übernehmen grundsätzlich die Kosten für Versand und
Rücksendung im Zusammenhang mit Service-Anforderungen
11 FRAGEN
Fragen können Sie telefonisch Ihrem Fachhändler oder
Importeur stellen (siehe Rückseite der Gebrauchsanweisung).
Sorgen Sie dafür, dass Sie folgende Angaben zur Hand haben:
• Seriennummer, die unten auf dem orange-weißen
ECE-Sticker angegeben ist (an der Rückseite des MaxiCosi Axiss).
• Marke, Typ und Baujahr des Autos und des Sitzes, auf
dem der Maxi-Cosi Axiss benutzt wird.
• Alter (Größe) und Gewicht Ihres Kindes.
Deutsch
35
Page 32

NOTES / NOTIZEN / NOTITIES / NOTAS / NOTÍCIAS
Nederlands
36
Page 33

GEACHTE OUDERS
Gefeliciteerd met de aankoop van de Maxi-Cosi Axiss.
Bij de ontwikkeling van de Maxi-Cosi Axiss hebben veiligheid,
gebruiksgemak, comfort en design steeds voorop gestaan.
Mede hierdoor voldoet dit product aan de meest strenge
veiligheidseisen.
Uit onderzoek is gebleken, dat veel kinderautozitjes
verkeerd gebruikt worden. Neem daarom de tijd om deze
gebruiksaanwijzing goed door te lezen. Alleen bij correct
gebruik is de veiligheid van uw kind optimaal gewaarborgd.
Voortdurend onderzoek door onze afdelingen
productontwikkeling en marketing; zowel door een intensieve
samenwerking met testinstituten, als in overleg met
consumenten en klanten, zorgt ervoor dat wij voorop blijven
lopen op het gebied van kinderveiligheid voor in de auto.
Vragen of opmerkingen met betrekking tot het gebruik van de
Maxi-Cosi Axiss vernemen wij dan ook graag van u.
Dorel (adres- en telefoongegevens; zie achterzijde
gebruiksaanwijzing)
INHOUDSOPGAVE
1 BELANGRIJK: EERST LEZEN!
WAARSCHUWING
- Lees deze gebruiksaanwijzing zorgvuldig door
en bewaar deze als naslagwerk in het daarvoor
bestemde opbergvakje op de achterzijde
van het autozitje. Het niet opvolgen van de
gebruiksaanwijzing kan de veiligheid van een kind
ernstig schaden.
- Gebruik alleen originele accessoires en onderdelen
die door de fabrikant zijn toegestaan. Breng geen
veranderingen aan het product aan. Als u klachten
of problemen heeft, neem dan contact op met uw
leverancier of importeur.
Maxi-Cosi Axiss toelating volgens ECE R 44/04
Groep Lichaamsgewicht Leeftijd
kind
Groep 1 (9 - 18 kg) 9 maanden –
ca. 3,5 jaar
1 BELANGRIJK: EERST LEZEN!
2 PRODUCTBESCHRIJVING
3 INSTALLEREN EN UITNEMEN VAN DE
MAXI-COSI AXISS
4 MAXI-COSI AXISS UIT DE AUTO NEMEN
5 HOOGTE SCHOUDERGORDELS VERSTELLEN
6 KIND IN HET AUTOZITJE PLAATSEN
7 KIND UIT HET AUTOZITJE NEMEN
8 HET AUTOZITJE IN ZIT/SLAAPSTAND VERSTELLEN
9 ONDERHOUD EN BEKLEDING AFNEMEN
10 GARANTIE
11 VRAGEN
-
Disclaimer:
Bij het ontwerpen en samenstellen van deze gebruiksaanwijzing
is de grootst mogelijke zorgvuldigheid betracht. We kunnen
echter geen garantie geven met betrekking tot de volledigheid
en juistheid van de vermelde informatie.
- De schoudergordel dient afgesteld te wor den op
de lengte van uw kind (zie pag. 42).
- Om uw kind correct in de Maxi-Cosi Axiss te
plaatsen dient u de aanwijzingen op pag. 42
strikt op te volgen.
37
Nederlands
Page 34

2 PRODUCTBESCHRIJVING
1. Bekleding
Nederlands
2. Verstelbare hoofdsteun
3. Hendel voor draaien van
zitkuip
4. Onderstel autozitje
(basis)
5. Gordelgeleiders voor het
heupdeel autogordel
6. Bedieningsknop zit- en
slaapstand
7. Aantrekband voor
gordelsysteem
8. Bedieningsknop
schoudergordels
9. Rood/groen indicator
voor vergrendeling
zitkuip
38
10. Gordelgeleider voor het
schouderdeel autogordel
11. Autogordel spanner
(spannen schouderdeel
van de autogordel)
12. Opbergvak voor de
gebruiksaanwijzing
13. Gordelhaak
14. Schoudergordels van
harnas
15. Knop voor kiezen
draairichting zitkuip
(links of rechts)
Speciale eigenschappen
Ter verhoging van het gebruiksgemak is de Maxi-Cosi Axiss
van de volgende speciale eigenschappen voorzien:
• De zitkuip is naar zowel links als rechts draaibaar in de
richting van het autoportier om het plaatsen van het kind
makkelijker te maken.
• Een gordelspanner voor het extra krachtig aanspannen
van de autogordel.
Page 35

3 INSTALLEREN EN UITNEMEN VAN
DE MAXI-COSI AXISS
Installatie met 3-puntsgordel
(volg rode kleurmarkering op product).
OK
OK
CLICK!
NO
NO
A. Installeren
- LET OP: Vergrendel neerklapbare achterbanken alvorens
de Maxi-Cosi Axiss te installeren.
- LET OP: Bij sommige zitplaatsen zijn de autogordels
zo ver naar voren geplaatst dat een goede installatie
onmogelijk wordt. Probeer in dat geval een andere
zitplaats.
Plaats de Maxi-Cosi Axiss bij voorkeur op de achterbank; of
indien dit niet mogelijk is op de passagiersstoel mits dit niet
in strijd is met de locale wetgeving van het land waar het
autozitje wordt gebruikt.
Zet bij plaatsing achter passagiersstoel de rugleuning hiervan
rechtop en zo ver mogelijk naar voren zodat het kind er zich
niet aan kan stoten.
BELANGRIJK: Vergrendel de Maxi-Cosi Axiss altijd in de
voorwaarts gerichte positie voordat u gaat rijden.
(Afb. 1 - 4)
Het autozitje draaien
De draairichting van de Axiss moet altijd ingesteld
worden in de richting van het dichtst bijzijnde
autoportier.
Aan de onderkant van de Axiss bevindt zich de keuzeknop
voor het instellen van de draairichting.
Om de zitting naar rechts te laten draaien.
1. Schuif de keuzeknop naar achter indien u wenst dat de
zitkuip naar RECHTS draait.
OK
Gebruik de Maxi-Cosi Axiss uitsluitend op een naar voren
gerichte zitplaats, die voorzien is van een automatische
3-puntsgordel, mits deze goedgekeurd is volgens ECE R16 of
een gelijkwaardige norm.
De juiste loop van de autogordel is van essentieel belang
voor de veiligheid van uw kind. De autogordel moet in de
juiste volgorde langs de rode markeringen op de Maxi-Cosi
Axiss worden aangebracht, zie hiervoor ook de sticker op de
zijkant van de Maxi-Cosi Axiss. Pas nooit een andere
gordelloop toe, dan beschreven.
Verwijder de hoofdsteun van de zitplaats waar de Maxi-Cosi
Axiss in de auto gebruikt wordt wanneer deze in de weg zit.
Vergeet de hoofdsteun niet terug te plaatsen wanneer de
zitplaats opnieuw in gebruik wordt genomen.
NO
Om de zitting naar links te laten draaien.
1. Schuif de keuzeknop naar voor indien u wenst dat de
zitkuip naar LINKS draait.
2. Open de hendel, houd de hendel met 1 hand
uitgetrokken, draai met de andere hand de zitkuip van
het autozitje in de gewenste positie.
Nederlands
39
Page 36

(Afb. 5 - 12)
INSTALLEREN IN DE AUTO: « MET DE RIJRICHTING MEE »
BELANGRIJK: Voordat u de Maxi-Cosi Axiss gaat gebruiken
dient u te controleren of de steuntjes uit de gordelgeleiders
genomen zijn. Deze steuntjes maken deel uit van de
verpakking en dienen verwijderd te worden.
2. Plaats het heupdeel vervolgens ook aan de andere zijde
achter de twee gordelgeleiders (a). Sluit de autogordel
(b) en trek de gordel aan. BELANGRIJK: controleer of
het heupdeel van de autogordel strak aangespannen is en
achter de 4 gordelgeleiders rondom het onderstel (sokkel)
doorloopt. De autogordel mag nergens gedraaid zijn.
Plaats het autozitje in de auto: « met de rijrichting
mee ».
1. Het heupdeel van de autogordel achter de twee
gordelgeleiders plaatsen (a), aan de zijde van het
autoportier en vervolgens om het onderstel van het
autozitje (b).
Nederlands
3. Draai het zitgedeelte naar u toe door de hendel te
openen (a). Houd de hendel geopend en draai met de
andere hand (b) de zitkuip naar u toe. BELANGRIJK:
de keuzeknop onder het onderstel/sokkel dient vooraf
ingesteld
te worden volgens de door u gekozen draairichting (zie
pag. 39).
OK OK
NO NO
OK
NO
40
Page 37

4. Draai de gordelspanner volledig tot het einde (zie
tekening).
5. (a) Plaats het schouderdeel van de autogordel in de
gordelgeleider aan de bovenrand van het onderstel
(sokkel).
(b) Schuif de schoudergordel in de gleuf van de spindel/
as gordelspanner. BELANGRIJK: Controleer of het
heupdeel van de autogordel strak zit, er mag GEEN
speling op het heupgordeldeel zitten (controleer dit door
zachtjes aan het heupdeel te trekken).
6. Beweeg de hendel van de gordelspanner een
aantal malen heen en weer totdat de gordel strak
opgespannen is (druk niet op het knopje van de
gordelspanner). BELANGRIJK: als de gordel
aangespannen is, dient de hendel opgeklapt
te zijn. (*zie tekening).
7. Draai de zitkuip in de rijrichting, de groene controleindicator is zichtbaar op de bovenrand van het onderstel.
De groene controle-indicator geeft aan dat de zitkuip
veilig in de positie “met de rijrichting mee” vergrendeld
is. BELANGRIJK: ook tijdens het rijden met een leeg
autozitje dient het autozitje altijd in de positie “met de
rijrichting mee” vergrendeld te worden.
Controleer de correcte installatie van het autozitje
(volgens de tekeningen). Voor de veiligheid van uw
kind is een correcte loop van de autogordel zeer belangrijk.
Om het autozitje in de auto te bevestigen dient de autogordel
langs de rode markeringen op de Maxi-Cosi Axiss te lopen.
Raadpleeg ook de instructie sticker op de zijkant van de
Maxi-Cosi Axiss. Pas nooit een andere gordelloop toe.
Iedere andere manier van installeren is onveilig.
(Afb. 13 - 14)
Het autozitje staat niet stabiel
• Zet de hoofdsteun van uw auto in een hogere stand.
De hoofdsteun mag NOOIT in contact komen met de
Maxi-Cosi Axiss.
• Wanneer het mogelijk is en nodig, verstel dan de hoek
van de rugleuning van de achterbank zodanig dat deze
volledig in contact komt met het onderstel van het
autozitje.
Het zitkuipje van het autozitje draait moeilijk en/of de
vergrendeling van het zitkuipje in de stand « met de
rijrichting mee » (groene indicator) gaat moeilijk.
Controleer de installatie:
• De autogordel moet door alle gordelgeleiders lopen.
• Het heupdeel moet STRAK (zonder speling) door de
gordelgeleiders lopen.
• De autogordel mag het draaibare zitgedeelte van het
autozitje niet raken.
• De autogordel is mogelijk té strak aangespannen.
• De stand* van de rugleuning/achterbank veroorzaakt een
probleem (*de hoek tussen de zitting en de rugleuning).
• Verstel indien mogelijk de rugleuning van de achterbank
zodat het onderstel/sokkel van het autozitje volledig in
contact komt met de achterbank.
• Controleer of geen enkel voorwerp het functioneren van
het autozitje belemmert.
Als het probleem niet opgelost kan worden, adviseren
wij contact op te nemen met de verkoper van het
autozitje.
Nederlands
BELANGRIJK: check nadat de installatie van uw
Maxi-Cosi Axiss is beëindigd, de volgende punten en
corrigeer ze indien nodig:
BELANGRIJK: Als het kind in de Maxi-Cosi Axiss is
geplaatst, dient de zitkuip in de positie “met de rijrichting
mee” vergrendeld te worden, pas daarna mag u vertrekken.
BELANGRIJK:
- Controleer of de autogordel nergens gedraaid is.
- Controleer of de autogordel goed gesloten is.
BELANGRIJK: om het zitkuipje makkelijker te vergrendelen
(groene controle-indicator), is het bij sommige auto’s nodig de
bovenkant van de zitkuip iets naar beneden te drukken.
41
Page 38

4 MAXI-COSI AXISS UIT DE AUTO
NEMEN
(Afb. 15 - 17)
1. Open de hendel (a) en draai gelijktijdig de zitkuip (b) naar
u toe.
2. (a) Druk op de knop (1) en draai gelijktijdig de hendel
van de gordelspannen naar beneden, houd het knopje
ingedrukt (1) en trek aan de gordel (2) om de gordel af
te rollen. Verwijder de gordel uit de gleuf van de spindel/
as (c).
BELANGRIJK: het is niet mogelijk de gordel los te
maken als de hendel van de gordelspanner niet volledig
naar beneden gedraaid is.
3. Open het autogordelslot (a), en haal de autogordel
uit de bovenste gordelgeleider (b) en uit de onderste
gordelgeleiders van het onderstel/sokkel van het autozitje.
BELANGRIJK: Ook wanneer het autozitje niet door
een kind in gebruik is, dient het autozitje Axiss volgens
de voorschriften in de auto bevestigd te zijn. Een niet
correct bevestigd autozitje kan gevaar opleveren voor de
medepassagiers. In het geval van een aanrijding is een niet
bevestigd autozitje een levensgevaarlijk voorwerp.
5 HOOGTE SCHOUDERGORDELS
VERSTELLEN
Het gordelsysteem dient aan de lichaamslengte
van het kind aangepast te worden.
* De schoudergordels van het harnas dienen op
Nederlands
schouderhoogte van het kind geplaatst te worden (zie
tekening).
maken (trek aan de gordels, nooit aan de
gordelbeschermers).
2. Om het kind makkelijker in het autozitje te plaatsen
maakt u gebruik van de praktische gordelhaken op de
zijkanten van het autozitje (a). Hang de schoudergordels
achter de haken voordat u het kind in het autozitje
plaatst.
3. Plaats het kind in het autozitje, neem de gordels van de
haken.
4. Voeg de 2 slotdelen (a) + (b) samen en plaats deze in het
slot tot u een duidelijke “klik” hoort.
5. Trek aan de verstelgordel van het gordelsysteem en trek
het gordelsysteem strak.
- Let op:
- Let op:
Laat niet meer dan één vingerdikte ruimte
tussen kind en het gordelsysteem.
De gordels moeten echt zeer strak worden
aangetrokken; bij een speling van slechts een vinger zal
het vrijwel onmogelijk zijn voor het kind om de armen
van onder de schoudergordels te bevrijden.
7 KIND UIT HET AUTOZITJE NEMEN
(Afb. 27 - 28)
1. Druk op de verstelknop (a) en trek gelijktijdig aan de
schoudergordels (b) om het gordelsysteem losser te
maken (trek aan de gordels, nooit aan de
gordelbeschermers).
2. Druk op de rode knop van het slot en open het
gordelsysteem. Hang de schoudergordels over de
gordelhaken.
(Afb. 18 - 21)
1. Kantel de hoofdsteun naar voren.
2. Beweeg de hoofdsteun naar boven of naar beneden al
naar gelang de lichaamslengte van het kind.
3. Druk de hoofdsteun terug om de gewenste positie te
vergrendelen.
8 HET AUTOZITJE IN ZIT/
(Afb. 29)
Het autozitje verstellen
De Maxi-Cosi Axiss is verstelbaar in 8 standen van zit
tot halve ligstand
- Druk op de knop aan de voorzijde van de zitkuip en
6 KIND IN HET AUTOZITJE PLAATSEN
(Afb. 22 - 26)
1. Druk op de verstelknop (a) en trek gelijktijdig aan de
schoudergordels (b) om het gordelsysteem losser te
42
SLAAPSTAND VERSTELLEN
beweeg gelijktijdig de zitting naar voor of achter in de
gewenste zit/ligstand. Laat de knop los om de zitkuip in
de gewenste stand te vergrendelen.
Page 39

9 ONDERHOUD EN BEKLEDING
AFNEMEN
Onderhoud
Bekleding:
• Raadpleeg het wasetiket voordat u de bekleding gaat
reinigen (het wasetiket is aan de bekleding gestikt). Op
het wasetiket treft u de bekende volgende onderhoudssymbolen aan.
5. Haal de elastiekjes over de bovenkant van de hoofdsteun
(zie tekening). Voer de gordelbeschermers door de
openingen van de hoofdsteunbekleding en verwijder de
bekleding. Neem voor het wassen de verstevigingplaat
uit de bekleding. BELANGRIJK: verwijder NOOIT andere
delen van het autozitje zoals het EPS/polystyreen of ander
schuimmateriaal dat zich onder de bekleding bevindt.
Deze materialen zijn van groot belang voor de veiligheid
van de Maxi-Cosi Axiss.
Wasvoorschriften
Reinigen bekleding:
• Was bekleding en gordelbeschermers met de hand
(maximaal 30°C). Gebruik geen wasdroger. Zie ook de
wasinstructies op de bekleding.
Tip: Het is verstandig, meteen bij aanschaf van de Maxi-Cosi
Axiss, een extra bekleding te kopen zodat u de Maxi-Cosi
Axiss steeds kunt blijven gebruiken, ook tijdens het wassen en
drogen van de bekleding.
Kunststof onderstel en zitkuip:
- LET OP: Doe dit alleen wanneer de Maxi-Cosi Axiss
buiten de auto staat. Reinig de kunststofdelen van
het autozitje met een doekje met lauw water en zeep.
Gebruik hierbij geen agressieve middelen.
- LET OP: Gebruik nooit smeermiddelen, ook niet voor
de bewegende delen van de Maxi-Cosi Axiss.
(Afb. 30 - 36)
De bekleding van de zitkuip verwijderen:
Tip: Alvorens de bekleding van de zitkuip te verwijderen
adviseren wij u het geheel aandachtig te bekijken; zodat u
later de bekleding weer correct op het autozitje
kunt plaatsen.
1. Draai de zitting van Maxi-Cosi Axiss.
2. Open het gordelslot door op de rode knop te drukken,
maak het slot open (a), druk daarna op de verstelknop (b)
en trek gelijktijdig beide schoudergordels naar voren (trek
aan de gordels, NIET aan de gordelbeschermers).
3. Verwijder de schoudergordels van de gordelplaat aan
de achterkant van het autozitje. Trek vervolgens via de
voorzijde van het autozitje de schoudergordels uit kuip en
gordelbeschermers.
* Bij het weer terugplaatsen van de bekleding is het zeer
belangrijk dat de harnasgordels niet gedraaid zijn. Deze
dienen vlak door het gordelslot te lopen (zie tekening).
De harnasgordels dienen onder het dwarsbalkje op
de achterzijde van het autozitje geplaatst te worden.
Voordat u het kind weer in het autozitje plaatst, dient u
de gordelfunctie te testen, bij elke vorm van twijfel dient
u contact op te nemen met de verkoper van het autozitje.
Uitsluitend om de bekleding van de
hoofdsteun te verwijderen
Maak het ijzeren staafje op de achterkant van het autozitje
los (b), en verwijder het ijzeren staafje. De lusjes van de
gordelbeschermers zijn nu los. Verwijder via de voorzijde van
het autozitje de gordelbeschermers. Nu kunt u de bekleding
van de hoofdsteun afnemen.
Functioneren en reinigen van het gordelslot:
Het goed functioneren van het gordelslot en
gordelverstelsysteem is van zéér groot belang voor de
veiligheid van het kind. Het niet functioneren van het
gordelslot is meestal te wijten aan verontreiniging (stof, vuil,
etensresten, etc…). Zorg dat u het gordelslot schoon houdt
door middel van uitzuigen met bijv. een stofzuiger.
In onderstaande lijst wordt een aantal mogelijke functiestoringen gegeven met bijpassende onderhoudsoplossing.
A. Storingen aan het gordelslot:
• De slotdelen worden bij het openen van het gordelslot
vertraagd uitgeworpen.
• Het gordelslot laat zich alleen met veel kracht openen.
• Het vastklikken van de slotdelen in het gordelslot
verloopt niet soepel (veel weerstand).
• Het slot kan niet meer gesloten worden, de slotdelen
worden weer uitgeworpen.
• Bij het sluiten van het gordelslot is geen duidelijke “klik”
hoorbaar.
Nederlands
4. Maak de elastiekjes van de bekleding los (a). Haal de
bekleding over de delen (b) + (c) van de zitkuip (zie
tekening). Haal de gordeldelen (d) door de openingen
van de zitting en verwijder voorzichtig en langzaam de
bekleding.
B. Oplossen eventuele storing van het gordelslot:
• Controleer het slot op verontreiniging en maak het indien
nodig schoon, door uitkloppen, uitspoelen, schoonblazen
of uitzuigen met bijv. een stofzuiger.
• LET OP: Gebruik nooit smeermiddelen.
43
Page 40

Wanneer het niet lukt om het gordelslot goed te sluiten of
indien u er niet zeker van bent dat de functiestoring verholpen
is, neem dan direct contact op met de leverancier of importeur
(zie achterzijde van de gebruiksaanwijzing). Gebruik de
Maxi-Cosi Axiss dan in geen geval.
BELANGRIJK: De Maxi-Cosi Axiss is een universeel
autozitje voor gebruik met 3-puntsgordel:
• Goedgekeurd model volgens ECE R44/04.
• Voor groep 1 (kind van 9 tot 18Kg) moet het autozitje
altijd “met de rijrichting mee” worden geplaatst; bij
voorkeur op de achterbank van de auto.
• Het autozitje dient altijd geplaatst te worden in de
positie “met de rijrichting mee” Dit autozitje mag nooit
geplaatst worden in de positie “tegen de rijrichting in”.
• De fabrikant kan alleen verantwoordelijk worden
gehouden voor zover het de toepassing van de
reglementering (R44) betreft. Deze bekrachtiging
sluit onvoorzichtigheid en het niet respecteren van de
verkeersregels uit.
• Nadat u uw kind in het autozitje geplaatst heeft, dient
u de spanning van de autogordel (de volwassen 3-punts
autogordel) te controleren. Span de 3-punts autogordel
op door er stevig aan te trekken. Controleer of de gordel
niet gedraaid is.
Algemene instructies
Let altijd op het volgende…
• Gebruik het autozitje altijd, ook bij korte ritjes, want juist
dan gebeuren de meeste ongelukken.
• Gebruik de Maxi-Cosi Axiss alleen in de auto en niet in
huis. Het autozitje is niet ontworpen voor gebruik in huis.
• De Maxi-Cosi Axiss mag zowel op de voorstoel als op
Nederlands
de achterbank worden gebruikt. Ook bij aanwezigheid
van een airbag. Wij adviseren u echter het autozitje op
de achterbank te plaatsen. Indien dat niet mogelijk is,
zorg er dan in ieder geval voor dat bij aanwezigheid
van een airbag de voorstoel in de achterste stand staat.
Raadpleeg ook de handleiding van de auto; in steeds
meer auto’s is de airbag eenvoudig uit te schakelen.
• Het autozitje moet altijd met de autogordel bevestigd
zijn, ook wanneer het niet gebruikt wordt. Een los
autozitje kan al bij een noodstop passagiers verwonden.
• Zorg ervoor dat de Maxi-Cosi Axiss niet bekneld of
belast wordt door zware bagage, verstelbare stoelen of
dichtslaande deuren. Neerklapbare rugleuningen van
achterbanken dienen altijd goed vergrendeld te zijn.
• Gebruik de Maxi-Cosi Axiss nooit zonder bekleding.
Vervang de bekleding niet door een andere bekleding dan
een originele, omdat de bekleding deel uitmaakt van de
totale veiligheid van het autozitje.
• Dek de Maxi-Cosi Axiss altijd af als de auto in de volle
zon geparkeerd wordt; kunststof- en metaaldelen kunnen
erg heet worden, dit kan tot brandwonden leiden en de
bekleding kan onnodig verkleuren.
• Logo’s etc. op de bekleding niet verwijderen, dit om
beschadigingen aan de bekleding te voorkomen.
• Zorg ervoor dat er geen bagage of andere losse objecten
(bijvoorbeeld op de hoedenplank) in de auto liggen. Deze
veranderen bij een noodstop of botsing in gevaarlijke
voorwerpen.
• Pauzeer bij langere ritten regelmatig om uw kind wat
bewegingsvrijheid te geven.
• Laat uw kind nooit alleen in de auto achter.
• Bewaar voor toekomstig gebruik, de gebruiksaanwijzing
in de daarvoor bestemde ruimte achterop de Maxi-Cosi
Axiss.
• Gebruik nooit tweedehands producten, u weet immers
nooit wat er mee is gebeurd. De veiligheid van het
autozitje kan uitsluitend door de fabrikant worden
gegarandeerd wanneer het gebruikt wordt door de eerste
eigenaar.
• Zowel aan een autozitje voor kinderen, als aan de gordels
mogen geen veranderingen worden aangebracht door de
gebruiker. Ook labels of waarschuwingen etc. die deel
uit maken van het autozitje mogen absoluut niet worden
verwijderd.
• Vervang de Maxi-Cosi Axiss na een ongeval altijd; het
autozitje kan door niet direct waarneembare schade
onveilig zijn geworden.
• De fabrikant houdt rekening met het feit dat autozitjes
afdrukken kunnen veroorzaken in de autobekleding of
autogordels. Door de voorgeschreven veiligheidsnormen
en de kracht waarmee deze moeten worden
aangespannen, laat dit zich echter niet vermijden. De
fabrikant is niet verantwoordelijk voor eventuele schade
die hierdoor ontstaan.
En vanzelfsprekend…
• Geef zelf het goede voorbeeld en draag altijd uw
autogordel.
Het scheiden van afval
Voor een optimaal en veilig gebruik van autozitjes, zouden
deze niet langer dan 5 à 6 jaar na de aankoopdatum gebruikt
moeten worden. Door de langzame veroudering van kunststof,
o.a. door zonlicht (UV), kunnen de eigenschappen van het
product onmerkbaar achteruit gaan. Indien het kind uit het
autozitje is gegroeid, adviseren wij dan ook het autozitje niet
langer te gebruiken en dit bij het afval te plaatsen.
44
Page 41

Vanuit onze zorg over het milieu verzoeken wij de gebruiker;
bij begin (verpakking) en einde (productonderdelen) van de
levensduur van de Maxi-Cosi Axiss; het ontstane afval te
scheiden.
Houd plastic verpakkingsmateriaal uit de buurt van uw kind
om verstikkingsgevaar te voorkomen.
(1) Producten die gekocht zijn van wederverkopers of leveranciers
die het etiket of het identificatienummer hebben gewijzigd of
verwijderd, worden als niet-toegelaten producten beschouwd.
Op de desbetreffende producten is geen garantie van toepassing,
aangezien de echtheid van die producten niet kan worden
vastgesteld.
10 GARANTIE
Wij geven 24 maanden garantie. Dit geeft ons vertrouwen weer
in de hoogwaardige kwaliteit van het ontwerp, de techniek,
het product en de productprestaties. Wij garanderen dat dit
product vervaardigd is overeenkomstig de actuele Europese
veiligheidsvoorschriften en kwaliteitsnormen die op dit product
van toepassing zijn, en dat dit product op het moment van
aanschaf vrij is van materiaal- en constructiefouten.
De garantie van 24 maanden omvat gebreken met betrekking
tot de gebruikte materialen en de constructie bij gebruik onder
normale omstandigheden en overeenkomstig onze handleiding.
Voor een reparatieverzoek of een verzoek om reserveonderdelen
uit hoofde van deze garantie dient u een aankoopbewijs te
overleggen dat binnen 24 maanden voorafgaand aan het
serviceverzoek dient te zijn afgegeven.
De garantie van 24 maanden omvat geen schade als gevolg
van normale slijtage, ongevallen, oneigenlijk gebruik of
onachtzaamheid, of als gevolg van het niet in acht nemen van
de handleiding. Normale slijtage omvat bijvoorbeeld slijtage aan
wielen en weefsels door regelmatig gebruik alsmede natuurlijke
vervaging van kleuren en achteruitgang van materiaal na verloop
van tijd en door gebruik.
Wat u kunt doen ingeval van gebreken:
Mocht zich een probleem of gebrek voordoen, dan kunt u zich,
indien u snel geholpen wilt worden, het beste richten tot uw
leverancier of wederverkoper van [merk]. Onze garantie van 24
maanden wordt door hen erkend(1). U dient een aankoopbewijs
te overleggen dat binnen 24 maanden voorafgaand aan
het verzoek dient te zijn afgegeven. Het is het eenvoudigst
wanneer u uw serviceverzoek vooraf laat goedkeuren door de
klantenservice van [merk]. In beginsel komen de kosten voor
verzending en retournering in verband met het serviceverzoek uit
hoofde van de garantie voor onze rekening. Schade die niet door
onze garantie wordt gedekt, kan tegen een redelijke vergoeding
worden afgewikkeld.
11 VRAGEN
Wanneer u vragen heeft, kunt u bellen naar uw leverancier of
importeur (zie achterzijde van de gebruiksaanwijzing). Zorg
dat u de volgende gegevens paraat heeft:
• Serienummer onderaan op de oranje-witte ECE-sticker (op
de achterzijde van de Maxi-Cosi Axiss).
• Merk, type en bouwjaar van de auto en de zitplaats
waarop de Maxi-Cosi Axiss wordt gebruikt.
• Leeftijd (lengte) en gewicht van uw kind.
Maxi-Cosi heeft een speciaal team beschikbaar gesteld om
alle vragen omtrent Maxi-Cosi producten en het gebruik
ervan te beantwoorden. Het Consumenten Contact team is te
bereiken via www.maxi-cosi.com.
Nederlands
Deze garantie voldoet aan Europese Richtlijn 99/44/EG van 25
mei 1999.
45
Page 42

NOTES / NOTIZEN / NOTITIES / NOTAS / NOTÍCIAS
Español
46
Page 43

ESTIMADOS PADRES
Os felicitamos por la compra de esta Maxi-Cosi Axiss.
En el desarrollo y la fabricación de la Maxi-Cosi Axiss hemos
considerado la seguridad, la sencillez de uso, la comodidad
y el diseño como los factores más importantes a tener en
cuenta. Este producto cumple con los requisitos de seguridad
más exigentes.
En investigaciones llevadas a cabo se ha constatado que, a
menudo, se hace mal uso de las sillitas de seguridad para
el automóvil. Por ello, lee atentamente este manual de
instrucciones. La seguridad de tu hijo sólo estará garantizada
si utilizas este producto correctamente.
Gracias a los continuos estudios llevados a cabo por nuestro
Departamento de Investigación y Desarrollo, a los grupos
de prueba de nuestros productos y a las sugerencias de
consumidores, estamos a la vanguardia en seguridad infantil
en el automóvil. Por ello, será un placer para nosotros
responder a cualquier pregunta u observación que puedas
tener respecto al uso de la Maxi-Cosi Axiss.
Dorel (dirección y datos de contacto telefónico: ver el reverso
de las instrucciones de uso).
ÍNDICE
1 IMPORTANTE: ¡ANTE TODO, LEE LAS
INSTRUCCIONES DE USO!
2 DESCRIPCIÓN DEL PRODUCTO
3 INSTALACIÓN Y DESINSTALACIÓN DE LA MAXI-COSI
AXISS
4 DESINSTALACIÓN DE LA MAXI-COSI AXISS DEL
AUTOMÓVIL
5 REGULACIÓN DEL ARNÉS DE SUJECIÓN
6 INSTALACIÓN DEL NIÑO EN EL AUTOMÓVIL
7 DESINSTALAR AL NIÑO DE LA SILLA DE AUTO
8 RECLINACIÓN DE LA SILLA
9 DESENFUNDADO Y MANTENIMIENTO DE LA
VESTIDURA
10 GARANTÍA
11 PREGUNTAS
1 IMPORTANTE: ¡ANTE TODO, LEE
LAS INSTRUCCIONES DE USO!
AVISO
- Lee atentamente este manual de instrucciones
y guárdalo como texto de consulta en el
compartimiento situado a tal efecto en la parte
trasera de la silla. La inobservancia de las
instrucciones de uso puede afectar gravemente
a la seguridad del niño.
- Utiliza solamente accesorios originales y piezas
homologadas por el fabricante. No modifiques
el producto. Si tienes problemas con el producto
o quieres presentar una reclamación, puedes
ponerte en contacto con tu proveedor o con el
importador.
Maxi-Cosi Axiss homologada en virtud de la ECE R 44/04
Grupo Peso corporal Edad
del niño
Grupo 1 (9 - 18 kg) Desde los 9
meses – 3,5 años,
aproximadamente.
- El cinturón del automóvil se tiene que ajustar a
la altura del niño (véase la
pág. 52).
- Para colocar a tu hijo correctamente en la
Maxi-Cosi Axiss deberá seguir atentamente las
instrucciones de la pág. 52
Español
Descargo de responsabilidad:
Se ha puesto el máximo esmero en el diseño y composición
de este manual de instrucciones. Sin embargo, no podemos
garantizar la integridad y exactitud de la información que
contiene.
47
Page 44

2 DESCRIPCIÓN DEL PRODUCTO
1. Vestidura
2. Reposacabezas regulable
3. Maneta Turno Safe para
girar la silla sobre su
base
4. Base
5. Guías-pasaje del
cinturón abdominal del
automóvil
6. Pulsador para la
Español
reclinación
7. Cinturón de regulación
del arnés
8. Bloqueo del arnés
48
9. Indicador de bloqueo del
asiento
10. Guía-pasaje del cinturón
diagonal del automóvil
11. Tensor del cinturón
diagonal del automóvil
12. Compartimiento para el
manual de instrucciones
13. Ganchos sujeta arneses
14. Cinturón del hombro del
arnés
15. Selector de la dirección
del giro (hacia la
izquierda o hacia la
derecha)
Propiedades especiales
Para incrementar la comodidad de uso de la Maxi-Cosi Axiss
se la ha dotado de las siguientes propiedades especiales:
• La silla se puede girar tanto hacia la izquierda como hacia
la derecha, en la dirección de la puerta del automóvil,
para facilitar la colocación del niño.
• Dispone de un tensor del cinturón de seguridad, para
reforzar el ajuste de éste.
Page 45

3 INSTALACIÓN Y DESINSTALACIÓN
DE LA MAXI-COSI AXISS
Instalación con cinturón de seguridad de 3 puntos
(sigue las guías de pasaje rojas en el producto).
OK
OK
NO
NO
obstáculo. No olvides colocarlo de nuevo cuando se vuelva a
utilizar el asiento de forma normal.
A. Instalación
- PRECAUCIÓN: Bloquea los respaldos abatibles de los
asientos traseros antes de instalar la Maxi-Cosi Axiss.
- PRECAUCIÓN: En algunos asientos, los cinturones del
automóvil están situados tan hacia adelante que se hace
imposible una correcta instalación. En ese caso, inténtalo
en otro asiento.
Coloca la Maxi-Cosi Axiss preferentemente en el asiento
trasero; o, si no se puede, en el asiento del copiloto, siempre
que la legislación del país en cuestión no lo prohíba.
Si la colocas detrás del asiento del copiloto, coloca el respaldo
de ese asiento en posición vertical y echado todo lo posible
hacia adelante, de forma que el niño no se dé con él.
IMPORTANTE: Cuando vayas a conducir, bloquea
siempre la Maxi-Cosi Axiss en posición hacia adelante.
(Ilustr. 1 - 4)
Girar la silla
La dirección de giro de la Maxi-Cosi Axiss deberá ser
siempre según la dirección de apertura de la puerta
más cercana.
En la parte inferior de la Maxi-Cosi Axiss se encuentra el
selector de la dirección del giro.
CLICK!
OK
Utiliza la silla Maxi-Cosi Axiss sólo en asientos dirigidos hacia
adelante, provistos de cinturón de seguridad de 3 puntos,
homologados en virtud de la normativa CEE R 16 o por una
normativa equivalente.
El correcto recorrido del arnés es de vital importancia para
la seguridad de tu hijo. El cinturón de seguridad se deberá
colocar en el orden correcto, a lo largo de las guías de pasaje
rojas sobre la Maxi-Cosi Axiss; para ello, consulta la pegatina
situada en el lateral de la Maxi-Cosi Axiss. No pases
nunca el cinturón por un recorrido distinto del
especificado.
Retira el reposacabezas del asiento del automóvil en el
que instales la silla Maxi-Cosi Axiss, si éste constituyera un
NO
Para girar el asiento hacia la derecha.
1. Presiona el selector hacia atrás si quieres que la silla gire
hacia la DERECHA.
Para girar el asiento hacia la izquierda.
1. Presiona el selector hacia adelante si quieres que la silla
gire hacia la IZQUIERDA.
2. Abre la maneta Turno Safe, sujétala con una mano y
gira la silla con la otra mano hasta alcanzar la posición
deseada.
Español
49
Page 46

(Ilustr. 5 - 12)
INSTALACIÓN DE LA SILLA EN EL AUTOMÓVIL:
« DE CARA A LA MARCHA »
IMPORTANTE: Antes de usar la Maxi-Cosi Axiss,
comprueba que se han retirado todos los protectores de
cartón de las guías de pasaje. Estas protecciones forman parte
del embalaje, y tienen que eliminarse.
Instalación de la silla en el automóvil: « de cara a la
marcha ».
1. Coloca el cinturón abdominal por las dos guías-pasaje (a),
por el lado de la puerta del automóvil y, a continuación,
rodeando la base de la silla (b).
2. Continúa pasando el cinturón por las guías-pasaje del
otro lado. Cierra el cinturón de seguridad (b) y ajústalo.
IMPORTANTE: comprueba que el cinturón abdominal
está firmemente tensado y que pasa por las 4 guíaspasaje alrededor de la base de la silla. El cinturón de
seguridad no deberá estar retorcido.
3. Gira la base del asiento hacia ti tirando de la maneta
Turno Safe (a). Mantén la maneta abierta y gira la silla
hacia ti con la otra mano (b). IMPORTANTE: El selector
situado debajo de la base deberá ajustarse previamente
según la dirección de giro que hayas elegido (véase la
pág. 49).
OK OK
NO NO
Español
OK
NO
50
Page 47

4. Gira totalmente el tensor del cinturón de seguridad, hasta
llegar al tope (véase la ilustración).
5. (a) Pasa el cinturón por la guía de pasaje superior de la
base. (b) Introduce el cinturón de seguridad en la ranura
del eje del tensor. IMPORTANTE: Comprueba que la
parte abdominal del cinturón no tiene holgura, tirando
ligeramente del mismo.
6. Bloquear el cinturón con un tirón seco y acciona varias
veces la palanca del tensor arriba y abajo, para enrollar
el cinturón en el eje hasta que quede bien tenso (no
presiones el botón del tensor del cinturón de
seguridad).
IMPORTANTE: cuando el cinturón de seguridad
esté tenso, baja la palanca. (*Véase la ilustración).
7. Gira la silla de cara a la marcha: se verá el indicador de
control verde en la parte superior de la base de la silla.
El indicador de control verde indica que la silla está
bloqueada de forma segura en la posición “de cara a la
marcha”.
IMPORTANTE: incluso cuando vayas en el automóvil
con la silla en vacío, ésta deberá estar siempre bloqueada
en la posición “de cara a la marcha”.
Comprueba que la silla de auto está correctamente
instalada (según las ilustraciones).
para la seguridad de tu hijo que el recorrido del cinturón de
seguridad sea el adecuado. Para fijar la silla en el automóvil,
el cinturón de seguridad deberá pasar por las marcas rojas de
la Maxi-Cosi Axiss. Consulta también las indicaciones de la
pegatina situada en el lateral del Maxi-Cosi Axiss. No pases
nunca el cinturón por un recorrido distinto del especificado.
Cualquier otra forma de instalación será insegura.
Es muy importante
(Ilustr. 13 - 14)
La silla para el automóvil no está estable
• Sube un poco el reposacabezas del automóvil. El
reposacabezas no debe estar NUNCA en contacto con la
Maxi-Cosi Axiss.
• Si es posible y resulta necesario, ajusta el ángulo del
respaldo del asiento trasero de tal forma que entre en
contacto con la base de la silla de auto.
La silla gira con dificultad y/o el bloqueo de la silla en
la posición “de cara a la marcha” (indicador verde) no
funciona bien.
Comprueba la instalación:
• El cinturón de seguridad debe pasar por todas las guías
de pasaje.
• La parte abdominal del cinturón tiene que pasar
AJUSTADAMENTE (sin holgura) por las guías del cinturón
de seguridad.
• El cinturón de seguridad no tiene que tocar la parte
giratoria de la base del asiento
• Puede que el cinturón de seguridad esté demasiado
tenso.
• La posición* del respaldo/asiento trasero está provocando
un problema (*el ángulo entre el asiento y el respaldo).
• Si es posible, ajusta el respaldo del asiento trasero, de
forma que la base, el anclaje de la silla de auto entre
totalmente en contacto con el asiento trasero.
• Comprueba que no haya ningún objeto que impida el
funcionamiento de la silla de auto.
Si no se puede solucionar el problema, te
recomendamos que te pongas en contacto con el
vendedor de la silla de auto.
IMPORTANTE: una vez que hayas terminado la
instalación de la Maxi-Cosi Axiss, comprueba los
puntos siguientes, y corríjelos si es necesario:
IMPORTANTE: Cuando el niño se encuentre en la Maxi-
Cosi Axiss, la silla deberá estar bloqueada en la posición “de
cara a la marcha”. Cuando esto sea así, podrás ponerte en
camino.
IMPORTANTE:
- Comprueba que el cinturón de seguridad no está
retorcido.
- Comprueba que el cinturón de seguridad está bien
anclado.
IMPORTANTE: para bloquear la silla con más facilidad
(indicador de control verde), en algunos automóviles es
necesario empujar un poco hacia abajo la parte superior de
la silla.
Español
51
Page 48

4 DESINSTALACIÓN DE LA
MAXI-COSI AXISS DEL AUTOMÓVIL
6 INSTALACIÓN DEL NIÑO EN EL
AUTOMÓVIL
(Ilustr. 15 - 17)
1. Tira de la maneta Turno Safe (a) y gira la base (b) al mismo
tiempo hacia ti.
2. (a) Pulsa el botón (1) y baja al mismo tiempo la palanca
del tensor del cinturón de seguridad hacia abajo. Mantén
presionado el botón (1) y tira del cinturón de seguridad
(2) para desenrollarlo. Saca el cinturón de seguridad de la
ranura del eje del tensor (c).
IMPORTANTE: No se podrá soltar el cinturón de
seguridad si la palanca del tensor del cinturón no está
girada totalmente hacia abajo.
3. Abre el cierre del cinturón (a) y saca el cinturón de
seguridad de la guía-pasaje superior (b) y de las guías
inferiores del cinturón del bastidor/anclaje de la sillita de
seguridad para el automóvil.
IMPORTANTE: Aunque el bebé no viaje en la silla
Axiss, ésta debe ir siempre correctamente sujeta por
cinturón de seguridad, según las prescripciones. Una silla
incorrectamente instalada puede ser un peligro para los
demás pasajeros. En caso de choque, se podría convertir
en un objeto muy peligroso.
5 REGULACIÓN DEL ARNÉS DE
SUJECIÓN
Es imprescindible ajustar el arnés a la altura
del niño.
* Los tirantes del arnés deben colocarse a la altura de los
hombros del niño (véase la ilustración).
(Ilustr. 22 - 26)
1. Pulsa el botón de ajuste (a) y tira simultáneamente de
los tirantes del arnés (b) para aflojarlos (tire de los
tirantes pero nunca de los protege arneses).
2. Para poder sentar con más facilidad al niño en la silla de
auto, puedes usar los prácticos ganchos sujeta arneses,
situados en los laterales de la silla de auto (a). Retira los
tirantes del arnés por detrás de los ganchos antes de
colocar al niño en la silla.
3. Coloca al niño en la silla y quita los tirantes de los
ganchos sujeta arneses.
4. Junta los 2 elementos de cierre (a) + (b) y colócalos en el
cierre hasta oír claramente un “clic”.
5. Tira del cinturón de regulación del arnés y ténsalo.
- Atención: No dejes un espacio superior al grosor de un
dedo entre el niño y el arnés.
- Atención: Los tirantes tienen que estar realmente
tensados; pues de esta forma al niño le será
prácticamente imposible sacar los brazos por debajo de
los tirantes del arnés.
7 DESINSTALAR AL NIÑO DE LA
SILLA DE AUTO
(Ilustr. 27 - 28)
1. Pulsa el botón de ajuste (a) y tira simultáneamente de
los tirantes del arnés (b) para aflojarlos (tire de los
tirantes pero nunca de los protege arneses).
(Ilustr. 18 - 21)
1. Echa el reposacabezas hacia adelante.
2. Sube o baja el reposacabezas en función de la altura del
niño.
3. Vuelve a colocar en su sitio el reposacabezas para
Español
bloquearlo en la posición deseada.
52
2. Pulsa el botón rojo del cierre y desabrocha el arnés.
Coloca los tirantes de los hombros del arnés por encima
de los ganchos sujeta arneses.
8 RECLINACIÓN DE LA SILLA
(Ilustr. 29)
Reclinado de la silla de auto
La Maxi-Cosi Axiss tiene 8 posiciones, desde sentada
hasta semitumbada
- Presiona el botón situado en la parte delantera de la silla
y mueve simultáneamente el asiento hacia adelante o
hacia atrás hasta alcanzar la posición deseada. Suelta el
botón para bloquear la silla en la posición seleccionada.
Page 49

9 DESENFUNDADO Y
MANTENIMIENTO DE LA
VESTIDURA
Mantenimiento
Vestidura:
• Consulta la etiqueta de lavado antes de limpiar la
vestidura (la etiqueta de lavado está cosida a la
tapicería). En la etiqueta de lavado encontrarás los
conocidos símbolos de mantenimiento siguientes.
Prescripciones de lavado
Limpieza de la vestidura:
• Lava a mano la vestidura y los protegearneses (máximo
30°C). No uses secadora. Consulta también las
instrucciones de lavado que se indican en la vestidura.
Recomendación: Es aconsejable que en el momento de la
compra de la Moxi-Cosi Axiss compres un segundo juego de
vestidura para que, de esa manera, siempre puedas utilizar la
Axiss aunque se esté lavando o secando la vestidura.
Base y partes plásticas:
- PRECAUCIÓN: Hazlo sólo cuando la Maxi-Cosi Axiss se
encuentre fuera del automóvil. Limpia los componentes
de plástico de la silla con un paño y agua templada con
jabón. No utilices productos de limpieza agresivos.
- PRECAUCIÓN: Nunca utilices productos lubricantes,
ni siquiera en las partes móviles de la Maxi-Cosi Axiss.
(Ilustr. 30 - 36)
Desenfundado de la silla:
Consejo: Antes de desenfundar la silla, fíjate bien en cómo
está montada en su totalidad, de manera que seas
capaz de volverla a colocar correctamente.
1. Gira la silla.
2. Desbloquea el cierre del arnés pulsando el botón
rojo (a), a continuación presiona el tensor (b) y tira
simultáneamente de los tirantes del arnés al máximo (tira
de los tirantes, NO de los protege arneses).
3. Saca los tirantes del arnés de la placa trasera de la silla.
Desde la parte frontal de la silla, tira de los tirantes del
arnés para liberarlos de los protege arneses.
4. Suelta los elásticos de la vestidura (a). Pasa la vestidura
por encima de los cierres y hebillas (b) + (c) de la silla
(véase la ilustración). Pasa las piezas del arnés (d) por
las aberturas del asiento y saca la vestidura lenta y
cuidadosamente.
5. Pasa los elásticos de la vestidura por encima de la parte
superior del reposacabezas (véase la ilustración). Pasa los
protege arneses por las aberturas de la vestidura, para
poder sacarla. Antes de lavarla, quita la placa de refuerzo
de la vestidura. IMPORTANTE: no saques NUNCA las
partes de poli estireno o espuma situadas debajo de la
vestidura. Esos materiales son de gran importancia para
la eficacia de la Maxi-Cosi Axiss.
* Cuando coloques la vestidura de nuevo, es muy
importante que compruebes que los tirantes del arnés
no esté retorcidos. Estos tirantes deben estar bien
planos en su longitud, hasta la hebilla del cierre (véase
la ilustración). Comprueba que los tirantes pasan por
debajo de la barra trasera de la silla. Comprueba el buen
funcionamiento del arnés antes de instalar al bebé. En
caso de duda, consulta con el vendedor de la silla o con
la tienda especializada.
Desenfundado del reposacabezas
exclusivamente
Suelta la barra o eje metálico de la parte trasera del respaldo
de la silla (b) y sácala. Ahora estarán sueltas las sujeciones
de los protege arneses. Saca los protege arneses por la parte
delantera de la silla. Ahora ya puedes retirar la vestidura del
reposacabezas.
Funcionamiento y limpieza de la hebilla del arnés:
Es de vital importancia el buen funcionamiento de la hebilla
del arnés y del sistema de ajuste par ala seguridad del niño. El
mal funcionamiento de la hebilla del cinturón se suele deber
a la suciedad (polvo, restos de alimentos, etc...). Asegúrate de
mantener limpio el cierre del cinturón, aspirando la suciedad
que pudiera tener, con un aspirador, por ejemplo.
En la lista que figura a continuación se indican una serie de
posibles anomalías de funcionamiento, junto a la solución
correspondiente.
A. Averías del cierre del arnés:
• Al abrir la hebilla del cinturón los elementos de cierre son
expulsados con retraso.
• Cuesta mucho esfuerzo abrir el cierre del arnés.
• El encaje de los elementos de cierre en la hebilla del
cinturón es poco suave (ofrece mucha resistencia).
• Los elementos de cierre no se mantienen en su sitio,
siendo expulsados.
• Al encajar la hebilla del cinturón no se oye ningún “clic”.
B. Solución a una posible avería del cierre del arnés:
• Comprueba si el cierre tiene suciedad y, de ser así,
límpialo dándole unos golpecitos, aclarándolo con
agua, soplando dentro o aspirando la suciedad con un
aspirador.
Español
53
Page 50

• PRECAUCIÓN
Si no consigues cerrar bien la hebilla del cinturón o si no
estás seguro/a de que la avería esté solucionada, contacta tu
vendedor o distribuidor (véase al dorso de las instrucciones de
uso). En cualquier caso, no deberás utilizar la Maxi-Cosi Axiss
en esas condiciones.
IMPORTANTE: La Maxi-Cosi Axiss es una silla de
seguridad universal para el automóvil, para el uso con
cinturón de seguridad con 3 puntos de anclaje:
• Modelo homologado según ECE R44/04.
• Para el grupo 1 (niños de 9 a 18 kg), la silla de auto
siempre deberá colocarse en la posición “de cara a la
marcha”, preferentemente en el asiento trasero del
automóvil.
• La silla de auto se deberá colocar siempre en posición
“de cara a la marcha”. Esta silla no se debe colocar
nunca en posición “en sentido contrario a la marcha”.
• Al fabricante sólo se le podrá responsabilizar en
aplicación del reglamento (R44). Esta ratificación excluye
la imprudencia y el incumplimiento de las reglas de
tráfico.
• Una vez colocado al niño en la silla de auto, deberás
controlar la tensión del cinturón de seguridad (el cinturón
de seguridad para adultos de 3 puntos de anclaje). Tensa
el cinturón de seguridad de 3 puntos de anclaje tirando
fuertemente de él. Comprueba que los tirantes del
cinturón no estén retorcidos.
: No
uses productos lubricantes.
Instrucciones generales
Ten en cuenta siempre lo siguiente...
• Usa siempre la silla, incluso en los desplazamientos
cortos, ya que es precisamente en esos trayectos cuando
ocurren más accidentes.
• Usa la Maxi-Cosi Axiss en el automóvil, nunca en casa.
La silla de seguridad para automóvil no ha sido diseñada
para su uso en casa.
• La Maxi-Cosi Axiss se puede usar tanto en el asiento
delantero como en el trasero. También si hay airbag.
Sin embargo, te aconsejamos que la coloques en el
asiento trasero. Si eso no es posible, asegúrate de
poner el asiento lo más atrás posible cuando haya un
airbag. Consulta también el manual de instrucciones del
Español
automóvil; cada vez hay un mayor número de modelos de
automóvil donde se puede desactivar el airbag.
• La silla de auto siempre debe fijarse con ayuda del
cinturón de seguridad del automóvil, incluso aunque el
niño no esté sentado en ella. Una silla suelta puede herir
a los demás pasajeros en caso de producirse un frenazo
brusco.
• Asegúrate de que la Maxi-Cosi Axiss no está bloqueada
por equipajes pesados y que no está sometida a presión
por pesos, asientos regulables o puertas al cerrarse. Los
respaldos abatibles de los asientos traseros tienen que
estar siempre bien bloqueados.
• Nunca uses la Maxi-Cosi Axiss sin vestidura. La vestidura
no debe sustituirse por otro tipo de tapizado diferente a
la vestidura original debido a que este es un componente
importante para la seguridad de la silla de auto.
• Tapa la Maxi-Cosi Axiss cuando el automóvil está a pleno
sol; los componentes de plástico y de metal se pueden
calentar enormemente pudiendo producir quemaduras y
la vestidura se puede decolorar por los rayos del sol.
• No quites los logotipos, etc., de la tapicería y así evitarás
que esta sufra daños.
• Asegúrate de que no hay equipaje u otros objetos sueltos
(por ejemplo en la bandeja trasera desmontable) dentro
del automóvil. ¡En caso de parada brusca o de colisión se
podrían transformar en peligrosos proyectiles!
• Cuando hagas viajes largos, realiza paradas regularmente
para poder descansar y ofrecer a tu hijo libertad de
movimientos.
• Nunca dejes al niño solo en el automóvil.
• Conserva las instrucciones de uso para cuando las
necesites en el compartimiento destinado a ello, situado
en la parte trasera de la Maxi-Cosi Axiss.
• Nunca uses productos de segunda mano, ya que no
se sabe qué trato han recibido o si han sufrido algún
percance. El fabricante sólo puede garantizar la seguridad
de la silla de auto a su primer usuario.
• El usuario no deberá hacer modificaciones ni en la silla
de auto ni en los cinturones de seguridad. ¡Tampoco
se podrán quitar de ningún modo las etiquetas ni las
pegatinas de advertencia de la silla!
• Después de un accidente se debe reemplazar siempre la
Maxi-Cosi Axiss, ya que se puede haber convertido en
insegura debido a cualquier daño sufrido, aunque este no
sea visible.
• El fabricante es consciente de que las sillas de seguridad
para automóvil pueden hacer marcas en la tapicería del
automóvil o en los cinturones de seguridad del automóvil.
Sin embargo, debido a las normas de seguridad prescritas
y a lo fuertemente que se debe ajustar y fijar la silla,
esas marcas son inevitables. El fabricante no se hace
responsable de los posibles daños que se pudieren
producir por esa causa.
Y, por supuesto...
• Da ejemplo y abróchate siempre tu propio cinturón de
seguridad.
Separación de residuos
Para un uso óptimo y seguro de las sillas de auto, no se
deben usar más de 5 a 6 años desde la fecha de compra.
El envejecimiento lento del plástico, debido, entre otros
factores al sol (UV), puede deteriorar el material con que está
fabricado el producto.
Si tu hijo ya no cabe en la silla de seguridad, te recomendamos
54
Page 51

que no sigas usando la silla y que la tires a la basura.
Por consideraciones medioambientales le rogamos que desde
el principio (embalaje) hasta el final de la vida útil de la
Maxi-Cosi Axiss (componentes del producto) procedas a la
separación de los residuos.Mantén los materiales plásticos del
embalaje fuera del alcance de los niños para evitar el riesgo
de asfixia.
eliminen o cambien las etiquetas o números de identificación,
se considerarán no autorizados. No se aplicará garantía
alguna a estos productos ya que la autenticidad de los
mismos no puede comprobarse.
11 PREGUNTAS
10 GARANTÍA
Nuestra garantía de 24 meses refleja nuestra confianza
en la extraordinaria calidad de nuestro diseño, ingeniería,
producción y en el rendimiento del producto. Garantizamos
que este producto ha sido fabricado de acuerdo con las
normas de seguridad y calidad europeas en vigor y que le son
aplicables , y que este producto está libre de defectos en el
momento de la compra.
Nuestra garantía de 24 meses cubre cualquier defecto de
fabricación en cuanto a materiales y mano de obra cuando se
utiliza en condiciones normales y de acuerdo con el manual
de usuario. Para solicitar reparaciones o piezas de repuesto
en garantía por defectos de fabricación deberá presentar el
comprobante de la compra (original o fotocopia) realizada en
los 24 meses anteriores a la solicitud del servicio.
Nuestra garantía de 24 meses no cubre los daños causados
por el uso y desgaste normales, accidentes, uso abusivo,
negligencia o como consecuencia de no cumplir las
instrucciones del manual de usuario. Pueden ser ejemplos de
uso y desgaste normales el desgaste de las ruedas y el tejido
por el uso habitual y la descomposición natural de los colores
y los materiales con el tiempo y el uso prolongado.
¿Qué hacer en caso de defectos?
Si surgen problemas o defectos, su mejor opción para obtener
un servicio rápido es visitar al distribuidor o la tienda de
[Marca]. Ellos aceptan nuestra garantía de 24 meses(1). Tiene
que presentar el comprobante de la compra realizada en los
24 meses anteriores a la solicitud del servicio. Lo más sencillo
es que consiga usted la preaprobación de la solicitud de
servicio por el Servicio de [marca]. En principio, pagamos los
gastos de envío y devolución relacionados con las solicitudes
de servicio en garantía. Los daños no cubiertos por nuestra
garantía se pueden atender a una tarifa razonable.
Si tienes dudas o preguntas te puedes poner en contacto
telefónico con tu proveedor o importador (véase al dorso
de estas instrucciones de uso). Para ello, ten a mano los
siguientes datos:
• Número de serie situado en la parte inferior de la
pegatina naranja y blanca CEE (en la parte trasera de la
Maxi-Cosi Axiss).
• Marca, modelo y año de fabricación del automóvil y
asiento sobre el que se usa la Maxi-Cosi Axiss.
• Edad (talla) y peso de su hijo.
Español
Esta garantía se ajusta a la Directiva Europea 99/44/CE de
25 de mayo de 1999 transpuesta para el estado Español en
la Ley 23/2003, de 10 de julio, de Garantías en la Venta de
Bienes de Consumo.
(1) Los productos adquiridos en tiendas o distribuidores que
55
Page 52

NOTES / NOTIZEN / NOTITIES / NOTAS / NOTÍCIAS
Italiano
56
Page 53

CARI GENITORI
Congratulazioni per l’acquisto del seggiolino auto Maxi-Cosi
Axiss. Durante tutte le fasi di progettazione del Maxi-Cosi
Axiss si è tenuto conto di alcuni importanti elementi quali
la sicurezza, la facilità d’uso, il comfort e il design. Per tali
motivi, questo prodotto soddisfa i più severi requisiti di
sicurezza.
Da una ricerca è risultato che molti seggiolini auto sono
utilizzati erroneamente. Vi consigliamo pertanto di leggere
con attenzione queste istruzioni. La sicurezza del vostro
bambino sarà tutelata al meglio soltanto in caso di utilizzo
corretto del prodotto.
Le ricerche continue condotte dalle nostre divisioni di Ricerca
e Sviluppo e Marketing, la collaborazione con gli istituti di
controllo della qualità e le osservazioni da parte di clienti e
consumatori ci consentono di essere sempre all’avanguardia
nel campo della sicurezza auto.
In caso di domande o osservazioni riguardanti l’utilizzo del
Maxi-Cosi Axiss, non esitate a contattarci.
Dorel (l’indirizzo e il recapito telefonico sono riportati sul retro
delle istruzioni d’uso)
INDICE
1 IMPORTANTE: LEGGERE PRIMA DELL’USO!
2 DESCRIZIONE DEL PRODOTTO
3 INSTALLARE E RIMUOVERE IL MAXI-COSI AXISS
4 RIMUOVERE IL MAXI-COSI AXISS DALL’AUTO
5 REGOLARE L’ALTEZZA DELLE CINTURE
6 POSIZIONARE IL BAMBINO NEL SEGGIOLINO
7 TOGLIERE IL BAMBINO DAL SEGGIOLINO
8 REGOLARE L’INCLINAZIONE DEL SEGGIOLINO
9 MANUTENZIONE E SFODERABILITA’
10 GARANZIA
11 RICHIESTE D’INFORMAZIONI
1 IMPORTANTE: LEGGERE PRIMA
DELL’USO!
AVVERTENZA
- Leggere attentamente queste istruzioni
e conservarle per ulteriore consultazione
nell’apposito scomparto situato sul retro
del seggiolino. La mancata osservanza delle
istruzioni d’uso può compromettere gravemente
la sicurezza del bambino.
- Utilizzare esclusivamente accessori originali
e parti di ricambio approvate dalla casa
produttrice. Non apportare alcuna modifica
al prodotto. In caso di problemi o reclami
contattare il distributore o l’importatore.
Maxi-Cosi Axiss omologato secondo ECE R 44/04
Gruppo Peso del Età
bambino
Gruppo 1 (9 - 18 kg) 9 mesi –
3,5 anni ca.
- E’ necessario adattare le cinture alla taglia del
bambino (vedi pag. 62).
- Per accomodare correttamente il bambino nel
Maxi-Cosi Axiss, è necessario consultare le fasi
di installazione a pag. 62.
Diniego di responsabilità:
Abbiamo ideato e scritto queste istruzioni per l’uso con la
massima accuratezza possibile. Ciononostante, non possiamo
rilasciare alcuna garanzia in merito alla completezza e alla
correttezza delle informazioni in esse contenute.
Italiano
57
Page 54

2 DESCRIZIONE DEL PRODOTTO
1. Rivestimento
2. Poggiatesta regolabile
3. Leva per ruotare il
seggiolino
4. Base
5. Guide per la cintura di
sicurezza dell’auto (parte
addominale)
6. Pulsante di regolazione
dell’inclinazione della
seduta
7. Cinghia di regolazione
delle cinture del
seggiolino
8. Pulsante di regolazione
delle cinture del
seggiolino
Italiano
58
9. Indicatore rosso/verde di
blocco della seduta
10. Guide per la cintura di
sicurezza dell’auto (parte
diagonale)
11. Tensionatore della
cintura di sicurezza
dell’auto
12. Scomparto per il libretto
d’istruzioni
13. Ganci per cinture
14. Cinture del seggiolino
15. Cursore (per scegliere
se ruotare la seduta a
destra o a sinistra)
Caratteristiche speciali
Maxi-Cosi Axiss è provvisto delle seguenti caratteristiche
speciali che accrescono la sua comodità d’uso:
• La seduta può essere ruotata a destra o a sinistra verso la
portiera dell’autovettura per agevolare il posizionamento
del bambino nel seggiolino.
• Un tensionatore per tendere al massimo la cintura di
sicurezza dell’auto.
Page 55

3 INSTALLARE E RIMUOVERE IL
MAXI-COSI AXISS
Installazione con cintura a 3 punti
(seguire gli indicatori rossi sul prodotto).
OK
OK
CLICK!
NO
NO
Rimuovere il poggiatesta del sedile su cui viene installato
il Maxi-Cosi Axiss, se questo diventa un ostacolo
all’installazione. Non dimenticare di rimontare il poggiatesta
quando il sedile viene nuovamente utilizzato da un adulto.
A. Installazione
- ATTENZIONE: bloccare i sedili posteriori reclinabili
prima di montare il Maxi-Cosi Axiss.
- ATTENZIONE: in alcuni casi, le cinture sono collocate
così in avanti da rendere impossibile una buona
installazione. In tal caso provare ad installare il seggiolino
su un altro sedile.
Collocare il Maxi-Cosi Axiss preferibilmente sul sedile
posteriore. Se non è possibile, collocarlo sul sedile passeggero
anteriore, dopo aver verificato che ciò non contravvenga alla
legislazione vigente nel Paese d’utilizzo del seggiolino auto.
Se il seggiolino è installato dietro al sedile passeggero
anteriore, regolare lo schienale del sedile anteriore in
posizione verticale e far avanzare il sedile il più possibile per
evitare che il bambino lo urti.
IMPORTANTE: Bloccare sempre il Maxi-Cosi Axiss in
senso di marcia prima di mettersi in viaggio.
(Fig. 1 - 4)
Ruotare la seduta
La seduta deve essere ruotata verso la portiera
della vettura più vicina al punto di installazione del
seggiolino.
Sotto la base del seggiolino Axiss si trova un cursore che
permette di scegliere il lato verso il quale ruotare la seduta.
OK
Utilizzare il Maxi-Cosi Axiss esclusivamente su un sedile
rivolto in senso di marcia, provvisto di una cintura a 3 punti
d’attacco, omologata secondo la norma ECE R16 o una norma
equivalente.
La corretta posizione della cintura dell’auto è di fondamentale
importanza per la sicurezza del vostro bambino. La
cintura dell’auto deve passare lungo le guide rosse del
Maxi-Cosi Axiss rispettando la corretta sequenza. Si veda
a tale proposito l’etichetta sul lato del Maxi-Cosi Axiss.
Non posizionare mai la cintura di sicurezza
diversamente da quanto indicato.
NO
Per ruotare la seduta verso destra.
1. Spostare il cursore indietro, per ruotare la seduta verso
destra.
Per ruotare la seduta verso sinistra.
1. Spostare il cursore indietro, per ruotare la seduta verso
destra.
2. Azionare la leva, poi, mantenendola in posizione di
sblocco, afferrare la seduta con l’altra mano per ruotarla
nella posizione desiderata.
Italiano
59
Page 56

(Fig. 5 - 12)
INSTALLARE IL SEGGIOLINO IN SENSO DI MARCIA
IMPORTANTE: al primo utilizzo del seggiolino Maxi-Cosi
Axiss, verificare di avere rimosso le protezioni delle guide per
cintura. Tali protezioni fanno parte dell’imballaggio e devono
essere rimosse.
Montare il seggiolino rivolto in senso di marcia.
1. Far passare la cintura di sicurezza dell’auto (parte
addominale) dietro le due guide (a) situate sul lato della
portiera e (b) attorno alla base del seggiolino.
2. Far passare la cintura di sicurezza dell’auto (parte
addominale) dietro le due guide (a) situate sull’altro lato
della base. Agganciare la fibbia della cintura di sicurezza
(b) e tendere la cintura. IMPORTANTE: verificare che la
cintura di sicurezza dell’auto (parte addominale) sia ben
tesa, non sia attorcigliata e passi correttamente dietro le
4 guide situate lungo la base.
3. Ruotare la seduta verso di voi, azionando la leva (a).
Mantenendo la leva sbloccata, ruotare con l’altra mano la
seduta verso di voi (b). ATTENZIONE: il cursore situato
sotto la base sarà stato precedentemente posizionato
secondo il lato di rotazione scelto (vedi pag. 59).
OK OK
NO NO
Italiano
OK
NO
60
Page 57

4. Ruotare al massimo il tensionatore per bloccarlo nella
posizione corretta (vedi illustrazione).
5. (a) Far passare la cintura (parte diagonale) nella guida
situata sul bordo superiore della scocca. (b) Inserire
la cintura nella fessura dell’asse del tensionatore.
IMPORTANTE: verificare che non ci sia gioco a
livello della parte addominale della cintura tirandola
leggermente.
6. Azionare più volte dal basso verso l’alto la leva del
tensionatore fino alla massima tensione della cintura
dell’auto (non premere il bottone situato sulla
leva).
IMPORTANTE: quando la cintura è tesa, la leva
deve essere richiusa (*vedi illustrazione).
7. Ruotare la seduta in senso di marcia. Un indicatore verde
appare in alto sulla scocca, per indicare che la seduta è
bloccata in senso di marcia. IMPORTANTE: con l’auto
in movimento, il seggiolino deve essere bloccato in
senso di marcia, anche quando il bambino non è seduto
all’interno del dispositivo di ritenuta.
Verificare l’installazione corretta del seggiolino
(secondo le illustrazioni). Il corretto passaggio della
cintura è molto importante per la sicurezza del vostro
bambino. La cintura del veicolo deve essere posizionata
seguendo gli indicatori rossi situati sul seggiolino MaxiCosi Axiss. Consultare anche l’etichetta posta sul lato del
seggiolino Maxi-Cosi Axiss. Non posizionare la cintura
diversamente da quanto indicato. Qualsiasi altra modalità di
installazione non è sicura.
IMPORTANTE: al termine del montaggio del
Maxi-Cosi Axiss, verificare i seguenti punti e correggere
l’installazione se necessario:
(Fig. 13- 14)
Il seggiolino non è stabile
• Regolare l’altezza del poggiatesta del sedile. Il
poggiatesta non deve essere a contatto con il seggiolino
Maxi-Cosi Axiss.
• Se possibile e necessario, regolare l’inclinazione dello
schienale del sedile del veicolo per garantire il contatto
con la base del seggiolino.
E’ difficile far ruotare la seduta e/o bloccare la seduta
in posizione fronte strada (indicatore verde).
Verificare l’installazione:
• La cintura deve passare attraverso tutte le guide.
• La parte addominale della cintura di sicurezza dell’auto
deve passare attraverso le guide e essere ben tesa.
• La cintura non deve essere a contatto con le parti girevoli
della seduta.
• La cintura è troppo stretta.
• La posizione dello schienale/del sedile posteriore
rappresenta un ostacolo per l’installazione - regolare
l’angolazione tra sedile e schienale.
• Se possibile, regolare l’inclinazione dello schienale del
sedile per garantire il contatto con la base.
• Verificare che nessun corpo estraneo interferisca con il
corretto funzionamento del seggiolino.
Se le difficoltà persistono, contattare il rivenditore.
IMPORTANTE: quando il bambino è accomodato nel
Maxi-Cosi Axiss, la seduta deve essere bloccata rivolta in
senso di marcia prima di mettere in moto il veicolo.
IMPORTANTE:
- verificare che la cintura dell’auto non sia attorcigliata
- verificare che la cintura dell’auto sia ben agganciata.
IMPORTANTE: in alcuni veicoli, per facilitare il blocco
della seduta in posizione frontale (indicatore verde), potrebbe
essere necessario esercitare una pressione sulla parte
superiore della seduta.
Italiano
61
Page 58

4 RIMUOVERE IL MAXI-COSI AXISS
DALL’AUTO
6 POSIZIONARE IL BAMBINO NEL
SEGGIOLINO
(Fig. 15 - 17)
1. Aprire la leva e ruotare (b) la seduta verso di voi.
2. (a) Premere il pulsante (1), sollevare al massimo la leva
(b) tenendo il pulsante premuto (1) e tirare la cintura per
svolgerla dall’asse (2). Togliere la cintura dall’asse (c).
IMPORTANTE: è possibile svolgere la cintura dall’asse
solo se la leva del tensionatore è sollevata al massimo.
3. Sganciare la cintura di sicurezza (a), poi toglierla sia dalla
guida superiore (b) sia dalle guide poste sulla base.
IMPORTANTE: anche se il bambino non è seduto nel
dispositivo di ritenuta, il seggiolino deve essere sempre
trattenuto dalla cintura di sicurezza dell’auto. In caso
contrario, potrebbe essere pericoloso per gli occupanti
del veicolo. In caso di incidente un seggiolino auto non
fissato correttamente può diventare un oggetto letale.
5 REGOLARE L’ALTEZZA DELLE
CINTURE
Le cinture devono essere adattate all’altezza
del bambino.
* Le cinture del seggiolino devono essere posizionate
all’altezza delle spalle del bambino (vedi illustrazione).
(Fig. 18 - 21)
1. Spostare il poggiatesta in avanti.
2. Alzare o abbassare il poggiatesta in base all’altezza del
bambino.
3. Spingere il poggiatesta indietro per bloccarlo nella
posizione selezionata.
(Fig. 22 - 26)
1. Premere il pulsante di regolazione (a) tirando (b)
contemporaneamente le cinture per allentarle (afferrare
le cinture e non le protezioni).
2. Per facilitare il posizionamento del bambino nel
seggiolino, fissare le cinture ai ganci situati sui lati del
seggiolino (a).
3. Far sedere il bambino nel seggiolino, staccare le cinture
dai ganci.
4. Unire le parti (a) e (b) delle cinture e inserirle nella fibbia
(c) fino ad udire un “click”.
5. Tirare la cinghia di regolazione delle cinture per stringerle
attorno al corpo del bambino.
- Attenzione: non lasciare più di un dito di spessore tra
le cinture e il bambino.
- Attenzione: le cinture devono essere ben strette;
lasciando non più di un dito di spessore tra il bambino e
le cinture, sarà praticamente impossibile che il bambino si
possa liberare dalle cinture.
7 TOGLIERE IL BAMBINO DAL
SEGGIOLINO
(Fig. 27 - 28)
1. Premere il pulsante di regolazione (a) tirando (b)
contemporaneamente le cinture per allentarle (afferrare
le cinture e non le protezioni).
2. Premere il pulsante rosso della fibbia per aprirla. Fissare le
cinture ai ganci.
Italiano
8 REGOLARE L’INCLINAZIONE DEL
SEGGIOLINO
(Fig. 29)
Per reclinare la seduta
E’ possibile regolare il Maxi-Cosi Axiss in 8 posizioni
(dalla posizione seduta a quella semi-sdraiata)
- Premere il pulsante situato sulla parte anteriore della
seduta e tirare verso l’alto o verso il basso per regolare
la posizione. Rilasciare il pulsante una volta raggiunta la
posizione desiderata.
62
Page 59

9 MANUTENZIONE E
SFODERABILITA’
Manutenzione
Rivestimento:
• Prima del lavaggio, consultare l’etichetta di composizione
del tessuto cucita sulla confezione. Sull’etichetta si
trovano le seguenti informazioni:
Istruzioni per il lavaggio
Pulizia del rivestimento:
• Lavare a mano il rivestimento e le protezioni delle cinture
(temperatura massima: 30°C). Non usare l’asciugatrice.
Attenersi alle istruzioni per il lavaggio riportate sul
rivestimento.
Consiglio: al momento dell’acquisto del Maxi-Cosi Axiss, si
consiglia di acquistare anche un rivestimento supplementare,
in modo da poter utilizzare il seggiolino anche durante il
lavaggio del rivestimento originale.
Scocca:
- ATTENZIONE: eseguire queste operazioni soltanto
quando il Maxi-Cosi Axiss si trova all’esterno
dell’autovettura. Pulire le parti in plastica del seggiolino
con un panno, acqua tiepida e sapone. Non utilizzare
detergenti aggressivi.
- ATTENZIONE: non usare mai lubrificanti, neppure per
le parti mobili del Maxi-Cosi Axiss.
(Fig. 30 - 36)
Per rimuovere il rivestimento dalla seduta:
Consiglio: prima di rimuovere il rivestimento, osservare
bene il modo in cui le diverse parti sono montate, per
rimontare il tutto correttamente.
1. Far ruotare la seduta.
2. Aprire la fibbia delle cinture premendo il pulsante rosso
(a), poi premere il pulsante di regolazione (b) tirando
al massimo le cinture (afferrare le cinture e NON le
protezioni).
3. Staccare le cinture dalla placca situata sul retro del
seggiolino. Dal davanti, tirare le cinture per liberarle dalle
protezioni.
5. Far passare sopra il poggiatesta gli elastici del
rivestimento (vedi illustrazione). Far passare le protezioni
per cinture attraverso le aperture nel rivestimento,
mentre lo si rimuove. Togliere la lastra di rinforzo dal
rivestimento prima di lavarlo. IMPORTANTE: non
rimuovere MAI altre parti del seggiolino come per
esempio le parti in EPS/polistirene o altro materiale
espanso che si trova sotto il rivestimento. Questi materiali
sono molto importanti per la sicurezza del Maxi-Cosi
Axiss.
* Quando si riposiziona il rivestimento, verificare che
le cinture non siano attorcigliate e che passino piatte
nelle apposite fessure della fibbia (vedi illustrazione).
Verificare che le cinture passino dietro la barra sul retro
della seduta. Testare il funzionamento delle cinture prima
di mettere il bambino nel seggiolino. In caso di dubbi,
contattare il rivenditore.
Per rimuovere il rivestimento solo dal
poggiatesta
Sganciare l’asse metallico (b) situato sul retro della seduta,
poi togliere l’asse per liberare le fibbie delle protezioni per
cinture. Dal davanti del seggiolino, rimuovere le protezioni
per cinture. E’ ora possibile togliere il rivestimento dal
poggiatesta.
Funzionamento e pulizia della fibbia delle cinture:
Il corretto funzionamento della fibbia delle cinture è
estremamente importante per la sicurezza del bambino.
Il mancato funzionamento della fibbia dipende solitamente
dalla sporcizia (polvere, sporco, residui di cibo, ecc.). Tenere la
fibbia pulita rimuovendo lo sporco con un aspirapolvere.
Nell’elenco sottostante sono riportati alcuni guasti che
si possono verificare, con i relativi suggerimenti per la
riparazione.
A. Guasti alla fibbia:
• La fibbia non si apre immediatamente quando si preme il
pulsante di apertura.
• Per aprire la fibbia della cintura occorre molta forza.
• La chiusura della fibbia è difficoltosa (si incontra molta
resistenza).
• La fibbia non si chiude, le parti della fibbia non
combaciano.
• Quando si chiude la fibbia, non si ode un chiaro “click”.
4. Staccare gli elastici (a) del rivestimento. Far passare il
rivestimento sopra le parti (b) e (c) della scocca (vedi
illustrazione). Far passare (d) attraverso le apposite
aperture nel rivestimento le parti della cintura. Rimuovere il
rivestimento.
B. Soluzione di un eventuale guasto della fibbia:
• Controllare che la fibbia non sia sporca e, se necessario,
pulirla scuotendola, sciacquandola con acqua, soffiando
via lo sporco o aspirandolo, per es. con un aspirapolvere.
• ATTENZIONE: non utilizzare
Qualora non riusciate a chiudere bene la fibbia o non siate
mai
lubrificanti!
Italiano
63
Page 60

sicuri di aver risolto il guasto, contattate direttamente il
fornitore o il distributore (vedi retro delle istruzioni per l’uso).
Non usate il Maxi-Cosi Axiss in alcun caso!
IMPORTANTE: Il Maxi-Cosi Axiss e’ un seggiolino auto
universale per uso con la cintura di sicurezza a 3 punti
d’attacco:
• Modello omolgato secondo ECE R R44/04
• Per il gruppo 1 (bambini da 9 a 18 kg) il seggiolino
deve sempre essere posizionato in senso di marcia,
preferibilmente sul sedile posteriore dell’autovettura.
• Il seggiolino auto deve essere sempre posizionato in
senso di marcia. Non installare mai il seggiolino in senso
inverso di marcia.
• La responsabilità del produttore riguarda l’ambito del
Regolamento Europeo (R 44). Questa omologazione non
esclude la prudenza ed il rispetto del codice della strada.
• Dopo aver accomodato il bambino, verificare la tensione
della cintura a 3 punti dell’autoveicolo. Tendere la cintura
a 3 punti tirandola con forza. Controllare che la cintura
non sia attorcigliata.
Istruzioni generali
Fare sempre attenzione a quanto segue…
• Utilizzare sempre il seggiolino, anche per tragitti brevi,
perché proprio durante questi tragitti si verifica la
maggior parte degli incidenti.
• Utilizzare il Maxi-Cosi Axiss solo nell’automobile e non
in casa. Il seggiolino auto non è stato progettato per
l’utilizzo domestico.
• E’ possibile installare il Maxi-Cosi Axiss sia su un sedile
anteriore sia su un sedile posteriore, anche in presenza
di airbag. Si consiglia di montarlo sul sedile posteriore.
Qualora ciò non fosse possibile, assicurarsi che, in
presenza di airbag, il sedile anteriore si trovi nella
posizione più arretrata. Fare riferimento al manuale d’uso
dell’auto; in un numero crescente di automobili l’airbag
può essere disattivato facilmente.
• Il seggiolino deve essere fissato sempre con la cintura di
sicurezza dell’automobile, anche se non viene usato. Un
seggiolino non fissato può colpire gli altri passeggeri in
caso di frenate di emergenza.
• Assicurarsi che il Maxi-Cosi Axiss non venga danneggiato
o schiacciato da carichi pesanti, sedili regolabili e
porte che si chiudono. Gli schienali reclinabili dei sedili
posteriori devono sempre essere bloccati correttamente.
• Non utilizzare mai il Maxi-Cosi Axiss senza rivestimento.
Non sostituire il rivestimento con un rivestimento non
originale. La sicurezza del seggiolino dipende anche dal
rivestimento.
Italiano
64
• Coprire sempre il Maxi-Cosi Axiss quando si parcheggia
l’auto al sole. I componenti in plastica e metallo possono
surriscaldarsi e provocare ustioni; inoltre, il rivestimento
può scolorire.
• Non togliere i loghi, ecc… dal rivestimento, per evitare di
danneggiarlo.
• Assicurarsi che bagagli ed altri oggetti (posti per es. sul
ripiano sopra il portabagagli), che potrebbero arrecare
ferite durante una collisione, siano ben fissati.
• Durante i viaggi più lunghi, si consiglia di fare delle pause
frequenti, per dare al bambino l’opportunità di muoversi.
• Non lasciare mai il bambino da solo in macchina.
• Conservare le istruzioni per l’uso nell’apposito scomparto
sul retro del Maxi-Cosi Axiss, per una successiva
consultazione.
• Non utilizzare mai articoli di seconda mano: non è
mai possibile conoscere con certezza la loro storia. La
sicurezza del seggiolino può essere garantita dalla casa
produttrice solo al primo proprietario.
• L’utente non deve apportare modifiche al seggiolino auto,
né alle cinture. Anche le etichette o le avvertenze fanno
parte del seggiolino e non devono essere assolutamente
rimosse
• Dopo un incidente sostituire sempre il Maxi-Cosi
Axiss; la sicurezza del seggiolino potrebbe essere stata
compromessa da danni non direttamente visibili.
• La casa produttrice è a conoscenza del fatto che il
montaggio dei seggiolini può lasciare traccia sulla
tappezzeria dell’autoveicolo o sulle cinture di sicurezza.
Le norme di sicurezza vigenti e la forza che occorre
esercitare durante l’installazione non consentono
di evitarlo. La casa produttrice si esime da qualsiasi
responsabilità in relazione ad eventuali danni di questo
genere.
E naturalmente…
• Dare il buon esempio, allacciando sempre la propria
cintura di sicurezza.
Differenziazione dei rifiuti
Per un uso ottimale e sicuro, i seggiolini auto non devono
essere utilizzati per più di 5-6 anni dopo la data d’acquisto.
L’invecchiamento del materiale plastico, causato per esempio
dall’esposizione alla luce del sole (raggi UV), potrebbe alterare
le caratteristiche del prodotto.
Quando il bambino avrà superato il limite di peso previsto per
l’utilizzo del seggiolino, consigliamo di interrompere l’uso del
seggiolino stesso e di disporne in modo adeguato. Per motivi
di salvaguardia ambientale, si raccomanda di differenziare e
smaltire adeguatamente i rifiuti prodotti all’inizio (imballaggio)
e alla fine (componenti) del ciclo di vita del seggiolino.
Tenere le parti in plastica dell’imballaggio lontano dalla portata
dei bambini, per evitare pericoli di soffocamento.
Page 61

10 GARANZIA
11 RICHIESTE D’INFORMAZIONI
La garanzia della durata di 24 mesi che applichiamo ai
nostri prodotti riflette la fiducia che riponiamo nella qualità
eccezionale del nostro design, della nostra progettazione
e produzione, nonché delle prestazioni. Garantiamo che
questo prodotto è stato fabbricato in conformità con gli
attuali requisiti europei in materia di sicurezza e con gli
standard di qualità applicabili a questo prodotto, e altresì che
quest’ultimo è scevro da difetti legati alla manodopera o ai
materiali impiegati al momento dell’acquisto.
La nostra garanzia della durata di 24 mesi copre eventuali
difetti dei materiali e di fabbricazione se il prodotto viene
utilizzato in condizioni regolari ed in conformità con il nostro
manuale d’istruzioni. Per richiedere riparazioni o parti di
ricambio in garanzia per i suddetti difetti, è necessario
presentare la prova d’acquisto (che deve essere stato
effettuato entro e non oltre i 24 mesi precedenti alla richiesta
di assistenza).
La garanzia non copre invece danni causati da normale usura,
incidenti, utilizzo non corretto, negligenza o altre conseguenze
derivanti dal mancato rispetto del manuale d’istruzioni.
Esempi di normale usura includono parti quali: ruote e tessuti
usurati da un utilizzo regolare del prodotto, nonché il naturale
deterioramento dei colori e dei materiali in seguito a un uso
prolungato nel tempo.
Cosa fare in caso di difetti:
Qualora si verifichino problemi o difetti, rivolgersi al
rivenditore dove si era effettuato l’acquisto o sceglierne
uno dalla lista di rivenditori autorizzati presente sul sito
internet, chiedendo di poter ricevere assistenza (per maggiori
informazioni rivolgersi al Servizio Assistenza Consumatori di
[marca]. Le spese di spedizione e reso legate alle richieste
di assistenza in garanzia sono normalmente a nostro carico.
I danni non coperti dalla garanzia possono tuttavia essere
gestiti secondo prezzi da listino.
In caso di domande, contattare il rivenditore o l’importatore
(vedi il retro delle istruzioni per l’uso). Tenere i seguenti dati a
portata di mano:
• Numero di serie riportato sull’adesivo ECE arancione/
bianco (sul retro del Maxi-Cosi Axiss).
• Marca, modello e anno di costruzione dell’autoveicolo e
sedile su cui è installato il Maxi-Cosi Axiss.
• Età (altezza) e peso del bambino.
La presente garanzia è conforme alla Direttiva Europea 99/44/
CE del 25 maggio 1999.
(1) I prodotti acquistati presso rivenditori che rimuovono o
modificano le etichette o i numeri di identificazione sono
considerati non autorizzati. Prodotti acquistati presso
rivenditori non autorizzati sono considerati essi stessi non
autorizzati. Nessuna garanzia si applica a questi prodotti,
in quanto l’autenticità di questi prodotti non può essere
accertata.
Italiano
65
Page 62

NOTES / NOTIZEN / NOTITIES / NOTAS / NOTÍCIAS
66
 Loading...