

Maxfield MAX-IVY Instruction Manual

Instruction Manual
©
Maxfield GmbH · Kaistraße 2 · 40221 Düsseldorf · Germany · www.maxfield.de · support@maxfield.de
MAX-IVY
AUDIO∙PHOTO∙VIDEO-PLAYER

CONTENT 2
MAX-IVY AUDIO·PHOTO·VIDEO-PLAYER
PACKAGE CONTENT . . . . . . . . . . . . . . . . . . . . . . . . . . . . . . . . . . . . .3
INTRODUCTION
. . . . . . . . . . . . . . . . . . . . . . . . . . . . . . . . . . . . . . . .4
CONNECTIONS
. . . . . . . . . . . . . . . . . . . . . . . . . . . . . . . . . . . . . . . .5
CONNECT EARPHONES . . . . . . . . . . . . . . . . . . . . . . . . . . . . . . . . . . . 5
CONNECT USB . . . . . . . . . . . . . . . . . . . . . . . . . . . . . . . . . . . . . . . . . 5
CHARGING THE BATTERY . . . . . . . . . . . . . . . . . . . . . . . . . . . . . . . . .5
RUBBER CASE
. . . . . . . . . . . . . . . . . . . . . . . . . . . . . . . . . . . . . . . . .6
ATTACH CARRYING STRAP . . . . . . . . . . . . . . . . . . . . . . . . . . . . . . . . . 6
ATTACH RUBBER CASE . . . . . . . . . . . . . . . . . . . . . . . . . . . . . . . . . . . 6
LOADING FILES TO AND FROM YOUR MAX-IVY . . . . . . . . . . . . . . . . .7
LOADING DRM PROTECTED WMA AUDIO TRACKS
WITH WINDOWS MEDIA® PLAYER 10 . . . . . . . . . . . . . . . . . . . . . . . . . 7
COPYING FILES WITH WINDOWS EXPLORER . . . . . . . . . . . . . . . . . . . . . 8
COPYING AUDIO FILES WITH THE MAGIX MP3 MAKER SE . . . . . . . . . . . . . 8
DISCONNECT THE PLAYER . . . . . . . . . . . . . . . . . . . . . . . . . . . . . . . .8
PLAYER OVERVIEW
. . . . . . . . . . . . . . . . . . . . . . . . . . . . . . . . . . . . .9
DESCRIPTION OF KEYS
. . . . . . . . . . . . . . . . . . . . . . . . . . . . . . . . . .10
TFT-DISPLAY IN PLAY MODE
. . . . . . . . . . . . . . . . . . . . . . . . . . . . . . 11
BASIC OPERATION
. . . . . . . . . . . . . . . . . . . . . . . . . . . . . . . . . . . . .12
MENU STRUCTURE
. . . . . . . . . . . . . . . . . . . . . . . . . . . . . . . . . . . . 13
PLAYBACK OF AUDIO FILES
. . . . . . . . . . . . . . . . . . . . . . . . . . . . . .14
NOW PLAYING . . . . . . . . . . . . . . . . . . . . . . . . . . . . . . . . . . . . . . . 14
AUDIO PLAY QUEUE . . . . . . . . . . . . . . . . . . . . . . . . . . . . . . . . . . . . 15
A-B REPEAT FUNCTION . . . . . . . . . . . . . . . . . . . . . . . . . . . . . . . . . . 16
LYRICS DISPLAY FUNCTION . . . . . . . . . . . . . . . . . . . . . . . . . . . . . . . 16
EDIT OR MODIFY LYRICS FILES . . . . . . . . . . . . . . . . . . . . . . . . . . . . . 17
NAVIGATION . . . . . . . . . . . . . . . . . . . . . . . . . . . . . . . . . . . . . . . . . .18
ABOUT
. . . . . . . . . . . . . . . . . . . . . . . . . . . . . . . . . . . . . . . . . . . . . . 18
VOICE RECORDING . . . . . . . . . . . . . . . . . . . . . . . . . . . . . . . . . . . . .19
PLAYBACK OF VIDEO FILES
. . . . . . . . . . . . . . . . . . . . . . . . . . . . . . .20
PLAYBACK OF PHOTO FILES
. . . . . . . . . . . . . . . . . . . . . . . . . . . . . .21
SETTINGS
. . . . . . . . . . . . . . . . . . . . . . . . . . . . . . . . . . . . . . . . . . . .22
REPEAT . . . . . . . . . . . . . . . . . . . . . . . . . . . . . . . . . . . . . . . . . . . . 22
EQUALIZER . . . . . . . . . . . . . . . . . . . . . . . . . . . . . . . . . . . . . . . . . . 22
BRIGHTNESS . . . . . . . . . . . . . . . . . . . . . . . . . . . . . . . . . . . . . . . . 23
BACKLIGHT . . . . . . . . . . . . . . . . . . . . . . . . . . . . . . . . . . . . . . . . . . 23
POWER SAVINGS . . . . . . . . . . . . . . . . . . . . . . . . . . . . . . . . . . . . . . 24
SLEEP . . . . . . . . . . . . . . . . . . . . . . . . . . . . . . . . . . . . . . . . . . . . . 24
TIME . . . . . . . . . . . . . . . . . . . . . . . . . . . . . . . . . . . . . . . . . . . . . . 24
LANGUAGE . . . . . . . . . . . . . . . . . . . . . . . . . . . . . . . . . . . . . . . . . . 25
BEEP . . . . . . . . . . . . . . . . . . . . . . . . . . . . . . . . . . . . . . . . . . . . . . 25
DEFAULT . . . . . . . . . . . . . . . . . . . . . . . . . . . . . . . . . . . . . . . . . . . 25
FORMATTING THE PLAYER . . . . . . . . . . . . . . . . . . . . . . . . . . . . . . .26
SYSTEM REQUIREMENTS
. . . . . . . . . . . . . . . . . . . . . . . . . . . . . . .27
PC DRIVER AND UTILITY INSTALLATION
. . . . . . . . . . . . . . . . . . . .28
TO OPEN THE SOFTWARE UTILITY
. . . . . . . . . . . . . . . . . . . . . . . . .29
UNINSTALLING DRIVER AND UTILITY
. . . . . . . . . . . . . . . . . . . . .30
UPGRADING THE FIRMWARE
. . . . . . . . . . . . . . . . . . . . . . . . . . . . .30
IF THE PLAYER DOES NOT WORK ...
. . . . . . . . . . . . . . . . . . . . . . . .32
PRODUCT SPECIFICATIONS
. . . . . . . . . . . . . . . . . . . . . . . . . . . . . . .33
COMPATIBLE VIDEO FORMATS
. . . . . . . . . . . . . . . . . . . . . . . . . . . .34
FAQ – FREQUENTLY ASKED QUESTIONS
. . . . . . . . . . . . . . . . . . . . .35
PRECAUTIONS
. . . . . . . . . . . . . . . . . . . . . . . . . . . . . . . . . . . . . . . .40
OPERATIONAL NOTES
. . . . . . . . . . . . . . . . . . . . . . . . . . . . . . . . . . . 41
COPYRIGHT NOTICES
. . . . . . . . . . . . . . . . . . . . . . . . . . . . . . . . . . .42
TablE Of CONTENTs
NOTE: You can easily navigate through this manual PDF by using the provided links. Click a page number or topic in the TABLE OF CONTENTS to jump to a desired topic.
Click the page number at the bottom right of each page to get back to the table of contents.
CONTENT 3
MAX-IVY AUDIO·PHOTO·VIDEO-PLAYER
PaCkagE CONTENT
Stereo Earphones 230 V Power Adaptor
USB Cable Carrying Strap
Rubber Case MAGIX mp3 maker SE
Music Software
Quick Start Guide CD-ROM: Drivers, Software &
Manual
MAX-IVY AUDIO·PHOTO·VIDEO-PLAYER 1GB|2GB|4GB

CONTENT 4
MAX-IVY AUDIO·PHOTO·VIDEO-PLAYER
INTrOduCTION
The MAX-IVY is a portable audio, photo & video player, voice recorder and USB mass storage
device in one unit.
Main Features
— Playback of MP3, OGG, WMA and WMA-DRM10 audio files
— Playback of AVI and WMV video files
— Playback of JPG photo files
— Synchronous lyrics display with WMA/MP3 music
— Voice recording function
— USB mass storage device
— Backlit TFT display
— Excellent audio quality
— Touch key pad
System Support
— Supports Windows Me/2000/XP without extra driver installation.
NOTE fOr WiNdOWs ME/2000/XP usErs:
Installation of the player software is required only if you wish to upgrade the firmware of the player.
NOTE fOr WiNdOWs 2000 usErs:
Windows Service Pack 3 must be installed before installing player software.
— Supports Windows 98SE after installation of the driver from the bundled CD-ROM.
— Supports Mac OS X (version 10.2.6 or above) without extra driver installation.
Upgradeable!
Firmware updates at www.maxfield.de
— You can upgrade the built-in programs (firmware) if necessary.
— This manual refers to firmware version 4.301.022.
Player operation may vary with later firmware versions.
CONTENT 5
MAX-IVY AUDIO·PHOTO·VIDEO-PLAYER
CONNECTIONs
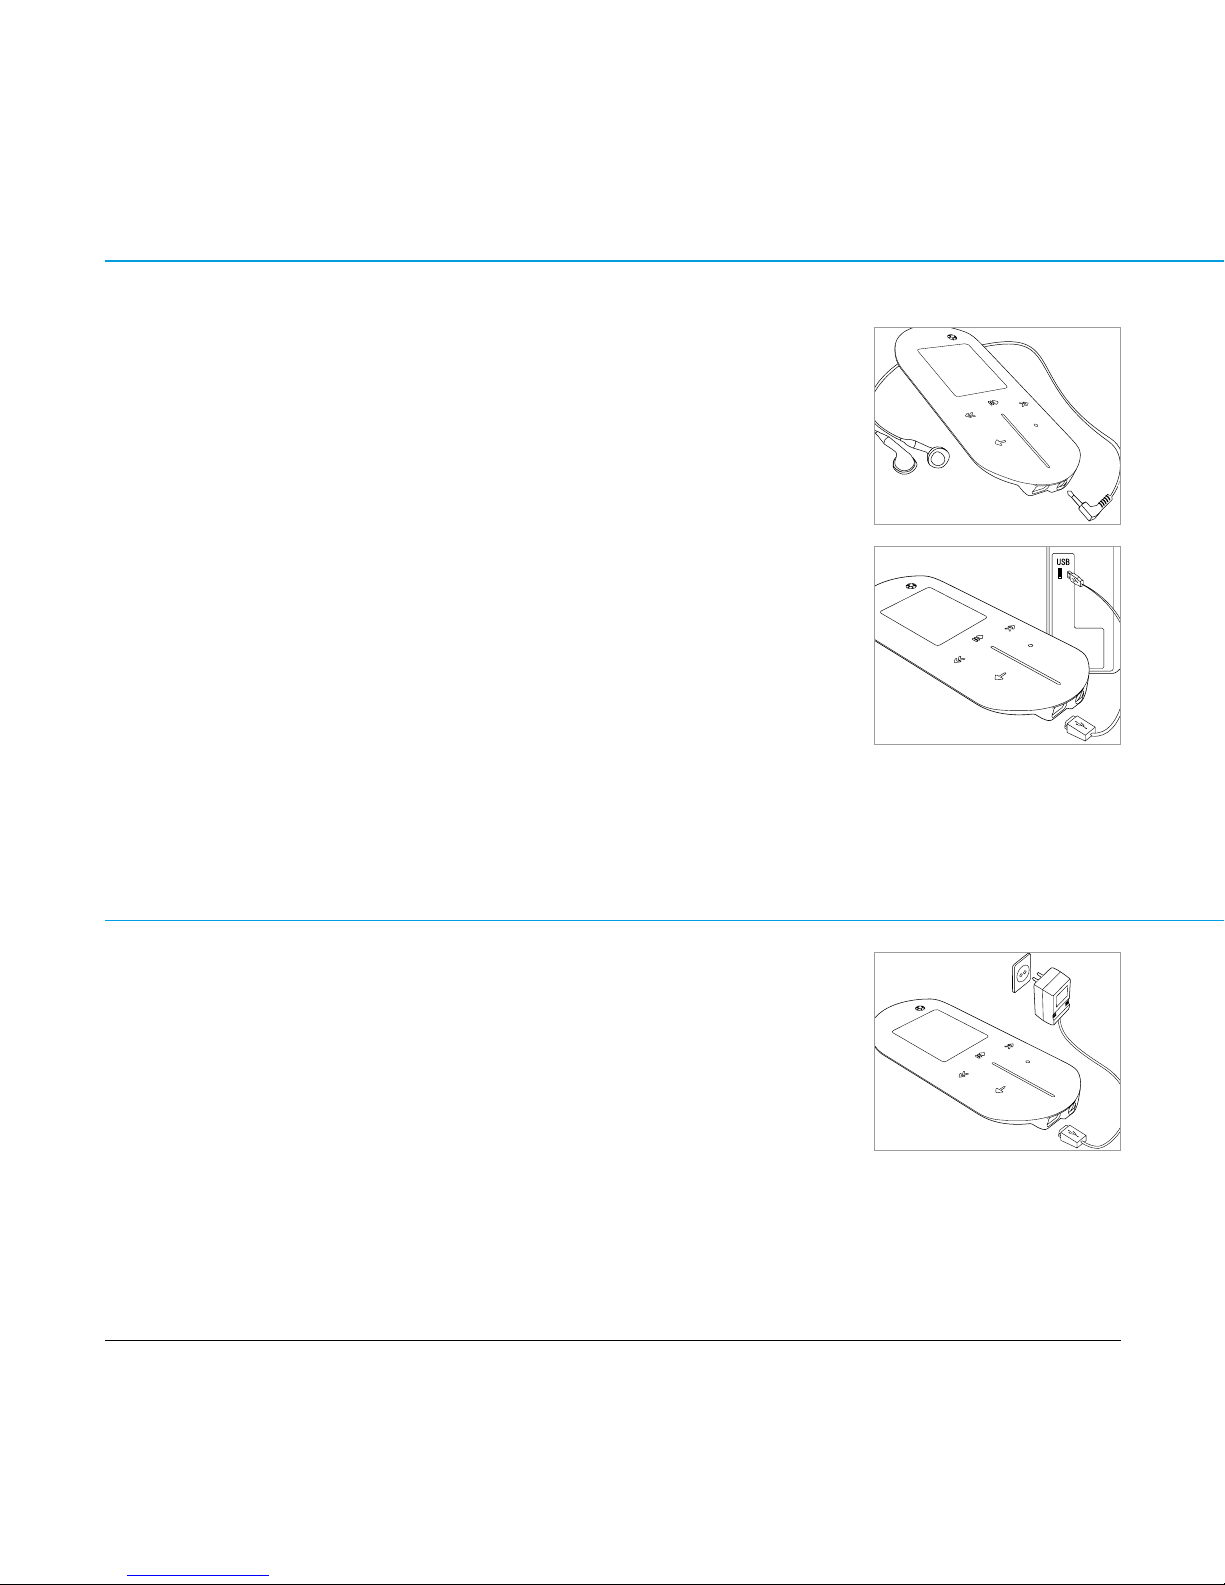
Connect Earphones
Firmly plug the earphones into the appropriate jack on the bottom part of the player.
PlEasE NOTE! Unplug earphones before connecting your player to your PC via USB cable.
Connect USB
1. Position the PC in a way that its USB ports can be easily accessed. (Note: The USB port(s) on
your PC may be found on the front panel instead of the back panel.)
2. Use the provided USB cable to connect the USB ports of both, player and PC.
3. The PC system detects New Hardware and starts to install the driver automatically, if needed.
Wait for the system to finish the installation.
4. When it has finished, double-click on “My Computer” on the desktop.
5. A new MTP Player will appear in the “My Computer” window when using Windows XP or
above, in case Media® Player 10 is installed. Using other operating systems, a new
Removable Disk will appear in the “My Computer” window. The new disk icon stands for the
player’s built-in memory. Now you can download your files to the player.
HOW TO cHEck THE usB drivEr WiNdOWs 98 sE/ME: Control Panel > System > Device Manager
ChargINg ThE baTTEry
— Use the USB cable to connect MAX-IVY to a PC, or the power adaptor to connect it to the mains supply.
— Wait until a battery icon motion appears in the top right corner of the player‘s display.
— The built-in Li-Ion battery is now charging.
— The battery is fully charged when battery icon motion stops, and you see a full icon.
— The first battery charge will take about 4 hours. For further recharges 2 to 3 hours will do.
PlEasE NOTE:
— Make sure that the battery is fully charged before first use.
— Please recharge the battery when there is a message that battery voltage is low and the player shuts down.
— Please fully charge the battery every 2 - 3 months when the player is not used for a long time. Otherwise, the battery
voltage may be too low to turn the player on.
CONTENT 6
MAX-IVY AUDIO·PHOTO·VIDEO-PLAYER
rubbEr CasE
The rubber case serves for player protection and as carrying equipment.
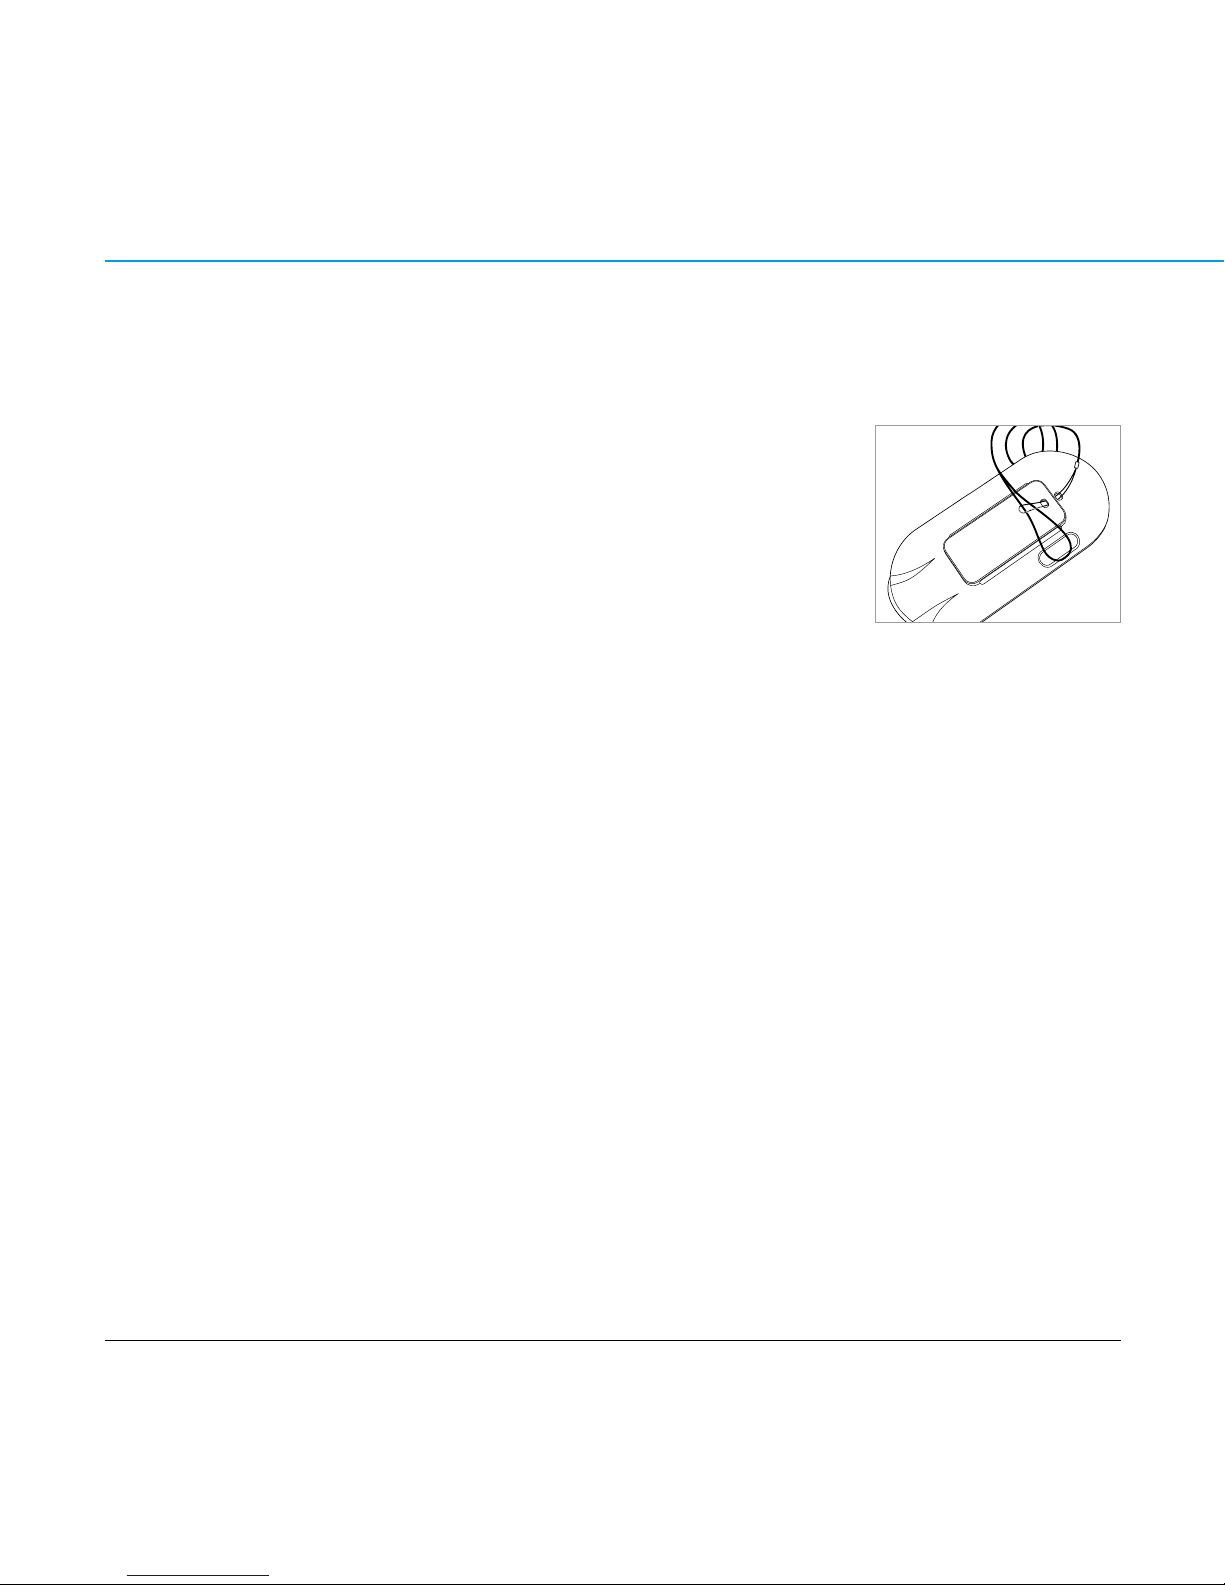
Attach carrying strap
There are two holes in the rubber case, provided to attach the carrying strap.
— First thread the thin loop of the carrying strap from the outside through the top hole.
— Thread the loop from the inside through the second hole.
— Thread the thicker end of the carrying strap through the thin loop and pull the whole
strap tight.
— Now attach the rubber case to the player.
Attach rubber case
— Unplug all cables.
— Put the rubber case edges first over the narrow bottom edge of your MAX-IVY.
— Carefully slide the whole rubber case around all the player’s edges until it fits in properly.
PlEasE NOTE:
Take care that the holes for ON OFF switch, USB port and earphone jack are in position.
Attach to waistbelt
— First attach the rubber case to the player.
— Thread the end of the waistbelt through the broad, flat loop on the rubber case. Take care that
the front side of the player faces outwards.
— Close the waistbelt.

CONTENT 7
MAX-IVY AUDIO·PHOTO·VIDEO-PLAYER
lOadINg fIlEs TO aNd frOm yOur max-Ivy
aTTENTiON!
When transferring data to the player, please pay attention that 5 Megabytes of memory per 1000 music files must be reserved for
player system files. If not provided, the player may not be turned on properly.
— Slide and hold the power switch into direction of the ON OFF symbol on the back of the player
until the screen motion disappears, to make sure that the player is turned off.
— Disconnect the earphones.
— Connect player and computer via USB cable. The screen displays “USB Connected“, indicating
that the player is in USB mode. The player will be automatically recognized by the computer.
— Transfer music, image or video files to or from the internal Flash RAM.
— Disconnect the player from your computer (see also “Disconnect the Player“), the files can now
be played by the player and all data stored in the unit can be transferred to another computer.
PlEasE NOTE:
For users of Windows XP and Windows Media® Player 10 : Store audio/photo/video files in the “Media“ folder.
There are different ways to transfer files to the player:
Copying files with Windows Explorer
After being connected with the PC via USB cable, the player will be recognized as a Removable
Disk under „My Computer“. Use the Copy, Paste, Delete etc. commands of your operating system
such as Windows or Mac OS.
— Select the files you want to load to the player by clicking the file/folder icon.
— Right-click the file(s)/folder(s). A menu appears. Click Copy.
— Double-click the Removable Disk to open the drive. The Removable Disk window appears.
— Right-click on the Removable Disk window and click Paste in the menu to copy the files/
folders into the player memory.
PlEasE NOTE: Copy music files, photo files and video files into the “Media“ folder, and data into the “Data“ folder.
HiNTs fOr filE sOrTiNg:
The audio/photo/video files in a folder are played in alphabetical order. — To maintain the alphabetical order, whole music albums should
be copied as a folder, not as single tracks. — To create a desired sequence, precede each file name before copying with, for example, track
numbers „01” - „99” or „1 01”, „1 02” ... „3 01”. Then the audio tracks will be played in numerical order. Please notice that the internal
sorting algorithm follows the first eight characters of a file name. So better don‘t number the files at the end of a long file name.
CONTENT 8
MAX-IVY AUDIO·PHOTO·VIDEO-PLAYER
Loading DRM protected WMA audio tracks with Windows Media® Player 10
— Windows Media® Player 10 recognizes the player as an MTP Player.
— Start the Windows Media® Player, and select the music library to manage your songs.
— In Windows Media® Player 10 choose the function “Sync”.
— For further advice please refer to the Windows Media® Player FAQs regarding Microsoft®
Windows Media
®
DRM (Digital Rights Management).
Copying audio files (also DRM protected ones) with the MAGIX mp3 maker SE
You can also use the bundled MAGIX mp3 maker SE music software to copy songs to your player
and, additionally, edit your contents. For detailed information, please refer to the MAGIX CD-ROM.
cauTiON:
Disconnecting the player from the PC during data transfer will damage the player! Before disconnecting the player, please make
sure that the transfer is complete.
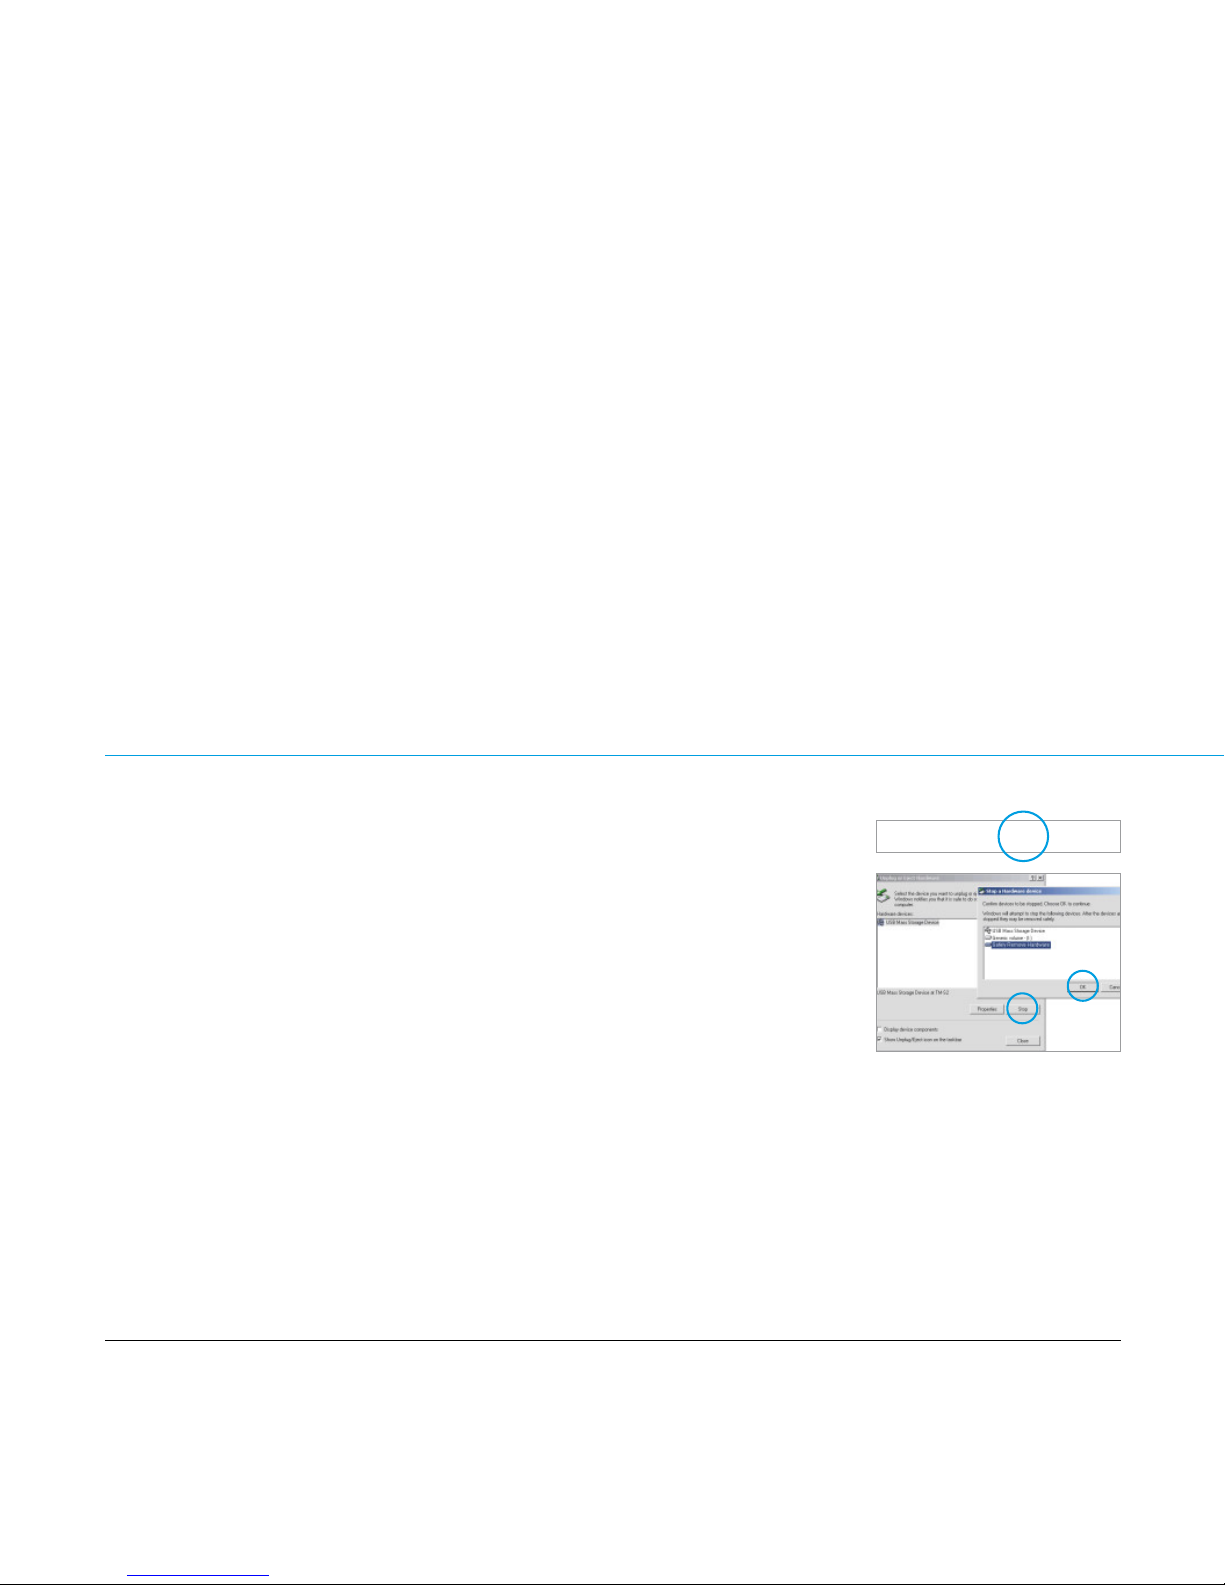
dIsCONNECT ThE PlayEr
After complete file transmission, do the following in order to disconnect the player from the PC.
(If you arbitrarily unplug the USB cable, the file transfer might fail in some systems.)
1. Double click the green arrow on the system tray on the bottom right corner of the Windows
screen.
2. After selecting the USB device, click the [Stop] button.
3. When you see the [Safely Remove Hardware] window, click [OK] and then unplug the USB cable.
PlEasE NOTE:
If you are using Windows Media® Player 10 to copy files to your player‘s memory, wait until your data transfer has been finished
and the screen does not display “writing“ or “reading“ any more. Then unplug the player
CONTENT 9
MAX-IVY AUDIO·PHOTO·VIDEO-PLAYER
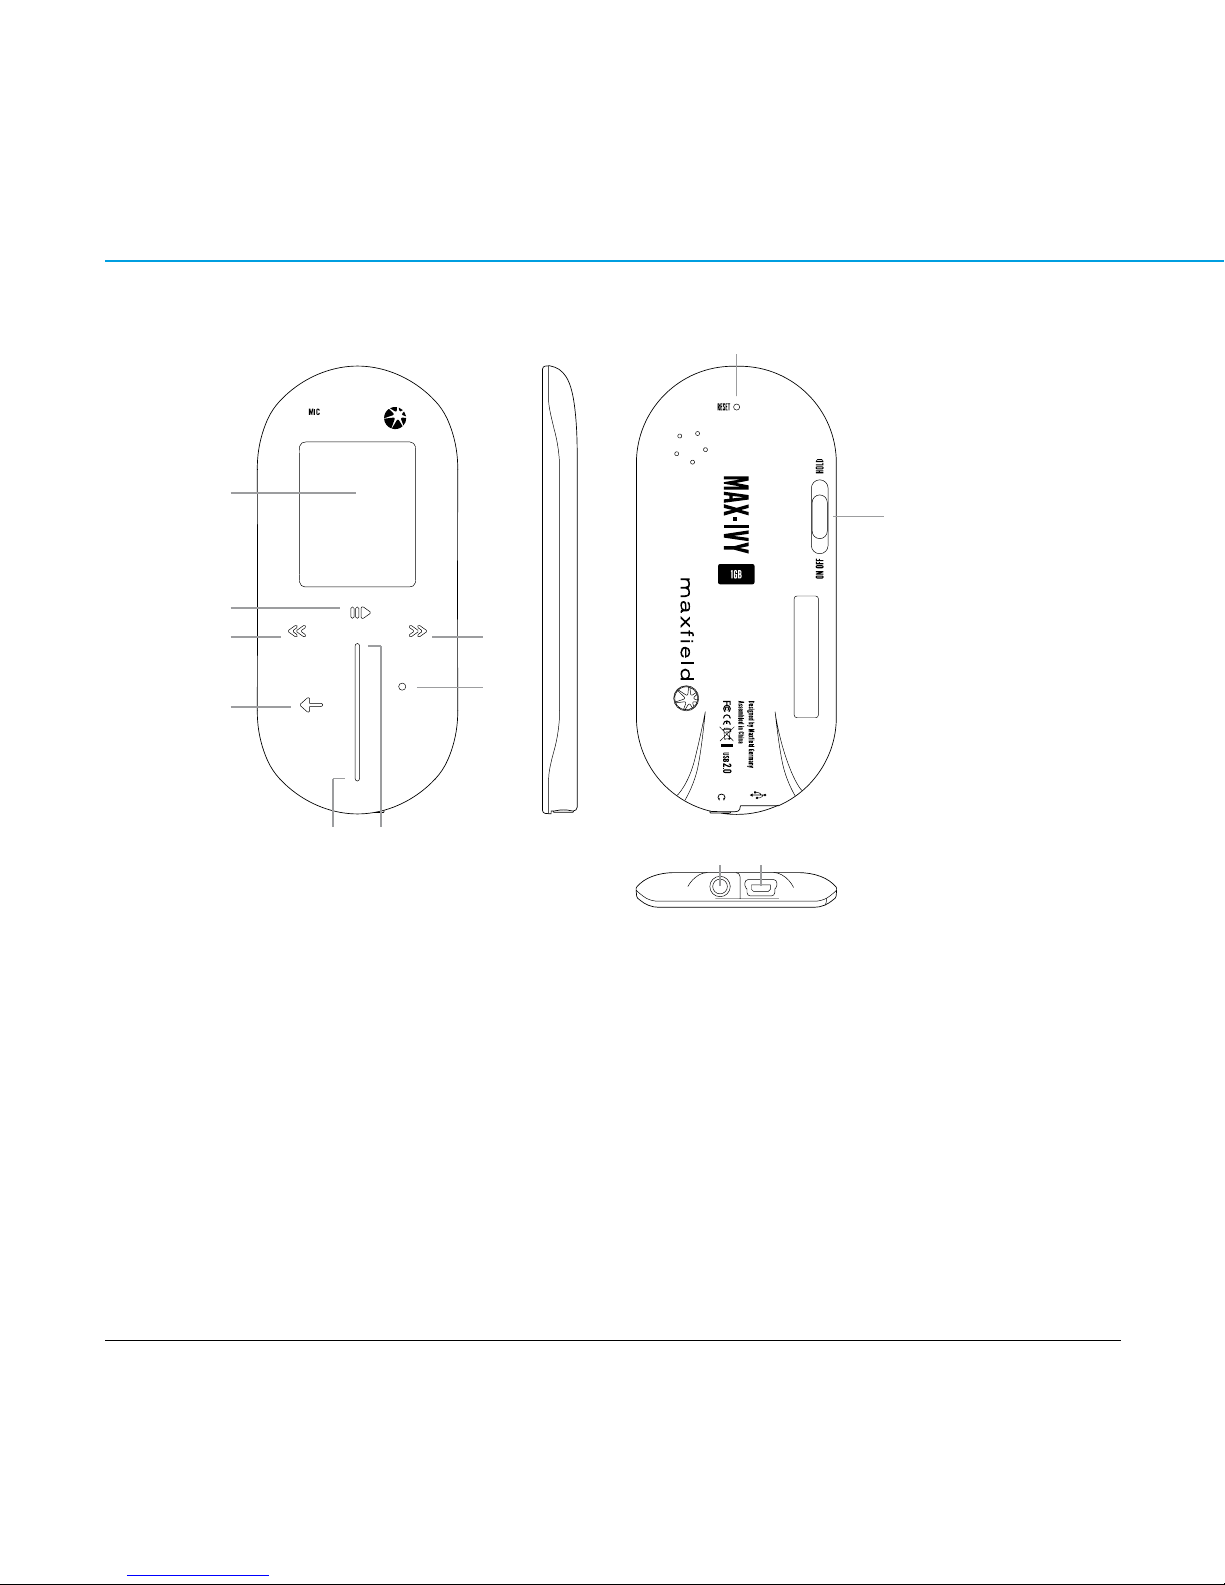
PlayEr OvErvIEw
1 Earphone jack 7 Volume –
2 TFT-Display 8 Volume +
3 Play|Pause 9 Power On/Off|Hold switch
4 Menu 10 Reset hole
5 Skip previous|Rewind 11 USB port
6 Skip next|Fast-forward 12 OK|A-B Repeat
* Sticker with Serial Number
(NOTE: Guarantee does not cover if the
Serial Number has been altered or removed.
)
4
5
2
3
10
9
111
12
6
87
*
CONTENT 10
MAX-IVY AUDIO·PHOTO·VIDEO-PLAYER
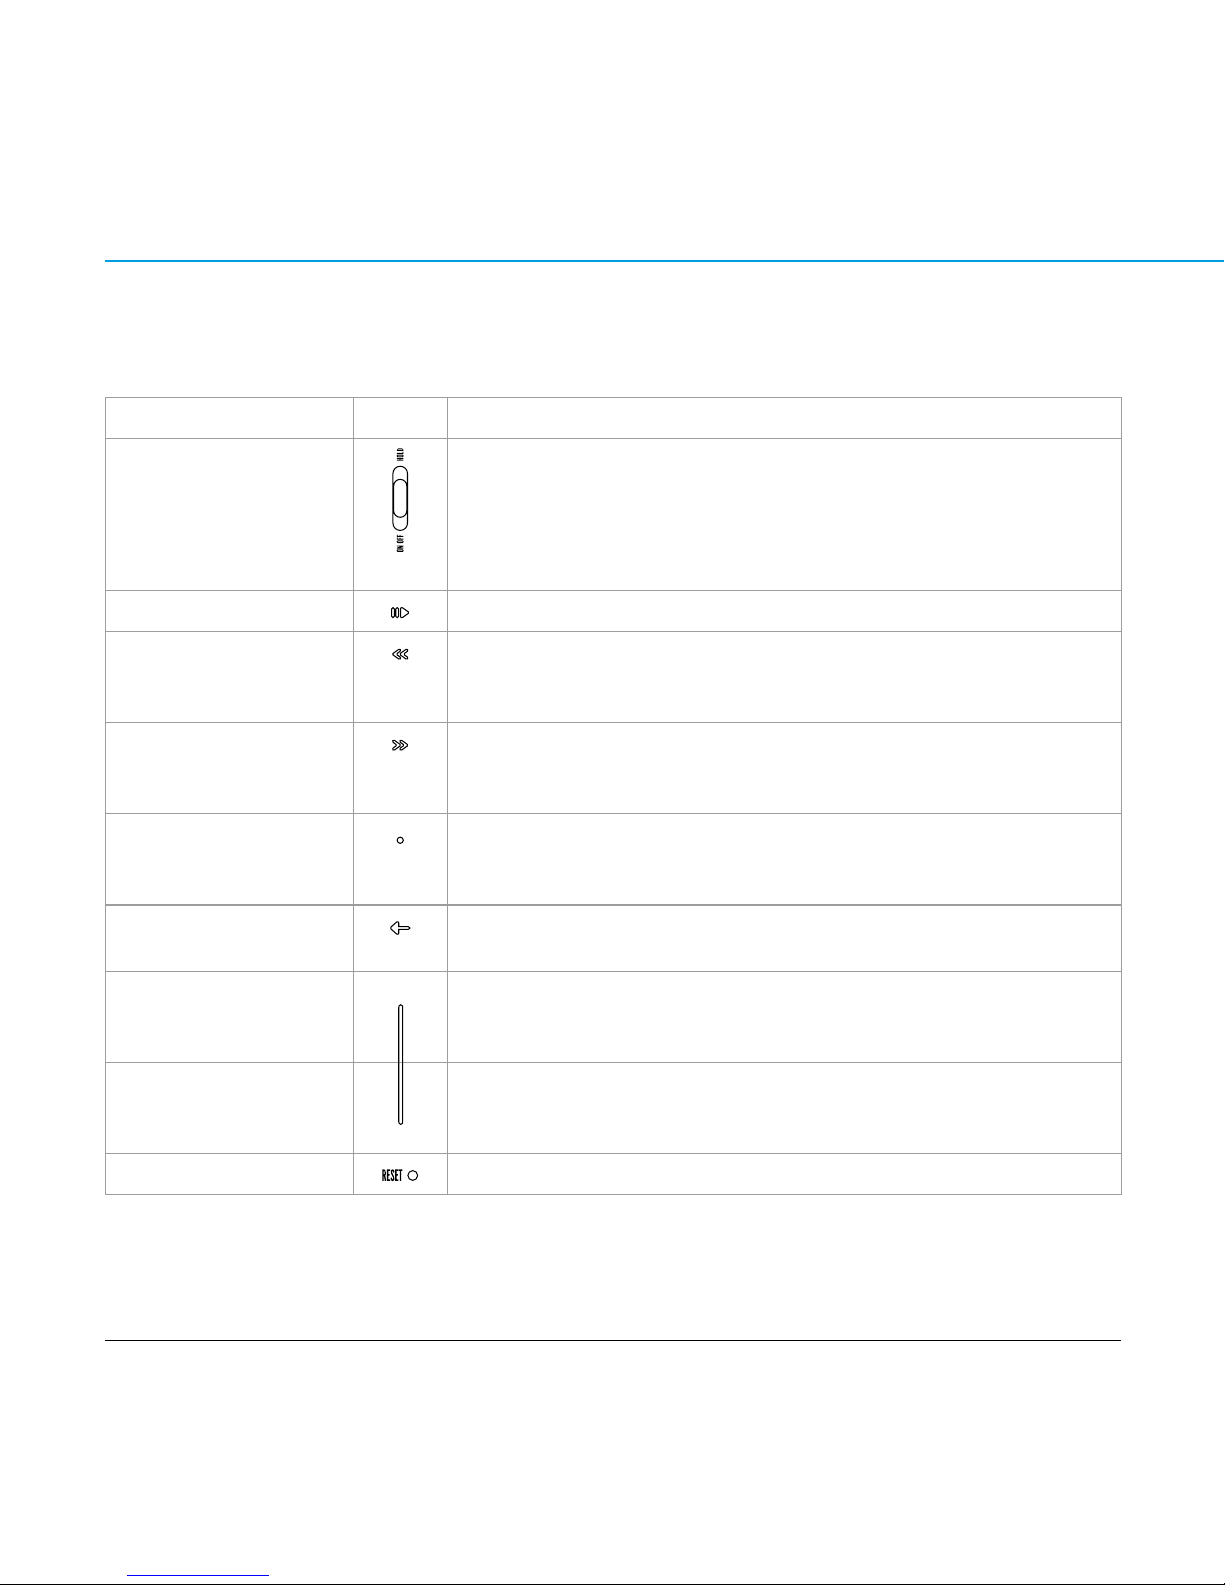
dEsCrIPTION Of kEys
Disconnect the player from your PC and remove the USB cable.
Function Key Operation
— Power On/Off
— Hold
ON OFF switch
Slide and hold into direction of ON OFF to turn the player on.
Slide and hold into direction of ON OFF until the screen motion disappears to turn the player off.
Push the switch into direction of HOLD to lock the player. Push it back to deactivate the keylock.
— Play/Pause Press to start playback of selected file or to pause current playback.
— Previous file
— Rewind
— Previous menu item
In Play mode press to skip to previous file.
Press and hold to rewind within a file.
In Menu mode press to skip to previous menu item.
— Next file
— Fast-forward
— Next menu item
In Play mode press to skip to next file.
Press and hold to fast-forward within a file.
In Menu mode press to skip to next menu item.
— Enter menu
— A-B Loop OK key
In Menu mode press to enter menu.
In Play mode press shortly to set start and end of the loop.
Press shortly again to cancel the loop.
— Enter menu
— Quit menu item Menu key
In Music mode press to enter the menu.
In Menu mode press to return to previous menu item.
— Volume +
— Previous file/folder/menu
item
Slider
In Play mode press or hold last element on top of the touchpad slider to increase volume.
In Menu mode press shortly to select previous file/folder or menu item.
— Volume -
— Next file/folder/menu item
Slider
In Play mode press or hold last element on bottom part of the touchpad slider to decrease volume.
In Menu mode press shortly to select next file/folder or menu item.
— Reset Push a thin metal pin (e.g. needle or end of paper-clip) into the reset hole, to reset the player.

CONTENT 11
MAX-IVY AUDIO·PHOTO·VIDEO-PLAYER
TfT-dIsPlay IN Play mOdE
Play Mode
EQ Mode
Filename/ID3-Tag
Elapsed time
Clock A-B Loop Hold
Battery indicator
Current/total number of songs
Music information
Total time
Earphone Volume level
Progress bar
Repeat Mode
Graphical EQ
Lyrics

CONTENT 12
MAX-IVY AUDIO·PHOTO·VIDEO-PLAYER
basIC OPEraTION
Touch keys
To guarantee smooth handling please use dry and clean hands.
Turn the player on
To turn the player on, slide the Power switch to the direction of the ON OFF symbol on the
back of the player.
Turn the player off
To turn the player off, slide and hold the Power switch into the direction of the ON OFF symbol
on the back of the player until the screen motion disappears.
PlEasE NOTE:
Slide and hold the Power switch into the direction of the ON OFF symbol until the shut-down process is completed.
Otherwise the player would return to the previous status.
Hold Function
Use the Hold (Lock) function to deactivate the player controls to avoid accidental activation.
— To activate the Hold function, slide the Power switch into direction of the HOLD symbol
on the back of the player.
The lock icon will appear in the top right corner of the display.
— Slide the Hold switch back to turn the Hold function off.
Adjusting Volume
— Move with your thumb/finger upward/downward the touchpad slider in the center of your
player to adjust the volume.
Alternatively, you can touch the last element of the slider – on the top to increase / on the
bottom to decrease the volume.
Resetting the player
In case of a system crash of your player, push a thin metal pin (e.g. a needle or the end of a paperclip) into the reset hole, to reset the player.

CONTENT 13
MAX-IVY AUDIO·PHOTO·VIDEO-PLAYER
mENu sTruCTurE
To get to a desired menu, use the touchpad slider respectively the FFD/REW keys to select a menu
item. Use the OK key to enter or the Menu key to quit a menu.
Music _______ Now Playing|Audio Play Queue|All Song|Artist|Album|Genre|Playlist
Video
Record _______ Start Record
_______ Settings ______ Encoder _ IM ADPCM|MS ADPCM|PCM
______ Rate ___ 8000|11025|16000|22050|32000|44100|48000 Hz
Voice
Photo _______ All Photo|Manual|Slide Show|Thumbnail
Settings ______ Repeat _______ Normal|Repeat One|Repeat All|Random
______ Equalizer _____ Normal|XBass|Rock|Jazz|Classical|Pop|User
______ Brightness
______ Backlight _____ 3|5|10|15 sec.|Always on
______ Power Savings __ Off|1|2|5|10|15 min.
______ Sleep ________ Off|15 min.|30 min.|1 hour|2 hours
______ Time
______ Language _____ English|Français|Deutsch|Español|Nederlands|Italiano
______ Beep ________ On|Off
______ Default
______ Format
Navigation ____ Memory Media|Recorded List|All Audio Track|All Video Track|All Image Files
About _______ Player Vers.|Int. Media Used|Int. Media Free
 Loading...