

Page 1

Maxey Moverley Limited, 6 Broad Ground Road, Lakeside, Redditch, Worcestershire, B98 8YP
Web: www.cctvrepairs.com ● Email: enquiries@maxeymoverley.com
Tel: 01527 522299 ● Fax: 01527 522588
Issue 1.1
| Page 1
Quick Reference Guide
VCL Orbiter Gold/Lite
VCL Orbiter Gold/Lite
Quick Reference Guide
Contents
1. INTRODUCTION 2
2. INSTALLATION 2
2.1 Ceiling and Wall Mounted Models 2
3. SETTING UP THE ORBITER GOLD/LITE 4
3.1 Wiring Details 4
3.2 Table 1 – VC408 Terminal Block PCB 4
3.3 Table 2 – Pin Descriptions of Pin Outs for False Ceiling 5
4. SETTING ON THE TOP BOARD 5
5. ADDRESS SETTINGS 6
6. COAX TELEMETRY 7
7. ALARM SETTINGS 7
8. TECHNICAL SUPPORT HELPLINE 5
9. REVISION HISTORY 6
Page 2
Maxey Moverley Limited, 6 Broad Ground Road, Lakeside, Redditch, Worcestershire, B98 8YP
Web: www.cctvrepairs.com ● Email: enquiries@maxeymoverley.com
Tel: 01527 522299 ● Fax: 01527 522588
Issue 1.1
| Page 2
Quick Reference Guide
VCL Orbiter Gold/Lite
1. Introduction
This guide provided by Maxey Moverley Limited contains programming instructions to aid onsite
engineers in tackling common problems when installing Orbiter Gold/Lite cameras.
This information has been compiled from publicly available documentation in conjunction with the
observations of Maxey Moverley Limited.
2. Installation
2.1 Ceiling and Wall Mounted Models
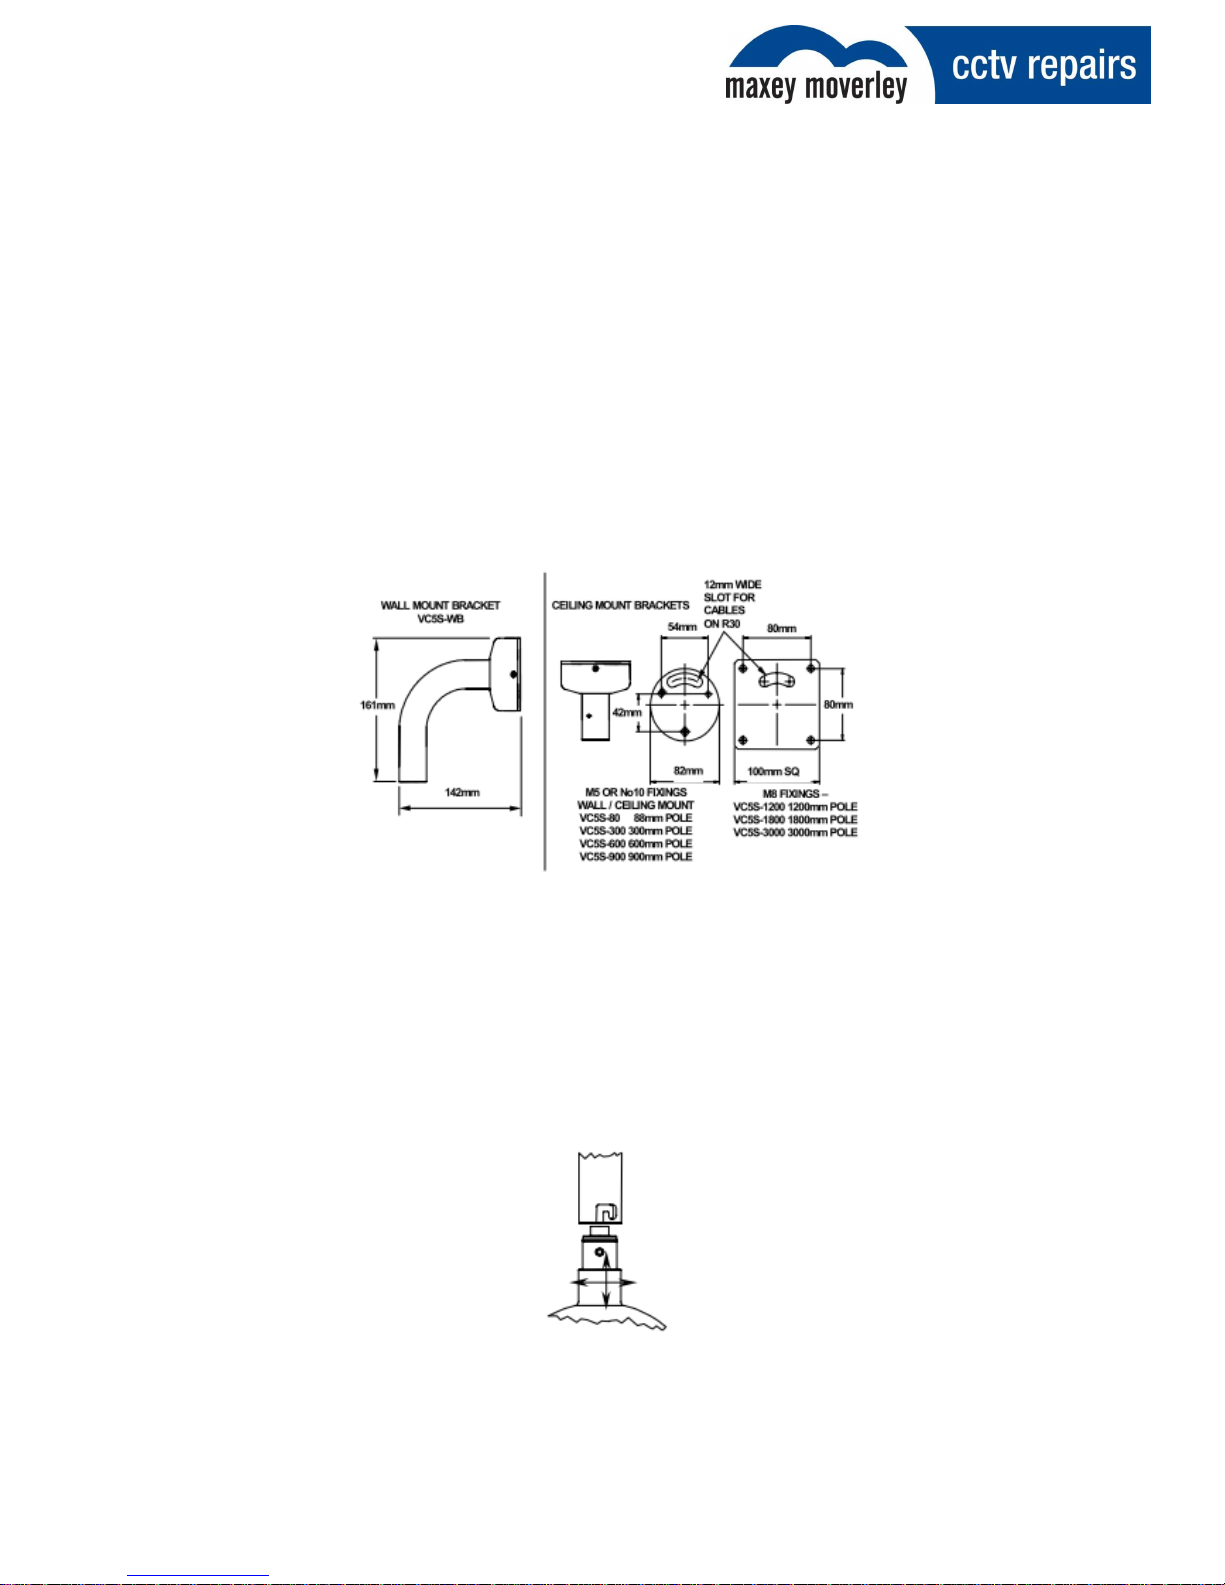
Figure 1. Below, details the ceiling and wall mount brackets, including dimensions.
Step 1
Attach the bracket (wall or ceiling type) using fixings which are appropriate for the surface and able
to support the weight of the Orbiter Gold/Lite (1.1kg) as shown in Figure 2.
Figure 2. Push up pole – Align to lug slot.
Page 3
Maxey Moverley Limited, 6 Broad Ground Road, Lakeside, Redditch, Worcestershire, B98 8YP
Web: www.cctvrepairs.com ● Email: enquiries@maxeymoverley.com
Tel: 01527 522299 ● Fax: 01527 522588
Issue 1.1
| Page 3
Quick Reference Guide
VCL Orbiter Gold/Lite
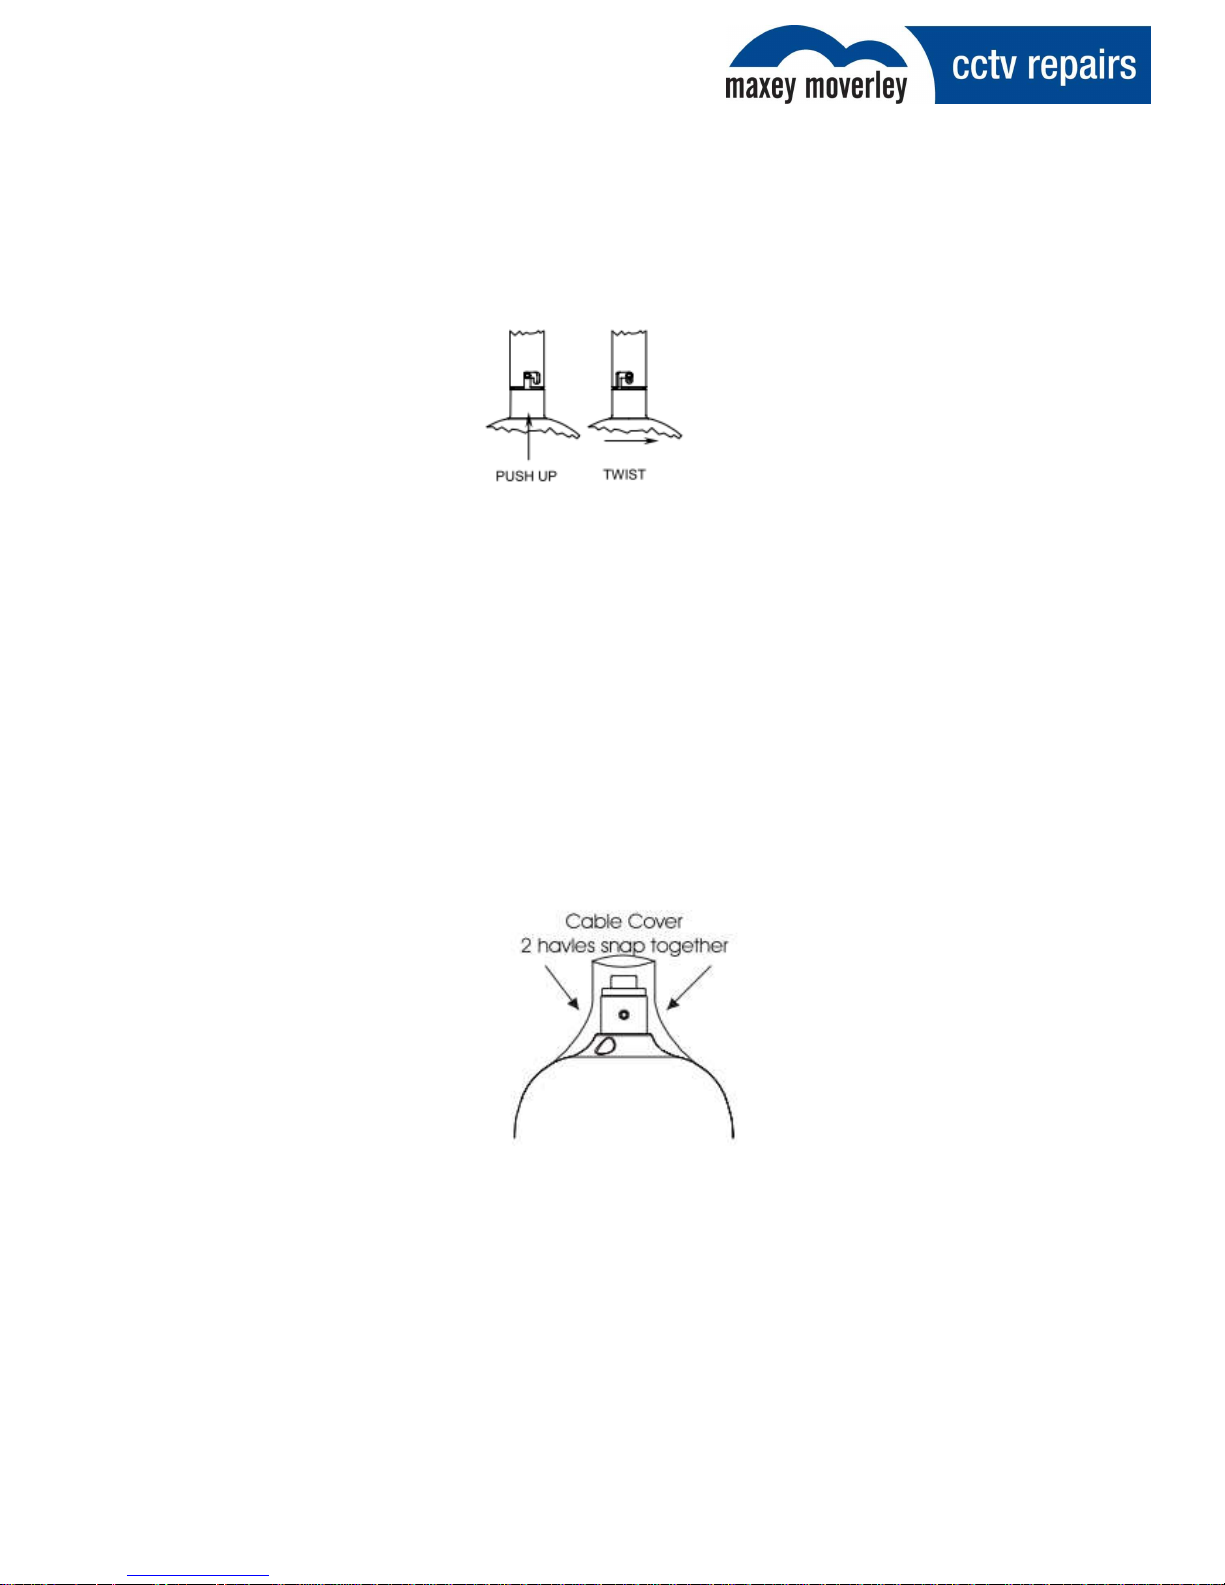
Step 2
Align the lug on the Orbiter Gold/Lite with the slot on the bracket. Carefully push the Orbiter
Gold/Lite into the bracket and twist clockwise. Allow to drop into the retainer, see Figure 2.
Figure 3. Fitting the Orbiter Gold/Lite into the bracket
Step 3
Fit the M3 CSK safety locking screw into the bracket to lock the Orbiter Gold/Lite in place. This is
ESSENTIAL for the safe operation of the Orbiter Gold/Lite. (The hole for the screw is on the opposite
side of the pole to the slot.)
Step 4
Attach the cable cover. This is supplied in two halves which snap together over the neck of the
Orbiter Gold/Lite as shown in Figure 4, below.
Figure 4. Fitting the Cable Covers.
Page 4

Maxey Moverley Limited, 6 Broad Ground Road, Lakeside, Redditch, Worcestershire, B98 8YP
Web: www.cctvrepairs.com ● Email: enquiries@maxeymoverley.com
Tel: 01527 522299 ● Fax: 01527 522588
Issue 1.1
| Page 4
Quick Reference Guide
VCL Orbiter Gold/Lite
3. Setting up the Orbiter Gold/Lite
3.1 Wiring Details
The Orbiter Gold/Lite is designed for speed of installation and set up and so the wall and ceiling
mount brackets are supplied pre wired. Customer wiring is via an internal terminal block PCB which
is located inside the base plastic cover.
Note: The terminal block is accessed by removing the two M3 CSK head screws, using appropriate
tool.
Figure 5. Mounting options for Orbiter Gold/Lite
Figure 6. Terminal block details
3.2 Table 1 – VC408 Terminal Block PCB
TWISTED PAIR ‘DATA IN COAX’
SG
(Not Used)
SG
(Not Used)
SYN
(Not Used)
SYN (Not Used)
D+
Twisted Pair Telemetry
D+
(Not Used)
D-
D-
(Not Used)
VID
Video Signal
VID Video Signal
VG
Video Ground
VG
Video Ground
+V (AC)
24V AC
+V (AC)
24V AC
0V (AC)
24V AC
0V (AC)
24V AC
Page 5

Maxey Moverley Limited, 6 Broad Ground Road, Lakeside, Redditch, Worcestershire, B98 8YP
Web: www.cctvrepairs.com ● Email: enquiries@maxeymoverley.com
Tel: 01527 522299 ● Fax: 01527 522588
Issue 1.1
| Page 5
Quick Reference Guide
VCL Orbiter Gold/Lite
Figure 7. Wiring details for the Orbiter Gold/Lite (False cealing mount)
3.3 Table 2 – Pin Descriptions of Pin Outs For False Ceiling
TWISTED PAIR ‘DATA IN COAX’
Pin 1
Green
24V AC
Pin 1
Green
24V AC
Pin 2
Red 24V AC
Pin 2
Red 24V AC
Pin 3
Blue Data +
Pin 3
Blue
Pin 4
Yellow
Data
- Pin 4
Yellow
Pin 5
Coax Screen
Video Ground
Pin 5
Coax Screen
Video Ground
Pin 6
Coax Core
Video Signal
Pin 6
Coax Core
Video Signal
Pin 7
(Not Used)
Pin 7
(Not Used)
4. Settings on the Top Board
Figure 8. The Orbiter Gold/Lite top board
Page 6

Maxey Moverley Limited, 6 Broad Ground Road, Lakeside, Redditch, Worcestershire, B98 8YP
Web: www.cctvrepairs.com ● Email: enquiries@maxeymoverley.com
Tel: 01527 522299 ● Fax: 01527 522588
Issue 1.1
| Page 6
Quick Reference Guide
VCL Orbiter Gold/Lite
LED D17 will illuminate if the receiver that is being controlled by Coax telemetry is selected by the
transmitter and the coax telemetry is satisfactory. If the receiver is being controlled by twisted pair
telemetry, LED D17 will flash whenever a valid telemetry command is received.
VR1 (LIFT) and VR2 (GAIN) are factory set. They are designed to improve the picture quality
transmitted by the Orbiter Gold/Lite when long cable runs are involved and a degradation of picture
quality occurs. Before adjusting either the LIFT or GAIN, ensure that the iris is correctly adjusted.
If the image is ‘smearing’ due to a long cable run, then the LIFT pot may be adjusted to sharpen the
image. If the contrast of the image is low, (caused by an attenuated video signal), make adjustments
by turning the GAIN pot.
Note. Over adjustments of either the GAIN or the LIFT pot will result in further image quality
degradation.
5. Address Settings
The addresses for each Orbiter Gold/Lite are set as shown in the table below. Set the poles on
DILSW2 to the desired position for each address.
Figure 9. Address Settings
Page 7

Maxey Moverley Limited, 6 Broad Ground Road, Lakeside, Redditch, Worcestershire, B98 8YP
Web: www.cctvrepairs.com ● Email: enquiries@maxeymoverley.com
Tel: 01527 522299 ● Fax: 01527 522588
Issue 1.1
| Page 7
Quick Reference Guide
VCL Orbiter Gold/Lite
6. Coax Telemetry
Coax telemetry Orbiter Gold/Lites do not require an address setting, therefore the settings of
positions 1-7 on DILSW2 are ignored. Position 8 controls the alarm feature.
7. Alarm Settings
Switch 8 of the 8 way DIL switch DILSW2 is used to toggle the Orbiter Gold/Lites alarm setting. When
the switch is ‘ON’ the Orbiter Gold/Lites alarm inputs are enabled and set to the default settings as
shown in the table below. If switch 8 is ‘OFF’ then the alarms are not automatically enabled, but can
be enabled and adjusted using a MaxCom with local alarm menus.
ALARM
INPUT
-
TYPE
PRESET
TIME
-
OUT
1 Normally Open
1
10 Seconds
2 Normally Open
2
10 Seconds
3 Normally Open
3
10 Seconds
4 Normally Open
4
10 Seconds
Page 8

Maxey Moverley Limited, 6 Broad Ground Road, Lakeside, Redditch, Worcestershire, B98 8YP
Web: www.cctvrepairs.com ● Email: enquiries@maxeymoverley.com
Tel: 01527 522299 ● Fax: 01527 522588
Issue 1.1
| Page 8
Quick Reference Guide
VCL Orbiter Gold/Lite
8. Technical Support Helpline
For help and guidance with installation issues, that are not covered within this guide please contact
our dedicated customer technical helpline on 01527 522299 and speak to one of our specially
trained technicians will who will be happy to assist you.
Page 9

Maxey Moverley Limited, 6 Broad Ground Road, Lakeside, Redditch, Worcestershire, B98 8YP
Web: www.cctvrepairs.com ● Email: enquiries@maxeymoverley.com
Tel: 01527 522299 ● Fax: 01527 522588
Issue 1.1
| Page 9
Quick Reference Guide
VCL Orbiter Gold/Lite
9. Revision History
Revision
Date
Author
Amendments
Comments
1 24/04/13 DS First draft Issued for internal review
1.1 14/05/2013 DS Agreed format/content Issued for distribution
 Loading...