

Page 1

User’s Guide
HD Satellite
PVR Ready STB
Page 2

Page 3

Contents
1. INTRODUCTION ........2
1.1 Safety Instructions........2
1.2 Packaging Contents........3
1.3 Product Descriptions........4
1.4 Conditional Access........5
1.5 Remote Control........6
1.6 Main Features........7
1.7 Technical Data........7
1.7.1 Basic Features........7
1.7.2 Basic Functions........8
2. INSTALLATION OF XP1000........9
2.1 Connecting the TV........9
2.1.1 Connecting TV via HDMI cable........10
2.1.2 Connecting TV via SCART cable........10
2.2 Connecting Power........10
2.3 Power On/Off........11
3. FIRST TIME INSTALLATION
(USING WIZARD)........11
3.1 Video Input Selection........11
3.2 Video Mode (Resolution) Selection........11
3.3 Language Selection........11
4. BASIC OPERATIONS........12
4.1 Switching Channels........12
4.2 Volume Control........13
4.3 Selecting Audio Track........14
4.4 Subtitle........13
4.5 Teletext........13
4.6 Program Information........14
4.7 Info Bar........14
4.8 Electronic Program Guide (Event View)........15
4.9 Time Shift........16
4.10 Recording........16
4.11 Recording Play........17
4.12 Managing Recording Files........18
4.13 Media Player........18
4.14 Plug-ins........19
4.15 Sleep Timer........19
5. MENU........19
5.1 Top Menu........19
5.2 Setup........20
5.2.1 System Settings........20
5.2.2 Service Searching........22
5.2.3 Checking CAM........24
5.2.4 Parental Control........24
5.2.5 Factory Reset........25
5.2.6 Software Update........25
5.3 Information........26
5.3.1 Service Information........26
5.3.2 Checking H/W & S/W Information........26
6. REMOTE CONTROL UNIT (RCU) SETUP........26
6.1 Setting up as a TV Remote Control........26
6.1.1 4-digit Setting Method........26
6.1.2 Smart Scan Method........27
6.1.3 Changing Factory Default Status........27
6.2 Supported TV Brand List........28
7. COPYRIGHT – GNU GPL........28
8.TROUBLESHOOTING........31
APPENDIX........32
01
Page 4

1. Introduction
1.1 Safety Instructions
XP1000 has been designed and manufactured in compliance with EU consumer safety requirements (CE). Please read the following
safety precautions carefully
1. Connecting Power
•
This product operates only in the range of AC 100V~250V and 50Hz/60Hz. Please check first your power supply to see if it fits in this range.
• Please be noted that you need to disconnect from the mains before you start any maintenance or installation procedures.
• Make sure that the power cord is placed in a position where it is easy to unplug it from the mains in an emergency.
2. Overloading
• Do not overload a wall outlet, extension cord or adapter as this may cause electrical fire or shock.
3. Liquid
• This product is not water-proof and should not be exposed to dripping, splashing, or any type of liquid.
• No objects filled with liquid such as vases shall be placed on the product.
• Please do not clean the product with wet cloth, which may cause a short circuit.
• No wet objects should be placed near the product.
4. Ventilation
• Allow sufficient space between the product and other objects to make sure air ventilation of the product.
• Do not block the top or rear of the product with an object, which will close the ventilation holes and lead to a high temperature of
the system. This may cause a failure of the product.
• Do not stack other electronic devices on top of the product.
• Do not insert any kind of pointed objects like screw, gimlet, etc. into the ventilation holes of the product. This will damage
the product.
5. Connecting the Satellite Cable.
• Disconnect the power of the product before you connect the satellite cable to the product. Otherwise, it may cause damage to the LNB.
6. Grounding
• The LNB must be earthed to the system earth for the satellite dish.
7. Location
• Place the product indoor.
• Do not expose the product to rain, sun or lightening.
• Do not place the product near any heat appliances such as a radiator.
• Ensure that there is more than 10 cm distance from any electrical devices & wall.
8. Lightening, Storm or Not In Use.
• Unplug the product and disconnect the antenna cable during a thunderstorm or lightening, especially when left unattended and
unused for a long period of time. This will prevent possible damages from power surges or lightening.
9. Replacement of Parts
• Unauthorized part replacements, especially by one who is not a qualified technician may result in damage to the product.
• Ensure that when part replacements are necessary qualified technicians perform the task using the components specified by the
manufacturer.
10. Hard Disk Drive
• Do not move the product or turn the power off suddenly while the Hard Disk Drive (HDD) is still running. This may result in
damage to the HDD and thus the system.
• The company shall not be liable for any corruption of data on the HDD caused by careless use or misuse of users.
02
Page 5

11. Battery
• There is danger of explosion if batteries are incorrectly replaced.
• Replace batteries only with the same or equivalent type.
Disposal “WEEE” Symbol instructions
This product should not be disposed with other house hold wastes at the end of its working life.
Please separate this from other types of wastes and recycle it responsibly to promote the sustainable reuse of material resources.
This will help prevent harm to the environment or human health from uncontrolled waste disposal.
1.2 Packaging Contents
Please check all package contents before using your product.
XP1000 Remote Control & Battery(AAA 1.5V Battery x 2)
User’s Guide
HDMI Cable
User’s Guide
Power Cord AC Adapter
* The accessories may vary according to area.
03
Page 6

1.3 Product Descriptions
Front Panel
1 2 3 4 5 6
1. IR Receiver: Receive the IR signal from remote controller.
2. Recording Indicator: Display the current recording status of STB.
3. On/Off button and Indicator: Display the current power status of STB. Using this button, you can power on and off your STB.
4. Channel up/down: Using the channel up and down buttons, you can switch the channels directly on your STB.
5. CI Module slot: One CI module slot is provided.
6. Smartcard reader slot: Two Smartcard slots are provided
Rear Panel
1 2 3 4 5 6 7 8
1. LNB 1 IN: One Satellite cable can be connected.
2. SCART: One SCART connector is provided for TV using SCART cable.
3. HDMI: Connect to TV using an HDMI cable for both audio and video signals.
4. S/PDIF: Connect to a digital audio system using S/PDIF cable.
5. Ethernet: Connect Network.
6. USB: Connect the USB memory stick or external HDD.
7.DC Power Jack: Connect the provided AC/DC adapter (2.5A@12V).
8. DC power On/Off Switch: Power on/off.
04
Page 7

1.4 Conditional Access
Amongst the channels scanned via XP1000, some channels can be properly tuned in only with the corresponding Smartcard and/
or CAM (Conditional Access Module). XP1000 provides two Smartcard Reader slots and one Conditional Interface slot. Users need to
purchase those Smartcards and CAMs that are required for viewing such subscription based services.
Insertion of Smartcard
1 Open the door on the right side.
2 Insert Smartcard as in the following instruction with the IC chip pointing down.
3 Make sure that the Smartcard remain inserted while viewing.
SMARTCARD
Insertion of CAM (Conditional Access Module)
There are several Conditional Access Systems (CAS) that XP1000 supports. To be able to watch channels encrypted in such CAS as
Nagravision, NDS, Irdeto, Viaccess, etc, users need to purchase a CAM corresponding to each CAS, as well as Smartcard to decrypt
those encrypted channels.
1 Insert a Smartcard into the CAM as in the below picture with the IC chip pointing up.
2 Once the Smartcard inserted into the CAM, insert the CAM into the CI slot.
3 Make sure that the CAM remains inserted while viewing.
05
CI MOUDULE
SMARTCARD
Page 8

1.5 Remote Control
Press to turn the product on or standby.
Press to switch the remote control to
Press to enter a channel number or numbers
according to the menu options.
Press to go to Previous Page.
Press to return to the previous service or
Press to navigate up/down and left/right on
Up/down keys are used to call up the
Press to exit the current menu option into
the live mode, or switches one step back of
the menu options.
Press to adjust the audio volume.
Press to mute the audio or un-mute.
Color Keys – RED, Green, Yellow & Blue
Each key is assigned a specific function
that may be different in each menu.
Press to start or stop recording media.
Press to stop playing media.
Press to play the selected file (e.g.
recording) at the normal speed or pause
the live program or recording play.
Press to view the Timer Schedule.
Press to move to previous program.
Faster rewind than the normal speed.
Faster forward than the normal speed.
Press to move to Next program.
Play / Pause[ ]
Previous Program[ ]
Fast Rewind[ ]
Fast Forward[ ]
Next Program.[ ]
Power
TV
control TV set.
Numeric Keys
Previous
Back
Menu.
Navigation Keys
channel list.
Exit
the menu.
Volume +/-
MUTE
Recording[ ]
STOP[ ]
Timer[ ]
STB
Press to switch the remote
control to control this product.
Next
Press to go to Next Page.
Info
Press to view the Program
information.
OK
Press to confirm the selected
menu option.
EPG
Press to display the EPG (Electronic
Program Guide) information if the
channel provide.
Portal
Press to go to Portal menu.
File List
Press to display the list of
recordings stored on the external
HDD if any.
Channel (Page) up/down
Press to navigate through the
scanned channel list or move the
channel/Program list in pages.
Text
Press to display the teletext
information of the current channel, if
the channel provides teletext data.
Audio
Press to select available audio
language and audio type.
Subtitle
Press to display the subtitle of the
current channel, if the channel
provides subtitle data.
Help
Press to display major important
operation methods. This provides
users with a quick guide of product.
V. Mode
Press to change the display output
ratio: Wide, Zoom or Original.
TV
Press to display the TV channel list.
RADIO
Press to display the Radio channel
list.
Sleep
Press to turn off the product sleep
timer by user.
06
Page 9

1.6 Main Features
• MIPS Processor 3300 class
• Linux Operating System
• Media Player
• Downloadable Plug-ins supported
• 2 x Smartcard Readers
• 1 x Common Interface
• MPEG2 / H.264 Hardware Decoding
• DVB-S2 Single Tuner
• 128MB NAND Flash / 512MB DDR Memory
• 10/100MB Ethernet Interface
1.7 Technical Data
1.7.1 Basic Features
PCB Size
WxD
Reliability
Operating Temp.
Relative Humidity
RF Reception
Terrestrial DVB-S
Terrestrial DVB-S2
Number of RF Input/output terminal
(75 Ohms F-Type)
• 1 x USB 2.0
• HDMI
• 1 x SCART
• SPDIF for digital bit stream out (optical)
• EPG supported
• Automatic & Manual Service Scan supported
• Multiple LNB control (DiSEqC) supported
• Skin change supported
• Stable power adaptor (external)
205x117 mm
0~45°C
10% ~ 80% (non-condensing)
950MHz~2150MHz
DiSEqC 1.2
LNB-IN 1 port
IO Features
Power Indication
Recording Indication
Network activity Indication
Ethernet
SCART output
HDMI output
USB 2.0
Smart Card Slot
CI Card Slot
Optical Output
Power Supply
Yes (Blue=on, Red=stand-by)
Red (PVR Ready)
Yes (Rear)
Yes (100baseT)
CVBS/RGB+LR Supported
576p, 720p @ 50Hz, 1080i @ 25Hz,1080p @ 50Hz
Yes (Rear, 1 port)
x2 (Front)
x1 (Front)
PCM / Dolby Digital
AC-DC Adaptor (12V/2.5A)
07
Page 10

Packaging
Gift box
Accessories
RCU
HDMI Cable
AC Adaptor (+12V/2.5A)
Battery (AAAx2)
User Manual Guide
1.7.2 Basic Functions
Solution
CPU
RAM
ROM
OS
Audio Decoder
Dolby Digital (AC3)
MPEG-1 L1/L2/L3
MPEG-2 AAC
MPEG-4 HE-AAC
WMA
Digital multi-lingual
Paper box, coloured design
Yes
Yes
Yes
Yes
Yes
MIPS 3300 class
512MB
SPI-NOR 4MB
NAND 128MB
Linux version > 3.5.0
Yes
Yes
Yes
Yes
Yes
Yes
Video Decoder
MPEG-1
MPEG-2
H.264
XVID
Video Display
16:9, 4:3 Monitor Selection
Aspect ratio control
(Normal, Wide, Zoom)
576i/576p/720p/1080i/1080p
Yes
MP@HL
HP@L4 (1080p 30fps)
XVID Highdef (HD)
Yes
Yes
Yes
08
Page 11

Control I/F
Front keypad
IR
AV Input/Output
SCART output
HDMI output
SPDIF optical output
USB 2.0
Copy Protection
HDCP
Network
RJ45
Wi- (802.11 b/g)
DHCP, Static IP
PPPoE
Other Functions
Volume & Mute Control
Photo viewer
3Keys – Power, Ch+, Ch-
Yes
Yes (CVBS & RGB + LR)
x1
Yes
x1
Yes
10/100 Base-T
USB type (optional)
Yes
Optional
Yes
Yes
2. INSTALLATION OF XP1000
This chapter will guide you through the whole installation process of XP1000. Please read each section carefully to make sure that
the system runs properly.
2.1 Connecting the TV
XP1000 provides a variety of audio/video connection methods.
We recommend you to use HDMI connector to get the best picture quality. If your television does not have a matching connector,
then use the SCARD connector in the following order for a better picture quality.
You should configure audio and video settings after connecting up the digital receiver.
09
Page 12

2.1.1 Connecting TV via HDMI cable
For the sake of the best picture quality, especially for digital TV, HDMI connection is recommended. Most HDTVs have HDMI
connectors to ensure the highest picture quality. In the rear panel of XP1000 one HDMI connector is available for this purpose.
Connect your TV to XP1000 using an HDMI cable as follows.
HDMI Cable
HDMI
2.1.2 Connecting TV via SCART Cable
In case your TV is analogue TV, SCART cable is the most common method. Connect your TV to XP1000 using SCART cable as follows.
SCART Cable
SCART
2.2 Connecting Power
A power adaptor is provided as one of the basic accessories of XP1000.
1 Connect the power adaptor to the connector at the rear panel of XP1000.
2 Connect the power adaptor to a power outlet.
3 Turn on the power switch at the rear panel.
NOTE: AC input condition
• Nominal Voltage Range: 100 - 240 VAC
• Maximum Voltage Range: 90 - 264 VAC
NOTE: means Remote control operation order.
• Nominal Frequency: 50 / 60 Hz
• Maximum Frequency Range: 47 - 63 Hz
10
Page 13

2.3 Power On/Off
[ : Press Power key / Press MENU > Select Standby/Reset]
There are several ways to turn your XP1000 ON or OFF.
* Complete Power Shutdown
There is a Power Switch in the rear panel and once it is ON, you do not need to turn it on or off each time. It takes a longer time to
boot the system if you turned it off by this switch.
* Standby Mode
POWER key is normally used to turn the power of XP1000 on or off. If you press POWER, it instantly switches your XP1000 off or on.
In this mode, the system is not completely shut down and thus it takes a shorter time to turn it on and off.
* Deep Standby Mode [ : Menu > Standby/Restart > Deep Standby]
Deep Standby is used to reduce the standby power consumption. XP1000 is designed to be energy efficient and to guarantee the
power consumption to be under 1W in the deep standby mode.
3. FIRST TIME INSTALLATION (USING WIZARD)
When you turn on XP1000 for the first time after purchase, an installation wizard will begin step by step.
NOTE: OK key is used for confirmation and turns to the next step. Press EXIT key to return to the previous page.
3.1 Video Input Selection
3.3 Language Selection
3.2 Video Mode (Resolution)
Selection
XP1000 provide s va rious languag es and here you can
choose the main language for your XP1000 . Use UP/DOWN
key to scroll up and down to find the language you want.
11
Page 14

4. BASIC OPERATIONS
4.1 Switching Channels
[ : Press
the next channels]
XP1000 offers various channel zapping methods. You can switch the
current channel by pressing
• UP/DOWN key
If you press UP or DOWN key, Channel Selection menu appears.
You can move up and down to select the channel that you want to
tune into
• LEFT/RIGHT key
If you press LEFT or RIGHT key, the previous or subsequent channel
of the current channel is tuned in.
NOTE:
If channel change is not done, it is probably because
the selected channel is encrypted and you do not
have a proper smartcard.
In order for you to add certain channels to this Favourites list,
1 Call up the Channel Selection list by Pressing UP or DOWN key.
2 Go to the list of All channels by pressing RED.
3 Select the channel that you want to add to the Favourites list.
4 Press MENU key on the selected channel and channel list menu appears.
5 Choose “add service to bouquet” and press OK.
6 Select “Favourites” and press OK.
7 Go to the “Favourites” list by pressing BLUE to confirm that the selected channel is correctly included in the list.
• CHANNEL +/- key
If you press CHANNEL + or - key, this will call up the Channel
Selection menu.
• Channel Number
Enter a channel number, and it will instantly tune into the channel.
, CHANNEL +/- key / Press
▲/▼
◀/▶
4.2 Volume Control
to move to
[ : Press VOLUME +/- key]
You can adjust the audio volume by pressing VOLUME +/- key. You can also mute or unmute the audio temporarily by pressing
MUTE key ( ).
Mute icon is on when the audio is muted.
12
Page 15

4.3 Selecting Audio Track
4.4 Subtitle
[ : Press AUDIO key]
You can check what audi o tracks are available to choose by
pressing AUDIO key.
By using UP/DOWN key and Colour key, you can select a different
audio language or Stereo sound.
NOTE: Avai lab le opt ion s on th is me nu will di ffe r
depending on the service.
[ : Press SUBTITLE key]
You can view the subtitle of the current program if the program
provides the subtitle. Press SUBTITLE key, Subtitle selection menu
appears as below.
Available subtitles, if any, will display. By using UP/DOWN navigate
the list to select a subtitle that you want to play and press OK to
activate it.
4.5 Teletext
[ : Press TEXT key]
You can call up Teletext information by pressing TEXT key. It will
take some time to load all the information.
You can navigate through the Teletext page by using UP/DOWN
key to select a text page. Also, just simply enter the page number
that you want to read.
• MUTE key
Once you activated Teletext, you can toggle between the live mode and the Teletext page by pressing MUTE ( ) key instantly.
In this case, loading of the Teletext page takes place instantly.
• VOLUME +
If you want to enlarge the page, press VOLUME + key.
• VOLUME If you want to reduce the page size, press VOLUME - key.
13
Page 16

4.6 Program Information
[ : Press INFO key]
Whenever you change the channel, infobar is always displayed
for 5 seconds (default setting). Infobar is designed to provide you
comprehensive information of the channel that you are currently
watching.
4.7 Info Bar
• Press OK to call up infobar.
4.8 Electronic Program Guide (Event View)
[ : Press EPG key]
Electronic Program Guide (EPG) displays the program information
of each channel, if provided, in time and date order.
Detailed information of the current channel will be displayed on
EPG. There are four options in the EPG display.
NOTE: Press and hold EPG key for Multi-EPG.
• GREEN (Add Timer)
If you press GREEN key, Timer entry menu appears as shown left. This option is used to set up a new timer for recording or zapping.
14
Page 17

- Name
Displays the name of the selected program.
- Description
Displays a short description of the selected program.
- Timer Type
• Select Zap for channel tuning reservation.
• Select Record for recording reservation.
- Repeat Type
• Select Once for one time of zapping or recording reservation.
• Select Repeated for repeated zapping or recording reservation.
• Repeats - This option is given only when you selected “Repeated” in the Repeat Type. You can reserve zapping or recording
per Daily / Weekly / Mon-Fri / User-defined.
- Date
Displays the current date. This entry is on when you selected “Repeat Type” as “once“.
- Start Time
You can set the time to begin recording or zapping.
- End Time
You can set the time to stop recording or zapping.
- Channel
This entry allows you to change the channel. Press LEFT/RIGHT key to call up Channel Selection menu. You can select a different
channel from this list using this option. To return to Timer entry menu, press EXIT.
• Multi EPG
- You can move the previous or next program within the same channel by using YELLOW (Previous)/BLUE (Next).
- You can switch to another channel by using UP/DOWN key.
- RED key is used to instantly tune into the selected channel.
- GREEN key is used to reserve recording or zapping of the selected program.
NOTE: Not all channels provide EPG information and thus in case of no EPG data, nothing will be displayed except for
the channel name.
15
Page 18
4.9 Time Shift
[ : Press key]
For your information, Timeshift is an instant recording of the current program that you are watching. Press , it will instantly
pause the audio and video of the program, and a small window displaying elapsing time information will appear on the left upper
side of the screen as below.
In this state, Timeshifted recording is running until you press either PLAY or PAUSE again. You can restart viewing of the program.
If you want to stop Timeshifted recording and to return to the live mode, press key.
You will be asked of Yes or No to stop Timeshift.
NOTE:
What is different from normal recording is that Timeshifted recording is not meant to be stored on HDD.
If you stop Timeshift, you cannot replay the Timeshifted recording.
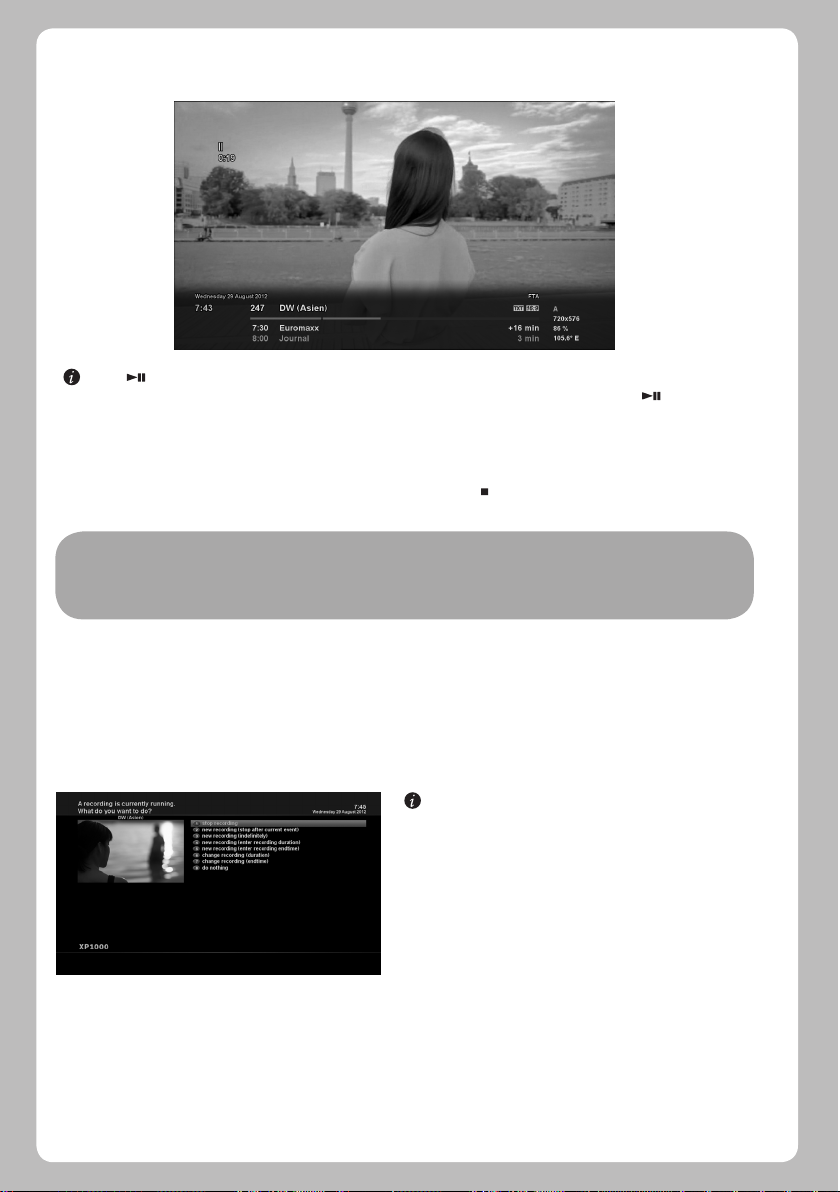
4.10 Recording
XP1000 is a Personal Video Recorder with an integrated DVB-S2 tuner. There are two ways to operate and manage recording.
1 Instant Recording
[ : Press REC key]
Press REC key to start the recording of the current program.
Five recording options are given.
- Add recording (stop after current event)
This option is used when you want to end recording when the
current program ends.
- Add recording (indefinitely)
This option is used when you want to keep recording running
without a specific end time. Recording will continue unless you
stop it.
- Add recording (enter recording duration)
This option is used when you want to manually set the length of recording by entering a certain number as below:
- Add recording (enter recording end time)
This option is used when you want to define a certain date and time when the recording is to stop.
- Exit
This option is used to exit from this menu without recording.
16
Page 19

2 Recording by Timer
You can manage recording process using Timer List menu. Press
MENU and select Timer on the menu.
In this menu, color keys are assigned for each different function.
- RED (Delete)
This option is used to delete a timer.
- GREEN (Add)
This option is used to add a timer.
- YELLOW (Disable)
This option is used to disable the timer and X mark will appear.
[ : Press MENU key > Select Timer]
- BLUE (Cleanup)
This option is used to remove those finished timers from the Timer List.
NOTE: Make sure that the HDD on your XP1000 has enough free space available for recording. If the free space on the
HDD is not sufficient, recording might stop before the defined end time.
3 Stop Recording
NOTE: if you want to enable the disabled timer,
press YELLOW again.
[ : Press REC key > Select “Stop Recording”]
4.11 Recording Play
[ : Press FILE LIST key]
You can view recorded files on the Recorded files menu. Press FILE
LIST to activate this menu.
Select the file that you want to play. It will instantly replay the file
and display the recording infobar.
This infobar gives you the following information of the recording.
1 Title of the recording
2 Remaining time
3 Progressive bar
4 Elapsed time
17
Page 20

4.12 Managing Recording Files
4.13 Media Player
[ : Press FILE LIST key > Press MENU key]
If yo u want to delete a recording file, press MENU key wh il e
Recorded file menu is on.
Select “Delete” and confirm OK to delete.
[ : MENU > Plugins > Media Player]
XP1000 is a multimedia receiver capable of playing media contents.
Using Media Player, you can enjoy Music, Photo and Video contents
stored on the external HDD and/or a USB memory stick plugged
into XP1000.
If you play Media Player, the following player will appear.
1. Go into any directory of the HDD or plugged USB.
2. Select a file to play and press OK
* Supported formats are mainly JPG, MP3, AVI, etc.
3. In the same way, you can play the recording files stored on the
HDD.
4.14 Plug-ins
[ : MENU > Plugins]
XP1000 is integrated with standard 10/100Mbps Ethernet with RJ
45 connector. You are recommended to use this network capability
of XP1000 to fully enjoy the system. If your XP1000’s network
connection is established, you can directly download plug-ins from
a designated website of XP1000 .
1 Press MENU and select Plugins menu to active Plugin browser.
2 Press GREEN key to download a list of plug-ins available.
3 Once the download is done, a list of plug-ins will be displayed.
4 Select a plug-in to download.
5 You can check if the download is done properly on the Plugin
browser.
From this site, you can check available plug-ins to download.
18
Page 21

4.15 Sleep Timer
[ : MENU > Power Management > Sleep Timer]
You can set a specific time when your XP1000 goes into Standby
mode or Deep Standby mode, using this menu. Three colour keys
are used to set up this sleep timer.
1 RED
This option is used to enable or disable Sleep Timer.
2 GREEN
This option is used to choose between Standby mode and Deep
Standby mode.
3 YELLOW
This option is used to choose whether to be asked of confirmation
before system shutdown.
3 BLUE
This option is used to use time of currently running service.
5. MENU
5.1 TOP Main
XP1000 is a very sophisticated device designed to allow users a variety of System Settings options as detailed as possible. You can
fine-tune your XP1000 to be your OWN system to fit your taste. This chapter will guide you through the entire menu of system
configuration.
[ : Press MENU]
The main menu of XP1000 consists of the following sub menus.
- Timer
Enables you to reserve program watching and recording.
- VCR scart
Switches to VCR scart connection.
NOTE: If your XP1000 is not connected to VCR scart, the
screen will go black. In this state, just press EXIT to
return to the previous state.
- Information
Has two sub menus for Service / About. Service menu provides the detailed information of the current channel. About menu
provides the detailed information of the H/W and S/W system of your XP1000. For more information, please refer to the Information
section.
- Plugins
Activates Plugin browser of XP1000. Using this browser, you can log onto the designated website and you can download a variety
of new plug-ins.
- Setup
Provides all of the System Settings. For more information, please refer to the next section.
- Power Management
Provides options for power on/off and sleep timer. For more information, please refer to the Power On/Off section.
19
Page 22

5.2 Setup
Setup menu consists of the following sub-menus.
1 System Settings
2 Service Searching
3 Common Interface
4 Parental Control
5 Factory Reset
6 Software Update
5.2.1 System Settings
5.2.1.1 Audio/Video
[ : MENU > Setup > System Settings > Audio/Video]
Here you will find options necessary to set up the audio and
video configuration of your XP1000.
NOTE: RED is for cancel and GREEN is for OK. OK key of
RCU is not working in this mode.
Amongst the parameters given in this menu, the following ones are generally what you need to decide for the audio and video.
1 Video output
Here you need to decide which video output you want to use between your TV and XP1000 . The available options are as below.
• HDMI
• SCART
2 Resolution
You need to decide which resolution to use.
3 Downmix
YES is used when you want to set the audio output to be down-mixed to Stereo. NO is used when you do not want to set the audio
output to be down-mixed to Stereo. This option is recommended when you are using S/PDIF connection.
5.2.1.2 Other settings
[ : MENU > Setup > System Settings > Other Settings]
In this menu you will find various customization options and
this menu can be displayed in three different
formats: Simple, Intermediate, and Expert.
NOTE: RED is for cancel and GREEN is for OK. OK key of
RCU is not working in this mode.
Amongst the options given in this menu, the following ones
are generally what you may need to know.
20
Page 23

5.2.1.3 Network Setup
[ : MENU > Setup > System Settings > Network Setup]
XP1000 is integrated with standard 10/100Mbps Ethernet
with RJ 45 connector standard. You are recommended to use
this network capability of XP1000 to fully enjoy the system.
You can set up the network settings through this Network
Configuration menu.
In the Netwo rk Configuration menu, you will see five sub
menus as follows:
1 Adapter settings
Use Interface
YES is used to activate the Ethernet. If you set this option at NO,
the Ethernet will not work.
Use DHCP
YE S is us ed to use DH CP (D yna mic H ost Conf igu rat ion
Protocol). If you set this option at YES, it will automatically
detect the correct IP address. NO is used when you want to use
a certain fixed IP address. In this case, you need to enter correct
addresses in each field.
2 Nameserver settings
This option is required if you selected not to use DHCP. You need to enter the address of the Nameserver.
3 Network test
When you are not sure whether the network configuration has been done correctly or not, you can run this test.
4 Restart Network
This option is used when you want to reboot the Ethernet of your XP1000 .
5.2.1.4 Language Selection 5.2.1.5 Time zone
[ : MENU > Setup > System Settings > Language]
A variety of languages are available for the OSD of XP1000.
[ : MENU > Setup > System Settings > Timezone]
You can set your time zone in this menu.
Using LEFT/RIGHT key, you can find a time zone that you
want to use for your XP1000. After selecting a time zone,
press GREEN to confirm and save the changed setting.
21
Page 24

5.2.1.6 Hard Disk Set Up
5.2.2 Service Searching
5.2.2.1 Tuner Configuration
[ : MENU > Setup > System Settings > Hard drive > Hard
drive Setup]
You can set the duration of time after which HDD is to be put
into standby mode.
Here, you can choose from No standby to various duration.
Once you set this option, press GREEN key to confirm the
change.
[ : MENU > Setup > Se rvice Searchi ng > Tun er
Configuration]
If you run the First Time Installation process, the Tuner A is
already configured.
5.2.2.2 Automatic Scan
[ : MENU > Setup > Service Searching > Automatic Scan]
The easiest way to scan services is to use Automatic Scan. In
the Automatic Scan menu, there are two options to choose
from as below.
• Clear Before Scan
YES is used when you want to delete the existing channel list
before you start the automatic scan. If you want to keep the
existing list, select NO.
• Scan Tuner A (DVB-S2)
Press OK to activate the automatic scan. This will take some
minutes. As the scan proceeds, you will see the progressive
bar and the newly found services underneath.
22
Page 25

5.2.2.3 Manual Scan
[ : MENU > Setup > Service Searching > Manual Scan]
If you know well enough to configure each exac t s et ting
required for manual search of services, you can do manual
scan as well. There are many parameter values that you need to
decide as below.
Amongst other things, the below parameters are what you
need to decide prior to performing manual scan.
1 Tuner
You need to decide which tuner you want to use for manual
scan.
2 System Settings
Here you have two options between DVB-S (SD) and DVB-S2 (HD).
3 Frequency
You need to enter the exact frequency of the transponder that you want to scan.
4 Symbol Rate
You need to enter the exact symbol rate of the transponder that you want to scan.
5 Polarization
Here, you have options for Horizontal, Vertical, Circular Left and Circular Right. You need to know the polarity of the transponder
that you want to scan.
6 FEC (Forward Error Correction)
You need to enter the exact FEC value of the transponder that you want to scan.
7 Network Scan
Here you have two options for YES and NO. NO is used to scan the transponder (TP) based on the data that your XP1000 currently
has. YES is used to scan the TP not just based on the existing TP data but also using new TP data, if there is TP data newly
transported from the TP. Naturally, YES option takes longer while it may results in a better scan result.
8 Clear Before Scan
YES is used when you want to delete the existing channel list before you start the automatic scan. If you want to keep the existing
list, select NO.
9 Only Free Scan
Here you have two options for NO and YES. If you want to scan only Free to Air channels without any encryption, select YES.
Otherwise, select NO to scan all FTA and CAS channels.
Press OK to activate the manual scan. This will take some minutes. As the scan proceeds, you will see the progressive bar and the
newly found services underneath.
5.2.2.4 Fast Scan
[ : MENU > Setup > Service Searching > Fast Scan]
In case there are service lists available for certain satellites,
for example, Astra or Hotbird, you can install the lists in the
channel list of your XP1000.
If defa ult serv ice lists are not available, you can run the
service scan automatically or manually to add TV and radio
channels to the channel list of your XP1000.
23
Page 26

5.2.3 Checking CAM
[ : MENU > Setup > CI > Common Interface]
To be able to watch CAS channels, you need to have a proper
CAM and a Smartcard. XP1000 is integrated with a Common
Interface slot and two Smartcard slots.
If you have inserted CAM, you can check the information of
the inserted CAM, through this menu as below:
5.2.4 Parental Control
[ : MENU > Setup > Parental Control]
If you want to prevent certain channels from being accessed
by others, you can do so using this menu.
1 Go to Parental Control menu by pressing MENU > Setup >
Parental Control.
2 Set the parental control option at YES using LEFT/RIGHT
key. The menu will change as below.
Protect setup
If you set this option at YES, you will be asked to enter PIN code when you enter this Parental
setup menu.
Change setup pin
If you want to change the existing PIN code for Parental setup, you can do so using this menu.
You need to enter a new PIN code twice.
Protect services
You need to set this option at YES, if you want to lock certain channels with PIN code.
Parental control setup
This option will be activated only if you set Protect services at YES.
Here there are two options:
- White list: This option is used to block all channels except those
channels in the parental control list.
- Black list: This option is used to block only those channels
included in the parental control list.
24
Page 27

Change service pin
5.2.5 Factory Reset
Here you can define a PIN code required to change services to
be included in the parental control list.
NOTE: PIN code here is used for Change service and thus you
are recommended to use a PIN code different from
that used for Protect services.
[ : MENU > Setup > Factory Reset]
If you want to erase all installed service list as well as all
configurations, run the Factory Reset process. Select YES in
the below menu to run the factory reset.
Upon the completion of factory reset process, your XP1000
will reboot automatically and start the First Time Installation
process.
NOTE:
If you do this factory reset, all of your configuration data
including bouquets, service lists, satellite parameters, and so
on will be erased.
5.2.6 Software Update
XP1000 can be updated in two ways. Firstly, you can update
XP1000 software by going into Menu > Setup > Software Update.
You can also try USB update as in the following step.
Step1: Download new software image from www.xp-support.tv.
Step2: Extract new software image using winrar, winzip or other
extracting tool and copy on an USB stick. All files shall be under
/XP1000 directory.
/xp1000/kernel.bin
/xp1000/rootfs.bin
/xp1000/imageversion
Step3: Power down the XP1000 by the power switch.
Step4: Place USB stick in the USB slot at the rear side of the XP1000.
Step5: Power up the XP1000 by the power switch. Then, the record LED and standby LED will become red.
Step6: After about 3 seconds, open the front panel cover and press CH+ button.
Step7: The standby LED will become light red and record LED is still on.
Step8: Wait couple of minutes till the standby LED will become blue.
Your box is now updated with a “clean” factory default image.
Note: If the box boots in a normal way in step6, press CH+ button earlier.
/xp1000/noforce
25
Page 28

5.3 Information
5.3.1 Service Information
[ : MENU > Information > Service]
In this menu, you can see the service information of the
current channel such as service name, service provider and
video format & size.
5.3.2 Checking H/W & S/W Information
[ : MENU > Information > About]
This menu is for you to check the current system of your
XP1000. You can see the following information:
1 S/W version
2 Detected NIMs for Tuner A
3 Detected HDD
6. REMOTE CONTROL UNIT (RCU) SETUP
In order to use the universal remote control feature, you must correctly setup for TV control. This section explains how to setup the
universal remote control. For the setting up, we have presented the list of supported TV codes.
6.1 Setting up as a TV Remote Control
When you press TV button, supplied remote control unit is working as TV remote controller. To do this, you have to setup with
corresponding TV codes. Valid buttons at TV mode are Power, Volume +/-, Mute, TV (for switching sources), Menu, numeric keys (0~9),
directional buttons (up/down/left/right) and colour buttons (Red/Green/Yellow/Blue).
6.1.1 4-digit Setting Method
1. Power on TV using TV power button or TV remote control.
From this step all further remote controls should be done using the universal remote control and the remote control should be
directed towards the TV.
2. Press and hold the TV button more than 3 seconds. Then, two LED lamps from TV and STB buttons are flickering. Release the TV
button. Then, LED lamp from the TV button is flickering.
3. Enter 4 digits with reference to the “TV Brand List” section. If 4-digit code is in the list, LED lamp from the TV button will flicker 3
times and corresponding 4-digit code is stored. Otherwise, TV LED lamp will turn off and 4-digit code is not stored.
NOTE: In case that the POWER ( ) button for TV is working but other important keys are not working, then repeat the
above procedure or follow “Smart Scan Method”.
26
Page 29

6.1.2 Smart Scan Method
1. Power on TV using TV power button or TV remote control.
From this step all further remote controls should be done using the universal remote control and the remote control should be
directed towards the TV.
2. Press and hold the TV button more than 3 seconds. Then, two LED lamps from TV and STB buttons are flickering. Release the TV
button. Then, LED lamp from the TV button is flickering.
3. Press
(up) or
▲
4. Once TV turns off, press OK button to store current setting. Then TV LED lamp will flicker 3 times and corresponding 4-digit code is
stored.
In case that the POWER ( ) button for TV is working but other important keys are not working, then follow the above
procedure again to set different code.
(down) button until TV turns off.
▼
6.1.3 Changing Factory Default Status
By default, remote control unit is supplied with volume-unlocked, channel-locked and master power reset status. However, you can
change lock status or set/reset status by following procedures.
6.1.3.1 Volume Key
Volume-unlocked status:
- In TV mode, volume related buttons (Volume +/-, Mute) are only working for TV.
- In STB mode, they are only working for STB.
Volume-locked status:
- Regardless of modes (TV or STB mode), volume related buttons (Volume +/-, Mute) are only working for TV.
How to set Volume-Locked status:
1. Press and hold the STB button more than 3 seconds.
2. If Vol+ button is pressed and then released, STB LED will be turned off and on.
3. Then, press Vol- button and release.
4. Press and release TV button to change the status. Then STB LED lamp will flicker 3 times.
How to set Volume-Unlocked status:
1. Press and hold the STB button more than 3 seconds to enter STB setting mode.
2. If Vol+ button is pressed and then released, STB LED will be turned off and on.
3. Then, press Vol- button and release.
4. Press and release STB button to change the status. Then STB LED lamp will flicker 3 times.
6.1.3.2 Channel Key
Channel-unlocked status:
- In TV mode, channel related buttons (CH+/-) are only working for TV.
- In STB mode, they are only working for STB.
Channel-locked status:
- Regardless of modes (TV or STB mode), channel related buttons (CH+/-) are only working for STB.
How to set Channel-Locked/Unlocked status (Locked/Unlocked status is toggled each other):
1. Press and hold the STB button more than 3 seconds to enter STB setting mode.
2. If CH+ button is pressed and then released, STB LED will be turned off and on.
3. Then, press CH- button and release.
4. Press and release OK button to change the status. Then STB LED lamp will flicker 3 times.
27
Page 30

6.1.3.3 Master Power
Master Power Reset:
- In TV mode, power button is only working for TV power.
- In STB mode, they are only working for STB power.
Master Power Set:
- Power button is working both for TV and STB power.
How to reset Master Power
1. Press and hold the STB button more than 3 seconds to enter STB setting mode.
2. Press and release POWER ( ) button. STB LED lamp will be turned off.
3. Press and release STB button.
4. Press and release POWER ( ) button. Then STB LED lamp will flicker 3 times.
How to set Master Power
1. Press and hold the STB button more than 3 seconds to enter STB setting mode.
2. Press and release POWER ( ) button. STB LED lamp will be turned off.
3. Press and release STB button.
4. Press and release TV button.
5. Press and release POWER ( ) button. Then STB LED lamp will flicker 3 times.
6.2 Supported TV Brand List
Please refer to the appendix.
7. COPYRIGHT – GNU GPL
GNU GENERAL PUBLIC LICENSE
Version 2, June 1991
Copyright (C) 1989, 1991 Free Software Foundation, Inc.
51 Franklin Street, Fifth Floor, Boston, MA 02110-1301, USA
Everyone is permitted to copy and distribute verbatim copies of this license document, but changing it is not allowed.
Preamble
The licenses for most software are designed to take away your freedom to share and change it. By contrast, the GNU General Public
License is intended to guarantee your freedom to share and change free software-to make sure the software is free for all its users.
This General Public License applies to most of the Free Software Foundation’s software and to any other program whose authors
commit to using it. (Some other Free Software Foundation software is covered by the GNU Lesser General Public License instead.)
You can apply it to your programs, too.
When we speak of free software, we are referring to freedom, not price. Our General Public Licenses are designed to make sure that
you have the freedom to distribute copies of free software (and charge for this service if you wish), that you receive source code or
can get it if you want it, that you can change the software or use pieces of it in new free programs; and that you know you can do
these things.
To protect your rights, we need to make restrictions that forbid anyone to deny you these rights or to ask you to surrender the rights.
These restrictions translate to certain responsibilities for you if you distribute copies of the software, or if you modify it.
For example, if you distribute copies of such a program, whether gratis or for a fee, you must give the recipients all the rights that
you have. You must make sure that they, too, receive or can get the source code. And you must show them these terms so they know
their rights.
We protect your rights with two steps: (1) copyright the software, and (2) offer you this license which gives you legal permission to
copy, distribute and/or modify the software.
28
Page 31

Also, for each author’s protection and ours, we want to make certain that everyone understands that there is no warranty for this
free software. If the software is modified by someone else and passed on, we want its recipients to know that what they have is not
the original, so that any problems introduced by others will not reflect on the original authors’ reputations.
Finally, any free program is threatened constantly by software patents. We wish to avoid the danger that redistributors of a free
program will individually obtain patent licenses, in effect making the program proprietary. To prevent this, we have made it clear
that any patent must be licensed for everyone’s free use or not licensed at all.
The precise terms and conditions for copying, distribution and modification follow.
TERMS AND CONDITIONS FOR COPYING, DISTRIBUTION AND MODIFICATION
0. This License applies to any program or other work which contains a notice placed by the copyright holder saying it may be
distributed under the terms of this General Public License. The “Program”, below, refers to any such program or work, and a “work
based on the Program” means either the Program or any derivative work under copyright law: that is to say, a work containing the
Program or a portion of it, either verbatim or with modifications and/or translated into another language. (Hereinafter, translation is
included without limitation in the term “modification”.) Each licensee is addressed as “you”.
Activities other than copying, distribution and modification are not covered by this License; they are outside its scope. The act of
running the Program is not restricted, and the output from the Program is covered only if its contents constitute a work based on
the Program (independent of having been made by running the Program). Whether that is true depends on what the Program does.
1. You may copy and distribute verbatim copies of the Program’s source code as you receive it, in any medium, provided that you
conspicuously and appropriately publish on each copy an appropriate copyright notice and disclaimer of warranty; keep intact all
the notices that refer to this License and to the absence of any warranty; and give any other recipients of the Program a copy of this
License along with the Program.
You may charge a fee for the physical act of transferring a copy, and you may at your option offer warranty protection in exchange
for a fee.
2. You may modify your copy or copies of the Program or any portion of it, thus forming a work based on the Program, and copy and
distribute such modifications or work under the terms of Section 1 above, provided that you also meet all of these conditions:
a) You must cause the modified files to carry prominent notices stating that you changed the files and the date of any change.
b) You must cause any work that you distribute or publish, that in whole or in part contains or is derived from the Program or any
part thereof, to be licensed as a whole at no charge to all third parties under the terms of this License.
c) If the modified program normally reads commands interactively when run, you must cause it, when started running for such
interactive use in the most ordinary way, to print or display an announcement including an appropriate copyright notice and
a notice that there is no warranty (or else, saying that you provide a warranty) and that users may redistribute the program under
these conditions, and telling the user how to view a copy of this License. (Exception: if the Program itself is interactive but does
not normally print such an announcement, your work based on the Program is not required to print an announcement.)
These requirements apply to the modified work as a whole. If identifiable sections of that work are not derived from the Program,
and can be reasonably considered independent and separate works in themselves, then this License, and its terms, do not apply to
those sections when you distribute them as separate works. But when you distribute the same sections as part of a whole which
is a work based on the Program, the distribution of the whole must be on the terms of this License, whose permissions for other
licensees extend to the entire whole, and thus to each and every part regardless of who wrote it. Thus, it is not the intent of this
section to claim rights or contest your rights to work written entirely by you; rather, the intent is to exercise the right to control the
distribution of derivative or collective works based on the Program. In addition, mere aggregation of another work not based on the
Program with the Program (or with a work based on the Program) on a volume of a storage or distribution medium does not bring
the other work under the scope of this License.
3. You may copy and distribute the Program (or a work based on it, under Section 2) in object code or executable form under the
terms of Sections 1 and 2 above provided that you also do one of the following:
a) Accompany it with the complete corresponding machine-readable source code, which must be distributed
under the terms of Sections 1 and 2 above on a medium customarily used for software interchange; or,
b) Accompany it with a written offer, valid for at least three years, to give any third party, for a charge no
more than your cost of physically performing source distribution, a complete machine-readable copy of
the corresponding source code, to be distributed under the terms of Sections 1 and 2 above on a medium customarily used for
software interchange; or,
29
Page 32

c) Accompany it with the information you received as to the offer to distribute corresponding source code. (This alternative is
allowed only for noncommercial distribution and only if you received the program in object code or executable form with such
an offer, in accord with Subsection b above.)
The source code for a work means the preferred form of the work for making modifications to it. For an executable work, complete
source code means all the source code for all modules it contains, plus any associated interface definition files, plus the scripts used
to control compilation and installation of the executable. However, as a special exception, the source code distributed need not
include anything that is normally distributed (in either source or binary form) with the major components (compiler, kernel, and so
on) of the operating system on which the executable runs, unless that component itself accompanies the executable.
If distribution of executable or object code is made by offering access to copy from a designated place, then offering equivalent
access to copy the source code from the same place counts as distribution of the source code, even though third parties are not
compelled to copy the source along with the object code.
4. You may not copy, modify, sublicense, or distribute the Program except as expressly provided under this License. Any attempt
otherwise to copy, modify, sublicense or distribute the Program is void, and will automatically terminate your rights under this
License. However, parties who have received copies, or rights, from you under this License will not have their licenses terminated so
long as such parties remain in full
compliance.
5. You are not required to accept this License, since you have not signed it. However, nothing else grants you permission to modify
or distribute the Program or its derivative works. These actions are prohibited by law if you do not accept this License. Therefore, by
modifying or distributing the Program (or any work based on the Program), you indicate your acceptance of this License to do so,
and all its terms and conditions for copying, distributing or modifying the Program or works based on it.
6. Each time you redistribute the Program (or any work based on the Program), the recipient automatically receives a license from
the original licensor to copy, distribute or modify the Program subject to these terms and conditions. You may not impose any
further restrictions on the recipients’ exercise of the rights granted herein. You are not responsible for enforcing compliance by third
parties to this License.
7. If, as a consequence of a court judgment or allegation of patent infringement or for any other reason (not limited to patent issues),
conditions are imposed on you (whether by court order, agreement or otherwise) that contradict the conditions of this License, they
do not excuse you from the conditions of this License. If you cannot distribute so as to satisfy simultaneously your obligations under
this License and any other pertinent obligations, then as a consequence you may not distribute the Program at all. For example, if
a patent license would not permit royalty-free redistribution of the Program by all those who receive copies directly or indirectly
through you, then the only way you could satisfy both it and this License would be to refrain entirely from distribution of the
Program.
If any portion of this section is held invalid or unenforceable under any particular circumstance, the balance of the section is
intended to apply and the section as a whole is intended to apply in other circumstances. It is not the purpose of this section to
induce you to infringe any patents or other property right claims or to contest validity of any such claims; this section has the sole
purpose of protecting the integrity of the free software distribution system, which is implemented by public license practices. Many
people have made generous contributions to the wide range of software distributed through that system in reliance on consistent
application of that system; it is up to the author/donor to decide if he or she is willing to distribute software through any other
system and a licensee cannot impose that choice.
This section is intended to make thoroughly clear what is believed to be a consequence of the rest of this License.
8. If the distribution and/or use of the Program is restricted in certain countries either by patents or by copyrighted interfaces,
the original copyright holder who places the Program under this License may add an explicit geographical distribution limitation
excluding those countries, so that distribution is permitted only in or among countries not thus excluded. In such case, this License
incorporates the limitation as if written in the body of this License.
9. The Free Software Foundation may publish revised and/or new versions of the General Public License from time to time. Such new
versions will be similar in spirit to the present version, but may differ in detail to address new problems or concerns.
Each version is given a distinguishing version number. If the Program specifies a version number of this License which applies to
it and “any later version”, you have the option of following the terms and conditions either of that version or of any later version
published by the Free Software Foundation. If the Program does not specify a version number of this License, you may choose any
version ever published by the Free Software Foundation.
30
Page 33

10. If you wish to incorporate parts of the Program into other free programs whose distribution conditions are different, write to
the author to ask for permission. For software which is copyrighted by the Free Software Foundation, write to the Free Software
Foundation; we sometimes make exceptions for this. Our decision will be guided by the two goals of preserving the free status of all
derivatives of our free software and of promoting the sharing and reuse of software generally.
NO WARRANTY
11. BECAUSE THE PROGRAM IS LICENSED FREE OF CHARGE, THERE IS NO WARRANTY FOR THE PROGRAM, TO THE EXTENT PERMITTED
BY APPLICABLE LAW. EXCEPT WHEN OTHERWISE STATED IN WRITING THE COPYRIGHT HOLDERS AND/OR OTHER PARTIES PROVIDE
THE PROGRAM “AS IS” WITHOUT WARRANTY OF ANY KIND, EITHER EXPRESSED OR IMPLIED, INCLUDING, BUT NOT LIMITED
TO, THE IMPLIED WARRANTIES OF MERCHANTABILIT Y AND FITNESS FOR A PARTICULAR PURPOSE. THE ENTIRE RISK AS TO THE
QUALITY AND PERFORMANCE OF THE PROGRAM IS WITH YOU. SHOULD THE PROGRAM PROVE DEFECTIVE, YOU ASSUME THE COST
OF ALL NECESSARY SERVICING, REPAIR OR CORRECTION.
12. IN NO EVENT UNLESS REQUIRED BY APPLICABLE LAW OR AGREED TO IN WRITING WILL ANY COPYRIGHT HOLDER, OR ANY
OTHER PARTY WHO MAY MODIFY AND/OR REDISTRIBUTE THE PROGRAM AS PERMITTED ABOVE, BE LIABLE TO YOU FOR DAMAGES,
INCLUDING ANY GENERAL, SPECIAL, INCIDENTAL OR CONSEQUENTIAL DAMAGES ARISING OUT OF THE USE OR INABILITY TO USE
THE PROGRAM (INCLUDING BUT NOT LIMITED TO LOSS OF DATA OR DATA BEING RENDERED INACCURATE OR LOSSES SUSTAINED
BY YOU OR THIRD PARTIES OR A FAILURE OF THE PROGRAM TO OPERATE WITH ANY OTHER PROGRAMS), EVEN IF SUCH HOLDER OR
OTHER PARTY HAS BEEN ADVISED OF THE POSSIBILITY OF SUCH DAMAGES. END OF TERMS AND CONDITIONS
8. TROUBLESHOOTING
Before you contact your local service centre, please read the following tips carefully.
NOTE: if the antenna is covered with snow or the RF signal is weakened by heavy rain, the quality of audio and video may become
temporarily poor. If you experience poor audio and video quality due to bad weather conditions, please check if your satellite
antenna is oriented in the original direction. And see if it is covered by snow. Also, check if your LNB is not damaged.
1. No video on TV
• Check first if the product is powered on and in operation mode.
• Check if the video cable is properly connected between TV and XP1000.
• Check if the satellite cable is properly connected to XP1000.
• Check if the selected channel is currently on air.
• Check if the selected channel is encrypted and if you have a corresponding access smartcard.
2. Problem with audio quality
• Check if your audio cable is connected correctly.
• Check the volume level of your TV and the product.
• Check if the product or TV is on mute.
• Check the audio option if it is correctly selected for the program that you are currently watching.
3. Remote control problem
• Check if the batteries are correctly mounted.
• If your remote control has been used for long, change the batteries.
• Point the remote control directly toward the product.
• Make sure that nothing blocks the front panel display.
4. Channel search problem
• Make sure if tuner configurations are all correctly made.
• Check if the antenna cable(s) are properly connected.
5. Encrypted channel viewing problem
• Check if you have the appropriate Smartcard and/or CAM.
• Take the Smartcard and CAM out and re-insert them to re-initialize.
• Check if your system correctly detects the smartcard and CAM.
6. Recording problem
• Check if the HDD has a sufficient space for recording.
• Check if there is a conflict between recording timers.
7. Noise
• XP1000 has an integrated FAN. This may create a noise but is inevitable to make sure the safety of the product.
• Also, when HDD is running, you may hear a noise.
31
Page 34

APPENDIX
Brand Codes
A.R. Systems
Accent
Acer
Action
Adcom
ADL
Admiral
Adventura
Adventuri
Adyson
AEA
AEG
Agashi
AGB
Aiko
Aim
Aiwa
Akai
Akashi
Akiba
Akira
Akito
Akura
Alaron
Alba
Alfa
Alkos
Allstar
All-Tel
American
High
Americana
Amplivision
Amstrad
Anam
Anam
National
Andersson
Anglo
Anitech
Ansonic
8644 7213 6896 5090 7014
7647 8644 6896 3637
3857
4523 5510 3637 4648
4884
7855
3193 2438 5553 5605 3488 3637 4648
5874
5874
4469 4523 4648
8644 6896
5952 6305 5319
4469 3488
8568
7647 8644 6896 4469 4530 6482 5739
3350 3518 3488 3637
8644 6764 6896 3036 7910 8435 8484
5448 7733 6736
3350 7910 4530 3011 8644 5739 6669
3518 6482 7647 3036 4016 2429 8060
5605 8568 6381 2810 6896 4783 8020
8394 4469 3488 5393 2796 6305 3840
7733 4659 3451 5905 4925 4523 3802
3637 5874 4648
7314 7647
4016 5896 7014 8644 6896
5553
8644 6896
8644 6896 5355 6764 7647 4016 5896
3488 8060 7066 3637 4648
4469
8644 3840 6896 8060 7647 5553 7287
4530 5355 7384 4016 4469 5531 5605
6230 6812 7733 5119 4925 3637 4648
4648
6482
8644 6896 4648
4677
5510
5510
7287
7647 8568 3488 4530 4016 8644 6896
5739 6764 8377 3840 3451 7066 3637
8644 6896 7647 4526
8644 6896 4526
5319 7660
7647 3488 3637
7647 3488 8644 6896 5896 4523 3637
4648
7287 8644 6896 7647 5355 5090 5605
2620 5531 4917 3637
AOC
Apollo
Arcam
Arc en Ciel
Ardem
Aristona
ART Tech
Arthur Martin
ASA
Asberg
Asora
Astra
Asuka
ATD
Atlantic
Atori
Atoro
Auchan
Audiosonic
Audioton
Audiovox
Audioworld
Autovox
AVP
AWA
Axxent
Axxon
B&D
Baird
Barco
Basic Line
Bauer
Baur
Beaumark
BEC
Becrese
Beko
Bell & Howell
Belson
BenchmarkBeaumark
Bennett
BenQ
Beon
Berthen
Best
Bestar
BestarDaewoo
4523 4648
4659
4469
7430
2590 8060 8644 5613 6896
6896 8644 4648
4648
5605
4819 6092 4265
8644 6896 4648
7647 3637
8644 6896 3637
4016 4469 3488 5896
2924
8644 6896 4469 4648
7647 3637
3637
5605
7647 8644 5090 8033 6896 7430 8060
6381 7287 3488 4016 2590 3637 4648
2590 7287 3488 3637
4648
2924
5531
7733
7507 6812 7647 5090 6764 8644 6896
4469 6305 5620 3488 4698 3637
7647
8060
7855
7430 6127 6982 5301 7910 3453
5605
3637 4648 5090 8644 5605 5355 6896
7647 4016 5896 7014 6559 3840
8484 7647
7647 6640 5265 3835 8644 6896 3518
3350 6736 3637 5874 4648
5393
4648
4523 3802 5874 4648
8060 6482 2590 7287 8644 5553 3840
6896 6305 6381 7361 4648
4648
4156 4706
4523 5510 3637 4648
6896 8644
8016
8644 6896 5553 4648
5355
7287
8644 6896 7287 5090 4648
5090
32
Page 35

Bigston
Black
Diamond
Black Star
Black Strip
Black Way
Blaupunkt
Blue Sky
Blue Star
Bondstec
Boots
Bosch
BPL
Brandt
Brandt
Electronique
Brend Star
Brinkmann
Brionvega
Briorryega
Britannia
Brockwood
Broksonic
Brother
Bruns
BSR
BTC
Bush
Cample
Candle
Canton
Capehart
Capsonic
Carad
Carena
Carrefour
Carver
Cascade
Casio
Cathay
CCE
Celestial
Centrex
Centrum
Centurion
Century
CGE
CGM
CIE
3637
5319 8033 3840 6896 7837 3036
5531
6482 3802 5510
5896 4016
3518 6640 5265 6538 7839 5186 7014
4849 6812
8644 8060 3840 6230 5355 6381 2499
6896 4016 5896 7014 7733 4156 7361
6685 4648
5896
5531
7647
7839
8644 6896 5896
4884 7430 4422 3270 6982 3847
4422 3270
3637
8644 6896 5355 7350 5553 2590
8644 6896 8377 4648
4648
4469
4523 3802 5874
4523 3802 5874
3488
2590
5605 3350
4016
5355 4016 5605 7647 6812 8644 4530
5896 7384 2438 5090 7350 3488 3350
3840 6230 7910 5952 5905 2924 6896
8060 5832 7733 5453 3802 4648
4523 3802 5874
4523
4016
4523 3802 4648
3488
2696 8644 6896 5355 3840
7014 8644 6896
6812 4265 8644 6896 4648
4849 4648
7647 8644 6896
8644 6896 5605 4648
8644 6896
8644 6896
6498 8033 7837
7046 5397
3840
8644 6896 4648
5531
4752 6634 5553 5531 7287 5605 3637
3637
3637
Cihan
Cimline
Cinex
Circuit City
Citizen
City
Clarivox
Clatronic
Clayton
CMS
Cobolt
Colortyme
Combitech
Computron
Concorde
Condor
Conia
Conic
Conrac
Conrad
Contec
Continental
Edison
Coronado
Cosmel
Craig
Crosley
Crown
Crystal
CS
Electronics
CTC
CTX
Curtis Mathes
Cybertron
Cytronix
Daewoo
Daichi
Dainichi
Daitsu
Dansai
Dansette
Dantax
Datsura
Dawa
4648
7647 4016 3637
3451 5952
4523 3802 5874
4523 5510 4648
7647 3637
5553 8644 6896 4265
8644 7287 4530 8060 4016 3488 6896
5531 7647 3451 6305 5319 3637
3840
4469
5397
5510 4648
7733
3637
7647 3637
8644 6896 7287 4469 7647 5896 5531
5553 2620 5605 3488 3637 4648
3491 7837 4706 8033
4523 3802 4648
7361
8644 6896
4469 7647 7507 6812 3488 8644 6896
3802 3637
7430 4422 6230
4523
7647 8644 6896 3637
4648
5531 4752 6634 5605 3802 5874 4648
7647 5716 7287 2590 8644 6896 6230
8060 6305 6381 5553 7910 4638 6559
3840 4523 3637 4648
4648
4469 4016 5531
5531
8016
4523 3802 5510 4648 3193
4016 3802
3191
5295 5090 2499 4874 3876 8644 6896
7647 4469 4016 6286 7733 3118 2016
3620 4677 4523 3637 4648
3637
4016 4469
4201
8644 6896 3488 6482 4469 7647 6812
7910 4523
6764
7287 2590 8060 6305 6381 7733
7910
7647 8644 6896 4648
33
Page 36

Daytek
Dayton
Daytron
DEC
Decca
de Graaf
Deitron
Denko
Denver
DER
Desmet
Diamant
Diamond
Digatron
Digihome
Digiline
DigiLogic
Digitek
Digitor
Digivision
DigiX
DiK
Dixi
DL
Domeos
Domland
Dream Vision
DSE
DTS
Dual
Dumont
Dunai
Durabrand
Dux
D-Vision
DVX
Dynamic
Dynatech
Dynatron
Easy Living
Eaton
Ecco
ECR
EdisonMinerva
Elbe
Elbe-Sharp
Elbit
Elcit
Elecs
Electratune
2924 4979 8435 4698
4979
7647 5090 8644 6896 4523 3637
4167 7314 5397
8568 8644 6896 6286 7733 4648
7910 5605 4783 2438
8644 6896 5090 4016
3488
8644 6896 6305 4485 8299 3637
6127
8644 6896 7647 3637 4648
8644 6896
3488 2924 7647 4777 4469 4530 7314
8033 3637
8644 6896
7660
8644 6896 4819 5355
8644 6896
8033
8644 6896 6641
3350
3118
8644 6896
7647 8644 6896 5531 3637 4648
5397 7046 8644 8299 4677
5355
3158
8561
6641 5952 8033
7647 3637
6982 7350 8644 6896 7213 3158 5605
6286 8394 7660 3840 4648 3637
4265 4523 3802 5874
5605
8644 4917 6896
8644 6896
8644 7066 6896
5397
3637
4523 3802 5874
8644 6896
4596 5905
5510
2335 8435
3802
6230
3444 8377 7287 5605 8644 6896 4016
3518 2620 2696 8568 3350
8568
4648
5531 8568 5605
4648
4523
Electro Tech
Electrobrand
Electrohome
Electronika
Elekta
Elfunk
ELG
Elin
Elite
Elta
Emco
Emerson
Emperor
Enzer
EON
Erres
ESC
Estèle
Etron
Eurofeel
EuroLine
Euroman
Euromann
Europa
Europhon
Evesham
Excel
Expert
Exquisit
Fagor
Fairtec
Family Life
Fast
Fenner
Ferguson
Fidelis
Fidelity
Filsai
Finlandia
Finlux
Firstline
3637
5874
4523 3802 5874
4648
7647 8644 6896 3488 5896 3637
3573 3840
8644 6896
4469 8644 6896 4819 4783 3350 5605
7647 3637 4648
4016 8644 6896 4523 3802 5510 4648
7647 3488 4469 3637
5531
8060 5393 5531 8644 6896 4530 4265
5896 3350 2499 2590 7287 5605 5355
4523 3802 5874
5896
3036
3802 5510
8644 6896 4648
8644 6896
5605
4709 8644 6896 7647 5605 8033 3637
3488
8644
4469 3488 8644 6896 7287
4648
8644 6896
8644 8568 5605 6896 5531 4469 4648
4596
8644 6896
5605
8644 6896 5531
8644 6896
4156
8644 6896
3634
5090 7647 3637
5301 4884 4422 3270 6127 7430 3847
8644 6896 6482 6982 4638 5620 3350
4783 5119 3840 4648
3637
5605 3835 2438 8644 6896 4530 6764
6127 4469 3488 7733 3350
3637
7910 6092 4783 3350 5605 2438 4422
6982
4819 8644 6896 8060 6092 5605 8568
6381 4265 2620 8394 6753 8020 5952
4659 5553 6305 7361 3637 4648
8644 6896 5090 5355 8060 5605 7647
4469 5531 2499 2620 7910 3350 3840
4156 7361 6685 5319 3637 4648
34
Page 37

Fisher
Flint
Force
Forgestone
Formenti
FormentiPhoenix
Fortress
Fraba
Friac
Frontech
Fujimaro
Fujitsu
Fujitsu
General
Fujitsu
Siemens
Funai
Furichi
Futronic
Future
Galaxi
Galaxis
Galeria
GBC
GE
Geant Casino
GEC
Geloso
Gemsound
General
General
Electric
General
Technic
Genesis
Genexxa
Gericom
Gitem
GM
GMG
Goldfunk
Goldhand
GoldStar
Gooding
Goodmans 5295 5905 3840 8644 4874 6896 8060
Gorenje
GPM
6812 7910 7287 3350 5605 3802
8644 6896 2696 4016 7014 3488 4648
7660
6127
5605 8644 6896 2590 4469 4648
4469
3193 4523 3802
8644 6896 7287
7647 8644 6896 7287 4874 2696
5531 3488 2438 7647 5605 3637
4677
5605 7647 7213 8644 6896 3350 8360
4523 3802 5874
7647 5605
3191 5905 5319
5355 3488 6764 4523 3802 5874
7314
3488 4167 7314
8644 6896
8644 6896 3350 5605
7287 5553 8644 6896
7647 3637
5605 7647 5090 4016 2438 3637
6982 5393 5896 3847 4422 7430 3270
4884
5605
5605 3350 8644 8568 6896
5531 7647 2438 5605 5090 3637
3637
7430 4422 3637
3637 7647
6982 4422
7647 8644 6896
4016 8644 6896 6764 5605 7647 4648
4677 3191 7855 3118
4648
3637
3637
5355
4469 3637
8644 7647 7287 4709 2796 5393 5531
4469 6896 5605 3350 7430 2438 6305
8060 6381 7014 4523 5510 4648
6230
5355 2499 5090 6812 3488 8568 7647
6230 4530 6982 6482 8020 3847 3270
4016 7733 3876 5832 3118 6948 8299
4698 3637 4648
7287
4016 3637
Gradiente
Gradin
Graetz
Granada
Grandin
Granprix
Grenadier
Gronic
Grundig
Grunkel
GTT
H&B
Haaz
Haier
Halifax
Hallmark
Hammerstein
Hampton
Hanimex
Hanseatic
Hantarex
Hantor
Harley
Davidson
Harrad
Harsper
Harvard
Harwa
Harwood
Hauppauge
HCM
Heathkit
Hedzon
Hema
Hicon
Hifivox
Higashi
Highline
Hikona
Hiline
Hinari
4638 4849 8644 6896
3637 4648
8060 3350 4530 5605 8644 6559 6896
5319
8644 6896 3001 5620 4659 3270 3847
5605 7910 6812 6559 8568 2438 3952
6982 4783 4648
8644 6896 7647 5605 5090 5896 4016
7014 2696 8060 6381 5355 3840 4677
4156 3118
3451
3637
5605
5265 4679 6640 3518 8435 6896 8299
7647 4265 6230 8644 5119 6812 7287
4925 7733 6948 5393 4698 6982
5319
3637
7361
8435
2924 3488
3488 4469
4523 3802 5874
3488
4469
4016 7733
8644 6896 4874 7350 5605 3350 5896
3158 5295 7287 3876 7647 7361 2590
3637 4648 2796 8060
7647 8644 6896 8568 3637 4648
8644 6896
4523 3802 5510 5874
4523 3802 5874
4677
4523 3802 5874
2335 3453 7789
7647 6764 8644 6896 6230
8644 6896
7647 6764 8644 6896 4016 5553 5896
3488 3637
5874 4648
6896 8644
7647
2519
7430
4469
3488 8644 6896
4016
3637
7910 8644 6896 7647 4016 6812 5605
7384 5119 6230 3488 7733 3802 3637
4648
35
Page 38

Hisawa
8
8
0
Hisense
Hitachi
Hitachi Fujian
Hitsu
HMV
Höher
Home
Electronics
Horizont
Hornyphon
Hoshai
Huanyu
Hugoson
Hygashi
Hyper
Hypersonic
Hypson
Hyundai
Iberia
ICE
Ices
Ict
IISonic
Iiyama
IMA
Imperial
Indiana
Infinity
InFocus
Ingelen
Ingersoll
Inno Hit
Innovation
Innowert
Inotech
Interactive
Interbuy
Interdiscount
Interfunk
Internal
5896 4016 7014 2696 7733 8060
6685 7910
3952 6069 4889 6812 6896 7430 243
4783 5620 4659 5605 6982 6619 5295
7040 5393 8568 6972 4874 8644 6286
4819 6753 4737 3350 3835 8020 3840
8374 7660 3802 5874 464
5620 3952
7647 2696 7014 4016
6127
8060 5952 4677
6305
4648
8644 6896 4648
4016 7014 5896
5090 4469
3094 7855
4469
7647 4469 5531 3637 4648
3350
8644 6896 8060 6381 3488 5896 7014
7733 3840 5355 2590 3637 4648
8644 4677 6896 8435 7314 3036 3620
5952
8644 6896
3488 8644 4530 7647 6896 4016 4469
3637 4648
4016 4469
8644 6286 6896
4698
7855 3094
4523 3802 5874
8644 5605 7287 4752 6634 6896 2620
3350 5553 5531 4648
8644 6896 4648
4648
3251
6230 2696 8060 5605 3350
7647 3637
7647 8644 6896 4016 3637 4648 5896
5319 8568 5531
7350 8644 6896
4677 3191
2335 8033
8644 6896 3835 7839 5605 3350 7287
7430 2620
7647 8644 3488 5531 3835 6896 3637
4648
8644 6896 3835 7839 5605 3350 7287
7430 5531 6538 4648
8644 6896 4874 5090 2499
International
Intervision
Irradio
IST
Isukai
ITL
ITS
ITT
ITT Nokia
ITV
JBL
JCB
JDV
Jean
JEC
Jetpoint
JMB
Jocel
Jubilee
Jumbotroic
JVC
Kaiser
Kaisui
Kambrook
Kamp
Kapsch
Karcher
Kathrein
Kawa
Kawasho
KB Aristocrat
Kendo
Kendwood
Kennedy
Kennex
Kenwood
Kingsley
Kiota
Kiton
KLH
Kloss
Kneissel
4469
5896 7014 8644 4530 2796 7350 259
7287 3488 5531 7647 6896 3158 6230
4016 5605
7647 8644 6896 4016 5531 4530 3637
4648
4648
4016 8644 6896 5896 7014 4648
3637
8644 4530 4016 5896 3488 4469 7647
6896 3637
5605 8020 3350 4659 4783 6127 6092
6559 7910 2696
3350 4783 5605 4659 6305 2696 8394
2438 8020 6092 7910 6559
3488 8644 6896 5531 5090
4648
5874
7066
6812
6482
5510 4648
8644 4874 5295 5090 6896 5119 7733
5716
6896
4648
4638 6812 6127 4530 4016 6305 5553
3193 4526 3802 4648
4648
4016 5896 8644 6896 4469 7014 7647
3637 4648
2796
4469
5605 3350
8644 6896 7287 2696 5605 5896 3488
5453 8060 5952 6305 3637 4648
6896 8644
4530
4469
5605
2696 8644 6896 5605 7350 3835 7287
2796 2438 2620 5531 8377 3451 3840
4917 2590 3637 4648
4523
5605 3444
4819
4469
4709 3637
6896 8644 5355
4523 3802 5874
5510
8644 7287 2696 2620 5090 4874 6896
3444 8377 7733
36
Page 39

Kobic
Kobra
Kolster
Konichi
Konka
Kontakt
Korpel
Korting
Kosmos
Kotron
Koyoda
KTV
Kuasho
Kuba
Kuba
Electronic
Kyoshu
Kyoto
L&S
Electronic
LaSAT
Lavis
Leader
Lecson
Legend
Lemair
Lenco
Lenoir
Lesa
Levis Austria
Lexsor
Leyco
LG
Liesenkötter
Life
Lifetec
Linitron
Lloyd
Lloyd's
Lodos
Loewe
Logik
Logix
Luker
3637
2519
8644 6896 5531 4016 4648
7647 3637
8644 6896 4530 8060 5553 4016 8485
8299 3491 4706
6230
8644 6896 4648
7287
8644 6896
6764 3488
7647
4523 3802 5874
4523 4648
5605
5605
6764 5553 3488
5605 4469
4677 8060
2590 7287
3840 8644 5605
7647 3637
8644 6896
7647 3637
2620
8644 7647 5605 5090 6896 8299 3840
3637 4648
3637 7647
5531
8644 6896
3453
3488 8644 6896 4648
8644 5393 7287 7647 7430 2924 6381
8265 2796 5447 4709 6896 4156 6944
4312 5531 8060 4469 5605 6305 3350
7839 8644 6896 4648 8644 7839 5186
6896
3637
8644 7647 7350 5090 5355 3835 3840
6286 6896 4016 3488 4596 8060 3637
4648
4523 3802
4523 3802 3637 5874
4709 7647
3840 7660
3835 5613 7337 8644 6896 7287 8377
8568 4648
7507 2924 2335 7647 6127 3488 4530
4709 3118 7855 3840
5355 7350
7066
Luma
Lumatron
Lux May
Luxor
LXI
M Electronics
Macys
Madison
Magnadyne
Magnafon
Magnasonic
Magnavox
Magnum
Mandor
Manesth
Manhattan
Marantz
Marcys
Mark
Master's
Masuda
Matsui
Matsushita
Matsuviama
Mava
Max-Multi
Max-Tip1
Max-Tip4
Maxam
Maxdorf
Maxell
Maxim
MCE
Mediator
Medion
Megas
Megatron
MEI
Melectronic
Memorex
Memphis
Mercury
8644 2438 5605 2620 6896 5090 7647
8377 3637 4648
2438 8644 6896 8377 5605 3350 3488
5301
4648 8644 7647 6896
5319 2438 8020 6753 6092 4659 3840
8394 3350 7910 4783 5605
5393 4648
3637 4648
4523 3802
8644 6896
5531 8568 5605 3637 4648
4648 8568 4469 5301
4523 3637 4648
8644 6896 6812 7046 3802 4648
3451 8060 8644 6896 6381 3730
3488
8644 6896 3488 6482 5605 2438 4648
8644 6896 5355 3840 4201 5605 5453
8644 6896 6764 4648
3802
8644 6896 4469 5090 7647 8060 6381
4648
4874 8644
4016 4530 7647 3488 8644 6896
8644 6896 6230 7647 5605 8568 6482
7910 7507 7384 6812 4530 5265 3518
3270 8060 5739 5119 2438 7014 7733
3840 3637 4648
4526
8299
4523
4648
3637
4648
3488 3637
2335
3637
7066 5952
7647 3637
8644 6896 4648
8644 8060 7361 7350 2924 7733 3840
4917 5355 6896 3835 6286 5832 4596
3118 3730
2696
5393
3840 8644 6896
6092 8644 3835 7430 2620 5605 4422
6896 6982 5531 4819 5090 5295 3350
3518 5265 7647 8020 6753 4469 3876
8060
7647 5393 4526 3637
3637 7647
4709 8644 7647 6896 3637
37
Page 40

Merritt
Metz
MGA
Micromaxx
Microstar
MicroTEK
Midland
Mikomi
Minato
Minerva
Minoka
Mirror
Mistral
Electronics
Mitsubishi
Mitsuri
General
Mivar
Monaco
Monitor
Morgan's
Motorola
MTC
MTlogic
Multibroadcast
Multitec
Multitech
Murphy
Musikland
MyCom
Myryad
NAD
Naiko
Nakimura
Namsunc
Naonis
NAP
Narita
NAT
National
NEC
Neckermann
NEI
Neovia
Nesco
4783 3350 5605
2769 6975 5313 2410 8644 6896 8299
5355 5319 5265 6640 3518 3840 7324
5393 8644 6896 4016
8644 6896 5355 3840 7361
7361
8033
4523
7660
8644 6896
6230 6640 5265 4265 3518 8568 5620
6764 8644 6896 4648
5832
6127
5620 3193 3835 8644 5393 6812 6127
6640 6896 7910 3840 3802 3637 4648
5605
7287 4469 4318 8568
7647
5510
8644 6896
3193 4648
3835 5605 4469 3350 4523 5510
8060 6948
6127
8644 6896 2590 5355 3840 5952
7647 2438 2590 8644 7287 6896 4469
5531 3488 4523 3802 3637 5874 4648
4469 5605
8644 4016 5531 6896
4698 5393
6896 8644
5393 3350 5605 3802
8644 7066 6305 6896
5090 8644 6896
3637
2438 5605
4648
7066
3001
3001 4648
4849 8299 7976 3726 8644 6896 7507
8561 6812 7014 7647 5090 4874 4638
3876 3637 3802 5510
8644 3518 7287 6736 5553 5531 2620
2438 6538 6896 5605 7839 3835 3637
5874 4648
8644 6896 4530 5605 4648
4677 4698
5531 7733
Netsat
Neufunk
New World
Nicamagic
Nikkai
Nikkei
Nikko
Nissan
Noblex
Nobliko
Nogamatic
Nokia
Noname
Nordmende
Norfolk
Normerel
Novabeam
Novak
Novatronic
Nurnberg
NU-TEC
O Genteral
Oceanic
Odeon
Okano
Olidata
Olympic
Omega
Omni
Onceas
Onwa
Opera
Optimus
Optonica
Orava
Orbit
Orcom
Orient
Orion
Orline
Ormond
Orsowe
Osaki
Osio
Oso
Osume
8644 6896
8644 7647 6896 2696 4016 5896 8060
8644 7647 6896 6982 3637 4648
4016
4469
4016 8644 6896 3488 6482 4469 7647
6812 4523 4648
8060
5393
5510
3637
4265 4469
7430
3350 5605 8020 4783 5090 8394 6305
6092 6753 4659 6559 7910 2696 7430
5510 3637 4648
4648
7430 8060 5397 4422 6896 3270 5605
5905 3847 6982 5265 8644 4648
5605
8644 6896
4648
8644 6896
8644 4819 5090 6896 3637 4648
5605 3350
7014 2924
3637
5605 3350 7910 4659 4783 8020
3488
7287 8644 6896 3488 7647 3637
4698
3637
3488
7046 5397 2924
3637
4530 2810 4016 5739
8644 6896 4648
4526
3193
4648
8644 6896 4648
4262
3637
8644 5119 7384 6896 6764 8568 7733
3118 8060 7507 7647 3488 3453 3637
5874 4648 4523 3802
8644 4016 6896
5355 3840 8644 6896
8568
4016 3488 8644 6764 5090 7384 6896
8644 6896
4016
6812 4016 8644 6896
38
Page 41

Merritt
Metz
MGA
Micromaxx
Microstar
MicroTEK
Midland
Mikomi
Minato
Minerva
Minoka
Mirror
Mistral
Electronics
Mitsubishi
Mitsuri
General
Mivar
Monaco
Monitor
Morgan's
Motorola
MTC
MTlogic
Multibroadcast
Multitec
Multitech
Murphy
Musikland
MyCom
Myryad
NAD
Naiko
Nakimura
Namsunc
Naonis
NAP
Narita
NAT
National
NEC
Neckermann
NEI
Neovia
Nesco
4783 3350 5605
2769 6975 5313 2410 8644 6896 8299
5355 5319 5265 6640 3518 3840 7324
5393 8644 6896 4016
8644 6896 5355 3840 7361
7361
8033
4523
7660
8644 6896
6230 6640 5265 4265 3518 8568 5620
6764 8644 6896 4648
5832
6127
5620 3193 3835 8644 5393 6812 6127
6640 6896 7910 3840 3802 3637 4648
5605
7287 4469 4318 8568
7647
5510
8644 6896
3193 4648
3835 5605 4469 3350 4523 5510
8060 6948
6127
8644 6896 2590 5355 3840 5952
7647 2438 2590 8644 7287 6896 4469
5531 3488 4523 3802 3637 5874 4648
4469 5605
8644 4016 5531 6896
4698 5393
6896 8644
5393 3350 5605 3802
8644 7066 6305 6896
5090 8644 6896
3637
2438 5605
4648
7066
3001
3001 4648
4849 8299 7976 3726 8644 6896 7507
8561 6812 7014 7647 5090 4874 4638
3876 3637 3802 5510
8644 3518 7287 6736 5553 5531 2620
2438 6538 6896 5605 7839 3835 3637
5874 4648
8644 6896 4530 5605 4648
4677 4698
5531 7733
Netsat
Neufunk
New World
Nicamagic
Nikkai
Nikkei
Nikko
Nissan
Noblex
Nobliko
Nogamatic
Nokia
Noname
Nordmende
Norfolk
Normerel
Novabeam
Novak
Novatronic
Nurnberg
NU-TEC
O Genteral
Oceanic
Odeon
Okano
Olidata
Olympic
Omega
Omni
Onceas
Onwa
Opera
Optimus
Optonica
Orava
Orbit
Orcom
Orient
Orion
Orline
Ormond
Orsowe
Osaki
Osio
Oso
Osume
8644 6896
8644 7647 6896 2696 4016 5896 8060
8644 7647 6896 6982 3637 4648
4016
4469
4016 8644 6896 3488 6482 4469 7647
6812 4523 4648
8060
5393
5510
3637
4265 4469
7430
3350 5605 8020 4783 5090 8394 6305
6092 6753 4659 6559 7910 2696 7430
5510 3637 4648
4648
7430 8060 5397 4422 6896 3270 5605
5905 3847 6982 5265 8644 4648
5605
8644 6896
4648
8644 6896
8644 4819 5090 6896 3637 4648
5605 3350
7014 2924
3637
5605 3350 7910 4659 4783 8020
3488
7287 8644 6896 3488 7647 3637
4698
3637
3488
7046 5397 2924
3637
4530 2810 4016 5739
8644 6896 4648
4526
3193
4648
8644 6896 4648
4262
3637
8644 5119 7384 6896 6764 8568 7733
3118 8060 7507 7647 3488 3453 3637
5874 4648 4523 3802
8644 4016 6896
5355 3840 8644 6896
8568
4016 3488 8644 6764 5090 7384 6896
8644 6896
4016
6812 4016 8644 6896
39
Page 42

OTF
Otto Versand
OVP
Pace
Pacific
Pael
Palladium
Palsonic
Panama
Panashiba
Panasonic
Panavision
Panavox
Panorma
Papouw
Pathe Cinema
Pathe
Pausa
PCE/PEC
Penney
Perdio
Perfekt
Performance
Philco
Philex
Philips
Phocus
Phoenix
Phonola
Pilot
Pioneer
Plantron
Playsonic
Policom
Polytron
Poppy
Portland
Powerpoint
PrandoniPrince
3637
3802 3637 5874 7350 3518 3350 7430
3001 6736 6812 3193 3835 5531 7647
5896 6982 8644 6896 6640 5265 8568
4648
7733
8644 6896 6286 8060 3840 5119
4469
7287 8644 2620 8060 5553 6896 5531
7839 6286 3518 6736 6538 5605 7350
2438 4648
3488 6764 8644 2796 4709 5553 5453
3453 4016 2924 6896 2335
7647 3488 4469 8644 6896 5531 3637
4709 3637
4526 5620 3001 3350 5605 4783 7605
4709 2410 8568 8644 6896 8360 5393
4648
8644 2620 6896
3637
3637
8644 6896
5605 4469 7287
7430
7647 3637
4523 3802 5510
4523 5510
5605 8644 4469 5896 6896
8644 6896 4648
3802 5874
6634 4752 5553 5531 5605 7287 8644
6896 3802 3637 4648 7350
6127 5605
6896 8644 3518 6127 6538 8016 3802
5874 6982 5090 3350 7647 4648
3730 6948 8060
8644 6896 7287 2590 5605 4469 4648
8644 6896 6127 4469 4648
6896 8644 5716 8435 5510
4174 7507 8644 4849 3350 7430 5605
4422 6896 8209 7287 6982 2590 3835
4648 7287 2590
8644 6896 3488 7647 3637 4648
8060 8644 6559 6381
7430 3350 5605 4265 4752 6634 6640
5896
7647 3637
5090 2499 4523 5874 4648
6230 8644 6896 2924
5531 8568 3350 2438
President
Prima
Princess
Prinston
Prinz
Proelco
Profex
Profi
Profitronic
Proline
Proscan
Prosonic
Protec
Protech
Proton
Provision
Pulser
Pye
Pymi
Qty1
Quadral
Quasar
Quelle
Questa
R Line
Radialva
Radio Shock
Radiola
Radiomarelli
RadioShack
Radiotone
Rank
Rank Arena
RBM
RCA
Realistic
Recor
Record
Rectiligne
Rediffusion
Redstar
Reflex
Regente
Relisys
Reoc
7314
7647 3488 6764 7789 4523 3802 5510
3637 4648
2924 3637
3840
3350
4648
7647 5605 3350 2438 3637
7647
8644 6896 4648
8644 6896 4884 5295 2620 4698
5510
8644 6896 7287 5090 4530 5355 8060
4469
3637 4648
8644 6896 7647 5531 3488 5553 5355
5896 5605 2590 3840
5393 4523 3637
4874 8644 6896 3840 8060
4523 5510 3637 4648 4156
8644 6896 5090 6764 4648
7647 3637
4648
4016
5531 4526 4677 7647 6634 5186 4265
4819
8644 6736 7507 7430 5355 6896 5265
6538 3835 6640 3518 3350 3488 3840
6092 7647 6812 5531 4752 7839 4523
3802 3637 5874 4648
6812 3802
4648
7430 4016 5605 8644 6896 4422
4523
8644 6896 4648
8568 5531 8644 6896
8644 6896 5393
7647 8644 6896 7287 3488 3840 3637
4648 5553 6764 3451 5355
4265
6812 2810 3036
4265
4884 3193 3847 3270 6982 3036 5510
5393
8644 5553 6896 4648
4648
8644 6896
3350 4783 6812 6092
8644 6896
8644 6896 3840 5355
3637
4677 2108 4979 3191
8060 5295 2499
40
Page 43

Revox/Studer
0
Rex
RFT
Rhapsody
Rice Club
Ricoh
Rinex
R-Line
RMB
Roadstar
Rodex
Rosita
Rover
Rowa
Royal
Royal Lux
Rukopir
Runco
Saba
Sagem
Saisho
Saivod
Sakaï
Sakio
Sakura
Sakyno
Salora
Salsa
Sambers
Sampo
Samsung
Samsux
Sandra
Sanky
Sansui
Santon
Sanyo
Save
Saville
SBR
Schaub
Lorenz
Schneider
4648
2438 2620 5531 5605 3488
7287 3488 8644 6896 2590
4469
5510
8644 6896
2335 5553
8644 6896 5605
4523
3840 7647 5553 8644 3488 5896 4485
5832 6896 8060 5355 4016 3637
8644 6896
3637
6812 2108
3488 2924 5716 7647 4469 8299 8644
6896 3637
3637
7287 6764 3270
6896 8644
5510
4884 7430 3847 6982 2104 3270 4783
4526 4422 5605 8568 3350 8060
2696 7014 5896 2820 2517
8568 7647 7507 5605 3488 4648
8644 7066 6896 5319 5355 5716 3840
5605
3637
3637
7014
5605 3350 8568 2438 4783 6559 7910
8020
3270
8568
4523
2517 8299 8644 5393 7910 7350 5605
4884 6896 7736 3193 4495 4523 5510
3637 4648 7647 7287 3488 4469
4523
4469
4523
8644 2429 6896 8435 4530 2810 7014
6641 3036 4523 5510 3637 4648
7647
7910 3573 6812 7507 5605 8644 562
6896 7287 6559 4469 7647 2590 4849
3802 3637
8644 6896
7733
8644 6896 6127 4648
4783 8060 3350 6305 2590 5090 4156
6286 8644 6896 7350 3840 5605 3451
8060 3158 7213 6982 5531 2499 7733
7066 4265 4530 3350 4016 5355 3637
4648
Scotland
Scott
Sears
Seaway
Seelver
SEG
SEI
Sei-Sinudyne
Seitech
Seleco
Semua
Sencora
Sentra
Serino
Sharp
Shintom
Shintoshi
Shivaki
Show
Siarem
Siemens
Siemes
Siera
Sierra
Siesta
Sigmax
Signature
Silma
Silva
Silva
Schneider
Silver
SilverCrest
Singer
Sinotec
Sinudyne
Sky
Skymaster
Skysonic
Sliding
SLX
Smaragd
Snyder
Soemtron
Solavox
5605
4485 5393 4523 3802 5874
5393
5295
6896 3840 8644
8644 6896 3840 4917 8377 4469 5319
4016 5355 6230 7647 5605 2499 3634
8060 3637 3488 5295 6812 5531 4523
3802
6736 5605 8568 8644 6896
8568 6736 8644 6896 5874 4648
7855
2438 8377 5605 2620 3444 3488 6092
6812 4530
4523
7647 3637
6482 4016 7647
2696 7014 4469 3193
3193 7138 6812 4638 6127 8568 6538
4174 7409 5319 4523 3802
5874
8644 6896
8644 6896 5119 5090 5393
5553 7647 3637
5605 8568
3518 6640 6538 5265 7839 5186 8644
6896 3350
4523 4648
8644 6896 8299
4648
7287
5510
5874
4648
8644 6896 4469 3350 3451 3637
5952
6812 8644 7014 3350 6896 6381 5605
3802
3840 8644 6896
7647 3011 8644 6896 5531 3444 3270
5605 3637 4648
2335
5605 3350 8568 6736 8644 6896 7733
8644 5896 3118 5393 6896 4262
4819
3036
4677 3118
5355
6230
4648
4677 3191
3350 5605 4783 8644 6896
41
Page 44

Sonawa
Soniko
Soniq
Sonitron
Sonneclair
Sonoko
Sonolor
Sontec
Sony
Sound &
Vision
Soundesign
Soundmaster
Soundwave
Soyea
Specrician
Spectra
Ssangyong
Staksonic
Standard
Starlite
Starlux
Stenway
Stern
Stevision
Strato
Strong
Sunic Line
Sunkai
Sunstar
Sunwatt
Sunwood
Superla
Supersonic
Supertec
Supertech
Supra
Supremacy
Supreme
Susumu
Sutron
Svasa
Swissline
Swisstec
SYC Line
Sydney
Sylvania
Symphonic
Sysline
Sytong
T+A
Tandberg
Tandy
4016
8644 6896
2519
7910 7287 6559
8644 6896
8644 6896 7647 3488 3637 5896 4648
7910 5605 6736 4783 3350 5896
8644 6896 7287 7647 4648
6736 2762 7507 6219 3193 4849 4752
5874 3078 6812 8644 6896 3802
4016 5090 8644 6896
4523 3802 5510 5874 5393
3637
8644 6896 5553 6381
2335
4523 4648
7647
7647
7647
8644 6896 3840 4016 7647 5090 3637
7647 5605 8644 6896 3488 6764 3637
3637
5896 4016
5605 2438 3488 2620 3444
7066 5952
8644 6896 3488 7647
5319 7660 3840 8644 6896
8644 6896
7384 7014 4016 2696 8644 6896 6230
4677
4530 8644 6896 7647 3488 3637
7014
8644 6896 7647 3637 4648
8568 4469
7910 6896 2924 3488 8484 7014
3637 4648
7647 8644 6896 4469 4016 3637
5393 5090 7647 3637
4523 3802
5874
3270 4016 4422
7647 3637
8484
5531
4262 3118
3637
4469
4648
4523 3802 5874
8644 6896
4469
6975
2410 2620 7430 8377 3350 5605
4016 5531 3193 5605
Tashiko
Tatung
TCM
Teac
Teak
TEC
Techica
Tech Line
Techlux
Technica
Technics
Techniland
TechniSat
Technisson
Technosonic
Techwood
Tecnimagen
Tecnison
Tedelex
Tehnol
Teiron
Teknant
Teknika
Tekon
Teleavia
Telecor
Telefac
Telefunken
Telefusion
Telegazi
Telemeister
Teleopta
Telesonic
Telestar
Teletech
Teleton
Televideon
Teleview
Tempest
Tennessee
Tensai
Tenson
Tesla
6812 4849 4469 5605 2438 3802
5952 8644 6896 8568 7507 7733 8016
5905 4156 4648
8060 3730 7361
2924 3835 8644 4917 5393 7647 6764
5896 3840 6896 5716 5355 5553 4849
8060 7660 7014 8435 3488 2499 5991
3637
7647 5531 3270 8644 6896 3350 5605
3637 3637
4016
8644 6896 5355 4917 5319
4485
7066
4526 4648
4648
8644 6896 5605 4201
8060 3730
8644 6896
5319 5510 5874
6896
3637
5553 6305 3011 7647 8435 7910 2924
8299 5397 8644 6896 3637
3637
7647
3637 4648
4523 5510
5510 3637
7430 4422 6982
8644 6896 5605 4016 3158
3637
4884 3847 4752 8299 4262 4422 6634
3270 7430 2924 6982 5716 5301 8644
6896 2590 2104 8033 2707 3491 8060
5952 6092 7837
8644 6896
8644 5605 4016 3488 6896
8644 6896
3637
8644 6896
7647 8644 6896 6764 3637
8644 6896 5355 7647 5531 3840 3637
5605 6812 2438
5605 4469
8644 6896
7647 8644 6896 3488 3637
8644 6896
4016 8644 6896 7647 4819 5090 4530
2796 5531 6381 5605 3840 3637 4648
3637 7647
8644 4648
42
Page 45

Tesla Orava
Tevion
Texet
Thomas
Thomson
Thorn
ThornFerguson
Tiny
Tobishi
Tobo
Tokai
Tokaido
Tokyo
Tomashi
Tongtel
Topline
Toshiba
Tosonic
Totevision
Toyoda
Trakton
TRANScontinents
Transonic
Transtec
TRC
Trevi
Triad
Trident
Trilux
Tristar
Triumph
Trivision
Tsoschi
TVTEXT95
Uher
Ultravox
UMA
Unic Line
Unimor
4648
7350 4706 5905 3191 3451 5355 6286
8060 8644 5952 6896 7361 3840 4596
3730
5090 7647 4469 4016
4523 5510 3637 5874 4648
4884 3847 6982 4422 7430 3270 8644
6896 4469
5620 6127 7430 5301 8644 6896 7507
3270 3952 6982 3350 6736 3835 6812
5090 6482 4752 6634 4874 6640 4265
3802
5620 7430 6127 3350 3270 4874 5301
6482
3453 7789 5393 5510
4016
3637
8644 6896 5355 5605 5090 7647 3840
4648
3840
4469 6482 5510
5896 4016
7046 8299
3840 5355
4679 4081 6482 3730 7733 7647 2924
8644 6812 4265 8060 7430 3251 5319
4925 5952 4940 5265 3518 2517 5447
4526 8561 3802 5510
4523 5510
4523
7647 4530 3488
7647 3488
5355 3840 8644 6896 2590 4677
8644 6896 7014 8299 3835 3488 2924
5716 5553 7647
4469
3637
3637
8644 6896 4016 4648
8568
4648
3488 4016 6127
8568 6092 6896 8644
3637
5896
6896
8644 6896 5090 5553 2590 7287 8020
4648
5090 5531 4469 5605 8644 6896
4648
8644 6896 4659 7014
4648
United
Universal
Universum
Univox
Uranya
Utax
V7
Videoseven
Vanguard
Veco
Vestel
Vexa
Victor
Video System
Videologic
Videologique
Videosat
VideoSystem
Videotechnic
Videoton
Vidion
Vidtech
ViewSonic
Visiola
Vision
Vistar
Vocson
Vortec
Voxson
Waltham
Wards
Watson
Watt Radio
Wega
Wegavox
Welltech
Weltblick
Weston
Wharfedale
White
Westinghouse
Windsor
Sindstar
Windy Sam
Winston
Wintel
8060 8644 6381 6896 7733 3840 8299
7066
8644 6896
6092 4819 5265 4659 2620 4752 7839
5186 6640 3350 5531 6753 6736 5355
7430 8377 8020 7287 6538 5553 8394
7647 6634 3634 7507 8644 3835 6812
3840 4917 4849 5319 4265 5605 3488
6896 7660 2517 3637 4648
8644 6896 5605
3637
5605
5991 5393 3118 4698 7855
3637
3637
8644 5605 6896 5355 3840 5319 4648
7647 8644 6896 3637 4648
4638
4648
4016 4469
4469 4016
5531
8644 6896
4469 5090
5605
3637
6812 5393
5991
4469
8644 3488 6896 3637 4648
3350
4648
8644 6896 4648
8644 6896 2438 5553 5605 5393
5553 4422 8644 6896 5355 7430 3840
5605 5119
4648
3840 4596 8644 6896 5605 7647 5355
4016 4698 7839 3637 4648 7350 3158
7733 4917
5605 4469
8644 6896 6812 3802
7647 8644 6896 3637 4648
8060
8644 6896 4648
8644 6896
8644 6641 7350 2707 6896 5952
4648 4469 8644 6896 2499
5355 3840
5896
6896
3637 4648
8060
43
Page 46

United
Universal
Universum
Univox
Uranya
Utax
V7
Videoseven
Vanguard
Veco
Vestel
Vexa
Victor
Video System
Videologic
Videologique
Videosat
VideoSystem
Videotechnic
Videoton
Vidion
Vidtech
ViewSonic
Visiola
Vision
Vistar
Vocson
Vortec
Voxson
Waltham
Wards
Watson
Watt Radio
Wega
Wegavox
Welltech
Weltblick
Weston
Wharfedale
White
Westinghouse
Windsor
Sindstar
Windy Sam
Winston
Wintel
8060 8644 6381 6896 7733 3840 8299
7066
8644 6896
6092 4819 5265 4659 2620 4752 7839
5186 6640 3350 5531 6753 6736 5355
7430 8377 8020 7287 6538 5553 8394
7647 6634 3634 7507 8644 3835 6812
3840 4917 4849 5319 4265 5605 3488
6896 7660 2517 3637 4648
8644 6896 5605
3637
5605
5991 5393 3118 4698 7855
3637
3637
8644 5605 6896 5355 3840 5319 4648
7647 8644 6896 3637 4648
4638
4648
4016 4469
4469 4016
5531
8644 6896
4469 5090
5605
3637
6812 5393
5991
4469
8644 3488 6896 3637 4648
3350
4648
8644 6896 4648
8644 6896 2438 5553 5605 5393
5553 4422 8644 6896 5355 7430 3840
5605 5119
4648
3840 4596 8644 6896 5605 7647 5355
4016 4698 7839 3637 4648 7350 3158
7733 4917
5605 4469
8644 6896 6812 3802
7647 8644 6896 3637 4648
8060
8644 6896 4648
8644 6896
8644 6641 7350 2707 6896 5952
4648 4469 8644 6896 2499
5355 3840
5896
6896
3637 4648
8060
44
Page 47

Page 48

Specifications and features are subject to change without notice.
Product may not be exactly the same as shown.
 Loading...