

Page 1

User’s Manual
MAXDATA Server PLATINUM 1500 IR M5
Page 2

2 Contents
Page 3

3MAXDATA Server PLATINUM 1500 IR M5
Contents
1 Setting up the System 7
Server Position ........................................................................................................................................7
Connecting the System ...........................................................................................................................8
Back Panel Connectors ......................................................................................................................8
Standard Control Panel ............................................................................................................................9
2 Server Board Features 11
Connector and Header Locations .......................................................................................................... 13
Configuration Jumpers .......................................................................................................................... 14
Hardware Requirements .......................................................................................................................15
Processor .........................................................................................................................................15
Memory ............................................................................................................................................15
Memory Sparing and Mirroring ........................................................................................................16
Optional Hardware ................................................................................................................................17
Intel® Management Module .............................................................................................................17
Local Control Panel ...........................................................................................................................17
3 Server Chassis Features 19
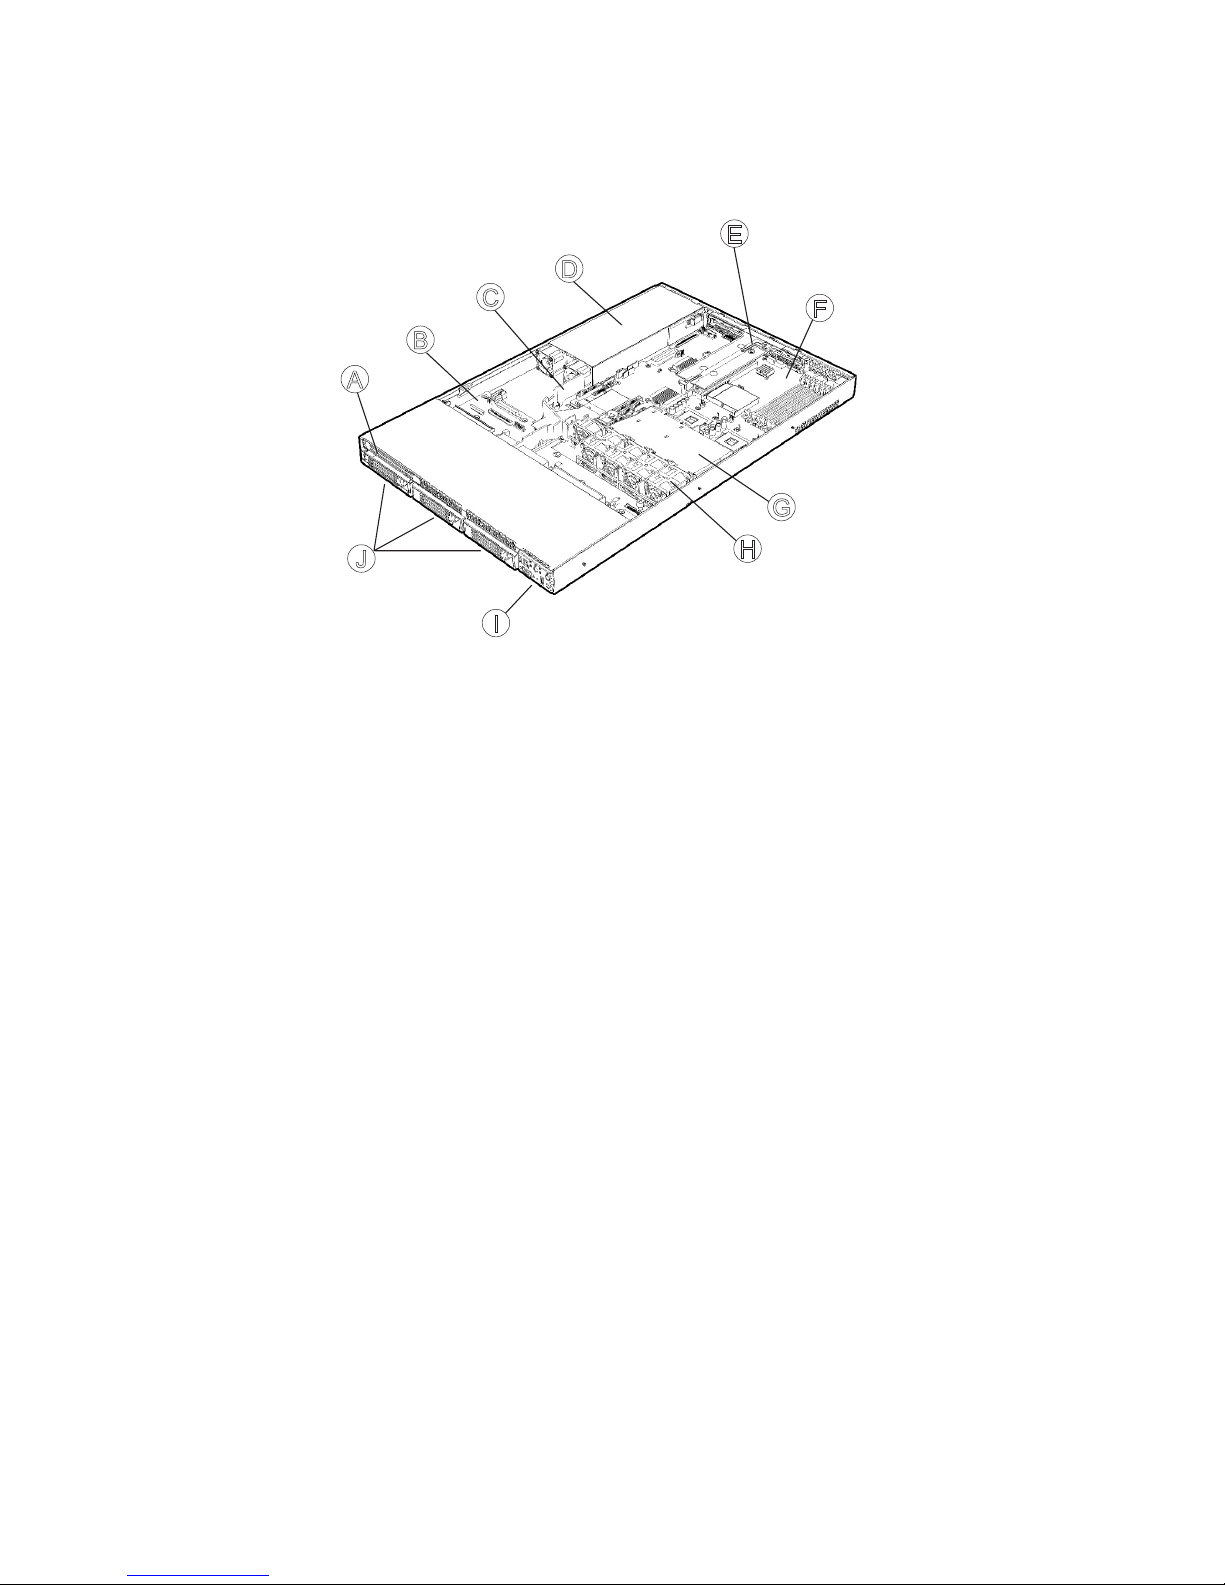
Component Identification ...................................................................................................................... 20
Internal Components ........................................................................................................................20
Local Control Panel ................................................................................................................................21
Back Panel Features ..............................................................................................................................22
Peripheral Devices .................................................................................................................................23
Hard Disk Drives ....................................................................................................................................23
4 Hardware Installations and Upgrades 25
Before You Begin ..................................................................................................................................25
Tools and Supplies Needed ..............................................................................................................25
System References ..........................................................................................................................25
Removing and Installing the Chassis Cover ..........................................................................................25
Removing the Chassis Cover ...........................................................................................................25
Removing and Installing the Front Bezel ...............................................................................................26
Removing the Front Bezel .....................................................................................................................26
Installing the Front Bezel .......................................................................................................................26
Installing and Removing a Hard Disk Drive ...........................................................................................27
Installing Hot-swap Hard Disk Drive .................................................................................................27
Removing Hot-swap Hard Disk Drive ....................................................................................................28
Installing and Removing a PCI Riser Connector ....................................................................................29
Installing a PCI Riser Connector .......................................................................................................29
Installing and Removing a PCI Add-in Card ...........................................................................................31
Installing a PCI Add-in Card ..............................................................................................................31
Installing and Removing Memory ..........................................................................................................33
Installing DIMMs ..............................................................................................................................33
Installing or Replacing the Processor ....................................................................................................34
Installing the Processor ....................................................................................................................34
Installing the Heat Sink(s) .................................................................................................................35
Removing a Processor .....................................................................................................................36
RJ45 Serial Port Configuration ..............................................................................................................37
Replacing the Backup Battery ...............................................................................................................38
Page 4

4 Contents
5 Server Utilities 41
Using the BIOS Setup Utility ................................................................................................................. 41
Starting Setup ...................................................................................................................................41
If You Cannot Access Setup .............................................................................................................41
Setup Menus .................................................................................................................................... 41
Clearing the Password ..........................................................................................................................43
Clearing the CMOS ...............................................................................................................................43
6 Troubleshooting 45
LED Information ....................................................................................................................................45
BIOS POST Beep Codes .......................................................................................................................46
7 Technical Reference 47
Power Supply Specifications ................................................................................................................. 47
500-W Single Power Supply Input Voltages ..................................................................................... 47
500-W Single Power Supply Output Voltages .................................................................................. 47
System Environmental Specifications ...................................................................................................47
8 Regulatory and Integration Information 49
Product Regulatory Compliance ............................................................................................................ 49
Product Safety Compliance ..............................................................................................................49
Product EMC Compliance ....................................................................................................................49
Product Regulatory Compliance Markings ............................................................................................49
Electromagnetic Compatibility Notices .................................................................................................50
FCC (USA) ........................................................................................................................................50
Europe (CE Declaration of Conformity) ............................................................................................50
Installation Precautions .........................................................................................................................50
Installation Requirements ......................................................................................................................51
Prevent Power Supply Overload ......................................................................................................51
Place Battery Marking ......................................................................................................................51
Use Only for Intended Applications .......................................................................................................51
Page 5

5MAXDATA Server PLATINUM 1500 IR M5
Figures
1. Back Panel Connectors .....................................................................................................................8
2. Standard Control Panel Features ....................................................................................................... 9
3. Server Board Connector and Component Locations .......................................................................13
5. Internal Component Locations ........................................................................................................20
6. Local Control Panel Features ...........................................................................................................21
7. Chassis Back ...................................................................................................................................22
8. Chassis Back ...................................................................................................................................23
9. Removing the Chassis Cover ..........................................................................................................25
10. Standard Front Bezel ....................................................................................................................... 26
11. Local Control Panel Front Bezel ....................................................................................................... 26
12. Removing a Hot-swap Hard Drive Carrier from Chassis .................................................................27
13. Removing the Retention Device from a Hot-swap Drive Carrier .....................................................27
14. Removing the PCI Riser Assembly from the Chassis .....................................................................29
15. Installing an Add-in Card Connector into the PCI Riser Assembly ..................................................30
16. Installing the PCI Riser Assembly into the Chassis .........................................................................30
17. Removing the PCI Riser Assembly from the Chassis .....................................................................31
18. Installing an Add-in Card to the PCI Riser Assembly .......................................................................31
19. Installing the PCI Riser Assembly into the Chassis .........................................................................32
20. Installing Memory ............................................................................................................................33
21. Opening Socket Lever .....................................................................................................................34
22. Inserting Processor ........................................................................................................................35
23. Installung Heat Sink .........................................................................................................................35
24. Changing the Serial Port Configuration ...........................................................................................37
25. Replacing the Backup Battery .........................................................................................................39
Tables
1. NIC LEDs ........................................................................................................................................... 8
2. Standard Control Panel Features ....................................................................................................... 9
3. Front Panel LED Description ...........................................................................................................10
4. Server Board Features .....................................................................................................................11
5. Configuration Jumper ...................................................................................................................... 14
6. DIMM Module Memory Capacity Support ......................................................................................15
7. Server Chassis Features ..................................................................................................................19
8. Local Control Panel Features ...........................................................................................................21
9. Keyboard Commands ......................................................................................................................42
10. LED Information ..............................................................................................................................45
11. POST Error Beep Codes ..................................................................................................................46
12. Error Beep Codes Provided by Intel® Management Modules .........................................................46
13. 500-W Power Supply System Output Capability .............................................................................47
14. Environmental Specifications ..........................................................................................................47
15. Product Certification Markings ........................................................................................................49
Page 6

6
Page 7
7MAXDATA Server PLATINUM 1500 IR M5
1 Setting up the System
Server Position
Please take note of the following criteria for creating a practical and safe workplace when setting up
your computer:
The system can be used anywhere the temperature is suitable for people. However, rooms
with humidity over 70%, and dusty or dirty areas are not appropriate. In addition, do not
expose the server to any temperatures over +30 °C or under +10 °C.
Make sure that the cables connecting the server to peripheral devices are not tight.
Make sure that all power and connection cables are positioned so that they are not trip
hazards.
When you save data to your server‘s hard disks or to a floppy disk, they are stored as
magnetic information on the media. Make sure that they are not damaged by magnetic or
electromagnetic fields.
Because the electronics in your computer can be damaged by jarring, no mechanical devices
should be placed on the same surface as the server. This is especially important for impact
printers whose vibrations could damage the hard disk.
Please take care to ensure a free air flow to the server at all times. Do not block the ventilation
slots of the server case and particularly the power supplies. An insufficient air flow may
damage the server and / or it’s components.
ATTENTION
In order to fully separate the server from current, the power cord must be removed from the wall
outlet.
Page 8
8 Setting up the System
Connecting the System
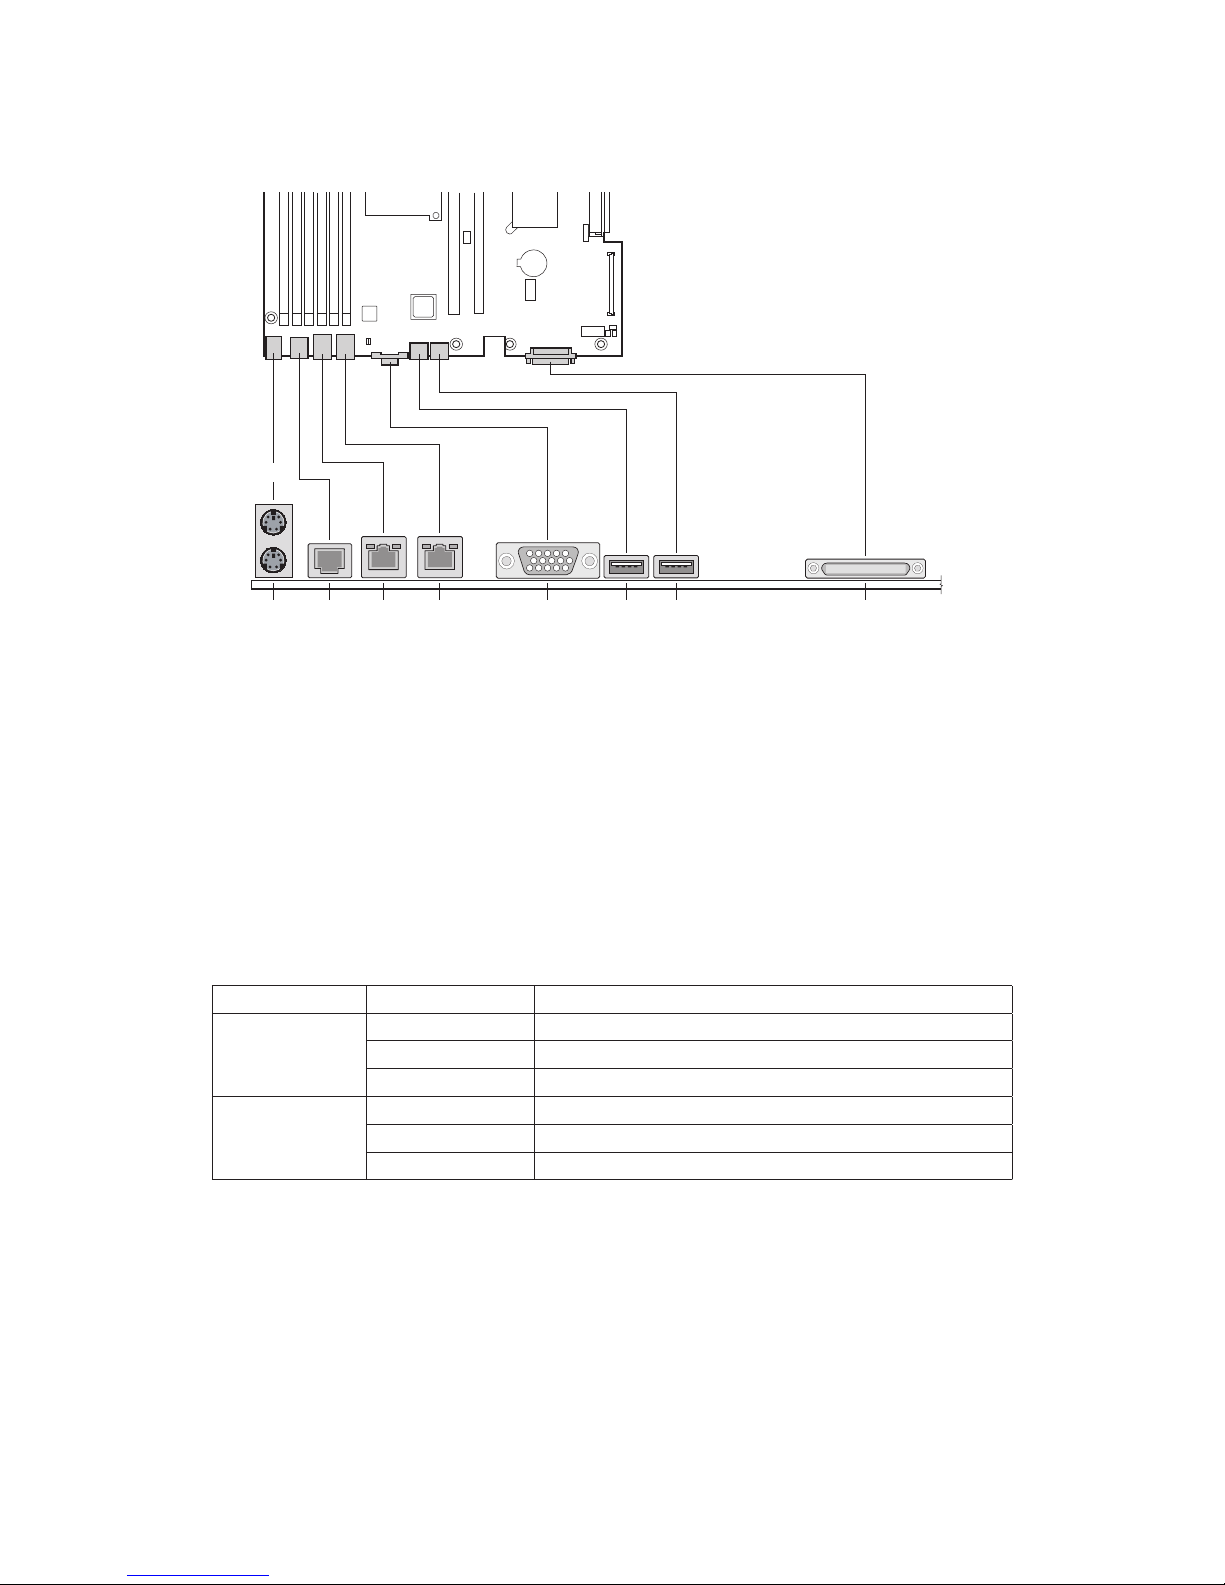
Back Panel Connectors
A. PS/2 mouse F. Video
B. PS/2 keyboard
G. USB port 1
C. Serial Port B H. USB port 2
D. NIC port 1 (1 Gbps)
I. SCSI channel B
E. NIC port 2 (1 Gbps)
Table 1. NIC LEDs
LED Color LED State Description
Left LED Off
No network connection
Solid Amber
Network connection in place
Blinking Amber Transmit/receive activity
Right LED Off 10 Mbps connection (if left LED is on or blinking)
Solid Amber 100 Mbps connection
Solid Green 1000 Mbps connection
TP00762
A
F
C
D
E
G
H
B
I
a
Figure 1. Back Panel Connectors
Page 9

9MAXDATA Server PLATINUM 1500 IR M5
Standard Control Panel
The diagram below shows the features available on the Standard Control Panel. The Standard Control
Panel is one of two required control options that can be selected. The other option is the Local Control
Panel.
Table 2. Standard Control Panel Features
Callout Feature Function
A NIC 2 activity LED Continuous green light indicates a link between the system
and the network to which it is connected.
Blinking green light indicates network activity.
B NIC 1 activity LED
C Power/Sleep button Toggles the system power on/off. Sleep button for ACPI
compatible operating systems.
D Power/Sleep LED Continuous green light indicates the system has power
applied to it. Blinking green indicates the system is in S1
sleep state.
No light indicates the power is off / is in ACPI S4 or S5 state.
E Hard disk drive activity
LED
Random blinking green light indicates hard disk drive activity
(SCSI or SATA).
No light indicates no hard disk drive activity.
F System Fault LED Solid green indicates normal operation
Blinking green indicates degraded performance
Solid amber indicates a critical or non-recoverable condition
Blinking amber indicates a non-critical condition
No light indicates POST is running or the system is off.
G System Identification LED Solid blue indicates system identification is active
No light indicates system identification is not activated
H System Identification
button
Toggles the front panel ID LED and the baseboard ID LED
on and off. The baseboard LED is visible from the rear of the
chassis and allows you to locate the server from the rear of a
rack of systems.
(Continued)
a
Figure 2. Standard Control Panel
Page 10
10 Setting up the System
Standard Control Panel Features (Continued)
I Reset button Reboots and initializes the system.
J USB 2.0 port Allows you to attach a USB component to the front of the
chassis.
K NMI button Puts the server in a halt-state for diagnostic purposes.
L Video port Allows you to attach a video monitor to the front of the
chassis. The front and rear video ports cannot be used at
the same time.
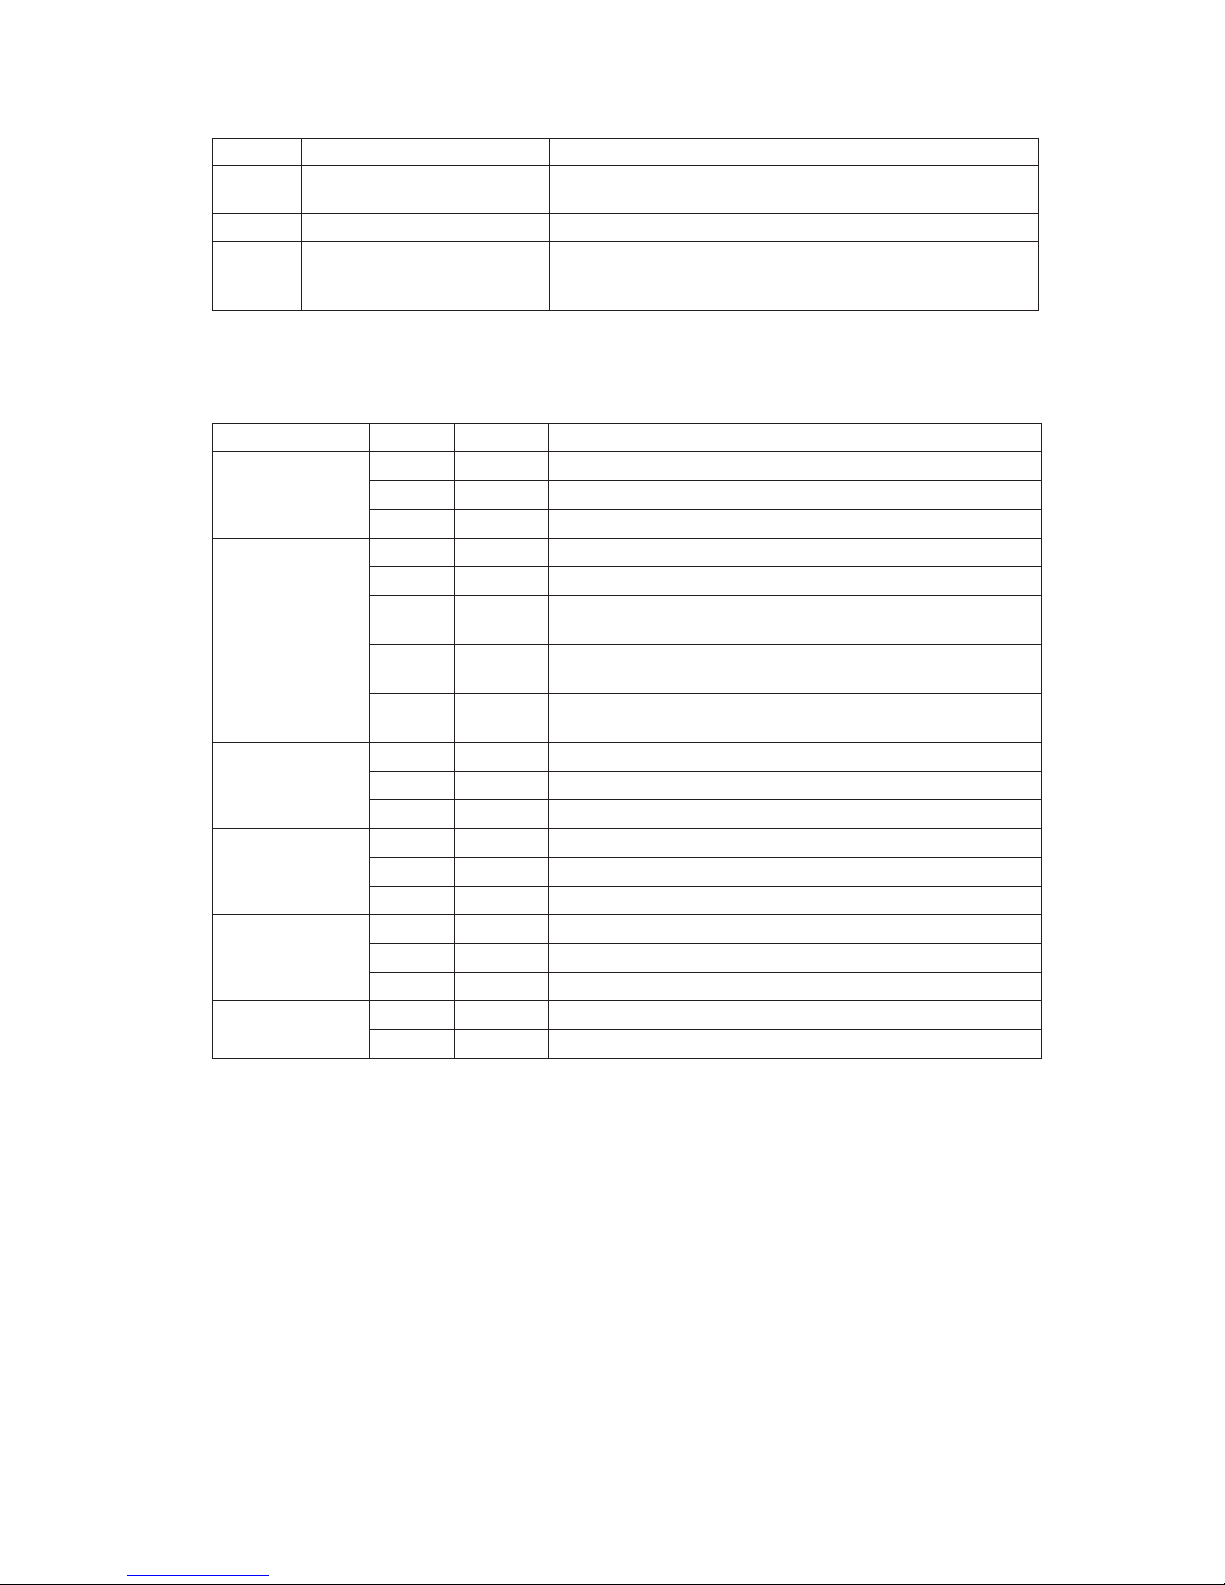
Descriptions of the front panel LEDs are listed in the following table.
Table 3. Front Panel LED Description
LED Name Color Condition Description
Power/Sleep LED
Green ON Power On
Green BLINK Standby/Sleep (S1)
OFF Off (also Sleep S4)
Status
Green ON System Ready
Green BLINK System ready, but degraded: some CPU fault, DIMM killed
Amber ON Critical alarm: Critical power module failure, critical fan
failure, voltage (power supply), voltage and thermal fault
Amber BLINK Non-critical failure: Redundant fan failure, redundant power
failure, non-critical power and voltage
OFF System not ready: Post error / NMI event / PCI or terminator
missing
Hard Drive
Activity
Green BLINK Hard drive activity
Amber ON Fault
OFF No activity
NIC 1 Activity
Green ON Linked
Green BLINK LAN activity
OFF Idle
NIC 2 Activity
Green ON Linked
Green BLINK LAN activity
OFF Idle
ID LED (rack
only)
Blue BLINK Server identification; Toggled by ID button or software
OFF Server identification; Toggled by ID button or software
Page 11
11MAXDATA Server PLATINUM 1500 IR M5
2 Server Board Features
This chapter briefly describes the main features of the MAXDATA PLATINUM Server Board. This
chapter provides a list of the server board features, and diagrams showing the location of important
components and connections on the server board.
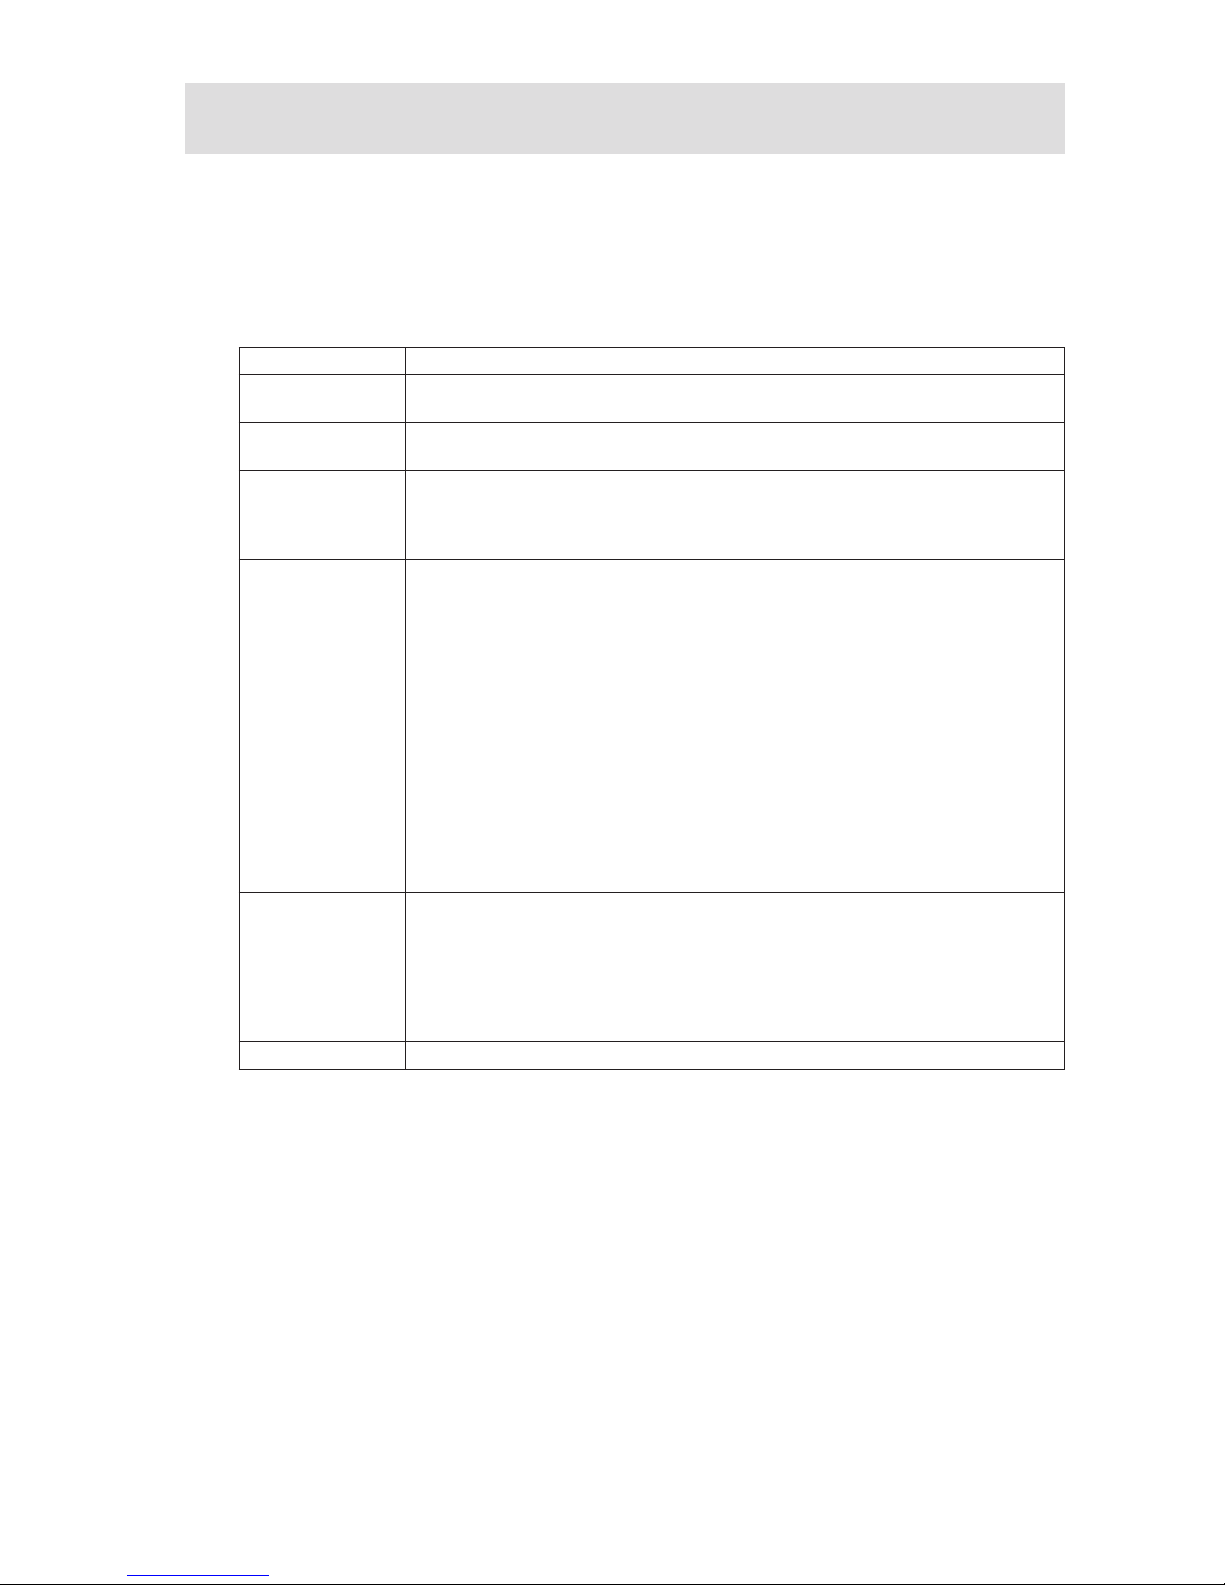
Table 4 summarizes the major features of the server board.
Table 4. Server Board Features
Feature Description
Processors Support for up to two Intel
®
Xeon™ Processors with an 800 MHz front side bus
and frequencies starting at 2.8 GHz.
Memory Memory mirroring and memory sparing options Six DIMM slots supporting DDR
266 MHz or DDR 333 MHz memory
Chipset Intel® E7520 chipset, including:
• E7520 MCH
• PXH
• Intel
®
82801ER I/O Controller Hub 5-R (ICH-5R)
I/O Control
External connections:
• Stacked PS/2 ports for keyboard and mouse
• RJ45 Serial B port
• Two RJ45 NIC connectors for 10/100/1000 Mbps connections
• Two USB 2.0 ports
• U320 high-density 80-pin SCSI connector (channel B)
Internal connections:
• Two USB port headers, each of which supports two USB 2.0 ports
• One DH10 Serial A header
• One Ultra320 80-pin SCSI connector (Channel A)
• Two SATA-150 connectors with integrated RAID 0/1 support
• One ATA-100 connector
• SSI-compliant 34-pin, high-density 100-pin, and alternate 50-pin control panel
headers
• Intel
®
Management Module 120-pin connector, supporting the optional
Professional and Advanced server management modules
Add-in Card • One low-profile riser slot that supports a riser card capable of supporting upto
three low-profile PCI-X 66 / 100 MHz add-in cards.
• One full-height riser slot, utilizing Intel® Adaptive Slot technology. Capable of
supporting riser cards that follow either PCI-X or PCI-Express® specifications.
The riser cards can support upto three full-height, full-length PCI-X 66 /
100 MHz, PCI-X 133, or PCI-Express
®
add-in cards, depending on the riser card
used.
Video On-board ATI
®
RAGE XL video controller with 8 MB SDRAM
(Continued)
Page 12

12 Server Board Features
Server Board Features (Continued)
Hard Drive, Optical
Drive, and Floppy
Drive
Floppy Support:
• Single Floppy channel accessed through either of two connectors. When
integrated with either the SATA or SCSI backplanes in the MAXDATA
PLATINUM 1500 IR or 2200 IR, the floppy controller signals are routed
through the 100-pin flex cable. Other server configurations can use the legacy
24-pin connector. Use of both interfaces in a common server configuration is
not supported.
Ultra ATA/100 support:
• Two IDE channels, each capable of supporting up to two drives. The primary
channel routes through a 100-pin flex cable to the backplane providing Optical
Drive support.
SATA support:
• Two SATA ports
• RAID level 0/1 support
SCSI support:
• Dual-channel LSI Logic
®
53C1030 Ultra320 SCSI controller
- Implements LSI Logic
®
Fusion-MPT architecture
- Supports LSI Logic
®
Integrated Mirroring and Striping technology
• Zero-channel RAID supporting the RUBI-2 specification
LAN Dual Intel® 82546GB 10/100/1000 NICs
Fans • Two 3-pin SSI compliant single speed processor fan connectors
• One 3-pin system fan connector with fan speed control.
• One 20-pin fan connector providing fan speed control and monitoring for
system fans in the MAXDATA PLATINUM 1500 IR and 2200 IR
Server
Management /
Diagnostics
• On-board Platform Instrumentation using the National Semiconductor
PC87431M mini-Baseboard Management Controller (mBMC) (Default).
• Support for optional Intel
®
Management Module - Advanced Edition or
Professional Edition
• Support for Intel® Server Management 8.x
• Intel
®
Light-Guided Diagnostics on all field replaceable units (FRUs)
Page 13
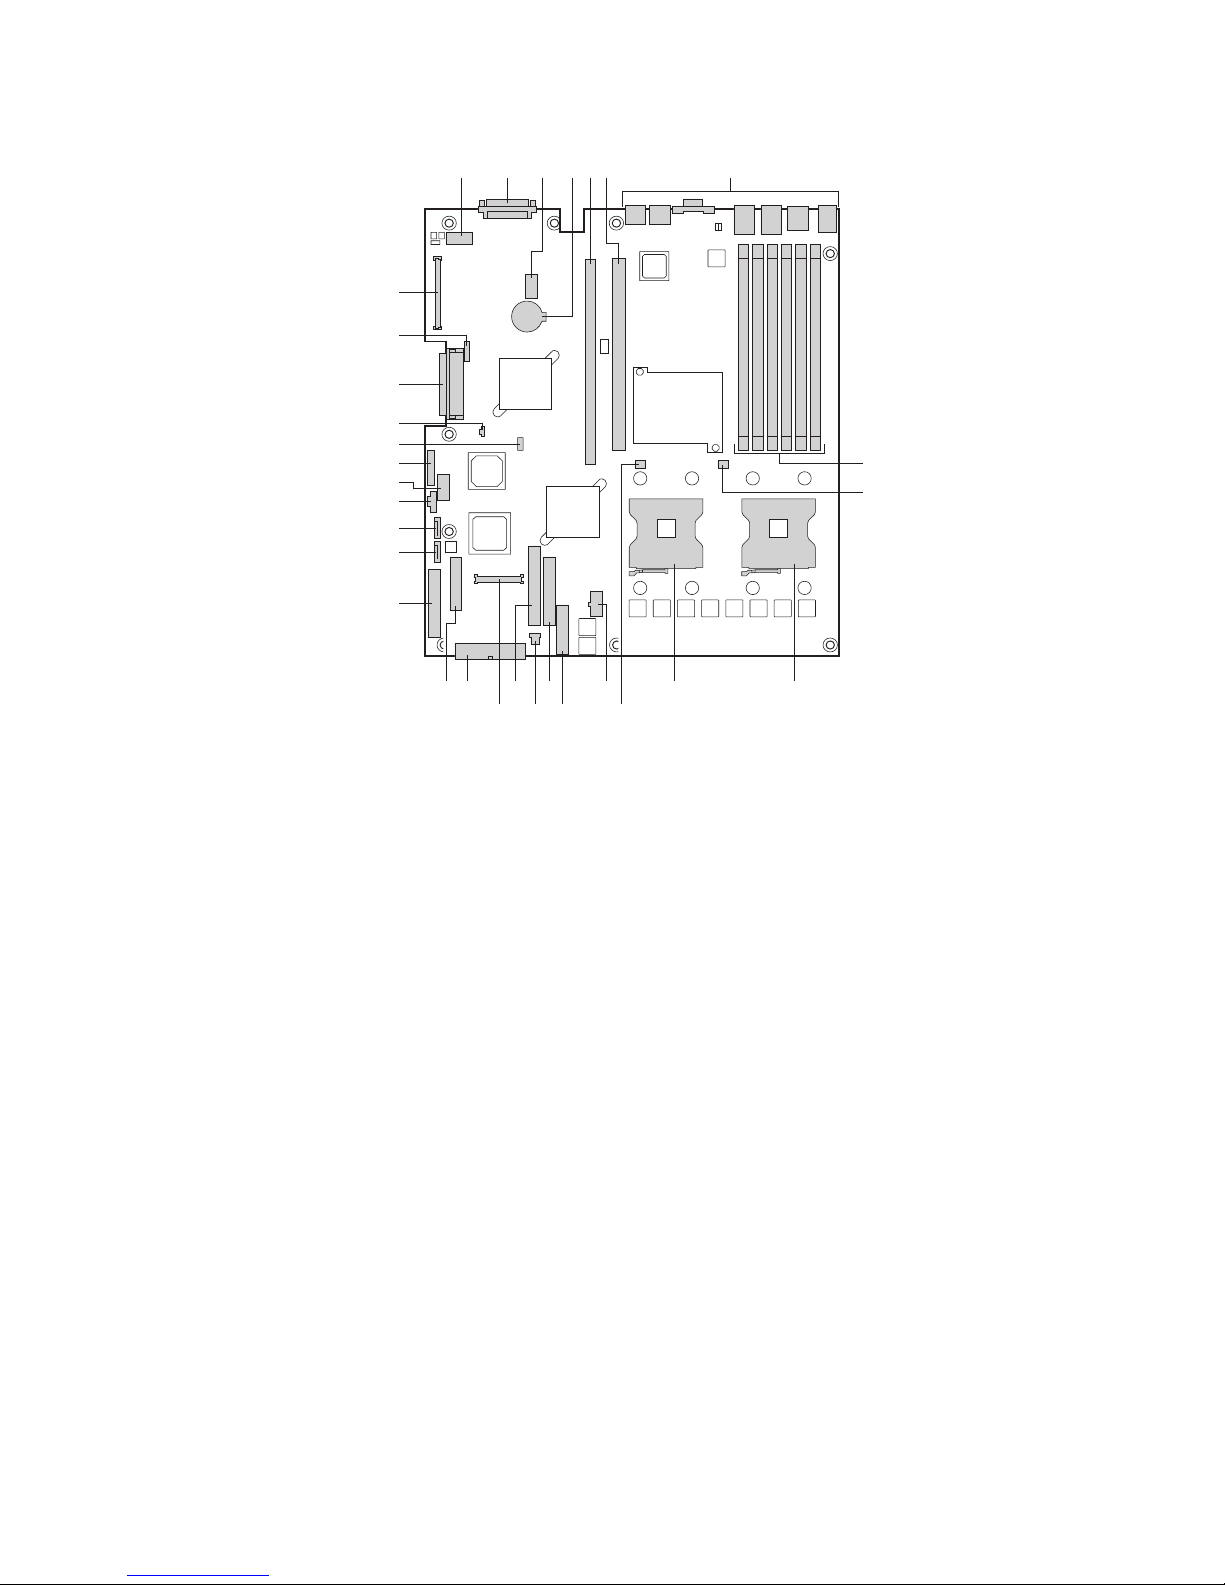
13MAXDATA Server PLATINUM 1500 IR M5
Connector and Header Locations
A. Serial Port A L. Processor 2 fan header W. SATA port 2
B.
SCSI Channel B M. +12V processor power X. Power supply signal cable
C. 8-pin OEM connector N. Fan board connector Y. USB header (DH-10)
D. Battery O.
Floppy connector Z. USB header (1 x 10)
E. Full-height riser slot P. System fan 3-pin header AA. IPMB connector
F. Low-profile riser slot
Q. Secondary IDE channel BB. IDE power connector
G. Back panel I/O ports
R. Control panel 100-pin
connector
CC. SCSI channel A
H. DIMM sockets S. 24-pin SSI power connector DD. ICMB connector
I. Processor 1 fan header T. 50-pin control panel connector EE. 120-pin connector for optional
Intel® Management Module
J. Processor socket 1 U.
34-pin SSI control panel
connector
K. Processor socket 2 V. SATA port 1
TP00757
A C DB E F G
H
I
JK
R
M
LN
ST
EE
CC
X
U
V
W
Z
Y
AA
DD
BB
QPO
a
Figure 3. Server Board Connector and Component Locations
Page 14
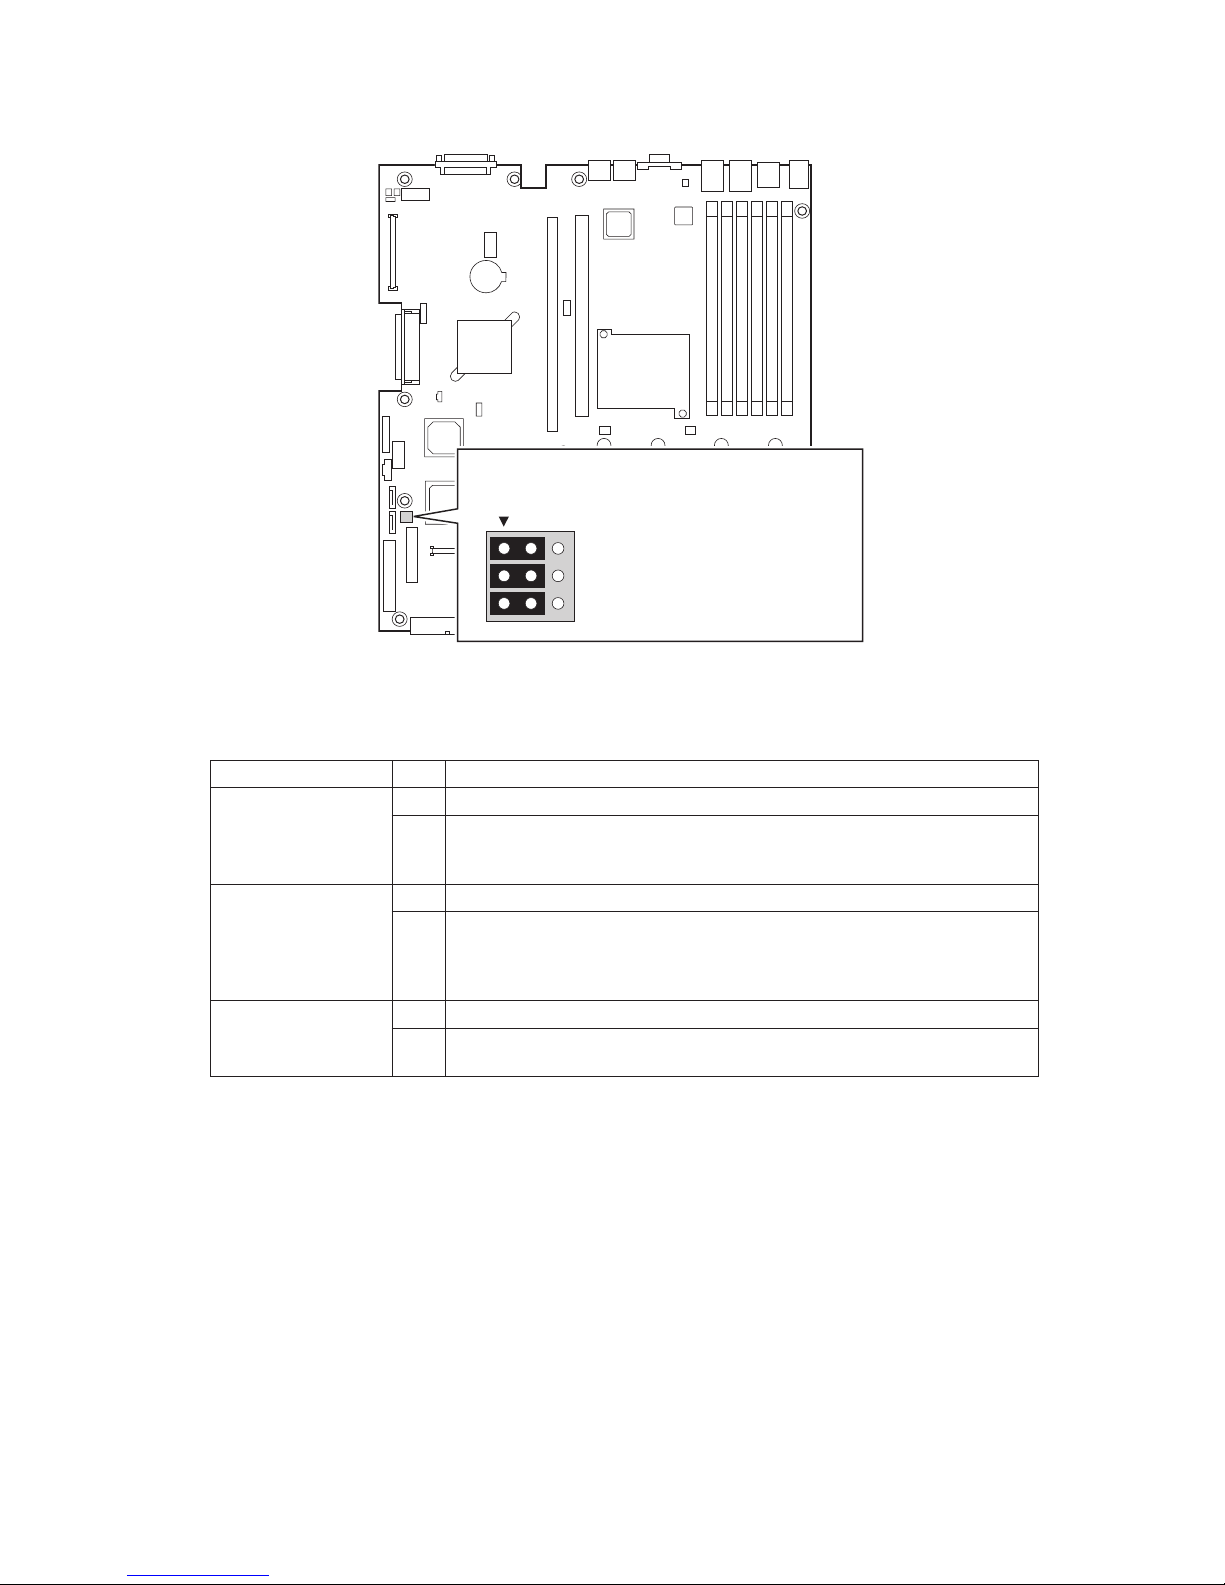
14 Server Board Features
Configuration Jumpers
Table 5. Configuration Jumper
Jumper Name Pins What happens at system reset…
Password Clear (line
“A” in figure above)
1 - 2 These pins should be jumpered for normal system operation.
2 - 3 If these pins are jumpered, administrator and user passwords will be
cleared on the next reset. These pins should not be jumpered for normal
operation.
Recovery Boot (line
“B” in figure above)
1 - 2 These pins should be jumpered for normal system operation.
2 - 3 If these pins are jumpered, the system will attempt to recover the BIOS
by loading the BIOS code into the flash device from a floppy disk. This
jumper is typically used when the BIOS has become corrupted. These
pins should not be jumpered for normal operation.
CMOS Clear (line
“C” in figure above)
1 - 2 These pins should be jumpered for normal system operation.
2 - 3 If these pins are jumpered, the CMOS settings will be cleared on the
next reset. These pins should not be jumpered for normal operation.
TP00759
3
2
C1-C2: CMOS Clear by BMC
1-2: Default setting for each jumper set
C2-C3: CMOS Clear Force Erase
B1-B2: Recovery Boot Disable (Normal Boot)
B2-B3: Recovery Boot Enable
A1-A2: Password Clear Protect
A2-A3: Password Clear Erase
A
B
C
a
Figure 4. Configuration Jumper Location
Page 15

15MAXDATA Server PLATINUM 1500 IR M5
Hardware Requirements
Processor
One or two Intel® Xeon™ Processors with an 800 MHz front side bus must be installed. Processor
frequencies form 2.8 GHz to 3.6 GHz are supported.
Memory
The server board provides six DIMM sockets across two channels, Channel A and Channel B. Channel
A consists of DIMM sockets 1A, 2A, and 3A. Channel B consists of DIMM sockets 1B, 2B, and 3B.
If six DIMMs are installed, the following maximum capacitites are possible:
• For DDR266 DIMMS: Maximum capacity of 24 GB
• For DDR333 DIMMS: Maximum capacity of 16 GB
A minimum of one 256 MB DIMM is required in DIMM socket 1A or 1B. This uses single-channel
interleave. However, for dual-channel interleave, providing optimum performance, a minimum of two
DIMMs should be installed in DIMM sockets 1A and 1B. Except for the option of installing a single
DIMM in socket 1A or 1B, DIMMs must be installed in pairs and populated as follows:
• DIMM 1A and DIMM 1B: Populate these two sockets together first
• DIMM 2A and DIMM 2B: Populate these sockets in addition to DIMM 1A and DIMM 2A if four
DIMMs are to be used.
• DIMM 3A and DIMM 3B: Populate these sockets after DIMM 1A, DIMM 1B, DIMM 2A, and
DIMM 2B have been populated.
DIMMs must meet the following requirements:
• Use only registered DDR DIMM modules
• DDR266 and DDR333 memory can be mixed on the server board, but when mixing DIMM
types, DDR333 memory will be treated as DDR266.
• Use only DIMMs with DIMM organization of x72 ECC
• Use only DIMMs with the capacities outlined in the following table can be used
Table 6. DIMM Module Memory Capacity Support
SDRAM Parts, SDRAM
Technology
128 MB 256 MB 512 MB 1 GB
X8, single row 128 MB 256 MB 512 MB 1 GB
X8, double row 256 MB 512 MB 1 GB 2 GB
X4, single row 256 MB 512 MB 1 GB 2 GB
X4, stacked, double row 512 MB
1 GB 2 GB 4 GB
NOTE
When using Dual Rank (Double Row) DDR-333 DIMM technologies, a maximum of four loads per
memory channel is supported. When all DIMMs used in the system match either of these technologies,
a maximum of four DIMMs can be populated.
In determining your memory requirements, the need for memory sparing or memory mirroring must
be considered.
Page 16

16 Server Board Features
Memory Sparing and Mirroring
The Intel® E7520 chipset includes hardware that supports memory mirroring and memory on-line
sparing. Both memory mirroring and memory on-line sparing provide a way to prevent data loss in
case a DIMM fails.
With memory mirroring the system maintains two copies of all data in the memory subsystem. If a
DIMM fails, the data is not lost because the second copy of the data is available from the mirrored
DIMM in the opposite channel. The system will not fail due to memory error unless both the primary
and the mirrored copy of the data become corrupt at the same time.
In a mirrored system, the maximum usable memory is one-half of the installed memory, with four
identical DIMMs installed in sockets 1A, 1B, 2A, and 2B. Since the data is duplicated across DIMMs,
it means that up to one-half of the installed DIMMs are actively in use at any one time. The remaining
DIMMs are used for mirroring:
– If the DIMM in socket 1A fails, the DIMM in socket 2B takes over.
– If the DIMM in socket 1B fails, the DIMM in socket 2A takes over.
For memory on-line sparing, one DIMM per channel is used as the memory spare. The spare DIMM is
not available for use, but is kept in reserve. If a DIMM begins to fail, the content of the failing DIMM
is copied to the spare DIMM in that channel. When all of the data is copied to the spare DIMM, the
primary DIMM is removed from service and the spare DIMM takes its place.
When memory on-line sparing is used, the spare DIMMs must be equal to or larger than the largest
in-service DIMM in that channel.
NOTE
Memory mirroring and memory sparing are mutually exclusive. Only one can be active at a time.
Page 17

17MAXDATA Server PLATINUM 1500 IR M5
Optional Hardware
Intel® Management Module
Two versions of the Intel® Management Module are available to provide enhanced server management
features.
• The Intel
®
Management Module - Professional Edition: contains a hardware mezzanine card
that plugs into the server board.
• The Intel
®
Management Module - Advanced Edition: includes a hardware mezzanine card,
10/100 Mbps NIC mezzanine card, and cables.
Local Control Panel
The Local Control Panel provides enhanced system control by utilizing a LCD display, which provides
additional controls and indicators beyond the standard control panel.
NOTE
Use of this feature requires the installation of either Intel® Management Module, Professional Edition
or Advance Edition.
Page 18

18
Page 19
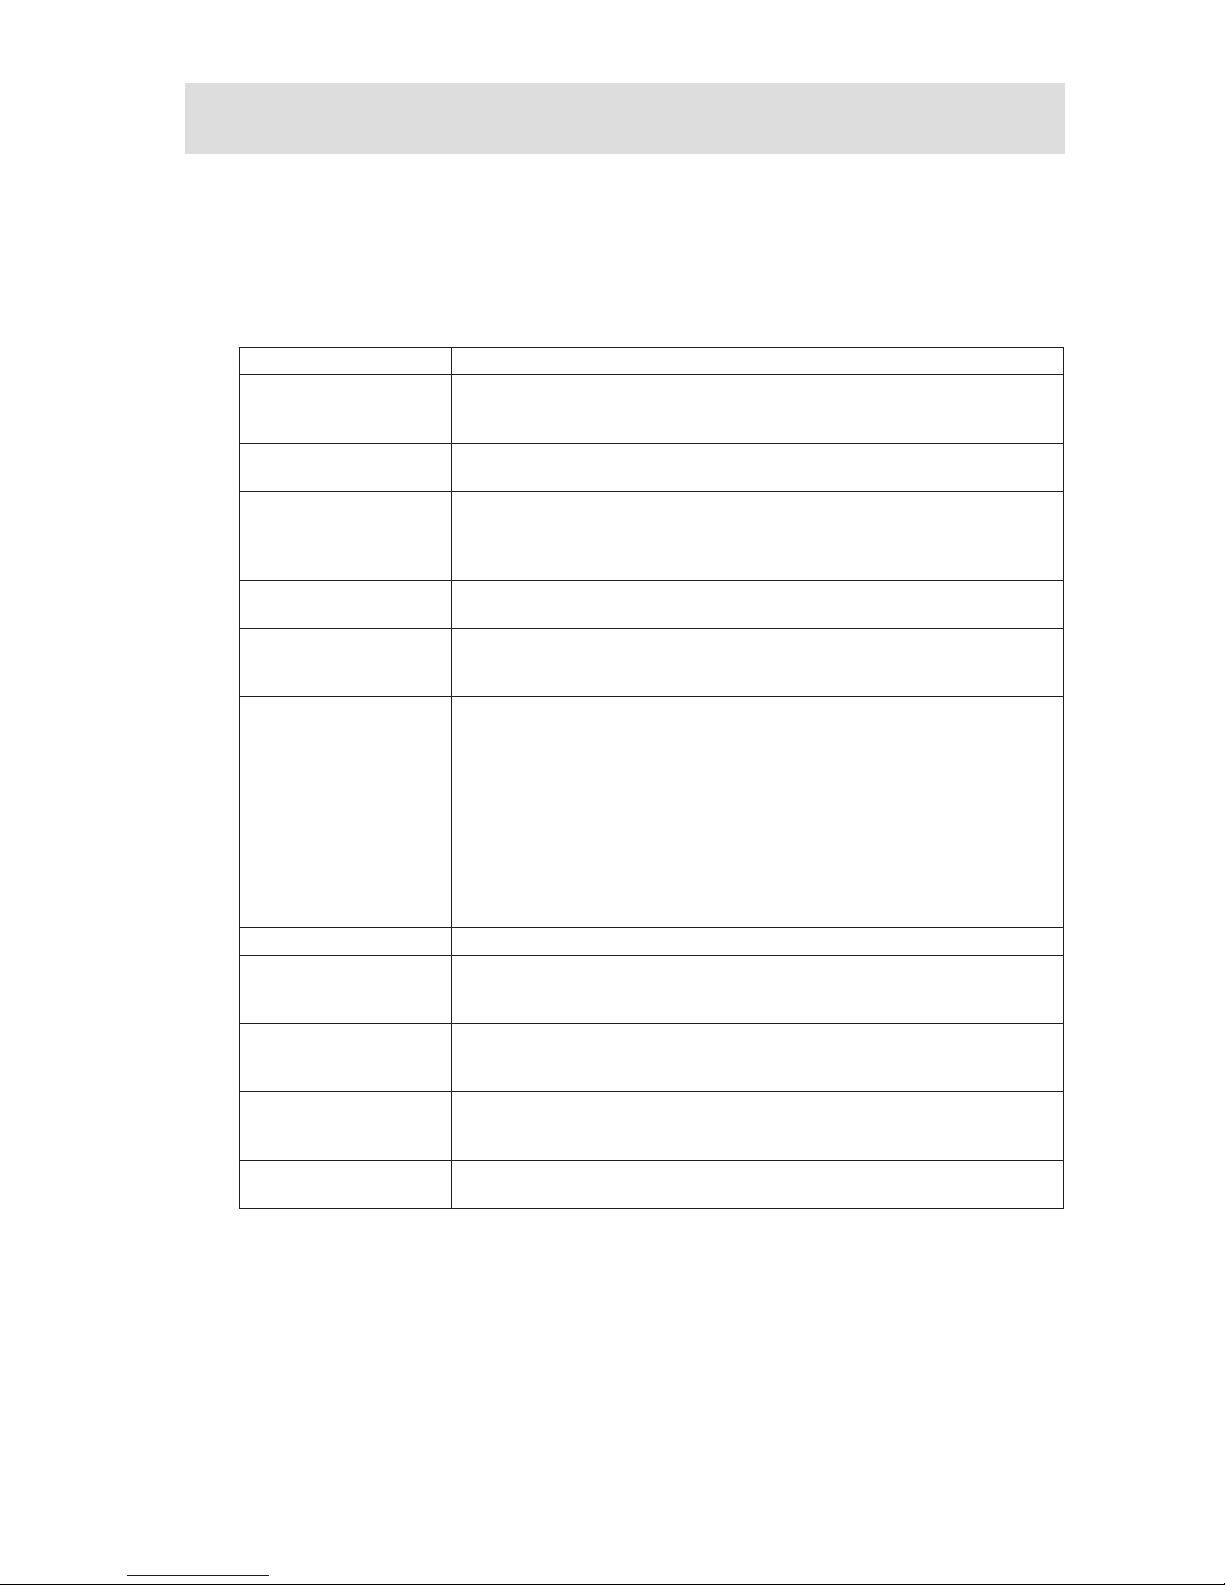
19MAXDATA Server PLATINUM 1500 IR M5
3 Server Chassis Features
This chapter briefly describes the main features of the MAXDATA PLATINUM 1500 IR Server Chassis.
It provides a list of the server features, and diagrams showing the location of important components
and connections on the server chassis.
Table 7 summarizes the major features of the server chassis.
Table 7. Server Chassis Features
Feature Description
Dimensions • 1.703 inches high
• 16.930 inches wide
• 26.457 inches deep
Hard Drives (dependent
on option selected)
• Up to three fixed or hot-swap SATA or SCSI drives
Peripherals (dependent
on option selected)
• Slimline bay for CD-ROM, DVD-ROM drive, or floppy drive
• Kit to convert one hard drive bay into a floppy drive bay (optional
accessory)
• PCI riser card bracket
Fans Support for up to seven system fans, including two fans in the power
supply
Control Panel
(dependent on option
selected)
Standard Control Panel:
Local Control Panel (requires installation of an optional Management
Module)
LEDs and displays
(dependent on option
selected)
With Standard Control Panel:
• NIC1 Activity
• NIC2 Activity
• Power / Sleep
• System Status
• System Identification
• Hard Drive Activity
With Local Control Panel:
• additional LCD Display
Power Supply One 500 W power supply
System Security • Lockable front bezel (optional accessory)
• Chassis intrusion switch
• Lock attach point for chassis cover
Fans • Four 40 x 40 x 56 mm dual-rotor fans
• One 40 x 40 x 28 mm single rotor fan
• Two 40 x 40 x 28 mm fans in the power supply
USB (dependent on
option selected)
• One front panel USB port with Standard Control Panel
• Two front panel USB ports with Local Control Panel
• Two back panel USB ports
Video • One front panel video port (available only with Standard Control Panel)
• One rear panel video port
Page 20
20 Server Chassis Features
Component Identification
Internal Components
The diagram below shows the server chassis with a server board installed into it.
A. Slimline drive bay (drive not included) F. Server board
B. Backplane (optional component)
G. Processor air duct
C. Power supply air baffle H. Fan module
D. Power supply
I. Control panel (Standard Control Panel shown)
E. PCI add-in card riser assembly J. Hard drive bays (drives not included)
a
Figure 5. Internal Component Locations
A
B
C
D
E
F
G
H
I
J
Page 21
21MAXDATA Server PLATINUM 1500 IR M5
Local Control Panel
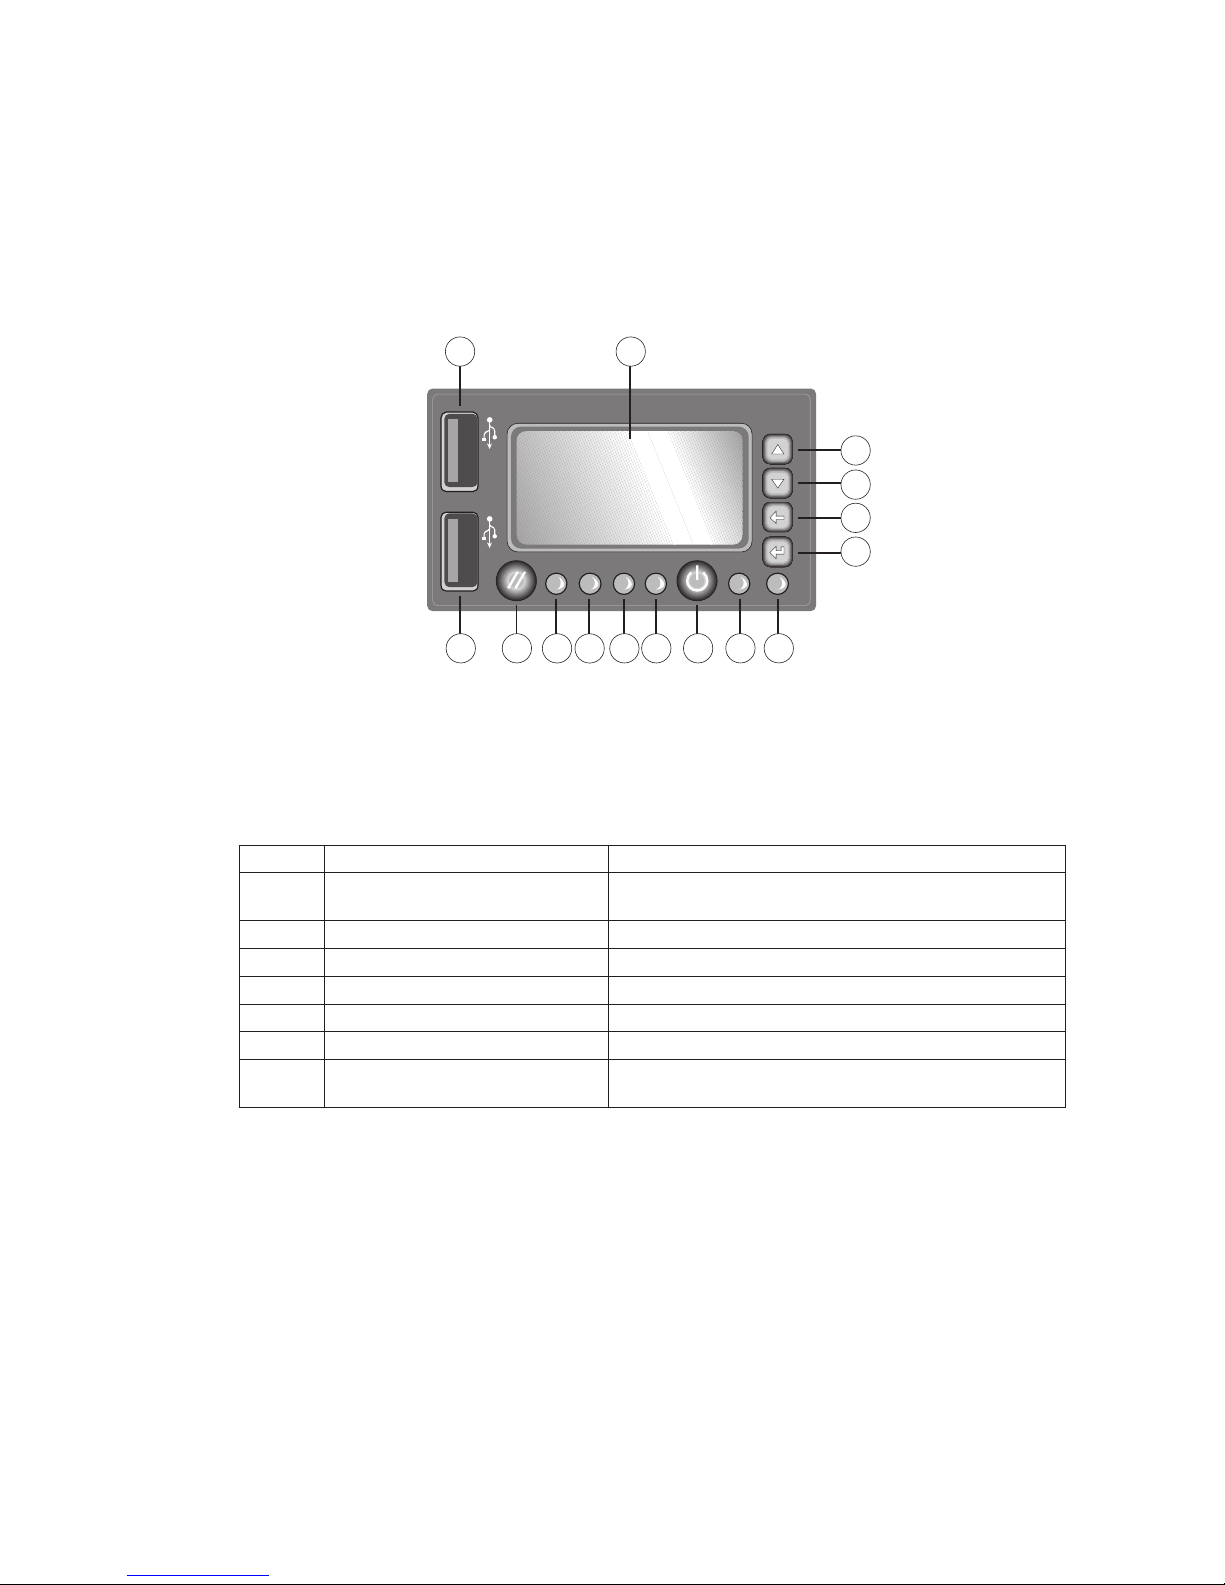
The diagram below shows the features available on the Local Control Panel. The Local Control Panel
is one of two required control options that can be selected. The other option is the Standard Control
Panel.
NOTE
This control panel requires the installation of a Management Module, Professional Edition or Advanced
Edition.
Table 8. Local Control Panel Features
Callout Feature Function
A USB 2.0 port Allows you to attach a USB component to the front of
the chassis.
B LCD display Screen on which system information is displayed.
C Menu control button, scroll up Scroll up one option at a time.
D Menu control button, scroll down Scroll down one option at a time.
E Menu control button, scroll left Move to the previous option.
F Menu control button, scroll right Move to the previous page.
G System Identification LED Solid blue indicates system identification is active. No
light indicates system identification is not activated.
a
Figure 6. Local Control Panel
Page 22
22 Server Chassis Features
Local Control Panel Features (Continued)
H Power/Sleep LED Continuous green light indicates the system has power
applied to it. Blinking green indicates the system is in
S1 sleep state. No light indicates the power is off / is in
ACPI S4 or S5 state.
I Power/Sleep button Toggles the system power on/off. Sleep button for ACPI
compatible operating systems.
J System Status LED Solid green indicates normal operation. Blinking green
indicates degraded performance. Solid amber indicates
a critical or non-recoverable condition. Blinking amber
indicates a non-critical condition. No light indicates
POST is running or the system is off.
L
K
NIC 1 activity LED
NIC 2 activity LED
Continuous green light indicates a link between the
system and the network to which it is connected.
Blinking green light indicates network activity.
M Hard disk drive status LED Random blinking green light indicates hard disk drive
activity. No light indicates no hard disk drive activity is
taking place.
N Reset button Reboots and initializes the system.
O USB 2.0 port Allows you to attach a USB component to the front of
the chassis.
Back Panel Features
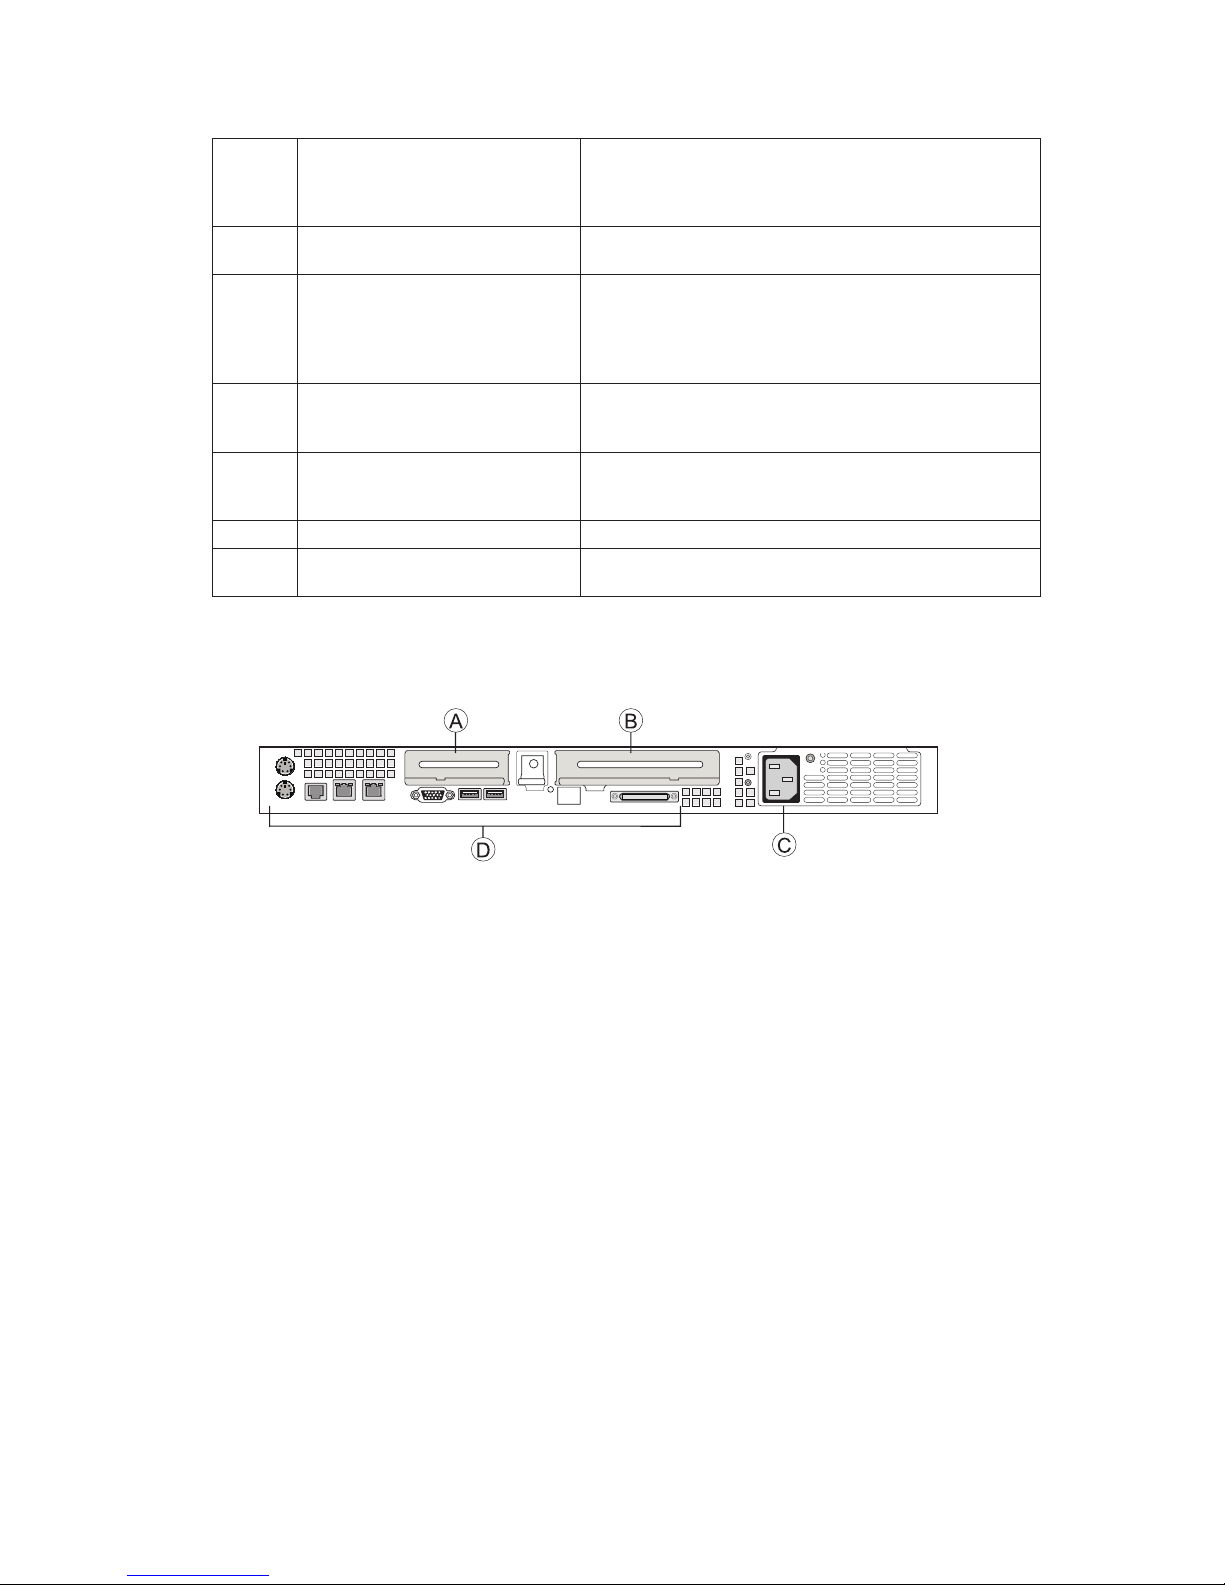
A. Low-profile add-in card bracket C. AC power receptacle
B. Full-height add-in card bracket D. I/O ports (see note)
NOTE
See the board section of the documentation for port identification.
a
Figure 7. Chassis Back
Page 23
23MAXDATA Server PLATINUM 1500 IR M5
Peripheral Devices
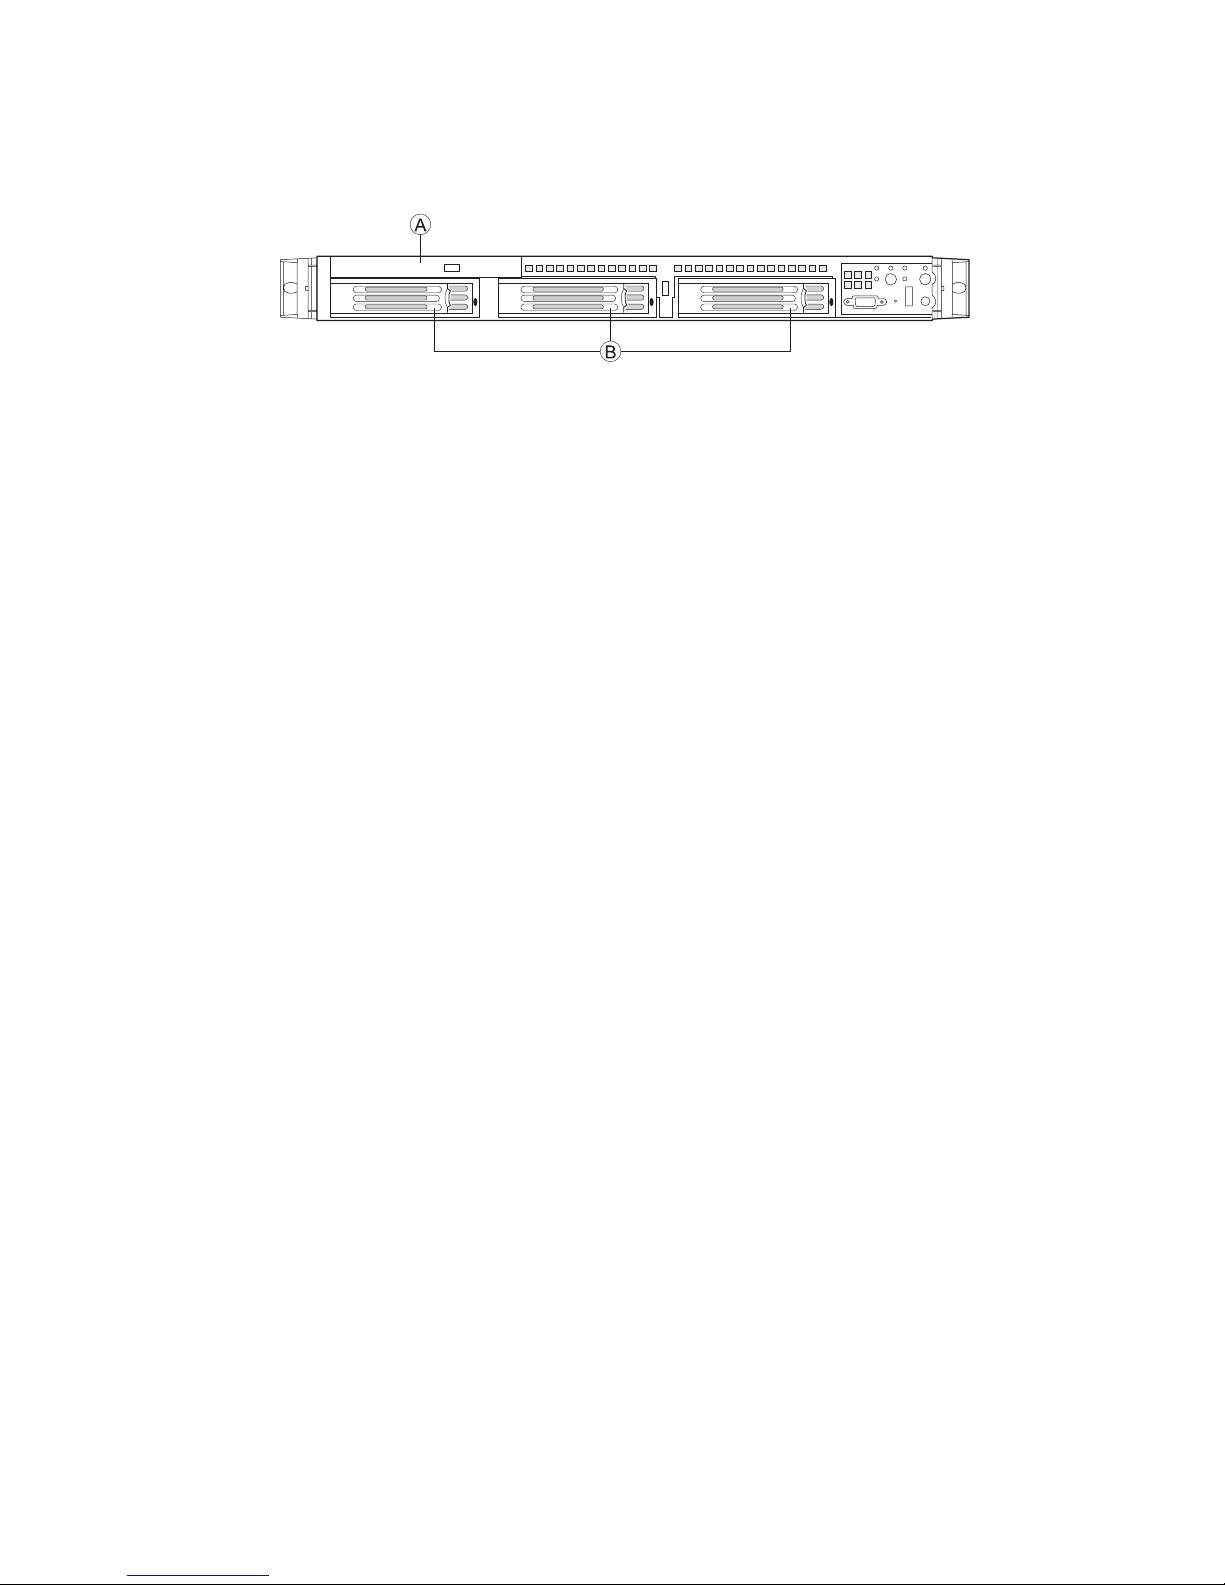
The chassis provide locations and hardware for installing hard drives, a floppy drive, CD-ROM drive,
or DVD-ROM drive. The following figure shows the available options.
A. Slimline floppy drive / DVD-ROM drive / CD-ROM drive
B. Hard drive bays (3)
Hard Disk Drives
The chassis ships with three drive carriers for installing three SCSI drives. One left drive bay can be
converted to be used as a floppy bay.
a
Figure 8. Optional Peripherals
Page 24

24
Page 25
25MAXDATA Server PLATINUM 1500 IR M5
4 Hardware Installations and Upgrades
Before You Begin
Before working with your server product, pay close attention to the safety instructions at the beginning
of this manual.
Tools and Supplies Needed
• Phillips (cross head) screwdriver (#1 bit and #2 bit)
• Needle-nosed pliers
• Antistatic wrist strap and conductive foam pad (recommended)
System References
All references to left, right, front, top, and bottom assume the reader is facing the front of the chassis
as it would be positioned for normal operation.
Removing and Installing the Chassis Cover
Removing the Chassis Cover
The Server Chassis must be operated with the top cover in place to ensure proper cooling. You will
need to remove the top cover to add or replace components inside of the platform. Before removing
the top cover, power down the server and unplug all peripheral devices and the AC power cable.
None of the components inside of the chassis is hot-swappable.
NOTE
A nonskid surface or a stop behind the chassis may be needed to prevent the chassis from sliding
on your work surface.
1. Observe the safety and ESD precautions at the beginning of this book.
2. Turn off all peripheral devices connected to the server. Turn off the server.
3. Disconnect the AC power cord.
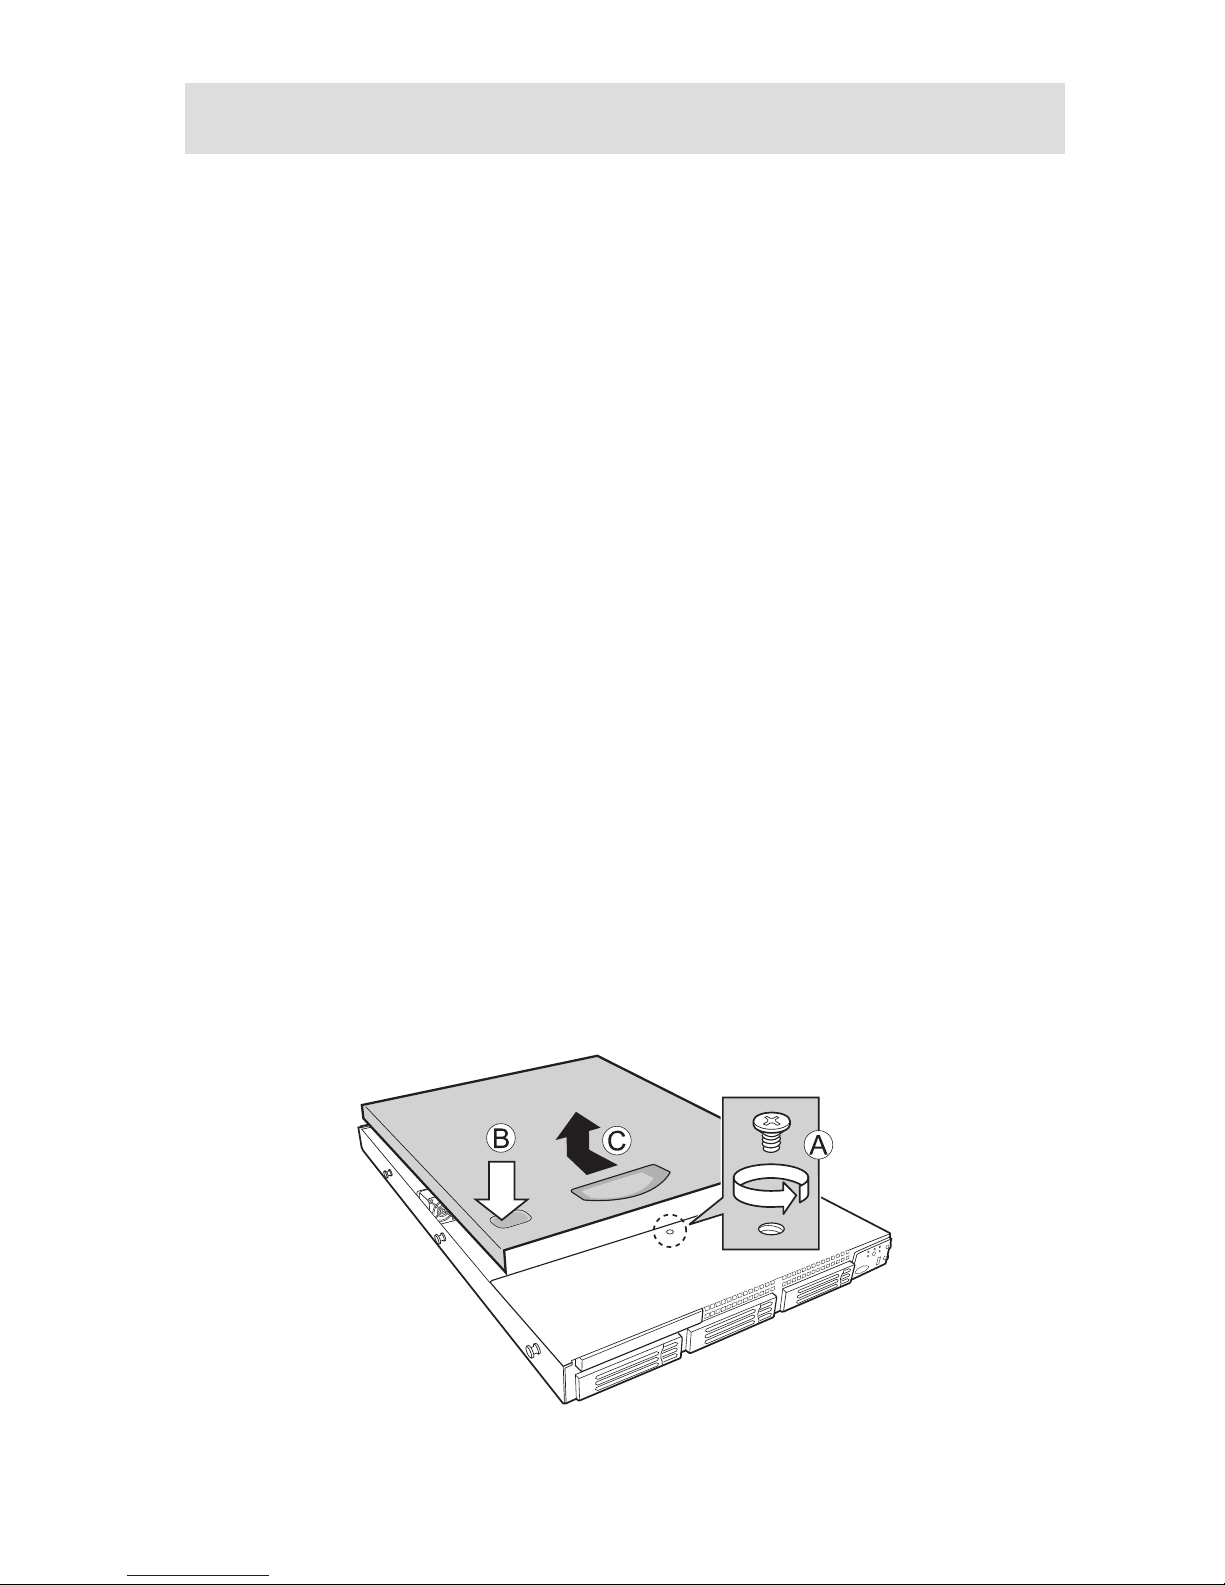
4. Remove the shipping screw if it is installed. See letter “A” in the figure below.
5. While holding in the blue button at the top of the chassis in (see letter “B”), slide the top cover
back until it stops (See letter “C”).
6. Lift the cover upward to remove it.
Figure 9. Removing the Chassis Cover
a
Page 26
26 Hardware Installations and Upgrades
Removing and Installing the Front Bezel
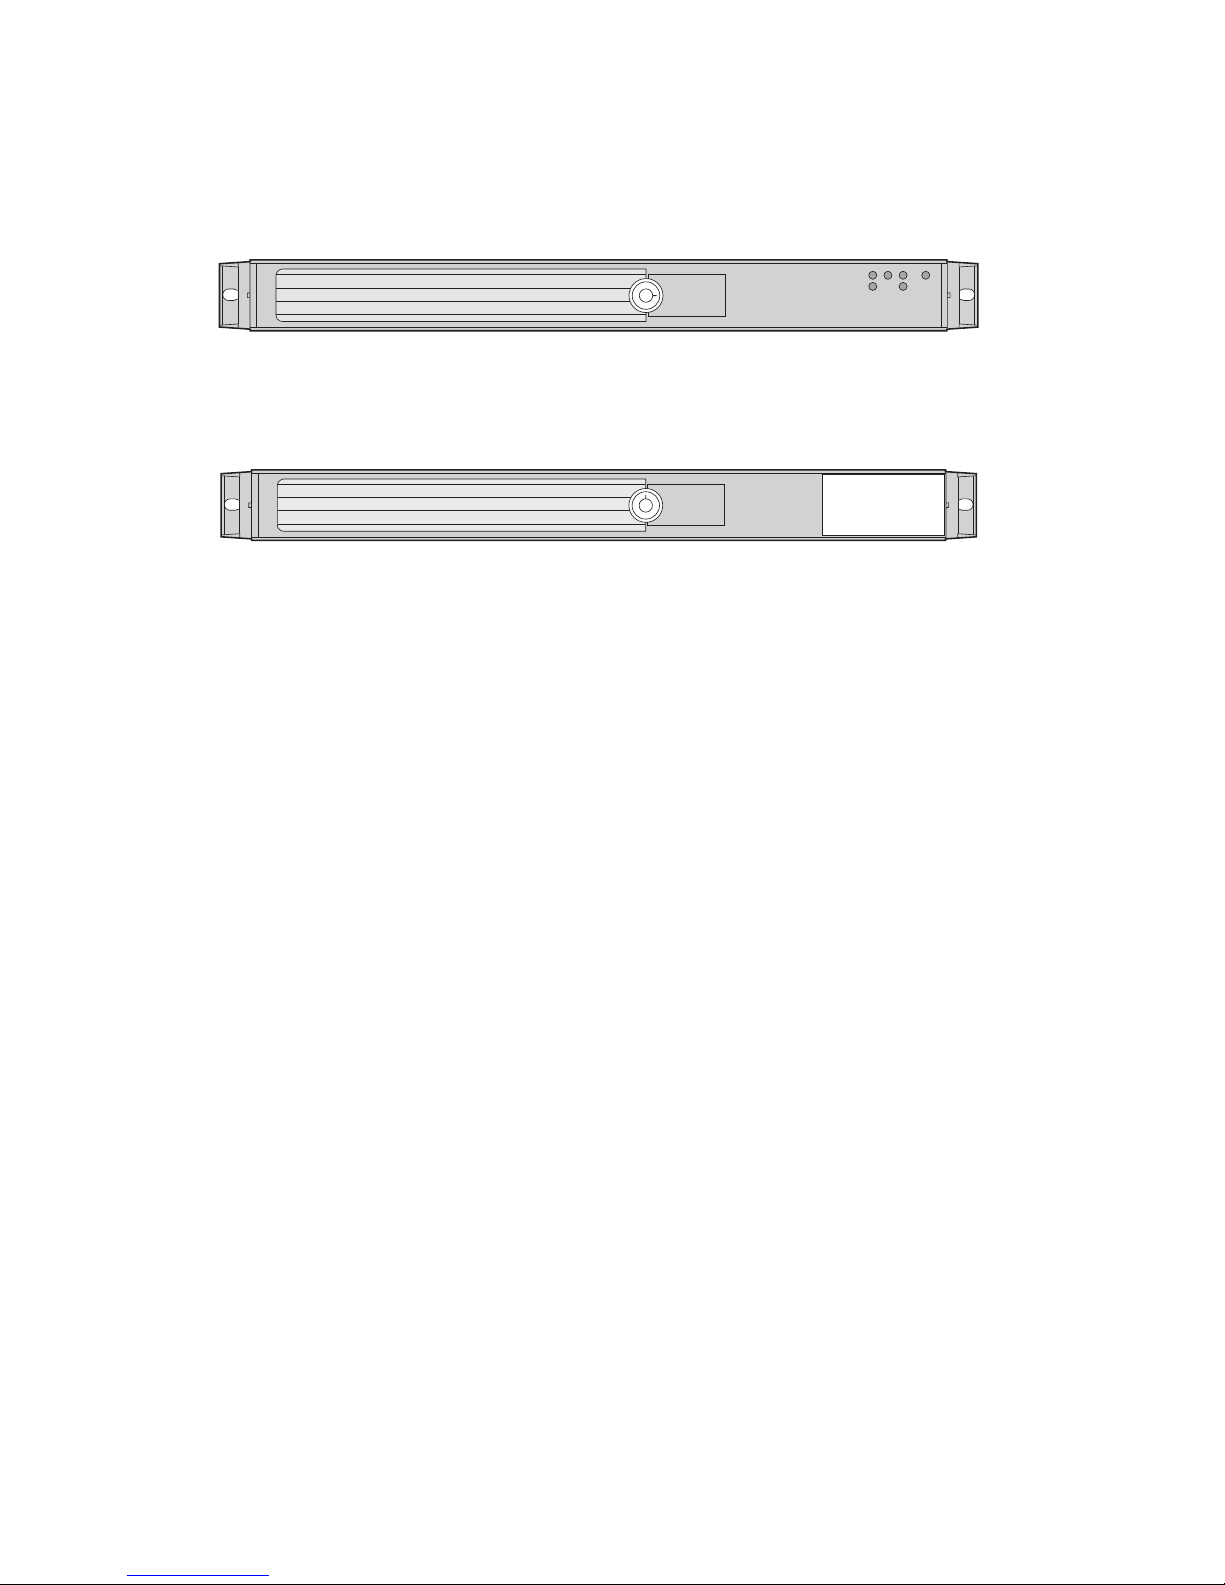
Two front bezel options are available. One is used for the Standard Control Panel and the other is
used with the Local Control Panel. Note the orientation in the figures below – the control panel is at
the right. If you are installing a bezel on your chassis, make sure you position it as shown.
Removing the Front Bezel
1. Disconnect any cables attached to the control panel.
2. Pull the bezel out from the chassis.
Installing the Front Bezel
1. At each end of the bezel, line up the center notch on the bezel with the center guide on the
rack handles.
2. Push the bezel onto the front of the chassis until it clicks into place.
Figure 10. Standard Front Bezel
a
Figure 11. Local
Control Panel Front Bezel
a
Page 27
27MAXDATA Server PLATINUM 1500 IR M5
Installing and Removing a Hard Disk Drive
Installing Hot-swap Hard Disk Drive
1. Remove the front bezel if it is installed
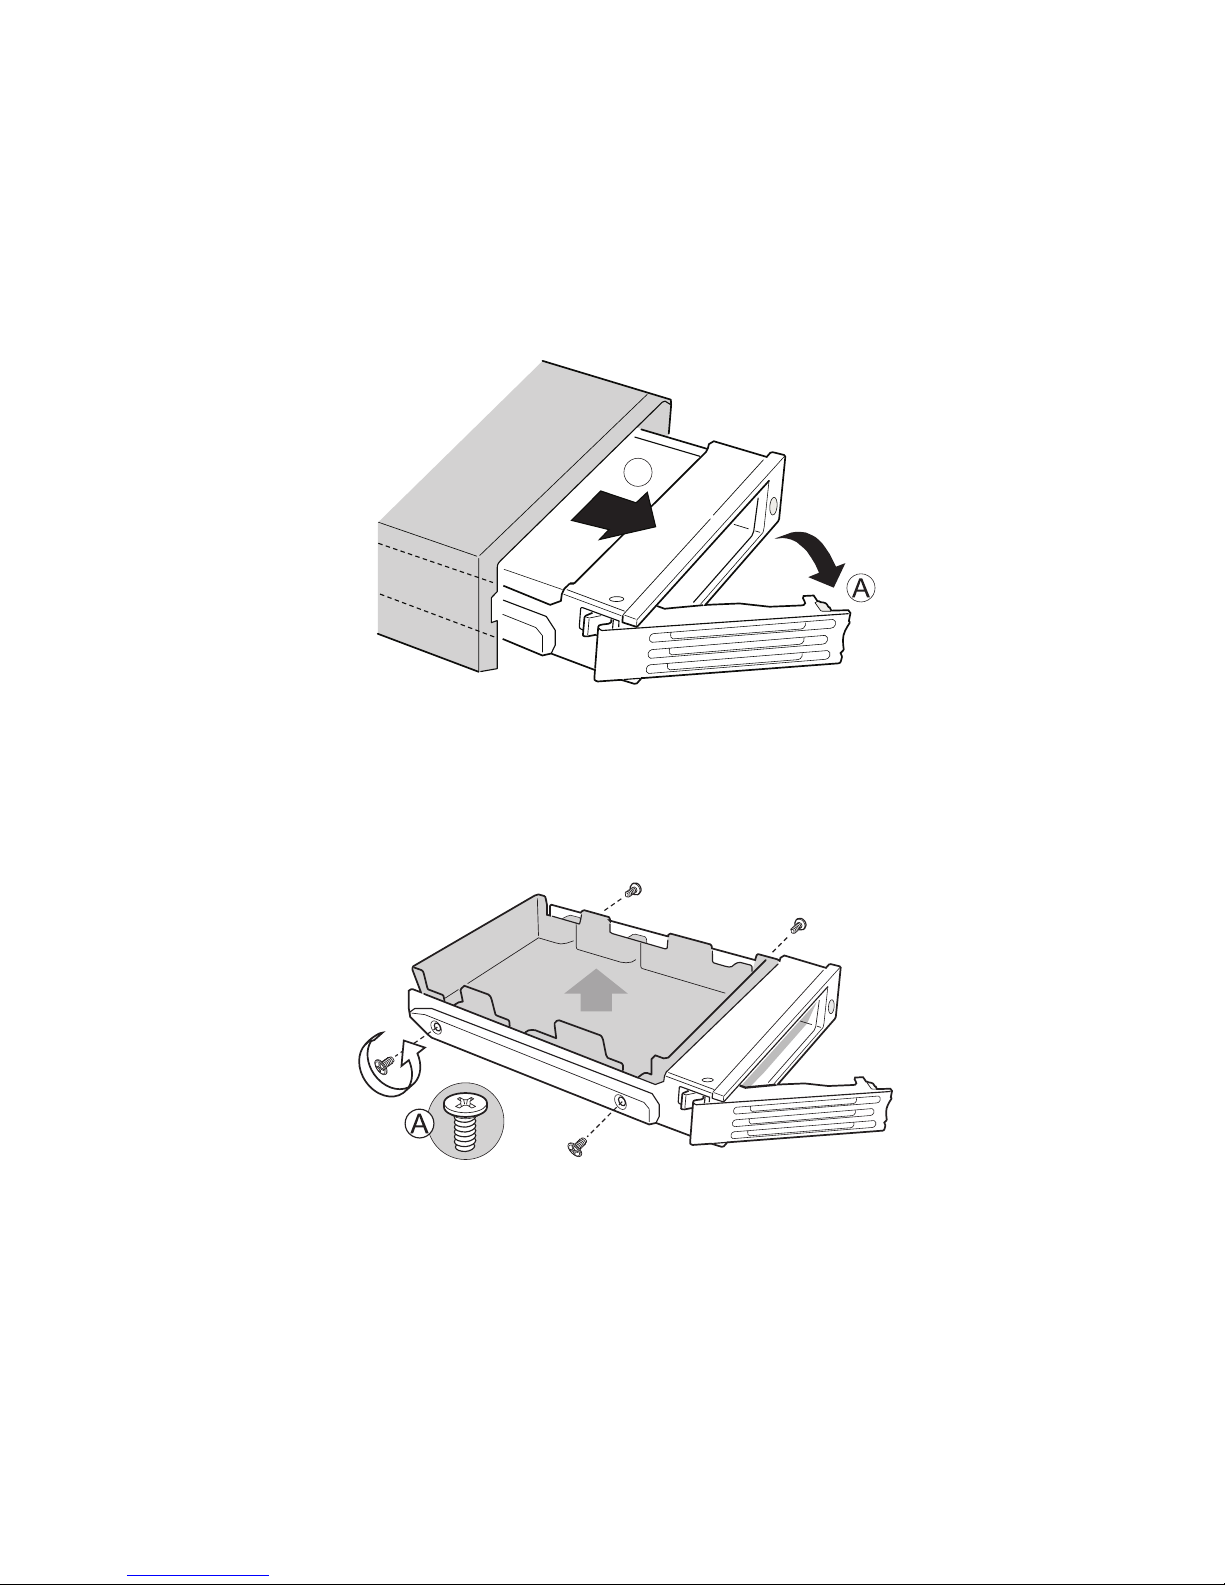
2. Press in on the green latch at the front of the hard drive carrier. See letter “A” in the figure
below.
3. Pull out on the black lever and slide the carrier from the chassis. See letter “B” in the figure
below.
4. Remove the four screws that attach the plastic retention device or the previously installed hard
drive to the drive carrier. Two screws are at each side of the retention device or the hard drive.
Store the plastic retention device for future use.
Figure 12. Removing a Hot-swap Hard Drive Carrier from Chassis
a
Figure 13. Removing the Retention Device from a Hot-swap Drive Carrier
a
�
Page 28

28 Hardware Installations and Upgrades
5. Remove the hard drive from its wrapper and place it on an antistatic surface.
6. Set any jumpers and/or switches on the drive according to the drive manufacturer’s
instructions.
7. With the drive circuit-side down, position the connector end of the drive so that it is facing the
rear of the drive carrier. See Error! Reference source not found.
8. Align the holes in the drive to the holes in the drive carrier and attach it to the carrier with the
screws that were attached to the plastic retention device.
9. With the black lever in the fully open position, slide the drive assembly into the chassis. The
green latch at the front of the drive carrier must be to the right. Do not push on the black drive
carrier lever until the lever begins to close by itself.
10. When the black drive carrier lever begins to close by itself, push on it to lock the drive
assembly into place.
Removing Hot-swap Hard Disk Drive
1. Remove the front bezel if it is installed.
2. Press in on the green latch at the front of the hard drive carrier.
3. Pull out on the black lever to slide the carrier from the chassis.
4. Remove the four screws that attach the hard drive to the drive carrier. Lift the drive from the
carrier. Store the drive in an anti-static bag.
5. If you are not installing a new drive, place the plastic retention device into the drive carrier,
using the four screws you removed from the hard drive.
6. Insert the screws that held the drive in the carrier into the screw locations on the carrier for
future use.
7. With the black lever in the fully open position, slide the drive carrier into the chassis. The green
latch must be to the right. Do not push on the black lever until the lever begins to close by
itself.
NOTE
For proper airflow, the hard drive carrier must be replaced in the chassis, even if no hard drive is
installed in it.
8. When the black lever begins to close by itself, push on it to lock the drive carrier into place.
Page 29
29MAXDATA Server PLATINUM 1500 IR M5
Installing and Removing a PCI Riser Connector
You received your server chassis with your choice of one of two PCI riser connectors:
• A full-height PCI-Express riser with one PCI-Express
®
x8 slot
• A full-height PCI-X riser with one PCI-X slot
CAUTION
PCI riser connectors are NOT hot swappable. Before removing or replacing the riser connector, you
must first take the server out of service, turn off all peripheral devices connected to the system,
turn off the system by pressing the power button, and unplug the AC power cord from the system
or wall outlet.
Installing a PCI Riser Connector
To install the PCI riser connector, use the following instructions.
1. Observe the safety and ESD precautions at the beginning of this book.
2. Power down the server and unplug all peripheral devices and the AC power cable.
3. Remove the chassis cover.
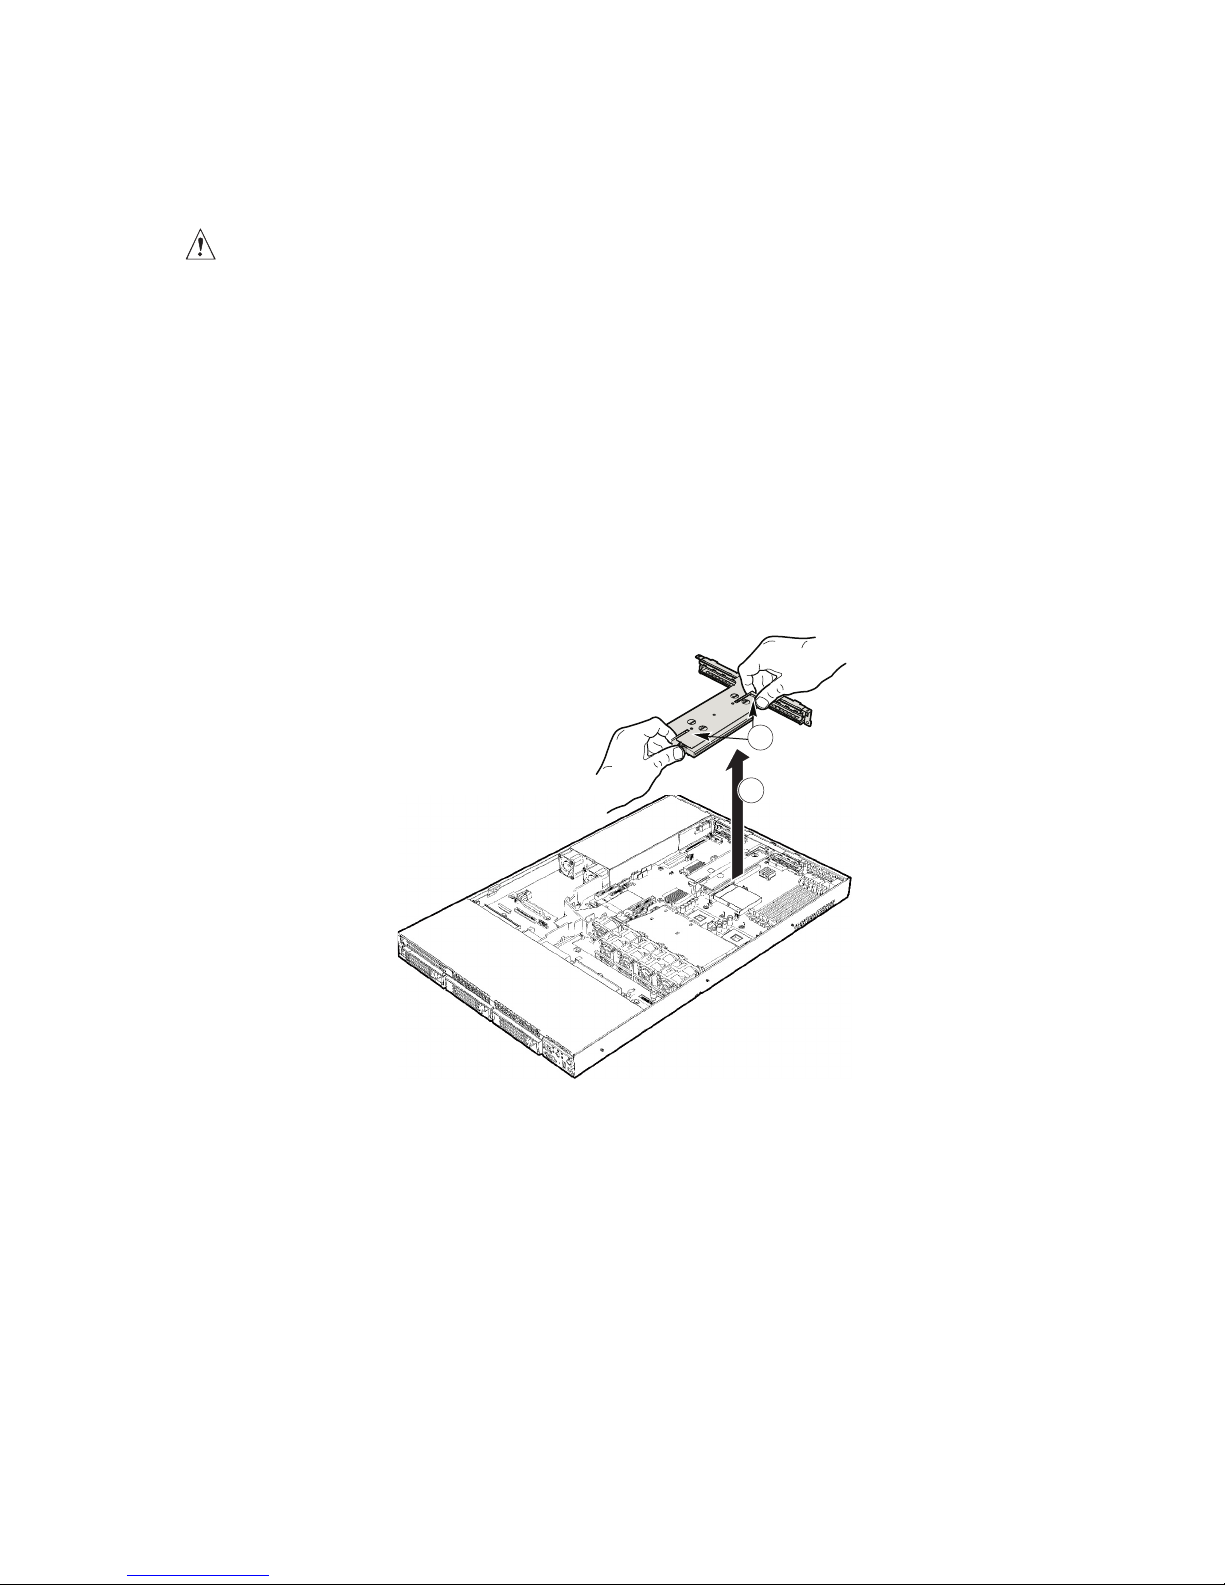
4. Pull up on the two latches on the assembly. See letter “A” in the figure below.
5. Lift the PCI riser assembly from the chassis.
Figure 14. Removing the PCI Riser Assembly from the Chassis
a
A
B
Page 30
30 Hardware Installations and Upgrades
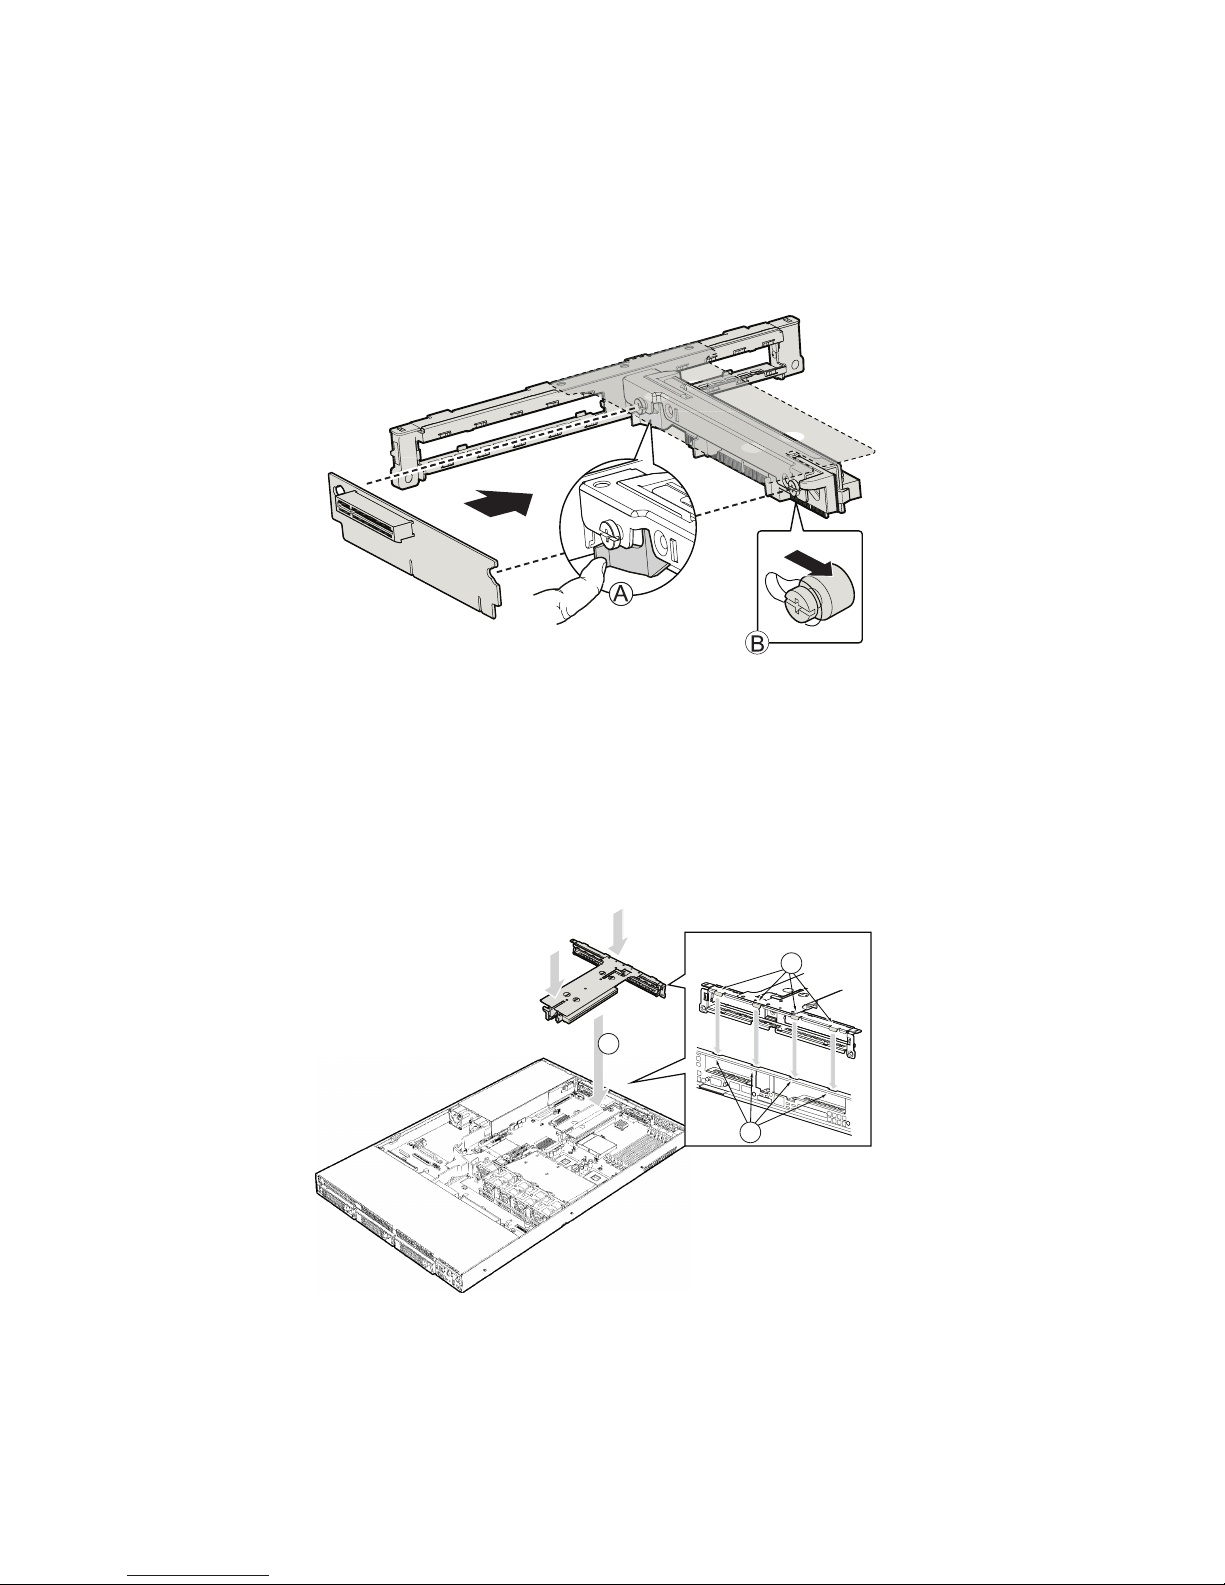
6. Line up the screws on the riser assembly with the slot and the large hole on the riser
connector.
7. Press and hold the blue riser locking lever. See letter “A” in the figure below.
8. Place riser connector onto the retention pins
9. Slide the riser connector to the right to lock it into place.
10. Release the blue locking lever.
11. Install a PCI add-in card, if desired. For instructions, see “Installing a PCI Add-in Card.”
12. Position the riser assembly over the PCI sockets on the server board (see letter “A” in the
figure below), lining up the four hooks at the rear of the riser assembly (see letter “B”) with
the four slots in the rear of the chassis (see letter “C”).
13. Push the riser assembly down until the assembly is securely seated.
14. Install the chassis cover.
15. Plug all peripheral devices and the AC power cable back into the server.
Figure 15. Installing an Add-in Card Connector into the PCI Riser Assembly
a
Figure 16. Installing the PCI Riser Assembly into the Chassis
a
A
B
C
Page 31
31MAXDATA Server PLATINUM 1500 IR M5
Installing and Removing a PCI Add-in Card
Installing a PCI Add-in Card
In the slots provided by the PCI riser connector, you can install either one or two add-in cards. Use
the following instructions to install an add-in card.
1. Observe the safety and ESD precautions at the beginning of this book.
2. Power down the server and unplug all peripheral devices and the AC power cable.
3. Remove the chassis cover.
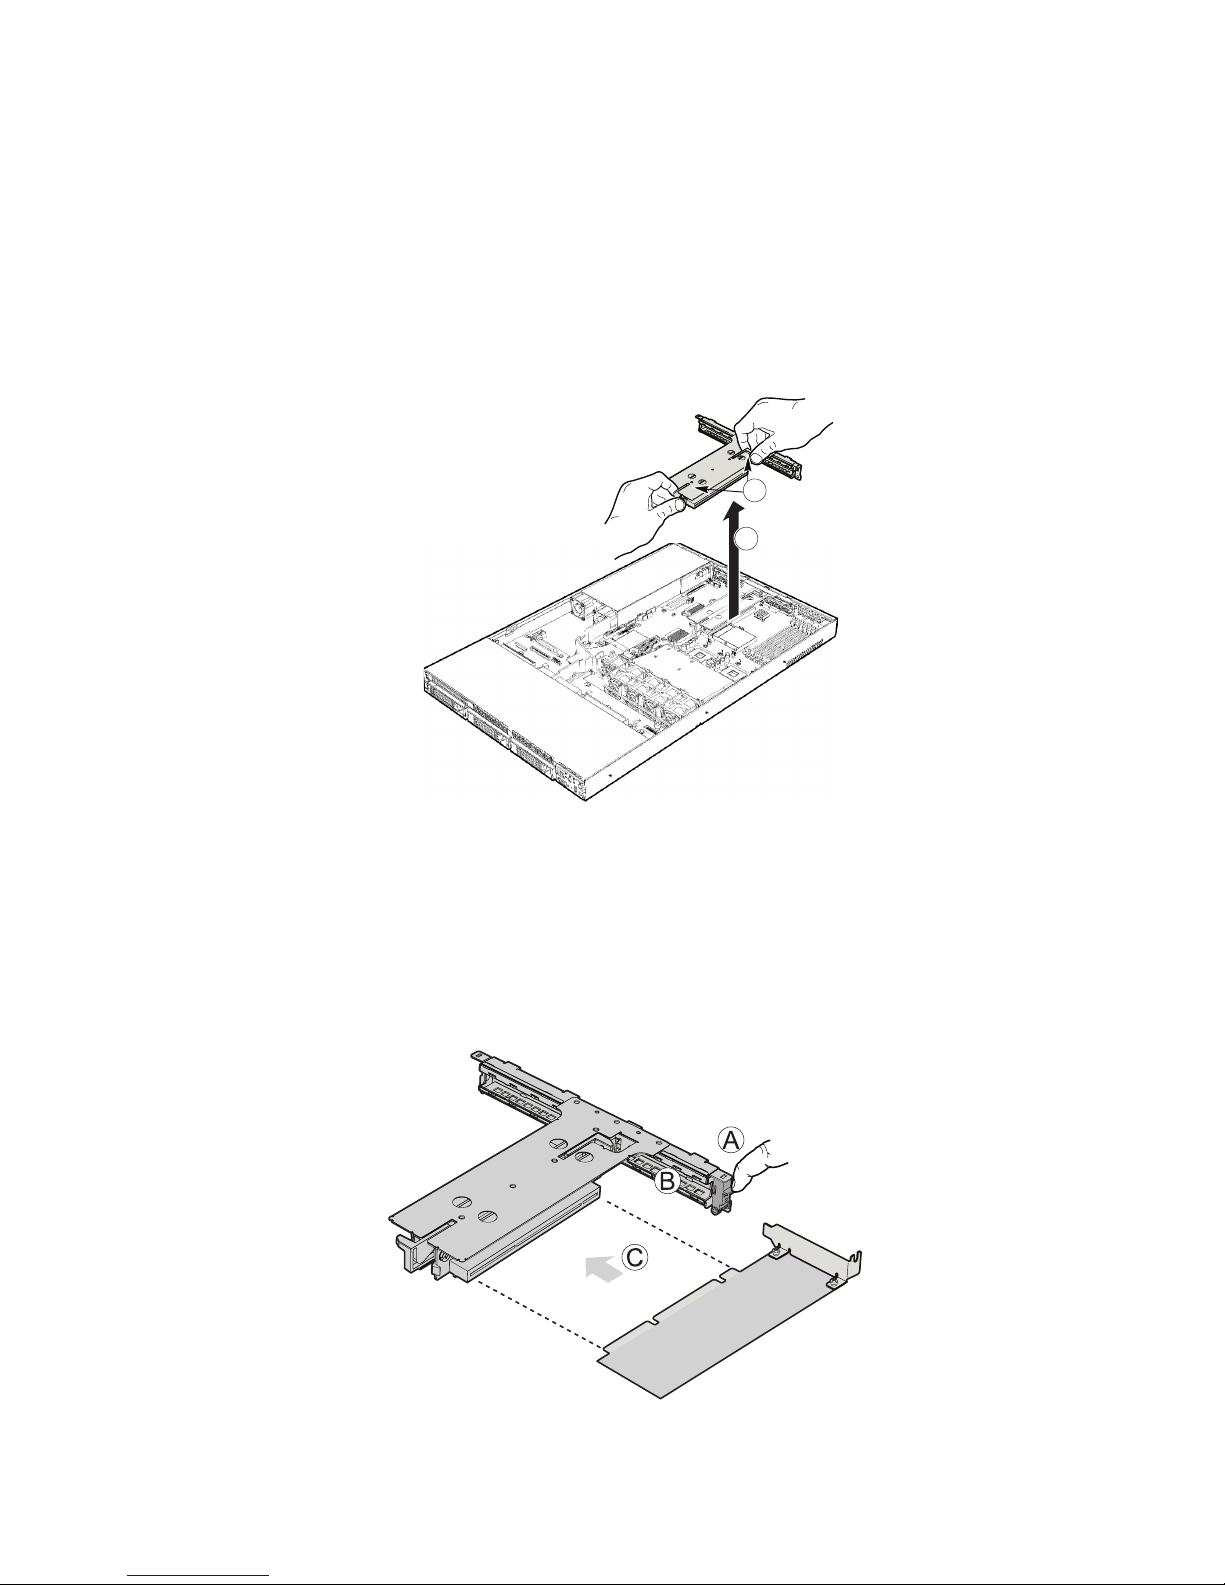
4. Pull up on the two latches on the assembly. See letter “A” in the figure below.
5. Lift the PCI riser assembly from the chassis.
6. Open the PCI retention clip on the PCI riser card assembly. See letter “A” in the figure below.
7. Remove the filler panel at the back of the riser assembly. See letter “B” in the figure below.
8. Insert the add-in card until it seats in riser card connector. Make sure the bracket inserts into
the matching slot. See letter “C”.
9. Close the retention clip. See letter “A” in the figure.
Figure 17. Removing the PCI Riser Assembly from the Chassis
a
Figure 18. Installing an Add-in Card to the PCI Riser Assembly
a
A
B
Page 32
32 Hardware Installations and Upgrades
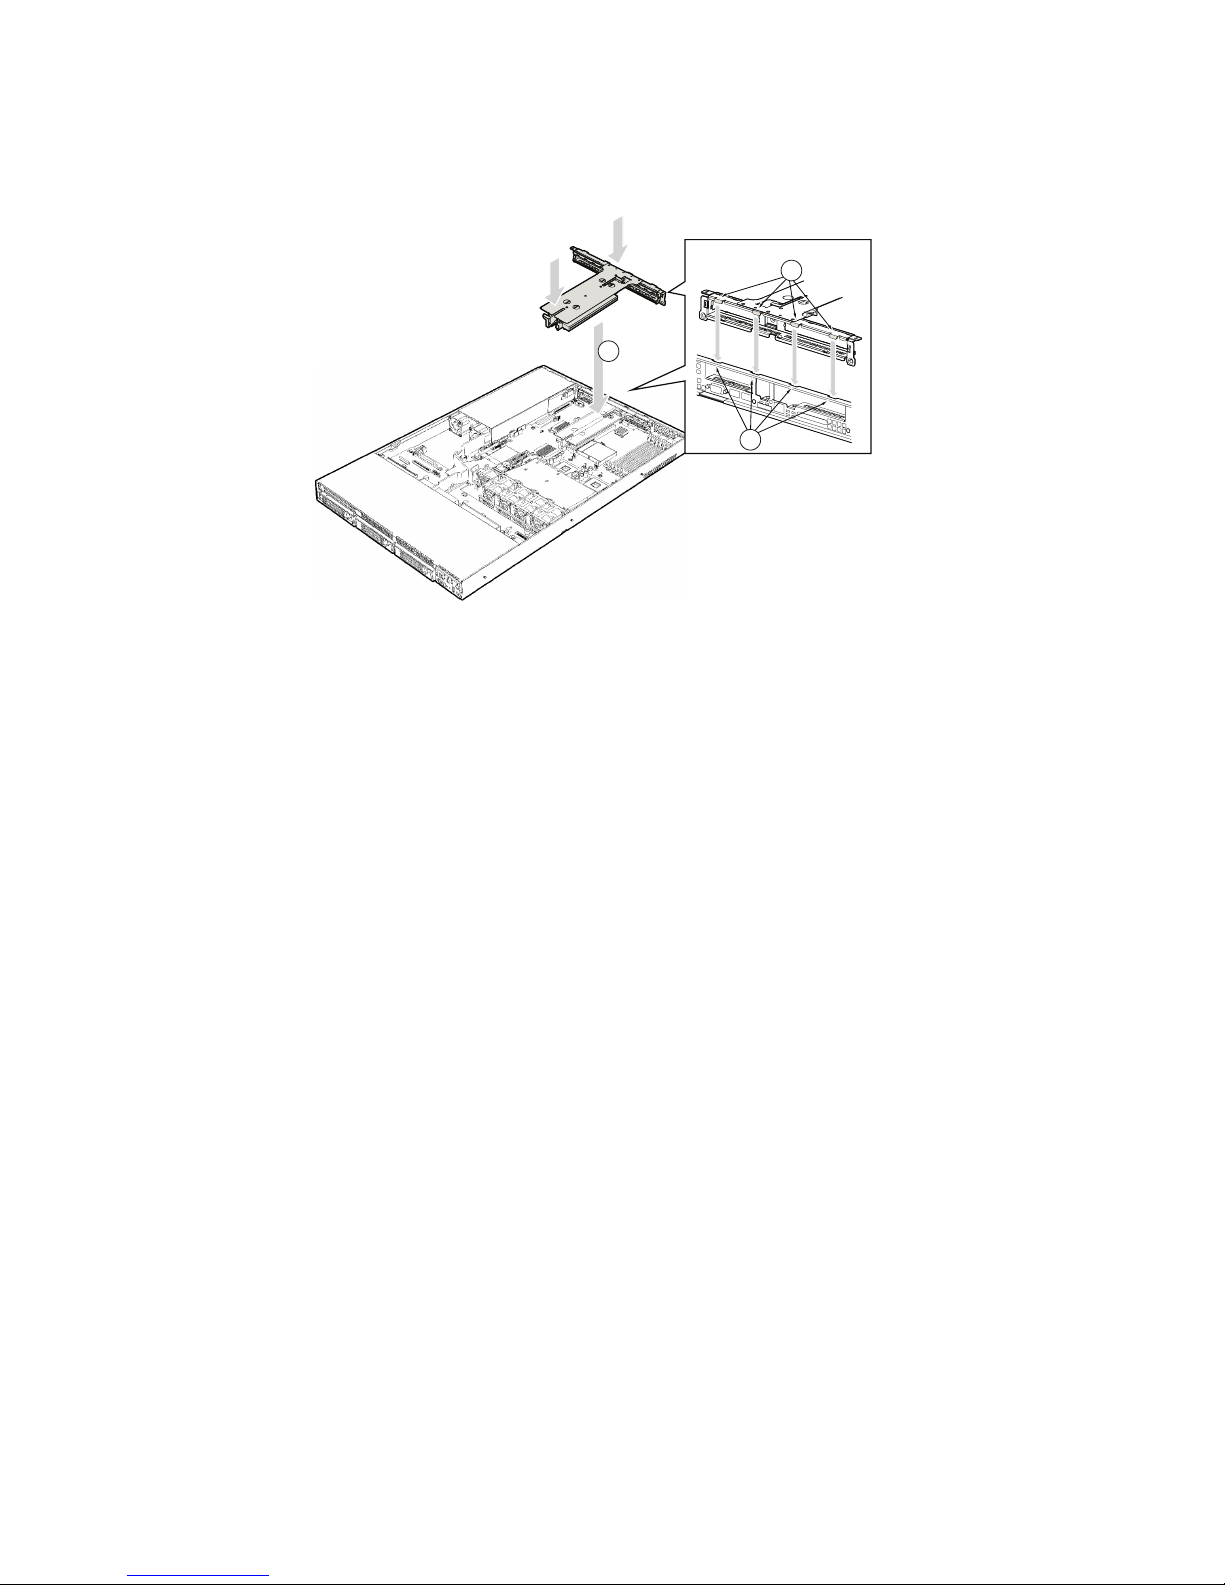
10. Position the riser assembly over the PCI sockets on the server board (see letter “A” in the
figure below), lining up the four hooks at the rear of the riser assembly (see letter “B”) with
the four slots in the rear of the chassis (see letter “C”).
11. Push the riser assembly down until the assembly is securely seated.
12. Install the chassis cover.
13. Plug all peripheral devices and the AC power cable back into the server.
Figure 19. Installing the PCI Riser Assembly into the Chassis
a
A
B
C
Page 33
33MAXDATA Server PLATINUM 1500 IR M5
Installing and Removing Memory
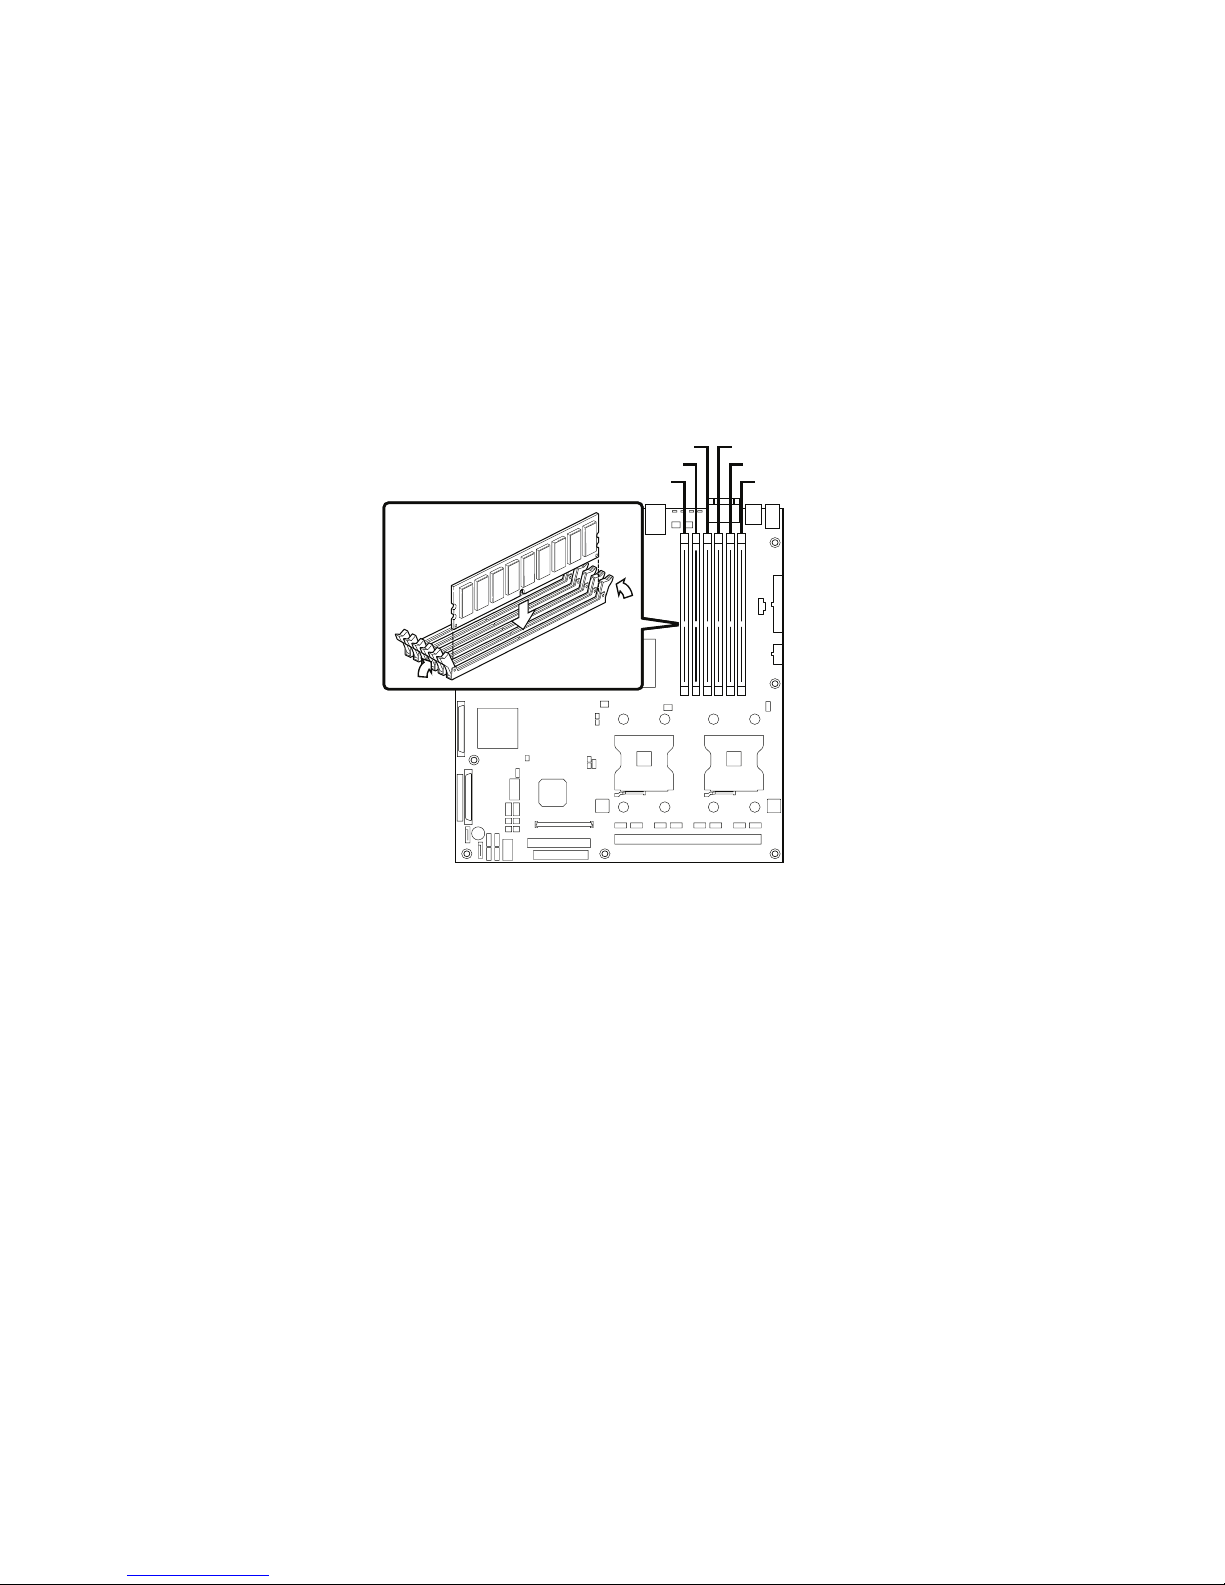
The silk screen on the board for the DIMMs displays DIMM 1B, DIMM 1A, DIMM 2B, DIMM 2A,
DIMM 3B, DIMM 3A starting from the edge of the board.
Installing DIMMs
To install DIMMs, follow these steps:
1. Observe the safety and ESD precautions at the beginning of this book.
2. Turn off all peripheral devices connected to the server. Turn off the server.
3. Disconnect the AC power cord from the server.
4. Remove the chassis cover and locate the DIMM sockets.
5. Make sure the clips at either end of the DIMM socket(s) are pushed outward to the open
position.
6. Holding the DIMM by the edges, remove it from its anti-static package.
7. Position the DIMM above the socket. Align the small notch in the bottom edge of the DIMM
with the key in the socket.
8. Insert the bottom edge of the DIMM into the socket.
9. When the DIMM is inserted, carefully push straight down on the top edge of the DIMM until
the retaining clips snap into place. Make sure the clips are firmly in place.
10. Replace the chassis cover and reconnect the AC power cord.
a
Figure 20. Installing Memory
Page 34
34 Hardware Installations and Upgrades
Installing or Replacing the Processor
CAUTIONS
Processor must be appropriate: You may damage the server board if you install a processor that
is inappropriate for your server.
ESD and handling processors: Reduce the risk of electrostatic discharge (ESD) damage to the
processor by doing the following: (1) Touch the metal chassis before touching the processor or server
board. Keep part of your body in contact with the metal chassis to dissipate the static charge while
handling the processor. (2) Avoid moving around unnecessarily.
Installing the Processor
To install a processor, follow these instructions:
1. Observe the safety and ESD precautions at the beginning of this book.
2. Turn off all peripheral devices connected to the server. Turn off the server.
3. Disconnect the AC power cord from the server.
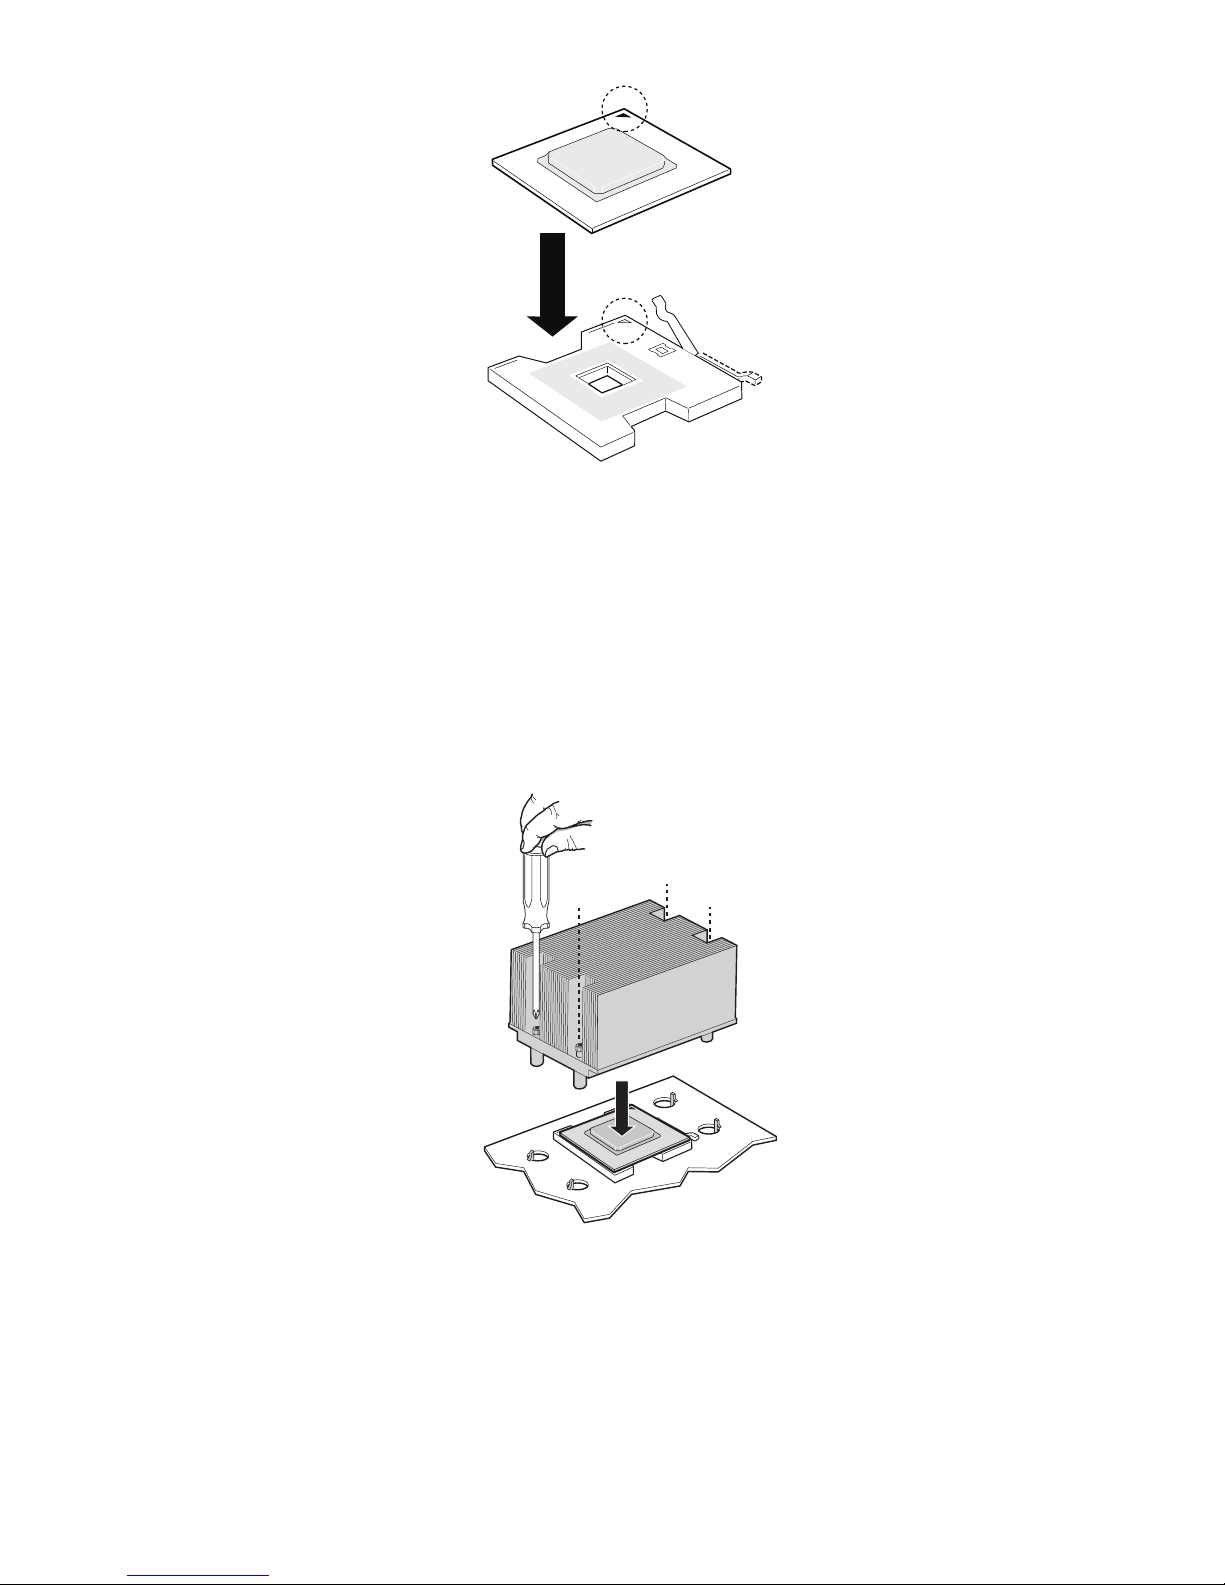
4. Remove the chassis cover and locate the processor sockets.
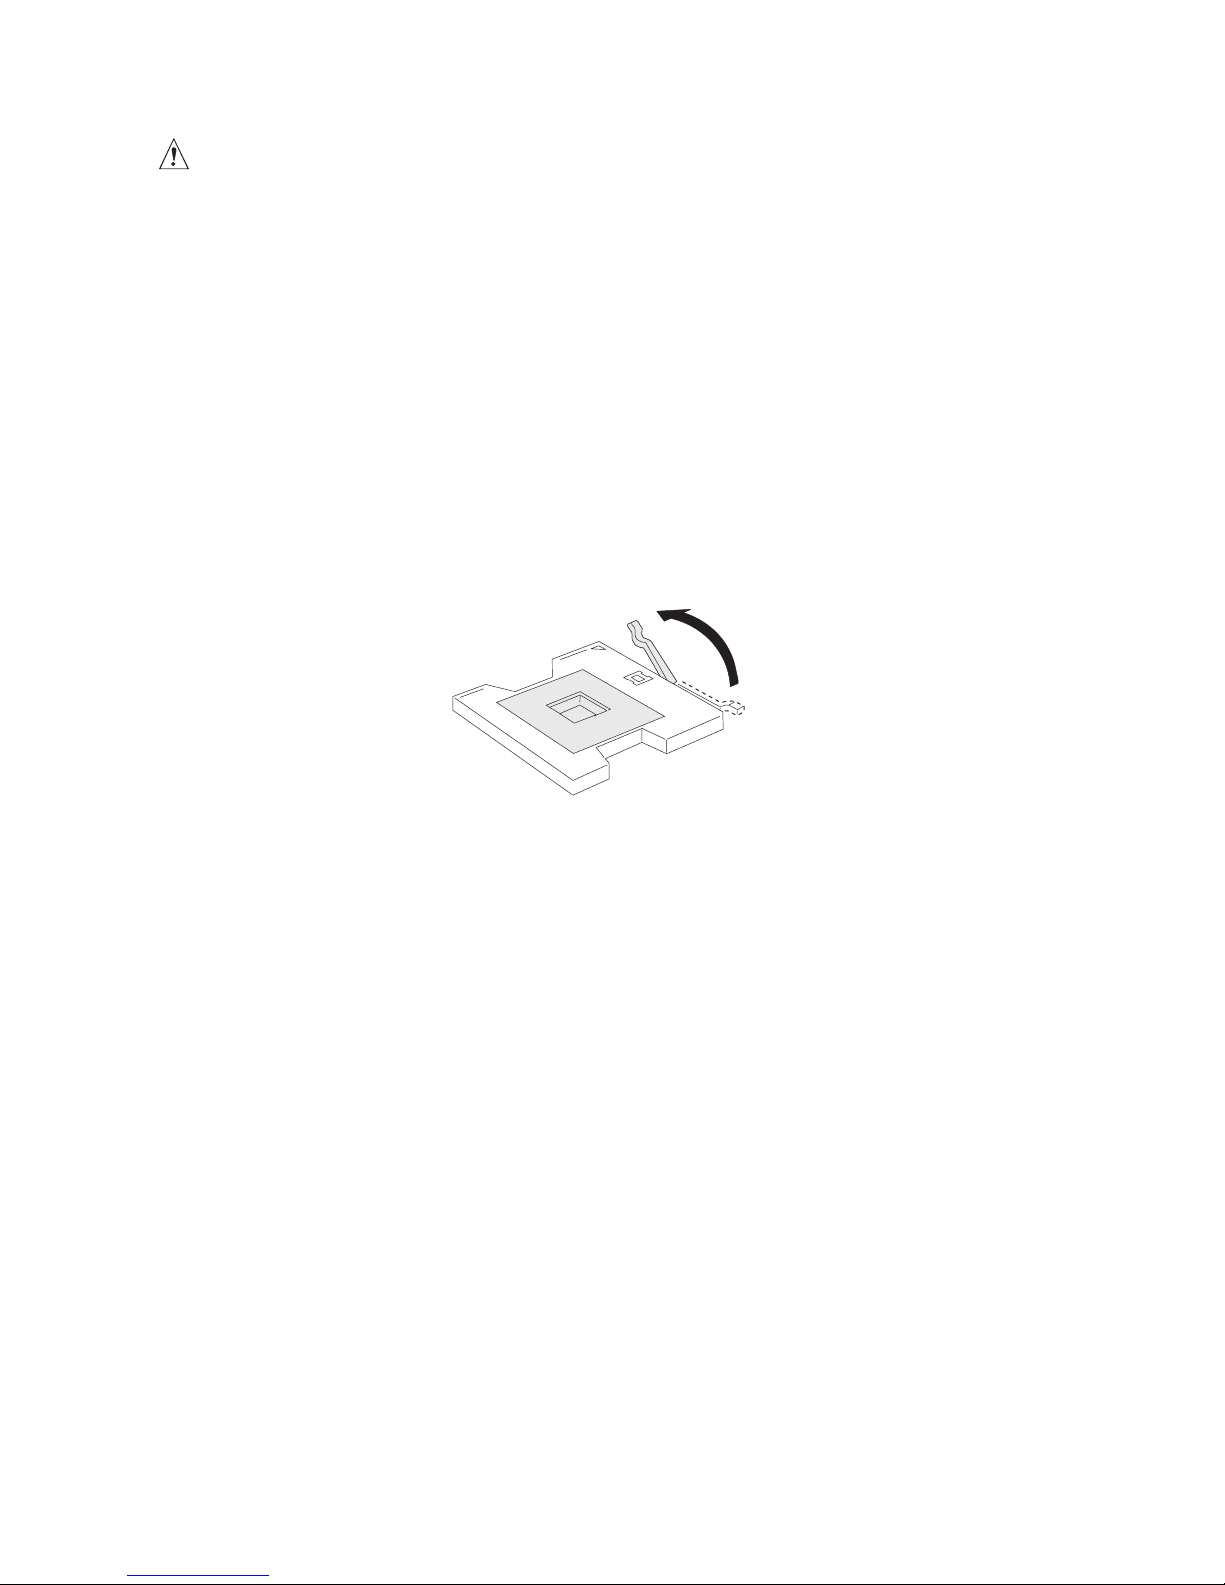
5. Locate the processor socket and raise the socket handle completely.
6. Align the pins of the processor with the socket, and insert the processor into the socket.
NOTE
Make sure the alignment triangle mark and the alignment triangle cutout align correctly (see Figure
on next page).
7. Lower the socket lever completely.
a
Figure 21. Opening Socket Lever
Page 35
35MAXDATA Server PLATINUM 1500 IR M5
Installing the Heat Sink(s)
1. The heat sink has Thermal Interface Material (TIM) located on the bottom of it. Use caution
when you unpack the heat sink so you do not damage the TIM.
2. Set the heat sink over the processor, lining up the four captive screws with the four posts
surrounding the processor.
3. Loosely screw in the captive screws on the heat sink corners in a diagonal manner. Do not fully
tighten one screw before tightening another.
4. Gradually and equally tighten each captive screw until all screws are tight.
5. Reinstall and reconnect any parts you removed or disconnected to reach the processor
sockets.
6. Replace the server’s cover and reconnect the AC power cord. See the documentation that
accompanied your server chassis for instructions on installing the server’s cover.
a
Figure 22. Inserting Processor
TP00774
a
Figure 23. Installung Heat Sink
Page 36

36 Hardware Installations and Upgrades
Removing a Processor
1. Observe the safety and ESD precautions at the beginning of this book.
2. Turn off all peripheral devices connected to the server. Turn off the server.
3. Remove the AC power cord from the server.
4. Remove the chassis cover.
5. Unplug the processor fan cable from the server board.
6. Loosen the four captive screws on the corners of the heat sink.
7. Twist the heat sink slightly to break the seal between the heat sink and the processor.
8. Lift the heat sink from the processor. If it does not pull up easily, twist the heat sink again. Do
not force the heat sink from the processor. Doing so could damage the processor.
9. Lift the processor lever.
10. Remove the processor.
11. If installing a replacement processor, see “Installing the Processor.” Otherwise, reinstall the
chassis cover.
Page 37
37MAXDATA Server PLATINUM 1500 IR M5
RJ45 Serial Port Configuration
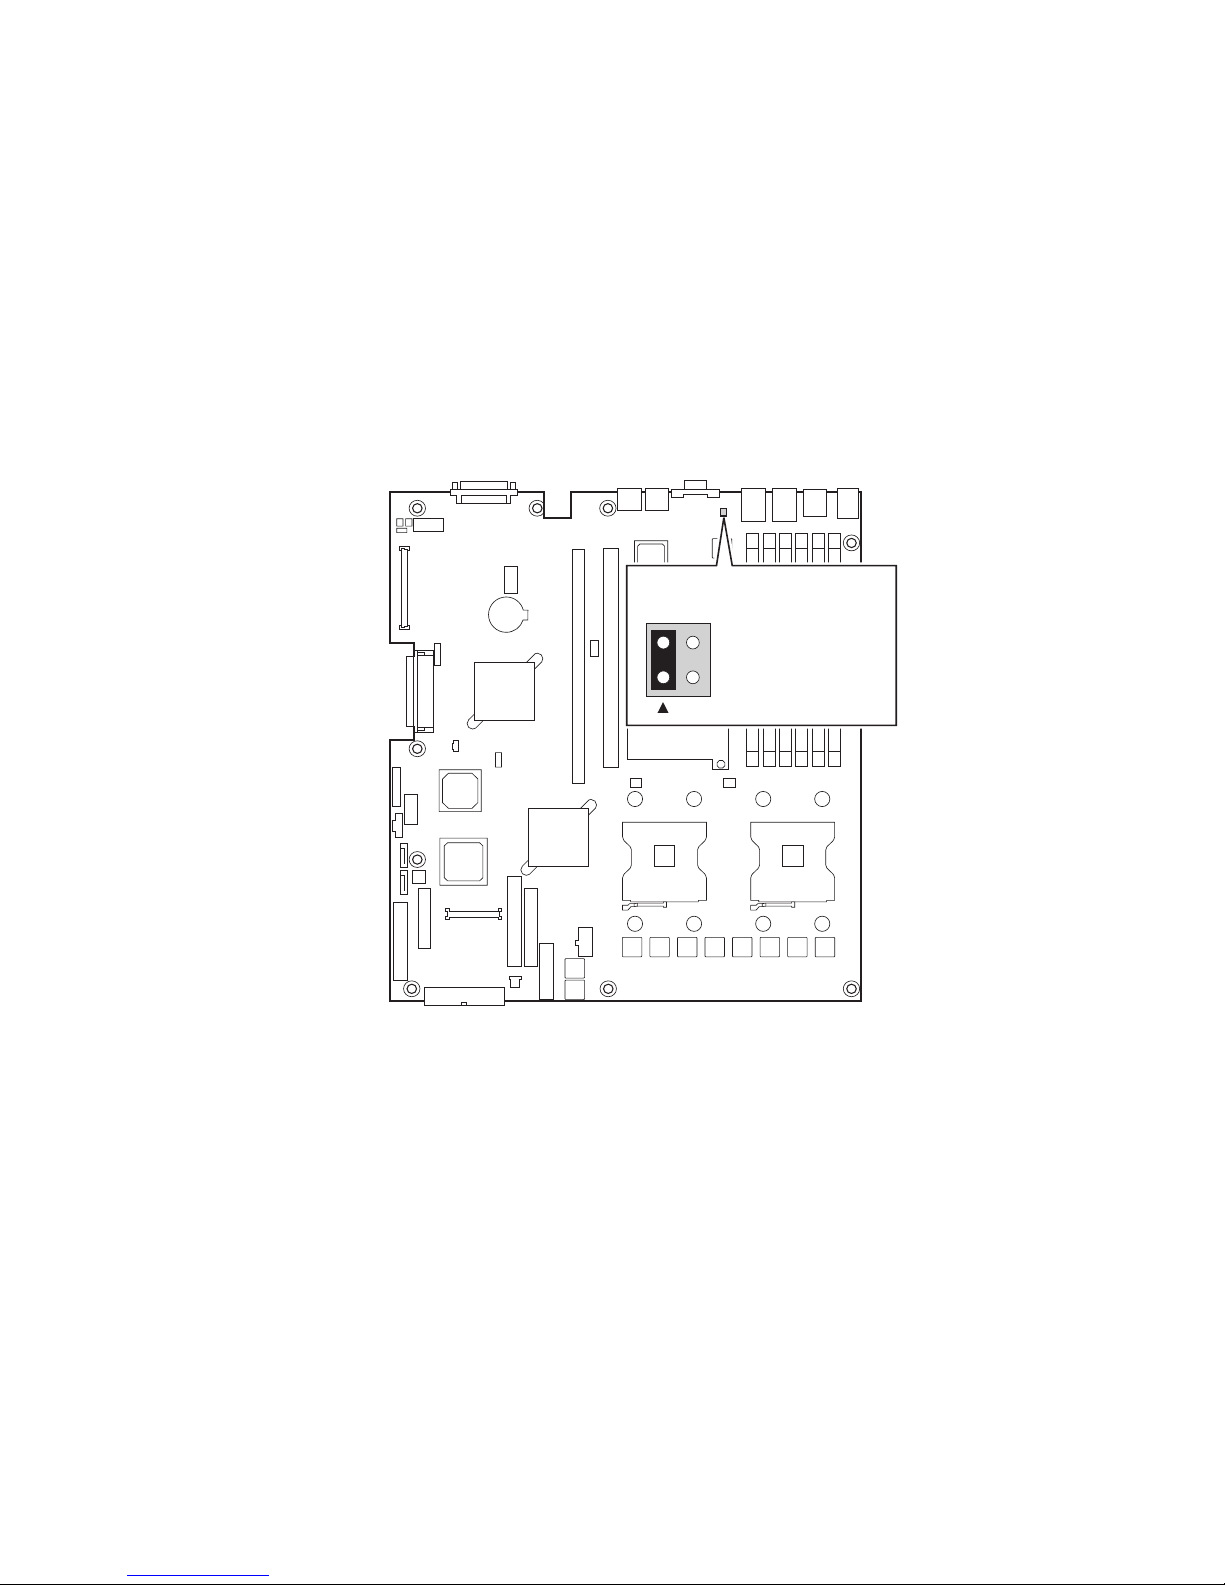
The RJ45 serial port connector can be configured to support either a DSR signal or a DCD signal.
As the server board is shipped, it is configured to support DSR signals. To change the configuration
to support DCD signals a jumper on the board must be changed. Use the following instructions to
configure your server board to support DCD signals.
1. Observe the safety and ESD precautions at the beginning of this book.
2. Turn off all peripheral devices connected to the server. Turn off the server.
3. Disconnect the AC power cord from the server.
4. Remove the server’s cover.
5. Locate the jumper block for the serial port. See figure 24.
6. Move the jumper from the default position covering pins 1 and 3 to cover pins 2 and 4.
Figure 24. Changing the Serial Port Configuration
aa
Page 38

38 Hardware Installations and Upgrades
Replacing the Backup Battery
The lithium battery on the server board powers the RTC for up to 10 years in the absence of power.
When the battery starts to weaken, it loses voltage, and the server settings stored in CMOS RAM in
the RTC (for example, the date and time) may be wrong. Contact your customer service representative
or dealer for a list of approved devices.
WARNING
Danger of explosion if battery is incorrectly replaced. Replace only with the same or equivalent
type recommended by the equipment manufacturer. Discard used batteries according to
manufacturer’s instructions.
WARNUNG
Wenn eine ungeeignete Batterie eingesetzt wird oder die Batterie falsch eingesetzt wird,
besteht Explosionsgefahr. Ersetzen Sie verbrauchte Batterien nur durch Batterien gleichen
oder äquivalenten Typs, der vom Hersteller empfohlen wurde. Entsorgen Sie die verbrauchte
Batterie entsprechend den Anweisungen des Herstellers.
AVERTISSEMENT
Danger d’explosion en cas de remplacement incorrect de la pile. Remplacez-la uniquement
par une pile du même type ou d’un type équivalent recommandé par le fabricant. Mettez au
rebut les piles usagées en vous conformant aux instructions du fabricant.
OSTRZEŻENIE
Nieprawidłowa wymiana baterii grozi eksplozją. Wymieniać tylko na taki sam lub
równoważny typ, zalecany przez producenta. Zużyte baterie utylizować zgodnie z instrukcjami
producenta.
ADVARSEL!
Lithiumbatteri - Eksplosionsfare ved fejlagtig håndtering. Udskiftning må kun ske med batteri
af samme fabrikat og type. Levér det brugte batteri tilbage til leverandøren.
ADVARSEL
Lithiumbatteri - Eksplosjonsfare. Ved utskifting benyttes kun batteri som anbefalt av
apparatfabrikanten. Brukt batteri returneres apparatleverandøren.
VARNING
Explosionsfara vid felaktigt batteribyte. Använd samma batterityp eller en ekvivalent typ
som rekommenderas av apparattillverkaren. Kassera använt batteri enligt fabrikantens
instruktion.
VAROITUS
Paristo voi räjähtää, jos se on virheellisesti asennettu. Vaihda paristo ainoastaan laitevalmistajan
suosittelemaan tyyppiin. Hävitä käytetty paristo valmistajan ohjeiden mukaisesti.
Page 39
39MAXDATA Server PLATINUM 1500 IR M5
1. Observe the safety and ESD precaution.
2. Turn off all peripheral devices connected to the server. Turn off the server.
3. Disconnect the AC power cord from the server.
4. Remove the server’s cover and locate the battery. See the documentation that accompanied
your server chassis for instructions on removing the server’s cover.
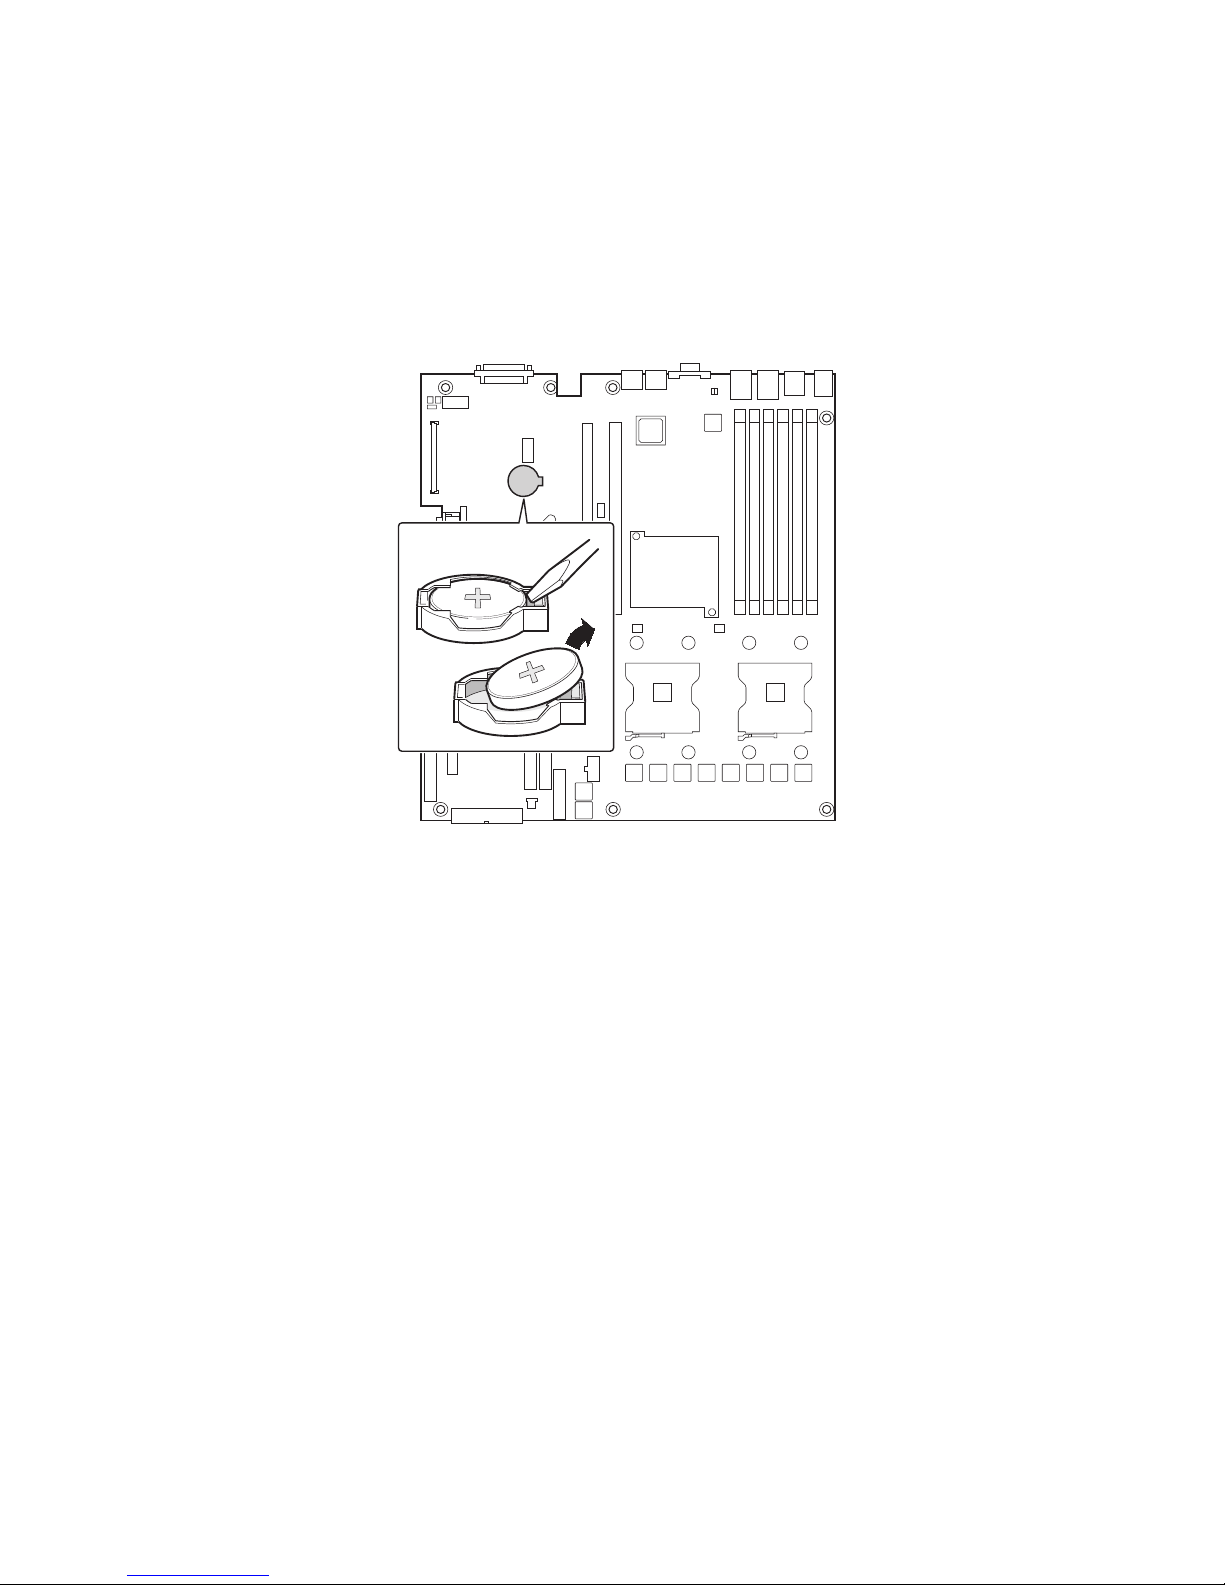
5. Insert the tip of a small flat bladed screwdriver, or an equivalent, under the tab in the plastic
retainer. Gently push down on the screwdriver to lift the battery.
6. Remove the battery from its socket.
7. Dispose of the battery according to local ordinance.
8. Remove the new lithium battery from its package, and, being careful to observe the correct
polarity, insert it in the battery socket.
9. Close the chassis.
10. Run Setup to restore the configuration settings to the RTC.
a
Figure 25. Replacing the Backup Battery
TP00760
Page 40

40
Page 41

41MAXDATA Server PLATINUM 1500 IR M5
5 Server Utilities
Using the BIOS Setup Utility
This section describes the BIOS Setup Utility options, which is used to change server configuration
defaults.
Starting Setup
You can enter and start BIOS Setup under several conditions:
• When you turn on the server, after POST completes the memory test
• When you have moved the CMOS jumper on the server board to the “Clear CMOS” position
(enabled)
In the two conditions listed above, during the Power On Self Test (POST), you will see this prompt:
Press <F2> to enter SETUP
In a third condition, when CMOS/NVRAM has been corrupted, you will see other prompts but not
the <F2> prompt:
Warning: CMOS checksum invalid
Warning: CMOS time and date not set
In this condition, the BIOS will load default values for CMOS and attempt to boot.
If You Cannot Access Setup
If you are not able to access BIOS Setup, you might need to clear the CMOS memory. For instructions
on clearing the CMOS, see “Clearing the CMOS”.
Setup Menus
Each BIOS Setup menu page contains a number of features. Except for those features that are
provided only to display automatically configured information, each feature is associated with a
value field that contains user-selectable parameters. These parameters can be changed if the user
has adequate security rights. If a value cannot be changed for any reason, the feature’s value field
is inaccessible.
Page 42
42 Server Utilities
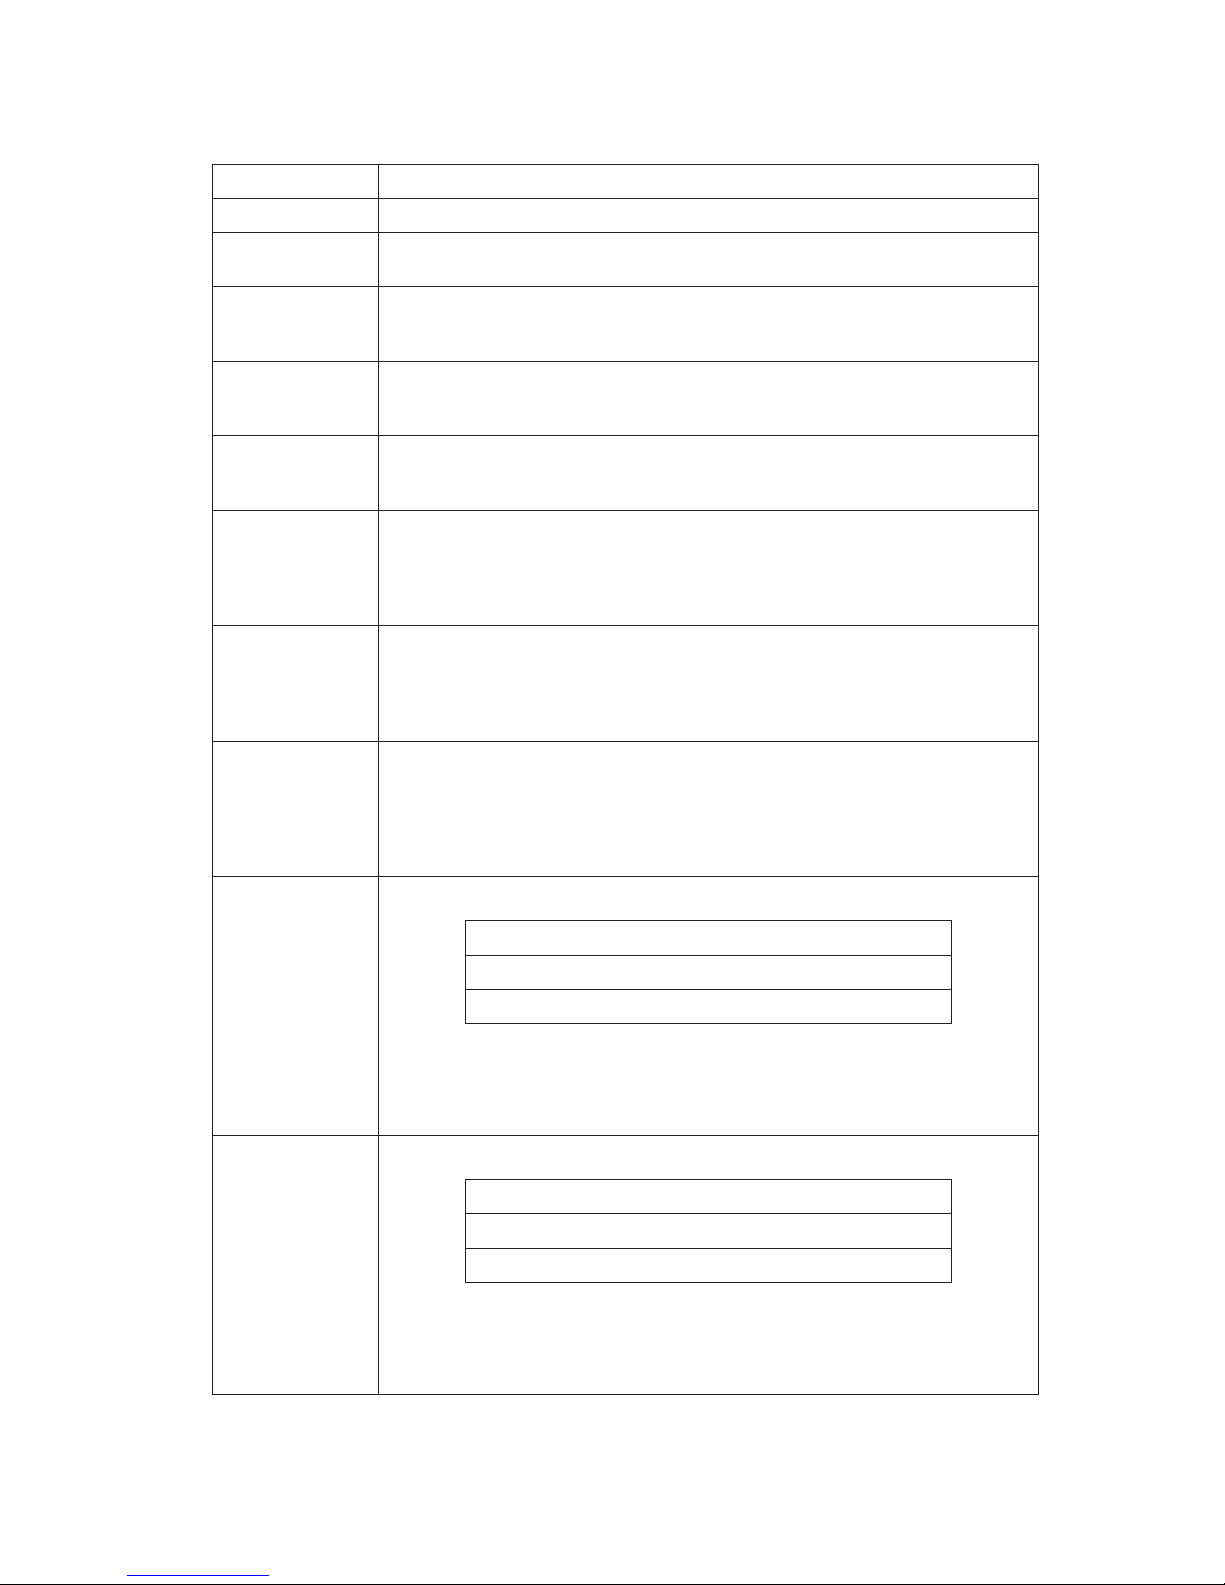
Table 9 describes the keyboard commands you can use in the BIOS Setup menus.
Table 9. Keyboard Commands
Press Description
<F1> Help - Pressing F1 on any menu invokes the general Help window.
← →
The left and right arrow keys are used to move between the major menu pages.
The keys have no affect if a submenu or pick list is displayed.
↑
Select Item up - The up arrow is used to select the previous value in a menu
item’s option list, or a value field pick list. Pressing the Enter key activates the
selected item.
↓
Select Item down - The down arrow is used to select the next value in a menu
item’s option list, or a value field pick list. Pressing the Enter key activates the
selected item.
F5/- Change Value - The minus key or the F5 function key is used to change the value
of the current item to the previous value. This key scrolls through the values in
the associated pick list without displaying the full list.
F6/+ Change Value - The plus key or the F6 function key is used to change the value
of the current menu item to the next value. This key scrolls through the values
in the associated pick list without displaying the full list. On 106-key Japanese
keyboards, the plus key has a different scan code than the plus key on the other
keyboard, but it has the same effect.
<Enter> Execute Command - The Enter key is used to activate submenus when the
selected feature is a submenu, or to display a pick list if a selected feature has a
value field, or to select a sub-field for multi-valued features like time and date.
If a pick list is displayed, the Enter key will undo the pick list, and allow another
selection in the parent menu.
<Esc> Exit - The ESC key provides a mechanism for backing out of any field. This key
will undo the pressing of the Enter key. When the ESC key is pressed while
editing any field or selecting features of a menu, the parent menu is re-entered.
When the ESC key is pressed in any submenu, the parent menu is re-entered.
When the ESC key is pressed in any major menu, the exit confirmation window
is displayed and the user is asked whether changes can be discarded.
<F9> Setup Defaults - Pressing F9 causes the following to appear:
Setup Confirmation
Load default configuration now?
[Yes] [No]
If “Yes” is selected and the Enter key is pressed, all Setup fields are set to their
default values. If “No” is selected and the Enter key is pressed, or if the ESC
key is pressed, the user is returned to where they were before F9 was pressed
without affecting any existing field values.
<F10> Save and Exit - Pressing F10 causes the following message to appear:
Setup Confirmation
Save Configuration changes and exit now?
[Yes] [No]
If “Yes” is selected and the Enter key is pressed, all changes are saved and
Setup is exited. If “No” is selected and the Enter key is pressed, or the ESC key
is pressed, the user is returned to where they were before F10 was pressed
without affecting any existing values.
Page 43

43MAXDATA Server PLATINUM 1500 IR M5
Clearing the Password
If the user or administrator password(s) is lost or forgotten, moving the password clear jumper into
the “clear” position clears both passwords. The password clear jumper must be restored to its
original position before a new password(s) can be set. The password clear jumper is shown on the
line labeled “A” in figure 4.
1. Power down the system and disconnect the AC power.
2. Open the server chassis.
3. Move the jumper from the normal operation position, Password Clear Protect, at pins 1 and 2
to the Password Clear Erase position, covering pins 2 and 3.
4. Reconnect the AC power, power up the system.
5. Power down the system and disconnect the AC power.
6. Return the Password Clear jumper to the Password Clear Protect position, covering pins 1 and 2.
7. Close the server chassis.
8. Reconnect the AC power and power up the server.
Clearing the CMOS
If you are not able to access the BIOS setup screens, the CMOS Clear jumper will need to be used to
reset the configuration RAM. The CMOS Clear jumper is shown on the line labeled “C” in figure 4.
1. Power down the system and disconnect the AC power.
2. Open the server.
3. Move the jumper from the normal operation position, CMOS Clear by BMC, at pins 1 and 2
to the CMOS Clear Force Erase position, covering pins 2 and 3 as indicated in the following
diagram.
4. Reconnect the AC power, power up the system.
5. When the system begins beeping, power it down and disconnect the AC power.
6. Return the CMOS Clear jumper to the CMOS Clear by BMC location, covering pins 1 and 2.
7. Close the server chassis.
8. Reconnect the AC power and power up the system.
Page 44

44
Page 45
45MAXDATA Server PLATINUM 1500 IR M5
6 Troubleshooting
This chapter helps you identify and solve problems that might occur while you are using the
system.
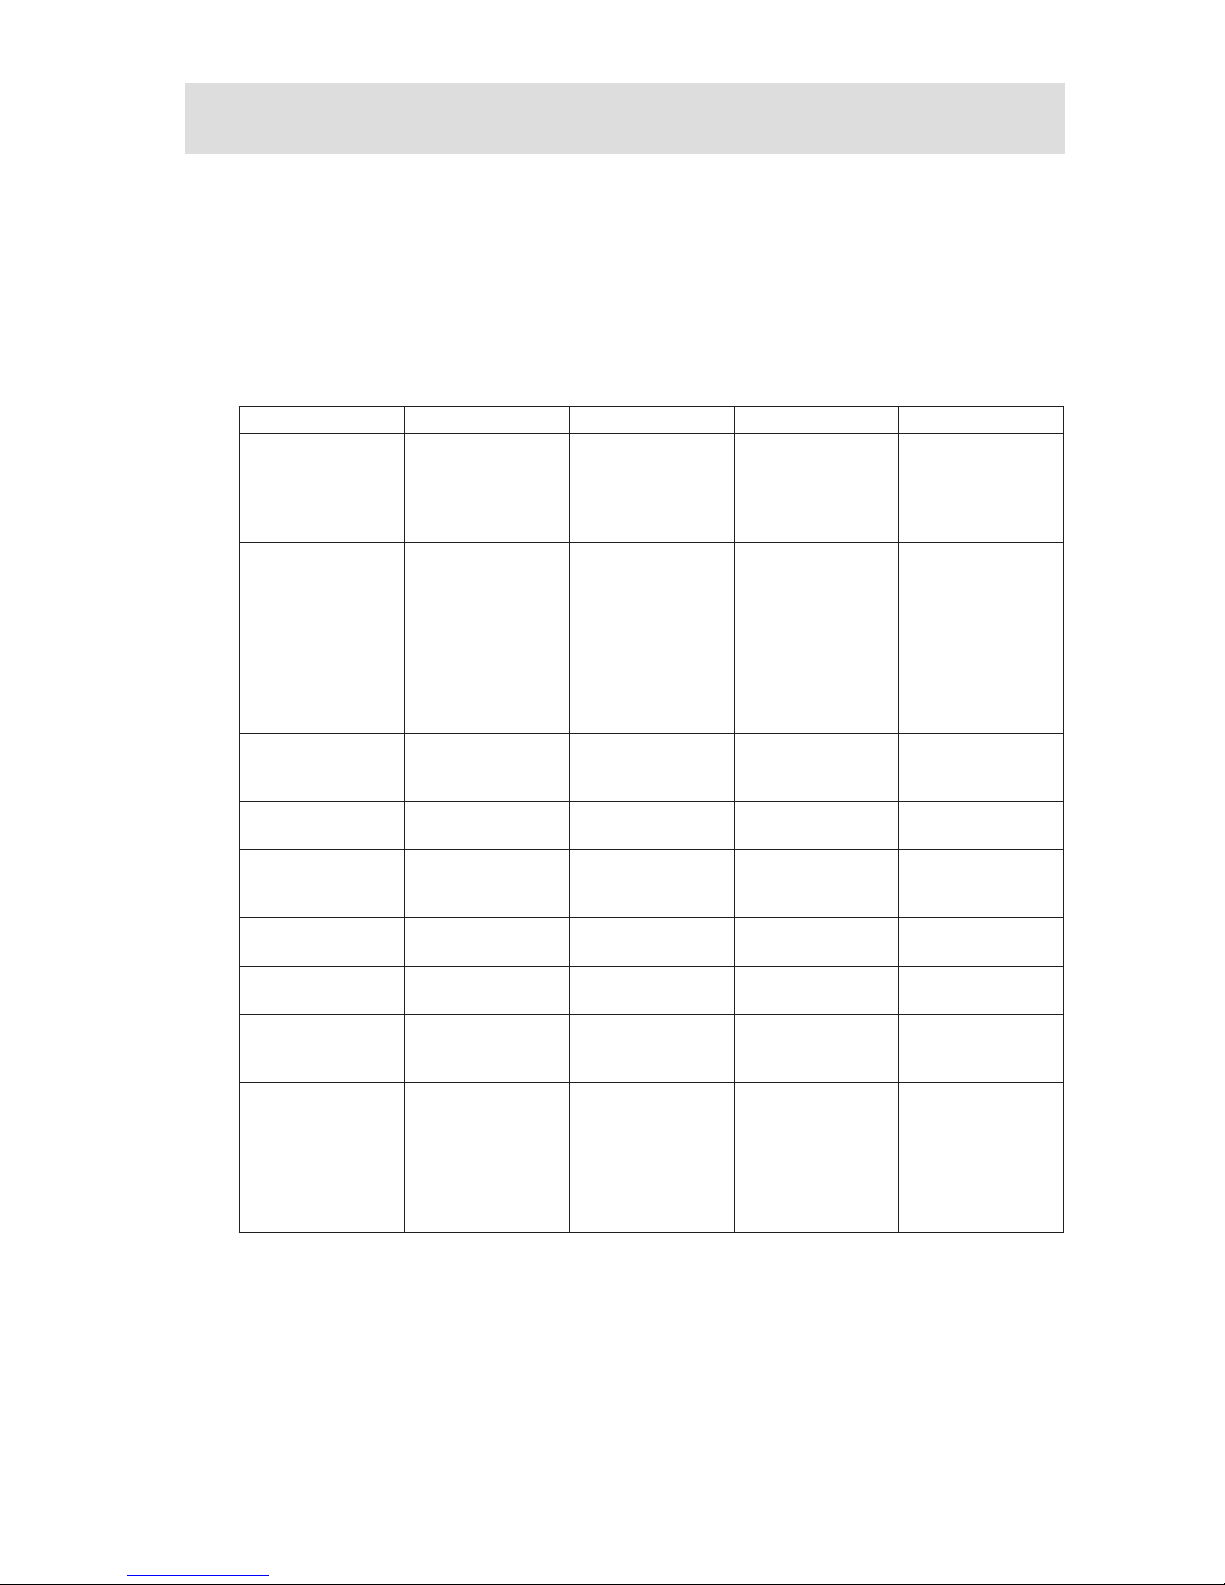
LED Information
The MAXDATA PLATINUM Server Board includes LEDs that can aid in troubleshooting your system.
A table of these LEDs with a description of their use is listed below.
Table 10. LED Information
LED Name Function Location Color Notes
ID Aid in server iden-
tification from the
back panel
Control panel and
board rear left
corner
Blue Press ID LED
button or user
Server Manage
ment software to
turn on the LED.
System fault Visible fault
warning
Control panel and
board rear left
corner
Green or Amber • Green = No
Fault
• Green Blink =
degraded
• Amber = critical
error or nonrecoverable
• Amber blink =
non-critical
ATA drive activity ATA drive activity
Control panel Green Blinking = Activity.
No action
required.
Memory fault 1–6
Identify failing
memory module
DIMM end rear of
board
Amber On = Fault
Diagnostic LEDs.
1–4 (LSB, bit1,
bit2, MSB)
Displays port 80
POST codes
Center back edge
of board
Each LED can be
Off, Green, Amber,
Red
See the POST
code table
CPU 1 & 2 Fan
Fault
Identify fan failure Front center board Amber On = Fault
CPU 1 & 2 Fault
Identify processor
failure
1” behind processor socket
Amber On = Fault
5v Standby
Identify 5v
standby power on
state
Front left board
Amber On = 5v standby
power on
Power LED
Identify the
power state of the
system
Control Panel
Green • Off = Power is
off (off or S5)
• On = Power on
or S0)
• Slow Blink =
Low power
state (S1 – S3)
Page 46
46 Troubleshooting
BIOS POST Beep Codes
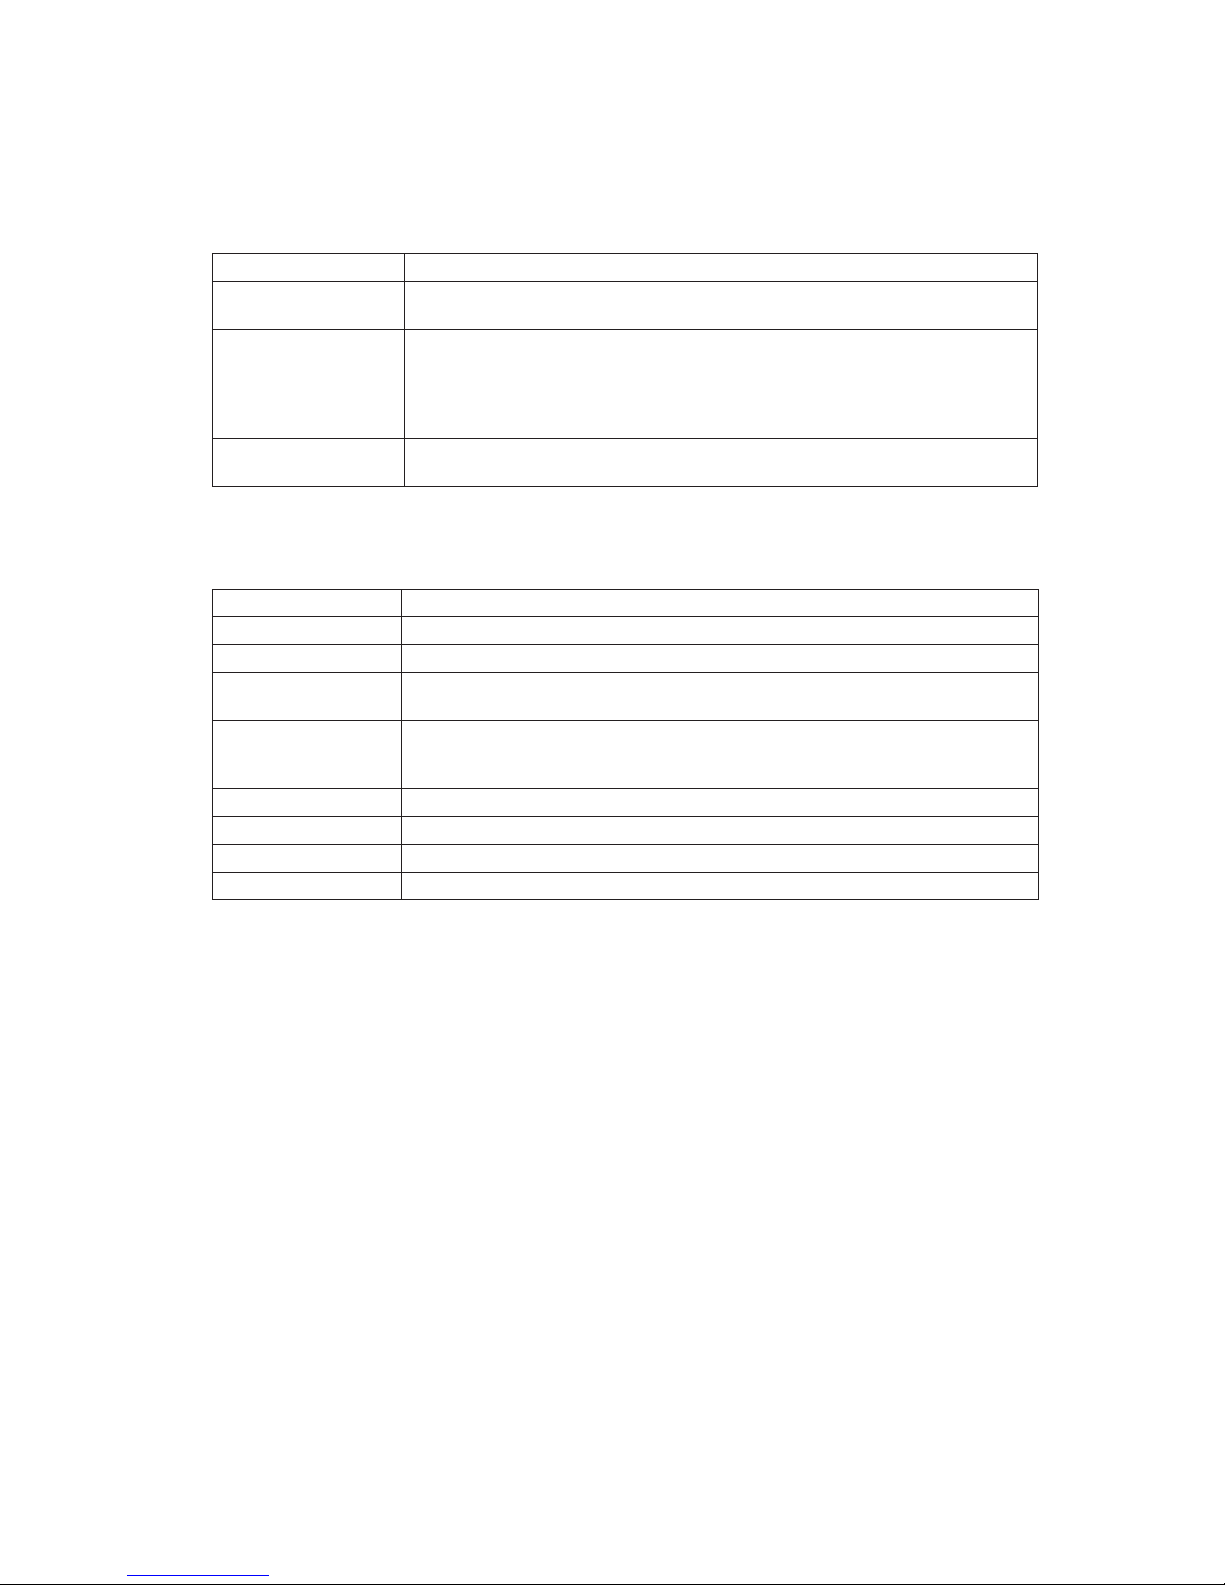
The table below lists the POST error beep codes. Prior to system video initialization, the BIOS uses
these beep codes to inform users of error conditions. Please note that not all error conditions are
supported by BIOS beep codes.
Table 11. POST Error Beep Codes
Number of Beeps Reason for the beeps and action to take
1, 2, or 3 Memory error. Reseat the memory or replace the DIMMs with known good
modules.
4 – 7 or 9 – 11 Fatal error indicating a possible serious system problem. Remove all add-in
cards and re-start the system. If the error still occurs, contact your system
manufacturer. If the beep codes are not generated after the add-in cards are
removed, insert the cards one at a time, booting the system between each
card addition, until the beeps again occur to reveal the malfunctioning card.
8 Replace or reseat the system video add-in card. If on-board video is bing
used, the server board may be faulty.
In addition to the beep codes above, additional beep codes are provided if an Intel® Management
Module is installed. The Intel® Management Modules provide the following additional beep codes.
Table 12. Error Beep Codes Provided by Intel® Management Modules
Beep Code Reason for the beeps and action to take
1 Control panel CMOS clear has been initiated.
1-5-1-1 Processor failure. Reseat or replace the failed processor.
1-5-2-1 No processor is installed or the CPU 1 socket is empty. Reseat or replace the
failed processor.
1-5-2-3 Processor configuration error or CPU 1 socket is empty. Reseat or replace the
failed processor. In a two-processor system, make sure the processors are
identical.
1-5-2-4 Front-side bus select configuration error.
1-5-4-2
DC power unexpectedly lost.
1-5-4-3
Chipset control failure.
1-5-4-4 Power control failure.
Page 47
47MAXDATA Server PLATINUM 1500 IR M5
7 Technical Reference
Power Supply Specifications
500-W Single Power Supply Input Voltages
• 100-127 V~ at 50/60 Hz; 8.2 A max.
• 200-240 V~ at 50/60 Hz; 4.1 A max.
500-W Single Power Supply Output Voltages
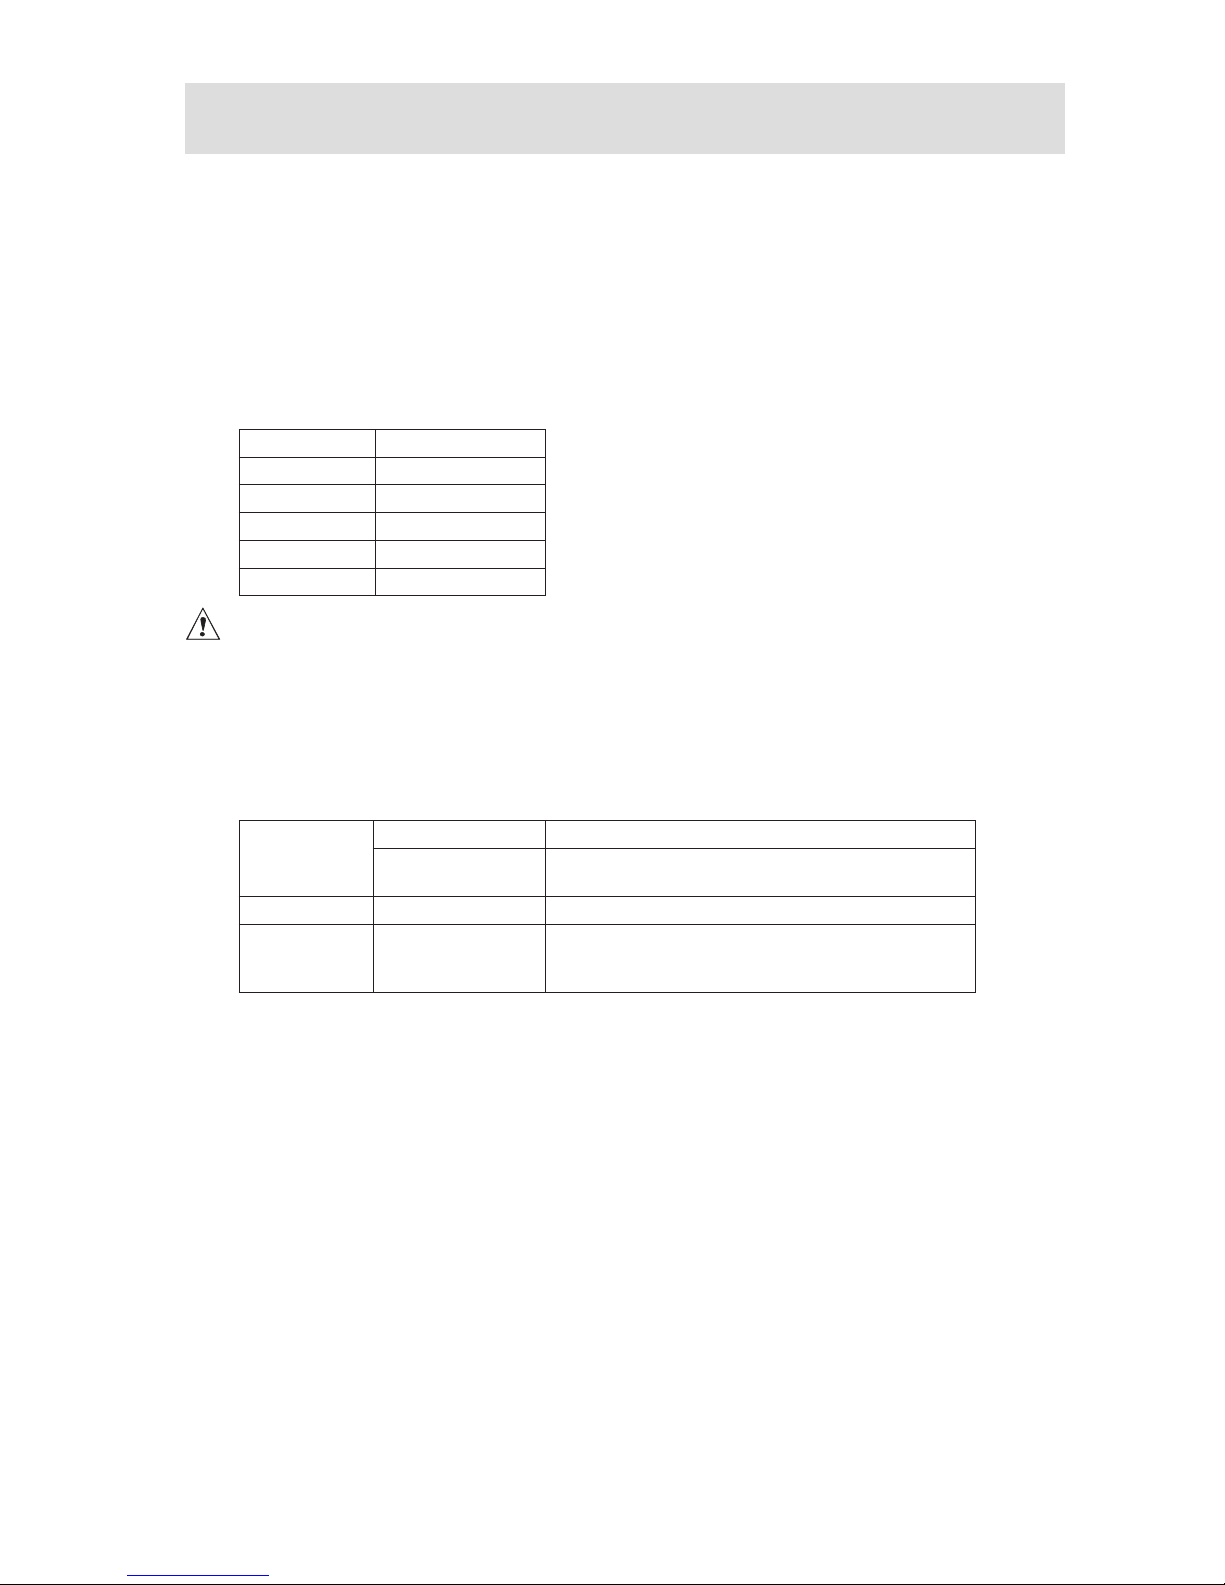
The table below lists the total wattage available from the power subsystem for each voltage.
Table 13. 500-W Power Supply System Output Capability
Voltage Maximum Current
+3.3 V 16 A
+5.0 V 12 A
+5 V Standby 2 A
+12.0 35 A
–12.0 V 0.5 A
CAUTION
Do not exceed a combined power output of 90 Watts for the +5 V and +3.3 V outputs. Exceeding
a combined 90 Watts will overload the power subsystem and may cause the power supplies to
overheat and malfunction.
System Environmental Specifications
Table 14. Environmental Specifications
Temperature Non-operating –40 °C to 70 °C.
Operating 10 °C to 30 °C; derated 0.5 °C for every 1000 ft
(305 m) to a maximum of 10,000 ft.
Humidity Non-operating 90 % relative humidity (non-condensing) at 30 °C.
Acoustic noise 7 Bels in sound power for a typical office ambient
temperature (18–24 °C). The selection of peripherals
may change the noise level.
Page 48

48
Page 49
49MAXDATA Server PLATINUM 1500 IR M5
8 Regulatory and Integration Information
Product Regulatory Compliance
Product Safety Compliance
The server board complies with the following safety requirements:
• EN 60 950 (European Union)
• IEC60 950 (International)
• CE – Low Voltage Directive (73/23/EEC) (European Union)
Product EMC Compliance
The mainboard has been tested and verified to comply with the following electromagnetical
compatibility (EMC) regulations when installed in a compatible MAXDATA host system.
• EN55022 (Class A) – Radiated & Conducted Emissions (European Union)
• EN55024 (Immunity) (European Union)
• CE – EMC Directive (89/336/EEC) (European Union)
Product Regulatory Compliance Markings
This product is marked with the following Product Certification Markings:
Table 15. Product Certification Markings
CE Mark
Page 50

50 Regulatory and Integration Information
Electromagnetic Compatibility Notices
FCC (USA)
This device complies with Part 15 of the FCC Rules. Operation is subject to the following two conditions:
(1) this device may not cause harmful interference, and (2) this device must accept any interference
received, including interference that may cause undesired operation.
This equipment has been tested and found to comply with the limits for a Class A digital device,
pursuant to Part 15 of the FCC Rules. These limits are designed to provide reasonable protection
against harmful interference in a residential installation. This equipment generates, uses, and can
radiate radio frequency energy and, if not installed and used in accordance with the instructions, may
cause harmful interference to radio communications. However, there is no guarantee that interference
will not occur in a particular installation. If this equipment does cause harmful interference to radio
or television reception, which can be determined by turning the equipment off and on, the user is
encouraged to try to correct the interference by one or more of the following measures:
• Reorient or relocate the receiving antenna.
• Increase the separation between the equipment and the receiver.
• Connect the equipment to an outlet on a circuit other than the one to which the receiver is
connected.
• Consult the dealer or an experienced radio/TV technician for help.
Any changes or modifications not expressly approved by the grantee of this device could void the
user’s authority to operate the equipment. The customer is responsible for ensuring compliance of
the modified product.
Only peripherals (computer input/output devices, terminals, printers, etc.) that comply with FCC Class
A or B limits may be attached to this computer product. Operation with noncompliant peripherals is
likely to result in interference to radio and TV reception. All cables used to connect to peripherals must
be shielded and grounded. Operation with cables, connected to peripherals, that are not shielded and
grounded may result in interference to radio and TV reception.
Europe (CE Declaration of Conformity)
This product has been tested in accordance to, and complies with the Low Voltage Directive (73/23/
EEC) and EMC Directive (89/336/EEC). The product has been marked with the CE Mark to illustrate
its compliance.
Installation Precautions
When you install and test the server board, observe all warnings and cautions in the installation
instructions.
To avoid injury, be careful of:
• Sharp pins on connectors
• Sharp pins on printed circuit assemblies
• Rough edges and sharp corners on the chassis
• Hot components (like processors, voltage regulators, and heat sinks)
• Damage to wires that could cause a short circuit
Observe all warnings and cautions that instruct you to refer computer servicing to qualified technical
personnel.
Page 51

51MAXDATA Server PLATINUM 1500 IR M5
Installation Requirements
CAUTION
Follow these guidelines to meet safety and regulatory requirements when installing this board
assembly.
Read and adhere to all of these instructions and the instructions supplied with the chassis and
associated modules. If the instructions for the chassis are inconsistent with these instructions or
the instructions for associated modules, contact the supplier’s technical support to find out how you
can ensure that your computer meets safety and regulatory requirements. If you do not follow these
instructions and the instructions provided by chassis and module suppliers, you increase safety risk
and the possibility of noncompliance with regional laws and regulations.
Prevent Power Supply Overload
Do not overload the power supply output. To avoid overloading the power supply, make sure that the
calculated total current loads of all the modules within the computer is less than the output current
rating of each of the power supplies output circuits.
Place Battery Marking
There is insufficient space on this server board to provide instructions for replacing and disposing of
the battery. For system safety certification, the following statement or equivalent statement may be
required to be placed permanently and legibly on the chassis near the battery.
CAUTION
Risk of explosion if battery is incorrectly replaced.
Replace with only the same or equivalent type recommended by the manufacturer. Dispose of used
batteries according to the manufacturer’s instructions.
Use Only for Intended Applications
This server board was evaluated as Information Technology Equipment (I.T.E.) for use in computers
that will be installed in offices, homes, schools, computer rooms, and similar locations. The suitability
of this product for other applications or environments, (such as medical, industrial, alarm systems,
test equipment, etc.) may require further evaluation.
 Loading...