

Page 1

MAXDATA FALCON 100/200
User‘s Manual
Page 2

Important Information
Copyright
This publication is protected under international copyright laws, with all rights reserved.
No part of this manual, including the products and software described in it, may be reproduced,
manipulated, transmitted, transcribed, stored in a retrieval system, or translated into any language
in any form or by any means, except documentation kept by the purchaser for backup purposes,
without the express written permission of MAXDATA AG.
Disclaimer
The information in this document is subject to change without notice. MAXDATA AG makes no representations or warranties with respect to the contents hereof and specifically disclaims any implied
warranties of merchantability or fitness for any particular purpose. Further, MAXDATA AG reserves
the right to revise this publication and to make changes from time to time in the content hereof
without obligation of MAXDATA AG to notify any person of such revision or changes.
Trademark Recognition
IGEL is a registered trademark of IGEL GmbH.
Windows, Windows 95, Windows NT, Windows 2000, Windows XP and Windows 2003 are either
registered trademarks or trademarks of Microsoft Corporation.
All other products and corporate names appearing in this manual may or may not be registered trade
marks or copyrights of their respective companies, and are used only for identification or explanation
and to the owner’s benefit.
-
Specifications and information contained in this manual are furnished for informational
use only, and are subject to change at any time without notice, and should not be con
strued as a commitment by MAXDATA AG.
MAXDATA AG assumes no responsibility or liability for any errors or inaccuracies that
may appear in this manual, including the products and software described in it
.
Copyright © 2005 MAXDATA AG, Marl. All Rights Reserved.
2
Important Imformation
-
Page 3

Table of Contents
1 Introduction 5
2 Quick Installation 7
3 Terminal Connection Manager 9
3.1 Connections .....................................................................................................................................9
3.2 Configure ........................................................................................................................................10
3.3 About ..............................................................................................................................................10
4 Terminal Properties 11
4.1 General ...........................................................................................................................................11
4.2 Display ............................................................................................................................................11
4.3 Control Panel ..................................................................................................................................12
4.3.1 Global ICA Setting .................................................................................................................13
4.3.2 Register Client .......................................................................................................................14
4.3.3 ThinPrint Settings .................................................................................................................. 15
4.3.4 Security .................................................................................................................................16
4.3.5 Printers .................................................................................................................................. 17
4.3.6 Terminal Server Client Licenses ............................................................................................19
4.3.7 Dialing ...................................................................................................................................19
4.3.8 Keyboard ...............................................................................................................................20
4.3.9 Password ..............................................................................................................................20
4.3.10 Owner ...................................................................................................................................21
4.3.11 System ..................................................................................................................................23
4.3.12 Display ...................................................................................................................................25
4.3.13 Mouse ...................................................................................................................................26
4.3.14 Volume & Sounds .................................................................................................................27
4.3.15 Date / Time ............................................................................................................................28
4.3.16 Certificates ............................................................................................................................28
4.3.17 Regional Settings ..................................................................................................................29
4.3.18 Network and Dial-up Connections .........................................................................................30
4.3.19 FTPUpdate ............................................................................................................................31
4.3.20 Internet Options ....................................................................................................................32
5 Configuring Sessions 33
5.1 Connection Startup Configuration ..................................................................................................33
5.2 ICA .................................................................................................................................................34
5.2.1 Server .................................................................................................................................... 34
5.2.2 Title .......................................................................................................................................34
5.2.3 Application .............................................................................................................................35
5.2.4 Logon ....................................................................................................................................35
5.2.5 Window ................................................................................................................................. 36
5.2.6 Options ..................................................................................................................................36
5.2.7 Firewall .................................................................................................................................. 37
5.3 RDP ................................................................................................................................................38
5.3.1 Server .................................................................................................................................... 38
5.3.2 Logon ....................................................................................................................................38
5.3.3 Application .............................................................................................................................39
5.3.4 General .................................................................................................................................. 39
5.3.5 Display ...................................................................................................................................40
5.3.6 Local Resources .................................................................................................................... 40
5.3.7 Programs ............................................................................................................................... 41
5.3.8 Experience ............................................................................................................................41
MAXDATA FALCON 100/200
3
Page 4

5.4 Powerterm Emulation ....................................................................................................................42
5.5 Internet Explorer ............................................................................................................................43
5.5.1 General .................................................................................................................................. 43
5.5.2 Connection ............................................................................................................................43
5.5.3 Security .................................................................................................................................44
5.5.4 Privacy ................................................................................................................................... 44
5.5.5 Advanced ..............................................................................................................................45
5.5.6 Popups ..................................................................................................................................45
6 Supported Software Features 47
7 Hardware Configuration Overview 49
4
Page 5

1 Introduction
Welcome
Congratulations on purchasing one of the MAXDATA Windows®-based Thin Client models. The MAXDATA Thin Clients are composed of state-of-the-art hardware and an operating system based on the
Microsoft® Windows® CE 5.0 Technology. We have done our best to deliver an excellent product and
we promise to provide support and service of the same quality.
Please refer to the “Software Feature Comparison List” (chapter 6) to get an overview of the sup
ported software features and protocols of the different MAXDATA Thin Client models.
How to use this Guide
In this MAXDATA User Guide we describe the setup screens and options as well as the boot procedure. We do not describe common functionalities like TCP/IP, NFS, SMB, DHCP, and BOOTP etc.
If you have any questions concerning these matters please ask your system administrator or if you
would like to know more about protocols please refer to the according documentation.
This guide is divided into the following chapters:
1. Introduction Welcome and User Guide Information
2. Quick Installation Instructions for a Quick Installation
3. Terminal Connection Manager Initial User Interface
4. Terminal Properties General Terminal Setup
5. Configuring Sessions Add and edit Sessions
6. Appendix Software Supported Software Features
7. Appendix Hardware Hardware Configuration Overview
-
MAXDATA FALCON 100/200
5
Page 6

6
Page 7

2 Quick Installation
If you carry out the following steps, the terminal can be installed in your network environment within
a few minutes.
• Connect the terminal to a VGA monitor, an AT compatible keyboard with PS/2 or USB connector, a
PS/2 or USB mouse, the LAN via RJ45 and AC power.
• Turn on the terminal and wait until the graphical desktop has started and the window of the “Ter
minal Connection Manager” appears on the screen.
• Press F2 to enter the setup.
• Click on the “Display” tab, select the needed resolution and color depth and check proper function
via the “Test…” button.
• Click on the “Control Panel” tab, then select “Network and Dial-up Connections” and finally
double-click the pre-configured network connection and change the network settings as needed.
(By default, DHCP is enabled.)
• Complete the terminal setup program by entering a local IP address in the “Network” section or
keep the default DHCP mode for automatic network configuration.
• Finally exit all setup pages via the “
Now your unit is set and you can start configure sessions within the “Terminal Connection Man
ager”.
OK” buttons in upper right corners.
-
-
Note: For detailed session configuration information refer Chapter 5.
MAXDATA FALCON 100/200
7
Page 8

8
Page 9
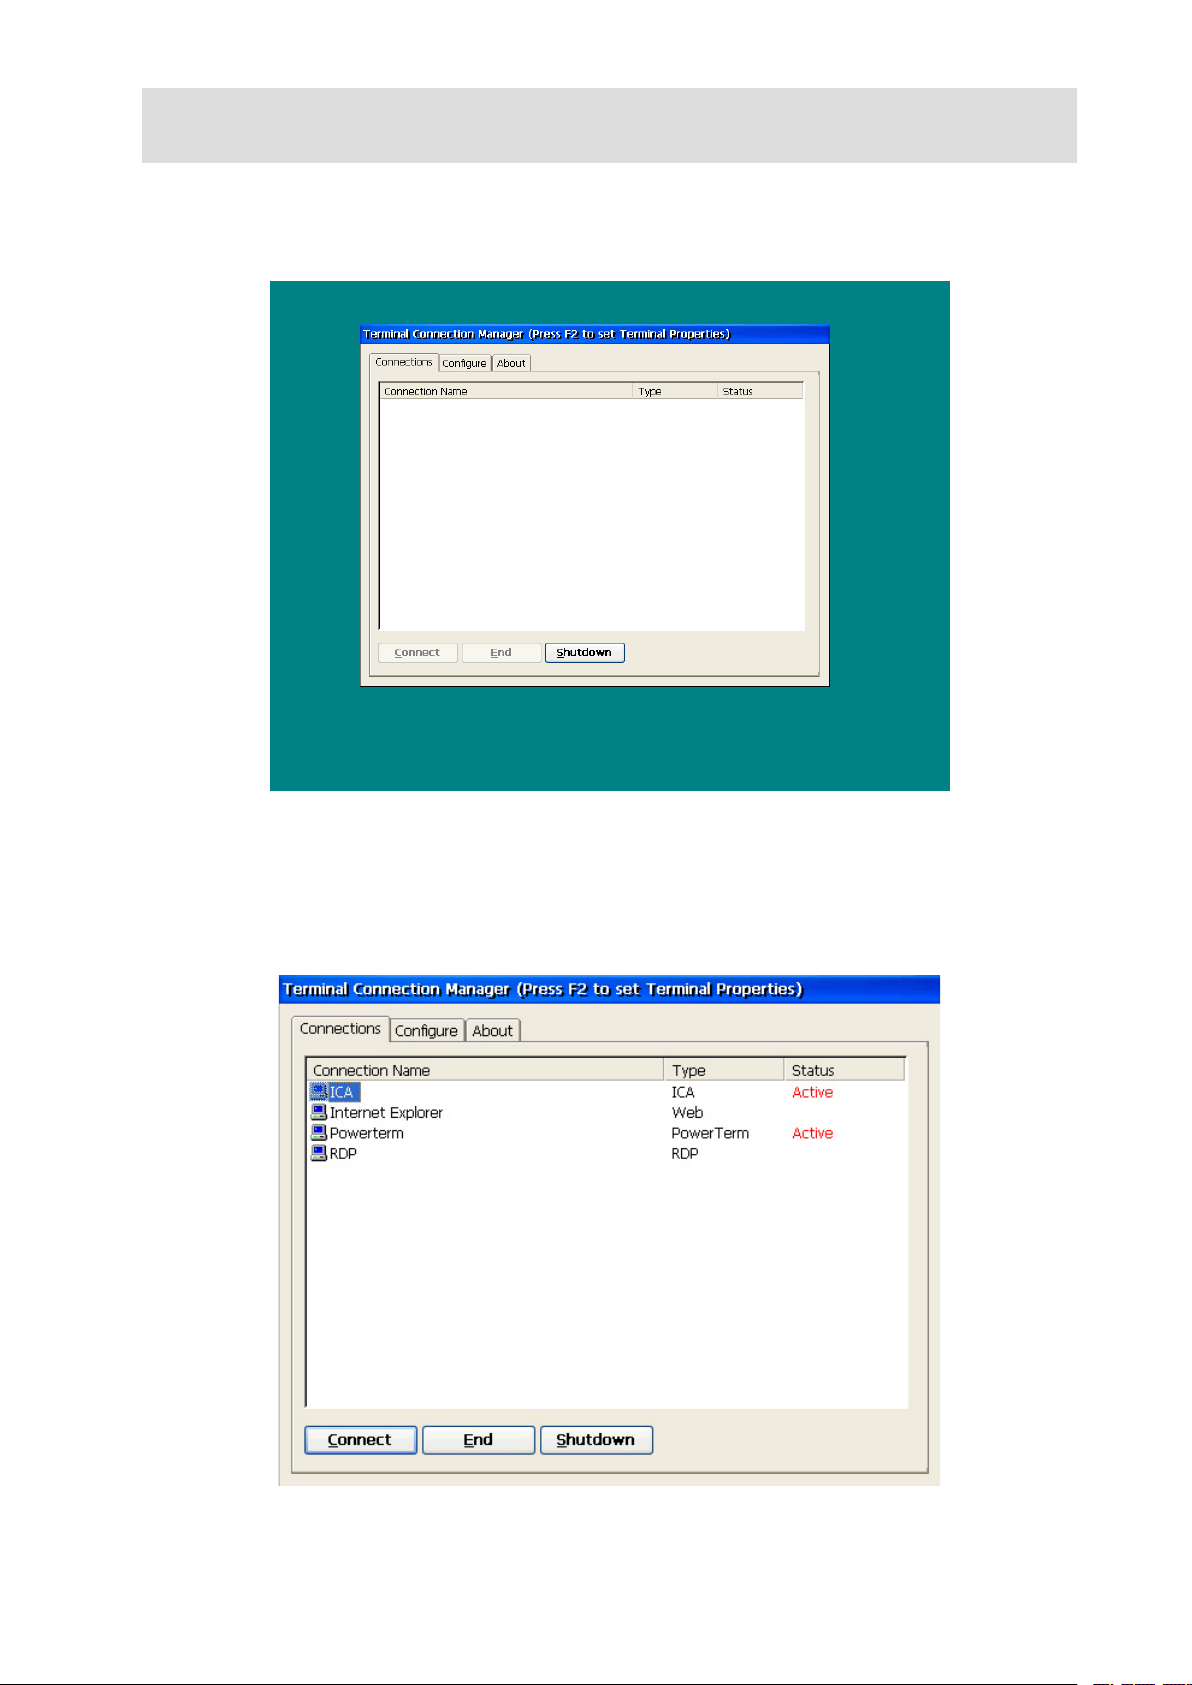
3 Terminal Connection Manager
After the boot procedure is finished, this desktop will come up on the screen. The “Terminal Connection Manager” starts automatically. The available tabs are:
Note:
With the hotkey combination CTRL+ALT+END pressed within any running session, you get back to
this screen. This enables you to switch to a different session without disconnecting.
3.1 Connections
All your configured sessions will be shown here with it’s name, type and the current state.
(“Active” indicates, that this session is currently running/connected.)
MAXDATA FALCON 100/200
9
Page 10
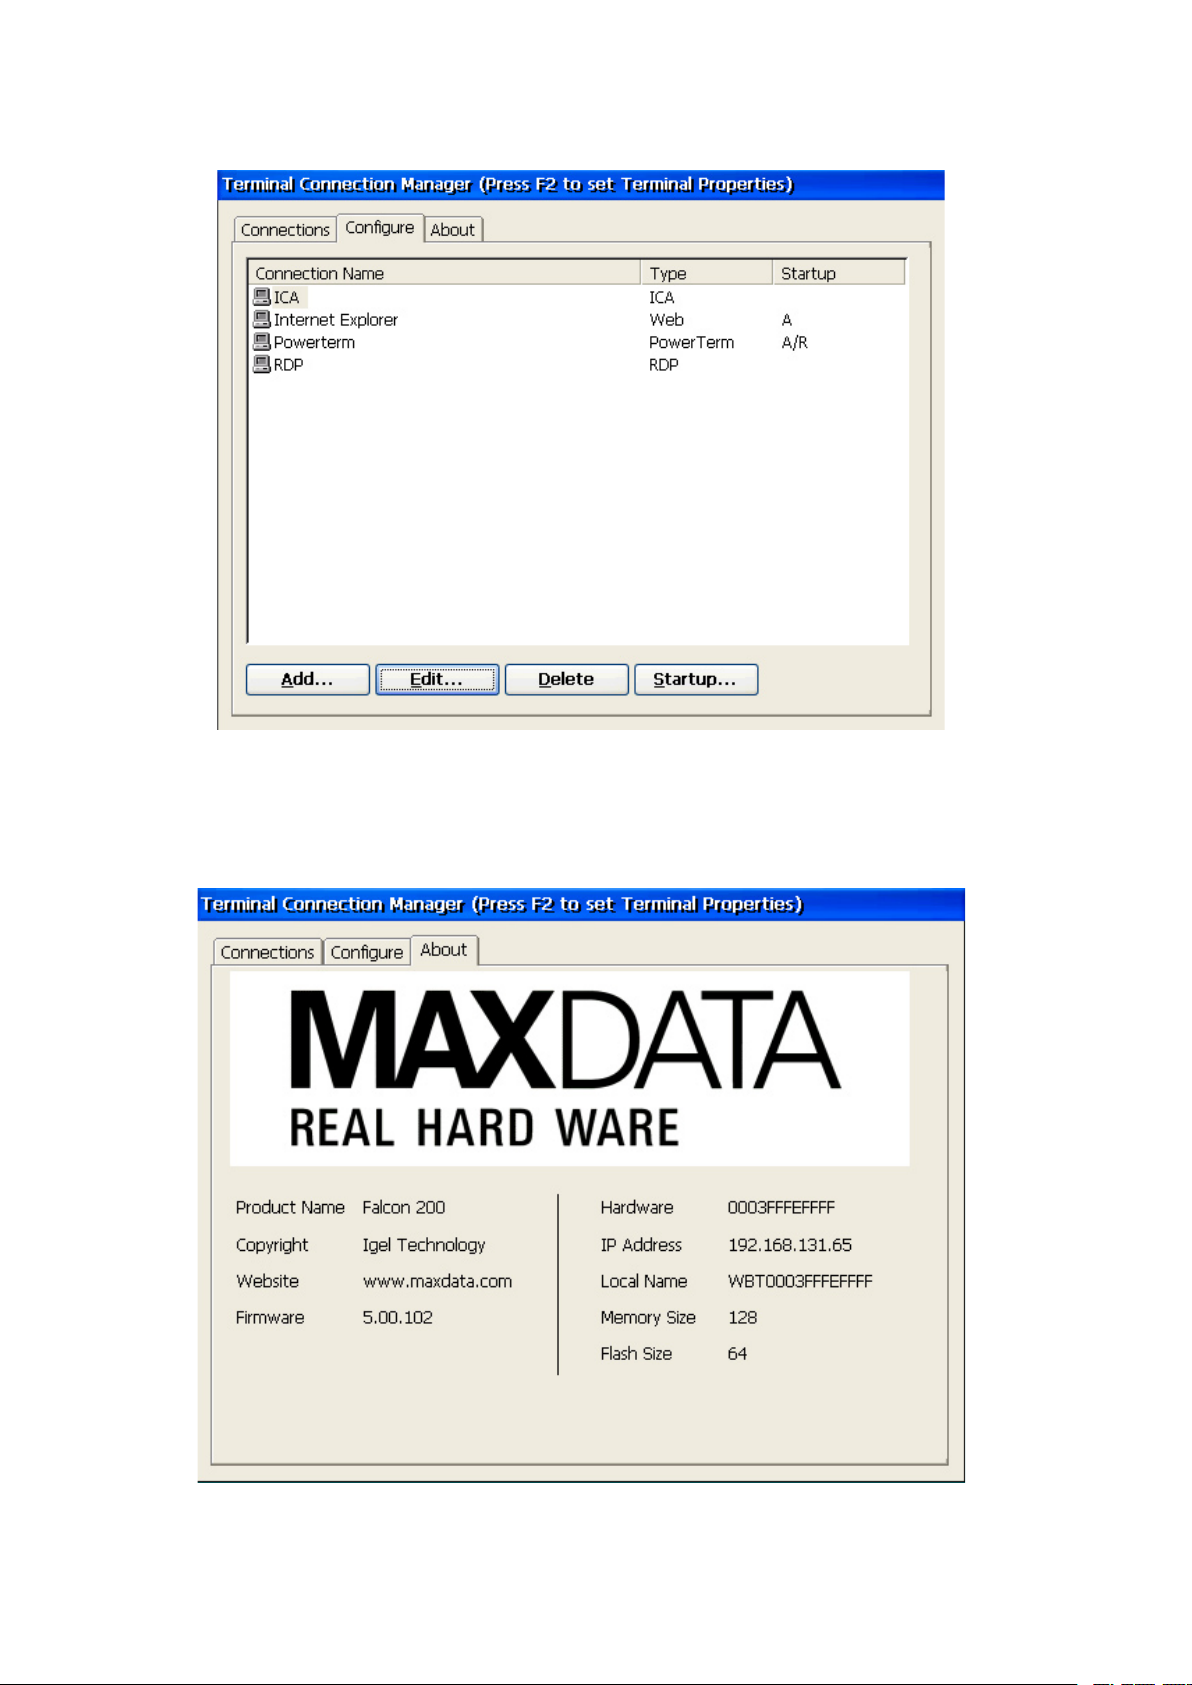
3.2 Configure
Via this tab, you create and manipulate all sessions.
For detailed session configuration information refer to chapter 5 “Configuring Sessions”.
3.3 About
Find the most vital informations like product name, IP Adress, firmware version etc are displayed at
a glance here.
10
Terminal Connection Manager
Page 11
4 Terminal Properties
To enter the “Terminal Properties” page, press the F2 key within the “Terminal Connection Man-
ager” screen.
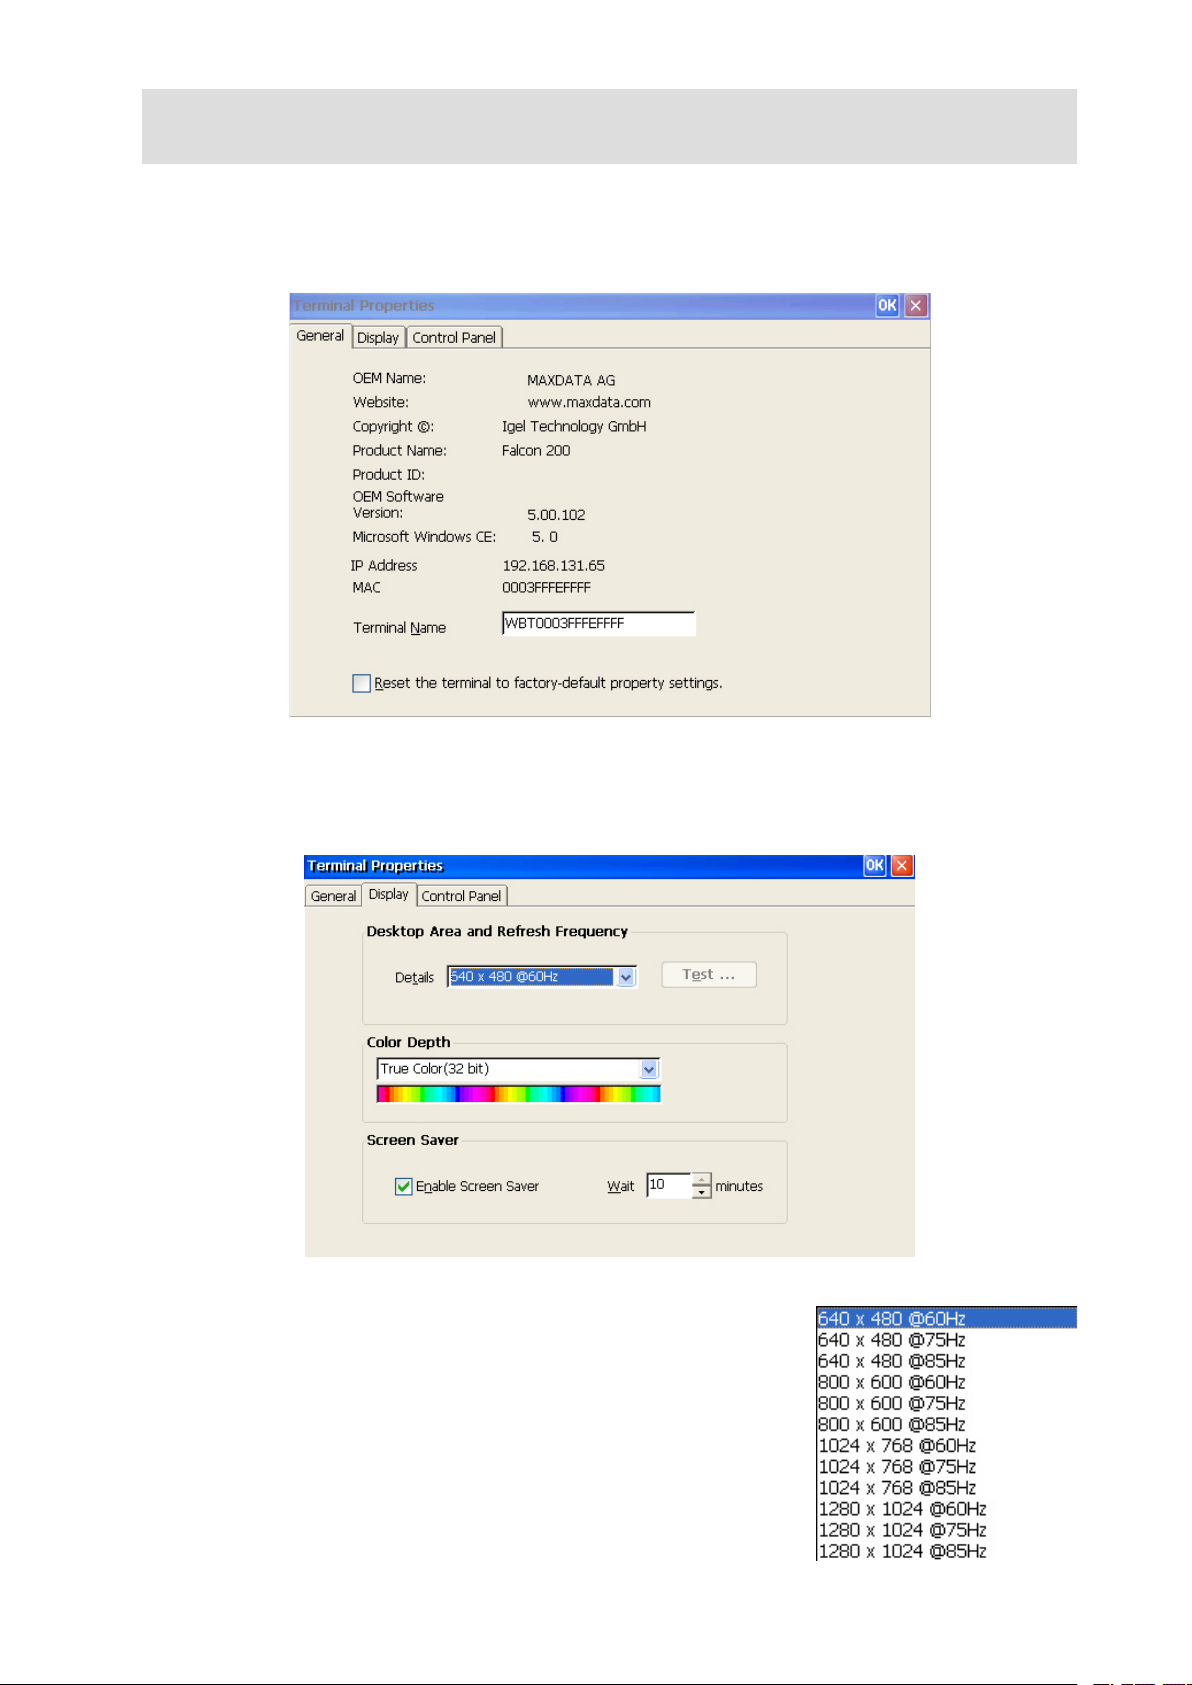
4.1 General
Similar to the “About” page, you find the most vital informations here.
4.2 Display
Set the needed resolution and color depth here.
These are the available combinations of resolution
and frequency:
Note:
Changing the resolution or color depth will cause the terminal to
reboot to take effect.
MAXDATA FALCON 100/200
11
Page 12
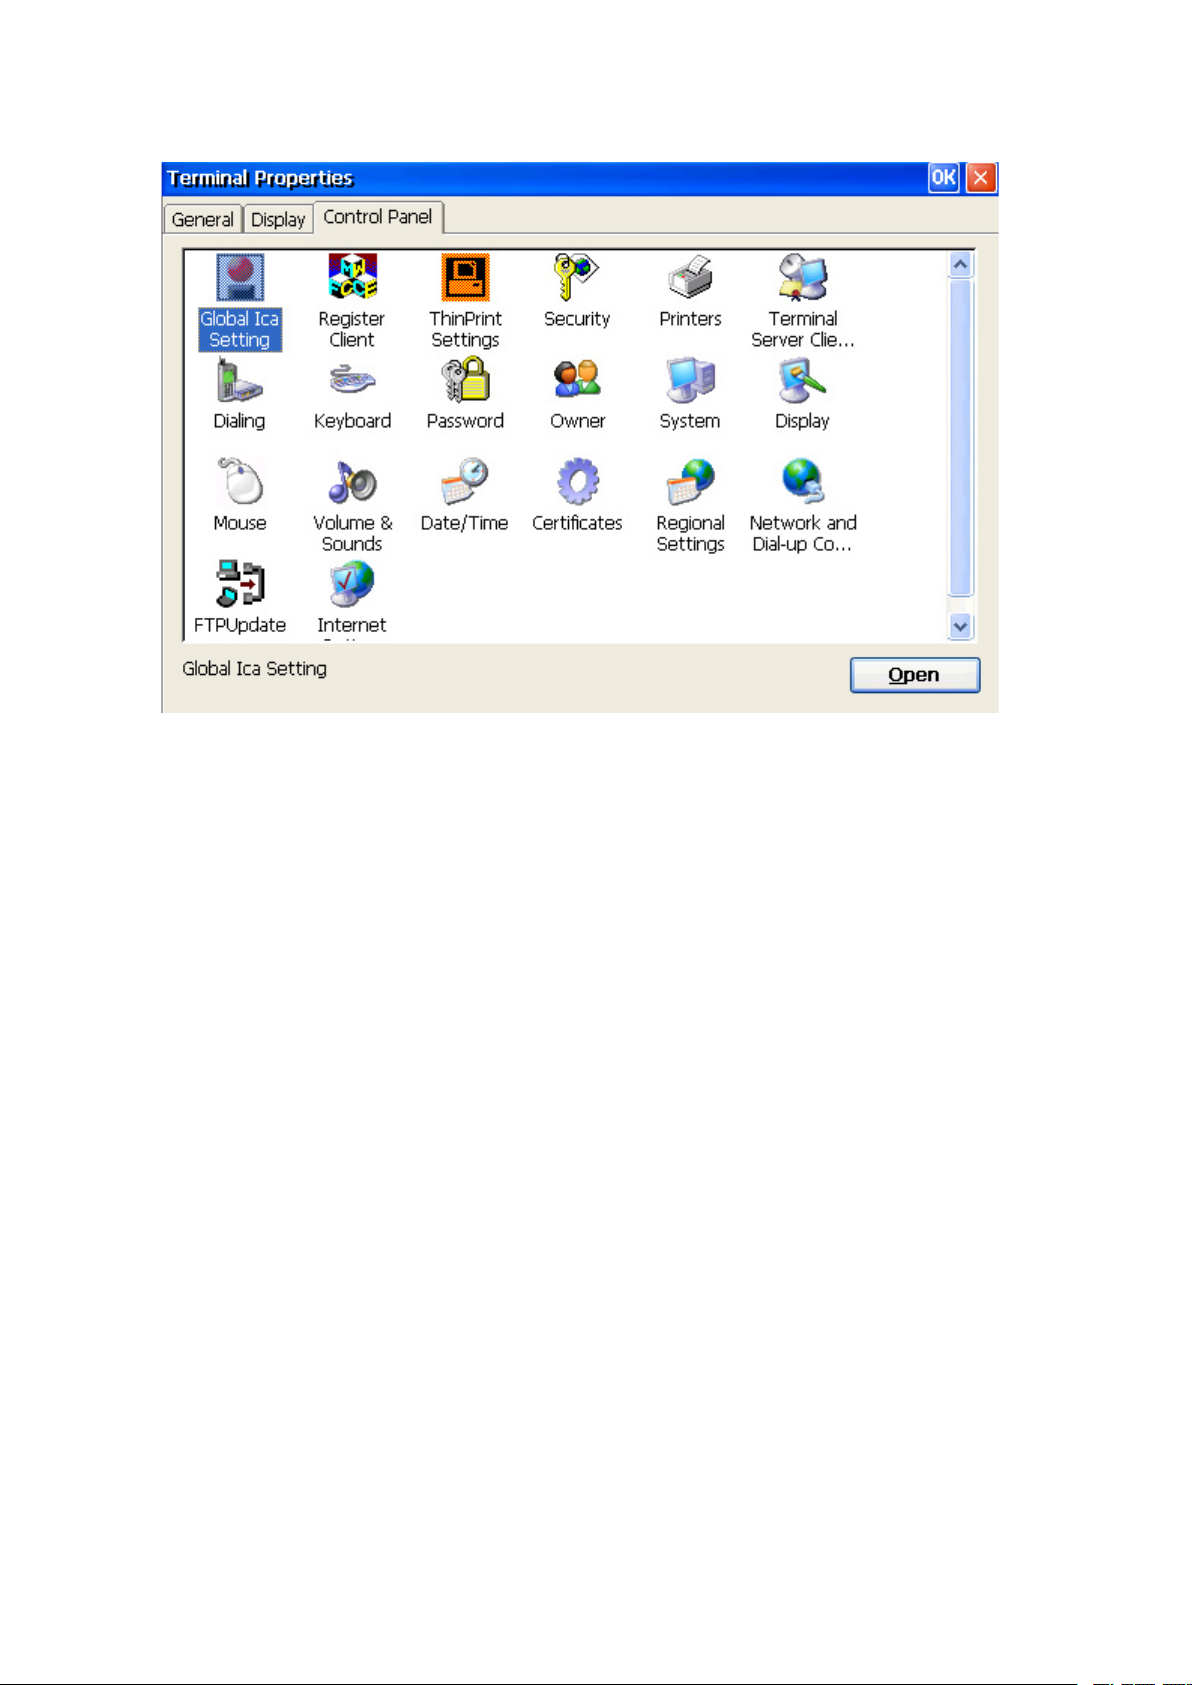
4.3 Control Panel
This tab is the central configuration screen.
Everything except sessions and screen resolution has to be configured here.
12
Terminal Properties
Page 13
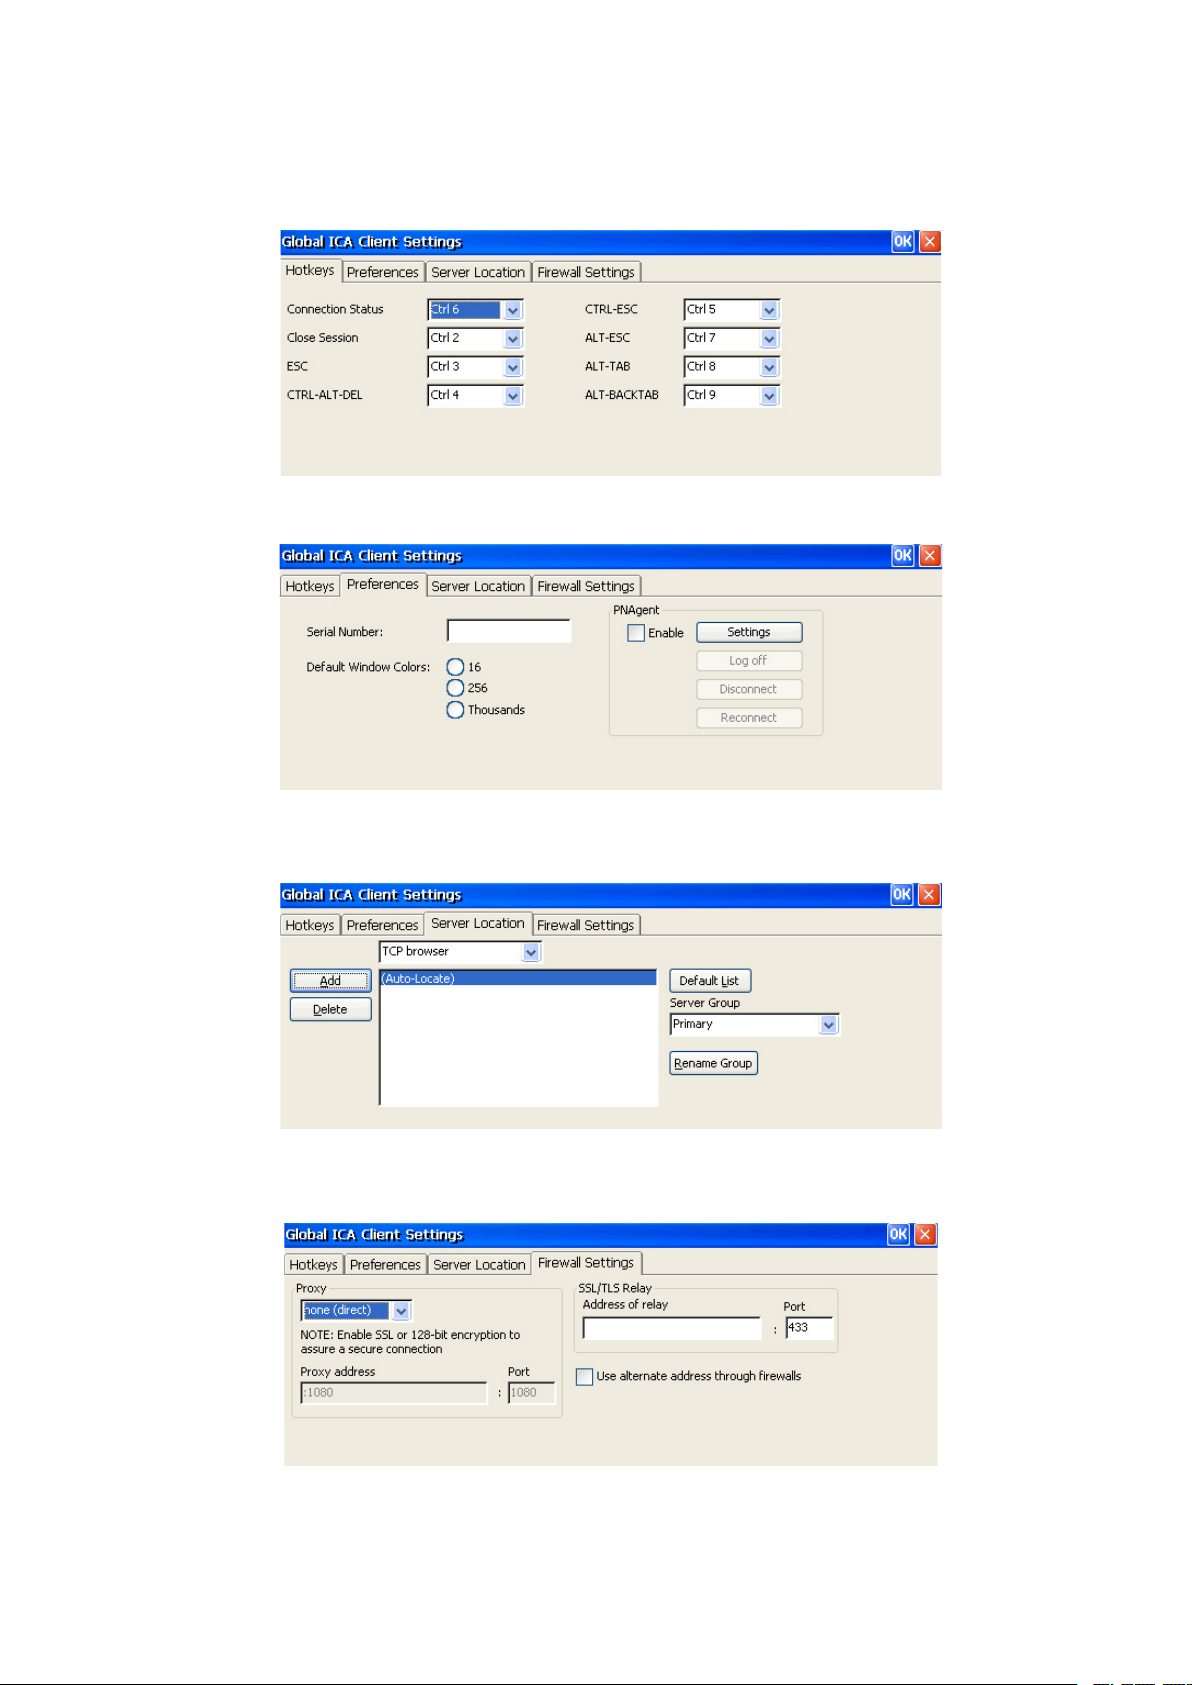
4.3.1 Global ICA Setting
Settings configured here will affect all your ICA sessions.
Most of them can be overruled by differing settings within the single session.
You may need to reassign hotkeys due to overlapping shortcuts.
Besides the default color depth, the PN Agent (Program Neighborhood Lite) can be enabled and
configured in this tab.
Specify your Metaframe Master Browser here. When configuring new ICA sessions, this master
browser will be queried for available published applications.
If you need to cross a firewall, configure the according settings here.
MAXDATA FALCON 100/200
13
Page 14
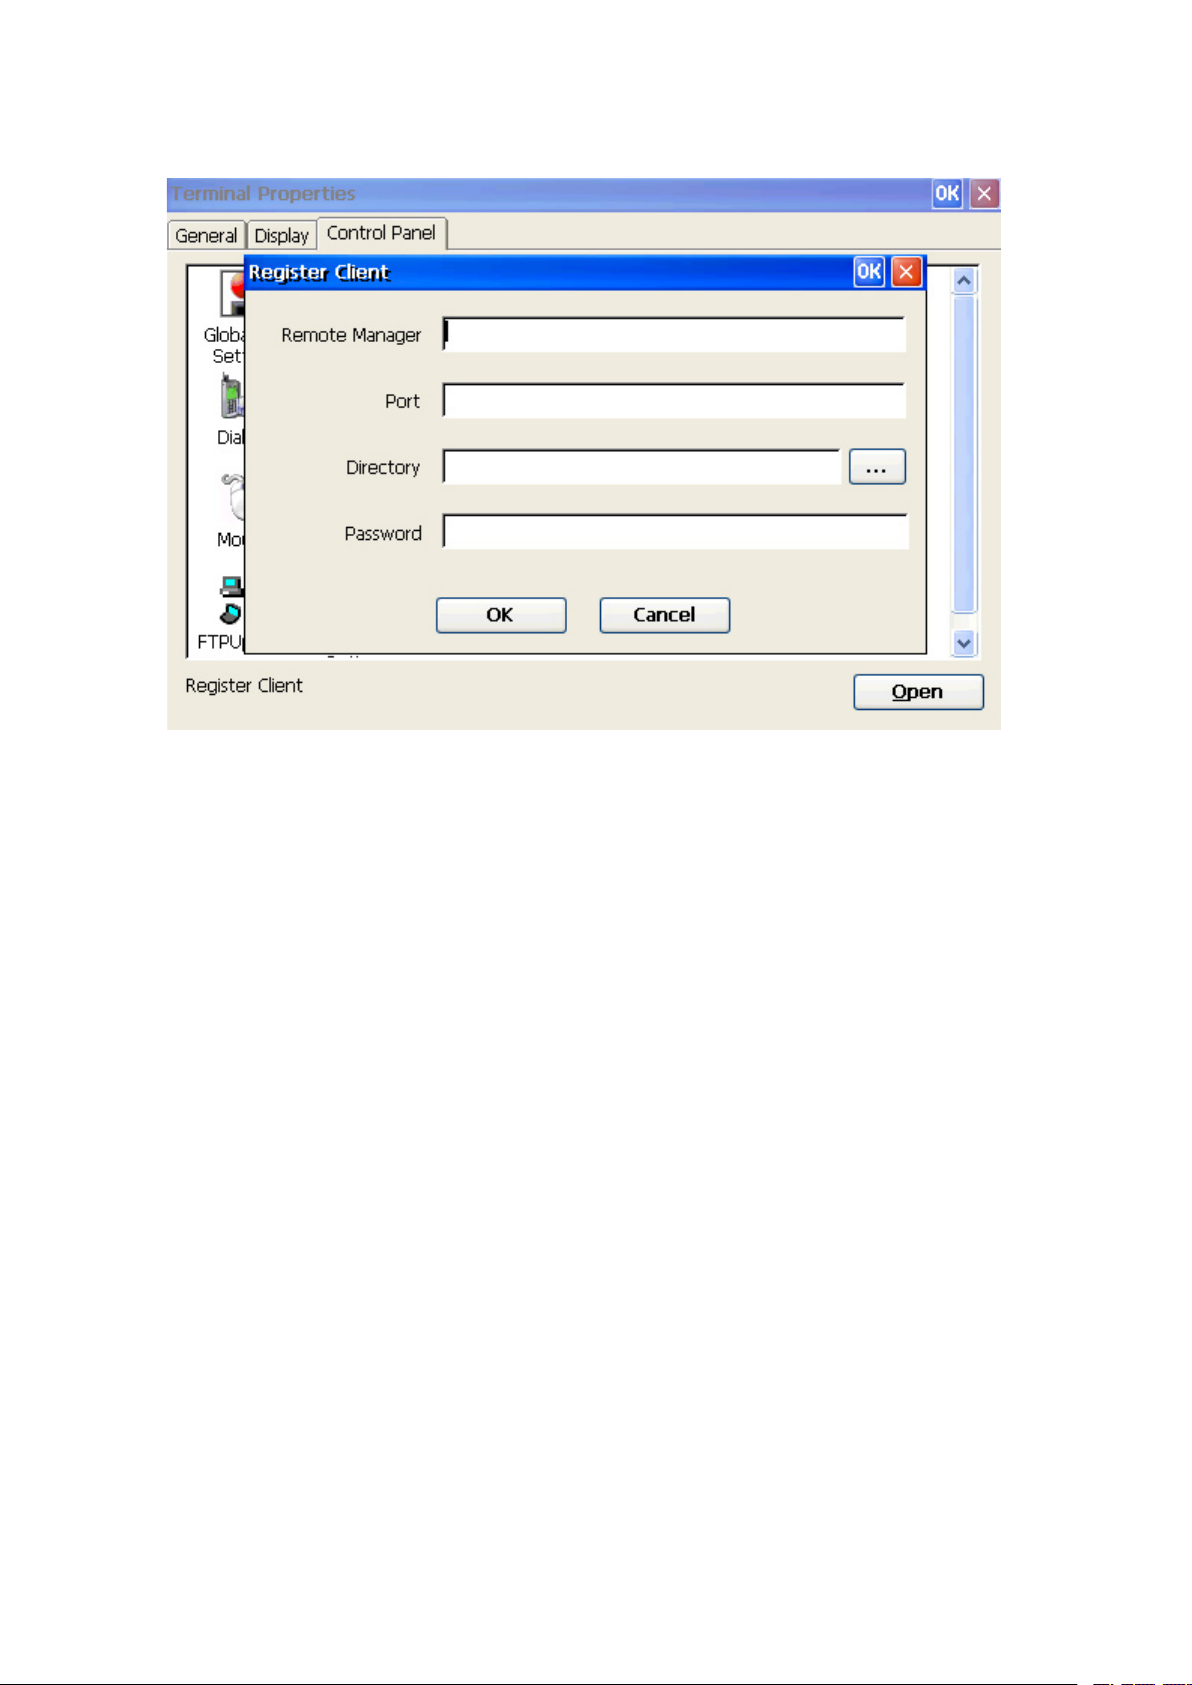
4.3.2 Register Client
To register the client to the MAXDATA Remote Manager, enter the RM server’s values here.
• Remote Manager
Enter the RM server’s full qualified network name or IP.
• Port
The default Remote Manager communication port is 30001
• Directory
After entering all informations, press the “…” button to query the RM server for the configured
directories.
• Password
Enter the password you set to log in to the Remote Manager.
14
Terminal Properties
Page 15
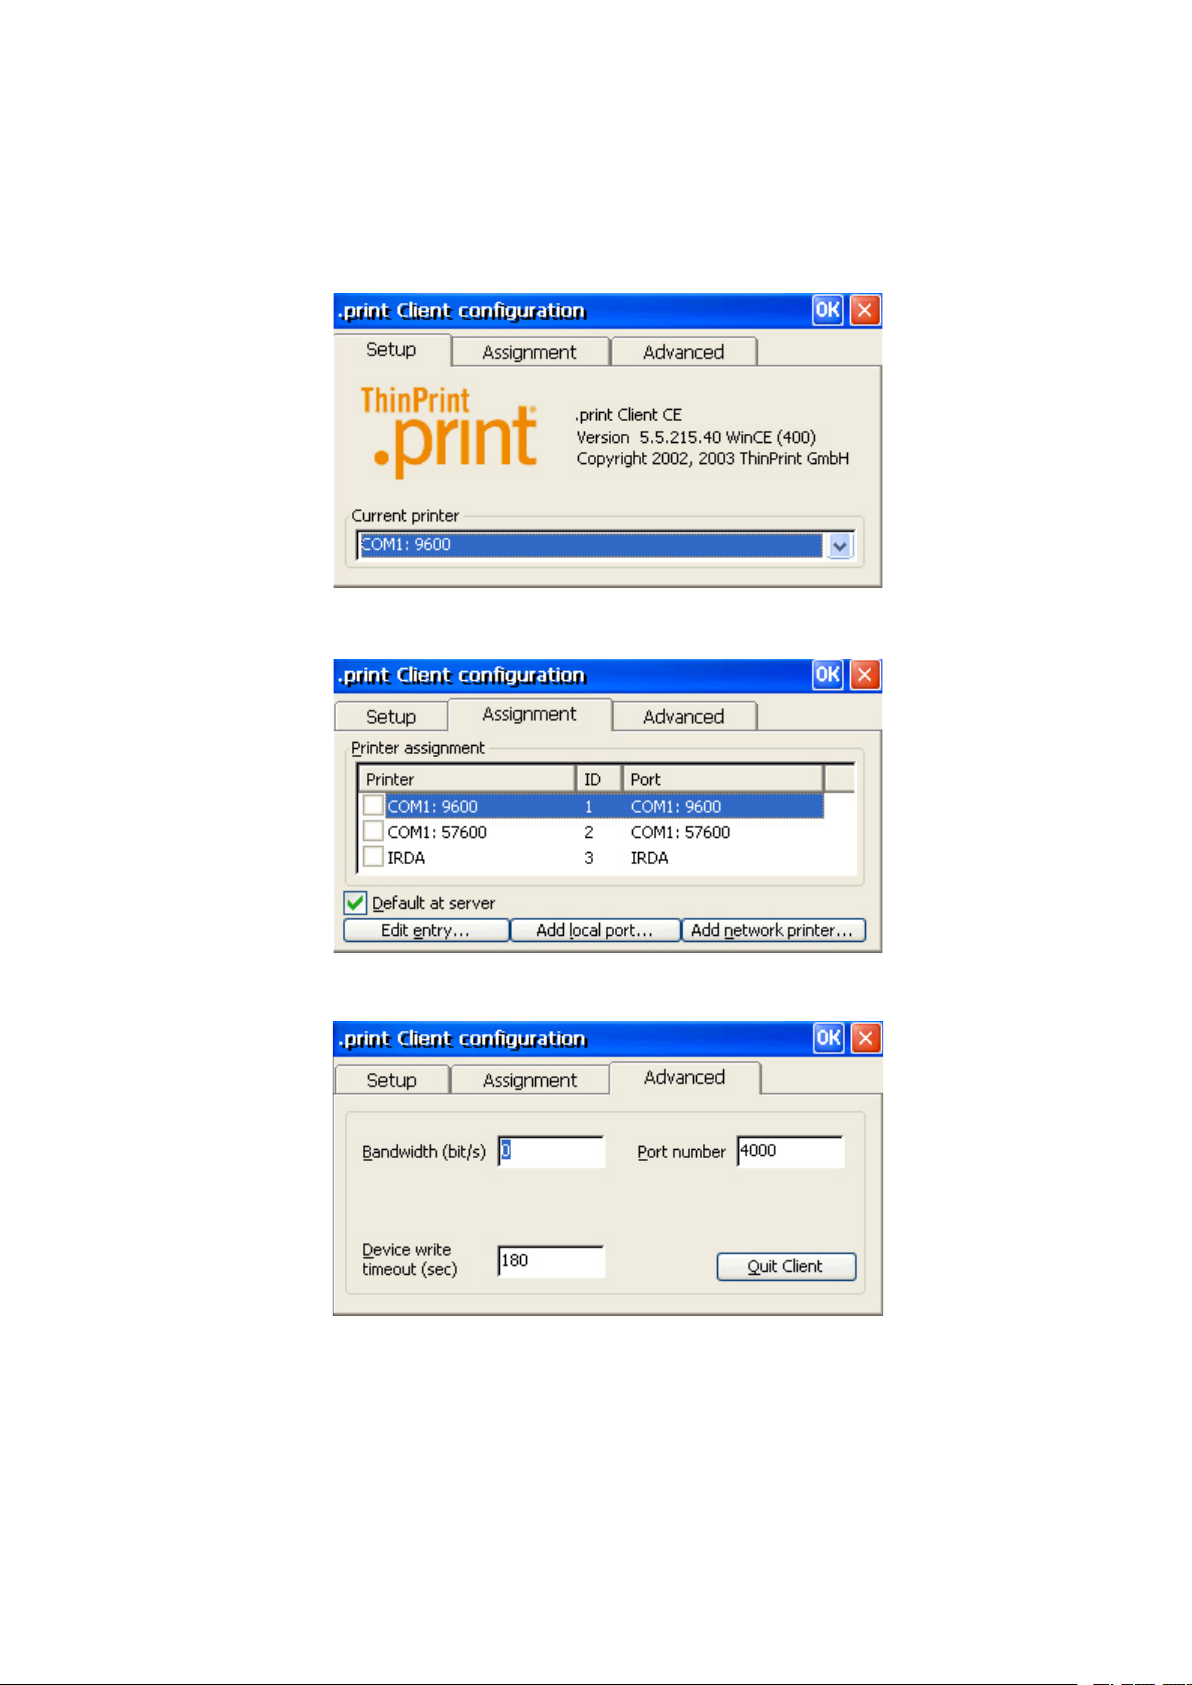
4.3.3 ThinPrint Settings
To improve printing performance and lower needed bandwith, you may use ThinPrint.
Please be aware that an according ThinPrint server must be runnning in your environment!
For more detailed setup description, please refer the ThinPrint manual.
Specify the interface the printer is attached to.
Activate or manipulate the assignment.
Allocate bandwith size, port number and desired timeout.
MAXDATA FALCON 100/200
15
Page 16

4.3.4 Security
In order to lock the setup for the user, specify an administrator password.
Also, you can hide the “Configure” tab in the Terminal Connection Manager, so that the user is
unable to create or manipulate any session.
16
Terminal Properties
Page 17

4.3.5 Printers
This tab enables you to configure your printer(s) connected to the thin client.
Double click “Add Printer” to open the printer configuration wizard.
Select the interface the printer is attached to.
MAXDATA FALCON 100/200
17
Page 18

Double click “Add Printer” to open the printer configuration wizard.
Specify a proper name for the printer.
After clicking “
(Simply choose “
18
Next”, you will be prompted if you want to configure another printer.
Next” in that dialog as long as you do not need one for now.)
Terminal Properties
Page 19

4.3.6 Terminal Server Client Licenses
Terminal Server Client Licenses assigned to the client will be displayed here.
(In case necessary, they can manually be deleted here.)
4.3.7 Dialing
Use this tab to set the proper pre-requisites to dial out with a locally attached modem.
MAXDATA FALCON 100/200
19
Page 20

4.3.8 Keyboard
Tweak the keyboard’s character repeat behaviour here.
4.3.9 Password
In oder to protect the terminal from unauthorized access, set a user password.
Choose, if the terminal should prompt for this password right after power on and/or if the screen
saver should also be password protected.
20
Terminal Properties
Page 21

4.3.10 Owner
Informations given here do have statistic function only.
Additional user information can be entered here (e.g. department, floor, …).
MAXDATA FALCON 100/200
21
Page 22

In oder to gain access to the network resources hold ready for the user, enter the user’s name and
the belonging password as well as the domain the account is valid.
22
Terminal Properties
Page 23

4.3.11 System
Most vital informations about the system are gathered in this summary.
The “General” tab mainly displays the exact OS version, CPU type and available memory.
For specific applications, you may need to allocate more RAM for program use or storage.
Note:
Use this setting with care and do not exceed respective do not fall below the “In Use” values! This
will cause malfunctions of the terminal.
MAXDATA FALCON 100/200
23
Page 24

Specify the terminal’s “Device Name” for network identification.
(By default, the device name is set to WBT+MAC adress.)
This tab is a disclaimer only. Please read the copyright information carefully.
24
Terminal Properties
Page 25

4.3.12 Display
You may put an image onto your desktop. Predefined are the standard Microsoft® Windows® CE logo
and the MAXDATA logo. But you may also load an image from an available network ressource.
Select one of the preconfigured Schemes (Themes) or manually set the look wanted.
Click on the picture to switch the “Item” drop box to the according setting.
MAXDATA FALCON 100/200
25
Page 26

4.3.13 Mouse
Within the Mouse Properties, you can test and tweak the mouse behaviour.
Click on the pictures to the right to execute the according test.
This tab enables you to switch from default right hand mouse to left hand mouse (exchanging mouse
buttons).
Also, the mouse speed could be altered here.
26
Terminal Properties
Page 27
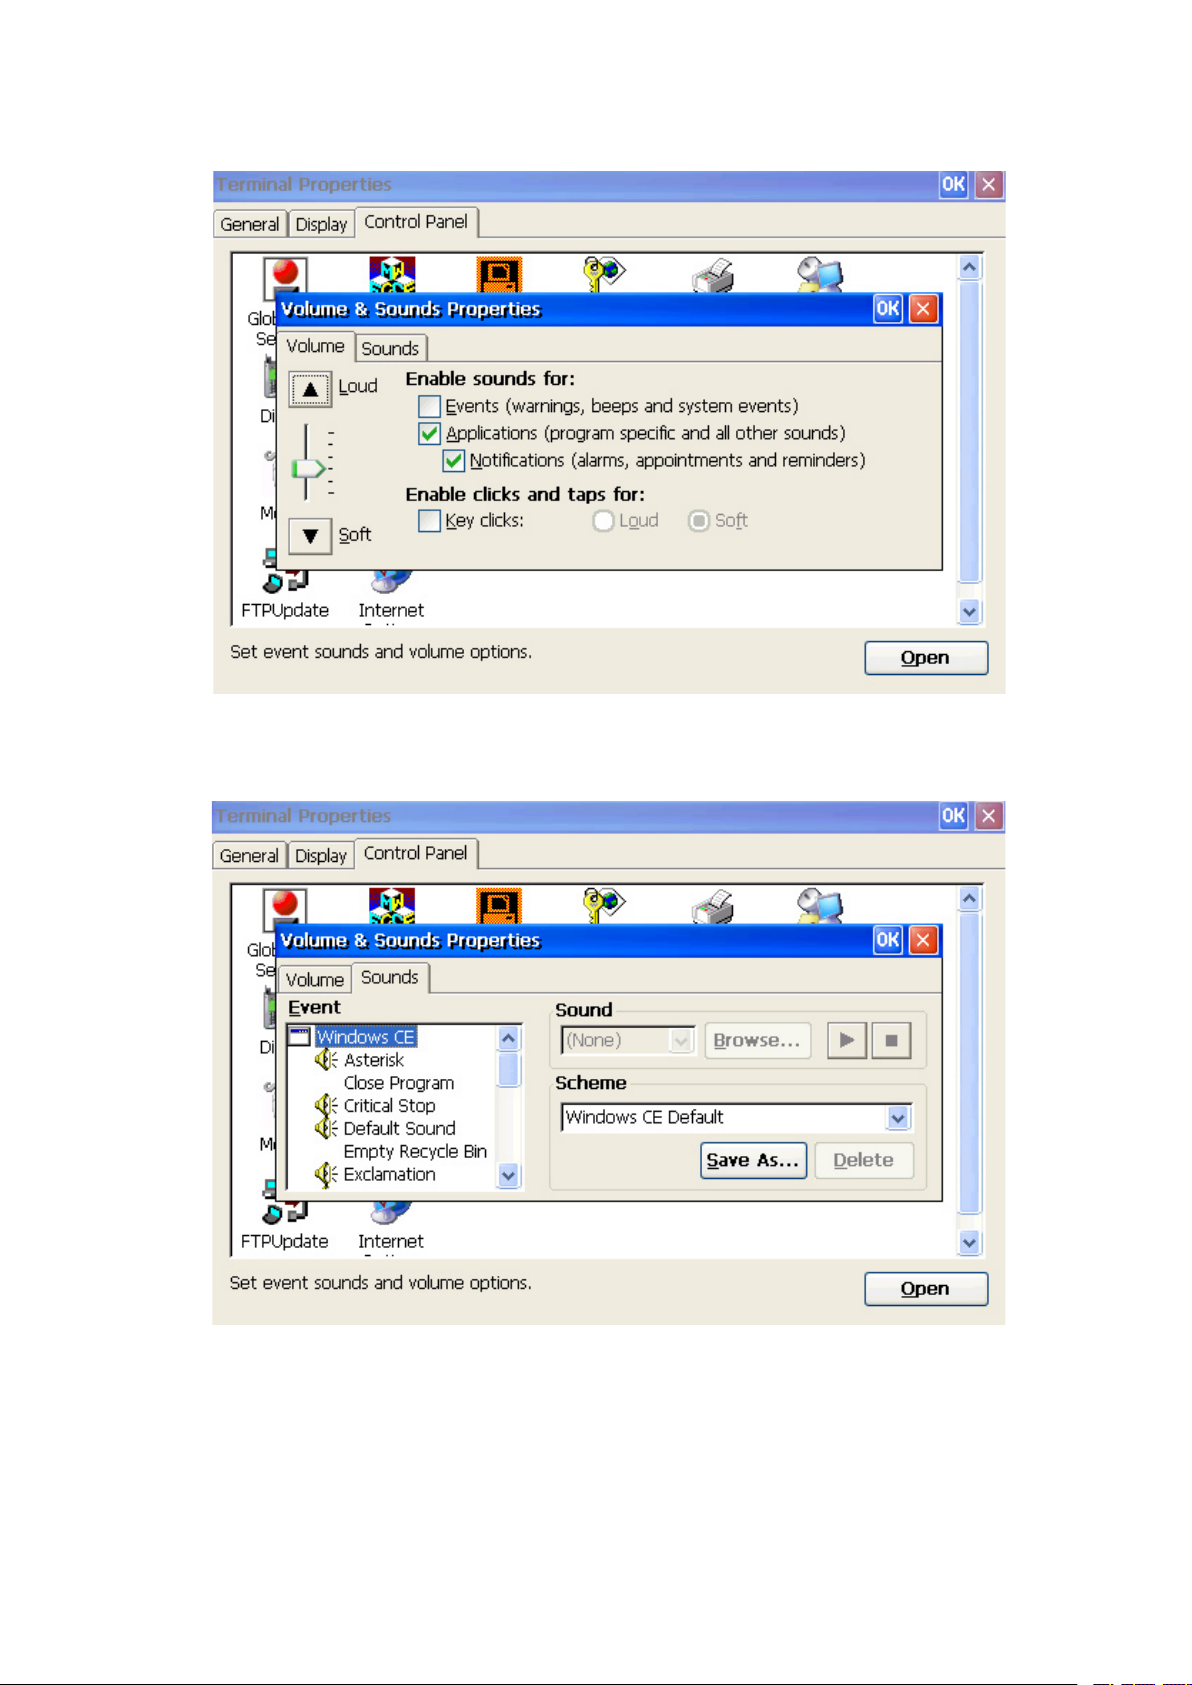
4.3.14 Volume & Sounds
Configure what system sounds (e.g. on mouse clicks) and acoustic alerts should be enabled and the
wanted volume.
Similar to a Microsoft
events.
MAXDATA FALCON 100/200
®
Windows® PC desktop, you can enable/assign sounds to the most common
27
Page 28

4.3.15 Date / Time
Adjust time and date as well as your time zone in this tab.
4.3.16 Certificates
Manage certificates for trusted authorities here.
28
Terminal Properties
Page 29

4.3.17 Regional Settings
Specify the proper locale (country) here. In case needed, you may also alter the detailed settings
like numbering, currency, time and date style. These settings are acessable via the “Customize…”
button.
Currently, the user interface is available in English language only.
“Input Language” means the attached keyboard’s layout (key arrangement) to be used.
MAXDATA FALCON 100/200
29
Page 30

4.3.18 Network and Dial-up Connections
Configure new or edit existing connections via this window.
This window pops up when clicking the “Make new Connection” button.
Select the connection to be configured and follow the respective subsequent configuration win
dows.
The ordinary connection is a LAN connection, which is always already preconfigured.
Choose between static IP or use of DHCP (DHCP is set by default).
-
In case DHCP is not used or does not provide name service information, specify your Domain Name
Services and/or Windows Internet Naming Service here.
30
Terminal Properties
Page 31
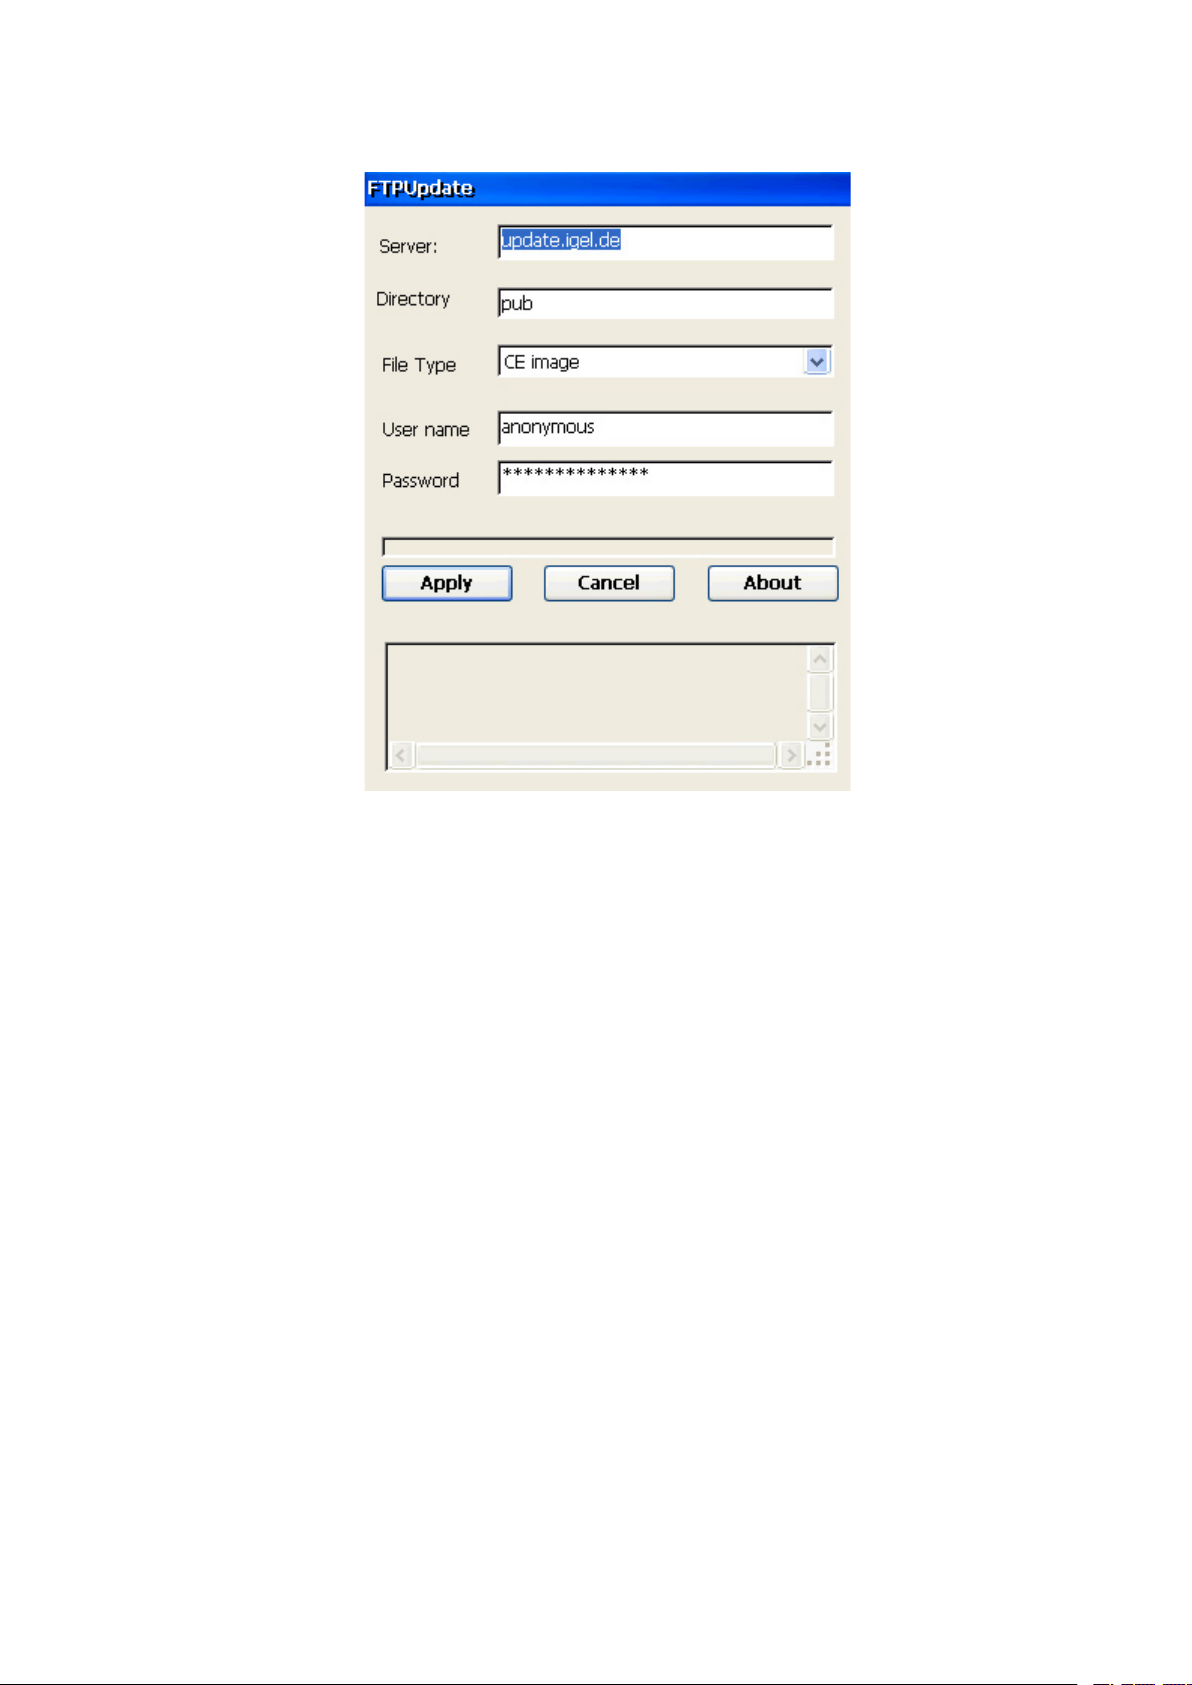
4.3.19 FTP Update
To update your terminal with a new firmware, enter the necessary credentials to log in to your FTPserver providing the firmware image.
Firmware updates are available from http://ftp.maxdata.de/t_index.asp?info=/info/MAXDATA_Falcon_
Thin_Clients (there are sub-directories named after the models).
You need to download, unpack and then distribute the firmware via your local FTP server.
The update process itself will be shown in the progress bar (below “Password” field).
After the update finished successfully, the terminal will have to be rebooted.
Note: “update.igel.de” is exemplary only here! You will not be able to directly update online.
MAXDATA FALCON 100/200
31
Page 32

4.3.20 Internet Options
Currently, only one browser session can be configured.
Please refer chapter 5.5 “Internet Explorer” for configuration details.
32
Terminal Properties
Page 33

5 Configuring Sessions
To create a new session from scratch, click on the “Configure” button first and then on “Add…”.
Choose the session type within the appearing drop box.
5.1 Connection Startup Configuration
Configure the behaviour of your sessions here.
In some environments, you may encounter timing problems with auto-started sessions.
Eliminate those by setting a slight delay before autostart.
MAXDATA FALCON 100/200
33
Page 34

5.2 ICA
5.2.1 Server
This is the initial configuration screen for an ICA session. By pressing the “Refresh” button, a broadcast will be send out through the network looking for Metaframe servers and/or available published
applications which will be displayed in the window. If you have more than one master browser in
your network, specify the one to be contacted via the “Server Location…” option.
5.2.2 Title
Enter a fitting name for the new ICA session.
34
Configuring Sessions
Page 35

5.2.3 Application
You may enter the needed application and it’s working directory manually.
(This window is not appear, if you chose a published application as both informations will already be
provided by the Metaframe server.)
5.2.4 Logon
If automatic logon is wanted, specify the user credentials here.
Note: When using auto-logon, it is strongly recommended to set a user password!
MAXDATA FALCON 100/200
35
Page 36

5.2.5 Window
Specify the needed color depth here.
5.2.6 Options
Tweak the common ICA features (compression, cache, audio etc) as needed in this tab.
36
Configuring Sessions
Page 37

5.2.7 Firewall
In case you need to cross a firewall, the necessary settings can be defined in this tab.
MAXDATA FALCON 100/200
37
Page 38

5.3 RDP
5.3.1 Server
Specify the name for your new RDP session here as well as the Terminal Server you want to connect
to (you may enter it’s network name or IP).
5.3.2 Logon
You may pre-define the user credentials to log in to the server by providing the account’s username,
password and domain.
38
Configuring Sessions
Page 39

5.3.3 Application
Connections to specific applications are possible as well as a plain desktop connection. Specify
application and it’s working directory here in case the user should not get the complete desktop but
a single application only.
5.3.4 General
After you successfully configured a new RDP session, you may need to edit the RDP global settings
(similar to the ICA global settings). Simply edit a configured RDP session.
Note: The RDP global settings will affect all RDP sessions!
This tab summarize the settings of the “Connection” and the “Logon” tab.
MAXDATA FALCON 100/200
39
Page 40

5.3.5 Display
Select the color depth your RDP sessions should work with.
5.3.6 Local Resources
Choose if the sessions need sound and which local resources should be available within the terminal
server sessions
40
Configuring Sessions
Page 41

5.3.7 Programs
Same page like 5.3.3 “Application”.
5.3.8 Experience
This tab enables you to manipulate the session’s appereance.
Note: In environments with low network bandwith, “Bitmap caching” may improve performance.
MAXDATA FALCON 100/200
41
Page 42

5.4 Powerterm Emulation
This is the main configuration page for an emulation session.
Mayor configuration needs to be done here, some more is only configurable within a running session
(for example keyboard remapping, script-recording, etc…)
As it would go beyond the scope of this manual, the emulation suite is not described in detail here.
Please refer to the according documentation by Ericom also available on our webpage and/or Prod
uct CD.
-
42
Configuring Sessions
Page 43

5.5 Internet Explorer
5.5.1 General
Enter a name for the browser session and specify the session’s start page and search page.
Also configure the browser’s cache behaviour and settings.
5.5.2 Connection
Set the type of connection to be used for the browser session.
Note: “Use LAN (no autodial)“ is not activated by default.
MAXDATA FALCON 100/200
43
Page 44

5.5.3 Security
Configure what websites belong to your trusted or restricted sites.
You are also able to constitute the behaviour of the local activex controls for each of the four zones
separately.
5.5.4 Privacy
Configure Cookie handling via this tab.
44
Configuring Sessions
Page 45

5.5.5 Advanced
Here you can manipulate most functionalities of the Internet Explorer.
(Similar to the advanced internet options of the desktop version of the IE.)
5.5.6 Popups
Define how to deal with popups.
When enabling popup blocking, you may unlock specific pages/domains via the “Exceptions”
button.
The “Advanced” button enables you to block popups on specific events only.
MAXDATA FALCON 100/200
45
Page 46

46
Page 47

6 Supported Software Features
MAXDATA Model Name FALCON 100 FALCON 200
Embedded Operating System
ICA Client Version 8.1 8.1
Citrix Program Neighborhood
RDP Client Version
PowerTerm Emulation Suite
Kerberos (within PowerTerm) – –
SAP Gui
X11R6
XDMCP (number of max. displays) – –
Extended Local Xfonts
Font Service (XC + NFS)
CONNECTIVITY
SMB / NFS Mounting SMB SMB
Devicemapping Daemon
ThinPrint Client
Printing via Line Printer (LP) – –
Printing via TCP/IP
Local Browser – IE 6.0
Java Runtime Environment (JRE)
Acrobat Reader
Media Player
Flash Player
Real Player
INTERNET
Messenger – –
PPTP (VPN)
PPPOE (DSL)
Cisco VPN – –
Smartcard Application – –
USB Hotplug Automounting Feature
MISC
KVK Support – –
Full Remote Managability
Shadowing/VNC – –
Remote RSH/SSH Access
ADMIN
Setup via Bootp/DHCP
PXE Netboot
CE 5.0 CE 5.0
PN Light PN Light
5.5 5.5
–
– –
– –
– –
– –
– –
– –
– –
– –
– 9.0
– –
– –
– –
– –
– –
Note:
In chapter 7 you will find a detailed overview of the hardware configurations and technical specifications of the different models.
MAXDATA FALCON 100/200
Hardware Configuration
47
Page 48

48
Page 49

7 Hardware Configuration Overview
MAXDATA Model Name FALCON 100/200
Embedded Operating System CE 5.0
Flash Disk Size 32/64 MB
RAM Size 64/128 MB
RAM expandable up to 512 MB
CPU Speed 400 MHz
CPU Type
Video RAM
VGA Chipset S3 Twister
HARDWARE BASE
Maximum VGA Resolution at 16 Bit 1280 × 1024
AC‘97 compliant Audio Chipset
Fanless Construction (convection)
Steel Housing
Power Supply internal
Power (max. consumption) 20 Watt
Power Frequency (single phase)
Operating Temperature 0 to 35 °C – 32 to 95 °F
Storage Temperature -20 to 60 °C – -4 to 140 °F
Relative Humidity (non-condensing)
Line Voltage (autosensing) 100–240 V AC
ENVIRONMENTAL
Dimensions of Unit (H × W × D in mm)
Dimensions of Unit (H × W × D in inch) 61 × 10.9 × 57.2
Weight of Unit 2,5 kg – 5.5 lbs
2 × PS/2 Port (mouse and keyboard)
Number of DB9 Pin Serial Ports 1
DB 25 Pin Parallel Port
Number of USB Ports (front – back) 1 – 2
RJ 45 10/100BaseT Port (autosensing)
DB 15 Pin VESA Monitor Port
Digital Video Interface (DVI-I dual link) –
16 Bit Stereo Sound Ports
Built-In Speaker
PHYSICAL CONNECTIVITY
PCMCIA Socket Onboard –
Free PCI Slot
Wireless LAN supported via –
AVM Fritz PCI (ISDN,ISDN/DSL,DSL)
Touchscreen (Elo- + Microtouch)
IBM122 + Trimodal + SUN Keyboards –
Analog Modem external
Token Ring Card PCI
Fiber Optics Card –
Smartcard Reader (internal)
SUPPORTED HARDWARE
USB Mass Storage Support
VIA Eden
8 MB UMA
50–60 Hz
5 % to 95 %
240 × 43 × 225
built-in
–
–
–
MAXDATA FALCON 100/200
49
 Loading...