

Page 1
USER MANUAL
GSM Mobile Telephone
Maxcom MM920
Page 2

Page 3

3
If any technical assistance is required, please contact our hotline at
THE SET INCLUDES
GSM Telephone
Charger
Battery 1400 mAh
User Manual
Warranty Card
Headphone Set
Screwdriver, 8 bolts (4 spare bolts)
Keeping the original package is
recommended as it might be used for
transport.
Keep the receipt as it is necessary for
warranty.
(+48) 32 325 07 00 or e-mail us at serwis@maxcom.pl
Our website:
http://www.maxcom.pl/
Important: The telephone works in the GSM 900/1800.
Prior to switching on the phone, a SIM Card must be
correctly inserted.
Page 4

4
Mobile Telephone GSM 900/1800
Large, color display screen
Waterproof and dustproof - IP67 Certificate
Photo Camera 2Mpix
MicroSD Memory Card Slot
Font Size Selection
Speakerphone
Phonebook -500 entries
Sending & Receiving Text Messages
Speed Dia lup to 8 numbers
Call Duration Notification
Loud ringtone
®
Bluetooth
Radio FM
Torch
Calculator
Alarm Clock
Battery 1400 mAh
Idle Time: up to 460 hrs.*
Conversation Time 11 hrs.*
Weigth:140g
* depending on conditions and GSM signal strength
Page 5

5
Contents:
1. Safety Precautions ................................................................... 8
2. Getting Started......................................................................... 9
SIM Card & Battery Installation ............................................. 9
Charging the Battery ............................................................13
Low Battery Alert .................................................................15
3. Location of Keys .....................................................................15
Key Primary Functions ..................................................................16
4. Using the Phone .....................................................................17
Powering On the Phone .......................................................17
Powering Off the Phone .......................................................19
Idle Mode.............................................................................19
Keypad Lock ........................................................................21
5. MENU .....................................................................................21
6. Phonebook .............................................................................21
Adding a New Contact .........................................................21
Viewing the Phonebook .......................................................22
Deleting Contacts ................................................................23
6.3.1 Deleting a Single Contact .................................................23
6.3.2 Deleting Multiple Contacts ................................................23
6.3.3 Deleting All Contacts ........................................................23
Copying Contacts ................................................................24
6.4.1 Copying a Single Contact .................................................24
6.4.2 Copying Multiple Contacts ................................................24
Transferring Contacts ..........................................................24
Select Some ........................................................................24
Phonebook Settings.............................................................25
6.7.1 Preferred Memory .............................................................25
6.7.2 Speed Dial ........................................................................25
6.7.3 Additional Numbers ..........................................................25
6.7.4 Memory Status .................................................................25
7. Making Phone Calls ................................................................26
Direct Dialing .......................................................................26
Dialing Number from the Phonebook ...................................26
Dialing Numbers from Call Log ............................................26
Speed Dialing ......................................................................27
Adjusting the Phone Call Volume .........................................27
Options While Calling ..........................................................27
Page 6

6
Answering Phone Calls ........................................................27
8. Call Log ..................................................................................27
9. Text & Multimedia Messages ..................................................29
Creating & Sending Text Messages .....................................29
Viewing & Replying to Text Messages .................................30
Text Messaging Boxes ........................................................31
9.3.1 Inbox ................................................................................31
9.3.2 Sentbox ............................................................................31
9.3.3 Drafts................................................................................31
9.3.4 Outbox ..............................................................................32
Deleting Messages ..............................................................32
Message Settings ................................................................32
9.5.1 Text Messages .................................................................32
9.5.2 Multimedia Messages .......................................................33
9.5.3 Service Messages ............................................................34
Voicemail .............................................................................34
10. Tools.......................................................................................34
Calendar ..............................................................................34
Calculator ............................................................................35
Alarm Clock .........................................................................35
Torch ...................................................................................35
World Clock .........................................................................36
File Manager .......................................................................36
11. Network Service ......................................................................37
11.1.1 WAP .................................................................................37
11.1.2 SIM Services ....................................................................37
12. Photo Camera ........................................................................38
13. Radio FM ................................................................................40
14. Multimedia ..............................................................................41
Image Viewer ......................................................................41
Video Recording ..................................................................41
Video Player ........................................................................42
Audio Player ........................................................................42
Voice Recorder ....................................................................43
15. Settings ..................................................................................43
Profiles ................................................................................44
Telephone Settings ..............................................................44
15.2.1 Set the Date and Time ......................................................44
Page 7

7
15.2.2 Language .........................................................................45
15.2.3 Scheduled Power On/Off ..................................................45
15.2.4 Preferred Text Input Method .............................................46
15.2.5 Display Screen .................................................................46
15.2.6 Auto Key Lock ..................................................................46
15.2.7 Backlighting ......................................................................46
15.2.8 Notification Diode .............................................................46
15.2.9 Themes ............................................................................47
15.2.10 Font Size ..........................................................................47
15.2.11 Shortcuts ..........................................................................47
15.2.12 Navigation Key .................................................................47
15.2.13 Flight Mode .......................................................................47
Call Settings ........................................................................48
15.3.1 Number Withhold ..............................................................48
15.3.2 Call Waiting ......................................................................48
15.3.3 Call Forwarding ................................................................48
15.3.4 Call Barring .......................................................................49
15.3.5 Advanced Settings ............................................................50
Network Settings .................................................................50
Connectivity .........................................................................51
15.5.1 Bluetooth® ........................................................................51
15.5.2 APN Profiles .....................................................................52
Security Settings ..................................................................52
15.6.1 PIN Code ..........................................................................52
15.6.2 Phone Security .................................................................52
Restore Factory Settings .....................................................53
16. Computer Connection .............................................................53
17. FAQ (Troubleshooting) ...........................................................53
18. Safe Use .................................................................................56
19. Terms of Warranty ..................................................................58
20. Battery Information .................................................................59
21. SAR Information .....................................................................60
22. Protect Your Environment .......................................................62
23. Declaration of Conformity........................................................63
Page 8

8
1. Safety Precautions
Reading the guidelines below will minimize the risk of
misusing the phone.
• Never use the phone in any area where the use of
mobile phones is prohibited such as refueling points or
hospitals. Using phones in such places might expose
others to danger. Never switch on the phone if it might
interfere with work of other devices!
• Never use the phone without right accessories while
driving.
• Never use the phone in hospitals, airplanes, refueling
points or at proximity to flammable materials.
• The telephone emits electromagnetic field that might
negatively interfere with other electronic devices
including medical equipment. A distance recommended
by the medical equipment manufacturers between the
phone and the implanted medical device such as a
heart pacemaker should be observed. Users with
implanted devices should get familiar with and follow
guidelines by the manufacturers of such implanted
medical devices. Users with a heart pacemaker should
not carry the phone in the breast pocket and should
keep the phone next to the ear opposite to the medical
device in order to minimize the risk of interference; in
case of suspecting such interference, the phone should
be switched off immediately.
• A device and its accessories might contain small parts.
Keep your phone and all parts out of reach of children.
Page 9

9
• Any repairs or modifications of the phone are not
allowed. Any problems should be repaired by the
qualified service only.
• Only original batteries and chargers must be used.
Using other accessories might damage the phone or
cause an explosion.
• WATERPROOF & DUST-RESISTANT
– the telephone offers IP67 protection – the phone is
resistant to ingress of dust and short-term (up to 30
minutes) immersion in water no deeper than 1 meter.
Longer exposure to liquid or deeper immersion will
damage the phone! The phone might be used while
raining.
Prior to exposing the phone to liquid make sure to
properly fasten both the seal under the battery cover
and the USB port cover.
2. Getting Started
Prior to switching on the phone, a SIM Card must be
inserted. Be careful not to damage the Card while inserting
it.
Keep the SIM Card away from children at all times.
SIM Card & Battery Installation
The phone has a MicroSIM slot. If you have a card of
different size with no possibility to push out the MicroSIM,
contact your service provider to replace the card for the
card of right size.
Page 10
10
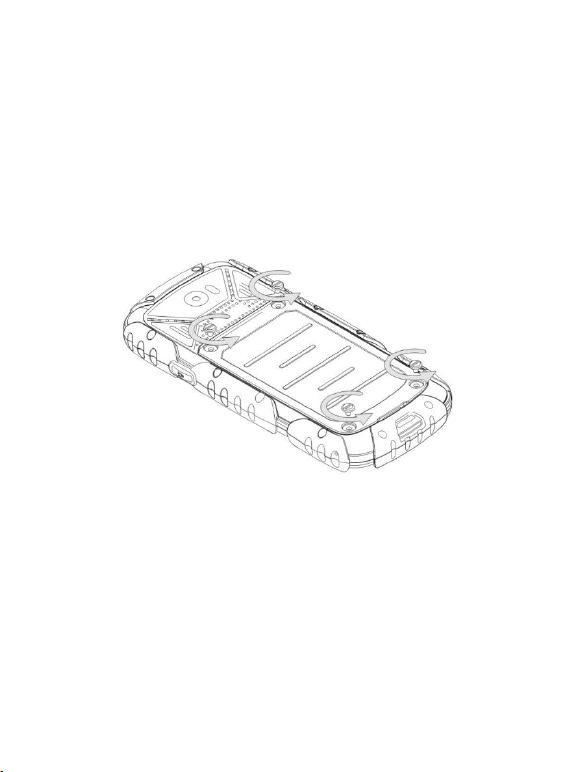
Prior to inserting the SIM Card, make sure the phone is
switched off, and the is battery removed. Charger should
be unplugged. To insert the SIM Card, first remove the
battery as shown in the drawings and instructions:
• With the phone switched off, place the phone with
its screen face down, and then use a screwdriver
to unscrew four bolts (if they are in place), and
gently remove the battery cover by lifting it up from
its bottom.
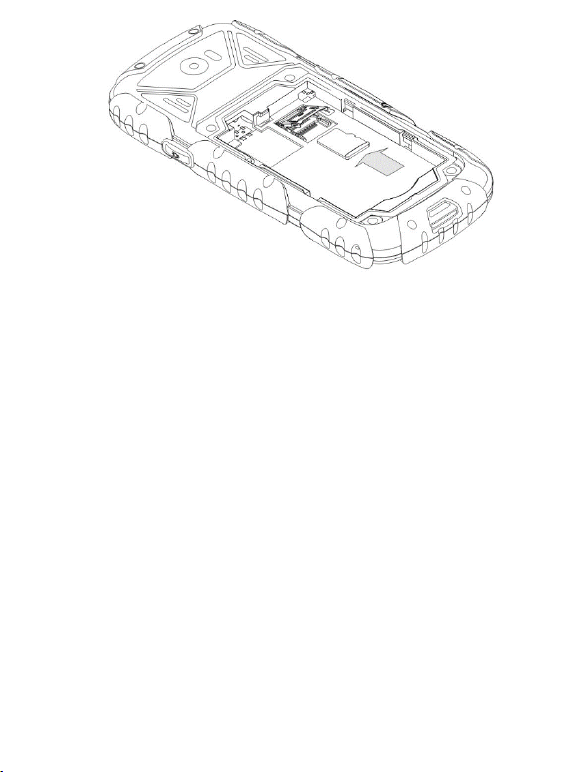
• Remove the battery by lifting it up with your
fingernail from the bottom of the phone.
• Release the SIM Card slot tray by sliding it
upwards, and then open it. Insert the SIM Card
to the slot located on the left edge of the phone,
with metal contacts facing down. Make sure to
position the notch of the card going down of the
phone.
Page 11

11
• Close the SIM Card slot tray, and slide it
downwards.
• There is a slot for the MicroSD memory card on the
right side of the SIM Card slot. To insert the memory
card, release the memory card slot tray by sliding it
upwards, and then open it. Insert the memory card
into the slot, paying attention to the notches. Close
the memory card slot tray by sliding it downwards.
Page 12
12
Be careful while using the memory card especially while
inserting and uninstalling the card. Some memory cards
must be formatted on a computer before the first use.
Regularly make backup copies of data stored on cards
used in other devices, if you use SD Cards. Misuse or
other factors might damage the card or make the card lose
its content.
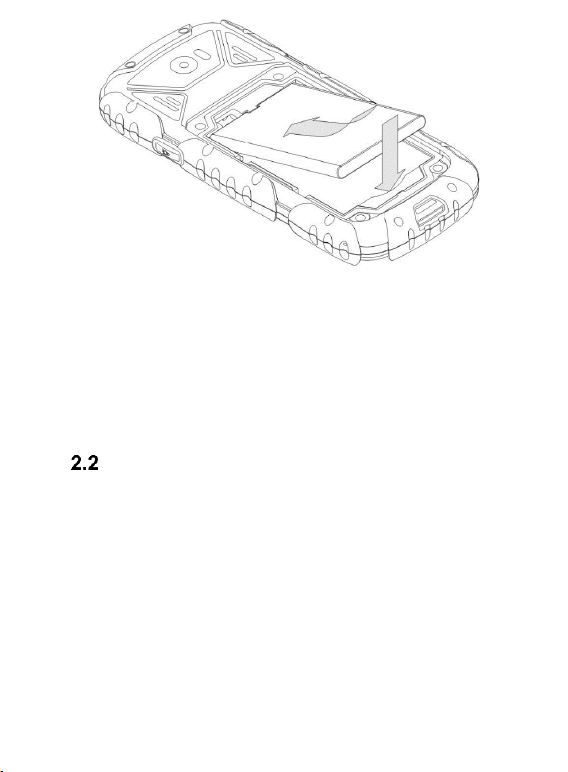
• Insert the battery so that the contacts +/- will
face upwards.
Page 13
13
• After the battery is in position, make sure the
battery cover seal is in position as well. Then,
put the battery cover on the phone and gently
press on the edges. Use the screwdriver to
screw four bolts on the cover.
Charging the Battery
Important! Only the battery included in the set should be
used. Using other batteries might damage the phone and
shall void warranty.
Never connect the charger while the back cover is
removed.
To charge the phone:
1. Use your fingernail to lift away the cover over
USB/headphones port.
2. Plug the charger into a power outlet.
Page 14

14
3. Plug the charger cable into a slot at the top edge of
the phone. A message about the charger being
connected will appear on the display screen, and
the battery icon will keep blinking wh ile the phone is
being charged.
4. When the battery is fully charged, unplug the
charger from the power outlet, and then unplug the
cable from the phone. Put the cover over the
USB/headphones port in position.
As soon as the charging process is completed, the
message “Charging Completed” will appear on the
display screen, and the battery icon will stop
blinking.
Important:
o Before you start the charging process, make sure
the battery is properly installed.
o Never remove the battery while charging – doing
so might damage the phone.
o If the battery level is too low to work properly,
there will be the message on the screen telling you
that the phone is about to be automatically
switched off, and the phone will automatically
switch off.
o If the battery is fully discharged (because for
example you had left the torch on), it might be
necessary to wait several minutes for the battery
icon to appear after the battery is plugged in.
Page 15
15
Low Battery Alert
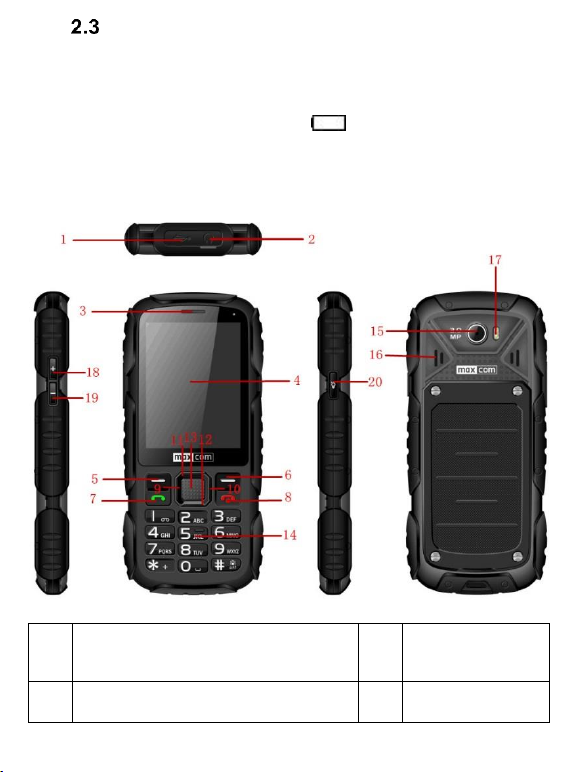
1
Micro USB slot/charging port
11
Key: Up
2
Headphones Port
12
Key: Down
The phone will emit a special sound alert (if warning alerts
are enabled in the profile) and a message „Battery
Discharged” will appear on the screen, if the battery level
is too low. There will be an icon on the screen. As
soon as you see such a message, charge the phone.
3. Location of Keys
Page 16
16 3 Speaker
13
Key: OK
4
Display Screen
14
Numeric
Keypad
5
Left Function Key LFK
15
Camera Lens
6
Right Function Key RFK
16
Ringtone
Volume
7
Green Receiver – making
phone calls
17
Torch/flash
8
Red Receiver – ending
phone call/return to the main
menu
18
Key: Volume
Up 9 Key: Left
19
Key: Volume
Down
10
Key: Right
20
Torch
Key Primary Functions
Key
Function
Red Receiver
Press: goes back to Idle mode, ends
a phone call.
Press & hold: powers on/off the
phone
Green
Receiver
Press: makes a phone call; in Idle
mode goes to Call Log.
Navigation
Keys
Up
Messages
Down
Photo Camera
Page 17

17
Left
Profiles
LFK
Function: as appears on the screen
RFK
Function: as appears on the screen
Right
Shortcuts
1
Press: digit 1 Press & hold: voicemail
0
Press: digit 0
2-9
Press: digits 2 to 9
Press & hold: dials a speed dial number
*
Entering symbols: *, +, P, W.
While typing a text message: special
symbols
#
Press: Change the text input mode
while typing a message, entering the
symbol#
Press & hold: enable/disable Meeting
mode
Key OK
Confirmation key, in most cases the
function concurs with the LFK function
4. Using the Phone
Powering On the Phone
To switch on the phone, press and hold the red receiver
key.
If the prompt to enter the PIN code appears, enter the
code. You will get the code in the SIM Card starter kit.
Page 18

18
After entering the code, press the Left Function Key to
Warning: If you enter an incorrect PIN code three
times in a row, the SIM card will be locked. You
might unlock the card by entering the PUK code. If
you enter the incorrect PUK ten times, the SIM
Card will be permanently locked.
confirm.
Then, after the first initial use of the SIM Card (or after
restoring to the factory settings) an option to enter the
current date and time will appear, as well as an opportunity
to copy Contacts from the SIM Card onto the phone. Enter
the correct time using the numeric keys, press the key
DOWN, and follow the same steps to enter the date, and
press the Left Function Key. To navigate between digits,
press the keys Right/Left. If you miss setting the time/date
(Return), the phone will get the data automatically from the
GSM network.
Then, the question will appear: Copy All from SIM to
Phone? Select YES, if you want to copy all Contacts from
the SIM Card onto the phone. Otherwise, press NO.
Page 19
19
Powering Off the Phone
2
3
4
5
6
To power off the phone, press and hold the End Call key
(red receiver).
Idle Mode
If the phone is switched on, but there is no activities, the
phone will go to Idle mode.
Display Screen Description
Page 20
20
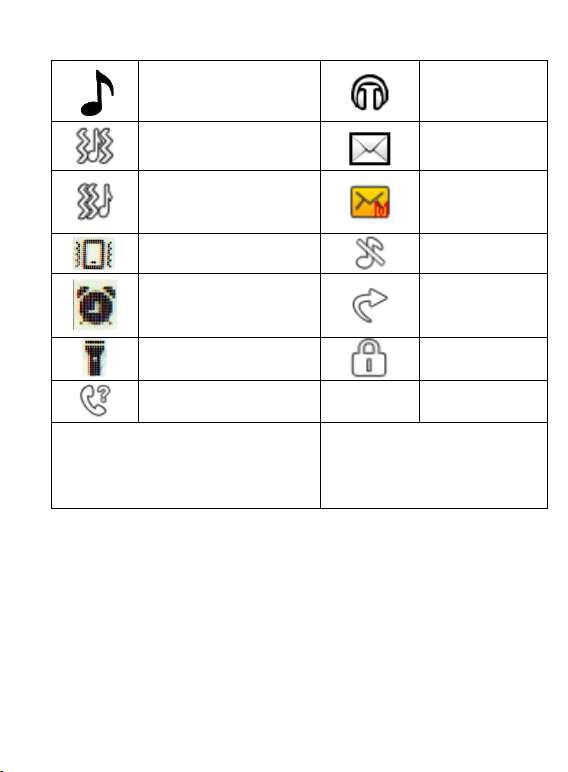
1. Icons showing functions:
Ringtone only
Headphones
on
Ringtone plus
vibrations
Unread Text
Message
Vibration, Ringtone
Later
Unread
Multimedia
Message
Vibration only
Silent
Alarm Clock On
Call
Forwarding
Enabled
Torch Switched On
Keypad
Locked
Missed Phone Call
RM
Roaming
Active
Icons might vary depending on
software
* Icon RM appears also
in domestic roaming if the
user is using another
provider’s network
2. Network signal
3. Battery level
4. Service Provider’s name
5. Day of the Week/Time/Date
6. Functions of Function Keys
Page 21

21
Keypad Lock
To lock the keypad, in Idle mode press the Left Function
Key, and then (*). To answer an incoming phone call,
unlock the keypad.
IMPORTANT: The keypad will lock (automatically or
manually) only, if the phone is in Idle mode.
5. MENU
To enter MENU in Idle mode, press the key OK and the
Left Function Key.
To navigate in MENU use the keys
UP/DOWN?RIGHT/LEFT.
To confirm selected option, press the key OK or Left
Function Key.
To return to the previous MENU (go back), press the RFK.
To go to Idle mode, press the red receiver key.
6. Phonebook
Adding a New Contact
There are two ways for you to save a new Contact:
1. You can save the number from the list of missed
and received phone calls. In order to do so, in Idle
mode press the green receiver key, select the
phone number you want to save, and press
„Options” (LFK). Select „Save in Phonebook”,
press the LFK, select where you want to save it.
Press Edit and enter the Contact’s name. Press
Options>Done>Save.
Page 22

22
2. You can add a new Contact directly to the
Phonebook. To do so, in Idle mode press the RFK,
and then using the key UP select New
Contact>Select. Select where you want to save
the Contact. Press Edit, enter the Contact’s name,
and press Options>Done. Using the key Down
go to the number box, and press Edit. Enter the
number and select Save.
If you selected to save the New Contact in the phone, by
pressing the keys RIGHT/LEFT, you can also add some
details such as a ringtone, email address, or the
company’s name.
Viewing the Phonebook
Method 1
1. Enter MENU and select Phonebook
2. Enter the first letter of the name (first or last name)
you are looking for.
3. The phone will go to the list of names starting with this
letter. You can scroll the list up and down using
navigation keys UP/DOWN.
Press the key „#” to change the text input mode.
Method 2
1. In Idle mode press the Right Function Key
2. Enter the first letter of the name (first or last name)
you are looking for.
3. The phone will go to the list of names starting with
Page 23

23
this letter. You can scroll the list up and down using
navigation keys UP/DOWN.
Press the key „#” to change the text input mode.
Deleting Contacts
6.3.1 Deleting a Single Contact
If you want to delete a Contact from the phone or the SIM
Card, do as follows:
1. In MENU, select Phonebook
2. Select the Contact you wish to delete, press Options>Delete
3. Press the LFK to confirm.
6.3.2 Deleting Multiple Contacts
If you want to delete multiple Contacts from the phone or
the SIM Card, do as follows:
1. In MENU select: Phonebook->Options->Mark Some>Delete Marked
2. Select the Contact you wish to delete, and then
mark/unmark other Contacts
3. Then select Options->Delete Marked>Yes.
6.3.3 Deleting All Contacts
If you want to delete all Contacts from the phone or the
SIM Card, do as follows:
1. In MENU select: Phonebook->Options->Settings>Delete All Contacts
2. Select whether you want to delete Contacts from the
SIM Card or the phone memory, and press Yes to
confirm.
Page 24

24
Copying Contacts
6.4.1 Copying a Single Contact
To copy a single Contact from the SIM Card to the phone,
or from the phone to the SIM Card, do as follows:
1. In MENU, select Phonebook
2. Select the Contact you wish to copy
3. Press Options->Copy, and then select where you wish
to copy the Contact to, and press the LFK.
6.4.2 Copying Multiple Contacts
To copy multiple Contacts from the SIM Card to the phone,
or from the phone to the SIM Card, do as follows:
1. In MENU select: Phonebook->Options->Settings>Copy All
2. Select where you want to copy Contacts to.
Select the Contacts you wish to copy by pressing OK.
If you want to copy all Contacts, select: Options->Mark
All. Press Options->Copy Marked.
Transferring Contacts
You can transfer Contacts from the SIM Card to the phone
memory, or from the phone memory to the SIM Card. To
do so, select: MENU->Phonebook->Options->Settings >Transfer All. Then follow the same steps as in Copying
Multiple Contacts (see Błąd! Nie można odnaleźć źródła
odwołania.).
Select Some
In MENU select: Phonebook->Options->Mark Some, and
then:
Page 25

25
- Send SMS, if you want to send a text message to
multiple recipients
- Delete Some, if you want to delete multiple Contacts, see
chapter Błąd! Nie można odnaleźć źródła odwołania..
Phonebook Settings
6.7.1 Preferred Memory
In MENU select: Phonebook->Options->Settings>Preferred Memory to select default memory for Contacts
to be saved to.
6.7.2 Speed Dial
In MENU select: Phonebook->Options->Settings->Speed
Dial->Status to enable or disable Speed Dialing. If Speed
Dial is enabled, and there are phone numbers assigned to
the keys 2-9, press and hold a given key to make a phone
call to the assigned number.
To assign a number to the key, in MENU select
Phonebook->Options->Settings->Speed Dial->Assign
Keys. Then select the key to assign a number to, press the
LFK, select the phone number from the Phonebook, and
press the LFK again.
6.7.3 Additional Numbers
In MENU select Phonebook->Options->Settings>Additional Numbers->FDN, to enable/disable the Fixed
Dialing Number option.
6.7.4 Memory Status
This option allows you to check the status of the memory
in the phone and on the Card.
Page 26

26
In MENU select ->Phonebook->Options->Settings-
For international phone calls, you must dial „00”
or „+” prior to dialing the actual number. To enter
„+” press the key „ ” twice.
>Memory Status.
7. Making Phone Calls
Direct Dialing
1. Enter the phone number you wish to call.
2. Press the green receiver key to call the number you
have just dialed.
3. To finish the phone call, press the red receiver key.
Dialing Number from the Phonebook
In Idle mode press the RFK to enter the Phonebook. Use
the keys UP/DOWN to select the number you wish to call.
If you want to quickly go to the Contact whose first or last
name starts with the letter U, press the key 8 twice. To call
the selected number, press the green receiver key.
Dialing Numbers from Call Log
Press the green receiver key when the phone is in the Idle
mode to go to Call Log.
Use the keys UP/DOWN to scroll up/down the Call Log.
Press the green receiver key to make a phone call.
Page 27

27
Speed Dialing
If you have any Contacts assigned to the keys 2-9, in Idle
mode press and hold the given key to make a phone call.
Adjusting the Phone Call Volume
While calling, press the volume up and down keys located
on the side of the phone to adjust the phone call volume.
Options While Calling
While calling, press Options to enable additional functions:
- Suspend: suspends a phone call
- End call: ends a phone call
- New Call: allows you to place a new phone call
- Phonebook: allows you to access the Phonebook to view
the number
- Call Log: allows you to view the Call Log
- Messages: allows you to view received/saved messages
- Voice Recorder: allows you to record the phone call
- Mute: enables/disables the microphone,
- DTMF: allows you to enable/disable DTMF.
Answering Phone Calls
To answer an incoming phone call, press the green
receiver key.
To reject an incoming phone call, press the red receiver
key.
To mute incoming phone call, press the RFK.
8. Call Log
To enter the Call Log, enter the main MENU and select
Call Log, and then use the key Right/Left to select:
Page 28

28
All Phone Calls (displays all phone calls)
Dialed Numbers (displays dialed numbers)
Missed Phone Calls (lists any phone calls you have
missed). If there are any phone calls you have missed, in
Idle mode a symbol of a receiver will appear at the top left
corner of the screen.
Received Phone Calls (displays received numbers).
To view phone call details (call duration, number of phone
calls) press the OK key.
Important: To view Call Log, it is enough to press the
green receiver key in Idle mode.
Color symbols inform you about the type of phone call.
After selecting a phone call, press the Left Function Key to
get additional options displayed:
- Call makes a phone call to a given number
- Preview allows you to view phone call details
- Send Text Mssg allows you to send a text message
- Send MMS, allows you to send a multimedia message
- Save in Phonebook allows you to add the number to the
Phonebook
- Add to the Black List, allows to add a number to the list
of blocked numbers
- Edit Before Call, allows you to update the number
before making a phone call
- Delete deletes a call
- Delete All allows you to delete all phone calls.
- Mark Some allows you to delete few phone calls.
Page 29

29
9. Text & Multimedia Messages
The phone allows you to send and receive text and
multimedia messages. If there is the symbol on the
screen, it means there is at least one unread message.
To enter MENU Text Message, press the Left Function
Key in Idle mode, and then select Messages->Inbox. If the
inbox is full, the symbol on the screen will blink. Delete
some messages out of your inbox to solve the problem.
Creating & Sending Text Messages
1. Go to MENU and then select: Messages->Create
Message->Text Mssg to open the message editor.
2. Type your message.
• Changing the text input mode: To change the text
input mode (digits, capital and lower case letters)
press the key „#” if you want to enter the symbol,
press the key „ ”.
3. Sending Text Messages: Press Options>Send To
and select whether you want to dial the number
manually or select it from the Phonebook. Select the
phone number and press OK. If you want to send a
text message to multiple recipients, you can add
additional numbers. To send the message, press
Options>Send
4. Saving Messages: To save the message you have
just typed, press Options>Save. The message will be
Page 30

30
saved in the Draft folder. You can select automatic
saving of sent messages, to do so go to MENU and
select: Messages->Settings->Text Mssg->Save Sent
Mssgs.
If you want to send a multimedia message, select in
MENU: Messages->Create Message->MMS, enter the
text, press Options and select content (photo, audio
clip, video), and then select Options and Send.
Viewing & Replying to Text Messages
1. If there is the symbol of unread message on the screen
or if you want to view unread messages, in MENU go
to: Messages->Inbox. To view a message, press the
key OK. While reading, you can use additional options
by pressing the LKF.
2. The icon next to the message means the message
has not been read yet.
By pressing „Options” while reading messages, you will
access additional options:
- Reply with text: creates a text message to the sender
- Reply with MMS: creates a multimedia message to the
sender
- Call: makes a phone call to the sender
- Forward: allows you to forward the message to another
recipient
- Delete: deletes messages
- Advanced: allows you to use the number, email address
or URL etc.
Page 31

31
- Editing option allows you to highlight the entire text to cut
and paste it.
Text Messaging Boxes
9.3.1 Inbox
You can view any received messages listed in order by the
date they have been received.
To navigate within the inbox, use the keys UP & DOWN.
To display additional options, while viewing the Inbox
press „Options”:
- Preview: allows you to read the message
- Reply with Text Mssg: send a text message to the sender
- Reply with MMS: send a multimedia message to the
sender
- Call: calls the sender
- Forward: allows you to send a message to another
sender
- Delete: deletes a message
- Delete All: deletes all messages from your inbox
- Delete Multiple: deletes marked messages.
9.3.2 Sentbox
If you use the option: Save Sent Mssgs, sent messages
will be saved in the folder „Sent”.
9.3.3 Drafts
You can save unsent messages in the folder „Drafts”. To
do so, type your message, and after pressing the LFK
select „Save in Drafts”.
Go to Drafts to send, delete or edit saved messages.
Page 32

32
9.3.4 Outbox
If you fail to send a message, it will be saved in the
Outbox.
Deleting Messages
To delete a selected message, go to Options and select
„Delete”.
Message Settings
Enter MENU and select: Messages->Settings, and then
select:
9.5.1 Text Messages
• SIM
- Profiles>Text Message Center Number: It works as an
intermediary between users while sending a text message.
In order to be able to send text messages from a mobile
phone, having a correct Text Message Center number
entered on the phone is necessary.
You can get this number from your service provider.
- Delivery Report: You can select for the phone to receive
a delivery report every time a message has been delivered
to a recipient (network service)
- Message Priority: defines priority of message
- Message Type: allows you to define the type of sent
message
- Reply Path: allows you to enable/disable the reply path
- Voicemail: allows you to set the voicemail server number
• Memory Status
Page 33

33
Allows you to verify the memory status on the SIM Card
and in the phone.
• Message Counter
Allows you to count the number of sent/received
messages
• Save sent messages
Allows you to enable/disable saving sent messages.
• Preferred memory
Allows you to decide whether you want your messages to
be saved in the phone or on the SIM Card.
9.5.2 Multimedia Messages
• Data Account
Allows you to select a data account necessary to send
multimedia messages or to add a new account.
• Common
- Composition: allows you to set time for each slide to be
displayed, and automatic signature.
- Sending: allows you to set delivery reports, priority, auto
save.
- Downloading: allows you to download multimedia
messages in your home network and roaming, and set
message filters.
- Preferred storage: allows you to select a location to store
messages
- Memory Status: allows you to check the memory status.
Page 34

34
9.5.3 Service Messages
Select Menu>Messages>Settings>Service Mssgs to set
options of service messages.
Voicemail
Voicemail is a network service that allows callers to leave
a voice message when you cannot answer the phone call.
To learn more, contact your service provider. If you want to
change the number of your voicemail in MENU go to:
Messages->Settings->Text Mssg->SIM->Voicemail, and
enter the right number.
You can get the voicemail number from your service
provider. To connect to your voicemail press and hold the
key
10. Tools
Calendar
To enable the calendar, in MENU go to: Tools->Calendar.
To navigate between dates, use keys Up/Down/Right/Left.
Press the LFK, to get some additional options:
- Preview: allows you to view events scheduled for a given
day,
- View All: allows you to view all scheduled events,
- Add event: allows you to add a new task. You can select
an event, its start and end, subject, description, and set
the alarm. To save the event, after setting all the options,
go to Start, End or Alarm, and press the Left Function Key
(Save).
- Delete event: allows you to delete tasks: all, old, for a
given period,
Page 35

35
- Go to Date: enter the date you want to go to
- Go to current date: it allows you to go to the current date,
- Week view, goes to a different calendar view.
Calculator
To enable the calculator, in MENU select: Tools>Calculator. There are four possible mathematical
operations on the phone: addition, subtraction,
multiplication, and division.
Enter the first number using keys 0-9, and then use
UP/DOWN/RIGHT/LEFT, select the operation, and enter
the next number. Press OK.
Alarm Clock
You can set five independent alarms in the phone. In order
to activate the alarm clock in MENU, select: Tools->Alarm
Clock. Select a given alarm and select Edit. You can
activate/deactivate the alarm clock, set the time for your
alarm clock to go off, alert tone, and repeat. If the phone is
switched off, the alarm clock will still go off as long as the
battery is sufficiently charged. If the alarm goes off, press
the LFK to deactivate the alarm clock. Press the Right
Function to snooze; the alarm will go off again in 5
minutes.
Torch
To enable/disable a torch press a key located on the side
of the phone. In Idle mode, press and hold the torch key
until the torch icon appears on the display screen. To
enable a torch, press the torch key. With the keypad
locked, the torch is impossible to be switched on, it will
Page 36

36
work as long as you press and hold the torch key on the
side.
World Clock
This option allows you to view time in other parts of the
world.
File Manager
Select in MENU: Tools->File Manager
Press the Left Function Key [Options]:
• Open – select, to open a selected folder.
• Format- to format a selected drive
• Details
After opening the folder, there are the following options
available under the Left Function Key:
• Open
• Create folder- to create a new folder in a selected
location,
• Rename folder
• Delete: Delete current folder
• Sort by: select the criterion to sort folders by.
• Select Multiple: Select some folders/files in order to
copy/send/delete/ transfer them.
• Copy: Copy a single folder
• Transfer: Transfer a single folder.
Page 37

37
11. Network Service
11.1.1 WAP
The phone browser allows you to use various W AP
service.
The phone has preset settings of some service providers.
To enable WAP, in MENU select: Network Service->WAP>Homepage (service provider’s default website) and
Search or enter URL (any website).
Due to the phone display screen resolution, websites
might appear differently than original websites. Some
details of websites might be lost.
Contact your service provider about service availability,
prices, and the User instructions.
You can get configuration settings necessary to view the
browser from the service provider, please refer to the
chapter 15.5.2 APN Profiles.
The phone’s remote configuration is allowed by some
providers.
11.1.2 SIM Services
Independently from the phone features, the SIM Card
might offer additional service. Name and features of such
menu depend on the type of available service.
Some features that require the Internet connection might
be unavailable.
Page 38

38
12. Photo Camera
Go to Video
Enables the video camera
Photos
Activates the photo viewer
Camera
Settings
Allows you to change the camera settings
such as anti-flicker, self-timer, flashlight,
contrast, EV, shutter sound
Image
Settings
You can resize the image and change
the quality of the image
White
Balance
Allows you to adjust white balance
Scene Modes
Automatic or night
Effect
Settings
Allows you to use negative effect, width
scale, etc.
The phone allows you to take photos and record videos.
To enable the camera, in MENU go to Camera. An image
will appear on the screen. The camera has a digital zoom
(enlarging). To zoom in the subject of a photograph press
UP, to zoom it out press DOWN.
To resize the image (240x320, 640x480, 800x600,
1280x960, 1600x1200), press Options->Image Settings>Image Size.
To take a photo, press the key OK. The image will be
automatically saved. Make sure the phone stays still as
long as the message: “Saving” appears on the screen.
To view more options, press the Left Function Key.
Page 39

39
Memory
Allows you to select whether your images
will be saved on the Card memory or in the
phone memory
Restore
default
Restores default settings of the photo
camera.
The phone memory allows you to take just a few photos
(depending on the set resolution). To store more photos,
install the MicroSD memory card.
While using the option Images, select the image you want
using keys Up/Down and press the Left Function Key to
view the following options:
- Preview, enlarges the selected image. If you want to view
a next image, use keys Up/Down.
- Send, allows you to send a photo as a multimedia
message, via Bluetooth® or e-mail.
- Use as, an image might be set as a wallpaper or
screensaver
- Rename, allows you to rename the image
- Delete, deletes the image
- Sort by, sorts images by applying a given criterion
- Delete All, deletes all images
- Memory, allows you to select whether the image will be
viewed and saved on the memory card or in the phone
memory
-Image details, you can view the image details.
After the image is enlarged, press Options to see
additional options:
- View – enables a slideshow
- Rotate – rotates the image
Page 40

40
- Use as – the image might be used as a wallpaper or a
Warning: Quality of reception depends on your
location. Such quality might be influenced by
numerous factors that might cause poor quality of
reception; it is not, however, grounds for filing a
complaint about the product.
screensaver
- Send – send the image as a multimedia message, via
Bluetooth® or E-mail
- Image details – allows you to view the image details.
13. Radio FM
The phone has a built-in radio FM. You can use it with no
headphones; the quality of reception, however, with no
headphones might make reception impossible as
headphones double as an antenna).
To enable the radio, in MENU select: Radio FM. To switch
on/off the radio, press the key OK. If the option: Play in
background is enabled, prior to switching off the radio
press OK to stop playing it, and then press the red receiver
key. Otherwise, the radio will keep playing.
Key functions while playing the radio:
• RIGHT: it automatically searches for next radio station
• LEFT: it automatically searches for the previous radio
station
• UP: increases frequency by 0,1 MHz
Page 41

41
• DOWN: decreases frequency by: 0,1 MHz
• Side key +: volume up
• Side key -: volume down
• Red receiver: going back to menu
• Keys 1 – 9: selecting the radio station from the list of
channels (must be stations that are saved in the
phone).
14. Multimedia
Image Viewer
In MENU select Multimedia->Image Viewer. You can view
images you have previously taken. Options in the Image
Viewer are identical to option: Images and they were
described in chapter 12 (Photo Camera).
Video Recording
In order to enable a video camera in MENU go to:
Multimedia->Video Camera. To set recording options,
press the Left Function Key.
To start recording, press OK. To pause recording, press
OK again. To stop recording, press the Right Function
Key.
To use the Video Camera, installing a MicroSD (not
included in the set) is recommended so is selecting the
card memory as the location for images to be saved; go to
Options ->Memory, and select a memory card.
Page 42

42
You can send images and videos taken with your phone to
a computer. To learn more, go to the chapter: Computer
Connection.
Video Player
In MENU select: Multimedia->Video Player. You can view
previously taken videos (folder Videos) with the video
player. Use keys Up/Down to select the video you want to
view. To start and pause, press the key OK. To stop
playing, press DOWN. To full size the image, press the
key UP.
The telephone supports files in AVI and 3GP.
While viewing the list of recordings, press „Options”, to
view additional options:
- Play
- Send
- Rename
- Delete.
- Delete All
- Sort by
- Memory.
Audio Player
Use the audio player to play audio files. They must be in
the folder: My Music. If there are some new files recorded
or added, after you start the player select Playlist>Options>Refresh Playlist. Press the OK key to start or pause the
playing. If you do not want audio files to be played in the
Page 43

43
background, before you leave the player stop the playing
by pressing the key OK.
You can navigate between the previous and next audio file
by pressing LEFT and RIGHT. To change the playing
options, select:
Options->Settings.
Press the key UP to change the playing options. Press the
key DOWN to change the playing order.
Use the side keys + and - to adjust volume.
The phone supports the following files: WAV, AAC, AMR.
Voice Recorder
You can record music and outside sound.
- Select in MENU: Multimedia->Voice Recorder
- Press OK to start or pause recording.
- To stop recording, press the Right Function Key.
By default, recordings are saved in the folder File Manager
->Telephone->Audio.
Select Options to enter the voice recorder settings (list
of recordings, location to save files, recording quality.
15. Settings
Select in MENU: Settings, and then:
Page 44

44
Profiles
The phone has a few profiles to suit various circumstances
you might be under. You can enable and adjust each profile
to your needs. Available profiles: General, Silent, Meeting,
Outdoors, My Style.
In each profile, use the option “Adjust” to change:
- Alert type (ringtone only, vibration only, etc.)
- Ringtone type (single or repeated)
- Ringtone sound
- Ringtone volume
- Message alert
- Message alert volume
- Keypad beep
- Keypad volume
- Powering on/off beep
- Warning alerts (for instance low battery alert)
In Idle mode, press and hold the key # to enable the profile
Meeting, press and hold again to return to the previous
profile.
Telephone Settings
15.2.1 Set the Date and Time
To set the date and time, select in MENU: Settings>Phone Settings->Time & Date. Select „Time zone” to
select a location you want, and then „Set time/date” to
enter the time and date. To navigate between date and
time use keys Up/Down/Right/Left; to enter time and date,
press keys 0-9.
Page 45

45
You can also format time (12h or 24h), date
(DD/MM/YYYY, MM/DD/YYYY or YYYY/MM/DD) and date
separator. If the battery was removed, after replacing the
battery you have to set the date and time again (if it is not
automatically taken from the network).
Option Update after zone change allows you to
enable/disable the function of auto update after the time
zone change.
Option Auto Time Update allows you to select whether
after switching off, the phone should get time automatically
updated, only after confirming, or not at all.
15.2.2 Language
This option allows you to change the language of the
phone menu. If you accidently change the language, to
return to the language you want, in Idle mode, press:
- 1x OK
- 1x DOWN
- 1x OK
- 1x DOWN
- 1x OK
- 1x DOWN
- 1x OK
Select the language you want and press OK.
15.2.3 Scheduled Power On/Off
You can schedule time for the phone to be switched on or
off.
Page 46

46
15.2.4 Preferred Text Input Method
Select what text input mode you want to use to enter the
text: Abc, abc, ABC or 123.
15.2.5 Display Screen
You can set your own wallpaper, screensaver, and enable
the option to display a watch and date in Idle Mode.
15.2.6 Auto Key Lock
Set time after which the keypad will be automatically
locked.
15.2.7 Backlighting
- Screen backlighting: allows you to set brightness and
time for the screen to be backlit.
- Keypad backlighting: allows you to select the key
backlighting mode: enabled, disabled, by user (see next
item)
- Disable keypad backlighting at certain times: allows you
to select certain time for the keypad backlighting to be off.
15.2.8 Notification Diode
Notification diode is located in the top corner of the display
screen (green color). It blinks as soon as there is a missed
phone call or unread text message on the phone.
Page 47

47
15.2.9 Themes
There are three themes preset on the phone that change
the wallpaper and layout of the phone menu. Select the
theme you want and press: Use.
15.2.10 Font Size
You can select the font size you want for menu,
messages, Phonebook, etc. Available font sizes are from
18 up to 30 (size for the service provider, watch and date
on the home screen cannot be changed).
15.2.11 Shortcuts
You can select what options will be available if you assign
Shortcuts to the navigation key.
15.2.12 Navigation Key
This option allows you to set the key functions in Idle
Mode: Up, Down, Right, Left.
15.2.13 Flight Mode
You can select the flight mode. If the flight mode is
enabled, there is no connection with the GSM network;
making phone calls, sending/receiving messages is
impossible.
Page 48

48
Call Settings
15.3.1 Number Withhold
It is a network service. If your provider offers such service,
configuration will be required.
Select „Establishes network”, „Withhold number” or „Send
number” and press „OK”.
15.3.2 Call Waiting
It is a network service. If your provider offers such service,
configuration will be required.
After entering MENU and option: Settings->Call Settings>Call Waiting you can select availability status, and decide
whether you want to disable such an option.
If Call Waiting is enabled, and the user is talking on the
phone, he/she will be notified about any other incoming
phone call by a special beep of a second call. You can
answer the second incoming phone call and suspend the
first one.
15.3.3 Call Forwarding
It is a network service. If your provider offers such service,
configuration will be required. The user might direct
incoming calls to be forwarded directly to voicemail or to any
other number.
1. To enable the option of Call Forwarding in MENI enter:
Settings->Call Settings->Call Forwarding
2. Then select when you want to forward calls from an
available list: 1 All voice calls (all incoming phone calls
are forwarded to a given number), 2 If unavailable
Page 49

49
(incoming calls are forwarded if the phone is switched off
or out of reception), 3 If I don’t answer (incoming phone
calls are forwarded if you don’t answer the phone) 4 If
busy (incoming phone calls are forwarded if you are
currently talking on the phone), 5 Forward all phone
calls 6 Annul all phone calls
3. Press Enable and enter the number to which you wish
to forward the phone calls to enable the number or press
Disable not to use this option.
To see what is the current status of this option, select:
Check status.
15.3.4 Call Barring
It is a network service. If your provider offers such service,
configuration will be required. This option allows you to
restrict certain types of phone calls.
1. Go to MENU to:
Settings->Call Settings->Call Barring
2. You can select the number to block from the Call Log.
You can block any outgoing calls, outgoing international,
international (except to home), any incoming calls and
incoming roaming calls. Additionally, you can update the
lock code.
Page 50

50
15.3.5 Advanced Settings
• Black List: You can blacklist any number you want.
If this option is enabled, any incoming phone call
from the blacklisted number will be automatically
rejected.
• Auto Redial: If this option is enabled and if the
attempt to make a phone call is unsuccessful, the
phone will automatically redial the number.
• Call duration reminder: You can set the phone to
remind you about how long you are on the phone.
Every predefined time (31-60sec) or after certain
time has passed (2-3000sek) you will hear a beep
to notify you about time amount that has just
passed.
• Received phone call notification: if this option is
enabled, the phone will vibrate to let you know that
the recipient has answered the phone call.
• Answering phone calls: You might set to answer
an incoming phone call by pressing any key, or
automatically, if the headphone set is on.
Network Settings
• Network Selection: You can either select the
provider manually or automatically.
• GPRS Connection: Allows you to decide whether
the GPRS connection is to be established on
demand or always
• Preferred transfer GPRS
Page 51

51
Connectivity
Bluetooth Status
Enable/disable Bluetooth®
Visability
Enable, so that other people will
see your phone
My Devices
Devices you have been connected
to before
Look for audio device
Looking for audio devices only
My Name
Select a name to call your device
Advanced
You can set an access path and
check the Bluetooth® address
15.5.1 Bluetooth®
Bluetooth® connectivity allows you to send and receive
files. You can also connect other devices such as wireless
headphone set.
Select in MENU: Settings->Connectivity and go to
Bluetooth
In Menu Bluetooth you can select one of the following
options:
Files transferred to the phone MM920 are saved in the
folder Received.
Page 52

52
15.5.2 APN Profiles
Select in MENU: Settings->Connectivity, and go to APN
Profile.
The telephone has preinstalled settings for WAP/MMS &
GPRS of some service providers. To edit/delete/add an
account, in Menu select Options->Connectivity->APN
Profiles.
You can get the correct configuration from your service
provider. Some providers might allow you to remotely
configure the phone.
Security Settings
15.6.1 PIN Code
You can enable/disable the prompt to enter the PIN Code
every time you switch on the phone and you can update
the PIN Code.
15.6.2 Phone Security
You can enable the phone lock. While switching on the
phone, you will be required to enter the lock code. The
default lock code is 0000.
Page 53

53
Restore Factory Settings
„Cannot make a
phone call”
Make sure the number you are dialing is
correct. If you make an international phone
call, dial a country code before the actual
number (eg. 0049 or +49 for Germany).
Warning: Default security code : 0000
This option allows you to restore factory settings. Select in
MENU: Settings->Restore Factory Settings, and enter the
security code. Press the Left Function Key to confirm .
16. Computer Connection
You can connect the phone to a computer using a USB
cable; you can copy and transfer files between the phone
and the computer.
Getting connected:
- plug the USB into the phone
- plug the other end of the USB cable to the USB port in
the computer
- there will be a message on the phone screen: „Mass
Memory Device” and „Port COM”. Select: Mass Memory
Device.
17. FAQ (Troubleshooting)
Only qualified service workers are authorized to repair the
phone. Any attempts of unauthorized repair and
modifications void the Manufacturer’s warranty!
Page 54

54
If you have a prepaid card, make sure there
are sufficient funds available on the card to
place a phone call.
“SIM Card in
place,
emergency
calls only
(112)”
Make sure the SIM Card is installed
correctly and the SIM Card has been
activated by the service provider.
“The phone
does not
work, the
phone does
not charge
when plugged
in”
The phone might be switched off; to switch on
the phone, press and hold the Make Call key
(red receiver) for about 3 seconds.
If you have not used the phone for a long
time, the battery might be “deeplydischarged”; to recover a deeply-discharged
battery leave your charger plugged in,
although there will be no image on the
display.
„Can I make a
phone call
while
abroad?”
If you are out of the country and ROAMING
is enabled, your phone automatically will use
the foreign telephone network. To learn
more, contact your service provider.
Page 55

55
„Can I make
an emergency
call if there is
no reception
or if there are
no funds on
my account?”
If you are in the area with no reception by
any network, no phone calls can be made.
If you have no funds available on the account,
emergency call to 112 can be made.
„How to get
the most of
reception?”
If there is a message „Does not work” or “No
Service” on the display, it means there is no
signal or sufficient funds on the account. In
such a case, only making emergency call 112
is possible as long as the User is in the area
covered by another service provider.
Reception might be weaker if you are inside
buildings. Move towards windows or get
outside.
„There is a
message on
the screen:
“Press * to
unlock”, keys
do not work.”
The keypad lock is enabled. To unlock the
keypad, press the Left Function Key, and
press * (star)
Page 56

56
„What is the
Text Message
Center”?
It is the service provider’s center number
storing all text messages. The number is
stored on the SIM Card, but you can change
the number in the phone MENU and enter
another number.
„When is the
fee for making
a phone calls
charged?”
A fee for making a phone call is charged as
soon as a phone call is made. To learn more
about charging details, contact your service
provider.
“Is there any
way to make
sure my
message was
delivered to
the recipient?”
Enable Delivery Report option. As soon as
the text message is delivered to the
recipient, you will get a return message
(network service).
18. Safe Use
• Never use the phone if it might interfere with work of
other devices!
• Never use the phone without an appropriate
headphone set while driving.
• The telephone emits electromagnetic field that might
negatively interfere with other electronic devices
including medical equipment. A distance recommended
by the medical equipment manufacturers between the
phone and the implanted medical device such as a
heart pacemaker should be observed. Users with
implanted devices should get familiar with and follow
guidelines by the manufacturers of such implanted
medical devices. Users with a heart pacemaker should
Page 57

57
not carry the phone in the breast pocket and should
keep the phone next to the ear opposite to the medical
device in order to minimize the risk of interference; in
case of suspecting such interference, the phone should
be switched off immediately.
• Never use the phone in hospitals, airplanes, refueling
points or at proximity to flammable materials.
• Never repair nor modify the phone on your own; any
repairs should be made by authorized service only.
• A device and its accessories might contain small parts.
Keep the phone and all parts out of reach of children.
• Never clean the phone with any chemicals or
corrosives.
• Never use the phone in proximity to credit and pay
cards – doing so might cause data to be lost.
• Because of your own safety, do not talk on the phone
while the charger is plugged in.
• Never expose the phone to either low or high
temperature, and direct sunlight. Do not place the
phone next to heating devices such as radiators,
heaters, ovens, furnaces, camp fires, barbeque, etc.
• Store the device in temp. between 0°C to 40°C.
• Protect your hearing:
Prolonged exposure to loud sounds might
damage your hearing. Listen to music at a
moderate level, and do not keep the phone too
close to an ear, while using a speakerphone. Lower the
volume prior to using headphones.
Page 58

58
19. Terms of Warranty
The phone is covered by the warranty; proof of purchase is
necessary to be covered by this warranty.
There is a fee for repair of the phone damaged due to
misuse, electrostatic discharge or lightning strike. Any
attempts to repair or modify the phone by the User shall
void the warranty!
Above disclosures are for information purposes only.
Page 59

59
20. Battery Information
There is a battery in the phone. The battery can be
recharged using a charger that is included in the set.
The battery life depends on conditions in which the phone
is used. Your distance from a relay transmitter, number and
the length of phone calls significantly reduce the battery life.
While on the go, the phone switches between relay
transmitters and such switching also significantly affects the
battery life.
After multiple charges and discharges, it is natural for the
battery to eventually lose its ability to hold charge. Get a
new battery if you notice a significant drop in the battery
performance.
Use only batteries recommended by the Manufacturer.
Never leave the charger connected longer than 2-3 days.
Never keep the phone in excessively hot places. High
temperatures might negatively impact both the battery and
the phone.
Never use a battery that is clearly damaged. Doing so might
cause a short circuit, and might damage the phone. Check
battery installation for proper polarization.
Leaving the battery in excessively hot or cold places will
reduce the battery life. The recommended storage
temperature range is between 15°C and 25°C. Installing a
Page 60

60
cold battery into the phone might cause the phone to
malfunction and might damage the phone.
The set contains a Li-ion battery. Old batteries pose
environmental risks. They should be disposed of at a
special place in a special container in compliance with
current regulations. Never throw old batteries or chargers to
municipal solid waste, they should be collected for disposal.
NEVER PUT BATTERIES AND CHARGERS INTO FIRE!
21. SAR Information
This telephone meets all international standards pertaining
to the impact of radio waves. The product both receives and
emits radio waves. It is designed not to exceed any limits
pertaining to impact of radio waves recommended by
international guidelines. These guidelines were developed
by the International Commission on Non-Ionizing Radiation
Protection (ICNIRP), an independent scientific organization
with a safety margin to protect all people regardless their
age and health condition. Such guidelines use a unit of
measurement called Specific Absorption Rate (SAR) –
actual absorption.
As recommended by ICNIRP, the border value of SAR for
portable equipment is 2,0 watts per kilogram (W/kg). SAR
value is determined at the maximum transmit power; the
actual SAR value while the product is working is usually
lower than the indicated level. Such discrepancies result
Page 61

61
from automatic changes in device power necessary to
The highest SAR value taken in tests
SAR – device
next to head
0.497 W/kg 10g (GSM900)
0.074 W/kg 10g (GSM1800)
SAR – device
next to body
0.954 W/kg 10g (GSM900)
0.314 W/kg 10g (GSM1800)
ensure that the device operates at a minimum power level
required to be connected with network.
Although SAR values might vary for different models of
phones or even for different positions of the same model,
they are all compliant with regulations pertaining to safe
level of radiation.
According to WHO current research, there is no need to
apply any special restrictions in using portable devices.
According to WHO, in order to reduce radiation, a length of
conversation should be reduced, or headset or
speakerphone should be used, or the phone should not be
held in proximity to head or body
SAR values might also vary due to various reporting and
testing requirements in different countries as well as to
different frequencies in a certain network.
Page 62

62
22. Protect Your Environment
Important: The phone is marked in compliance with the
European Waste Electrical and Electronic
Equipment Directive 2002/96/EC (WEEE) and the
Polish Act on Waste Electrical and Electronic
Equipment, and with the symbol of waste
electricals.
Such a symbol tells us that the device, after use, must not
be disposed of in the normal household waste stream.
Important: Never throw the phone nor accessories to
municipal solid waste!!! The product should be utilized in
authorized places only.
As the product contains hazardous components, improper
storage and use of such equipment might lead to serious
consequences harmful for both people and natural
environment. To avoid such consequences, proper
handling of waste electrical and electronic equipment is
essential.
Page 63

63
23. Declaration of Conformity
Page 64

Complains or device defects can be reported via website:
http://www.comtek.co.uk/maxcom-rma-service/
Mobile service address:
Comtek Network Systems
Unit 108, Tenth Avenue (Zone 3)
Deeside Industrial Estate
Deeside, Flintshire CH5 2UA
Page 65

Some information presented in this Manual might vary
MM920 v01-06-2017
depending on the phone configuration. It depends on the
software installed, your service provider or SIM Card. We
reserve the right to make any updates in the product and
its options, without any prior notification about it.
For any help please call +48 32 325 07 00 or email at
serwis@maxcom.pl
MAXCOM S.A.
43-100 Tychy,
ul Towarowa 23a
POLAND
tel. +48 32 327 70 89
fax +48 32 327 78 60
www.maxcom.pl
office@maxcom.pl
 Loading...