

Maxcom MM831 User Manual
User Manual
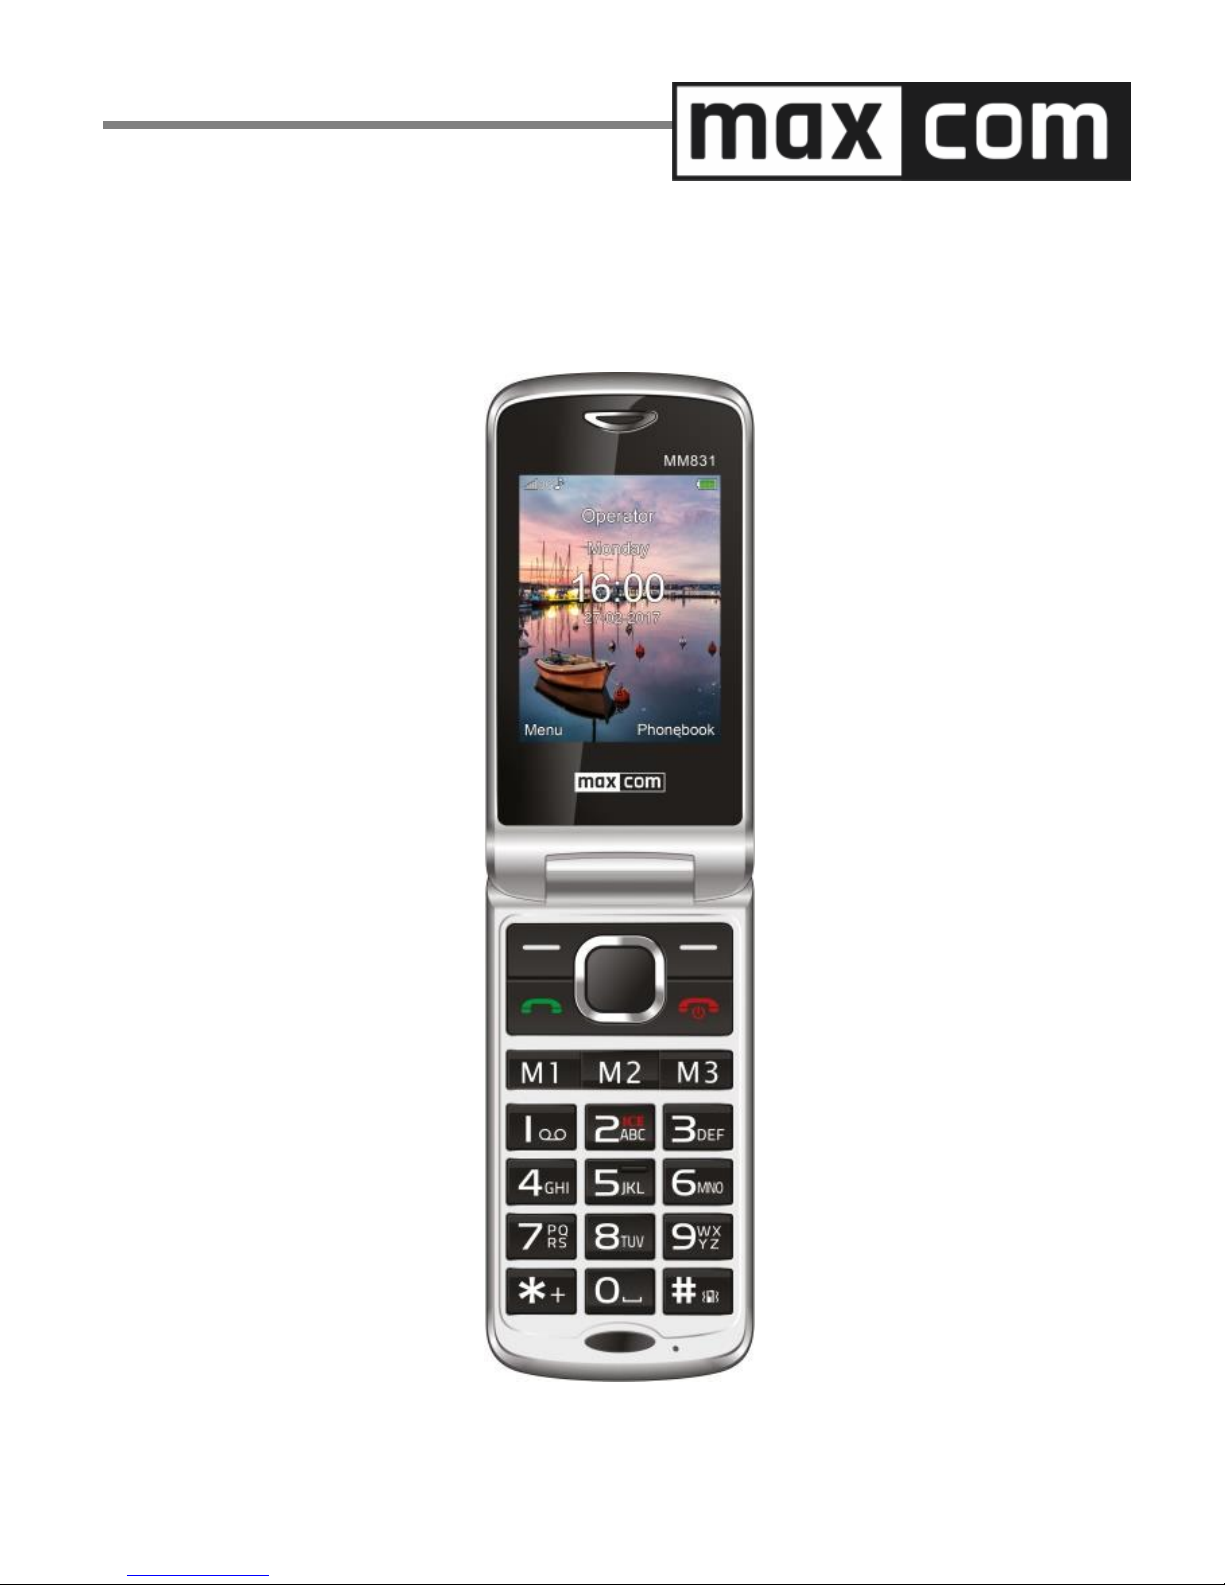
Maxcom MM831 Mobile Telephone


3
If any technical assistance is required, please contact our hotline
at (+48) 32 325 07 00 or e-mail us at serwis@maxcom.pl
Our website:
http://www.maxcom.pl/
Important! The telephone works in the GSM 900/1800
and WCDMA 900/2100 networks. Prior to switching on
the phone, a SIM Card must be correctly inserted.
The Set Includes
GSM Telephone
Charger
Desktop Charger
Battery
User Manual
Warranty Card
Headphones
Keeping the original package is
recommended as it might be used
for transport.
Keep the receipt as it is necessary
for warranty.

4
The Mobile Telephone GSM 900/1800; WCDMA
900/2100
Large backlit keypad
Big, color display screen
Photo Camera
MicroSD memory card slot
Big Font, Easy Menu
Speakerphone
Emergency SOS Feature
Conversation Volume Boost
Phonebook -500 entries
Sending & Receiving Text Messages
Speed Dial up to 7 numbers
Call Duration Notification
Loud Ringtone
Bluetooth®
Radio FM
Torch
Calculator
Alarm Clock
1000 mAh Battery
Idle time: up to 380 hrs.*
Conversation time: up to 10 hrs.*
Weight:88g
*depending on conditions and GSM signal strength

5
Contents
Trademarks .................................................................................... 8
Safety Precautions ................................................................... 8
Getting Started ....................................................................... 10
SIM Card, MicroSD Memory Card and Battery Installation .. 10
Charging the Battery ........................................................... 13
Low Battery Alert ................................................................. 15
Keys Location ......................................................................... 15
Keys’ Primary Functions ...................................................... 18
Using the Phone ..................................................................... 20
Powering On/Off the Phone ................................................. 20
Idle Mode ............................................................................ 22
MENU .................................................................................... 23
Phonebook ............................................................................. 24
Adding Contacts .................................................................. 24
Viewing Contacts ................................................................ 25
Editing Contacts .................................................................. 26
Deleting Contacts ................................................................ 26
6.4.1 Deleting a Single Contact ................................ ................. 26
6.4.2 Deleting Multiple Contacts ................................................ 26
6.4.3 Deleting All Contacts ........................................................ 26
Copying Contacts ................................................................ 27
6.5.1 Copying a Single Contact ................................ ................. 27
6.5.2 Copying Multiple Contacts ................................................ 27
Transferring Contacts .......................................................... 27
Sending Text Messages to Multiple Recipients ................... 28
Phonebook Settings ............................................................ 28
6.8.1 Preferred Memory ............................................................ 28
6.8.2 Speed Dial ....................................................................... 28
6.8.3 Additional Numbers .......................................................... 29
6.8.4 Memory Status ................................................................. 29
Making Phone Calls ............................................................... 29
Direct Dialing ....................................................................... 29
Dialing Numbers from the Phonebook ................................. 29
Dialing Numbers from Call Log ............................................ 30
Speed Dialing ...................................................................... 30
Adjusting the Call Phone Volume ........................................ 30
Options While Calling .......................................................... 30

6
7.6.1 Speakerphone ..................................................................30
7.6.2 Boost Mode (additional volume booster) ...........................30
7.6.3 Other Options ...................................................................31
Receiving Incoming Phone Calls .........................................31
Call Log ................................................................ .................. 32
Text & Multimedia Messages ..................................................33
Creating & Sending Text Messages .....................................34
Viewing and Replying to Text Messages..............................35
9.2.1 Creating & Receiving Multimedia Messages (MMS)..........35
Text Messages Boxes .........................................................36
9.3.1 Inbox ................................................................................36
9.3.2 Sentbox ............................................................................37
9.3.3 Drafts................................................................................37
9.3.4 Outbox ..............................................................................37
9.3.5 Templates.........................................................................37
Deleting Messages ..............................................................38
Message Settings ................................................................38
9.5.1 Text Messages .................................................................38
9.5.2 Multimedia Messages (MMS) ...........................................39
Voicemail .............................................................................39
Email Messages .....................................................................40
Tools.......................................................................................40
Calendar ..............................................................................40
Calculator ............................................................................41
Alarm Clock .........................................................................41
Torch ...................................................................................42
World Clock .........................................................................42
File Manager .......................................................................42
Network Services ................................................................ ....43
The Internet .........................................................................43
SIM Services .......................................................................44
Photo Camera ........................................................................44
Radio FM ................................................................................46
Multimedia ..............................................................................48
Image Viewer ......................................................................48
Video Recording ..................................................................48
Video Player ........................................................................49
Audio Player ........................................................................49

7
Voice Recorder ................................ ................................ ... 50
Settings .................................................................................. 50
Profiles ................................................................................ 50
Phone Settings .................................................................... 51
16.2.1 Set the Time and Date ..................................................... 51
16.2.2 Language ......................................................................... 52
16.2.3 Preferred Text Input Method............................................. 52
16.2.4 Display Screen ................................................................. 52
16.2.5 Themes ............................................................................ 53
16.2.6 Font Size .......................................................................... 53
16.2.7 Shortcuts .......................................................................... 53
16.2.8 Navigation Key ................................................................. 54
16.2.9 Flight Mode ...................................................................... 54
Reading Numbers Out Loud ................................................ 54
16.3.1 Of Keys ............................................................................ 54
16.3.2 Of Incoming Phone Calls .................................................. 54
Call Settings ........................................................................ 54
16.4.1 Number Withhold ............................................................. 54
16.4.2 Call Waiting ...................................................................... 55
16.4.3 Call Forwarding ................................................................ 55
16.4.4 Call Barring ...................................................................... 56
16.4.5 Advanced Settings ........................................................... 56
Network Settings ................................................................. 57
M1/M2/M3 Memory ............................................................. 58
Emergency SOS Settings .................................................... 58
16.7.1 Entering, Deleting, and Editing Emergency Contacts ....... 59
16.7.2 User Information .............................................................. 59
16.7.3 Emergency Message ....................................................... 59
16.7.4 Disabling Emergency Beep .............................................. 60
16.7.5 Emergency Voice Message .............................................. 60
16.7.6 Emergency SOS Key ....................................................... 61
Connectivity ........................................................................ 61
16.8.1 Bluetooth® ........................................................................ 61
16.8.2 APN Profile ................................................................ ...... 62
16.8.3 Data Service .................................................................... 62
Security Settings ................................ ................................ . 62
16.9.1 PIN Code ......................................................................... 62
16.9.2 Phone Security ................................................................. 62

8
Restore Factory Settings .....................................................63
Computer Connection .............................................................63
FAQ (Troubleshooting) ...........................................................63
Safe Use .................................................................................66
Terms of Warranty ..................................................................68
Battery Information .................................................................69
SAR Information ................................ ..................................... 71
Protect Your Environment .......................................................73
Declaration of Conformity........................................................74
Trademarks
- MAXCOM and the Maxcom logo are trademarks
reserved for the Maxcom S.A. company.
- Bluetooth® is a trademark of Bluetooth SIG.
Safety Precautions
Reading the guidelines below will minimize the risk of
misusing the phone.
• Never use the phone in any area where the use of
mobile phones is prohibited such as refueling points
or hospitals. Using phones in such places might
expose others to danger. Never switch on the
phone if it might interfere with work of other devices!
• Never use the phone without right accessories while
driving.
• Never use the phone in hospitals, airplanes,
refueling points or at proximity to flammable
materials.
• The telephone emits electromagnetic field that
might negatively interfere with other electronic
devices including medical equipment. A distance

9
recommended by the medical equipment
manufacturers between the phone and the
implanted medical device such as a heart
pacemaker should be observed. Users with
implanted devices should get familiar with and
follow guidelines by the manufacturers of such
implanted medical devices. Users with a heart
pacemaker should not carry the phone in the breast
pocket and should keep the phone next to the ear
opposite to the medical device in order to minimize
the risk of interference; in case of suspecting such
interference, the phone should be switched off
immediately;
• A device and its accessories might contain small
parts. Keep your phone and all parts out of reach of
children.
• No repairs or modifications of the phone by the User
are allowed. Any problems should be repaired by
the qualified service only.
• Only original batteries and chargers must be used.
Using other accessories might damage the phone
or cause an explosion.
• The phone is not dustproof, it shall not be exposed
to dust, metal chips, etc. as it might cause the
phone to malfunction.
WATERPROOF – the phone is not waterproof.
Keep it dry at all times.
10
Getting Started
Make sure your set contains all pieces as listed on page
3: “The Set Included” prior to the first use.
Prior to switching on the phone, a SIM Card must be
inserted. Be careful not to damage the Card while
inserting it.
Keep the SIM Card away from children at all times.
SIM Card, MicroSD Memory Card and
Battery Installation
The phone has a MicroSIM slot. If you have a card of
different size with no possibility to push out the
MicroSIM, contact your service provider to replace the
card with the card of right size.
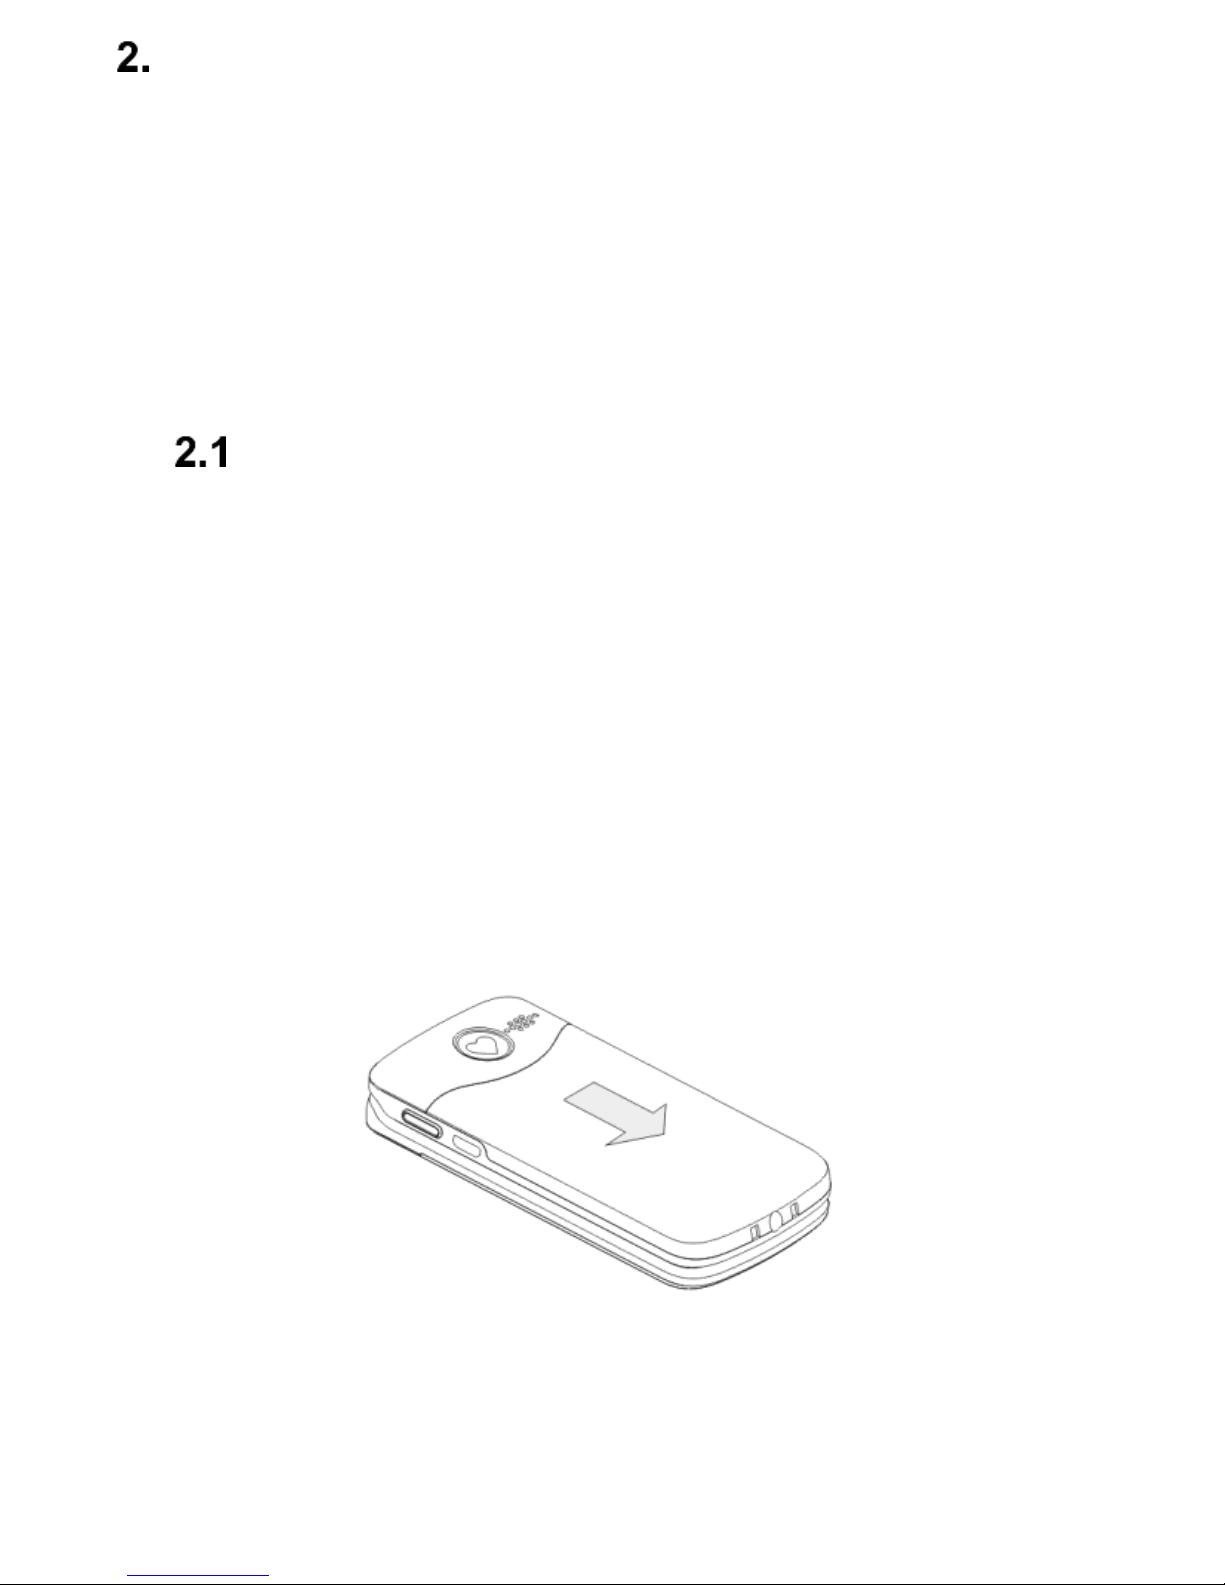
• Make sure the phone is switched off, and the
charger is unplugged; if the phone is switched
on, press and hold the red receiver key.
• Slide the battery cover down.
• Remove the battery by lifting it up with your
fingernail from the bottom of the telephone.
11
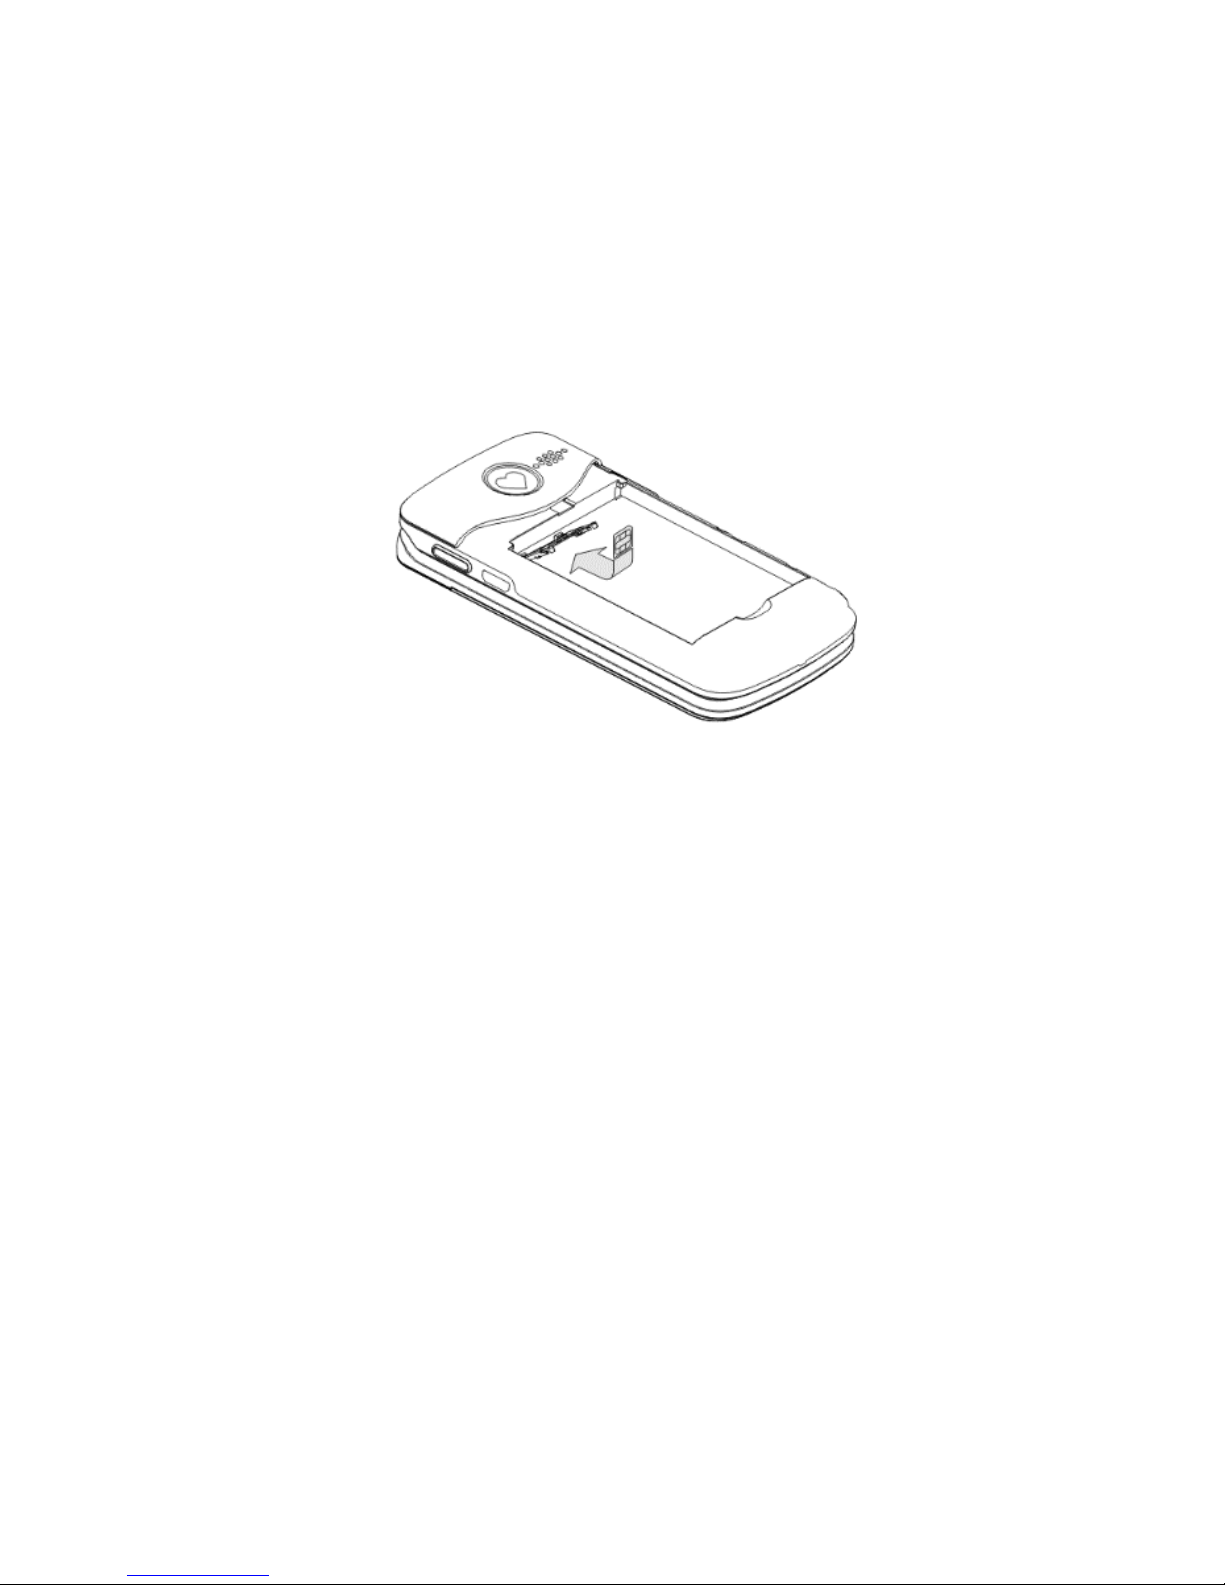
• Slide the SIM socket lock upwards, and then
gently lift it away upwards.
• Insert the MicroSIM so that its metal contacts will
be face down; pay attention to the notch of the
card. Using the phone options that require the
GSM network is not possible without the SIM
Card.
• Close the SIM socket lock, and slide it back
downwards.
• To install the MicroSD card (the Card slot is
located on the right side of the SIM socket), slide
the lock to the right and open it. Then, insert the
memory card, close the lock and slide it toward
the SIM Card socket.
12
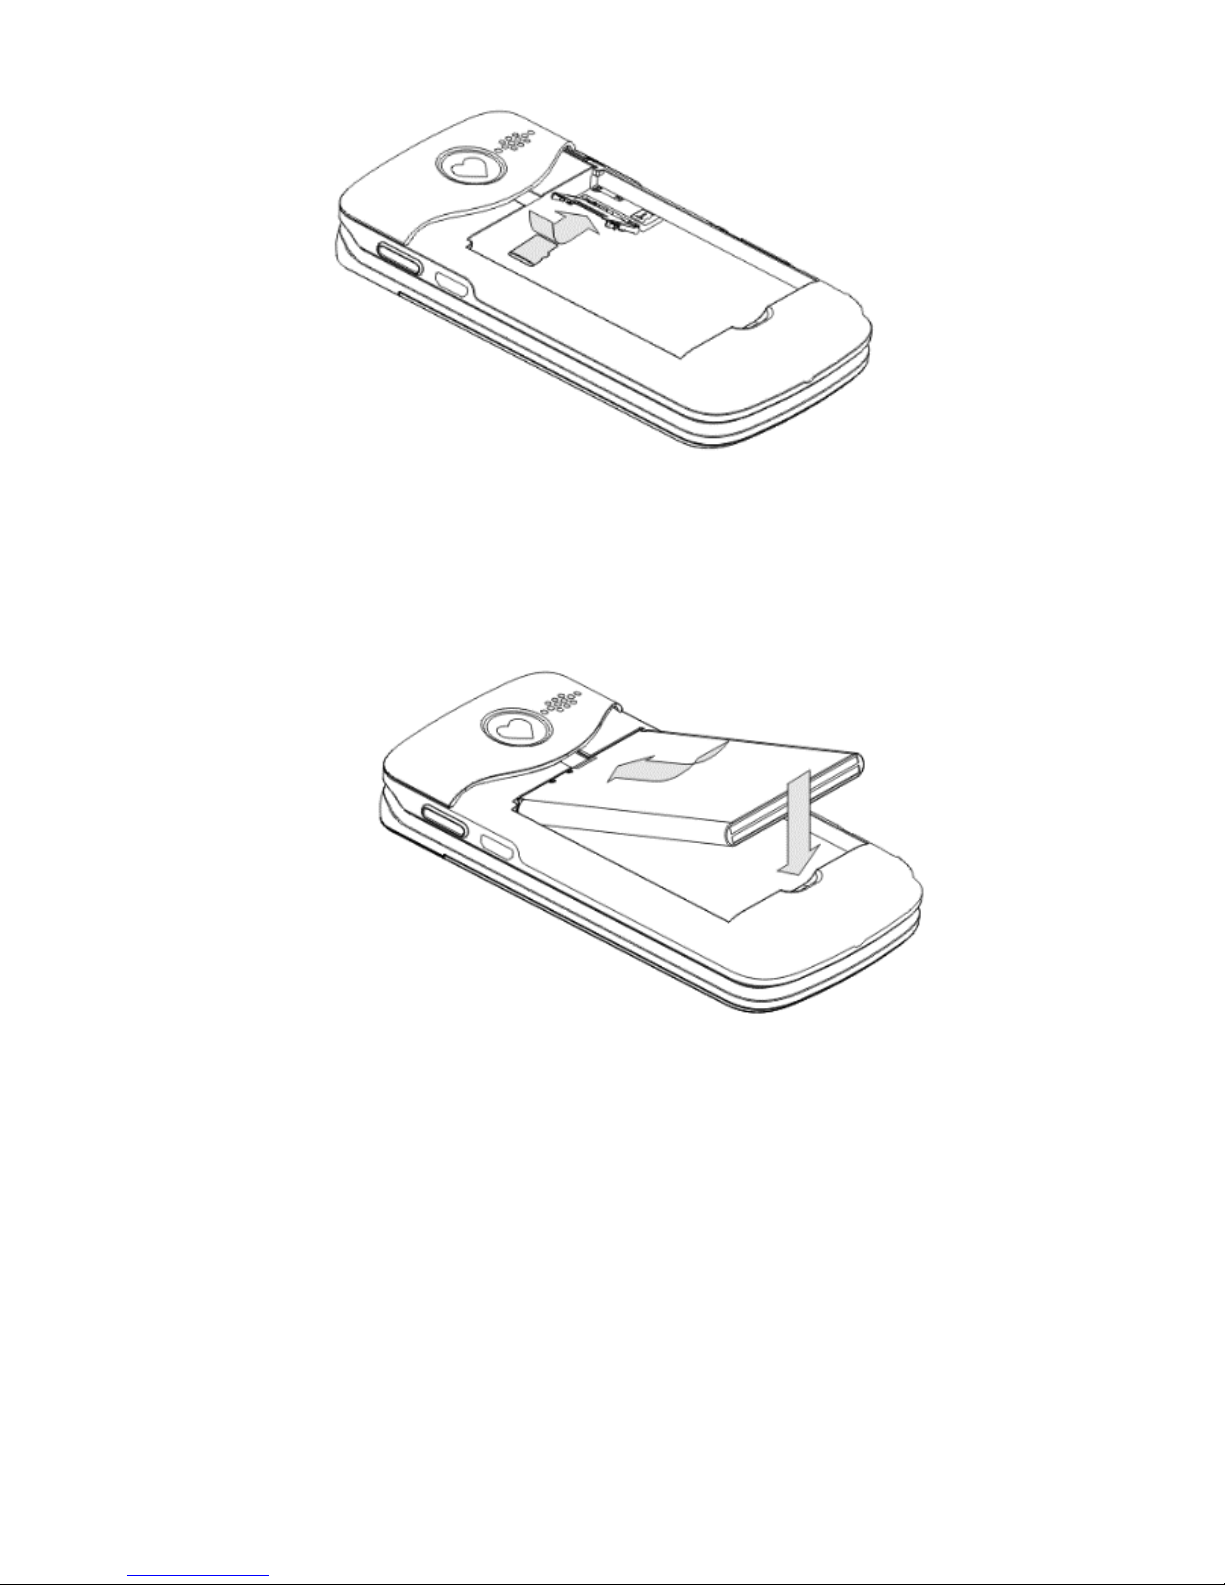
• Install the battery so that its metal contacts +/will be face up.
• Put the battery cover back in place and slide it
upwards.
Be careful while using the memory card especially while
inserting and uninstalling the card. Some memory cards
must be formatted on a computer before the first use.
Regularly make backup copies of data stored on cards
used in other devices, if you use SD Cards. Misuse or

13
other factors might damage the card or make the card
lose its content.
Charging the Battery
Important! Only the battery included in the set should be
used. Using other batteries might damage the phone
and shall void warranty.
Never connect the charger while the back cover is
removed.
To charge the phone:
1. Plug the charger into a power outlet.
2. Plug the charger cable into a slot at the top edge
of the phone. A message about the charger being
connected will appear on the display screen, and
the battery icon will keep blinking while the
phone is being charged. The battery icon on the
flip will light in red.
3. When the battery is fully charged, unplug the
charger from the power outlet, and then unplug
the cable off the phone.
4. As soon as the charging process is completed,
the battery icon will stop blinking, and the battery
on the flip will go off as well.
To charge the phone, you might also use the desktop
charger. To do so, plug the charger cable into the
socket on the back of the desktop charger, place the
desktop charger on an even surface, and position the
phone on the desktop charger so that the phone’s metal
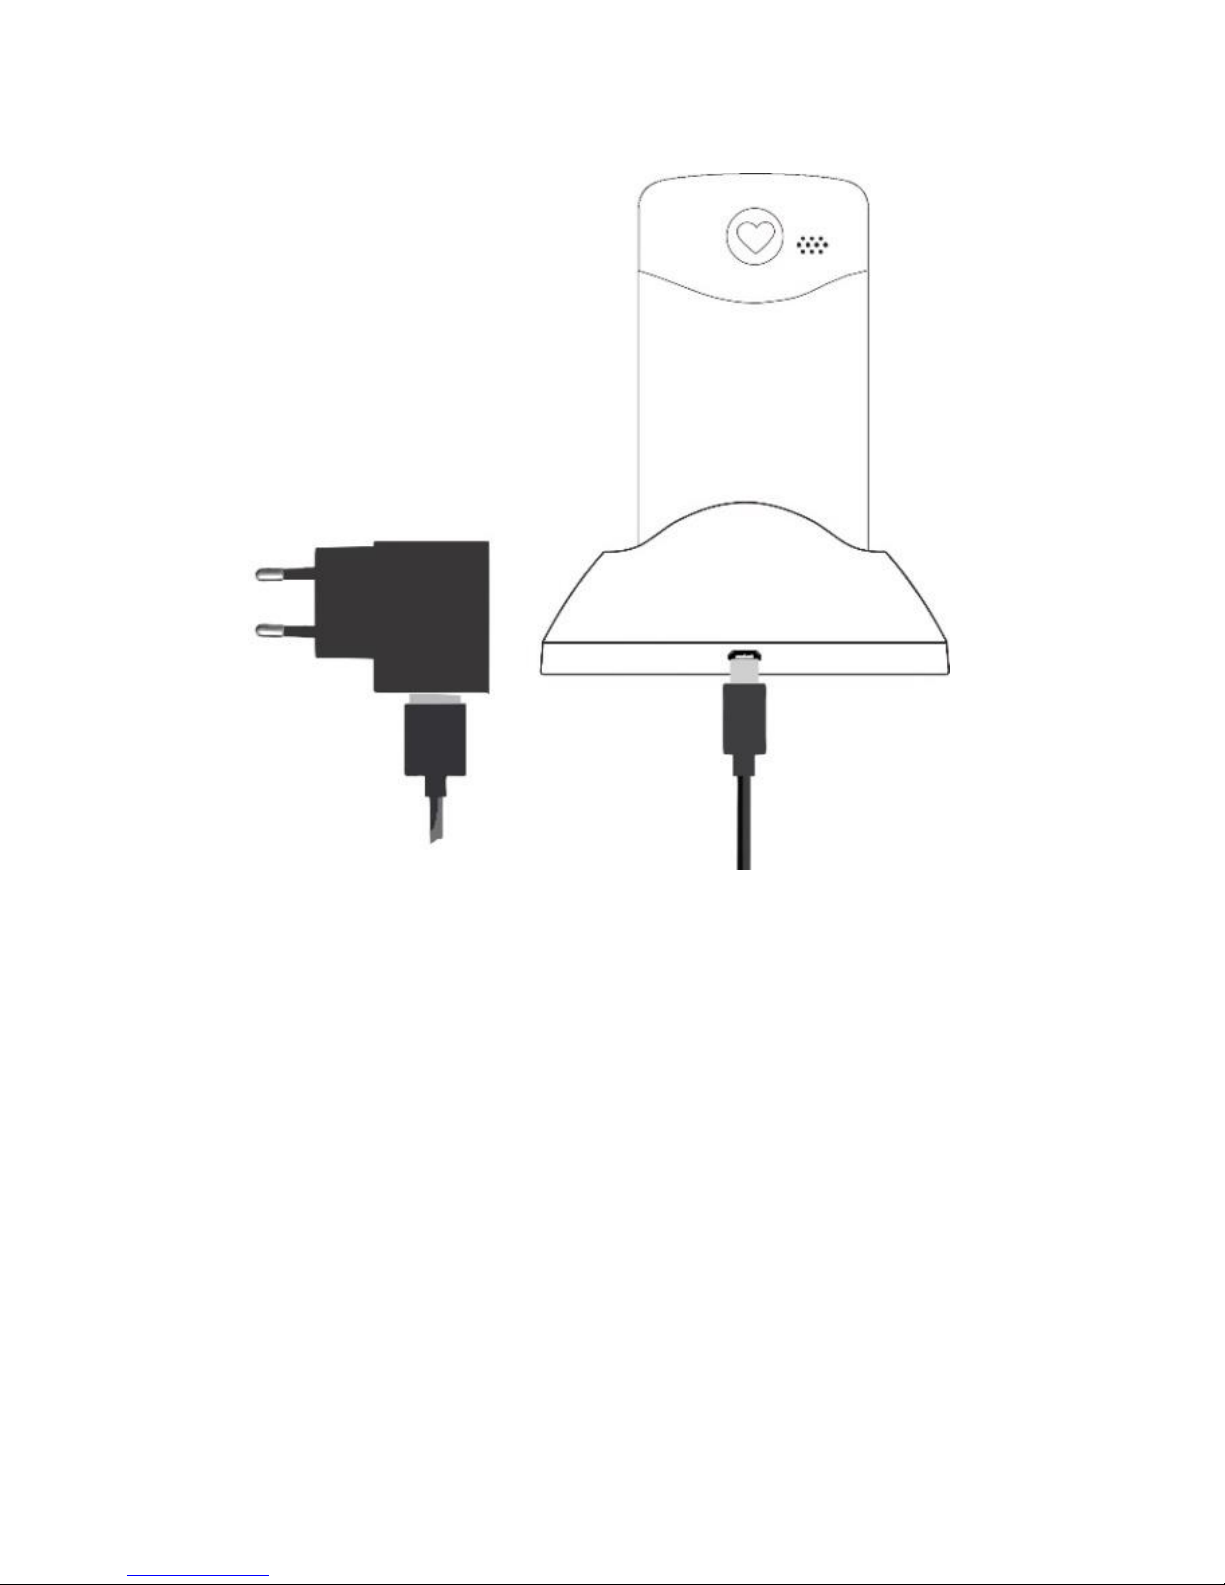
14
contacts will go down. The phone mm831 might be
charged either with an open or closed flip.
Important:
o Before you start the charging process, make
sure the battery is properly installed.
o Never remove the battery while charging –
doing so might damage the phone.
o If the battery level is too low to work properly,
there will be the message on the screen telling
you that the phone is about to be automatically
switched off, and the phone will automatically
switch off.
o If the battery is fully discharged (because for
example you had left the torch on), it might be
necessary to wait several minutes for the

15
battery icon to appear after the battery is
plugged in.
Low Battery Alert
The phone will emit a special sound alert (if warning
alerts are enabled in the profile) and a message
„Battery Discharged” will appear on the screen, if the
battery level is too low. There will be an icon on the
screen, and the red battery icon will blink on the phone’s
flip.
As soon as you see such a message, charge the phone.
Keys Location
16
1
Volume Up Key
17
Memory M1 Key
2
Volume Down Key
18
Memory M2 Key
3
Battery Cover
19
Numeric Keypad

17
4
Phone Leash Socket
20
Up Key
5
Torch/Flash
21
Right Function Key
6
Camera
22
Right Key
7
Low Battery/Charging
Diode
23
Down Key
8
Missed Phone Call
Diode
24
Red Receiver Key
9
New Text Message
Diode
25
Memory M3 Key
10
Headphones Socket
26
Microphone
11
Charging Contacts for
Desktop Charger
27
Emergency SOS Key
12
Speaker
28
Ringtone Speaker
13
Left Function Key LFK
29
Torch/Boost Mode
Key
14
OK Key
30
Torch/Boost Mode
Key
15
Left Key
31
MicroUSB/Charging
Slot
16
Green Receiver Key
18
Keys’ Primary Functions
Key
Function
Red Receiver
Press: goes back to Idle mode,
ends a phone call.
Press & hold: powers on/off the
phone
Green Receiver
Press: makes a phone call; in Idle
mode goes to Call Log
Navigation
Keys
Up
Messages
Dow
Photo Camera
19
Left
Profile
LFK
Function as appears on the screen
RFK
Function as appears on the screen
Right
Shortcuts
1
Press: digit 1 Press & hold:
Voicemail
0
Press: digit 0
Press & hold: enables/disables a
torch
3-9
Press: digits 3 to 9
Press & hold: dials a speed dial
number
2
Press: digit 2
Press & Hold: ICE Function –ICE
Contacts and the User information
*
Enter symbols *, +, P, W.
While typing a text message:
special symbols
#
Press: Change the text input mode
while typing a message, entering
the symbol#
Press & hold: Enable/disable Silent
mode
Key: OK
Confirmation key, in most cases the
function concurs with the function of
the LFK
Torch/Boo
st Mode
Key
With the flip open: short press, and
then press & hold to enable/disable
a torch

20
While talking: backlight the display
screen, and then press to
enable/disable volume booster.
Using the Phone
Powering On/Off the Phone
To switch on/off the phone, press and hold the red
receiver key.
If there are any problems to switch on the phone, make
sure the battery is charged and properly installed.
If the prompt to enter the PIN code appears, enter the
code. You will get the code with the SIM Card starter kit.
After the code is entered, press the Left Function Key to
confirm.

21
Then, after the first initial use of the SIM Card (or after
restoring the factory settings) an option to enter the
current date and time will appear, as well as an
opportunity to copy Contacts from the SIM Card onto
the phone. Enter the correct time using the numeric
keypad, press the key DOWN, follow the same steps to
enter the date, and press the Left Function Key. To
move between digits, press the keys Right/Left. If you
skip setting the time/date (Return), the phone will get
the data automatically from the GSM network.
Then, the question message will appear: Copy All from
SIM to Phone? Select YES, if you want to copy all
Contacts from the SIM Card onto the phone. Otherwise,
press NO.
Warning: If you enter an incorrect PIN code three
times in a row, the SIM card will be locked. You
might unlock the card by entering the PUK code. If
you enter the incorrect PUK ten times, the SIM Card
will be permanently locked.
22
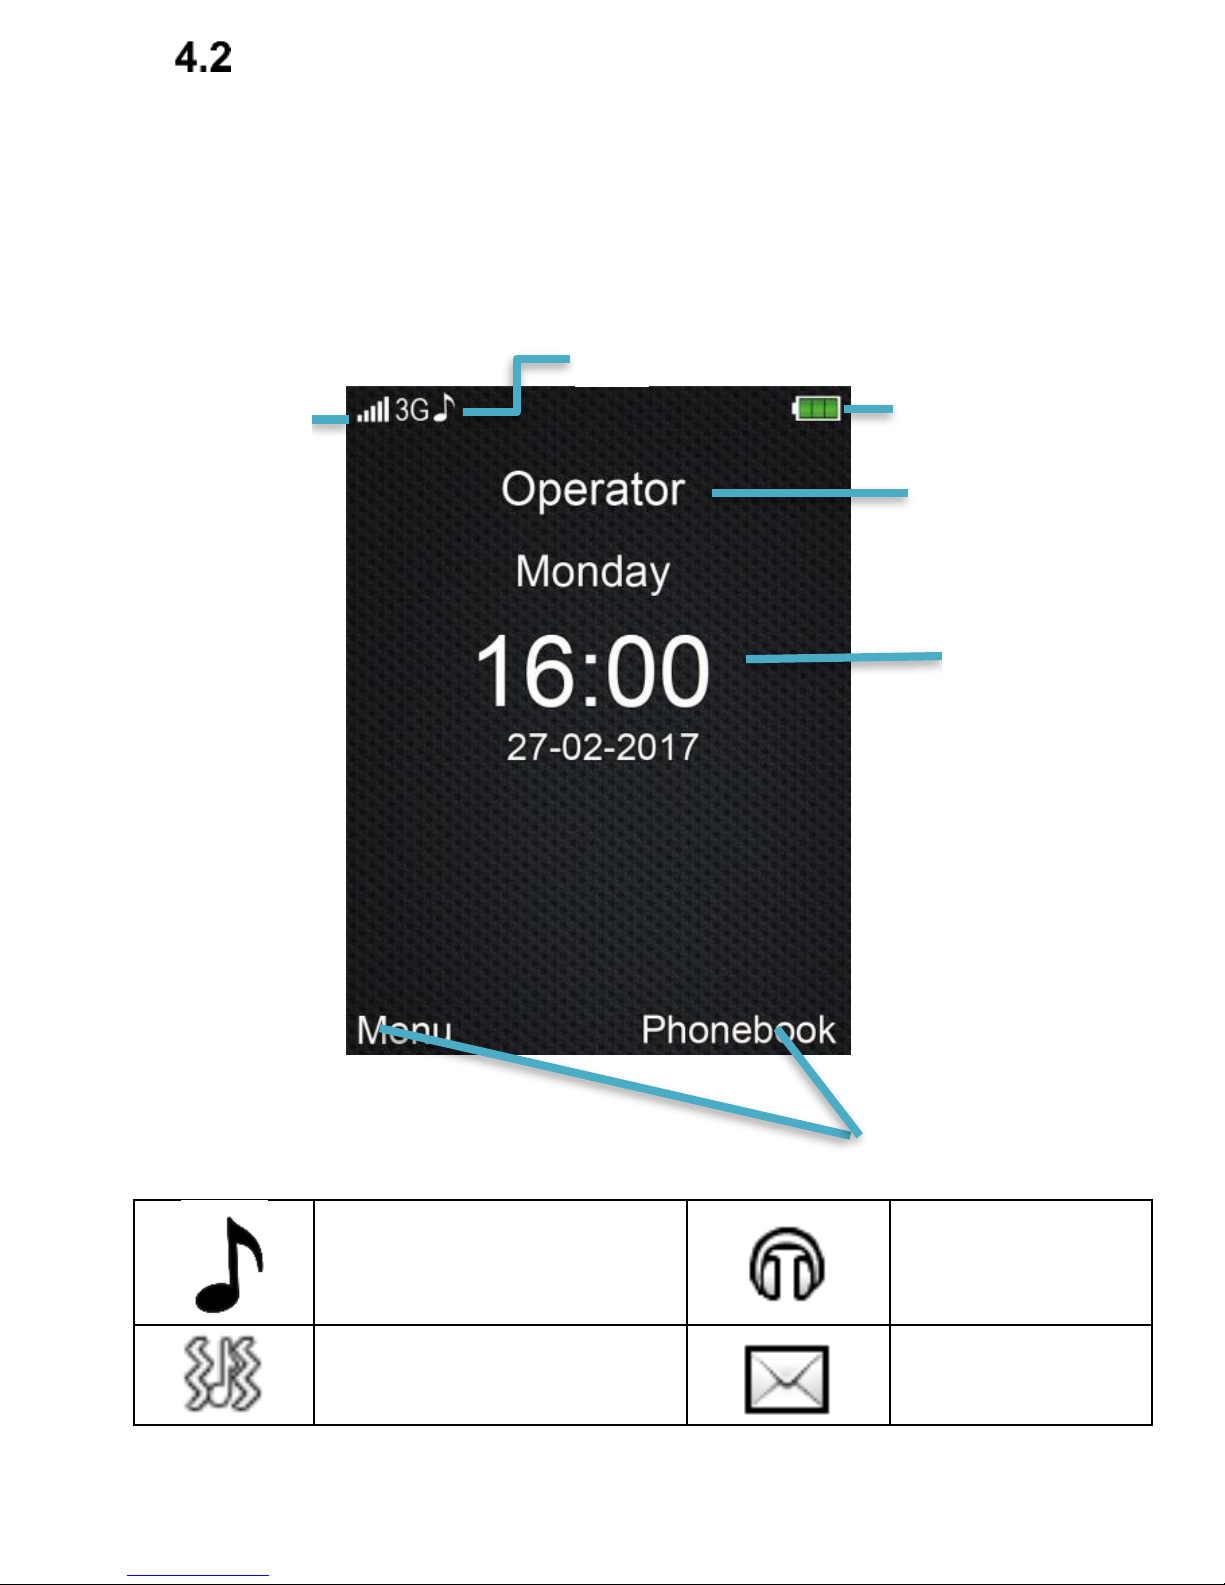
Idle Mode
If the phone is switched on, but there is no activities, the
phone will go to Idle mode.
Display Screen Description
1. Icons showing functions:
Ringtone only
Headphones
on
Ringtone +
vibration
Unread Text
Message
2
3 4 5
6
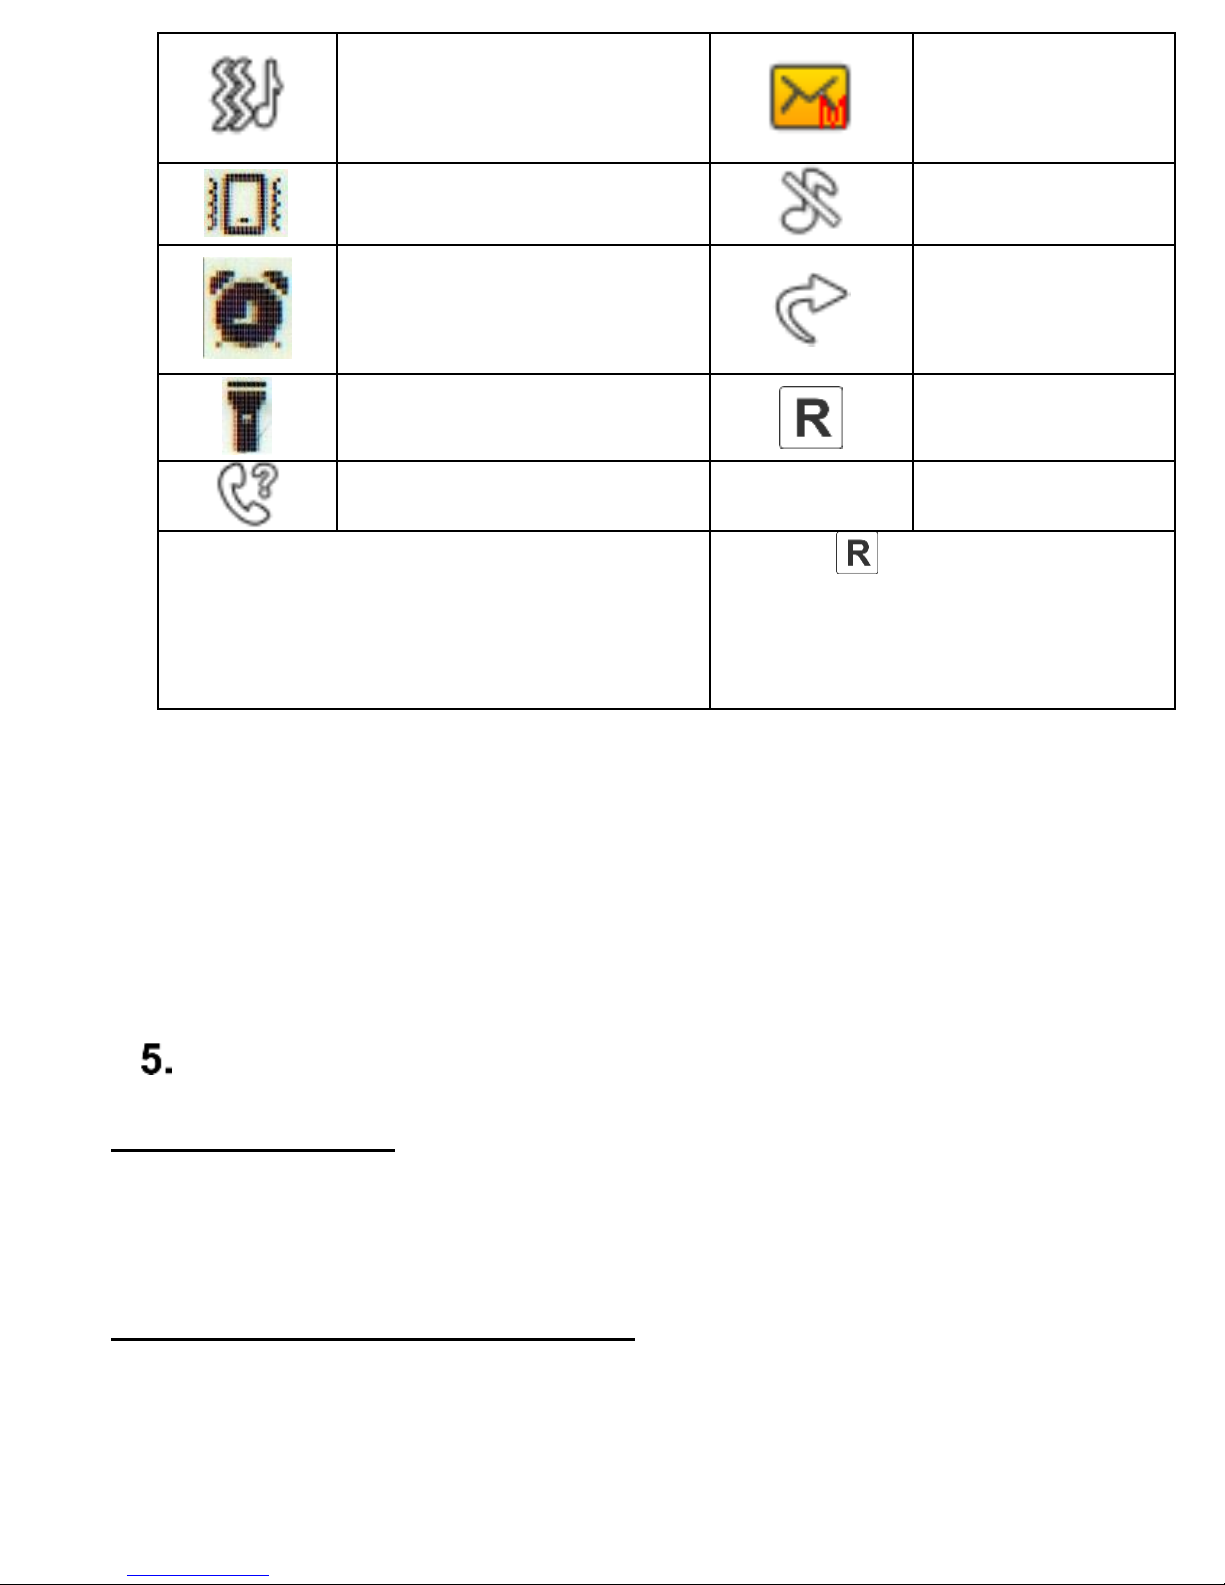
23
Vibration, Ringtone
Later
Unread
Multimedia
Message
Vibration Only
Silent
Alarm Clock On
Call
Forwarding
Enabled
Torch Enabled
Roaming
active
Missed Phone Call
Icons might vary depending on
software
* Icon appears also in
domestic roaming if the
User is using another
provider’s network
2. Network Signal
3. Battery Level
4. Service Provider’s Name
5. Week/Time/Date
6. Functions of Function Keys.
MENU
To enter MENU in Idle mode, press the key OK and the
Left Function Key.
To navigate in MENU use the keys
UP/DOWN/RIGHT/LEFT.
To confirm selected function, press the key OK or Left
Function Key.

24
To return to the previous MENU (go back), press the
RFK.
To go to Idle mode, press the red receiver key.
After entering the main MENU, there are 9 icons visible
on the display screen. To move between them, you can
use the navigation key or you can select digits from 1 to
9 on the keypad – the digits match the icons.
Phonebook
Adding Contacts
There are two ways for you to save a new Contact:
1. You can save the number from the list of
missed and received phone calls. In order to do
so, in Idle mode press the green receiver key,
select the phone number you want to save, and
press „Options” (LFK). Select „Save in
Phonebook”, press the LFK, select where you
want to save it. Press Edit and enter the
Contact’s name. Press Options>Done>Done.
2. You can add a new Contact directly to the
Phonebook. To do so, in Idle mode press the
RFK, and then using the key UP select New
Contact>Options>Add. Select where you want
to save the Contact. Press Edit, enter the
Contact’s name, and press Options>Done.
Using the key Down go to the number, press
Edit. Enter the number and press OK>Done.
 Loading...