

Maxcom MM823 User Manual
USER MANUAL
GSM Mobile Telephone
MaxcomMM823


3
Getting Started ..........................................10 1.
Accessories ................................................12 2.
Safety Guidelines .......................................12 3.
Telephone Description ..............................16 4.
SIM Card and MicroSD Installation ...........18 5.
SIM Card Handling .....................................22 6.
Battery and Back Cover Installation ..........23 7.
Charging the Battery
7.1.1 Desktop Charger (Option) ...........26
..........................24
Backlight Icons .................................27 7.2
Entering a text ...........................................27 8.
Operate Your Phone ..................................28 9.
Switching on the Phone ...................28 9.1
How to Set the Time and Date.........29 9.2
Making Phone Calls .........................30 9.3
9.3.1 Dialing a Number from the
Phonebook ................................................31
Answering Phone Calls ....................32 9.4
Volume Adjustment .........................32 9.5

4
Icons on LCD Screen.........................33 9.6
Additional Features While Talking ...33 9.7
9.7.1 Hands-free Mode ........................35
9.7.2 Call Waiting .................................36
Phonebook ................................................36 10.
How to Add a New Contact .............37 10.1
Speed Dial ........................................38 10.2
10.2.1 How to Assign Keys .....................38
Managing Your Phonebook Entries .39 10.3
Text Messages ...........................................41 11.
How to Create and Send Text Message11.1
41
Inbox ................................................44 11.2
Sentbox ............................................46 11.3
Drafts ...............................................46
11.4
Outbox .............................................47 11.5
Text and Multimedia Message Settings11.6
47

5
Message Memory Status .................51 11.7
Multimedia Messages [MMS] ..........51 11.8
Emergency Calls ........................................51 12.
Emergency Key ................................53 12.1
12.1.1 Emergency Key Settings ..............54
Call Log ............................................56 12.2
Radio FM ...................................................58 13.
Multimedia ................................................60 14.
Camera and Video Camera ..............60 14.1
Audio Player .....................................62 14.2
Video Player .....................................63 14.3
Voice Recorder .................................65 14.4
Tools ..........................................................65 15.
My Files ............................................66 15.1
Calendar ..........................................66 15.2
Calculator .........................................68 15.3
Alarm Clock ......................................68 15.4
SIM Service ......................................69 15.5

6
Settings......................................................69 16.
Call Settings .....................................70 16.1
Telephone Settings ..........................72 16.2
16.2.1 Setting the Date and Time ...........72
16.2.2 Language .....................................72
16.2.3 Setting Shortcuts .........................74
16.2.4 Auto Powering On/Off .................74
16.2.5 Battery Level ................................75
16.2.6 Dafault Settings ...........................75
LCD Screen .......................................76 16.3
16.3.1 Animation On/Off ........................76
16.3.2 Wallpaper Settings ......................76
16.3.3 Desktop Settings ..........................77
16.3.4 Contrast .......................................78
16.3.5 Backlight ......................................78
16.3.6 Keypad Backlight .........................78
MENU Settings – Simple/Advanced .79 16.4
Security ............................................79 16.5

7
16.5.1 PIN1 / PIN2 ..................................80
16.5.2 Locking the Phone .......................80
16.5.3 Change the Phone Code ..............81
16.5.4 Black List ......................................81
Ringtone Settings .............................82 16.6
Connections .....................................84 16.7
16.7.1 Bluetooth ....................................84
16.7.2 Data Account ...............................85
16.7.3 GPRS Service................................86
16.7.4 Data Connection ..........................86
16.7.5 Network Selection .......................86
Network Service ..............................86 16.8
The Internet ..............................................87 17.
Important Safety Precautions ...................88 18.
FAQ (Troubleshooting) ..............................91
19.
Technical Specs ..........................................98 20.
Battery Information ...................................98 21.
SAR Information ..................................... 101 22.
Protect Your Environment ...................... 103 23.

8
Declaration of Conformity ...................... 109 24.

9
If any technical assistance is required, please contact the
hotline at (+48) 32 325 07 00 or serwis@maxcom.pl
Out website:
http://www.maxcom.pl/
The Set includes:
GSM Telephone
Charger
USB Cable
Battery 800mAh
Headset
Desktop charger
User Manual
Warranty Card

10
Keeping the original package is recommended as it
might be used for transport.
Keep the receipt as it is necessary for your
warranty!
Note – The telephone works in the GSM 900/1800
MHz network. Prior to switching on the phone,
you should correctly insert the SIM card.
Getting Started 1.
Thank you for selecting the Maxcom telephone.
The Manufacturer reserves the right to make
updates and modifications arising from errors and
inaccuracies in current information or from

11
upgrades in the telephone and software without
prior notification; the updates, however, will be
reflected in updated versions of the User Manual.
For more information or for any form of assistance
go to our website at www.maxcom.pl. The entire
content of this Manual is copyright by the
Manufacturer.
Copyright and trademarks as mentioned in this
Manual remain the property of their owner.
Reproduction, transmission, storing, or
dissemination of any material, in whole or in part,
covered by copyright, without prior written
consent, are strictly prohibited.

12
Accessories 2.
Use only batteries, chargers, and accessories
recommended by the telephone Manufacturer. To
see what accessories are available in your area,
contact your seller.
Safety Guidelines 3.
Reading these guidelines presented below will
minimize the risk of misusing the phone.
USING – The telephone emits electromagnetic
field that might negatively interfere with other
electronic devices including medical equipment.
Never use your phone in any area where the
use of mobile phones is prohibited such as
hospitals, airplanes, refueling points or in
proximity to flammable materials. Using mobile
phones in such places might expose others to

13
danger.
Never use your phone without hands-free
accessories while driving.
A device and its accessories might contain small
parts. Keep your phone and all parts out of the
reach of children.
SERVICING - Never repair or modify your phone
by your own. Only qualified service is authorized
to repair the phone.
CLEANING - Never use any chemicals or
corrosive substances to clean your phone.
TORCH – Never look directly into the stream of
light,
HEARING AID DEVICE – If the user has a hearing
device, phone volume and hearing aid sensitivity
should be carefully adjusted,
ELECTRONIC MEDICAL DEVICES – Your phone is a
radio transmitter that might interfere with
electronic medical devices or implants such as
hearing aid, heart pacemakers or insulin pumps,

14
etc. A minimum distance of 15 cm is
recommended to be kept between a telephone
and an implanted medical device. For more
information consult your physician or
manufacturers of such medical devices.
WATERPROOF – the phone is not waterproof.
Keep it dry at all times.
DUSTPROOF – The phone is not dustproof, do
not use your phone in areas with high
concentration of dust. Protect your phone
against metal chips since they might cause the
phone to malfunction.
DISPLAY– hard pressing against the LCD should
be avoided. Never used any sharp tools as doing
so might damage the phone.
Never press battery contacts with metal objects
as it may explode.
Never expose your phone to low or high
temperatures, direct sunlight or high humidity.
Do not place your phone next to heating devices
15
such as radiators, heaters, ovens, furnaces, camp
fires, barbeque, etc.
PROTECT YOUR HEARING!
not keep the phone close to an ear while using a
speakerphone. Set the volume to a safe level
prior to using headphones.
Prolonged exposure to loud sounds
might damage your hearing. Listen to
music at a moderate level, and do

16
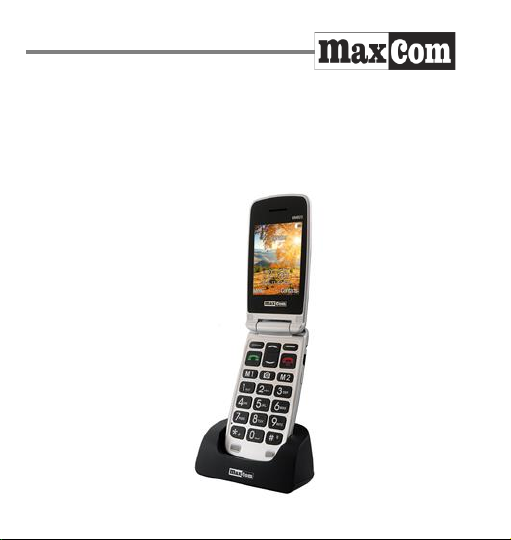
Telephone Description 4.

17
1. Speakerphone
2. LCD display
3. Left Function Key (LFK)
4. Make Call key
5. M1/To the left
6. Voicemail
7. Numeric keypad
8. Microphone
9. Star
10. Profile: Outdoors
11. Profiles: Silent, Vibration
12. Camera
13. M2 / To the right
14. End Call key / Power On/Off
15. Right Function Key (RFK)
16. Navigation Keys: Up & Down
17. Emergency Key
18. Ringtone Volume
19. Camera Lenses

18
20. Charging port / USB
21. Torch key
22. Desktop charger slots
23. Volume Down
24. Volume Up
25. Torch diode
26. Battery indicator (charged / discharged
battery)
27. Call diode (missed phone call)
28. Message diode (new message)
29. Alarm diode (alarm enabled)
30. Headphones port
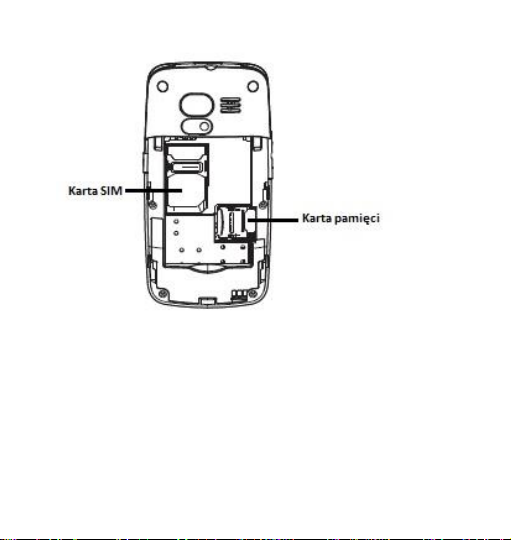
SIM Card and MicroSD Installation 5.
The SIM card slot is located under the battery.
Before installing the SIM Card make sure the
phone is switched off, not connected to a charger
19
or any other accessories.
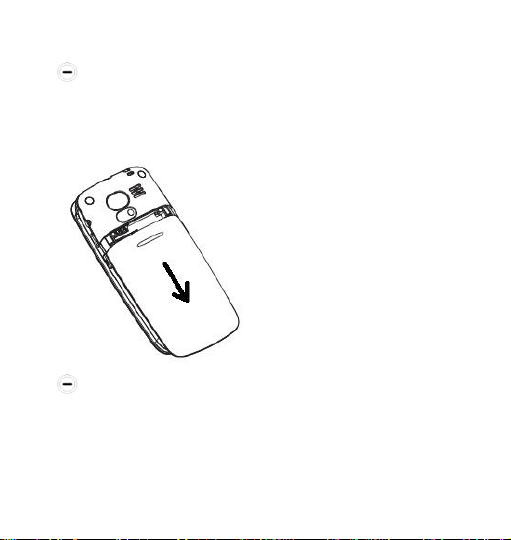
Place the phone with the back facing up, get
hold of the battery cover, slide it downwards, and
remove it.
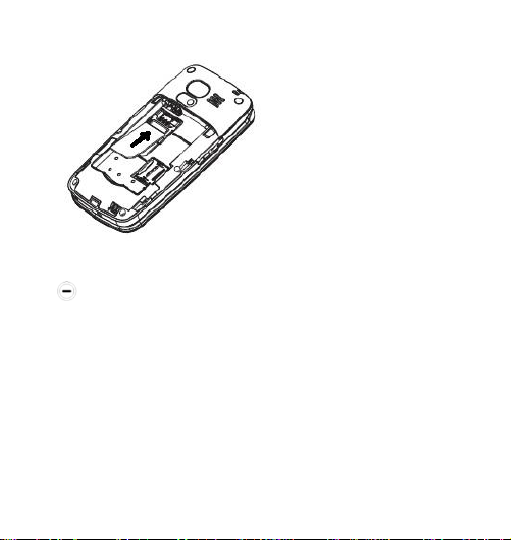
Carefully insert the SIM card to the SIM slot,
and slide it with metal contacts facing downwards.
Make sure the slanted edge is positioned in the
right bottom corner.
20
There is a spot for the MicroSD card just next to
the SIM card slot. Position the pin towards OPEN
and next lever it up. Insert the MicroSD so that the
MicroSD card contacts will touch the phone
contacts; close the pin towards LOCK.
21
Be careful while using your memory card,
especially while installing and uninstalling it. Some
memory cards must be formatted on a PC before
the first use.
On the regular basis make backup copies of
22
information stored on the cards, used in other
devices, if you use SD cards! Misuse or other
factors might cause damage or loss of data stored
on the cards.
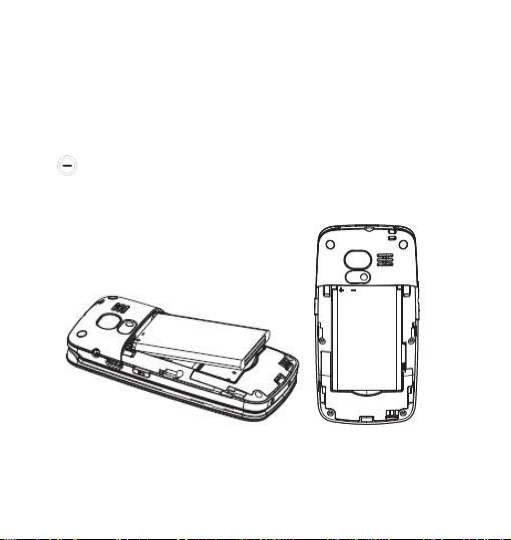
Insert the battery so that the contacts +/- will
face upwards.
SIM Card Handling 6.

23
Prior to inserting or removing the SIM Card,
switch off the phone and wait few seconds.
Handle the SIM Card with care; never bend
or scratch it.
If the SIM Card is improperly installed or
damaged, the message „Insert SIM Card” will be
displayed on the LCD screen after switching on the
phone. Make sure the card is properly installed
and it is not damaged, and switch on your phone
again. If the message “Insert SIM Card” is still
there, take it back to your GSM network provider
in order to have it replaced.
Battery and Back Cover Installation 7.
Insert the battery carefully making sure the
24
metal contacts are properly positioned.
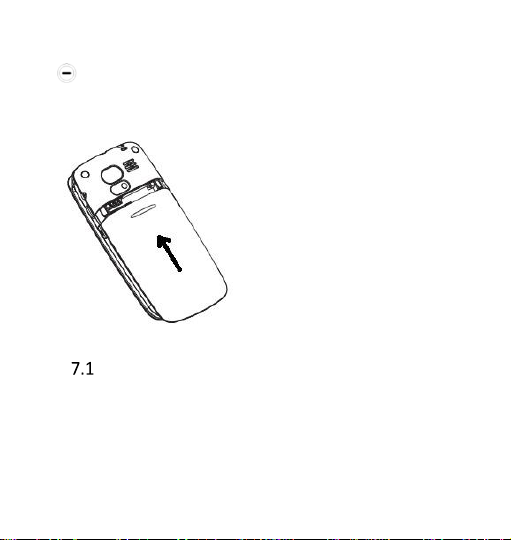
Replace the back cover and snap it nto place
(you should hear a clicking sound).
Charging the Battery
Never use a charger or battery that is not
manufactured by Maxcom or it is damaged. Other
than original accessories or any modifications

25
could damage the phone, might violate
regulations pertaining to radio devices, and will
void the Manufacturer’s warranty.
If the battery is getting discharged, an empty
battery icon will appear on the LCD screen, and
there will be a sound alert (if warning alerts are
enabled). To charge the battery, plug in the
charger both into the phone jack and into a power
outlet.
The bars in the battery icon will repeatedly fill to
indicate the ongoing charging process. The icon
will stop blinking if the battery is fully charged or
the phone is unplugged.
Note!
While charging, the air temperature should be

26
between 0°C and +40°C.
Battery performance is progressively reduced.
What it means is that they hold the charge for
shorter and shorter time.
7.1.1 Desktop Charger (Option)
In case of using a desktop charger, you should first
plug the small end of the regular charger into the
jack of the desktop charger, and then plug the
other end into the power outlet. To charge the
battery, just position the phone onto the desktop
charger with the contacts face into the base.
27
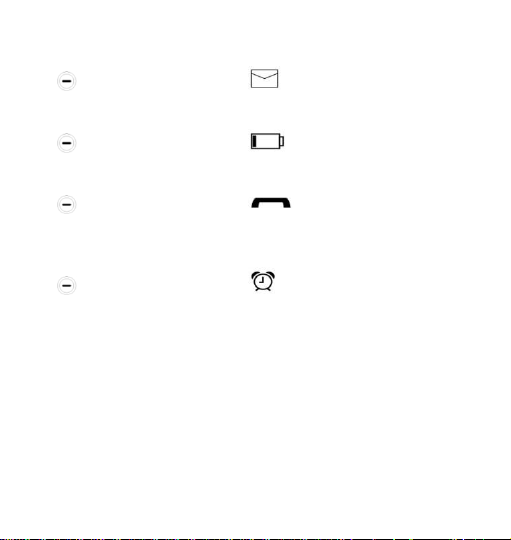
Backlight Icons 7.2
If there is an icon blinking, you have
received a new text message,
If there is an icon blinking, the battery
is charging,
If there is an icon blinking, you have
missed a phone call,
If there is an icon blinking, the alarm
clock is enabled.
Entering a text 8.
You can enter any words, numbers, symbols, and
punctuation marks.
To select either upper or lower case letters and to

28
type digits while creating a text message, press “#”,
use the keys Up/Down to select a preferred text
entry method and press the Left Function Key to
confirm. An icon of selected text entry method
appears in the top right corner of the screen.
To insert symbols:
Press“*” to see the chart of symbols. Press the
Up/Down keys to scroll within the chart. To insert
a symbol, press OK.
Operate Your Phone 9.
Switching on the Phone 9.1
Press and hold the key to switch on or off
the phone.
If the SIM Card is protected by the PIN Code, enter

29
the code, and confirm by pressing the Left
Function Key. If you enter any digit by error,
remove it by pressing the Right Function Key.
Note!
If PIN and PUK codes are not delivered along
with the SIM Card, contact your service provider.
If you enter an incorrect PIN code three times the
SIM Card will be locked and entering the PUK code
will become necessary.
Enter PUK, and confirm by pressing “OK”.
Enter new PIN code, and confirm by pressing
“OK”.
How to Set the Time and Date 9.2
Time and date must be set at the first use of the

30
telephone. Use numeric keypad to enter the date.
If you make an error, use M1 & M2 keys to move
right/left between keys. Press OK, enter the time.
Press OK to confirm.
Language should set automatically. If you want to
change language, go to the point 16.2.2.
Making Phone Calls 9.3
Enter the phone number. Press “Delete” to delete
digits you have entered by mistake.
Press to dial a number. Press „End Call” to
annul the connection.
Press to end a phone call.
Note!
To make an international phone call, press twice
 Loading...