

Maxcom mm822 User Manual
User Manual
GSM Mobile Telephone
Maxcom mm822

2

3
For technical assistance is please call the hotline at: (+48) 32 325 07
00 or email: serwis@maxcom.pl
Our website:
http://www.maxcom.pl/
Please note – the telephone works in GSM 900/1800
network. Insert a SIM card prior to switching on your
phone.
Your Package Contains:
Mobile Telephone GSM
Charger (travel adapter)
Battery
User Manual
Warranty Card
Headphones set
Desk Adapter
Keeping the package is highly
recommended as it might be useful
for transport.
Keeping the receipt is necessary to
use the warranty.

4
GSM 900/1800 Mobile Telephone
Big Illuminated Keypad
Colorful Display
Camera
MicroSD Card Slot
Emergency Key (Emits emergency sound, makes
automatic calls, and send text messages to previously
assigned numbers)
Big fonts, Easy Menu
Speakerphone
Contacts -100 Entries
Sending & Receiving Text Messages
Speed Dial up to 7 Numbers
Call Duration Display
Loud Ringtone
Bluetooth
Radio FM
Flashlight/torch
Calculator
Alarm clock
Battery 800 mAh
Idle time up to 260 hours*
Conversation time up to 7 hours*
Earpiece weight:100g
*depending on conditions and signal strength of the GSM
network

5
Table of Contents
1. Important safety precautions Błąd! Nie zdefiniowano zakładki.
2. Getting started ..................... Błąd! Nie zdefiniowano zakładki.
SIM Card and Battery Installation ..... Błąd! Nie zdefiniowano 2.1
zakładki.
Charging the Battery ......... Błąd! Nie zdefiniowano zakładki. 2.2
2.2.1 Desk Adapter (optional) ....................................................12
Low Battery Message ....... Błąd! Nie zdefiniowano zakładki. 2.3
3. Keys .................................... Błąd! Nie zdefiniowano zakładki.
4. Using your phone ................. Błąd! Nie zdefiniowano zakładki.
Switching on Your Phone.. Błąd! Nie zdefiniowano zakładki.
4.1
Switching off Your Phone.. Błąd! Nie zdefiniowano zakładki. 4.2
Idle Mode.......................... Błąd! Nie zdefiniowano zakładki. 4.3
5. MENU ..................................................................................... 22
6. Contacts .............................. Błąd! Nie zdefiniowano zakładki.
Saving Contacts ............... Błąd! Nie zdefiniowano zakładki. 6.1
Viewing Contacts .............. Błąd! Nie zdefiniowano zakładki. 6.2
Deleting Contacts ................................ ................................ 24 6.3
6.3.1 How to Delete a Single Contact ..... Błąd! Nie zdefiniowano
zakładki.
6.3.2 How to Delete Multiple Contacts .... Błąd! Nie zdefiniowano
zakładki.
6.3.3 How to Delete All ContactsBłąd! Nie zdefiniowano zakładki.
Copying Contacts ............. Błąd! Nie zdefiniowano zakładki. 6.4
6.4.1 How to Copy a Single ContactBłąd! Nie zdefiniowano zakładki.
6.4.2 How to Copy Multiple Contacts ...... Błąd! Nie zdefiniowano
zakładki.
Transfering Contacts ........ Błąd! Nie zdefiniowano zakładki. 6.5
Mark Multiple .................... Błąd! Nie zdefiniowano zakładki. 6.6
Contacts Settings ............. Błąd! Nie zdefiniowano zakładki. 6.7
6.7.1 Speed Dialing ................ Błąd! Nie zdefiniowano zakładki.
6.7.2 Addiditonal Numbers ..... Błąd! Nie zdefiniowano zakładki.
6.7.3 Memory Level ................ Błąd! Nie zdefiniowano zakładki.
7. Calling ................................ . Błąd! Nie zdefiniowano zakładki.
Direct Dialing .................... Błąd! Nie zdefiniowano zakładki. 7.1
Making a Call from ContactsBłąd! Nie zdefiniowano zakładki. 7.2
Redialing the Last Number Błąd! Nie zdefiniowano zakładki. 7.3
Speed Dialing ................... Błąd! Nie zdefiniowano zakładki. 7.4

6
Adjusting the Call Volume . Błąd! Nie zdefiniowano zakładki. 7.5
Options during a CAll ........ Błąd! Nie zdefiniowano zakładki. 7.6
In Case of Emergency (ICE) keyBłąd! Nie zdefiniowano zakładki. 7.7
Emergency Calls .............. Błąd! Nie zdefiniowano zakładki. 7.8
7.8.1 Emergency Contacts ..... Błąd! Nie zdefiniowano zakładki.
7.8.2 Information about the UserBłąd! Nie zdefiniowano zakładki.
7.8.3 Emergency Text MessageBłąd! Nie zdefiniowano zakładki.
7.8.4 Deactivating Emergency ModeBłąd! Nie zdefiniowano zakładki.
7.8.5 Emergency Message ..... Błąd! Nie zdefiniowano zakładki.
7.8.6 Emergency Key ............. Błąd! Nie zdefiniowano zakładki.
Receiving Calls ................. Błąd! Nie zdefiniowano zakładki. 7.9
8. Call log ................................ Błąd! Nie zdefiniowano zakładki.
9. Text message (SMS) and Multimedia (MMS) MessagesBłąd! Nie
zdefiniowano zakładki.
Creating and Sending Text MessagesBłąd! Nie zdefiniowano 9.1
zakładki.
Reading and Replying to Text Messages Błąd! 9.2
Nie zdefiniowano zakładki.
Text message Boxes ........ Błąd! Nie zdefiniowano zakładki.
9.3
9.3.1 Inbox ............................. Błąd! Nie zdefiniowano zakładki.
9.3.2 Sent messages .............. Błąd! Nie zdefiniowano zakładki.
9.3.3 Drafts................................................................................ 37
9.3.4 Outbox ........................... Błąd! Nie zdefiniowano zakładki.
Deleting Messages ........... Błąd! Nie zdefiniowano zakładki. 9.4
Message Settings ............. Błąd! Nie zdefiniowano zakładki. 9.5
9.5.1 Text Message ................ Błąd! Nie zdefiniowano zakładki.
9.5.2 Multimedia Message ...... Błąd! Nie zdefiniowano zakładki.
Voicemail .......................... Błąd! Nie zdefiniowano zakładki. 9.6
10. Additional Features .............. Błąd! Nie zdefiniowano zakładki.
Calendar ........................... Błąd! Nie zdefiniowano zakładki. 10.1
Calculator ......................... Błąd! Nie zdefiniowano zakładki. 10.2
Alarm Clock .........................................................................41 10.3
Torch ................................ Błąd! Nie zdefiniowano zakładki. 10.4
World Time ....................... Błąd! Nie zdefiniowano zakładki. 10.5
Network Service ............... Błąd! Nie zdefiniowano zakładki.
10.6
10.6.1 Wireless Application Protocol (WAP) ................................42
10.6.2 SIM Features ....................................................................42
File Manager .................... Błąd! Nie zdefiniowano zakładki. 10.7

7
11. Camera ................................ Błąd! Nie zdefiniowano zakładki.
12. Radio FM ................................ ................................................ 45
13. Multimedia ..............................................................................47
Image Viewer ................... Błąd! Nie zdefiniowano zakładki. 13.1
Video Recorder ................. Błąd! Nie zdefiniowano zakładki. 13.2
Video Player ..................... Błąd! Nie zdefiniowano zakładki. 13.3
Audio Player ..................... Błąd! Nie zdefiniowano zakładki. 13.4
Voice Recorder ................. Błąd! Nie zdefiniowano zakładki. 13.5
14. Settings ............................... Błąd! Nie zdefiniowano zakładki.
Profiles ................................................................................49 14.1
Telephone Settings ........... Błąd! Nie zdefiniowano zakładki. 14.2
14.2.1 Setting Date and Time ... Błąd! Nie zdefiniowano zakładki.
14.2.2 Language ...................... Błąd! Nie zdefiniowano zakładki.
14.2.3 Display .......................... Błąd! Nie zdefiniowano zakładki.
14.2.4 Flight Mode .................... Błąd! Nie zdefiniowano zakładki.
Call Settings ..................... Błąd! Nie zdefiniowano zakładki. 14.3
14.3.1 Blocking Caller ID .......... Błąd! Nie zdefiniowano zakładki.
14.3.2 Call Waiting ................... Błąd! Nie zdefiniowano zakładki.
14.3.3 Call Forwarding ............. Błąd! Nie zdefiniowano zakładki.
14.3.4 Call Barring .................... Błąd! Nie zdefiniowano zakładki.
14.3.5 Advanced Settings ......... Błąd! Nie zdefiniowano zakładki.
M1/M2 Memory ....................................................................54 14.4
Network Settings ................................................................ .54 14.5
Connectivity ...................... Błąd! Nie zdefiniowano zakładki. 14.6
14.6.1 Bluetooth ................................................................ ..........55
14.6.2 Access Point Name (APN) Profile .....................................55
Security Settings ............... Błąd! Nie zdefiniowano zakładki.
14.7
14.7.1 PIN .....................................................................................56
14.7.2 Phone Security .............. Błąd! Nie zdefiniowano zakładki.
Restore Factory Settings .. Błąd! Nie zdefiniowano zakładki. 14.8
15. PC Connections ................... Błąd! Nie zdefiniowano zakładki.
16. FAQ (Troubleshooting) ..........................................................57
17. Safety Precautions ............... Błąd! Nie zdefiniowano zakładki.
18. Warranty .............................. Błąd! Nie zdefiniowano zakładki.
19. Battery Information .............. Błąd! Nie zdefiniowano zakładki.
20. SAR information ......................................................................63
21. Protecting the Environment .. Błąd! Nie zdefiniowano zakładki.
22. CE Marking .......................... Błąd! Nie zdefiniowano zakładki.

8

9
1. Important Safety Precautions
Reading these guidelines minimize the risk of misusing
your telephone.
Do not use your telephone in all areas where the use
of mobile phone is restricted such as at refueling
points or hospitals. The use of mobile phones in such
places might impose danger to others. Do not switch
on your phone if it might interfere with other devices!
Do not use your telephone without hands-free
accessories while driving.
Do not use your telephone in hospitals, airplanes, at
refueling points and near flammable materials.
Telephone emits electromagnetic field that might
negatively interfere with other electronic devices
sensitive to external RF energy, including medical
equipment. A safe distance between a telephone and
implanted medical devices such as a heart pacemaker
should be maintained as recommended by
manufacturers of medical equipment. Users with
implanted devices should read and follow the
instructions by manufacturers of implanted medical
devices. Users with heart pacemakers should not
carry telephones in their front chest pockets and they
should hold a telephone next to the ear opposite to the
medical device in order to minimize the risk of
interference. If they have any reasons to suspect
interference with a pacemaker, they should switch off
the phone immediately.

10
A device and its accessories might contain small parts.
Keep your phone and all parts out of the reach of
children.
Never repair or try to modify your phone by yourself.
Only qualified service is authorized to repair your
phone.
Use only original Maxcom batteries and chargers.
Using any unauthorized accessories could damage
your phone or might cause an explosion.
LIQUID RESISTANCE – your telephone is not water
or liquid resistant. Keep your phone dry.
2. Getting Started
Before switching on your phone you need to correctly
install the Subscriber Identity Module (SIM) card. Pay
close attention not to damage the card while inserting it.
Keep SIM cards away from children.
SIM Card and Battery Installation 2.1
Before inserting a SIM card, make sure your phone is
switched off. The charger should be disconnected as well.
In order to insert the SIM card, first follow the written and
graphic instructions on how to remove the battery:
When your phone is switched off, with your
fingernail pull up the battery cover on the right side
at the bottom of your phone.
Remove the battery by pulling it up with your
fingernail from the top side of your phone.

11
Insert the SIM card into the SIM card socket
with the metal contacts of the card face into the
phone. Make sure the notched corner of the
card is positioned downward as well.
A memory MicroSD card should be inserted below
the SIM card socket. Position the pin to your right,
and lift the pin. Insert MicroSD card so the
contacts of the MicroSD card touch the phone
contacts, close the pin and position the pin back to
your left.
Be careful while using the memory card, especially while
installing and uninstalling it. Some memory cards must be
formatted on a PC before the first use. Export the data
stored on the card in use to other devices to make backup

12
copies, if you use SD cards! Misuse of the card or other
factors might cause damage or loss of data stored on the
cards.
Insert the battery with the contacts +/- face into
the phone,
After installing the battery put the battery cover
back and slightly press the battery against the
back of the phone until it clicks into place.
Charging the Battery 2.2
Note: Use only the original Maxcom battery included in the
package. Using other batteries could damage your phone;
the manufacturer’s warranty does not cover damage of
your phone caused by the use of any unauthorized
accessories. Never plug in the charger with the back cover
open.
In order to charge your phone.
1. Plug the charger into a power outlet.
2. Plug the end of the charger into a jack at the left side
of your phone. A message about connecting the
charger will appear on the display, and the bars in the
battery icon will repeatedly fill to show that the battery
is charging.
3. When the battery is fully charged, unplug the
charger from the power outlet and disconnect it
from your phone. The message Fully Charged will

13
appear on the display, and the battery icon will
disappear.
2.2.1 Desk Adapter
In case of using a desk adapter, first plug the small end of
the wall charger into the jack of the desk adapter, and next
plug the power adapter into a power outlet. To charge the
battery, just position your phone into the desk adapter with
the contacts face into the base. Your phone might be
either open or closed while charging. If the phone is open,
make sure the contacts of the charger touch the contacts
of the phone - if the phone moves slightly forward, the
charging will discontinue and the desk adapter will just
serve as a base.
Note:
o Before connecting the charger, make sure the
phone’s battery in correctly installed,
o Do not remove the battery while charging - doing
this could damage your phone,
o If the battery voltage is too low for your phone to
work, you will see the Power-Off message on the
display, and your phone will switch off
automatically,

14
o If the battery is fully discharged (e.g. due to
leaving a torch on) and you plug in the charger,
you will wait several minutes before a charging
icon will appear.
o
Low Battery Message 2.3
When the battery is low, your phone will emit a warning
tone (if the phone’s current Profile permits warning tones)
and display a low battery message. The message „Battery
critically low” will appear on your display. You will also see
the battery icon on your screen. Recharge the battery
to continue using your phone.
15
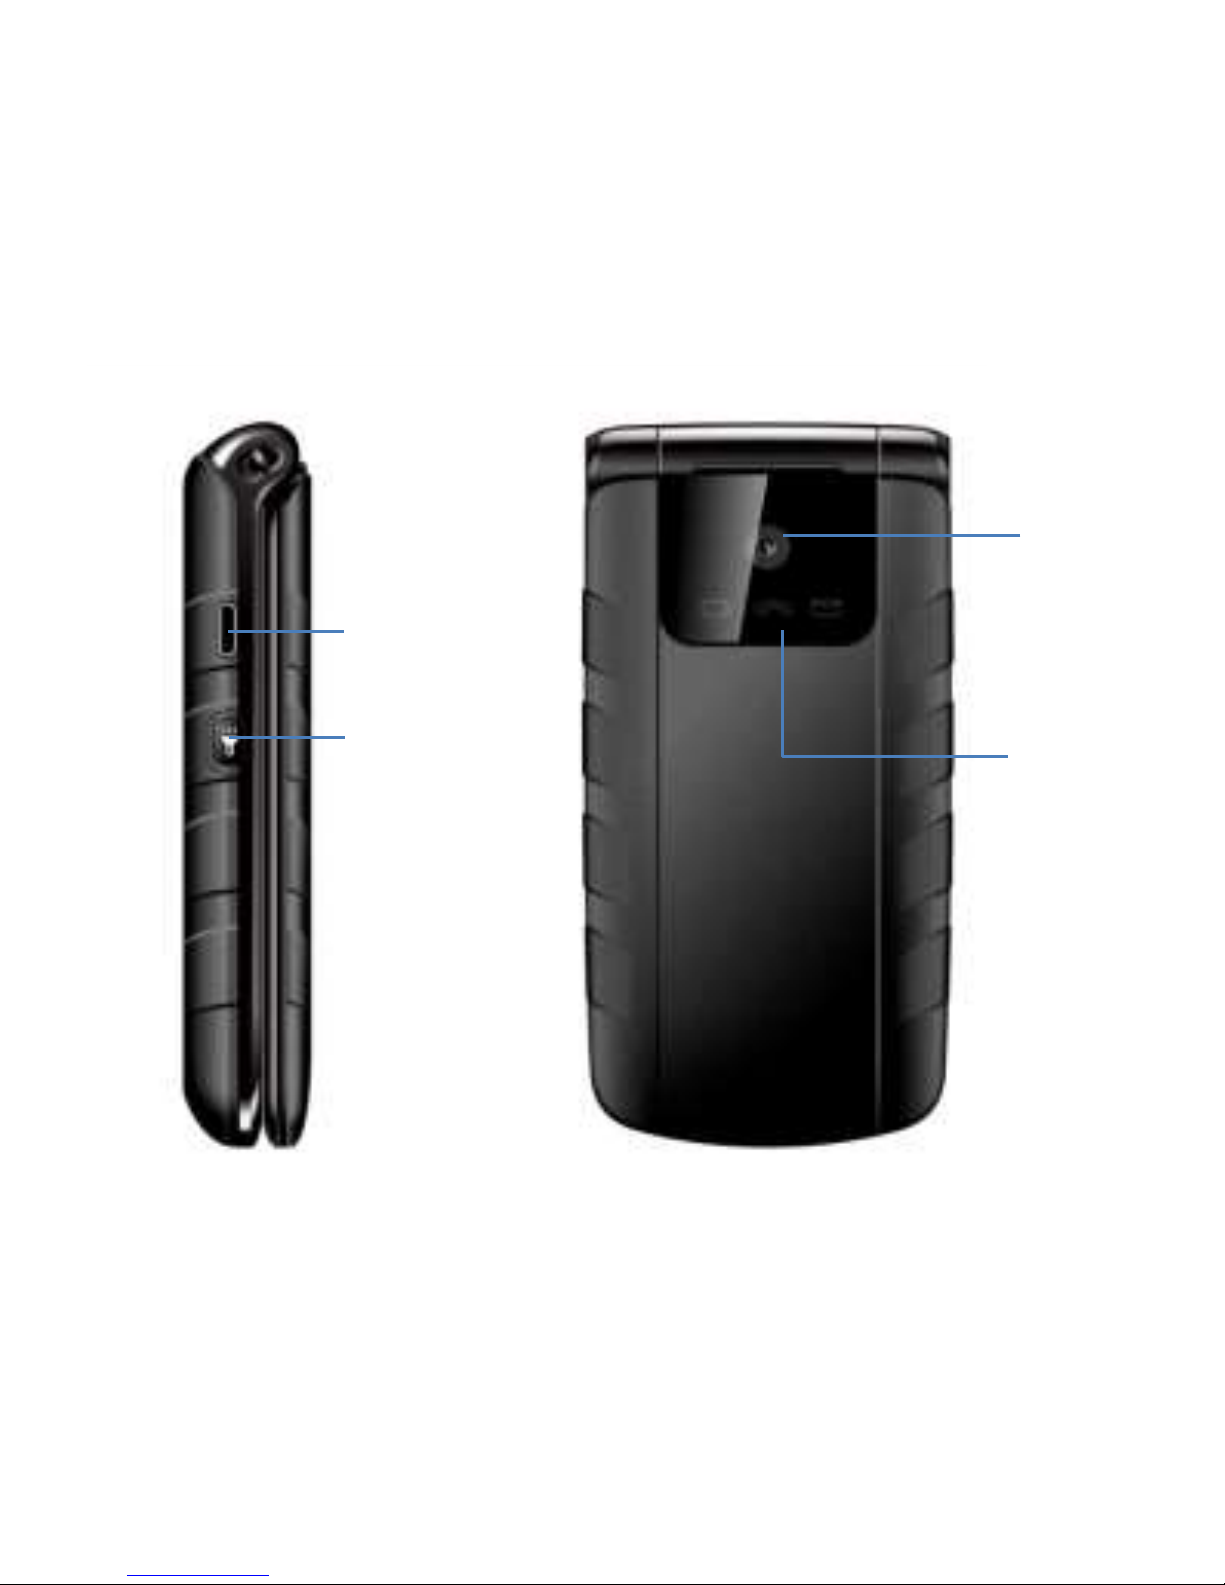
3. Keys
1
Slot for headphones, micro USB, or charger
2
Torch on/off key
3
Camera
4
Low battery, missed call or unread text message
indicator
1 2 3
4
16
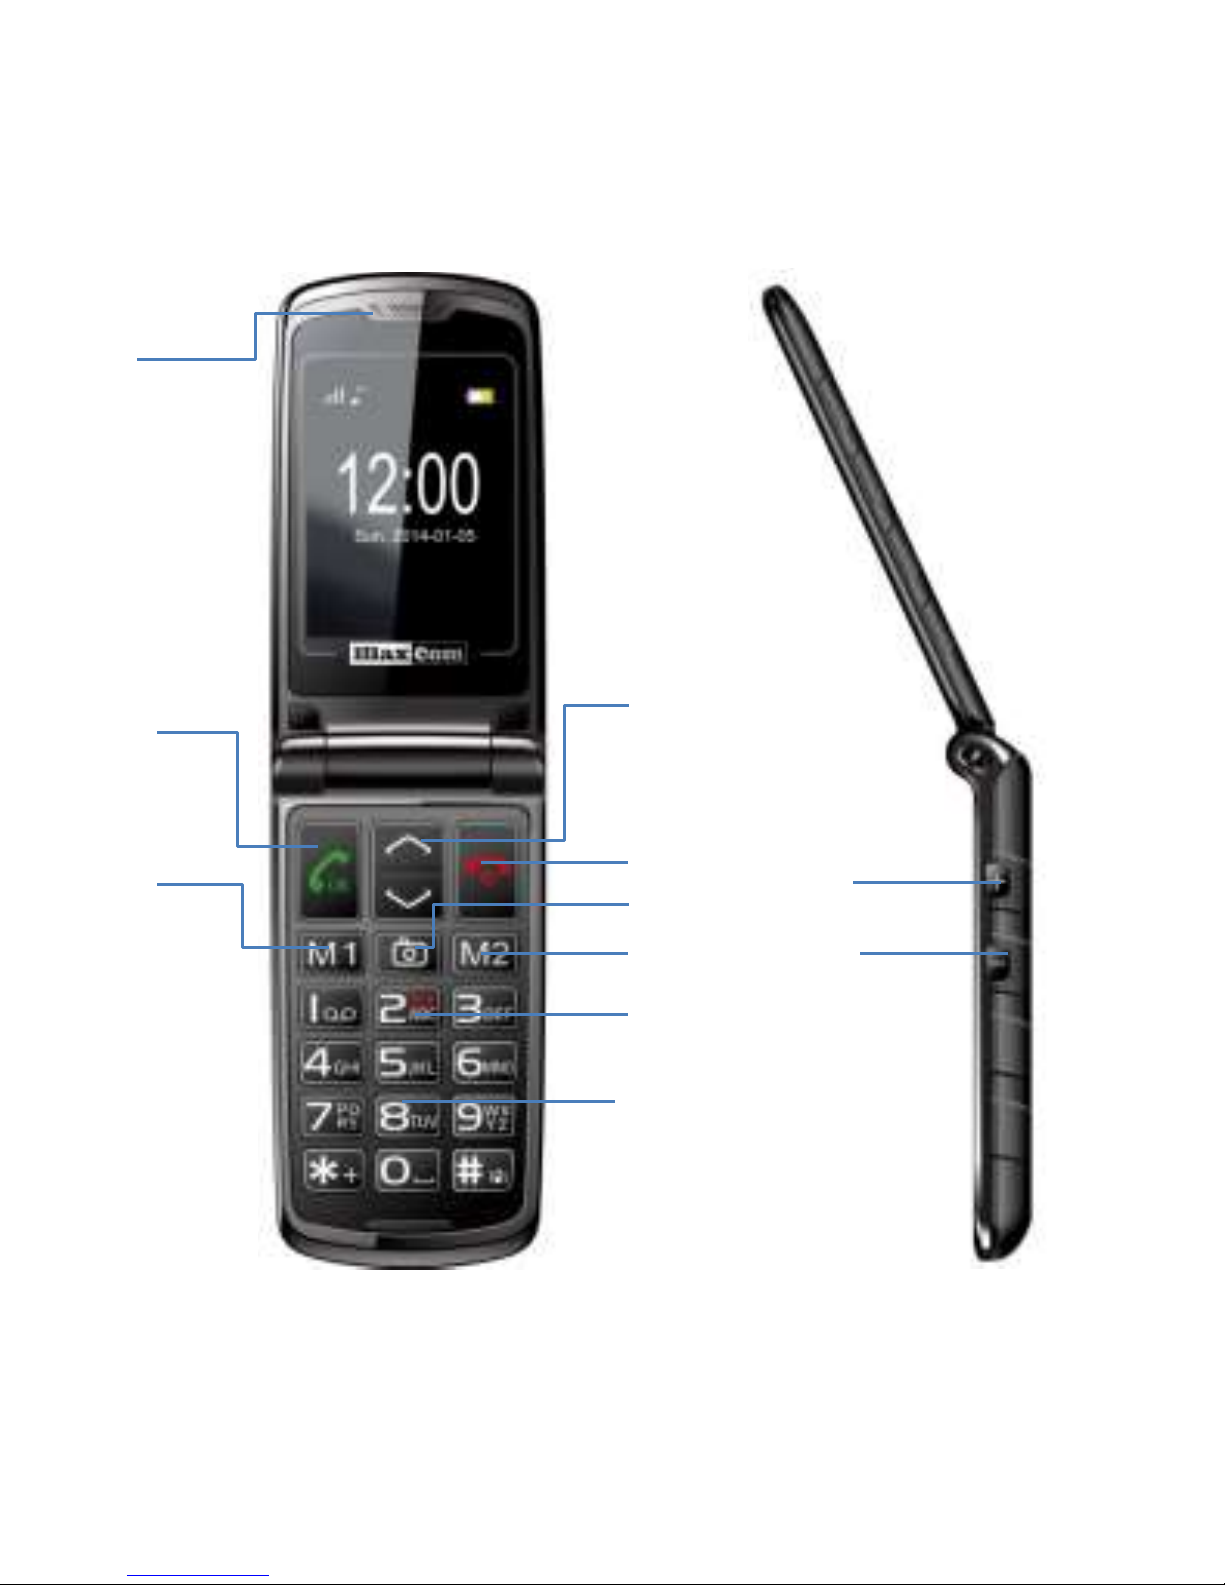
5
Speaker
11
M2 Memory
6
Green receiver
12
ICE MENU
7
M1 Memory
13
Alphanumeric keys
5 6 7 8 9
10
11
12
13
14
15
17
8
UP/DOWN key
14
Volume Up
9
Red receiver/Power
key
15
Volume Down
10
Camera key
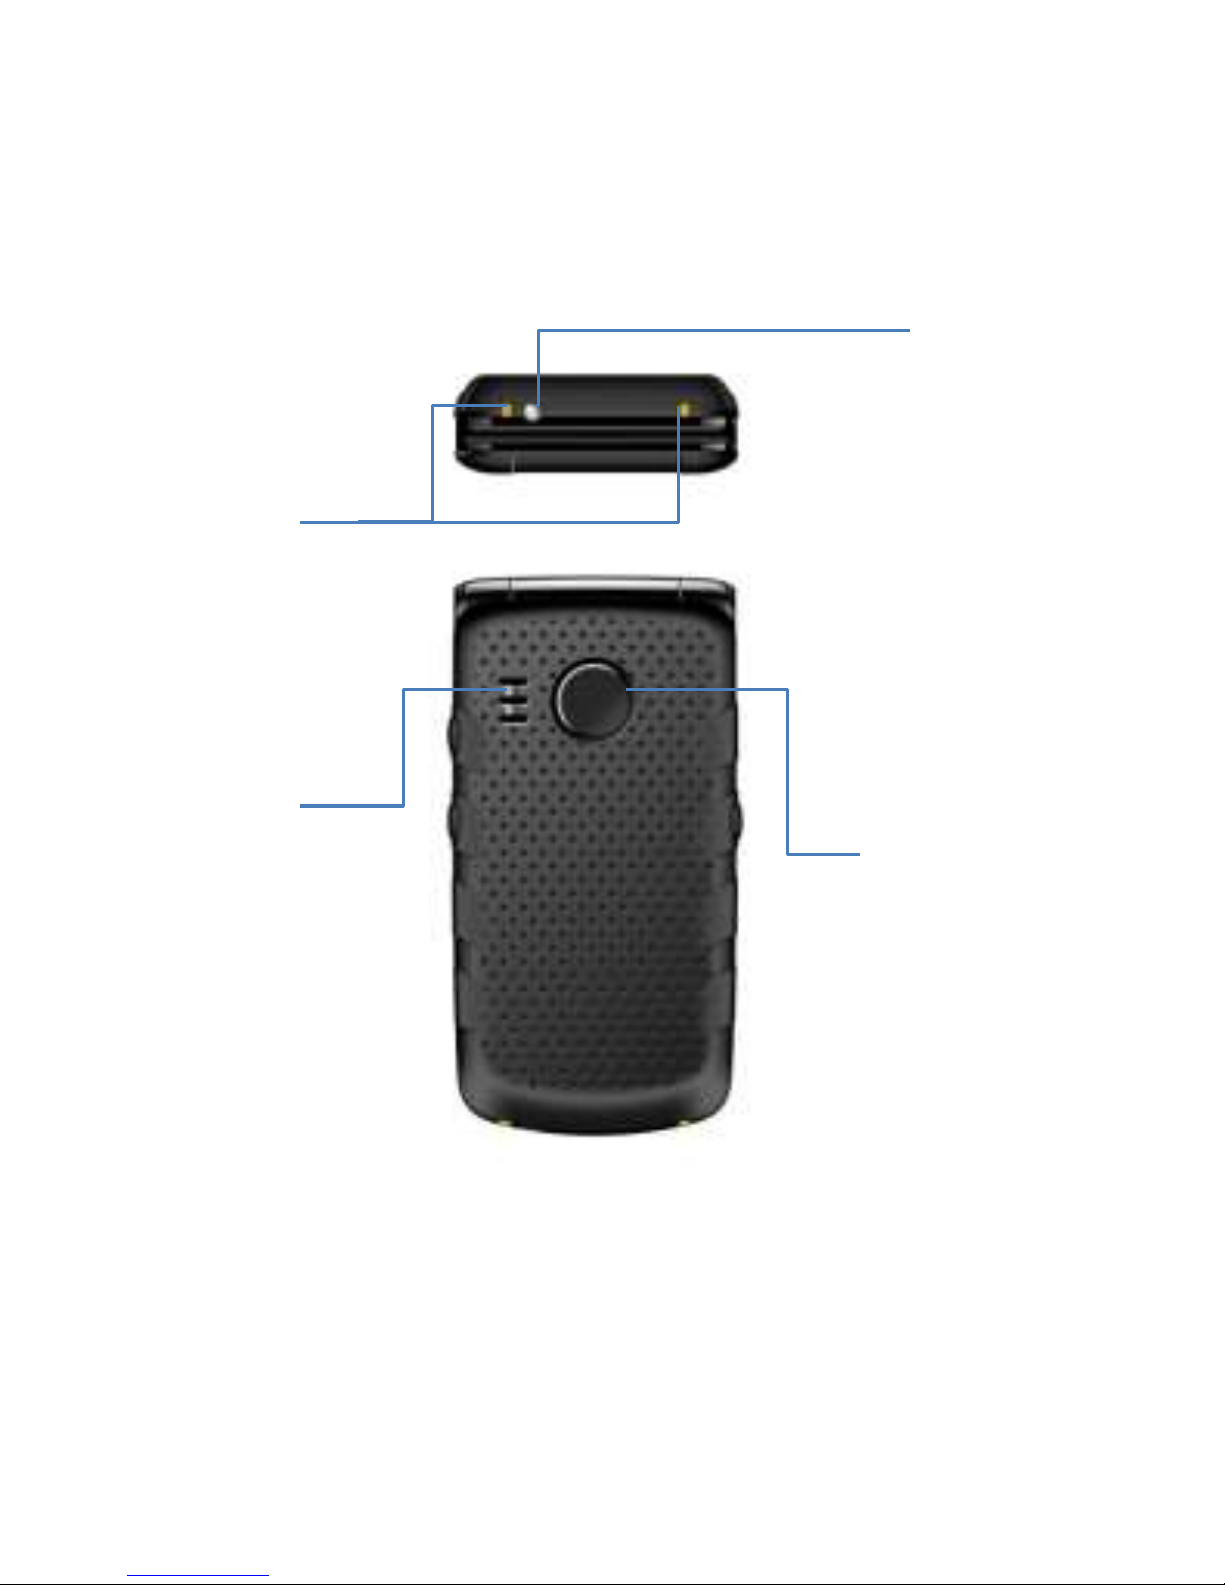
16
Contact for charging by the base
17
Torch
18
Ringtones speaker
19
Emergency key
16
17
18
19

18

19
Basic Keys Functions:
Key
Function
Red
receiver/power
key
Press to return to Idle mode and to
end your phone call. Press & hold to
switch your phone on and off.
Green receiver
Press to make a phone call, in Idle
mode press to enter the Call Log, in
MENU confirm your selection
Klawisze nawigacyjne
UP
MENU
DOWN
Contacts
1
Press: digit 1
Press & hold: voice mail
2
Press: digit 2
Press & hold: Displaying MENU ICE
„Emergency”
0
Digit 0
3-9
Press: digits 3 up to 9
Press & hold: activates
preprogrammed speed dialing
option
*
Entering symbols: *, +, P, W.
For texting: special symbols
#
Press Change of mode
wprowadzania podczas pisania

20
SMS; entering the # key
Press & hold: Turning on and off the
Silent Profile
Side keys
+/-
While calling, press to play the radio
and adjust volume, in Idle mode to
adjust key volume.
Press & hold to mute speakers or
maximize key volume, holding +
while talking initiates recording of
the conversation.
Klawisze funkcyjne
Emergency
key
Press & hold to turn the emergency
procedure: calling and texting the
assigned numbers
Torch
Press & hold while the phone is
open to switch the torch on or off.
Key lock
Press to lock the keys in Idle mode.
If the keypad is locked, press & hold
to unlock the keypad.
Camera
key
Press to switch on the camera, take
a photo
M1 & M2
memory
keys
If a contact is not assigned, press to
enter your contact. If the contact is
assigned press to call your contact.
4. Using Your Phone

21
Switching on Your Phone 4.1
Press and hold a red receiver/power key to switch on your
phone.
If a message asking for a Personal Identification Number
(PIN) code appears, you must enter your PIN. You can
find the PIN in a SIM card starter kit. Upon entering the
code, press the green receiver key to confirm.
When you use your phone with the SIM card for the first
time (or after restoring factory settings) you will get a
chance to enter the date and time, and to import your
contacts from the SIM card to your phone. First, use the
keypad to enter the correct time, press the DOWN key,
use the keypad to enter the correct date, press the DOWN
key, and next press the green receiver key. A message:
„Import all from SIM to phone?” will appear. Select YES if
you want to import all contacts from the SIM card to your
phone’s memory. Otherwise, select NO.
Warning: If you enter incorrect PIN three times in a
raw your SIM card will be locked. You might unlock
your card by entering the PIN Unlock Key (PUK)
code. Entering incorrect PUK code ten times in a
raw will permanently lock the SIM card.
 Loading...