

Page 1
1
User manual
GSM Mobile phone
Maxcom MM715BB with wireless
SOS bracelet
Page 2

2
Contents
1. For your Safety ..................................4
2. Mobile Phone Profile ........................6
3. SOS bracelet ......................................9
4. Preparation before Use ................. 12
Install SIM Card ..........................................12
Install Memory card ....................................13
Install Battery ............................................14
Charge Batte ry ...........................................15
Notices on using the battery .........................16
PIN code ...................................................18
5. Use of Menu Functions.................. 19
Phonebook ................................................19
Messaging.................................................23
Call history ................................................26
In case of emergency ...................................28
Setting SOS bracelet ....................................30
FM radio ...................................................31
Multimedia................................................32
Organizer ..................................................43
Magnifying glass ........................................44
Page 3

3
Calculator..................................................44
Alarm .......................................................45
Bluetooth ..................................................46
Settings.....................................................48
Services.....................................................55
5. Use of USB ...................................... 57
6. Maintenance & Safety................... 57
After sales service .......................................57
Charger and Adap ter Safety..........................58
Battery Information and Care ........................58
General Notice ...........................................58
Troubleshooting .........................................60
7. Abbreviations ................................. 63
Page 4

4
1. For your Safety
For your safety and proper use of the mobile phone,
please read the following guidelines carefully: Do not
switch the mobile phone on when close to chemical
factory, gas station or other explosive objects.
During driving, please use headset for safety
purpose; otherwise in emergency, always stop
the car on roadside to have a call conversation.
Because the use of the mobile phone can cause
interference in the aircraft, never use the mobile
phone in aircraft. Please switch off the mobile
phone before boarding.
Pay special attention to the use of the mobile
phone near heart pacemaker, deaf-aid and some
other me dical equipment. Because the mobile
phone can cause interference with them.
None-original factory’s accessories and parts will
lose guarantee.
Do not dismantle the mobile phone without
permission. In case of failure, please contact the
seller as soon as possible.
Do not plug the cha rger into the mobile phone
and charge without batte ry. Always power off the
Page 5

5
mobile phone when taking out the battery;
otherwise the memory of the phone may be
damaged.
When charging the mobile phone, always keep it
in the place with good ventilation, heat sink and
away from flammable and explosive objects.
In order to avoid demagnetization, always keep
the mobile phone away from magnetic objects
such as CD, credit card etc.
Ensure the mobile phone not to contact any
liquid; once such case occurs, remove the battery
and contact the seller immediately.
Do not use the mobile phone in the environme nt
at too high or too low temperature, never expose
the mobile phone under strong sunshine or too
wet environment. The suitable temperature for
the phone and accessories is 0℃-40℃. The
height to use the phone shall be less than
2,000m.
Do not use liquid or wet cloth with strong
cleanser to clean the mobile phone.
This mobile phone has shooting, videoing and
audio recording functions, which shall be used as
per the related laws and regulations.
Always keep the mobile phone out of children’s
Page 6

6
reach. Do not throw or vibrate the mobile phone
because violent treatment to the mobile phone
may damage the inner circuits and precise
structures.
Please do not discard the waste battery into
general household garbage. Please deal with the
waste battery a ccording to provisions where they
are definitely made.
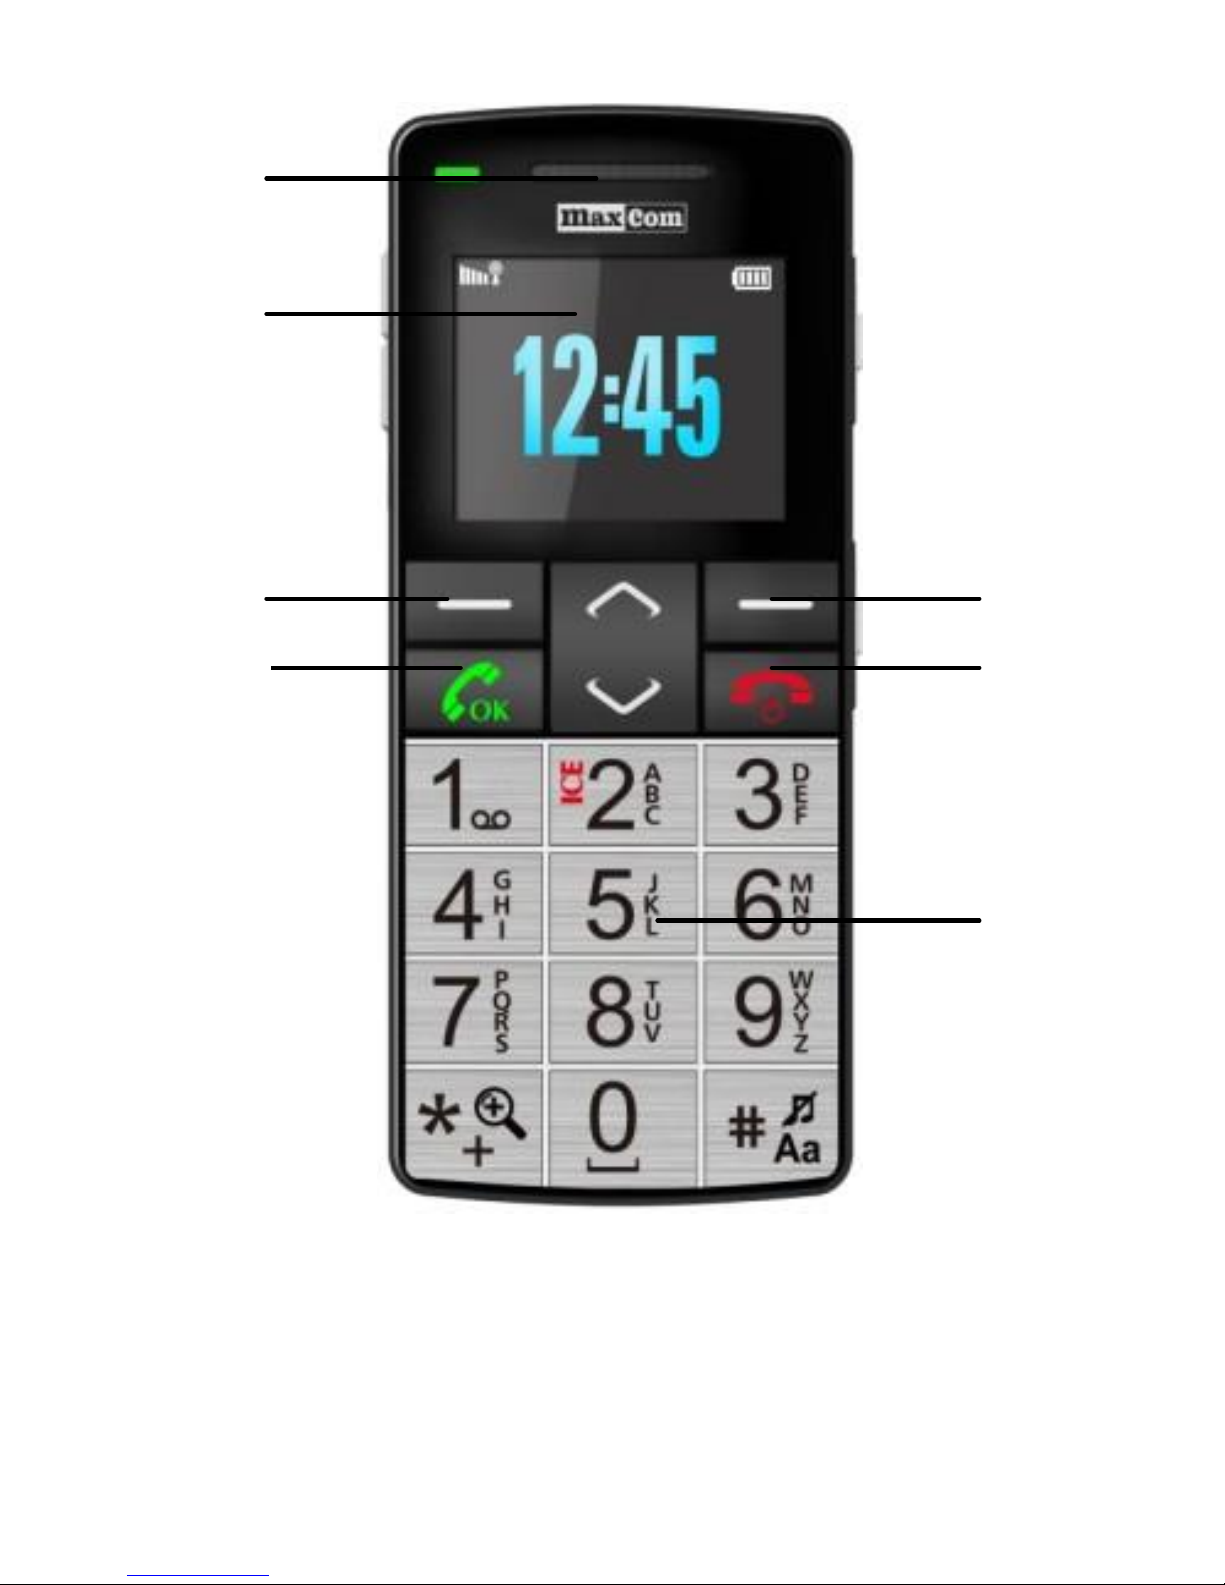
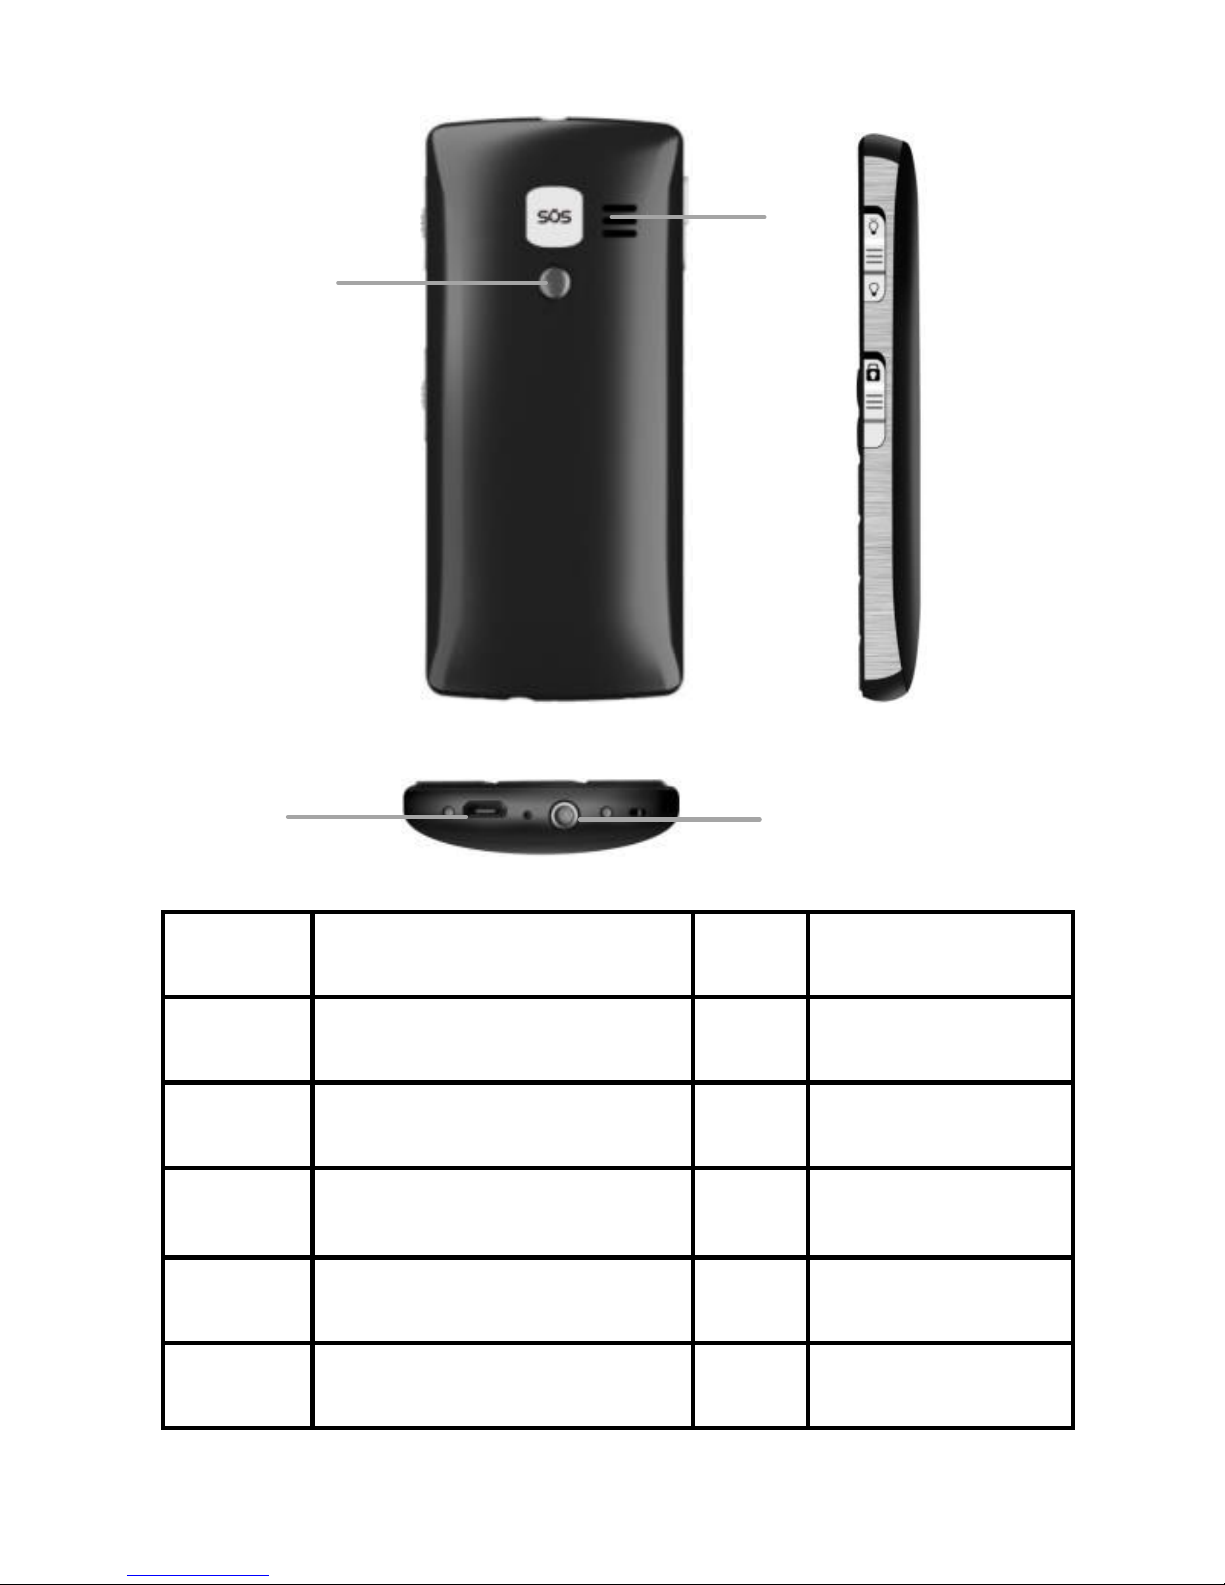
2. Mobile Phone Profile
The following is the front and back of the mobile
phone.
Page 7
7
1
2
3
7
5
6
4
Page 8
8
1
Receiver
7
Keypad
2
LCD
8
Camera
3
Main menu keys
9
Speaker
4
Call key
10
3.5 Jack
5
Retreat key
11
Micro USB
6
End key
9
10
11
8
Page 9
9
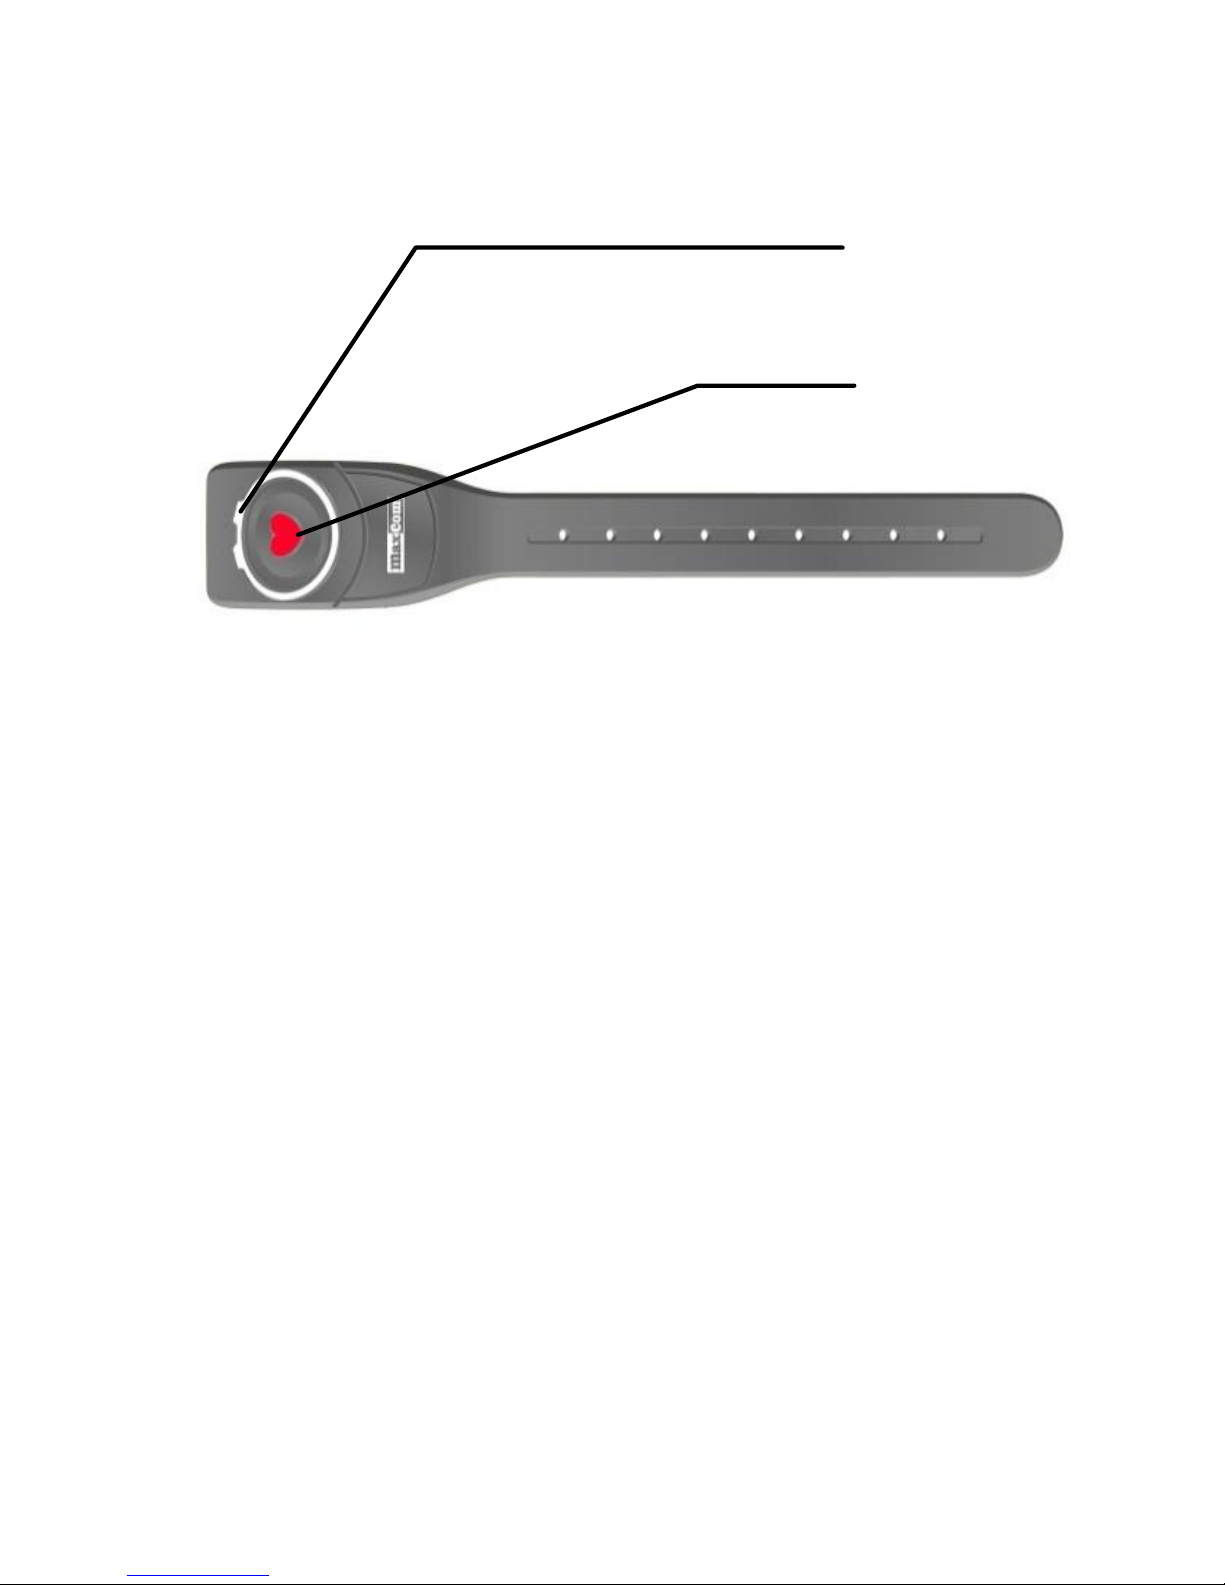
3. SOS bracelet
SOS bracelet is usually registe red to a particula r
phone placed in the package by default. It enables
making SOS call in the case when we do not have the
phone at ha nd. In order to ensure that the SOS
procedure was performed, the bracelet must be
registered and switched on in the phone. See page
30 if the bracelet is not properly paired.
LED diode
SOS button
Page 10

10
Bracelet SOS button
Press and hold SOS button to check the battery state.
Flashing orange diode informs that the bracelet is
ready to be used. If the diode does not light, it means
that the battery is discha rged and that it is necessary
to contact the service for replacement.
Press and hold SOS button for more than 3 seconds to
start SOS procedure.
To end SOS procedure press and hold SOS button on
the phone
Note: Indoors the range of the bracelet is up to 20m,
outdoors up to 100m
The range of the bracelet of the phone depends on
the surrounding (line of the land, thickness of walls,
electromagnetic interferences etc.) and it may be
Page 11

11
significantly limited.
433MHz band, which is used by SOS bracelet, is a lso
used by othe r devices for example by alarm remote
controls, remote controls for garage doors, wireless
doorbells, sockets with remote controls, immobilizers,
alarm detectors and many others.
Because of radio interferences, it can happen that
SOS bracelet will not work in relevant time.
The confirmation that the remote SOS connection
was made can be the alarm signal. That is why, it is
not recommended to switch off SOS alarm in
phone’s menu.
SOS bracelet has a protection against strong streams
of water, for example while taking a shower. It is not
resistant to complete immersion in water.
Page 12

12
4. Preparation before Use
Install SIM Card
When registering mobile phone number, you can
apply for phone number, mobile phone network
service providers and thus obtain SIM (Subscriber
Identification Module) card.
With the SIM card, you can use all functions of
your mobile phone. The SIM card save the pa rameters
needed for communications and personal data,
including PIN (Pe rsonal Identif ication Numbe r) code,
phonebook, short message and other extra system
services.
Warning: Do not distort or scratch the SIM card nor
let it contact static, dust or moisture. If it is lost,
please contact immediate ly your network operator for
help.
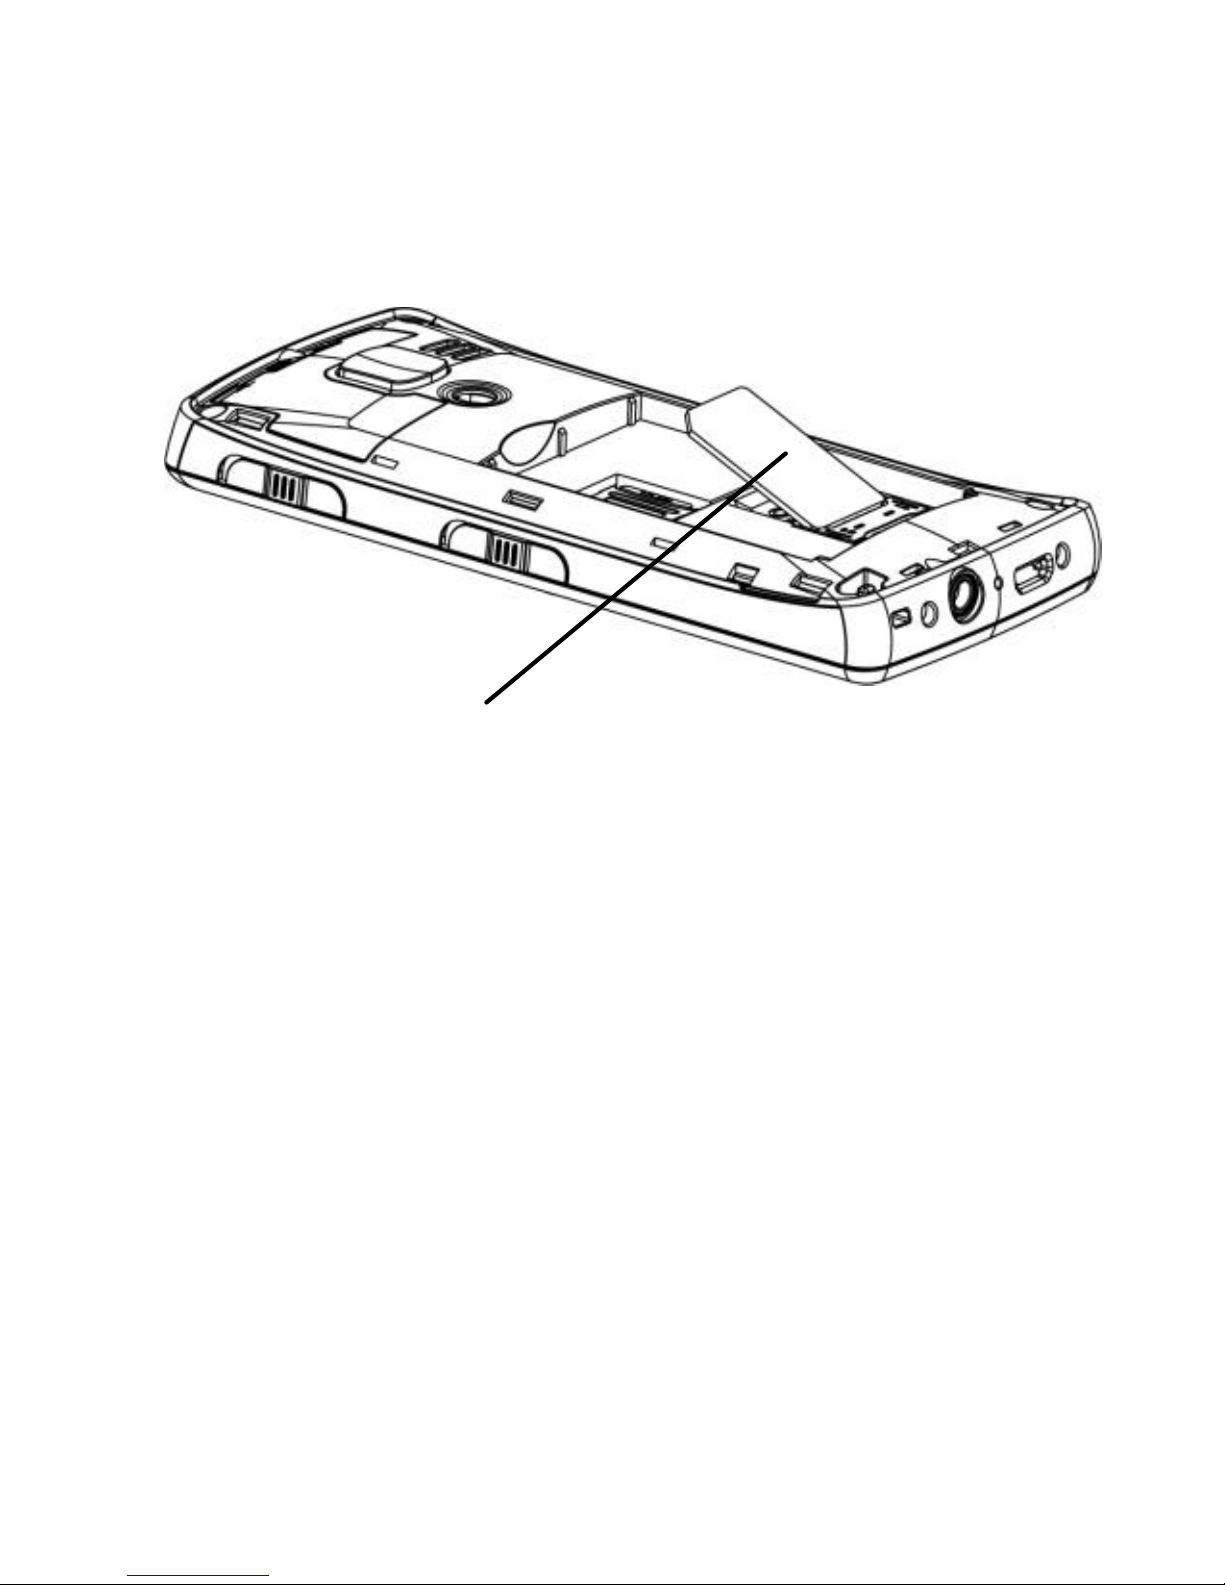
Before SIM card installation, please switch off the
mobile phone. The SIM card is installed on the back of
the mobile phone.
Follow the following diagram to install the SIM
card.
Page 13
13
Note: As the SIM card is small object, keep it out of
children’s touch or prevent children gulping it!
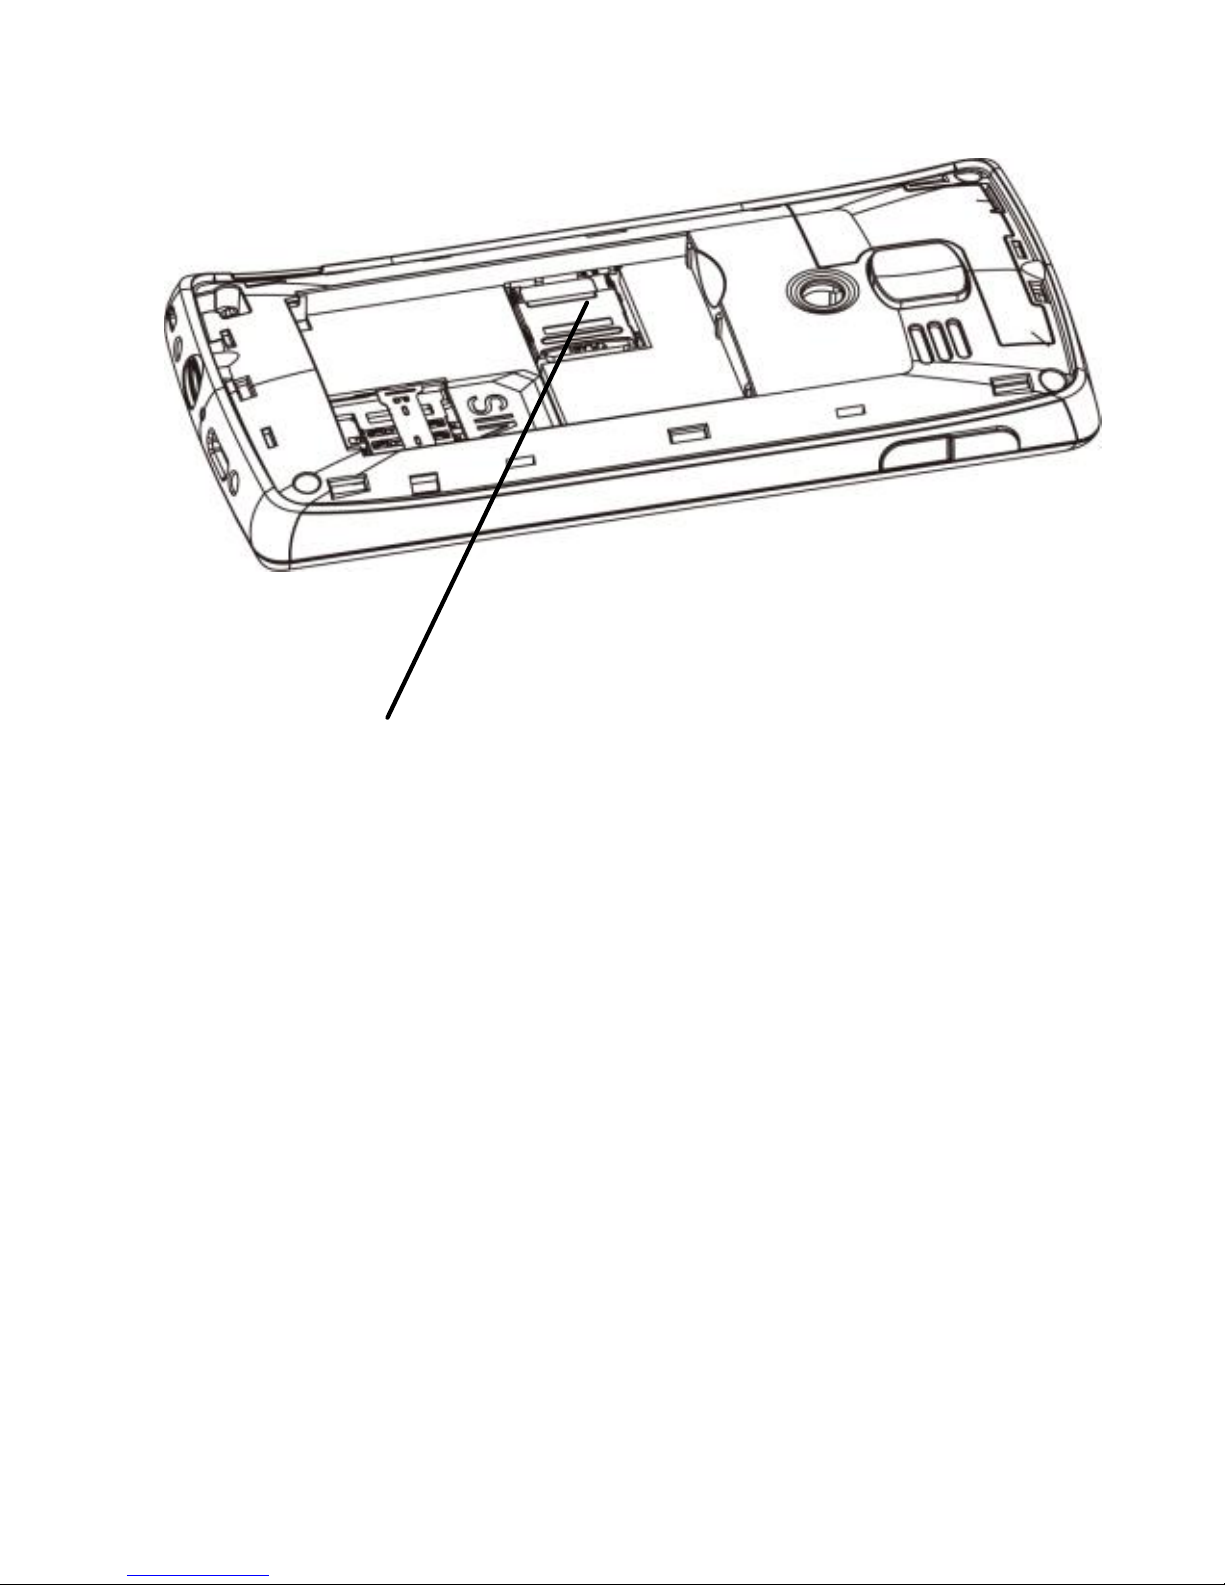
Install Memory card
As the mobile phone does not have enough
storage space, to use some functions, you need to
install a memory card (This mobile phone use T-FLASH
card.)
Install T-FLASH card: Open the back cover to take
out the battery, release the T-Flash card lock, insert
the T-Flash card into its slot, and restore the lock and
the battery before restarting the mobile phone.
Page 14
14
Note: As the T-FLASH card is small object, keep it out
of children’s touch or prevent children gulping it!
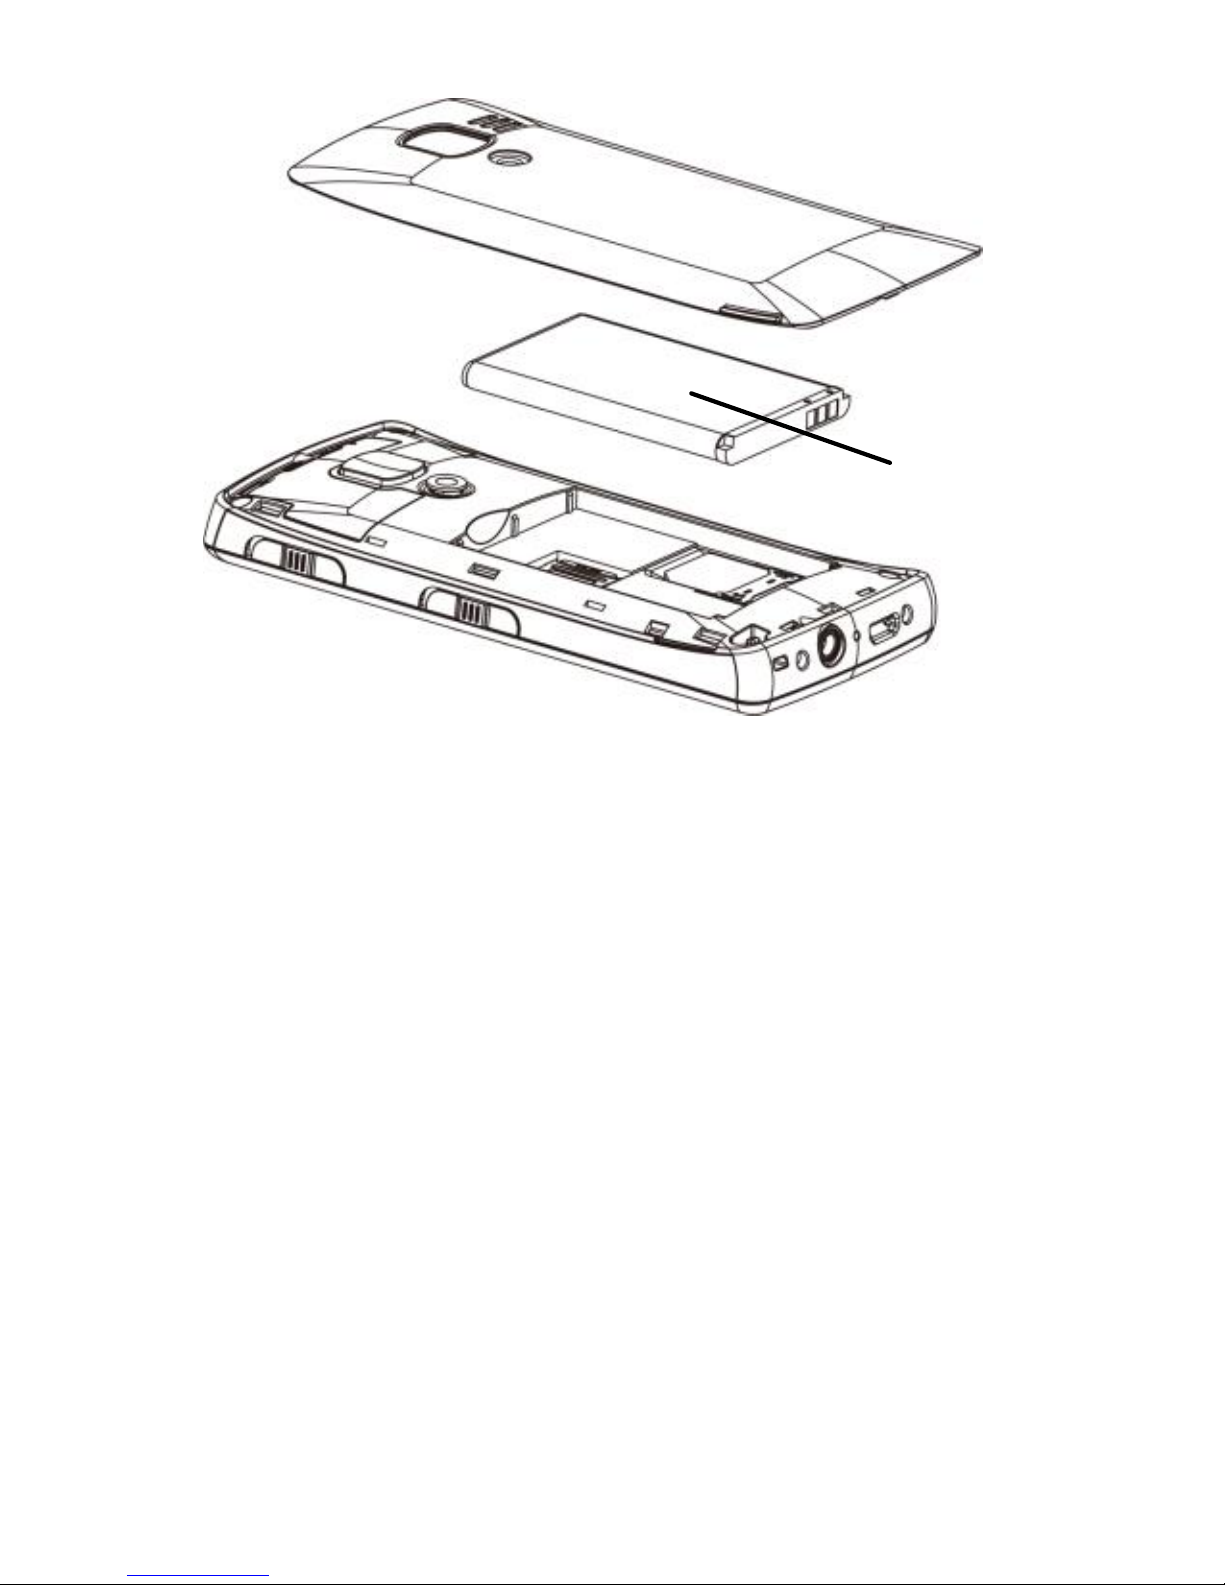
Install Battery
The mobile phone is suitable for original battery
and accessories. When the battery is idle, it is
recommended to put it into the protection box.
Note: Do install the battery as per the diagram so as
prevent the battery contact patch being damaged.
Memory Card
Page 15
15
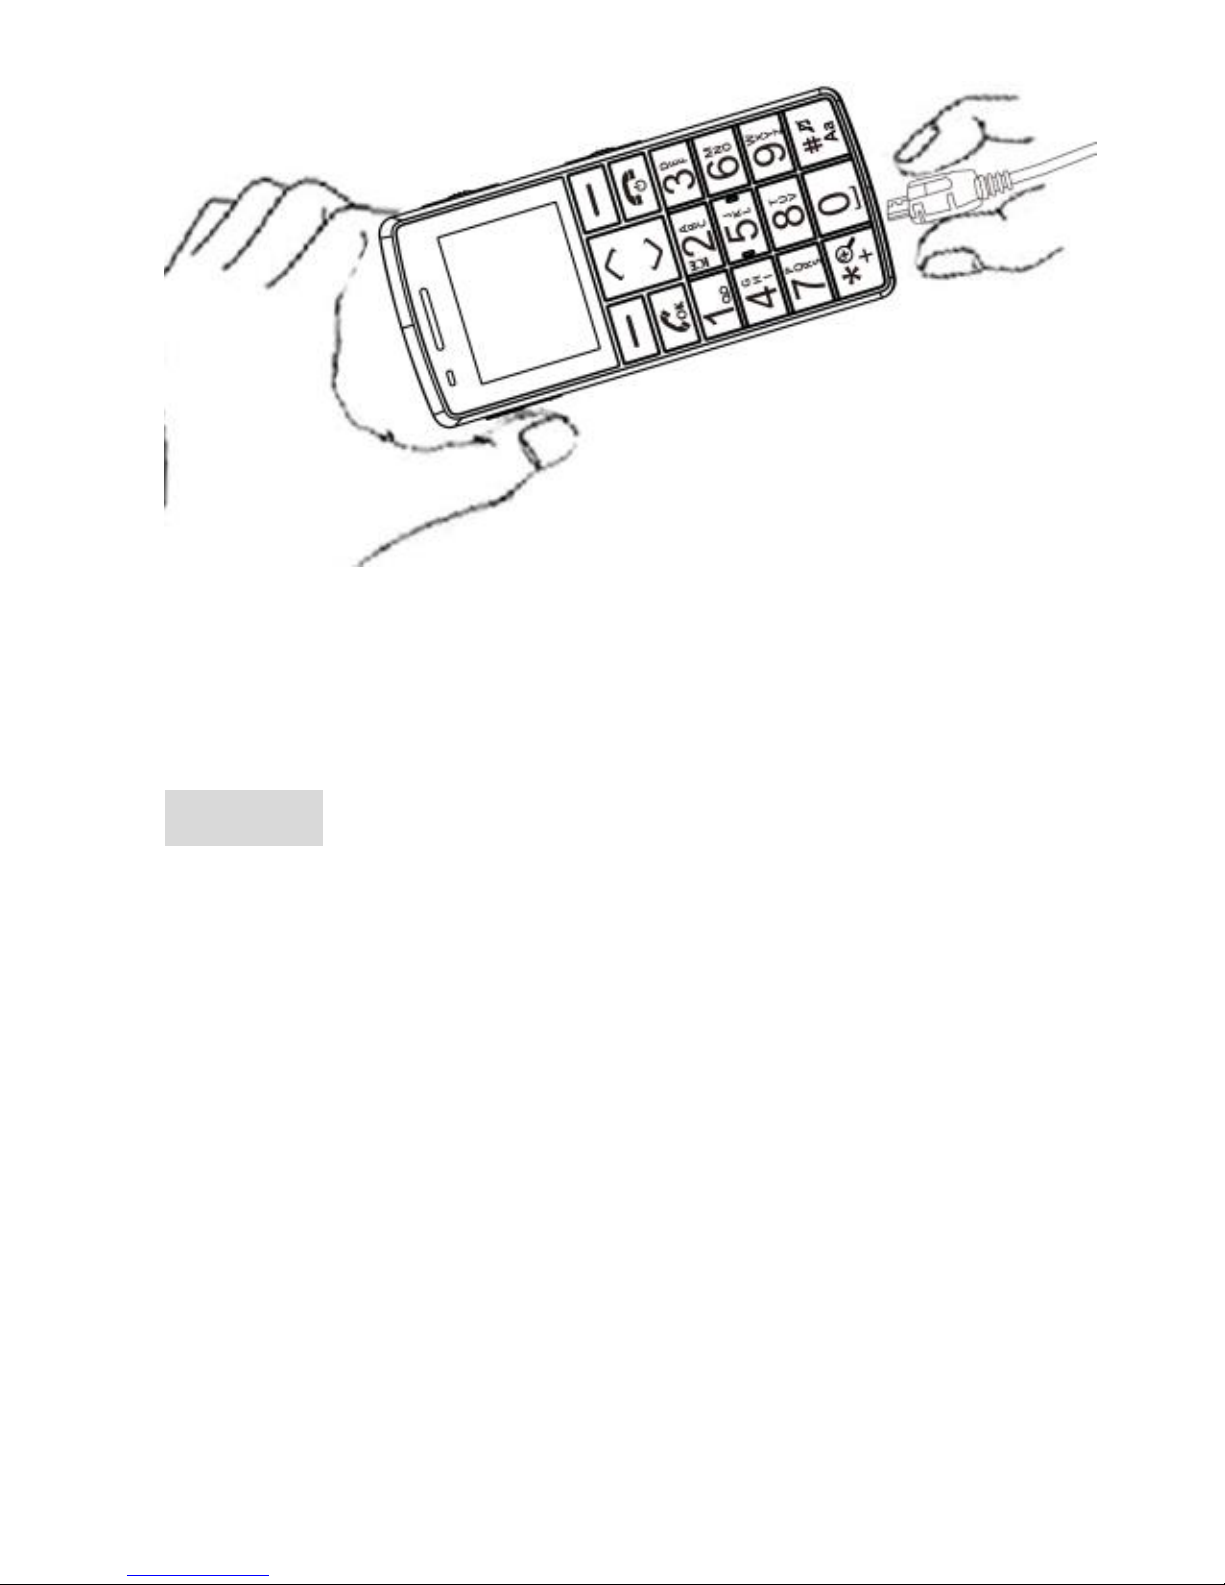
Charge Battery
When the battery is used up, charge it in time.
Over-discharge can damage the battery.
Follow the following diagram to connect the
charger.
Battery
Page 16
16
During charging, the batte ry capacity icon on the
screen flickers from the right to the left. After the
battery is charged full, the icon is full of bars. Slight
heat during charging is normal.
Warning: When a travel cha rger and its accessories
are used to charge the battery, please firstly check if
they are original or recognized by the original
manufacturer. The use of other accessories may
damage your mobile phone and cause risks! Always
use them indoor and dry places.
Notices on using the battery
The performance of the battery is affected by
many factors, including radio barrier network settings,
Page 17

17
signal strength, signal strength, work tempe rature,
chosen and used functions or settings as well as
phone accessories, tone, data or other applications.
For optimal performances, please follow the
rules below:
New batte ry or the battery having been idle for
long need charging for long. The standa rd voltage
scope for the battery is 3.6V-4.2V.
During charging, keep the battery a t room
temperature or similar temperature.
With time passing by the battery will gradually be
worn and thus need longer time to charge. This is
normal. However, after normal charging, if call
duration decreases but charging time increases,
you need to buy anothe r battery from the
original ma nufacturer or authorized by the
original manufacturer. The battery of interior
quality can damage your m obile phone and cause
danger!
If the phone is overused at low batte ry when
charging, there might need a longer time for the
charge indicator to be shown on the screen.
Note: Please dispose the battery according to the
local regulations. Try to recycle the batte ry as possible.
Do not treat the waste battery as common waste.
Page 18
18
Warning: Do not throw the battery into fire so as to
prevent fire. The broken battery may cause explosion.
Warning
Charging the mobile phone by
improper means can cause to explosion.
Always refer to the related regulations for
the disposal of the battery.
PIN code
PIN1 Code: It is the pers onal identification
number used to enter SIM and able to prevent othe rs
using SIM1 without permission. If the mobile phone
has activated the PIN1 code protection, when the
mobile phone is switched on, the screen will display
“Input PIN”. In the process of inputting PIN1 code, the
screen will use “*” to represent the input content.
While obtaining SIM, you can obtain its PIN1 code.
.
PUK Code (8-digit)
To change the locked PIN code, you need to use
PUK (Personal Unblocking Key) code. If these two
codes are not provided together with the SIM cards,
ask the local service provider for them.
Warning: If the PIN code is input wrongly for
Page 19

19
successively three times, the SIM card will be locked.
Please contact the ne twork operator immediately for
help. Attempt to unlock the code may make the SIM
card ineffective forever!
5. Use of Menu Functions
Phonebook
The mobile phone is provided with the business
card folder type phonebook. The information of every
contact saved on the mobile phone include
multi-numbers. Every contact saved into SIM card can
only include name and number. The mobile phone
supports 300 groups of numbers.
Search
Search a contact name in phonebook.
Add new contact
Add your contact into phonebook.
To SIM
Save new entry to SIM card.
To phone
Page 20

20
Name: the contact name for this new entry;
Number: the number for this new entry;
Talking Clip: When there is is an incoming
call, the telephone will automatically enounce
the incoming number. If the incoming call has
recorded name and assigned to the contact,
the telephone will enounce the name for
consecutive 3 times. The user can activate the
function of enouncing the incoming call
number and name. If the user only activates
enouncing the incoming call number, the
telephone will automatically enouncing the
incoming call number when call comes in; If
only activates enouncing incoming call name,
the telephone will automatically enounce the
incoming call name under condition is
recorded.
Speaking Number: with on/off choose.
Speaking Name: with on/off switch, and
you can record name options.
Delete
Delete contacts you choose.
You have two modes marking contacts: all and
one by one.
Page 21

21
Copy
Copy contacts you choose from SIM to phone, or
from phone to SIM.
You have two modes ma rking contacts: all and
one by one.
Move
Move contracts you choose from phone to SIM
or from SIM to phone.
You have two modes marking contacts: all and
one by one.
Blacklist
Reject numbers in blacklist: to turn on/off
rejecting call from blacklist.
Blacklist numbers: You can add contacts to
blacklist here.
Mark several
Send text message: mark contacts you want to
send text message to, then input the message and
send, you can send to contacts you marked at the
same time.
Send business card: mark conta cts you want to
send bus iness card to, you can se nd to contacts you
Page 22

22
marked at the same time.
Caller Groups
You can set call tone, photo and members for
five callers’ groups. Callers’ group member can only
come from the number saved on phone.
Phonebook settings
Favorite numbers: you can add 5 contacts here,
these 5 contacts w ill always on the top of
phonebook.
Storage: You can choose the storage path for the
current number.
My number: You can edit and send my business
card.
Speed dial: set contacts on keyboard from 2 to 9,
you can dial the number while you long press one
of these keys.
Memory Status: You can view the current use
status of the phonebook, including SIM card and
phone memory. The dis play format is
“Used/Total”.
Page 23

23
Messaging
Write Message
You can write message in this menu.
You can enter the phone number or choose a
number from the phonebook to send the SMS.
Inbox
You can see the SMS in the inbox.
V iew: You can view the SMS or MMS and save
photos, audio and annex.
Reply by SMS: You can reply to the rece ived
SMS.
Reply by MMS: You can reply to the rece ived
MMS.
Call sender: You can make a call to the sender by
pressing the key.
Forward: You can directly forward this SMS/MMS
to others.
Delete: Delete the current SMS/MMS.
Delete All: You can delete all SMS in inbox.
Page 24

24
Drafts
If you are edi ting th e message and th e messages are not
sent out im mediately, the messages will b e save h ere. You
can send, edit, delete or have the advanced function.
Outbox
If you are editin g the message and the messages are
not sent out i mmediat ely, th e m essages will b e save h ere.
You can send, edit, delete or have the advanced function.
Sent message
The message are sent and saved here.
Broadcast message
Cell broadcast is a kind of information service
such as weather report, traffic etc that the network
operator sends to the GSM users within certain area.
In dual-SIM mode, you can separately set SIM1 and
SIM2.
Receive Mode: You can ON/OFF such function.
Channel Settings: You can choose, add and edit
and delete channel number.
Languages: You can set the language for the
received information.
Read Message: You cannot read the received
Page 25

25
information until you open such function.
Templates
With it, you can pre-edit s ome common phrases,
which is convenient for quick SMS editing.
Message settings
SMS
Profile Settings: To send SMS, you must input
the SMS center number.
Note: The SMS center number is provided by the
network operator.
Voicemail server: Edit the related options.
Common Settings
o Delivery Report: The ne twork will inform
you whether the other party has re ceived
the SMS and what the time is.
o Reply Path: You can send the reply path to
the network terminal. This function needs
the support from the SMS center.
Memory Status: You can view the capacity of
the SIM card or the phone for SMS.
Preferred Storage: You can set the storage
position (SIM or phone) for SMS.
Preferred connection: Prefer GPRS, Prefer GSM
and GSM only.
Page 26

26
MMS
Data account: Choose one of the media to have
the mms functions.
Common settings: Compose Sending, Retrieval
and Memory status.
Service message
Enable pus h: you can set accept all service
messages or disable.
Enable service loading: Prompt, Auto launch and
Disable.
Call history
Missed calls
With the function, you can view the duration of all
missed calls.
Dialed calls
With function, you can view the duration of all
dialed calls.
Received calls
With the function, you can view the duration of all
received calls.
Page 27

27
Delete call logs
With the function, you ca n delete “Dialed calls”,
“Missed calls”, “Received calls” and “All calls”. Please
make sure need to delete the call logs before to do
this function.
Note: The actual call duration and service time in the
bill of the se rvice provider may be different from
them, which depe nds on the network functions,
accounting rounding and tax etc.
Call timers
This needs the s upport of the network service
provider.
Last Call: W ith this function, you can view the
duration of the last call.
Dialed calls: W ith this function, you can view the
duration of all calls.
Received calls: With this function, you can view
the duration of the received calls.
Reset all: W ith this function, you can reset all the
records of the calls.
Page 28

28
GPRS data counter
Last Sent: You can view the sending traffic of last
link.
Last Received: You can view the reception traffic
of last link.
All Sent: You can view the sending traffic of all
links.
All Received: You can view the rece ption traffic of
all links.
Reset Counter: You can clear all link traffic.
In case of emergency
You can save 5 emergency contact person’s phone
number,when the eme rgency happe ns you can long
press the SOS back of the mobile phone, the mobile
phone will send SMS automatically or make phone
call one by one from the emergency phone number
list you have set.
Owner info
You can write your name, decease, allergy and
blood group here.
Page 29

29
Emergency contacts
You can set 5 contacts here. The contacts would
receive your message or call while the emergency
function is running.
Emergency button
To switch the emergency button on/off.
Emergency SMS
Send SMS config: turn on/off sending SMS to
emergency contacts.
Emergency SMS content: the message you want
to send while the emergency function is running.
Emergency alarm
To turn on/off the alarm while the emergency
function is running.
Emergency Communication
To turn on/off calling the contacts while the
emergency function is running.
Page 30

30
Setting SOS bracelet
Switching off SOS bracelet
You may switch on/off SOS bracelet.
In order to do this in MENU-> In the case of
emergency.-> SOS bracelet->State->Switch on/off
Switching off the bracelet is connected with
switching off the receiver in the phone and it
automatically lengthens the time of battery
operation. If the bracelet is switched off it
cannot make a remote SOS call.
Checking logged SOS bracelet
To check whether any bracelet is logged select
MENU-> In the case of emergency-> SOS
bracelet->Logged
If a message “0x0 connected” appears, it means
that no bracelet is logged to the phone. If there is
an ID in the message for example 0xFDDEE1, it
means that bracelet with the identification
FDDEE1 is logged to the phone.
Logging in/out SOS bracelet
To log out SOS bracelet press
MENU-> In the case of emergency-> SOS
Page 31

31
bracelet->Log out the bracelet and press LFK to
confirm
To log in SOS bracelet press MENU-> In the case
of emergency-> SOS bracelet->Log in the brace let
and press and hold SOS button of a bracelet
FM radio
Enter into the FM radio interface, “Back” and
“Options” will be shown on the bottom.
Click “Options” to view channel list, search
channels and setting.
- Channel list:
FM channel list, click “options” to compile and
play the current channel.
- Manual input:
To input any FM channel that you.
- Auto search:
To search channel automatically.
-settings:
To switch playing FM radio on the background
on/off.
Page 32

32
Multimedia
File Manager
You can manage photos, MP3 and folders.
[Phone]-- The storage body is phone.
[Open]: You can open Audio, Images, Photos, My
Music and Video folders.
Received
Audio—Audio folder
Play: You can play the selected content.
Forward: You can send audio to Profiles, MMS,
e-mail and SMS.
Details: You can see the date and size of the
file.
Rename: You can rename the folder.
Copy: You can copy the file into Audio, Images,
My Music, Photos, Video or specified folders.
Move: You can move the file into Images, My
Music, Photos, Video or specified folders.
Delete: You can delete the current record.
Delete All files: You can delete all records in all
Page 33

33
current folders.
Sort by: You can rank files as per name, type,
time and size or choose “None”.
Ebook:
Images—Images Folder
View: You can see the current image.
Forward: You can send images to screen saver,
Switch-on Cartoon, Switch-off Cartoon, Phonebook,
MMS and SMS etc.
Details: You can see the date and size of the
file.
Rename: You can rename the folder.
Copy: You can copy the file into Audio, Images,
My Music, Photos, Video or specified folders.
Move: You can move the file into Audio, My
Music, Images, Photos, Video or specified folders.
Delete: You can delete the current record.
Delete All files: You can delete all records in all
current folders.
Sort by: You can rank files as per name, type,
time and size or choose “None”.
Page 34

34
My Music—MP3 Folder
Play: You can play the current MP3.
Forward: You can send music to Profiles, MMS
and SMS.
Details: You can see the date and size of the
file.
Rename: You can rename the folder.
Copy: You can copy the file into Audio, Images,
Photos, Video or specified folders.
Move: You can move the file into Audio,
Images, Photos, Video or specified folders.
Delete: You can delete the current record.
Delete All files: You can delete all records in all
current folders.
Sort by: You can rank files as per name, type,
time and size or choose “None”.
Photos—Photo Folder
View: You can see the current photo.
Edit: You can enter photo artist and edit the
desired photo.
Forward: You can send photos to screen saver,
Page 35

35
Switch-on Cartoon, Switch-off Cartoon, Phonebook,
MMS, e-mail and SMS etc.
Details: You can see the date and size of the
file.
Rename: You can rename the folder.
Copy: You can copy the file into Audio, Images,
My Music, Photos, Video or specified folders.
Move: You can move the file into Audio, My
Music, Images, Video or specified folders.
Delete: You can delete the current record.
Delete All files: You can delete all records in all
current folders.
Sort by: You can rank files as per name, type,
time and size or choose “None”.
Video—Video Folder
Play: You can play the current video.
Forward: You can send videos to Phonebook,
MMS, e-mail, Switch-on Cartoon and Switch-off
Cartoon.
Details: You can see the date and size of the
file.
Page 36

36
Rename: You can rename the folder.
Copy: You can copy the file into Audio, Images,
My Music, Photos, Video or specified folders.
Move: You can move the file into Audio,
Images, My Music, Photos or specified folders.
Delete: You can delete the current record.
Delete All files: You can delete all records in all
current folders.
Sort by: You can rank files as per name, type,
time and size or choose “None”.
Create Folder: Under the root directory, you can
create a new folder to save more detailed files.
Format: Formatting can clear all files in the mobile
phone and newly created folders. After formatting,
you need to restart the mobile phone and the Audio
folder and Images folder will restore automatically
and Photos folder will automatically occur after the
first photo is taken.
Memory Card
Open: You can open the files in the memory
card.
Page 37

37
New Folder: Under the root directory, you can
create a new folder to save more detailed files.
Format: You can format all files in the memory
card.
Remove: You can remove the desired memory
card from the mobile phone safely.
Camera
With this function, you can use the inbuilt
camera to take photos. The lens of the camera is
located on the back of the s lide and the screen is used
as the viewing window. All photos taken are in JPG
form. After downloading the photos onto PC, you
need some software to view them.
If the storage space of the mobile phone is
insufficient to store the taken photos, it is necessary
to delete some old photos or other files in “File
Management” function list to release more space.
Description of Mobile Phone Options:
Page 38

38
Options
Description
Photos
To view the saved photos.
Camera Settings
Shutter Sound: sound 1, sound 2, sound 3 & off
EV: EV-2——EV+2.
Anti-flicker: 50Hz (default), 60Hz.
Contrast: High, Medium & Low
Delay Timer: 5s, 10s, 15s or Off.
Cont.Shot: 1 Shot, 3 Shot, 5 Shot and Off.
Image
Settings
Size: 80*60,160*120,320*240,640*480,
Quality: Good, Normal, Low.
White
Balance
Auto, Daylight, Tungsten, Fluorescent, Cloudy,
Incandescence.
Scene
Auto, Night.
Effect
Settings
Normal, Grayscale, Sepia, Sepia green, Sepia blue,
Color invert.
Storage
Phone, Memory Card.
Restore
You can restore the recorder to factory settings.
Page 39

39
Image viewer
All photos taken are saved in the album.
Options
Description
View
You can view the selected photos.
Image info.
You can look up the image info.
Browse Style
There are two browse styles, i.e. list and matrix.
Send
As multimedia message; as email; via Bluetooth.
Use as
You can send photo to wallpaper ,Screen saver,
power on display, power off display, call picture
Rename
You can rename the selected photo.
Delete
You can delete the selected photo.
Delete All files
You can delete all photos in the album.
Sort by
For convenience of search, you can rank them as
per name, type, time and size or choose “None”.
Storage
You can choose photos storage path (to phone
or memory card).
Video recorder
Press the OK key to start video recording. The
duration of recording depends on the time limit set
and file management capacity. Entering the options,
you can have the following settings:
Page 40

40
Options
Description
camcorder
Settings
You can set White Balance, EV, Night Mode
and Banding for your recorder so as to have
high-quality videos.
Video Settings
You can set Cartoon Quality.
Effect Setting
There are 6 options available.
Storage
Choose to store in Phone or Memory card.
Restore Default
You can restore the recorder to factory
settings.
Video player
It supports the videos in AVI. In such mode, you
can have the following ope rations to the specified file
in AVI.
Options of the player
Options
Description
Play
It supports the videos in AVI and will not be limited
by file size. Click the play interface to play.
Send
As multimedia message; as email; via Bluetooth.
Rename
You can rename the specified video.
Delete
You can delete the specified videos.
Delete All
files
You can delete all files.
Page 41

41
Sort by
For convenience of search, you can rank them as
per name, type, time and size or choose “None”.
Storage
You can choose video storage path (to phone or
memory card).
Audio player
To download music, you must insert the T-Flash
card into the mobile phone, switch off the m obile
phone, connect the mobile phone and PC with USB
cable, then the PC will detect the new hardware and
create a new mobile HD. Download the chose n MP3
file to under "My Music" of the mobile disk rathe r
than in such folders as Audio, Images and Photos;
otherwise, the file cannot be played. (Only the music
in MP3, AMR and MIDI are supportable).
WOW HD™ significantly improves the playback
quality of audio, delivering a dynamic 3D
entertainme nt e xperience with deep, rich bass and
high frequency clarity for crisp detail.
Description of audio player options:
Options
Description
Play
Play the current chosen music.
Details
View file name, track, SQ, file
Page 42

42
size, music duration, music name,
singer, music special a music type
etc.
Refresh list
Enter the tracklist and update it
(e.g. the deleted music in the file
management will not disappear
until update is conducted.
Settings
Play Settings: Tracklist path,
automatic tracklist, repeat,
shuffle ,background play.
Sound recorder
After choosing “Sound Recorde r” and press “OK”
to enter, you can the previous record files. Press
“Options” to have the following operations:
New record: You can record new files.
List: You can view all files.
Settings: You can set the storage position for
record f iles, including phone and memory card.
Also you can set the format of the record file,
including AMR and WAV. As followings, you can
set audio quality either Low or High.
Page 43

43
Organizer
Calendar
With this function, you can set the alarm clock to
remind you of your schedule and record your
schedule. Roll the highlight block to the desired date
and then the current date will be highlighted in green.
If the date is set with memo function, then this date
will be highlighted in red. To view all memos of one
day, press OK to see the schedule. You can have the
following operations:
V iew: You can view the schedule of the date
where the cursor is on and set the time, date,
content and whether to activate ala rm on this
schedule of todays. When editing the schedule,
you can choose alarm type with the left and right
direction keys. In addition, you can have such
operations as Delete, Delete and Add on the
schedule.
V iew all: You can view the entire schedule of the
date where the cursor is on and set the time,
date, content and whether to activate alarm on
this schedule.
Add event: you can select task type as reminder,
meeting, course.
Delete event: You can delete the task as the
Page 44

44
phone guides.
Jump to Date: You can move to the calendar of
the specified date.
Go to today: V iew the details of the current day.
Go to weekly view: You can go to weekly and
monthly view.
Tasks
You can have such operations as Create Memo,
Browse, Add, Edit, Delete, Delete All and Send on
memos.
If you have set alarm for the memo, when the
set time is reached, the mobile phone will ring and
display the memo content.
Magnifying glass
You can use the camera as a magnifying glass.
Calculator
The upper direction key for “+” and the lowe r
direction key for “-”, the left dire ction key for
"×" and the right direction key for "÷";
Press the clear key to clear the latest inputs or
results digit by digit; press the clear key long to
clear all content or result;
Page 45

45
Press “OK” key to obtain the result.
Note: The precision of this calculator is limited and
can be used for simple calculation.
Alarm
The time format for the alarm clock is identical
to that of clock. When the mobile phone is off, the
alarm clock can still work provided the battery is
sufficient. The system has set 5 alarm clock options
and the defaulted is of f. You can activate one option
or all options according to the actual demand. Every
alarm clock option can set inde pendent time and date.
When the time is reached, the mobile phone will give
out alert tone and flicker the current time and date
on the screen. Press Stop to stop alarm clock; press
Sleep, then the mobile phone will pause ringing and
continue after 4min.
If alarm time is reached but the mobile phone
is switched off, then the mobile phone will be switch
on automatically and ring. If Stop is pressed, then the
mobile phone will ask you whether to switch on the
mobile phone. Press “No” to switch off the mobile
phone and “Yes” to register at the network and switch
on the mobile phone.
Page 46

46
Bluetooth
The mobile phone supports the Blue tooth
function. You can use Bluetooth wireless technology
to set wireless connection with other compatible
devices, including m obile phone, compute r, headset,
in-car accessories etc. W ith Bluetooth function, you
can send photo, video segment, audio segment,
personal business card and memo. You can a lso
establish wireless connection with the compatible PC
to transmit f iles and connect to web by dialing
number via SIM.
As the device s upporting Bluetooth wireless
technology performs communications via wireless
wave, you need no keeping the device opposite to
other devices but keep the distance between tem not
more than 10m (about 33”). However, Bluetooth
connection can be affected by wall or other electronic
equipments etc. To ensure mutual ope ration betwee n
this device and other devices supporting Blue tooth
wireless technology, cons ult the manufacture r to
confirm whe ther the device by it is compatible with
this device. Do not use Bluetooth function in hospital
and aircraft etc.
Bluetooth Menu
Power: Before using Bluetooth function, you
Page 47

47
need to activate this option. When Bluetooth function
or other functions are being used, allowing this
function to operate in the back desk will consume
more power. It is recommended to close this function
when it is idle.
V isibility: After this option is activated, other
peripheral devices supporting Bluetooth wireless
technology can see your device and its name via
search. After the step audio play service is activated,
this device will be unable to be searched.
My Device: After entering this option, you will
see the Bluetooth devices compatible with the mobile
phone. Entering options, you can have necessary
operations on the desired Bluetooth device or search
the incompatible Bluetooth devices.
Search audio device: W ith this function, you can
inquiry audio device. For other devices, enter My
Devices to search.
My name: Edit the name of the device here.
Advanced: Before using Bluetooth function, enter
this menu to have corresponding settings. If your
mobile phone’s Bluetooth function is not activated,
you can have activation confirmation.
Audio Path: You can leave the audio on my
device or send to other hand-free devices via
Page 48

48
Bluetooth. If using Bluetooth to have a call, set
this path as hand-free devices.
My address: V iew the details of My address.
Settings
Phone Settings
In such menu, you can set phone language,
standby wallpaper, time etc.
T ime and Date: W ith this function, you can set
city, time and date format and the time of
specific place.
Set Home City: You can set different
cities.
Note: This option must be used together with auto
update of time and date. Auto update of time and
data cannot be conducted unless the network
supports.
Set T ime and Date: You can set the
current time and date.
Set Format: You can se t the display
format for time and date.
Note: If the batte ry is taken from the mobile phone or
the batte ry is used up f or long time, when sw itching
Page 49

49
on the mobile phone afte r reinstalling the battery or
charging the battery, you need to reset the time and
date.
Special Note: In the area forbidding using mobile
phone (such as cabinet), you m ust confirm to
inactivate this function before ente ring this area s o as
to prevent accident.
Schedule Power on/off: You can set the time for
schedule Power on/off.
Language: You can choose the desired language
for phone display.
Pref.input method: Choose the preferred input
method.
Display: You can set standby menu display as
wallpaper, power on display, power off display,
Show date and time
Dedicated key: Here you can change the
shortcut function for dedicated key.
Call settings
[SIM Card settings]
[SIM Card settings]
Call Waiting: You can set this function On or Off. The
call hold and multi-party call cannot be active unless
Page 50

50
this function is activated. This needs network support.
Call Divert: This is a kind of network function, which
cannot be used unless you apply to the network
operator for it. With this function, you can divert calls
meeting he conditions to another number.
Name
Description
Divert All
Voice Calls
The network will divert all voice
calls without conditions.
Divert if
Unreachable
When the ne twork cannot find
your mobile phone (switched-off
or out of the service area), it will
divert the calls.
Divert if no
Answer
When the mobile phone does
not answer the call, the ne twork
will automatically divert it.
Divert if Busy
When you are on line, the
network will divert the call.
Divert All
Data Calls
Network support needed.
Cancel All
Diverts
Cancel all divert functions.
Call Barring
Outgoing Calls:
Page 51

51
1. All Calls: You can bar all outgoing calls.
2. International Calls: You can bar internationa l
calls.
3. International Calls Except To Home PLMN:
When abroad, you can dial the calls of the
current country and the original country (the
service providers allows to do so).
Incoming Calls:
1. All Calls: You can bar all incoming calls.
2. When Roaming: You can bar all calls except
the calls of the local service area.
Cancel All: You can cance l call barring settings
and dial/receive calls normally.
Change Barring Password: You can apply to the
network to change the password for call
barring.
Line Switching: You can choose Line 1 or Line 2.
Closed User Group: This function needs
network support. Please consult the local
operator for details.
[Advance settings]
Blacklist: you can add the contacts to blacklist.
Auto redial: You can set it as On or Off. After the first
automatic redial fails, you can have at most ten times
to connect a phone number.
Page 52

52
Call T ime Reminder: You can set one alert tone or
periodic alert tone for several round minutes during
call conversation so that you can understand call time.
You can turn off the alert tone.
Reject by SMS: Off/On.
Answer mode: you can choose Any key to answer a
call or/and Auto answer when headset mode.
Profiles
Your mobile phone is provided with multiple
profiles so that you can customize some settings in
different cases for different events. Firstly, as per your
personal hobby, have individualized settings on profile
and then activate it. You can have such profiles as
General, Silent, Meeting, Outdoor, My style, headset
and Bluetooth.
The content can be edited at every profiles mode as
following:
Alert type: You can choose any one from Ring,
V ibration, V ibra tion and Ring ,V ibration then
Ring as the current ring mode.
Ring Type: You can choose any one from single,
repeat and ascending as the current ring type.
Incoming call: you can choose ring type as your
phone guides you.
Page 53

53
Ringtone volume: set the volume of the Ring.
Message: set message Tone.
Message Volume: Set the volume of message
Ring.
Keypad: Click or Tone.
Keytone volume: set the volume of keypads.
Power on: Set tone for power on.
Power off: Set tone for power off.
System alert: On/Off.
After individualized settings, choose “Activate” in
“Select” to start profiles.
Note: After the headset is inserted into the mobile
phone, the mobile phone will automatically change
into headset profile. Unplug the headset to return to
the previous profile.
In standby state, you can press # key to switch to
silence profile and again to the previous profile.
Network Settings
Network Selection: You can search the network
again. Select your favorite network and choose to
register the network automatically or manually.
GPRS connection: You can set a conne ction way
you want.
GPRS transfer pref.: You can set the preferred
Page 54

54
registered network for SIM card.
Security Settings
SIM Lock: You can set SIM lock (PIN code) as
on/off. When this option is chose n, it is
necessary to input PIN code for every insert of
the SIM card.
Phone Lock: You can set it as On or Off. It is a
password of 4-8 digits and the defaulted one is
1122. You can change it.
Auto Keypad Lock: You can set it as On or Off.
The mobile phone has keypad lock function.
When it lasts certain time, the keypad will be
locked, including such options as off, 5s, 30s,
60s, 1min and 5min.
Restore Factory Settings
You can restore the factory settings of the mobile
phone. The factory setting password is 1122.
Shortcuts
Here, you can choose shortcut function menu
options; after specifying the shortcut f unctions for
the two function keys, press the shortcut function key
to enter this menu.
Page 55

55
Data accounts
GSM Data— You can set the number, name DNS etc.
GPRS— You can set the name, APN, user name,
password, Auth. type, DNS.
Note: For re lated charging standard and detailed
settings, please consult the loca l network service
operator. Different network service providers provide
different services. Consult the local network operator.
Services
Internet service
Homepage
Start the website chosen in the connection
settings file.
Bookmarks
WAP, Enter the options menu and have the
following operations on the bookmark:
Go to: Log into the chosen website.
Edit: Edit the chosen bookmark name
and website.
Page 56

56
Send: Send the bookmark as text
message or multimedia message.
Delete: Delete the chosen bookmark.
Delete all: Delete all bookmarks.
Add bookmark: Add new bookmarks.
Serch or input URL
Input the website to be logged in.
Recent pages
Record the latest 10 web pages browsed.
Settings:
Homepage: Default/User defined.
Data account: Automatic, China Mobile
Internet, China Mobile MMS and China Mobile
WAP.
Browser options-- You se t whe ther to display
images during waiting time and when browsing
WebPages.
Preferences: you can set T imeout, Show picture,
Cache and Cookies.
Security settings: you can have a view about
trusted certificates as your phone guides you.
Page 57

57
5. Use of USB
Notices before use
Always connect and stop USB device correctly.
Never use W indows formatting command to
format the mobile disk of the mobile phone;
otherwise, it will be damaged severely.
USB work environment:
o W indows2000 / XP.
o For other operation systems, the
connection between PC and the mobile
phone cannot be conducted unless USB
driver is installed.
6. Maintenance & Safety
Please read and observe the following information for
safe and proper use of your phone and to prevent
damage. Also, keep the user guide in an accessible
place at all the times after reading it.
After sales service
You are kindly referre d to the Warranty Card provided
Page 58

58
in the sales package box.
Charger and Adapter Safety
Charger and adapter are designed for indoor use only.
Battery Information and Care
o Please dispose of your battery properly.
o Do not disassemble or short-circuit the battery.
o Keep the battery’s metal contacts clean.
o Recharge the batte ry after long periods of
non-use to maximize battery life.
o Battery life will vary due to usage patterns and
environmental conditions.
o The self-protection function of the batte ry cuts
the power of the phone when its operation is in
an abnormal status. In this case, remove the
battery from the phone, reinsert it, and turn the
phone on.
General Notice
o Using a damaged battery or placing a battery in
Page 59

59
your mouth may cause serious injury.
o Do not place items containing magnetic
components such as a credit card, phone card,
bank book, or subway ticket near your phone.
The magnetism of the phone may damage the
data stored in the magnetic strip.
o Talking on your phone for long period of time
may reduce call quality due to heat generated
during use.
o When the phone is not used for a long period
time, store it in a safe place with the powe r cord
unplugged.
o Using the phone in proximity to receiving
equipment (i.e. TV or Radio) may cause
interference to the phone.
o Do not immerse your phone in water. If this
happens, remove the battery and take it to
Authorized Service Center.
o Do not paint your phone.
o The data saved in your phone might be deleted
due to ca reless use, repair of the phone, or
upgrade of the software. Please backup your
important phone numbers. (Ring tones, text
messages, voice messages, picture, and videos
could als o be deleted.) The manufacturer is not
liable for damage due to the loss of data.
Page 60

60
o Do not turn your phone on or off when the
phone is close to your ear.
Troubleshooting
Phenomena
Possible Causes
Unable to
switch on
1. Does the battery have
power?
2. Is the battery placed
correctly
SIM failed
1. The SIM card is dirty. Clean
it.
2. Reinstall the SIM card.
3. The SIM card is damaged.
Replace it.
Poor signals
Check the signal strength icon on
the screen. If the icon contains 4
bars, it indicates the signal is the
strongest; if below 1 bars, it
indicates the signal is very poor.
Page 61

61
Unable to
dial out
1. Maybe you have set Hide
My Caller ID but your
network operator does not
provide this service for you.
2. Strong interference exists
around you.
3. Maybe you have activated
the call restriction function.
4. Maybe you have activated
Line 2 but your network
operator does not provide
this service for you.
Unable to
charge the
battery
1. The battery may discharge
too much; so it cannot be
charged until it is connected
for certain time.
2. Its performance has
worsened.
Page 62

62
Unable to
register to
the
network
1. Too weak signals or strong
interference.
2. SIM card installed properly?
Bad contact or SIM card
damaged? If the SIM card is
broken, please contact the
network operator to replace
it.
Unable to
access
service
menus.
Maybe the SIM card does not
support service function.
Only part of
the photo
set as
standby
photo can
be seen.
The size of the photo may be too
big. The re commended size is
220*176
Page 63

63
7. Abbreviations
SMS
Short Message Service
EMS
Enhanced Message Service
SIM
Subscriber Identity Module
GSM
Global System for Mobile
Communication
PIN
Personal Identity Number
PUK
PIN Unblocking Key
IMEI
International Mobile Equipment
Identity
CB
Cell Broadcast
GPRS
General Packet Radio Service
MMS
Multimedia Message service
Card
1
Host card (the card inserted in SIM1
slot)
Card
2
Slave card (the card inserted in SIM2
slot)
 Loading...