

Maxcom MM462BB Instruction Manual
Instruction manual
GSM cell phone
Maxcom MM462BB

2

If you need technical assistance, call the following hotline
Set content:
GSM cell phone
Charger
Battery 600mAh
Instruction manual
Warranty card
Desktop charger
Keep the package, it may be useful in
the case of possible transport.
Keep the receipt, it is inseparable part
of warranty.
(+48) 32 325 07 00 or serwis@maxcom.pl
Our website:
http://www.maxcom.pl/
Note – The phone operates in GSM 900/1800 network. Before
switching the phone on insert the SIM card correctly.
3

Large highlighted keys
SOS button (Emits an alarm and automatically calls and
sends SMS to a previously specified number)
ICE button (Press and hold „2 ICE” button to display the
contacts you may call in the case of an accident as well as
the information about the user)
Large type, simple Menu
Hands-free function
Phonebook -300 entries
Receiving and sending SMS
Quick dialing of 7 numbers
Displaying the time of a call
Loud ringtone (10 melodies)
Camera
Torch
Calculator
Alarm clock
Bluetooth
Micro SD card slot
Standby time: to 120 hours*.
Talking time: to 3 hours*
Weight:91g
Dimensions: 106 X 53 X 15mm
*depending on conditions and GSM network signal
4

5

Table of contents
1 Buttons localisation .................................................................11
2 Rules of safe use ...................................................................14
2.1 GSM network .......................................................................15
3 Installation ..............................................................................15
3.1 SIM card installation ............................................................16
3.1 Micro SD card installation ....................................................17
3.2 Battery installation ...............................................................18
3.3 Battery charging ..................................................................19
3.3.1 Desktop charger (option) ..................................................20
3.4 Low battery alarm ................................................................20
3.5 Switching on the phone .......................................................21
3.6 Switching off the phone .......................................................22
3.7 Keylock ................................................................................22
3.8 Standby mode .....................................................................23
3.9 Icons on the display ................................ .............................24
3.10 Basic functions of buttons ....................................................24
4 Using MENU ...........................................................................26
5 Torch ......................................................................................27
6 ICE button...............................................................................27
7 Emergency calls .....................................................................27
7.1 SOS button ..........................................................................28
7.1.1 Emergency procedure ......................................................28
7.1.2 Emergency contacts .........................................................29
7.1.3 Emergency text.................................................................30
7.1.4 SOS information /Information about the owner..................30
7.1.5 Deactivation of SOS alarm................................................31
8 Calls .......................................................................................31
8.1 Making a call .......................................................................31
6

8.1.1 Quick dialing .....................................................................32
8.2 Hands free mode .................................................................32
8.1 Volume regulation ................................................................32
8.2 Conference ..........................................................................33
9 SMS........................................................................................34
9.1 Writing SMS ........................................................................34
9.2 Changing the method of entering the text ............................35
9.3 Sending messages ..............................................................36
9.4 Saving messages ................................................................37
9.5 Reading SMS ......................................................................37
9.6 SMS boxes ..........................................................................38
9.6.1 Inbox ................................................................................38
9.6.2 Sent messages .................................................................38
9.6.3 Drafts................................................................................39
9.7 SMS templates ....................................................................39
9.8 Voice mail ............................................................................39
9.9 SMS settings .......................................................................40
9.9.1 Number of message center ...............................................40
9.9.2 Validity of the message .....................................................40
9.9.3 Report of delivery .............................................................41
9.9.4 Save sent messages ........................................................41
9.9.5 Memory settings ...............................................................41
9.10 Deleting all messages ..........................................................41
9.11 Memory state .......................................................................41
10 Phonebook .............................................................................42
10.1 Scrolling contacts ................................................................43
10.2 Creating new contacts .........................................................43
10.3 Deleting contacts .................................................................44
10.4 Copying contacts .................................................................44
10.5 Transferring contacts ...........................................................45
7

10.6 Programming quick dialing ...................................................45
10.7 Adding contact to the black list.............................................46
10.8 Other settings of the phonebook ..........................................46
10.8.1 My number .......................................................................46
10.8.2 Numbers of services .........................................................47
10.8.3 Memory status ..................................................................47
11 Call list ....................................................................................47
11.1 Deleting entries ....................................................................48
11.2 Call time ..............................................................................48
12 Multimedia ..............................................................................48
12.1 Camera ...............................................................................49
12.2 Camera recording ................................................................50
12.3 Picture browser ....................................................................50
12.4 Music player ........................................................................51
12.5 Dictaphone ..........................................................................51
13 FM radio .................................................................................51
14 Alarm clock (alarm) .................................................................52
14.1 Alarm clock settings .............................................................52
14.2 Canceling the alarm clock ....................................................53
15 Applications ............................................................................53
15.1 SIM services ........................................................................53
15.1 Scrolling files .......................................................................54
15.2 Torch ...................................................................................54
15.3 Calendar .............................................................................. 54
15.4 Calculator ............................................................................55
15.5 Bluetooth .............................................................................56
16 Settings ..................................................................................56
16.1 Call settings .........................................................................57
16.1.1 Transferring a call .............................................................57
16.1.2 Waiting call .......................................................................58
8

16.1.3 Call barring .......................................................................58
16.1.4 Hiding the number ............................................................59
16.1.5 Additional call settings ......................................................59
16.2 Phone settings .....................................................................60
16.2.1 Time and date ..................................................................60
16.2.2 Phone language ...............................................................60
16.2.3 Automatic switching on/off the phone ................................61
16.2.4 Factory settings ................................................................61
16.3 Display settings ...................................................................61
16.3.1 Wallpaper .........................................................................61
16.3.2 Display contrast ................................................................62
16.3.3 Display highlighting ...........................................................62
16.3.4 Automatic keylock .............................................................62
16.3.5 Highlighting .......................................................................62
16.3.6 Signaling events ...............................................................63
16.4 Security settings ..................................................................63
16.4.1 PIN ...................................................................................63
16.4.2 PIN 2 ................................................................................63
16.4.3 Phone lock........................................................................64
16.4.4 Privacy protection .............................................................64
16.4.5 Locking the keys with red receiver button .........................65
16.4.6 Fixed numbers ..................................................................65
16.4.7 Black list ...........................................................................66
16.5 Profile settings .....................................................................66
16.5.1 Ringtone settings ..............................................................66
16.5.2 Volume settings ................................................................67
16.5.3 Vibration settings ..............................................................67
16.5.4 Keys and warnings sounds ...............................................68
16.6 Network selection ................................................................68
17 Connecting to the computer ....................................................68
9

18 FAQ (Solving problems) ..........................................................70
19 Use and safety terms ..............................................................73
20 Warranty terms .......................................................................75
21 Information concerning the battery ...........................................76
22 Information about SAR ............................................................77
23 Information concerning the environment protection .................79
24 Declaration of conformity ........................................................81
10
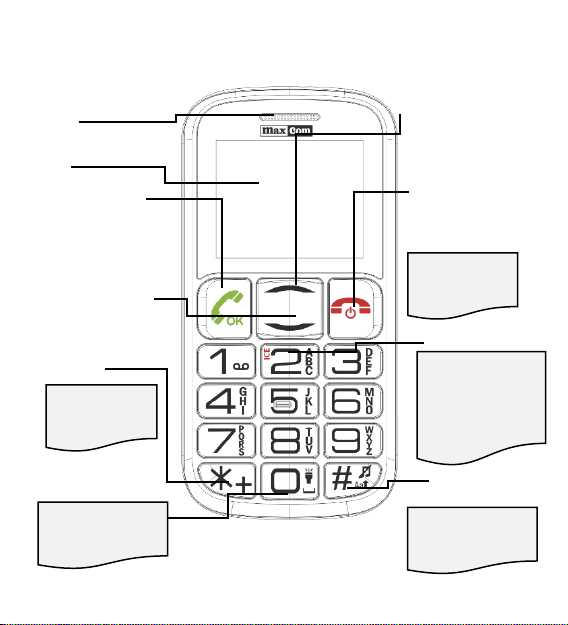
1 Buttons localisation
Call button/
Confirming the
function
Speaker
Torch button
Entering
MENU/”Up
navigation
key
Press and hold to
switch on/off the
torch
Display
Call end button/
Cancelling the
function
Press and hold
to switch on/off
the phone
Entering the
phonebook/ “Down”
navigation key
Silent mode
Press and hold to
switch on/off the
ringtone
Type change
Press and hold
to change the
type size
ICE button
Press and hold to
display important
contacts and
information about
the user
11
Press and hold to
activate the emergency
procedure
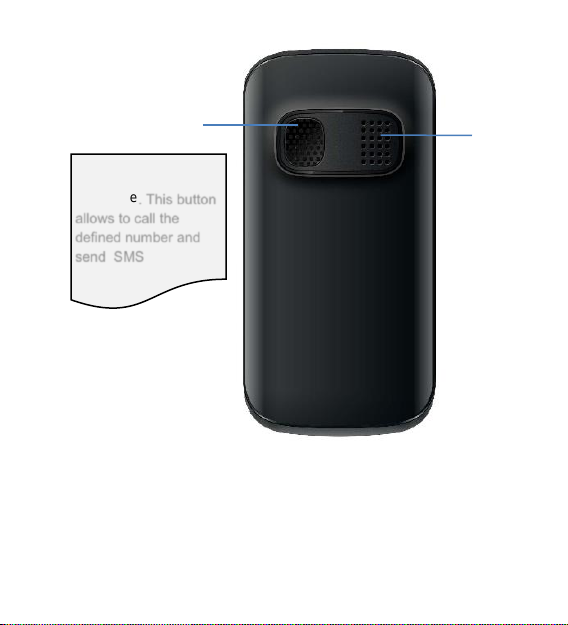
. This button
allows to call the
defined number and
send SMS
SOS button
Speaker
12
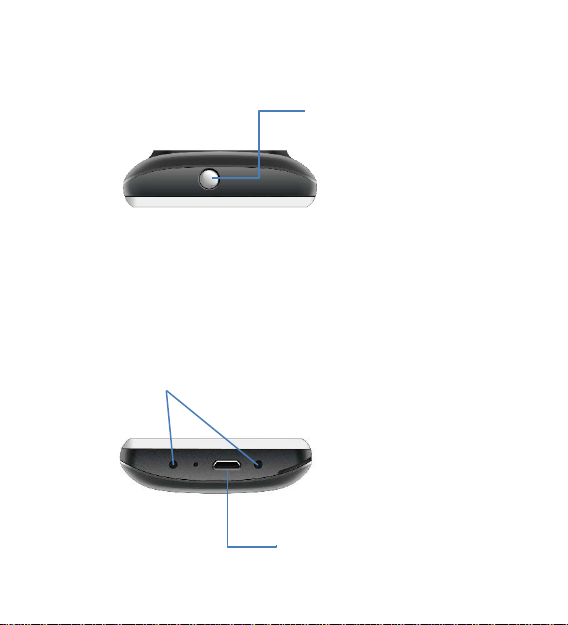
Top view
Bottom view
Torch
Charging jack
Charging contacts
13

2 Rules of safe use
Reading the following rules will minimize the risk of
improper use of the phone. The rules are described in
details in further part of the instruction manual.
USE – do not use the phone in the places where it is
forbidden for example in petrol stations or hospitals. Using
the phone in such places may be dangerous for other
people.
TORCH– do not look directly on the light beam.
HEARING AID– If the user has got a hearing aid, set the
phone volume carefully and properly set the sensitivity of
the hearing aid.
WATERTIGHTNESS – the phone is not watertight. Keep it
in dry place.
HANDS-FREE SET –the phone may be used in hands
free mode using Bluetooth wireless technology. The
hands-free set may be purchased separately in shops with
GSM accessories.
14

2.1 GSM network
The phone is set to operate in GSM 900/1800 network.
Before using the phone functions ask the GSM operator
whether the functions are available.
Note: No all operators make it possible to send polish
characters in text messages. Consult your operator.
3 Installation
Before switching on the phone install SIM card and the
battery. Pay attention not to damage the card while
inserting it.
Keep SIM cards away from children.
15
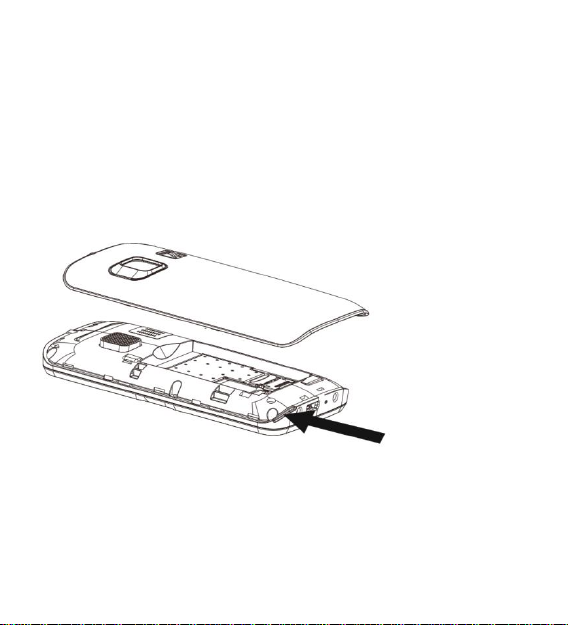
3.1 SIM card installation
Notch
Before inserting SIM card make sure that the phone is
switched off. The charger should be disconnected.
1. Lever the battery cover with your nail in the notch,
located at the bottom of the phone (as shown in the
figure)
16
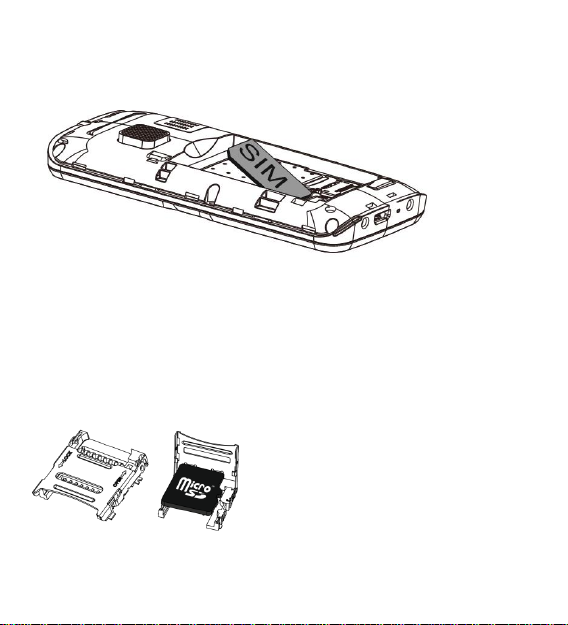
2. Insert the SIM card to „SIM slot” as shown in the
figure.
3.1 Micro SD card installation
On the right, next to the SIM card slot there is a slot for
MicroSD card. Move the cotter pin to OPEN side and then
lift it up. Insert the microSD card so that the contacts touch
the phone contacts, close the cotter pin moving it to LOCK.
17

Exercise caution while using the memory card, particularly
when inserting and removing it. Some memory cards must
be first formatted with the use of a computer.
Regularly prepare backups of the information saved on
cards used in other devices, if you use card of SD type!
Incorrect use or other factors may cause the damage or
the loss of cards content. The set does not include the
micro SD card. Micro SD card increases the phone
memory, which may be used for saving multimedia files.
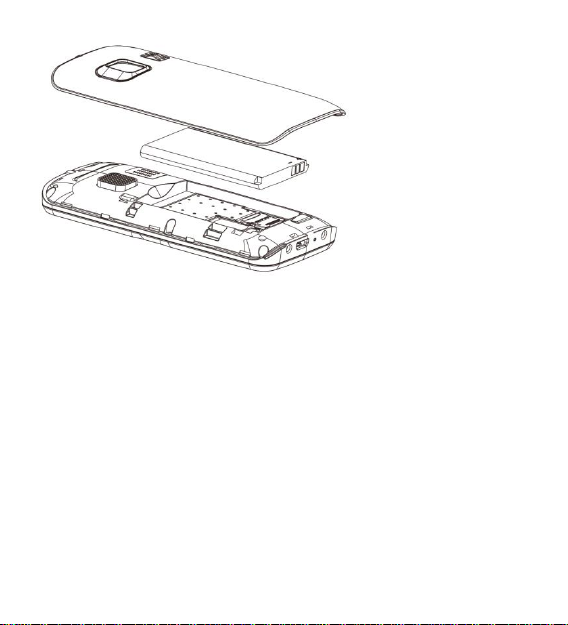
3.2 Battery installation
1. Insert the battery so that +/- contacts were directed
downwards.
2. After inserting the battery place the battery cover on
the phone and press the edges gently.
18
3.3 Battery charging
Note! Use the battery included in the set. Using other
battery may cause the damage of the phone and the loss
of warranty. Do not connect the charger when the battery
cover is removed.
To charge the phone:
1. Connect the charger to the jack located at the
bottom of the phone.
19

2. Connect the plug to the wall socket. In the right
upper corner information about battery charging will
appear. The battery symbol shows the battery
charging state.
3. When the battery is fully charged disconnect the
charger from the wall socket and then the cable
from the phone.
3.3.1 Desktop charger (option)
In the case of using the desktop charger, first connect the
small plug of the charger to the desktop charger and then
connect the adapter to the wall socket. To charge the
battery insert the phone to the desktop charger with the
contacts directed downwards.
3.4 Low battery alarm
The phone will generate a sound signal (if warning sounds
are activated in profiles) together with the message on the
display when the battery level will be too low. The display
will show the red symbol of empty battery. Charge the
battery when this message will appear.
20
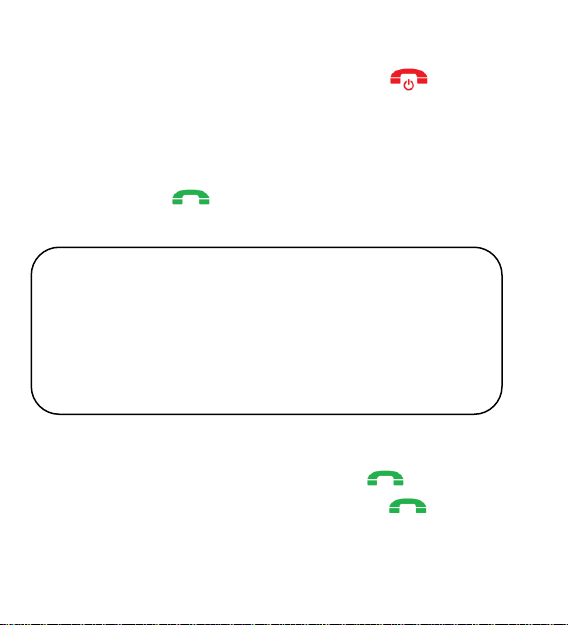
3.5 Switching on the phone
Warning: Entering incorrect PIN code three
times in a raw will cause that the SIM card will
be locked. It can be unlocked with the use of
PUK code. Entering incorrect PUK code 10
times will cause that the card will be locked
permanently.
Press and hold the red call end button , to switch on
the phone.
If you are asked for PIN code you need to enter it. You will
find it in the SIM card starter set.
After entering the code confirm it pressing the green
receiver button .
After first switching on the phone you will be asked to enter
the current date and time. Enter appropriate digits of the
date and time and then confirm with . Then in similar
way enter current time and confirm with .
21

You may use UP/DOWN keys to switch
between the digits.
3.6 Switching off the phone
To switch off the phone press and hold the call end key
.
3.7 Keylock
To lock the keys press : and .
The keys will be locked automatically after specified period
of time of idle operation. This period of time may be
changed or deactivated by entering: MENU > Settings >
Display > Automatic keylock.
You may also set the function of locking the keys only by
pressing the red receiver button (it will not be necessary to
press key)
MENU > Settings > Security > Red receiver button lock
To unlock the keys press:
22

and .
Range of the
network
Time
Battery level
Date
Unread
messages
Missed calls
(Mon)
It is not necessary to unlock the keys to answer the call.
3.8 Standby mode
When the phone is switched on but no actions are taken
then it is in the standby mode.
Display description:
Flashing display indicates the new message or a missed
call. The display flashes for about 1 hour. This function
may be deactivated in:
MENU > Settings > Display > Events signalling
23
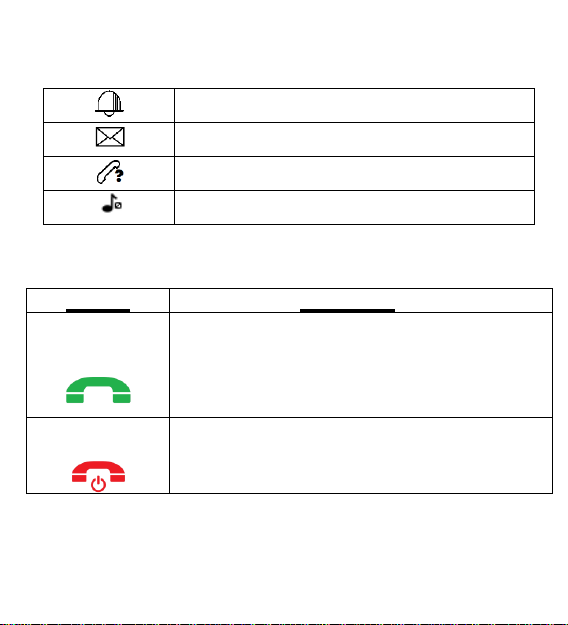
3.9 Icons on the display
Alarm clock
New message
Missed calls
Silent mode
Button
Functions
Call button
(green
receiver)
Making and answering calls. Standby mode:
press to enter the call history.
Navigation in MENU: ”Confirm” Press to
confirm the function you have chosen.
Call end button
(red receiver)
Switching on/off the phone.
Navigation in MENU: ”Back” Press to return
to the previous MENU
3.10 Basic functions of buttons
24

„UP” navigation
key
Standby mode: Press to enter the main
MENU
Navigation in MENU: Press to move the
cursor up
„DOWN”
navigation key
Standby mode: Press to enter the
phonebook.
Navigation in MENU: Press to move the
cursor down
1 key
Press: digit 1
Press and hold: voice mail
2 key
Press: digit 2
Press and hold: Displaying MENU ICE „In
emergency”
3-9 keys
Press: digits 3 to 9
Press and hold: dials the programmed
quick dialing number
Button
Standby mode: Press and hold to change
the mode into silent or normal
Writing SMS: Press to change the mode of
entering
Button
Writing SMS: Press to use symbols
Torch button
Standby mode: Press and hold to switch
on/off the torch.
25
 Loading...